

montpellier MTL6120W, MWBI8014 Installation And Operating Instructions Manual
Top Loading Washing Machine
MTL6120W - 6kg - 1200rpm
Please read these instructions carefully before attempting to install or use this appliance.
We recommend that you keep these instructions in a safe place for future reference.
Installation and Operating Instructions
THE PERFECT BALANCE OF FUNCTION AND STYLE
LAUNDRY - DISHWASHING - COOKING - COOLING

Thank you for choosing this Montpellier Top Loading Washing Machine.
Our Washing Machines has been designed to provide you with the best combination of style, reliability and
performance to give you years of trouble-free use.
You may be familiar with a similar product, but please take time to read these instructions carefully before installing
or using your Washing Machine to ensure you get the most from your purchase.
We recommend that you keep this manual in a safe place for future reference.
Your Washing Machine is covered by a comprehensive two year Parts & Labour
Guarantee. In the unlikely event that you experience a problem with your
Washer, you can rest assured that you are fully protected against the cost of
repairs for the first 24 months . Please note that any claim must be
accompanied by the model reference number, serial number and proof of
purchase.
To activate your guarantee, you will need your product serial number. This can
be found on the rear of the machine.
There are two ways to register your Guarantee:
• Online: Visit the Support page on our website and complete the online Product
Registration form. www.montpellier-appliances.com
•
By Post: Simply detach and ll in the form provided, attach a stamp and send
it in the post. Don’t forget to include your e-mail address so that we can send
conrmation through to you.
Welcome
Note: We are unable to take registrations over the phone.
ACROSS ALL OUR MODELS
YEAR
GUARANTEE
PA R TS & L AB OU R
www.montpellier-appliances.com

3
Thank-you for choosing a Montpellier
washing machine. We are confident it will
loyally assist you in safely washing your
clothes, even delicates, day after day.
Carefully read this manual for correct and
safe appliance use and for helpful tips on
efficient maintenance.
Only use the washing machine
after carefully reading these instructions.
We recommend you always keep this
manual on hand and in good conditions for
any future owners.
Please check that the appliance is
delivered with this instruction manual,
warranty certificate, service centre address
and energy efficiency label. Also check that
plugs, curve for drain hose and liquid
detergent or bleach tray (only on some
models) are included. We recommend you
keep all these components.
This appliance is marked according to
the European directive 2012/19/EU
on Waste Electrical and Electronic
Equipment (WEEE).
WEEE contains both polluting substances (which
can cause negative consequences for the
environment) and basic components (which can
be re-used). It is important to have WEEE
subjected to specific treatments, in order to
remove and dispose properly all pollutants, and
recover and recycle all materials. Individuals can
play an important role in ensuring that WEEE
does not become an environmental issue; it is
essential to follow some basic rules:
WEEE should not be treated as household
waste;
WEEE should be handed over to the relevant
collection points managed by the municipality o
r
by registered companies. In many countries, fo
r
large WEEE, home collection could be present.
In many countries, when you buy a new
appliance, the old one may be returned to the
retailer who has to collect it free of charge on
a
one-to-one basis, as long as the equipment is of
equivalent type and has the same functions a
s
the supplied equipment.
1. GENERAL SAFETY RULES
2. INSTALLATION
3. PRACTICAL TIPS
4.
MAINTENANCE AND CLEANI
NG
5.
QUICK USER GUID
E
6.
CONTROLS AND PROGRAMS
7.
THROUBLESHOOTING AND WARRANTY
Environmental conditions
Contents

EN
4
1. GENERAL SAFETY
RULES
This appliances is intended to
be used in household and
similar applications such as:
- Staff kitchen areas in shops, offices
and other working environments;
- Farm houses;
- By clients in hotels, motels and
other residential type environments;
- Bed and breakfast type environments.
A different use of this appliance
from household environment
or from typical housekeeping
functions, as commercial use by
expert or trained users, is excluded
even in the above applications. If
the appliance is used in a manner
inconsistent with this it may reduce
the life of the appliance and may
void the manufacturer’s warranty.
Any damage to the appliance or
other damage or loss arising
through use that is not consistent
with domestic or household use
(even if located in a domestic or
household environment) shall not
be accepted by the manufacturer to
the fullest extent permitted by law.
This appliance can be used by
children aged from 8 years and
above and persons with reduced
physical, sensory or mental
capabilities or lack of experience
and knowledge if they have been
given supervision or instruction
concerning use of the appliance
in a safe way and understand the
hazards involved.
Children shall not play with the
appliance. Cleaning and user
maintenance shall not be made
by children without supervision.
Children should be supervised
to ensure that they do not play
with the appliance.
Children of less than 3 years
should be kept away unless
continuously supervised.
If the supply cord is damaged, it
must be replaced by the
manufacturer, its service agent
or similarly qualified persons in
order to avoid a hazard.
Only use the hose-sets
supplied with the appliance for
the water supply connection
(do not reuse old hose-sets).
Water pressure must be between
0,05 MPa and 0,8 MPa.
Make sure that a carpet do not
obstruct the base of the machine
and ventilation openings.
The OFF condition is reached
by
placing the reference mark on
the programmes control/knob in
the vertical position. Any other
different position of such control
sets the machine in ON condition
(only for models with programmes
knob).
5
After installation, the appliance
must be positioned so that the
plug is accessible.
The maximum load capacity of
dry clothes depends on the
model used (see control panel).
To consult the product fiche
please refer to the manufacturer
website.
Before cleaning or maintaining
the washing machine, unplug
the appliance and turn off the
water faucet.
Make sure the electrical system
is grounded. Otherwise, seek
qualified professional assistance.
Please do not use converters,
multiple sockets or extension
cords.
Do not pull on the power cord
or appliance to unplug the
machine.
Do not expose the washing
machine to rain, direct sunlight
or other weather elements.
In the event of fault and/or
malfunction, turn off the
washing machine, close the
water faucet and do not tamper
with the appliance.
Immediately contact the
Customer Service Centre and
only use original spare parts.
Failure to observe these
instruction may jeopardise
appliance safety.
By placing the
mark on this
product, we are confirming
compliance to all relevant
European safety, health and
environmental requirements which
are applicable in legislation for
this product.
Safety instructions
WARNING:
water may reach very high
temperatures during the
wash c
y
cle.

EN
2. INSTALLATION
A
B
B
B
B
A
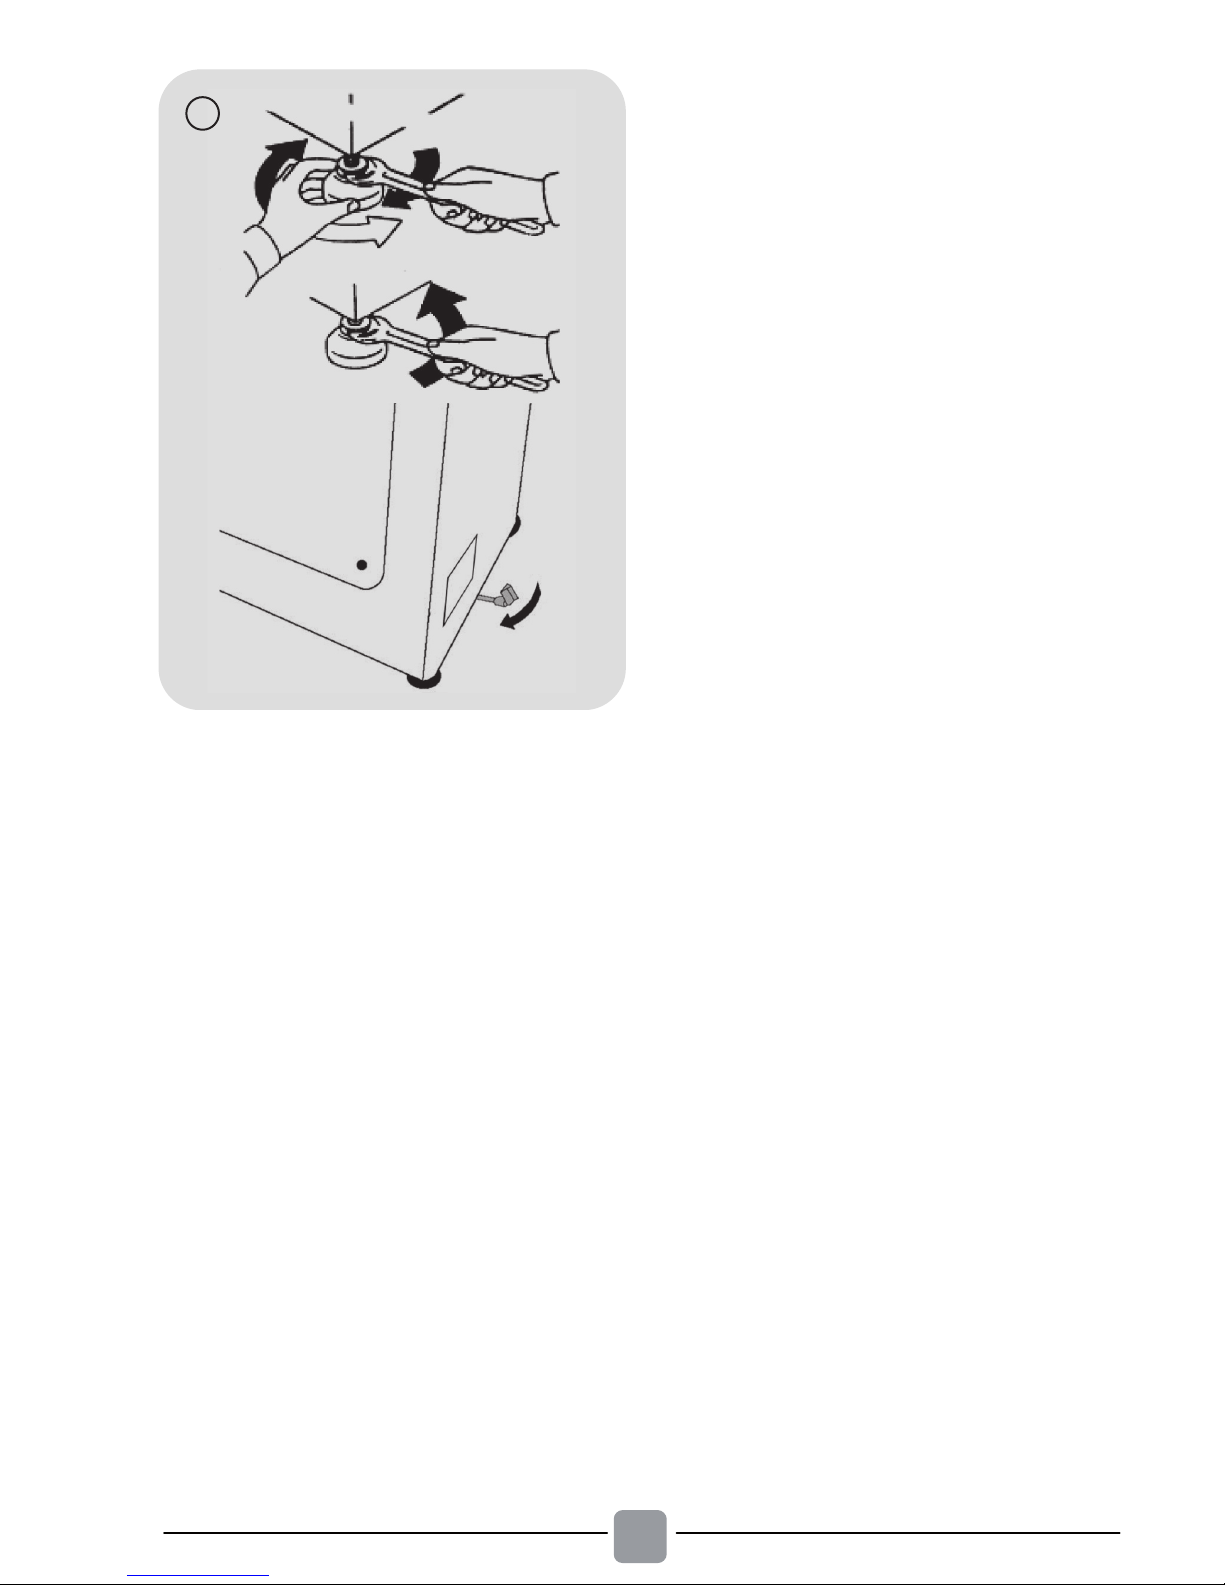
1
Remove the 2 or 4 transportation
screws (A) on the back and
remove the 2 or 4 flat washers,
rubber bungs and plastic spacer
tubes (B) as illustrated in figure 1
.
2
Fit the trims provided "C" (fig. 2).
3
4
min 50 cm
max 85 cm
+2,6 mt
max
max 100 cm
min 4 cm
6
7
5
The washing machine should b
e
connected to the water mains via th
e
new tube supplied with th
e
appliance (inside the drum). Do no
t
use the old tube for this purpose.
Connect one end of the water inle
t
pipe with the elbow bend to th
e
electrovalve (top rear part of the
machine) and the other end to a tap
or a plumbed-in 3/4" gas threaded
connection.
Place the washing machine close t
o
the wall, ensuring that there are n
o
bends or kinks anywhere in the tube.
Hook the outlet pipe to the edge o
f
the sink or preferably to a fixed
drainage outlet of a diameter greater
than that of the outlet pipe and at
a
height of min. 50 cm. and
a
maximum of 75 cm. from the floo
r
(fig. 4).
If necessary, use the curved
accessory to attach and suppor
t
the outlet pipe more securely.
If your model offers this function:
To move the washing machin
e
easily, turn the trolley lever to th
e
right. Once you have finished
moving the machine, return the leve
r
to its original position.
Level the machine by adjusting th
e
front feet (fig. 5).
a) Turn the nut clockwise to releas
e
the screw on the foot.
b) Raise or lower the foot by rotating
it until it stands firmly on the floor.
c) Lock the foot in position by turning
the nut anticlockwise until it come
s
up against the bottom of th
e
washing machine.
Check that the appliance is properl
y
levelled.
Check that the washing machin
e
does not rock by trying to move tw
o
diagonally opposite top corners a
t
the same time.
If you move the washing machin
e
from one place to another, you mus
t
level the feet again afterwards.
EN
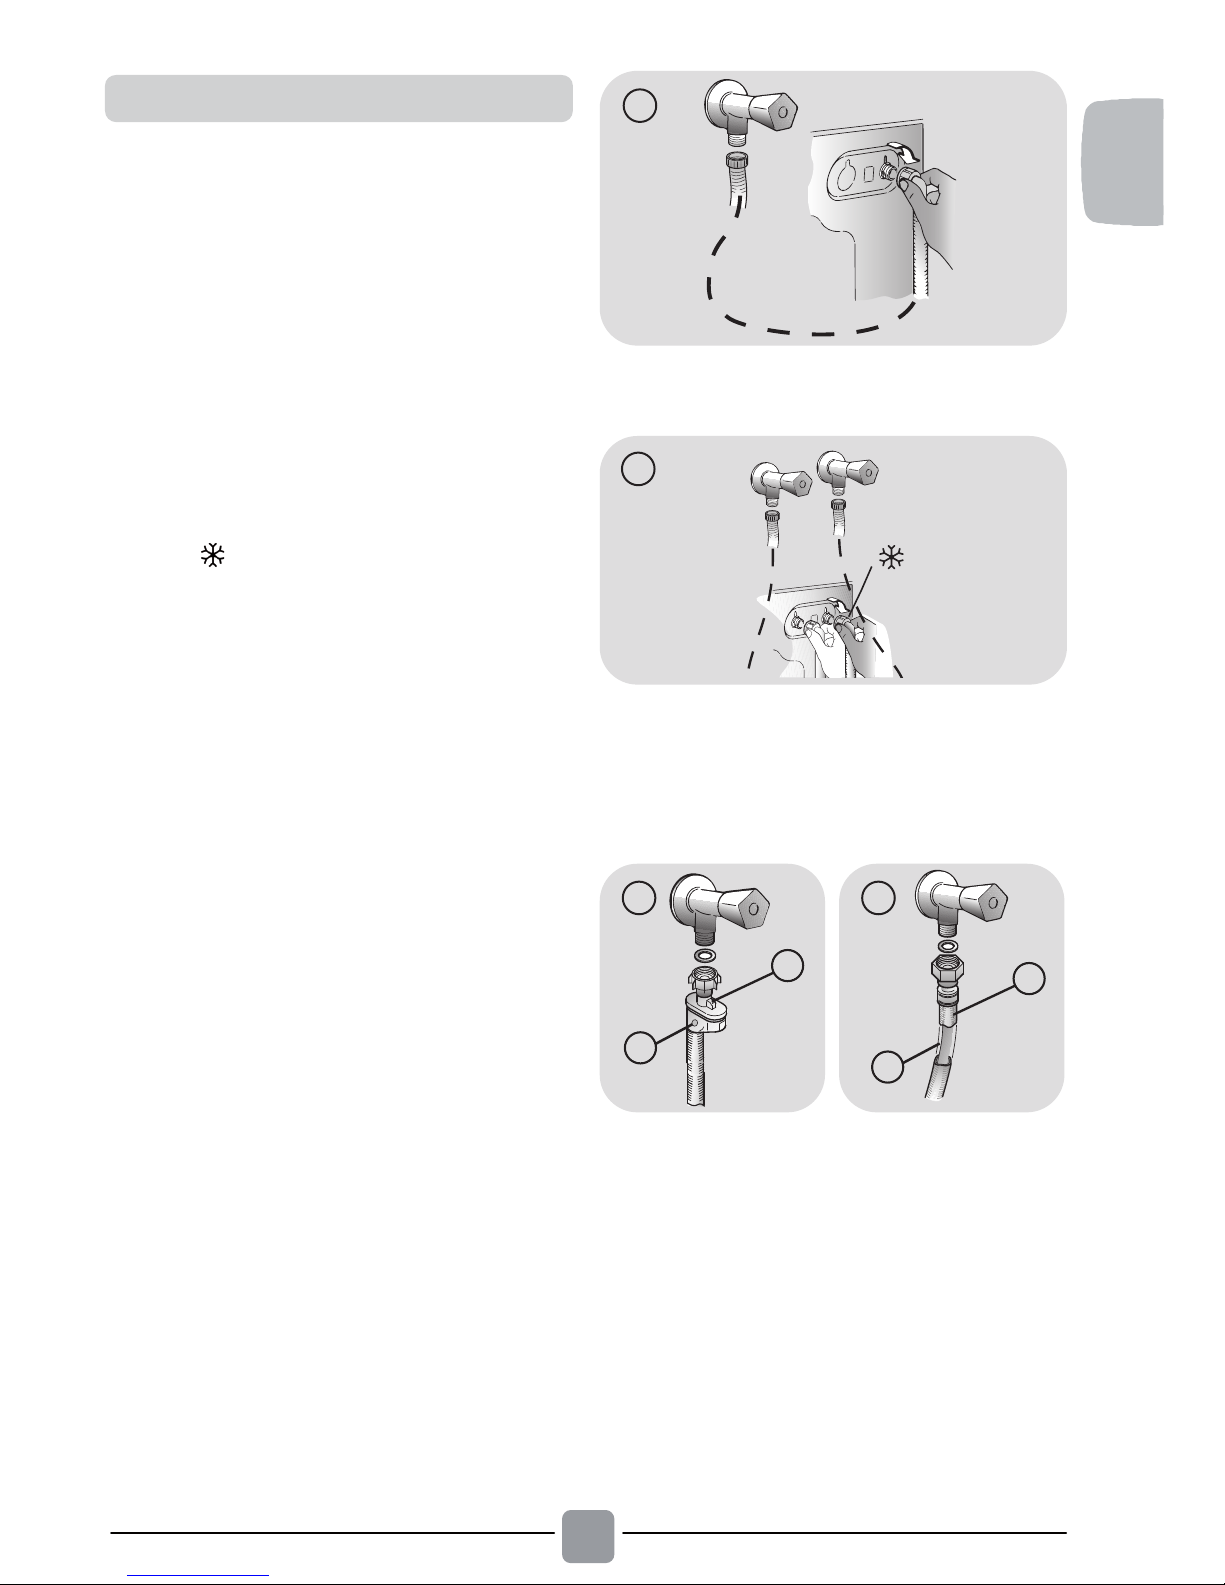
Connect the water hose to the wate
r
supply tap (fig. 6) only using the hose
supplied with the appliance (do not reuse
old hose-sets).
Some models may include one or more o
f
the following features:
HOT&COLD (fig. 7):
water mains connection settings with hot
and cold water for higher energy savings.
Connect the grey tube to the cold water
faucet
and the red one to the hot water
faucet. The machine can be connected to
the cold water faucet only: in this case,
some programs may start a few minutes
later.
AQUASTOP (fig. 8):
a device located on the supply tube that
stops water flow if the tube deteriorates;
in this case, a red mark will appear in the
window “A” and the tube must be
replaced. To unscrew the nut, press the
one-way lock device "B".
AQUAPROTECT – SUPPLY TUBE WITH
GUARD (fig. 9):
Should water leak from the primary
internal tube "C", the transparent
containment sheath "D" will contain water
to permit the washing cycle to complete.
At the end of the cycle, contact the
Customer Service Centre to replace the
supply tube.
6
1
7
B
A
8
D
C
9
Hydraulic connections
8
 Loading...