

Page 1
EN
BUILT IN LARDER
User manual
MITL100
Page 2

EN
2
Page 3

EN
3
Index
BEFORE USING THE APPLIANCE .................................4
General warnings...................................................................... 4
Safety warnings ........................................................................ 6
Installing and operating your fridge........................................... 7
Electrical connection (For UK type plug) .................................. 8
Before using your fridge............................................................ 8
THE PARTS OF THE APPLIANCE AND THE
COMPARTMENTS ........................................................... 9
USAGE INFORMATION .................................................. 10
Control panel ........................................................................... 10
Fridge partition temperature setting button .......................... 10
Alarm light ............................................................................ 10
Super cooling mode ............................................................. 10
Fridge temperature settings ..................................................11
Warnings about temperature adjustments ................................11
Accessories ............................................................................. 12
Fresh dial ............................................................................. 12
ARRANGING FOOD IN THE APPLIANCE ..................... 13
CLEANING AND MAINTENANCE .................................. 14
Defrosting the refrigerator compartment .................................. 15
Replacing the LED strip ........................................................... 15
SHIPMENT AND REPOSITIONING ................................ 16
BEFORE CALLING YOUR AFTER SALES SERVICE ... 17
Tips for saving energy ............................................................. 18
INSTALLATION INSTRUCTIONS AND DOOR
REVERSIBILITY ..............................................................19
Installation instructions ............................................................ 19
Door reversing ......................................................................... 24
Page 4

EN
4
BEFORE USING THE APPLIANCE
General warnings
WARNING: Keep ventilation openings, in the appliance
enclosure or in the built-in structure, clear of obstruction.
WARNING: Do not use mechanical devices or other
means to accelerate the defrosting process, other than
those recommended by the manufacturer.
WARNING: Do not use electrical appliances inside the
food storage compartments of the appliance, unless
they are of the type recommended by the manufacturer.
WARNING: Do not damage the refrigerant circuit.
WARNING: To avoid a hazard due to the instability of
the appliance, it must be xed in accordance with the
instructions.
• If your appliance uses R600a as a refrigerant (this
information will be provided on the label of the cooler)
you should take care during transportation and
installation to prevent the cooler elements from being
damaged. R600a is an environmentally friendly and
natural gas, but it is explosive. In the event of a leak
due to damage of the cooler elements, move your
fridge away from open ames or heat sources and
ventilate the room where the appliance is located for
a few minutes.
• While carrying and positioning the fridge, do not
damage the cooler gas circuit.
• Do not store explosive substances such as aerosol
cans with a ammable propellant in this appliance.
• This appliance is intended to be used in household
and domestic applications such as:
- staff kitchen areas in shops, ofces and other work-
ing environments.
Page 5

EN
5
BEFORE USING THE APPLIANCE
- farm houses and by clients in hotels, motels and other residential type environments.
- bed and breakfast type environments;
- catering and similar non-retail applications.
• If the socket does not match the refrigerator plug,
it must be replaced by the manufacturer, a service
agent or similarly qualied persons in order to avoid
a hazard.
• A specially grounded plug has been connected to the
power cable of your refrigerator. This plug should be
used with a specially grounded socket of 13 amperes.
If there is no such socket in your house, please have
one installed by an authorised electrician.
• This appliance can be used by children aged from 8
years and above and persons with reduced physical,
sensory or mental capabilities or lack of experience
and knowledge if they have been given supervision or
instruction concerning use of the appliance in a safe
way and understand the hazards involved. Children
shall not play with the appliance. Cleaning and user
maintenance shall not be made by children without
supervision.
• If the supply cord is damaged, it must be replaced
by the manufacturer, an authorised service agent or
similar qualied persons, in order to avoid a hazard.
• This appliance is not intended for use at altitudes
exceeding 2000 m.
Page 6
EN
6
BEFORE USING THE APPLIANCE
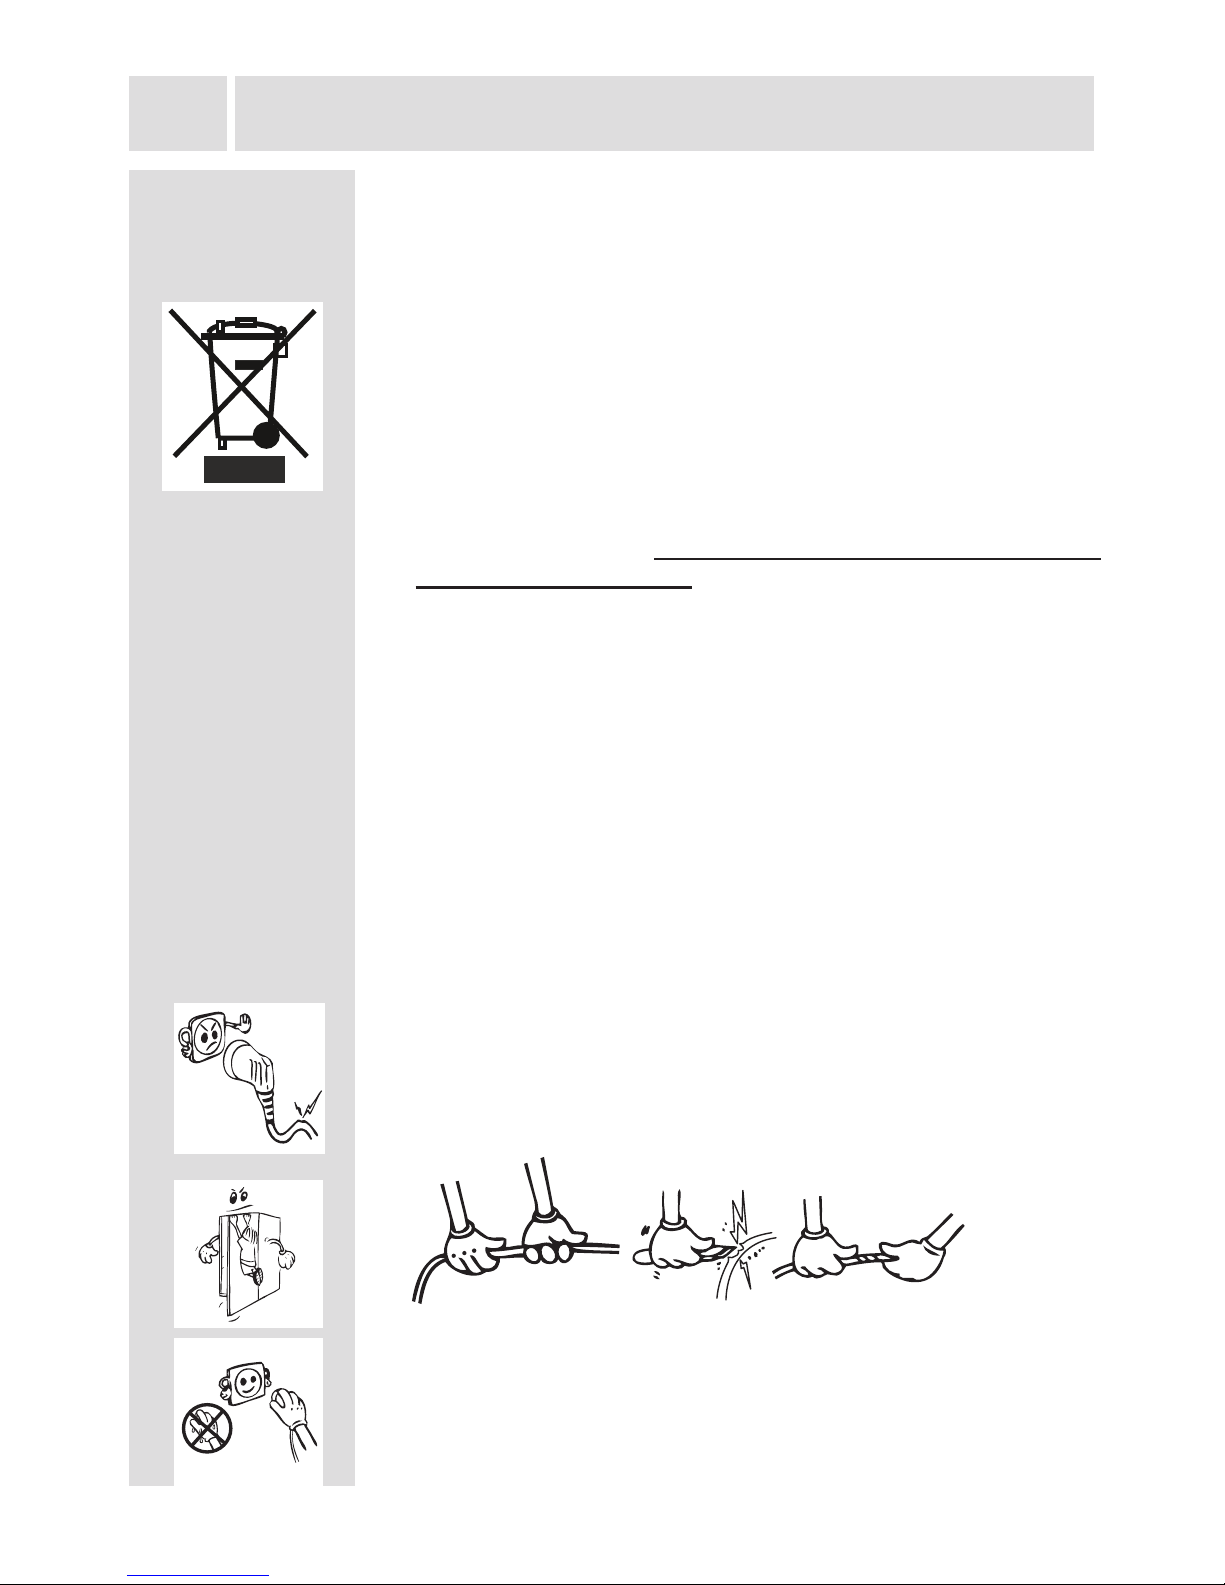
Old and out-of-order fridges or freezers
• If your old fridge has a lock, break or remove the lock before
discarding it, because children may get trapped inside it and may
cause an accident.
• •Old fridges and freezers may contain isolation material and
refrigerant with CFC or HFC. Therefore, take care not to harm
environment when you are discarding your old fridges.
Please ask your municipal authority about the disposal of the WEEE
reuse, recycle and recovery purposes.
Notes:
• Please read the instruction manual carefully before installing and
using your appliance. We are not responsible for the damage
occurred due to misuse.
• Follow all instructions on your appliance and instruction manual,
and keep this manual in a safe place to resolve the problems that
may occur in the future.
• This appliance is produced to be used in homes and it can only be
used in domestic environments and for the specied purposes.
It is not suitable for commercial or common use. Such use will
cause the guarantee of the appliance to be cancelled and our
company will not be responsible for losses incurred.
• This appliance is produced to be used in houses and it is only
suitable for cooling / storing food. It is not suitable for commercial
or common use and/or for storing substances except for food.
Our company is not responsible for losses to be incurred in the
contrary case.
Safety warnings
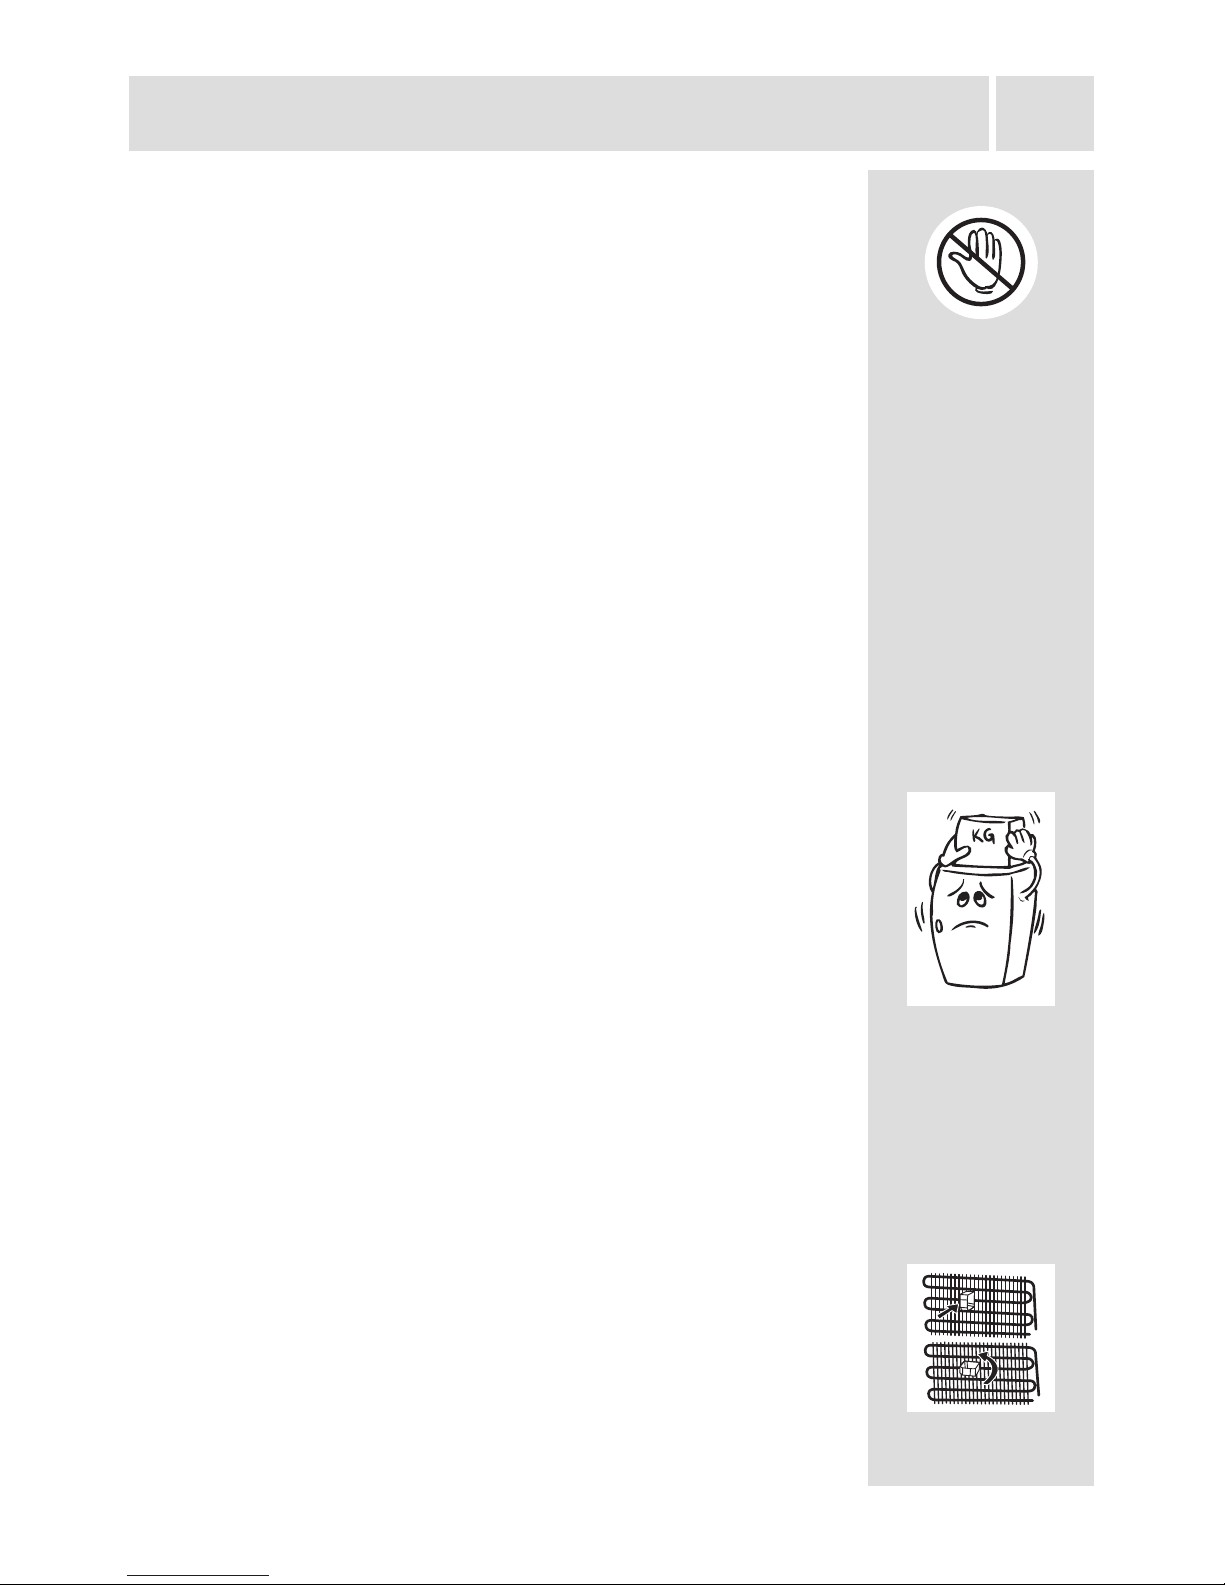
• Do not use multiple receptacles or extension cord.
• Do not plug in damaged, torn or old plugs.
• Do not pull, bend or damage the cord.
• This appliance is designed for use by adults, do not allow children
to play with the appliance or let them to hang over the door.
• Do not plug-in or out the plug from the receptacle with wet hands
to prevent electrocution!
Page 7
EN
7
BEFORE USING THE APPLIANCE
• Do not place explosive or ammable material in your fridge for
your safety. Place drinks with higher alcohol amount vertically
and by closing their necks tightly in the fridge.
• Do not cover the body or top of fridge with lace. This affects the
performance of your fridge.
• Fix the accessories in the fridge during transportation to prevent
damage to accessories.
Installing and operating your fridge
Before starting to use your fridge, you should pay attention to the
following points:
• Operating voltage for your fridge is 220-240 V at 50Hz.
• We do not take the responsibility of the damages that occur due
to ungrounded usage.
• Place your fridge in a place that it would not be exposed to direct
sunlight.
• Your appliance should be at least 50 cm away from stoves, Gas
ovens and heater cores, and should be at least 5 cm away from
electrical ovens.
• Your fridge should never be used outdoors or left under the rain.
• When your fridge is placed next to a deep freezer, there should
be at least 2 cm between them to prevent humidity on the outer
surface.
• Do not place heavy items on the appliance.
• Do not place anything on your fridge, and install your fridge in
a suitable place so that at least 15 cm is available on the upper
side.
• The adjustable front legs should stabilized in an appropriate
height to allow your fridge operate in a stable and proper way.
You can adjust the legs by turning them clockwise (or in the
opposite direction). This should be done before placing food in
the fridge.
• Before using your fridge, wipe all parts with warm water added
with a tea spoonful of sodium bicarbonate, and then rinse with
clean water and dry. Place all parts after cleaning.
• Install the distance adjustment plastic (the part with black vanes
at the rear) by turning it 90° as shown in the gure to prevent the
condenser from touching the wall.
• Refrigerator should be placed against a wall with a free distance
not exceeding 75 mm.
Page 8
EN
8
BEFORE USING THE APPLIANCE
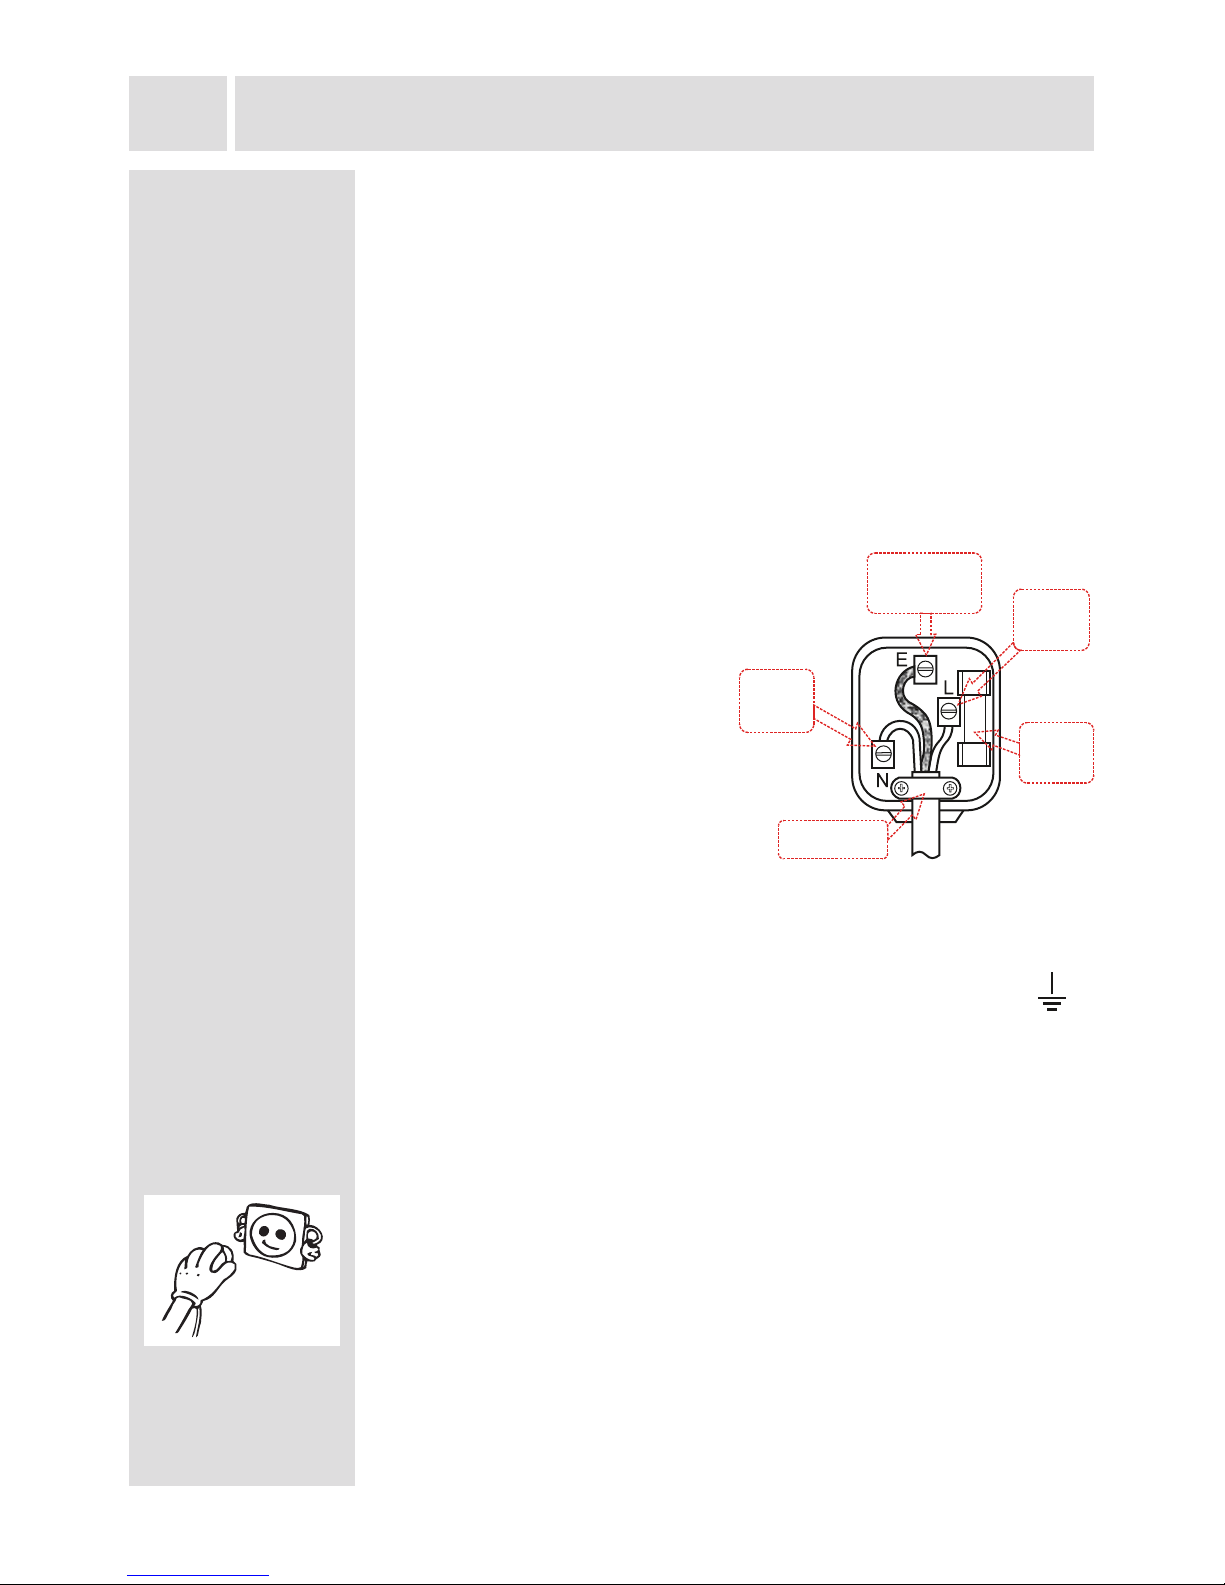
Electrical connection (For UK type plug)
For your safety please read the following information
Warning: This appliance must be earthed.
This appliance operates from 220-240 volts and should be protected
by a 13 amp fuse in the plug.
The appliance is supplied with a standard 13 amp 3-pin mains plug
tted with a 13-amp fuse. Should the fuse require replacement, it must
be replaced with a fuse rated at 13 amp and approved to BS1362.
If the mains plug which is tted is unsuitable for the socket outlet
in your home or is removed for any other reason, please follow the
instructions below on how to wire a 13 amp 3 pin plug..
How to wire a 13 amp plug.
Important
The wires in the mains lead on
this appliance are coloured in
accordance with the following
code:
Green and Yellow - Earth
Blue – Neutral
Brown – Live
As the colours may not correspond with the markings identifying the
terminals in your plug proceed as follows.
The green and yellow wire must be connected to the terminal in the
plug which is marked with the letter E or with the earth symbol or
coloured green and yellow.
The blue wire must be connected to the terminal marked N.
The brown wire must be connected to the terminal marked L.
You must make sure the lead is rmly secured under the cord clamp.
Before using your fridge
• When it is operated for the rst time or after transportation,
keep your fridge in the upright position for 3 hours and plug it
on to allow efcient operation. Otherwise, you may damage the
compressor.
• Your fridge may have a smell when it is operated for the rst time;
the smell will fade away when your fridge starts to cool.
GREEN/YELLOW
Earth
BROWN
Live
FUSE
13 Amps
Cord Clamp
BLUE
Neutral
Page 9
EN
9
THE PARTS OF THE APPLIANCE AND THE
COMPARTMENTS
1
2
3
4
5
6
7
8
9
10
11
12
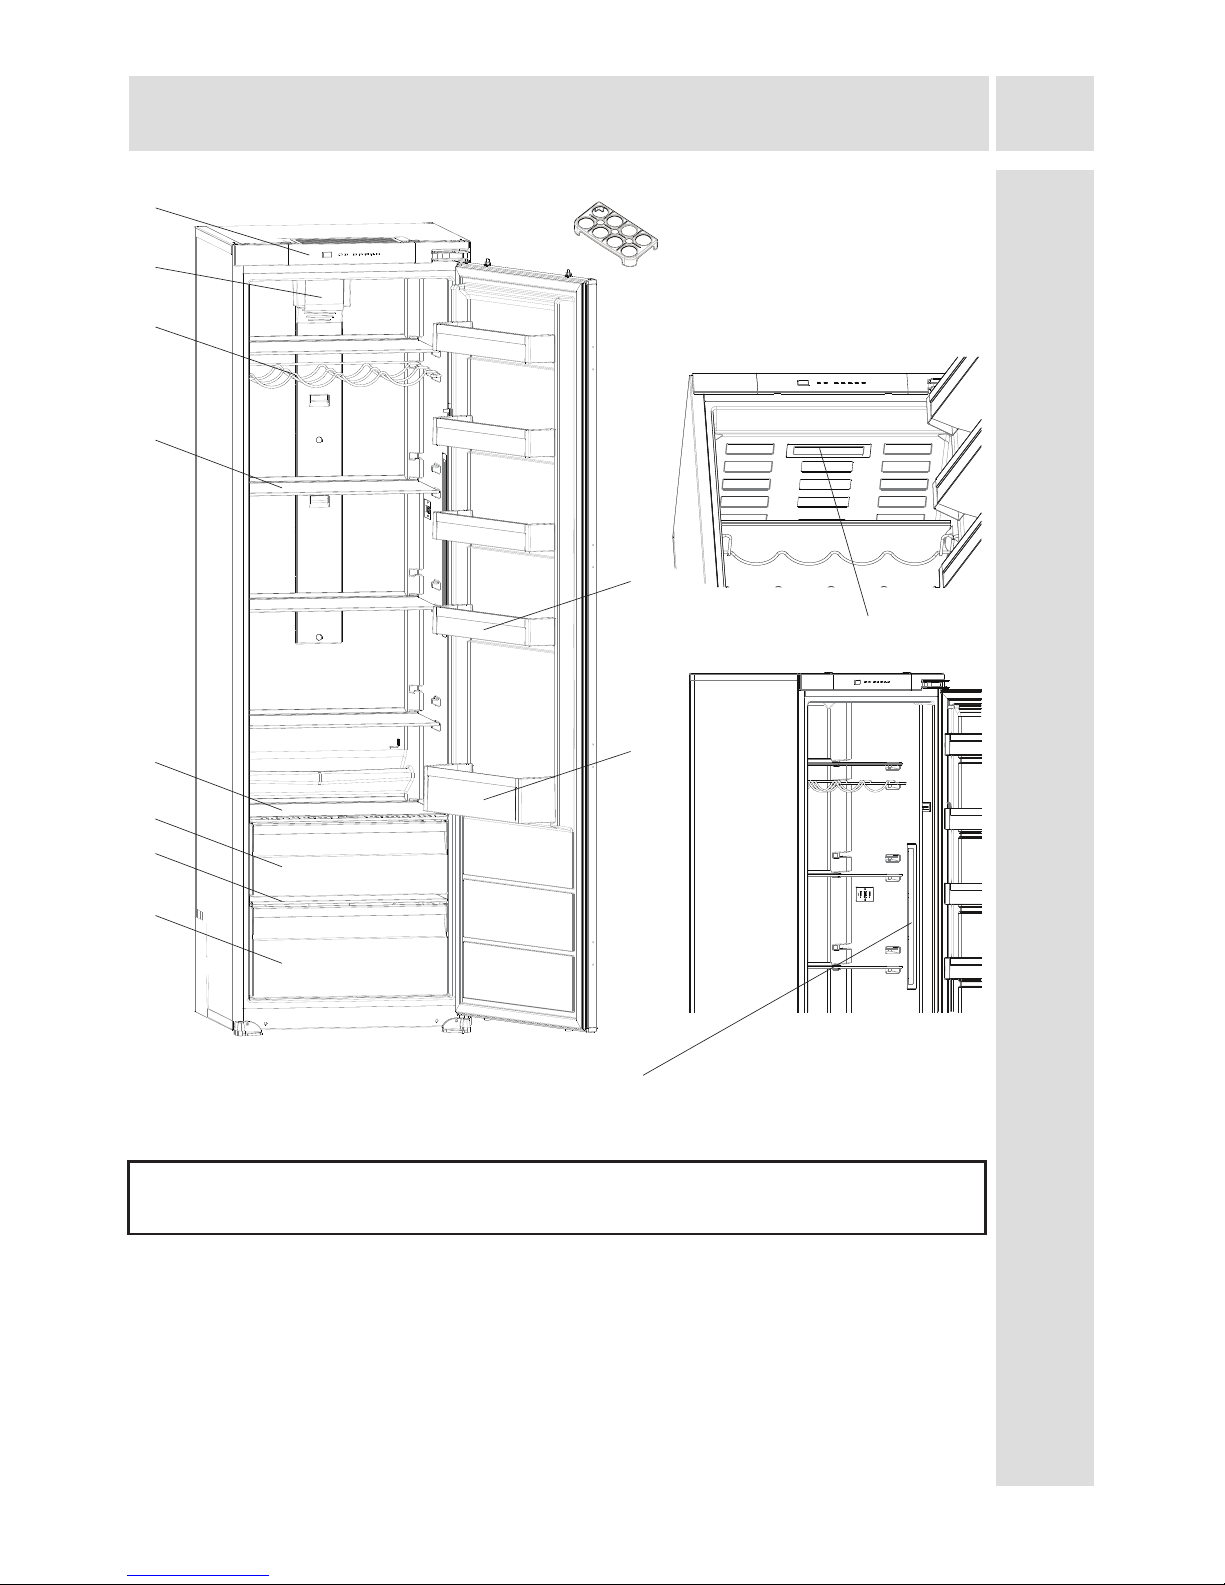
This presentation is only for information about the parts of the appliance. Parts
may vary according to the appliance model.
1. Control panel
2. Turbo fan
3. Wine rack
4. Fridge shelves
5. Upper crisper cover
6. Upper crisper
7. Bottom crisper cover
8. Bottom crisper
9. Bottle shelf
10. Door shelves
11. Egg holder
12. Upper side LED strip *
13. Left / Right side LED strip *
* In some models
13
Page 10
EN
10
USAGE INFORMATION
Control panel
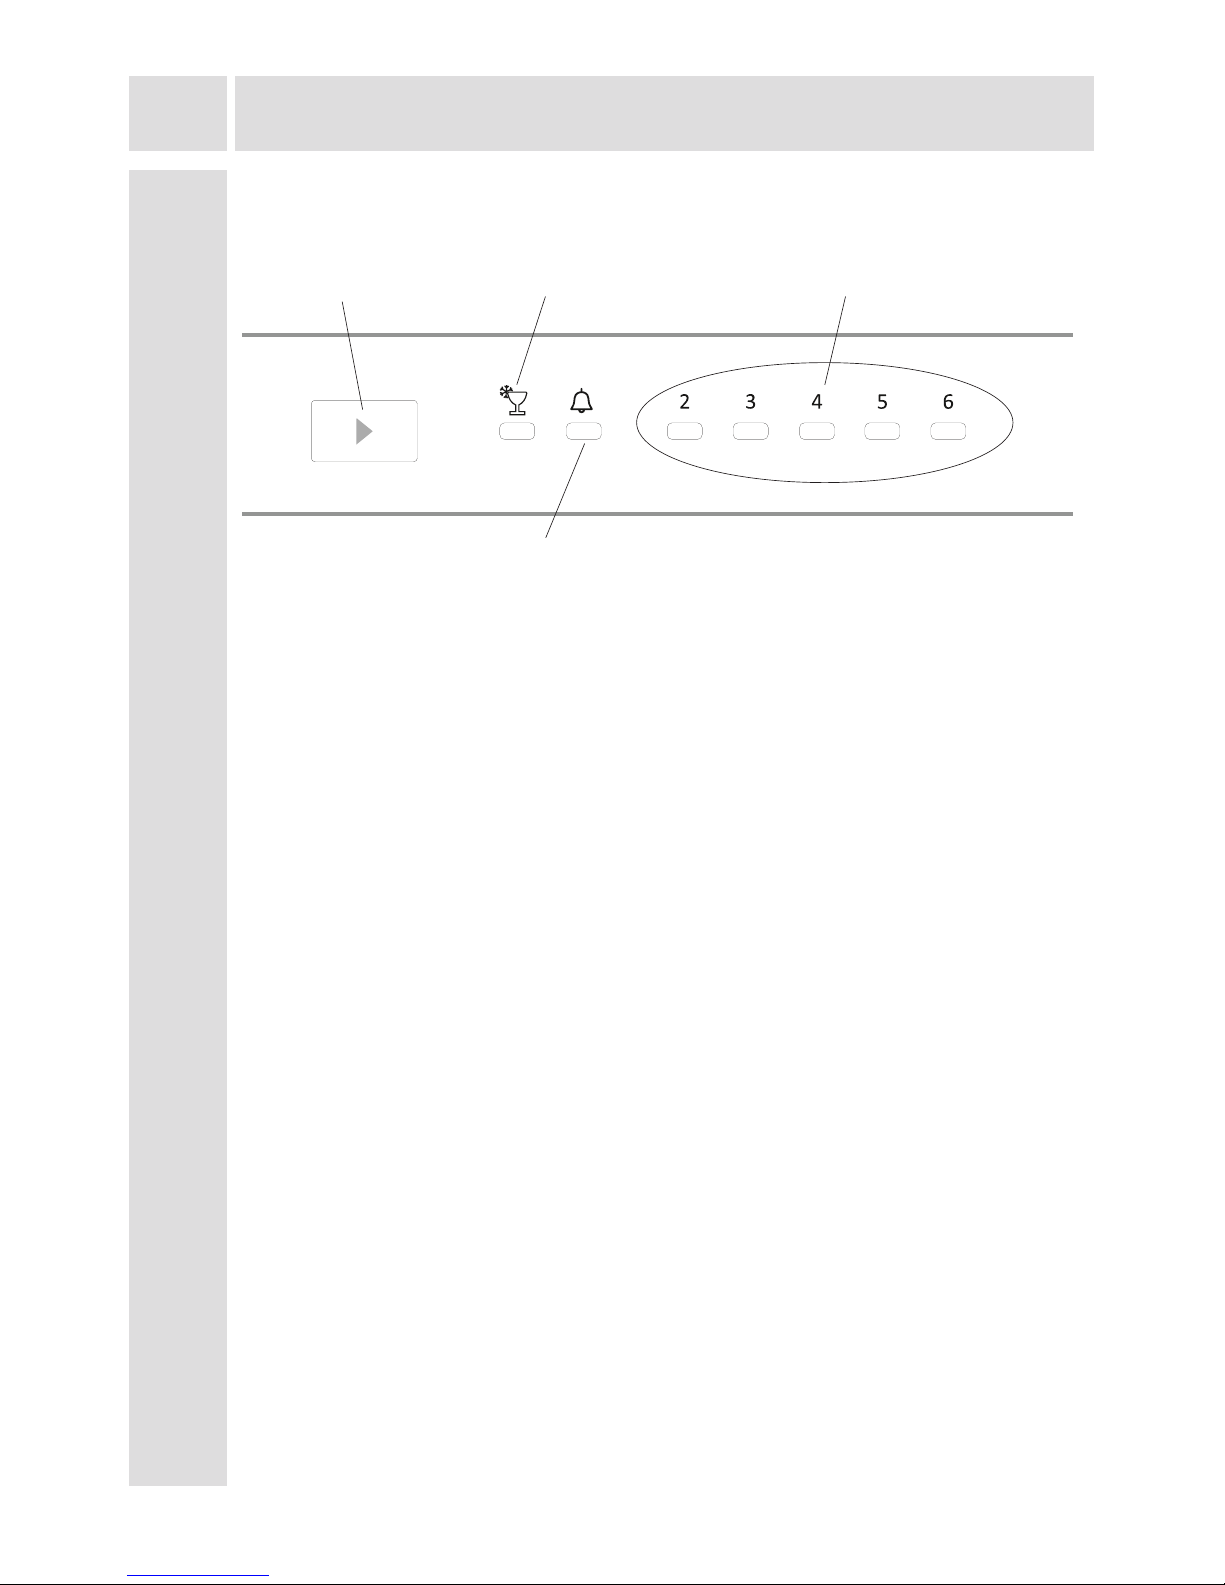
Fridge partition temperature setting button
This button allows setting temperature of the fridge. In order to set values for
fridge partition, press this button. Use this button also to activate Super Cooling
mode.
Alarm light
In case of a problem within the fridge, the alarm led will release red light
Super cooling mode
When would it be used?
• To cooling huge quantities of food.
• To cooling fast food.
• To cooling food quickly.
• To store seasonal food for a long time.
How to use?
• Press temperature set button until super cooling light comes on.
• Super cooling led will light during this mode.
• For optimal appliance performance in maximum cooling capacity, set
the appliance to active Super Cooling mode 6 hours before you put the
fresh food into the fridge.
During this mode:
If you press temperature set button, the mode will be cancelled and the
setting will be restored from 2.
Note: “Super cooling” mode will be automatically cancelled after 6 hours or
when cooling sensor temperature drops beneath 2 °C.
Fridge temperature
set button
Symbol of
Super Cooling Mode
alarm indicator led
Fridge adjusted
temperature indicator
Page 11
EN
11
USAGE INFORMATION
Fridge temperature settings
• The initial temperature of the Setting Display is 5°C.
• Press fridge setting button once.
• Every time you press the button, the setting temperature will increase. (2°C,
4°C, 5°C, 6°C, 8°C, super cooling)
• If you press fridge setting button until super cooling symbol is displayed on
your fridge
Settings Display and you do not press any button within the following 3 seconds,
Super cooling will blink.
• If you keep on pressing, it will restart from last value.
Warnings about temperature adjustments
• Your temperature adjustments will not be deleted when an energy breakdown
occurs.
• Do not pass to another adjustment before completing an adjustment.
• Temperature adjustments should be made according to the frequency of door
openings, the quantity of food kept inside the fridge and ambient temperature
of the place of your fridge.
• Your fridge should be operated up to 24 hours according to the ambient
temperature without interruption after being plugged in to be completely
cooled.
• Do not open doors of your fridge frequently and do not place much food
inside it in this period.
• A 5 minute delaying function is applied to prevent damage to the compressor
of your fridge, when you take the plug off and then plug it on again to operate
it or when an energy breakdown occurs. Your fridge will start to operate
normally after 5 minutes.
• Your fridge is designed to operate in the ambient temperature intervals stated
in the standards, according to the climate class stated in the information
label. We do not recommend operating your fridge out of stated temperatures
value limits in terms of cooling effectiveness.
• This appliance is designed
for use at an ambient
temperature within the 10°C 38°C range.
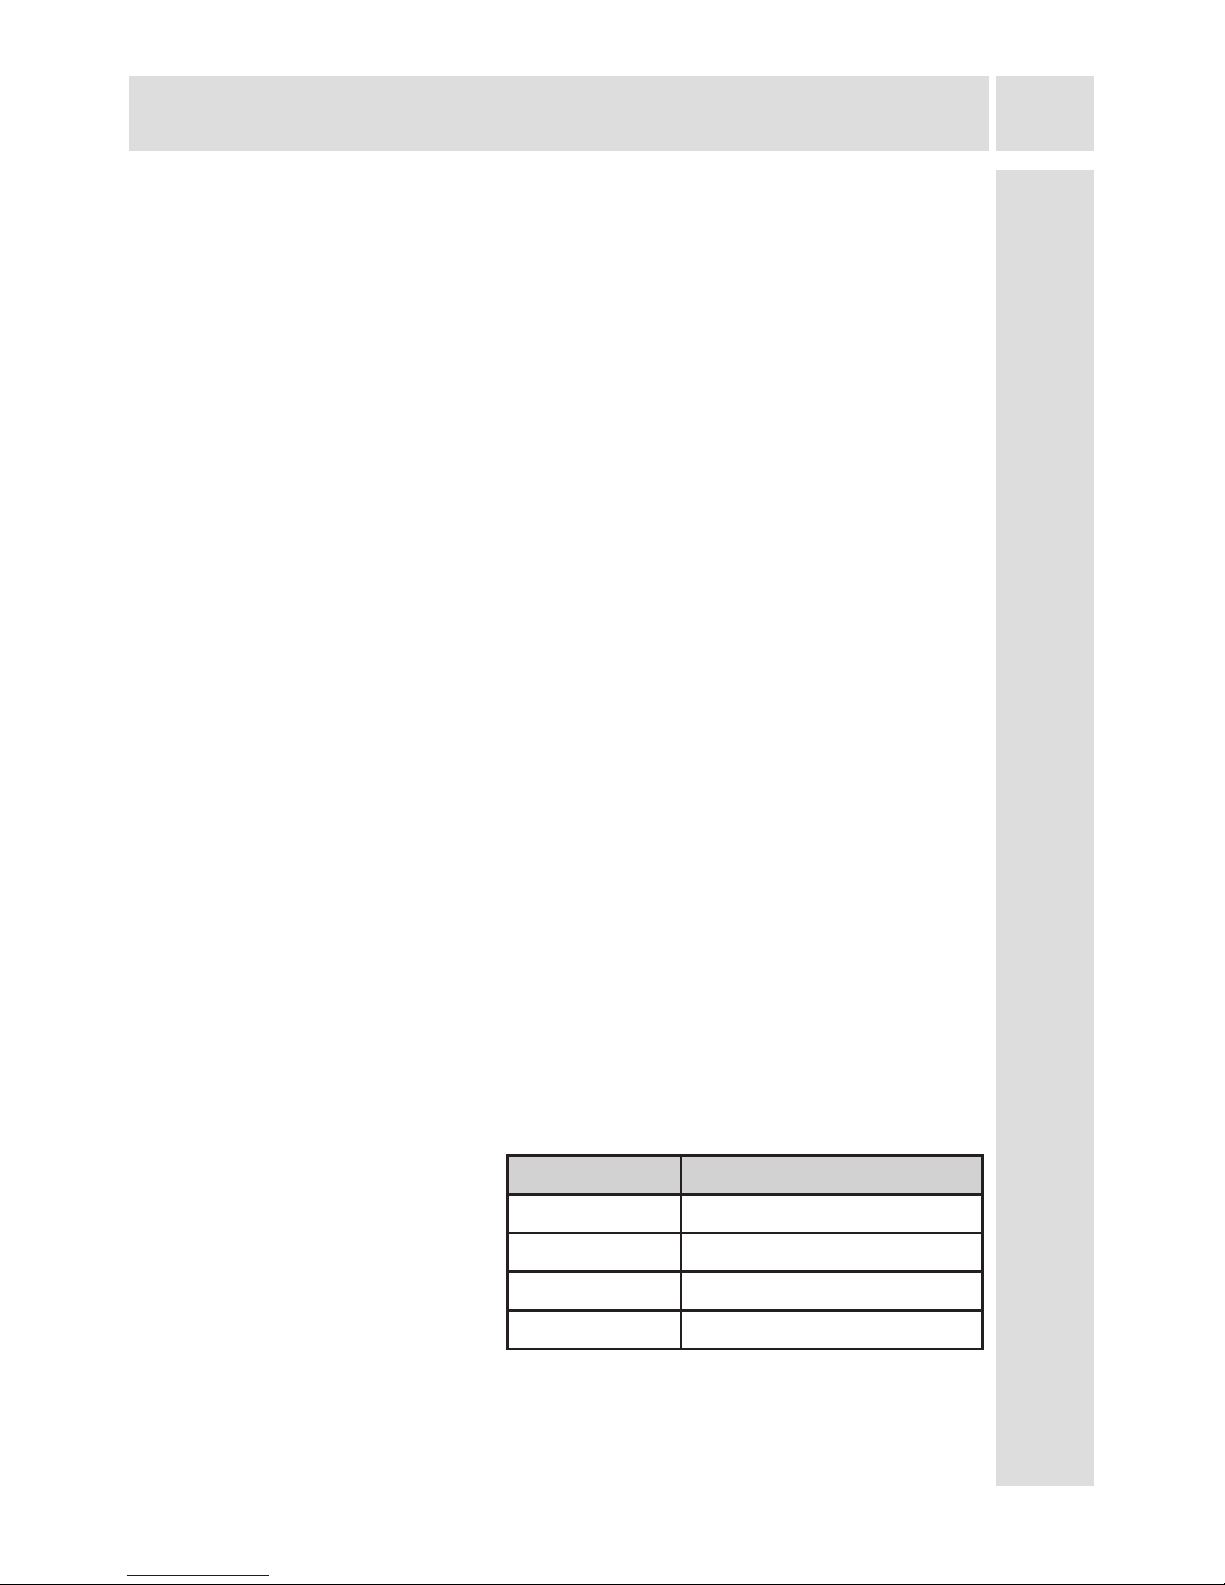
Climate class Abbient temperature (oC)
T Between 16 and 43 (oC)
ST Between 16 and 38 (oC)
N Between 16 and 32 (oC)
SN Between 10 and 32 (oC)
Page 12
EN
12
USAGE INFORMATION
Accessories
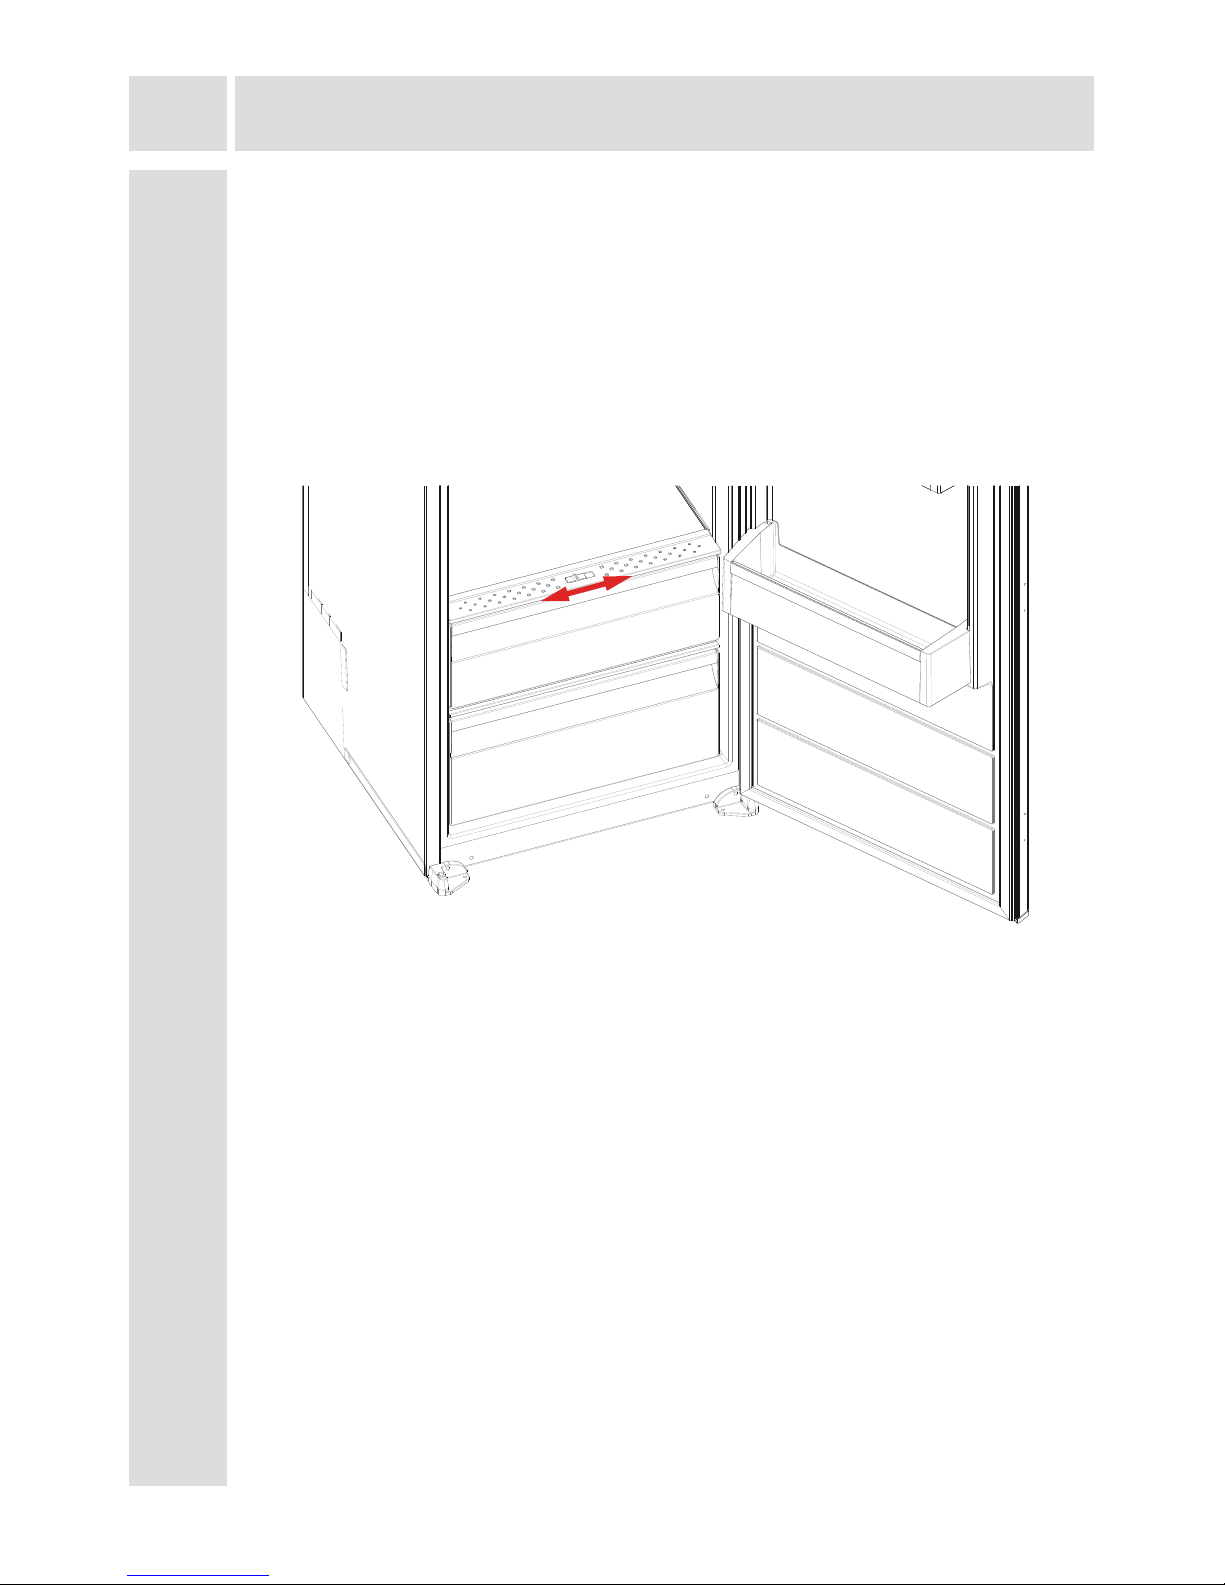
Fresh dial
When the humidity controler in the closed position, it allows fresh fruit and
vegetables to be stored longer.
In case of the crisper is totally full, the fresh dial is located in front of crisper,
should be opened. By means of this the air in the crisper and humidity rate will be
controlled and endurance life will be increased.
If you see any condensation on glass shelf, humidity control should be taken into
the open positions.
Page 13

EN
13
ARRANGING FOOD IN THE APPLIANCE
• To reduce humidity and consequent increase of frost never place liquids
in unsealed containers in the refrigerator. Frost tends to concentrate in
the coldest parts of the evaporator and in time will require more frequent
defrosting.
• Never place warm food in the refrigerator. Warm food should be allowed to
cool at room temperature and should be arranged to ensure adequate air
circulation in the refrigerator.
• Nothing should touch on the back wall as it will cause frost and the packages
can stick on the back wall. Do not open the refrigerator door too frequently.
• Arrange the meat and cleaned sh (wrapped in packages or sheets of plastic)
which you will use in 1-2 days, in the bottom section of the refrigerator (that
is above the crisper) as this is the coldest section and will ensure the best
storing conditions.
• You can put the fruits and vegetables into crisper without packing.
Page 14
EN
14
CLEANING AND MAINTENANCE
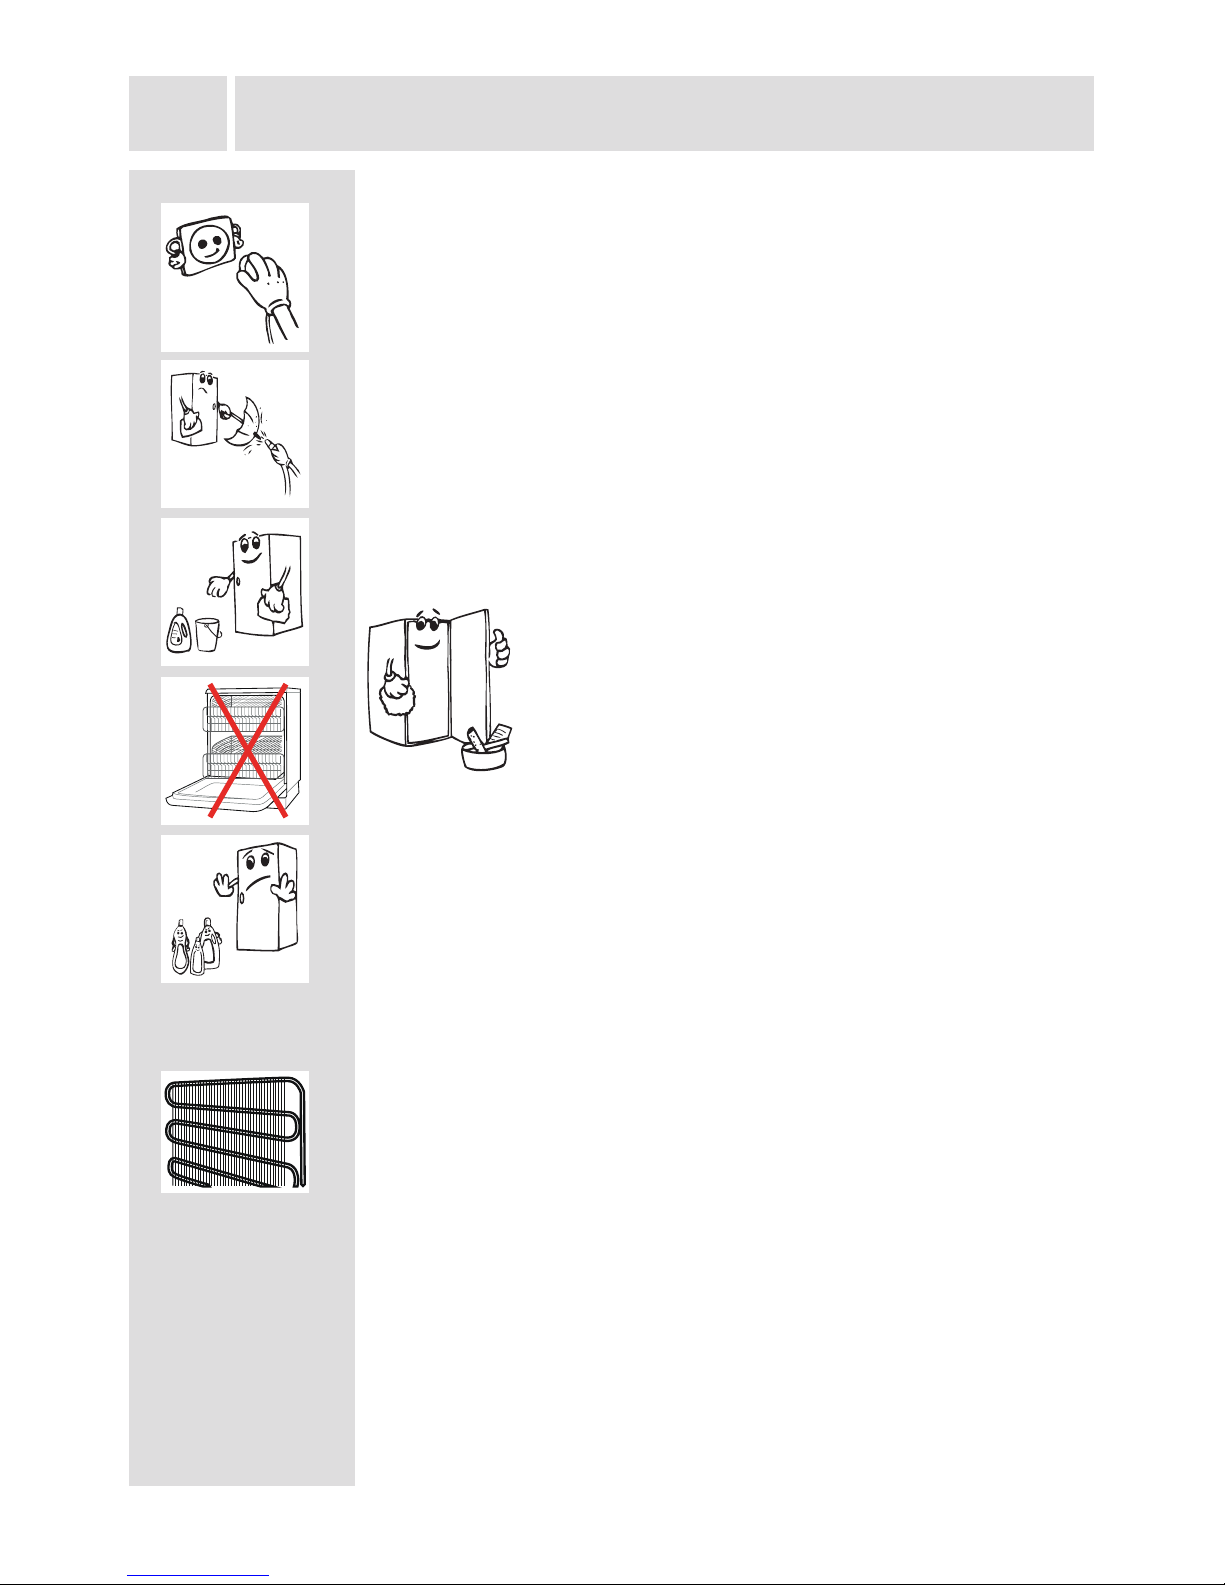
• Disconnect the unit from the power supply before cleaning.
• Do not clean the appliance by pouring water.
• Make sure that no water enters the lamp housing and other
electrical components.
• The refrigerator should be cleaned periodically using a solution
of bicarbonate of soda and lukewarm water.
• Clean the accessories separately with soap and
water Do not clean them in the dishwasher.
• Do not use abrasive products, detergents or soaps. After washing,
rinse with clean water and dry carefully. When you have nished
cleaning, reconnect the plugto the mains supply with dry hands.
• Clean the condenser with a broom at least twice a year. This will
help you to save on energy costs and increase productivity.
THE POWER SUPPLY MUST BE DISCONNECTED.
Page 15
EN
15
Defrosting the refrigerator compartment
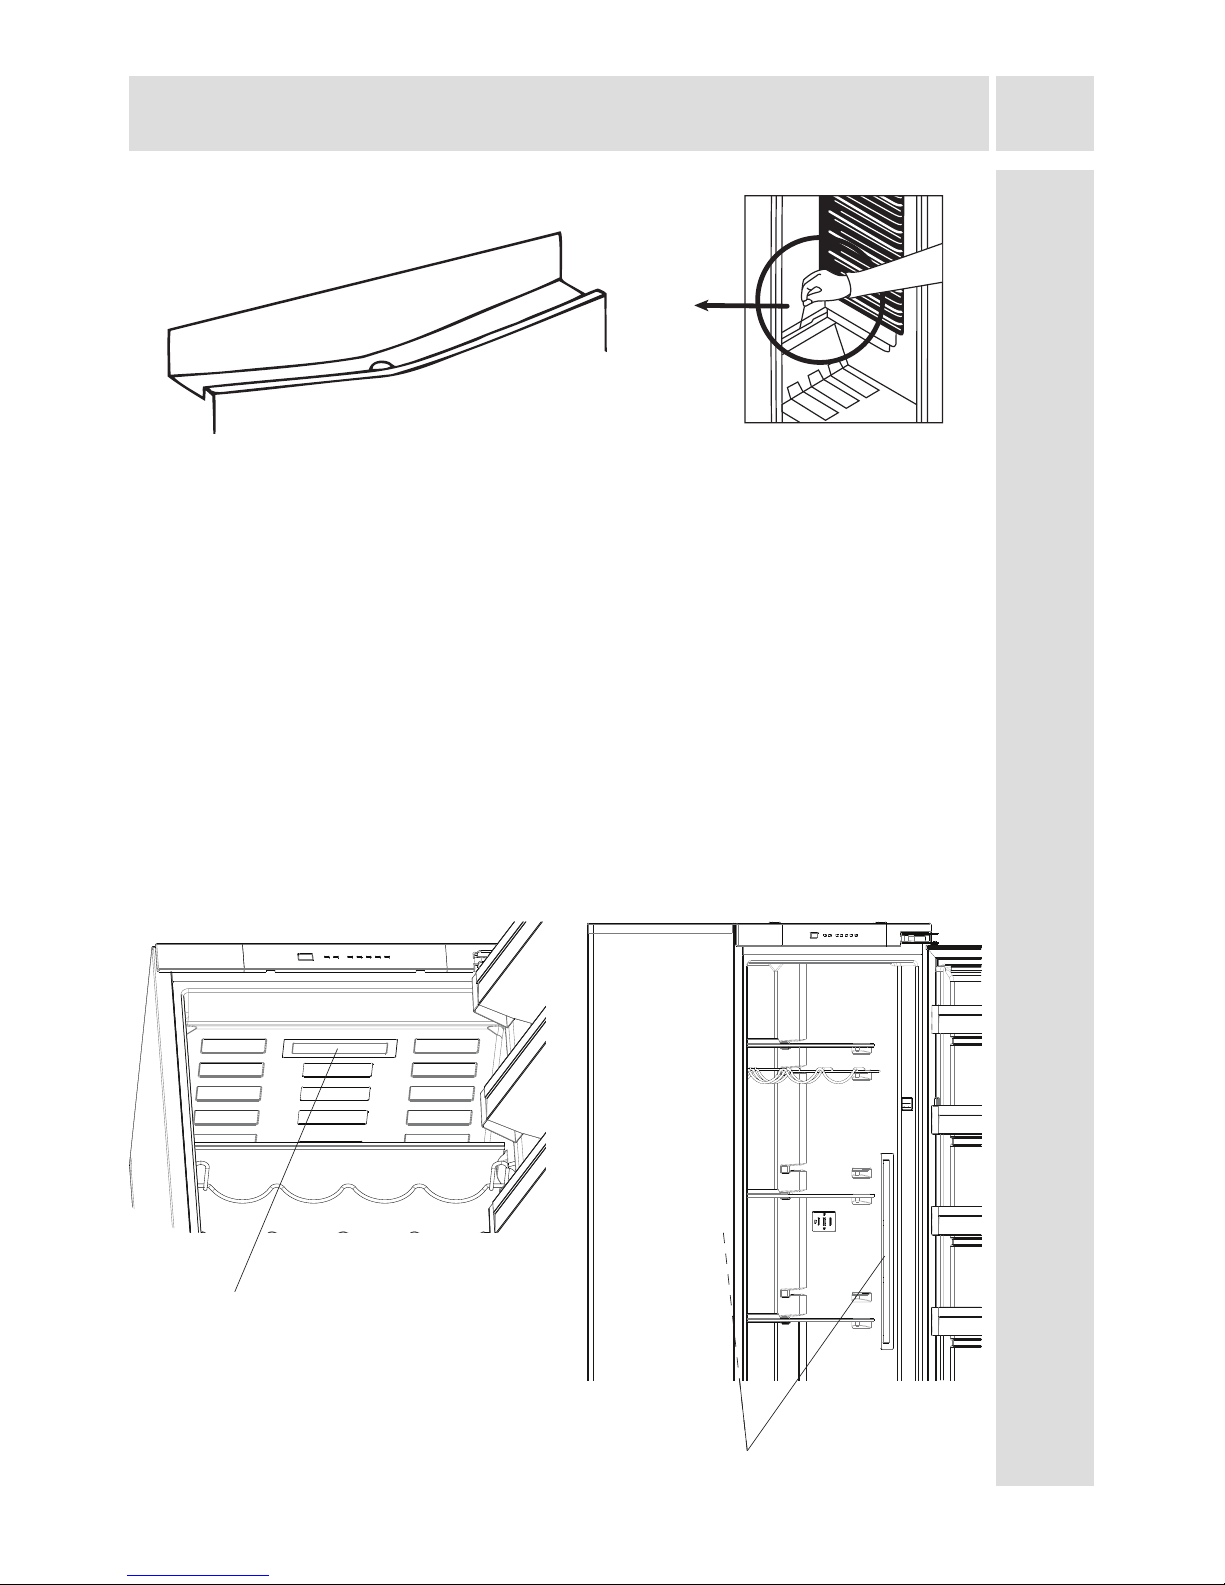
• Defrosting occurs automatically in the refrigerator compartment during
operation; the water is collected by the evaporation tray and evaporates
automatically.
• The evaporation tray and the water drain hole should be cleaned periodically
with the defrost drain plug to prevent the water from collecting at the bottom
of the refrigerator instead of owing out.
• You can also clean the drain hole by pouring ½ glass of water down it.
Replacing the LED strip
1 or 2 led strips in fridge is used to illumianate your appliance. Please call the
service man.
Note: Numbers and location of led strips may be changed according to the model.
!!! Some versions may be without illumination.
CLEANING AND MAINTENANCE
Upper side LED strip
(In some models)
Left / Right side LED strip (In some models)
Page 16
EN
16
SHIPMENT AND REPOSITIONING
Transportation and Changing of Installation Position
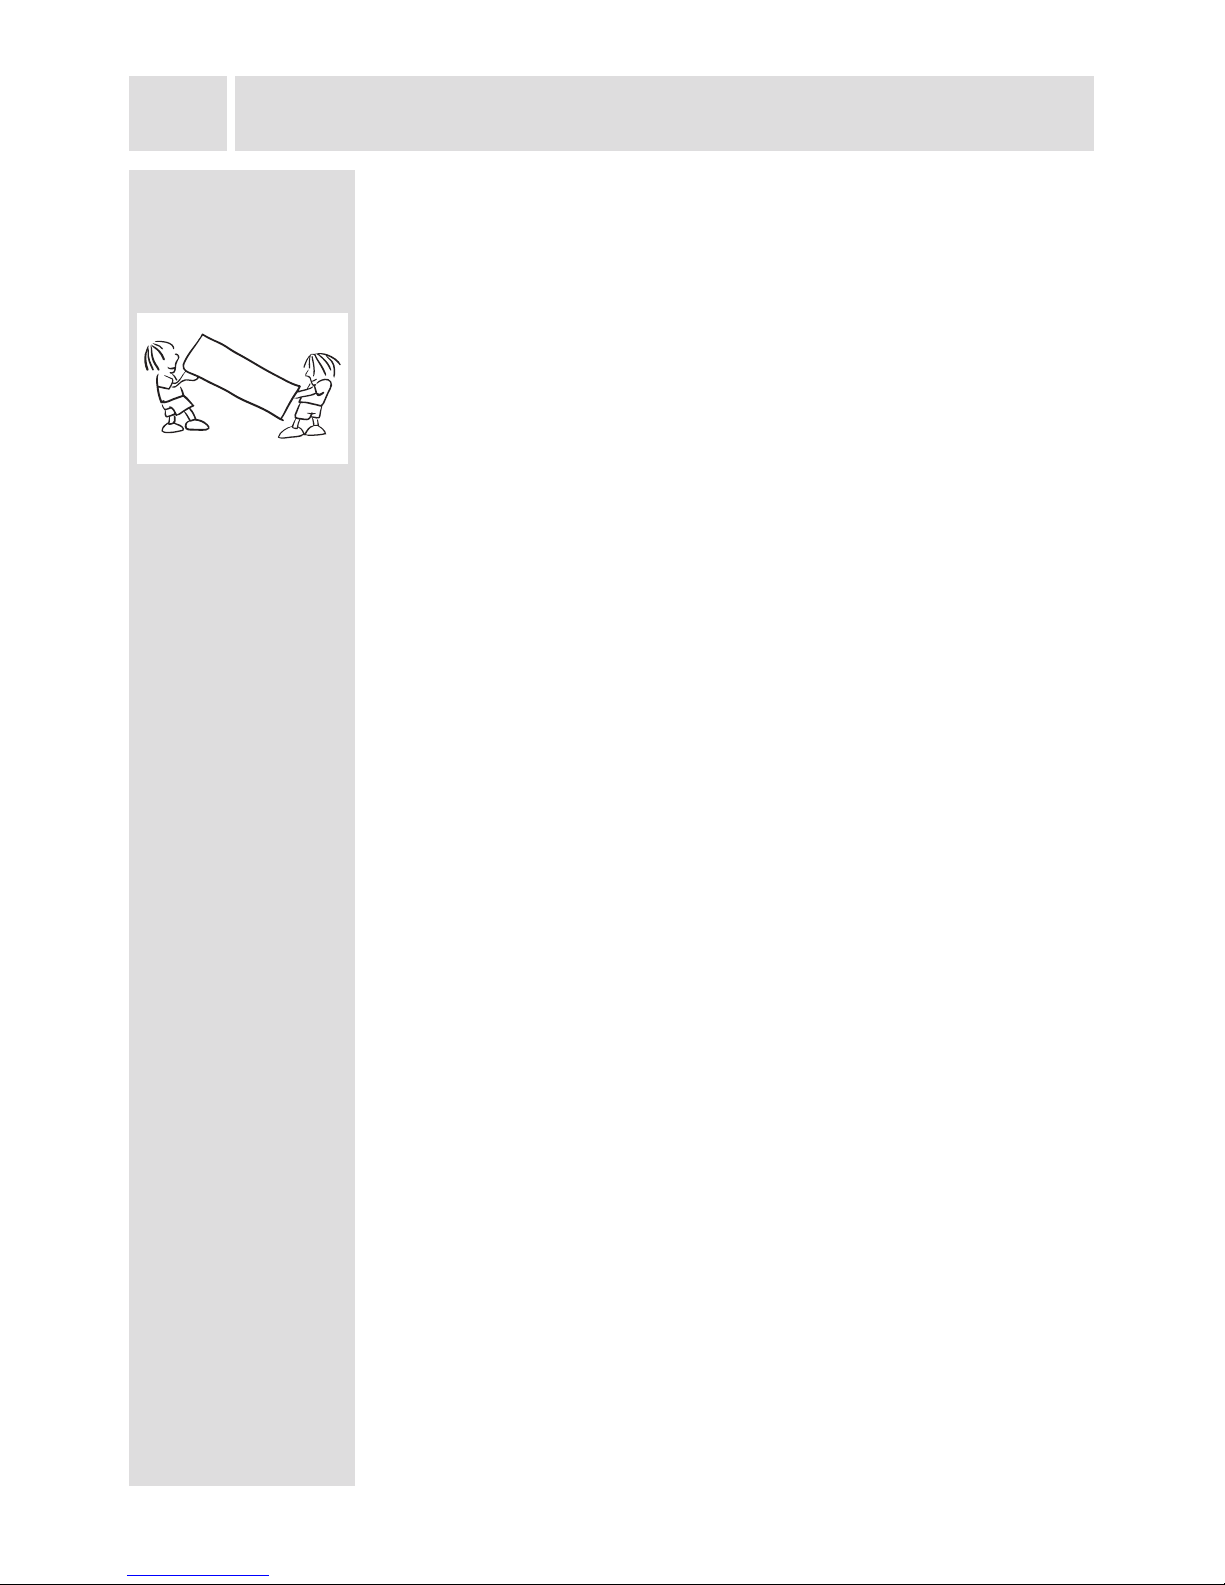
• The original packages and foamed polystyrene (PS) can be
retained if required.
• During transportation, the appliance should be secured with
a wide string or a strong rope. The instructions written on the
corrugated box must be followed while transporting.
• Before transporting or changing the installation position, all the
moving objects (ie,shelves,crisper…) should be taken out or
xed with bands in order to prevent them from getting damaged.
Carry your fridge in the upright position.
Page 17
EN
17
BEFORE CALLING YOUR AFTER SALES SERVICE
If your fridge is not working properly, it may be a minor problem, therefore check
the following, before calling an electrician to save time and money.
What to do if your appliance does not operate;
Check that;
• There is no power,
• The general switch in your home is disconnected ,
• The socket is not sufcient. To check this, plug in another appliance that you
know which is working into the same socket.
What to do if your appliance performs poorly;
Check that;
• You have not overloaded the appliance ,
• The fridge temperature set to 2.
• The door is closed perfectly ,
• There is no dust on the condenser ,
• There is enough place at the rear and side walls.
If your fridge is operating too loudly;
Normal Noises
Cracking (Ice cracking) Noise:
• During automatic defrosting.
• When the appliance is cooled or warmed (due to expansion of
appliance material).
Short cracking: Heard when the thermostat switches the compressor on/
off.
Compressor noise: Normal motor noise. This noise means that the
compressor operates normally Compressor may cause more noise for a
short time when it is activated.
Bubbling noise and splash: This noise is caused by the ow of the
refrigerant in the tubes of the system.
Waterownoise: Normal ow noise of water owing to the evaporation
container during defrosting. This noise can be heard during defrosting.
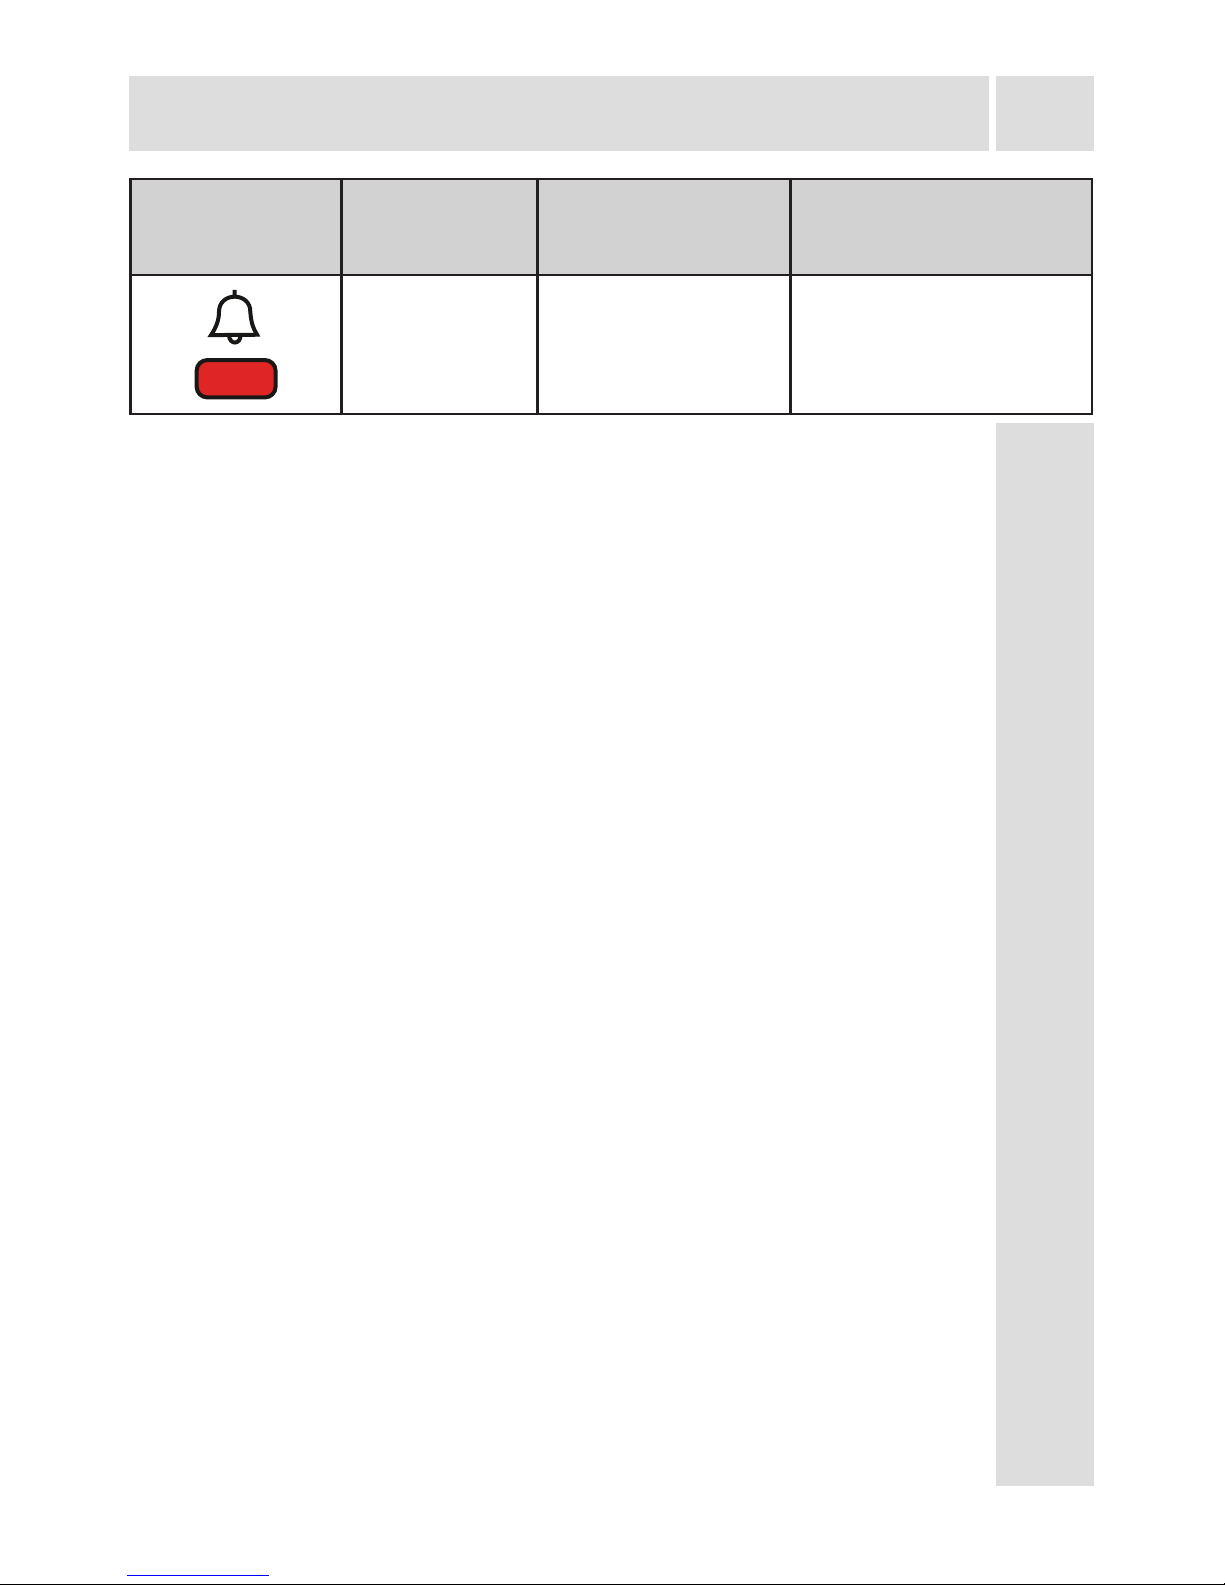
Alarm
indicator led
is turning on
ERROR
TYPE
WHY WHAT TO DO
"Failure
Warning"
There is/are some
part(s) Out of order
or there is a failure in
cooling process
Check the door is open
or not. If the door is not
open, call service for
assistance as soon as
possible.
Page 18

EN
18
BEFORE CALLING YOUR AFTER SALES SERVICE
Air Blow Noise: Normal fan noise. This noise can be heard in fridges
during normal operation of the system due to the circulation of air.
If the edges of fridge cabinet that the door joint contact are warm;
Especially in summer (hot weather), the surfaces that the joint contact may get
warmer during the operation of the compressor, this is normal.
If humidity builds up inside the fridge;
• Are all food packed properly? Are the containers dried before placing them
in the fridge?
• Is the fridge's door opened frequently? Humidity of the room gets in the fridge
when the door is opened. Humidity build up will be faster when you open the
door more frequently, especially if the humidity of the room is high.
If the door is not opened and closed properly;
• Do the food packages prevent closing of the door?
• Are the door compartments, shelves and drawers placed properly?
• Are door joints broken or torn?
• Is your fridge on a level surface?
Recommendations
• To stop the appliance completely, unplug from main socket (for cleaning and
when the door is left open)
Tips for saving energy
1. Install the appliance in a cool, well ventilated room , but not in direct sunlight
and not near a heat source (radiator, cooker.. etc). Otherwise use an insulating
plate.
2. Allow warm food and drinks to cool down outside the appliance.
3. Cover drinks or other liquids when placing them in the appliance Otherwise
humidity increases in the appliance. Therefore, the working time gets longer.
Also covering drinks and other liquids helps to preserve smell and taste.
4. Try to avoid keeping the doors open for long periods or opening the doors too
frequently as warm air will enter the cabinet and cause the compressor to
switch on unnecessarily often.
5. Keep the covers of the different temperature compartments (crisper, chiller
...etc ) closed
6. Door gasket must be clean and pliable. Replace gaskets if worn.
Page 19

EN
19
INSTALLATION INSTRUCTIONS AND DOOR
REVERSIBILITY
Installation instructions
! It is recommended that this installation be performed by authorized technical
stuff.
! Before installation, read the instructions carefully.
! Fit the refrigerator/freezer in stable kitchen units only.
! If necessary, reverse the door according to instructions.
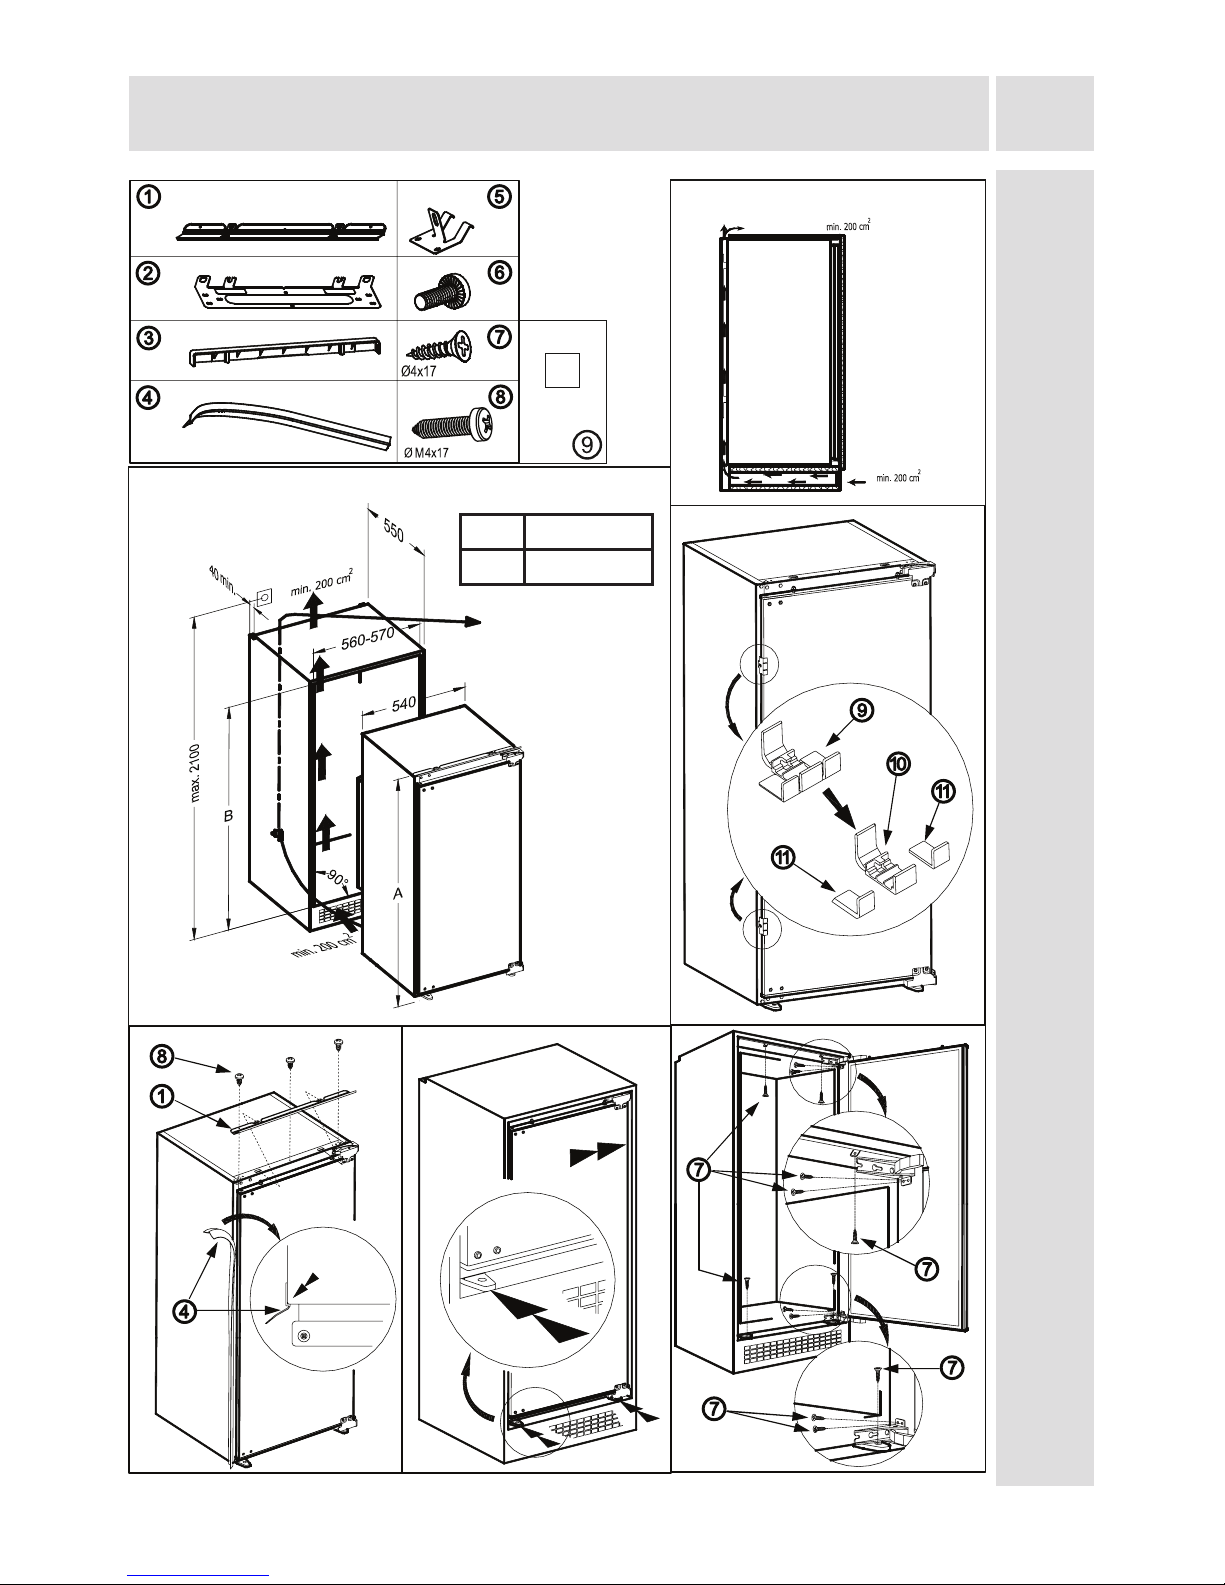
1. See g.A for the necessary attachment components.
2. Open the package. Take gasket spacer
(9)
and brake into three as shown in
gureD. The middle part is door hang rail
(10)
. The other two parts are unit
door spacers
(11)
. (g.D)
3. Insert trimap
(1)
into slot and screw by screws
(8)
. (g.E)
4. Pass the power cord through ventilation shaft and position it so that the
appliance could be easily plugged in once it has been installed. (g.B - g.C)
5. Cut trim gasket
(4)
to the height of the recess and stick it on reverse side of the
door hinges of the appliance. (g.E)
6. Raise the appliance and slide into the kitchen unit.
7. Lean the appliance to the kitchen unit through the hinges and align the front
feet with front surface of the kitchen unit. (g.F)
8. Open the appliance door and screw the front feet by using screws
(7)
. (g.G)
9. Screw trimap
(1)
to kitchen unit using screws
(7)
. (g.G)
10. Screw the hinges to the kitchen unit using screws
(7)
. (g.G)
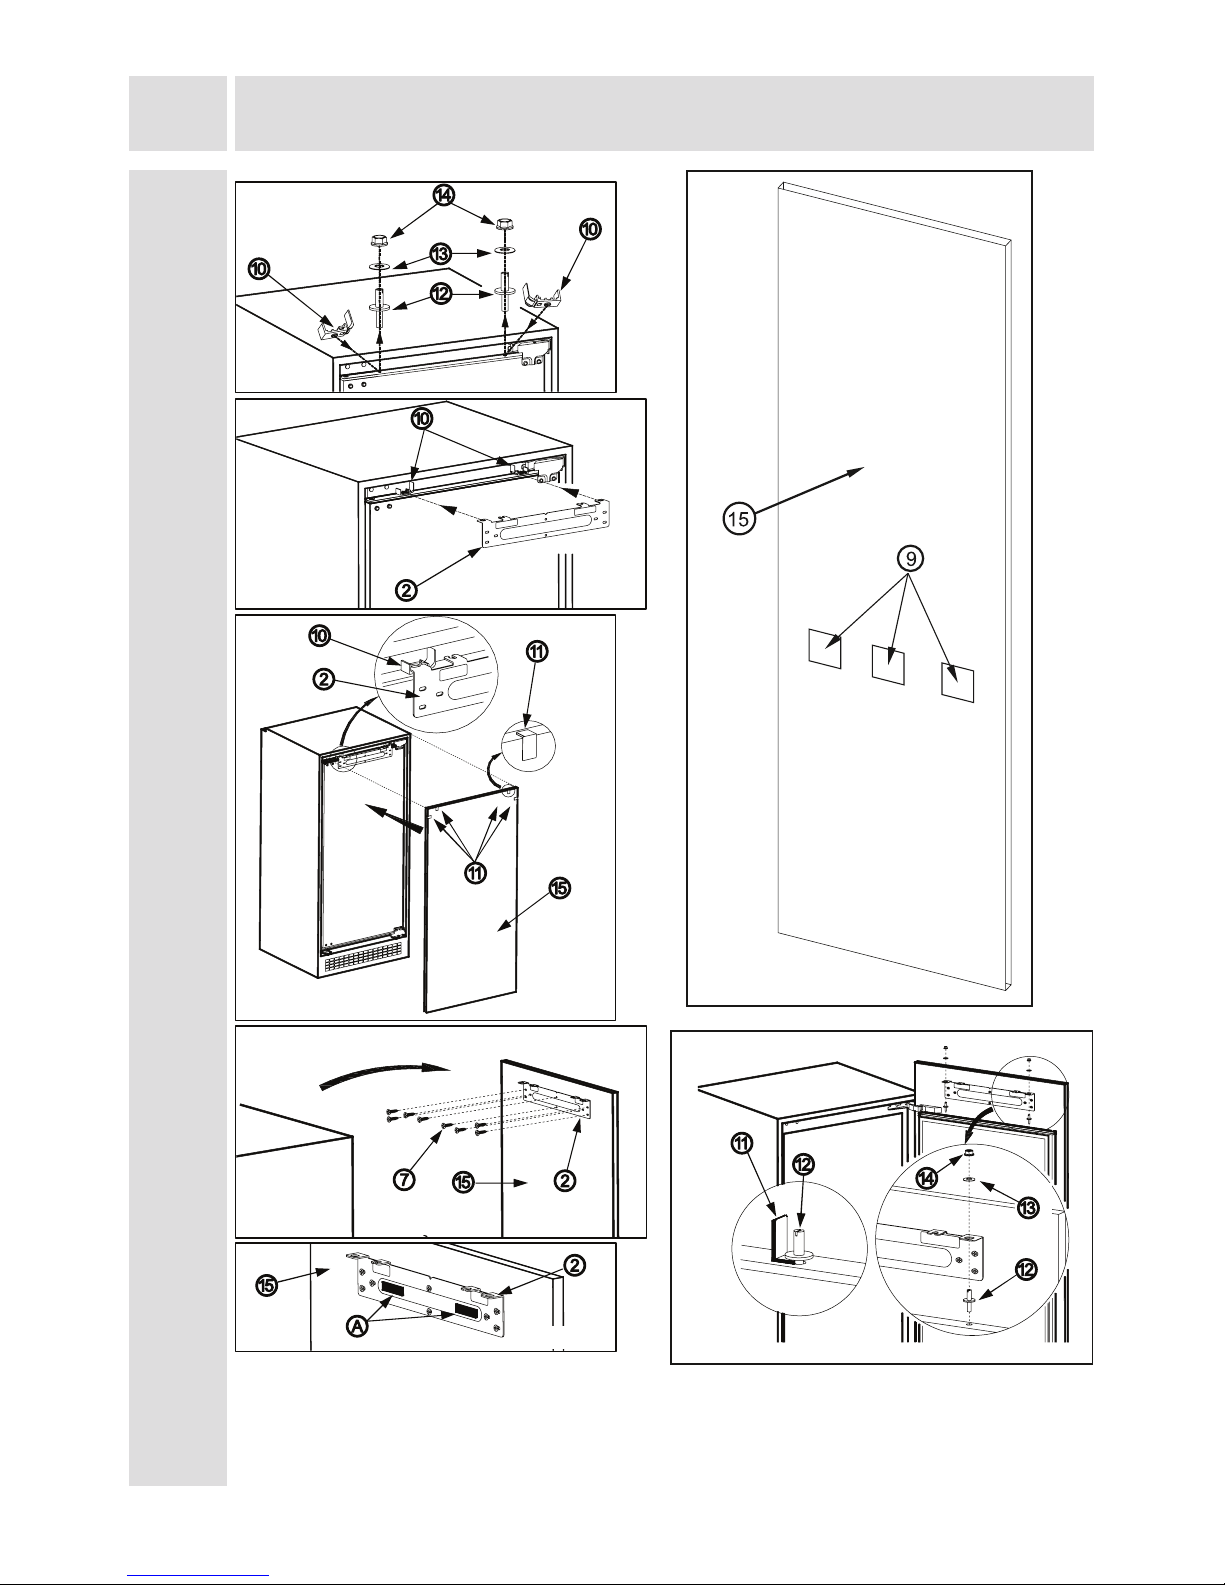
11. Close the appliance door. Unscrew and remove the nuts
(14)
, washers
(13)
and
adjustment bolts
(12)
from the appliance door. (g.H)
12. Take out the liners of the tapes on door hang rails
(10)
. Place door hang
rails
(10)
on the appliance door by inserting the bosses on the holes of the
appliance door, aligning the front surfaces of the door hang rails
(10)
and the
appliance door parallel to each other. Let the door hang rails
(10)
, stick onto
the appliance door. (g.H)
13. Slide the door hang
(2)
into door hang rails
(10)
. (g.J – g.K)
14. Take out the liners of the tapes on the front side of the door hang
(2)
.
15. Take out the liners of the tapes on the unit door spacers
(11)
and and stick
them onto the unit door
(15)
, closer to the upper corners. (g.K)
16. Lean the unit door
(15)
to the door hang
(2)
, aligning the unit door spacers
(11)
on the left, right and top edges with the sides of the unit or the doors of the
nearer and upper kitchen units. (g.K)
17. The bumper
(9)
must stick to be located on the middle of the unit door
(15)
with
equal space. (g.L)
18. Make sure that the unit door
(15)
sticks onto the door hang
(2)
. Pull the unit
door
(15)
allowing the door hang
(2)
to slide out the door hang rails
(10)
. Observe
that the door hang
(2)
stays stuck on the unit door
(15)
. (g.M)
Page 20

EN
20
19. Lay down the unit door
(15)
on the oor and screw the door hang
(2)
to the unit
door
(15)
by screws
(7)
. (g.M)
20. To overcome some of the furniture mistakes, there are plastic spacers
(A)
sticked on the door hang
(2)
. Remove these plastic spacers
(A)
. (g.N)
21. Remove the door hang rails
(10)
from the appliance door. Screw the adjustment
bolts
(12)
to the holes on the appliance door by leaving the necessary space
using unit door spacer
(11)
. (g.O)
22. Open the appliance door. Place the unit door
(15)
onto the appliance door
inserting adjustment bolts
(12)
into the slots on the door hang
(2)
. (g.O)
23. Place the washers
(13)
and screw the nuts
(14)
onto the adjustment bolts
(12)
.
(g.O)
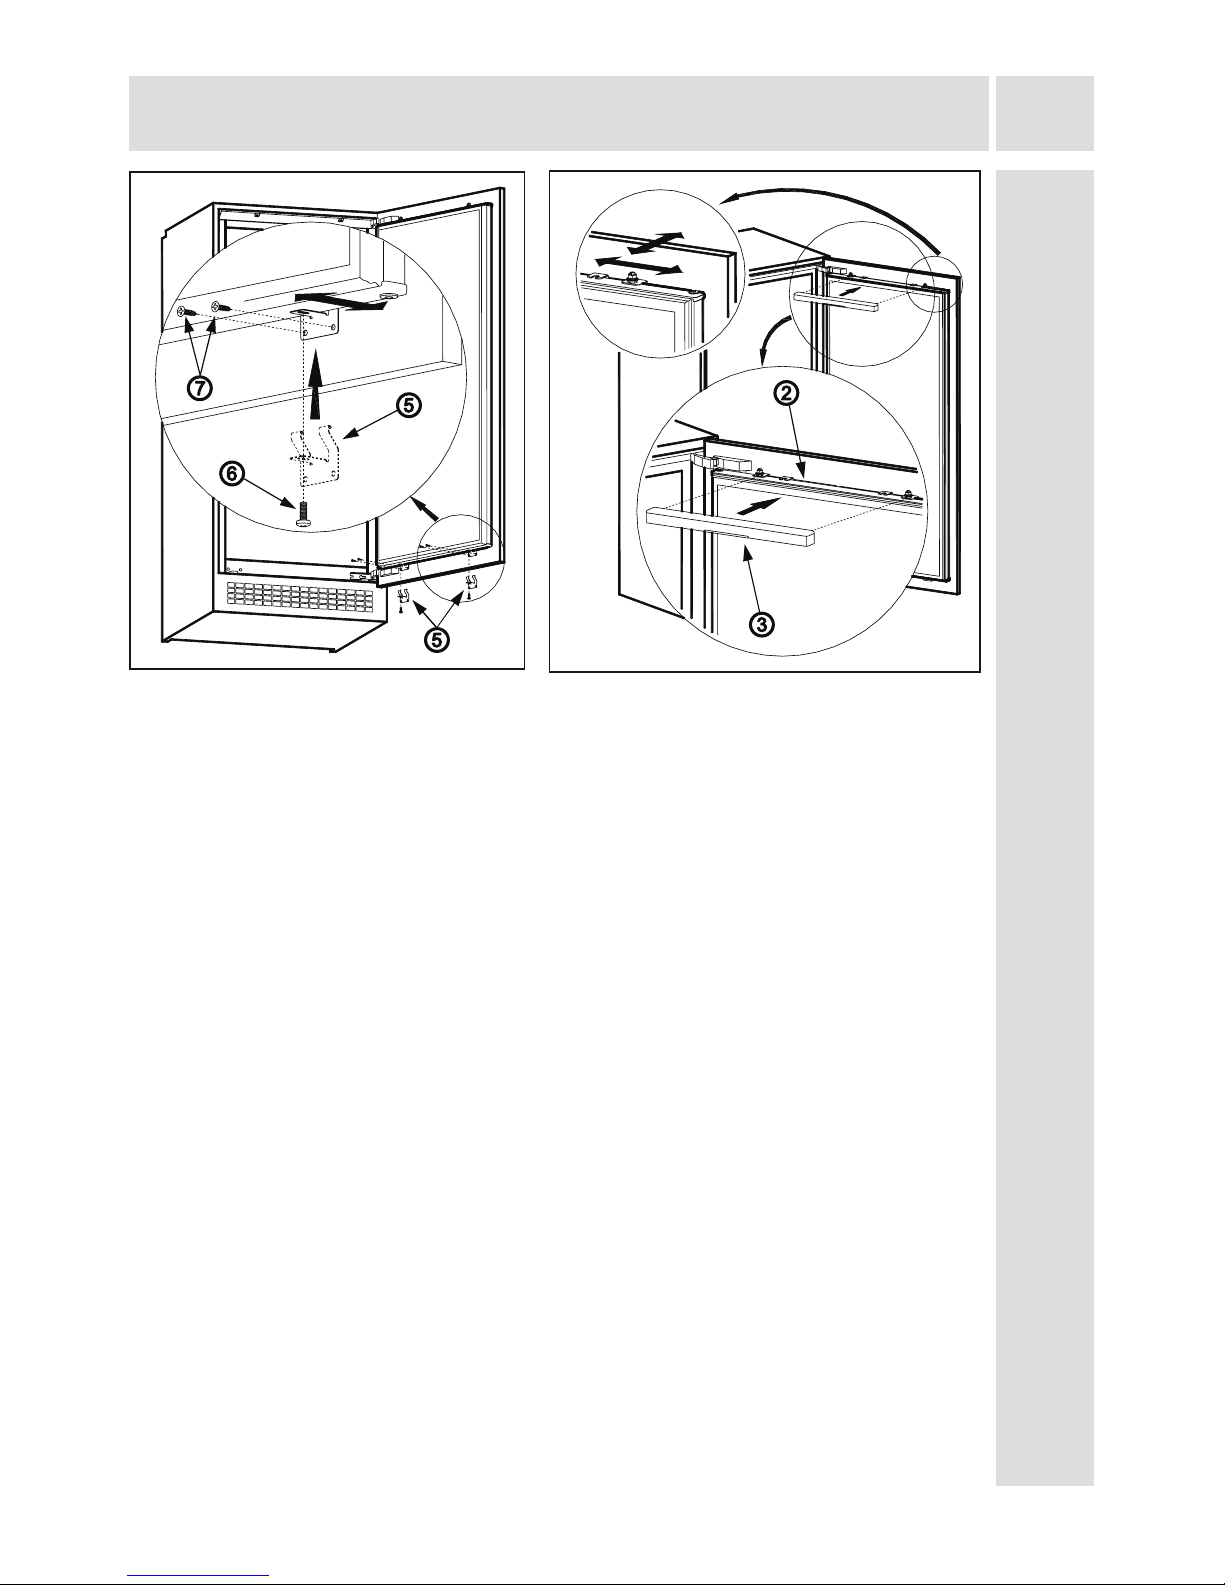
24. 1~2 mm gap between the unit itself and unit door is vital for appliance
performance. Close the door and make the accurate adjustment of the unit
door
(15)
by screwing or unscrewing the adjustment bolts
(12)
for vertical
adjustment and by the help of the slots on the door hang
(2)
for other directions.
(g.Q1)
25. Place the doorbottomxings
(5)
to the bottom of the appliance door between
the appliance door and unit door
(15)
. Screw the doorbottomxings
(5)
to the
appliance door with screws
(6)
. (g.P)
26. Screw the doorbottomxings
(5)
to the unit door
(15)
by screws
(7)
. (g.P)
27. For the adjustment of the space between the unit upper door
(15)
and the
unit itself, you can unscrew the screws
(6)
then adjust the space between the
appliance upper door
(19)
and unit upper door
(15)
by the spring effect of the
doorbottomxings
(5)
while screwing back the screws
(6)
.
28. Slide the hang cover
(3)
onto the door hang
(2)
. (g.Q2)
INSTALLATION INSTRUCTIONS AND DOOR
REVERSIBILITY
Page 21
EN
21
INSTALLATION INSTRUCTIONS AND DOOR
REVERSIBILITY
A B
1770 1770 - 1790
mm
Figure. A
Figure. B
Figure. C Figure. D
Figure. E Figure. F Figure. G
Page 22
EN
22
INSTALLATION INSTRUCTIONS AND DOOR
REVERSIBILITY
Figure. H
Figure. J
Figure. K
Figure. L
Figure. M
Figure. N
Figure. O
Page 23
EN
23
INSTALLATION INSTRUCTIONS AND DOOR
REVERSIBILITY
Figure. P
Figure. Q
Fig. Q1
Fig. Q2
Page 24
EN
24
INSTALLATION INSTRUCTIONS AND DOOR
REVERSIBILITY
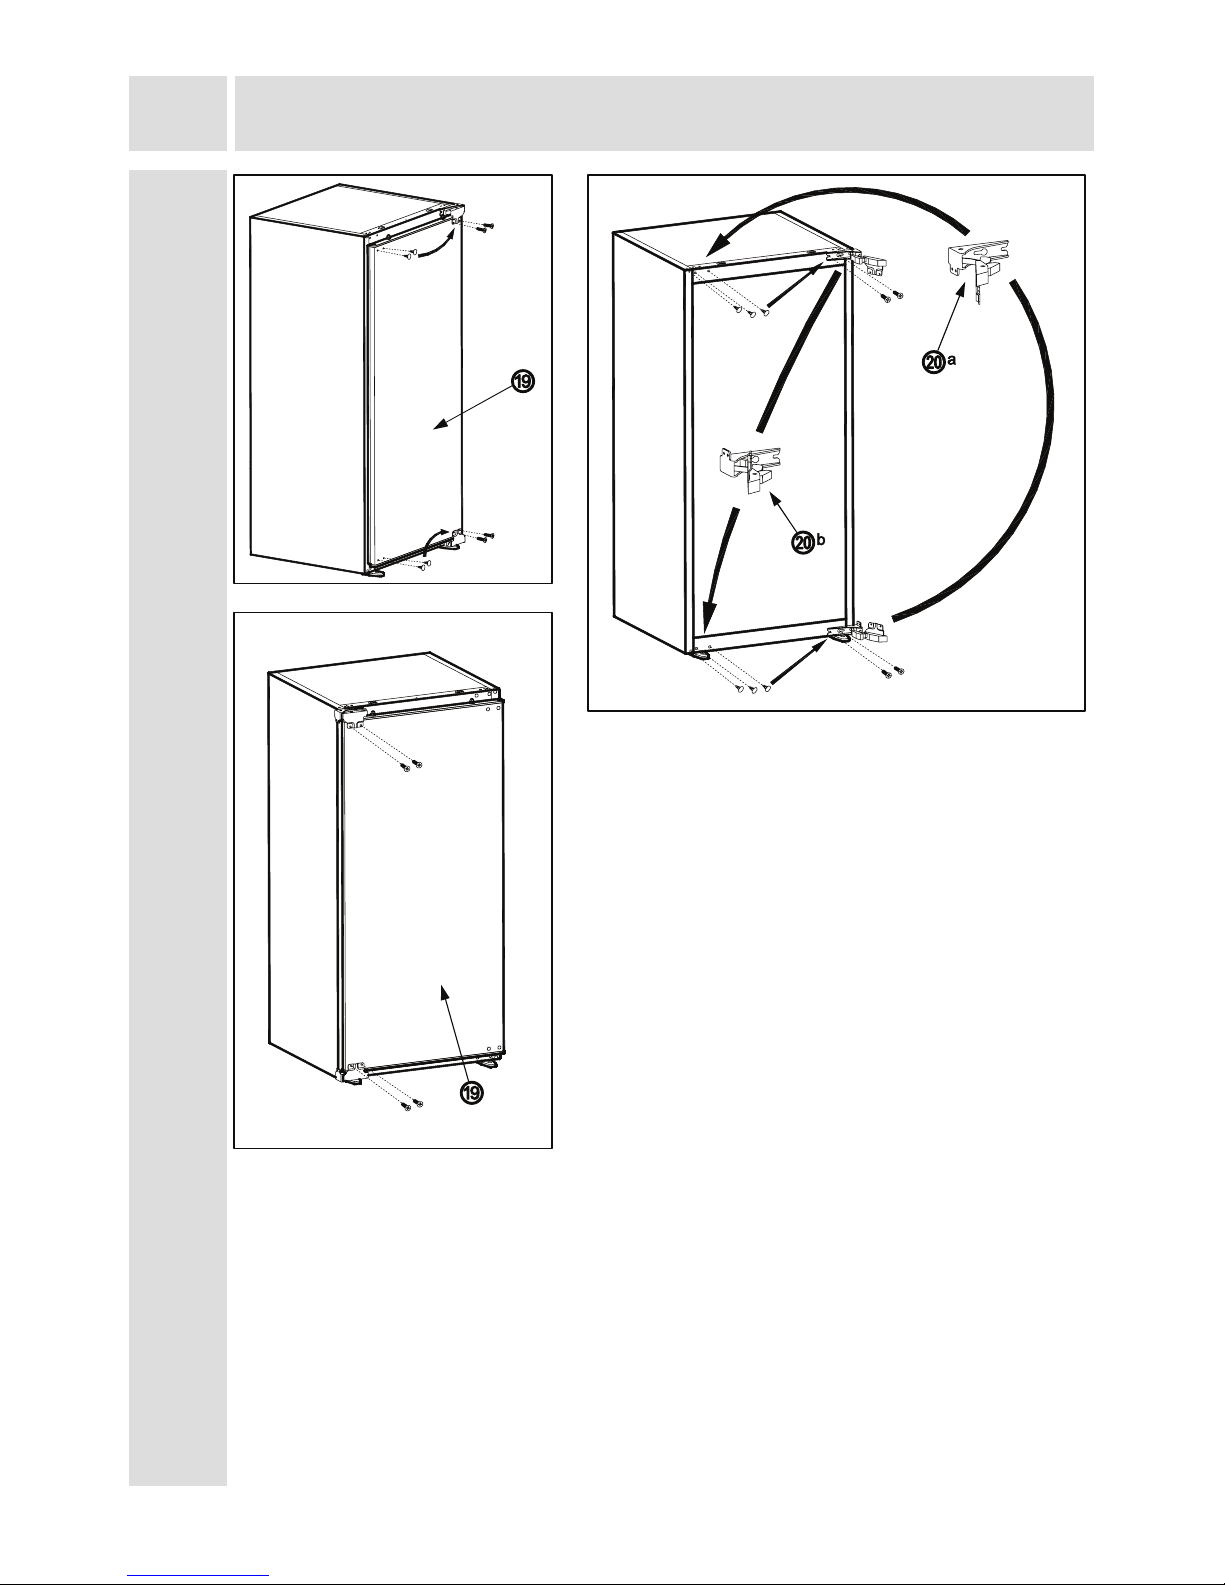
Door reversing
! Be careful about not to pinch your ngers in
the hinges (door upper hinge
(20-a)
and door
lower hinge
(20-b)
).
1. Unscrew the screws on the front surface of
the appliance door
(19)
. Take the appliance
door
(19)
to a safe place. (g.R)
2. Move the hole plugs on the appliance
door’s
(19)
front surface, to the holes on the
reverse side. (g.S)
3. Open the door upper hinge
(20-a)
and door
lower hinge
(20-b)
. (g.S) and dissamble
them. (g.T)
4. Move the hole plugs to opposite side. (g.T)
5. Assemble the door upper hinge
(20-a)
and
door lower hinge
(20-b)
to the opposite
corners of their original position. (g.T)
6. Assemble the appliance door
(19)
. (g.U)
Figure. R
Figure. S
Figure. T
Page 25

EN
25
Page 26

EN
26
Page 27

EN
27
Page 28
52206311
Repairtech Service Helpline:
01527-888133
DOMESTIC APPLIANCE DISTRIBUTORS;
HENRY JOHN HOUSE
NORTHWAY LANE
ASHCHURCH
TEWKESBURY
GLOUCESTERSHIRE
GL20 8JH
 Loading...