

montpellier
Installation and Operating Instructions
Model: MD9INT45W
9 Place Integrated Dishwasher
Please read these instructions carefully before attempting to install or use this appliance. It is
advisable to keep these instructions in a safe place for future reference.
1

Introduction
Thank you for choosing this montpellier appliance. It has been
designed to give years of trouble-free use provided it is installed and
maintained correctly.
Please read these instructions carefully before installing or using your
appliance. It is advisable to keep your purchase and installation receipts
with these instructions in a safe place for future reference. Included is
some important safety information in addition to guidelines and
recommendations that will enable you to take full advantage of all the
functions available.
This quality appliance has been tested and certified to meet all applicable
UK electrical and safety standards.
This appliance must be installed and connected in accordance with
current regulations by a qualified electrician.
After unpacking the appliance ensure that there is no visible damage. If the
appliance has been damaged during transit, do not use it, contact your
retailer immediately.
2

Your 2 year Manufacturer's guarantee
THIS DOES NOT AFFECT YOUR STATUTORY RIGHTS.
Your new Montpellier appliance carries a free guarantee which protects you against the cost of
repairs during the first 24 months from date of purchase provided that:
Any claim is accompanied by evidence of the model reference, model serial number and proof
of purchase, such as a Sales Receipt, showing that the appliance was purchased within the 24
months prior to the date of claim.
What is not covered under the Guarantee :
Any appliance not correctly installed and operated in accordance with the manufacturer's
instructions.
Any appliance that is used for anything other than domestic purposes.
Any defect caused by accident, misuse, unauthorized modification or inexpert repair.
Cost of Call-out where a fault cannot be found with the appliance.
Cost of Call-out for work covering routine maintenance, such as, but not exclusively,
cleaning of filters or defrosting.
Cost of Call-out for work required to correct the alignment of doors following door
reversal procedures carried out by you.
Use of the appliance by anyone other than the Householder.
Use in any commercial environment.
Consumable items, such as, but not exclusively, fuses in plugs, bulbs and breakable
items which require routine replacement.
Repair costs incurred that have not been authorised by Repairtech and/or carried out by
a non-approved Repairtech engineer.
YOUR GUARANTEE IS VALID ONLY IN THE UK.
To Register your Appliance simply complete the card in your appliance pack and
return it
with a stamp affixed or Alternatively you can Register online at
www.repairtechuk.com
SERVICE HELP-LINE
Should your appliance develop a fault, please call the
Repairtech Service Helpline on:
01527-888133
Please remember to have all your product details available, including the
model number, serial number, date of purchase and your retailer’s details
before registering a fault.
Your service call cannot progress without this information.
3
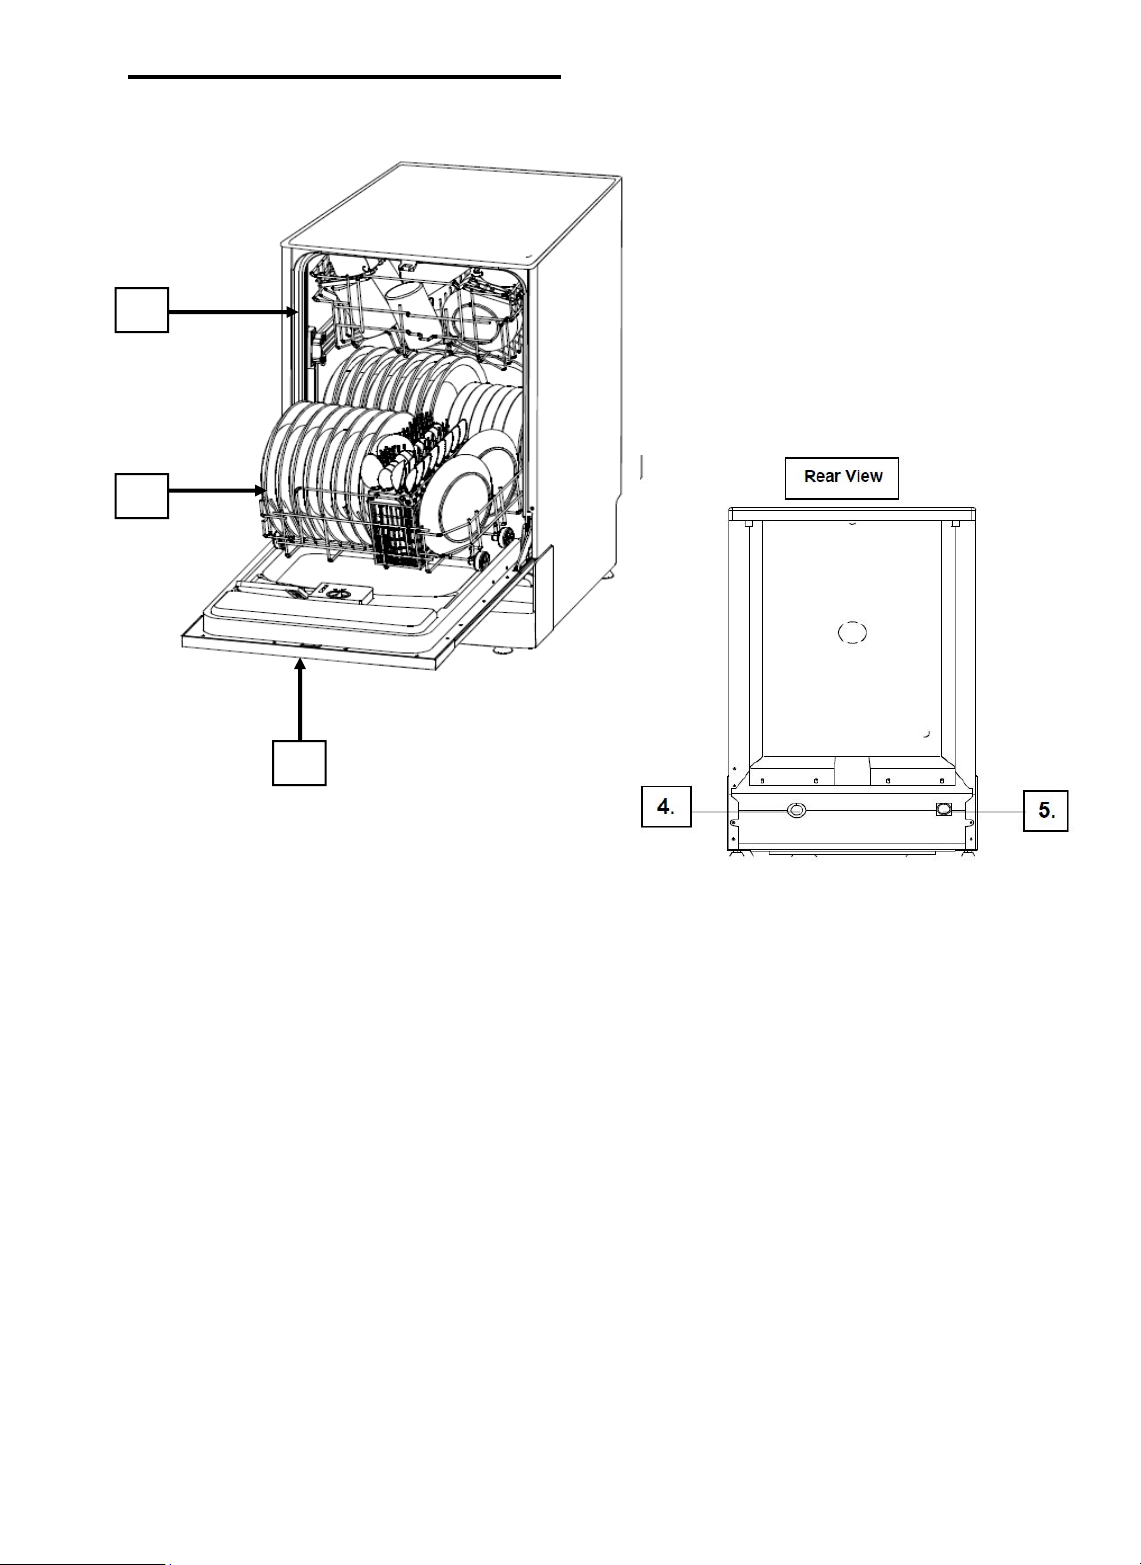
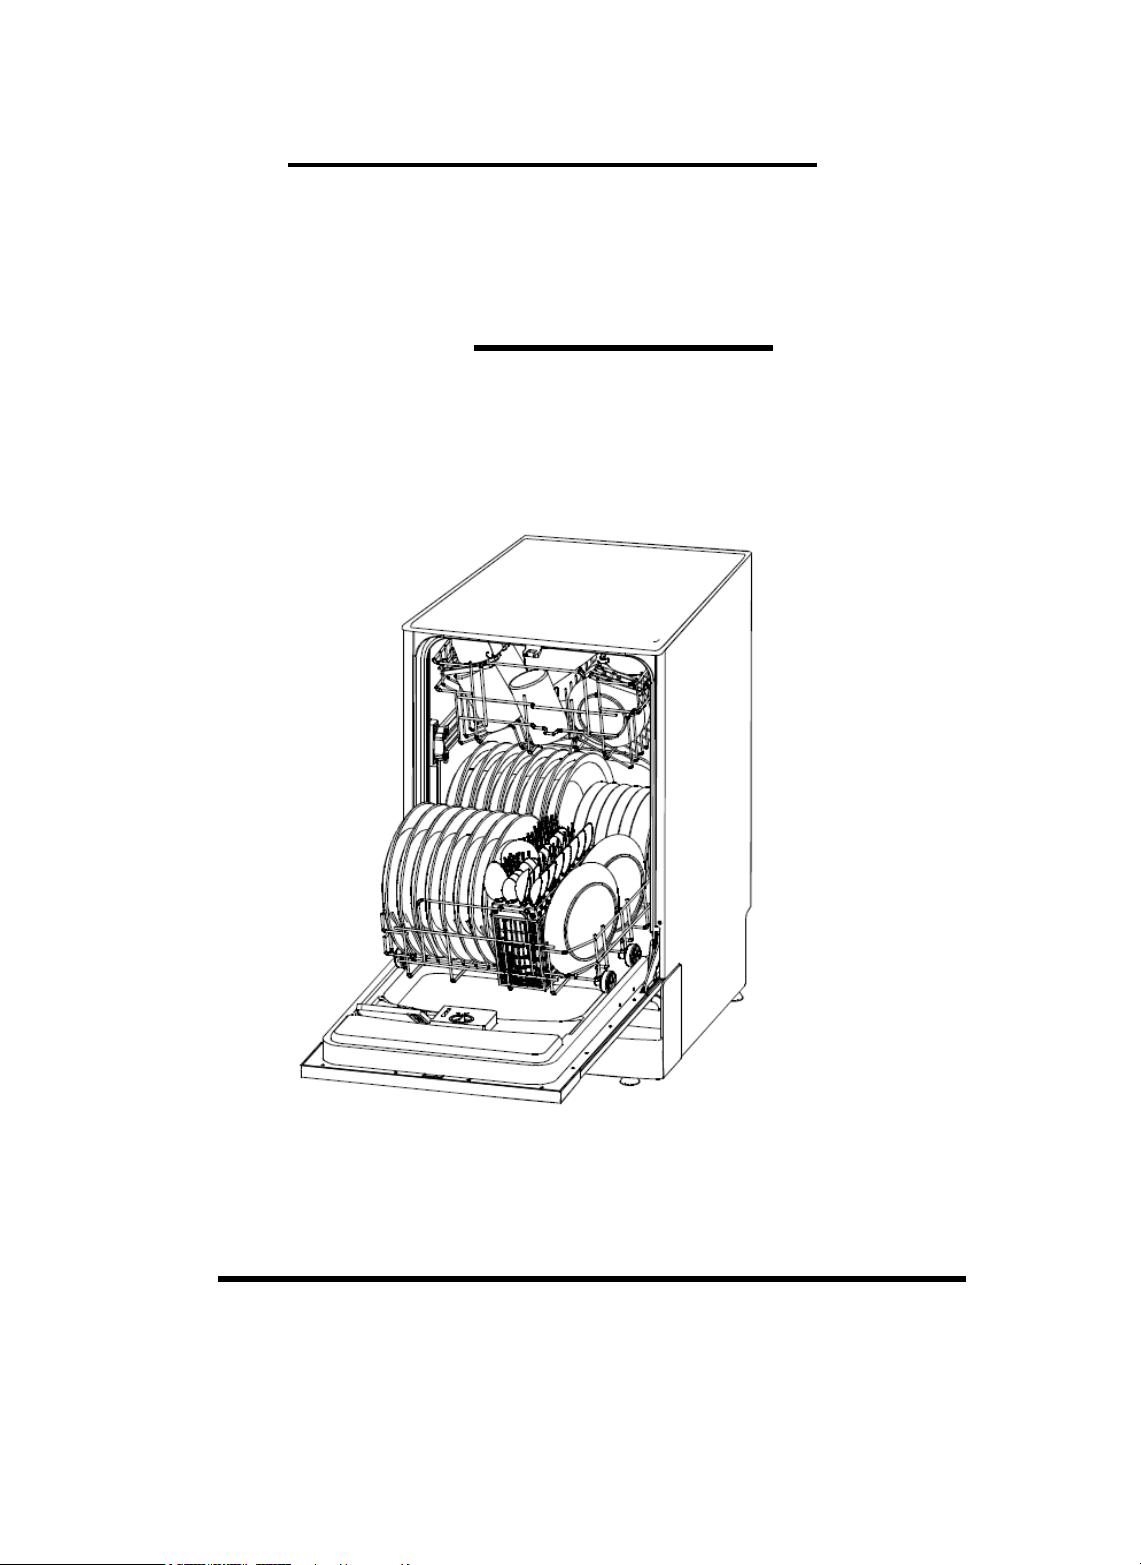
Description of the Appliance
1.
2.
3.
1. Upper Basket with spray arm below
2. Lower Basket with Spray Arm Below
3. Door with Control Panel on top edge
4. Water Drain Pipe
5. Water Inlet Connector
4

CONTENTS:
Section 1. Installation
Section 2. Safety Advice
Section 3. Operating the Appliance
Section 4. Maintenance
5
Section 1. Installation
Position the appliance in a dry, well ventilated room with a solid level floor.
The room temperature must not fall below +5° or rise above +35°.
This appliance is fitted with adjustable feet so that you can ensure it is sitting
level. Adjust the feet by turning left or right until the appliance is level.
The adjustable feet must never be removed.
Plug the 3pin moulded plug into a nearby 13amp plug socket. Always make
sure that you can easily gain access to switch the power on or off at the plug
socket.
N.B. This appliance must be earthed!
If you have installed this appliance underneath a work surface the plug
socket should have a fused switch located above the work surface so that
you can easily switch the appliance on or off.
You are advised to turn the power off at the plug socket when you have
finished using your appliance.
Before using the appliance for the first time, you must set the water softener,
add salt, add rinse aid and add detergent.
To open the door, use the door handle and the catch will release. To close
the door, use the door handle to push the door and the catch will lock the
door. Never try to force open the door by any other method!
Your plumber will connect the water hose (supplied) to the water inlet
connection at the rear of the appliance and to an adjacent cold water supply.
It is your responsibility to ensure that the supplied washers have been used
and that both connections are water tight.
Ensure water pressure is within the range specified on the Rating Label.
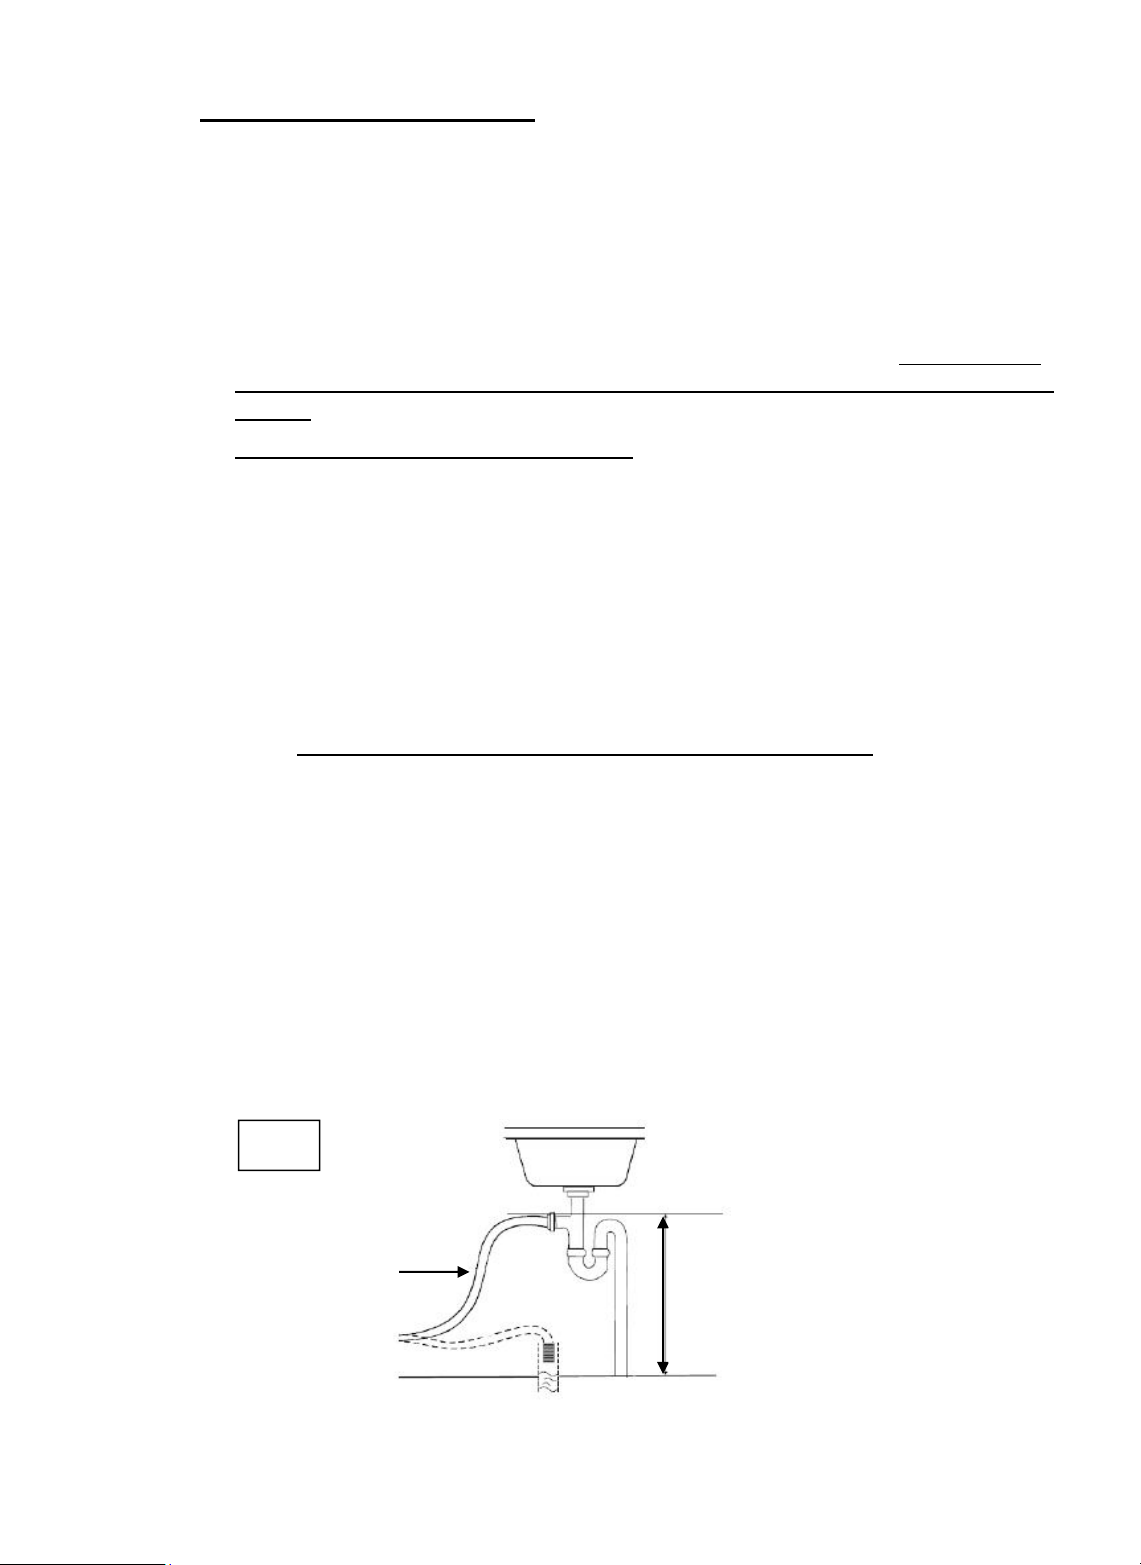
Your plumber will connect the water drain pipe to an adjacent sink (see Pic.1
below)
Ensure that the water hose and water drain pipe are not kinked when the
appliance is pushed into place. If either of these pipes is kinked the appliance
will not operate correctly.
Ensure that the appliance is not standing on the power cable.
Pic.1
Water Drain Pipe
6
Maximum
1000mm
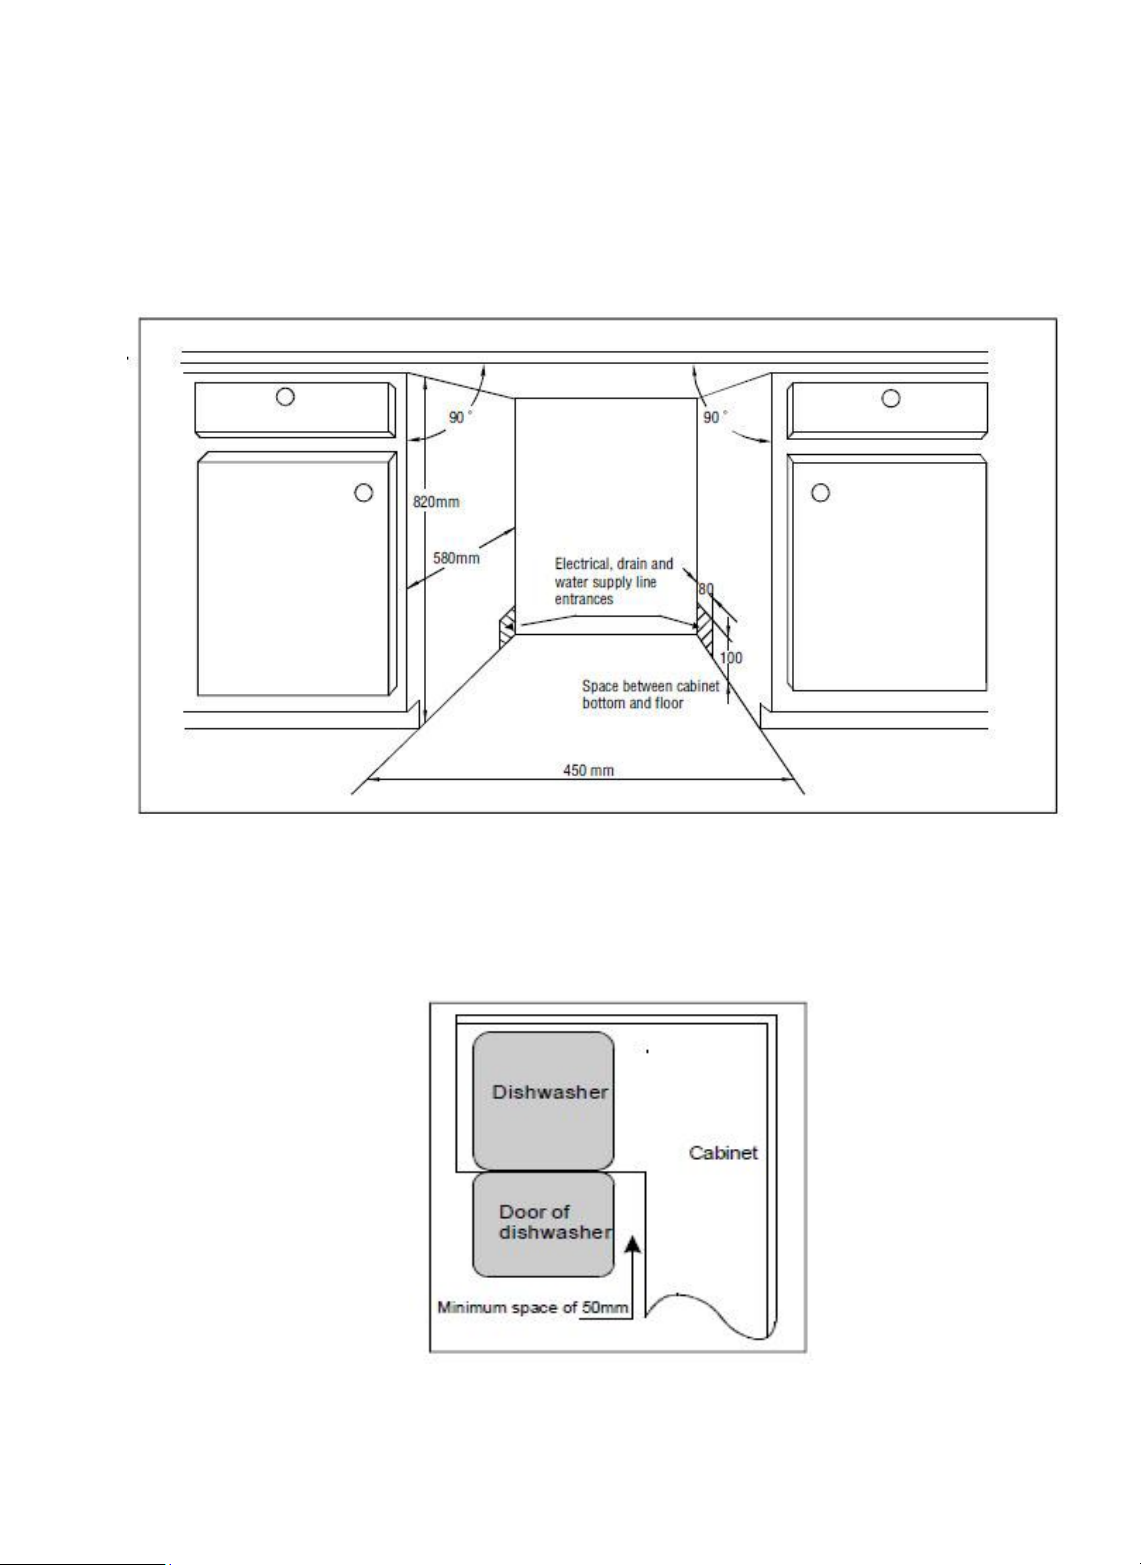
The following diagrams are shown as guidance for installation between
existing built-in cabinetry.
Ensure that the position for your dishwasher has the following minimum
dimensions:
you must maintain a minimum of 50mm clearance for the door to open
correctly (see diagram below).
If you are positioning the appliance close to a right angled run of cabinets,
7
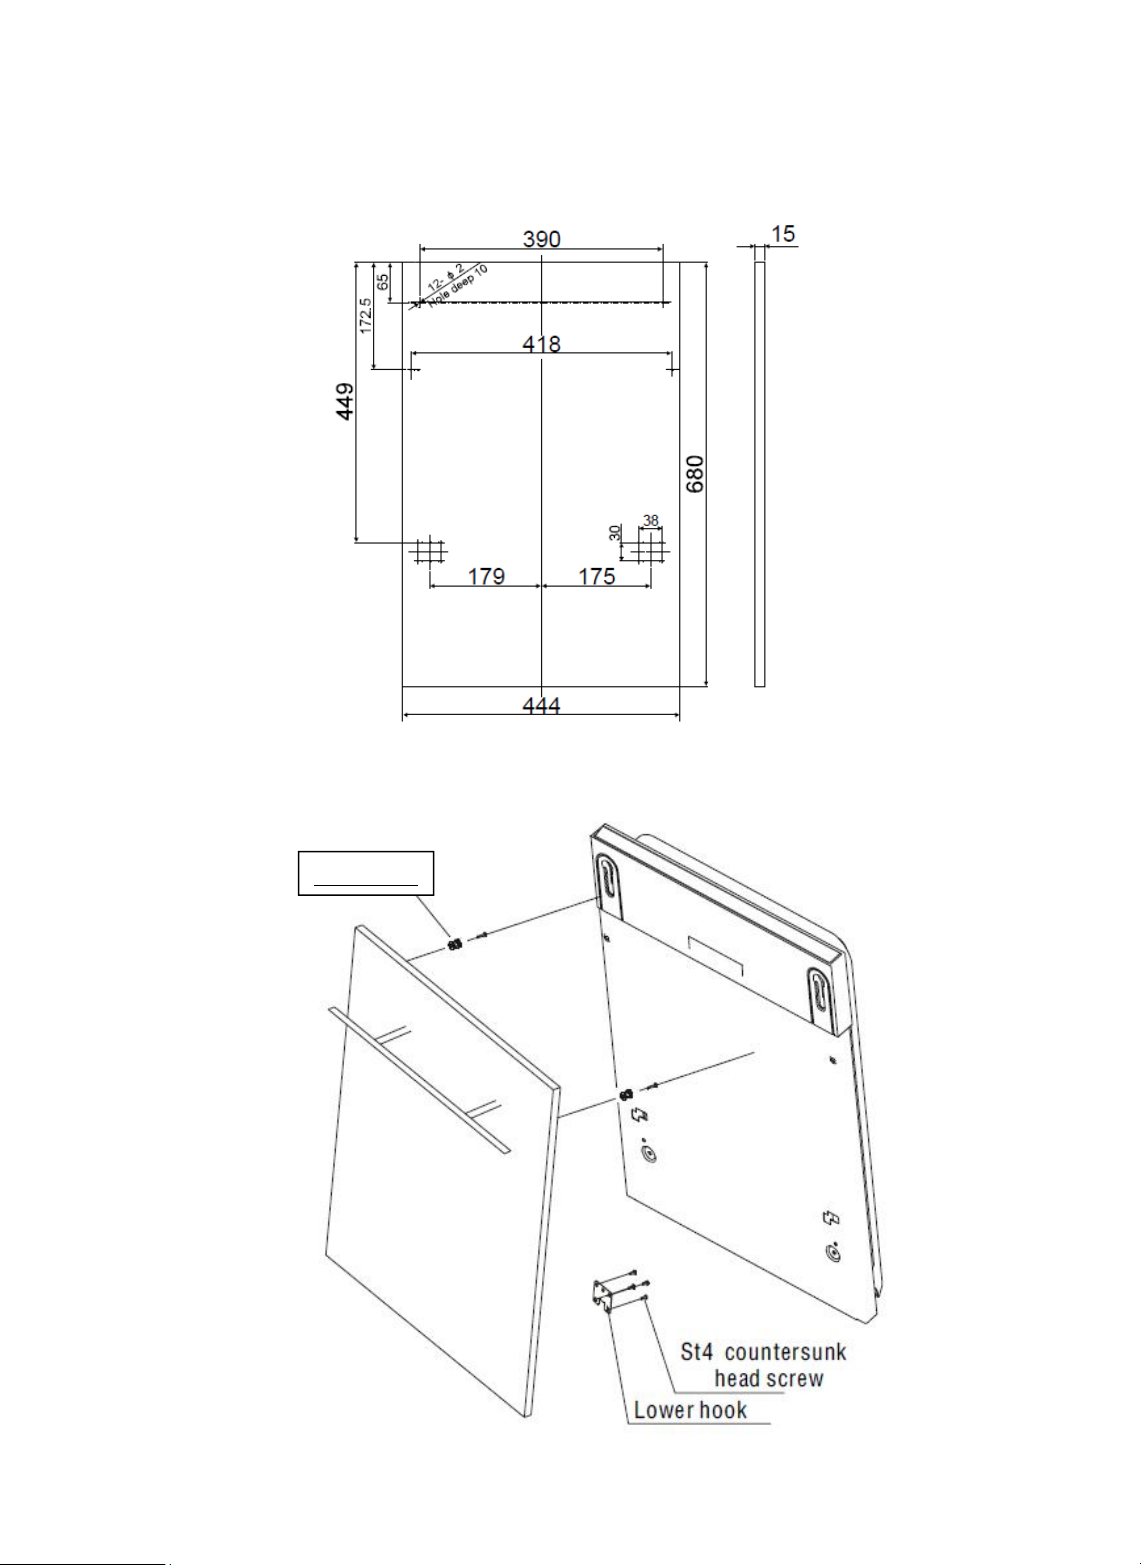
To fit your cabinetry décor panel to the dishwasher, use the template
supplied. This will allow you to accurately position the fixing hooks.
Fix the top and lower hooks onto your décor panel as shown above and then
position the panel onto the appliance door (see diagram below)
Top Hook
8

When you have positioned the décor panel onto the appliance door, secure it
in place using the screws provided (see diagram below)
When you have fitted the décor panel to the appliance door, you will need to
adjust the door spring tension. To do this turn the adjusting screws in a
clockwise direction to increase the door tension and anti-clockwise to relax
the tension (see diagram below). The spring tension is correct when the door
remains horizontal in the fully open position, but can be lifted and closed with
ease.
9

Section 2. Safety Advice
This appliance is manufactured and intended for DOMESTIC use only. Any
guarantee offered with the appliance is not valid for any installation in a
commercial environment.
This appliance MUST BE EARTHED!
Never try and disconnect the power by pulling the supply cable – hold the plug
firmly and pull it out of the socket.
Never touch the plug or power cable with wet hands.
Check the power cable periodically for signs of damage and ensure that it is
not trapped underneath the appliance. If the cable is damaged, turn off the
power at the socket and arrange for a qualified electrician to replace the
cable.
Never remove the power cable, open the appliance cabinet or try to modify
the appliance in any way. All service work must be carried out by a qualified
electrician.
The appliance is not intended for use by persons (including children) with
reduced physical, sensory or mental capabilities, or lack of experience and
knowledge, unless they have been given supervision or instruction concerning
the use of the appliance by a person responsible for their safety. Children
should be supervised to ensure that they do not play with the appliance.
Ensure that the appliance is sited well away from other heat sources, i.e. open
fires, boilers etc and in a dry, well ventilated room. The
fall below +5° or rise above +35°.
temperature must not
Do not sit on the appliance or stand on the open door – the appliance could
tip forwards.
Keep children away from detergent and rinse aid, keep child away from the
open door of the dishwasher, there could still be some detergent left inside.
This appliance is not a toy – ensure that children are
whilst in the vicinity of this appliance.
Take care when loading the baskets with knives and cutlery. Always ensure
that sharp points are pointing away from you or down into the basket..
Only wash crockery and utensils that are clearly marked ‘dishwasher safe’.
Do not wash plastic items unless they are clearly marked ‘dishwasher safe’.
Only use dishwasher detergents and rinse aid clearly marked for use with
automatic dishwashers.
Never use non dishwasher detergent in this appliance, i.e. hand soap,
washing machine detergent, washing up liquid etc
Always add dishwasher salt to your dishwasher, even when using 3-in-1
tablets. This will help protect your appliance against limescale.
If the power supply cord is damaged, it must be replaced by the
manufacturer, it’s service agent or similarly qualified persons in order to avoid
a hazard.
supervised at all times
10

Section 3. Operating the Appliance
3.1. Before You Operate The Appliance
3.1.1. Adding Salt
The sole use of 3-in-1 tablets is not recommended as failure to add
salt to the salt container will leave your dishwasher exposed to
limescale damage which is not covered by the manufacturers
guarantee. Protect your appliance by adding salt as follows:
Remove the lower basket and then unscrew the salt container cap (1).
Add approximately 1kg of specialist dishwasher salt to the container
using the funnel provided (2). N.B. It is normal for a small amount of
water to come out of the container whilst filling it with salt.
Now replace the screw cap correctly and ensure that it is tight. If not,
salt may leach into the dishwasher chamber which can be detrimental
to the stainless steel interior. This is not covered by the manufacturers
guarantee.
After adding salt you should run a program to activate the water
softener and flush away any salt spilled into the machine.
If salt is low the indicator light (6) will show on the control panel.
3.1.2. Adding Rinse Aid
11

Remove the Rinse Aid Filler Cap (1).
Add Rinse Aid until the container is full (2).
Replace the Filler Cap (3).
If rinse aid is low the indicator light (6) will show on the control panel.
3.1.3. Adding Detergent
Use specialist dishwasher detergent powder or dishwasher
tablets in this appliance. However, please note that tablets do not
always dissolve fully during shorter wash programs, so you are advised
to operate your appliance on a longer wash program if using tablets.
In addition, the use of tablets may result in spots appearing on dishes
and glasses, if this happens you are advised to activate the water
softener as described in section 3.1.1. above.
Open the detergent dispenser (Pic.1) add powder (See program for
Qty) or tablet to the correct container (Pic.2) then close the container
cover.
If the program selected has
a pre-wash cycle and you
are using detergent powder,
add the main dosage of
powder to compartment ‘A’
and the specified amount of
powder into compartment
‘B’.
Close the compartment lid
once the powder has been
added.
12
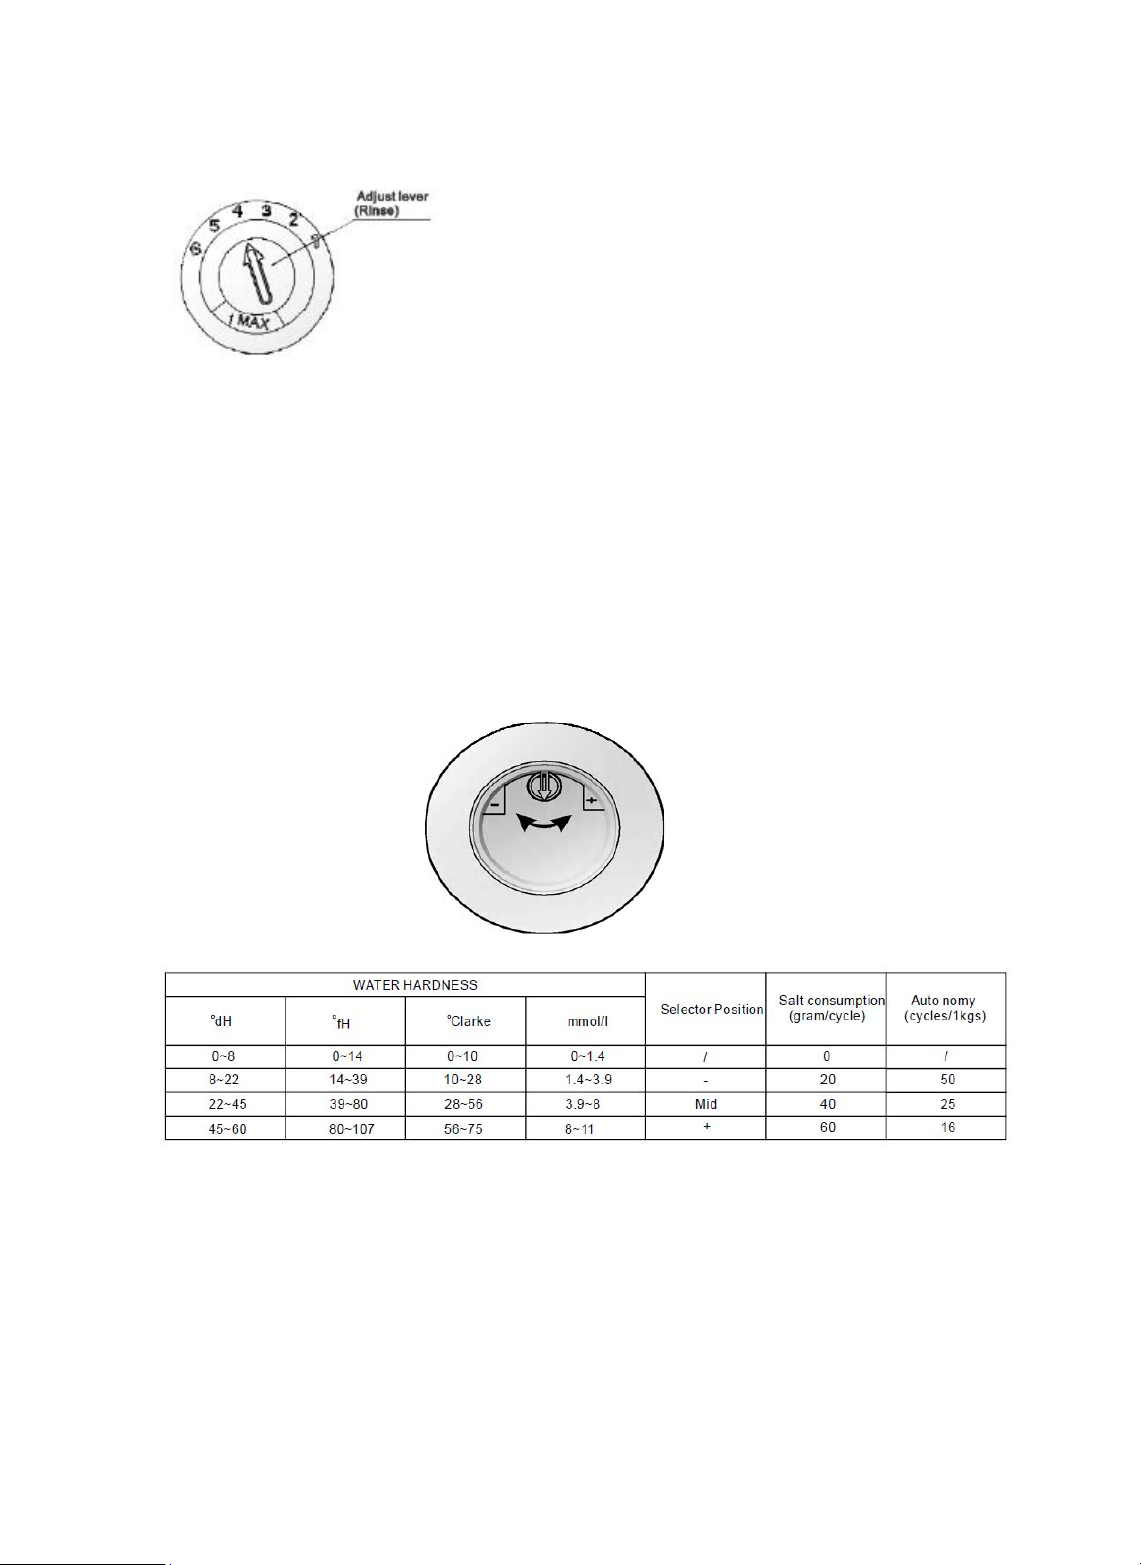
3.1.4. Adjusting The Rinse Aid Dispenser
The rinse aid container has 6 settings.
Your machine has been pre-set at setting 4.
If you can see white spots on the crockery or poor
drying is a problem increase the setting to 5.
If the crockery is still not drying properly, increase
the setting to 6.
3.1.5. Adjusting the Water Softener
The water softener in your appliance has been pre-set to the mid setting, but if you need to change the setting please proceed as
follows: Unscrew the salt container lid. Turn the arrow to the ‘+’ or ‘-‘
setting according to your water hardness (see chart below). Now
screw the salt container lid back into place.
Please note that the Clarke scale indicates the UK degree of water hardness
Please Note: Occasionally small rust deposits may be present in your
incoming water supply due to the water passing through older pipe work in
the network. If present, the rust may show up as small harmless brown
spots on the stainless steel interior of your appliance. To remove the
spots, simply wipe them away with a damp cloth.
13

1 2 3 4 5 6 7
3.2. The Control Panel
1) On/Off Button 2) Program Selection Button
3) Power Indicator Light 4) Delay Indicator Lights
5) Program Indicator Lights 6) Salt & Rinse Aid Warning Lights
7) Delay Function Button
(3, 6, 9 or 12 hours)
3.3. Loading The Baskets
3.3.1. Upper Basket
The upper basket is designed to
hold delicate and lighter items
such as glasses, coffee and
tea cups and saucers, as well as
small plates, small bowls
and shallow pans (as long as they
are not too dirty).
Remove large deposits of food
and ensure that all items are
positioned securely so that they
will not be moved by the force of
the water.
Ensure that items are not blocking
the rotation of the spray arms.
14

3.3.2. Lower Basket
3.3.3. Cutlery Basket
The lower basket is designed to
hold large items and those most
difficult to clean such as pots,
pans, lids, serving dishes and
Bowls.
Always ensure that bowls, pots or
pans are placed in the rack as
shown in the diagram left.
Remove large deposits of food
and ensure that items are not
blocking the rotation of the spray
arms.
The cutlery basket has been
designed to hold cutlery items
only. Do not use this basket for
other items!
Always ensure that knives and/or
sharp items are placed into the
basket with the sharp end pointing
down. Do not let them touch each
other – this will reduce the wash
performance.
Ensure that items are not blocking
the rotation of the spray arms.
15

3.4. Adjusting The Baskets
You can adjust the position of the Upper Basket as follows:
You can fold back the cup shelves on the top basket as follows:
You can collapse the plate racks in the lower basket as follows:
16

3.5. Program Selection Table
= Rinse Aid Required
N.B. The dishwasher does not have a separate drying programme.
Drying is by residual heat only.
3.6. Selecting a Program & Starting the Cycle
Please read in conjunction with Section 3.2. The Control Panel
Ensure that the power supply to the appliance is ON.
Ensure that the door is closed securely.
Load the baskets, ensuring that large deposits of food are removed.
Add detergent and then Press the On/Off Button (1)
Press the Program Selection Button (2) until the required program
indicator light (5) is lit. (See Program Selection Table 3.5.)
Press the delay function button (7) if required (3/6/9 or 12 hours).
Close the door and the cycle will automatically start after 10 seconds.
At the end of the cycle a buzzer will sound for approximately 8
seconds. Press the On/Off button to turn off the machine. Opening the
door slightly, 10 to 15 minutes after the end of the cycle, to allow
excess steam to escape, may aid drying. However water will collect in
some items where there are indents or dimples. This is normal.
Turn off the power supply to the machine and leave the machine to
cool down for a few minutes before unloading.
Open the door carefully – steam may escape – this is normal.
Handle and remove items carefully as they may be hot.
Always empty the lower basket first. This will avoid water dripping
from the upper baskets onto the lower basket.
17

Section 4. Maintenance
4.1. Cleaning the Filter
The filter helps prevent large pieces of food or other items entering the
pump and causing damage. It is important that you examine and clean
the filter system on a regular basis. Blocked filters are not covered
under the Guarantee!
The filter assembly is located
inside the appliance just
underneath the lower spray arm.
To remove the filter assembly,
turn the top anti-clockwise and
lift the assembly out.
Wash the filter assembly in
warm soapy water.
Re-assemble the filter assembly
and return it to the filter
chamber.
Turn the top clockwise to lock
the assembly back into position.
4.2. Cleaning the Door
Periodically clean the inner stainless steel lining of the door with a warm
damp cloth. Pay particular attention to the edges (as shown below) so
that food deposits do not build up, causing the door seal to fail. Clean the
door seal with warm soapy water.
Never use abrasive cleaners or polishes on the stainless steel!
18

4.3. Cleaning the Spray Arms
Small particles of food will over time get into the spray arms and cause
blockages. Periodically remove the spray arms (as shown below) and
wash them in warm soapy water. Blocked spray arms are not covered
under the Guarantee!
To remove the upper spray arm,
hold the nut and rotate the arm
clockwise. Wash the arm in
warm soapy water and clean the
spray holes with a soft brush.
Replace in reverse order.
To remove the lower spray arm,
hold the arm just above the
spindle and pull it upwards
Wash the arm in warm soapy
water and clean the spray holes
with a soft brush.
Replace in reverse order.
4.4. Daily Maintenance
Follow these useful tips to ensure your dishwasher stays in tip-top
working order:
Always switch off the power supply at the plug when your dishwasher
is not in use.
Always pay particular attention to the filter and spray arms – give them
a regular clean as described in 4.1. and 4.3. above.
Clean the door edges and door seal as described in 4.2. above.
Add salt to your appliance when prompted by the salt light on the
control panel.
Add rinse aid to your appliance when prompted by the rinse aid light
on the control panel.
Only use Dishwasher salt, Dishwasher detergent and Dishwasher
rinse aid in your dishwasher.
Never use abrasive cleaners to clean your appliance.
When the appliance is not in use, leave the door slightly ajar in order
to avoid moisture and odours building up inside. However, this may
not be advisable if small children have unsupervised access to
the area where the dishwasher is sited.
If you are vacating the house for a long period, run a rinse cycle
through the machine and then ensure that the water and power
supplies to the dishwasher have been turned off. Leave the door ajar.
19

4.5. Before Calling Service
If you appear to have a problem with your dishwasher, please take a few
minutes to check the following ‘trouble shooting’ guide. The problem may
be easily solved without the need for a service call.
Dishwasher Will Not Start
• Is the power on at the socket?
• Is the Start/Pause button set to Pause?
• Have you checked the fuse in the plug?
• Is the dishwasher door closed correctly?
• Is your water pressure low – if yes, wait until normal pressure is resumed
Water Left In Bottom of Dishwasher
• Check & clean the filter
• Make sure the drain hose is not trapped/kinked
• If your drain hose is connected to the kitchen sink trap, make sure the
sink is not blocked
Soap Suds in the Dishwasher
• Are you using the correct dishwasher detergent/tablets. You must only
use specialist dishwasher detergent in a dishwasher
• You may have spilled rinse aid into the dishwasher whilst topping up the
dispenser – it will clear after one or two rinse or wash programmes
Stains Inside the Dishwasher
• Refer to Section 3 in this User Instruction Manual
There Are Rust Stains on the cutlery
• Your utensils may not be dishwasher safe – you must use dishwasher
safe utensils
• You may have spilled salt into the dishwasher whilst topping up the salt
dispenser
20

Knocking Noise From Inside the Cabinet
• The spray arm is catching against an item in the basket – reposition the
items
• Items of crockery are loose in the basket and water pressure is causing
them to move – reposition the items of crockery
The Crockery is not Clean
• Ensure that you load items correctly – do not stack items on top of other
items
• You selected the wrong wash programme – select a stronger wash
• Did you use enough detergent?
• Have you cleaned the spray arms recently?
• Have you cleaned the filters recently?
The Glasses are Cloudy
• Are your glasses dishwasher safe? You must only place dishwasher safe
glassware in a dishwasher
• Soft water can cloudy marks on glassware
• Too much detergent can cause cloudy marks on glassware
The Crockery is not Drying
• Ensure you load the baskets with space around the items
• Check your rinse aid – top up the dispenser
• Do not unload your dishwasher too soon - allow the drying process time
to work and open the door slightly at the end of the cycle to allow steam
to escape.
Warning!
If your dishwasher overflows or develops a water leak, you must turn off
both the water and power supplies until an engineer has corrected the
fault!
21

To Register your Appliance simply complete the card in your appliance pack and
return it with a stamp affixed or Alternatively you can Register online at
www.repairtechuk.com
SERVICE HELP-LINE
Should your appliance develop a fault, please call the
montpellier Service Helpline on:
01527-888133
Please remember to have all your product details available, including the
model number, serial number, date of purchase and your retailer’s details
before registering a fault.
Your service call cannot progress without this information.
Appliance Dimensions:
22

23

Important Note:
This appliance is marked according to the European directive
2002/96/EC on Waste Electrical and Electronic Equipment (WEEE).
By ensuring this product is disposed of correctly, you will help
prevent potential negative consequences for the environment and
human health, which could otherwise be caused by inappropriate
waste handling of this product.
The symbol on the product, or on the documents accompanying the
product, the Crossed Out Wheelie Bin, indicates that this appliance
may not be treated as household waste. Instead it shall be handed
over to the applicable collection point for the recycling of electrical
and electronic equipment.
Disposal must be carried out in accordance with local environmental
regulations for waste disposal. For more detailed information
about treatment, recovery and recycling of this product, please
contact your local authority, your household waste disposal service
or the retailer where you purchased the product.
We continuously try to improve our products for the benefit of our customers.
For this reason we reserve the right to make changes to any product at any time,
Issue: 09/01-09-2014
without notice
24
 Loading...