

Montigo 1001 TH-A User Manual
1001 TH-A
INSTALLATION AND OPERATING INSTRUCTIONS
IF YOU CANNOT READ OR UNDERSTAND THESE INSTALLATION INSTRUCTIONS DO NOT
ATTEMPT TO INSTALL OR OPERATE
INTRODUCTION
SKYTECH’S remote control system was developed to provide a safe, reliable and user-friendly remote control system for gas heating
appliances. This all battery system operates independently of household current. The system operates on radio frequencies with a
non-directional signals. The SYSTEM’s operating range is approximately 20 feet range. The system operates on one of 1,048,576
security codes that are programmed into the transmitter at the factory; the remote receiver's code must be matched to that of the
transmitt er prior to initial use.
Review COMMUNICATION SAFETY SECTION under TRANSMITTER section and THERMO SAFETY SECTION under REMOTE
RECEIVER section. These signal /temperature safet y feat ures shut down the fireplace system when a potentially unsafe condition exists.
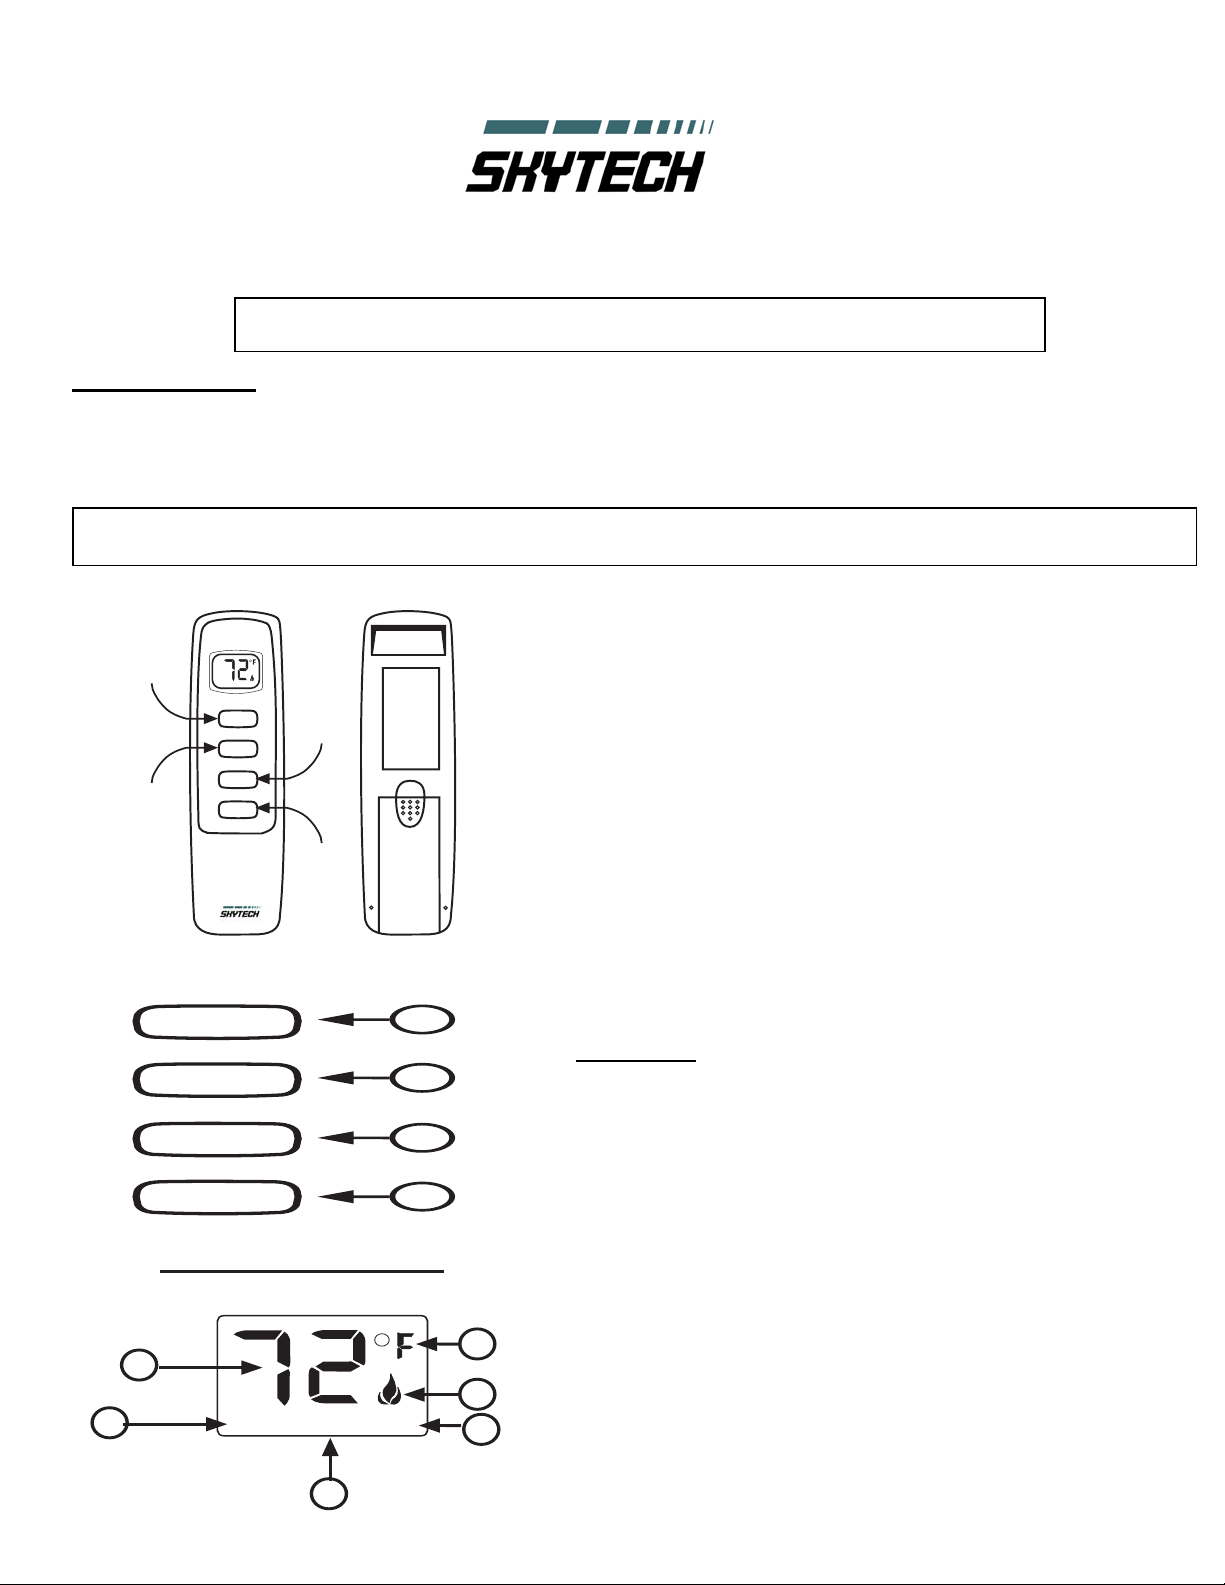
TRANSMITTER
WALL CLIP
SLOT
ON
BUTTON
ON
OFF
OFF
BUTTON
MODE
SET
FRONT BACK
ON
OFF
MODE
SET
MODE
BUTTON
SET
BUTTON
BATTERY
COMPARTMENT
1
2
3
4
LCD - Liquid Crystal Display
1
4
ROOM
SET
TEMP
This remote control SYSTEM offers the user a battery-operated remote control
that operates most millivolt gas v alves use d in some he ater rated g as logs, ga s
fireplaces and other gas heating appli ances.
The transmitter operates on (2) 1.5V AAA batteries.
It is recommended that ALKALINE batteries always be used for longer battery life
and maximum operational performance.
Before using the transmitter, install the (2) AAA transmitter batteries into the
battery compartment. (Use caution that batteries are installed in the proper
direction)
1. DISPLAY Indicates CURRENT room temperature .
2
2.
3. FLAME Indicates bur ner/valve in operation.
3
5
4. ROOM Indicates rem ote is in THERMO operation.
5. TEMP Appears during manual operation.
6. SET Appears during t ime the of setting the desired
KEY SETINGS
• ON - Operates unit to on position, Manually ON.
• OFF - Operates unit to off position, Manually OFF.
• MODE - Changes unit from manual mode to thermo mode.
• SET - Sets temperature in thermo mode.
0
F OR 0 C Indicates degr ees Fahrenheit or Celsius.
temperature in the thermo operation..
6
Rev. 8/22/05 Page 1 of 9
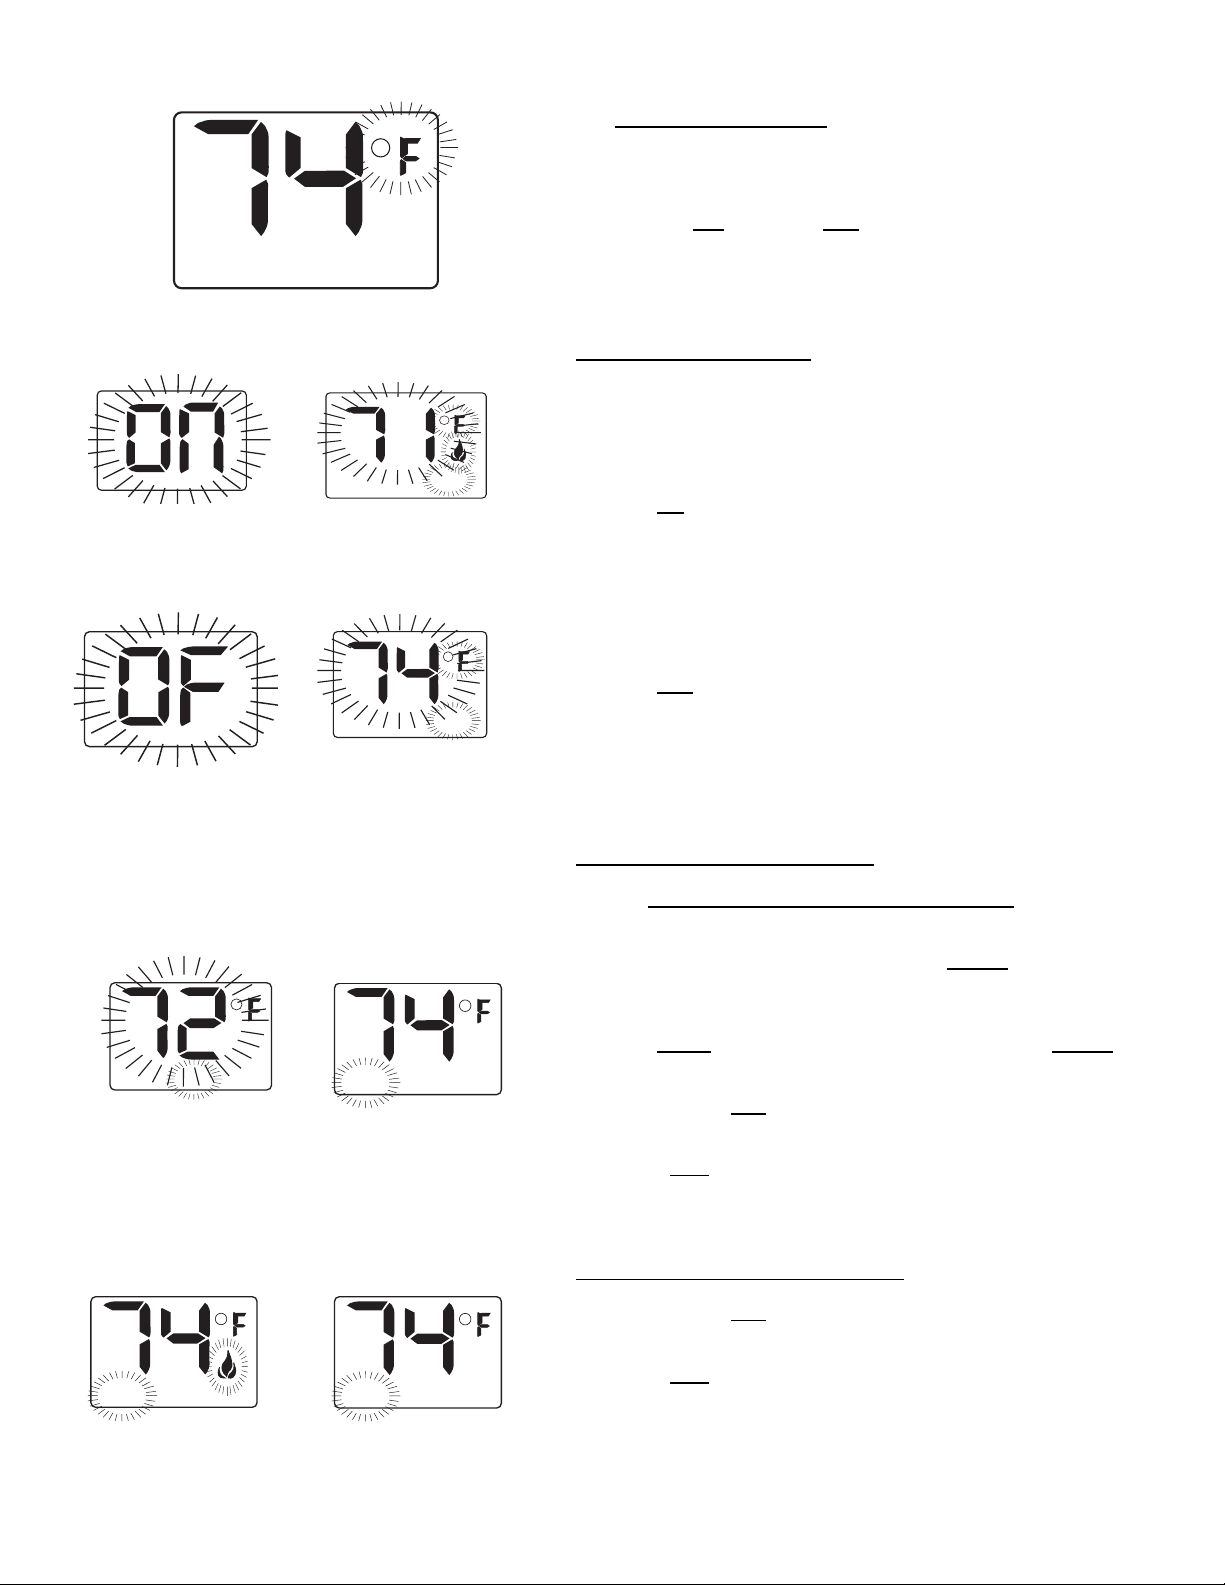
SETTING
The factory set ti ng for temperature is
first
• Press the ON
time this will change fr om
TEMP
change from
MANUAL FUNCTION
To operate the syst em in the manual “MO DE” does the following.
ON OPERATION
Press the ON
LCD screen will show ON, after 3 seconds the LCD screen will default
to display room tem perature and the word TEMP will show. (Flame icon
will appear on LCD screen in on mode)
SCREEN WHILE
DEPRESSING ON
TEMP
SCREEN AFTER 3
SECOND DEFAULT
OFF OPERATION
Press the OFF
TEMP
SCREEN WHILE
DEPRESSING OFF
KEY
SCREEN AFTER 3
SECOND DEFAULT
LCD screen will show OF, aft er 3 seconds the LCD screen will default to
display room t emperature and the word “TEMP” will also show on the
screen.
THERMOSTAT FUNCTION
This remote contr ol system can be thermostati cally controlled when the
transmitter i s in the THERMO mode (The word ROOM
displayed on the screen). To set the THERMO MODE and DESIRED
room temperature,
Press the MODE
then the remote i s in the thermostatic mode.
Press and hold the SET
reached. (By pressing and holding the set key the LCD scr een set
numbers will increase from 45
release the SET
for 3 seconds and the LCD scr een will flash the set temperat ure f or 3
seconds, then the LCD scr een wil l default to display the room
temperature.
TO CHANGE THE SET TEMPERATURE
Press and hold the SET
reached. (By pressing and holding the set key the LCD scr een set
numbers will increase from 45
release the SET
for 3 seconds, t hen will flash the set temperat ure for 3 seconds, then the
LCD screen will defaul t to display the room temperature.
ROOM
THERMO ON
TEMPSET
THERMO SET
TEMP
ROOM
THERMO MODE
ROOM
THERMO OFF
TEMP
TEMP
0
F / 0C SCALE
0
F. To change this setting to 0 C,
key and the OFF key on the transmitter at t he same
0
C back to 0 F.
key the appliance flame will come on. Duri ng this time the
key the appliance flame will shut off. During this time the
SETTING DESIRED ROOM TEMPERATURE
key until the LCD screen shows the word ROOM,
key. The LCD screen will display the set t emperature
key. The LCD screen will display the set t emperature
0
0
F to
C. Follow this same procedure to
must be
key until the desired set tem perature is
0
to 990 then restart over at 450 ) Next
key until the desired set tem perature is
0
to 990 then restart over at 450 ) Next
Rev. 8/22/05 Page 2 of 9
Press the MODE key to disengage t he ther m o mode. The word ROOM
on the LCD screen will not show when the thermo is not in operation.
NOTE: The highest SET temperature is 99
and the lowest temperature is (45
0
Fahrenheit (60 Celsius)
0
Fahrenheit (320 Celsius)
OPERATIONAL NOTES:
The Thermo Feature on the transmitter operates the appli ance whenever the ROOM TEMPERATURE varies a certain number of
degrees from the SET TEMPERATURE. This vari ation is cal led t he “SWING” or TEMPERATURE DIFFERENTIAL. The normal
operating cycle of an appliance may be 2-4 times per hour depending on how wel l the room or home is insulated fr om the cold or drafts.
The factory set ti ng for the “swing number” is 2. This represent s a temperature variat ion of +/- 2
0
F (10 C) between SET temperature
and ROOM temperature, which determines when the fireplace wil l be act ivated. This function i s pre- set at the factory.
The transmitter has ON and OFF manual functions that are activated by pressing either button on the face of the transmitter. When a
button on the transmitter is pressed the word ON or OF will appear on the LCD screen to show while the signal is being sent. Upon
initial use, there may be a delay of three seconds before the remote receiver will respond to the transmitter. This is part of the system's
design.
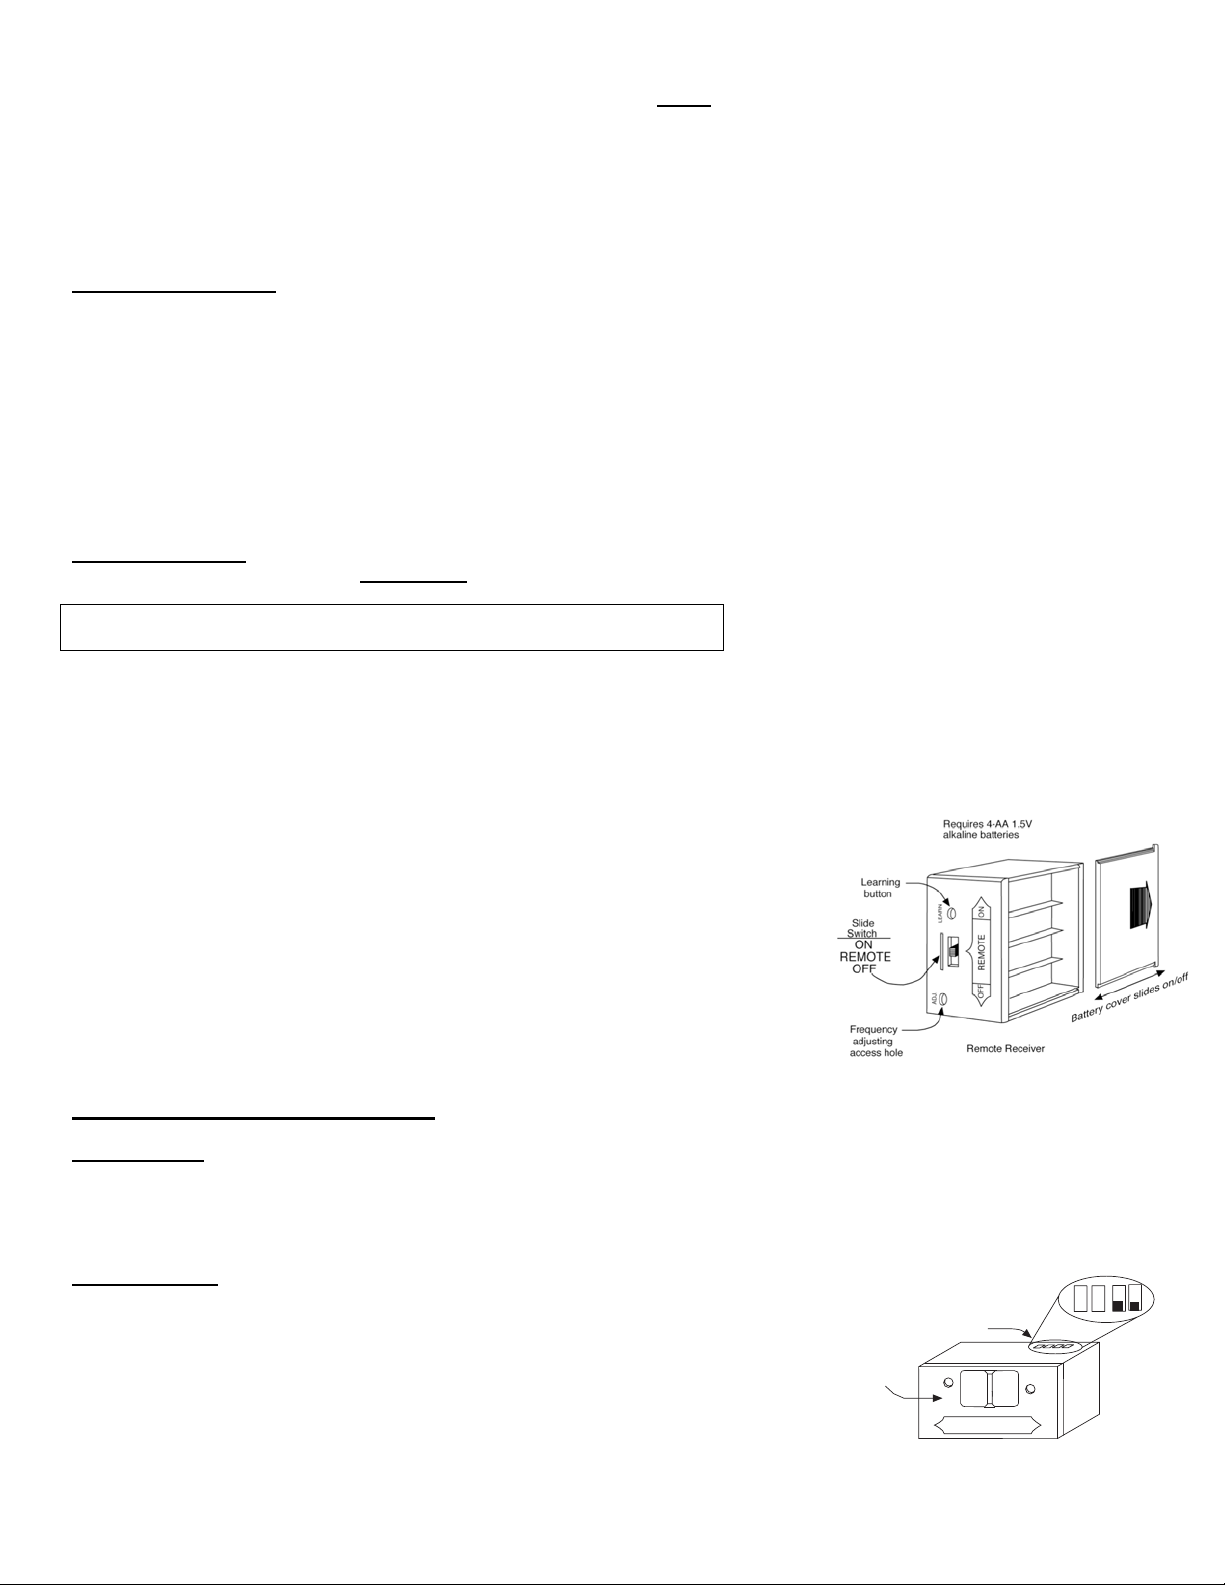
REMOTE RECEIVER
IMPORTANT
THE REMOTE RECEIVER SHOULD BE POSITIONED WHERE AMBIENT
TEMPERATURES DO NOT EXCEED 130° F.
The remote receiver operates on 4 AA-size 1.5V batteri es. It is recommended that ALKALINE batter ies be used for longer battery life
and maximum microprocessor performance. IMPORTANT: New or fully charged batteries are essent ial for proper operation of the
remote re c e iv e r.
The remote receiver houses the microprocessor that responds to commands from the tr ansm itter to control syst em operation. It emits
one beep when it receives an ON or OFF command manually, but no beep when cycling on and off autom atically in THERMO mode.
The remote receiver has a 3-position slide swit ch for selecting the MODE of oper ati on: ON/REMOTE/OFF
• With the sli de swit ch in the ON position (toward the LEARN button), the system will
remain on until the sl ide switch is placed in the OFF or REMOTE position.
• With the slide switch in the REMOTE position (centered), the system will only operate if
the remote recei ver receives commands from the tra n s m i tter.
• With the sli de switch in the OFF position (away from the LEARN button), the system is
off.
• It is suggested t hat the slide switch be placed in the off position if you will be
away from your home for an extended period of time. If the remote receiver is
mounted out of children’s reach, placing the slide switch in the OFF position also
functions as a safety “lock-out” by both turning the system off and rendering the
remote receiver inoperative.
INSTALLATION INSTRUCTIONS
INSTALLATION
The remote receiver can be mounted on or near the fireplace hearth. PROTECTION FROM EXTREME HEAT IS VERY IMPORTANT.
Like any piece of electronic equipment, the remote receiver should be kept away from temperatures exceeding 130º F inside the
receiver case. Batt ery life is also significantly shortened if batteries are exposed to high t em peratures.
HEARTH MOUNT
The remote receiver can be placed on the fireplace heart h or under the fireplace, behind the
control access panel . Position where the ambient t em perature inside the receiver case
does not exceed 130º F.
NOTE: Black Button is used on Heart h Mount Applications.
Remote Receiver
Receiver
Slide
Button
Wire terminals
ADJ.
LEARN
ON
REMOTE
OFF
Rev. 8/22/05 Page 3 of 9
 Loading...