

Page 1

Instruction Manual
Item No.: 749557
115V~, 60Hz, 3517W
Wards.com 1•888•557•3848
Montgomery Ward Customer Service
1112 7th Avenue Monroe, WI 53566
8:00 a.m. to Midnight CT, Monday through Friday
Wards.com 1•888•557•3848
Window AC 12000BTU
Energy-
Saving
Mode
MODEL: AW121005E
Page 2

Thank you for purchasing your 12000 BTU Window Air Conditioner by
Montgomery Ward®. It will perform to the highest standard, time after time,
with all the convenience and durability you rely on from Wards.
We guarantee it!
Your new 12000BTU air conditioner has an easy touch control panel with
digital display. Not only does it cool rooms up to 500 square feet, it's also a
fan and dehumidifier. That's three appliances in one easy to use unit!
3
PLEASE READ ALL INSTRUCTIONS BEFORE USE
WARNING: TO AVOID THE RISK OF ELECTRICAL SHOCK, ALWAYS MAKE
SURE THE PRODUCT IS UNPLUGGED FROM THE ELECTRICAL OUTLET
BEFORE ASSEMBLING, DISASSEMBLING, RELOCATING OR CLEANING. DO
NOT TRY TO SERVICE THIS PRODUCT YOURSELF.
1. Close supervision is necessary when any appliance is used by or near children.
2. Do NOT allow children or pets to be exposed to direct airflow for long periods of time.
3. To protect against electrical shock, do NOT place cord, plug or appliance in
water or other liquid.
4. Use a dedicated circuit to avoid a power surge or overloading of the circuit.
5. Do NOT allow water to get on control panel or into any part of the unit.
6. Discard appliance following local ordinances.
7. Use the plug to disconnect from electrical outlet; never pull out by the cord.
8. Do NOT modify or alter the plug or cord.
9. Turn power OFF before removing plug from outlet.
10. NEVER operate the appliance or remove the plug with wet hands.
11. Do NOT use an extension cord with this appliance.
12. Do NOT operate any appliance with a damaged cord or plug, or after the
appliance malfunctions or has been damaged in any manner. Call our toll-free
customer service number for information regarding replacement, or returning
the product.
13. Do NOT remove front grill when machine is in use.
14. The back of the unit must be lower than the front of the unit to allow for adequate
flow of condensation.
15. Do NOT block front grill, air inlet or outlet, or in any way restrict airflow.
16. Do NOT use abrasive cleansers or pads to clean air conditioner.
17. Remove batteries from remote control when not in use for long periods of time.
18. Do NOT unplug air conditioner when it is operating.
19. Use care when removing the filter. Do NOT touch metal parts of unit when
removing filter.
20. Before cleaning, turn power OFF and unplug from electrical outlet.
21. Do NOT insert body parts or tools into the inlet or outlet grills during operation.
22. Do NOT ingest water drained from air conditioner.
23. Do NOT store flammable or combustible liquids by unit.
24. Do NOT step or sit on air conditioner.
25. Do NOT store appliance on its side.
26. Do NOT use appliance for anything other than intended use.
Important Safeguards ........................... 3
3-Prong Plug......................................... 4
Parts & Features ................................4-5
Installation .......................................6-12
AC Removal ....................................... 13
How to Use ....................................14-15
Cleaning & Care ................................. 16
Troubleshooting .................................. 17
Warranty & Return Information ......18-19
Table of Contents
2
1•888•557•3848
Wards.com
Important Safeguards
PLEASE SAVE THESE INSTRUCTIONS
THIS APPLIANCE IS FOR HOUSEHOLD USE ONLY
© 2017 Montgomery Ward, Inc. All rights reserved.
ank you
for your
purchase!
3102543
Conforms to UL Std. 484
Page 3
4
1•888•557•3848
Wards.com
4
5
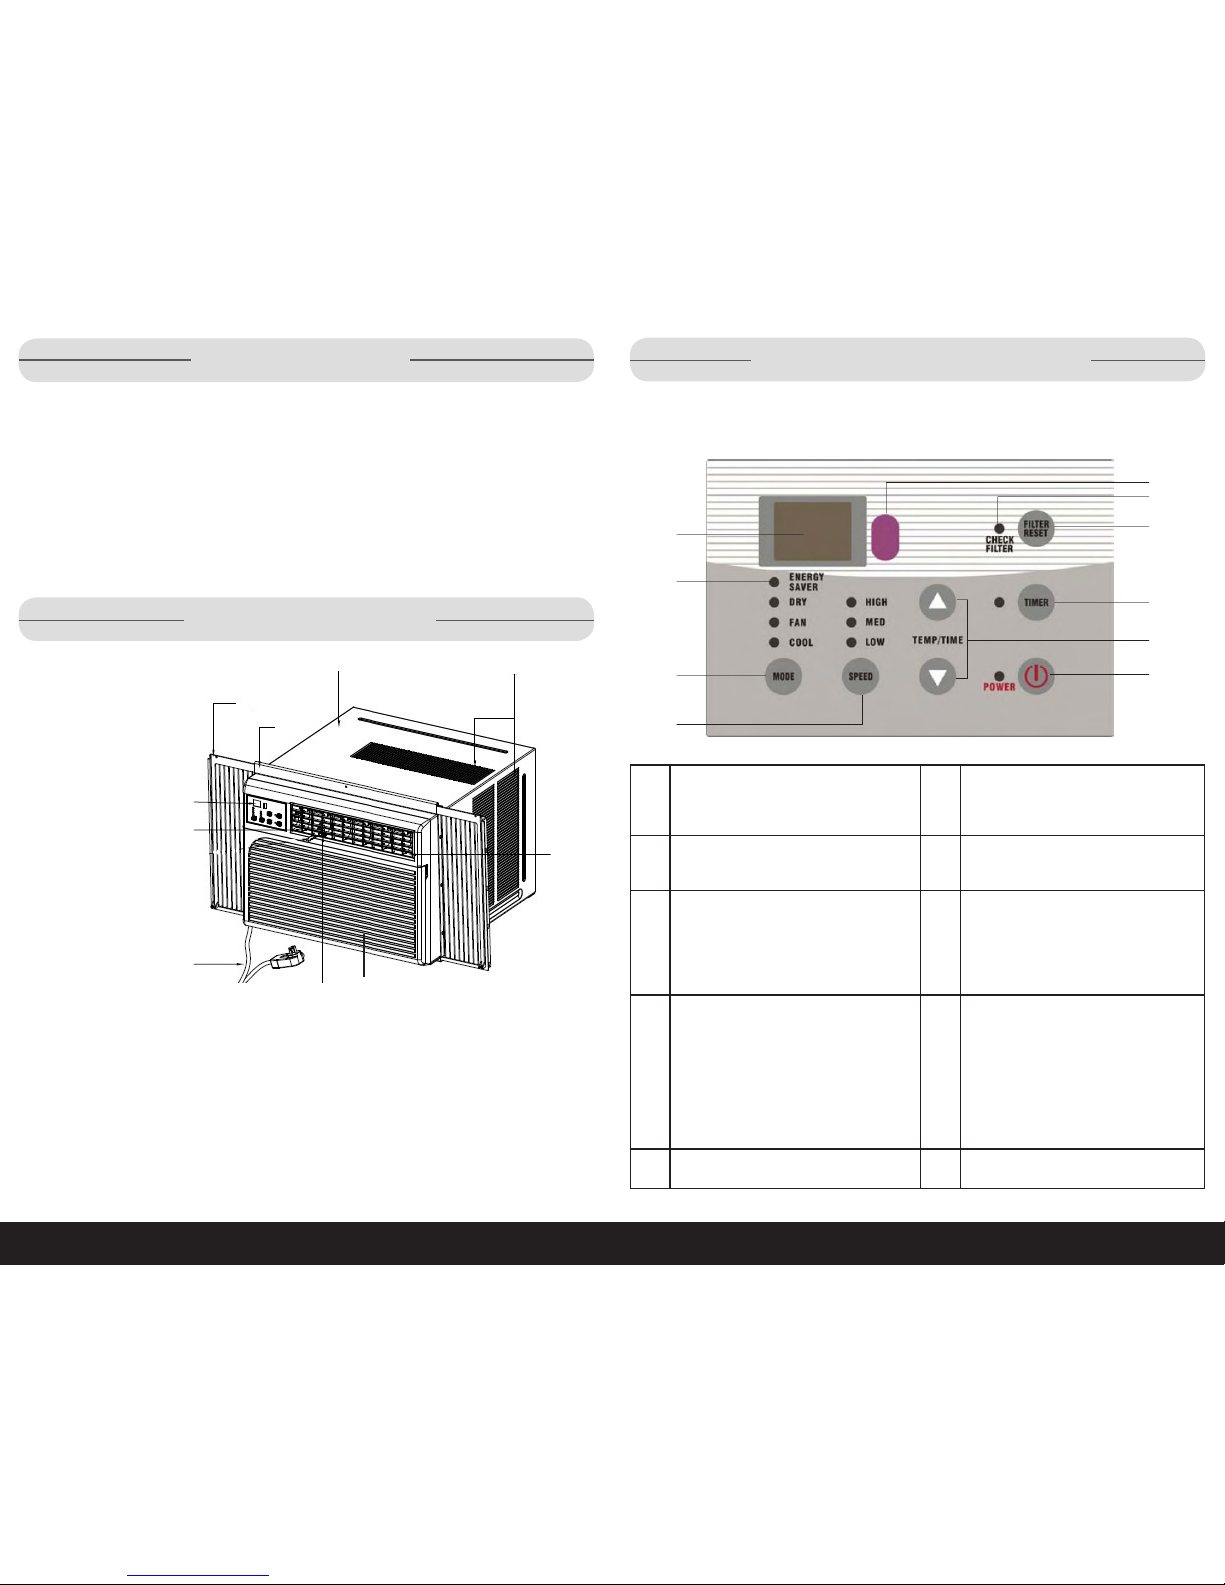
Parts & Features
3-Prong Plug
This appliance has a 3-prong GFCI (Ground Fault Circuit Interrupter) plug for use in
a 3-prong (grounding) outlet to minimize the possibility of electric shock. This appliance should only be used with a 115V, 60Hz grounded outlet. Failure to follow these
instructions could result in fire, electrical shock, serious injury or death.
If the plug does not fit fully in the outlet, contact a qualified electrician to install a
3-prong (grounding) outlet. Do NOT attempt to modify the plug in any way. Failure to
follow these instructions could result in fire, electrical shock, serious injury or death.
1. Cabinet
2. Side Curtains
3. Upper Guide
4. Control Panel
5. Horizontal Louver Blades
6. Power Cord
7. Horizontal Air Direction Control Lever
8. Front Grill
9. Vertical Air Direction Control Lever Air Inlet
10. Air Inlets
Parts & Features (cont'd)
1
2
3
4
5
6
7
8
9
10
Control Panel
1.
Digital Display:
• Room temp. (fan mode)
• Unit temp. (cool & dry mode)
• Remaining run time on timer
6.
Check Filter: When the LED
is illuminated, filter cleaning is
necessary.
2.
Energy Saver: Feature is in use
when the LED is illuminated.
7.
Filter Reset Button: After cleaning
the filter, press to turn off check
filter LED.
3.
Mode Button: Press to set modes;
• Energy Saver
• Dry
• Fan
• Cool
8.
Timer Button:
A/C is on: press to turn A/C off.
A/C is off: press to turn on timer
function and set amount of time
for unit to run by using the Temp/
Time buttons.
4.
Speed Button: Press to set the fan
speed to low/medium/high.
9.
Temp/Time Buttons:
• In cool mode, press to increase/
decrease the unit temperature.
• Use with timer to set the amount
of time (up to 24 hours) for the
unit to run continuously.
• Press both buttons simultaneously
to change display to Fahrenheit
or Celsius.
5.
Remote Control Signal Receiver
10.
Power Button: Use to turn unit
ON or OFF.
1
2
4
5
6
7
8
9
10
3
Page 4

76
1•888•557•3848
Wards.com
Installation (cont’d)
Remove air conditioning unit and accessories from box. Save box to use for storage
of unit during the winter or when not in use for long periods of time.
1. Place the unit on a sturdy table or counter.
2. Remove the front grill and the air filter.
3. Remove and set aside the 4 screws that hold in the louvres and control panel frame.
Installation
Your 12000BTU air conditioner is designed to be installed into a standard double
hung window with a 31– 43" opening width and 19" vertical height.
Item Name of Part Qty. Item Name of Part Qty.
1 Side Curtain 2 8 Flat Head Bolt & Lock Nut 2
2 Short Screws 10 9 Window Support Bracket 2
3 Wood Screws 13 10 Upper Guide 1
4 Sash Lock 1 11 Window Sash Seal 2
5 Curtain Lock 2 12 Bottom Seal 1
6 Sill Angle Bracket 2 13 Foam Pads 2
7 Screw & Lock Nut
(Washers not shown)
4 14 Air Filter & Remote Control not shown
1
2
3
4
5
6
7
8
9
10
11
12
13
Page 5

8
9
1•888•557•3848
Wards.com
Installation (cont’d) Installation (cont’d)
4. Carefully pry the frame away from the cabinet and set aside.
5. Remove the ground screw on the lower left corner of the unit and set aside.
6. Carefully remove the chassis from the cabinet.
7. Install the upper guide to the cabinet using 3 short screws (Item 2).
• The taller side of the guide should be facing out, towards you.
8. Insert the curtains into the channel on either side of the cabinet.
9. Secure in place with the short screws (Item 2).
• When the curtains are extended, the flange on each curtain should be facing
out, towards you.
Flange
Flange
10. Cut the adhesive-backed foam seal (Item 11) to the width of the window. Remove
backing from foam and attach strip to the underside of the window.
11. Cut the adhesive-backed foam pads (Item 8) to the height of the opening and
adhere to the insides of the window frame.
12. With the window open, find and mark the center of the inner sill.
13. Place the cabinet in the window opening and lower the sash behind the upper guide.
14. Line up the center of the cabinet with the center line marked on the sill.
15. With the cabinet in place, pre-drill the holes using the three openings at the bottom,
front of the cabinet as a guide. Then secure the cabinet to the sill using 3 wood
screws (Item 3).
16. Place the bottom seal (Item 12) over the screws.
Page 6

Window Sash Seal
Sash Lock
8
9
1•888•557•3848
Wards.com
Installation (cont’d) Installation (cont’d)
1•888•557•3848
Wards.com
10
11
17. Line up the window support brackets (Item 9) to the sill on the outside (backside
of unit) and the underside of the cabinet. Mark the top of the bracket on the sill
on the left and right sides.
18. Install the sill angle brackets (Item 6) to the marks you just made on the sill,
using wood screws (Item 3) and tightening by hand.
19. Attach the window support brackets (Item 9) to the sill angle brackets and bottom
of cabinet. Use the flathead bolts & locknuts (Item 8) to secure the vertical bracket
to the sill. Use the screws and locknuts with washers (Item 7) to secure the
horizontal bracket to the bottom of the cabinet.
Screws and Lock Nuts
with washers (Item 7)
Drawing of cabient is transparent to show positioning of window support brackets on
underside of cabinet.
20. Trim the non-adhesive backed window sash seal (Item 11) to the width of the
window and insert in between the upper and lower sashes. This will help to
keep out drafts and bugs.
21. Attach the sash lock (Item 4) to the top of the lower sash and the window frame,
using 3 wood screws (Item 3).
22. Place the chassis back into the cabinet, making sure that it is firmly seated
towards the back of the cabinet.
23. Replace the grounding screw on the grounding wire on the inside, bottom left of
the unit.
24. Reattach the louver/control panel frame using the 4 screws set aside in step 3.
25. Insert the air filter and snap the front grill back into place.
26. Extend the curtains on both sides of the unit. Slip a curtain lock (Item 5) on to
the bottom of each curtain, center on the curtain and secure to sill with a wood
screw (Item 3).
27. Attach the flange on the corner of each curtain to the sill using a wood screw (Item 3).
28. Drive wood screws (Item 3) through upper guide holes into window sash.
29. Plug the air conditioner into a 115V, 60Hz grounded outlet and press the power
button to turn ON.
Page 7

13
12
1•888•557•3848
Wards.com
Installation
A/C Removal
Storm Window Drainage
When the air conditioner is properly installed it should tilt back and down on the
outside of the window. If it does not, there is a problem with the installation. Correct
installation allows for proper drainage of the condensation.
If AC is blocked by storm window frame, fasten a 2" wide wood strip to the inner
window sill across the full width of the sill. The wood strip should be thick enough
to raise the height of the window sill so that the unit can be installed without
interference from the storm window frame (approximately ¾" above storm window
frame).
Install a second wood strip (approximately 6" long by 1½" wide and the same thickness as the first wood strip) in the center of the outer sill. Place it flush against the
back of the inner sill.
IMPORTANT: See Cleaning and Care section prior to removal.
To remove air conditioner, turn power OFF and disconnect power cord. Pull foam
seal out from between window sashes. If wood strips were installed, remove them.
Remove screws from:
• Sash Lock (total 6 screws)
• Curtain Locks (total 2 screws)
• Flanges (total 2 screws)
• Upper guide (total 2 screws)
1. Close curtains on side of the unit
2. Remove the front grill and the air filter.
3. Remove and set aside the 4 screws that holds in the louvres and control panel
frame.
4. Carefully pry the frame away from the cabinet and set aside.
5. Remove the ground screw on the lower left corner of the unit and set aside.
6. Carefully remove the chassis from the cabinet.
7. Lift off the bottom seal and remove the 3 screws that secure the cabinet to the sill.
8. From inside the cabinet, remove the screws that secure it to the outside window
brackets.
9. (Optional) Remove window brackets from outside of window.
10. Take cabinet out of window frame and set on a sturdy surface.
11. Place the chassis back into the cabinet, making sure that it is firmly seated
towards the back of the cabinet.
12. Replace the grounding screw on the grounding wire on the inside, bottom left
of the unit.
13. Reattach the louver/control panel frame.
14. Insert the air filter and snap the front grill back into place.
To Store:
Be sure all parts are clean and dry before storing. Store hardware in a bag and put
in box with unit. Store appliance in original box.
Page 8

14 15
1•888•557•3848
Wards.com
How to Use
Control Panel Functions
1. After the unit is properly installed and plugged in, press the power button to turn ON.
2. Press the mode button to select desired setting:
• Energy Saver: The fan will automatically turn off when the compressor stops.
When the compressor starts again, the fan will turn on.
• Dry: Unit acts as a dehumidifier to pull moisture out of the air.
• Fan: The fan runs, but the condenser does not.
• Cool: When the temperature of the unit is set colder than the air temperature
of the room, both the compressor and fan will run. But when the room temp
becomes colder than what is set on the AC, only the fan will run.
3. If fan mode is selected, press the speed button to choose low, medium or high
fan speed.
4. If cool mode is selected, use the time/temp buttons to select desired temperature.
The range of settings is 64–90˚ F.
5. Use the air direction control levers to aim the stream of cool air up/down and left/right.
How to Use (cont’d)
Remote Control
1
2
3
4
5
6
7
8
9
10
11
12
Remote Control Functions
1. Signal transmission - Point the remote control at the air conditioner. When
the signal is received, a beep will sound.
2. Cool button - Turn on cooling mode. Set the temperature using the +/- buttons.
3. Dry button -Turn on dehumidifying functionality.
4. Fan button - Use to vent the inside air through the unit to the outside.
5. Energy Saver button - Use to start or stop Energy Saver mode, which is only
functional when cool mode is ON.
6. ON/OFF button - Press to start or stop operations on the unit.
7. Timer button - Use this button to set the number of hours (up to 24) the unit
should run continuously until automatically shutting down. To set the timer,
press the timer button, then use the + and - buttons to set the number of hours.
Pressing the timer button when the timer is in use will turn the timer off.
8. Filter Reset button - When the check filter LED is illuminated, clean the
filter and then press this button to turn off the LED.
9.-11. The Low, Medium and High Fan buttons - These buttons will set the fan speed.
The fan will circulate the air in the room, but the condenser will not run.
12. Increase (+) and Decrease (-) buttons - Use in conjunction with the timer
button for increasing/decreasing the time or with the cool mode for setting
the temperature.
Things to keep in mind regarding the remote control:
• If the air conditioner does not beep, letting you know that the signal has been
received from the remote, check the batteries.
• Do NOT place the remote on or near heat-emitting objects, such as a radiator or
electric blanket.
• Do NOT put the remote where the sun can shine on it.
• Do NOT expose the remote to water or other liquids.
• Do NOT put heavy objects on top of the remote.
• Avoid accidentally dropping the remote.
Battery Replacement
1. Turn the remote over and slide the battery cover in the direction of the arrow.
2. Replace batteries.
3. Slide cover back into place, making sure it is securely closed.
Page 9

12
13
1•888•557•3848
Wards.com
Cleaning & Care
WARNING: Turn AC OFF and remove plug from outlet prior to cleaning.
The only user-serviceable part in the air conditioner is the filter. Do NOT try to repair
the unit yourself. If your appliance is damaged or does not operate, call our toll-free
customer service number for information regarding returning or replacing the product
Air Filter Cleaning
The air filter should be cleaned whenever the check filter LED light comes on. Dust
and dirt can build up in the filter and block airflow, which decreases the cooling
capacity, increases the noise and power consumption and can cause an accumulation
of frost on the cooling evaporator.
1. Place the tips of your fingers into the inserts on the bottom, front corners of the
grill and gently pull out.
2. Unhook the tabs at the top of the grill and pull straight down.
3. Remove the air filter, taking care not to stretch or tear it.
4. Shake dust and dirt from filter. If it's very dirty, gently wash filter under warm tap
water. Do NOT soak, put in boiling water or use any detergent.
5. Air dry the filter before replacing in unit. Do NOT bake the filter dry.
Air Conditioner Cleaning
To clean the front grill and air inlet, wipe with a soft cloth dampened with mild soap
or detergent. The cabinet may also be washed with mild soap or detergent and
lukewarm water.
To keep your air conditioner running at peak efficiency, the condenser coils on the
back (outside) of the unit should be checked periodically for embedded debris.
Brush or vacuum condenser coils to remove debris from fins.
End of Season
1. Prior to removing the air conditioner, set to cooling mode at 86° F and run for
half a day. This will dry the interior of the unit.
2. Clean the filter.
3. Remove the batteries from the remote control.
Troubleshooting
Before calling for service, try these troubleshooting tips.
Problem Possible Cause Remedy
AC is cooling but room is
still warm.
1. Air filter may be dirty.
2. Temperature on unit is
too warm.
3. Air flow is restricted.
1. Clean filter.
2. Lower temperature.
3. Remove any obstacles
(drapes, furniture, etc.)
from in front of unit.
Air conditioner will not
operate.
1. Wall plug is loose or
disconnected.
2. Fuse is blown or circuit
breaker is tripped.
3. Unit was turned off and
immediately turned
back on.
4. Temperature set on unit
is warmer than room
temperature.
1. Confirm that plug is
firmly pushed into
socket.
2. Replace fuse or reset
circuit breaker.
3. Turn unit off and wait
3 full minutes before
turning back on.
4. Lower the temperature
on the AC.
Air from unit is not cool
enough.
1. Fan speed is set too low.
2. Temperature on unit is
too warm.
3. Room temperature is
below 61˚ F.
1. Increase fan speed.
2. Lower the temperature.
3. Cooling will not occur
until room temperature
is above 61˚ F.
AC is cooling, but room
is warm and ice formed
behind air inlet grill.
1. Outdoor temperature is
below 70˚ F.
2. Air filter may be dirty.
1. To defrost coil, set the
AC to fan mode.
2. Clean filter.
AC rapidly turns on/off. Outside temperature is
extremely hot.
Set fan speed to high.
AC is emitting noises.
1. Sounds like fan hitting
water.
2. Sounds like gurgling or
bubbling.
1. This is normal when
humidity is high. Be
sure all doors, windows
and registers are closed.
2. This is the normal
noise of gas passing
through the condenser.
Remote control does not
work.
1. Batteries are dead.
2. Sunlight is shining on
unit.
1. Replace batteries.
2. Shade unit from sun.
Fog is coming out of the
unit.
1. The indoor humidity
and temperature are
very high.
1. Once humidity and
temperature drops, the
fog will disappear.
16 17
1•888•557•3848
Wards.com
Page 10

Wards.com 1•888•557•3848
Montgomery Ward Customer Service
8:00 a.m. to Midnight CT, Monday through Friday
1•888•557•3848
Wards.com
18
119
If any item, for any reason, does not meet your expectations, just return it to us. We’ll
gladly either:
• Refund your merchandise amount
• Credit your account
• Send a replacement
You may return any unused item in its original packaging within 60 days of its receipt
for a full refund of the purchase price (excluding shipping and processing charges).
Please send returns to:
Montgomery Ward, Inc.
Attn: Customer Returns
2000 Harrison Suite 100
Clinton, IA 52732-6676
When returning an item:
• Use the original packaging and pack it securely.
• Please adequately insure your item in case you need to make a claim with
the carrier you choose for returning your item.
• Include your order number and reason for return.
• We recommend keeping the receipt for 4 weeks.
Returns
Montgomery Ward, Inc. warrants this product
to be free from defects in material and workmanship
for one year from provable date of purchase.
Within this warranty period, Montgomery Ward will repair or
replace, at its option, defective parts of this
product at no charge, provided the product is returned,
freight prepaid with proof of purchase to Montgomery Ward.
Allow 2–4 weeks for return shipping.
This warranty does not cover improper installation, misuse,
abuse or neglect on part of the owner. Warranty is also
invalid in any case that the product is taken apart or
serviced by an unauthorized service station.
This warranty gives you specific legal rights and they may
vary from state to state.
THE FOREGOING WARRANTIES ARE IN LIEU OF ALL
OTHER WARRANTIES AND CONDITIONS,
EXPRESS OR IMPLIED, INCLUDING
BUT NOT LIMITED TO THOSE OF MERCHANTIBILITY
OR FITNESS FOR A PARTICULAR PURPOSE.
1 Year Limited Warranty
 Loading...