

Monterey Boats 318 SS Super Sport, 318 SC Sport Cruiser, 278 SC Sport Cruiser, 278 SSX Super Sport, 318 SSX Super Sport Owner's Manual
...
BOATSBOATS
SUPER SPORT
OWNER’S MANUAL
278 SS/SSX Super Sport
278 SC Sport Cruiser
318 SS/SSX Super Sport
318 SC Sport Cruiser

Dear Valued Customer,
Welcome to the Monterey Life!
We would like to extend to you our “Thank You” for choosing a Monterey boat!
You have made an investment in our product and we are confident you will enjoy many years of boating
pleasure. Your new boat has been built to the standards set forth by the United States Coast Guard, National
Marine Manufacturers Association and the American Boat and Yacht Council. We are proud to have you in our
“Family!”
At this time, we need you to read your owner’s manual and become familiar with all systems on your boat. Make
certain that you and your dealer have filled out and mailed your warranty registration card back to us here at the
factory. It is very important to us and it is also a U.S. Federal Regulation.
This manual is an important aid in the operation and maintenance of your boat. The information is intended as a
guide and cannot cover every question you may have about your boat and boating in general. We encourage
you to contact your dealership for any additional information you might need. If there is a question about your
boat that can’t be answered by your dealer, please contact our factory direct by calling the Monterey Boats
Customer Service Department, (352) 529-9181 or online if you prefer at: www.info@montereyboats.com.
If you are new to boating, we recommend you participate in a boating class or group to gain more knowledge
and confidence. Contact your dealer, local U.S. Coast Guard or U.S. Power Squadron Organizations for information in your area.
With proper care, routine service and preventive maintenance, your Monterey boat will not only reward you with
enjoyment, but with reliability, dependability and one of the higher resale values in today’s boating industry.
Enjoy your new boat and please respect our environment at all times. Always remember to practice safe boating
procedures for your protection as well as those around you.
Sincerely,
The M.O.S.T. (Monterey Owners Support Team)
Have a safe boating day!
DATE PURCHASED ____________________________________________________________________
DEALER/PHONE NUMBER ______________________________________________________________
BOAT MODEL__________________________________________________________________________
HULL ID NUMBER ______________________________________________________________________
TRAILER ID NUMBER __________________________________________________________________
ENGINE MAKE/MODEL __________________________________________________________________
ENGINE #1 SERIAL NUMBER ____________________________________________________________
ENGINE #2 SERIAL NUMBER ____________________________________________________________
DRIVE MAKE/MODEL __________________________________________________________________
DRIVE #1 SERIAL NUMBER ______________________________________________________________
DRIVE #2 SERIAL NUMBER ______________________________________________________________
To comply with Federal regulations it is important to return the warranty registration card within 15 days.

TABLE OF CONTENTS
Page
M INTRODUCTION ...................................... M-1
New Boat Delivery ..................................... M-2
Parts .......................................................... M-2
Specifications ............................................ M-3
Special Care & Cleaning ........................... M-3
Battery Specifications .............................. M-10
Fire Extinguishing System ........................M-11
Special Gas Precautions ..........................M-12
Generator Set ......................................... M-13
Air Conditioner......................................... M-15
Boat Layouts & Details ........................... M-16
1 BOATING SAFETY ................................... 1-1
Boating Regulations .................................. 1-2
Boater Responsibilities .............................. 1-2
Required Safety Equipment ....................... 1-3
Emergencies .............................................. 1-7
Hazardous Conditions ............................... 1-8
Operation By Minors ................................ 1-10
Passenger Safety .................................... 1-11
Water Sports ............................................ 1-11
General Precautions ................................ 1-12
2 BASIC RULES OF THE ROAD ................ 2-1
Aids to Navigation ...................................... 2-1
Right-of-Way .............................................. 2-4
3 CONTROLS AND INDICATORS ............... 3-1
Shift/Throttle Control .................................. 3-1
Instruments ................................................ 3-2
Switches .................................................... 3-4
Steering System ......................................... 3-8
Page
5 GETTING UNDERWAY ............................ 5-1
Safety Checklist ........................................ 5-1
Safety Equipment ..................................... 5-2
Boarding ................................................... 5-2
6 RUNNING ................................................. 6-1
Maneuvering Techniques .......................... 6-1
Salt Water ................................................. 6-2
Freezing Temperatures ............................. 6-3
Towing Procedure ..................................... 6-3
Anchoring ................................................. 6-4
Performance Boating ................................ 6-5
Propellers ................................................. 6-6
7 CARE AND MAINTENANCE ................... 7-1
Electrical ................................................... 7-1
Fuel System .............................................. 7-3
Steering System ....................................... 7-3
Corrosion Protection ................................. 7-3
General Maintenance ............................... 7-4
8 TROUBLESHOOTING ............................. 8-1
Trouble Check Chart ................................. 8-1
9 STORAGE ................................................ 9-1
10 TRAILERING .......................................... 10-1
Classifications ......................................... 10-1
Trailer Components ................................. 10-2
Safety Chains ......................................... 10-2
Trailering Checklist ................................. 10-3
Backing Up Trailers ................................ 10-4
Launching ............................................... 10-5
Loading ................................................... 10-5
Slinging/Lifting ........................................ 10-6
4 OPERATION ............................................. 4-1
Fueling ....................................................... 4-1
Starting ...................................................... 4-2
Shifting/Running ........................................ 4-4
Warning Alarm ........................................... 4-4
Steering Controls ....................................... 4-5
Stopping .................................................... 4-5
Docking ...................................................... 4-6
Boat Trim ................................................... 4-7
Drive Trim Angle ........................................ 4-7
11 SHIP SYSTEMS ..................................... 11-1
Electrical Systems .................................. 11-1
Water Systems ........................................ 11-8
Hot Water Heater .................................. 11-11
Sanitizing The Fresh Water System ..... 11-12
Sample Float Plan ................................ 11-17
12 GLOSSARY OF TERMS ........................ 12-1
WARRANTY
i-1

This page intentionally left blank
i-2
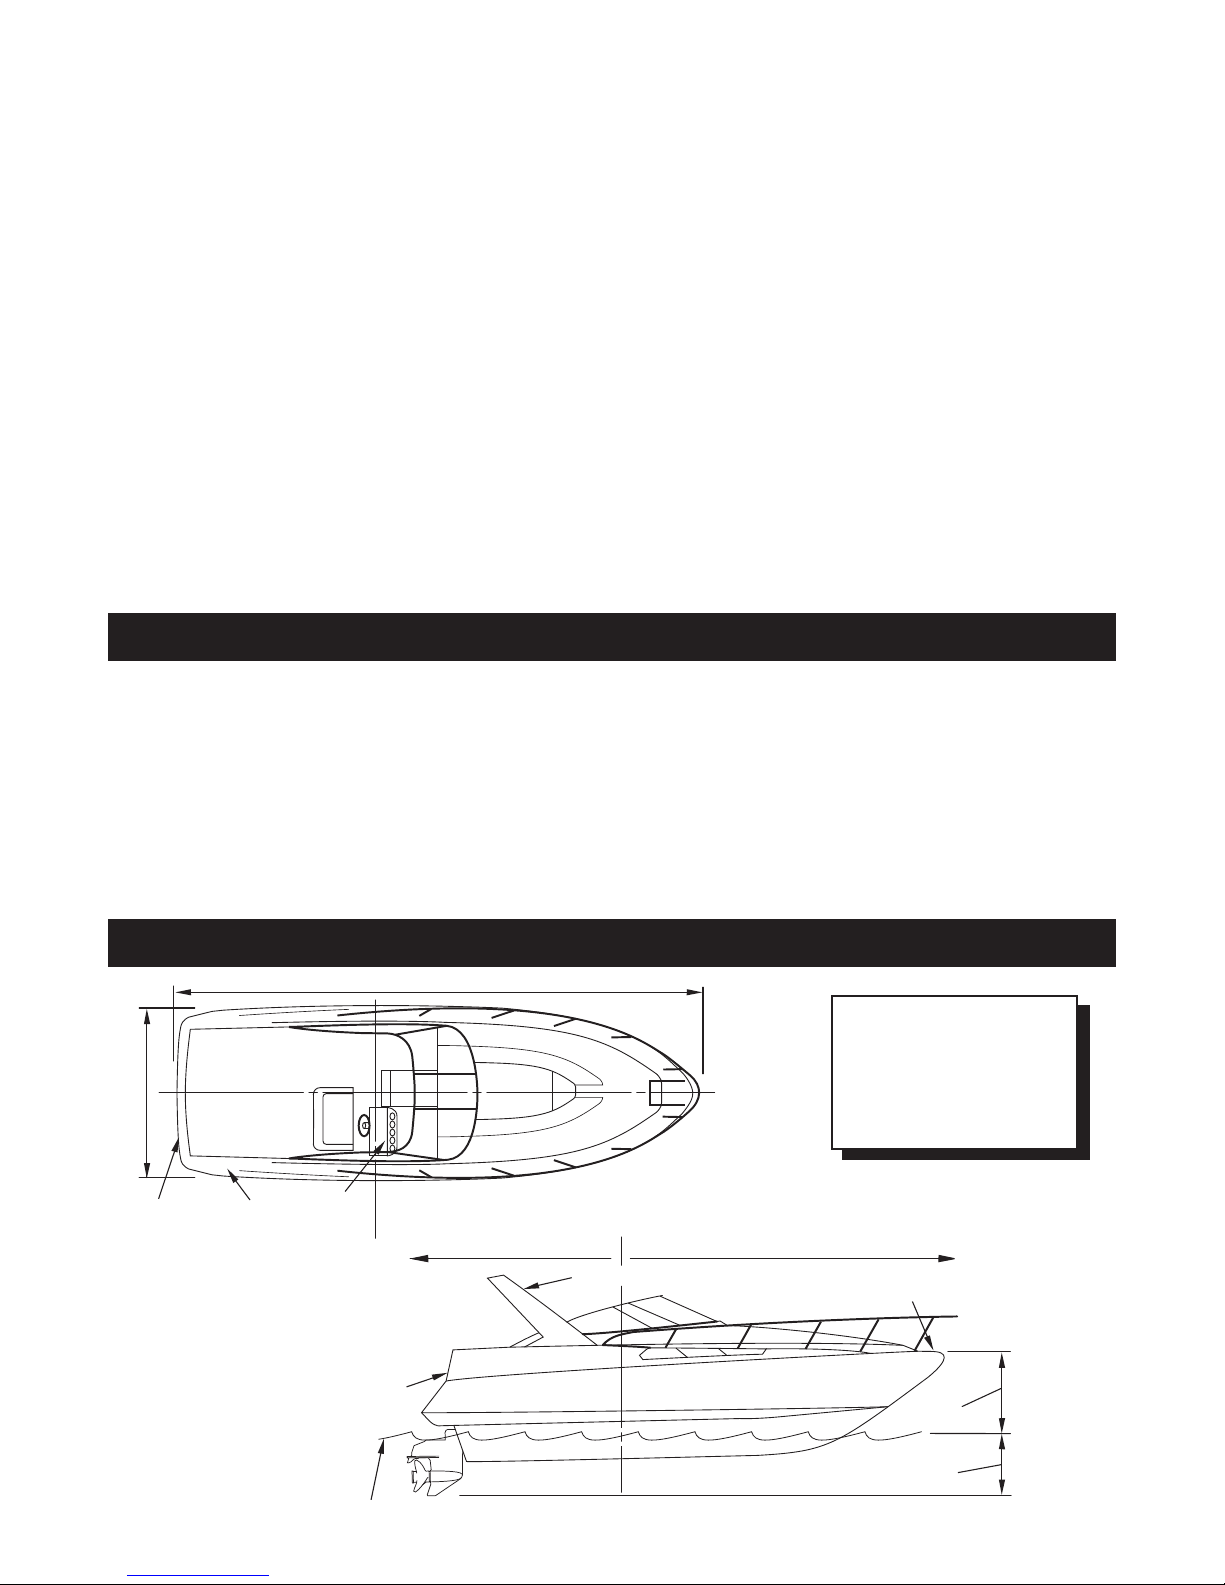
INTRODUCTION
FREEBOARD
BOW
DRAFT
GUNWALE
WATERLINE
AFT
FORWARD
HELM
BEAM
TRANSOM
LENGTH OVERALL (LOA)
PORT SIDE
STARBOARD SIDE
KC-0941A
RADAR ARCH
STERN
Monterey Boats has long been known as a quality boat manufacturer with a commitment to customer
satisfaction. This manual is but one example of that commitment. We have carefully prepared this
information to assist you in the proper operation and care of your new boat, and some of the
responsibilities that go along with owning/operating a boat.
This section contains supplemental information about your Monterey boat that is different or not covered
elsewhere in this manual. If you have questions about your boat not covered in this manual, or in the other
supplied information, your dealer will be glad to assist you. Refer to the Table of Contents on page i-1 to
locate general information.
As part of your warranty responsibilities, you must perform periodic maintenance/inspections as outlined
in this manual, the engine owner’s manual and other information supplied in the owner’s important
papers packet. Please keep this manual onboard for future reference and pass it along to the new owner
if you ever decide to sell the craft.
All information, illustrations, and specifications contained in this manual are based on the latest product
information available at the time of publication. Monterey Boats reserves the right to make changes at any
time, without notice and without incurring obligation, in colors, materials, equipment, specifications and
models.
Once again, thank you for choosing a Monterey boat; we wish you many years of boating enjoyment!
IDENTIFICATION NUMBERS
Safeguard information about your boat by recording the Hull Identification Number (HIN), and model and
serial numbers of major components and accessories. Keep a detailed Data Sheet for emergency
purposes in a safe place off the boat. In case of theft, damage, etc., report these numbers to local
authorities, your insurance agent and your dealer.
NOTICE
By law, the HIN must be clearly visible and may not be removed, altered, or tampered with
in any way. The HIN is attached to the transom on the upper starboard side, above the
waterline.
BOATING TERMINOLOGY
Tip!
PORT side from
An easy way to remember
STARBOARD side
is “PORT” and “LEFT”
both have four letters!
M-1

NEW BOAT DELIVERY
Your Monterey boat is inspected at each step of the manufacturing process. Before leaving the factory,
every Monterey boat undergoes a thorough check for systems operation, fit and finish. Your Monterey
dealer also performs a Pre-Delivery inspection prior to final delivery. When the new boat is delivered to
you, the customer, a final check is performed during orientation. Both the Pre-Delivery and Final Delivery
inspections are documented (New Boat Checklist) to ensure trouble-free operation and returned to
Monterey Boats.
At the time of new boat delivery, your Monterey dealer will ask you to sign the completed Warranty
Registration and New Boat Checklist for the boat and other accessory equipment. By signing these
documents, you acknowledge that you have reviewed and understand all information.
PARTS
Should you require new parts or would like to order an option after your original purchase, please contact
your Monterey Boats dealer to place your orders. Orders may not be placed with the manufacturer.
WARRANTY REGISTRATION AND NEW BOAT CHECKLIST
SUPER SPORT & CRUISER
Boat Number (HIN): RGF Boat Model:
Selling Dealer: Dealer Code:
Engine Brand:
Engine Serial #1:
Engine Serial #2:
Date of Sale:
Owner Name (Last, First):
Address:
City:
E-Mail Address:
Phone:
Indicate Status with the following Key: ¥ or 1 – OK, 2 – Needs Correction, 3- Completed, N/A – Not Applicable
Boat gel coat, striping & graphics
Upholstery fit, clean and free of defects
Sundeck/Sun Island/lounger operation
Canvas fit, clean and free of defects
Cabin Doors, port lights, hatches, cabinet & head doors, latches
All thru-hull fittings, ball valves, head drain, galley drain, anchor
well drain, drain plug-hull, wet bar drain are secure, no leaks
Windshield fit
Ladders
Running Lights (Navigation)
Cabin lights, cockpit lights
Toilet (Head) operation & hoses
Stereo – Radio, CD, remote control
Bilge Pumps – Auto float switch
Air Conditioner/Heater – operation & components secure
Water pressure system (let pressure stand 15 minutes to see if
pump goes on) & heater
Stove, coffee maker, oven, refrigerator, ice maker
Generator – Operation & components secure
Bilge Blower(s)
Wipers
Shore power (AC)
Tables
Plumbing Hose Clamps
Battery – Polarity, Voltage, Tight Connections
Battery Switch(es) - Operation
Engine mounts – tight
Fuel system operation - no leaks
Engine compartment components not missing, disconnected,
loose, kinked, pinched or could chafe
Hose clamps on engine & exhaust
Steering system operation, components secure, steering wheel
straight
Drains cooling system closed (Closed cooling coolant level)
Throttle control, operation & adjustment
Shifter control, operation & adjustment
Stern drive oil level at full mark
Crankcase & power steering oil levels at full mark
Stern drive trim operation
Prop Size:
Prop installed correctly with grease, nut(s), cotter pins
Prop rotation – Forward & Reverse
Neutral start switch, engine will not start in gear
Transom plate seal has no leaks – water, oil
COMMENTS
Distribution: Factory CS – Green, Dealer – Yellow, Owner – Manila Card Rev 1204
PLEASE, INSPECT AND CHECK OFF THE FOLLOWING OPERATIONS
BOAT
EQUIPMENT
ENGINE – BEFORE STARTING
SAMPLE
Engine Model:
Drive Serial #1:
Drive Serial #2:
Warranty Start Date:
State: Zip:
(We respect your privacy and will use for internal puposes only.)
2nd Phone:
Technical Check Performed by
Technician Date
Owner Orientation Performed by
Dealer Personnel Date
I have read and agree with the checklist. I have read and
understand the Monterey Boats Lifetime Limited Warranty
as it appears on the back of this form.
Owner Signature Date
ENGINE - AFTER STARTING: (in water)
Oil pressure
Fuel line connectors – no leaks
Engine has no water or oil leaks
Idle speed per engine specs, in gear
Ignition timi ng check with timing light or scan tool
Gear shift works properly - forward, neutral, reverse
Instruments read correctly
Exhaust system - no leaks
Boat performance
Port engine operation
Starboard engine operation
Steering –operation
Stern drive trim operation
Instruments register normal
Maximum R.P.M.
PRE-DELIVERY FINAL CHECK
All accessory equipment operates (Mech. & Elect.)
Carpets, curtains, cushions & canvas installed
All boat, engine and accessory literature
Boat properly cleaned, interior and exterior
Trailer wiring, wheels, fenders & brakes
Review & familiarize Owner with operation of all features
and options on boat
Sea Trial with Owner
Review of Owners Manual
Review of Warranties
Review of Owner Responsibilities
Review of Service & Maintenance Procedures
Review of Care & Cleaning
OWNER ORIENTATION
SEA TRIAL
1579 S.W. 18
www.montereyboats.com
th
Williston, FL 32696
Fax 888-922-6287
Street
Tel 352-529-9181
M-2
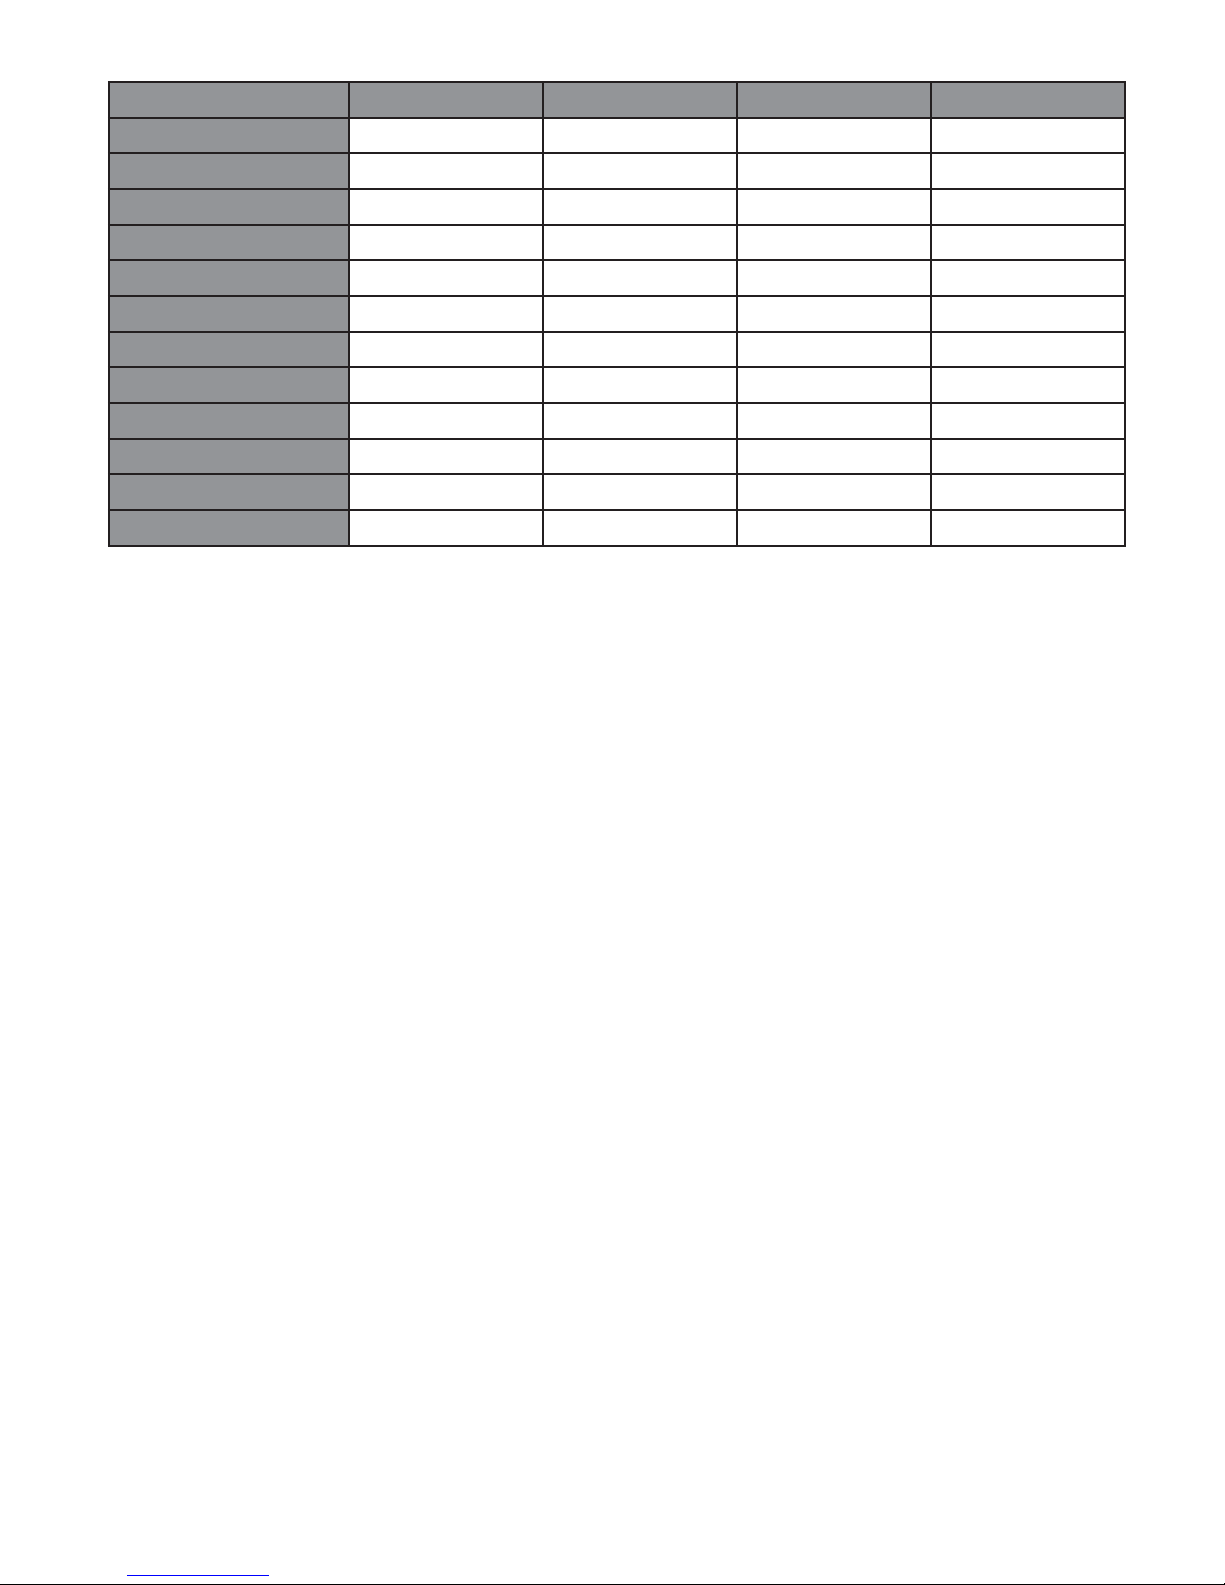
SPECIFICATIONS
MODEL 278 SS/SSX 278 SC 318 SS/SSX 318 SC
LOA W/ SWIM PLATFORM 28’-10” (8.8 m) 28’-10” (8.8 m) 31’-10” (9.7 m) 31’-10” (9.7 m)
MOLDED HULL LENGTH 26’-6” (8.1 m) 26’-6” (8.1 m) 29’-7” (9.0 m) 29’-7” (9.0 m)
BEAM 8’-6” (2.6 m) 8’-6” (2.6 m) 9’-6” (2.9 m) 9’-6” (2.9 m)
BRIDGE CLEAR W/O ARCH 5’-8” (1.5 m) 5’-8” (1.5 m) 6’-0” (1.8 m) 6’-0” (1.8 m)
BRIDGE CLEAR W/ ARCH 8’-0” (2.4 m) 8’-0” (2.4 m) 8’-0” (2.4 m) 8’-0” (2.4 m)
DEAD RISE 21° 21° 22° 22°
DRAFT DRIVE UP 24” (60.9 cm) 24” (60.9 cm) 27” (68.6 cm) 27” (68.6 cm)
DRAFT DRIVE DOWN 37” (94.0 cm) 39” (99.1 cm) 40” (101.6 cm) 40” (101.6 cm)
FUEL CAPACITY 89 gal (337 l) 89 gal (337 l)
WATER CAPACITY 15 gal (57 l) 15 gal (57 l) 15 gal (57 l) 15 gal (57 l)
WASTE CAPACITY N/A N/A 18 gal (68 l) 18 gal (68 l)
STANDARD WEIGHT 5,500 lbs (2,495 kg) 5,500 lbs (2,495 kg) 8,000 lbs (3,629 kg) 8,500 lbs (3,856 kg)
l Draft Up and Draft Down - Minimum shown, will increase based on loading and placement
l Water and Waste Capacity - may differ according to options
l Dry Weight - Average weight of base boat without options, fuel, water, waste, battery(ies) or gear.
142 gal (537 l) 142 gal (537 l)
SPECIAL CARE & CLEANING
The marine environment (sun, salt, pollution and bird droppings) requires special products for proper care
and cleaning. Your dealer is best suited for recommendations on marine care and cleaning products that
work best in your area.
Canvas
The convertible/bimini top is made of acrylic materials. To gain longer life and top performance from your
canvas including windshield connector, side and aft curtains, bow and cockpit covers, we recommend the
following:
l The canvas and clear plastic are not designed to withstand long periods of time exposed to the
elements as a protective cover at dockside or when your boat is in storage. A full, properly fitted, light
colored mooring transportation or storage cover should be used for these purposes.
l If canvas gets wet during use, remove side curtains and open windshield so seams can dry out. The
air circulation will allow all canvas to dry and prevent the growth of mildew. Never store wet or
damp canvas.
l Occasionally set up all canvas and curtains and hose down with fresh water to remove accumulated
soot and dirt. Sweep or brush the underside of the canvas to prevent the accumulation of dirt and
mildew.
M-3

WARNING
!
!
Never trailer your boat with the convertible/bimini canvas (including side curtains, aft
curtain, windshield connector, bow cover and cockpit cover) up. Monterey Boats’ canvas is
not designed to withstand the high wind loads of trailering. Severe wind damage can occur
such as torn material, fastener pull-out and frame distortion. Damage caused by trailering
is not covered under the limited warranty.
l The outer canvas surfaces can be cleaned with a soft scrub brush and either automotive convertible
top cleaners or household cleaners suitable for use on acrylic surfaces. The underside of the canvas
may be periodically sprayed with a spray disinfectant to prevent the growth of mildew.
l Do not store or dock your boat under trees. Tree sap is very corrosive to canvas and can also be
harmful to gelcoat and vinyl interiors.
l Adjust top bows to eliminate pockets in which rain water can accumulate. The weight of this
accumulated water can collapse the top or bag the canvas.
l Zippers and snaps should never be forced. Occasionally lubricate with silicone/Teflon grease.
l When trailering, dismantle, roll or fold and securely stow all canvas to prevent damage. Monterey
recommends purchasing a transportation cover to keep your boat clean on the road. Your Monterey
dealer will assist you in finding a suitable cover (not available from Monterey Boats).
l Roll clear plastic (isinglass) curtains (do not fold) and store in a clean, dry place.
l Do not allow petroleum products or bug sprays to come in contact with canvas.
NOTICE
Your Monterey boat is basically an open vehicle. Therefore, in spite of well-designed and
well-fitting canvas enclosures, your boat is not waterproof. We have made every effort to
design these enclosures to conform with the boat, but a certain amount of leakage may
occur, especially at the seam lines. After cleaning with soap and water, allow seams to
thoroughly dry. A sealant can be applied on the seams to somewhat close the needle holes
according to the manufacturer’s instructions.
Acrylic and Plexiglas
Acrylics and Plexiglas have properties that make them ideal for the marine environment. Components
such as cabin doors and deck hatches need special care to prevent scratches and other damage. The
following guidelines will help keep acrylics and Plexiglas looking good for years to come.
DO’S
l Wash your hatches, windshield connector, side curtains and other clear plastic pieces, as well as
other acrylic components on your boat with a mild soap and plenty of lukewarm water.
l Use a clean, soft cloth, applying only light pressure.
l Rinse with clear water and dry by blotting with a damp cloth or chamois.
l Grease, oil or tar may be removed with a good grade of hexane, aliphatic naphtha or kerosene.
These solvents may be obtained at a paint or hardware store and should be used in accordance with
the manufacturer’s recommendations.
l To maintain a high-luster finish on your acrylics, we recommend that after properly cleaning, apply
Meguiar’s™ Mirror Glaze #10 with a soft towel. Note: If slight scratches appear on acrylics, use
Meguiar’s™ Mirror Glaze #17.
®
M-4

NOTICE
Clear plastic (isinglass) is subject to ultraviolet (sunlight) degradation over time. It may turn
yellow-brown (a burnt appearance) and get brittle. Two things that can accelerate this
degradation are:
1. Direct contact with aluminum or stainless steel frames. Use “Standoffs.”
2. In salt water areas, dried salt crystals on the plastic will amplify sunlight. Wash after
each use and/or windy day.
DON’TS
l Do not subject acrylic material to high temperatures when polishing.
l Do not use glass cleaning sprays, scouring compounds or solvents like acetone, gasoline, benzene,
carbon tetrachloride or lacquer thinner.
l Do not use masking tapes, duct tapes or packing tapes on your acrylic materials.
l Do not drill holes in your acrylic materials without proper drill bits (special bits are used in acrylic
material to avoid damage).
Stainless Steel
Marine grade stainless steel components such as hardware, cleats, eyes, and rails offer superior corrosion
resistance. When properly maintained, stainless steel will not rust or stain, even in harsh saltwater
environments. However, if not maintained, stainless steel can rust, discolor or even corrode. The following
guidelines will help keep stainless steel looking good for years to come.
DO’S
l Clean stainless steel frequently (daily in salt or polluted environments) with mild soap and plenty of
water. Any cleaner safe for use on glass is usually safe for stainless steel.
l Remove rust spots (especially around welds) immediately with a brass, silver or chrome cleaner.
Irreversible pitting will develop under rust allowed to remain on stainless steel for any period of time.
l Remove rust stains on gelcoat. See dealer for recommended product.
l Protect stainless steel with waxes or polishes suitable for marine use.
DON’TS
l Do not use coarse abrasives like sandpaper or steel wool which may actually cause rusting.
l Do not use acids or bleaches which may etch the naturally occurring protective coating.
l Do not leave stainless steel in contact with iron, steel, or other metals which cause contamination
leading to rust or corrosion.
M-5

Gemlux Stainless Steel Information and Care Instructions
The GEMLUX Stainless Steel products on your boat are made to the highest quality standards.
Stringent quality control processes such as metallurgical analysis, precision polishing, multiple inspections
and Six Sigma procedures ensure the highest quality possible. In order to ensure that your GEMLUX
Stainless Steel maintains its beautiful finish, it is critical that you care for it properly.
WARNING: Your Stainless Steel can be damaged by exposure to acids and other corrosive agents
found in many cleaning products. A partial list of additives that may cause staining and a weakening of
the finish is provided below. Use of these and other similar solutions to clean your boat can cause your
Stainless Steel to bleed and will void your warranty.
Chlorsulphonic Acid
Ferrous Iodide
Hydrobromic Acid
Iodine
Sodium Chlorite
Sulphur Chloride
Bleach
Comet
EZ-ON, EZ-OFF
Cleaner
Ferric Chloride
Fluorine
Hydrofluosilicic Acid
Silver Chloride
Sodium Hypochlorite
Sulphuric Acid
Muriatic Acid
On & Off Cleaner
Rust StainsAway
Ferrous Chloride
Hydrochloric Acid
Hydrofluoric Acid
Sodium Bifluoride
Stannic Chloride
SnoBol
Soft Scrub
Marine Spray Nine
Cleaning and Cleansers
Frequent cleaning of your stainless steel with soap, water and GEMLUX Cleaning Wax will help maintain
the finish. Always rinse the metal thoroughly with clean water and dry completely. Clean soft cloths or
pads should be used. The use of steel wool pads or other highly abrasive brushes or sponges are not
recommended and will damage the surface.
Contamination of the surface by chemicals, dirt or other material hinders the passivation process and
traps corrosive agents, thus reducing corrosion protection. If your stainless steel is exposed to such
chemicals it should be re-passivated with GEMLUX Passivation solution.
Job Cleaning Agents Method Comments
Once your stainless is
free of discoloration
and/or bleeding, spray
GEMLUX Passivation
Solution directly onto
Routine cleaning Soap and water
Apply with a sponge
or soft cloth. Dry area
completely.
stainless. Allow to cure
for 30-60 seconds.
Stubborn stains,
discoloration or
bleeding
GEMLUX Cleaning
Wax
Apply with soft, dry
cloth. Allow to dry.
Polish and buff using
a clean, dry cloth.
Rinse with fresh water
and dry the area. This
solution will help
re-passivate the stainless
steel.
For purchase information on the GEMLUX Cleaning Wax or GEMLUX Passivation Solution, please
contact us at the numbers listed below.
Tel: 904-264-0173 / 888-GEMLUX-1 (888-436-5891)
Fax: 904-269-5905
www.gemlux.com
M-6

Cockpit Vinyl Upholstery with PreFixx®Coating
Beginning with the 2008 model year, Monterey Boats uses OMNOVA white, smoother and embossed
pleated vinyl material with PreFixx top coating. All other accent embossed white and colored vinyl
requires different care and maintenance. Please refer to page 7-4 for more information.
PreFixx Cleaning Instructions
PreFixx is engineered so that upholstery can be cleaned again and again without showing signs of wear.
With easy cleanability, proven stain and abrasion resistance, PreFixx protective finish can reduce
maintenance costs and frequent reupholstery.
Durability. Creates a barrier that resists stains from penetrating to the surface of the vinyl for proven,
long-lasting protection. With laboratory-tested stain resistance and improved wear properties, BoltaSoft
®
upholstery treated with PreFixx protective finish can retain a “like-new” appearance longer.
Easy Maintenance. Enables most common stains like dirt and smudges to wipe off easily. Many difficult
stains like ballpoint ink also can be cleaned with active solvents, such as nail polish remover, without
damaging the PreFixx protective finish (when recommended cleaning instructions are followed).
Normal Care and Cleaning
Remove ordinary dirt and smudges with a mild soap and water solution and a clean, soft cloth or towel.
Dry with a soft, lint-free cloth or towel. CAUTION: The use of vinyl “conditioners” or “protectants” is not
recommended and should be avoided on vinyl upholstery treated with PreFixx protective finish.
Special Cleaning Problems
Although BoltaSoft upholstery treated with PreFixx protective finish is resistant to most common stains,
the dyes and pigments in some staining agents have the ability to create a permanent stain if not treated
properly. To clean difficult stains from upholstery treated with PreFixx protective finish, locate the staining
agent in the lists below and follow its recommended cleaning method. For best results, treat all stains
immediately.
Cleaning Tip: To determine the method and type of cleaners, the source of the stain should be identified.
Staining Agents: Baby oil, ketchup, chocolate, motor oil, olive oil, grape juice, urine, blood, hair oil tonic,
tea, coffee and betadine. Use Method 1.
Staining Agents: Eye shadow, crayon and grease. Use Method 1. If stains remain, use Method 2.
Staining Agents: Tobacco tar (nicotine), permanent felt tip marker, yellow mustard, lipstick, ballpoint pen
and spray paint. Use Method 1. If stains remain, use Method 2. For stubborn stains still remaining, use
Method 3.
The recommended cleaners used in Cleaning Methods 1, 2 and 3 are progressively more aggressive.
Often, it is better to begin with the least aggressive cleaner and move to the next strongest only if the stain
remains. NEVER EXCEED a staining agent’s recommended cleaner or cleaning method, however.
Method 1: Use one of the following cleaners with a soft cloth or damp sponge. Rinse area with fresh
water, and then dry with a clean, lint-free cloth.
l Formula 409
l Fantastik
®
All-Purpose Spray Cleaner
®
Spray Cleaner
M-7

Method 2: Use a solvent-type cleaner*, such as rubbing alcohol (isopropyl alcohol). Rinse cleaned area
with fresh water, and then dry with a clean, lint-free cloth.
Method 3: Use a strong, active solvent cleaner* diluted in water (70% water/30% solvent cleaner), such
as nail polish remover (acetone/water). Clean with a soft cloth or damp sponge. Stain should be removed
with less than six (6) rubs. If the stain persists after six rubs, the stain has set and probably cannot be
removed. Rinse cleaned area with fresh water, and then dry with a clean, lint-free cloth.
CAUTION
!
Some solvents are highly flammable. Exercise proper care in cleaning and notify personnel
in area of danger. Wear rubber gloves during all cleaning activities. Use caution in cleaning
around buttons, stitching and wooden or decorative trim, since these solvents could
seriously damage such areas.
PREFIXX is a registered trademark of OMNOVA Solutions, Inc.
FORMULA 409 is a registered trademark of The Clorox Company.
FANTASTIK is a registered trademark of Dow Consumer Products, Inc.
Gelcoat
The smooth, beautiful skin of the fiberglass hull is made of gelcoat. Gelcoat is a strong but thin (though
thicker than automotive paint) layer of colored resin. The best way to keep the gelcoat skin on your boat in
top condition is through regular maintenance. The following guidelines will help keep gelcoat looking good
for years to come.
DO’S
l Keep the gelcoat surface out of direct sunlight or covered when not in use.
l Wash gelcoat frequently (daily in salt or polluted environments) with mild detergent and plenty of fresh
water. Remove any stains quickly. Gelcoat is microscopically porous, so long term staining may
become permanent.
l Regularly (monthly in salt or polluted environments) wax gelcoat surfaces with marine grade wax
recommended for fiberglass finishes.
DON’TS
l Do not use plastic or other nonporous (non-breathable) materials to cover gelcoat surfaces. Trapped
moisture from condensation can cause gelcoat damage. Shrink wrap storage covers must be
properly ventilated, including hullsides.
l Do not use abrasives, bleaches, ammonias, acids or harsh detergents. See your dealer for special
marine formulations.
l NEVER wax a gelcoat surface in direct sunlight.
l Do not attempt to remove stains and scratches. Chalking, stains, and minor scratches can be
removed in most cases with careful rubbing and polishing with appropriate chemicals and is best
done by a professional – see your dealer.
CAUTION
!
Apply No-Slip tape or step plates on surfaces which are walked on. Waxed gelcoat surfaces
are extremely slippery, especially when wet.
M-8
Exterior Carpet
Exterior carpet manufactured by Syntec Industries is produced with a special blend of resilient fibers to
withstand traffic and retain its beauty.
Carpets manufactured by Syntec are inherently stain-resistant. To keep your carpet at its best, we
recommend regular vacuuming for general cleaning, soap and water for hard-to-remove spots and an
approved cleaner for deep cleansing and to revitalize the carpet.
Stain Removal
If a spill does occur, it can easily be removed by following the stain removal chart. All stains should be
removed as soon as possible, as this enhances the ability to remove the stain.
Miscellaneous Stains Removal Process
Coffee, Tea, Coke, Dye, Fruit Juice, Ice Cream,
Motor Oil, Clay, Grease, Blood, Catsup,
Chocolate, Milk, Rust, Latex Paint, Water
Colors, Berry Stains, Egg, Salad Dressing,
Wine, Furniture Polish, Fish Formula,
Mayonnaise or Urine
Persistent Stains Removal Process
Chewing Gum, Crayon, Ink, Wax, Lipstick,
Tar, Polish or Oil Paint
Apply warm water and household detergent in
minimal amounts to the stained area. Sponge
or scrape until stain is removed and wash
thoroughly with clean water.
Apply warm water and household detergent.
Work well into the stained area, then flush with
warm water.
NOTICE
Most stains should be removed easily from olefin fibers. If the stain persists, the cleaning
procedure should be repeated to ensure stain removal. Remember, the sooner the stain
removal process begins, the easier the stain will be to remove. Under no circumstances
should any solvents normally associated with the dry cleaning of apparel
(perchlorethylene, carbon tetrachloride, etc.) be utilized, as permanent damage to the
fiber will result.
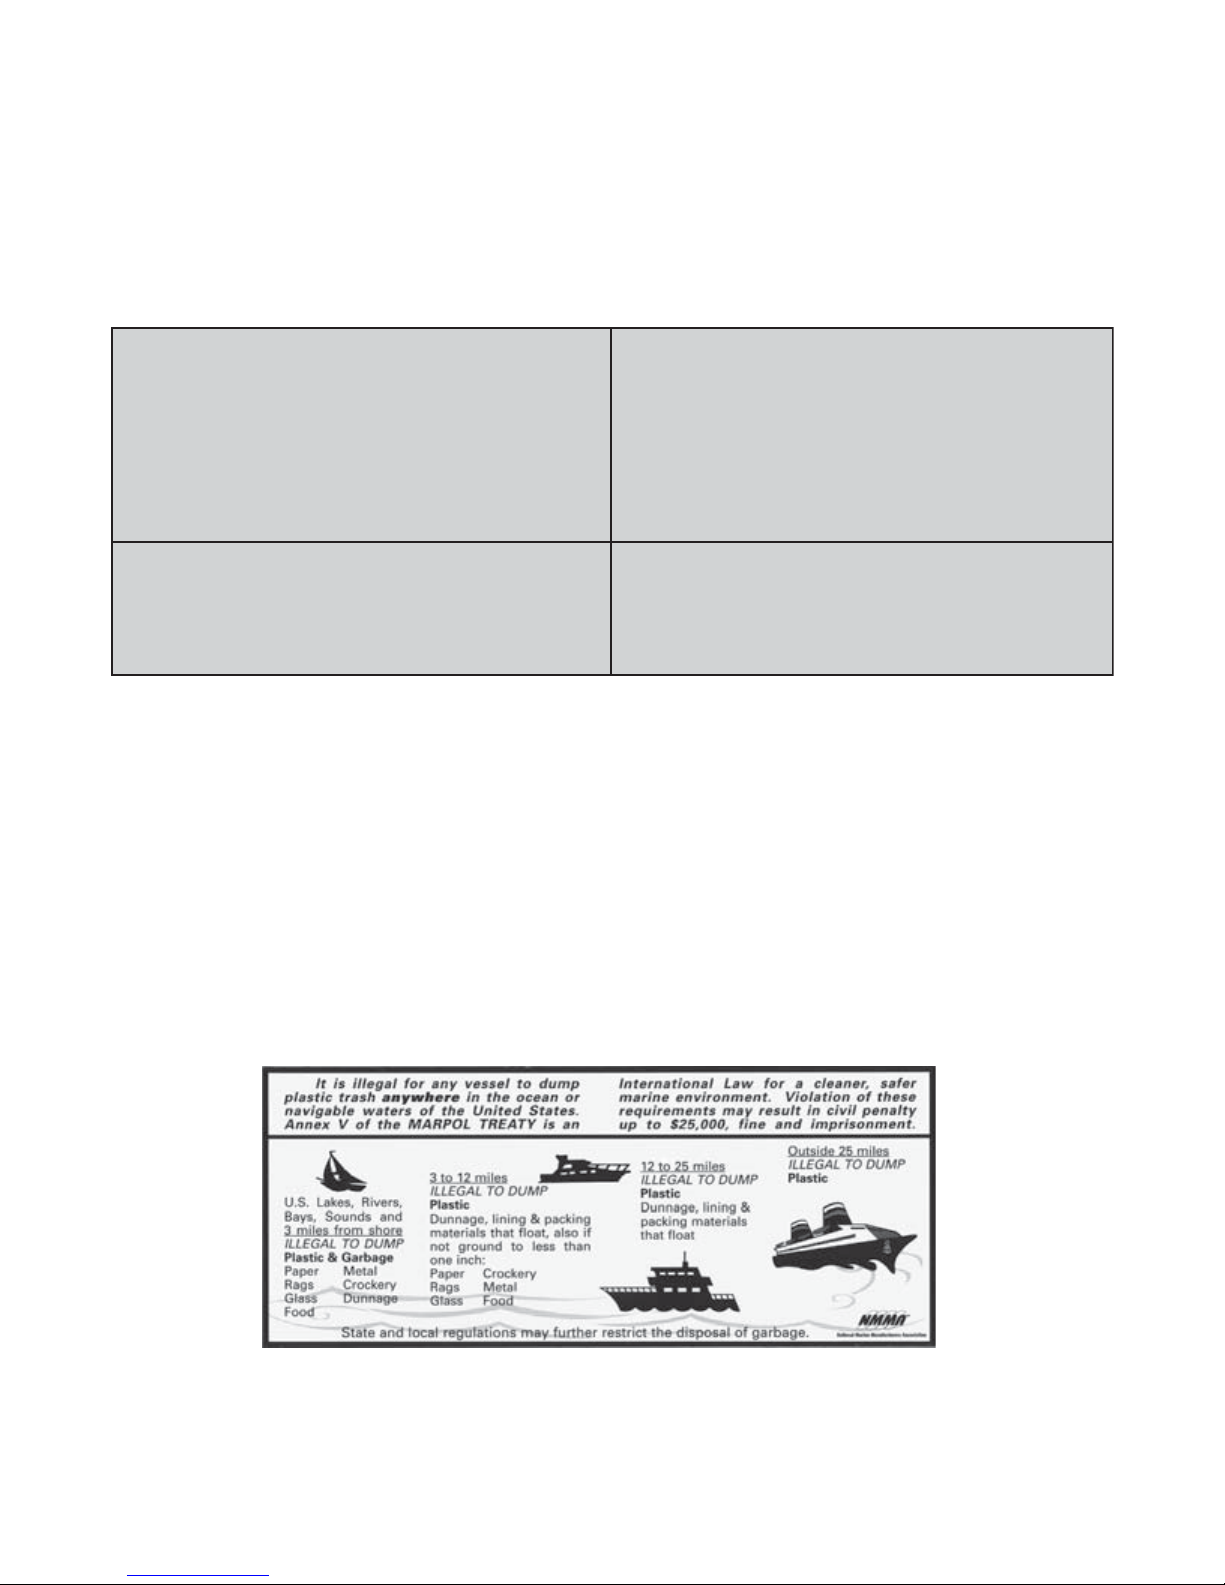
MARPOL Treaty
The International Convention for the Prevention of Pollution from ships, commonly referred to
as the MARPOL Treaty (MARine POLlution) prohibits the overboard dumping of all shipgenerated plastics, chemicals, garbage and oil.
M-9
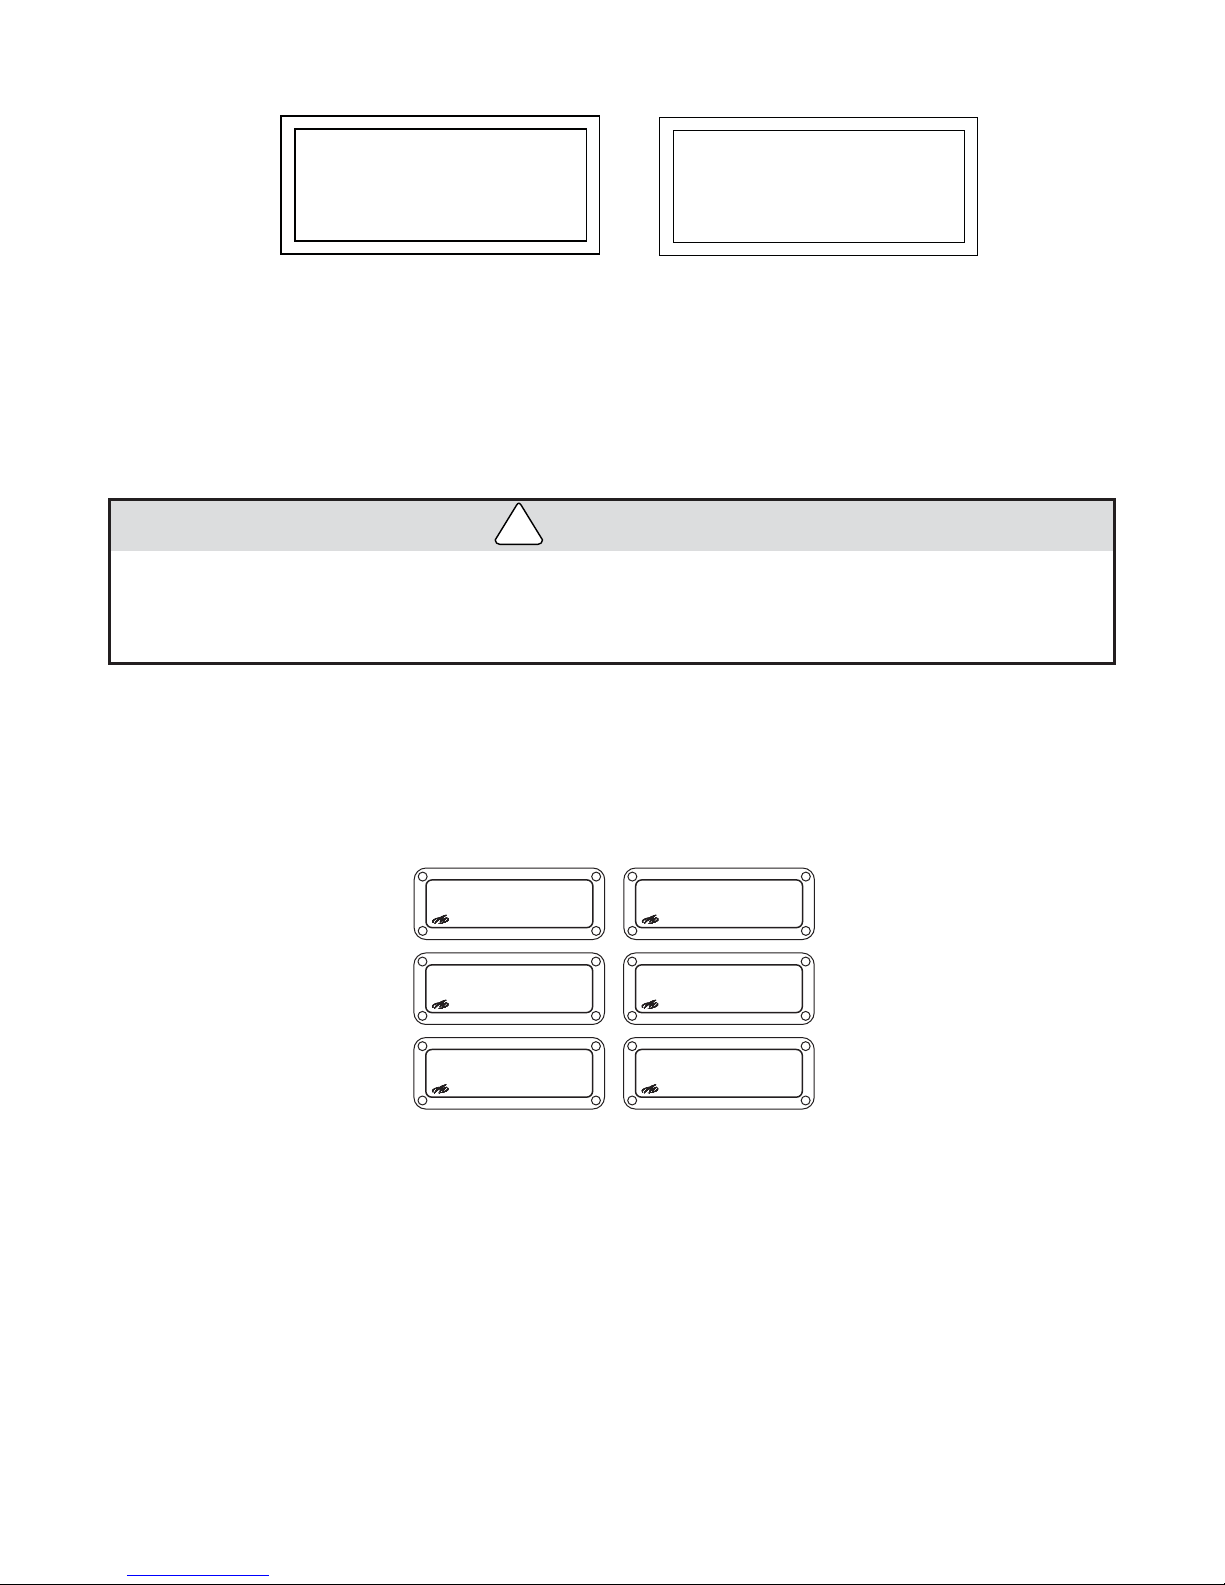
BATTERY SPECIFICATIONS
ATTENTION
MINIMUM BATTERY SIZE REQUIRE D:
Group 24
750 CCA@ 0°F/-18°C or 950 MCA
MINIMUM BATTERY SIZE REQUIRE D:
800 CCA@ 0°F/-18°C or 1000 MCA
ATTENTION
Group 31
Group 24 is for: V6 & V8 Small Block Engines up to 6.2 Liters.
Group 31 is for: Volvo 8.1L, Merc 496 Mag Big Block Engines and Merc DTS Models
NOTICE:
Do not use a battery with wing nut connectors; use hex nuts. Battery cables should
always be tightened with a wrench.
CAUTION
!
Do not use deep cycle batteries on EFI engines. A deep cycle battery, while it may have
enough cold cranking amps (CCA), will cause problems with EFI engines. The correct
battery for EFI engines is a standard marine starting battery.
NOTE: Batteries are not provided by Monterey Boats. The above battery information was obtained
from installation and owners manuals published by Mercury Marine and Volvo Penta of the
Americas. For sourcing and additional battery information, contact your local Monterey dealer.
Typical labels used to identify battery cables and fuel lines are shown below.
PORT BATTERY
POSITIVE (+)
STBD BATTERY
POSITIVE (+)
ENGINE
GROUND (-)
PORT ENGINE FUEL
SUPPLY
STBD ENGINE FUEL
SUPPLY
TANK FUEL
SUPPLY
Positive battery cables are red. Negative battery cables are yellow or occasionally black.
M-10

FIRE EXTINGUISHING SYSTEM
a
Some stern drive boats are equipped with an optional Automatic Fire Extinguishing
System for an engine compartment fire. The system is automatically actuated when
temperatures reach or exceed a preset limit.
SYSTEM
CHARGED
When actuation occurs, a loud popping sound may be heard followed by “rushing”
air sound. When a discharge occurs, immediately shut down all electrical and
mechanical systems including engine and powered ventilation (blowers).
Do not open the engine hatch at this time! This feeds oxygen to the fire and
flashback can occur. Allow the extinguishing agent to “soak” the compartment for at
least fifteen (15) minutes, and wait for hot metals and fuels to cool before inspecting
for cause or damage.
WARNING
!
Fire extinguishing agents and fire by-product fumes are toxic; do not breath fire fumes.
Accidental discharge can be dangerous and may cause serious injury. Do not attempt to
service the system unless qualified to do so.
WARNING
!
If fire is still active after system discharges: All occupants should immediately put on PFDs
(Personal Flotation Devices) and get off the boat.
!
!
DISCHARGED
AUTOMATIC
FIRE
EXTINGUISHING
SYSTEM
SYSTEM
KC-0084
CAUTION
!
Extinguishing agent cylinders must be accurately weighed periodically according to the
manufacturer’s specifications to ensure that they are adequately charged.
M-11
SPECIAL GAS PRECAUTIONS
KC-0463
KC-0464
KC-0468
KC-0465
KC-0469.1
KC-0466
KC-0467
DANGER
!
Holding tank systems on boats produce odorless Methane gas which is extremely lethal in
enclosed spaces. Follow these precautions when working on your boat's holding tank
system to prevent injury:
l Before work, open all doors and hatches wide, and rig a good fan to disperse gas.
l During work, have another person frequently check on you.
l Before and during work, DON’T SMOKE.
DANGER
!
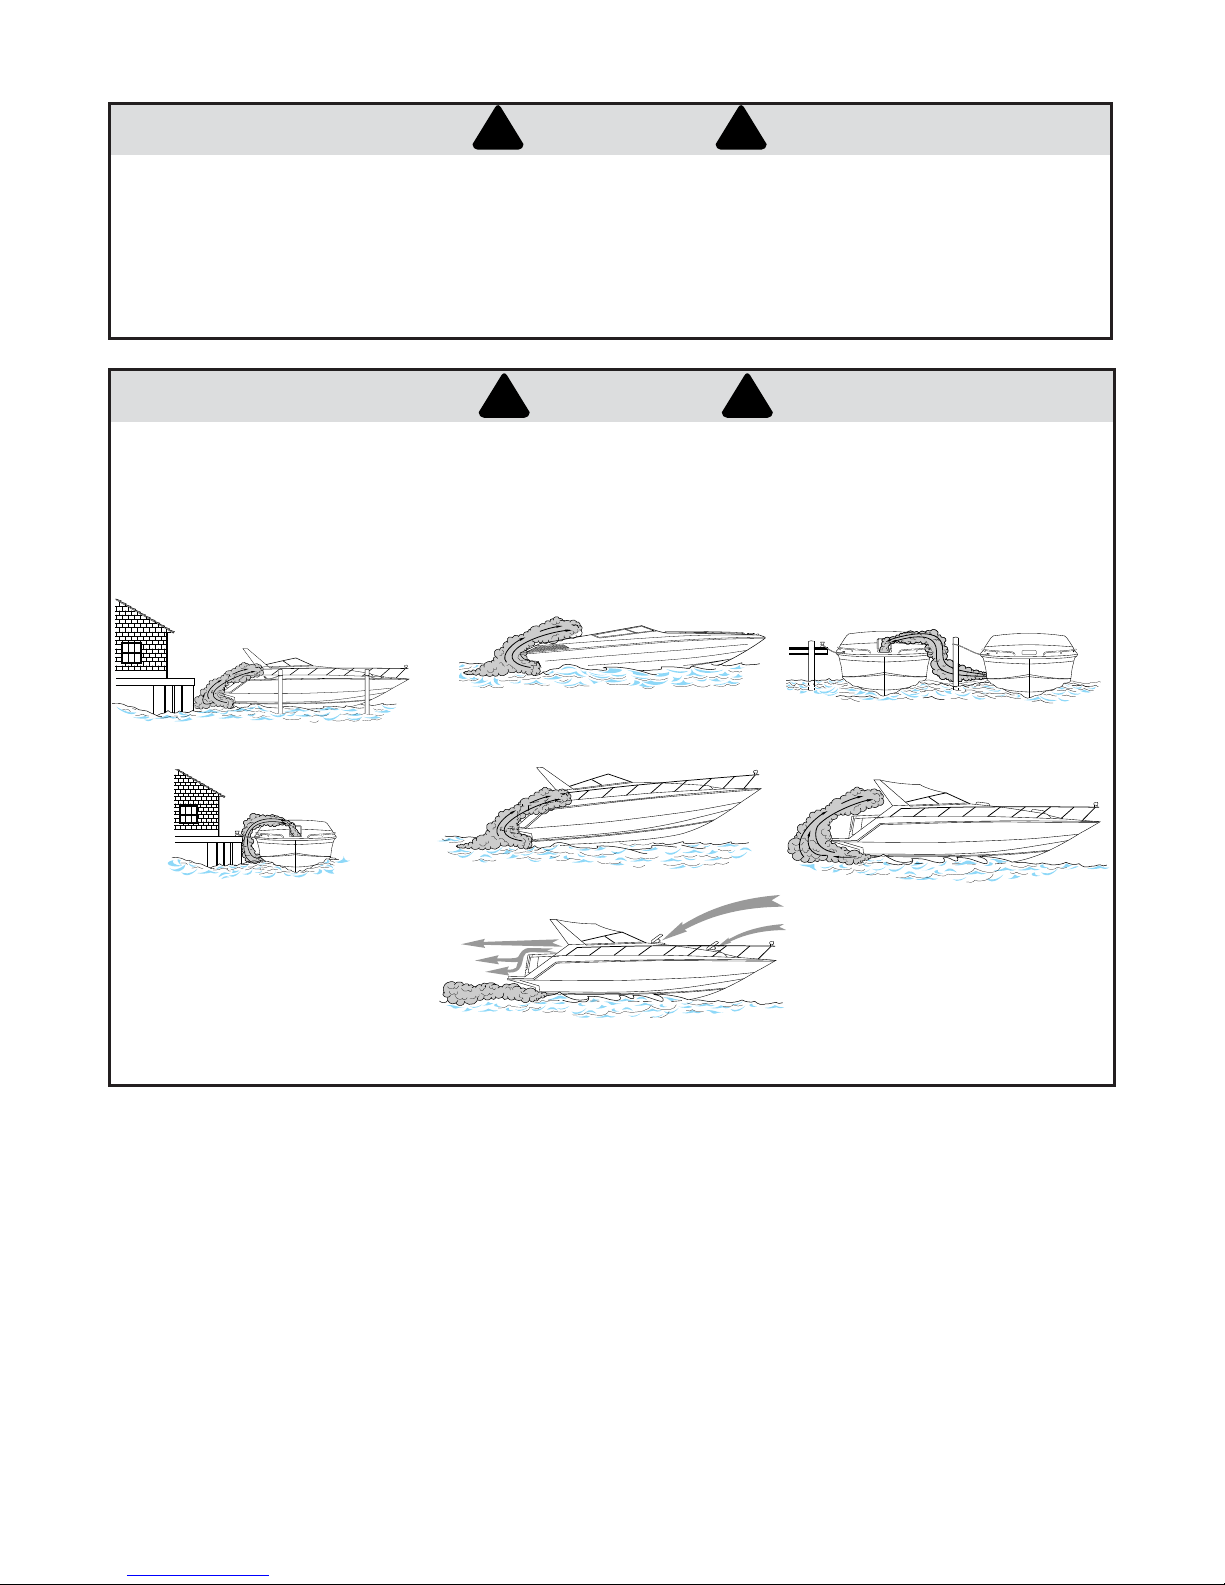
EXTREME HAZARD – Carbon monoxide gas (CO) is colorless, odorless and extremely
dangerous. All engines and fuel burning appliances produce CO as exhaust. Direct and
prolonged exposure to CO will cause BRAIN DAMAGE or DEATH. Signs of exposure to
CO include nausea, dizziness and drowsiness. Sources of CO include:
!
!
Blockage of boat exhausts by
obstruction.
Exhausts traveling along obstruction.
ENSURE ADEQUATE VENTILATION FOR CORRECT AIR MOVEMENT THROUGH BOAT!
Operating at slow speed or while dead
in the water.
Operating with high bow angle.
Exhausts from other vessels in
confined areas.
Operating with canvas tops and side
curtains in place without ventilation.
M-12

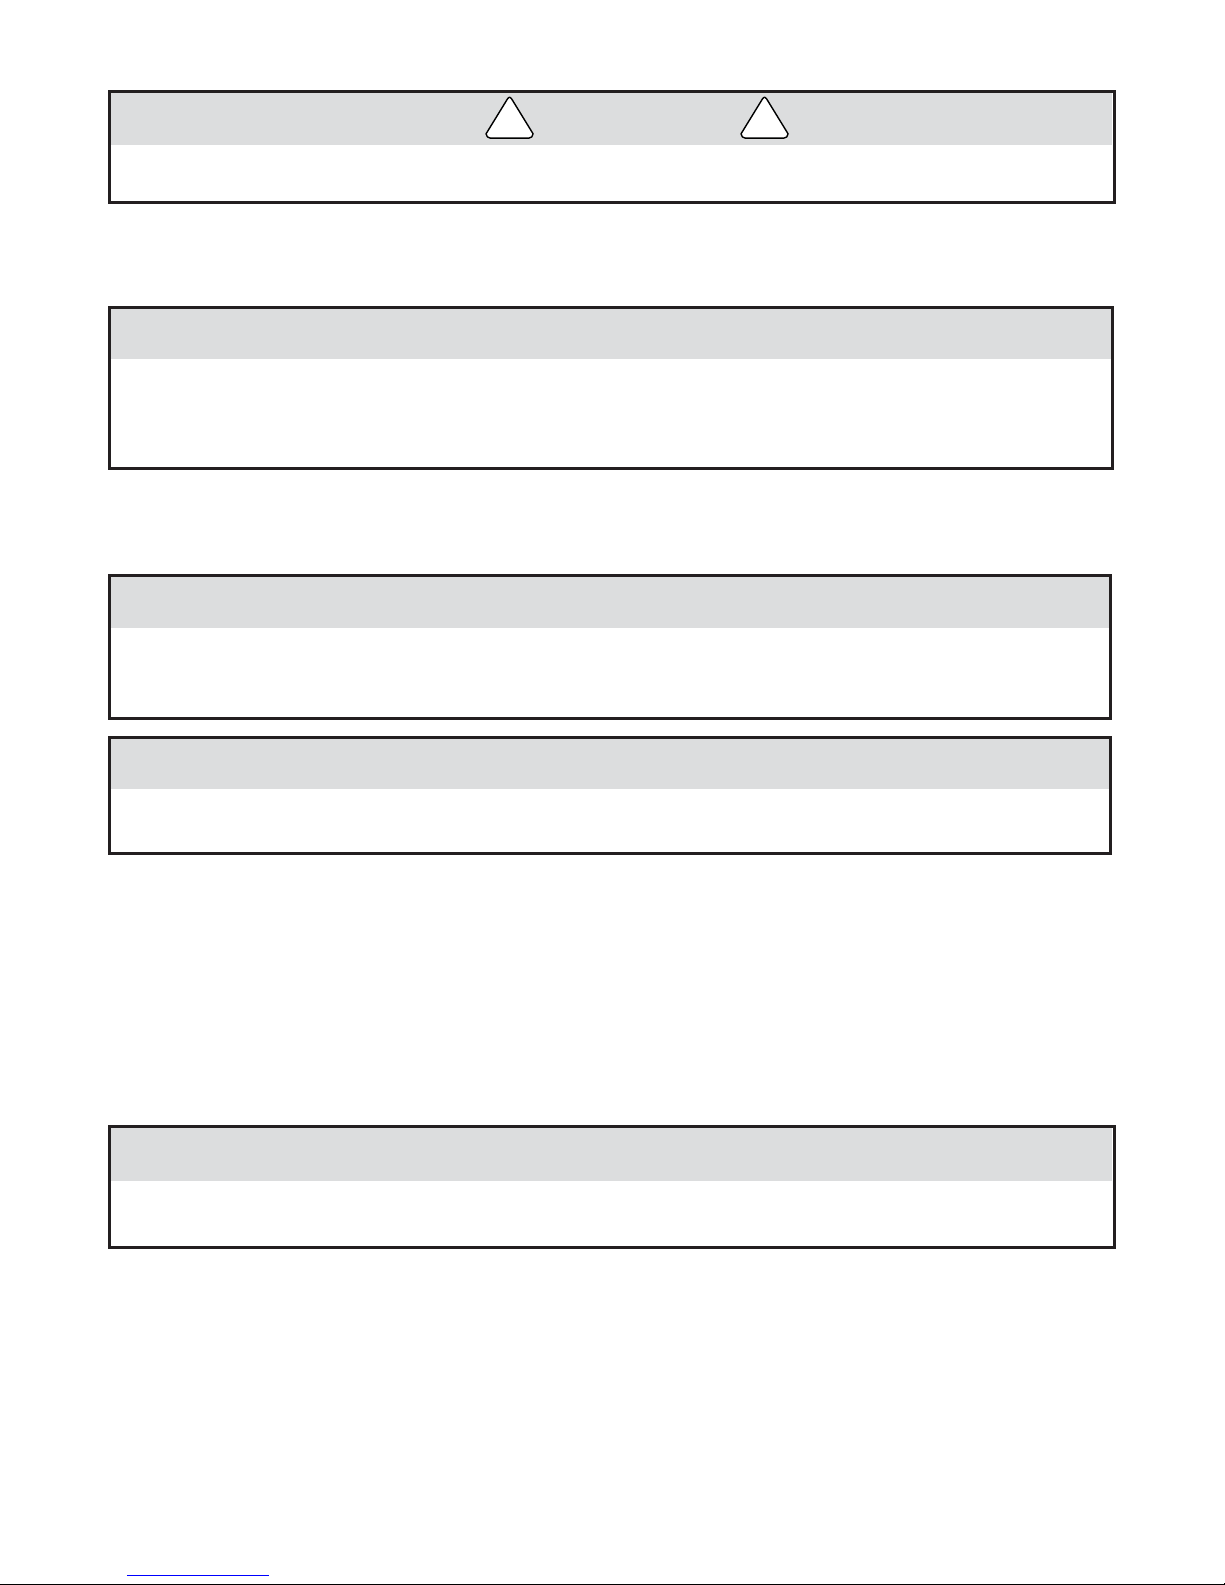
GENERATOR SET
KOHLER
HEAT
EXCHANGER
EXHAUST
MIXER
ENGINE-DRIVEN
SEAWATER PUMP
SEAWATER
STRAINER
INTAKE
STRAINER
SEACOCK
HANDLE
SEACOCK
COOLANT
RECOVERY
TAN K
KC-2058
The following procedure summarizes the operation of, and safety precautions for, the optional marine
generator available for your boat. Before operating your generator, read the owner's manual which
accompanies your generator.
Prestart
1. Check that the air cleaner is clean and properly installed.
2. Check the battery connections and electrolyte level (if battery has filler caps).
3. Check that the fuel tanks are full and that the fuel system is primed for operation.
4. Check that the oil level is at or near FULL mark.
WARNING
!
!
Hot coolant can cause severe burns. Do not remove the pressure cap when engine is hot.
4. Check that coolant level in coolant recovery tank is between the MIN and MAX marks. Periodically
remove the pressure cap and check on the fluid level when engine is cool. Do not rely solely on
level in the coolant recovery tank.
5. For initial startup only, prime the seawater pump by closing seacock, removing hose from water filter
outlet, filling hose and pump with clean water, replacing hose and opening seacock.
CAUTION
Failure to have seacock open when generator is running will result in serious engine
damage due to overheating.
6. Check that generator seacock is open.
7. Check that marine ship-to-shore transfer switch is in the proper position and that all breakers are in
the OFF position.
8. Open the manual fuel shut-off valve (if equipped).
M-13
Starting
WARNING
!
The blowers must be operated for a minimum of four minutes before each time the engine
is started. Failure to operate the blower can cause an explosion.
1. Operate the ventilation blowers for a minimum of four minutes and check the engine compartment for
gasoline vapors.
!
CAUTION
Do not crank the engine for more than seven seconds at a time. Allow a five-second cool
down period between cranking attempts if the engine fails to start. If the engine fails to start
after three attempts, contact an authorized dealer for repairs. Failure to do so may result in
serious damage to the starter motor.
2. Press the controller master switch, or the remote start switch on the AC control panel, to the START
position and release switch when the unit has started.
CAUTION
Allow at least 30 seconds after shutdown before starting a hot engine. If the engine fails to
start after the first attempt, close the seacock before continuing. This will prevent seawater
from entering the engine cylinders through the exhaust valve.
CAUTION
After generator has started, check to be sure that water is flowing overboard from the
generator discharge. If there is no discharge, stop and check for leaks or obstructions.
Stopping
1. Run generator set at no load for five minutes to allow engine to cool down.
2. Switch the controller master switch, or the remote start switch on the AC control panel, to the STOP
position and wait until the generator set comes to a complete stop.
Circuit Protection
The AC circuit breaker on the generator controller will trip if a fault is detected in the AC output circuit. In
case of fault, refer to your generator owner's manual for troubleshooting information.
CAUTION
Only replace fuses with fuses of the same type (ABC or #AB (ceramic)) and ampere rating.
Do not use clear glass fuses.
Engine Shutdown Switches
The generator set engine is protected by three shutdown switches which automatically reset after the
engine cools down; or in the case of low oil pressure, if the problem is corrected.
Low Oil Pressure (LOP) – will shut down unit if pressure is 20 psi or less.
High Water Temperature (HWT) – will shut down unit if temperature is greater than 248°266°.
High Exhaust Temperature (HET) – will shut down unit if temperature is greater than
M-14
215° ± 5°.
AIR CONDITIONER
The following describes the optional air conditioning unit available for your boat. Before operating your air
conditioner, read the accompanying owner's manual for more information.
The rated capacity of the air conditioning unit for the 318 CU is 5,000 BTU/hr.
The optional air conditioning unit is supplied with seawater through a seawater pump. The seacock must
be open to operate the heating/cooling unit.
WATER LINE
SEACOCK
CONDITIONING
STRAINER
SCOOP TYPE
THRU HULL INLET
AIR
UNIT
SEAWATER
PUMP
SEAWATER
OUTLET
KC-2088
CAUTION
After air conditioner has started, check to be sure that water is flowing overboard from the
air conditioner discharge. If there is no discharge, stop and check for leaks or obstructions.
M-15
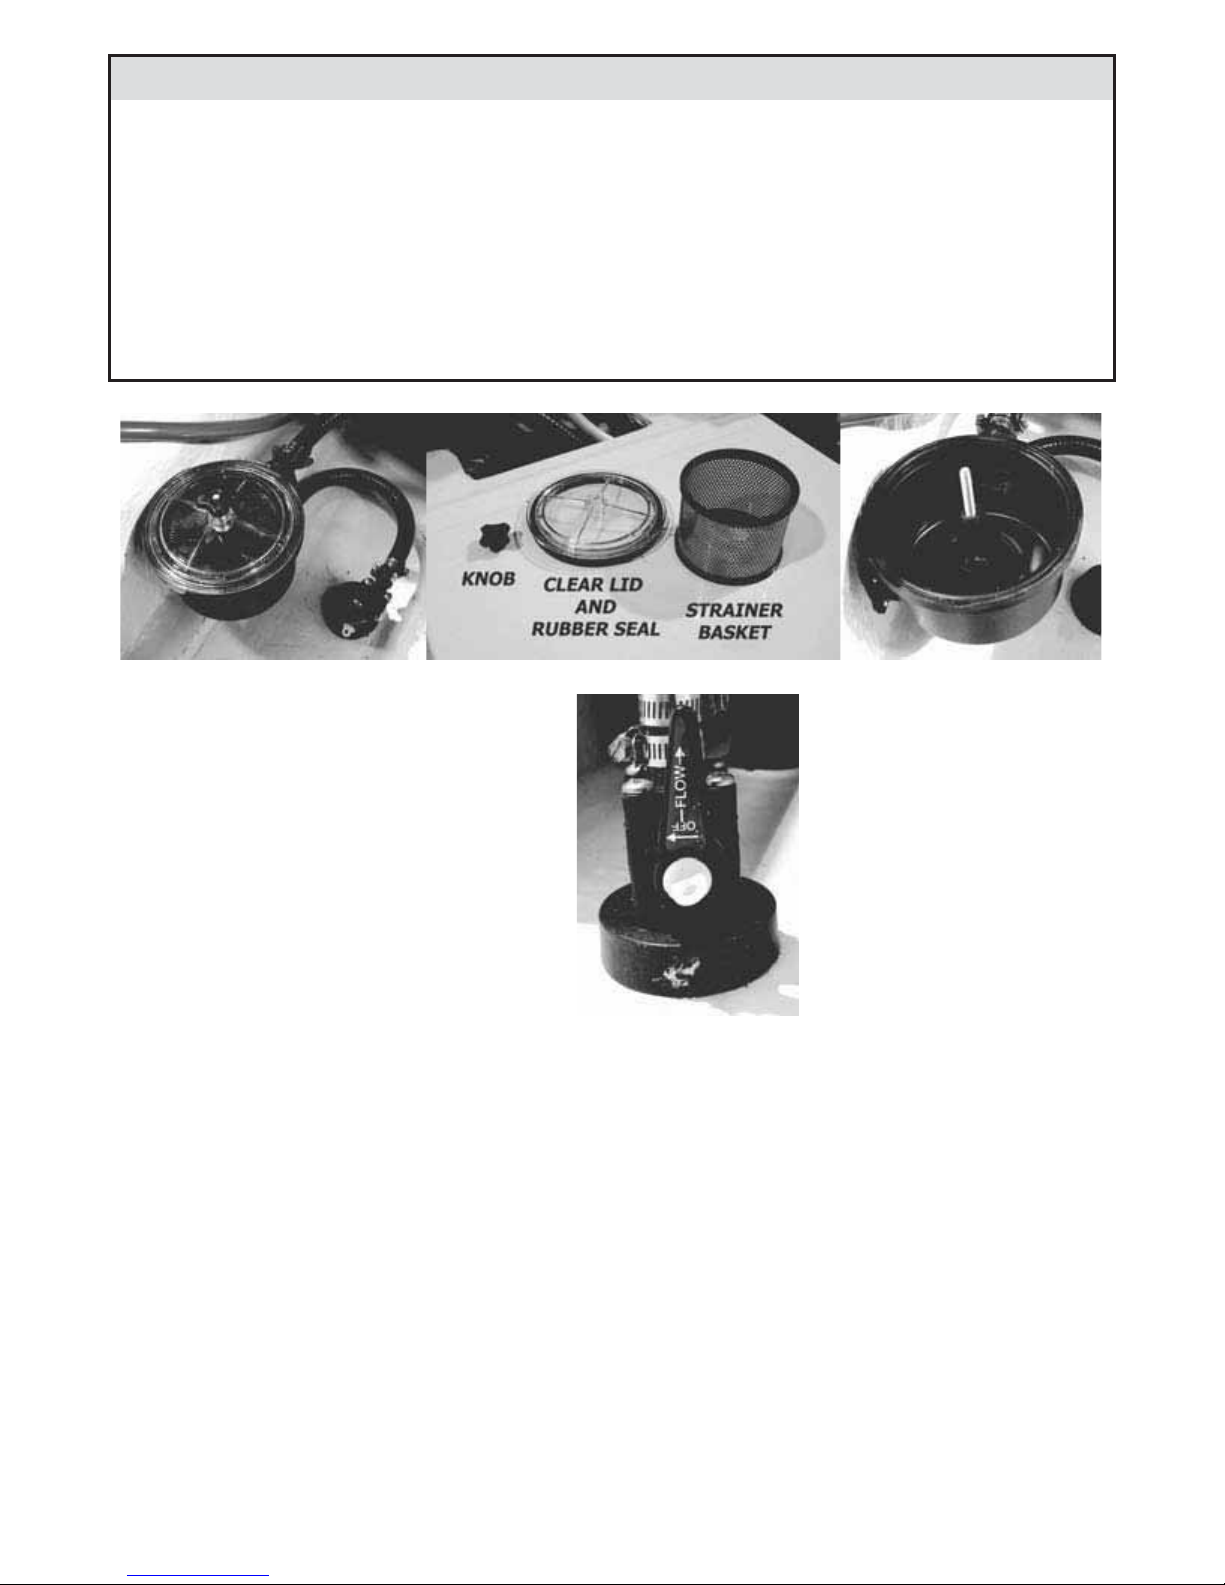
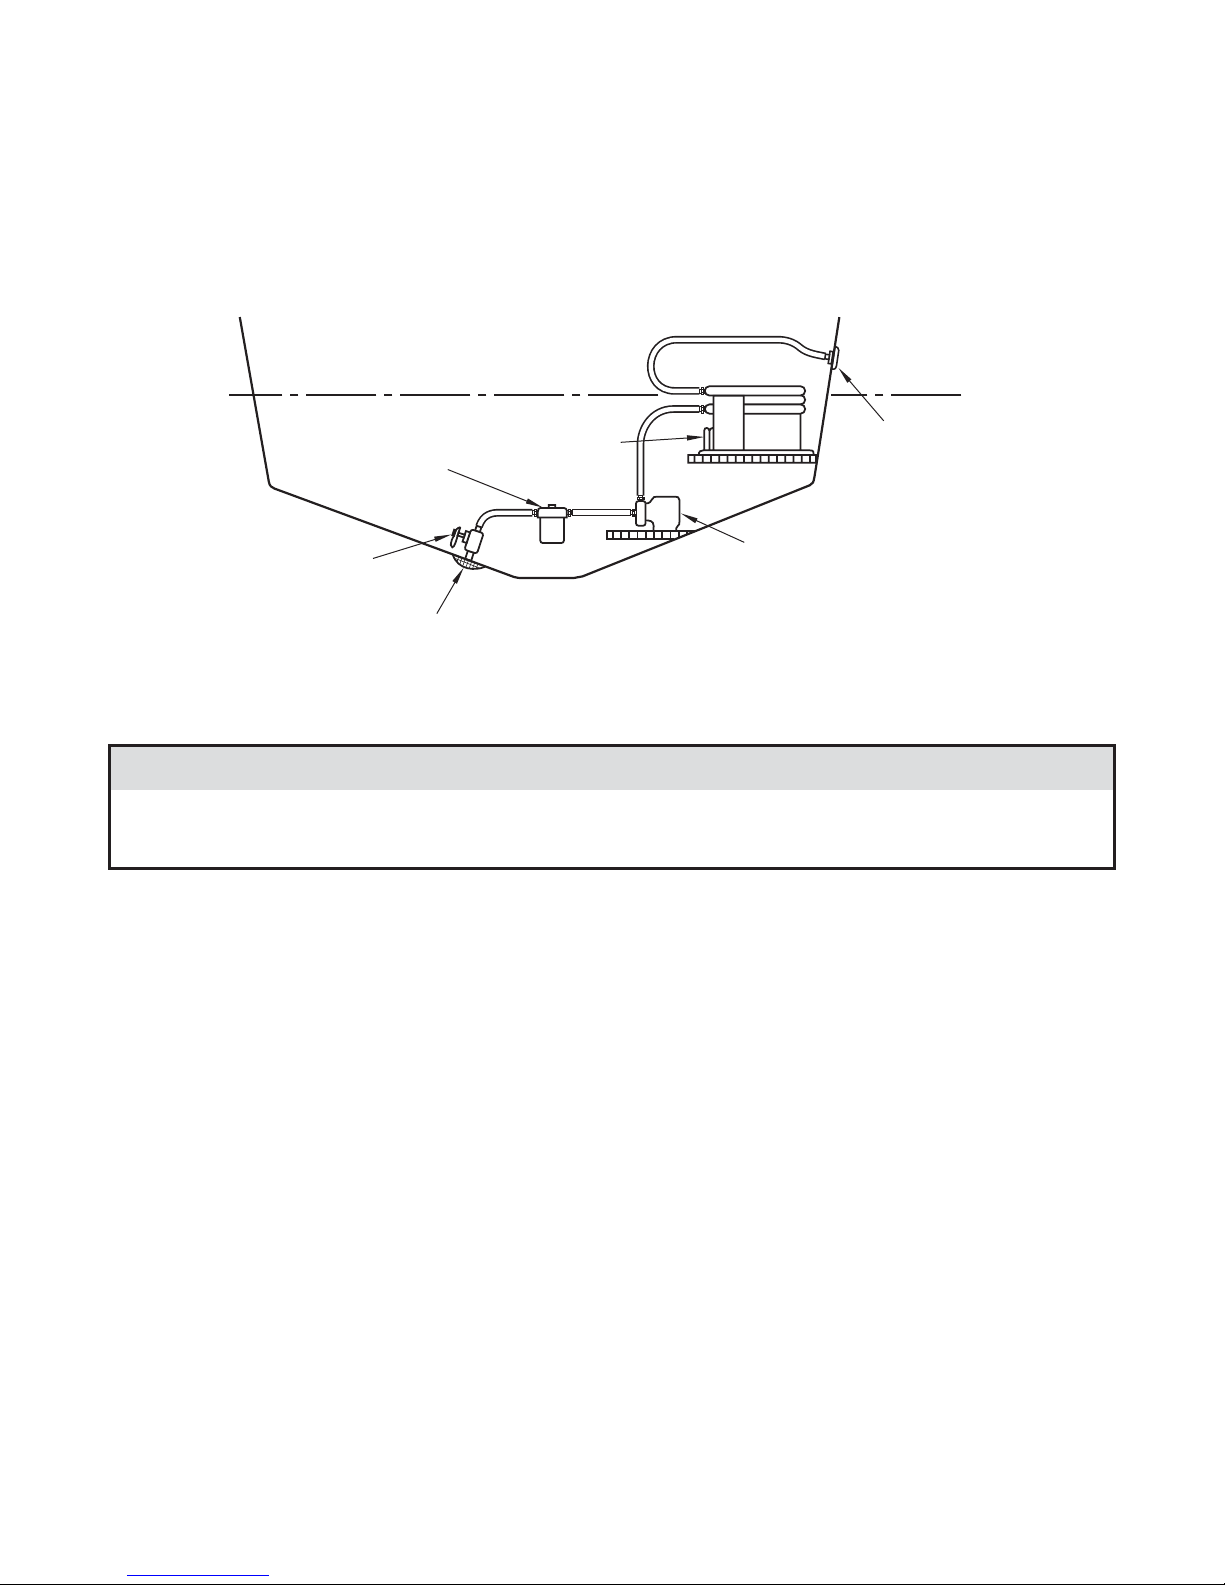
CAUTION
The sea strainers for the generator and/or air conditioning must be checked regularly for
obstructions. If the strainer gets clogged it can prevent adequate water flow to the units
causing severe damage. The strainers are equipped with a clear top for easy visual
inspection. In order to clean the filter basket, first make sure the seacock is in the CLOSED/
OFF position. Verify the genset and or AC systems are turned off. Remove the knob located
on the top of the strainer basket. Gently apply upward pressure on the clear lid. Do not use
any tool to force or pry the lid up. This may result in damage to the strainer. Remove the
clear lid and rubber seal. Remove the strainer basket assembly, remove all debris, and
rinse clean. Reinstall the strainer basket. Apply a small amount of lubricant to the rubber
seal. Reinstall the lid and tighten the knob snugly. Do not overtighten! Open the seacock
and activate the unit to check for leaks.
When the seacock handle is in the vertical
position to the base, it is open and seawater
can flow into the system it supplies. When
the handle is in the horizontal position, the
seacock is closed and no water can flow
into the unit. Always keep the seacock
closed when not in use. Also verify it is
open before starting any equipment it
supplies water to. Periodically check
seacock seals for leaks and that all hose
clamps on fittings are tight. Lubricate
moving parts at least annually.
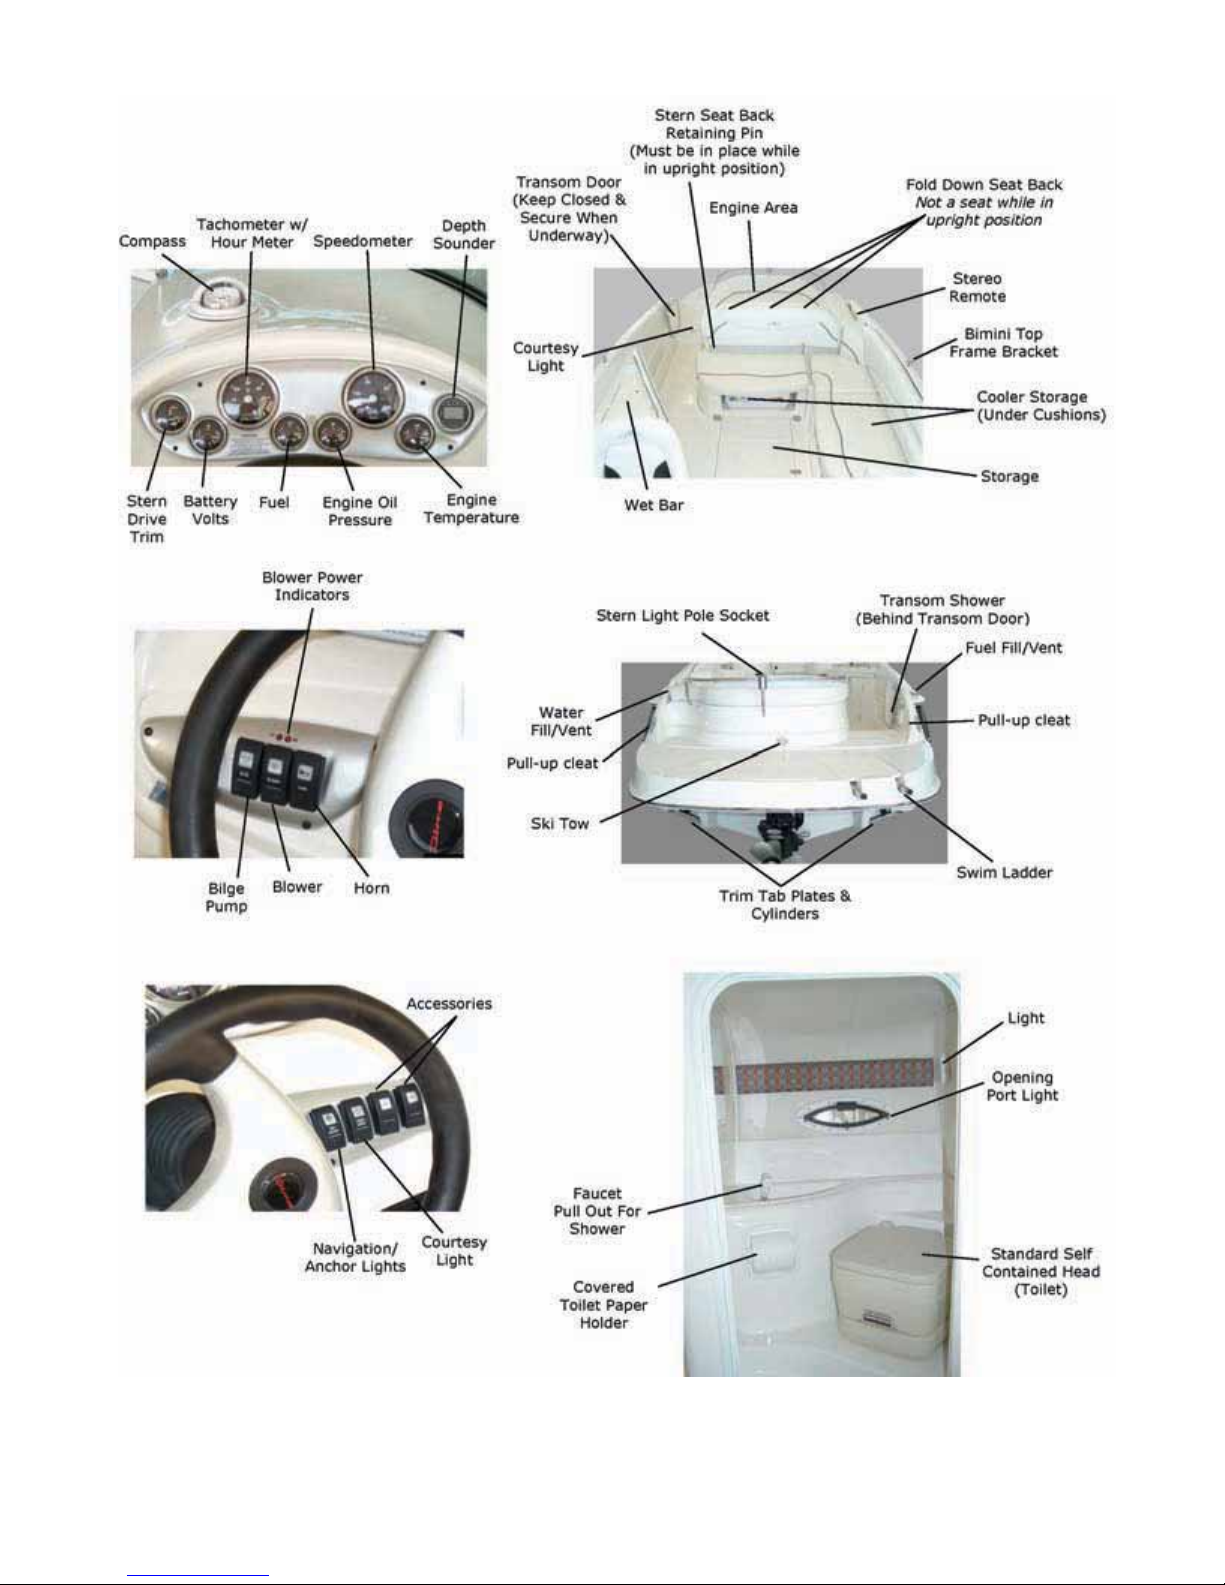
BOAT LAYOUTS & DETAILS
The following illustrations are intended to give you, the boat owner, a brief overview of your new boat.
These illustrations are a representation and may not reflect all options or layouts. Your Monterey dealer or
their representative can give you a detailed demonstration of your boat and operation of its many features.
M-16

VECTOR SERIES AIR CONDITIONER SELF CONTAINED UNIT WIRING DIAGRAM
M-17
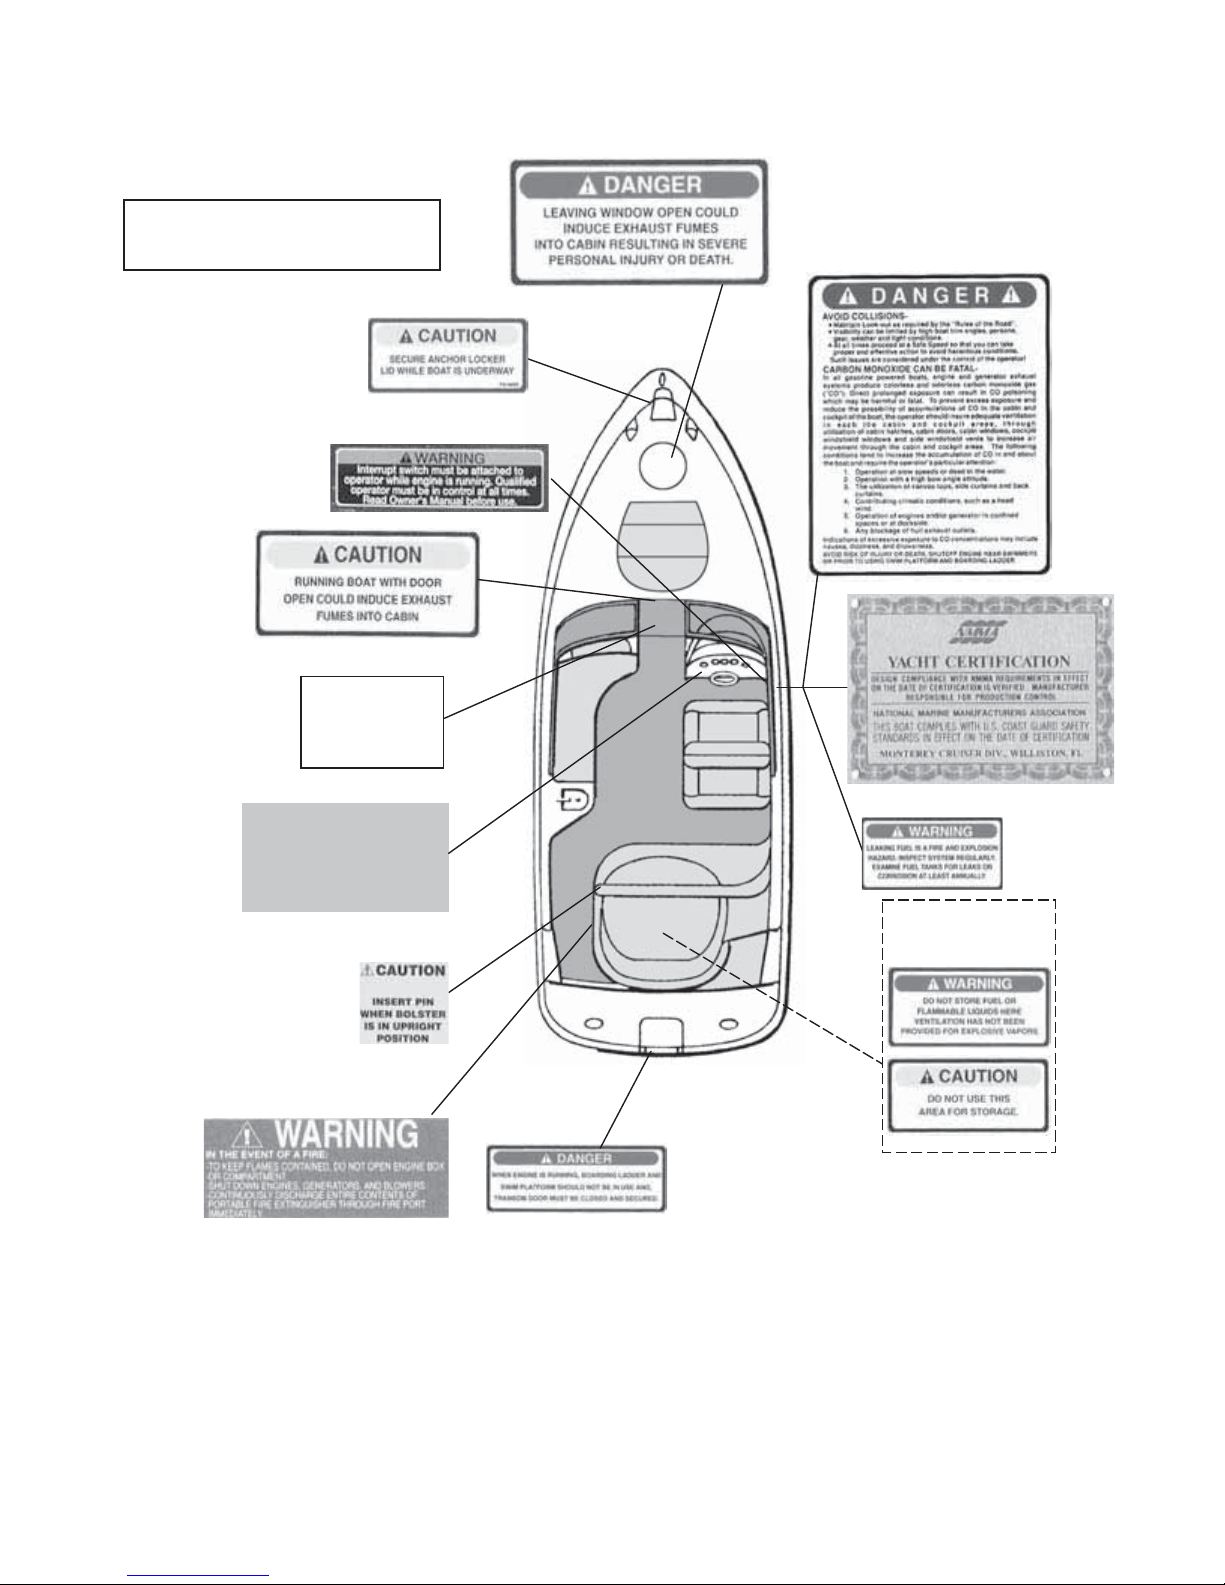
Warning and Safety Labels
The labels on this page are a sample of the warning
and safety labels on your boat. There may be
additional or differently worded labels. Please be
aware and use appropriate caution.
Volvo Engine
WARNING
GASOLINE VAP ORS CAN EXPLODE
BEFORE STARTING ENGINE:
CHECK ENGI NE COMPARTMEN T FOR
GASOLINE OR VAPORS.
OPERATE BL OWER FOR 4 MINUT ES.
RUN BLOWER BE LOW CRUISING SPEED.
CAUTION
TO AVOID INJU RY, GLASS
DOOR MUST B E S ECU R ED IN A
CLOSE D A ND LOC KED
POSITION WHEN BOAT IS
UNDER WAY. USE BOTH TURN
LOCKS TO SECUR E DOOR.
WARNING & SAFETY LABELS
Label placement shown is
approximate.
ENGINE AREA
LABELS
M-18
278 SS/SSX/SC General Features
M-19
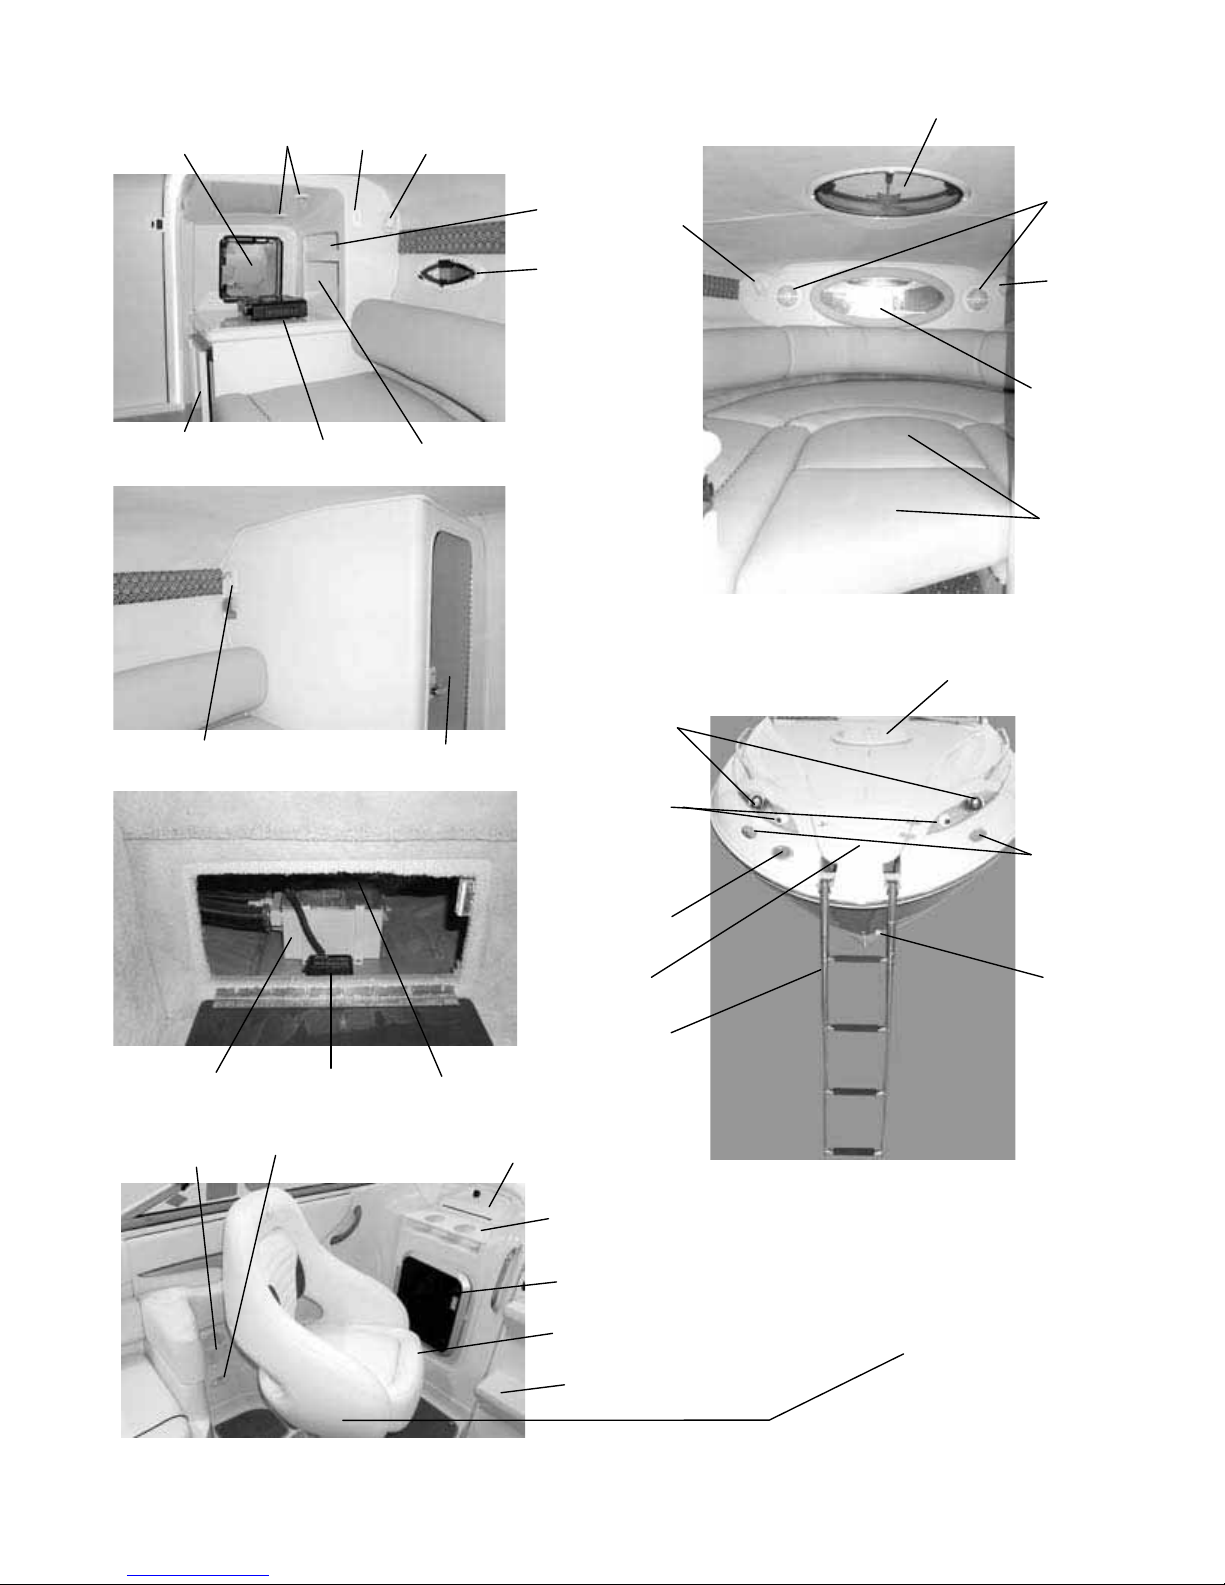
278 SC Features
(CO)
Window Hatch/
Pass Thru
Refrigerator
(Optional)
Overhead
Lights
Portable
Stove
Light
Switch
Swivel
Light
Storage
Stove
Storage
Opening
Port Light
Deck Hatch
Speakers
Swivel
Light
Swivel
Light
Mirror
(Storage Area
Behind Mirror)
V Berth
Filler
Cushions
Deck Hatch
Carbon Monoxide
Detector
Access Hatch Below Companionway
Shower Sump
with Auto Pump
Speaker
Bilge Pump
Float Switch
Courtesy
Light
Head Door
Bilge Pump
(Not Shown)
Docking
Lights
Navigation
Ladder/Line
Storage
Locker
Telescoping
Ladder
Glove
Box
Drink
Holder
Window Hatch/
Pass Thru
Flip-up
Bolster
Companionway Door/
Bow Access Steps
Lights
Pull-up
Cleats
Horn
Storage
Locker
Drain
Pedestal Seat Bottom with
Swivel Brake & Fore/Aft Brake
(Secure before boat operation)
M-20

278 SS/SSX Features
Head
Walk-Thru
Door
Walk –Thru
Door Latch
Cockpit Table
Base
Storage Area
Compass
Storage
(Under Cushion)
Navigation Lights
Horn
Locker Lid
Latch
Anchor
Roller/Frame
Docking Lights
Pull-Up
Cleat
Anchor
Rope
Locker
M-21

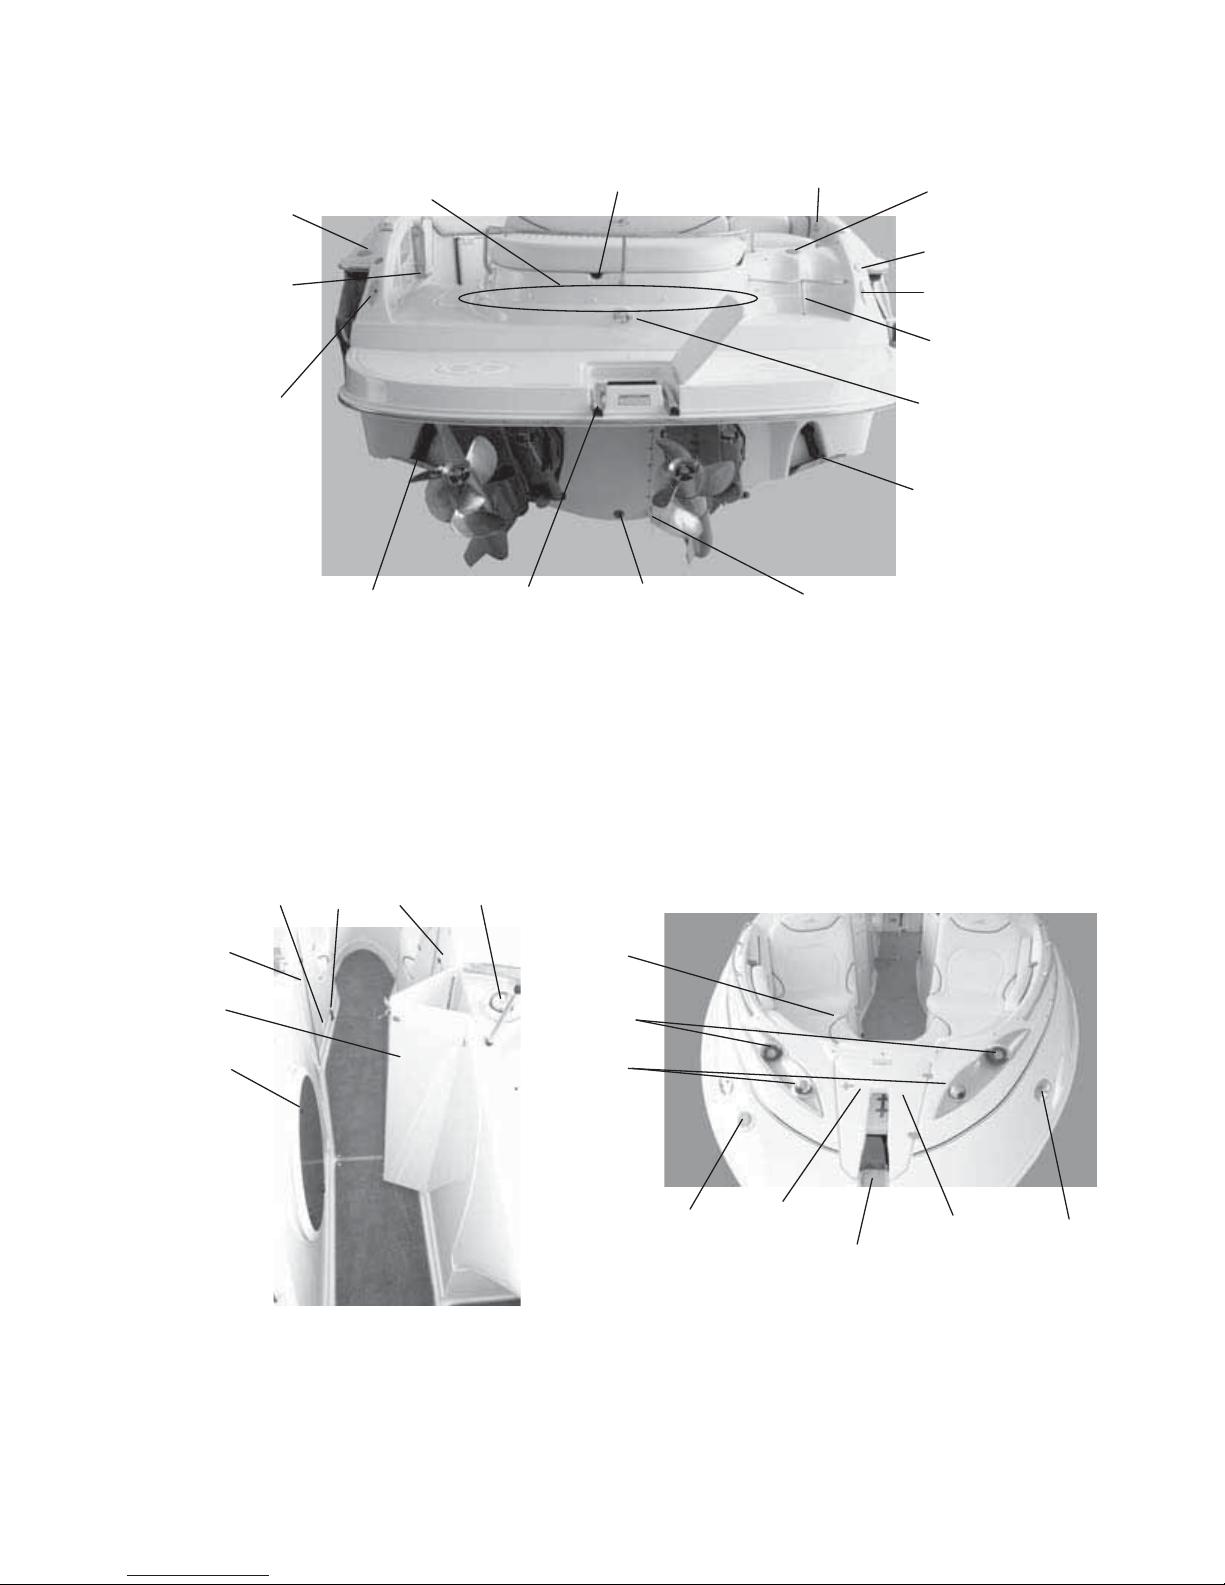
278 Engine
Automatic
Float Switch
Bilge Pump
Battery Trays
(Batteries not
provided by
Monterey Boats)
Engine
Blowers
Trim Tab
Pump
Blower
Hoses
Stern Drive
Trim Pump
Sea Water Intake for
Porcelain Head
Option
(Seacock shown in
parallel open
position)
Waste Out
(Seacock shown
in perpendicular
closed position)
Macerator
(Option)
Main DC Accessory
Breaker (40 Amp)
Circuit Breakers
(Remove Cover to Access)
• Aft Bilge Pump
•
Fwd Bilge Pump
• Shower Sump Pump
• CO Monitor
Automatic
Fire
Light
Fresh Water Tank, Pump & Strainer
Not Shown - Recessed und e r ste p a re a
Yellow Battery Cable (Ground)
(Trim Pump Ground – Black)
Red Battery
Cable (Positive)
Light
(Not Shown)
BATTERY
POSITIVE (+)
M-22
ENGINE
GROUND (-)
Stereo
Remote
(optional)
Not a seat
while in upright
position
Stern Seat Back
Retaining Pin
(Must be in place while
in upright position)
Engine Hatch Switch
(Bow Rider Only, Switch
for Cuddy Engine hatch
located at helm)
Faucet
Pull Out For
Shower
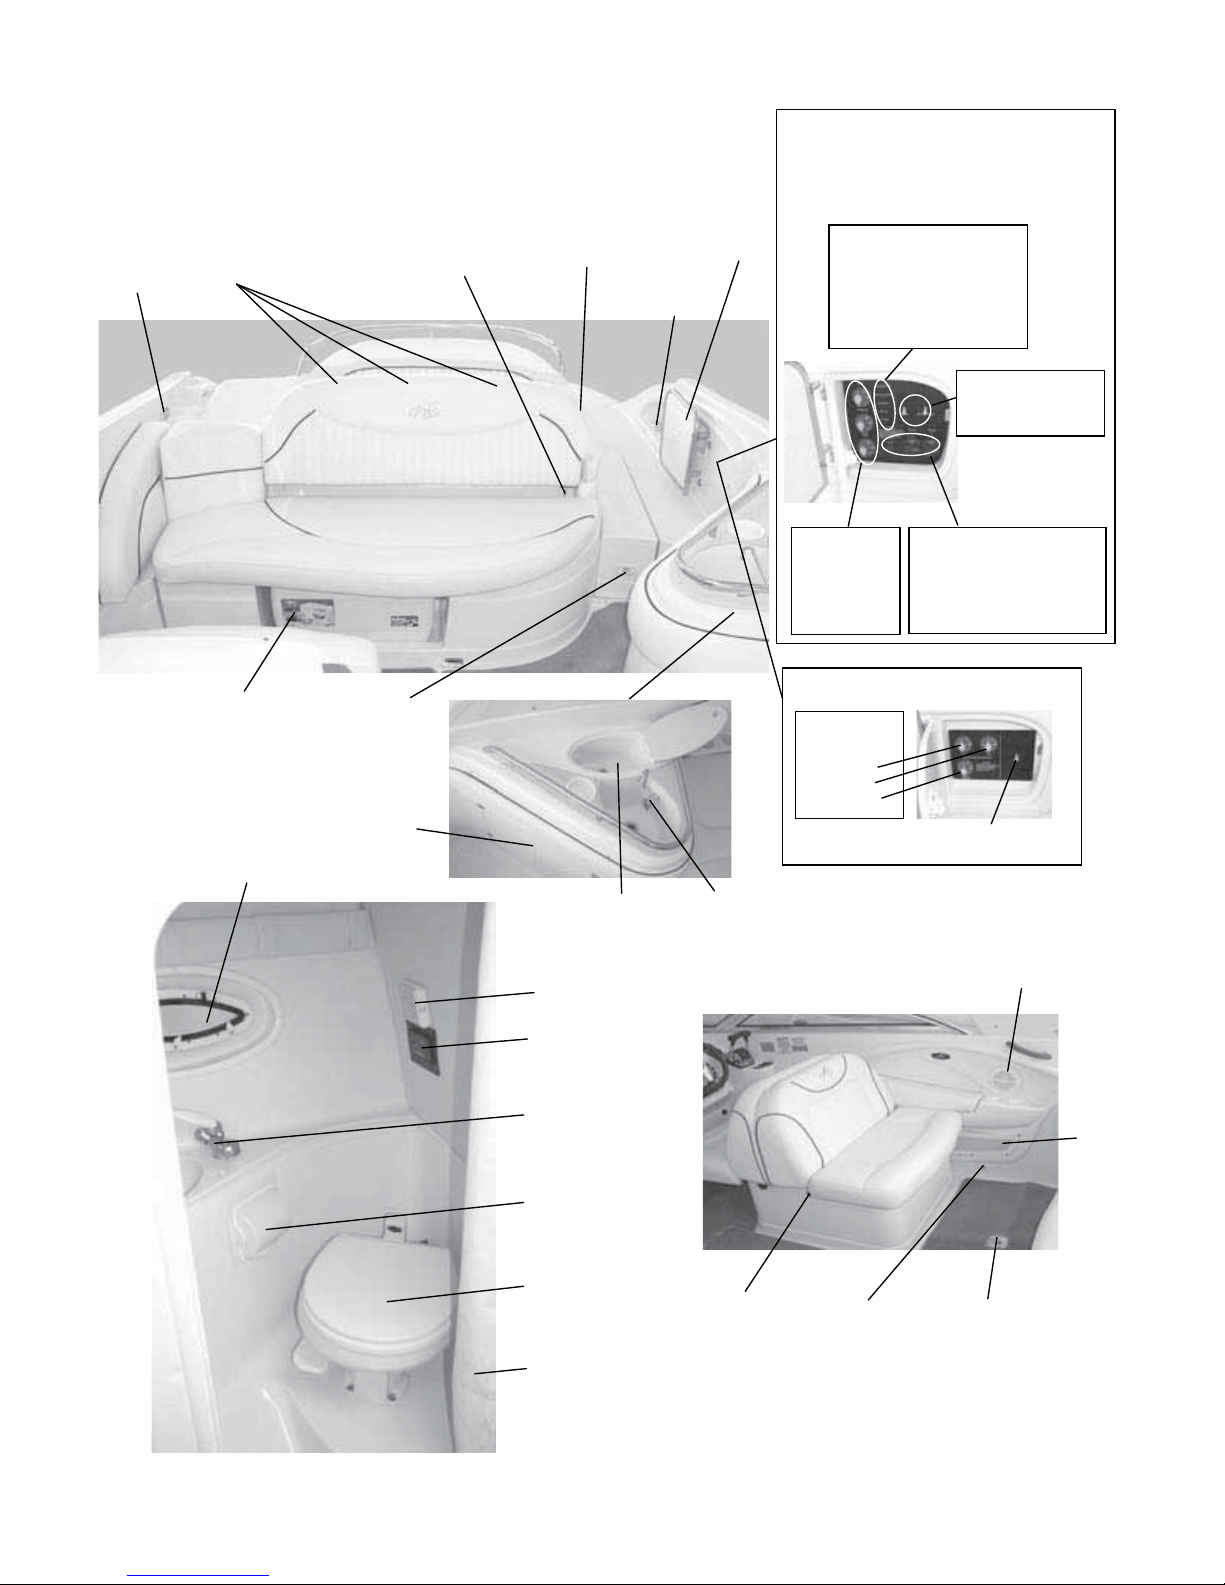
318 SS/SSX/SC General Features
Cuddy Panel
NOTE: Original version pictures -
See electrical schematics
for later info.
Transom
Door
Circuit Breakers
Fwd Emergency Pump
Emergency Bilge Pump
Stereo Memory
Sump Pump
Electronics
Circuit Breakers
AC (Alt Crnt) Main
Air Conditioner
Cooler Storage
(Space not available
with Generator Option)
Refrigerator Option
Opening
Port Light
Courtesy
Light
Storage or
(not shown)
Ice Area
w/ drain
Cabin Light
Waste Tank
Level Indicator
Faucet
Pull Out For
Shower
Faucet
Battery
Switches
Port
Parallel
Stbd.
Battery
Switches
Port
Stbd.
Parallel
Circuit Breakers
Windlass (opt)–80A
Helm Main–50A
Cabin Main-50A
Bowrider Panel
AC (Alt Crnt) Main
Circuit Breaker
Speakers
Storage
Net
Covered
Toilet Paper
Holder
Vacu-Flush Toilet
(Head)
Shower Curtain
(Cuddy Only)
Seat Slide
Tension Knob
Courtesy Light
Access Hatch to
Storage and
Fuel Sender
M-23
318 SS/SSX/SC General Features
Anchor
Roller/Frame
Anchor
Locker
Windlass Under Lid
(Optional)
Pull-up
Cleat
Navigation
Lights
Docking
Lights
Storage
(Under Cushion)
Water
Fill/Vent
Transom Door/Gate
Ensure door is
secured in closed
position when
underway
Pull-up
Cleat
Cockpit Cover or Aft
Curtain Bungee Clips
Trim Tab
Swim Ladder
Ensure ladder is
stowed when
engine(s) running
Shore Power Cord/
City Water
Routing Notch
Garboard Drain
Plug
Aft Stereo
Remote
Speedometer Pitot & Hose
(Volvo Ocean Series
Drive/Composite Only,
Built-in drive on MerCruiser,
Volvo SX-1 & Volvo DP)
Waste Withdrawal
Gas Fill/Vent
Pull-up
Not to be used for tying
boat or towing anything
other than skiers
Trim Tab
Cleat
Fender
Holder
Ski Tow
318 SS/SSX Bow Area
Cabin
Entry
Folding Door
Bomar
Opening Cabin
Window
Courtesy
Light
Cabin
Door
Strap
Head
Entry
Compass
Horn
M-24
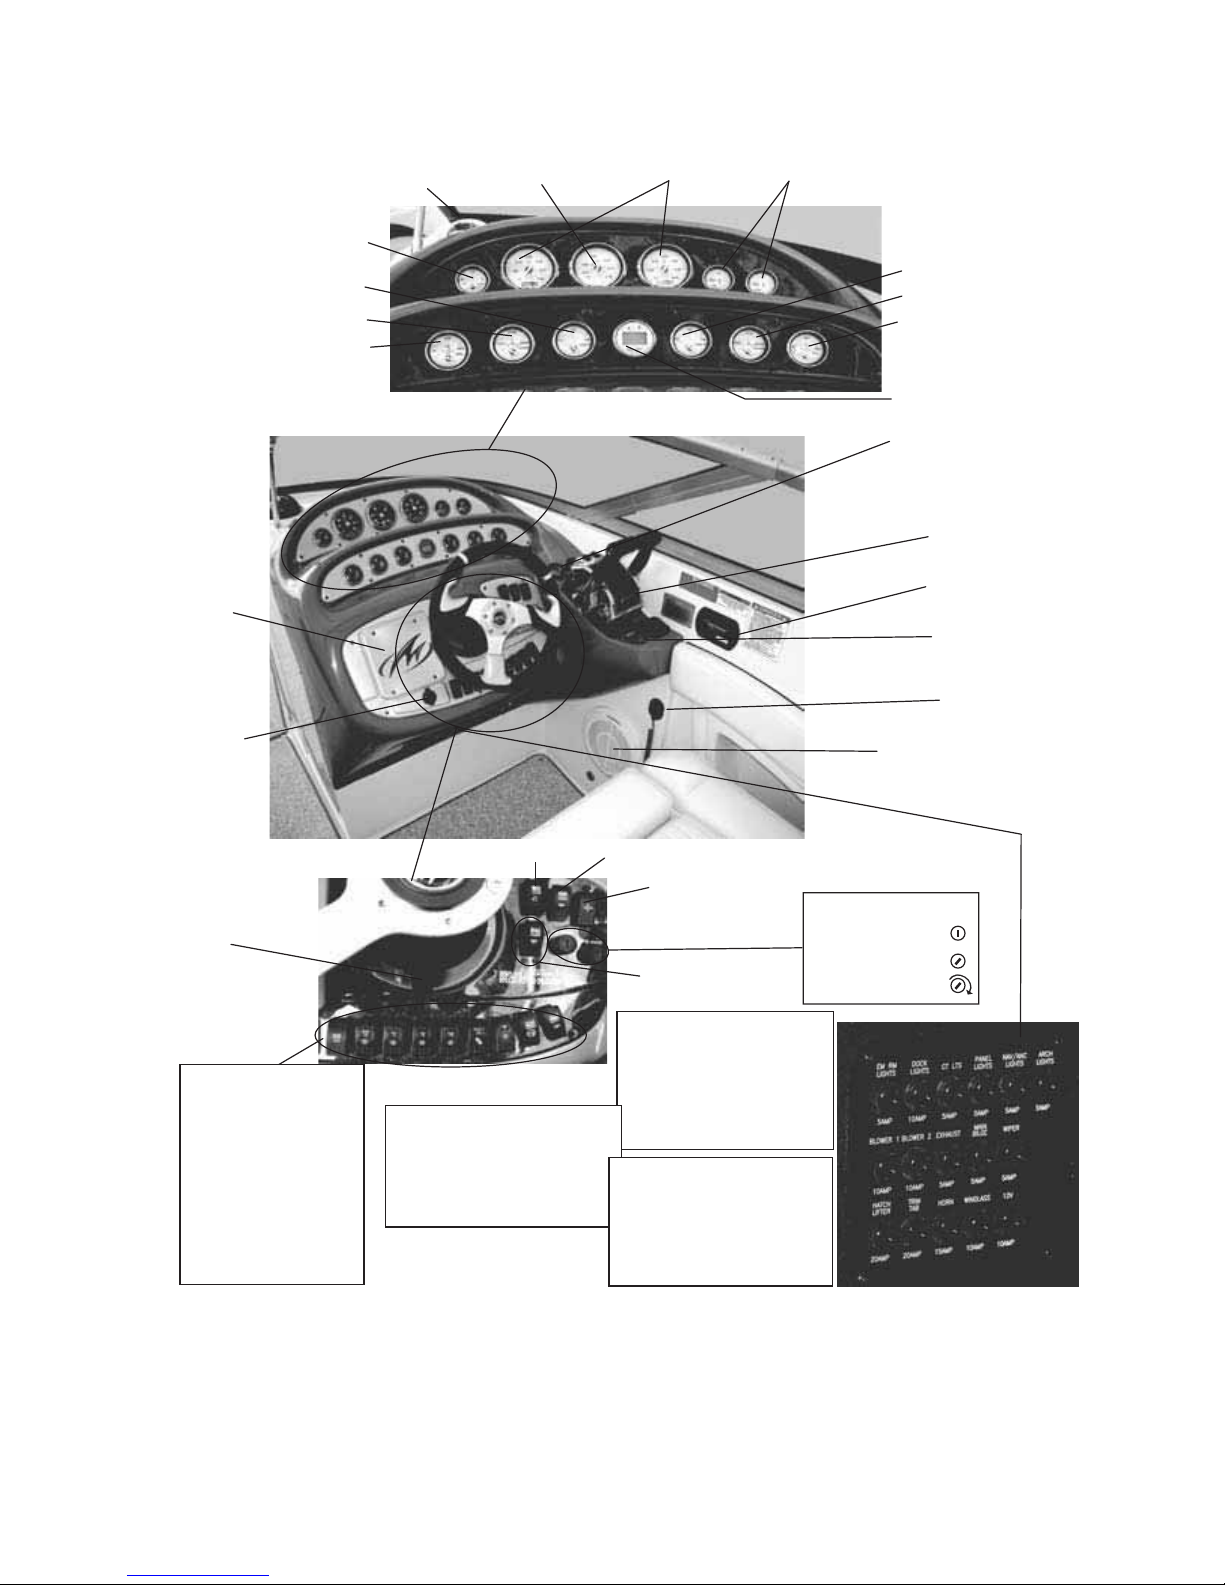
318 SS/SSX Helm
g
p
p
p
Port Eng. Oil Pressure
Port Eng. Temperature
GPS/
Chartplotter
Location
(Option)
Fuel
Port Volts
Compass
Speedometer
Tachometer with
Hour Meter
Stern Drive
Trim Indicators
Stbd Volts
Stbd Eng. Oil Pressure
Stbd Eng. Temperature
Depth Sounder
Trim Tab
Indicators
Drive Trim
Switches/
Throttle/Shift
Levers
Stereo Remote
Fixed Fire
Extinguisher
Indicator Light
Engine Stop Switch
w/ Lanyard
12-Volt
Receptacle
(15A Max)
Steer Tilt
Release
Lever
Switches
(In order Left to Right)
Engine Hatch
Bilge
Wiper
Eng. Rm. Lights
Docking Lights
Courtesy Lights
Panel Lights
Nav/Anchor
Exhaust
Accessory
Horn
Wiper
Circuit Breakers - Center Row
(In order Left to Right)
Blower 1 – 10 Amp
Blower 2 – 10 Amp
Exhaust – 5 Amp
Main Bilge – 5 Amp
Wi
er – 5 Am
Push Circuit Breakers to Reset
Horn
Windlass
(Option)
Blower Switch & Power
Indicator Lights
Circuit Breakers - Top Row
(In order Left to Right)
Engine Room Lights – 5 Amp
Dock Lights – 10 Amp
Courtesy Lights – 5 Amp
Panel Lights – 5 Amp
Nav/Anchor Lights – 5 Amp
Arch Li
hts – 5 Am
Circuit Breakers- Bottom Row
(In order Left to Right)
Hatch Lifter – 20 Amp
Trim Tabs – 20 Amp
Horn. – 15 Amp
Windlass – 10 Amp
12-V Receptacle – 15 Amp
Stereo Subwoofer
(Optional)
Ignition Switches
Off
On
Crank to Start
M-25
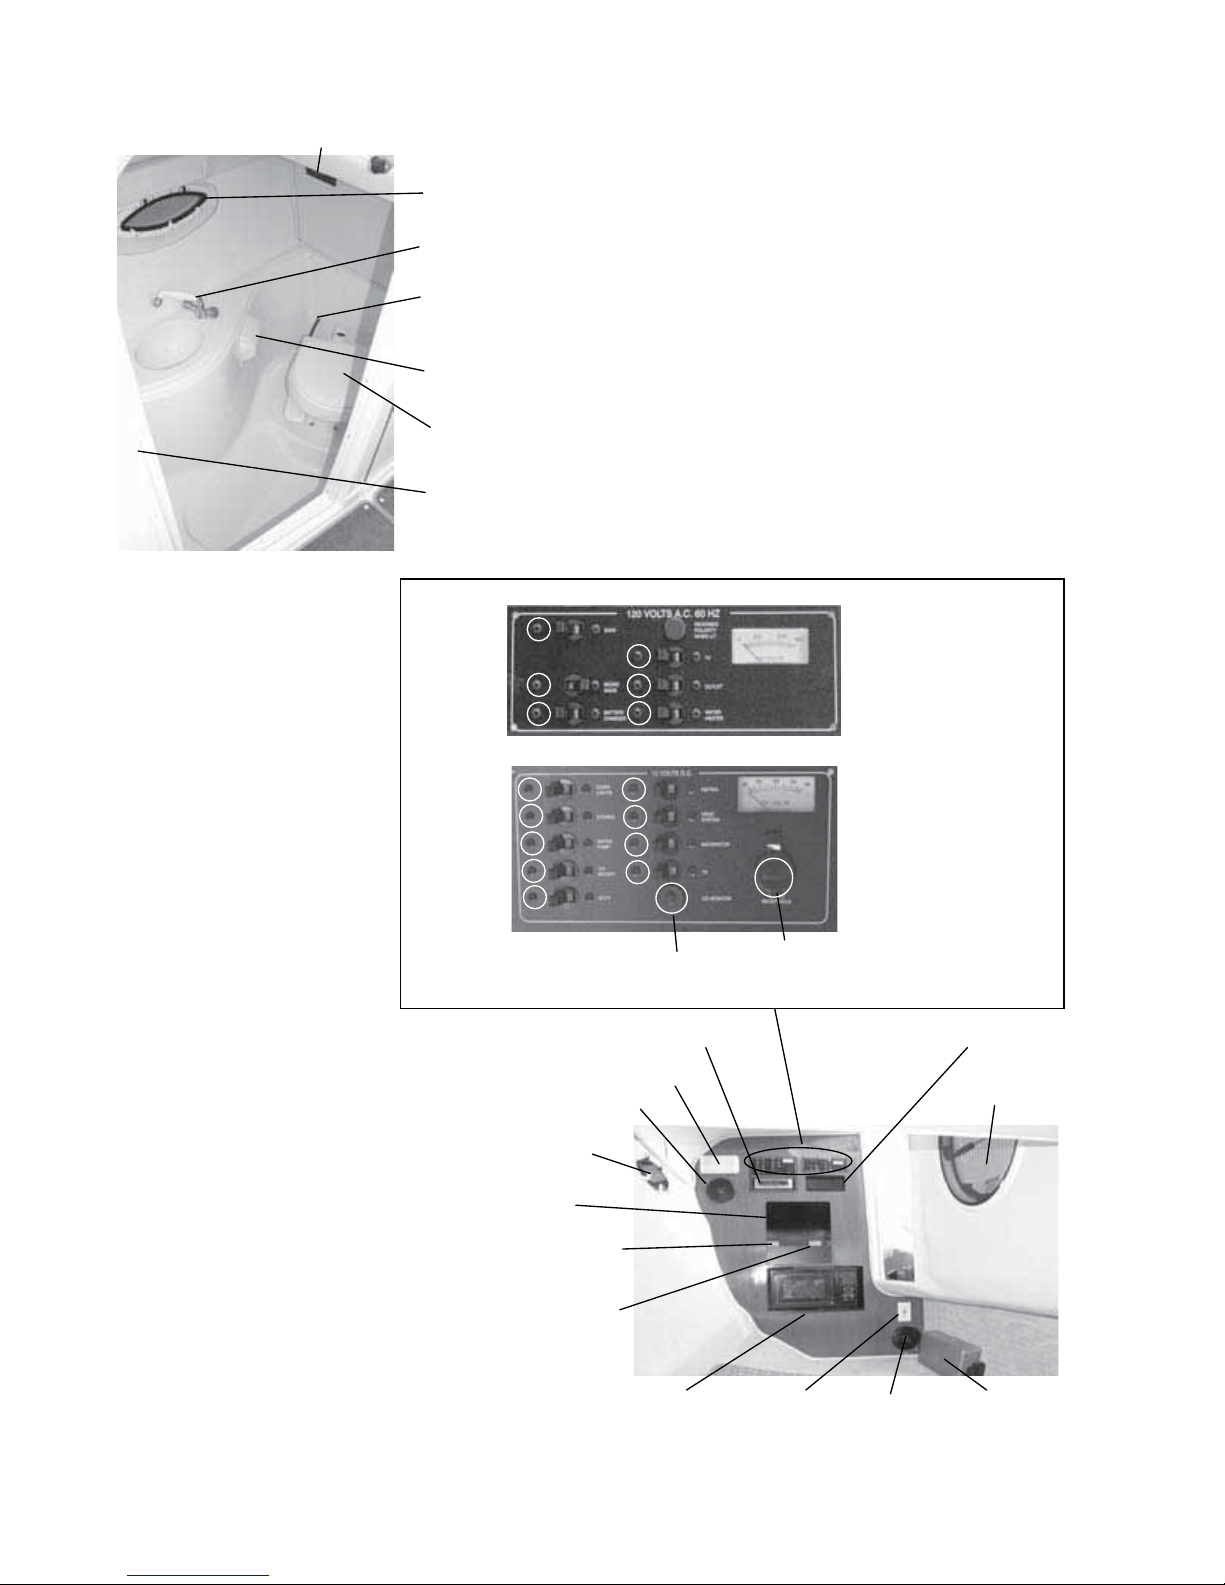
318 SS/SSX Cabin/Head
(
)
p
p
Waste Tank
Level Indicator
Opening Port
Light
Faucet (Pull out
for shower)
Water Intake
Hose
Toilet Paper
Holder w/ Cover
Vacu-Flush
Toilet (Head)
Vanity Mirror
& Cabinet
(Not Shown)
NOTE: Original version pictures -
See electrical schematics
for later info.
Electrical
Switch
Panel (AC)
Electrical
Switch
Panel (DC)
Optional LCD Flat
Panel TV
not shown
1
2
3
A
B
C
D
E
Opening
Port Light
Telephone
TV/
S
eaker
4
5
6
F
G
H
I
CO Monitor
Reset Breaker
(3A)
Stereo
Cabin
Light
1. Main (30A)
2. Microwave (15A)
3. Battery Charger (10A)
4. TV (10A)
5. Outlet (15A)
6. Water Heater (15A)
A. Cabin Lights (15A)
B. Stereo (15A)
C. Water Pump (10A)
D. 12 Volt Receptacle (5A)
E. Accessory (15A)
F. Refrigerator (15A)
G. Head System (7.5A)
H. Macerator (7.5A)
I. TV (10A)
12 Volt
Receptacle
(15A Max)
Optional DVD Player
(not shown)
Opening
Hatch
M-26
120 Volt
Electrical
Outlet
Microwave
120 Volt
Electrical
Outlet
S
eaker
Optional
CD Changer
 Loading...