

Monterey 180 FS, 228 SI, 208 SI, 190 LS, 214 FS Owner's Manual
...
SPORT BOAT
OWNER’S MANUAL
180 FS
194 FS
208 SI
228 SI
248 LS
190 LS
214 FS
218 LS Cuddy
228 SI Cuddy
248 LS Cuddy

Dear V alued Customer,
Welcome to the Monterey Life!
We would like to extend to you our “Thank You” for choosing a Monterey boat!
You have made an investment in our product and we are confident you will enjoy
many years of boating pleasure.Your new boat has been built to the standards set
forth by the United States Coast Guard and the National Marine Manufacturers
Association.We are proud to have you in our “Family!”
At this time, we need you to read your owner’s manual and become familiar with all
systems on your boat.Make certain that you and your dealer have filled out and
mailed your warranty registration card back to us here at the factory. It is very
important to us and it is also a U.S.Federal Regulation.
This manual is an important aid in the operation and maintenance of your boat.The
descriptions, information and specifications are intended as a guide and cannot cover
every question you may have about your boat and boating in general.We encourage
you to contact your dealership for any additional information you might need. If there
is a question about your boat that can’t be answered by your dealer, please contact
our factory direct by calling the Monterey Boats Customer Service Department, (352)
529-9181 or online if you prefer at:www.info@montereyboats.com.
If you are new to boating, we recommend you participate in a boating class or group
to gain more knowledge and confidence.Contact your dealer, local U.S.Coast
Guard or U.S.Power Squadron Organizations for information in your area.
With proper care, routine service and preventive maintenance, your Monterey boat
will not only reward you with enjoyment, but with reliability, dependability and one of
the higher resale values in today’s boating industry.
Enjoy your new boat and please respect our environment at all times.Always
remember to practice safe boating procedures for your protection as well as those
around you.
Sincerely,
The M.O.S.T.(Monterey Owners Support Team)
TO COMPLY WITH FEDERAL REGULATIONS IT IS IMPORTANT TO RETURN
THE WARRANTY REGISTRATION CARD WITHIN 15 DAYS.
Sport Boat
i

IDENTIFICATION NUMBERS
Safeguard information about your boat by recording the Hull Identification
Number (HIN) and model of your boat, and model and serial numbers of
the engine, trailer, and accessories below.The HIN is located on the upper,
starboard corner of the transom.The HIN must be clearly visible and may
not be removed, altered or tampered with in any way as regulated by federal law.
The identification numbers are important! Keep a copy of these numbers
stored in a safe place off the boat.In case of theft, damage, etc., repor t these
numbers to the local authorities, your insurance agent and your dealer.
DATE PURCHASED ______________________________________________
DEALER/PHONE NUMBER ________________________________________
BOAT MODEL____________________________________________________
HULL NUMBER __________________________________________________
TRAILER ID NUMBER ____________________________________________
ENGINE #1 MAKE/MODEL__________________________________________
ENGINE #1 SERIAL NUMBER ______________________________________
ACCESSORY MAKE/MODEL ________________________________________
ACCESSORY SERIAL NUMBER ____________________________________
ii
©Ken Cook Co.2004
Sport Boat

Monterey Boats has long been known as a quality boat manufacturer with
a commitment to customer satisfaction.This manual is but one example to
that commitment.We have carefully prepared this information to assist you
in the proper operation and care of your new boat, and some of the
responsibilities that go along with owning/operating a boat.
This section contains supplemental information about your Monterey boat
that is different or not covered elsewhere in this manual.If you have questions about your boat not covered in this manual, or in the other supplied
information, your dealer will be glad to assist you.Refer to the Table of
Contents on page v to locate general information.
As part of your warranty responsibilities, you must perform periodic
maintenance/ inspections as outlined in this manual, the engine owner’s
manual and other information supplied in the owner’s important papers
packet.Please keep this manual onboard for future reference and pass it
along to the new owner if you ever decide to sell the craft.
All information, illustrations, and specifications contained in this manual are
based on the latest product information available at the time of publication.
Monterey Boats reserves the right to make changes at any time, without
notice and without incurring obligation, in colors, materials, equipment,
specifications and models.
Once again, thank you for choosing a Monterey boat; we wish you many
years of boating enjoyment!
Sport Boat
iii

BOATING TERMINOLOGY
AFT
FORWARD
BEAM
LENGTH OVERALL (LOA)
STARBOARD
SIDE
PORT
SIDE
HELM
TRANSOM
STERN
WATERLINE
DRAFT
FREEBOARD
BOW
GUNWALE
MONTEREY
* An easy way to remember PORT side from STARBOARD side is
iv
“PORT” and “LEFT” both have four letters.
Sport Boat

Table of Contents
Page
MMonterey Boats ............. M-1
New Boat Delivery ...........M-1
Parts..................................M-1
Warranty Registration/
New Boat Checklist ...........M-2
Specifications ...................M-3
Special Care and
Cleaning ...........................M-4
Instrument Console ..........M-8
Battery Switches ..............M-8
Fire Extinguishing
System .............................M-9
Fresh Water Tank ...........M-10
Head and Waste
Containment System .....M-12
Important Papers Package –
Boat Layouts & Details....M-13
Wiring Diagrams .............M-32
1Boating Safety ................ 1-1
Boating Regulations ......... 1-2
Boater Responsibilities .... 1-2
Required Safety
Equipment ........................ 1-3
Recommended
Equipment ........................ 1-5
Emergencies .................... 1-6
Hazardous Conditions ..... 1-7
Boating Under the
Influence ........................ 1-10
Carbon Monoxide .......... 1-10
Operation By Minors ...... 1-11
Passenger Safety ........... 1-12
Water Sports .................. 1-12
General Precautions ...... 1-13
Our Environment ............ 1-14
2 Basic Rules
of the Road ..................... 2-1
Aids to Navigation ............ 2-1
Right-of-Way .................... 2-4
Page
3 Systems, Controls
and Indicators ................ 3-1
Systems ........................... 3-1
Controls ........................... 3-4
Switches .......................... 3-6
Indicators ......................... 3-8
4 Operation ........................ 4-1
Fueling ............................. 4-1
Starting ............................ 4-3
Shifting/Running .............. 4-3
Warning Alarm ................. 4-4
Steering ........................... 4-4
Stopping ........................... 4-6
Docking ............................ 4-6
Boat Trim .......................... 4-8
Drive Trim Angle .............. 4-9
5 Getting Underway .......... 5-1
Safety Checklist ............... 5-1
Safety Equipment ............ 5-2
Boarding .......................... 5-3
6 Running .......................... 6-1
Maneuvering
Techniques ....................... 6-1
Salt Water ........................ 6-2
Freezing Temperatures .... 6-2
Towing Procedure ............ 6-3
Anchoring ......................... 6-4
Performance Boating ....... 6-5
Propellers ......................... 6-7
7 Care and
Maintenance ................... 7-1
Repairs and
Modifications .................... 7-1
Electrical .......................... 7-1
Corrosion Protection ........ 7-4
General Maintenance ...... 7-5
Fuel System ..................... 7-7
Steering System .............. 7-7
Sport Boat
v

Table of Contents
8 Troubleshooting ............ 8-1
Trouble Check Chart ........ 8-1
9Storage ........................... 9-1
Storage Preparation.......... 9-1
Slinging/Lifting................... 9-4
10 Trailering ...................... 10-1
Hitch ............................... 10-2
Safety Chains ................ 10-2
Trailering Checklist ......... 10-3
Backing Up Trailers ........ 10-4
Launching ...................... 10-5
Loading .......................... 10-5
11 Glossary of Terms ....... 11-1
Warranty
vi
Sport Boat

NEW BOAT DELIVERY
Your Monterey boat is inspected at each step of the manuf acturing process.
Before leaving the factory, every Monterey boat undergoes a thorough check
for systems operation, fit and finish. Your Monterey Dealer also performs a
Pre-Delivery inspection prior to final delivery. When the new boat is delivered
to you, the customer , a final check is performed during orientation. Both the
Pre-Delivery and Final Delivery inspections are documented (New Boat
Checklist) to ensure trouble free operation and returned to Monterey Boats.
At the time of new boat delivery, your Monterey Dealer will ask you to sign the
completed Warranty Registration and New Boat Checklist f or the boat and
other accessory equipment. By signing these documents, you acknowledge
that you hav e reviewed and understand all information.
PARTS
Should you require new parts or would like to order an option after your
original purchase, please contact your Monterey Boats Dealer to place your
orders. Orders may not be placed with the manufacturer .
M-1
s
WARRANTY REGISTRATION AND
NEW BOAT CHECKLIST
SPORT BOAT & DECK BOAT
Boat Number (HIN): Boat Model:
Selling Dealer: Dealer Code:
Engine Brand: Engine Model:
Engine Serial #: Drive Serial #:
Date of Sale: Warranty Start D ate:
Owner Name (Last, First):
Address:
City: State: Zip:
E-Mail Address:
Phone: 2nd Phone:
PLEASE, INSPECT AND CHECK OFF THE FOLLOWING OPERATIONS
Indicate Status with the following Key: 1 – OK, 2 – Needs Correction, 3 – Completed, N/A – Not Applicable
Boat gel coat, striping & graphics
Upholstery fit, clean and free of defects
Sundeck/Sun Island/lounger operation
Canvas fit, clean and free of defects
Hatches, cabinets & head doors, latches operation
All thru-hull fittings, ball valves, head drain, anchor well drain,
drain plug-hull, wet bar drain are secure, no leaks
Windshield fit
Ladders
Running Lights (Navigation)
Cockpit lights
Toilet (Head) operation & hoses
Stereo – Radio, CD, Remote Control
Bilge Pumps – Auto float switch
Water pressure system (let pressure stand 15 minutes to see if
pump goes on) & heater
Bilge Blower(s)
Wipers
Horn
Tables
Plumbing Hose Clamps
Engine mounts – tighten
Fuel system operation – no leaks
Engine compartment components not missing, disconnected,
Hose clamps on engine & exhaust
Steering system operation, components secure, steering wheel
Drains cooling system closed
Throttle control, operation & adjustment
Shifter control, operation & adjustment
Stern drive oil level at full mark
Crankcase & power steering oil levels at full mark
Stern drive trim operation
Prop Size:
Prop installed correctly with nut(s), cotter pins
Prop rotation – Forward & Reverse
Safety start switch, engine will not start in gear
Transom plate seal has no leaks – water, oil
ENGINE – BEFORE STARTING
loose, kinked, pinched or could chafe
straight
BOAT
EQUIPMENT
SAMPLE
Oil pressure
Fuel line connectors – no leaks
Engine has no water or oil leaks
Idle speed per engine specs, in gear
Ignition timing check with timing light or scan tool
Gear shift works properly – forward, neutral, reverse
Instruments read correctly
Exhaust system – no leaks
Boat performance
Port engine operation
Starboard engine operation
Steering – smooth operation
Stern drive trim operation
Instruments register properly
Technical Check Performed by
Technician Date
All accessory equipment operates (Mech. & Elect.)
Carpets, curtains, cushions & canvas installed
All boat, engine and accessory literature
Boat properly cleaned, interior and exterior
Trailer wiring, wheels, fenders & brakes
Review & familiarize Owner with operation of all features
Sea Trial with Owner
Review of Owners Manual
Review of Warranties
Review of Owner Responsibilities
Review of Service & Maintenance Procedures
Review of Care & Cleaning
Owner Orientation Performed by
Dealer Personnel Date
ENGINE - AFTER STARTING: (in water)
PRE-DELIVERY FINAL CHECK
OWNER ORIENTATION
and options on boat
1579 S.W. 18th Street
Williston, FL 32696
Tel 352-529-9181
Fax 888-922-6287
www.montereyboats.com
SEA TRIAL:
COMMENTS
Distribution: Factory CS – White, Dealer – Yellow, Owner – Manila Card Rev 0904
I have read and agree with the checklist. I have read and
understand the Monterey Boats Limited Warranty as it appear
on back.
Owner Signature Date
Warr anty is located in the bac k of this man ual.
M-2

SPECIFICATIONS
The specifications given were in eff ect at the time of printing. Monterey Boats
reserves the right to make changes without incurring obligation.
Type
LOA
LOA w/ Swim Platform
BEAM (meters)
BRIDGE CLEAR
DEADRISE
DRAFT DRIVE DOWN
DRAFT DRIVE UP
WATER CAPACITY
(liters)
FUEL CAPACITY (liters)
DRY WEIGHT (kg)
MAX CAPACITY PERSONS
MAX CAPACITY PERSONS & GEAR
180 FS 190 LS 194 FS 208 SI 214 FS
18’-2” (5.5 m) 18’-10” (5.7 m) 19’-7” (5.7 m) 18’-10” (5.7 m) 20’-0” (6.1 m)
18’-2” (5.5 m) 20’-4” (5.7 m) 20’-4” (5.7m) 20’-8” (6.3 m) 21’-0” (6.4 m)
7’-8” (2.3 m) 8’-2” (2.5 m) 8’-4” (2.5 m) 8’-2” (2.5 m) 8’-6” (2.6 m)
3’-9” (1.1m) 4’-0” (1.2 m) 4’-2” (1.3 m) 4’-2” (1.3 m) 4’-9” (1.5 m)
20° 20° 20° 20° 20°
34” 34” 34” 34” 34”
21” 21” 21” 21” 21”
N/A 9 gal (34 l) 9 gal (34 l) 9 gal (34 l) 9 gal (34 l)
28 gal (106 l) 36 gal (164 l) 36 gal (164 l) 36 gal (164 l) 55 gal (208 l)
2000 lbs
(907.2 kg)
8 Persons or
1300 lbs
(590 kg)
1500 lbs
(680 kg)
3200 lbs
(1451.5 kg)
9 persons or
1500 lbs
(680 kg)
1680 lbs
(762 kg)
3201 lbs
(1451.5 kg)
9 persons or
1500 lbs
(680 kg)
1675 lbs
(757 kg)
3200 lbs
(1451.5 kg)
9 Persons or
1380 lbs
(626 kg)
1700 lbs
(771 kg)
3500 lbs
(1587.6 kg)
10 Persons or
1775 lbs
(805 kg)
1900 lbs
(861 kg)
Type
LOA
LOA w/ Swim Platform
BEAM (meters)
BRIDGE CLEAR
DEADRISE
DRAFT DRIVE DOWN
DRAFT DRIVE UP
WATER CAPACITY
(liters)
FUEL CAPACITY (liters)
DRY WEIGHT (kg)
MAX CAPACITY PERSONS
MAX CAPACITY PERSONS & GEAR
218 LSC 228 SI 228 SIC 248 LS BR 248 LS CU
21’-6” (6.6 m) 21’-6” (6.6 m) 21’-6” (6.6 m) 24’-6” (7.5 m) 24’-6” (7.5 m)
23’-0” (7.0 m) 23’-4” (7.1 m) 23’-4” (7.1m) 26’-7” (8.1 m) 26’-7” (8.1 m)
8’-6” (2.6 m) 8’-6” (2.6 m) 8’-6” (2.6 m) 8’-6” (2.6 m) 8’-6” (2.6 m)
4’-9” (1.5 m) 4’-8” (1.4 m) 4’-10” (1.5 m) 5’-3” (1.6 m) 5’-3” (1.6 m)
21° 21° 21° 20° 20°
35” 36” 36” 37” 37”
22” 23” 23” 24” 24”
9 gal (34 l) 9 gal (34 l) 9 gal (34 l) 14 gal (53 l) 14 gal (53 l)
57 gal (216 l) 57 gal (216 l) 57 gal (216 l) 77 gal (291 l) 77 gal (291 l)
3800 lbs
(1723.7 kg)
11 Persons or
1800 lbs
(816 kg)
2100 lbs
(952 kg)
3800 lbs
(1723.7 kg)
11 persons or
1800 lbs
(816 kg)
2100 lbs
(952 kg)
3900 lbs
(1769 kg)
11 persons or
1800 lbs
(816 kg)
2100 lbs
(952 kg)
4900 lbs
(2222.6 kg)
11 Persons or
2300 lbs
(1043 kg)
2650 lbs
(1202 kg)
5100 lbs
(2313.4 kg)
11 Persons or
2300 lbs
(1043 kg)
2650 lbs
(1202 kg)
● Draft Up and Draft Down - Minimum shown, will increase based on loading
and placement
● Water and Waste Capacity - may differ according to options
● Dry Weight - Average weight of base boat without options , fuel, water,
waste, battery(ies) or gear.
M-3

SPECIAL CARE & CLEANING
The marine environment (sun, salt, pollution, and bird droppings) requires
special products for proper care and cleaning. Your dealer is best suited for
recommendations on marine care and cleaning products that work best in
your area.
Canvas
The convertible/bimini top is made of acrylic materials. To gain longer life and
top performance from your canv as including windshield connector, side and
aft curtains, bow and cockpit covers , w e recommend the following:
● The canvas and clear plastic are not designed to withstand long periods
of time exposed to the elements as a protective cover at dock side or
when your boat is in storage. A full, properly fitted, light colored mooring
transportation or storage cover should be used for these purposes.
● If canvas gets wet during use, remove side curtains and open windshield
so seams can dry out. The air circulation will allow all canvas to dry and
prevent the growth of mildew. Never store wet or damp canvas.
● Occasionally set up all canvas and curtains and hose down with fresh
water to remove accumulated soot and dirt. Sweep or brush the
underside of the canvas to prevent the accumulation of dirt and mildew.
● The outer canvas surfaces can be cleaned with a soft scrub brush and
either automotive convertible top cleaners or household cleaners suitable
for use on acrylic surfaces. The underside of the canvas may be
periodically sprayed with a spray disinfectant to prevent the growth of
mildew.
● Do not store or dock your boat under trees. Tree sap is very corrosive to
canvas and can also be harmful to gelcoat and vinyl interiors.
● Adjust top bows to eliminate pockets in which rain water can accumulate.
The weight of this accumulated water can collapse the top or bag the
canvas.
WARNING
!
Never trailer your boat with the convertible/bimini canv as
(including side curtains, aft curtain, windshield connector, bow
cover and cockpit cover) up. Monterey Boats’ canv as is not
designed to withstand the high wind loads of trailering. Severe
wind damage can occur such as torn material, fastener pull-out
and frame distortion. Damage caused by trailering is not covered
under the limited warranty.
● Zippers and snaps should never be forced. Occasionally lubricate with
silicone/Teflon grease.
● When trailering, dismantle, roll or fold and securely stow all canvas to
prevent damage . Monterey recommends purchasing a transportation cover
M-4

to keep your boat clean on the road. Your Monterey Dealer will assist you
in finding a suitable cover (not available from Monterey Boats).
● Roll clear plastic (isinglass) curtains (do not fold) and store in a clean,
dry place.
● Do not allow petroleum products or bug sprays to come in contact with
canvas.
NOTICE
Your Monterey boat is basically an open vehicle. Therefore, in
spite of well-designed and well-fitting canvas enclosures, your
boat is not waterproof. W e ha ve made e very eff ort to design
these enclosures to conform with the boat, but a certain amount
of leakage may occur, especially at the seam lines. After cleaning
with soap and water, allow seams to thoroughly dry. A sealant
can be applied on the seams to somewhat close the needle holes
according to the manufacturer’s instructions.
Acrylic and Plexiglass
Acrylics and plexiglass have properties that make them ideal for the marine
environment. Components such as cabin doors and deck hatches need
special care to prevent scr atches and other damage . The following guidelines
will help keep acrylics and plexiglass looking good for y ears to come.
DO’S
● Wash your hatches, windshield connector, side curtains and other clear
plastic pieces, as well as other acrylic components on your boat with a
mild soap and plenty of lukewarm water.
● Use a clean, soft cloth, applying only light pressure.
● Rinse with clear water and dry by blotting with a damp cloth or chamois.
● Grease, oil or tar may be removed with a good grade of hexane, aliphatic
naphtha or kerosene. These solvents may be obtained at a paint or
hardware store and should be used in accordance with the
manufacturer’s recommendations.
● To maintain a high-luster finish on your acrylics, we recommend that after
properly cleaning, apply Meguiar’s™ Mirror Glaze #10 with a soft towel.
Note: If slight scratches appear on acrylics, use Meguiar’s™ Mirror Glaze
#17.
NOTICE
Clear plastic (isinglass) is subject to ultraviolet (sunlight)
degradation over time. It may turn yellow-br o wn (a burnt
appearance) and get brittle. Two things that can accelerate this
degradation are:
1. Direct contact with aluminum or stainless steel frames. Use
“Standoffs.”
M-5

2. In salt water areas, dried salt crystals on the plastic will
amplify sunlight. Wash after each use and/or wind y day.
DON’TS
● Do not subject acrylic material to high temperatures when polishing.
● Do not use glass cleaning sprays, scouring compounds, or solvents like
acetone, gasoline, benzene, carbon tetrachloride or lacquer thinner.
● Do not use masking tapes, duct tapes or packing tapes on your acrylic
materials.
● Do not drill holes in your acrylic materials without proper drill bits (special
bits are used in acrylic material to avoid damage).
Stainless Steel
Marine grade stainless steel components such as hardware, cleats, e y es , and
rails offer superior corrosion resistance. When properly maintained, stainless
steel will not rust or stain, even in harsh saltwater en vironments . Ho w e ver , if
not maintained, stainless steel can rust, discolor, or e v en corrode . The
follo wing guidelines will help k eep stainless steel looking good f or years to
come.
DO’S
● Clean stainless steel frequently (daily in salt or polluted environments)
with mild soap and plenty of water. Any cleaner safe for use on glass is
usually safe for stainless.
● Remove rust spots (especially around welds) immediately with a brass,
silver, or chrome cleaner. Irreversible pitting will develop under rust
allowed to remain on stainless for any period of time.
● Remove rust stains on gelcoat. See dealer for recommended product.
● Protect stainless with waxes or polishes suitable for marine use.
DON’TS
● Do not use coarse abrasives like sandpaper or steel wool which may
actually cause rusting.
CAUTION
Apply No-Slip tape or step plates on surfaces which are walked
on. Waxed gel coat surfaces are extremely slippery, especially
when wet.
● Do not use acids or bleaches which may etch the naturally occurring
protective coating.
● Do not leave stainless steel in contact with iron, steel, or other metals
which cause contamination leading to rust or corrosion.
M-6

Gel Coats
The smooth, beautiful skin of the fiberglass hull is made of gel coat. Gel coat
is a strong but thin (though thicker than automotive paint) lay er of colored
resin. The best way to k eep the gel coat skin on your boat in top condition is
through regular maintenance. The follo wing guidelines will help keep gel coat
looking good for years to come .
DO’S
● Keep the gel coat surface out of direct sunlight or covered when not in use.
● Wash gel coat frequently (daily in salt or polluted environments) with mild
detergent and plenty of fresh water . Remo ve any stains quickly. Gelcoat is
microscopically porous, so long term staining may become permanent.
● Regularly (monthly in salt or polluted environments) wax gel coat surfaces
with marine grade wax recommended for fiberglass finishes .
DON’TS
● Do not use plastic or other nonporous (non-breathable) materials to
cover gel coat surfaces. Trapped moisture from condensation can cause
gel coat damage. Shrink wrap storage covers must be properly
ventilated, including hullsides.
● Do not use abrasives, bleaches, ammonias, acids or harsh detergents.
See your dealer for special marine formulations.
● NEVER wax a gel coat surface in direct sunlight.
● Do not attempt to remove stains and scratches. Chalking, stains, and
minor scratches can be removed in most cases with careful rubbing and
polishing with appropriate chemicals and is best done by a professional –
see your dealer.
M-7
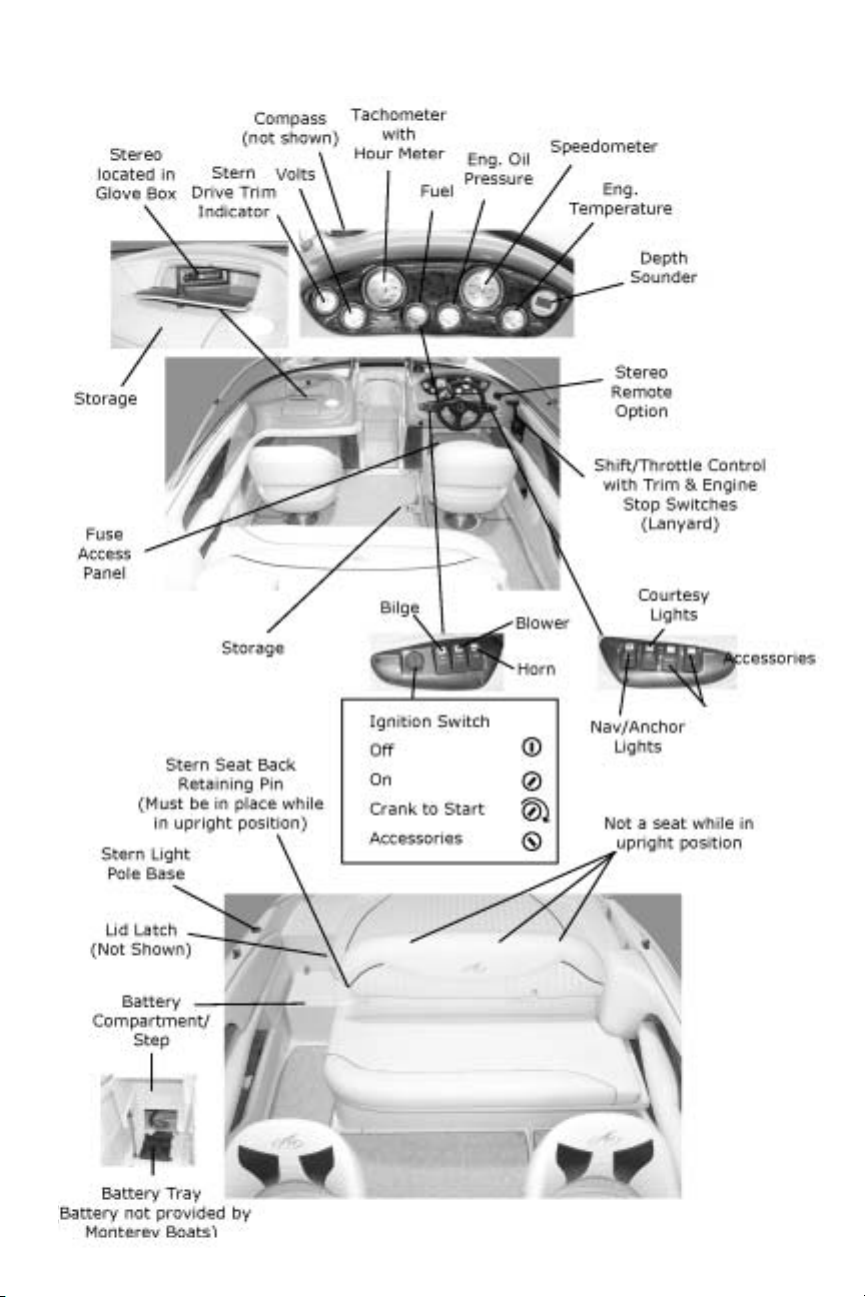
INSTRUMENT CONSOLE
5
All Monterey boat models are equipped with full instrumentation for
monitoring boat performance. Each individually switched electrical circuit is
protected with a replaceable fuse. An accessory circuit is provided for
additional elecrical accessories. Refer to the Controls and Indicators section
for more inf ormation. See page M-20 to M-31 f or Sport boat helms.
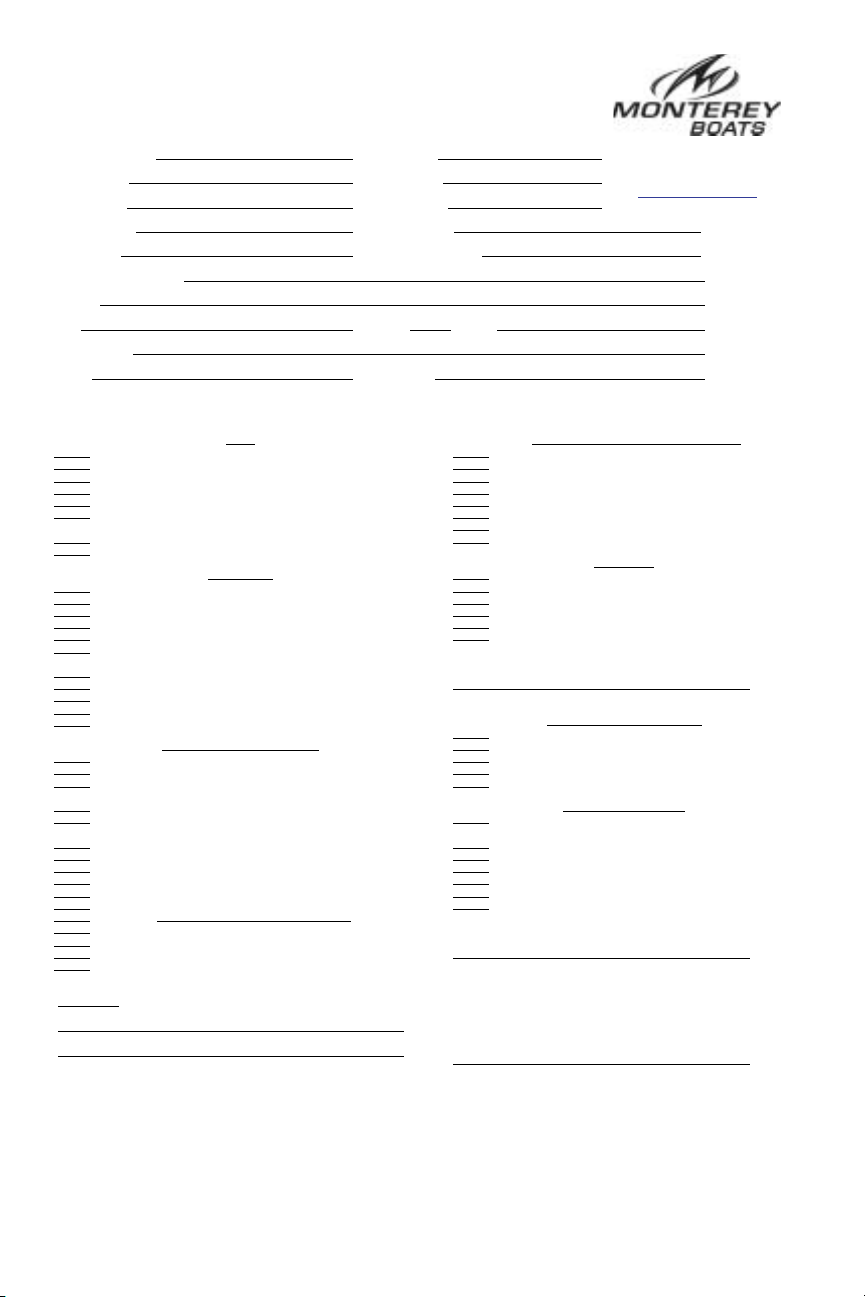
BATTER Y SWITCHES
Your boat may be equipped with an optional battery switch which connects/
disconnects all power to the electrical system (except the automatic bilge
pump, stereo memory, and electronic corrosion controller if equipped). Two
types of battery switches are common; a single battery switch for one battery
system, and a dual battery selector switch for systems with an auxiliary
battery .
+
–
MAIN
BATTERY
+
–
AUXILIARY
BATTERY
BATTERY
SELECTOR
SWITCH
BOTH
12
AUTO
BILGE
PUMP
TO INSTRUMENT
OFF
CONSOLE
ENGINE
KC-1618
WARNING
!
BATTERY
ENGINE
TYPICAL BATTERY SWITCH INSTALLATION
–
MAIN
+
BATTERY
SWITCH
ON
OFF
AUTOMATIC
BILGE PUMP
Never turn switch to the OFF position while the engine(s) is
running or serious alternator/electrical system damage could
occur.
Battery Switch – Connects the battery to the
electrical system. Provides isolation and positive
disconnect of battery . Rotate switch to the OFF
position when boat is not in use.
12
Battery Selector Switch – Operates as a battery
switch and provides the additional ability to connect
two batteries in parallel for starting in case one battery
is low. Rotate switch to the OFF position when the
boat is not in use.
TYPICAL BATTERY
SELECTOR SWITCH
TO INSTRUMENT
CONSOLE
KC-1619
BOTH
OFF
KC-070
M-8
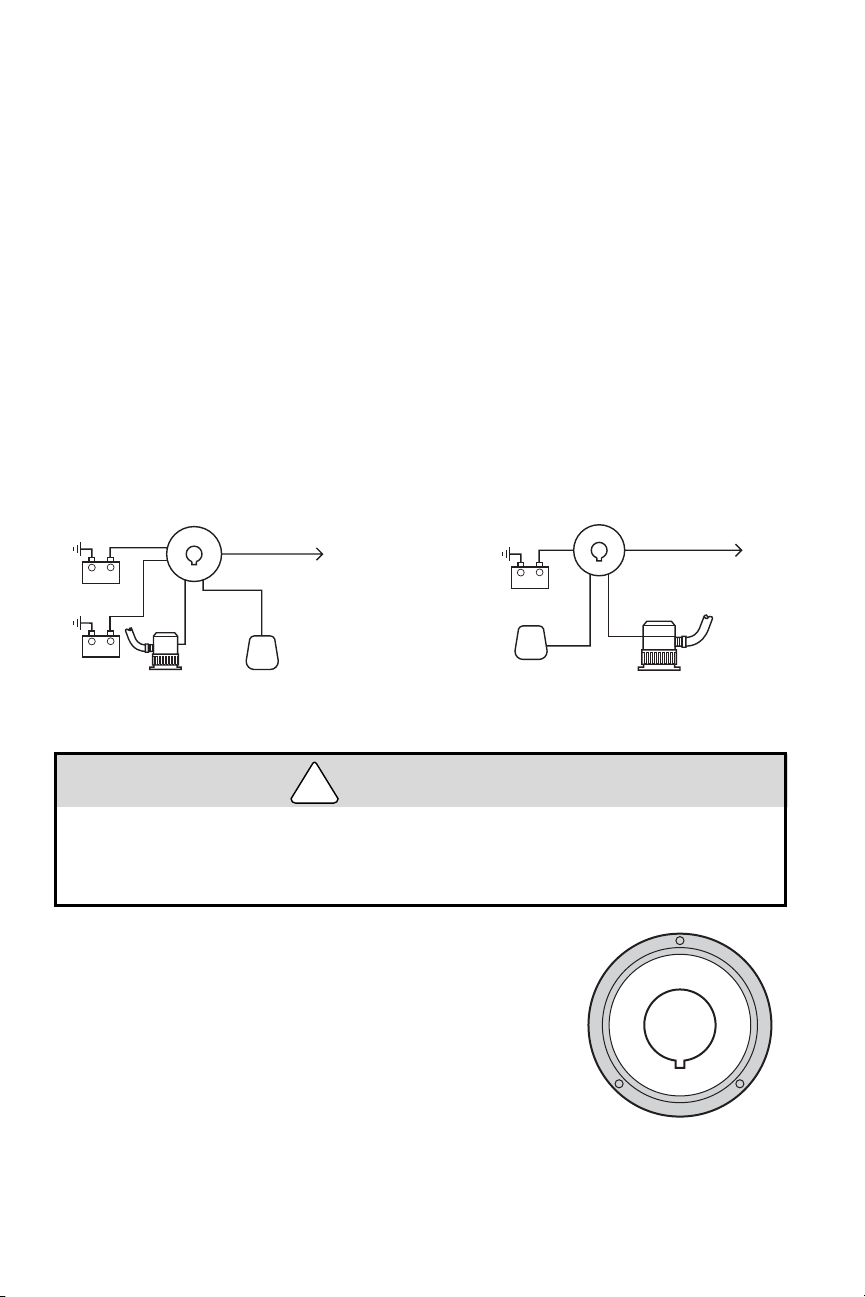
FIRE EXTINGUISHING SYSTEM
a
Some stern drive boats are equipped with an optional
Automatic Fire Extinguishing System f or an engine
compartment fire. The system is automatically
actuated when temperatures reach or exceed a preset
limit.
When actuation occurs, a loud popping sound may be
heard followed by “rushing” air sound. When a
discharge occurs, immediately shut down all
electrical and mechanical systems including
engine, and powered ventilation (Blowers).
Do not open the engine hatch at this time! This
feeds o xygen to the fire and flashback can occur . Allo w
the extinguishing agent to “soak” the compartment for
at least fifteen (15) minutes, and wait f or hot metals
and fuels to cool before inspecting for cause or
damage.
WARNING
!
Fire extinguishing agents and fire by-product fumes are toxic; do
not breath fire fumes. Accidental discharge can be dangerous
and may cause serious injury. do not attempt to service the
system unless qualified to do so.
DISCHARGED
AUTOMATIC
EXTINGUISHING
SYSTEM
SYSTEM
CHARGED
SYSTEM
FIRE
KC-0084
WARNING
!
If fire is still active after system dishcarges: All occupants should
immediately put on PFDs (Personal Flotation Devices) and get off
the boat.
M-9
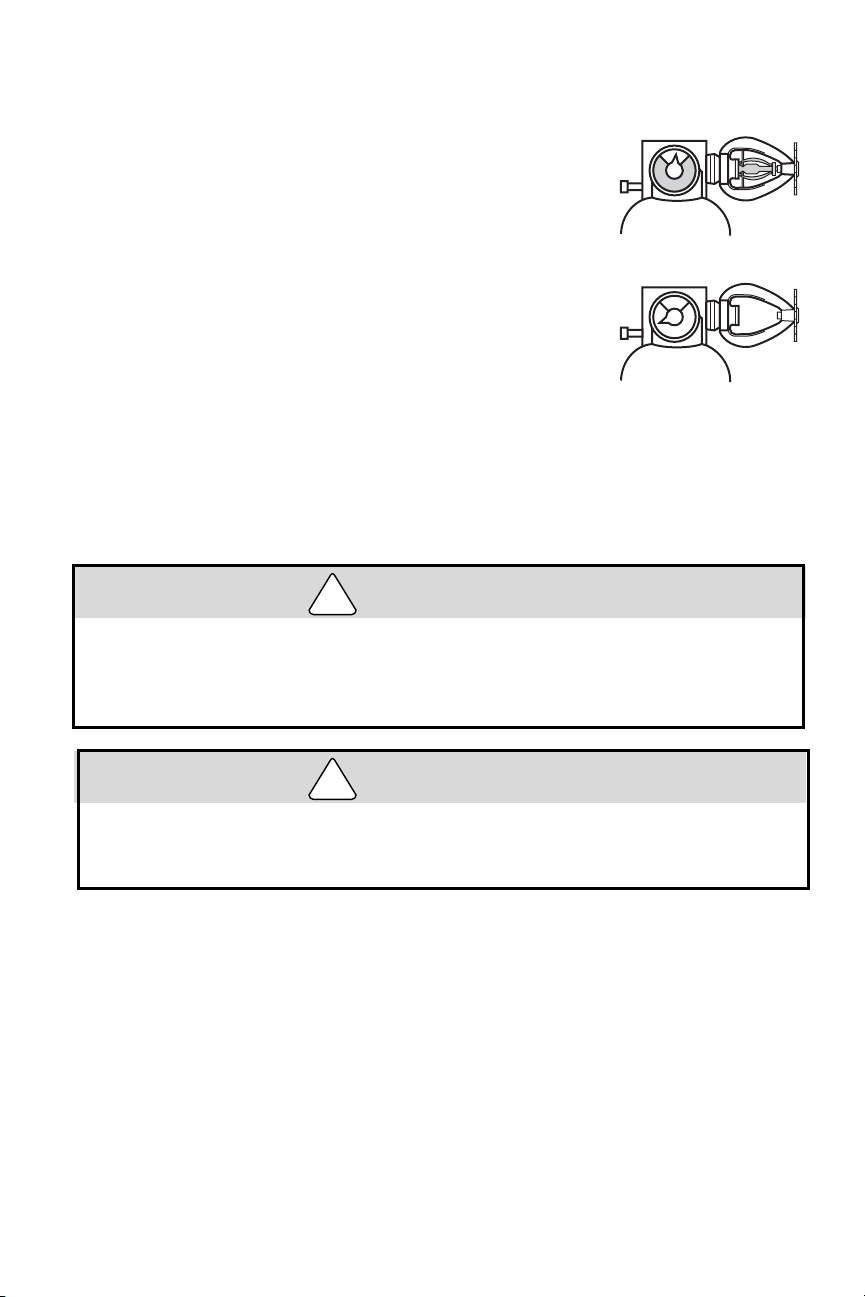
FRESH WATER TANK
KC-2047
TYPICAL DECK PLATE KEY
The fresh water tank is filled through the deck plate filler marked “WATER.”
The tank is vented through the combination water fill/v ent fitting; this allo ws air
to enter/escape as water lev els rise and fall. The water tank is full when water
comes out of the fill/vent fitting.
Notice
Fill the tank only with potable water. Using and refilling the tank
often will help keep it a source of clean drinking water.
To fill the tank:
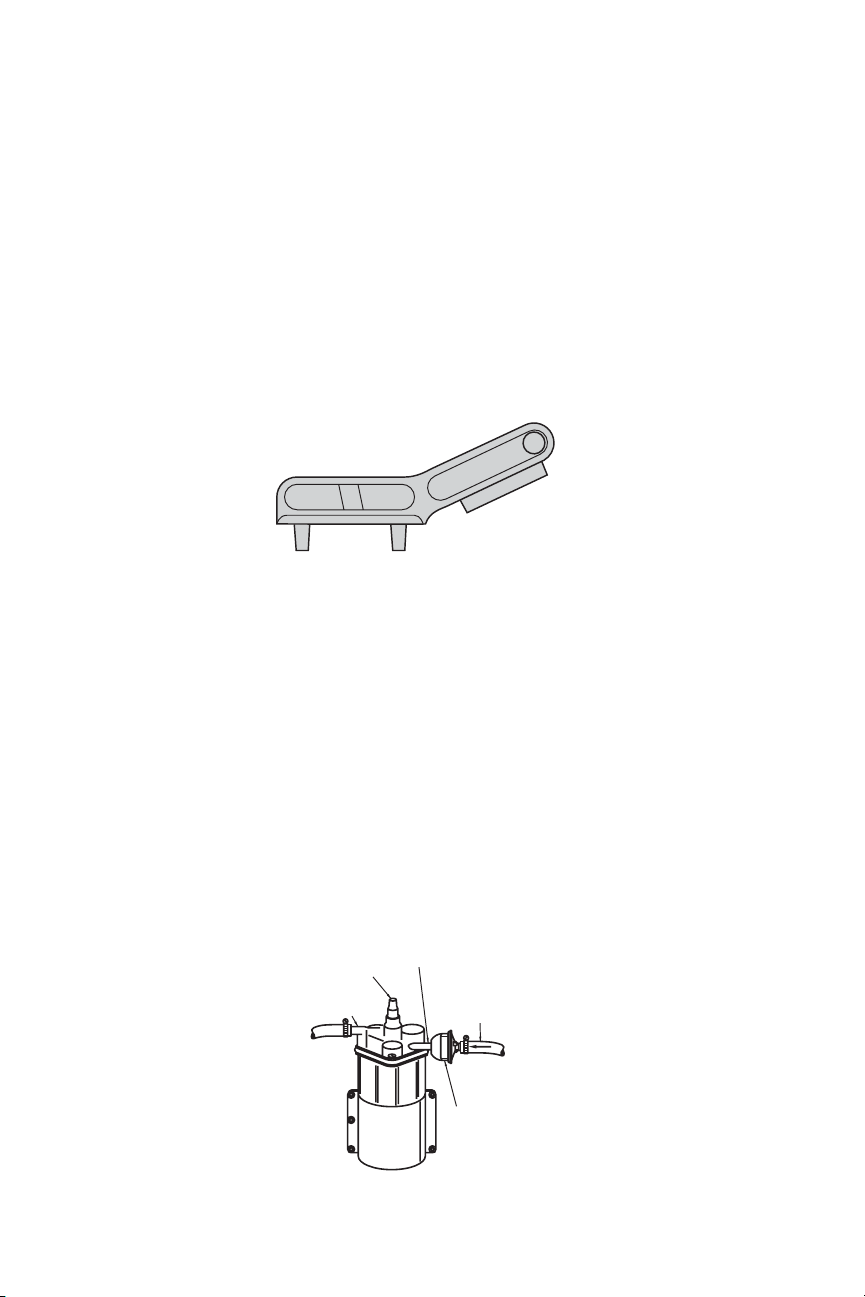
1. Insert the filler cap (special) key provided with your boat.
2. Insert the key into the slot in the cap and turn counterclockwise to unlock.
3. Remove the cap.
4. Using a sanitary drinking water hose (blue or white), fill the tank with
clean, fresh drinking water.
5. Replace the cap and lock into position with the key.
Filter and Pump
Water is drawn from the tank by a self-priming pump located in the engine
area. Before entering the pump, the w ater passes through a filter to capture
any solid contaminants. The pump provides a flow of water at a preset
pressure to the remainder of the system.
PUMP
INLET
WATER
HOSE
(FROM
TANK)
FILTER
HOUSING
KC-2042.1
M-10
PRESSURE
SWITCH
PUMP
OUTLET
TYPICAL FRESHWATER PUMP

Initial Fresh Water System Startup
1. Fill the fresh water tank (approximately 15 gallon capacity) with potable
water.
2. Turn the FRESH WATER PUMP switch “ON.”
3. Open the wet bar faucet to allow air to escape. Close the faucet when a
steady flow of water is apparent.
4. Bleed air from the remainder of the faucets, showers, etc., in the same
manner as step 3. After all lines have been bled, the pump will build to
operating pressure and then shut off.
5. You may now continue to fill the tank to its capacity.
CAUTION
The fresh water pump works on demand and WILL NOT automatically
shut-off when the tank is empty. If the switch is in the “ON” position,
and the tank is empty, the pump will run continuously and may
overheat.
Fresh Water System Maintenance
The following maintenance actions should be performed monthly to keep
the fresh water system clean and sanitary:
•Drain the fresh water tank completely (using all faucets, showers, etc.).
Refill tank with at least 15 gallons of clean, fresh water and drain again.
• Clean fresh water pump inlet filter screen.
• Rotate housing slightly counterclockwise and pull to separate housings
and gain access to the filter screen. After cleaning, reverse procedure.
Ensure O-Ring is in place.
Sanitizing the Fresh Water System
If water in the tank has been allowed to stagnate and you suspect that the
fresh water system may be contaminated, sanitize the system. To sanitize:
1. Drain the fresh water tank completely (using all faucets, showers, etc.).
2. Mix a solution of 1/4 cup household bleach to 1 gallon of water for every
15 gallons of tank capacity. Pour the solution into the fresh water tank.
3. Fill the tank with clean, fresh water.
4. Turn fresh water pump “ON” and bleed air from all faucets, showers, etc.
5. After approximately 3 hours, drain the system completely.
6. Flush the system with one full tank of water.
7. Fill tank with clean, fresh drinking water.
M-11

If you can smell or taste bleach in the water:
1. Drain the system completely.
2. Mix a solution of one quart of white vinegar to 5 gallons of water. Pour
the solution into the fresh water tank.
3. Allow the solution to remain in the tank until approximately one hour of
cruising time is logged.
Notice
Boat motion will “slosh” the vinegar/water solution to help
clean the tank.
4. Allow the solution to remain in the tank for at least one week.
5. Drain the fresh water system completely.
6. Flush the system with one full tank of water.
7. Fill the tank with clean, fresh drinking water.
HEAD AND WASTE CONTAINMENT
SYSTEM
Some models have either a portable chemical toilet, chemical toilet with
optional pump-out fittings, or porcelain manual pump. It is recommended to
read the separate owner’s manual before operating toilet.
Waste Disposal Dockside Pump-out
To clear holding tank of wastewater, you need to use the dockside
pump-out services provided at certain marinas, etc.
To empty the tank of waste, hook suction hose to the pump-out plate and
to the dockside pump. The marina will handle the proper disposal of the
waste, and may charge for this service. After emptying, be sure to add
fresh toilet chemical per label directions.
M-12

IMPORTANT PAPERS PACKAGE
Stereo Remote Control – Hand Held
Battery Post Covers
Keys
Engine Owner's Package
Gas Cap Key
Garboard Drain Plug
Owner’
s Package:
• Monterey Boats Owner’s Manual
•Water Systems Pump Literature
•Tilt Mechanism Instructions
•Safe-T Helms Instructions
• Steering Cable Instructions
• Depth Sounder Owner’s Manual
• Marine Ignition Interrupt Switch Literature
• Compass Literature
•Audio Keypad Literature
•Kenwood Stereo Literature
•Propeller Literature
• Canvas Literature
• Throttle Control Manual
•Waste System Literature
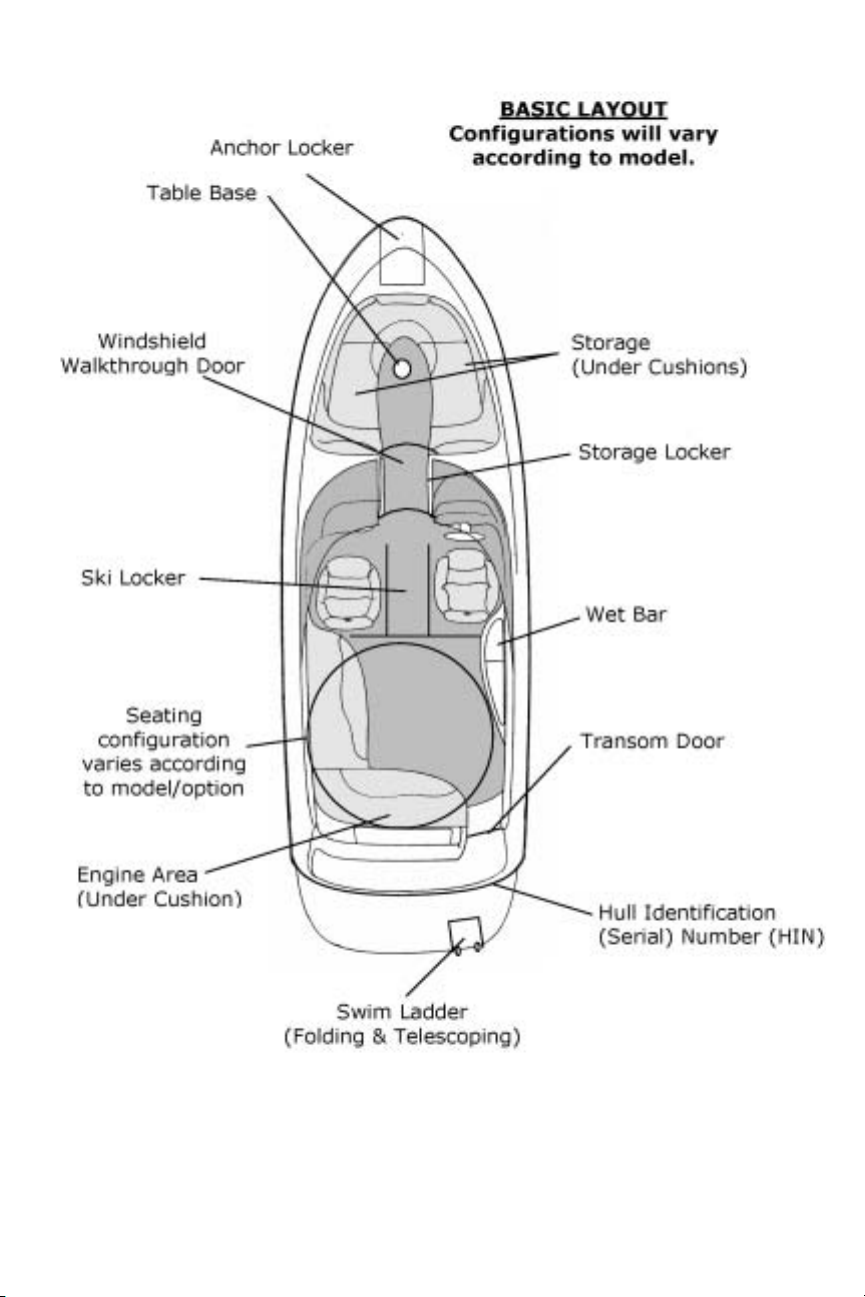
BOAT LAYOUTS & DETAILS
The following illustrations are intended to give you, the boat owner, a brief
overview of your new sport boat. These illustrations are a representation and
may not reflect all options or layouts. Your Monterey dealer or their
representative can give y ou a detailed demonstr ation of your boat and
operation of its many features .
M-13
M-14
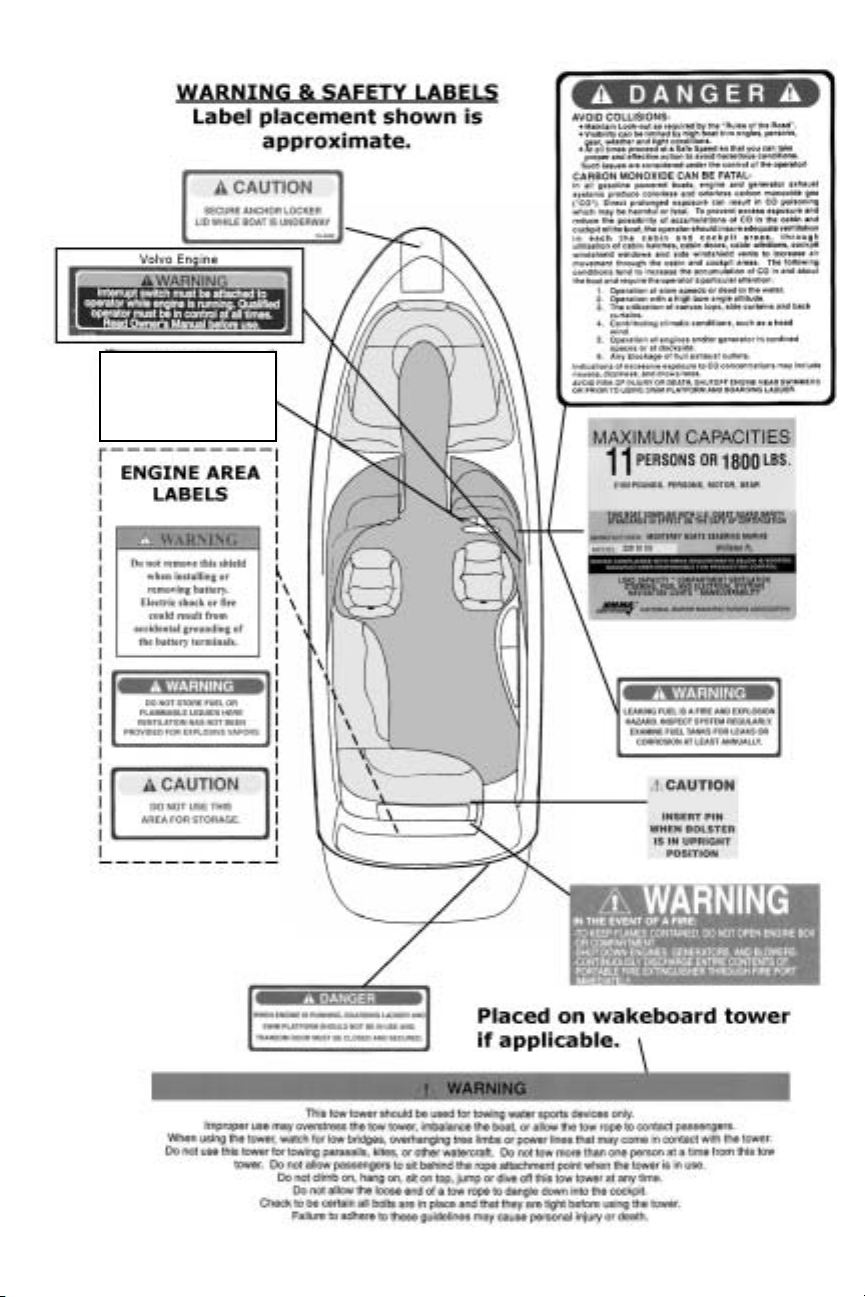
WARNING
GASOLINE VAPORS CAN EXPLODE.
BEFORE STARTING ENGINE:
CHECK ENGINE COMPARTMENT FOR
GASOLINE OR VAPORS. OPERATE
BLOWER FOR 4 MINUTES. RUN
BLOWER BELOW CRUISING SPEED.
M-15

Back to Back Lounge Seating
Figure 1
Figure 2
Figure 3
To adjust seat position forward or aft:
1. Turn lever in figure 3 clockwise to release rack teeth and hold, moving
seat forward or aft until in desired position. Return lever to original up &
down position to lock position. Ensure at least 2 rack teeth are engaged.
To change from upright position (figure 1) to lounge position (figure 2):
1. Turn lever in figure 3 clockwise to release rack teeth. Hold & Pull lever
toward front of boat while lifting up on seat bottom, releasing both tabs
(figure 1) until seat pulls freely and move seat into lounge position.
2. To secure headrest (aft) in angled position, push brackets in figure 4 into
locked position as shown in figure 5.
Figure 4 Figure 5
To change from lounge position (figure 2) to upright position (figure 1):
1. Push seat back into almost* upright position. While holding one end,
slide the other end with a quick motion, exerting some pressure until seat
snaps into place (tab inside framework shown in figure 1 will drop back
into place).
2. Ensure lever in figure 3 is in the up/down position.
*Leave an approximate 6 inch gap at bottom of seat back.
M-16
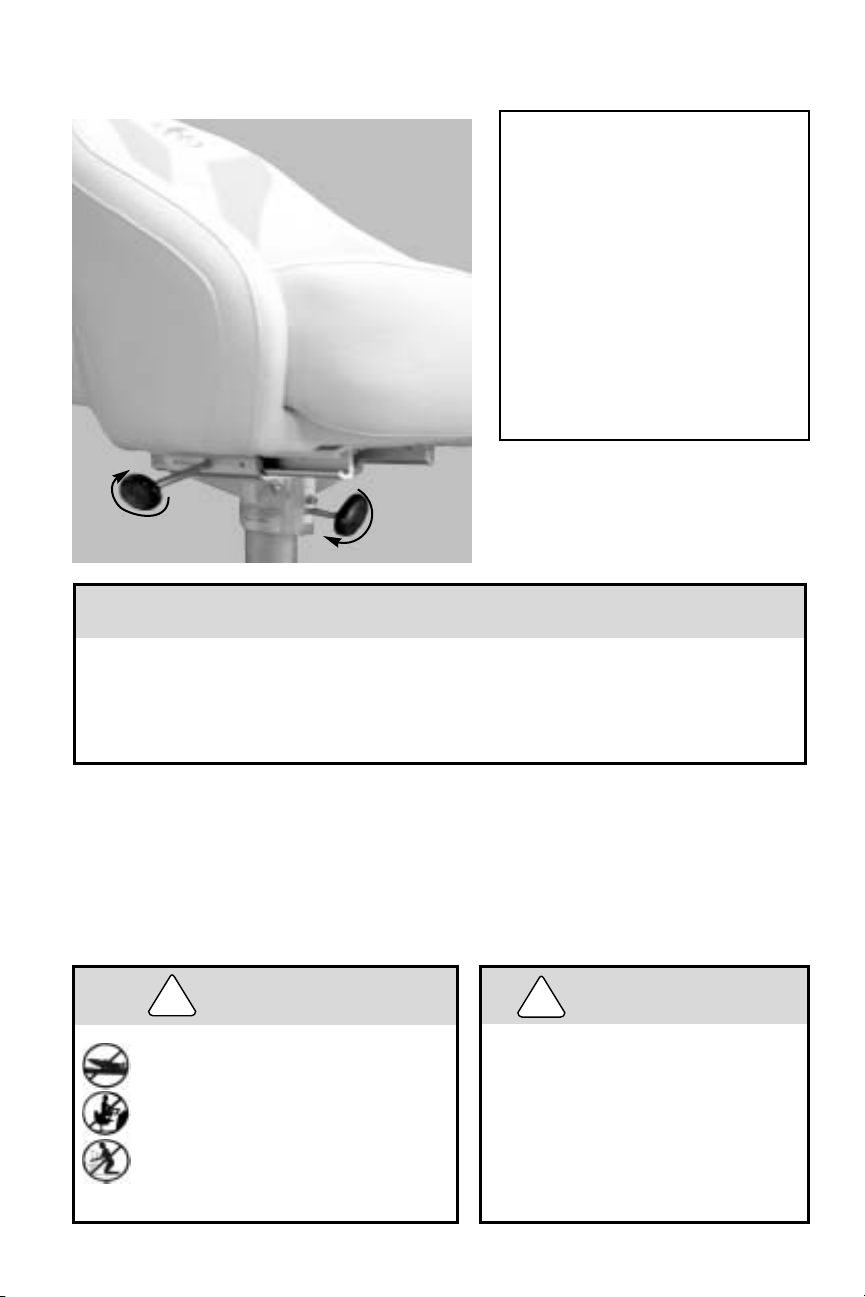
Pedestal Seating
To adjust pedestal seat fore
and aft:
1. Turn black locking handle
counter-clockwise until
seat moves forward and
aft freely.
2. Move seat into desired
position.
3. Turn locking handle
clockwise until seat is
secured.
Slide
Locking
Handle
Swivel
Locking
Handle
CAUTION
Pedestal is equipped with a 360° swivel rotation feature*. A
positive locking mechanism can secure your seat swivel from
unintentional rotation. Follow these instructions to avoid
unnecessary wear that could cause permanent damage to the
lock.
To Lock:
Turn black locking handle clockwise and rotate seat slightly to begin positive
engagement of interlocking teeth. Secure seat in place by tightening handle.
To Unlock:
Turn locking handle counter-clockwise enough to ensure free rotation.
WARNING
!
Do Not Ride On Bolster In
Rough Water Conditions
Keep Both Feet On Deck
(Floor)
Keep Head And Arms Out
Of Flip-Up Bolster Area
WARNING
!
Avoid serious or fatal
injury due to rotation
of seat. Lock swivel
when speed exceeds 5
mph.
*Due to pedestal position, Monterey seats may not swivel full circle.
M-17
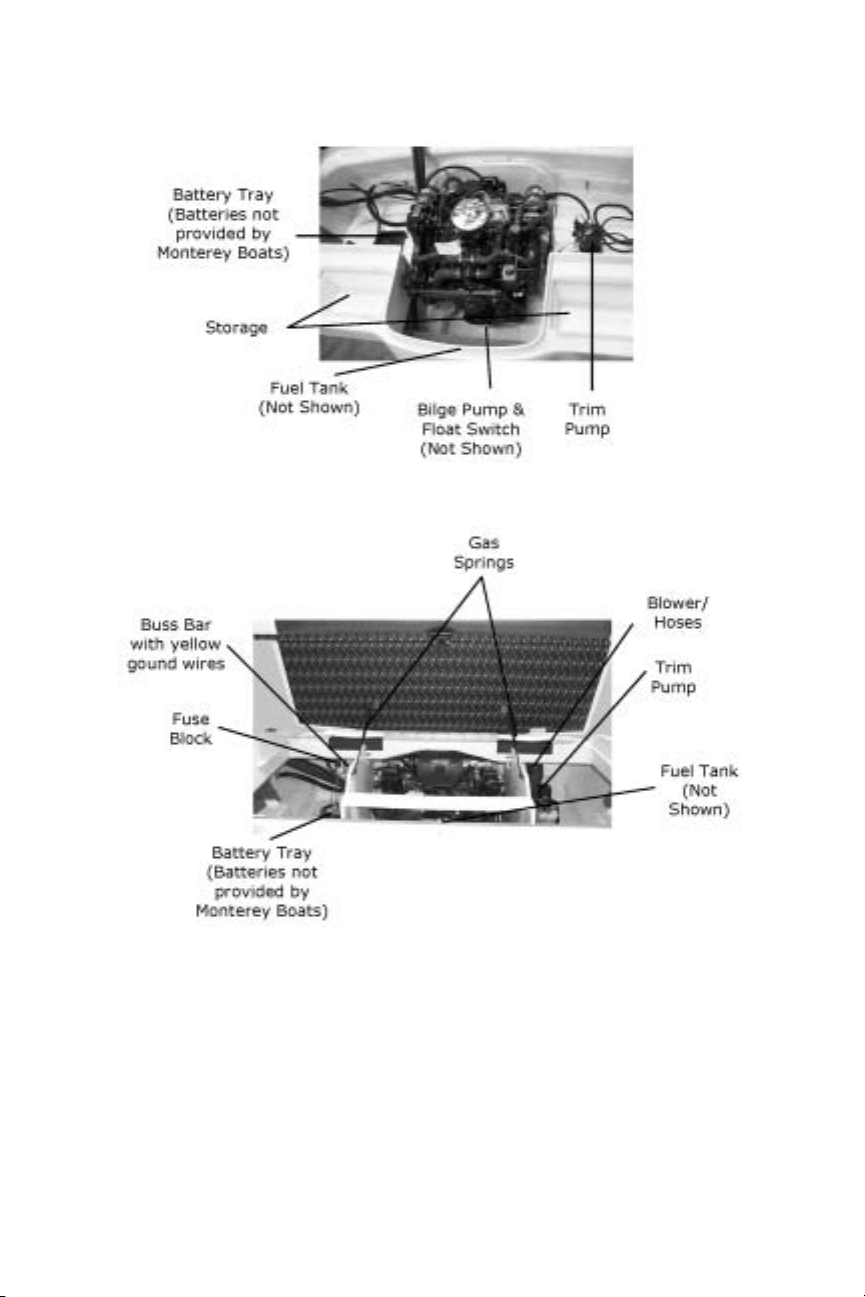
Engine Area
The above engine la youts are typical of most Monterey Sport Boats.
M-18
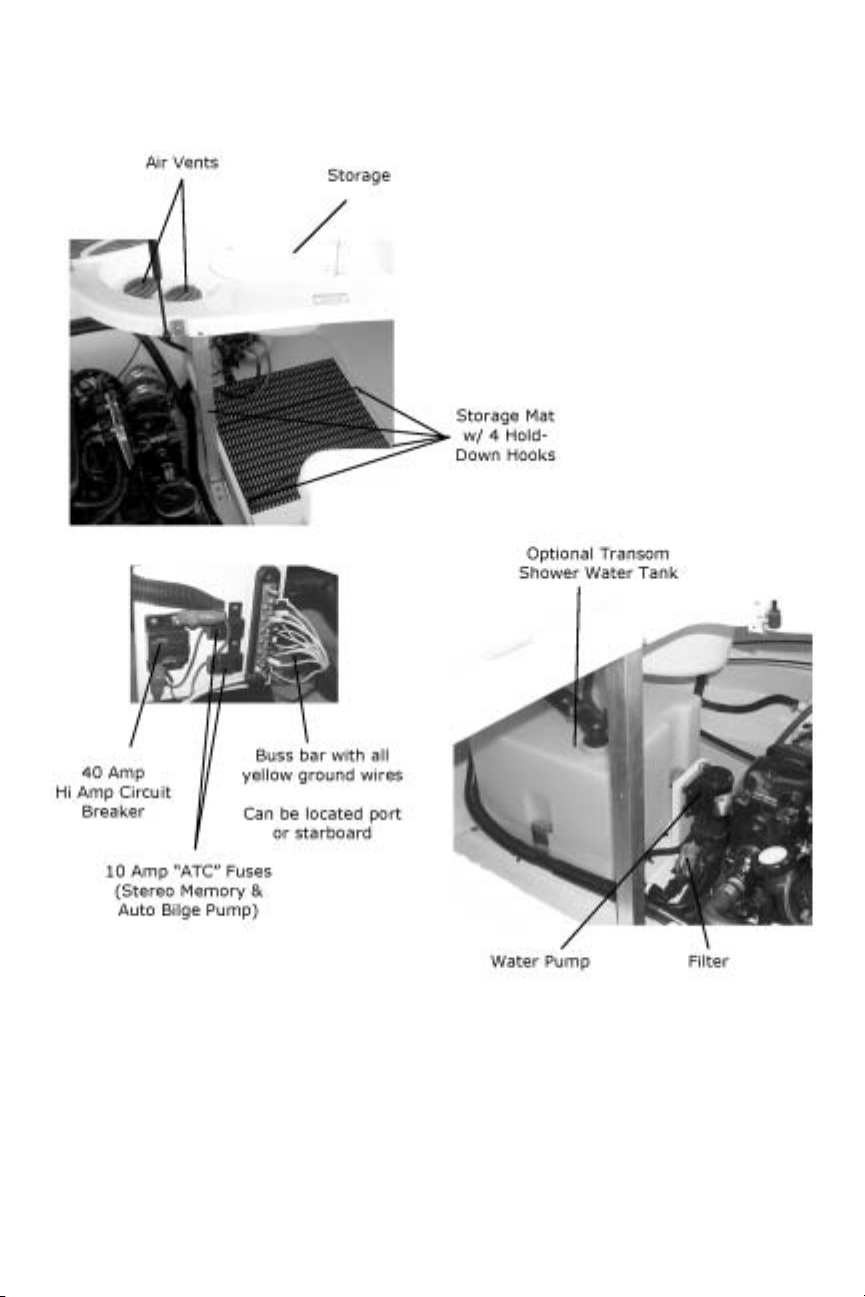
Engine Area
The above engine la youts are typical of most Monterey Sport Boats.
M-19
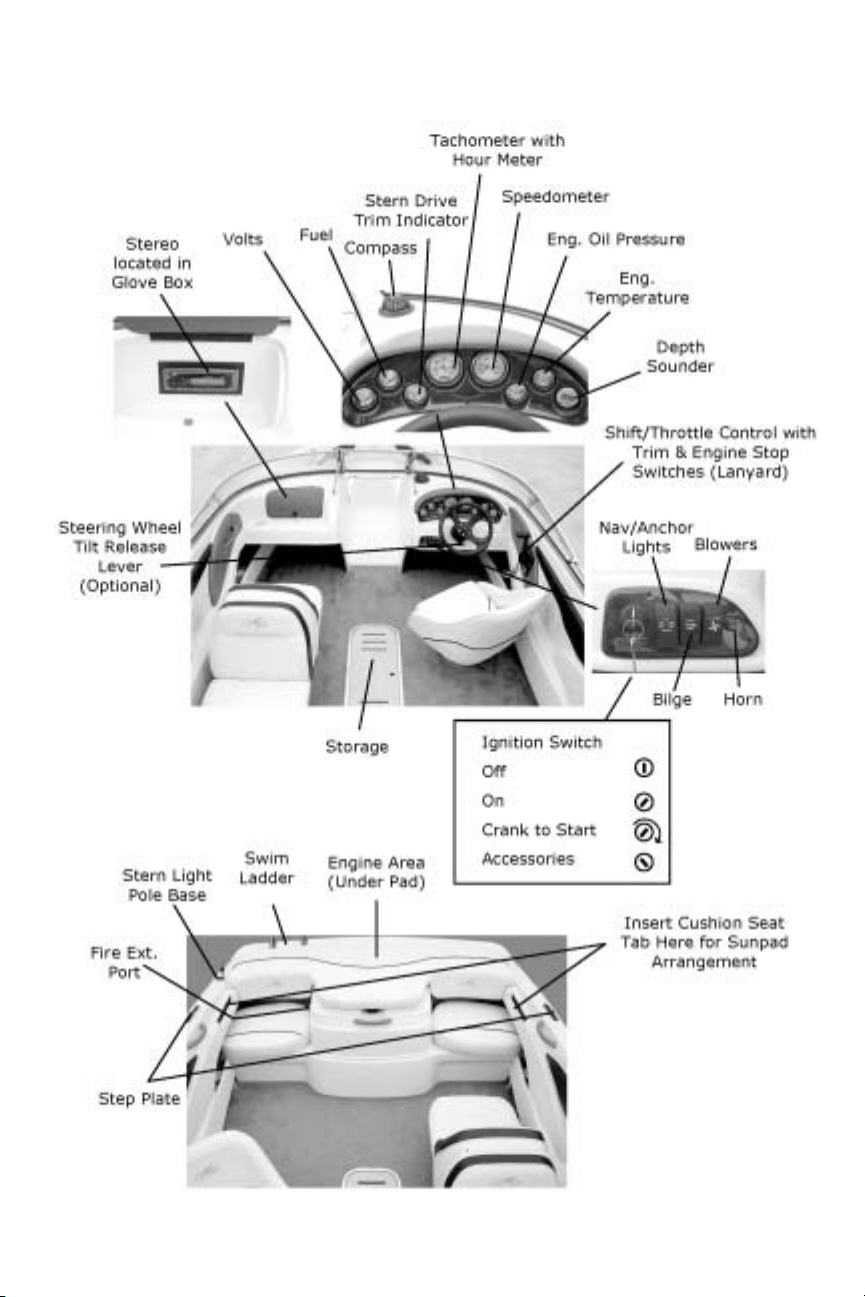
180 FS Layout
M-20
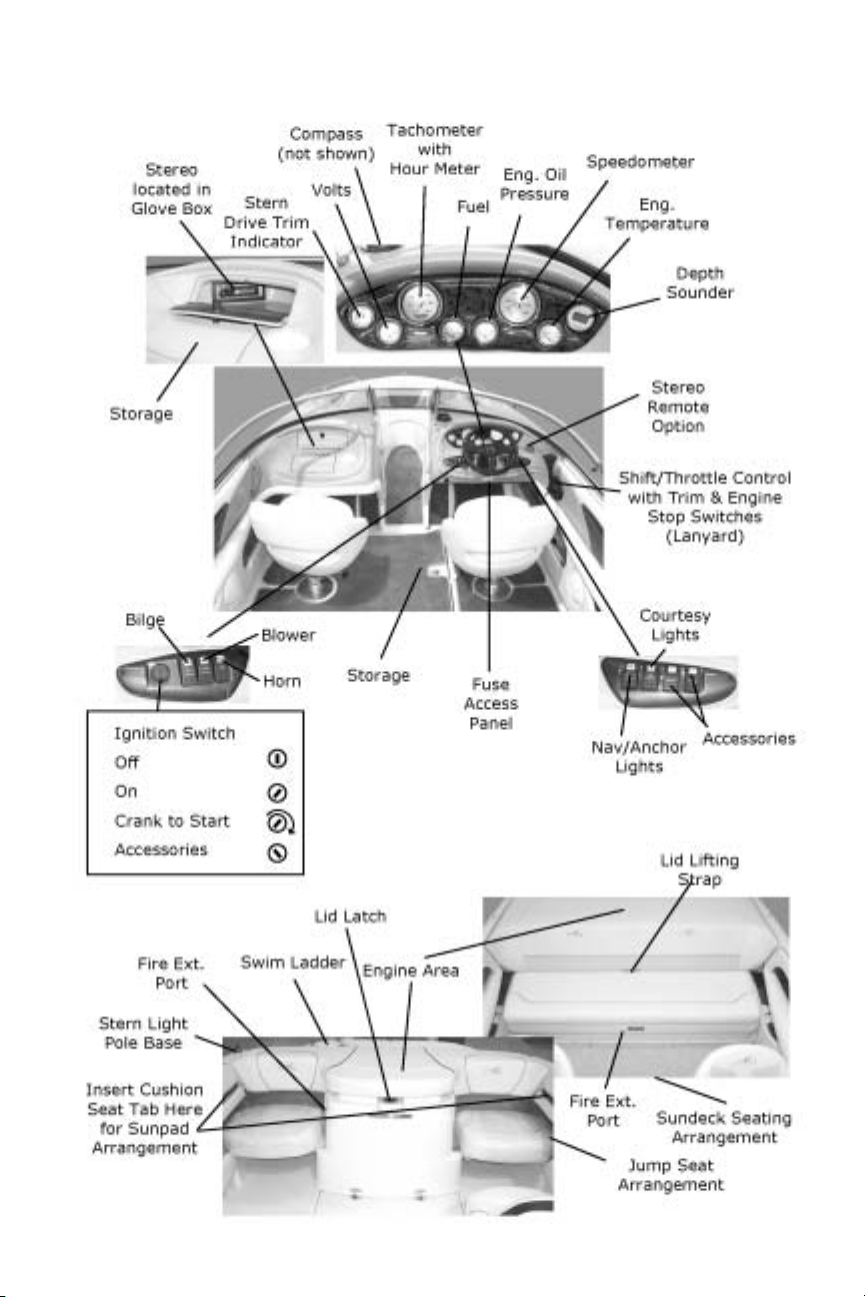
190 LS Layout
M-21

194/214 Layout
M-22
208 SI Layout
M-23
 Loading...