

Mont Blanc e-Strap User Manual

e-Strap
User Guide

1
Contents
By purchasing the Montblanc e-Strap you made a good decision. Please
read this user guide with care to make the most of your e-Strap.
A. Getting Started
Box contents
Understanding your e-Strap
Charging the e-Strap
Adjusting the e-Strap
Navigating by touch
Turning the e-Strap on
Setting up the e-Strap app
Pairing the e-Strap with your phone
Setting up notifications on iOS
Updating the e-Strap
Reconnecting to a new phone
B. Montblanc e-Strap app
Home screen
Notifications
Tracking your activity
Camera mode
Find your e-Strap
Settings
C. e-Strap functionality
Connection
Notifications
Music
Camera
Mute
Activity
“Find my phone”
Battery
D. Safety instructions
E. Certication statements
F. End-user licence agreement
G. Privacy policy
H. Terms of use
I. Technical information
J. Disclaimer
K. Certications
2
A. Getting Started
The e-Strap is a smart companion to your mobile phone. It keeps track of
the incoming communications on your smartphone, monitors your physical activity and remotely controls your phone. Follow this Getting Started
chapter or the Quick-start guide enclosed with the e-Strap before setting
up your e-Strap and connecting it to your phone.
Box contents
The e-Strap comes with the following items:
1 x e-Strap
1 x micro-USB cable
1 x Quick-start guide
1 x Montblanc service guide
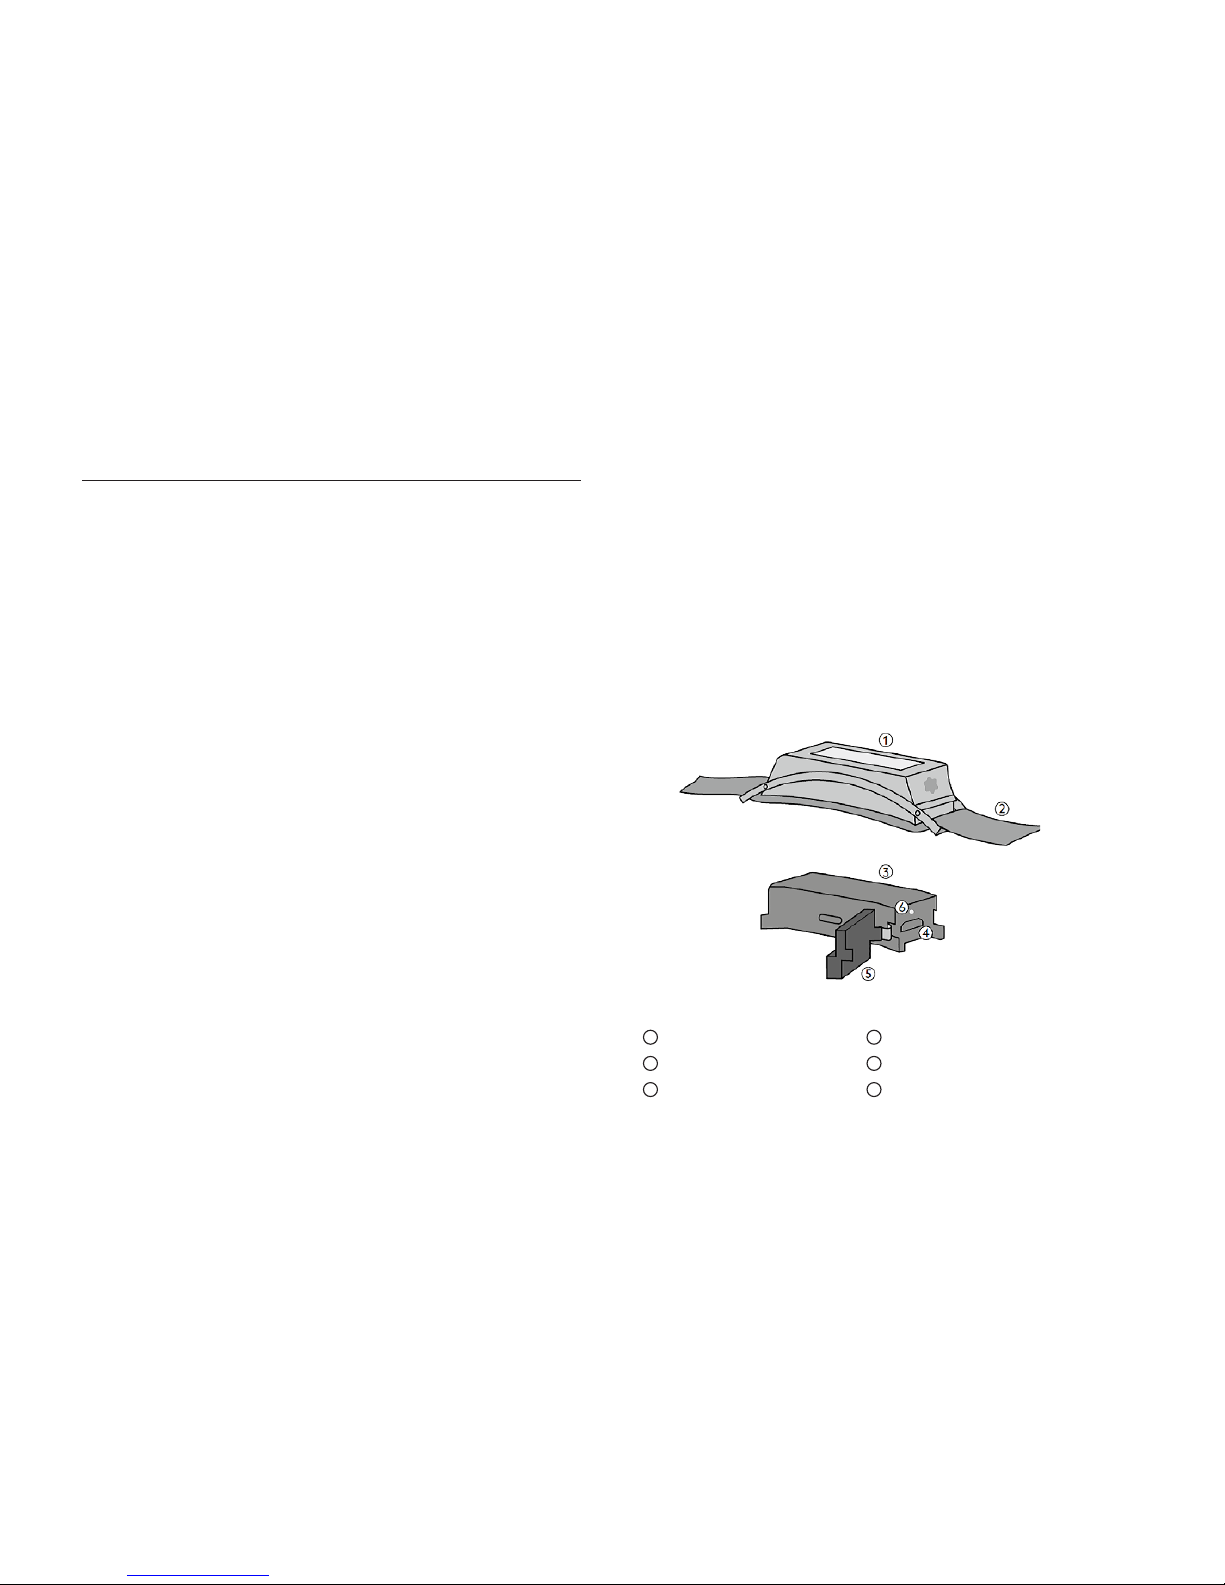
Understanding your e-Strap
The e-Strap consists of three parts: the device holder made of stainless
steel and rubber, the electronic device with display and touch-control,
and the leather strap for attaching to your Montblanc TimeWalker watch.
1
holder
2
leather strap
3
display & touch-control
4
charging port
5
cover
6
reset button

3
A. Getting Started
Charging the e-Strap
You need to charge the battery before first use. Follow these instructions
to charge the battery.
1. For charging, remove the electronic device from the holder by applying gentle pressure. Loosen the strap to increase the space between
the device and the strap, and take care not to drop the device.
2. Open the cover by carefully pulling it out of the charging port. Make
sure that no dust, humidity or liquidity enters. In order to prevent loss,
the cover is fixed to the device. Please do not pull it out using force, in
order to avoid damaging the connection.
3. Plug the enclosed Montblanc micro-USB cable into the charging port
and into a USB port of a computer or a suitable USB charger. Please
make sure that the output of the USB charger is 5 volts.
4. When charging, the e-Strap shows the battery status. A filled battery
icon will be displayed if the battery is fully charged. This takes approximately four hours. First remove the USB cable from the computing
device or USB charger and then disconnect the micro-USB from the
e-Strap.
4
A. Getting Started
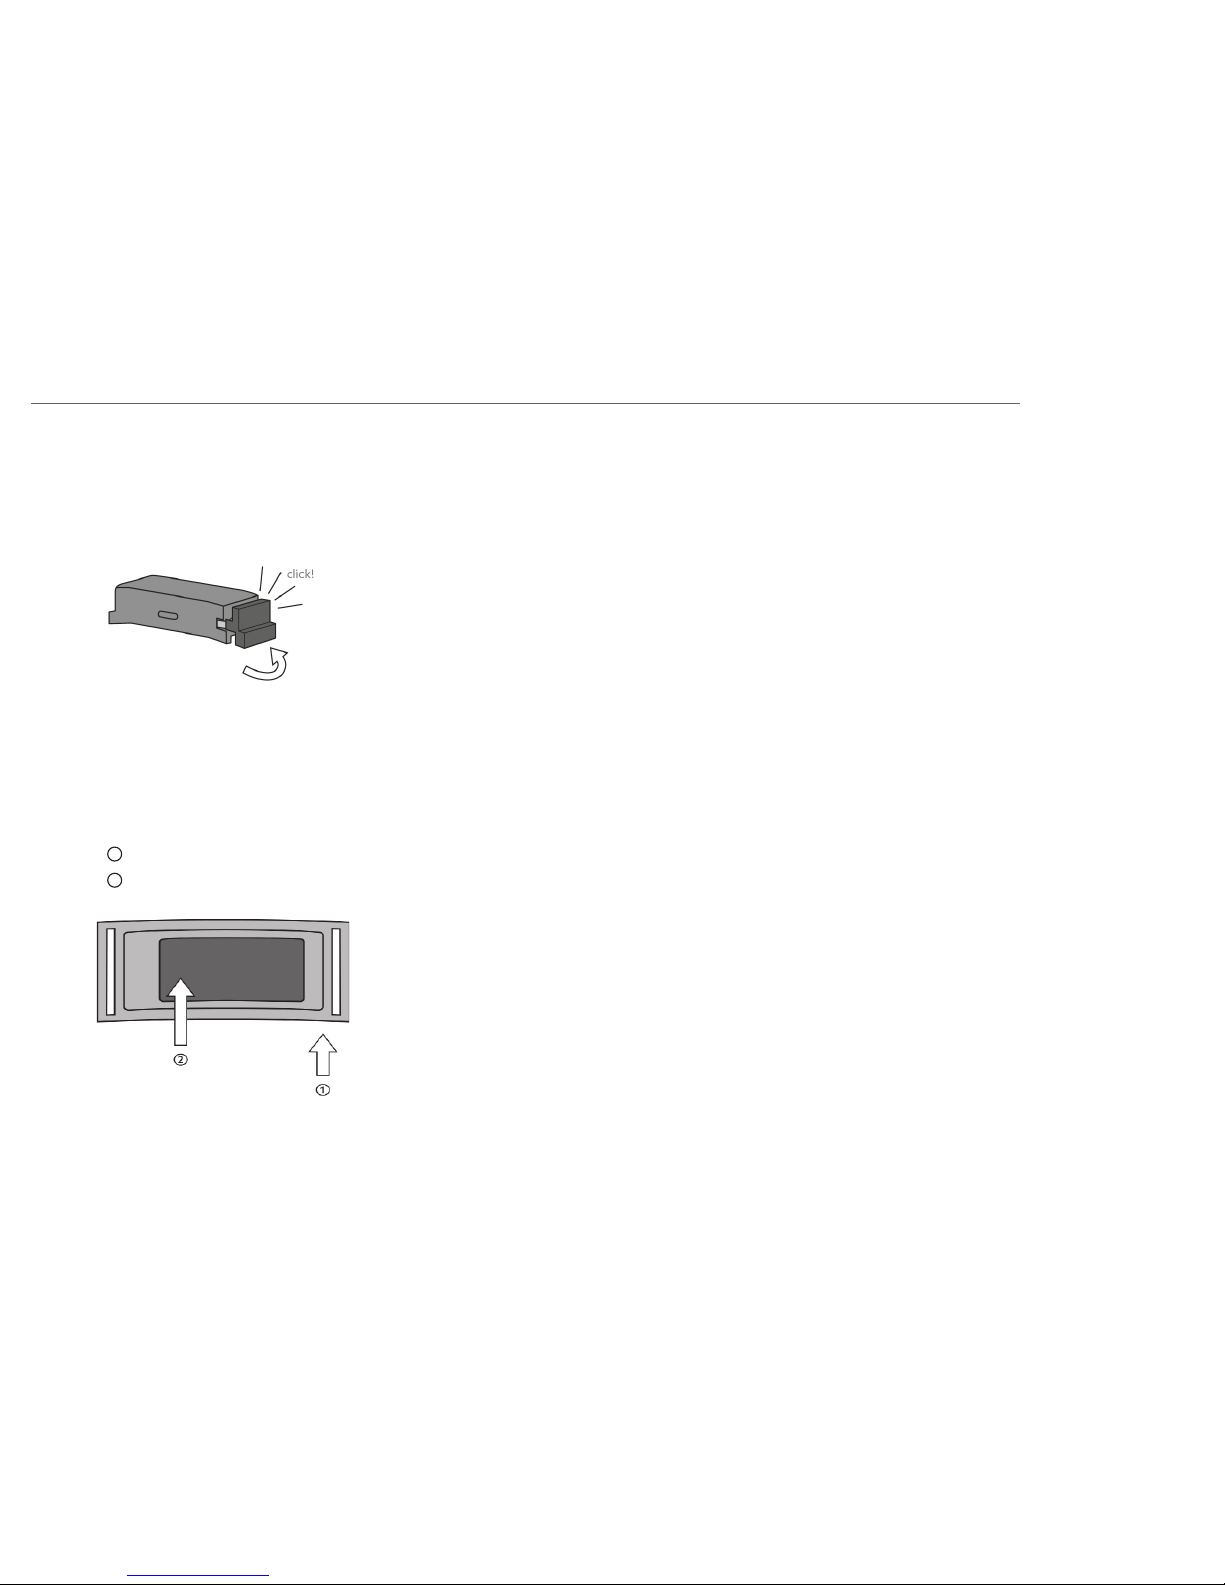
5. After charging, carefully insert the cover into the charging port of the
device. Make sure that it fits and clicks into the charging port. If it is
not inserted properly, the e-Strap will not be protected against water
or dust.
6. Please ensure that the device is inserted with the cover facing the
narrow side of the holder and the touch control at the bottom.
1
cover this side
2 touch at the bottom
Battery Life
The battery lasts approximately five days, depending on the number of
notifications received per day and the personal usage pattern. You can
check the remaining battery life in the companion app. If the battery
drops below a critical level, you will be reminded to charge your e-Strap.
Please make sure that you fully charge your battery.
You can extend the battery life by:
• Reducing the number of notifications: you can decrease the number of
notifications by deselecting notification types in the companion app.
• Activating mute mode: if there is a time frame where you do not want
to be disturbed, mute the notifications.
• Avoiding frequent checks of notifications and limit the time you remotely control your phone.
• Activating Bluetooth on your phone: When no Bluetooth connection is
enabled, the e-Strap is waiting to connect to Bluetooth. This consumes
more energy than when the device is connected.
5
A. Getting Started
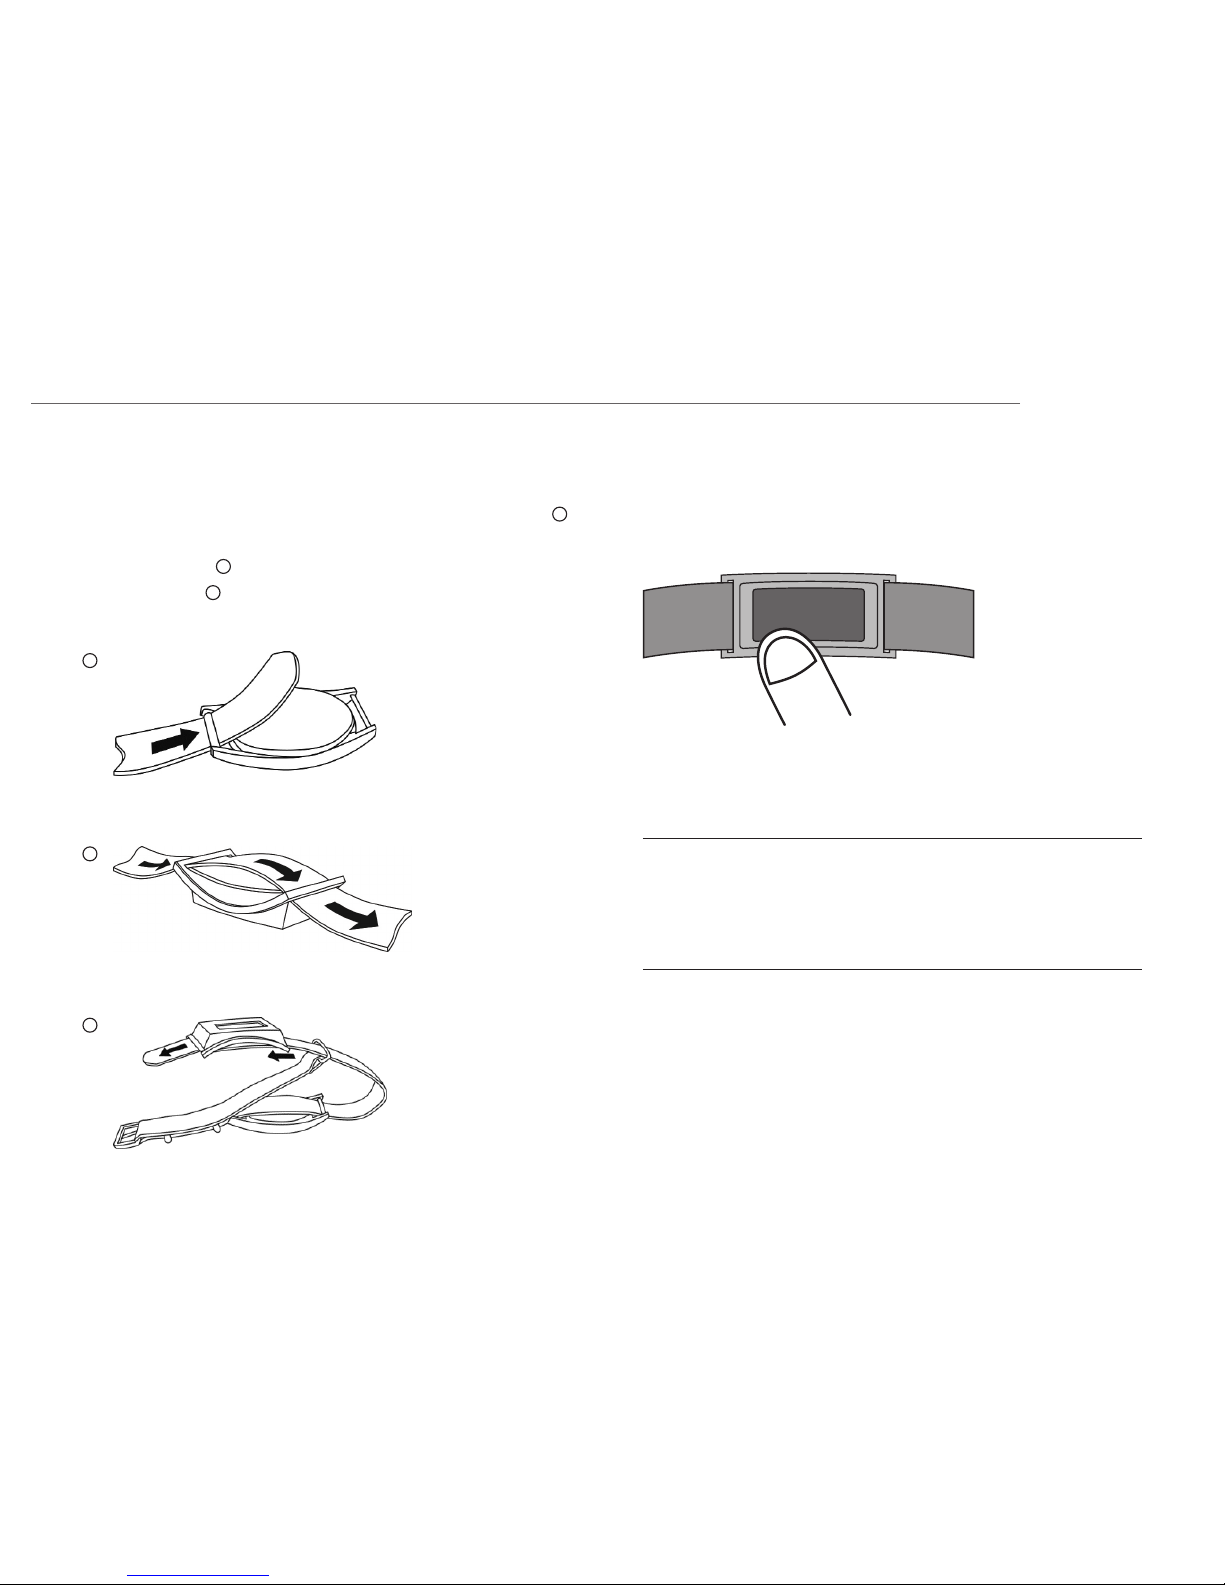
Adjusting the e-Strap
To attach the e-Strap to your watch, pull the strap through the watch 1
and then through the holder with the electronic device so that the strap
covers its back of it 2. You can adjust the position of the device on your
wrist on the strap 3. The device should be worn at the bottom of your
wrist.
Navigating by touch
The touch-sensor is located under the display. The best way to navigate
is by touching under the display.
The e-Strap recognises the following touch patterns:
Tap
Short tap Tap with your finger for less than one second.
Long tap Tap with your finger and leave the finger on the touch-
sensor for three seconds.
Swipe
Right Drag your finger from left to right
Left Drag your finger from right to left
1
2
3
6
A. Getting Started
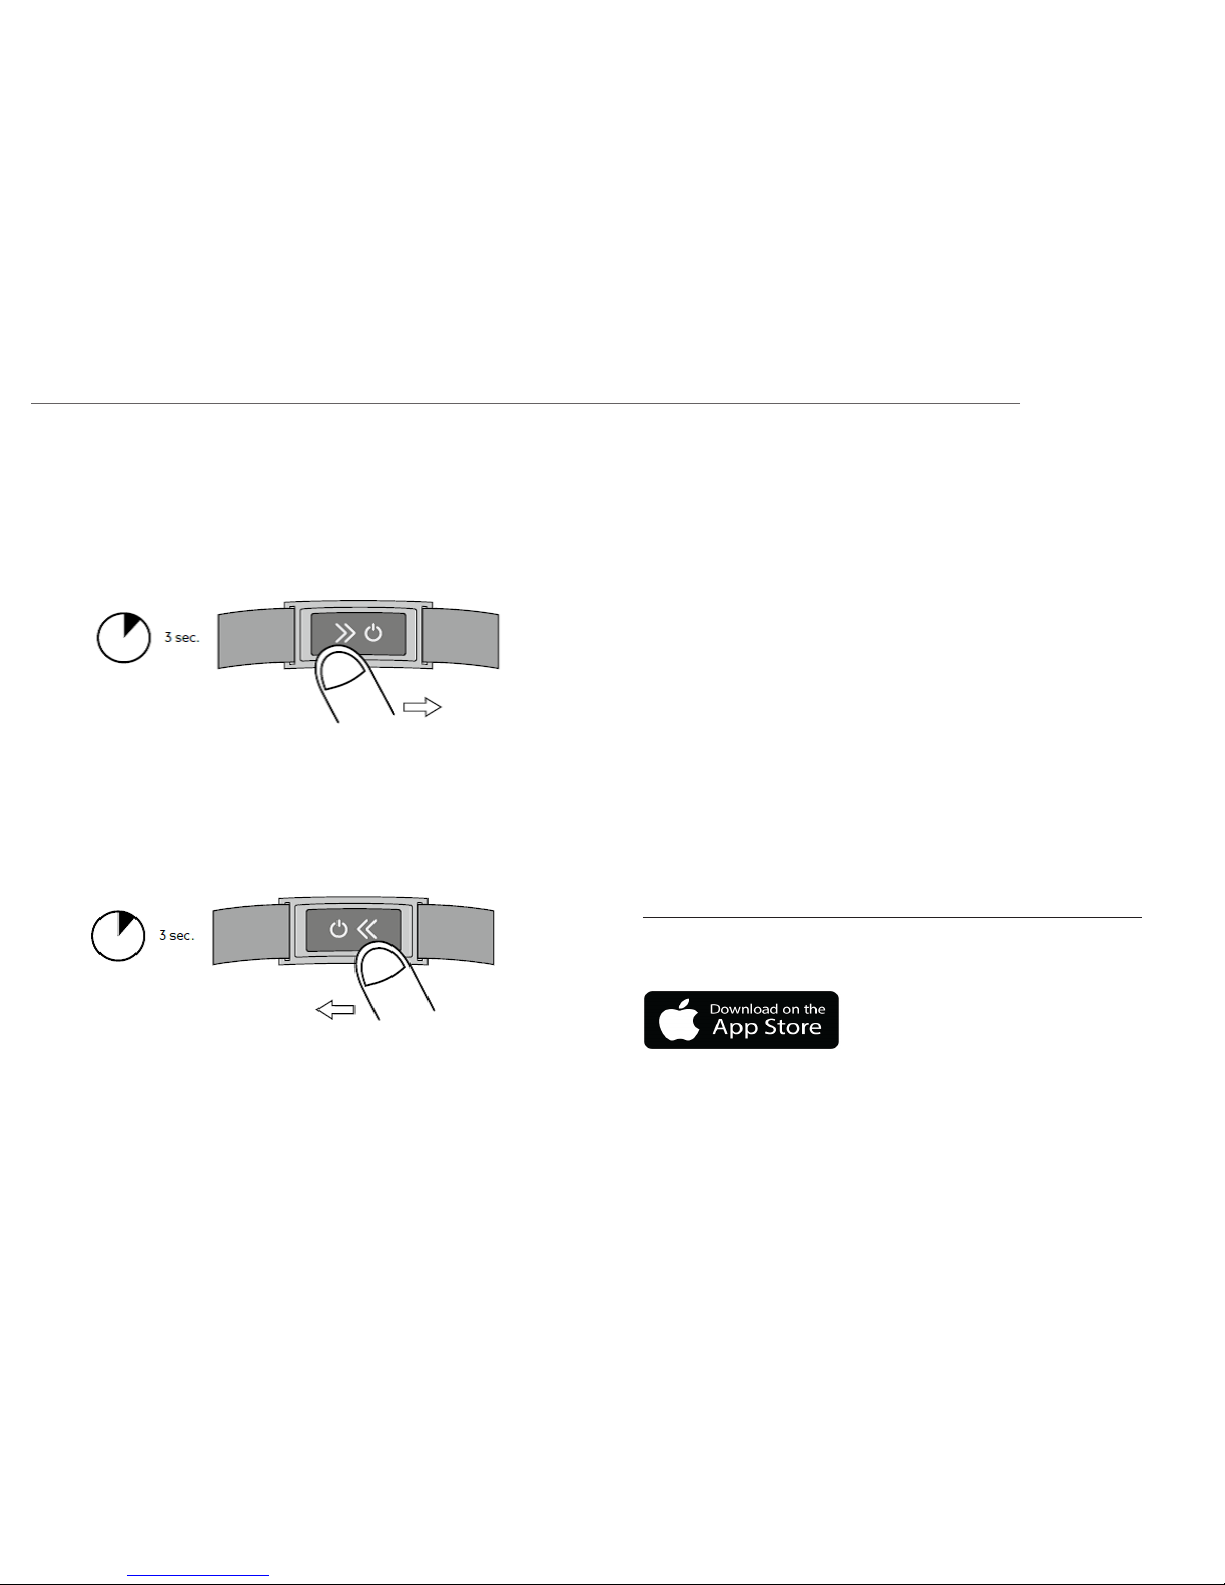
Turning the e-Strap on
To turn the device on, tap and hold three seconds on the touch-sensor.
Then swipe your finger from left to right. The device will respond by vibration and the Montblanc logo will appear.
To turn the device off, tap and hold for three seconds. Then swipe your
finger from right to left.
When the device is already turned on, you can wake it up with a simple
tap.
Setting up the e-Strap app
The Montblanc e-Strap app is compatible with the following mobile
phones:
• Apple iPhone 4S and later running iOS 8
• Samsung Galaxy S4 and later
• Samsung Galaxy Note 3 and later
Other mobile devices are not supported.
Installation of the app
For installing the mobile application make sure that you have an active
Wi-Fi or mobile network connection for accessing the application store.
The installation procedure depends on your mobile device.
For iPhones
By clicking on the App Store logo below you will be forwarded to the app
download.
7
A. Getting Started
You can also download the app by following these instructions:
1. Access the store from your phone by tapping on the “App Store” icon.
2. Tap the “Search” icon in the navigation bar.
3. Tap on the search field and type “Montblanc e–Strap”.
4. Select the first search result from the list and tap on the “Load” button.
For Samsung Android phones
By clicking on the Google play store logo below, you will be directly forwarded to the app:
You can also download the app by following these instructions:
1. Access the store from your phone by tapping on the “Play store” icon.
2. Tap the “Search” icon in the navigation bar.
3. Tap on the search field and type “Montblanc–Strap”.
4. Select the first search result from the list and tap on the “Install” button.
Pairing the e-Strap with your phone
The e-Strap is paired to your mobile phone using Bluetooth® Low Energy.
Pairing enables the e-Strap to communicate continuously with your
phone. The pairing process only needs to be carried out once.
Before pairing, please ensure the following:
1. Bluetooth is on
2. e-Strap is on
3. e-Strap is nearby
4. The app is up to date
5. Your phone has an active Internet connection
Depending on your mobile phone, Bluetooth is activated differently.
iPhone
1. Swipe from bottom to top
2. Tap on the Bluetooth icon in the overlay
Android phone
1. Swipe from top to bottom
2. Tap on the Bluetooth icon in the overlay
The e-Strap will automatically connect to your smartphone once paired.
8
A. Getting Started
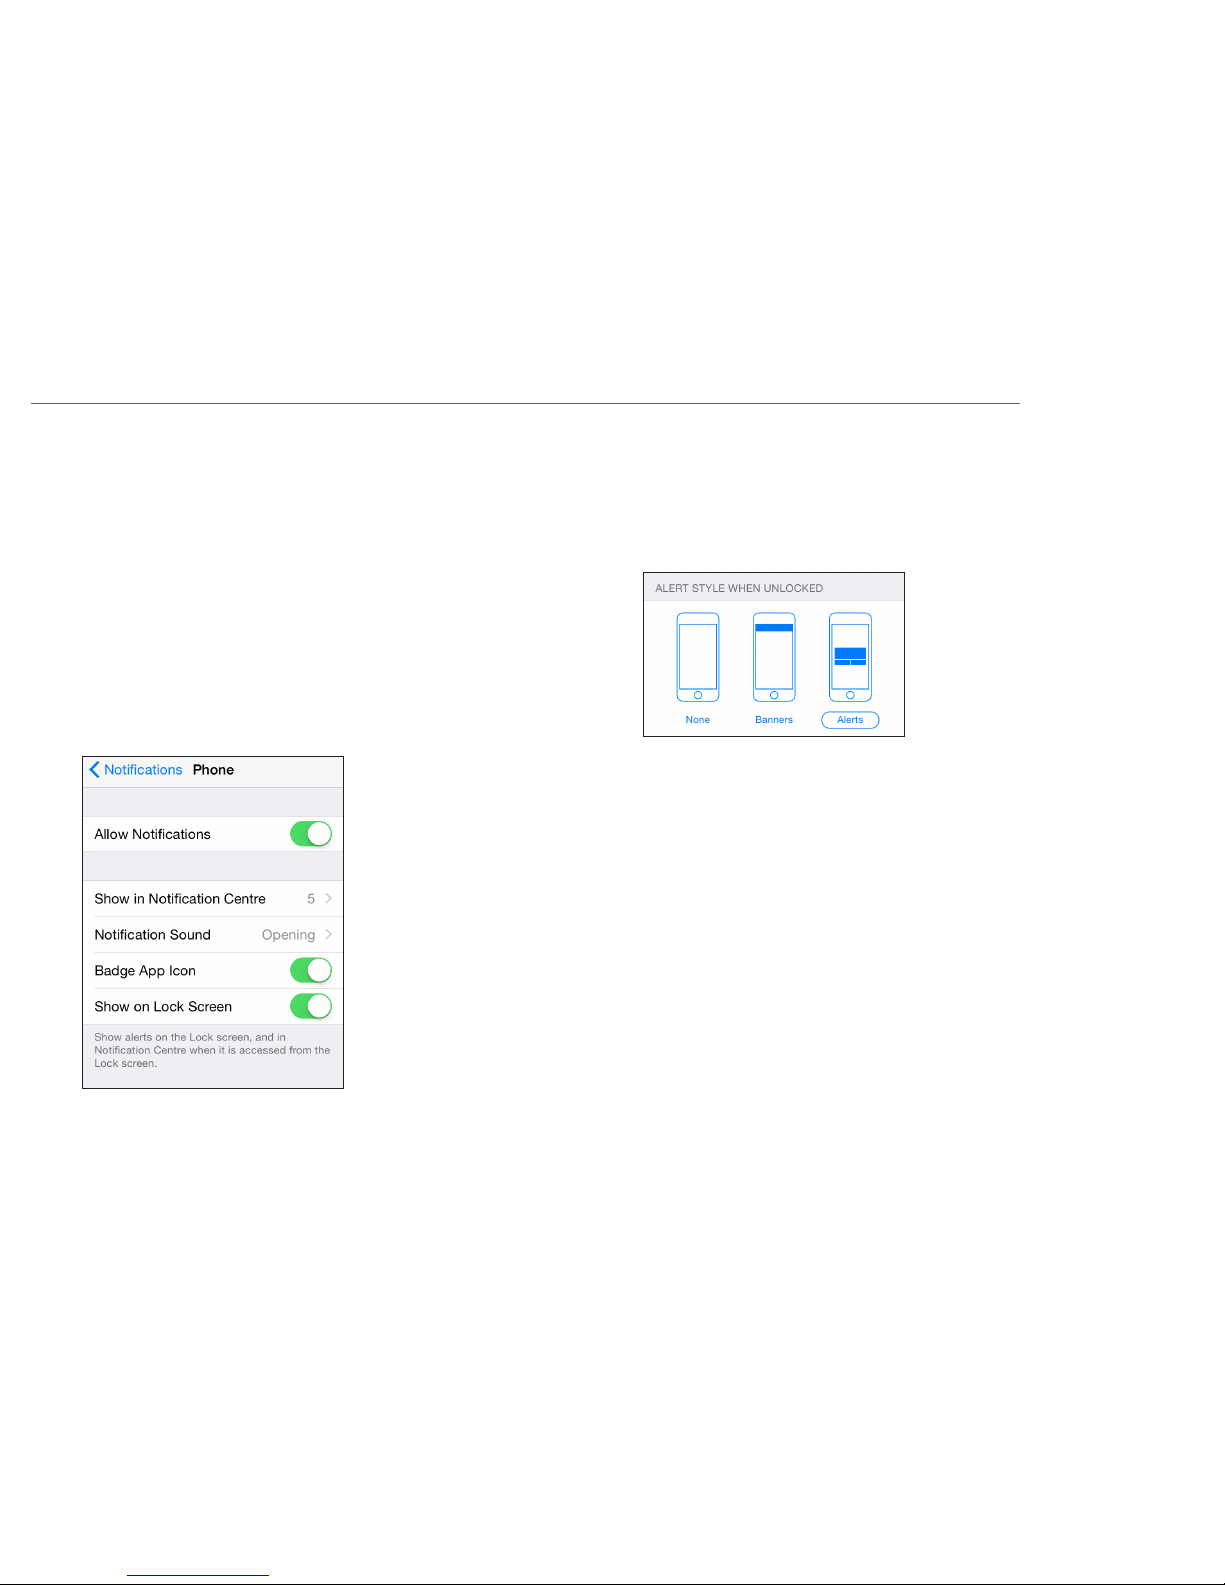
Setting up notifications on iOS
To receive notifications on your e-Strap, they have to be set up in iOS. For
this, enter “Settings” on your iPhone and select “Notifications”. To receive
notifications from apps, add them to the “Include” list. Apps listed under
“Do Not include” will not send notifications. To include or exclude apps,
use “Edit”.
For each app that you would like to receive notifications from, activate
“Allow Notifications”.
Set the Alert Style to “Alerts” or “Banners”. Some apps require the Alert
Style to be set to “Banners” to be displayed on the e-Strap.
9
A. Getting Started
Updating the e-Strap
If an update for the e-Strap is available, it will be triggered by the app.
When you tap on the “Update” button, the updating will start. Please
make sure that you have an active internet connection. A bar will show
the progress of the process.
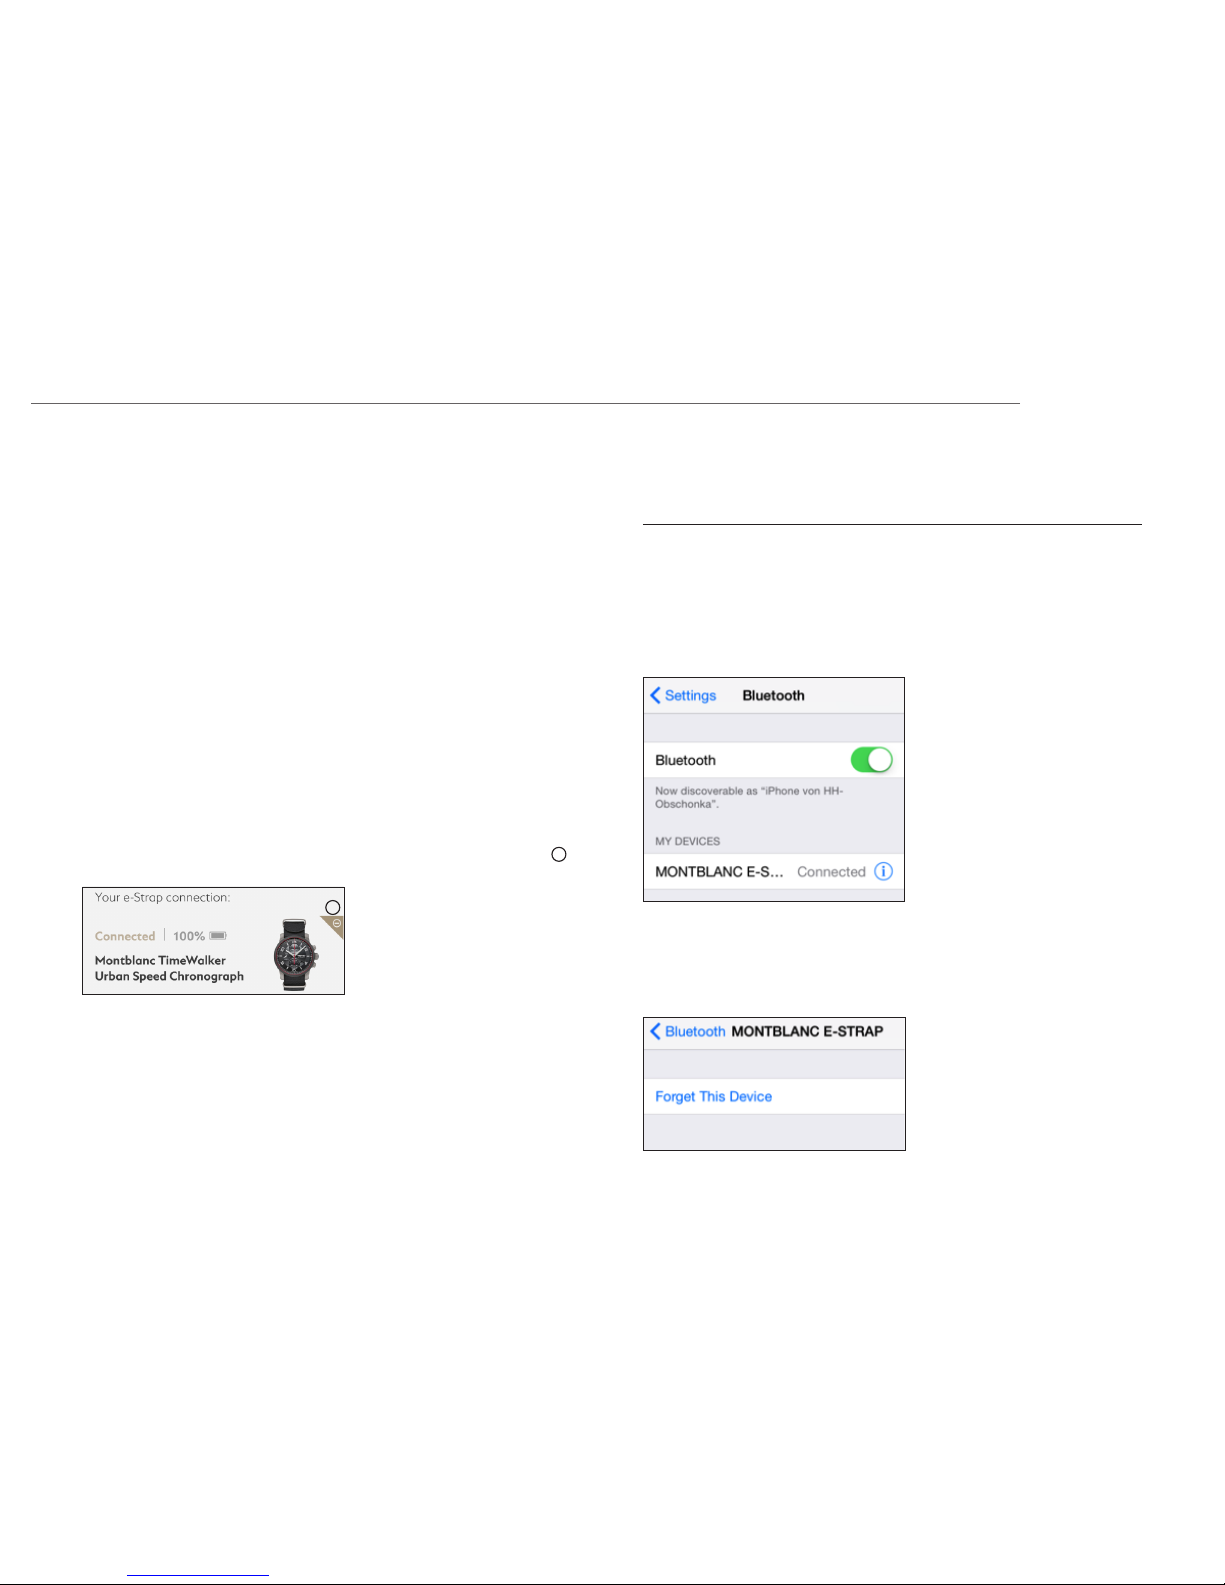
Reconnecting to a new phone
Once the e-Strap is paired, it cannot be used with another phone unless
you unpair it. To reconnect the e-Strap to another phone follow these
three steps.
1. Remove the e-Strap from your app
Tap on the “-“ icon next to the e-Strap in order to remove it from the app 1.
2. Unpair the e-Strap from your phone
The e-Strap can only be paired to one phone at a time. If you have already paired your e-Strap to a phone, you must unpair it before pairing it
with another phone.
Unpairing the e-Strap from your iPhone
Enter Settings and tap on Bluetooth.
Under “My Devices”, tap on the information icon next to “MONTBLANC
E-STRAP”.
Then tap on “Forget This Device”. Turn your e-Strap off. The e-Strap is now
ready to pair again.
1
10
A. Getting Started
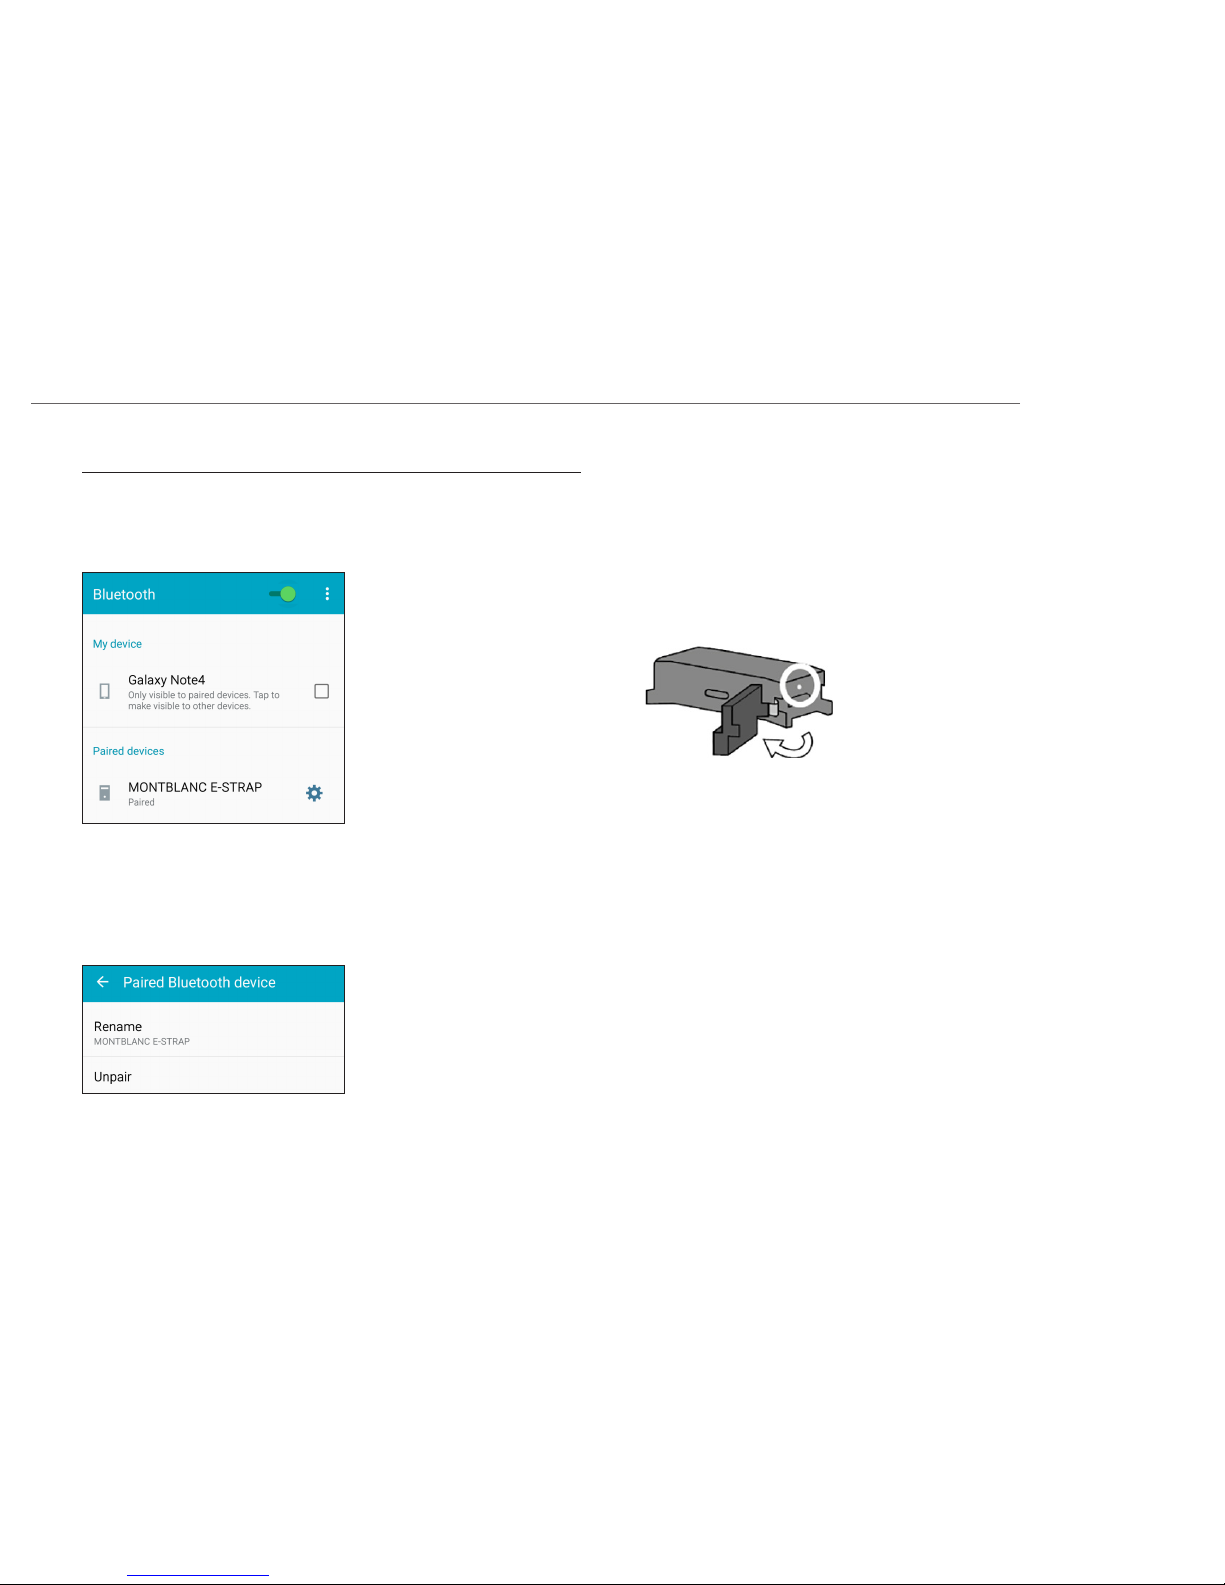
Unpair the e-Strap from your Samsung Android phone
Enter “Settings” and select under “Connections” the “Bluetooth” connection. Below “Paired Devices” the paired Bluetooth devices are listed.
Tap on the gear icon next to “MONTBLANC E-STRAP” and then on “Unpair”. Turn your e-Strap off. The e-Strap is now ready to pair again.
3. Reset the e-Strap
Before pairing to another phone, reset the e-Strap to factory settings by
pressing the reset button. For this, please use a pointed object like a needle, paper clip or pen to press on the button. Make sure that the object
does not damage the device or cover. When the button is pressed, the
e-Strap will show the Montblanc logo and then turn off.
11
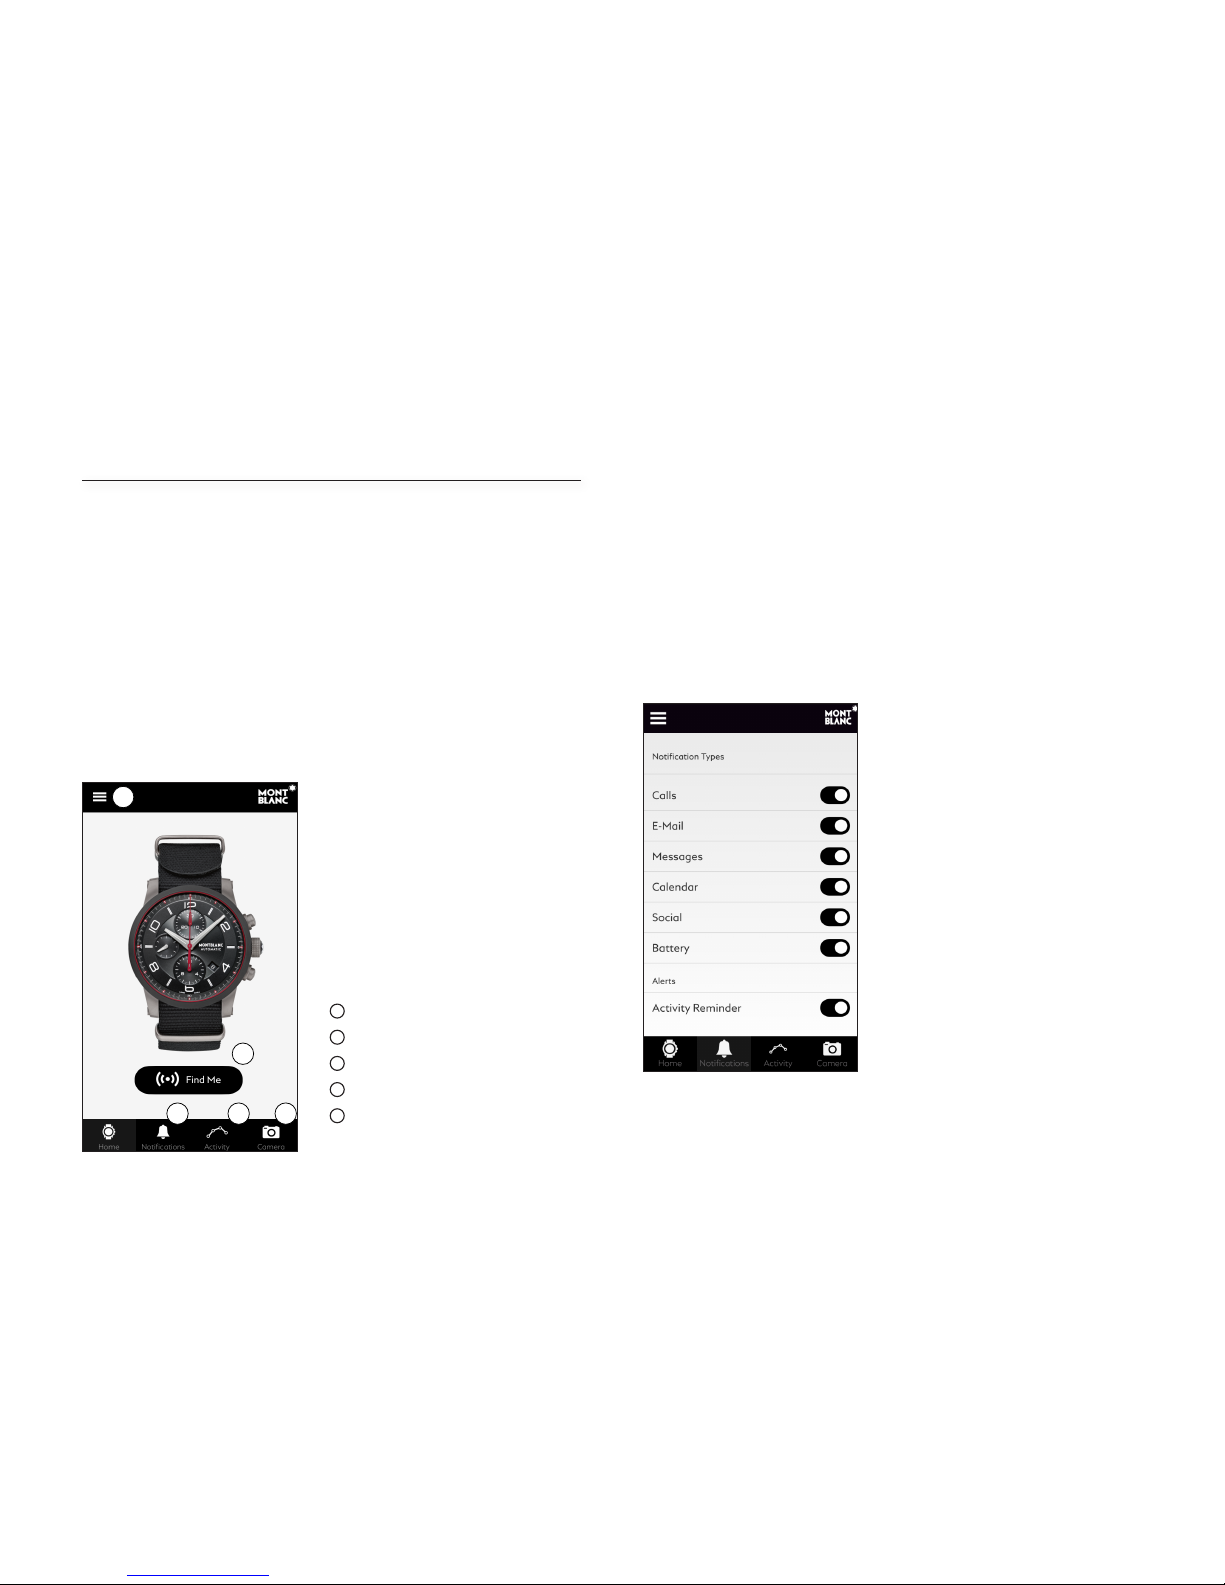
B. Montblanc e-Strap app
The Montblanc e-Strap app manages the connection between your
e-Strap and your mobile phone.
Home screen
From the home screen, all functionalities of the application can be accessed. Tapping on the Montblanc logo will always bring you back to the
home screen. Please keep the application running for best operation.
1
Notifications
2
Tracking your activity
3
Camera mode
4
“Find-me” function
5
Settings & profile
Notifications
The e-Strap will vibrate and light up for incoming notifications. The types
of notification received by the e-Strap are set in the notification settings.
Tap the button next to the item in order to activate or deactivate the notification. Only active notifications will be displayed by your e-Strap.
1 2 3
4
5
 Loading...