

Montarbo LM 260 Owner's Manual
LM 260
LOUDSPE AKER MANAGEMENT PROCESSOR
OWNER’S MANUAL
LM 260
IMPORTANT PRECAUTIONS
WARNING
In order to protect your own and others’ safety
and to avoid invalidation of the warranty of
this product, please read this section carefully
before operating this product.
•Read all documentation before operating your equipment.
•Retain all documentation for further reference.
•Mains voltage must correspond to rear unit label.
•Damages caused by connecting to improper AC voltage are
not covered by any warranty.
•Always operate the unit with the AC ground wire connected
to the electrical system ground. Precautions should be taken
to avoid equipment faulty, improper or inefficient grounding.
•After connection to power supply Standby LED is lit, showing
that some components inside are already powered.
•Make sure the signal is correctly connected to amplifier input
channel following current input mode.
•Please turn off the power switch when extracting the power
cord and signal cable, or adjusting the input mode switch.
•In order to split one signal to more than one amplifier, we
suggest to use a signal distributor.
•In typical use, please set the volume to -0dB position.
•If you need to supply power to more than one unit power
amplifiers, to eliminate the big surge current interference
to electricity net, and preventing the voltage fluctuate
abnormal when simultaneously switching on the amplifiers,
we recommend you use the sequence power procedure.
•Do not obstruct the air entrance and exit ports.
To reduce the risk of electric shock, do not
remove cover (or back). No user serviceable parts
inside. Refer servicing to qualified personnel.
The lighting flash with arrowhead symbol within an equilateral
triangle, is intended to alert the user to the presence of uninsulated
’dangerous voltage’ within the product’s enclosure, that may be of
sufficient magnitude to constitute a risk of electric shock to humans.
The exclamation point within an equilateral triangle, is intended
to alert the user to the presence of important operating and
maintenance (servicing) instructions.
CAUTION
This product does not contain user serviceable parts. In order
to prevent fire and/or electrical shock, never disassemble it.
For maintenance and servicing always refer to the official
FiveO by Montarbo® Distributor in your Country or to qualified
personnel specifically authorised by the Distributor.
WEEE | Waste from Electrical and Electronic Equipment
ATTENTION!
The crossed out wheeled bin symbol that can be found
on this product means that the product is covered by the
Waste from Electrical and Electronic Equipment Directive.
The symbol is intended to indicate that waste from
electrical and electronic equipment must be subject to a selective
collection. For more details on available collection facilities please
contact your local government office or the retailer where you purchased this product. The solid bar underneath indicates that the
product has been put on the market after 13
INFORMATION ON PROPER DISPOSAL
Information on Disposal for Users (private households)
In the European Union | Attention: If you want to dispose of
this equipment, please do not use the ordinary dust bin! Used
electrical and electronic equipment should not be disposed of via
the normal household waste stream but must be treated separately and in accordance with legislation that requires proper treatment, recovery and recycling of used electrical and electronic
equipment. Following the implementation by member states, private households within the EU states may return their used electrical and electronic equipment to designated collection facilities
free of charge*. In some countries* your local retailer may also
take back your old product free of charge if you purchase a similar
new one. *Please contact your local authority for further details.
In other Countries outside the EU | If you wish to dispose of
this product, please contact your local authorities and ask for the
correct method of disposal.
In Switzerland | Used electrical or electronic equipment can be
returned free of charge to the dealer, even if you don’t purchase
a new product. Further collection facilities are listed on the homepage of www.swico.ch or www.sens.ch.
Information on Disposal for Professional Users
In the European Union | If the product is used for business purposes and you want to discard it: please contact your FiveO by
Montarbo® dealer who will inform you about the take-back of the
product. You might be charged for the costs arising from takeback and recycling. Small products (and small amounts) might be
taken back by your local collection facilities.
In Spain | Please contact the established collection system or your
local authority for takeback of your used products.
In other Countries outside the EU | Please contact your local
authorities and ask for the correct method of disposal.
th
August 2005.
Owner’s manual | LM 260 Loudspeaker Management Processor
2

LOUDSPEAKER MANAGEMENT PROCESSOR
CONTENTS
Important precautions
Contents
Introduction
Features
Installation
Operations
Tips
DESCRIPTION
1. Front panel
2. Real panel
3. Fast system configuration
4. Menu details
4.1 Menu details
4.2 Menu details
4.3 Menu details
4.4 Routing
4.5 Versions
4.6 Language
5. Preset editing
6. Software
6.1 Installation
6.2 Operation
6.3 Main page
6.4 X-over
6.5 Out pages
6.6 Example
6.6.1 LOW
6.6.2 MID
6.6.3 HIGH
7. Troubleshooting
8. Technical specifications
2
3
4
4
4
4
5
6
6
7
8
8
8
8
8
9
9
10
13
13
13
13
14
15
16
16
16
17
18
19
PACKAGE CONTENTS
∙ Loudspeaker management processor
∙ AC power cable
∙ All Control Software CD
∙ Owner’s manual
∙ Warranty certificate
LM 260 Loudspeaker Management Processor | Owner’s manual
3

LM 260
INTRODUCTION
First of all, thank you for choosing a product FiveO by Montarbo®. This line of products has been designed for those who
want to set-up their user friendly audio sound system with excellent performances and outstanding value. Furthermore, we
manufacture all FIVEO products to assure you many years of satisfying and reliable operation.
Your LM 260 Loudspeaker Management processor, which perfectly suits the needs of stage, bands, rehearsal rooms and
even recording studios applications. Please, in order to enjoy each feature of your new processor thus achieving the best sonic
results, take a few moments to carefully read these instructions.
For further information about your microphone, please check our website www.fiveo.it, or send an email to: mail@fiveo.it
FEATURES
Your LM 260 Loudspeaker Management processor has been designed to successfully work in most demanding live and
studio applications. LM260 provides your several processing devices for your sound system. The first unit is a digital crossover,
allowing you to choose dividing frequencies for each way of your sound system, with slopes up to 24dB/Oct. by Bessel,
Butterworth and Linkwitz-Riley filters. The delay line allows you to align the emission point of each driver. The powerful 10band parametric equalizer allows you to make frequency response fine adjustments to perfectly tune each output of your
sound system in any venue. Furthermore we provided you also a useful phase switch and a limiter section to avoid amplifiers
overload.
Versatility, reliability and toughness will make LM 260 your faithful sound-mate for years...
∙
USB Firmware and Software
∙
Option for Linked Stereo DSP Processing
∙
2-Channel XLR Input and 6-Channel XLR Output
∙
2x1, 2x2, 2x3, 1x4, 1x5, 1x6 Crossover Configurations
∙
Independent 10-band Parametric EQ for each output
∙
Independent Output Limiter for each output
∙
Independent Output Alignment Delay for each output
∙
Power on/off Mute Circuitry
∙
1 Factory Preset / 49 User Programmable Presets
∙
2x16 LCD Display
∙
Front Panel Input and Output Meters
∙
Front-Panel Output Mutes
SOF T WA R E USE
A USB I/O Type B (square) port is provided for upload/download presets to computer. Please, check the software pages to have
an easier and faster control over your LM 260.
INSTALLATION
Be sure that there is enough space around the unit to comfortably work and even for cooling purposes, to avoid over-heating.
Don’t place your processor on high-temperature devices such as power amps or radiators. LM 260 is connected to the
mains via the supplied cable. First connect the cable plug to the mains, then turn on the processor.
Please note that all units must be properly grounded.
For your own safety, you should never remove any ground connector/device from electrical devices or power cables, or make
them inactive. Please ensure that only qualified people install and operate the mixing console.
OPERATIONS
With your amplifiers turned off, start making connections. Using XLR cables connect balanced line level sources to LM 260 inputs, and
LM 260 outputs to amplifiers inputs. Turning on your LM 260, the last used preset is loaded but for a short time all LM 260 outputs
are set to MUTE. It’s a safety feature to avoid problems to connected sound systems, particularly when the levels are set to the maximum.
Owner’s manual | LM 260 Loudspeaker Management Processor
4

LOUDSPEAKER MANAGEMENT PROCESSOR
TIPS
We strongly suggest you to avoid exposition to loud music for prolonged periods, you risk to seriously damage your hearing.
It’s a good idea to check all the cables in your warehouse before departing, as well as carrying with you spare cables for any
emergency.
In order to prevent switch-on thumps, and subsequent drivers damages, please keep in mind the first audio lesson: amplifiers
must be turned on last, amplifiers must be turned off first! In order to keep the front panel clean, please scrub it with a soft
fabric just moistened with water. Don’t use solvents, which may corrode the front panel printing and paint.
Before activating your sound system, please carefully check mains grounding. Otherwise you could have hum or other
unpleasant noise. We suggest you to regularly inspect audio INPUTS level indicators. In this way, you can immediately detect
any abnormal level setting, making a fast reduction of input levels you can avoid inputs overloads.
Be careful using LM 260 extremely boosted EQs and LEVELs; such operation could overload the amplifiers inputs! So, we
suggest you to use the EQ to emphasize sound nuances and details, even cutting EQ on other bands! If the output CLIP LED
of any band is continuously lit, please check all the settings (LEVEL, Eqs, etc.) for that band; keeping in mind your settings,
you can operate in a fast way to reduce output levels thus avoiding amplifiers input overload.
LM 260 Loudspeaker Management Processor | Owner’s manual
5

LM 260
DESCRIPTION
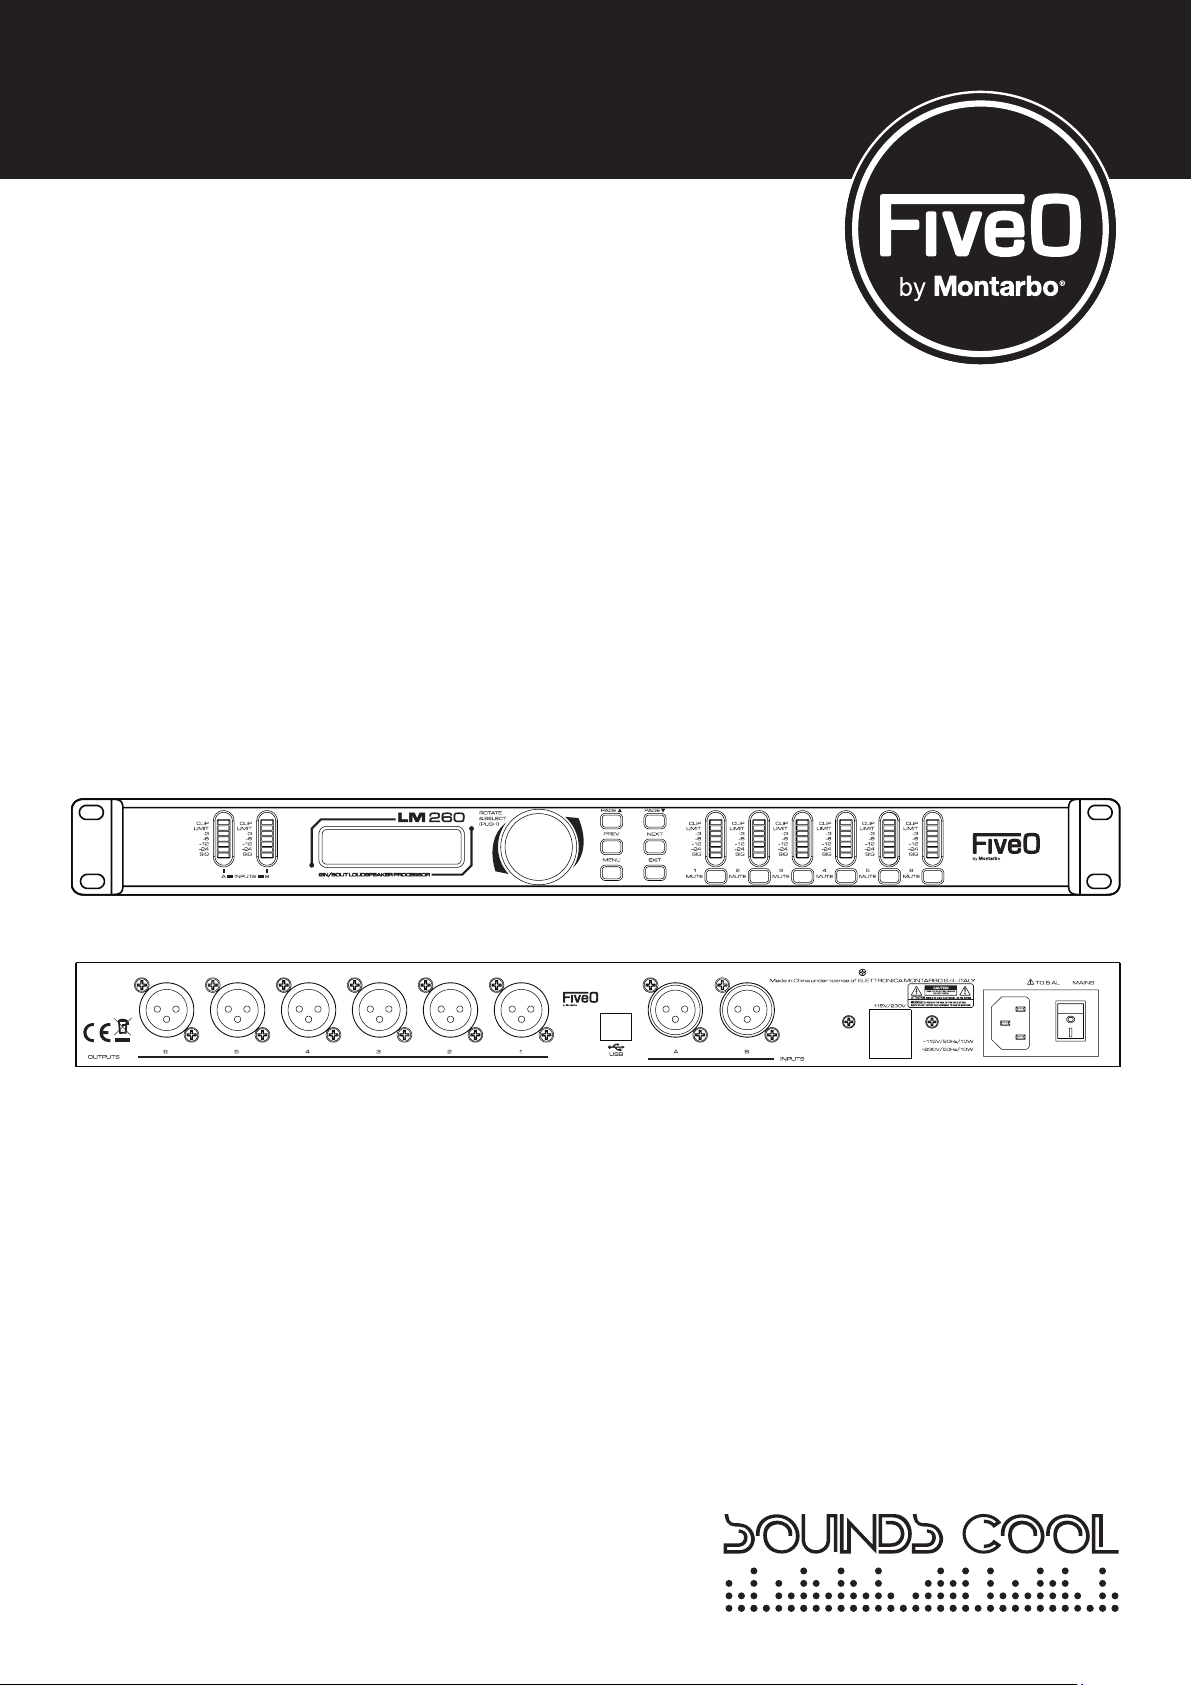
1. FRONT PANEL
2
1
1
A/B INPUTS Meters – LM260 provides the user with two independent, seven-segment input meters ranging from SIG
3
4
5
6
7
to CLIP. These meters monitor the input signal level, as adjusted from the source.
2
Display – This 16 character 2 lines backlit display will show you all the information about LM260 parameters and their values.
3
DIAL – This DIAL (encoder) can be used in two ways. Rotating it you can edit parameter values, to set the desired value.
Pushing it you can select most features.
4
PAGE keys – Navigate through the pages by depressing PAGE or PAGE successively until arriving at the desired page.
PREV/NEXT keys – Navigate through the parameters by depressing NEXT or PREV successively until arriving at the desired
5
parameter.
OUTPUT LEVELS – LM260 provides the user with two independent, seven-segment output meters ranging from SIG to
6
CLIP. These meters monitor the input signal level, as adjusted from the source.
7
OUTPUT MUTE keys – Each output channel of the LM260 contains a MUTE key. These keys are automatically activated
for safety during parameters editing, and can be manually used to do safe operations.
2. REAR PANEL
8
9
8
Outputs 1-6 – The output section of your LM260 offers six balanced XLR connectors.
9
USB port – Your LM260 can be interfaced to your computer by this USB Type B (square).
Inputs 1-2 – The input section of your LM260 offers two balanced XLR connectors.
10
11
115V/230V selector – This selector can be used match the unit to local voltage supply. In order to avoid accidental
operation, this selector is protected by a small cover, secured by a screw.
12
IEC Power Cord Receptacle – This cord receptacle contains also a fuse-holder. Use only the right type (and value)
replacement fuse! An IEC power cord is supplied in unit package.
13
Power Switch – The Power Switch turns the LM260 on and off. Please don’t forget a basic rule: power amplifiers should
be powered down prior to turn on your LM260.
10
11
12
13
Owner’s manual | LM 260 Loudspeaker Management Processor
6
 Loading...