

Montarbo B115, B108, B112, B110 User manual
MANUALE D’USO - SEZIONE 1
USER MANUAL - SECTION 1
BEDIENUNGSANLEITUNG - ABSCHNITT 1
NOTICE D’EMPLOI - SECTION 1
MANUAL DE USO - SECCIÓN 1
ماﺪﺨﺘﺴﻟاا ﻞﯿﻟد- ﻢﺴﻘﻟا1
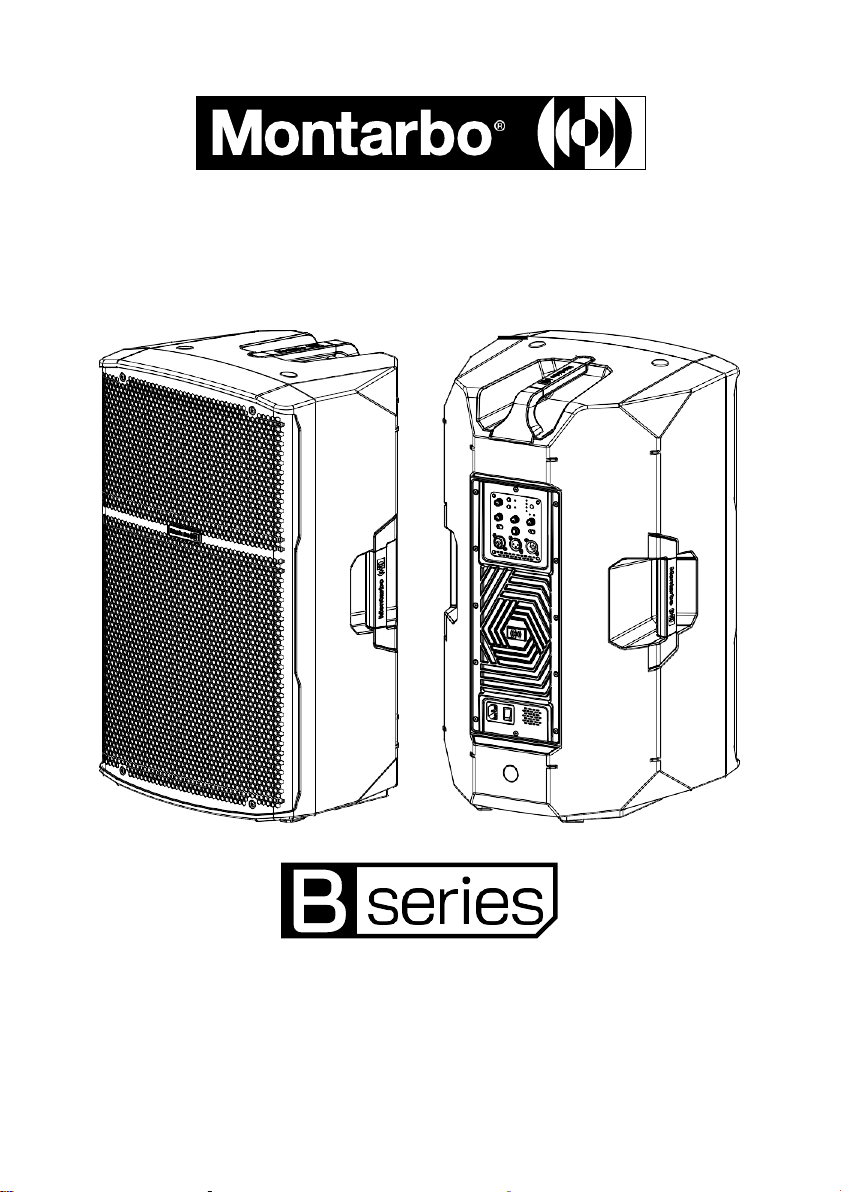
B108 - B110 - B112 - B115
DIFFUSORI IN PLASTICA BI-AMPLIFICATI CON MIXER & CONNESSIONE BLUETOOTH® BI-
AMPLIFIED PLASTIC SPEAKERS WITH MIXER & BLUETOOTH
BI-AMPING KUNSTSTOFF-LAUTSPRECHER MIT MIXER UND BLUETOOTH
ENCEINTES EN PLASTIQUE BI-AMPLIFIÉES AVEC MIXEUR ET CONNEXION BLUETOOTH
ALTAVOCES DE PLÁSTICO BIAMPLIFICADOS CON MEZCLADOR Y CONEXIÓN BLUETOOTH
®
ثوﺗوﻠﺑﻟﺎﺑ لﯾﺻوﺗو جزﻣﻟا ﺔﻟوﺎط ﻊﻣ ﻲﺋﺎﻧﺛ مﯾﺧﺿﺗ تاذ ﺔﯾﻛﯾﺗﺳﻟﺎﺑ توﺻ تارﺑﻛﻣ
®
CONNECTION
®
-VERBINDUNG
®
®

B SERIES
2
1 2 3 4 5 6 7 8 9
10
11
INDICE
CONTENUTO DELLA CONFEZIONE 2
DOTAZIONI MECCANICHE/ACUSTICHE 3
OPZIONI DI CONFIGURAZIONE 3
PANNELLO DI CONTROLLO 4
ALIMENTAZIONE 6
CONNESSIONE BLUETOOTH
QUICK SETUP 7
ACCESSORI 8
ESEMPI DI INSTALLAZIONE 8
SOLUZIONE DEI PROBLEMI 9
DATI TECNICI 10
®
7
1
Le avvertenze nel presente manuale devono essere osservate congiuntamente al “MANUALE D’USO - Sezione 2”.
CONTENUTO DELLA CONFEZIONE
1 x Diffusore serie B
1 x Manuale d’uso - Sezione 1
1 x Manuale d’uso - Sezione 2
1 x Cavo di alimentazione specifico per la vostra zona di utilizzo

3
ITA
manuale d’uso
Grazie per aver acquistato un prodotto Montarbo, azienda italiana fondata nel 1962, da
sempre al servizio della musica e dell’audio professionale. I prodotti Montarbo, originali e
all’avanguardia, sono progettati con la massima attenzione ai dettagli e alla durevolezza
nel tempo. L’affidabilità è in linea con gli alti standard qualitativi e la sensibilità all’impatto
ambientale che contraddistinguono l’azienda.
I diffusori attivi della serie B sono versatili, ergonomici e
portatili. Adatti all’utilizzo PA in contesti piccoli e medi,
sono dotati di un mixer con tre ingressi per tutti i tipi
®
di sorgenti, inclusi segnali via Bluetooth
da dispositivi
quali smartphone e tablet. Un DSP con 4 preset adatta le
prestazioni acustiche alle diverse condizioni di utilizzo.
2
DOTAZIONI MECCANICHE/ACUSTICHE
I diffusori sono equipaggiati con un compression driver per le alte frequenze (1” per il
B108, 1,35” per gli altri modelli) e un trasduttore da 8”, 10”, 12”, e 15” rispettivamente per
B108, B110, B112 e B115. Il design meccanico integra 3 maniglie, oltre ad un supporto per
fissaggio su palo. In particolare, sui modelli B110, B112 e B115 è possibile la selezione
dell’inclinazione (0/7,5°). Oltre a questo, due lati del cabinet con inclinazione 40° permettono
l’utilizzo come monitor da palco.
Cover specifiche per ogni modello sono inoltre disponibili come accessori per il trasporto e
la rapida protezione dalle intemperie.
3
OPZIONI DI CONFIGURAZIONE
PER ULTERIORI INFORMAZIONI
VEDERE IL CAPITOLO 9
B SERIES
4
4
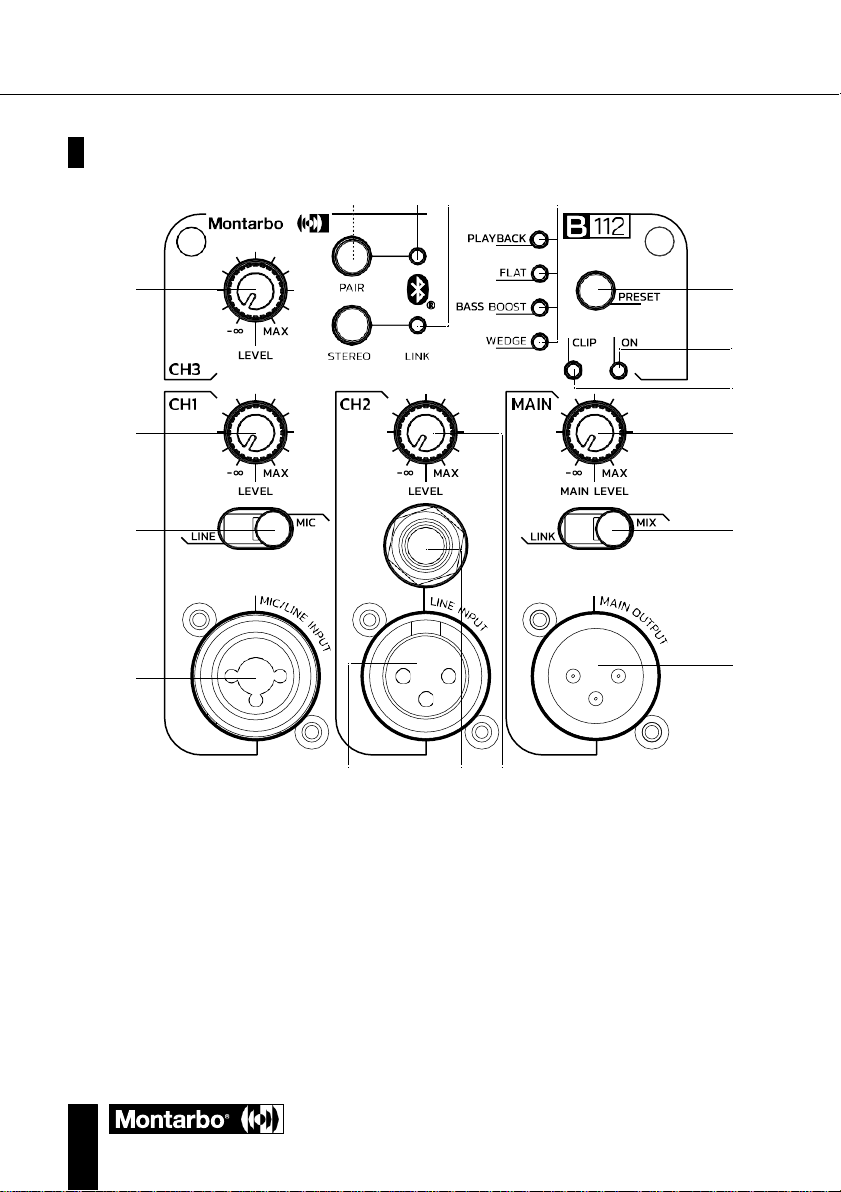
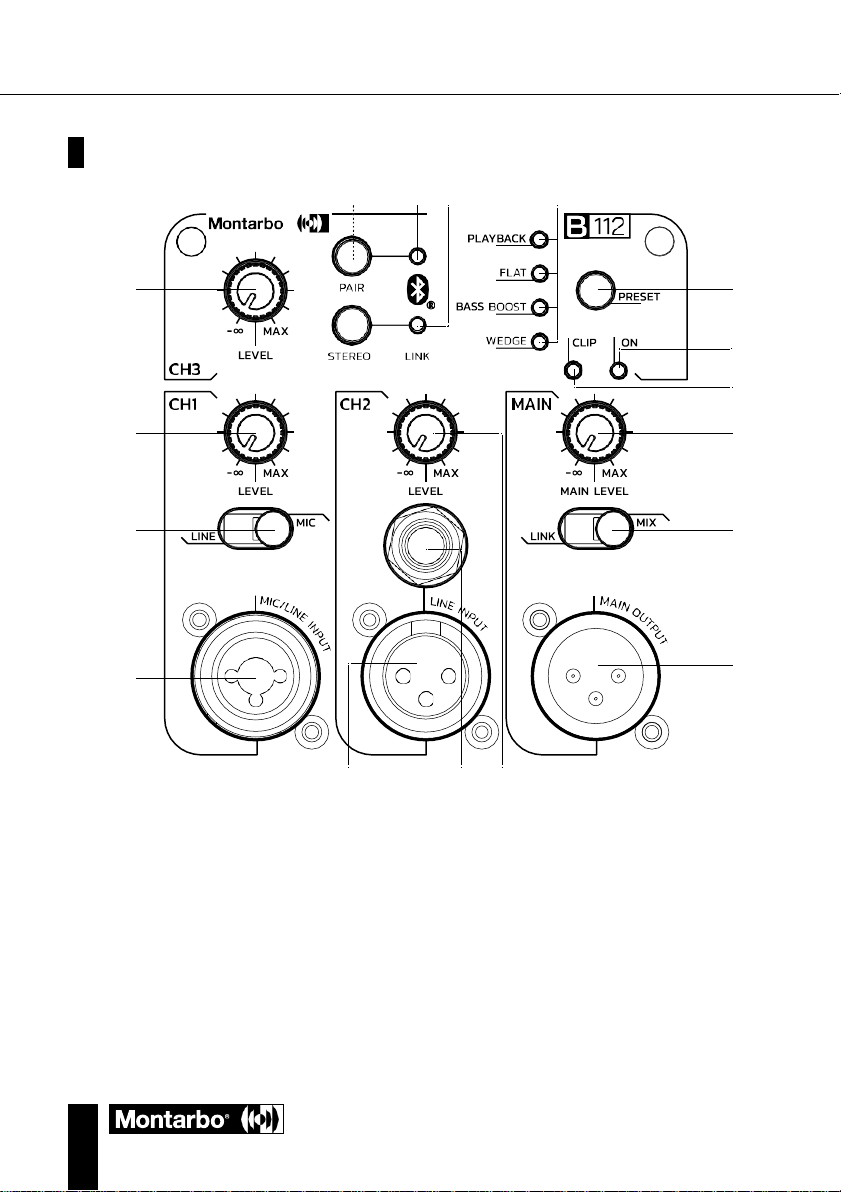
PANNELLO DI CONTROLLO
8 9 11 12
7 13
15
1 MIC/LINE INPUT
Ingresso combo XLR/jack da 6,35 mm. per segnali microfonici e linea.
2 SELETTORE LINE/MIC
Tramite questo selettore potete regolare la sensibilità dell’ingresso.
3 LEVEL CH1
Questa manopola regola il livello del canale 1, ruotatela verso destra per alzare il livello,
verso sinistra per diminuirlo.
4 LINE INPUT
Ingresso per segnali di livello linea con connettore XLR-F.
5 LINE INPUT
Ingresso per segnali di livello linea con connettore jack da 6,35mm.
14
3 18
2 17
1
4 5 6
16

5
ITA
manuale d’uso
6 LEVEL CH2
Questa manopola regola il livello del canale 2, ruotatela verso destra per alzare il livello,
verso sinistra per diminuirlo.
7 LEVEL CH3
Questa manopola regola il livello del canale 3, ruotatela verso destra per alzare il livello,
verso sinistra per diminuirlo.
8 PAIR
Questo tasto serve per sincronizzare e collegare telefoni cellulari o tablet. Per la
procedura consultare il capitolo 6 CONNESSIONE Bluetooth®.
9 LED PAIR
Indicatore luminoso di stato per la connessione Bluetooth®. Lampeggia durante la
sincronizzazione con il dispositivo mobile, è illuminato con connessione attiva.
10 AUX INPUT
Ingresso sbilanciato con presa stereo da 3,5mm per collegamento via cavo con
dispositivi esterni (PC, smartphone, tablet, ecc).
11 LINK
Questo led rimane acceso in modo fisso durante lo streaming audio.
12 PRESET LED
Questi led indicano quale preset è attivo fra PLAYBACK, FLAT, BASS BOOST e WEDGE.
Questi preset sono stati ottimizzati per le diverse applicazioni. PLAYBACK è ideale per
ascolto di audio registrato e/o karaoke, FLAT è ottimo per concerti, BASS BOOST è
perfetto per riproduzione di audio ricco di frequenze basse, quali DJing e musica da
discoteca, mentre WEDGE serve per l’uso come monitor da palco.
13 PRESET
Questo selettore consente di scegliere fra i quattro preset quello ottimale per
l’applicazione attuale.
14 LED CLIP
Questo led si accende quando il segnale del diffusore è vicino alla distorsione. In questo
caso riducete sia il segnale MAIN che quello dei canali attivi.
15 LED ON
Questo led si accende quando il diffusore è collegato alla rete elettrica e l’interruttore di
accensione è su ON.
16 LINE OUTPUT
Questa uscita XLR-M fornisce un segnale bilanciato di livello linea, il suo segnale è
stabilito dal relativo selettore.
17 LINK/MIX
Tramite questo selettore potete scegliere se il segnale in uscita verso un altro diffusore
deve essere quello presente negli ingressi (LINK) o quello miscelato fra i tre canali di
ingresso e controllato dal MAIN (MIX).
18 MAIN LEVEL
Questa manopola regola il livello di uscita del diffusore attivo.
B SERIES
6
5
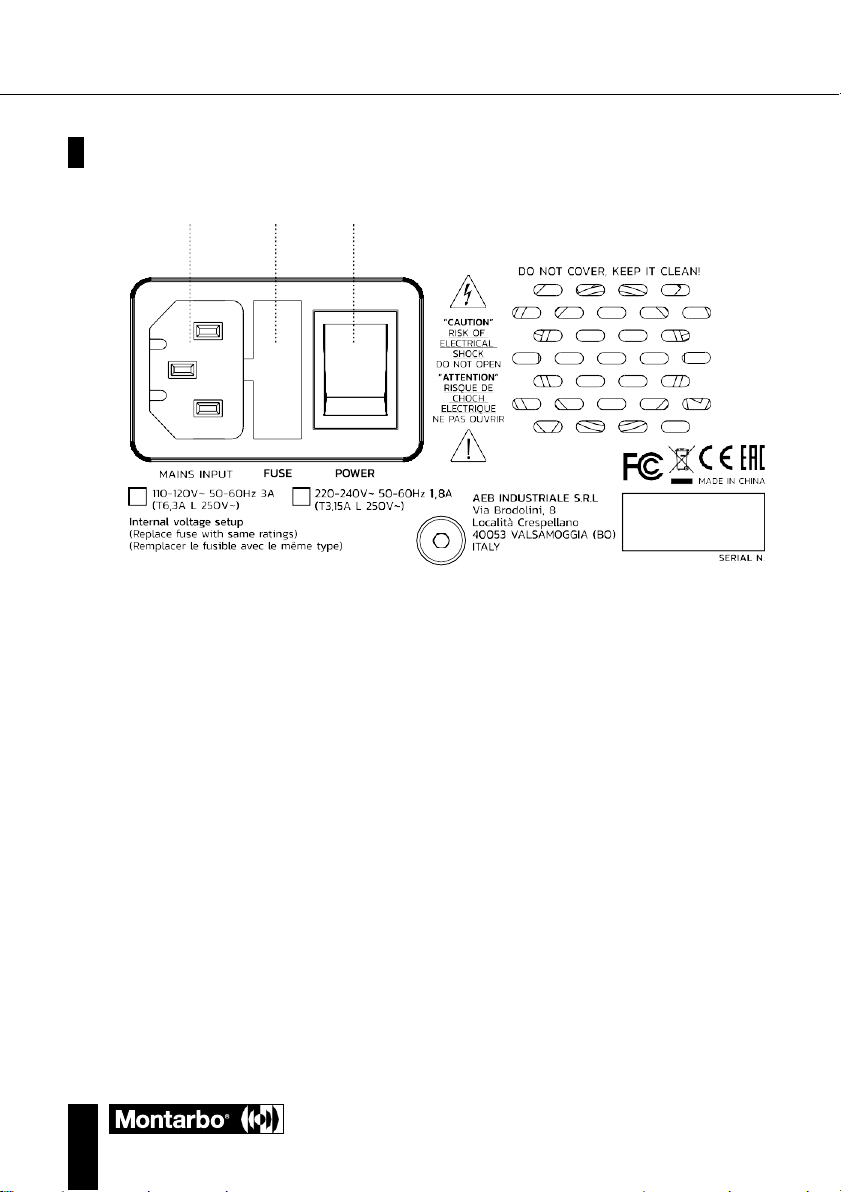
ALIMENTAZIONE
1 2 3
1 MAINS INPUT
Presa IEC di ingresso con filtro di rete integrato. Ogni confezione è fornita del cavo di
alimentazione necessario, specifico per la vostra area. Con il diffusore spento inserite in
questa presa il cavo per l’alimentazione elettrica. Per la vostra sicurezza, non scollegate
mai lo spinotto di terra.
2 FUSE
Fusibile di protezione.
ATTENZIONE: Sostituire il fusibile unicamente con uno dello stesso tipo e con gli
stessi valori.
Se il fusibile continua a bruciare, rivolgetevi ad un centro di assistenza autorizzato.
3 POWER ON/OFF
Interruttore per accensione/spegnimento del diffusore attivo.

7
ITA
manuale d’uso
6
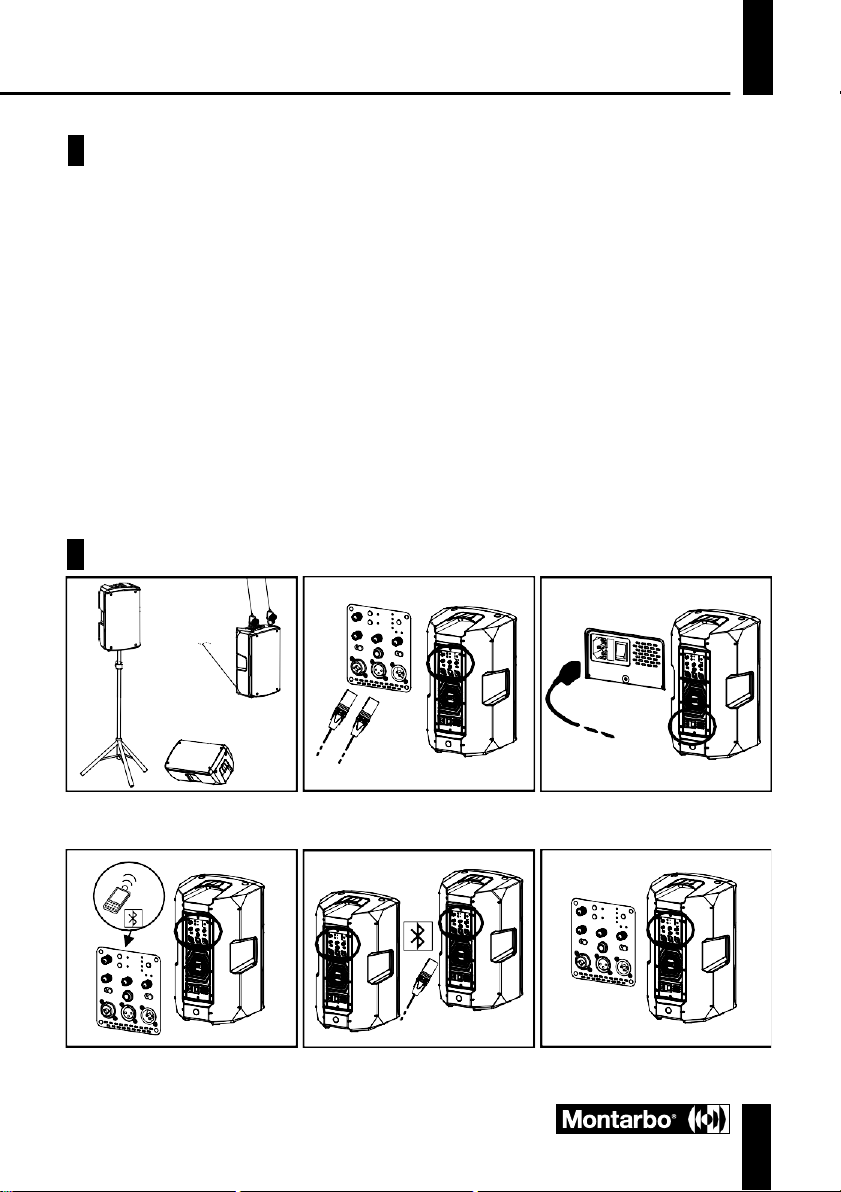
CONNESSIONE BLUETOOTH
- Assicurarsi che il dispositivo da sincronizzare al diffusore sia acceso e pronto per la
connessione via Bluetooth®. Con il diffusore acceso, premere il tasto PAIR per attivare la
sincronizzazione Bluetooth®. Il relativo led verde lampeggia.
- Verificare sul dispositivo mobile che il nome del diffusore (p. es. B108) compaia fra i
dispositivi disponibili.
- Selezionare il modello del diffusore per sincronizzare il dispositivo. La perfetta
connessione è segnalata dal relativo led che resta illuminato.
- Regolare i livelli CH3 e MAIN per il volume di riproduzione desiderato dei brani scelti nel
dispositivo sincronizzato.
AD UN SECONDO DIFFUSORE
- Sul primo diffusore, già sincronizzato, tenere premuto per qualche secondo il tasto
STEREO. Il led blu LINK inizia a lampeggiare.
- Accendere il secondo diffusore e premere il suo tasto PAIR, il cui led inizia a lampeggiare.
A sincronizzazione avvenuta sia il led LINK del primo diffusore che il led PAIR del secondo
diffusore restano illuminati.
- Regolare LEVEL CH3 e MAIN del secondo diffusore; il segnale proveniente dal dispositivo
sorgente è emesso da entrambi i diffusori.
7
QUICK SETUP
©
Collocare il diffusore secondo
l’installazione scelta
Collegare le sorgenti audio agli
ingressi (livelli canali a zero)
Inserire il cavo di
alimentazione e accendere
Accendere e sincronizzare il
Bluetooth
®
Collegare ulteriori diffusori
(via Bluetooth
®
o tramite cavi)
Regolare tutti i volumi come
desiderato

B SERIES
8
8
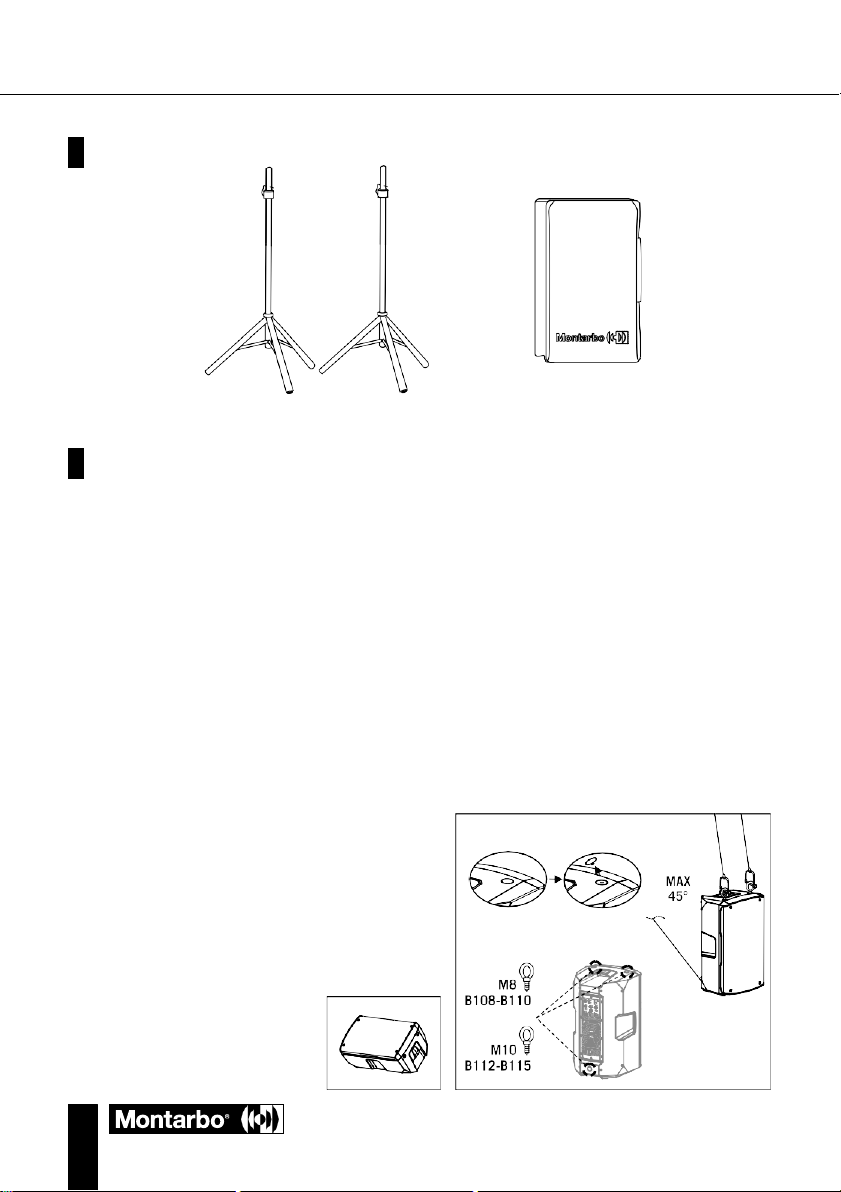
ACCESSORI
Coppia di treppiedi CV-B108/B110/B112/B115 cover
9
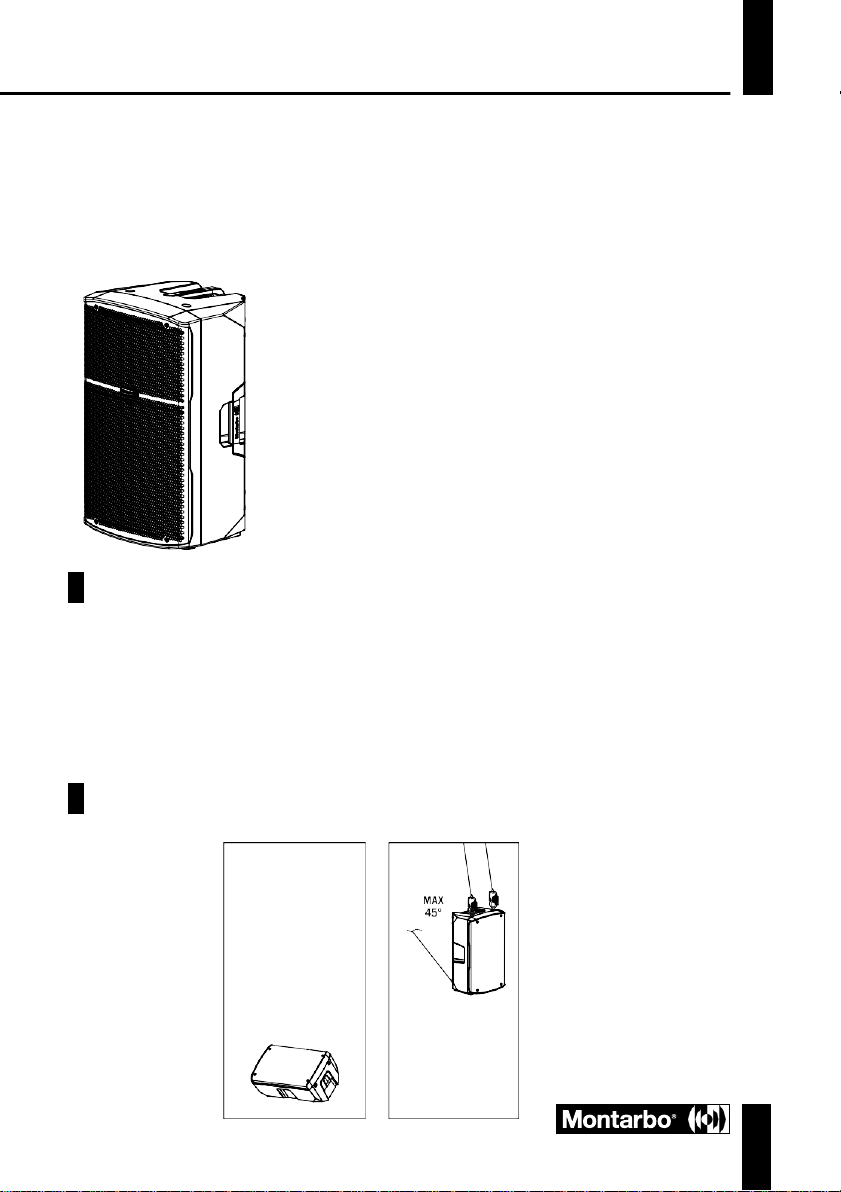
ESEMPI DI INSTALLAZIONE
Il posizionamento è intuitivo. Per la diffusione verso una platea seduta o in piedi è consigliato
l’uso di stativi certificati, collocati su una superficie piana e con i cavi di alimentazione e di
segnale posti in modo che non siano calpestabili, né siano tesi, o possano costituire motivo
di inciampo o scarsa sicurezza.
INSTALLAZIONE SU STATIVO TREPPIEDE
Il diffusore è installabile su stativo a treppiede opzionale standard con palo di diametro 35
mm. La massima altezza ammessa tra la base dello speaker e il pavimento è 170 cm. Per
ogni altro utilizzo è necessario un fissaggio addizionale (non fornito). Nei modelli B110,
B112, e B115 è possibile selezionare l’inclinazione (0/7,5°).
INSTALLAZIONE WEDGE
Il diffusore pu� essere posizionato, usando l’angolazione del cabinet, come monitor live.
In questo caso, si consiglia di selezionare la preselezione WEDGE sul pannello di controllo.
INSTALLAZIONE CON GOLFARI
E’ possibile installare lo speaker utilizzando ganci eyebolt (golfari). Il posizionamento è
rappresentato nella figura sotto, in cui l’eyebolt posteriore permette di regolare l’angolazione
finale (MAX 45°).
manuale d’uso
9
ITA
10
RISOLUZIONE DEI PROBLEMI
Il diffusore non si accende
Verificare la presenza della corretta alimentazione a monte dell’impianto.
Verificare che il cavo di alimentazione con connettore VDE sia correttamente inserito.
Il diffusore si accende ma non emette nessun suono
Verificare che i collegamenti agli ingressi dei canali audio (CH1, CH2 e/o CH3) siano
corretti.
Verificare che i cavi utilizzati non siano interrotti. Utilizzare esclusivamente cavi di qualità
e in buono stato.
Verificare che le sorgenti audio siano accese e indichino segnale in uscita.
Verificare la corretta sensibilità dell’ingresso del CH1.
Verificare la corretta sincronizzazione del segnale Bluetooth
Verificare il volume dell’uscita MAIN.
Il diffusore emette un suono di livello basso o distorto:
Regolare il volume delle sorgenti adeguato per gli ingressi della sezione mixer.
Verificare che i cavi utilizzati non siano danneggiati. Utilizzare esclusivamente cavi di
qualità e in buono stato.
Controllare il livello dei volumi degli ingressi e del MAIN.
Verificare il segnale in uscita dal dispositivo Bluetooth
Attenuare il livello degli ingressi MIC, LINE e/o del MAIN.
Assicuratevi di non aver collegato un segnale di linea al canale 1 con sensibilità MIC.
Presenza di rumore di fondo
Spegnere l’alimentazione e scollegare tutti i dispositivi collegati.
Verificare il segnale di tutte le sorgenti per scoprire quale ha causato il problema.
®
.
®
associato.
B SERIES
10
11
DATI TECNICI
MODELLO B 108 B 110 B 112 B 115
Tipologia
MAX SPL (@ 1m)
Risposta in
frequenza (-10 dB)
Risposta in
frequenza (-6 dB)
HF
LF
Copertura (H x V)
Frequenza di
crossover
Classe di
ampificazione
Potenza RMS
Potenza di picco
Raffreddamento
Tensione operativa
Temperatura
ambiente di
esercizio
2-vie bass reflex 2-vie bass reflex 2-vie bass reflex 2-vie bass reflex
125 dB 126 dB 129 dB 130 dB
68Hz-20KHz 60Hz-20KHz 54Hz-20KHz 50Hz-20KHz
73Hz-19KHz 64Hz-19KHz 57Hz-19KHz 55Hz-19KHz
1” (25mm) driver 1.35” (34mm) driver 1.35” (34mm) driver 1.35” (34mm) driver
8” - 2” V.C (50mm) 10” - 2” V.C (50mm) 12” - 2.5” V.C (65mm) 15” - 2.5” V.C (65mm)
90° H x 60° V 90° H x 60° V 90° H x 60° V 90° H x 60° V
2,1 kHz 1,8 kHz 1,8 kHz 1,8 kHz
D + A/B D + A/B
200 W 200 W 600 W 600 W
400 W 400 W 1200 W 1200 W
Convezione Convezione Ventola Ventola
110-120V~ 50-60Hz
220-240V~ 50-60Hz
-20° +45° -20° +45° -20° +45° -20° +45°
110-120V~ 50-60Hz
220-240V~ 50-60Hz
D
110-120V~ 50-60Hz
220-240V~ 50-60Hz
D
110-120V~ 50-60Hz
220-240V~ 50-60Hz
DSP
Funzioni avanzate
Convertitore AD/
DA
Bluetooth
28/56 bit 28/56 bit 28/56 bit 28/56 bit
Filtri FIR Filtri FIR Filtri FIR Filtri FIR
24 bit, 48 kHz 24 bit, 48 kHz 24 bit, 48 kHz 24 bit, 48 kHz
®
5.0 (stereo) 5.0 (stereo) 5.0 (stereo) 5.0 (stereo)
manuale d’uso
11
Corrente di inrush
ITA
Connettori I/O
CH1: Combo
CH2: XLR-F + jack
6,35mm (1/4”)
AUX IN:
mini-jack 3,5mm
LINE OUT: XLR-M
CH1: Combo
CH2: XLR-F + jack
6,35mm (1/4”)
AUX IN:
mini-jack 3,5mm
LINE OUT: XLR-M
CH1: Combo
CH2: XLR-F + jack
6,35mm (1/4”)
AUX IN:
mini-jack 3,5mm
LINE OUT: XLR-M
CH1: Combo
CH2: XLR-F + jack
6,35mm (1/4”)
AUX IN:
mini-jack 3,5mm
LINE OUT: XLR-M
Controlli
Fusibile
Assorbimento a
1/8 della potenza
(condizioni medie
di utilizzo)
Assorbimento a
1/3 della potenza
(condizioni
massime di
utilizzo)
Consumo in
stand-by
Materiale cabinet
Dimensioni
(L x H x P)
Peso
Livello dei canali
Livello MAIN
Selettore PRESET
Sensibilità canale 1
Uscita LINK/MIX
T5A L 250V~
T2,5A L 250V~
0.6 A (110-120V~)
0.39 A (220-240V~)
1.1 A (110-120V~)
0.85 A (220-240V~)
19 W 19 W 19.2 W 19.2 W
15,8 A 15,8 A 6,3 A 6,3 A
Polipropilene Polipropilene Polipropilene Polipropilene
250 x 430 x 237 mm
(9.8” x 16.9” x 9.3”)
8.5 kg (18.74 lb) 11.3 kg (24.92 lb) 17.9 kg (39.46 lb) 21.6 kg (47.62 lb)
Livello dei canali
Livello MAIN
Selettore PRESET
Sensibilità canale 1
Uscita LINK/MIX
T5A L 250V~
T2,5A L 250V
0.6 A (110-120V~)
0.39 A (220-240V~)
1.1 A (110-120V~)
0.85 A (220-240V~)
310 x 524.5 x 280 mm
(12.2” x 20.6” x 11”)
Livello dei canali
Livello MAIN
Selettore PRESET
Sensibilità canale 1
Uscita LINK/MIX
T6,3A L 250V~
T3,15A L 250V~
1.47 A (110-120V~)
0.89 A (220-240V~)
3 A (110-120V~)
1.8 A (220-240V~)
365 x 625 x 345 mm
(14.4” x 24.6” x 13.6”)
Livello dei canali
Livello MAIN
Selettore PRESET
Sensibilità canale 1
Uscita LINK/MIX
T6,3A L 250V~
T3,15A L 250V~
1.47 A (110-120V~)
0.89 A (220-240V~)
3 A (110-120V~)
1.8 A (220-240V~)
430 x 725 x 405 mm
(16.9” x 28.5” x 15.9”)
MODELLO B 108 B 110 B 112 B 115
B SERIES
12
1 2 3 4 5 6 7 8 9
10
11
INDEX
PACKAGE CONTENT 12
MECHANICAL AND ACOUSTICAL FEATURES 13
CONFIGURATION OPTIONS 13
CONTROL PANEL 14
MAINS 16
BLUETOOTH
QUICK SETUP 17
ACCESSORIES 18
INSTALLATION EXAMPLES 18
TROUBLESHOOTING 19
TECH SPECS 20
®
CONNECTION 17
1
The warnings in this manual must be observed together with the “USER MANUAL - Section 2”.
PACKAGE CONTENT
1 x B Series speaker
1 x User Manual – Section 1
1 x User Manual – Section 2
1 x Mains cable, specific for your area
13
ENG
User manual
Thank you for purchasing a Montarbo product, the Italian company founded in 1962, and
since then serving music and audio. The unique and state of the art Montarbo products are
designed with the utmost attention to detail and durability. Reliability is in line with the high
quality standards and sensitivity to the environmental impact that distinguish the company.
B series active speakers are versatile, ergonomic and
portable. Suitable for PA use in small and medium
venues, they are equipped with a mixer with three inputs
for all �ind of sources, includin� si�nals via �luetooth
®
from devices such as smartphones and tablets. A DSP
with 4 presets adapts the acoustic performance to
different applications.
2
MECHANICAL AND ACOUSTICAL FEATURES
The speakers are equipped with a high frequencies compression driver (1” for B108, 1.35” for
the other models) and an 8”, 10”, 12”, and 15” drivers respectively for B108, B110, B112 and
B775 mode s The des gn ntegrates 3 hand es, as we as a fiange for po e flx ng On B77O,
B112, and B115 models, it is possible to select the inclination (0 ° /7.5 °). In addition to this,
two sides of the cabinet with 40 ° inclination allow the use as a stage monitor. Furthermore,
for each model are also available as accessories optional covers for transport and rapid
protection from the weather.
3
CONFIGURATION OPTIONS
FOR FURTHER INFORMATION,
REFER TO CHAPTER 9
14
B SERIES
4
CONTROL PANEL
7 13
8 9 11 12
1 MIC/LINE INPUT
Combo socket (XLR-F + 6,35mm. - 1/4” jack) for microphone and line signals.
2 LINE/MIC SWITCH
Use this switch to choose input sensitivity.
3 LEVEL CH1
This knob adjusts channel 1 level. Turn the knob clockwise to increase volume, or
counterclockwise to lower it.
4 LINE INPUT
XLR-F input socket for line level signals.
5 LINE INPUT
6,35mm. (1/4”) for line level signals.
3 18
2 17
1
4 5 6
15
14
16

15
ENG
User manual
6 LEVEL CH2
This knob adjusts channel 2 level. Turn the knob clockwise to increase volume, or
counterclockwise to lower it.
7 LEVEL CH3
This knob adjusts channel 3 level. Turn the knob clockwise to increase volume, or
counterclockwise to lower it.
8 PAIR
Button to synchronize and connect mobile phones or tablets. For the procedure, see
chapter 6 Bluetooth® CONNECTION.
9 LED PAIR
Status indicator LED for Bluetooth® connection. t flashes while synchronizing the
speaker with the mobile device, and it’s steadily lit during the connection.
10 AUX INPUT
Unbalanced input with 3.5mm stereo socket for wired connection with external devices
(PC, smartphone, tablet, etc.).
11 LINK
This led is steadily lit during audio streaming.
12 PRESET LEDS
These LEDs indicate which preset is active among PLAYBACK, FLAT, BASS BOOST and
WEDGE.
These presets have been optimized for different applications. PLAYBACK is ideal for
recorded audio listening and/or karaoke, FLAT is ideal for concerts, BASS BOOST is
ideal for reproduction of audio rich of low frequencies, such as DJing and disco music,
while WEDGE is suited for use as a monitor stage.
13 PRESET
This selector allows to choose among the four presets the best one for the current
application.
14 CLIP LED
This LED lights up when the speaker signal is close to distortion. In this case, reduce
both the MAIN signal and those of the active channels.
15 ON LED
This LED lights up when the speaker is connected to the mains and the power switch
is ON.
16 LINE OUTPUT
This XLR-M output provides a balanced line level signal, the output signal is set by the
related selector.
17 LINK/MIX
Use this selector to choose the output signal towards another speaker. The choice
is between the input signals (L NK) or the mix between the three input channels as
controlled by the MAIN (MIX).
18 MAIN LEVEL
This knob adjusts active speaker output level.
16
B SERIES
5
MAINS
1 2 3
1 MAINS INPUT
EC nput socket w th ntegrated ma ns fllter. Each package s suppl ed w th the
necessary power cable, spec flc for your area. W th the speaker turned off, nsert the
power cable into this socket. For your own safety, never disconnect the earth plug.
2 FUSE
Protection fuse.
CAUTION: Replace the fuse only with one of the same type and with the same value.
If the fuse blows repeatedly, contact an authorized service center.
3 POWER ON/OFF
Use this switch to turn ON/OFF the unit.
17
ENG
User manual
6
BLUETOOTH© CONNECTION
- Make sure the device to be synchronized with the speaker is turned on and ready to
be connected via Bluetooth®. With the speaker on, press the PAIR button to activate
Bluetooth® synchronization. The related green LED flashes.
- Check on the mobile device that the name of the speaker – e.g. B108 - appears among
the available devices.
- Select the speaker model to synchronize the device. The perfect connection is indicated
by the relative LED remaining lit.
- Now adjust CH3 and MAIN levels for the desired playback volume of songs chosen in
synchronized device.
CONNECTION TO THE SECOND SPEAKER
- �n the first speaker, already synchronized, keep the �TERE� button pressed for fe�
seconds. The blue LINK led starts flashing.
- Turn on the second speaker and press its PAIR button, its relevant LED starts flashing.
After synchronization, both the LINK LED of the first speaker and the PAIR LED of the
second speaker remain lit.
- Adjust second speaker LEVEL CH3 and MAIN; the signal from the source device is output
from both speakers.
7
QUICK SETUP
Place the speaker according to
the installation choice
Switch on and pair the
Bluetooth
®
Connect the audio sources to the Insert the mains cable and
inputs (channel levels zeroed) turn on the speaker
Connect additional speakers
(via Bluetooth
®
or via cables)
Adjust all volumes as desired
18
B SERIES
8
ACCESSORIES
Tripod stand kit CV-B108/B110/B112/B115 cover
9
INSTALLATION EXAMPLES
The placement is intuitive. For the diffusion towards a seated or standing audience, the
use of certifled placed on a flat surface and with mains and signal cables placed in such
a way that they cannot be walked on, nor are they stretched, or they can cause a stumble
or poor safety.
INSTALLATION ON TRIPOD STAND
The speaker can be installed on an optional tripod stand with a standard 35mm diameter
pole. The maximum height allowed between the speaker base and the floor is 170 cm
(5.57ft)
WEDGE INSTALLATION
The speaker can be placed, using the cabinet angle, as a live monitor. In this case it is
suggested to select the WEDGE preset on the control panel.
INSTALLATION WITH EYEBOLTS
The speaker can also be installed using eyebolts. The positioning is shown in the flgure on
the side, where the rear eyebolt allows adjusting the flnal angle (MAX 45°).

User manual
19
ENG
10
TROUBLESHOOTING
The speaker does not turn on
The speaker does not turn on
Check for the correct power supply upstream of the system.
Check that the power cable with VDE connector is correctly inserted.
The speaker turns on but makes no sound
Check audio channels (CH1, CH2 and/or CH3) proper input connections.
Check that the cables used are properly working. Use only good quality cables in good
condition.
Check that audio sources are turned on and indicate the output signal.
Check CH1 input proper sensitivity.
Check CH1 proper synchronization of the Bluetooth® signal.
Check MAIN output level.
The speaker outputs poor or distorted sound:
Adjust the source volume appropriate of mixer section inputs.
Check that the cables used are not damaged. Use only good quality cables in good
condition.
Check inputs and MAIN volume levels.
Check the associated Bluetooth
Cut the level of the MIC, LINE and/or MAIN inputs.
Make sure you have not connected a line signal to channel 1 with MIC sensitivity.
Background noise
Turn off the power and disconnect all connected devices.
��
connectin� one device at a time� chec� the si�nal from each source to �nd out �hich
one caused the problem.
®
device output signal.

B SERIES
20
Advanced functions
11
TECH SPECS
MODEL B108 B110 B112 B115
System type
MAX SPL (@ 1m)
Frequency
response
(-10 dB)
Frequency
response
(-6 dB)
HF
LF
Coverage (H x V)
Crossover
frequency
Amplifier class
RMS Power
Pea� Power
Cooling
Mains
����� ��ss re�ex ����� ��ss re�ex ����� ��ss re�ex ����� ��ss re�ex
125 dB 126 dB 129 dB 130 dB
68Hz-20KHz 60Hz-20KHz 54Hz-20KHz 50Hz-20KHz
73Hz-19KHz 64Hz-19KHz 57Hz-19KHz 55Hz-19KHz
1” (25mm) driver 1.35” (34mm) driver 1.35” (34mm) driver 1.35” (34mm) driver
8” - 2” V.C (50mm) 10” - 2” V.C (50mm) 12” - 2.5” V.C (65mm) 15” - 2.5” V.C (65mm)
90° H x 60° V 90° H x 60° V 90° H x 60° V 90° H x 60° V
2,1 kHz 1,8 kHz 1,8 kHz 1,8 kHz
D + A/B D + A/B
200 W 200 W 600 W 600 W
400 W 400 W 1200 W 1200 W
Convection Convection Fan Fan
110-120V~ 50-60Hz
220-240V~ 50-60Hz
110-120V~ 50-60Hz
220-240V~ 50-60Hz
D
110-120V~ 50-60Hz
220-240V~ 50-60Hz
D
110-120V~ 50-60Hz
220-240V~ 50-60Hz
Operating ambient
temperature
DSP
AD/DA converter
Bluetooth
-20° +45° -20° +45° -20° +45° -20° +45°
28/56 bit 28/56 bit 28/56 bit 28/56 bit
FIR filters FIR filters FIR filters FIR filters
24 bit, 48 kHz 24 bit, 48 kHz 24 bit, 48 kHz 24 bit, 48 kHz
®
5.0 (stereo) 5.0 (stereo) 5.0 (stereo) 5.0 (stereo)
 Loading...