

Montana Woodworks Montana Assembly Instructions Manual

Assembly Instructions for Porch Swing
ank you for purchasing your heirloom quality furniture from Montana Woodworks®. Should you have
any questions or need to contact sales or support, please do not hesitate to contact our corporate oces at
888.889.3728 or via E-Mail at: cs@montanawoodworks.com
Tools Needed: 9/16” Wrench, Socket or Impact Drill, Rubber Mallet
Before beginning assembly, please take a few moments to carefully read the instructions, familiarize yourself
with the components and understand each step of the process. Likewise, please ensure that the hardware package
contains the items as described below.
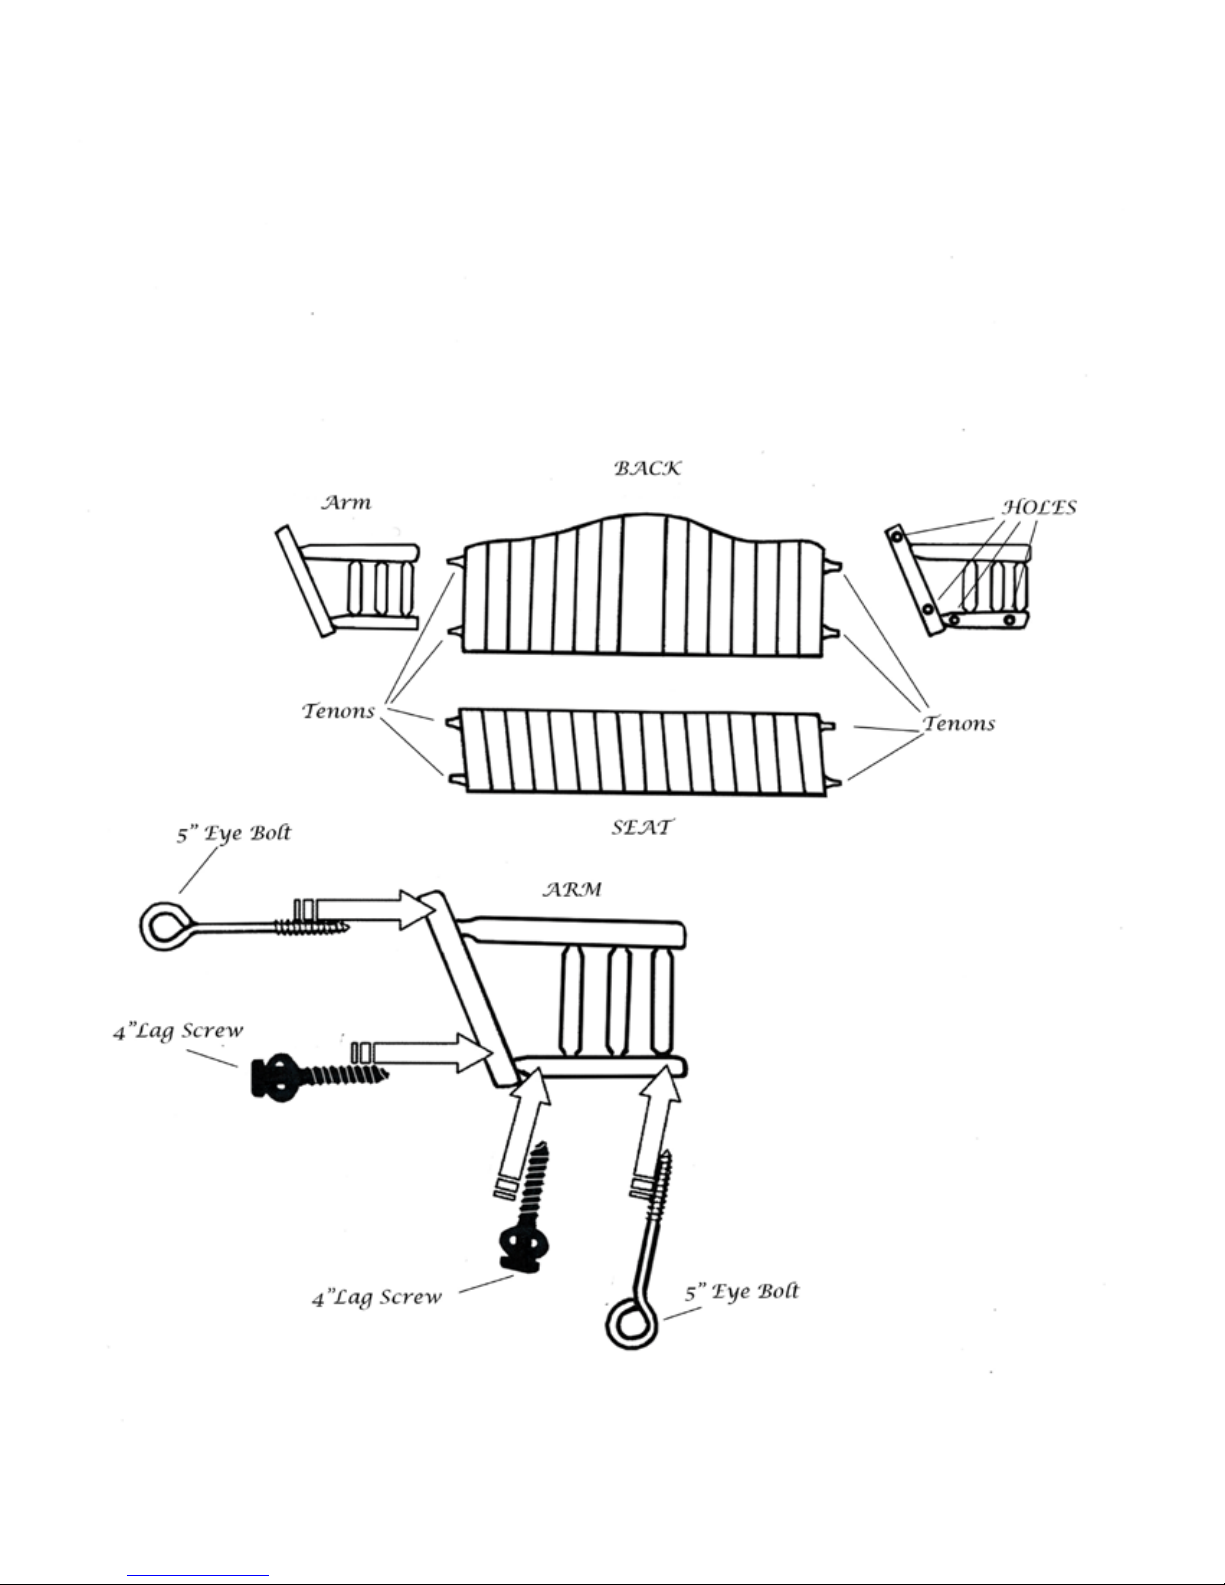
Parts List: (1) Back Assembly, (1) Seat Assembly, (1) Right and Le Arm Assemblies
Hardware List: (4) 3” Lag Bolts, (4) 4” Eye Bolts, (8) Washers, (2) Long Chains, (2) Short Chains, (8) “S” Hooks
Swing Assembly Instructions:
Step 1. Remove components from shipping boxes. You may lay the cardboard on the oor to prevent marring of
nish.
Step 2. Lay one arm assembly (“A” in the image shown on these instructions) on the oor with holes facing
upward.
Step 3. Insert the two tenons of the seat assembly “B” into the holes on the shortest part of the arm assembly.
Step 4. Insert the two tenons of the back assembly “C” into the holes on the longer, angled part of the arm
assembly.
Step 5. Repeat steps 3 and 4 above for opposite arm.
Step 6. Insert lag bolts “D” with washers “E” and eye bolts “F” into holes on outside of arms and tighten fully.
See diagram on reverse for detail.
Hanging the Swing:
Step 1. Separate the two dierent lengths of chain and the “S” shaped hooks.
Step 2. Count eight links from the end of one long chain “G” and insert an “S” hook into the 8th link. Attach the
other end of this “S” hook into porch header hardware (not included).
Step 3. Count forty links from the opposite end of the long chain that is now hanging from the porch header
and insert another “S” hook into the 40th link.
Step 4. Attach one end of the short chain “H” to the remaining end of the “S” hook from the last step.
Step 5. Insert an “S” hook into the remaining end of the short chain.
Step 6. Counting nine links from the bottom of the long chain hanging from the porch header, insert “S” hook
into 9th link.
Step 7. Attach the opposite end of the “S” hook from last step into the eye bolt at the front/bottom of the swing
assembly.
Step 8. Insert the remaining end of the middle “S” hook (Step 5 Above) into the eye bolt at the swing back/top of
the swing assembly.
Step 9. Repeat steps 2 through 8 to hand the other side of the swing
*Adjust the height and balance of the swing by moving the “S” hooks one link at a time until satised
PLEASE NOTE: If you purchased your item “ready to nish” special care must be taken to properly apply a high
grade nal nish in a timely manner. Doing so will help protect your purchase from discoloration and damage
caused by exposure to ultra-violet light and/or weather. if the products intended use is outside, please use an
exterior rated nish to also protect from weather damage. See use and care instructions for further information.
Failure to adequately protect item by application and as needed, re-application of a nal nish may void warranty.
 Loading...