

Page 1
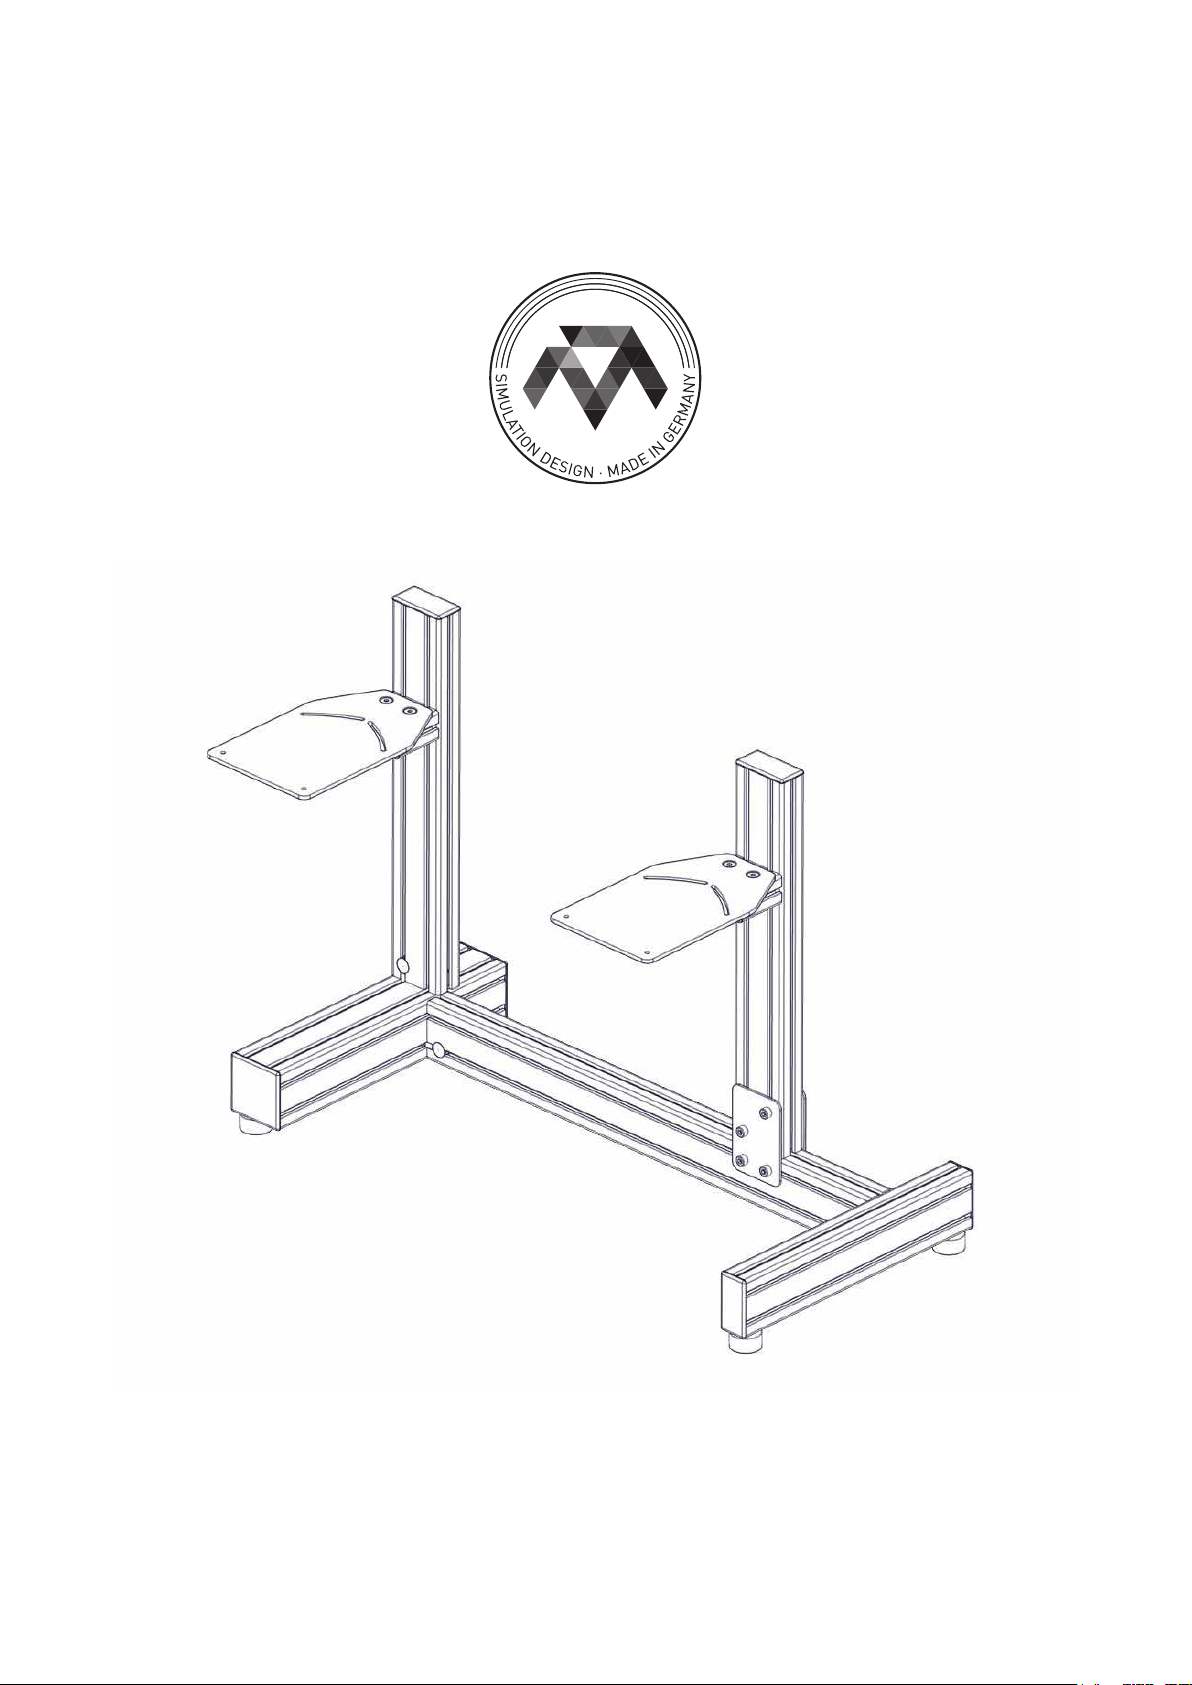
STAND
Instruction Manual EN
Page 2

STAND INSTRUCTION MANUAL
1 General information
Congrats on your brand new MONSTERTECH Stand!
This guide is meant to help you assemble your Stand as smoothly as possible. If you still have
questions about the assembly process, please contact [email protected] or support@
monstertechusa.com.
1.1 Before you start
Before you start the Stand assembly, we are going to look at some common assembly steps
and often used parts, as well as required tools.
1.1.1 Required Tools
For our Stand assembly, we need the following tools*:
- Hex key set with ball head with extension
- Rubber or plastic mallet
- Flat head screwdriver
- Tape measure w/ millimeters
*Tools are not included with the Sim Rig
2
Page 3
STAND INSTRUCTION MANUAL
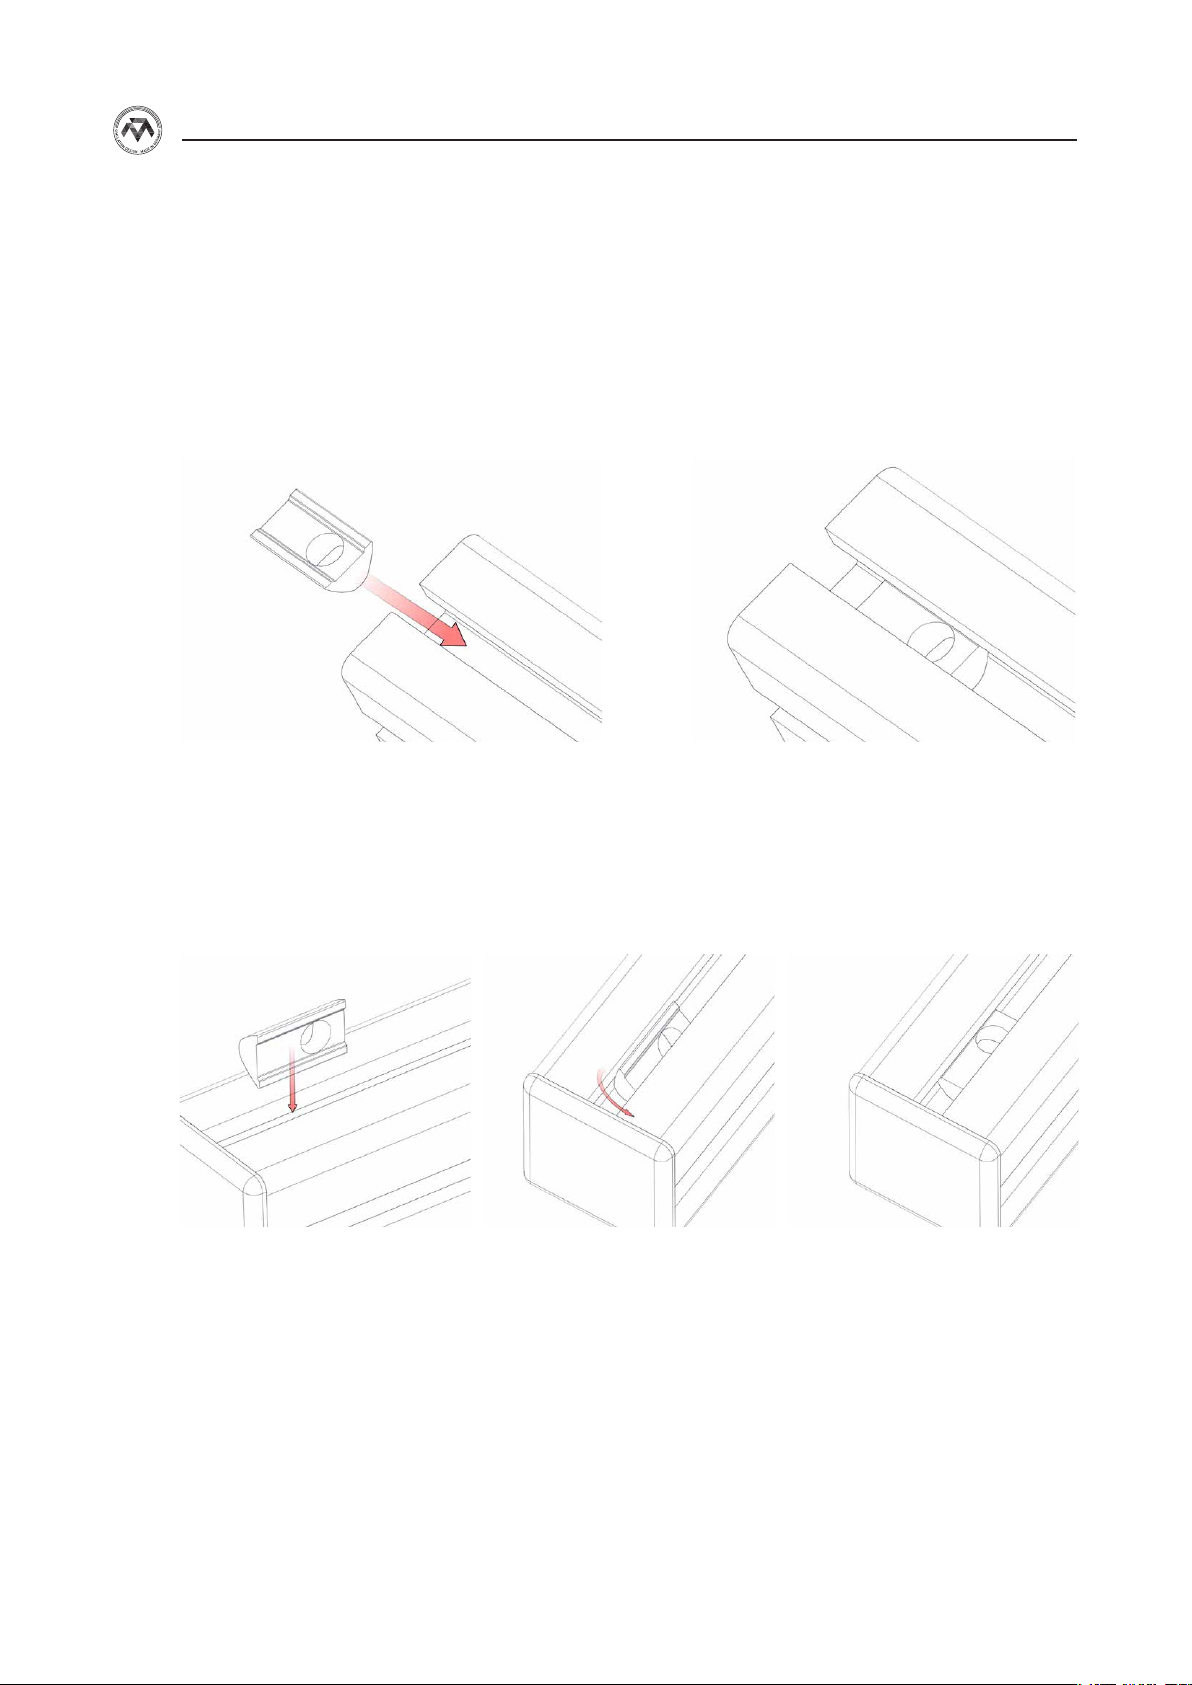
1.1.2 Inserting T-Nut into Profile
There are two ways to insert the M8 T-Nuts into the respective prole groove; refer to Figure 1
and 2 respectively.
Figure 1: Slide in from side
Figure 2: Rotate in from top
3
Page 4
STAND INSTRUCTION MANUAL
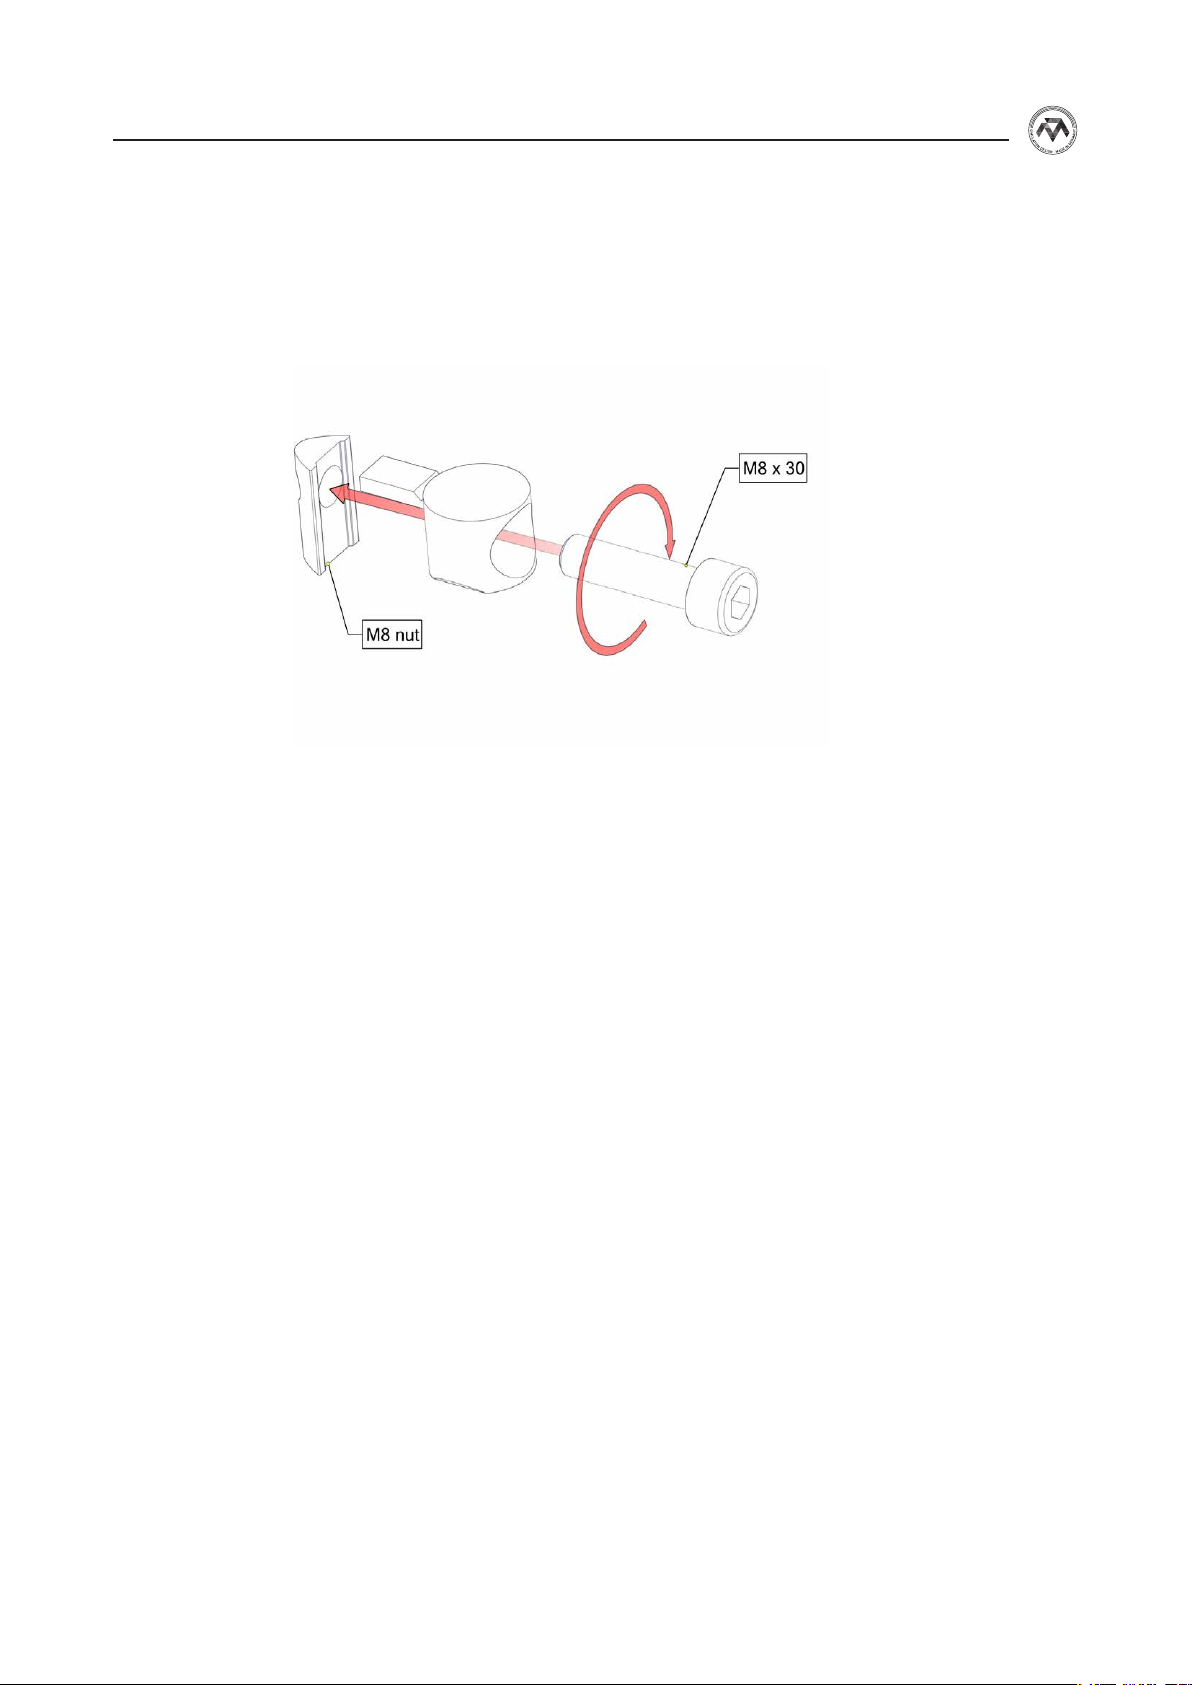
1.1.3 Universal Fastener Assembly
The universal fastener assembly can be prepared the following way, so long as the T-Nut can
be slid in from the side. One Universal Fastener Assembly is made up from one (1) M8x30 Hex
Screw, one (1) T-Nut, and one (1) Universal Fastener.
Figure 3: Universal fastener assembly
If inserting the universal fastener assembly from the side is not possible, it is necessary to rota-
te the T-Nut into the prole groove rst, and then screw the M8x30 bolt (along with the universal fastener) into the T-Nut.
4
Page 5

STAND INSTRUCTION MANUAL
1.1.4 Angle Bracket Stud Removal
Sometimes it might be necessary to break off the studs from angle brackets (if those are part
of the product). This is best achieved by:
1. Inserting a at-head screwdriver between the stud and the bracket, and then
2. Rotate the screwdriver for the stud to come off
5
Page 6
STAND INSTRUCTION MANUAL
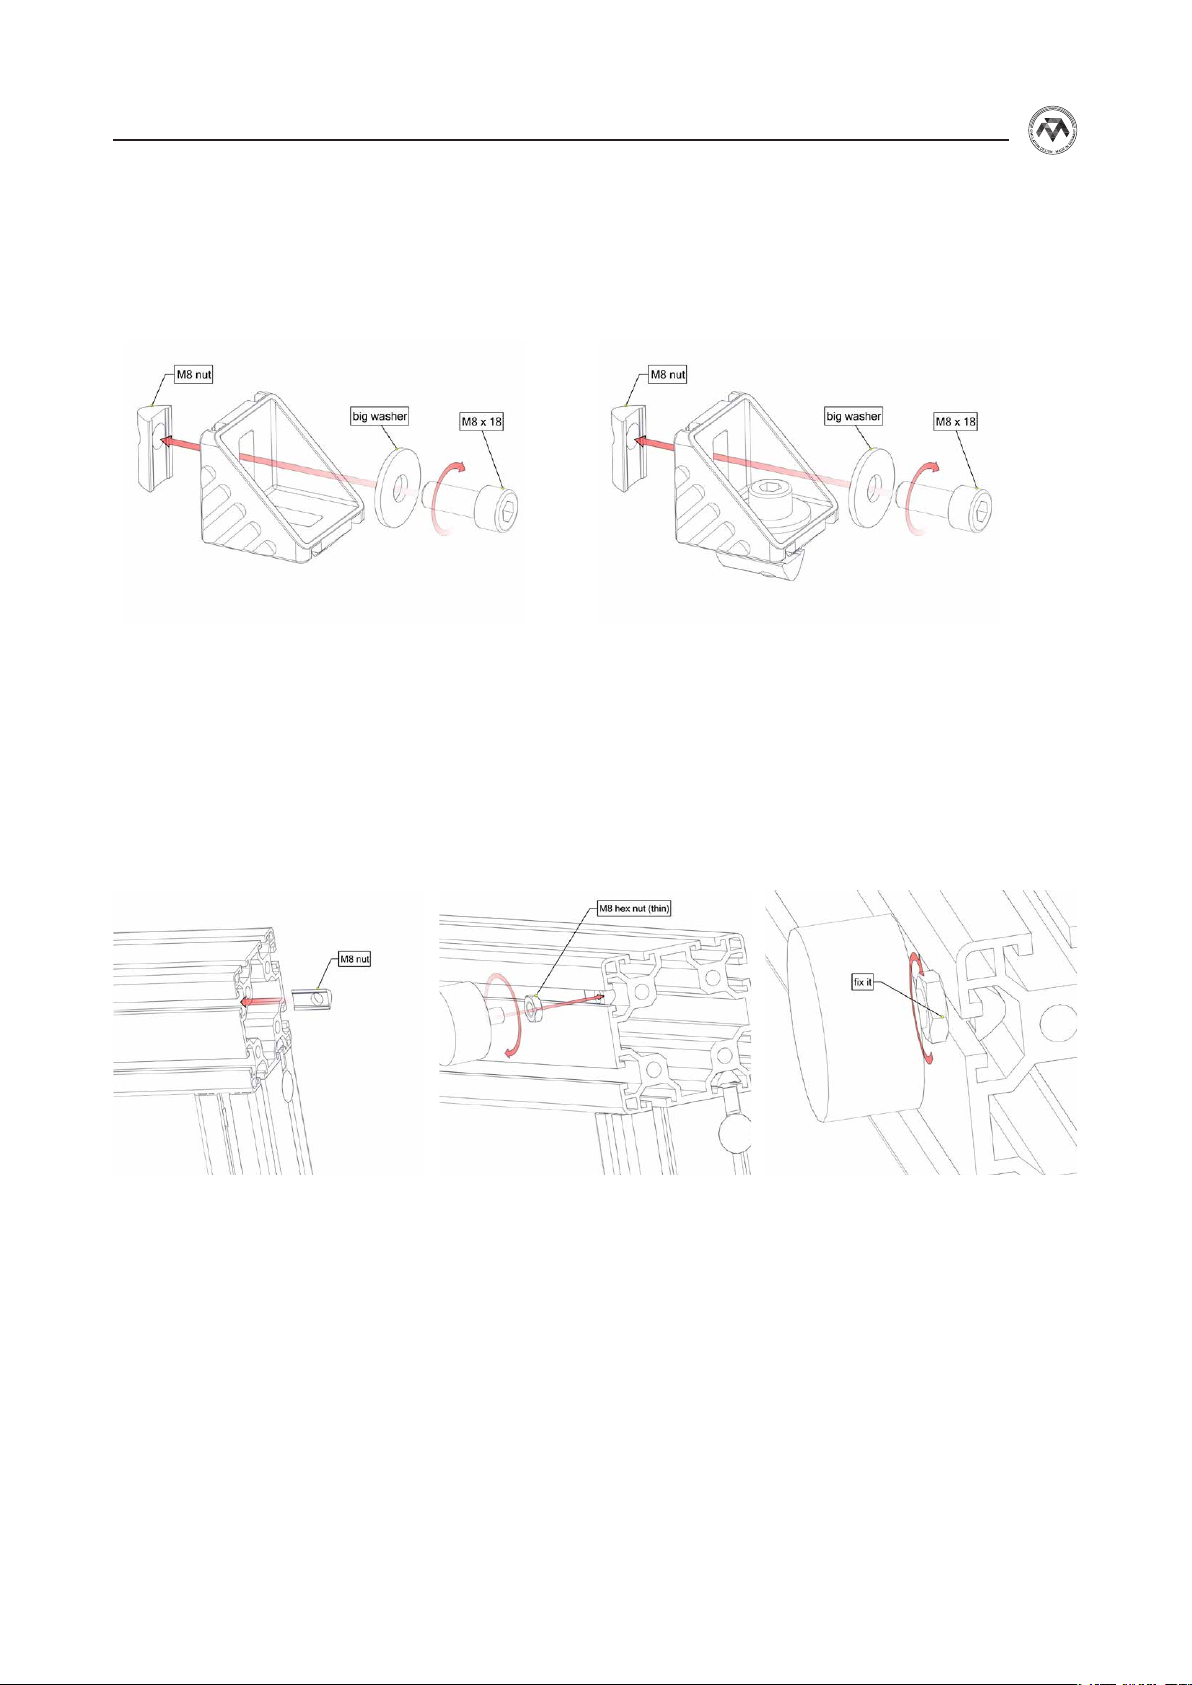
1.1.5 Angle Bracket Assembly
For some assemblies the use of angle brackets is required. These are prepared by using two
(2) M8x18 hex screws, two (2) washers, and two T-Nuts.
Figure 5: Angle bracket assembly
1.1.6 Adjustment of Profile Feet
The prole feet are installed on the MTX Base Stand, MTX Stand-Alone TV or Stand.
Figure 6: Prole feet
6
Page 7
STAND INSTRUCTION MANUAL
2 Overview
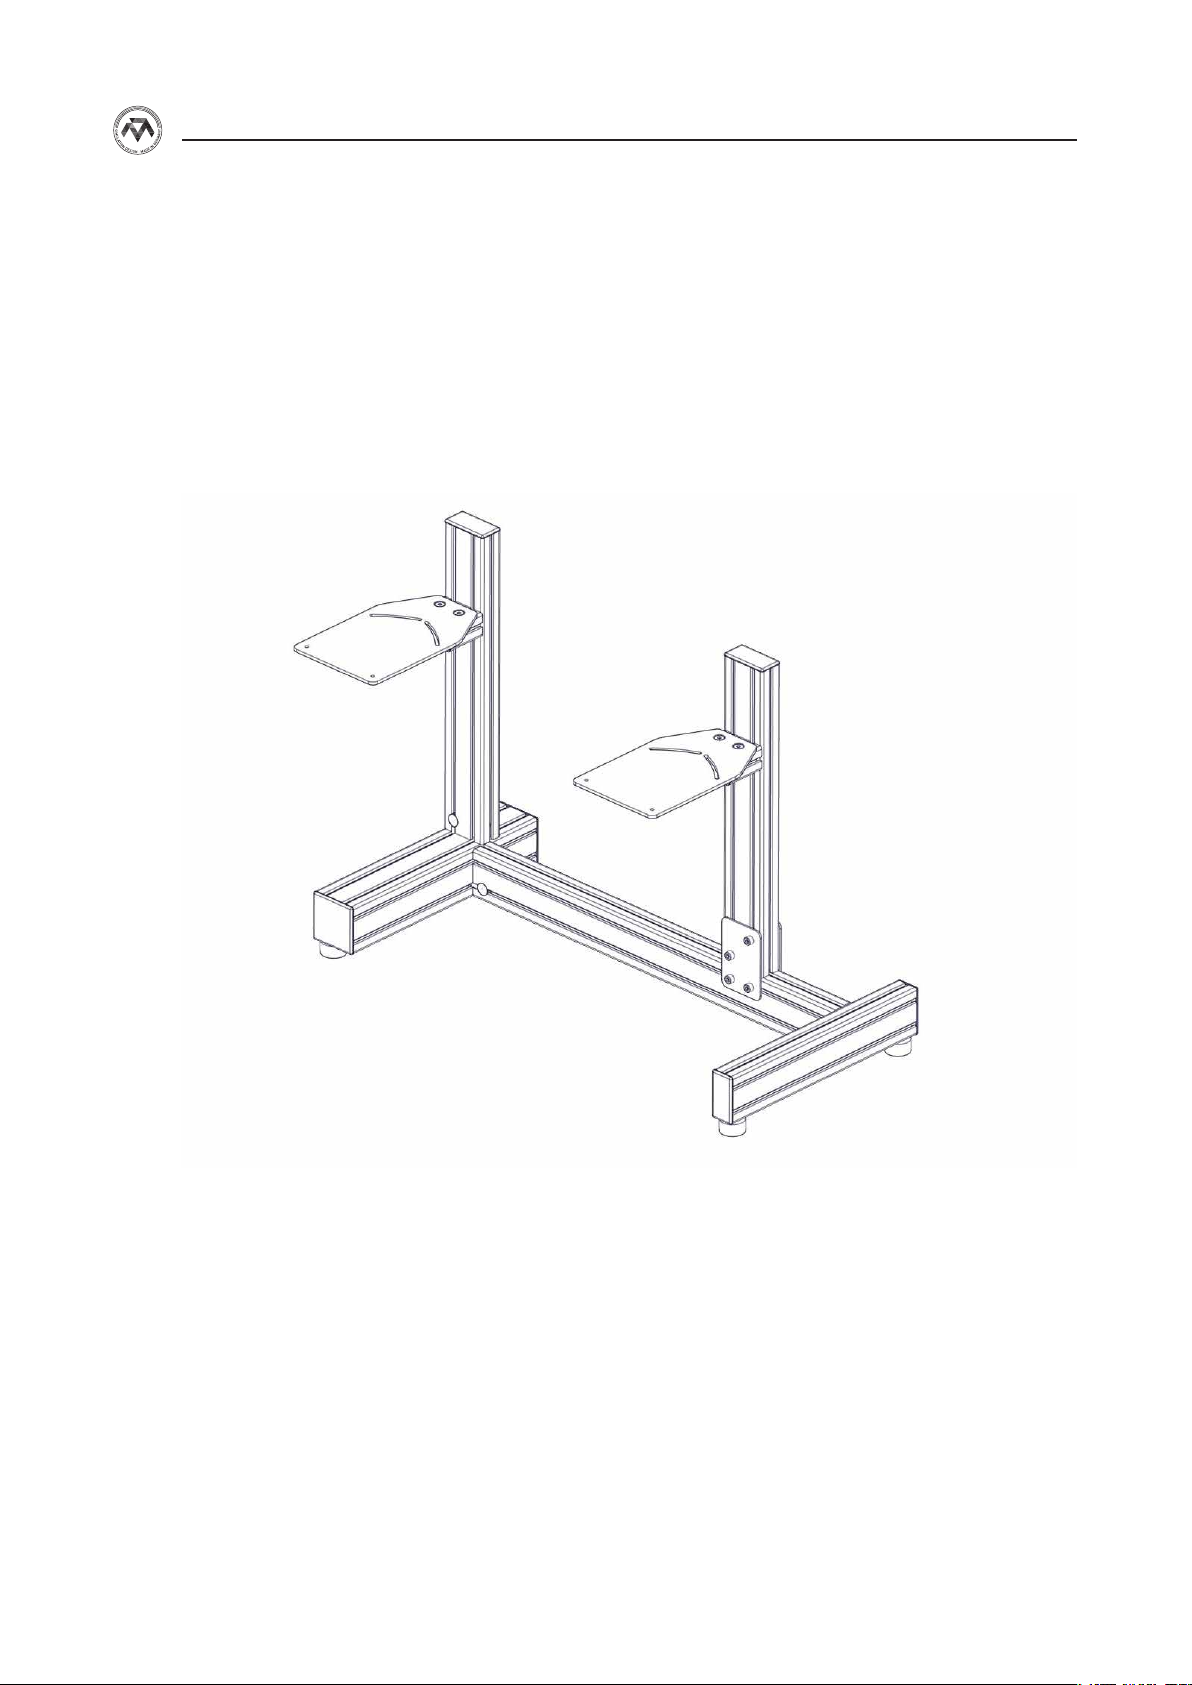
2.1 Completed Stand
Stand - Overview
Figure 8: Complete Stand
Use the above image as reference for the following Stand assem-
bly instructions.
7
Page 8
3.1
STAND INSTRUCTION MANUAL
3.2
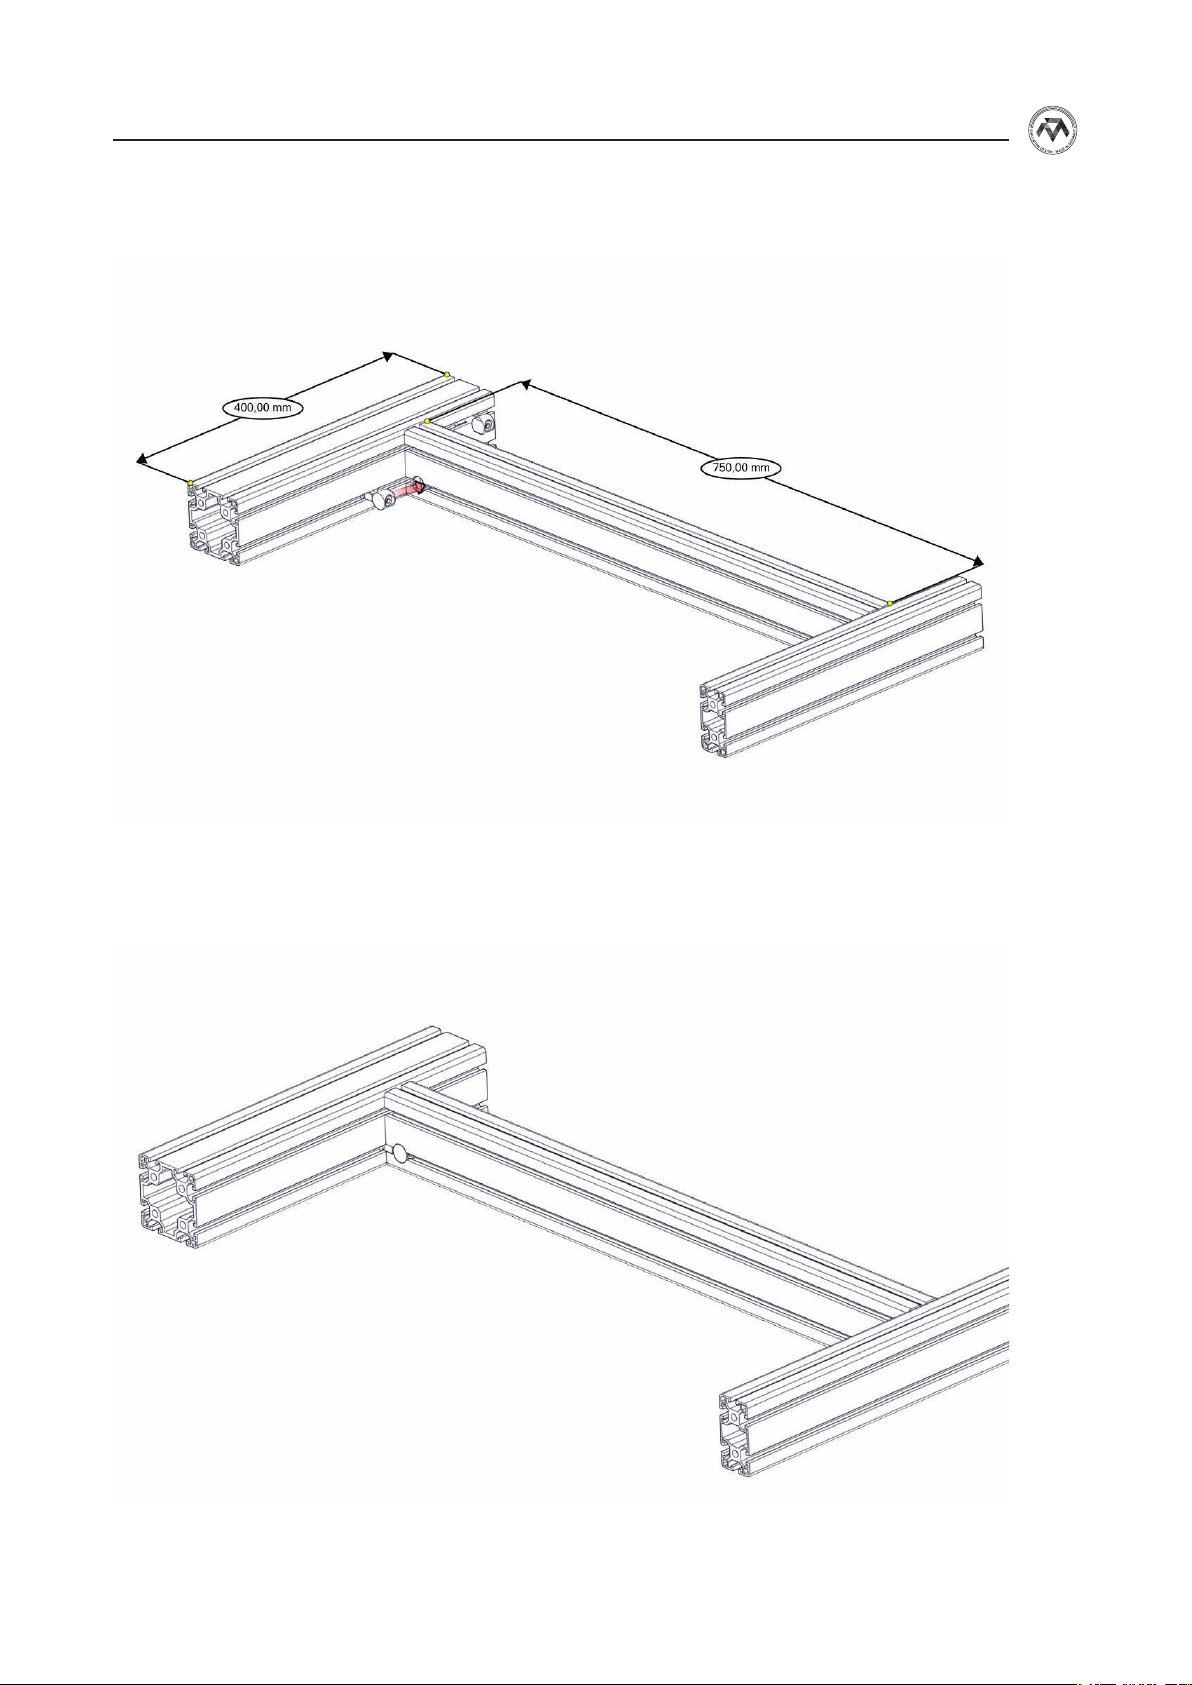
Figure 9: Stand assembly - step 1
Figure 10: Stand assembly - step 2
8
Page 9
STAND INSTRUCTION MANUAL
3.3
3.4
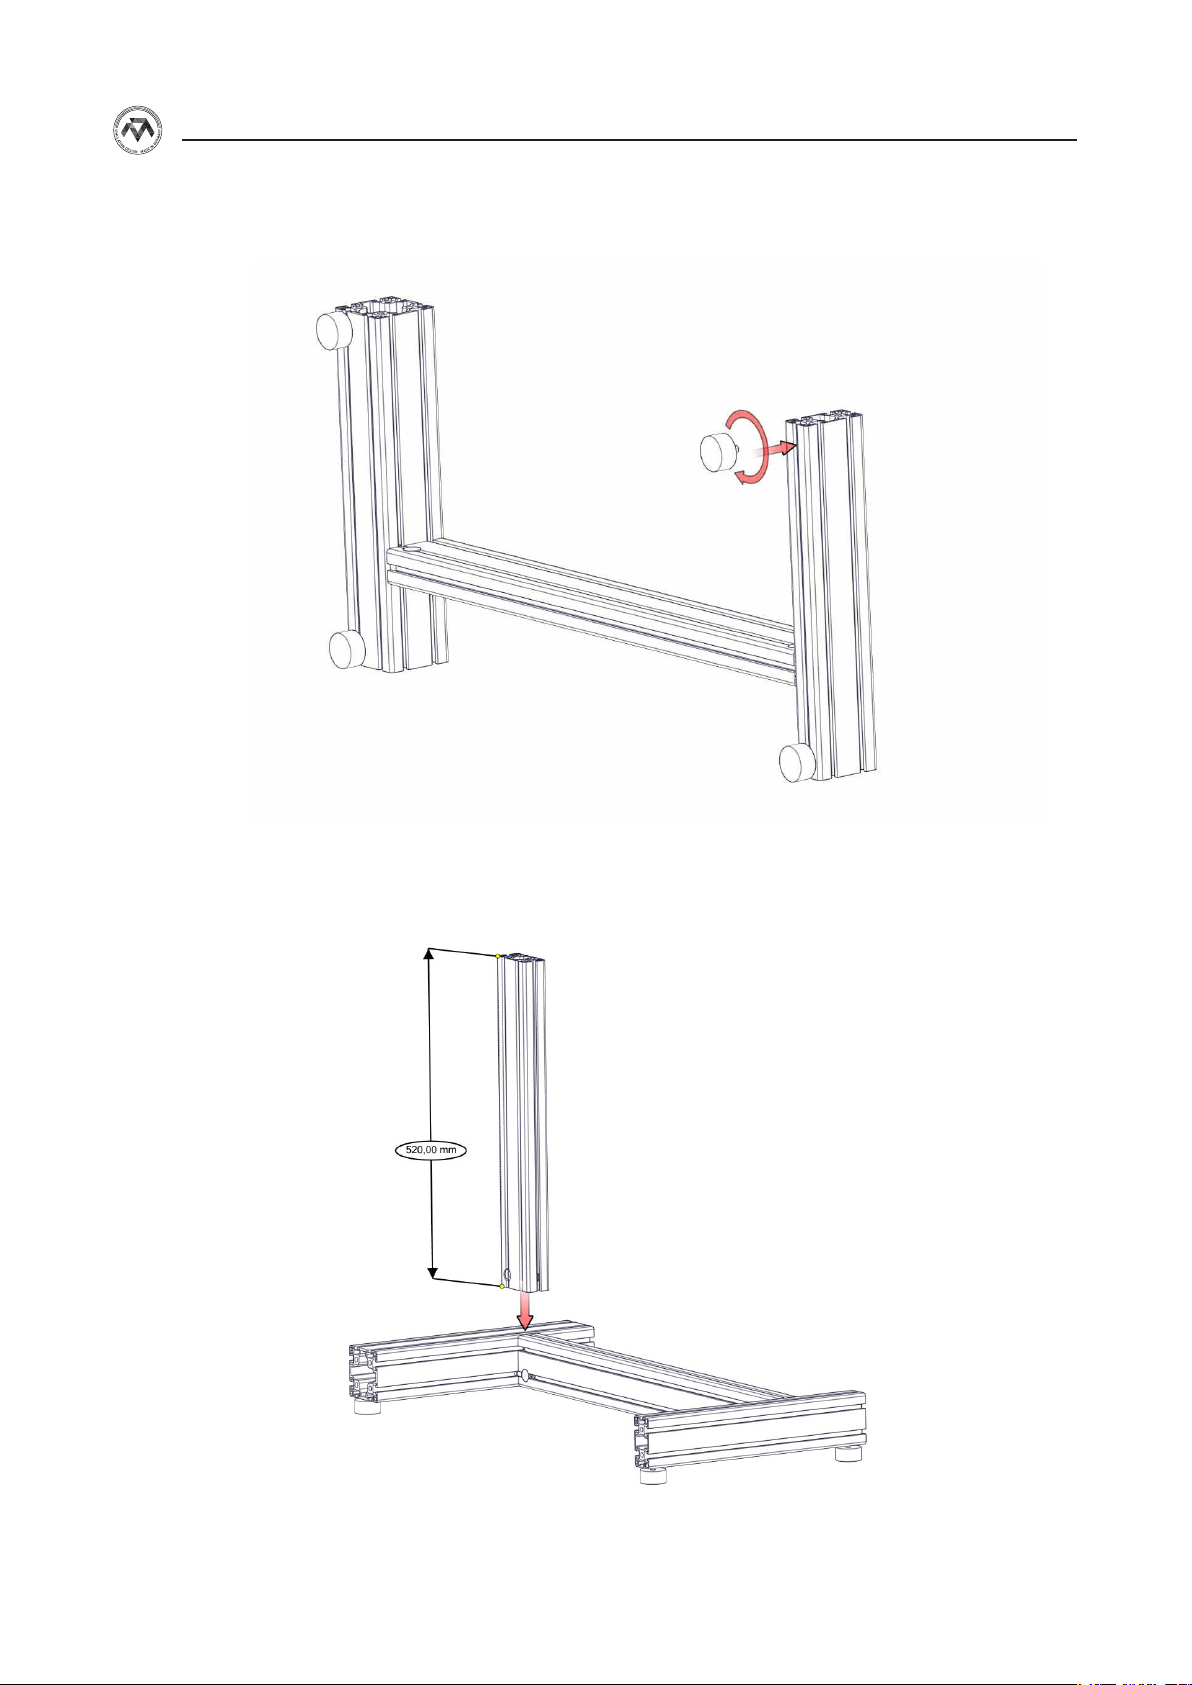
Figure 11: Stand assembly - step 3
Figure 12: Stand assembly - step 4
9
Page 10
3.5
STAND INSTRUCTION MANUAL
3.6
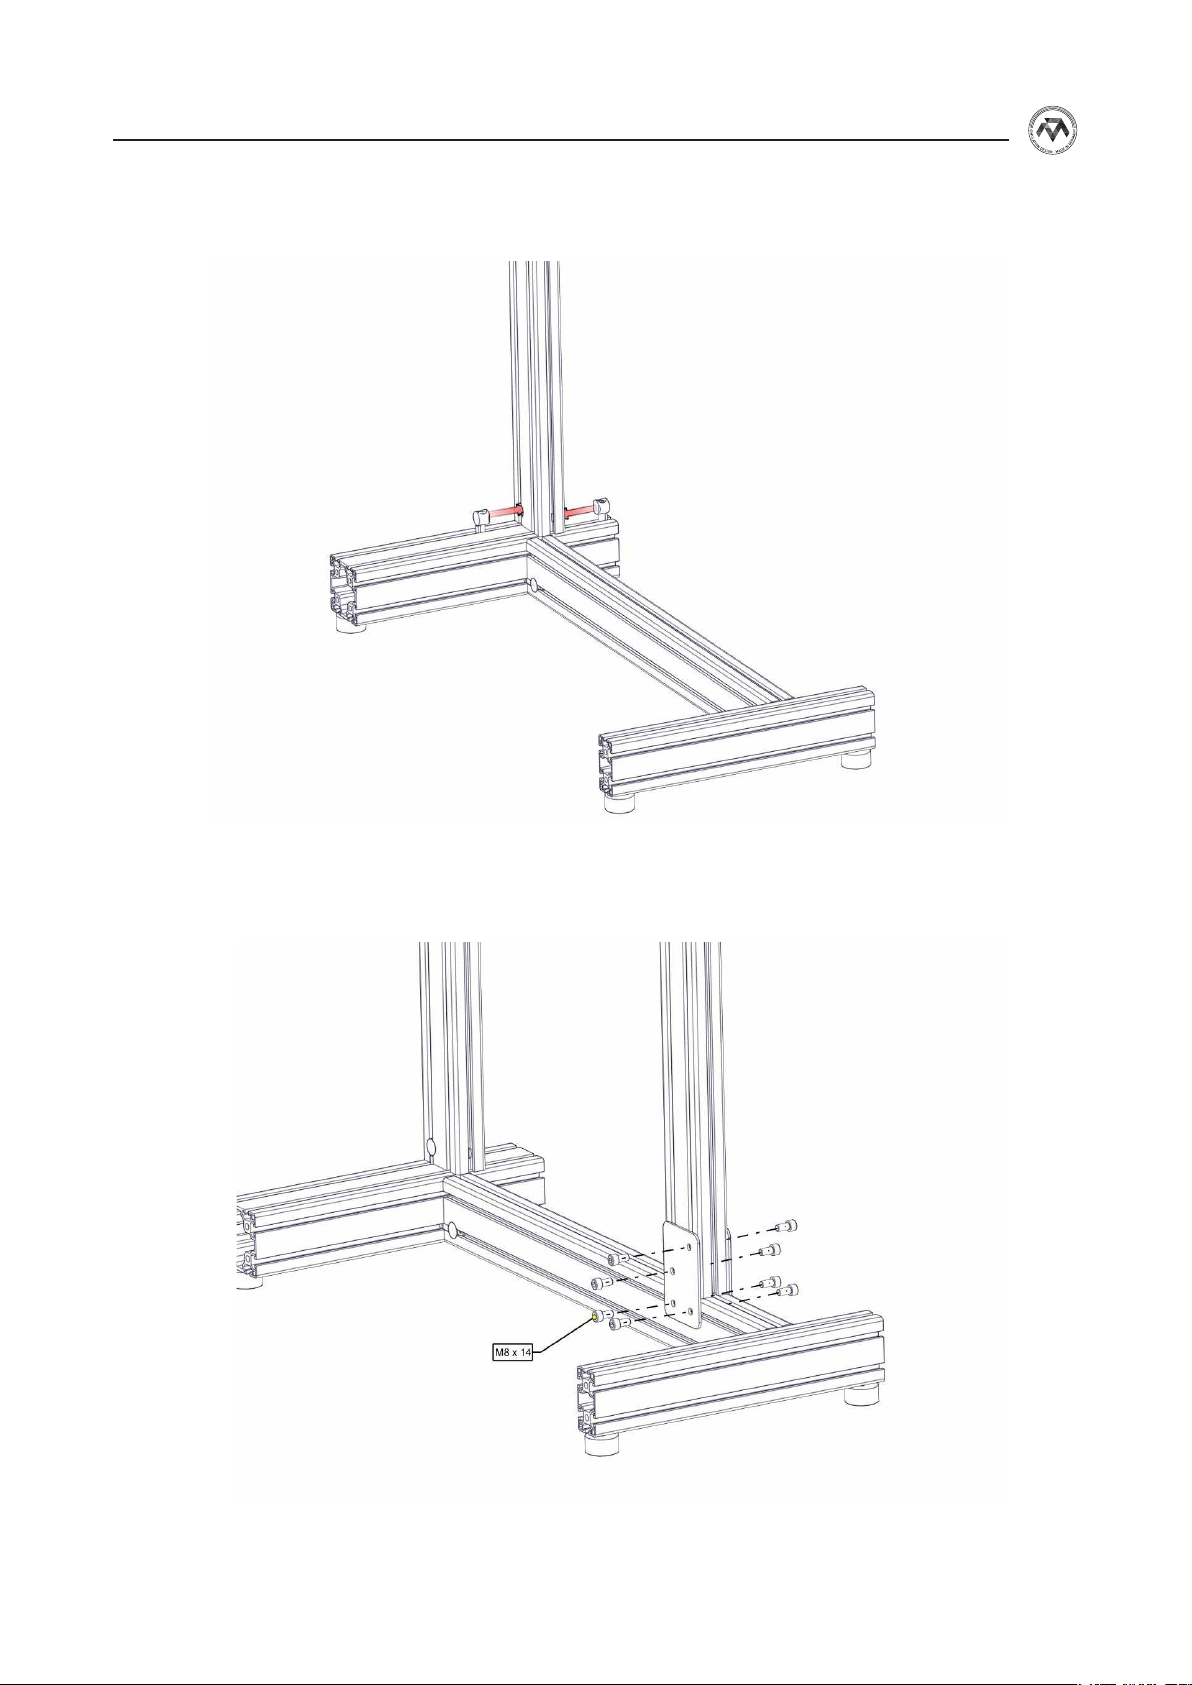
Figure 13: Stand assembly - step 5
10
Figure 14: Stand assembly - step 6
Page 11
STAND INSTRUCTION MANUAL
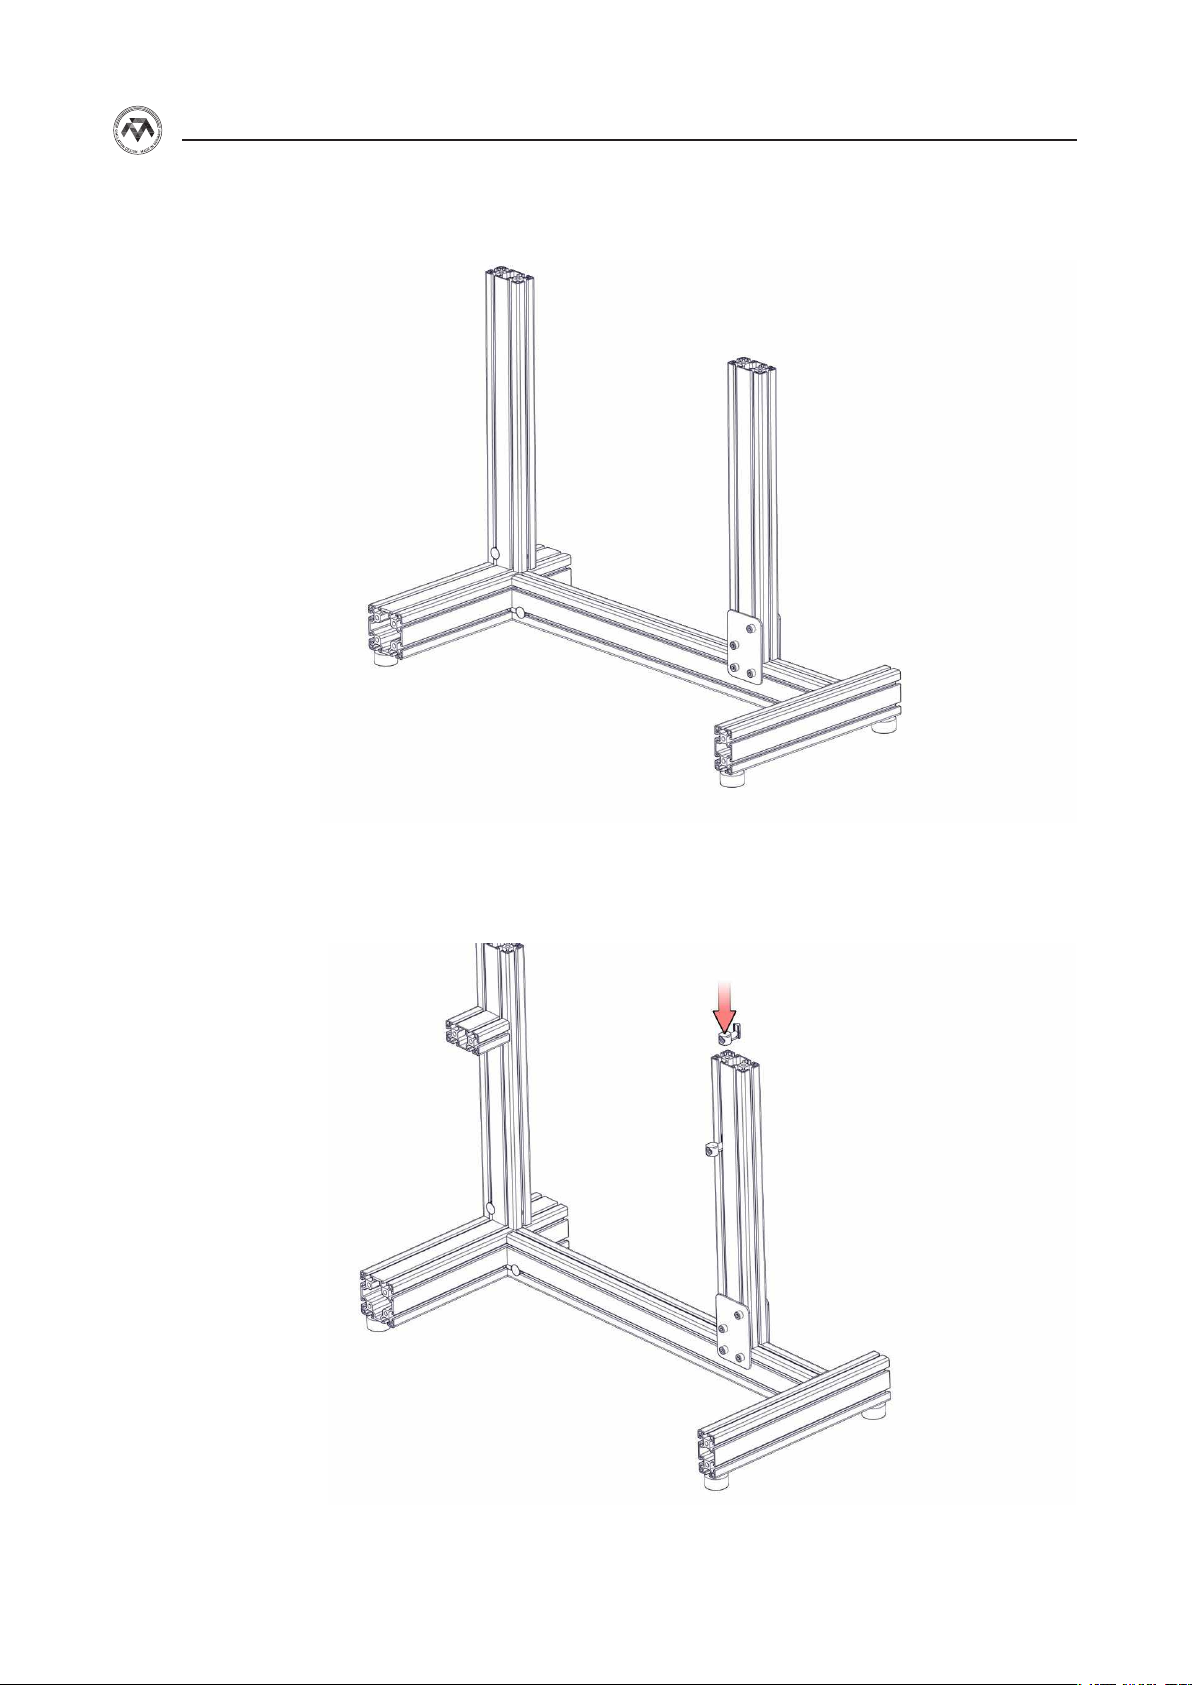
3.7
3.8
Figure 15: Stand assembly - step 7
Figure 16: Stand assembly - step 8
11
Page 12
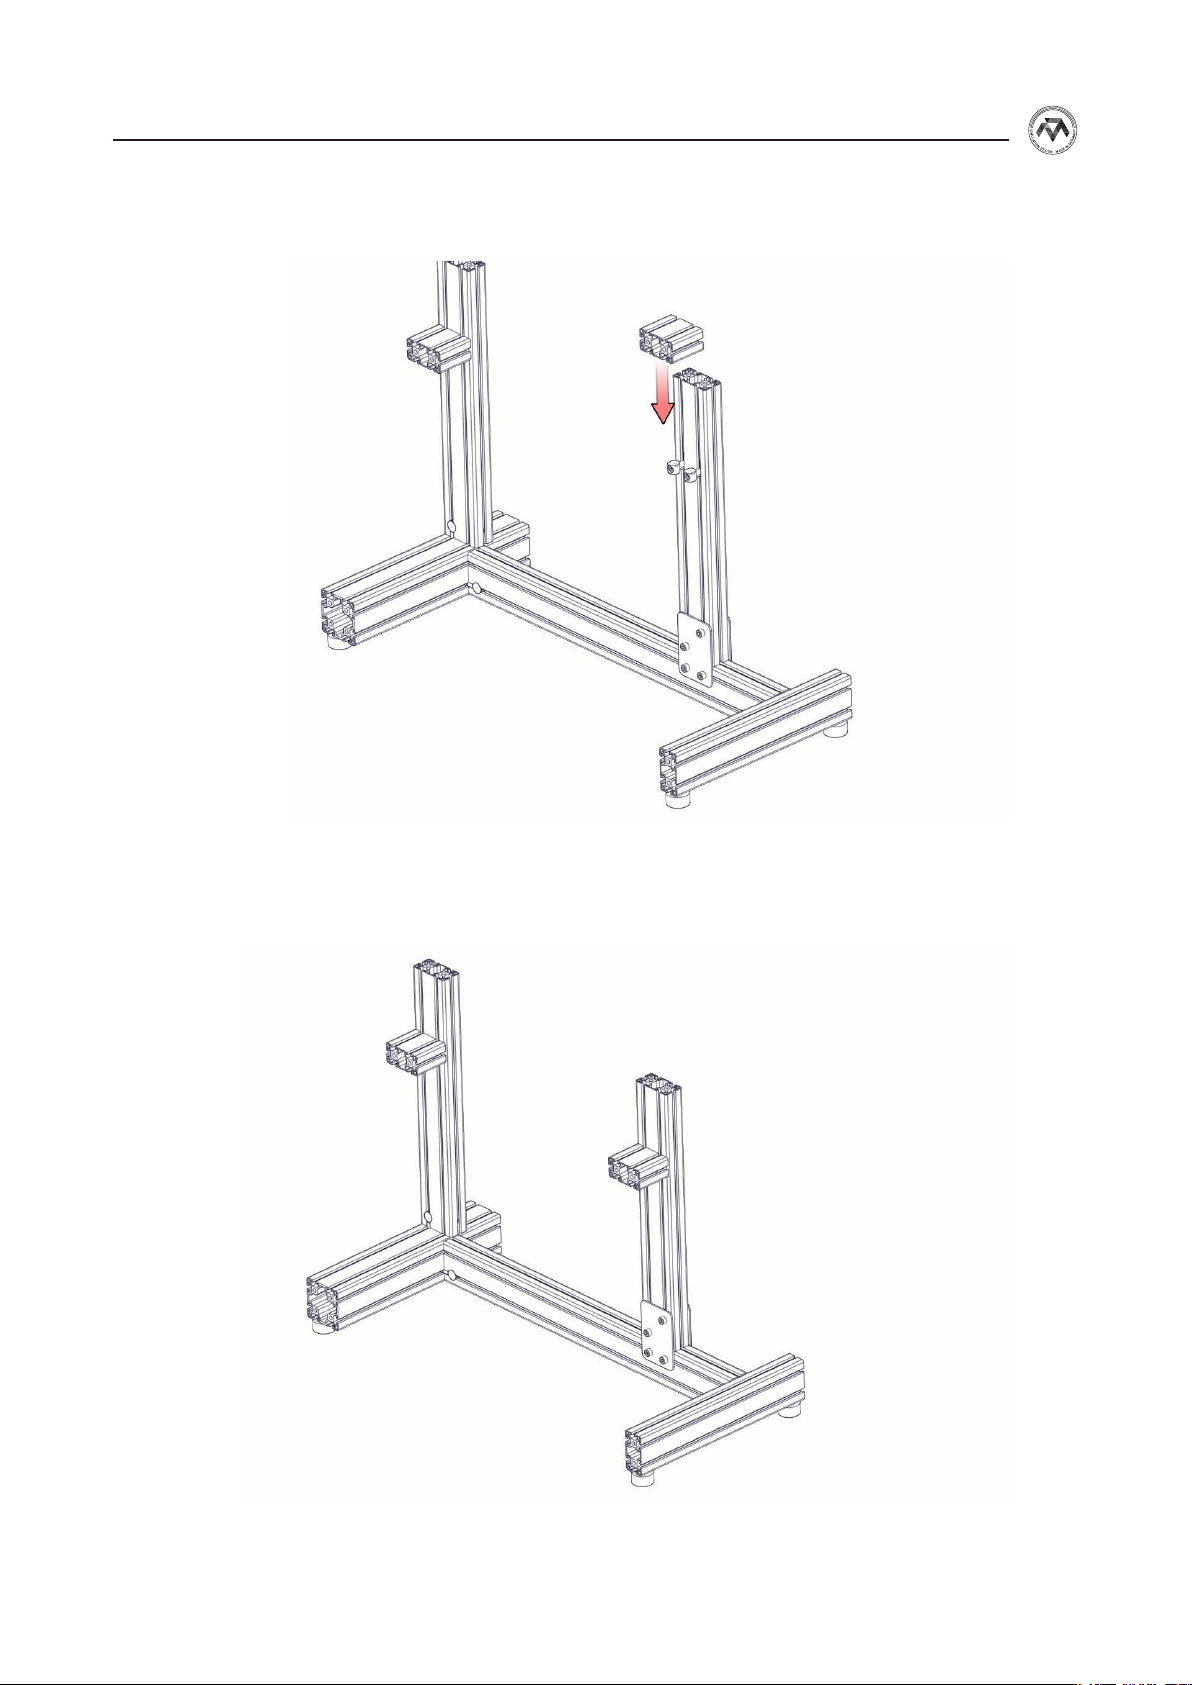
3.9
STAND INSTRUCTION MANUAL
3.10
Figure 17: Stand assembly - step 9
12
Figure 18: Stand assembly - step 10
Page 13
STAND INSTRUCTION MANUAL
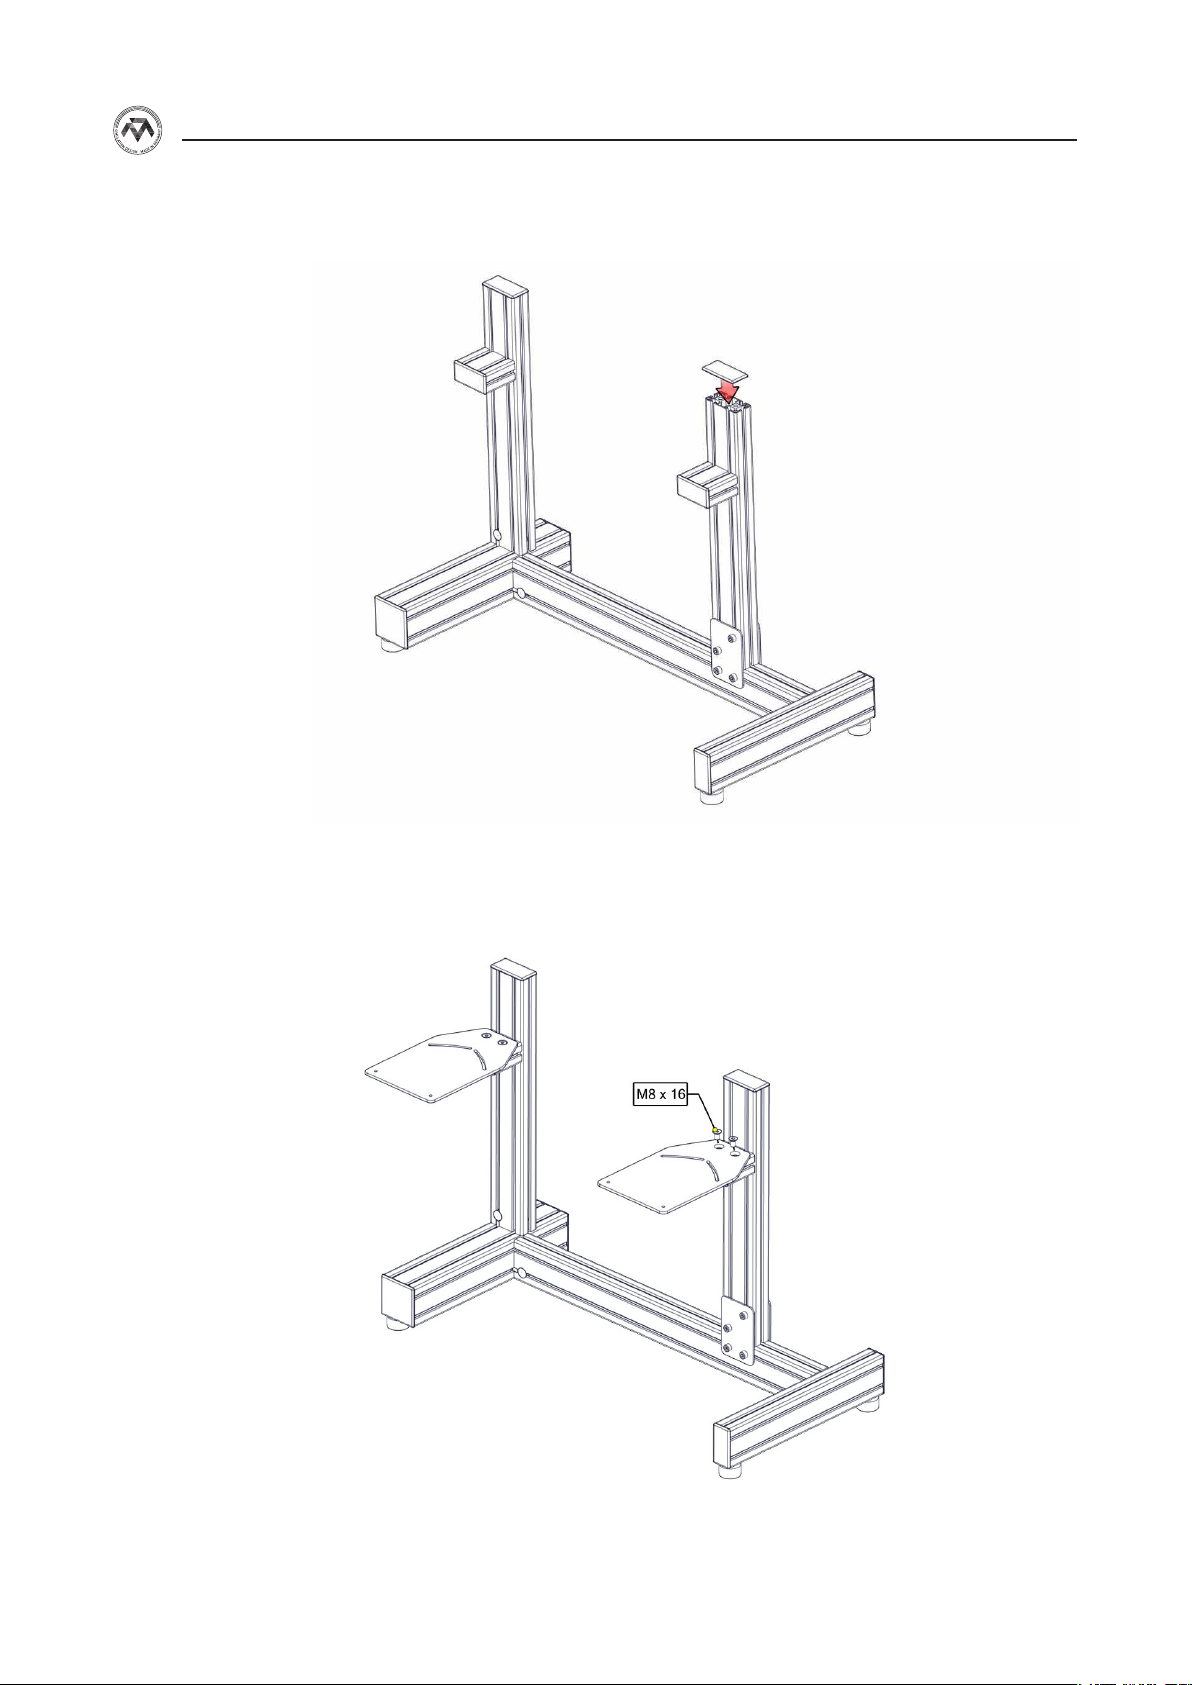
3.11
Figure 19: Stand assembly - step 11
Your Completed MONSTERTECH Stand
Figure 20: Stand assembly - step 12
13
Page 14
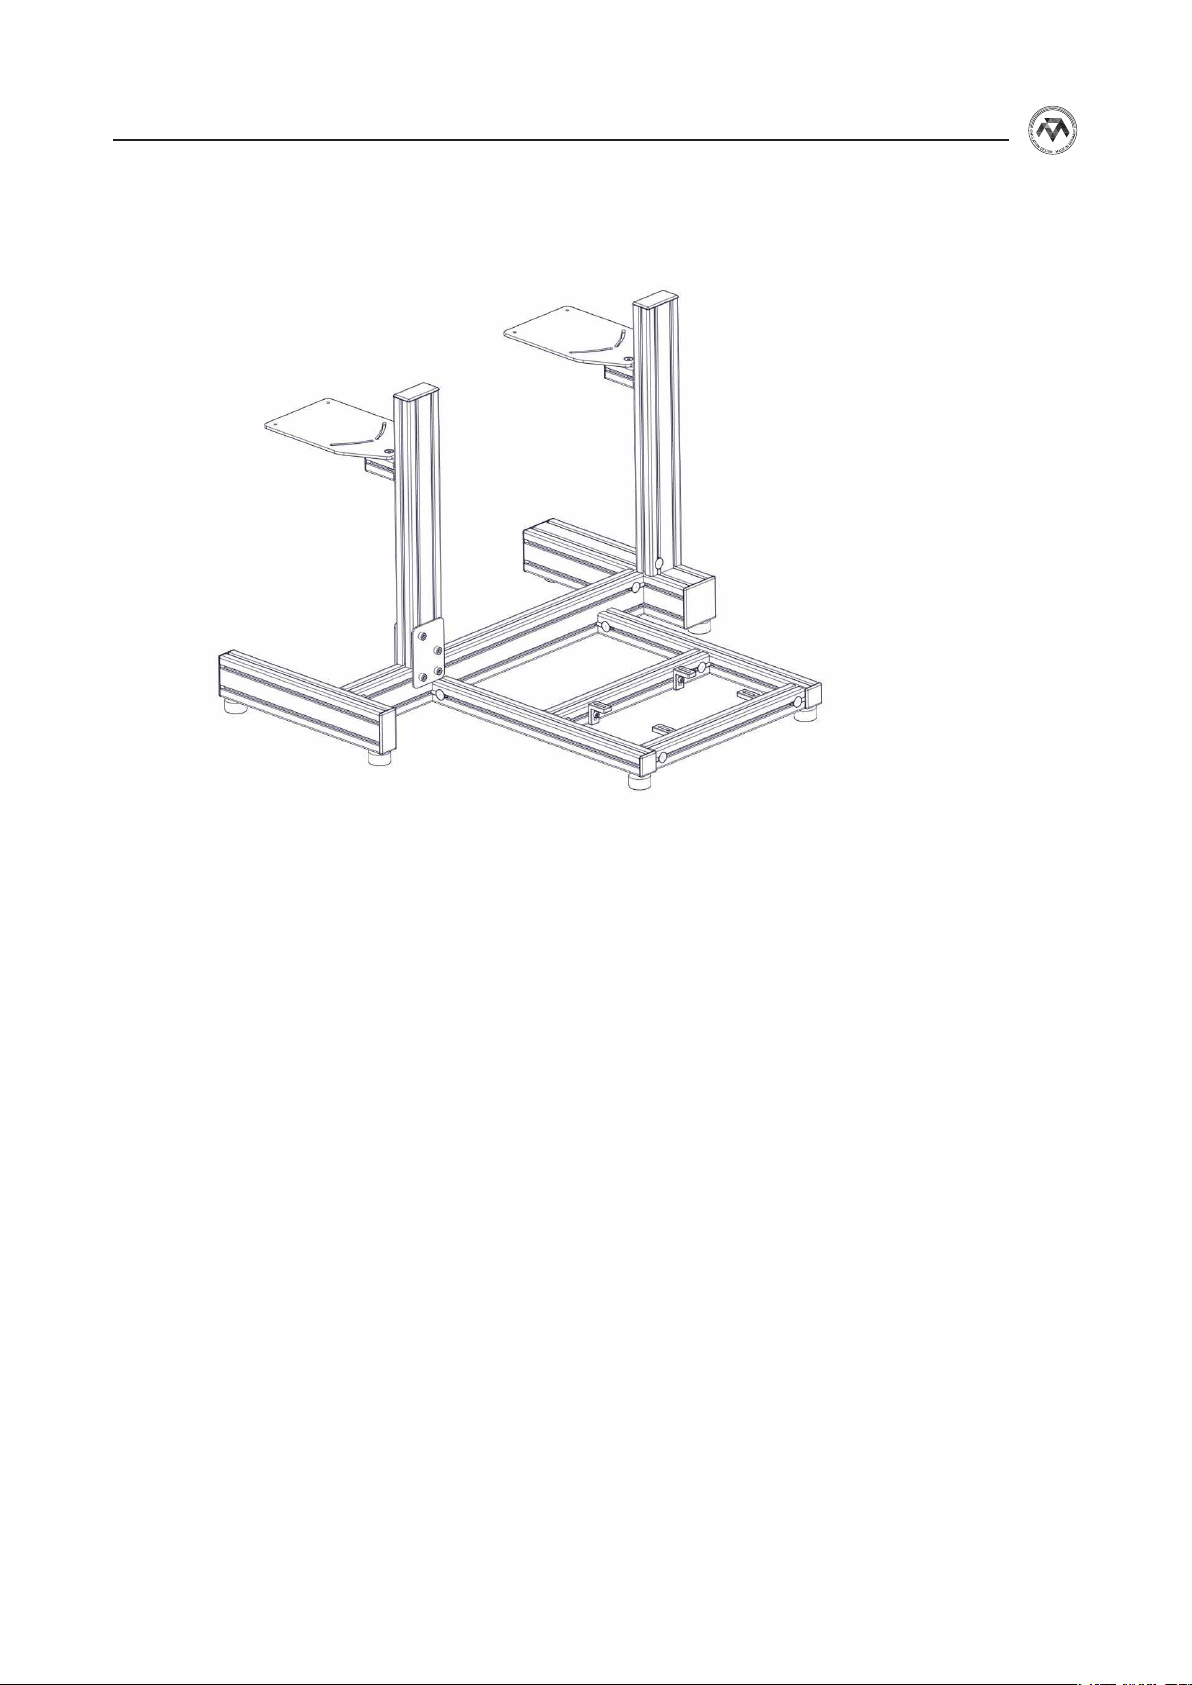
4 Pedal Mount (optional)
STAND INSTRUCTION MANUAL
Figure 25: Pedal mount
14
Page 15
STAND INSTRUCTION MANUAL
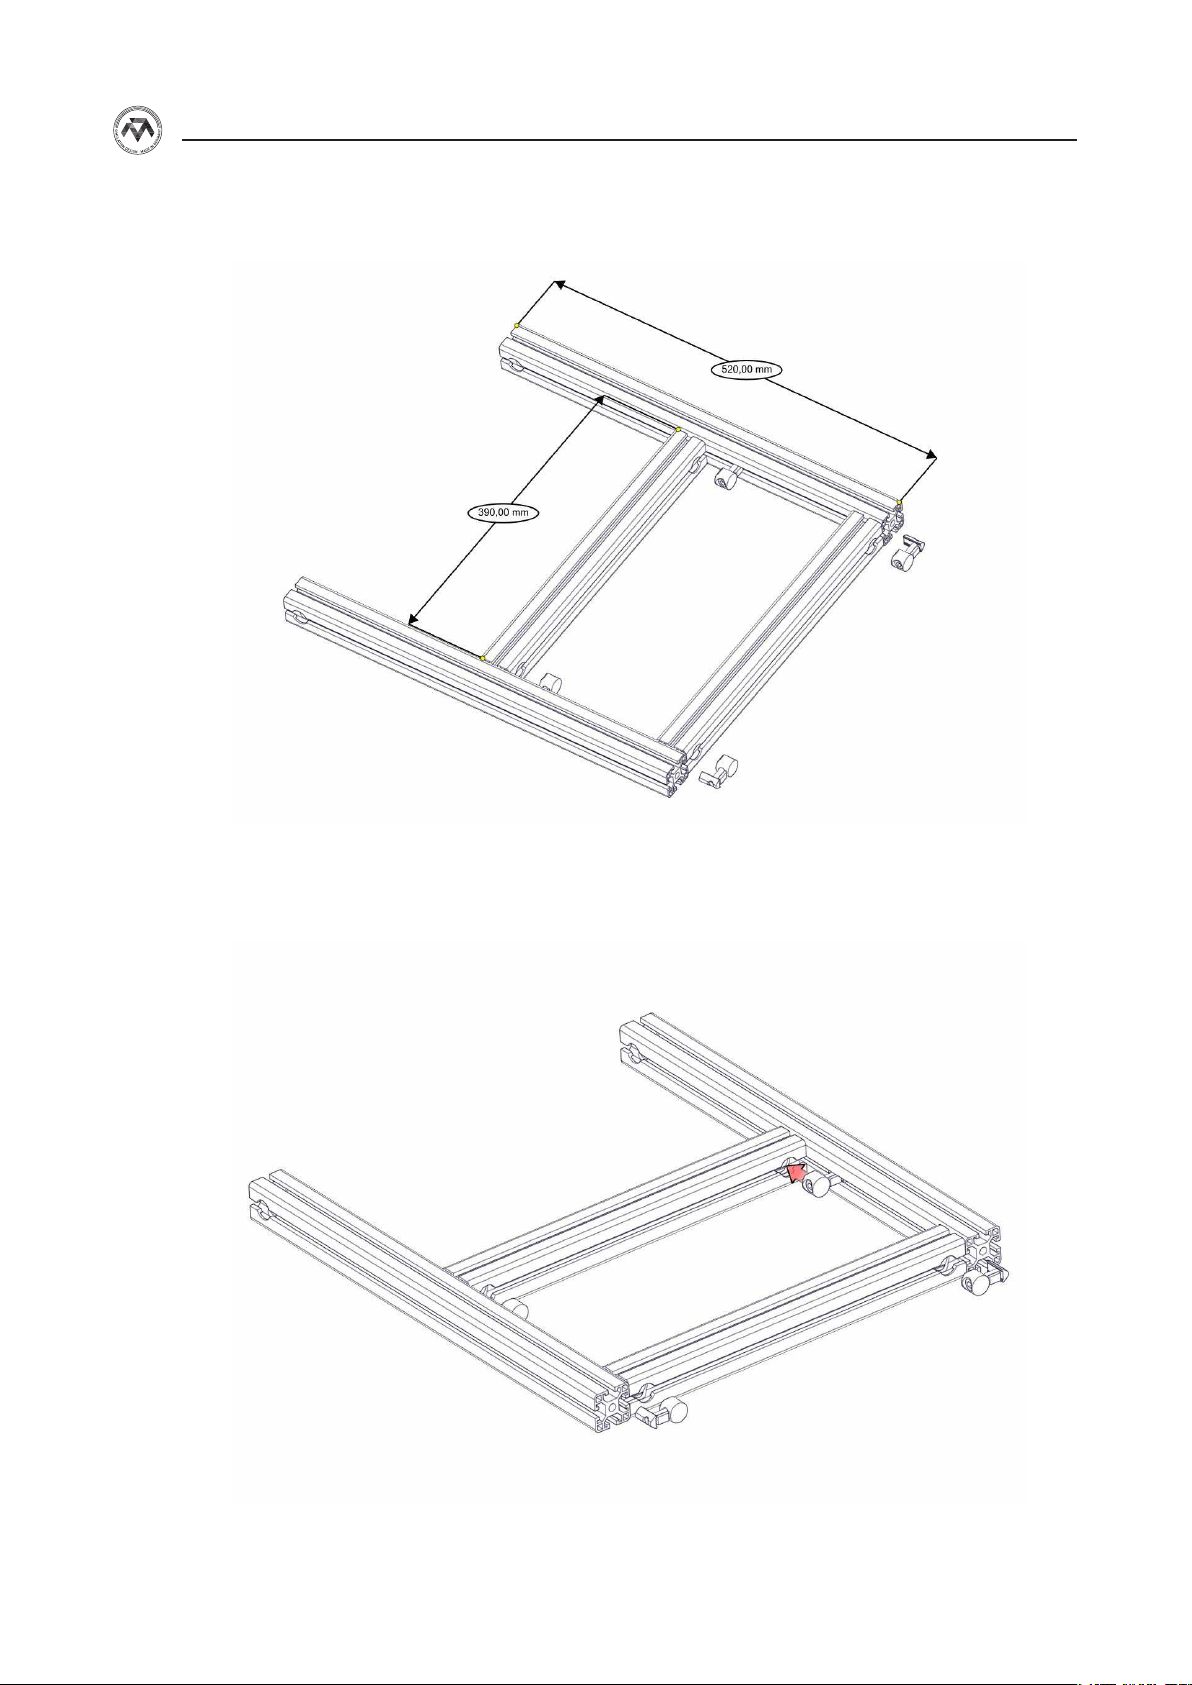
4.1
4.2
Figure 26: Pedal mount assembly - step 1
Figure 27: Pedal mount assembly - step 2
15
Page 16
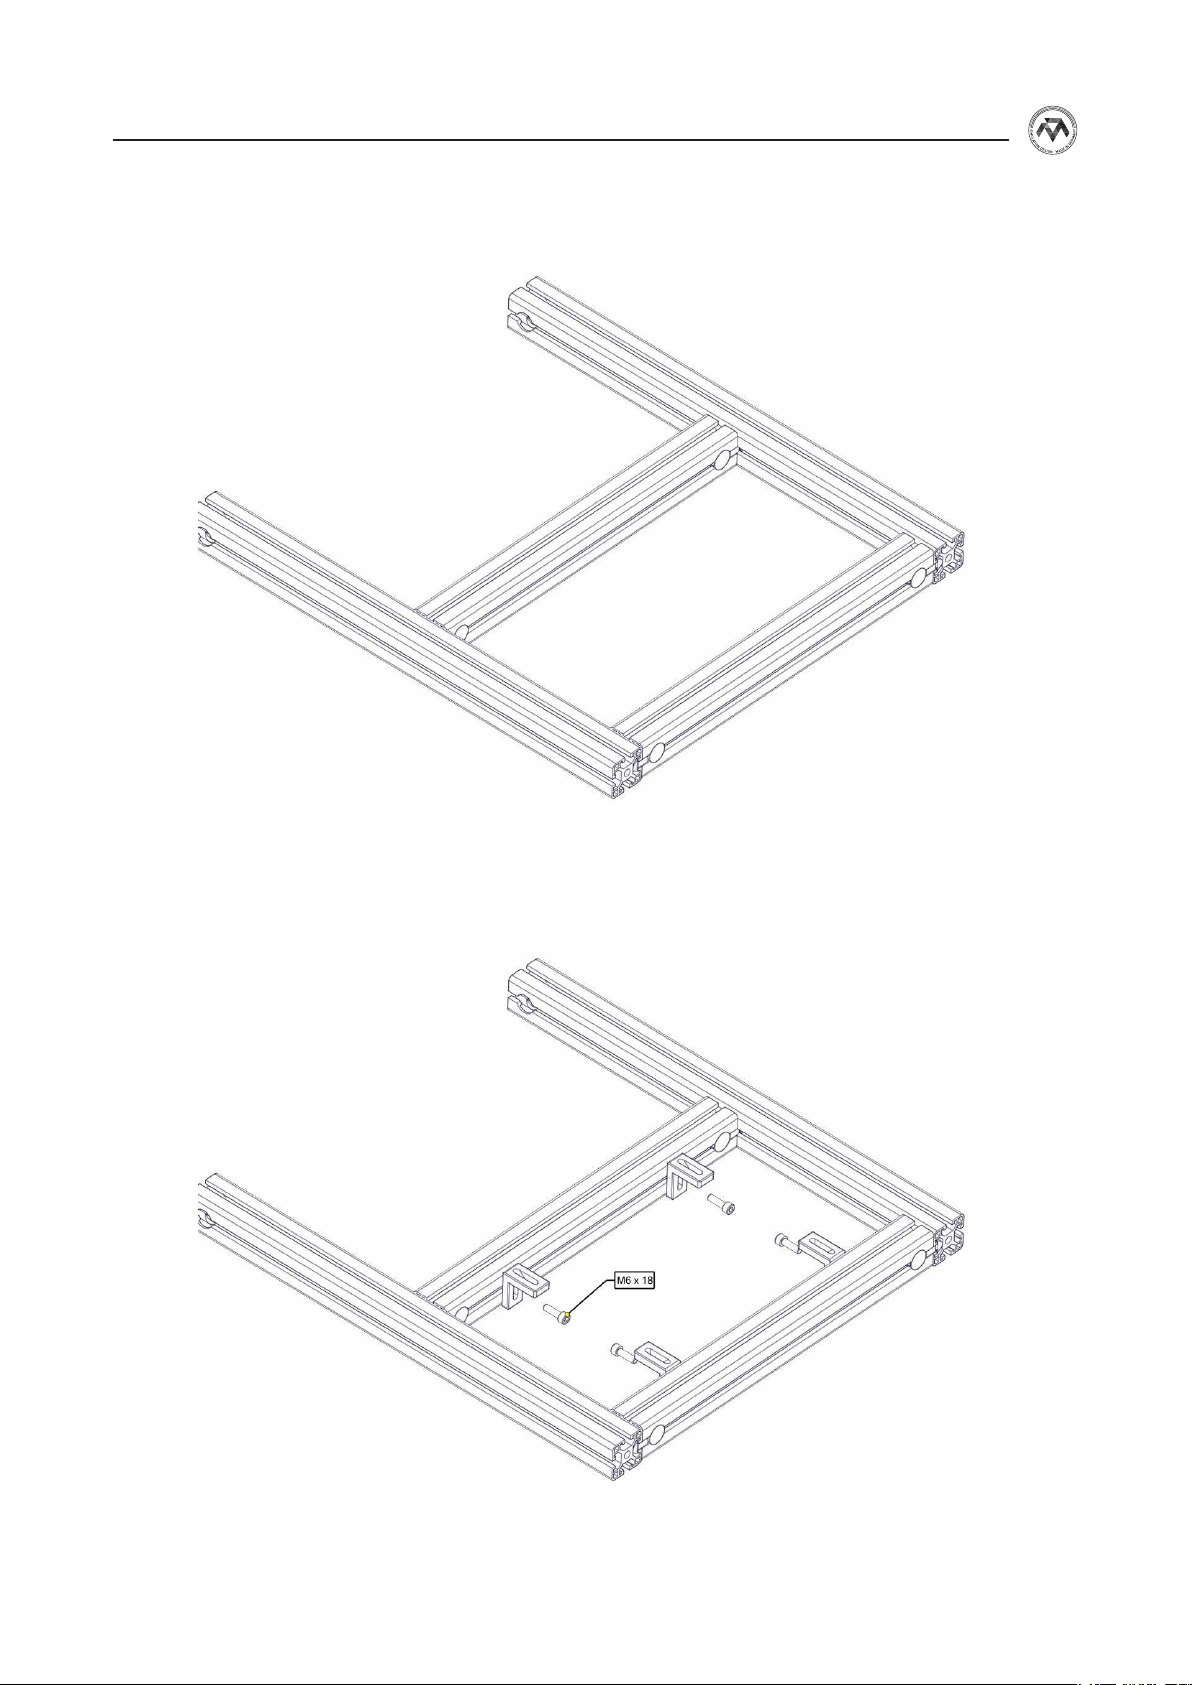
4.3
STAND INSTRUCTION MANUAL
4.4
Figure 28: Pedal mount assembly - step 3
16
Figure 29: Pedal mount assembly - step 4
Page 17
STAND INSTRUCTION MANUAL
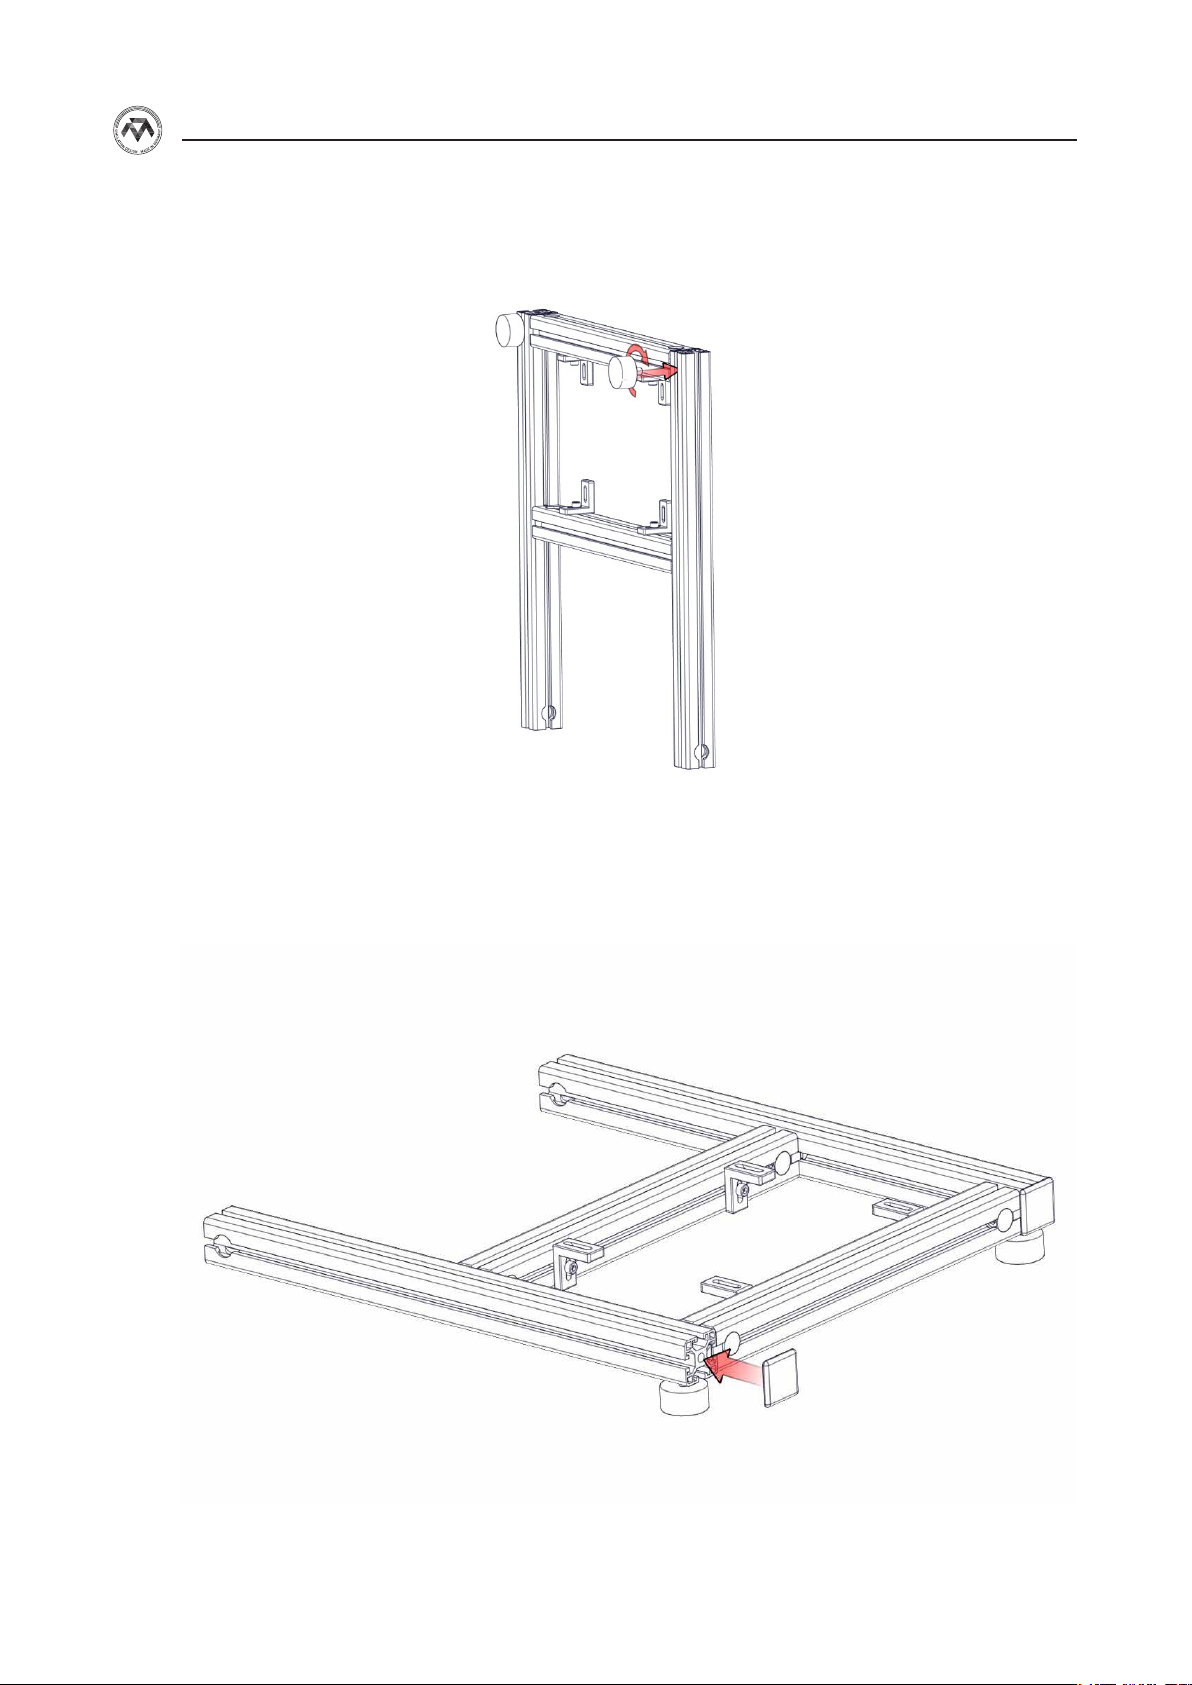
4.5
4.6
Figure 30: Pedal mount assembly - step 5
Figure 31: Pedal mount assembly - step 6
17
Page 18
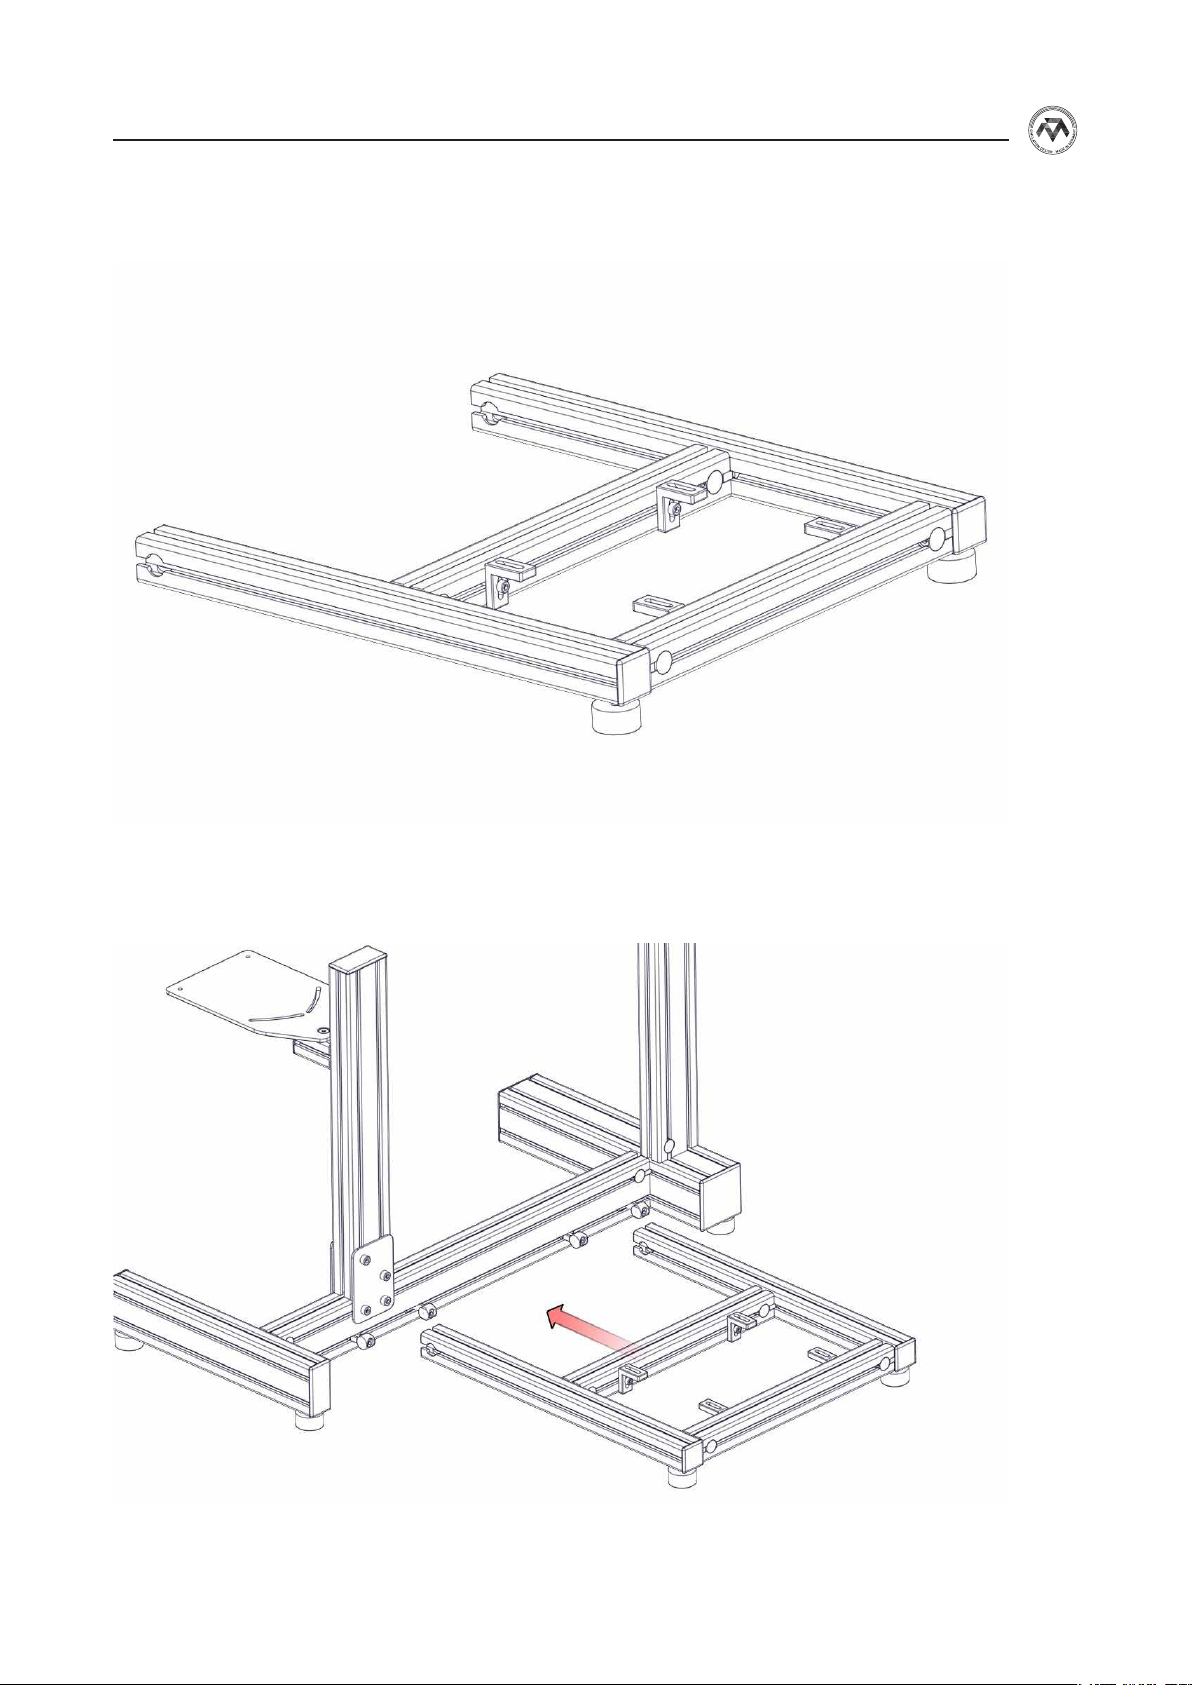
4.7
STAND INSTRUCTION MANUAL
4.8
Figure 32: Pedal mount assembly - step 5
18
Figure 33: Pedal mount assembly - step 6
Page 19
STAND INSTRUCTION MANUAL
4.9
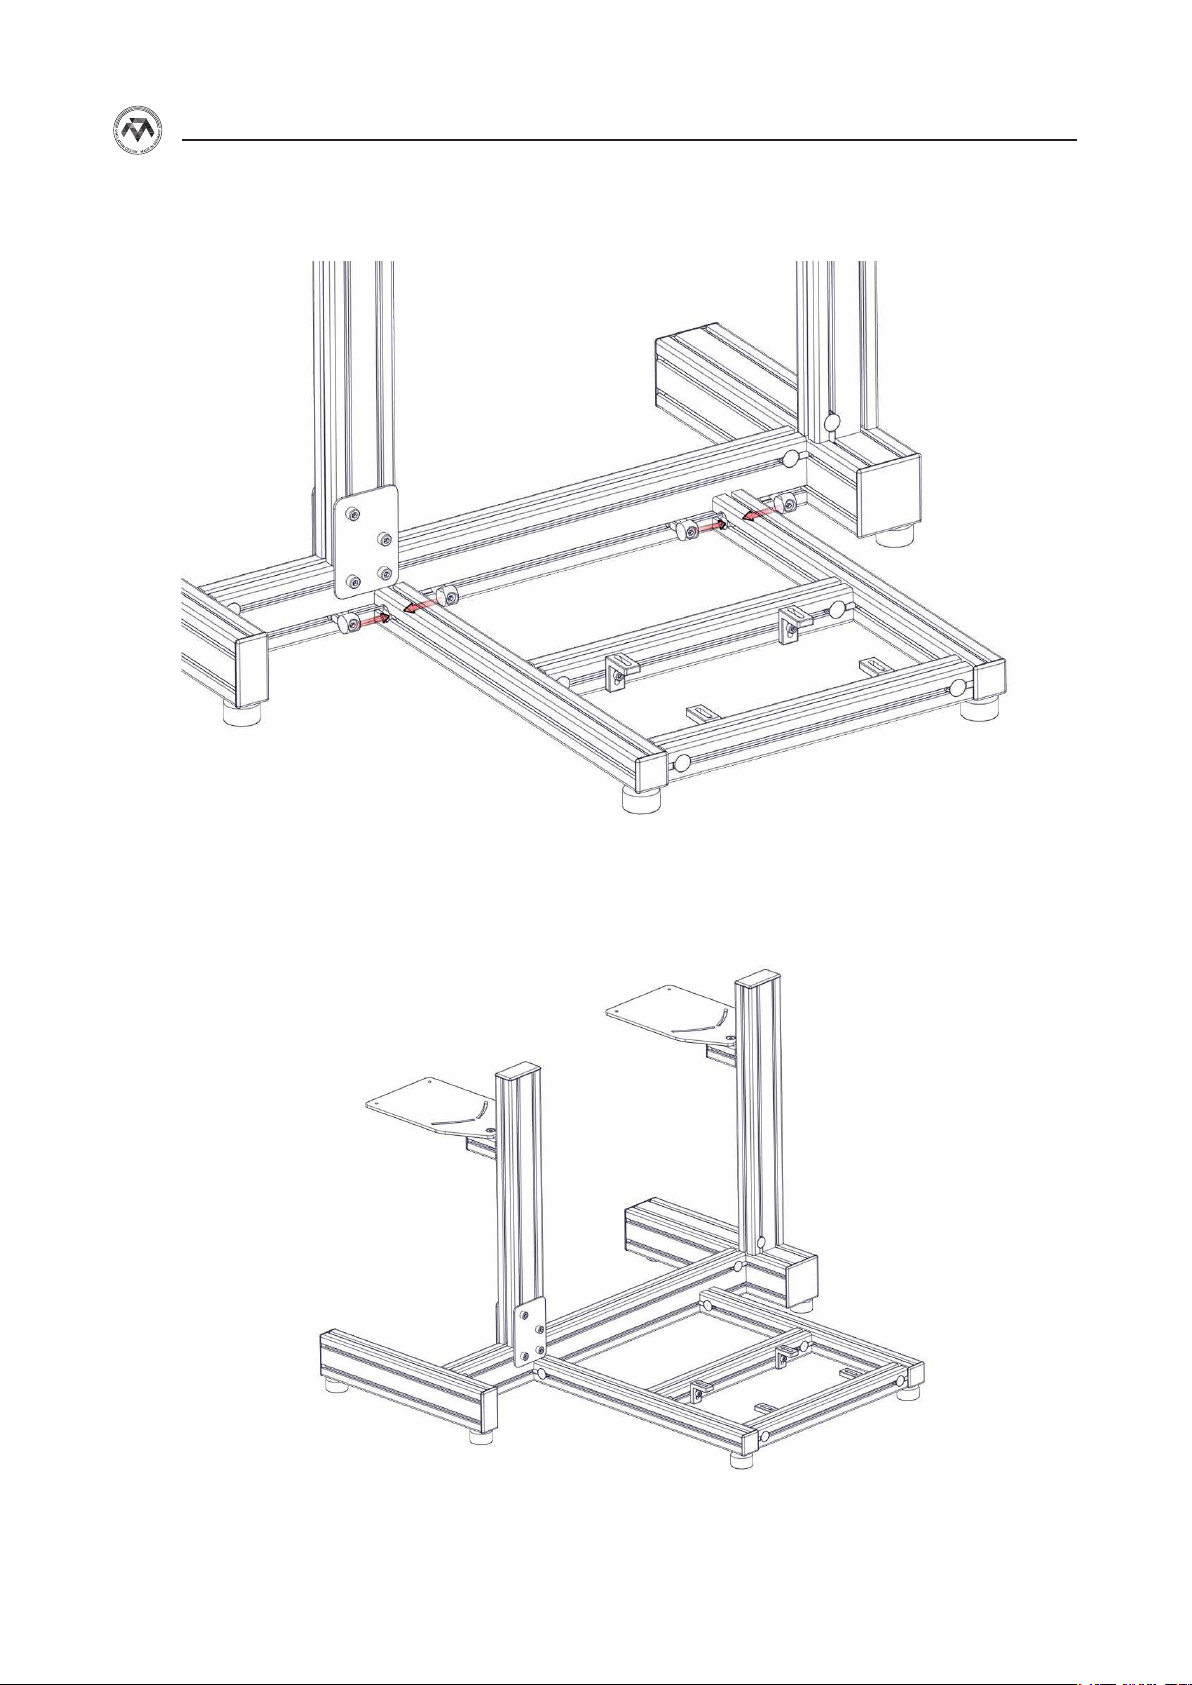
Figure 34: Pedal mount assembly - step 7
Your Completed Stand with Pedal Mount
Congratulations! You’re all done with your MTX Stand!
19
Page 20

WARNHINWEISE
VORSICHT! Achten Sie darauf, dass die
Lenkradwinkelverstellung nach dem Einstellen wieder fest
angezogen ist.
GEFAHR: Nicht für Kinder unter 3 Jahren,
Kleinteile - Verschluckungsgefahr!
Nur für Kinder ab 12 Jahren und Erwachsene
Alle MONSTERTECH Produkte sind handgefertigt und
qualitätsgeprüft.
Das Rennsitzgestell ist zur Verwendung in Kombination mit
einem Autositz und nur zur Verwendung im Innenbereich
ausgelegt.
Wir übernehmen keine Haftung für zweckentfremdete
Benutzung.
Bei Fragen zur Sicherheit oder Aufbau des Rennsitzgestells,
wenden Sie sich an [email protected] oder besuchen
unsere Website unter www.monstertech.de.
Page 21

WARNING NOTICES
CAUTION! Check before usage that all screws are tightened.
NOTE: Contains small parts not suitable for children under 3
years.
Only suitable for children over 12 years and adults.
All MONSTERTECH products are handmade and quality
checked.
The racing Stand is only designed for inside usage in
combination with a car seat.
We exclude liability if the product is used for purposes other
than intended.
If you have safety concerns or questions regarding assembly,
contact us under [email protected] or visit
www.monstertech.de.
 Loading...