

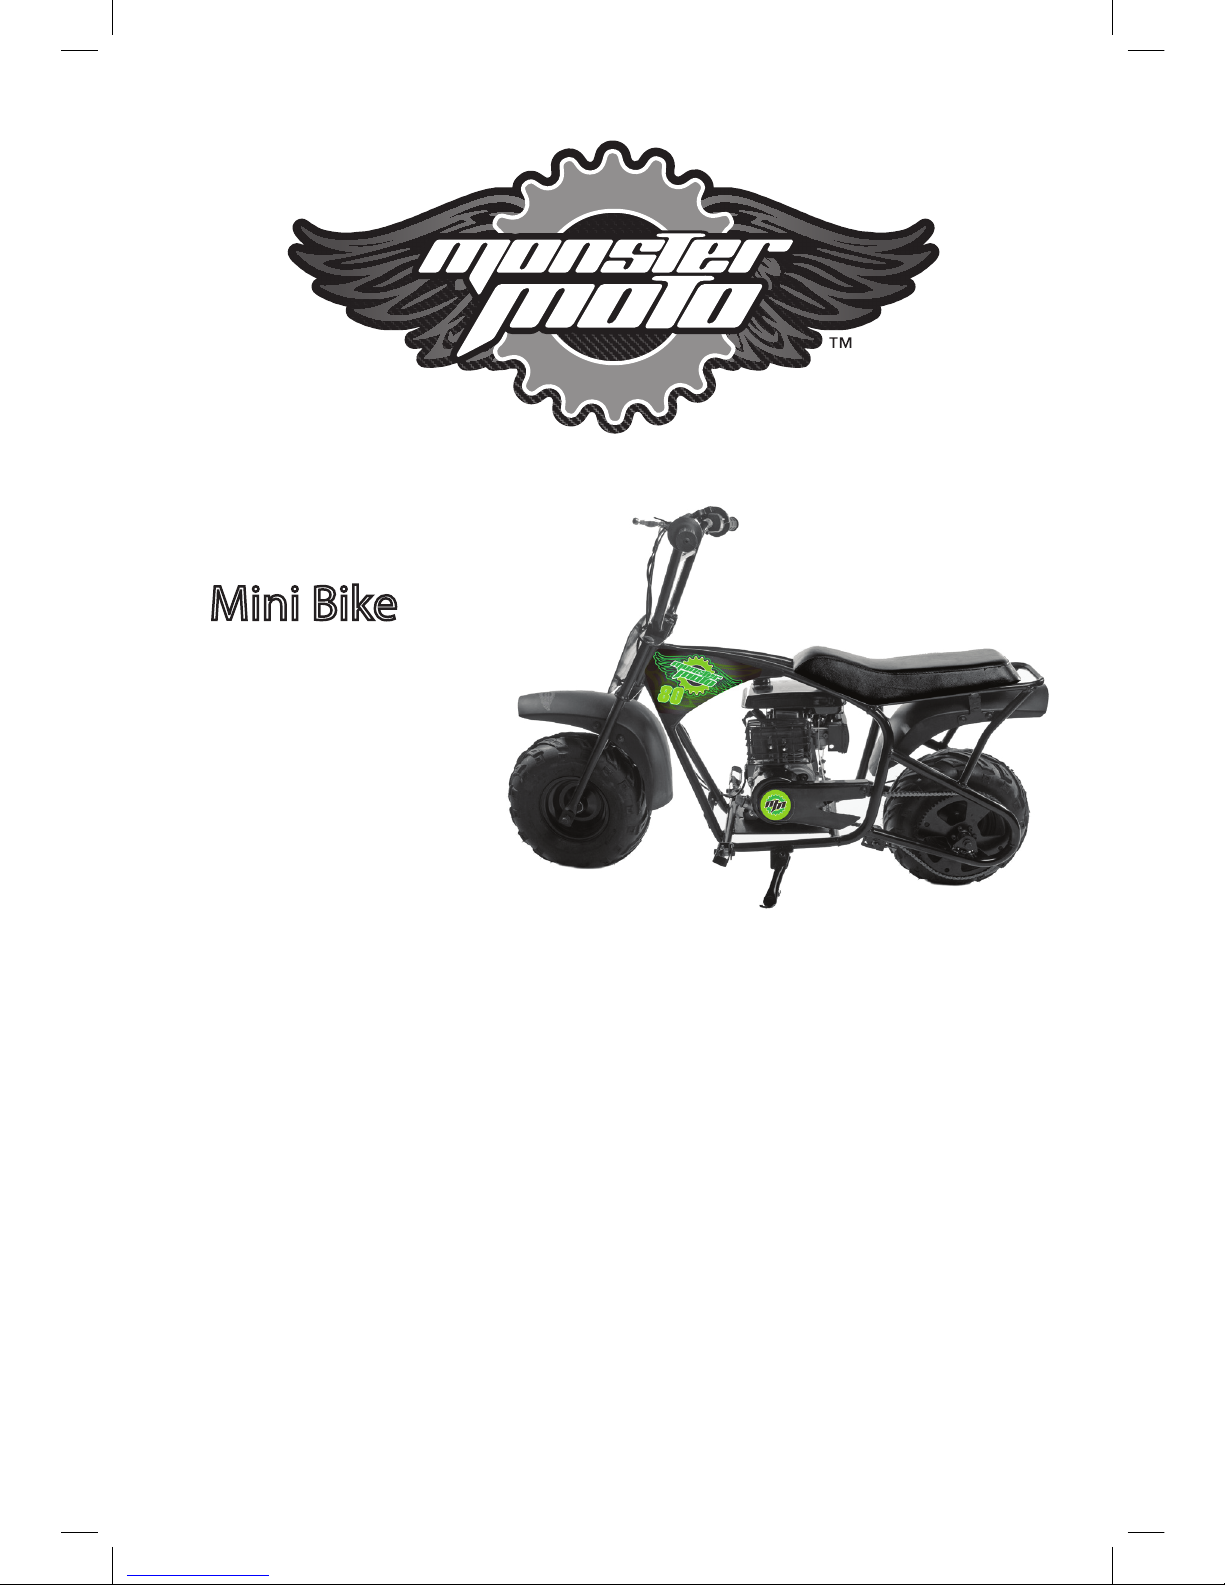
Monster Moto MMB80 Owner's Manual
This operators manual contains important safety information and maintenance
information. Read it carefully before using this vehicle. Failure to follow the warnings
contained in this operators manual could result in INJURY or DEATH.
Keep this manual in a safe place. It is very important that this owners manual be
reviewed by any rider and it should be considered a permanent part of the mini bike
and should remain with the vehicle when transferred to a new owner.
This manual contains the latest product information available before printing. Due to
improvements or production changes, there could be discrepancies. Monster Moto LLC
(Monster Moto) reserves the right to make changes at any time, without notice and
without obligation to make the same or similar changes to any vehicle previously built
or sold.
No part of this publication may be reproduced or copied without written permission
from Monster Moto.
© Monster Moto LLC, 2014
Owner’s Manual
Monster Moto, LLC
1001 South Jupiter Road
Garland, Texas 75042
Phone: 855-833-6483
Monstermoto.com
All rights reserved. © 2014
MADE IN CHINA
MMB80
Mini Bike

855*833*6483 OR EMAIL US AT info@monstermoto.com
PROBLEMS? DO NOT RETURN TO STORE! CALL US!
2
Contents
Warranty 1
Introduction and Safety Messages 2 - 5
Operating Controls 6 - 9
Before Riding 10 - 11
Basic Operation & Riding Technique 12 -13
Starting and Stopping the Engine 12
Braking Technique 13
Parking & Post Ride Inspection 13
Maintaining your Mini Bike 14 - 28
Maintenance Schedule 16
Component Locations 17
Fuel & Engine Oil 18 - 20
Air Filter 20
Throttle Freeplay Adjustment 21
Spark Plug 22
Rear Brake Adjustment 23
Tires 23 - 24
Drive Chain 25 - 27
Clutch 28
Appearance & Care 28
Troubleshooting 29 - 32
Resolving the Unexpected 33 - 34
Emissions Control Warranty 35 - 36

855*833*6483 OR EMAIL US AT info@monstermoto.com
1
Warranty Information
Congratulations on your decision to purchase a Monster Moto Power Sports product! We are
gratied that you have chosen a Monster Moto product, and we are dedicated to supporting your
successful and safe power sports recreation experience!
We are grateful for your business, and in order to assure your quality experience, please review and
make note of the following warranty related issues:
KEEP YOUR RECEIPT: Proof of purchase will be required to substantiate any warranty claim.
WHAT IS COVERED: Monster Moto warrants to the original retail purchaser of this Product that this
Product is free from defects in material or workmanship and agrees, at Monster Moto’s discretion,
to either repair, provide replacement parts for, or replace (without charge or labor) any product
component having a material defect for a period of ninety (90) days from the date of purchase,
except as limited below. Monster Moto may require the purchaser to return to Monster Moto, at
their expense, the part claimed to be defective for Monster Moto’s inspection, at which time the
returned parts or product become property of Monster Moto. This product is also covered by an
Emissions Control System Warranty which is separate from and in addition to this warranty.
WHAT IS NOT COVERED: This warranty does not cover any conditions caused by misuse, neglect,
negligence, accident or operation in any way contrary to the operating instructions located in the
operator’s manual. Normal wear, alteration, modication, improper or inadequate maintenance,
or use of unauthorized replacement parts or service provided by anyone other than an Authorized
Monster Moto Service Center are not covered under this warranty. This warranty does not cover
products used for rental or commercial purposes or used in competition, nor does it cover transportation costs for warranty service. Without limiting the above, this warranty is VOID with respect
to any product that has sustained damage resulting from impacts, accidents, jumping, or any other
uses considered outside of the scope of normal and safe operation.
LIMITATIONS OF LIABILITY: This Warranty is non-transferable after the Product’s initial sale. No
unapproved modications can be made to the Product, its performance or otherwise, in order for
this Limited Warranty to remain in eect. No reimbursement is provided for towing, loss of time, loss
of use, inconvenience, incidental or consequential damages. This Limited Warranty covers only parts
and labor due to manufacturer defect. This Warranty does not cover minor surface blemishes, rips,
tears, or other cosmetic damages due to normal use, or other intentional or unintentional damage
to Product. This Limited Warranty will not cover any damage which results from the application of
improper cleaners, solvents or chemicals to the Product, or from smoke or soot, or from exposure to
saltwater, sea breeze or salt. This Limited Warranty will not cover any damage resulting from product storage in the elements. This Limited Warranty does not cover improper repair or misdiagnosis
of problem.
OWNER'S RESPONSIBILITIES As the vehicle owner, you are responsible for performing required
maintenance and maintaining a record and all receipts for maintenance performed on your mini
bike. Your warranty claim may be denied solely because of your failure to ensure the performance
of all scheduled maintenance or lack of maintenance records or receipts. As the vehicle owner, you
may be denied your warranty coverage if your vehicle or a part has failed due to abuse, neglect,
improper maintenance, or unapproved modications.
855*833*6483 OR EMAIL US AT info@monstermoto.com
PROBLEMS? DO NOT RETURN TO STORE! CALL US!
2
Introduction
Your Monster Moto dirt bike was designed as a recreational mini bike for o-road use
only and by a single rider. This mini bike is ideal for younger riders with basic experience.
Avoid operating this vehicle on paved surfaces including, but not limited to highways,
parking lots, sidewalks and driveways. Never operate this or any designated o-road
vehicle on a public street, road or highway where it will be in violation of local trac
laws and restrictions.
Before riding, please take your time to get acquainted with your dirt bike and how it
works. To protect your investment we urge you to keep it well maintained. In addition
to regular maintenance it is important to observe and perform all pre-ride and periodic
checks outlined in this manual. In this manual you will nd helpful safety information,
instructions, facts, and helpful tips. To make it easier to use, there is a table of contents
at the beginning.
As you read through this manual you will nd information that is preceded with a
NOTICE symbol. This information is intended to help you avoid damage to your dirt bike
and property around you. This manual covers basic maintenance procedures.
Read the warranty page carefully so that you understand the coverage on your dirt bike
and are aware of your rights and responsibilities.
Whenever you ride, tread lightly by staying on established trails and in approved areas.
Protect the environment and keep o-road riding areas open for future use.
If you have any questions or you need any special service or repair, remember that
your Monster Moto dealer knows your mini bike best and will be dedicated to your
complete satisfaction. Replacement parts and technical support can be obtained online
at www.monstermoto.com or through phone at 855-833-6483. Please be sure to register
your Monster Moto product and notify us of any address changes so we may contact you
in the future with any important product information.
You can also visit our website at www.monstermoto.com to view service videos and
information about all Monster Moto Products.
855*833*6483 OR EMAIL US AT info@monstermoto.com
3
Important Safety Information
Your personal safety, and the safety of those around you, is extremely important. Operating this
mini bike safely is an important responsibility.
Monster Motor has provided operating procedures and other information on labels and in this
manual to help you make informed decisions about safety. This information will alert you to
potential hazards that could harm you or others.
It is understood that it is not practical or possible to warn you about all possible hazards associated
with operating and maintaining a mini bike. You must use your own good judgment.
Safety information will come in a variety of dierent forms, including:
t
Safety Labels on the mini bike
t
Safety Messages preceded by a safety symbol and one of these three signal words:
DANGER, WARNING or CAUTION.
Below are the denitions of these three words:
You WILL be KILLED or SERIOUSLY INJURED if you do not follow instructions.
You CAN be KILLED or SERIOUSLY INJURED if you do not follow instructions.
You CAN be INJURED if you do not follow instructions.
t
Safety Headings such as important safety reminders and/or precautions.
t
Safety Section such as mini bike safety.
t
Instruction how to use the mini bike safely and correctly.
This entire manual is lled with important safety information - please read it carefully.
!
DANGER
!
WARNING
!
CAUTION
!
855*833*6483 OR EMAIL US AT info@monstermoto.com
PROBLEMS? DO NOT RETURN TO STORE! CALL US!
4
Important Safety Information
A mini bike can provide many years of service and pleasure, provided you take responsibility for
safety, properly maintain your mini bike and understand the challenges you may encounter while
riding.
This mini bike has been designed for younger riders. However, not all youngsters meet the
physical and emotional levels that are needed for riding. Before parents allow any children to ride this
mini bike, we strongly recommend that both of you read this entire manual so you are fully informed
before deciding if your children are ready to ride. Listed below are some of the most important safety
measures one should take when riding.
Never Ride Without a Helmet The following statement is a proven fact:
``Helmets signicantly reduce the number and severity of head injuries.” Never ride your mini bike
without a helmet. Even a crash at slow speed can result in a fatal head injury if you are not wearing
a helmet. Monster Moto recommends wearing helmets that have been certied for safety by helmet
testing organizations whom are independent from the helmet manufacturer. We also recommend
that you wear eye protection, boots, gloves, and other protective gear such as o-road riding pants.
Never Carry a Passenger This mini bike has been designed for ONE rider only.
There are no passenger pegs, footrests, handles or seat room for a passenger. Riding with a passenger
can interfere with your ability to operate and/or control the mini bike and may result in serious injury
or death.
Ride O-Road Only This mini bike has been designed and manufactured for
o-road use only. The mini bike is not equipped with lights, turn signals, horn and other features
required to drive a mini bike on public roads. The tires are not designed for pavement and will make
the mini bike unstable if it is ridden on pavement. If you have to cross a paved road, dismount and
walk the mini bike across the road.
Ride Within Your Limits Never attempt to ride your mini bike in a manner that is
beyond your skill level. It takes time to learn o-road riding skills. Learn to ride your mini bike step by
step. Start by practicing on safe terrain at slow speeds and gradually build your skill level. Instruction
from an experienced rider(s) is highly recommended. Alcohol, drug use, and fatigue will reduce your
ability to make good decisions and ride safely. Monster Moto does not recommend minibike usage
when inuenced by alcohol or drug use or when fatigued.
Be Alert for Hazards The terrain in which you ride can present many hazards.
Always “scan” the terrain ahead of you continually. Watch for unexpected turns, drop-os, ditches,
rocks and other hazards. Always maintain a speed slow enough to allow you enough time to see and
react to hazards.
Do Not Drink and Ride Even one drink can impair your ability to ride a
mini bike safely. Each drink afterward will make the impairment worse. Do not drink and ride. Do
not let your friend’s drink and ride. Remember, in most states throughout the United States, you can
be arrested and charged with Driving Under the Inuence (DUI) if you are riding a mini bike while
intoxicated. This applies to o-road mini bikes as well.
DANGER
!
DANGER
!
WARNING
!
WARNING
!
WARNING
!
WARNING
!

855*833*6483 OR EMAIL US AT info@monstermoto.com
5
Important Safety Information for Parents
As a parent, your child’s safety is your rst priority. Riding an o-road mini bike is very fun.
However, just like riding a bicycle, bad decisions can result in injury. As a parent, you can prevent
accidents by making informed decisions about if, when and how your child will ride. Always
supervise your child when he/she is riding.
Before you allow your child to ride, you need to decide if he/she is capable of riding. Riding readiness
can vary tremendously from one person to another. Age and size are not the only factors that help
determine one’s riding readiness. There are three other factors that you should also consider before
deciding if your child is ready to ride.
First, consider physical ability of your child. Riders must be able to hold the mini bike up, get on,
and sit comfortably with both feet on the ground. The rider must also be able to reach all of the
controls on the handlebars and work the brakes. Second, consider your child’s athletic ability. Your
child should be good at riding a bicycle before riding a mini bike. Determine if your child can judge
speeds and distances while riding a bicycle and react with the proper hand and foot actions. Any
person who does not have good coordination, balance, and agility should not ride this mini bike.
Finally, determine your child’s level of mental and emotional maturity. It is imperative that you are
honest with yourself when you ask yourself the following questions: Does your child think through
problems and come to logical conclusions? Does your child obey your rules when they ride their
bicycle? If your child makes bad judgements, takes unwarranted risks and/or does not obey your
rules, they should not ride this mini bike.
If you have decided that your child is ready to ride, please remember the following points and never
let your child ride without a helmet. It is up to you (parent) to ensure your child’s safety, even if they
learn to ride from another experienced adult. Never push your child to try things faster than they are
willing or capable of doing. Always supervise your child when they are riding and regularly remind
them about safety rules. As a parent it is your responsibility to be sure that the mini bike is properly
maintained and kept in safe operating condition.
Modifying this mini bike or using parts not manufactured by Monster Moto can make your
mini bike unsafe. Before you consider making any modications or adding an accessory, please read
the following information carefully.
Improper accessories or modications can cause a crash in which you can be
seriously hurt or killed. Follow all instructions in this owner’s manual regarding modications and
accessories.
Monster Moto strongly recommends that you do not remove any original equipment or
modify your mini bike in any way that may alter the design and/or operation. Such a change could
drastically impair the stability, handling, acceleration, and braking capabilities of the mini bike and
cause a crash. We also strongly suggest that you do not make any modications to the exhaust
system components.
WARNING
!

855*833*6483 OR EMAIL US AT info@monstermoto.com
PROBLEMS? DO NOT RETURN TO STORE! CALL US!
6
Operating Controls and Component Locations
When you ride a mini bike o-road, you need to be able to operate the throttle, brakes,
and other controls without stopping to look at them. Please read this section carefully
before you ride your mini bike. This section of the manual will describe the function,
location, and operation of all the basic controls of your mini bike.
Your Monster Moto MMB80 is shipped with
the handlebars NOT bolted on.
To attach the handlebars follow the steps below:
1. After unpacking your mini bike, place it on
the side stand on a at level surface.
2. Unscrew the screws from the handlebar
clamps and set aside. Remove upper clamp.
3. While sitting on the bike, place the handle
bars in the lower clamp in a comfortable position,
being careful to center in the clamps.
4. Replace upper clamps and bolts and tighten to
18 foot lbs with the wrench provided.
Attaching The Handlebars
Brake Lever
Engine Kill Switch
Foot Peg
Pull Start
Kick Stand
Fuel Cap
Fuel Shut O
Choke Lever
Chain Tensioner
Throttle
Foot Peg
Top View
Handlebar
Clamps
Tighten to
18 ft-lbs
855*833*6483 OR EMAIL US AT info@monstermoto.com
7
Operating Controls
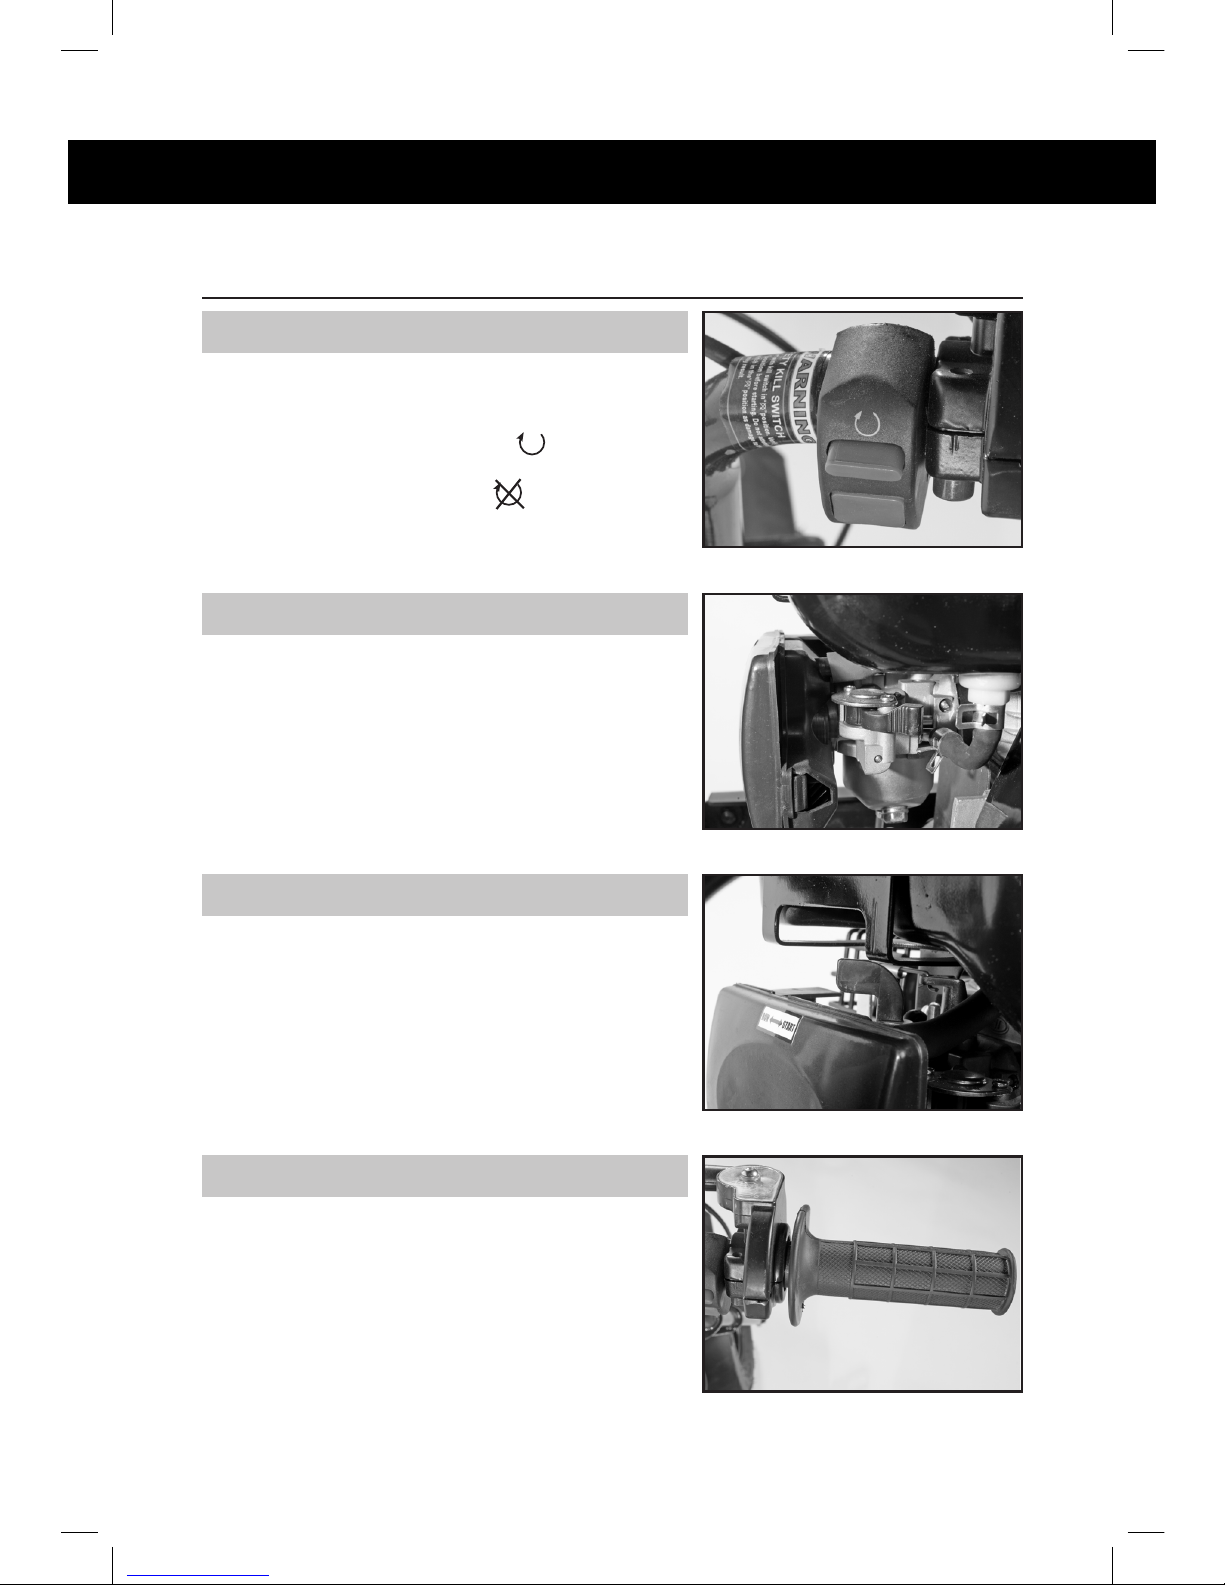
Fuel Valve
Choke Lever
Engine Stop
The two way fuel valve is used to control the ow of fuel
from the gas tank to the carburetor. The valve is located
under the gas tank. Turning the fuel valve to the “ON” position before starting the engine allows fuel to ow from the
tank to the carburetor. Turning the fuel valve to the “OFF”
position after shutting o the engine stops the ow of
fuel from the gas tank to the carburetor. Always keep the
fuel valve in the “OFF” position when you are not using the
mini bike.
The choke lever is used for starting the engine when it is
cold or when you live in a cold weather climate. It is located
above the air lter on the back of the engine. The choke
lever increases the amount of fuel in the air/fuel mixture
that is delivered to the engine. See the photo to the right.
“Start” - Choke Fully ON “Run” - Choke Fully OFF
The engine stop switch is used to turn o the engine.
When the switch is in the “OFF” position it will remove the
spark from the ignition system. To start and ride the mini
bike, push the small red button (top). This is the “RUN”
position. To shut o the engine, push the large red button
(bottom). This is the “OFF” position.
Throttle
The throttle controls the speed of the engine. To increase
engine speed, twist the throttle grip toward you. To reduce engine speed, twist the throttle grip away from you.
The throttle is spring loaded and will return to the closed
position (engine idle) when you remove your hand.

855*833*6483 OR EMAIL US AT info@monstermoto.com
PROBLEMS? DO NOT RETURN TO STORE! CALL US!
8
Operating Controls
Rear Brake Lever
The brake lever is used to apply the brake to the rear wheel
and will slow or stop the mini bike. When you pull back on
the lever, brake uid is forced into the brake caliper causing
the caliper to close on the brake disc. The amount of force
that you use when pulling the brake lever will determine
how much braking power is applied. To release the rear
brake, release the brake lever.
Pull Starter Cord
Air Filter
The air lter is used to keep dirt and large objects out
of the engine’s air supply. It is located at the rear of the
engine under the air lter cover. Examine the lter before
each ride to be sure it is not dirty and/or full of debris. You may
also use air lter oil (usually in spray cans) to keep the lter
owing properly.
The Pull Starter Cord is used to start the engine and has a
recoil mechanism to retract the cord after the engine has
been started. It is located on the right side of the mini-bike,
directly below the front of the seat.
Spark Plug
The spark plug is used to produce the spark that res the
engine. You should never touch the spark plug when the
engine is running or you will be shocked. Please refer to the
Basic Maintenance Procedures section of this manual for
detailed instructions on cleaning and replacing a spark
plug.
855*833*6483 OR EMAIL US AT info@monstermoto.com
9
Operating Controls
Kick Stand
The kick stand is used to support the mini bike when it is
parked. To operate, use your foot to lower the stand. Always
raise the stand before riding.
Brake Mechanism
The MMB80 mini bike is equipped with a rear disc brake.
It provides power to safely bring the mini bike to a stop. It
will also hold the mini bike at a stop if the engine is running.
Refer to the Basic Maintenance Procedures section for brake
adjustment instructions.
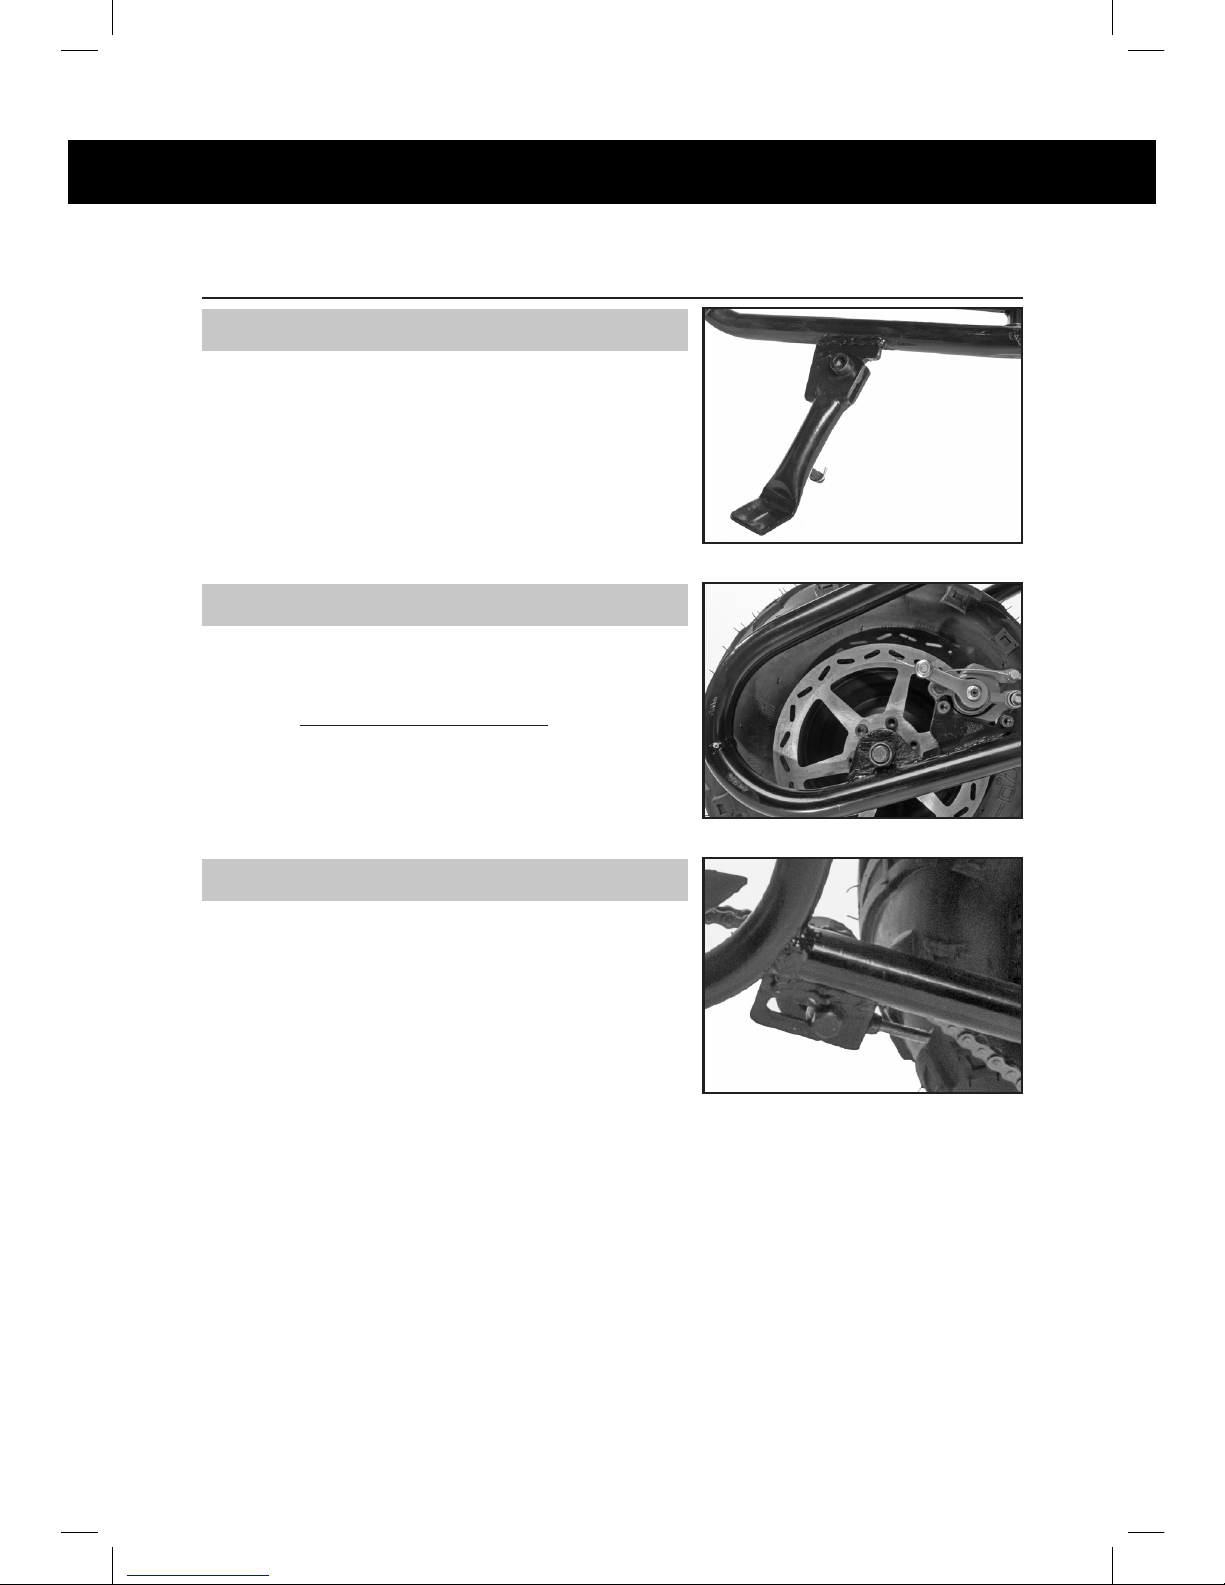
Chain Tensioner
The Chain Tensioner is located on the frame, near the rear
wheel on the frame. It is used to maintain proper chain
tension. The adjustment screw will increase or decrease
the slack on the chain. Please see Basic Maintenance
Procedures to understand how to determine proper
chain tension and for instructions to make adjustments to
maintain proper tension.

855*833*6483 OR EMAIL US AT info@monstermoto.com
PROBLEMS? DO NOT RETURN TO STORE! CALL US!
10
Before Riding
Before you ride, you must be absolutely sure that you and your mini bike are ready to ride. To help
you get prepared, this section of the manual will discuss how to evaluate your riding readiness and
how to preform our recommended pre-ride inspection of your mini bike. If you are a parent, please
be sure you have read the section Important Message to Parents on page 4.
Are you Ready to Ride?
Before you ride your mini bike for the rst time, we strongly recommend the following:
1. Completely read this manual.
2. Be sure you have read and understand all of the safety messages and labels.
3. You know how to operate all of the mini bike’s controls.
Before each ride, we also strongly recommend that you:
1. Are in good physical and mental condition.
2. Are free of alcohol and other drugs.
3. Are wearing an approved mini bike helmet with a tight chin strap, eye protection and other
protective clothing.
Protective Gear & Apparel
For your safety, we strongly recommend that you always wear an approved helmet, eye protection,
boots, gloves, long pants and a long sleeved jersey , shirt or jacket whenever you ride. Although
complete protection is not possible, wearing the proper gear can reduce the chance of and severity
of injuries when you ride.
Not wearing a helmet increases the chance of serious injury or death in a crash. Be
sure you always wear your helmet and other protective apparel when you ride.
Helmets and Eye Protection - Your helmet is your most important piece of riding gear because
it oers the best protection against head injuries. A good helmet will be approved by a testing
organization independent of the helmet manufacturer and will have a chin strap that can be tightened securely. Open-face helmets oer some protection, but a full-face helmet oers the most
protection. When purchasing a helmet, regardless of style, look for a DOT (Department Of Transportation) sticker (USA only). If the helmet has been tested by an independent organization such as the
Snell Institute, you will usually nd their logo on a tag inside the padding of the helmet
Additional Riding Gear - In addition to your helmet and eye protection, we also recommend:
1. Sturdy o-road riding boots to help protect your feet, ankles and lower legs.
2. O-Road riding gloves to protect your hands.
3 Riding pants with knee and hip pads, a riding jersey with elbow pads and a chest/shoulder
protector.
WARNING
!
 Loading...