

Monster Central REVOLUTION 200 Instruction Manual

HOME THEATER AND LIGHTI NG CONTR O L
INSTRUCTION MANUAL
SIMPLE ADVANCED
AUDIO/VIDEO

REVOLUTION 200 SETUP GUIDE
Overview . . . . . . . . . . . . . . . . . . . . . . . . . . . . . . . . . . . . . . . . . . . . . . . . . . . . . . . . . . . . . . . . . . . . . . . . . . . . . . . . . . . . . . . . . . . . 2
What’s in the Box .....................................................................................2
Installing Batteries . . . . . . . . . . . . . . . . . . . . . . . . . . . . . . . . . . . . . . . . . . . . . . . . . . . . . . . . . . . . . . . . . . . . . . . . . . . . . . . . 3
GETTING STARTED WITH THE REVOLUTION 200. . . . . . . . . . . . . . . . . . . . . . . . . . . . . . . . . . . . . . . . . . . . . . . . . . . . . . . . . . . . . 3
Installing the REVOLUTION Remote Control Setup Wizard ................................................3
Overview . . . . . . . . . . . . . . . . . . . . . . . . . . . . . . . . . . . . . . . . . . . . . . . . . . . . . . . . . . . . . . . . . . . . . . . . . . . . . . . . . . . . . . . . . 3
Minimum Technical Requirements ...................................................................3
Installing the REVOLUTION Remote Control Setup Wizard . . . . . . . . . . . . . . . . . . . . . . . . . . . . . . . . . . . . . . . . . . . . . 4
If Your CD Does Not Start the Install Process Automatically… ..........................................4
Launching the REVOLUTION Remote Control Setup Wizard . . . . . . . . . . . . . . . . . . . . . . . . . . . . . . . . . . . . . . . . . . . . 4
Logging In .........................................................................................4
Connecting Your Remote . . . . . . . . . . . . . . . . . . . . . . . . . . . . . . . . . . . . . . . . . . . . . . . . . . . . . . . . . . . . . . . . . . . . . . . . . . . 5
HOW TO SET UP ACTIVITIES .............................................................................13
Overview of Activities . . . . . . . . . . . . . . . . . . . . . . . . . . . . . . . . . . . . . . . . . . . . . . . . . . . . . . . . . . . . . . . . . . . . . . . . . . . . . . . 13
Getting Started with Activities ........................................................................ 13
Why You Should Set Up a Hello Activity . . . . . . . . . . . . . . . . . . . . . . . . . . . . . . . . . . . . . . . . . . . . . . . . . . . . . . . . . . . . . 13
Adding a Hello Activity (All ON) ..................................................................14
Configuring the Hello Activity for Your Components ................................................ 16
Testing the Hello Activity . . . . . . . . . . . . . . . . . . . . . . . . . . . . . . . . . . . . . . . . . . . . . . . . . . . . . . . . . . . . . . . . . . . . . . . 18
Finishing the Hello Activity ......................................................................20
Setting Up the Good Night Activity . . . . . . . . . . . . . . . . . . . . . . . . . . . . . . . . . . . . . . . . . . . . . . . . . . . . . . . . . . . . . . . . . 22
Adding the Good Night Activity ..................................................................22
To Add the Good Night Activity. ..................................................................22
Configuring the Good Night activity for Your Devices ...............................................24
Testing the Good Night Activit y ..................................................................26
Finishing the Good Night Activity . . . . . . . . . . . . . . . . . . . . . . . . . . . . . . . . . . . . . . . . . . . . . . . . . . . . . . . . . . . . . . . . 28
Setting Up the Watch Movie Activity . . . . . . . . . . . . . . . . . . . . . . . . . . . . . . . . . . . . . . . . . . . . . . . . . . . . . . . . . . . . . . . 29
Recording Which Devices You Use to Watch Movies ...............................................29
Recording How You Access These Inputs With Your Original Remotes ...............................30
Adding a New Activit y Using the REVOLUTION Remote Control Setup Wizard ........................30
Building the Watch Movie Activity ...............................................................32
Setting Up the Watch Satellite or Cable Activity . . . . . . . . . . . . . . . . . . . . . . . . . . . . . . . . . . . . . . . . . . . . . . . . . . . . . 39
Recording Which Devices You Use to Watch Satellite or Cable ......................................39
Recording How You Access These Inputs With Your Original Remotes ...............................39
Adding a New Activit y in the REVOLUTION Remote Control Setup Wizard . . . . . . . . . . . . . . . . . . . . . . . . . . . 40
Building the Watch Cable or Watch Satellite Activity . . . . . . . . . . . . . . . . . . . . . . . . . . . . . . . . . . . . . . . . . . . . . . 41
Using Your Activities . . . . . . . . . . . . . . . . . . . . . . . . . . . . . . . . . . . . . . . . . . . . . . . . . . . . . . . . . . . . . . . . . . . . . . . . . . . . . . 47
HOW TO SET UP FAVORITES .............................................................................49
Overview of Favorites ................................................................................49
Setting Up a List of Favorite Channels ...............................................................49
Choosing Your Favorite Channels ...................................................................53
Assigning Remote But ton Groups to Control Dif ferent Devices . . . . . . . . . . . . . . . . . . . . . . . . . . . . . . . . . . . . . . . . 57
TROUBLESHOOTING .................................................................................... 58
1
REVOLUTION 200 SETUP GUIDE
Everything you need to start using your new remote:
What’s in the Box•
Installing the REVOLUTION Remote Control Setup Wizard•
How to Assign Devices•
How to Set Up Activities•
How to Set Up Favorites•
How to Set Up Lighting•
OVERVIEW
Goal of this section: to become familiar with your remote.
What’s in the Box•
Installing Batteries•
Understanding the Display Window•
Setting Up the REVOLUTION•
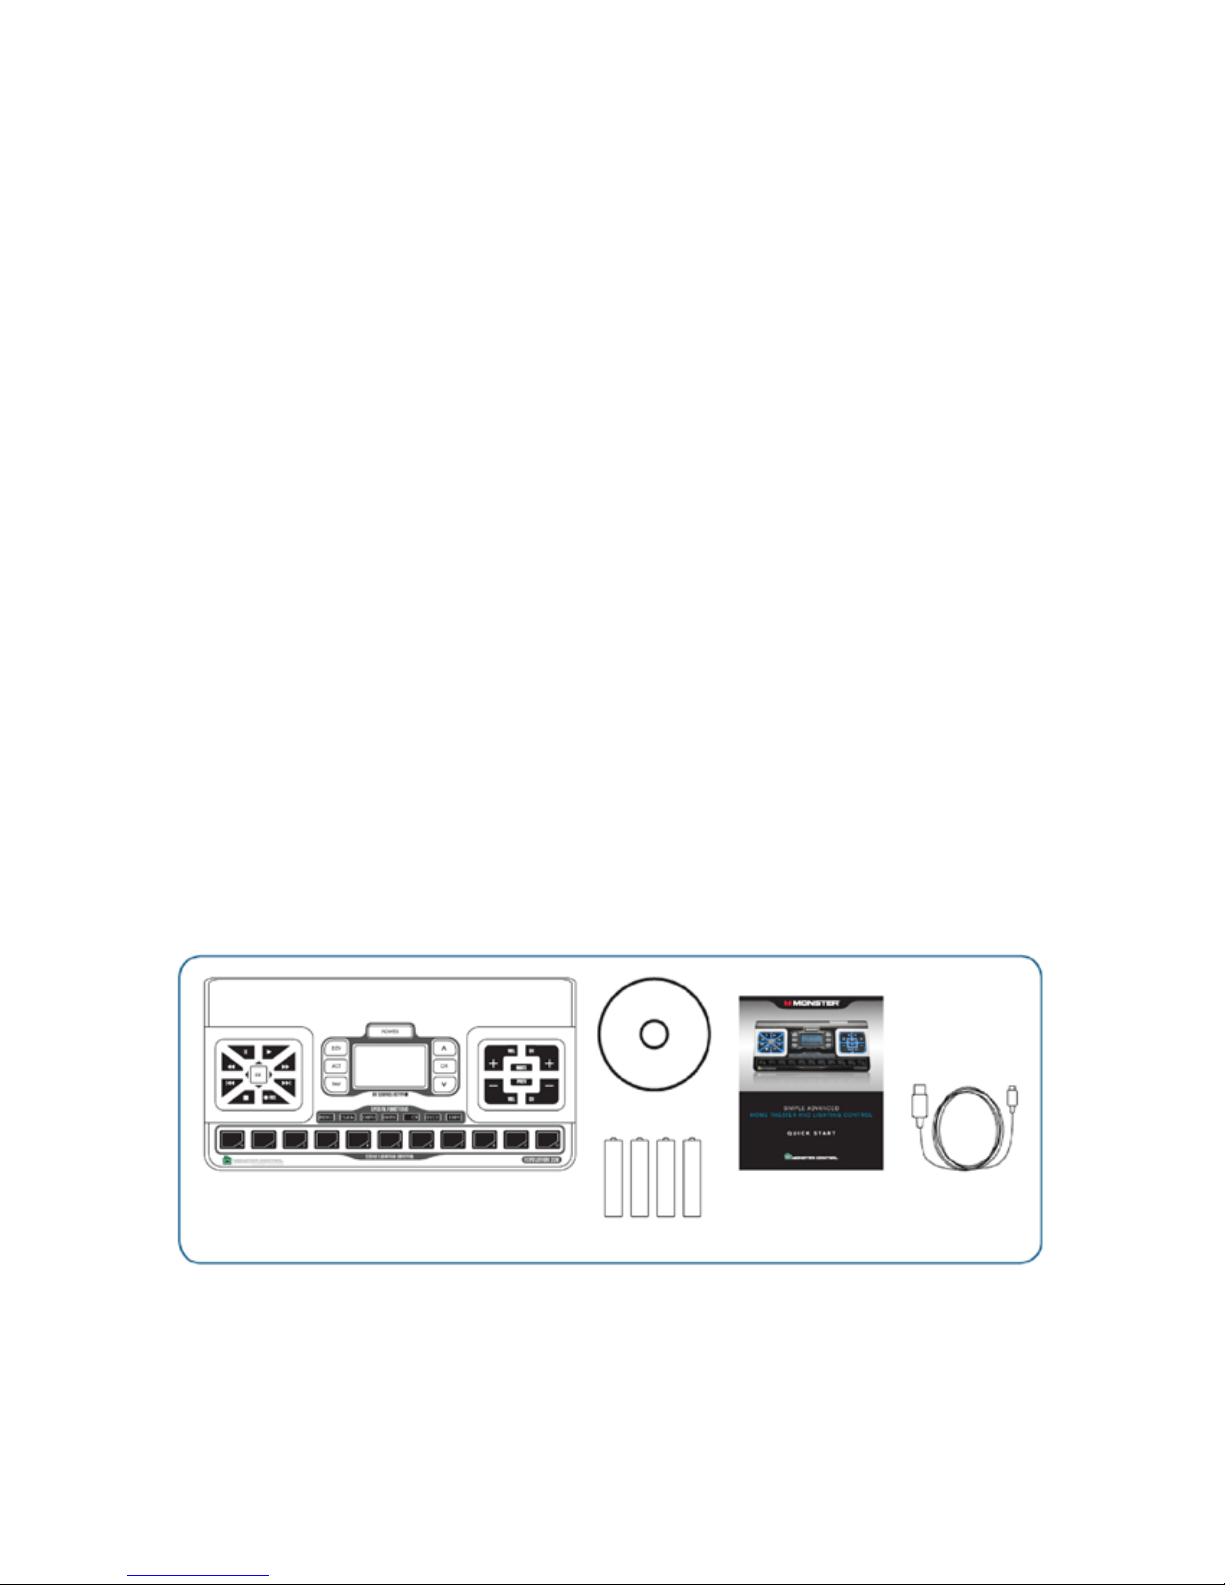
WHAT’S IN THE BOX
First, check that all of the following items are in your package.
CD-ROM
Remote
4 AAA Batteries
Quick Start
USB Adapter
2
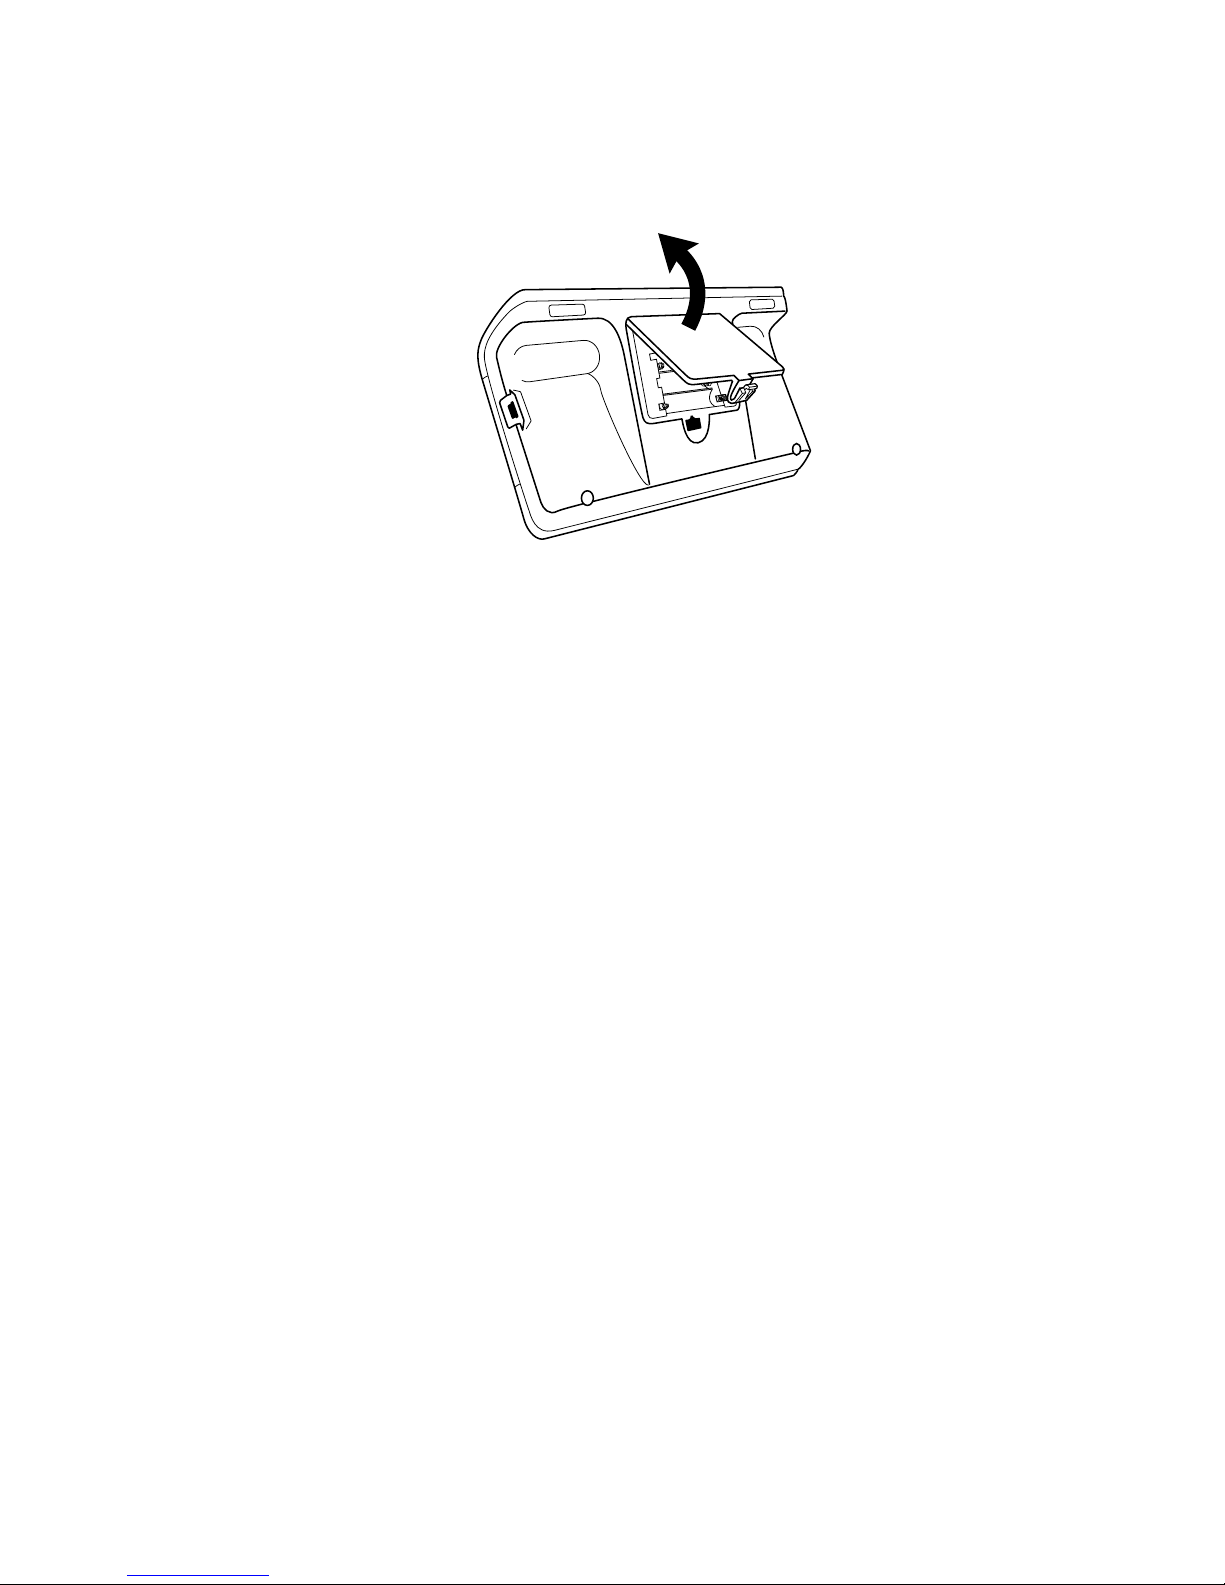
Installing Batteries
The REVOLUTION uses 4 AAA batteries. To put batteries in your remote, follow these instructions.
Remove the battery cover from the back of the remote by pressing on the latch.1.
Install 4 AAA batteries in the battery bay, following the diagram inside.2.
GETTING STARTED WITH THE REVOLUTION
INSTALLING THE REVOLUTION REMOTE CONTROL SETUP WIZARD
Goal of this section: set up the advanced features on your remote using the Setup Wizard.
Overview
Minimum Technical Requirements•
Installing the REVOLUTION Remote Control Setup Wizard•
Launching the REVOLUTION Remote Control Setup Wizard•
Logging In•
Connecting Your Remote•
Minimum Technical Requirements
Make sure your PC meets the REVOLUTION’s minimum technical requirements.
Minimum hardware requirements:
USB 2.0 port•
CD-ROM drive•
Internet connection•
3
Minimum software requirements:
Operating system: Windows XP (Service Pack 3 and later), Windows Vista, Windows 7 •
(Windows 2000 not supported)
Web browser: Internet Explorer 7.0 or later•
Installing the REVOLUTION Remote Control Setup Wizard
To begin setting up your remote, install the software and follow these instructions.
If your CD does not start the install process automatically…
Open the CD as a folder on your desktop.1.
Double-click the icon shown above.2.
* If you are using Windows XP, make sure you have installed Service Pack 3 before
you install this software.
Launching the REVOLUTION Remote Control Setup Wizard
Double-click the Setup Wizard icon on your desktop.
Logging In
The first time you run the Setup Wizard, you need to register so you can save your remote’s
settings. Click “Create New Account.” After creating your account, use your username
and password to log in.
Need help setting up this remote? Call Monster Support toll-free at 1-877-800-8989.
4
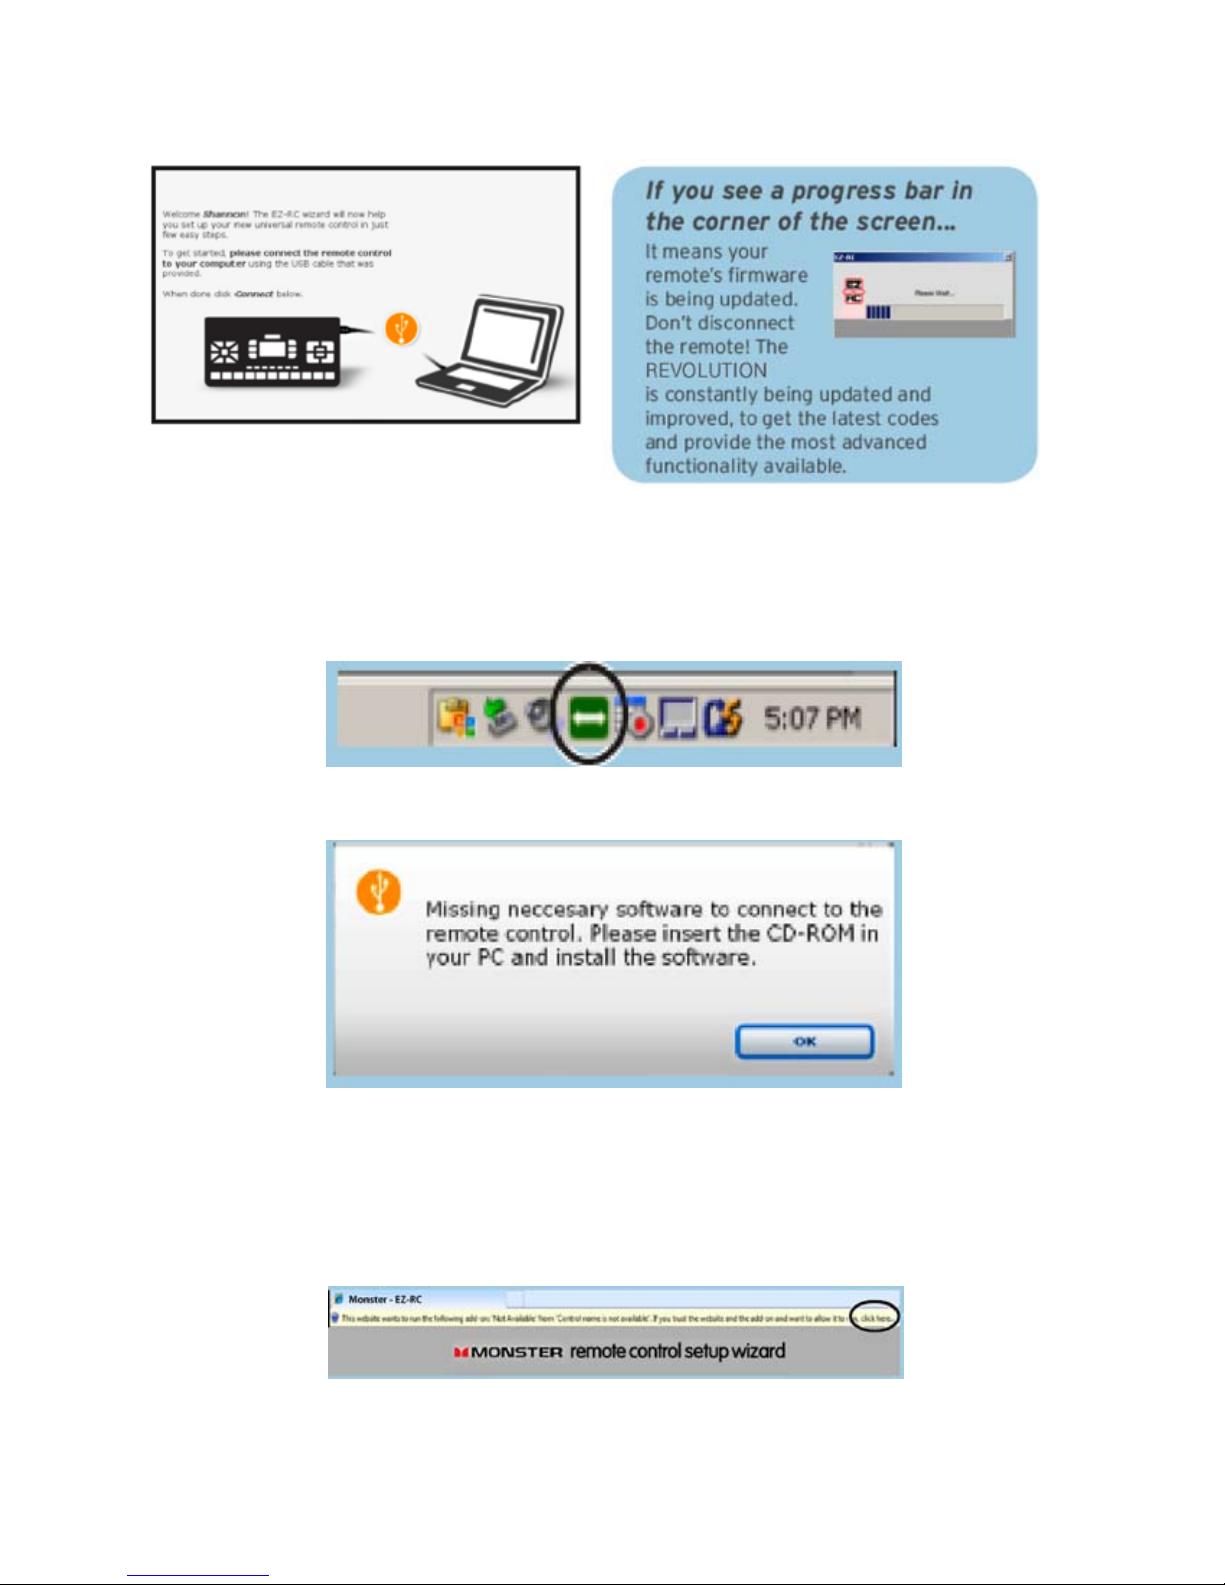
Connecting Your Remote
Connect the remote to your computer, using the USB cable that came with it.
Check that your remote is connected.
See the green arrow icon in the status bar of your PC.
What to do if this error message appears…
Change the ActiveX settings in your browser to enable the Setup Wizard to work:
Click “OK” in the dialog box pictured above.1.
Find the pale yellow bar across the top of the page, as shown below.2.
To begin changing the ActiveX setting, click on the text that reads “click here” as circled above.3.
Click the “Connect” button again at the bottom of the screen.4.
5
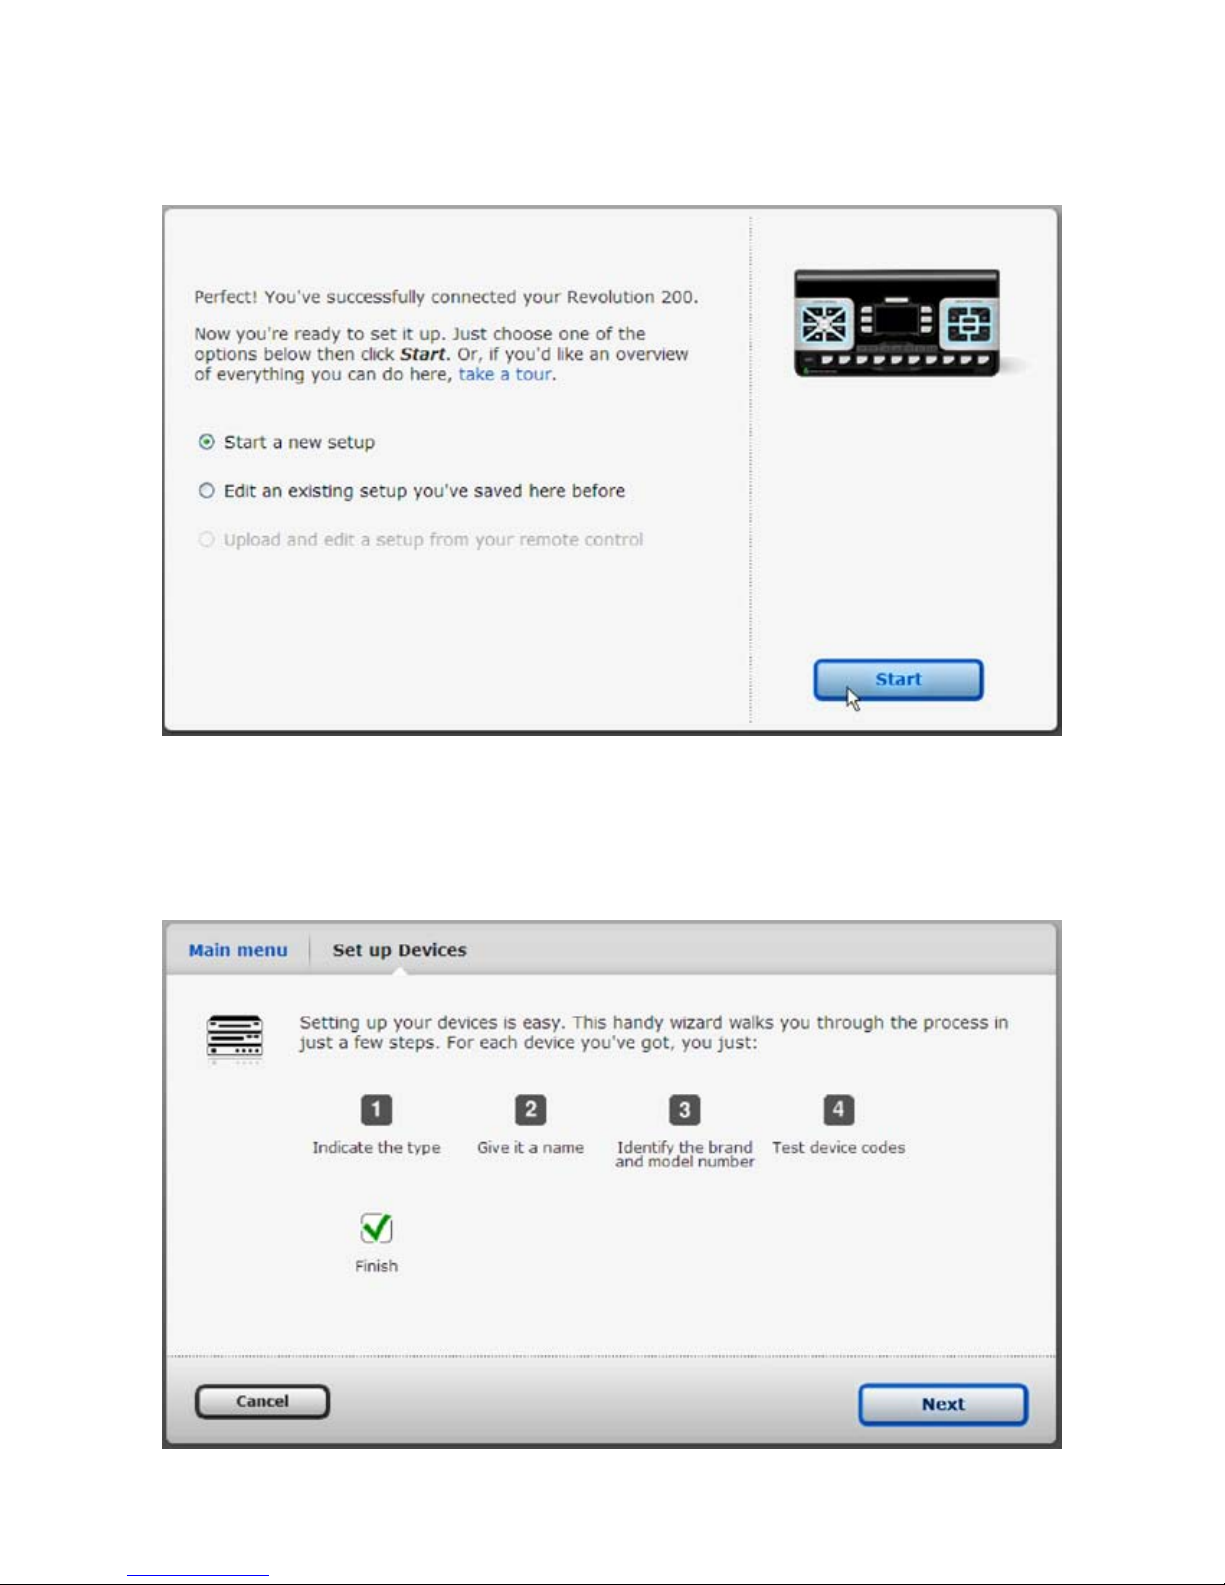
Once your remote is connected…
Check the option “Start a new setup” and click the Start button.
Next, the “Set up Devices” screen appears. It gives you an overview of the steps to entering your
home entertainment system’s components. Once you finish the steps for each component,
signal the Wizard to transfer this information to your remote.
Click the “Next” button to begin the process.
6
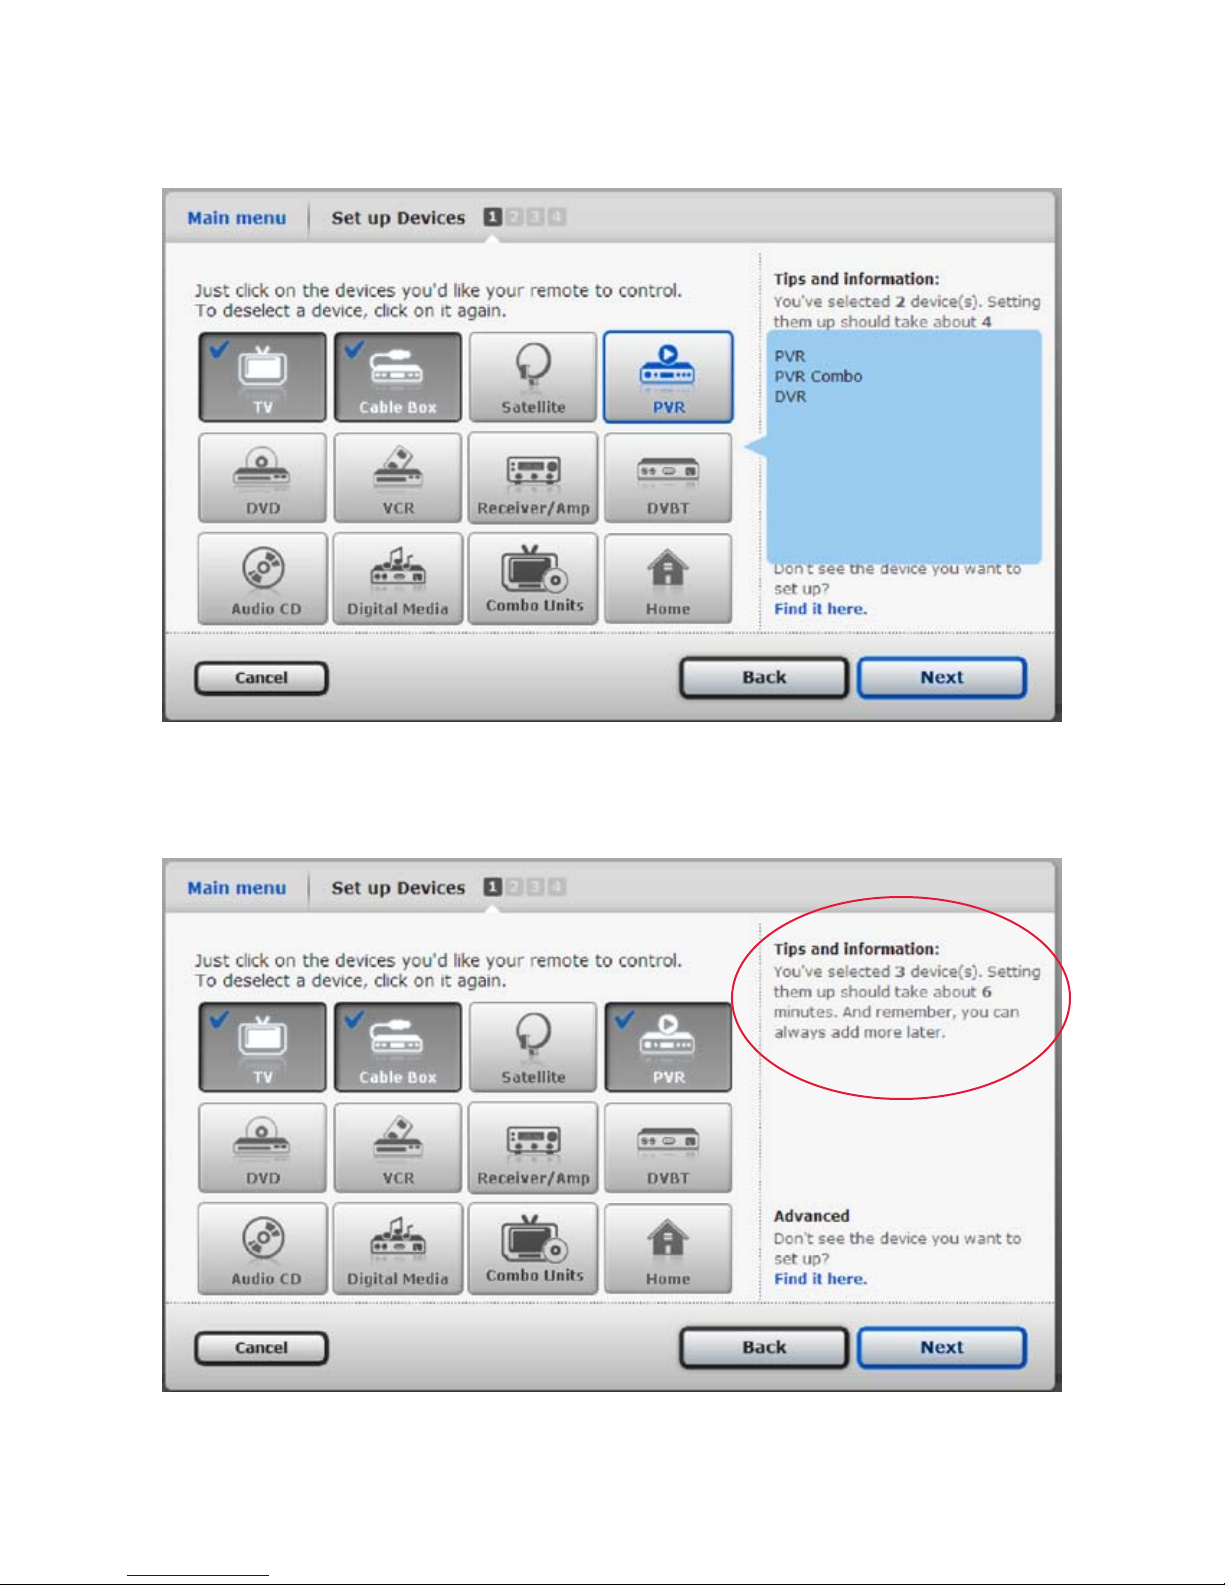
In Step #1 of “Set up Devices,” roll your cursor over any icon, and a list of the relevant devices
appears on the right.
As you choose the types of components, the Wizard estimates how much time you need to
complete setup (see “Tips and Information” as circled in red below). Make all your selections,
and click the “Next” button.
7
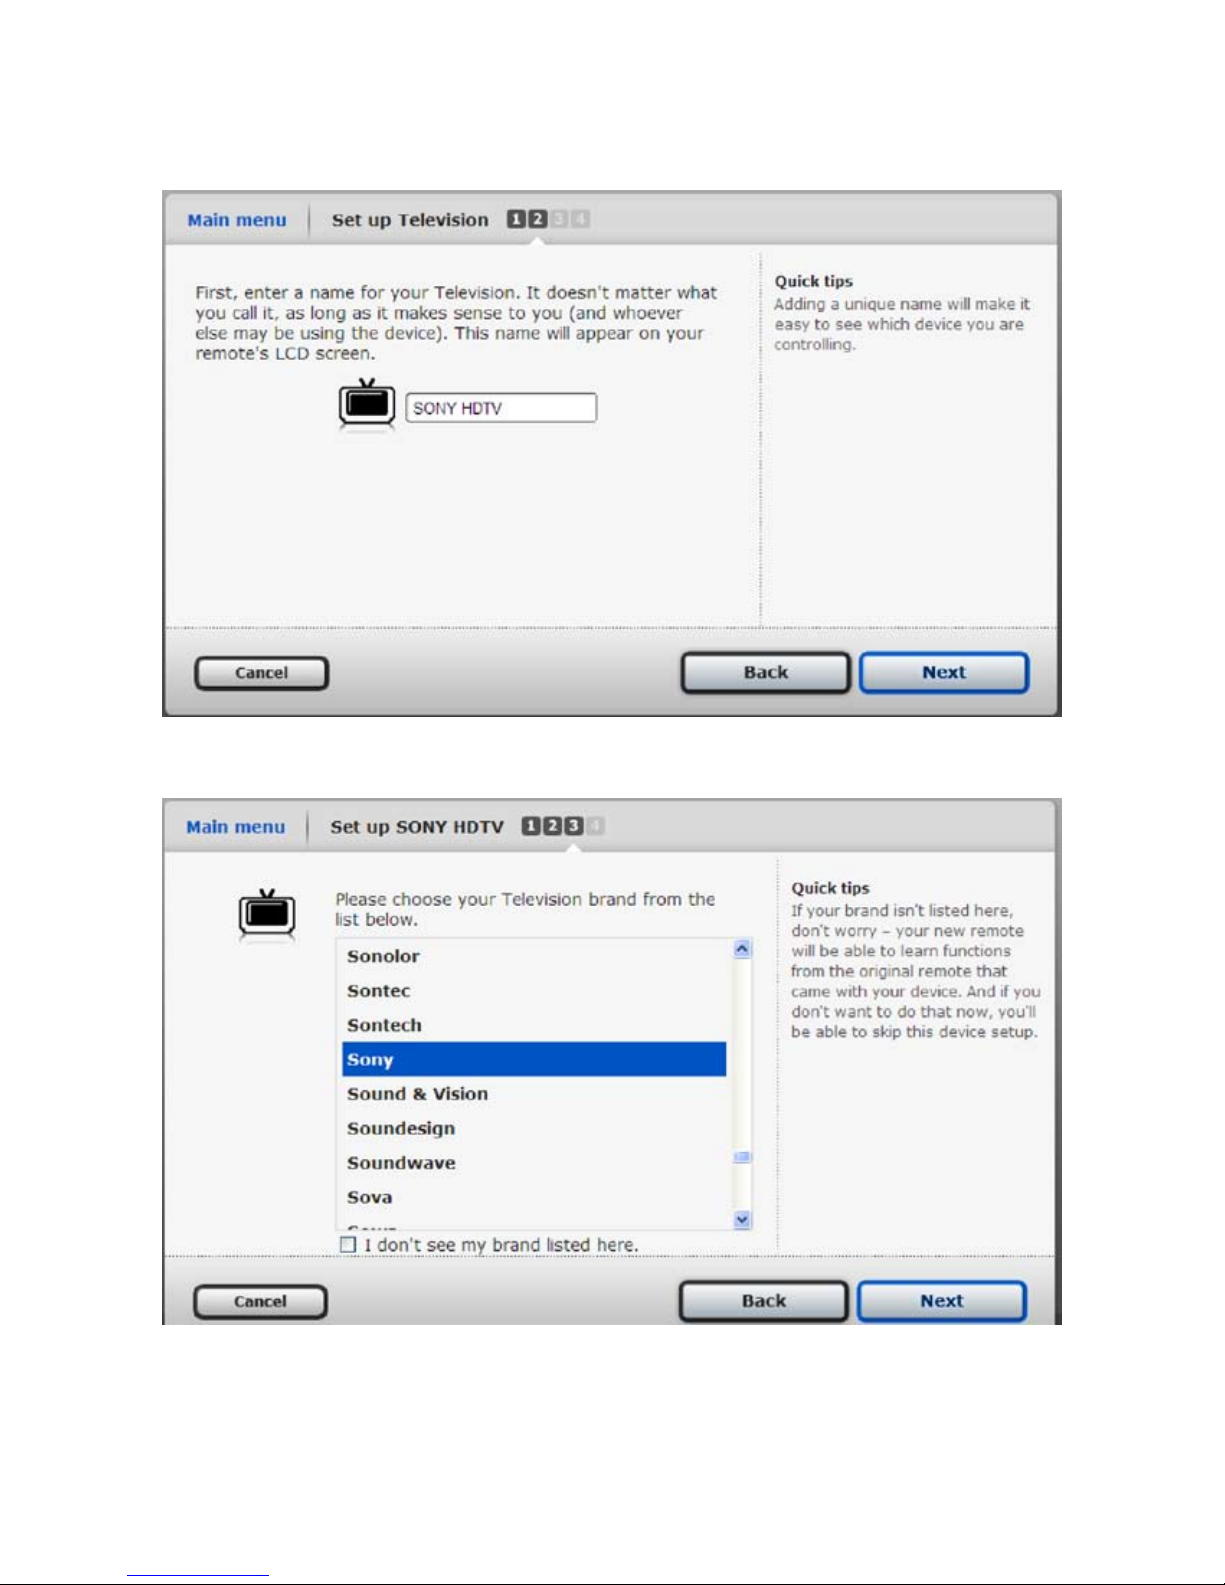
In Step #2, you set up your TV. Enter a name that’s descriptive and easy for you to remember.
Click “Next” to continue.
In Step #3, scroll to find the manufacturer of your component and select it. Click “Next” to continue.
8

Enter its model number (and only its model number). Notice you can still continue without model
numbers. Click “Next” to continue.
The Setup Wizard lists all models numbers similar to what you entered. Scroll through the list
to find yours and highlight it. Click “Next” to continue.
9
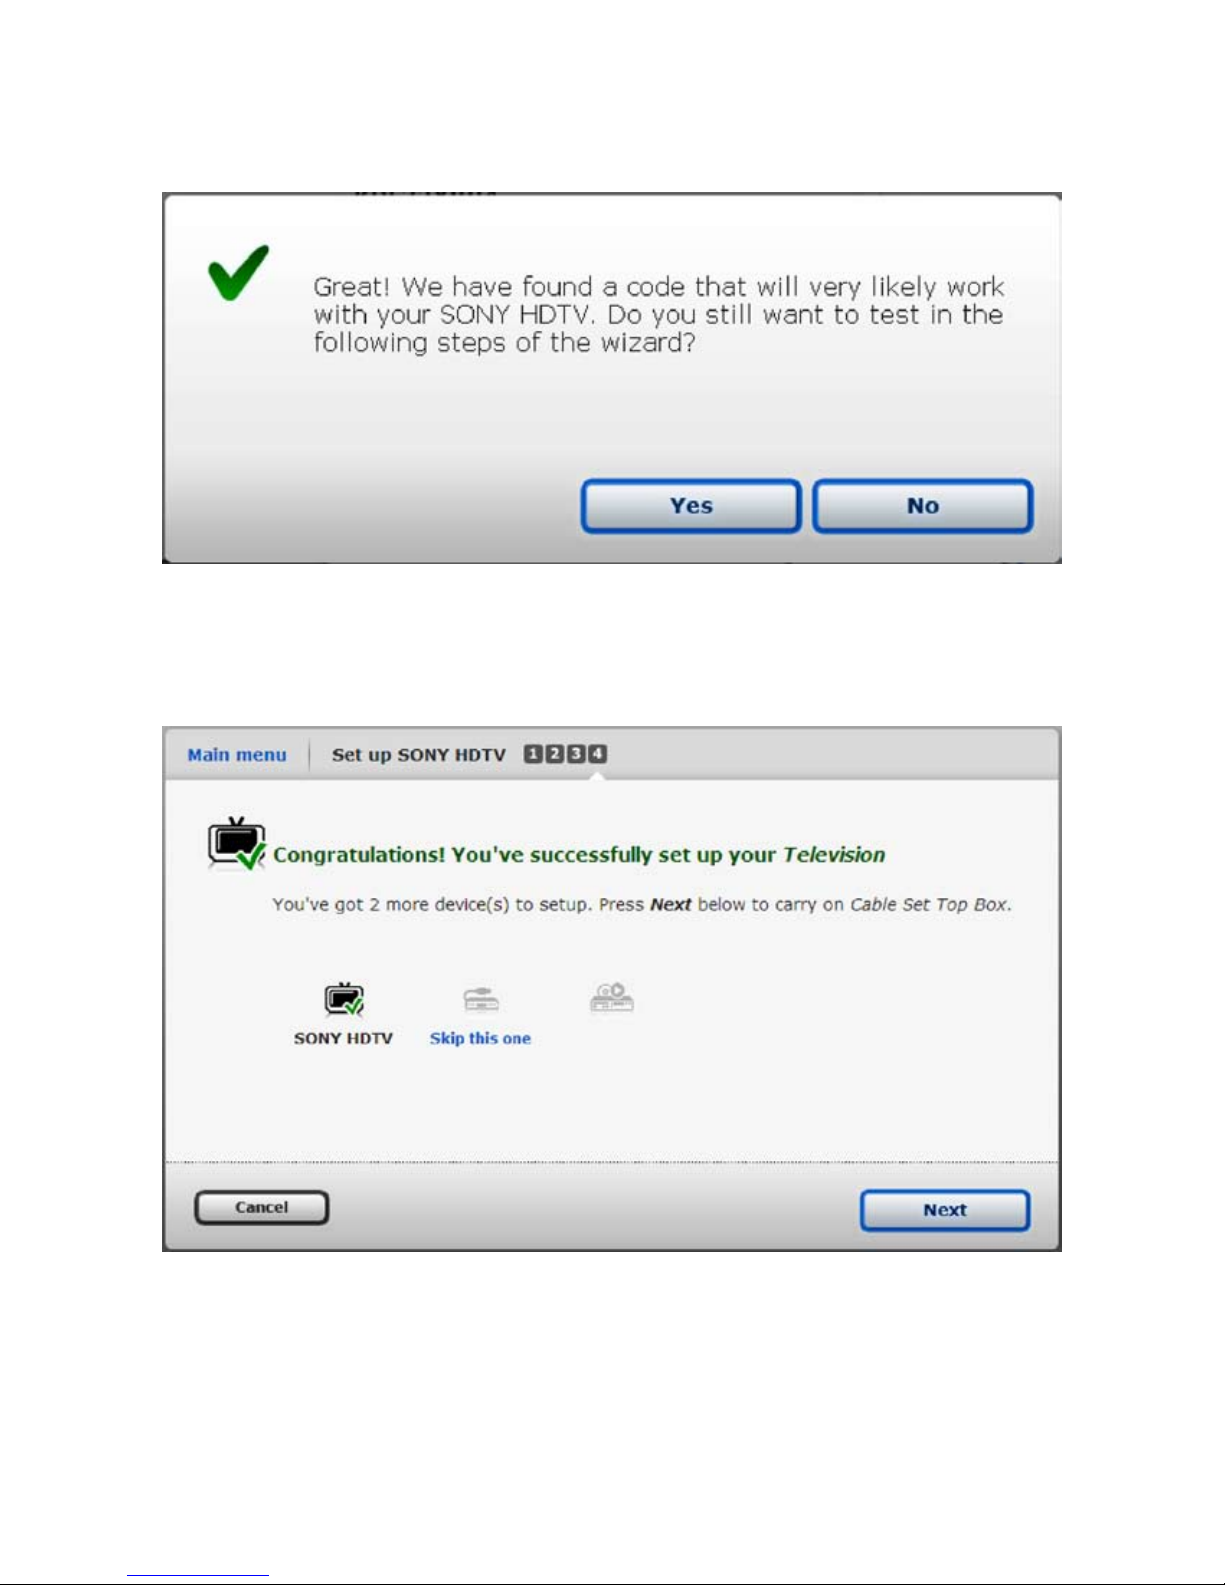
When you select a code the Wizard recognizes, you can test that code in the following steps,
as you can see below.
For now, click “No” and start setting up the other devices you indicated in Step #1.
The Wizard congratulates you on setting up your TV. It also displays the other devices you will
set up. To set up the next device, click “Next” and continue.
NOTE: Since the process for setting up the other devices is the same, skip ahead to what your
complete setup looks like.
10

Complete all four steps for each device to see the screen below. Click “No” and return to the
Main Menu to download your configuration to your remote.
To download your configuration, click the “Download to Remote” button.
11
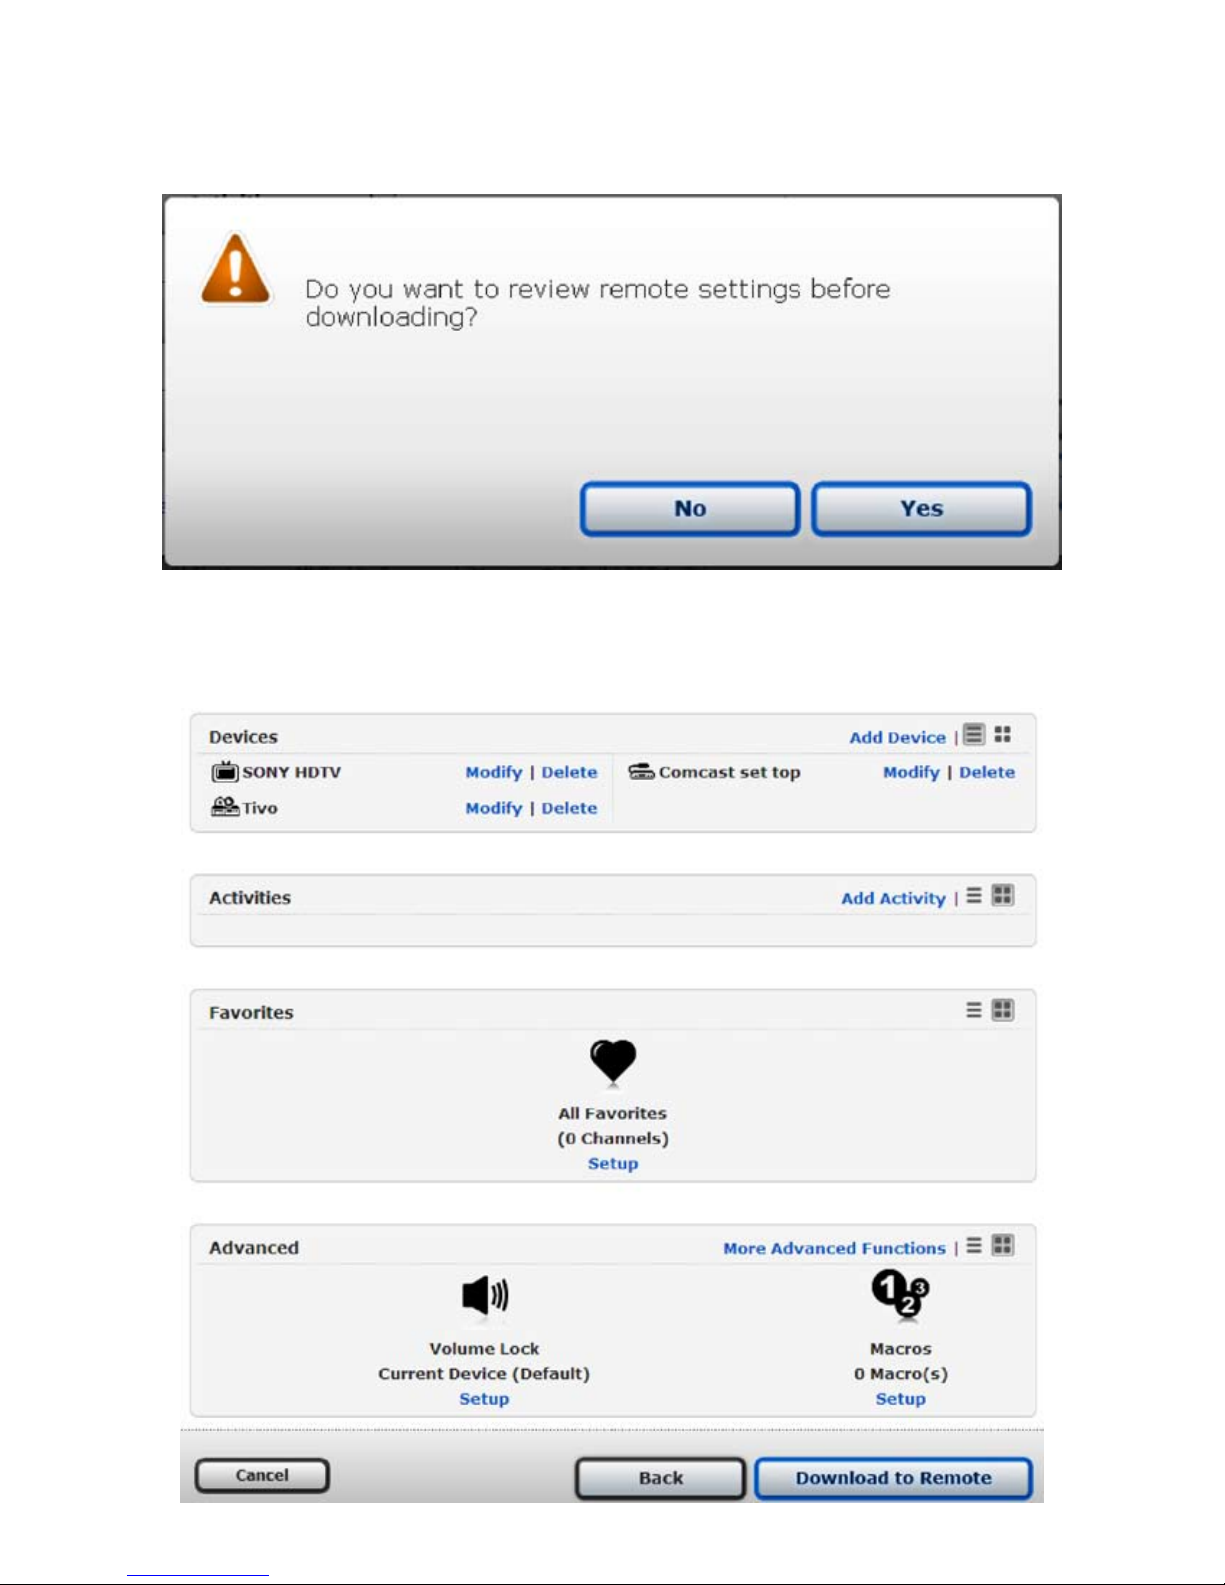
The Wizard prompts you to review your settings, which is a good idea before sending
the configuration to your remote. Click “Yes.”
The next screen contains a list of your devices with links to add another device, modify the settings
of a device you already added, or to delete one of them. If all appears correct, click the “Download
to Remote” button.
12
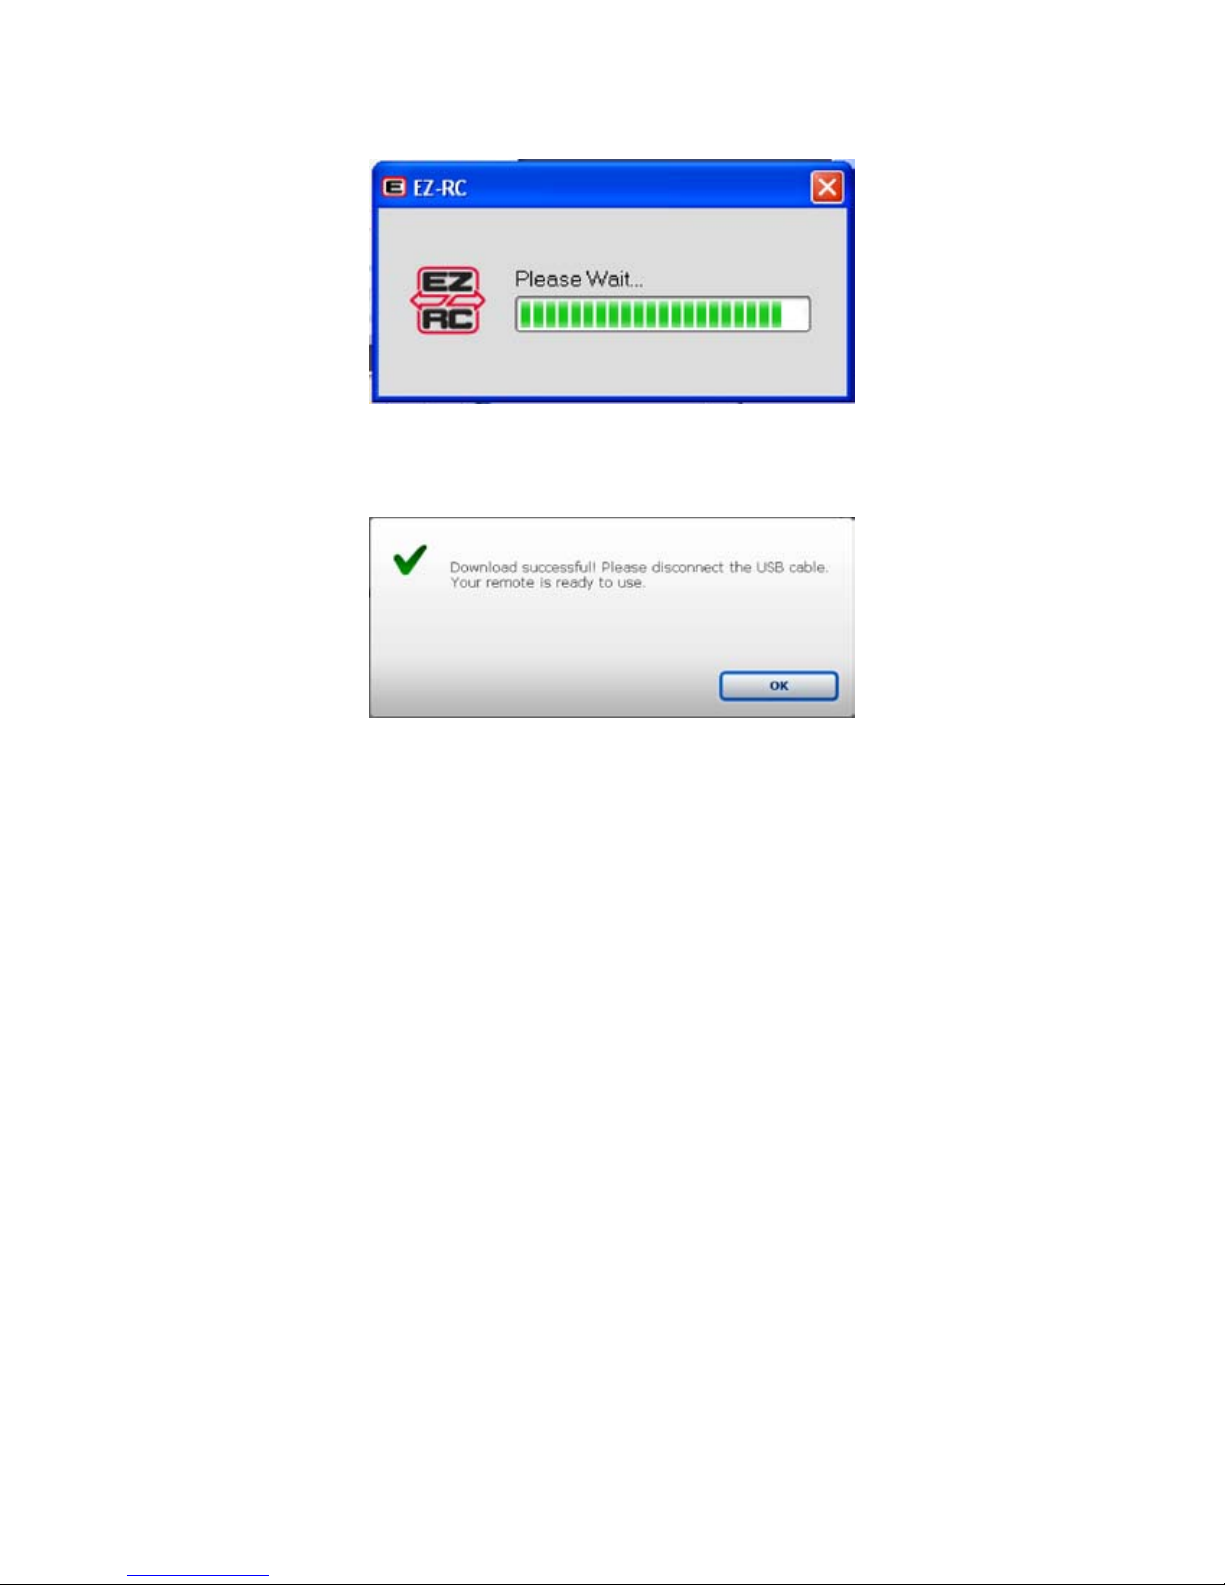
While the configuration downloads to your remote, you see this progress indicator.
After a successful download, see the dialog box below. Click “OK.” You’ve successfully configured
your remote to control your home system.
HOW TO SET UP ACTIVITIES
This section teaches you how to control your entire home entertainment system at the
touch of a button.
OVERVIEW OF ACTIVITIES
Set up the Hello activity•
Set up the Good Night activity•
Set up a Watch Movie activity•
Set up a Watch Satellite or Cable activity•
GETTING STARTED WITH ACTIVITIES
Activities give you one-touch control over your complete home system to watch movies
and listen to music.
Why You Should Set Up a Hello Activity
Different components need different amounts of time to warm up before they are ready
for use. This can interfere with activities like “Watch Movie” that require multiple steps.
The Hello activity makes certain your components are ready before a multi-step activity
like “Watch Movie.”
13

Adding a Hello Activity (All ON)
From the Main Menu, click “Activities.” From the submenu, click “Add an Activity.”
Select “Smart Wizard” and click “Next” to continue.
14
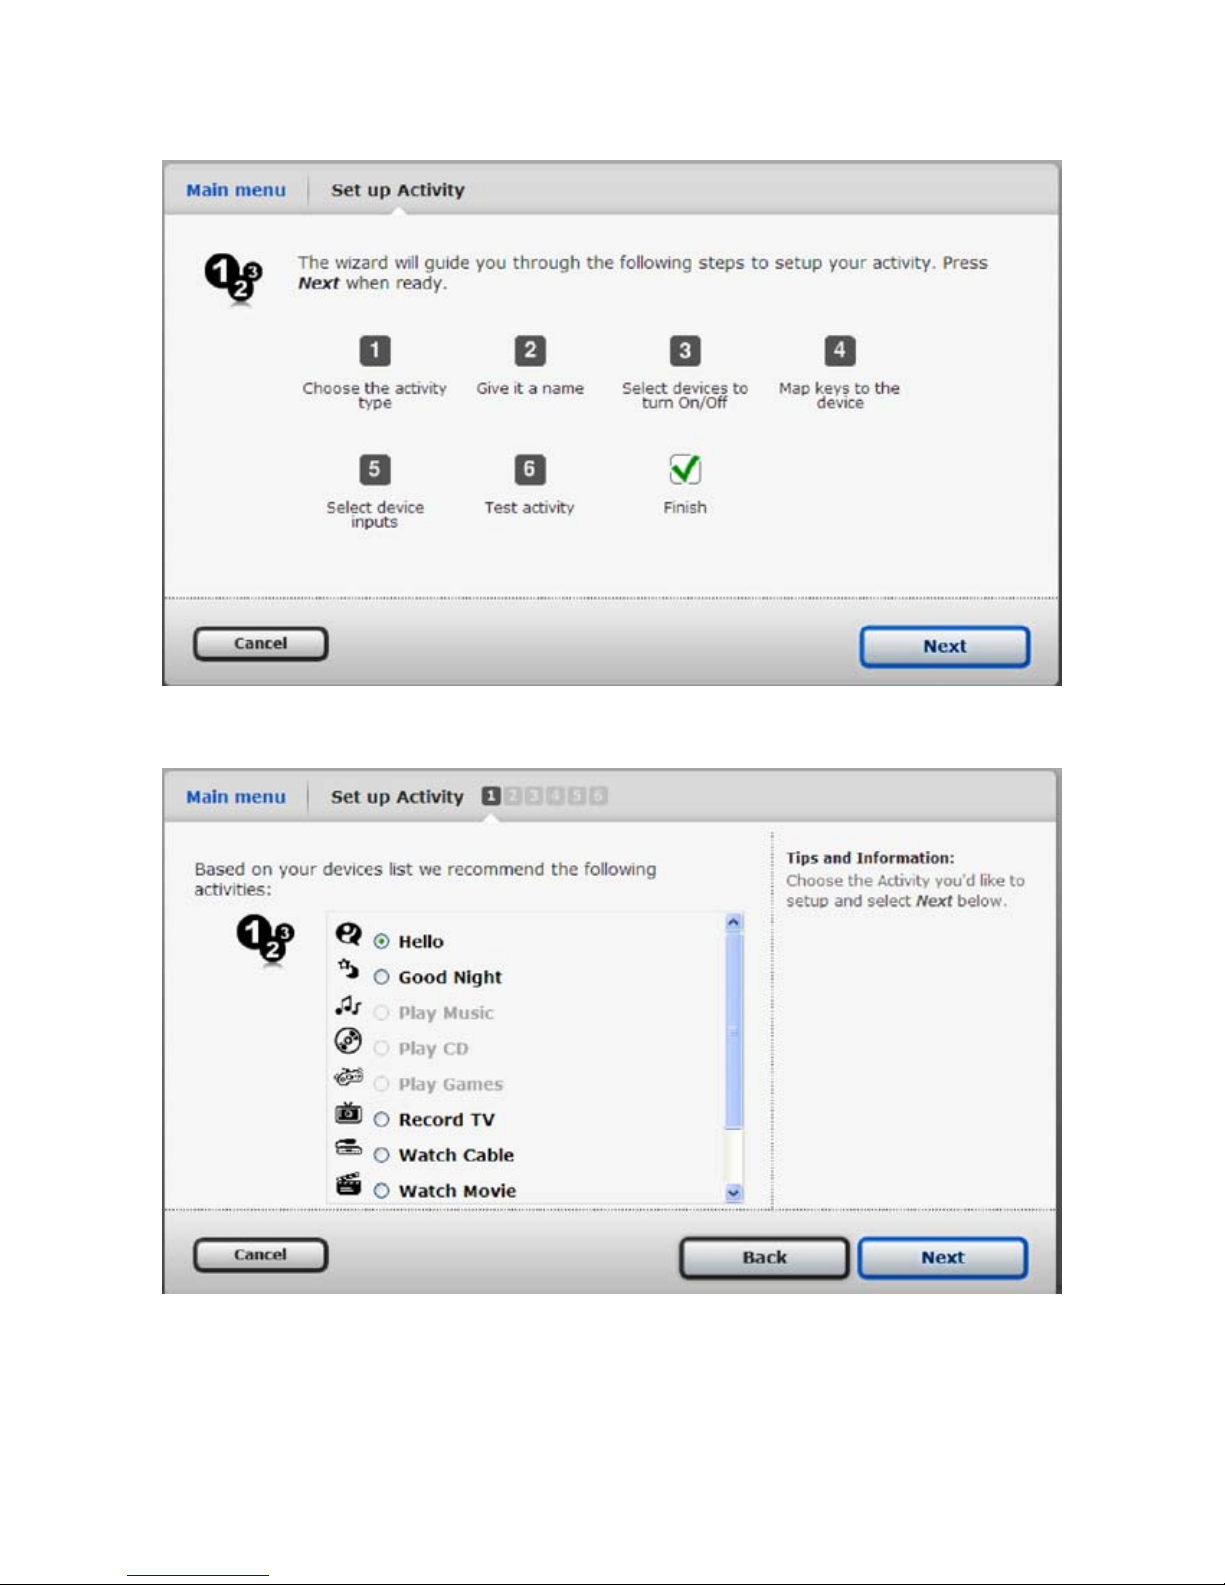
The following screen lists the steps needed to set up the activity. Click “Next” to continue.
Select “Hello” from the list of activities. Click “Next” to continue.
15
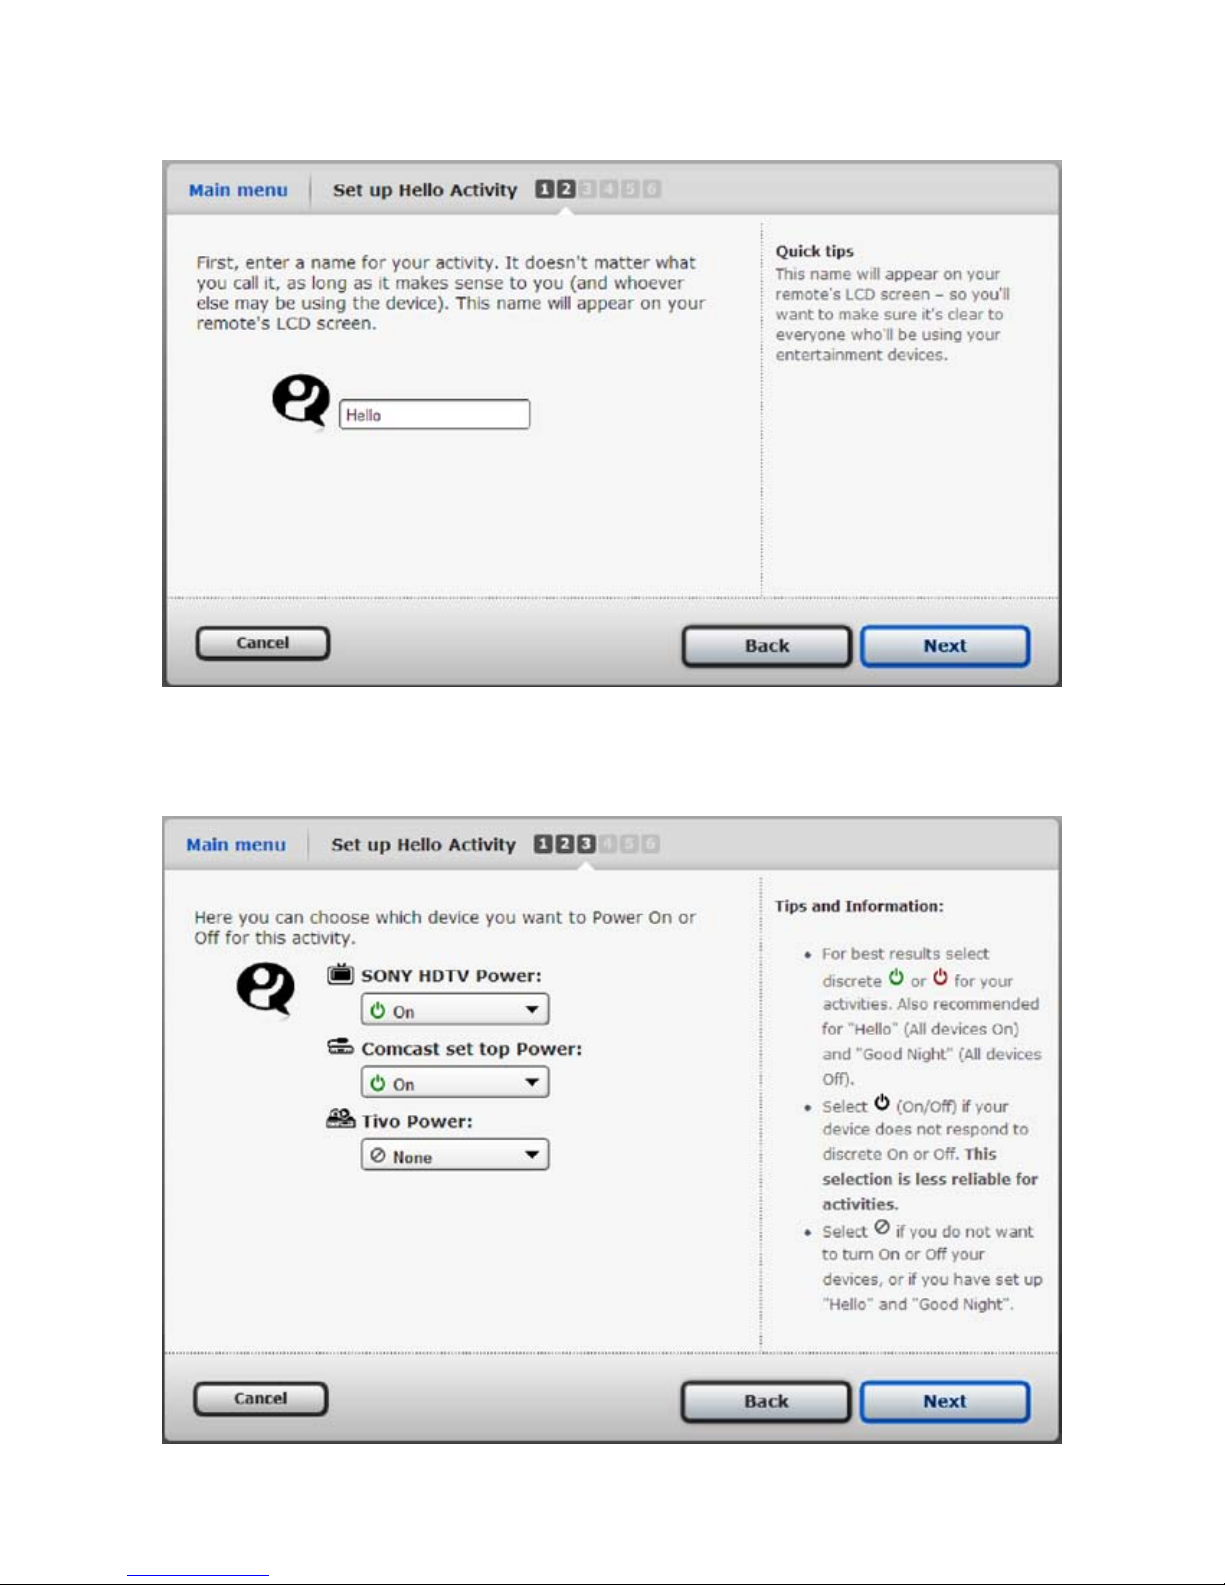
Enter a new name for this activity, or leave it as “Hello.” Click “Next” to continue.
Configuring the Hello Activity for Your Components
In this screen you can tell each device how to turn on.
16
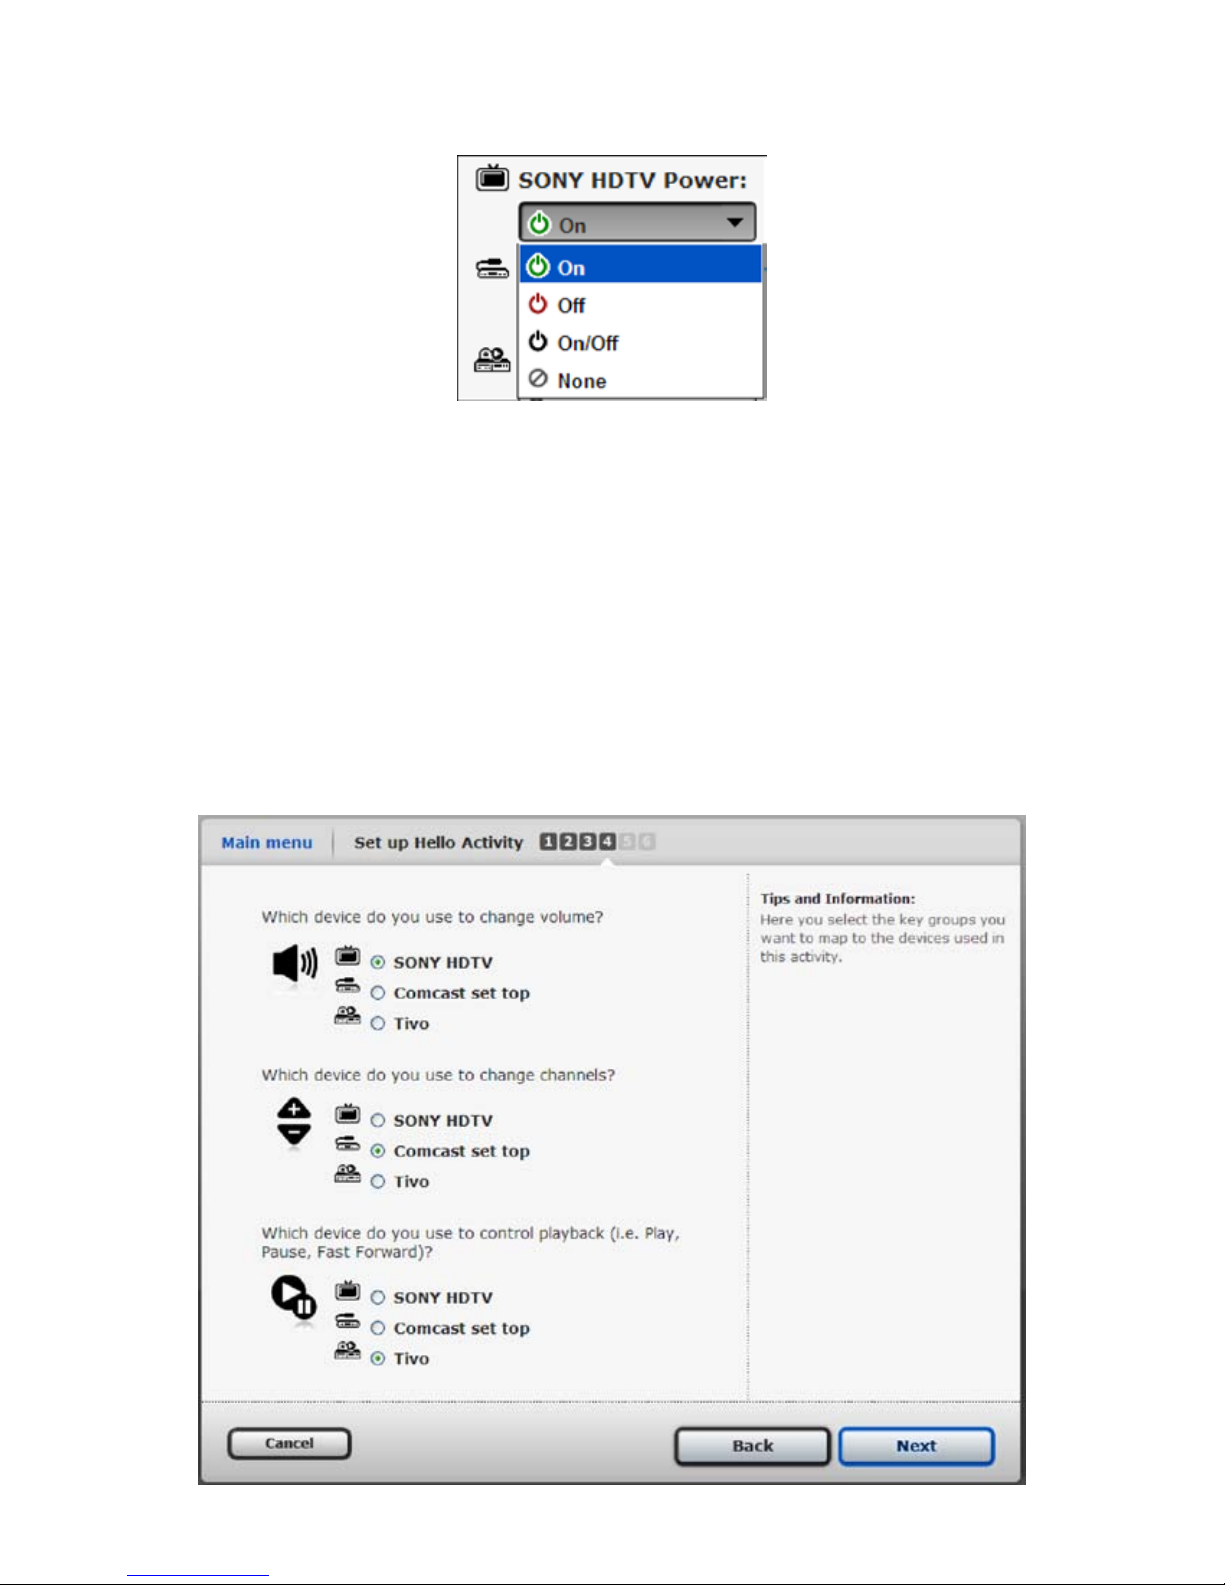
Use the drop-down menu for each device and choose from:
None Use this option to exclude a device from an activity.
On Use this option if the device’s original remote has separate “Power ON” and “OFF” buttons.
Off You won’t need this option for the Hello activity.
Toggle Use this option if the device’s original remote has a single “Power ON/OFF” button.
Once you set the Power ON command for each device, click “Next“ to continue.
Setting Volume/Channel/Playback Controls
For the Hello activity, you can assign volume control, channel-changing, and playback
to the appropriate devices.
17
After you make your settings, click “Next” to continue.
Now the Setup Wizard prepares your remote.
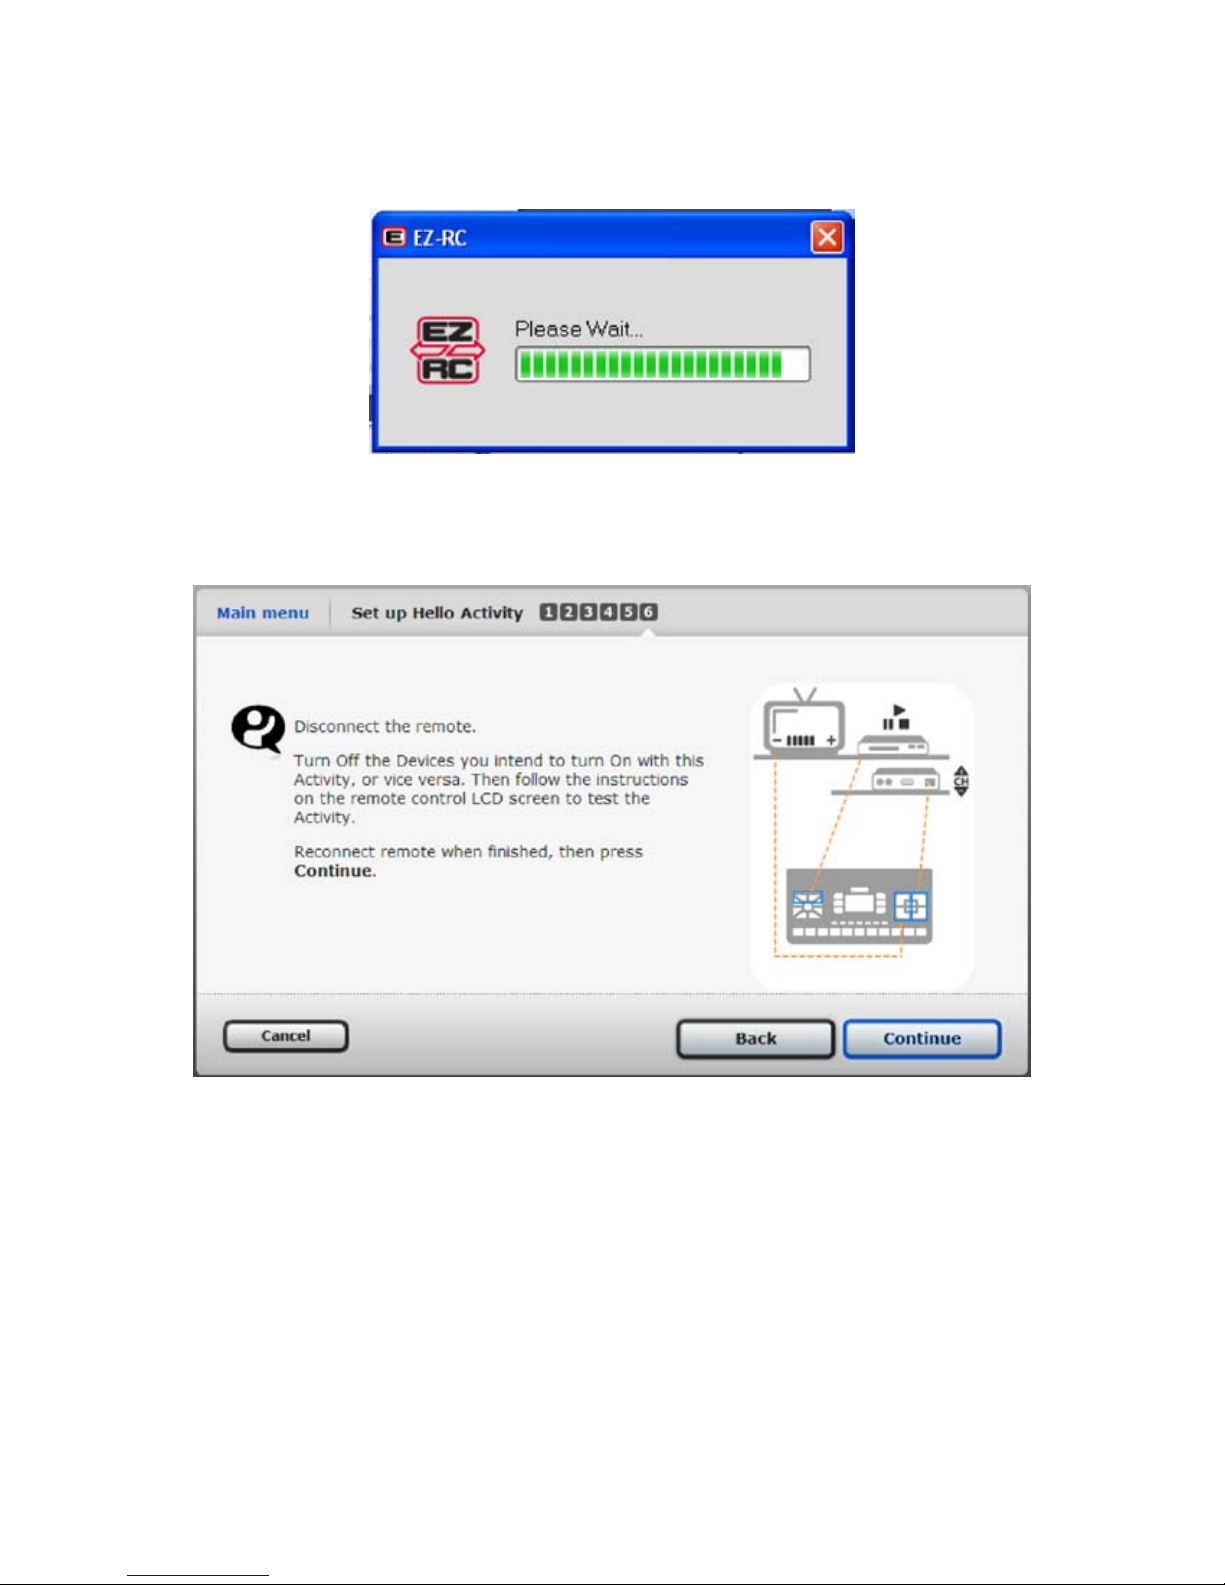
Testing the Hello Activity
When the remote is ready, you see the screen shown below.
Testing the Hello activity has three phases. In the first phase, you can test Power ON commands
for each device individually. In the second phase, you send a Power ON command to all of these
devices at once.
To get started, carefully disconnect the remote from your PC.
IMPORTANT: Turn off all devices in your Hello activity before you test the remote.
18
 Loading...