

Page 1
MUSIC WITHOUT LIMITS
USER MANUAL
The Bluetooth® word mark and logos are registered trademarks owned by Bluetooth SIG, Inc. Other trademarks and trade names are those of their respective owners.
Monster and the Monster logo are registered trademarks of Monster Inc., and it’s subsidiaries in the U.S. and other countries, used under license.
NWS, NOAA, and the NOAA Radio logo are registered trademarks of the National Weather Service in the United States and used with kind permission.
The N-Mark is a trademark or registered trademark of NFC Forum, Inc. in the United States and in other countries.
1-800-976-0677 • support@mymonsteraudio.com • MyMonsterAudio.com
MODEL: RR4
Page 2

PACKAGE CONTENTS
THANK YOU FOR
CHOOSING MONSTER
Congratulations on your Rockin’ Roller 4 indoor/
outdoor wireless speaker. Please take your time to
explore all of the features and utilities we have built
into this product.
We put all of our products through rigorous testing
and quality control. We take great pride in presenting
this product to you now. For your peace of mind,
we oer a one-year limited warranty against
manufacturing defects and workmanship. Please
refer to the warranty section of the user manual for
more details.
For more information on all of our products,
please visit: MyMonsterAudio.com.
FOLLOW US:
@MyMonsterAudio
Included with your Rockin’ Roller 4 purchase:
Rockin’ Roller 4 AC Power Cable
(Length: 8’)
AUX Cable
(Jack: 3.5mm; Length: 6’)
Microphone
(Jack: ¼”; Length: 8’)
@MyMonsterAudio
/MyMonsterAudio
User Manual &
Quick Start Guide
2-Piece Stacking Lock
Assembly
(incl. Screws x8)
Page 3

TABLE OF CONTENTS
PRODUCT CONTROLS 1
POWER & BATTERY
• Power/Charging
• AC Pass Through Outlet
• Battery Level Indicator
• USB Power Banks
AUDIO
• Bluetooth Pairing
• NFC Pairing (Android Devices)
• ¼” Guitar/Mic Inputs & Gain/Echo Controls
• AUX-IN (3.5 mm)
• True Wireless System (TWS)
• Bass/Treble Adjustment
• AM/FM Radio
• NOAA Weather Radio (NWR)
• Saving Radio Stations (AM/FM/NOAA)
• Line Out (3.5mm)
2
2
2
2
FEATURES
• Standby Mode
• Telescoping Handle
• Stacking System
• LED Lights
3
3
4
4
4
5
5
5
TROUBLESHOOTING 8
SPECIFICATIONS 9
IMPORTANT SAFETY INSTRUCTIONS 10
LIMITED WARRANTY 11
FCC WARNING STATEMENT 12
6
6
6
6
7
7
• Equalizer Presets (Bluetooth/AUX-IN ONLY)
5
Page 4
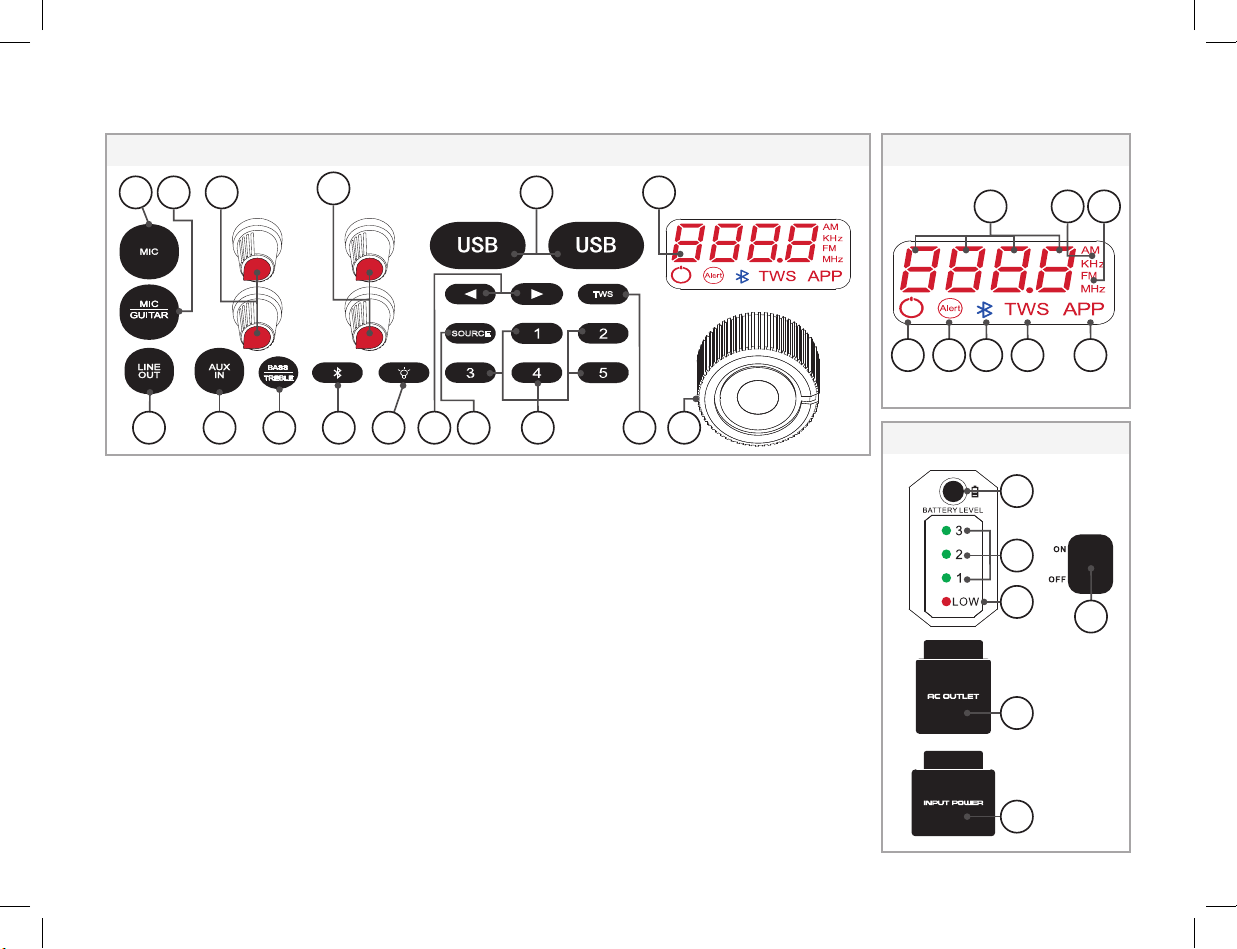
PRODUCT CONTROLS
Control Panel
1 2 3
7 8 9
Control Panel
1. MIC ¼” Input
2. MIC/GUITAR ¼” Input
3. GAIN Knob (x2)
4. ECHO Knob (x2)
5.
USB Power Bank (x2)
6. LED Display
7. LINE OUT
8. AUX IN
9. BASS/TREBLE Button
10. BLUETOOTH Button
11. LED LIGHT Button
4
11 12
10
12. ARROW Buttons
13. SOURCE Button
14. NUMBER Buttons
15. TWS Button
16. VOLUME Knob
LED Display
17. SSD Display
18. AM Indicator
19. FM Indicator
20.
STANDBY Indicator
21.
NOAA ALERT Indicator
22.
BLUETOOTH Indicator
SOURCE
13 15 1614
LED Display
TWS
6
20 21 22 23 24
17 18
19
5
Side Panel
25
TWS Indicator
23.
24. APP Indicator
Side Panel
25. BATTERY Indicator Button
26.
BATTERY Level
Indicator LEDs
27.
BATTERY LOW
Indicator LED
28.
AC OUTLET Port
(Pass Through)
29.
INPUT POWER Port
30.
POWER ON/OFF Switch
26
27
28
29
30
1
Page 5
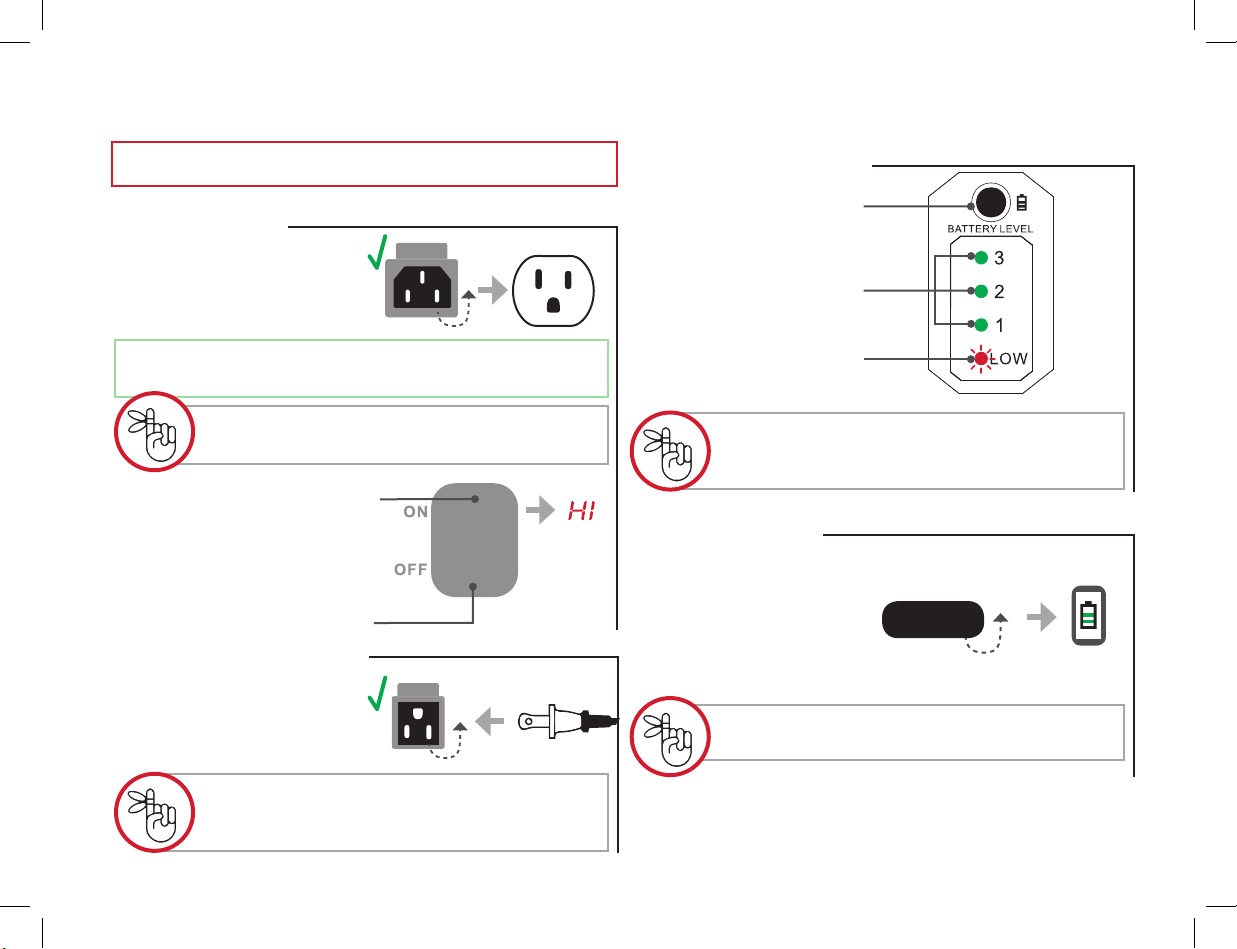
POWER & BATTERY
IMPORTANT: Before first use, charge for ~6 hours.
Power/Charging
• Connect the INPUT
POWER port to an external
power source using the
included power cord.
Full Charge – achieved in 7 hours while powered OFF
– achieved in 15 hours while powered ON.
DO NOT use the speaker’s AC Outlet port
– it will not charge or power the speaker.
• Flip the switch UP to turn ON
the speaker.
(“HI” will appear on the LED
display. The speaker will connect
to the last selected source.)
• Flip the switch DOWN to
turn OFF the speaker.
AC Pass Through Outlet
• Connect the AC OUTLET
port to an external device
to power that device
through the speaker.
Battery Level Indicator
• Press the button above the
LED indicators to check the
current battery level .
• Green LEDs indicates a full
to low battery.
• Flashing RED LED indicates
the battery is very low and
needs to be charged.
The indicator is only active while the speaker is on.
– Indicator shows current battery level each time
the speaker is turned ON.
USB Power Banks
• Connect up to two devices
to the speaker via the
5V/2.1A USB ports to charge
those devices from the
speaker’s internal battery.
(USB cable not included.)
USB ports are for charging ONLY
– they will not make audio connections.
USB
The speaker must be connected to a power
source in order to use AC pass through.
(See Power/Charging Speaker.)
2
Page 6

AUDIO
Bluetooth Pairing
1 Place your mobile device
within 3 feet of the speaker.
Make sure Bluetooth is enabled
on your mobile device.
2 Press the BLUETOOTH
button to set the speaker to
Bluetooth mode.
The speaker will automatically enter pairing mode.
The speaker will make audible
and visual LED confirmation.
Bluetooth icon will flash in
pairing mode.
If the Bluetooth icon is NOT flashing, press and hold the BLUETOOTH button
to manually enter pairing mode.
3 ft.
(Press)
“Bluetooth”
“Pairing”
3 Select “MONSTER RR4” on
your mobile device to pair
with the speaker.
The speaker will make audible
confirmation and the Bluetooth
Icon will stop flashing.
MONSTER RR4
“Connected”
NFC Pairing
(Android Devices)
1 Enable NFC on the music
device you wish to pair.
2 Press the BLUETOOTH
button to set the speaker to
Bluetooth mode.
The speaker will automatically enter pairing mode.
The speaker will make audible
and visual LED confirmation.
Bluetooth icon will flash in
pairing mode.
If the Bluetooth icon is NOT flashing, press and hold the BLUETOOTH button
to manually enter pairing mode.
(Press)
“Bluetooth”
“Pairing”
3 Place your music device
directly on the speaker’s
NFC logo until paired.
The speaker will make audible
confirmation and the Bluetooth
Icon will stop flashing
“Connected”
~30 feet max connection range after paired.
Moving devices outside this range may cause
disruption or signal loss.
~30 feet max connection range after paired.
Moving devices outside this range may cause
disruption or signal loss.
3
Page 7

¼” Guitar/Mic Inputs & Gain/Echo Controls
• Connect an instrument,
microphone, or other device
to the MIC/GUITAR or MIC
port(s) with a standard ¼
inch jack.
The device(s) will automatically transmit audio playback
through the speaker in the current mode.
• Turn GAIN and ECHO
control knobs clockwise
to increase their eect,
and counter-clockwise to
decrease their eect.
Each ¼ inch port has its own GAIN and ECHO knobs
that can be adjusted independently.
Devices plugged into the ¼ inch ports will
transmit audio playback in all modes/sources.
AUX-IN (3.5mm)
MIC
GUITAR
or
G
(-) (+)
MIC
E
• Connect a music device
to the AUX IN port with a
standard 3.5 mm jack. The
speaker will automatically
change to AUX mode.
Speaker will make audible and
visual LED display confirmation.
AUX
IN
“AUX IN”
True Wireless System (TWS)
Wirelessly connect two Rockin’ Roller 4 speakers together.
1 Place two Rockin’ Roller 4
speakers within 10 feet of
each other.
10 ft.
2 Connect your music device
to one of the speakers via
BLUETOOTH.
Leave the second speaker in
BLUETOOTH mode without
connecting to a device.
3 Press the TWS pairing
button on both speakers to
activate TWS pairing. The
speakers will automatically
connect with each other.
Speaker will make audible
confirmation. TWS icons will be
displayed on both speakers LED
displays when connected.
To disconnect a speaker,
press the TWS button.
~30 feet max connection range after paired.
Moving devices outside this range may cause
disruption or signal loss.
1
1
2
“Connected”
(Press)
“Connected”
2
(Press)
TWS
TWS
4
Page 8

Bass/Treble Adjustment
• Press the BASS/TREBLE
button ONCE to enter bass
level mode.
• Press the BASS/TREBLE
button TWICE to enter
treble level mode.
• Turn the VOLUME knob
clockwise to increase
or counter-clockwise to
decrease the bass/treble
levels (-06 to 06).
Pressing the BASS/TREBLE button a third
time will revert to the audio source mode.
The menu will revert to the audio source mode
AM/FM Radio
1 Press the SOURCE button
to change the speaker to
AM or FM RADIO.
Speaker will make audible and
visual LED display confirmations.
2 Press the ARROW buttons
to change radio frequency.
Press and hold the ARROW
buttons to scan for a station.
5
(Press x1)
(Press x2)
after ~5 seconds of being idle.
“Radio”
BASS
TREBLE
BASS
TREBLE
(-) (+)
(Press)
SOURCE
or
(Press or Hold)
or
“Radio”
NOAA Weather Radio (NWR)
Access a network of nationwide radio stations
that broadcast local weather information.
1 Press the SOURCE button
to change the speaker to
NWR mode.
Speaker will make audible and
visual LED display confirmation.
2 Press the ARROW buttons to
change stations.
Raise the antenna to a vertical position
for improved reception. Stations and signal
strength vary depending on location.
(Press)
(Press)
• Press the VOLUME knob
once to turn NWR alerts
o (NOFF). Press again to
turn NWR alerts back on
(N ON). Works in any audio
source mode.
Equalizer Presets (Bluetooth/AUX-IN ONLY)
• Press a NUMBER BUTTON
(1-5) to change the
speaker’s equalizer settings.
Setting will show on the
speaker’s LED display.
(Press)
(Press)
BUTTON SETTING LED
1 FLAT E-1
2 JAZZ E-2
3 ROCK E-3
4 POP E-4
5 CLASSIC E-5
SOURCE
“NOAA”
or
Page 9

FEATURES
Saving Radio Stations (AM/FM/NOAA)
• Save the current radio
station by pressing and
holding one of the NUMBER
BUTTONS (1-5).
The LED display will confirm the
saves station (P-1, P-2, etc.)
/ /
(Hold)
Press the NUMBER KEY
while in radio mode to
go to the corresponding
SAVED station.
LINE-OUT (3.5mm)
(Press)
• Connect a second speaker
to the Rockin’ Roller 4 via
the LINE OUT port with
a standard 3.5 mm jack.
Audio playback will transmit
through the Rockin’ Roller
4 and the second speaker
simultaneously.
LINE
OUT
(External Line-In)
Standby Mode
• Press and hold the
VOLUME knob for ~3
1
seconds to put the speaker
in standby mode.
LED indicators will shut o.
Power icon will turn on.
(Press & Hold
~3 seconds)
• Press any button or turn the
1
VOLUME knob to wake the
speaker up from standby.
The speaker will automatically enter standby
mode after ~15 minutes of inactivity or lack
of connection. Standby mode can be manually
enabled in any mode.
Telescoping Handle
(Turn)
• Pull the telescoping carry
handle UP and away from
the speaker to extend it.
• Press the BUTTON on
the grip area to adjust
the carry handle to a
comfortable length.
DO NOT use the carry handle when speakers
are stacked. The handle is graded to only carry the
weight of one Rockin’ Roller 4 speaker.
6
Page 10

Stacking System
Stack two Rockin’ Roller 4 speakers on top of each other.
1 Place the FIRST Rockin’
Roller 4 on a stable, nonslippery surface.
2 Lift the SECOND Rockin’
Roller 4 on top of the first
speaker and slide the
“hooked” feet in first.
3 Pull the latch UP
to release the locking
mechanism on the
bottom speaker.
LED Lights
• To turn on the LED lights,
press the LIGHT button. Press
up to four times to increase
the brightness level (25%,
50%, 75%, 100%). Press
again to turn o the LED lights.
• To change the LED light color,
press and hold the LIGHT
button to activate color
selection (C-1, C-2, etc.). Turn
the VOLUME knob to change
the color mode.
C-8= White C-1= Rainbow
C-2
= Red C-3= Blue
C-4
= Green C-5= Purple
C-6
= Yellow C-7 = Turquoise
25%50%75%100
(Press) (x1) (x2) (x3) (x4)
(Hold)
C-8 C-3C-1
C-4
C-5
C-2
C-6
C-7
%
5 Swing the locking arm UP
and into the top speaker’s
mounting hook.
6 Push the latch DOWN until
it locks securely into place.
Some assembly required. Make sure the upper
and lower locking brackets are installed with all 8
7
Color selection display will revert to source
display after ~2 seconds of being idle.
LED lights revert to white color and o when the
speaker is turned o or enters standby mode.
screws tightly in place.
Page 11

Speaker is not
powering on
Buttons are not
responding
No music is playing
Bluetooth/NFC audio
quality is poor
Bluetooth/NFC device
is not pairing
Contact our support
team for additional
services
TROUBLESHOOTING
• Verify that the POWER switch is fully turned to the ON position. (see pg. 2)
• Ensure the speaker is not in STANDBY MODE. (see pg. 6)
• Make sure AC POWER cord is fully inserted into the unit. (see pg. 2)
• Reset the speaker by turning the power OFF, and then back ON. (see pg. 2)
• Unplug the AC POWER cord, then plug it back in. (see pg. 2)
• Make sure the speaker is set to the same source as your audio device. If you are playing
audio via AUX cable, make sure the speaker is in AUX IN mode, etc. (see pg. 3-5)
• Make sure the VOLUME is high enough on your audio device as well as the speaker.
• Move your music device closer to the speaker.
• Remove objects that may be interfering with the wireless connection.
• Verify that the speaker and your device have BLUETOOTH mode active. (see pg. 3)
• Make sure the speaker and/or your device is not already paired with another device.
• Check that the speaker is in pairing mode. (see pg. 3)
• Turn the speaker OFF, and then back ON. Press and hold the BLUETOOTH button to
manually enter pairing mode. (see pg. 3)
Call: 1-800-976-0677
Email: support@mymonsteraudio.com
Hours of Operation:
Monday - Friday: 7:00 am - 5:00 pm (PST) Saturday - Sunday: CLOSED
8
Page 12

SPECIFICATIONS
General
Bluetooth Version
Power Input
Speaker Drivers
THD + Noise
Cabinet Material
Battery Capacity
USB Bank Output
Dimensions (W x H x D)
Weight
Operating Temperature Range
Operating Humidity Range
Storage Temperature Range
4.0
AC ~120V/60Hz – 220V/50Hz
30W (x 1) / 15W (x 1)
<10%
Plastic
12V 9000mAh (18~22 hours at max volume and light settings)
5V/2.1A
18” x 16” x 9”
25.5 lbs
Operating Temperature
32F° - 104F°
40~90% RH
-13F° to 158F°
9
Page 13

IMPORTANT SAFETY INSTRUCTIONS
• Read all instructions and save them for personal
reference in the future.
• Follow all directions for operating the product.
• Heed all warnings on the product and in the
operation instructions.
• Clean with a dry cloth only. Always unplug the
product from any power source before cleaning.
• Do not use third-party attachments or non-
recommended accessories with this product.
• Do not place product on an unstable surface,
such as a cart, stand, tripod, table, etc. Unstable surfaces may
cause the product to fall and cause serious injury to people
and serious damage to the product. Follow all manufacturer
instructions for mounting and accessories.
• Do not block or cover ventilation slots.
Openings in the product cabin ensure reliable operation and
prevent overheating. Avoid placing on beds, sofas, and rugs,
or mounting on racks or bookcases, unless proper ventilation
is provided.
• Do not use plug incorrectly. The product may come
with a polarized, alternating-current line plug(one blade is
wider/larger than the other). This is a safety feature: the plug
will only go into outlet receptacles one way. Do not force
the plug. If the plug does not fit, contact your electrician to
replace the outlet.
• Prevent power cord hazards. Route cords to avoid
walking on them or pinching them, especially at plug ends
and connection points to the product & power outlets.
• Unplug power cord when not in use. The product
should not be plugged into a power source when not in use
for long periods of time.
• Do not use this product near bodies of water.
The product is not waterproof and cannot be fully submerged
in water. Power cords and electric currents should never be
exposed to water.
• Do not set up near heat sources. Avoid radiators,
stoves, heat registers, amplifiers, and other devices that produce
heat. Avoid long exposure to sunlight and high temperatures.
• Refer all service to qualified personnel. If the
product becomes damaged during use or encounters a
malfunction, contact qualified service personnel. Do not
attempt to service yourself.
• To use wirelessly, disconnect AC power. The plug
must be completely disconnected from the power outlet.
• Do not stand, sit, jump or strike the Rockin’ Roller 4
Speaker with sharp objects. The product may break and not
function.
10
Page 14

LIMITED WARRANTY
Model: RR4
This Monster-branded product, marketed as new, in the original carton to the original
purchaser (“Product”), is warranted by Russell Distribution Company, LLC against
manufacturing defects in materials and workmanship for a limited warranty period
of ninety (90) days for Labor and one (1) year for Parts. This Limited Warranty is
conditioned upon proper use of Product by you, the Purchaser.
This Limited Warranty does not apply to store display products and product sold as
a ‘marked down” special, in as is condition, ‘close outs”, “liquidation and clearance
sales”, “open box”, products missing accessories, or no fault found.
Proof of purchase in the form of a Bill of Sale, Receipt or Receipted Invoice is
evidence the Product is within the limited warranty period. The Bill of Sale, Receipt
or Receipted Invoice must be presented as a pre-condition to obtaining the limited
warranty service.
This limited warranty begins on the original date of purchase and is valid only on
Products purchased through authorized dealers and used In the United States, and
Puerto Rico, by the original Purchaser. To receive warranty service, the Purchaser
must first contact us for problem determination and service procedures. The original
dated bill of sale, receipt or receipted invoice must be presented upon request as
proof of purchase.
We will repair your product or if repairs cannot be made, we will replace it at no
charge with the same or similar product. If the Product is defective as specified
in this limited warranty during the limited warranty period, we may use new or
remanufactured parts to repair the Product. All replaced parts and products become
our property and must be returned to us. Replacement parts and products assume
the remaining original limited warranty, or ninety (90) days, whichever is longer.
Product freight must be prepaid by you, the original Purchaser and shipped in either
its original packaging or packaging aording an equal degree of protection. We will
not be responsible for or obligated to replace damaged Products.
If the Product is received damaged, it is your responsibility as the consumer to file a
claim against the carrier. We will only store the damaged Product for 30 days and
reserve the right, in our sole discretion, to dispose of the damaged Product or ship it
back to you at your expense after 30 days.
This limited warranty covers manufacturing defects in materials and workmanship
encountered in normal, and except to the extent otherwise expressly provided for
in this statement noncommercial use of this Product, and shall not apply to the
following, including, but not limited to: Damage which occurs in shipment; delivery
and installation; applications and uses for which this Product was not intended;
altered Product or serial numbers; cosmetic damage or exterior finish: accidents,
abuse, neglect, fire, water, lightning or other acts of nature; use of products,
equipment, systems, utilities, services, hardware, supplies, accessories, applications,
installations, repairs, external wiring or connectors not supplied or authorized by us
or the manufacturer, which damage this Product result in service problems: incorrect
electrical line voltage, fluctuations and surges: customer adjustments and failure to
follow operating instructions, cleaning, maintenance and environmental instructions
that are covered and prescribed in the instruction book; reception problems and
distortion related to noise, echo, interference or other signal transmission and
delivery problems; burned-in images. Uninterrupted or error-free operation of the
Product is not warranted.
THERE ARE NO EXPRESS OR IMPLIED WARRANTIES OTHER THAN THOSE
LISTED AND DESCRIBED ABOVE, AND NO WARRANTIES WHETHER EXPRESS
OR IMPLIED, INCLUDING, BUT NOT LIMITED TO, ANY IMPLIED WARRANTIES
OF MERCHANTABILITY OR FITNESS FOR A PARTICULAR PURPOSE, SHALL
APPLY AFTER THE EXPRESS WARRANTY PERIODS STATED ABOVE, AND NO
OTHER EXPRESS WARRANTY OR GUARANTY GIVEN BY ANY PERSON, FIRM OR
CORPORATION WITH RESPECT TO THIS PRODUCT SHALL BE BINDING ON US.
REPAIR OR REPLACEMENT AS PROVIDED UNDER THIS LIMITED WARRANTY
IS YOUR EXCLUSIVE REMEDY AS THE CONSUMER. WE SHALL NOT BE LIABLE
FOR ANY INCIDENTAL, OR CONSEQUENTIAL DAMAGES FOR BREACH OF
ANY EXPRESS OR IMPLIED WARRANTY ON THIS PRODUCT; EXCEPT TO
THE EXTENT PROHIBITED BY APPLICABLE LAW, ANY IMPLIED WARRANTY
OF MERCHANTABILITY OR FITNESS FORA PARTICULAR PURPOSE ON THIS
PRODUCT IS LIMITED FOR THE DURATION OF THIS LIMITED WARRANTY THIS
LIMITED WARRANTY SHALL NOT EXTEND TO ANYONE OTHER THAN THE
ORIGINAL PURCHASER OF THIS PRODUCT, IS NONTRANSFERABLE AND STATES
YOUR EXCLUSIVE REMEDY.
Some states do not allow limitations on how long an implied warranty lasts, or
the exclusion or limitation of incidental or consequential damages, so the above
limitations or exclusions may not apply to you. This limited warranty gives you
specific legal rights, and you may also have other rights, which vary from state to
state. Any provision contained herein which is found contrary to state or local laws
shall be deemed null and void and the remaining provisions shall continue in full
force and eect.
11
To obtain warranty service, please contact technical support with questions
Phone: 1-800-976-0677 • Email: support@mymonsteraudio.com
DO NOT return this product to the store. Visit: MyMonsterAudio.com
Page 15

FCC WARNING STATEMENT
Changes or modifications not expressly approved by the party responsible for compliance could void the user’s authority
to operate the equipment. This equipment has been tested and found to comply with the limits for a Class B digital device,
pursuant to Part 15 of the FCC Rules.
These limits are designed to provide reasonable protection against harmful interference in a residential installation. This
equipment generates, uses, and can radiate radio communications. However, there is no guarantee that interference will not
occur in a particular installation. If this equipment does cause harmful interference to radio or television reception, which can be
determined by turning the equipment o and on, the user is encouraged to try to correct the interference by one or more of the
following measures:
• Reorient or relocate the receiving antenna.
• Increase the separation between the equipment receiver.
• Connect the equipment into an outlet on a circuit dierent
from that to which the receiver is connected.
• Consult the dealer or an experienced radio/TV technician for help.
FCC Radiation Exposure Statement
This equipment complies with FCC radiation exposure limits set forth for an uncontrolled environment. In order to avoid the
possibility of exceeding the FCC radio frequency exposure limits, Human proximity to the antenna shall not be less than 20cm (8
inches) during normal operation.
A lightning flash and arrowhead within
an equilateral triangle denotes the
presence of insulated “dangerous
voltage” within the product’s
enclosure. The voltage may be of
sucient magnitude to constitute a
risk of electric shock to persons who
come into contact with it.
An exclamation point within an
equilateral triangle denotes the
presence of important operation &
maintenance/service instructions.
Prevent fire and shock hazards. Do not use extension cords
or outlets that expose plug blades. Do not expose cables and
plugs to rain or moisture.
Do not attempt to perform any servicing that is not included
in the operating instructions. Do not attempt to replace the
battery, as incorrect installation can cause fire or explosion. For
service, contact qualified service personnel.
Do not remove cover or back of product. There are no userserviceable parts inside. Attempting to modify controls or
performance beyond manufacturer specifications may result in
hazardous exposure to radiation.
WARNING
12
 Loading...