

Quick Start Guide
VULKANO FLOW LC
Windows 7 and Vista
Vulkano Setup for Windows 7 and Vista
Congratulations on buying Vulkano. W e will take you through a few simple
steps to get you up and running.
These steps are for setting up your Vulkano from a Windows 7 PC or
Windows Vista PC. If you are using a Windows XP PC or a M ac, please
follow the steps on the other side of this Quick Start Guide.
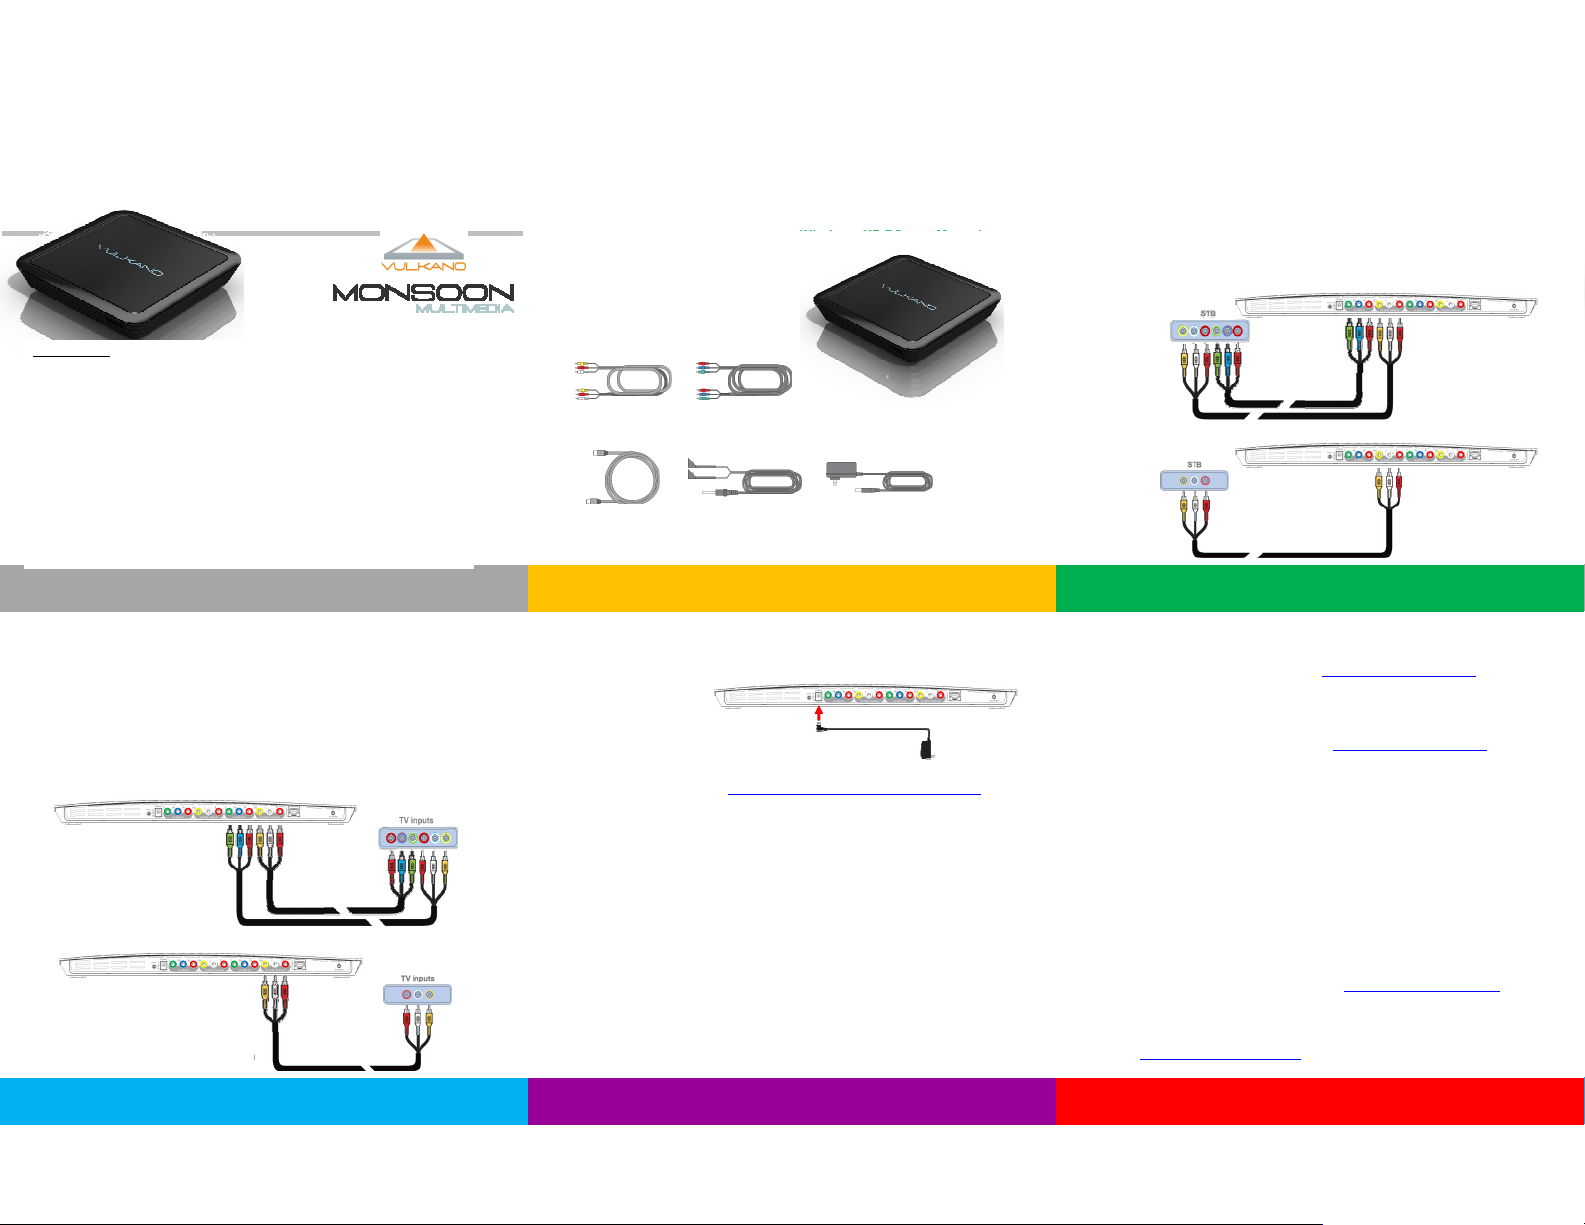
1. Connect Vulkano to Your Set-Top Box (STB)
Your STB has outpu t connectors on the back for Component, Composite, or both. If you
have both, use Component for b etter video quality. (You will need a Set-Top Box to use
Vulkano)
Connect audio and video cables f rom the STB “Output” connectors to Vulkano’s video
and audio “Input” connectors as shown. For Component, you will use two cables. For
Composite, you will only use on e
Write down your STB brand and model number. You will need it later in the Setup
Component
Compliance note:
•Changes or modifications not expressly approved by the p arty responsible for compliance could void the
user’s authority to operate the equipment.
•This equipment has been te sted and found to comply with the limits for a C lass B digital device, pursuant
to part 15 of the FCC Rules. T hese limits are designed to provide reasonable protection against harmful
interference in a residential installation. T his equipment generates, uses and can radiate radio frequency
energy and, if not installed and used in accordance with the instructions, may cause harmful interference to
radio communications. However, there i s no guarantee that interference will not o ccur in a particular
installation. If this equipment does cause harmful interference to radio or television reception, which can be
determined by turning the equipment off and on, the user is encouraged to try to correct the interference by
one or more of the following measures:
—Reorient or relocate the receiving antenna.
—Increase the separation between thee quipment andrec eiver.
—Connect the equipment into an outleton a ci rcuitdi fferentfrom that to whi chthe recei veris connec ted.
—Consult the dealer or an experienced radio/ TVtech nician forhel p.
•The antennas used for this transmitter must be installed to provide a separation distance of at least 2 0cm
from all persons and must not be located oro perating inco njunctionw ithany other antenna or transmitter.
•Operation is subject to the following two conditions: (1) this device may not cause interference, and (2)th is
device must accept any in terference, including interference that may c ause undesired operation of the
device
2. Connect Vulkano to Your TV
Your TV has audio and video “Inpu t” connectors on the back or side for Component,
Composite, or both. Make sure you use the same cable types, either Component or
Composite for this connection as used in Step 1
Connect audio and video cables f rom the Vulkano “Out put” connectors to your TV’s video
and audio “Input” connectors as shown. For Component, you will use two cables. For
Composite, you will only use on e
Component
Composite
What’s in the Box
2 Composite cables
Ethernet cable
2 Component cables
Vulkano unit
Power adapter IR blaster cable
3. Power
Plug the power adapter into Vulkano and a wall plug or power strip as shown
4. Vulkano Player
Download Vulkano Player from http://www.monsoonmultimedia.com/players.html . Click
on the “Download now” button for the PC Player
Save Vulkano Player to your computer
After download is complete, run Vulkano Player . (It takes a few minutes to download,
and then a few more minutes to install)
When asked, select “Run Vulkano Setup Wizard”
Vulkano Setup Wizard will start and lead you through the remaining steps
If you have wireless setup problems
If you see the “Network Connection Lost” screen more than once, connect the Ethernet
cable as described in the Mac/XP Setup process on the back of this Quick Start Guide
Composite
Players
PC
• Download Vulkano P C Player to your PC from www.myvulkano.com/players.html
• Install and run Vulkano Player
• Select Run Vulkano P layer if you already set up Vulkano using your TV
• Enter the name and password of Vulkano
• Select Watch TV to get started
Mac
• Download Vulkano M ac Player to your Mac from www.myvulkano.com/players.html
• Install and run Vulkano Player
• Go to Player > Add/Select Player > Add to enter the name and password of Vulkano
• Go back to the Home screen and push Watch TV to get started
iPhone/iPad
• Download Vulkano P layer to your iPhone or iPad from the App Store
• Go to Settings>Select to enter the name and password of Vulkano
• Go back to the Home screen and push Live TV to get started
Android
• Download Vulkano P layer to your phone from Android Market
• Install and run Vulkano Player
• Go to Settings > Selected Vulkano > Add Vulkano
• Enter the name and password of Vulkano
• Go back to the Home screen and push Live TV to get started
Troubleshooting
If your STB is too far from Vulkano, or hidden fro m it, you can use the included IR Blasters. Plug the
pin in the back of Vulkano and place the IR ‘paddles’ in front of the remote window on your STB.
Additional information and technical support available at www.myvulkano.com/support.html
Support
9:00 AM to 9:00 PM PST (Monday – Friday)
phone: +1 (866) 937-4282
e-mail: support@monsoonmultimedia.com
Congratulations, setup is complete
Quick Start Guide
Vulkano3 Flow Vulkano3 Stream
Windows XP and Mac
Vulkano Setup for Windows XP and Mac
Congratulations on buying Vulkano. W e will take you through a few simple
steps to get you up and running.
These steps are for setting up your Vulkano from a Windows XP PC or
Mac. If you are using a Windows 7 PC or a Windows Vista PC, please
follow the steps on the other side of this Quick Start Guide.
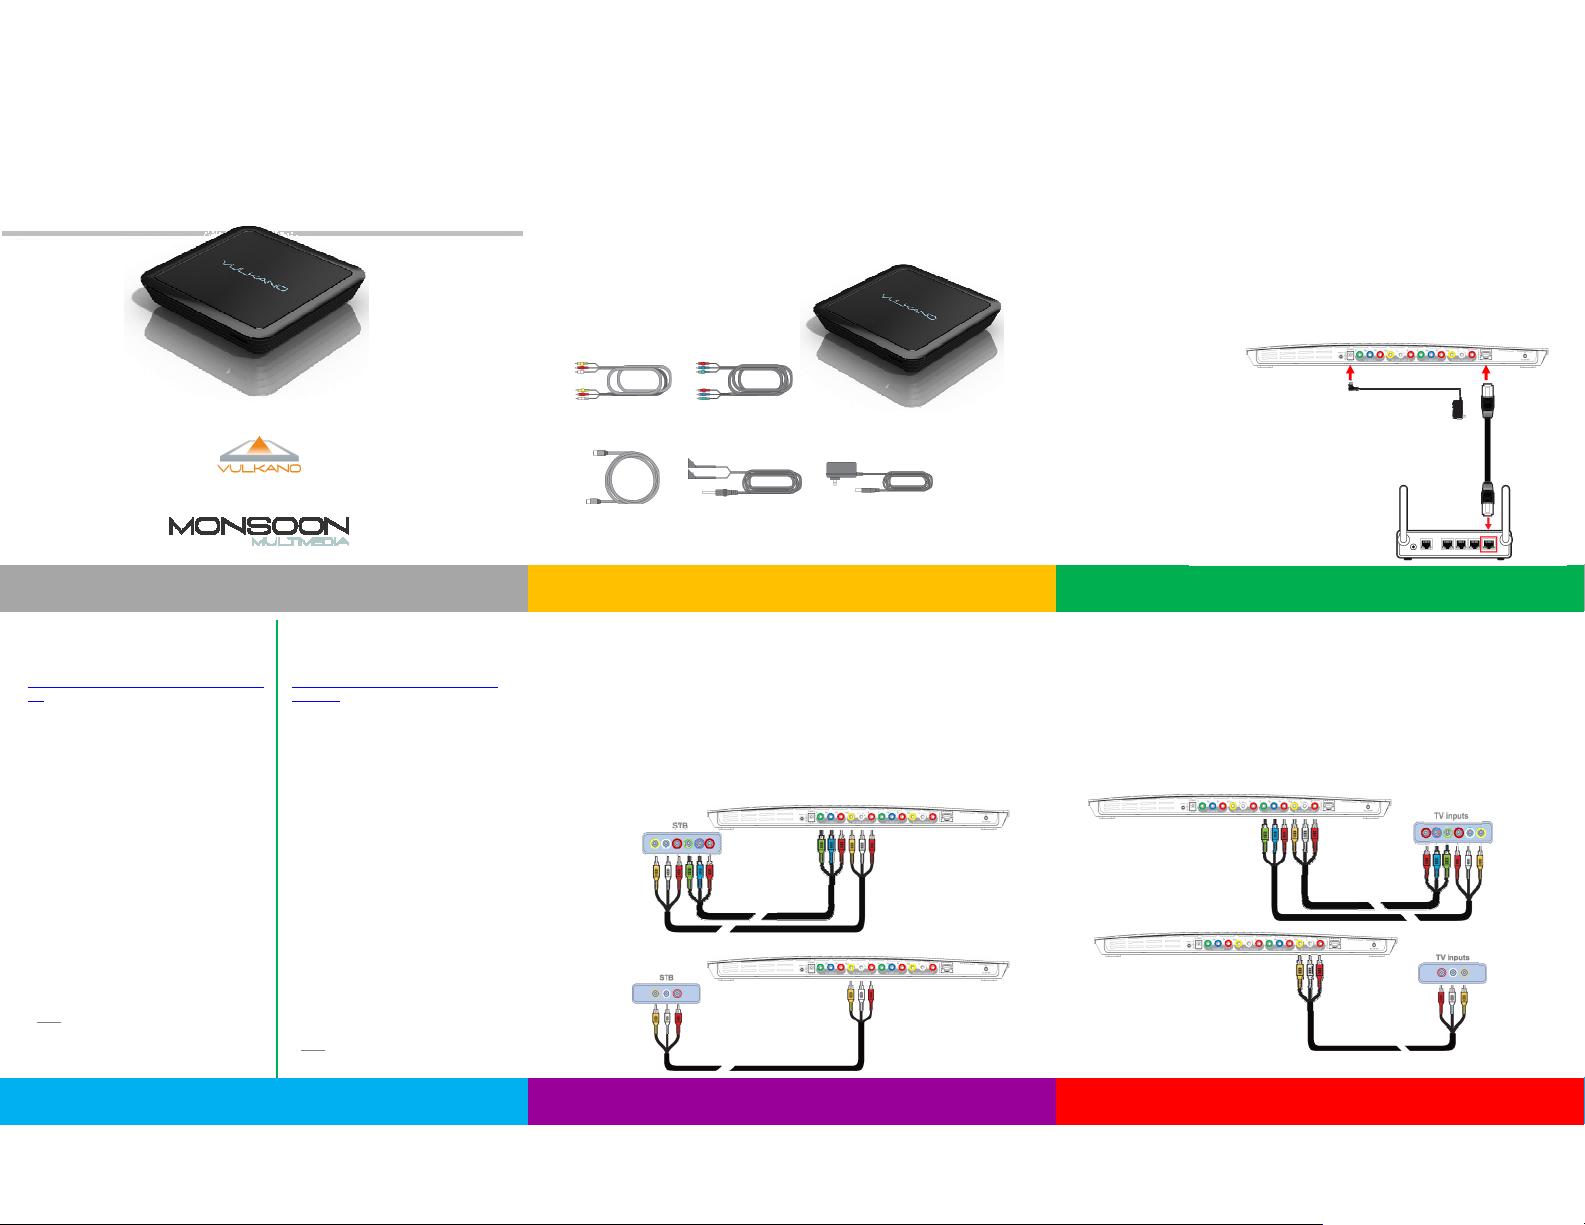
What’s in the Box
2 Composite cables
Ethernet cable
2 Component cables
Vulkano unit
Power adapter IR blaster cable
1. Network and Power
During this first portion of the setu p, we will use an Ethernet cable to connect to your
Vulkano to your home WiFi n etwork. Once it is on the network we will disconnect th e cable
and Vulkano can be used wirelessly
Use the included Ethernet cabl e to connect from Vulkano to an op en Ethernet connection;
either to your router, your PC or an open Ethernet connection on your network
If you have an Ethernet connection cl ose to your STB, use th is connection. Otherwise,
move your Vulkano for this part of the setup. We will move it close to your STB in a few
minutes
If you do not have an open port, you should purchase a 4-port Ethernet switch or hub
Plug the power adapter into Vulkano and a wall plug or power strip
PC or
Router
Ethernet cable
2. PC Player
Download Vulkano Player from
http:// www.monsoonmultimedia.com/players.h
tml and save it to your computer
After download is complete, run Vulkano
Player. (It takes a few minu tes to download,
and then a few more minutes to install)
When asked, select “Run Vulkano Setup
Wizard”
Vulkano Setup Wizard will start and lead
you through the setup
When the Setup Wizard tell s you to “***”,
move Vulkano close to your STB, if it is not
already there. It is OK to un plug the power
and Ethernet connections from Vulkano
If you moved Vulkano, reconnect t he power
in the new location
Complete the cable connections d escribed
in Steps 3 and 4
After th e cables are connected, hit “Next”
on the Vulkano Setup Wizard and complete
the remaining steps
Mac Player
Download Vulkano Player from
http:// www.monsoonmultimedia.com/pla
yers.html
After download is complete, install
Vulkano Player. (It takes a few minutes
to download, and then a few more
minutes to install)
When Vulkano Player starts, select
Player > Run Vulkano Setup
Vulkano Setup Wizard will start and
lead you through the setup
When the Setup Wizard tell s you to
“***”, move Vulkano close to your STB,
if it is not already there. It is OK to
unplu g the power and Ethern et
connections from Vulkano
If you moved Vulkano, reconnect t he
power in the new location
Complete the cable connections
described in Steps 3 and 4
After th e cables are connected, hit
“Next” on the Vulkano Setup Wizard
and complete the remaining steps
3. Connect Vulkano to Your Set-Top Box (STB)
Your STB has outpu t connectors on the back for Component, Composite, or both. If you
have both, use Component for b etter video quality. (You will need a Set Top Box to u se
Vulkano)
Connect audio and video cables f rom the STB “Output” connectors to Vulkano’s video
and audio “Input” connectors as shown. For Component, you will use two cables. For
Composite, you will only use on e
Write down your STB brand and model number. You will need it later in the Setup
Component
Composite
4. Connect Vulkano to Your TV
Your TV has audio and video “Inpu t” connectors on the back or side for Component,
Composite, or both. Make sure you use the same cable types, either Component or
Composite for this connection as used in Step 1
Connect audio and video cables f rom the Vulkano “Out put” connectors to your TV’s video
and audio “Input” connectors as shown. For Component, you will use two cables. For
Composite, you will only use on e
Component
Composite
5. Finish Setup Wizard
Hit “Next” on the Vulkano Setup W izard and complete the remaining steps
Congratulations, setup is complete
 Loading...