

Page 1

5-piece Electronic Drum Kit
P/N 625921
User's Manual
Page 2

2
CONTENTS
SAFETY WARNINGS AND GUIDELINES .................................................................................................................................................... 3
FEATURES .................................................................................................................................................................................................................... 4
PACKAGE CONTENTS ...................................................................................................................................................................................... 4
CUSTOMER SERVICE ......................................................................................................................................................................................... 6
PRODUCT OVERVIEW ...................................................................................................................................................................................... 6
Host Machine .................................................................................................................................................................................................... 6
Assembled Kit.................................................................................................................................................................................................... 7
ASSEMBLY .................................................................................................................................................................................................................. 8
SETUP ............................................................................................................................................................................................................................ 16
BASIC OPERATION ............................................................................................................................................................................................ 16
ADVANCED OPERATION.............................................................................................................................................................................. 17
Pedal Adjust ...................................................................................................................................................................................................... 17
Software Update .......................................................................................................................................................................................... 17
Factory Reset .................................................................................................................................................................................................. 18
System Version ............................................................................................................................................................................................. 18
BASIC PLAY ............................................................................................................................................................................................................. 18
Hi-Hat and Hi-Hat Pedal ....................................................................................................................................................................... 18
Bass Drum Pedal........................................................................................................................................................................................... 18
Ride Cymbal...................................................................................................................................................................................................... 19
Snare Drum........................................................................................................................................................................................................ 19
MIDI FORMAT LIST .......................................................................................................................................................................................... 20
TECHNICAL SUPPORT ................................................................................................................................................................................... 22
SPECIFICATIONS ................................................................................................................................................................................................ 22
REGULATORY COMPLIANCE .................................................................................................................................................................. 22
Page 3

3
Notice for FCC ............................................................................................................................................................................................... 22
Notice for Industry Canada ...............................................................................................................................................................23
SAFETY WARNINGS AND GUIDELINES
Please read this entire manual before using this device, paying extra attention to these
safety warnings and guidelines. Please keep this manual in a safe place for future reference.
• This device is intended for indoor use only.
• Do not expose this device to water or moisture of any kind. Do not place drinks or
other containers with moisture on or near the device. If moisture does get in or on
the device, immediately remove it from its power source and allow it to fully dry
before reapplying power.
• Do not touch the device, the power cord, or any other connected cables with wet
hands.
• Unplug this device from the power source when not in use.
• Take care to prevent damage to the power cord. Do not allow it to become
crimped, pinched, walked on, or become tangled with other cords. Ensure that the
power cord does not present a tripping hazard.
• Never unplug the unit by pulling on the power cord. Always grasp the connector
head or adapter body.
• Clean using a soft, dry cloth only. Do not use chemical cleaners, solvents, or
detergents. For stubborn deposits, moisten the cloth with warm water.
• This device has no user serviceable parts. Do not attempt to open, service, or
modify this device.
Page 4

4
FEATURES
• Includes 12 preset drum sound kits
• Built-in metronome
• Headphone jack for low-volume play
• USB MIDI port for connecting a synthesizer or PC
• 10" plastic and silicone crash cymbal, ride cymbal, and hi-hat
• Three 6" toms and one 8" snare drum
• Toms and snare feature mesh heads for better feel and quieter play
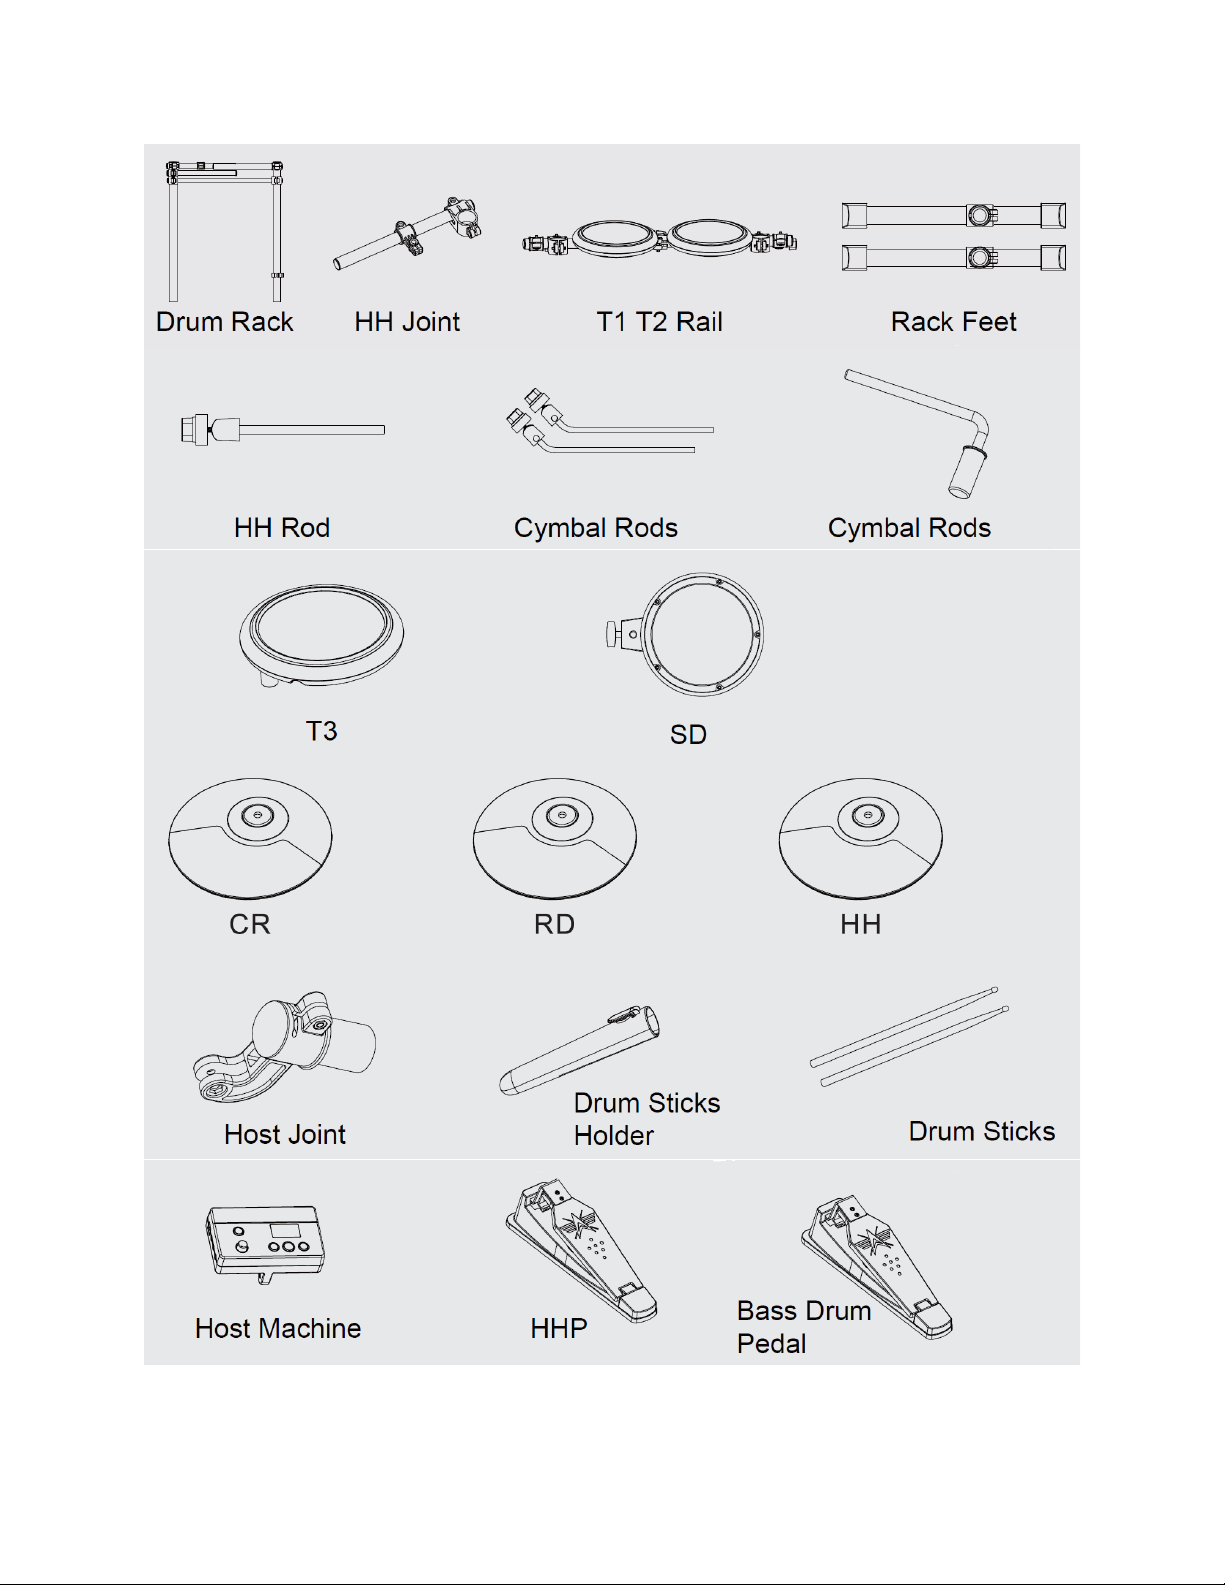
PACKAGE CONTENTS
Please take an inventory of the package contents to ensure you have all the items listed
below. If anything is missing or damaged, please contact Monoprice Customer Service for a
replacement.
1x Drum Rack
1x Hi-Hat (HH) Joint
1x Tom 1 and Tom 2 (T1 T2) Rail
2x Rack Feet
1x Hi-Hat (HH) Rod
2x Cymbal Rods
1x Tom 3 (T3) Pad
1x Snare Drum (SD) Pad
1x Crash (CR) Cymbal
1x Ride (RD) Cymbal
1x Hi-Hat (HH) Cymbal
1x Host Joint
1x Drum Sticks Holder
1x Pair Drum Sticks
1x Host Machine
1x High Hat Pedal (HHP)
1x Bass Drum (BD) Pedal
1x Cable Assembly
1x M6 Tool
1x User's Manual
Page 5
5
Page 6
6
CUSTOMER SERVICE
The Monoprice Customer Service department is dedicated to ensuring that your ordering,
purchasing, and delivery experience is second to none. If you have any problem with your
order, please give us an opportunity to make it right. You can contact a Monoprice
Customer Service representative through the Live Chat link on our website
www.monoprice.com or via email at support@monoprice.com. Check the website for
support times and links.
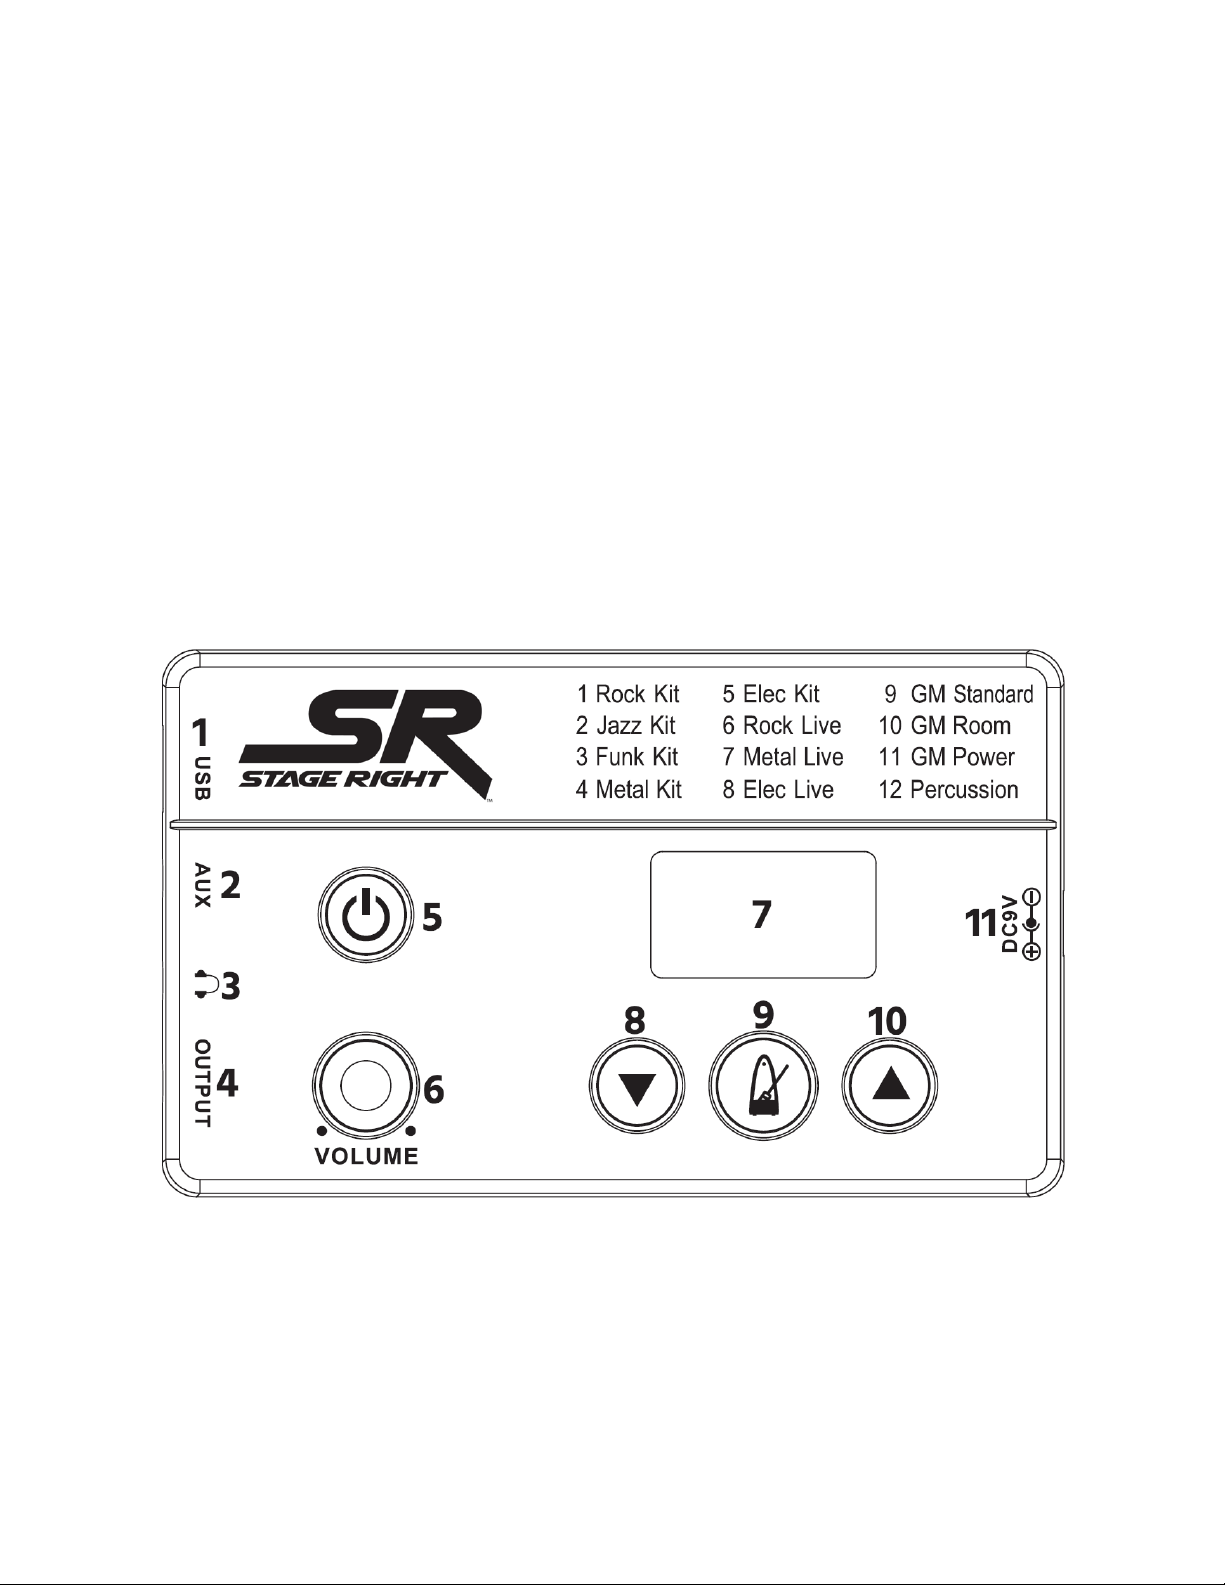
PRODUCT OVERVIEW
Host Machine
1. USB: USB MIDI port for connecting an external synthesizer or PC.
2. AUX: 3.5mm analog audio input.
3. HEADPHONES: 3.5mm stereo headphones output.
4. OUTPUT: 3.5mm analog audio output for connecting a drum amplifier.
Page 7
7
5. POWER: Momentarily press the button to turn the Host Machine on. Press and hold
the button for several seconds to turn the unit off.
6. VOLUME: Controls the output volume level.
7. DISPLAY: Displays the system status and menu selections.
8. DOWN: When the metronome is off, press the button to cycle down through the
drum sound list. When the metronome is on, press the button to decrease the
tempo and beat.
9. METRONOME: Press the button to turn the built-in metronome on or off.
10. UP: When the metronome is off, press the button to cycle up through the drum
sound list. When the metronome is on, press the button to increase the tempo and
beat.
11. DC9V: DC barrel connector for connecting the included AC power adapter.
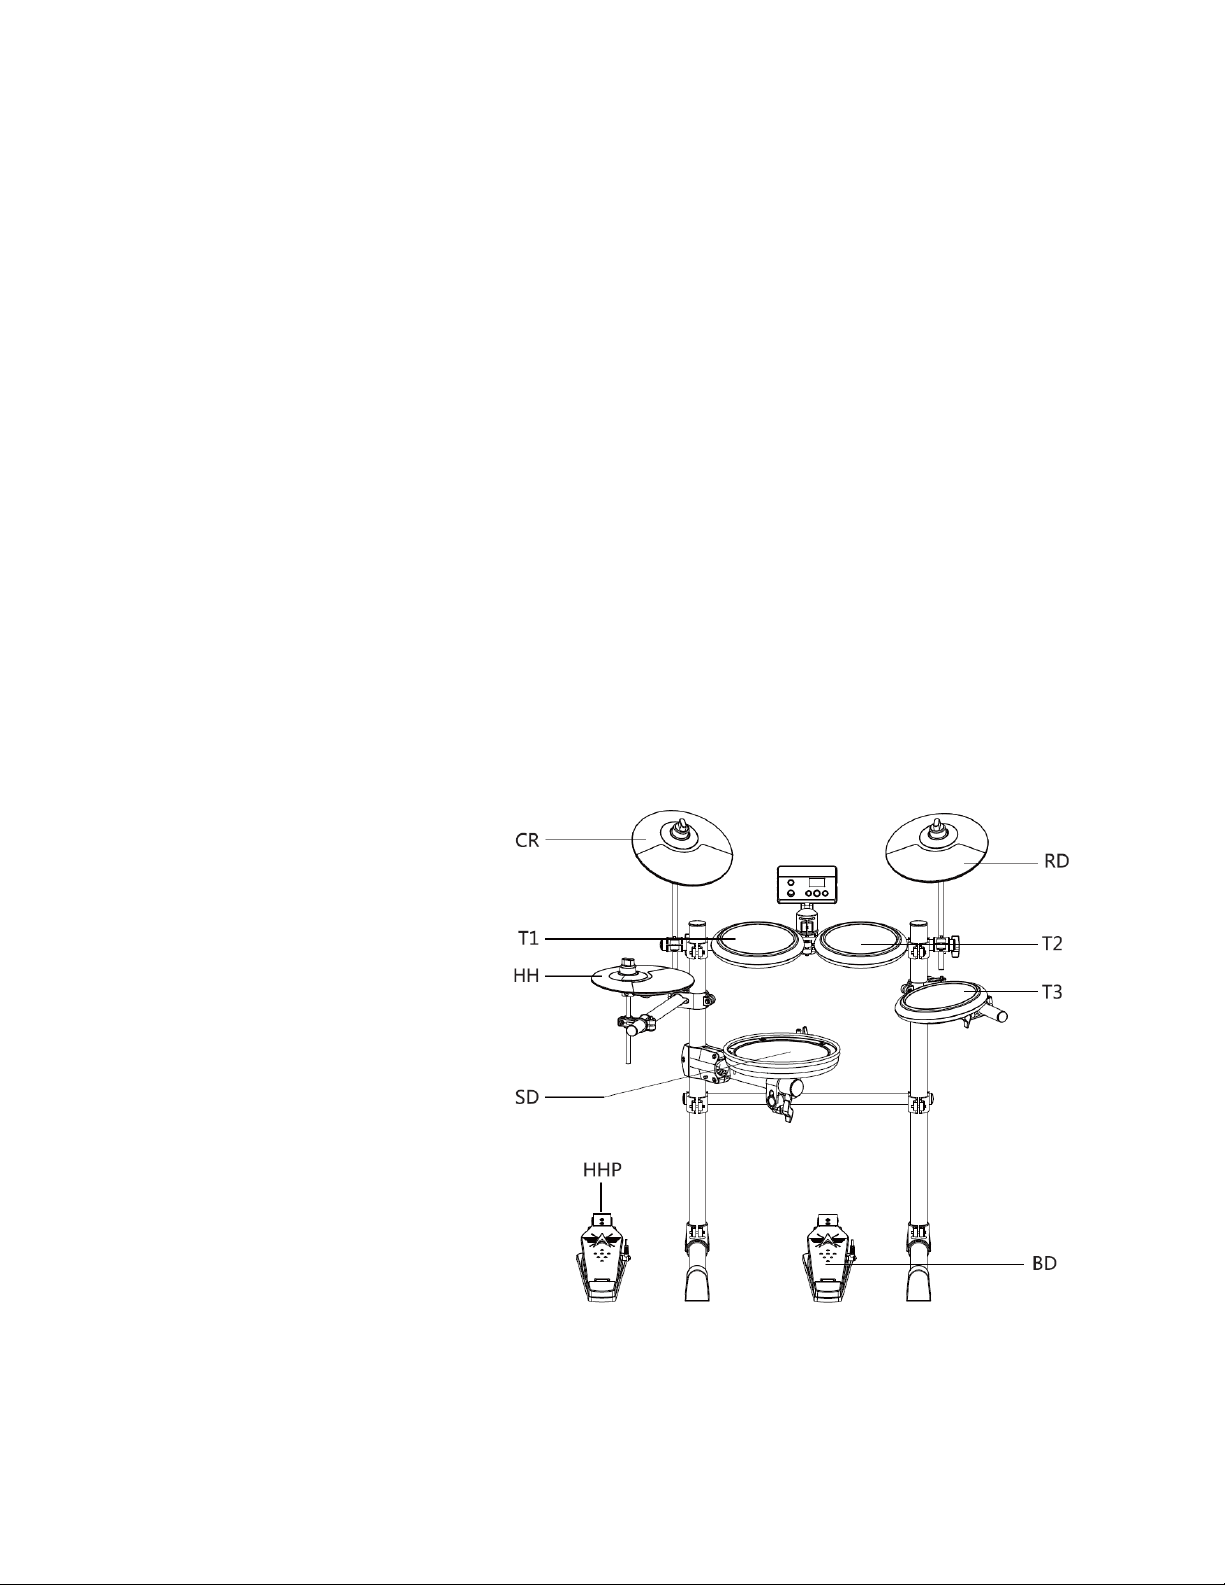
Assembled Kit
1. CR: Crash Cymbal
2. T1: Tom 1
3. HH: Hi-Hat Cymbal
4. SD: Snare Drum
5. HHP: Hi-Hat Pedal
6. RD: Ride Cymbal
7. T2: Tom 2
8. T3: Tom 3
9. BD: Bass Drum Pedal
Page 8

8
ASSEMBLY
1. Place the two Rack Feet on one end of the Drum Rack assembly, then use the
included M6 tool to tighten the clamps to secure them in place. Stand the assembly
up on its feet.
2. Swing the Snare Drum Joint (left side arm of the Drum Rack assembly) and the Tom
3 Joint (right side arm of the Drum Rack assembly) out to the positions shown
above, then use the included M6 tool to tighten the clamps to secure them in place.
3. Slide the HH Joint onto the left leg of the Drum Rack assembly to the position
shown above, then use the included M6 tool to tighten the clamp to secure it in
place.
4. Slide the T1 T2 Rail onto the two legs of the Drum Rack assembly, then use the
included M6 tool to tighten the clamps to secure it in place.
Page 9

9
5. Insert the HH Rod into the clamp on the HH Joint, then use the included M6 tool to
tighten the clamp to secure it in place.
6. Insert the single Cymbal Rod (with the 90° bend) into the clamp on the Snare Drum
Joint, then use the included M6 tool to tighten the clamp to secure it in place.
7. Insert the two Cymbal Rods (with the 45° bend) into the clamps on each side of the
T1 T2 Rail, then use the included M6 tool to tighten the clamps to secure them place.
Page 10

10
8. Attach the Snare Drum Pad to the Cymbal Rod on the Snare Drum Joint and secure
it into place.
9. Attach the Tom 3 Pad to the Tom 3 Joint and secure it into place.
Page 11

11
10. Unscrew the cap on the Hi-Hat Rod, place the Hi-Hat Cymbal onto the Hi-Hat Rod,
then screw the cap back on to secure the Hi-Hat Cymbal in place.
11. Unscrew the cap on the Cymbal Rod on the left, place the Crash Cymbal onto the
Cymbal Rod, then screw the cap back on to secure the Crash Cymbal in place.
12. Unscrew the cap on the Cymbal Rod on the right, place the Ride Cymbal onto the
Cymbal Rod, then screw the cap back on to secure the Ride Cymbal in place.
Page 12

12
13. Attach the Host Joint to the T1 T2 Rail.
14. Attach the Drum Sticks Holder to the clamp on the right leg of the Drum Rack
assembly, then insert the Drum Sticks into the Drum Sticks Holder.
Page 13

13
15. Attach the Host Machine to the Host Joint.
16. Place the Hi-Hat Pedal on the floor beneath the Hi-Hat Cymbal.
17. Place the Bass Drum Pedal on the floor near the center of the Drum Rack assembly.
Page 14

14
18. Plug the connector on the Cable Assembly into the connector on the back of the
Host Machine, then tighten the two screws to secure it into place.
Page 15

15
19. Locate the cable end with the HHP label and plug it into the Hi-Hat Pedal.
20. Locate the cable end with the BD label and plug it into the Bass Drum Pedal.
21. Locate the cable end with the CR label and plug it into the Crash Cymbal.
22. Locate the cable end with the RD label and plug it into the Ride Cymbal.
23. Locate the cable end with the HH label and plug it into the Hi-Hat Cymbal.
24. Locate the cable end with the T3 label and plug it into the Tom 3 pad.
25. Locate the cable end with the T1 label and plug it into the Tom 1 pad.
26. Locate the cable end with the T2 label and plug it into the Tom 2 pad.
27. Locate the cable end with the SD label and plug it into the Snare Drum pad.
Page 16

16
SETUP
Perform the following steps to prepare the drum kit for use. Ensure that all external
equipment to be connected is powered off and disconnected from its power source.
1. If you want to use a Drum Amplifier, plug one end of a 3.5mm audio cable (not
included) into the OUTPUT jack on the Host Machine, then plug the other end into
the input on the amp. Alternatively, plug a pair of headphones (not included) into
the HEADPHONES jack on the Host Machine.
2. If you want to use an external synthesizer or PC, plug one end of a USB cable (not
included) into the USB jack on the host machine, then plug the other end into the
synthesizer or an available USB port on your PC.
3. Plug the included AC Power Adapter into the DC9V jack on the Host Machine, then
plug the adapter into a nearby AC power outlet.
BASIC OPERATION
• Momentarily press the POWER button to turn the system on. Press and hold the
POWER button for several seconds to turn the system off.
• With the system powered on and the metronome off, press the UP and DOWN
buttons to cycle through the twelve Drum Sounds. The DISPLAY will show which kit
is selected.
• With the system powered on, momentarily press the METRONOME button to turn
the metronome on into the default Tempo Mode.
• With the system powered on and the metronome on in Tempo Mode, press the UP
button to increase the tempo or press the DOWN button to decrease the tempo.
• With the system powered on and the metronome on in Tempo Mode, press and
hold the METRONOME button for three seconds to enter Beat Mode.
• With the system powered on and the metronome on in Beat Mode, use the UP and
DOWN buttons to select one of the 8 beats. The DISPLAY will show which beat is
selected.
Page 17

17
• With the system powered on and the metronome on in Beat Mode, momentarily
press the METRONOME button to exit Beat Mode and return to Tempo Mode.
• With the system powered on and the metronome on in Tempo Mode, momentarily
press the METRONOME button to turn the metronome off.
ADVANCED OPERATION
Pedal Adjust
With variations in temperature and humidity, the sensitivity of the pedals can vary. Perform
the following steps to recalibrate the pedal sensitivity.
1. With the system powered off, simultaneously press and hold the POWER and
METRONOME buttons to enter Pedal Adjust Mode.
2. With the DISPLAY showing HHF, stomp on the Hi-Hat Pedal and hold it down.
3. The METRONOME button will illuminate green and orange while the system is
automatically calibrating the pedal sensitivity. When the calibration is complete, the
METRONOME button will turn red and the system will exit Pedal Adjust Mode. You
may now release the pedal.
Software Update
In the event that the system software is updated, perform the following steps to update
the system software.
1. Download the software update on your PC and place the update file where
directed.
2. Using a USB cable (not included), plug one end into the USB jack on the Host
Machine, then plug the other end into an available USB port on your PC.
3. With the system powered off, press and hold the POWER and DOWN buttons to
enter Software Update Mode. The DISPLAY will show UPG. Follow the instructions
for the update.
Page 18

18
Factory Reset
With the system powered off, press and hold the POWER and UP buttons to reset the
system to its factory default settings. The DISPLAY will show CLr.
System Version
With the system powered on, press and hold the METRONOME button for 3 seconds. The
DISPLAY will show the current software version number.
BASIC PLAY
The system plays the same as a physical drum kit and allows you to create the same
sounds and rhythms using the same methods as with a physical kit.
Hi-Hat and Hi-Hat Pedal
• Press down on the Hi-Hat Pedal and strike the Hi-Hat Cymbal to make short, high
pitched sounds.
• Strike the Hi-Hat Cymbal without holding down the pedal to make longer, lower
pitched sounds.
• Stomp on the Hi-Hat Pedal without striking the Hi-Hat Cymbal to make different
sounds. The strength and speed of your stomp affects the sound.
Bass Drum Pedal
You can make different Bass Drum sounds depending on how strong and how fast you
stomp on the Bass Drum Pedal.
Page 19

19
Ride Cymbal
• The Ride Cymbal supports Bow Shots and Bell Shots, as depicted in the images
below.
• Pinch the edge of the Ride Cymbal in the black area in the image below to mute the
cymbal.
Snare Drum
• The Snare Drum allows you to make a Cross Stick sound.
Page 20

20
MIDI FORMAT LIST
Function
Transmitted
Recognized
Remarks
Basic Channel
Default
Changed
10
x
1~8 & 10~16
x
Mode
Default
Messages
Altered
x
x
*************
Mode 3
x
*************
Note Number
True Voice
0~127
*************
0~127
0~127
Velocity
Note ON
Note OFF
0~127
x
0~127
0~127
After Touch
Keys
Channels
x x x
x
Pitch Bend
x O
Control Change
0
1
4
5
6
7
10
11
64
65
66
67
71
72
73
74
x
x
x
x
x
x
x
x
x
x
x
x
x
x
x
x
O
O
O
O
O
O
O
O
O
O
O
O
O
O
O
O
Bank Select
Modulation
Foot Control
Portamento Time
Data Entry
Volume
Pan
Expression
Sustain Pedal
Portamento On/Off
Sostenuto Pedal
Soft Pedal
Resonance
Release Time
Attack Time
Cut Off
Page 21

21
Function
Transmitted
Recognized
Remarks
Control Change
(continued)
80
81
90
91
120
121
123
x
x
x
x
x
x
x
O
O
O
O
O
O
O
Reverb Program
Chorus Program
Reverb Level
Chorus Level
All Sounds OFF
Reset All Controllers*
All Notes OFF*
Program Change
x
O System Exclusive
x
O
System
Common
Song Position
Song Select
Tune
x
x
x
x
x
x
System Real
Time
Clock
Commands
x x x
x
Aux Message
Local ON/OFF
All Notes OFF
Active Sense
Reset
x
x
O
x
x
x
x
x
Mode 1: Omni On, Poly Mode 2: Omni On, Mono O=Yes, x=No
Mode 3: Omni Off, Poly Mode 4: Omni Off, Mono Notes: *Except 9, 10 Channel
Page 22

22
TECHNICAL SUPPORT
Monoprice is pleased to provide free, live, online technical support to assist you with any
questions you may have about installation, setup, troubleshooting, or product
recommendations. If you ever need assistance with your new product, please come online
to talk to one of our friendly and knowledgeable Tech Support Associates. Technical
support is available through the online chat button on our website www.monoprice.com
or through email by sending a message to tech@monoprice.com. Check the website for
support times and links.
SPECIFICATIONS
Model
625921
Active Elements
3 Cymbals (Hi-Hat, Crash, Ride), 3 Toms,
1 Snare, 2 Pedals (Hi-Hat, Bass Drum)
Metronome Tempo
40 ~ 240 bpm
Metronome Beats
1 ~ 8
Input Power
9 VDC, 300mA
REGULATORY COMPLIANCE
Notice for FCC
This device complies with Part 15 of the FCC rules. Operation is subject to the following
two conditions: (1) this device may not cause harmful interference, and (2) this device must
accept any interference received, including interference that may cause undesired
operation.
Page 23

23
Modifying the equipment without Monoprice's authorization may result in the equipment
no longer complying with FCC requirements for Class B digital devices. In that event, your
right to use the equipment may be limited by FCC regulations, and you may be required to
correct any interference to radio or television communications at your own expense.
This equipment has been tested and found to comply with the limits for a Class B digital
device, pursuant to Part 15 of the FCC Rules. These limits are designed to provide
reasonable protection against harmful interference in a residential installation. This
equipment generates, uses and can radiate radio frequency energy and, if not installed and
used in accordance with the instructions, may cause harmful interference to radio
communications. However, there is no guarantee that interference will not occur in a
particular installation. If this equipment does cause harmful interference to radio or
television reception, which can be determined by turning the equipment off and on, the
user is encouraged to try to correct the interference by one or more of the following
measures:
• Reorient or relocate the receiving antenna.
• Increase the separation between the equipment and receiver.
• Connect the equipment into an outlet on a circuit different from that to which the
receiver is connected.
• Consult the dealer or an experienced radio/TV technician for help.
Notice for Industry Canada
This Class B digital apparatus complies with Canadian ICES-003.
Cet appareil numérique de la classe B est conforme à la norme NMB-003 du Canada.
Monoprice™, Stage Right™, the Stage Right logo, and all Monoprice logos are trademarks
of Monoprice Inc.
 Loading...