

Page 1
SB-600 Dolby Atmos® 5.1.2 Soundbar
with Wireless Subwoofer and Wireless Surround Speakers
P/N 42034
User's Manual
Page 2

2
CONTENTS
SAFETY WARNINGS AND GUIDELINES ............................................................................................................4
INTRODUCTION....................................................................................................................................................................6
FEATURES .................................................................................................................................................................................6
CUSTOMER SERVICE........................................................................................................................................................ 7
PACKAGE CONTENTS ..................................................................................................................................................... 7
PRODUCT OVERVIEW .....................................................................................................................................................8
Soundbar Overall ........................................................................................................................................................8
Soundbar Top Panel .................................................................................................................................................8
Soundbar Rear Panel ............................................................................................................................................... 9
Wireless Subwoofer ...............................................................................................................................................10
Wireless Surround Speakers ...........................................................................................................................10
Remote Control........................................................................................................................................................... 11
INSTALLATION .................................................................................................................................................................... 12
Safety Warning........................................................................................................................................................... 12
Positioning ..................................................................................................................................................................... 13
Table/Shelf Placement ......................................................................................................................................... 13
Soundbar Wall Mounting ..................................................................................................................................14
Surround Speaker Wall Mounting ............................................................................................................. 15
Remote Control.......................................................................................................................................................... 17
SOUNDBAR ENHANCED FEATURES .................................................................................................................. 17
Dolby Atmos ................................................................................................................................................................. 17
eARC/ARC .......................................................................................................................................................................18
CONNECTIONS ................................................................................................................................................................... 19
Page 3

3
HDMI OUT ....................................................................................................................................................................... 19
HDMI IN 1/HDMI IN 2 ............................................................................................................................................20
OPTICAL ...........................................................................................................................................................................20
COAXIAL .......................................................................................................................................................................... 21
AUX...................................................................................................................................................................................... 22
Surround Speakers ................................................................................................................................................. 22
PAIRING THE SUBWOOFER AND SURROUNDS...................................................................................... 23
Automatic Pairing ................................................................................................................................................... 23
Manual Pairing ........................................................................................................................................................... 25
POWER SAVING ............................................................................................................................................................... 26
AV SYNC ................................................................................................................................................................................. 26
BLUETOOTH OPERATION .......................................................................................................................................... 27
USB OPERATION ..............................................................................................................................................................28
TROUBLESHOOTING ..................................................................................................................................................... 29
TECHNICAL SUPPORT ................................................................................................................................................... 31
SPECIFICATIONS ............................................................................................................................................................... 31
REGULATORY COMPLIANCE ................................................................................................................................. 34
Notice for FCC ............................................................................................................................................................ 34
Radio Notice for FCC ............................................................................................................................................ 35
RF Exposure Statement for FCC ................................................................................................................. 35
Notice for Industry Canada ............................................................................................................................. 35
Radio Notice for Industry Canada ............................................................................................................. 36
RF Exposure Statement for Industry Canada .................................................................................. 36
Page 4

4
SAFETY WARNINGS AND GUIDELINES
Please read this entire manual before using this device, paying extra attention to
these safety warnings and guidelines. Please keep this manual in a safe place for
future reference.
• This device is intended for indoor use only.
• Do not expose this device to water or moisture of any kind. Do not place
drinks or other containers with moisture on or near the device. If
moisture does get in or on the device, immediately remove it from its
power source and allow it to fully dry before reapplying power.
• Do not touch the device, the power cord, or any other connected cables
with wet hands.
• If operating this speaker in a humid environment, ensure that no
condensation occurs. Condensation could cause damage to the speaker
cone and could cause a short in the amplifier, which in turn could cause
fire or severe electric shock.
• Do not install this device on an unstable surface where it could fall and
cause either personal injury or damage to the device and/or other
equipment.
• Do not expose this device to excessive vibration, extreme force, shock,
or fluctuations in temperature or humidity.
• Avoid prolonged exposure to excessive volume levels, which could
cause hearing damage. Reduce the volume to minimum before using this
speaker system, then increase the volume to a comfortable listening
level.
• Do not expose this device to excessively high temperatures. Do not
place it in, on, or near a heat source, such as a fireplace, stove, radiator,
etc. Do not leave it in direct sunlight.
Page 5

5
• Do not place or install this device in an area where it can be exposed to
excessive amounts of dust, humidity, oil, smoke, or combustible vapors.
• Prior to operation, check the unit and power cord for physical damage.
Do not use if physical damage has occurred.
• Before plugging the unit into a power outlet, ensure that the outlet
provides the same type and level of power required by the device.
• Unplug this device from the power source when not in use.
• Take care to prevent damage to the power cord. Do not allow it to
become crimped, pinched, walked on, or become tangled with other
cords. Ensure that the power cord does not present a tripping hazard.
• Never unplug the unit by pulling on the power cord. Always grasp the
connector head or adapter body.
• Ensure that power is turned off and disconnected before making any
electrical connections.
• Remove the batteries from the controller if it will go unused for a
lengthy period of time.
• Do not mix new and old batteries or batteries of different types.
• Do not mix alkaline, standard, or rechargeable batteries with this
product.
• Clean using a soft, dry cloth only. Do not use chemical cleaners, solvents,
or detergents. For stubborn deposits, moisten the cloth with warm
water.
• This device has no user serviceable parts. Do not attempt to open,
service, or modify this device.
Page 6

6
INTRODUCTION
The Monoprice™ SB-600 Dolby Atmos® 5.1.2 Soundbar delivers a true and
powerful Dolby Atmos home theater experience, with built-in Atmos height
speakers on the soundbar, wireless surround speakers, and a wireless 8"
subwoofer. Two HDMI® inputs, an HDMI eARC output, coaxial and optical digital
audio inputs, and a 3.5mm analog audio input allow you to connect your various
audio and video devices, while the Bluetooth® 4.2 radio and USB input allow you
to stream audio from your smartphone or PC. Enjoy total control from the
comfort of your easy chair using the included IR remote control. The wireless
connectivity ensures a quick and easy setup and a clutter free appearance. The
Monoprice SB-600 Dolby Atmos 5.1.2 Soundbar delivers stellar looks and a
complete home theater experience.
FEATURES
• Dolby Atmos® 5.1.2 soundbar
• Wireless surround speakers
• Wireless 8" subwoofer
• Two HDMI® inputs and an HDMI ARC output
• Bluetooth® 4.2 and USB streaming
• Coaxial and optical digital inputs
• 3.5mm analog audio input
• Four DSP sound modes
• Includes an IR remote control
• Includes a Premium High Speed HDMI® Cable and mounting hardware
• Automatic standby mode after 15 minutes of inactivity
Page 7

7
CUSTOMER SERVICE
The Monoprice Customer Service department is dedicated to ensuring that your
ordering, purchasing, and delivery experience is second to none. If you have any
problem with your order, please give us an opportunity to make it right. You can
contact a Monoprice Customer Service representative through the Live Chat link
on our website www.monoprice.com or via email at support@monoprice.com.
Check the website for support times and links.
PACKAGE CONTENTS
Please take an inventory of the package contents to ensure you have all the
items listed below. If anything is missing or damaged, please contact Monoprice
Customer Service for a replacement.
1x SB-600 Soundbar
1x Wireless Subwoofer
2x Wireless Surround Speakers
1x Remote Control
2x AAA Batteries
1x AC Power Adapter
2x AC Power Cord
1x Premium High Speed HDMI®
Cable
1x 3.5mm Audio Cable
1x 2.5mm Surround Speakers
Interconnect Cable
2x Soundbar Wall Mount
Brackets
4x Soundbar Wall Mount
Screws
4x Soundbar Wall Mount
Anchors
2x Soundbar Mounting Screws
2x Surround Speaker Wall
Mount Brackets
2x Surround Speaker Wall
Mount Screws
2x Surround Speaker Wall
Mount Anchors
4x Surround Speaker Mounting
Screws
1x User's Manual
Page 8
PRODUCT OVERVIEW
Soundbar Overall
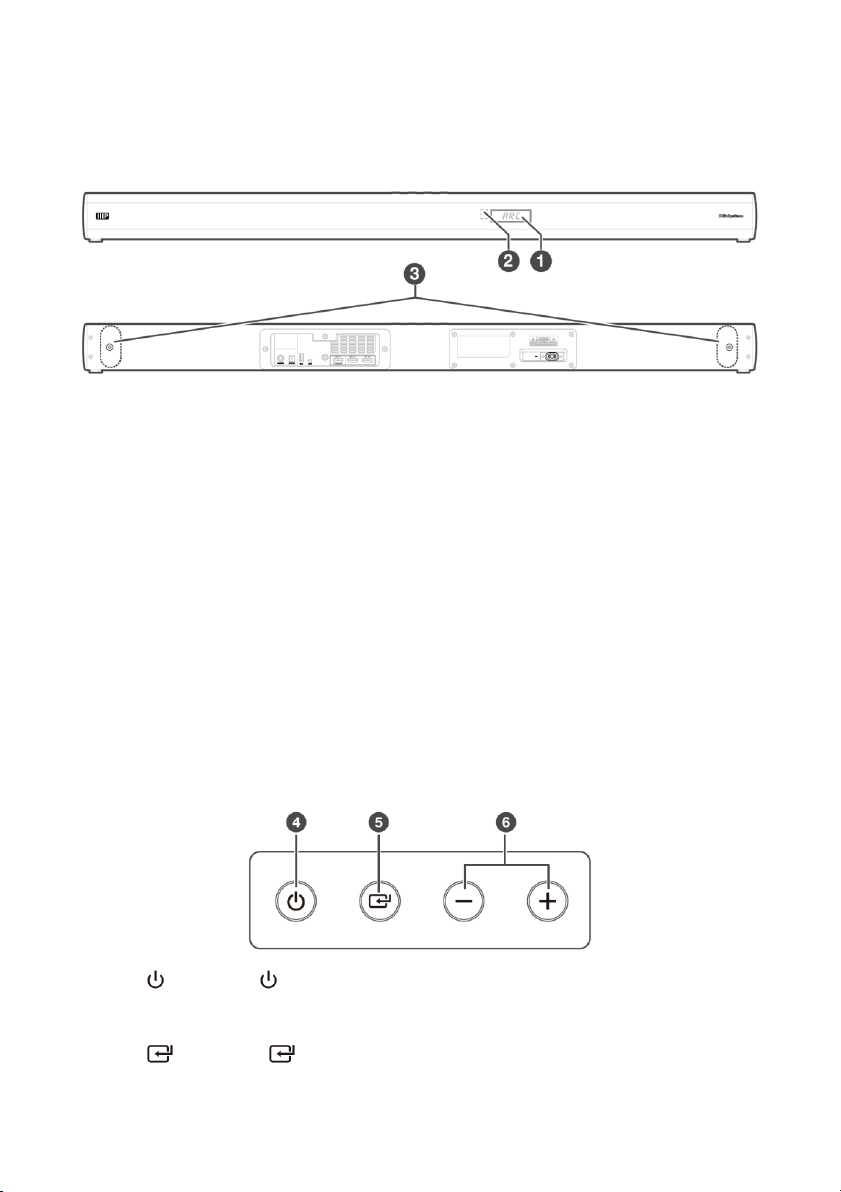
1. DISPLAY: The DISPLAY shows information about the status of the
system, including the selected input. When audio playback begins, the
display shows DOLBY ATMOS, DOLBY DIGITAL, PCM, or NONSUPPORT
FORMAT, depending on the audio format.
2. IR RECEIVER: The IR RECEIVER accepts signals from the included IR
remote control. The remote control has a maximum operating range of
up to 19.6 feet (6 meters) with angles up to ±30°.
3. WALL MOUNT MOUNTING POINTS: The soundbar mounting screws are
installed to these two locations.
Soundbar Top Panel
4. : Press the button to turn the system on or to put it into standby
mode.
5. : Press the button to cycle through the inputs. The cycle order is
AUX, BT, OPT/COA, HDMI® 1/2, HDMI eARC, USB.
Page 9
9
6. ━/╋: Press the ━ button to decrease the volume level and the ╋
button to increase the volume level.
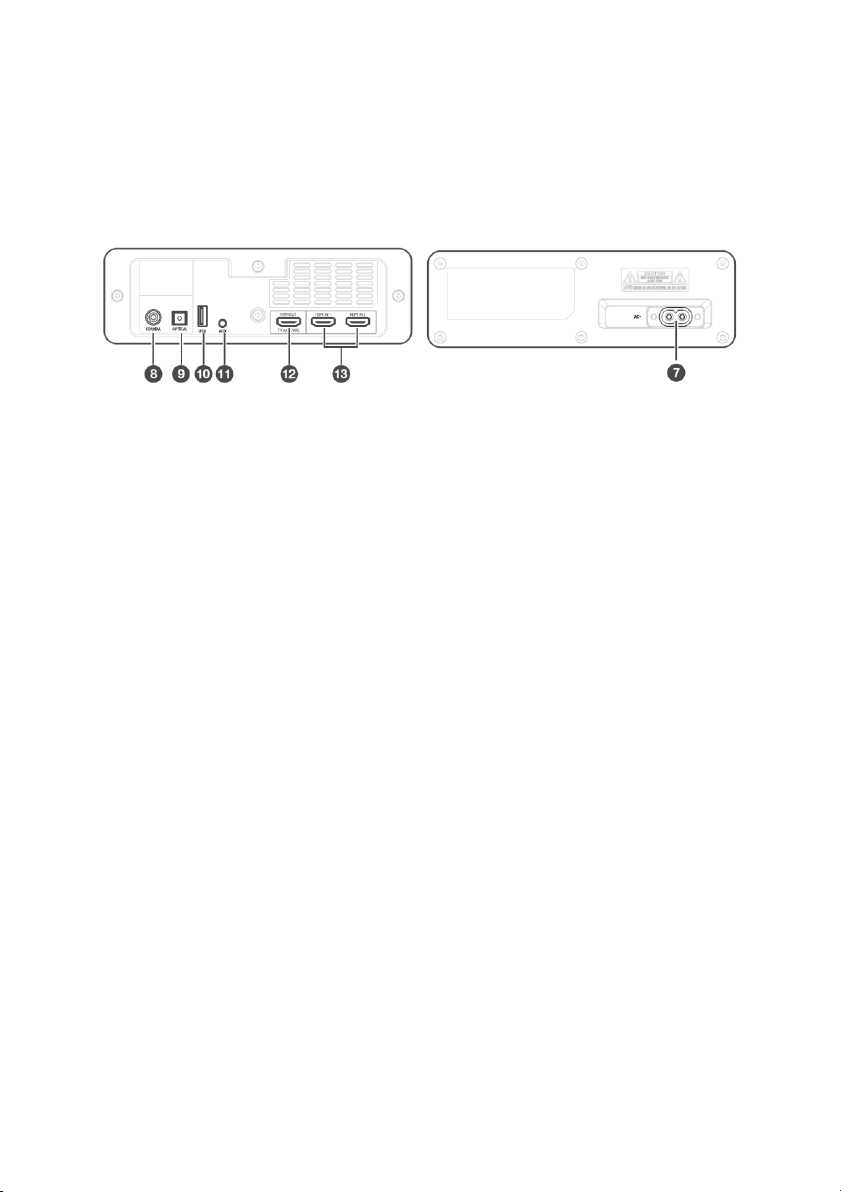
Soundbar Rear Panel
7. AC INPUT: AC power socket for connecting one of the included AC
power cords.
8. COAXIAL: Digital coaxial audio input for connecting the coaxial output
on your TV. Note that you can use either the OPTICAL or COAXIAL input,
but not both.
9. OPTICAL: Digital optical audio input for connecting the optical output on
your TV. Note that you can use either the OPTICAL or COAXIAL input,
but not both.
10. USB: USB port for connecting a USB flash drive with mp3 files for audio
playback. You can use flash drives up to 32GB capacity, formatted with
the FAT16 or FAT32 file system.
11. AUX: 3.5mm stereo audio input for connecting an external audio device,
such as a smartphone or mp3 player or for connecting the analog audio
outputs on your TV.
12. HDMI OUT: HDMI® port for connecting a TV. The port supports the
eARC/ARC HDMI feature, which allows the soundbar to play audio that
originates on the connected TV.
13. HDMI IN: Two HDMI ports for connecting HDMI source devices, such as a
DVD player, Blu-ray Disc™ player, or gaming console. Note that only one
HDMI input is usable at a time.
Page 10
10
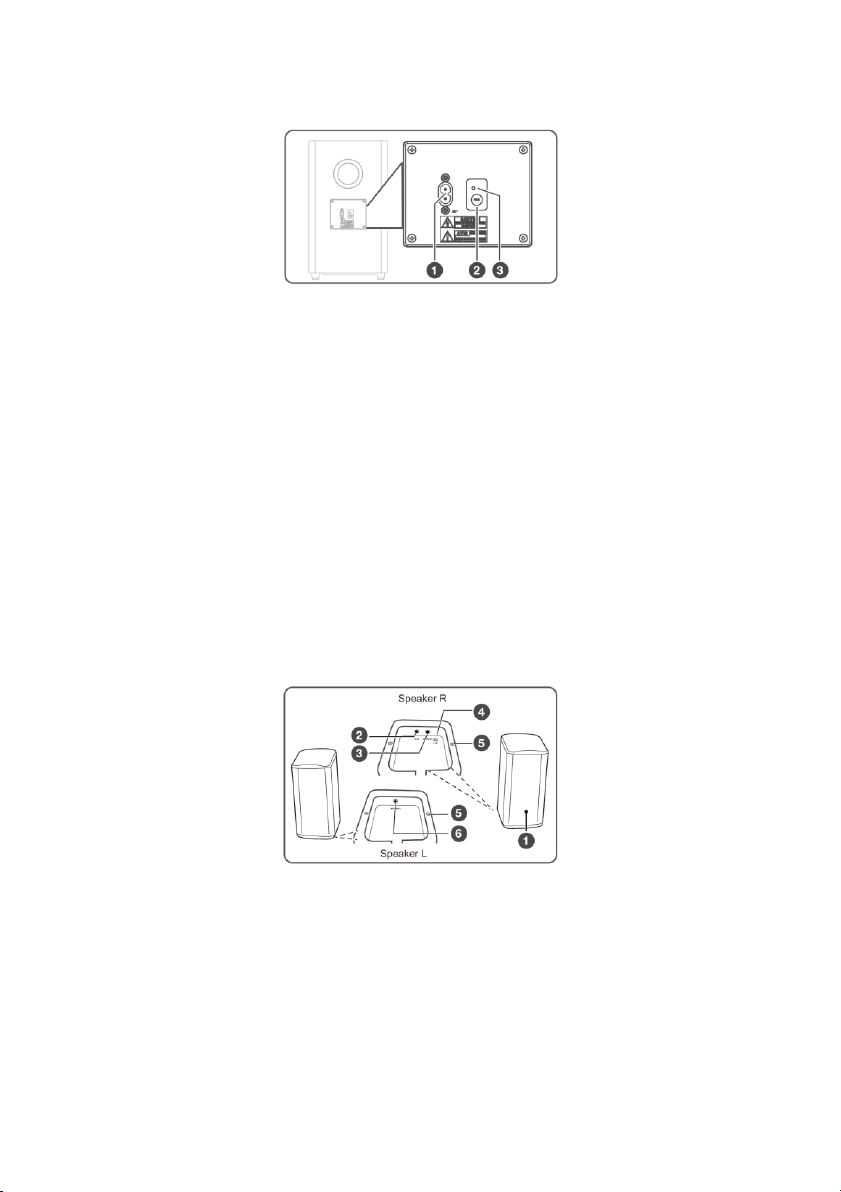
Wireless Subwoofer
1. AC INPUT: AC power socket for connecting one of the included AC
power cords.
2. PAIR BUTTON: Press the PAIR BUTTON to activate the pairing function
between the subwoofer and the soundbar.
3. PAIR INDICATOR: The PAIR INDICATOR illuminates steadily when the
subwoofer is paired with the soundbar. It will flash rapidly while pairing
is in progress. It will blink slowly when the subwoofer is not paired with
the soundbar and pairing is not in progress.
Wireless Surround Speakers
1. PAIR INDICATOR: The PAIR INDICATOR illuminates steadily when the
surround speakers are paired with the soundbar. It will flash rapidly while
pairing is in progress. It will blink slowly when the surround speakers are
not paired with the soundbar and pairing is not in progress.
2. DC IN: DC barrel connector for connecting the included AC power
adapter.
Page 11
11
3. SPEAKER (R): 2.5mm jack for connecting the 2.5mm surround speakers
interconnect cable to connect to the left surround speaker.
4. PAIR BUTTON: Press the PAIR button to activate the pairing function
between the surround speakers and the surround speaker.
5. WALL MOUNT MOUNTING POINTS: The included surrounds wall mount
brackets attach to the surround speakers at these two points.
6. SPEAKER (L): 2.5mm jack for connecting the 2.5mm surround speakers
interconnect cable to connect to the right surround speaker.
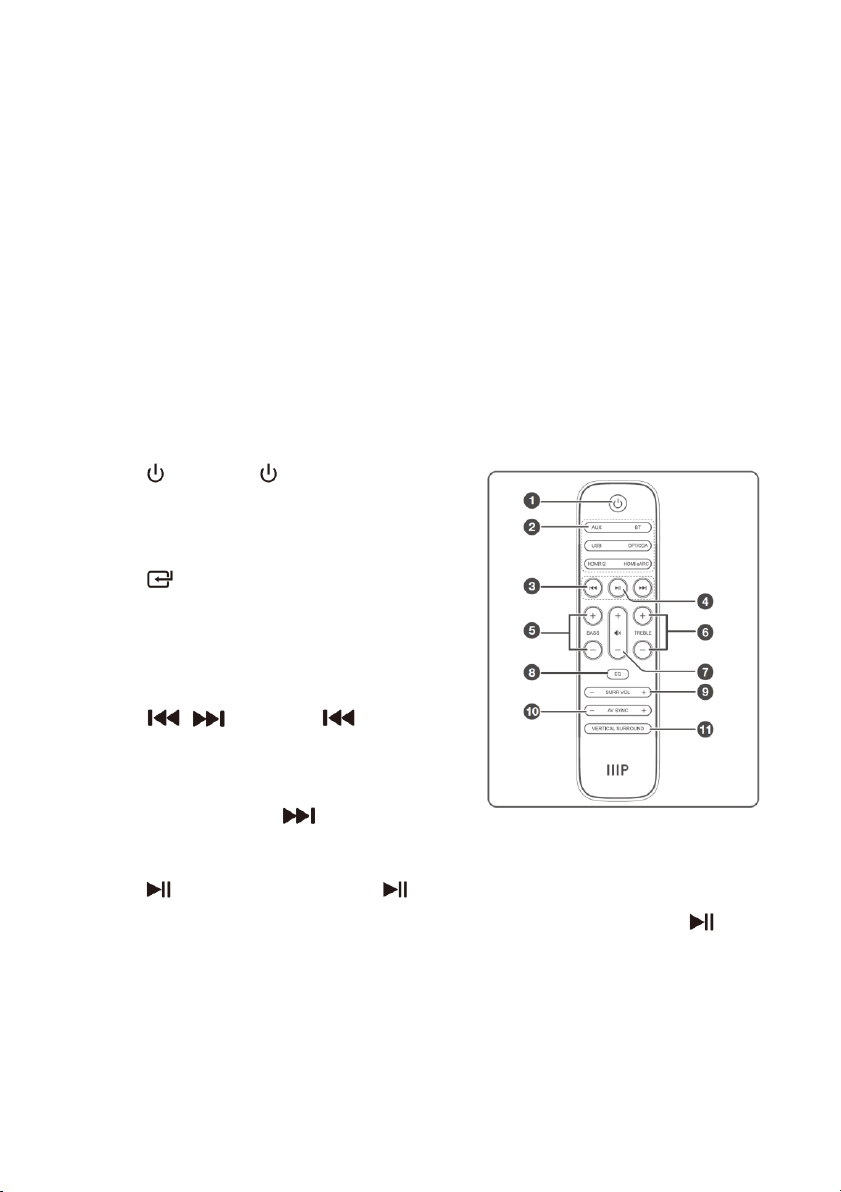
Remote Control
1. : Press the button to turn the
system on or to put it into standby
mode.
2. : These rocker buttons (AUX / BT,
USB / OPT/COA, and HDMI 1/2 /
HDMI® eARC) are for selecting one
of the input sources.
3. / : Press the button to
skip back to the previous track when
using the Bluetooth® (BT) or USB
input. Press the button to skip
forward to the next track when using the Bluetooth (BT) or USB input.
4. : Momentarily press the button to pause or resume playback
when using the Bluetooth (BT) or USB input. Press and hold the
button for about 1 second to enter Bluetooth® pairing mode or to
disconnect an existing paired Bluetooth device.
5. BASS: Press the ╋ button to increase the bass response or press ━ the
button decrease the bass response.
Page 12

12
6. TREBLE: Press the ╋ button to increase the treble response or press ━
the button decrease the treble response.
7. ╋/━/ : Press the ╋ button to increase the volume level of the
system or press the ━ button to decrease the volume level of the
system. Press the icon in the center of the button to toggle audio
mute on or off. If audio is muted, increasing or decreasing the volume
level toggles mute off.
8. EQ: Press the EQ button to cycle through the four audio equalization
effects. The cycle order is Voice, Sport, Movie, and Music.
9. SURR VOL: Press the ╋ button to increase the relative volume level of
the surround speakers or press the ━ button to decrease the relative
volume level of the surround speakers. The surround speakers will follow
the overall soundbar system volume, but this control allows you to fine
tune the volume level of the surrounds in relation to the overall volume.
10. AV SYNC: Press the ╋ button to increase the audio delay or press the
━ button to decrease the audio delay. Refer to the
AV SYNC
section for
more details.
11. VERTICAL SURROUND: Press the VERTICAL SURROUND button to turn
the surround speakers on or off.
INSTALLATION
Safety Warning
Mounting the soundbar and/or surround speakers to the wall should be
performed by qualified personnel only. Incorrect installation can result in severe
personal injury or property damage. Care must be taken to avoid damage to any
electrical wiring or plumbing inside the walls. It is the installer's responsibility to
ensure that the wall can safely support the weight of the soundbar/surround
speakers and wall mount brackets. Use a stud finder as necessary to find the
Page 13
13
studs on a wood stud drywall wall. Additional tools (not included) are required to
install this speaker system.
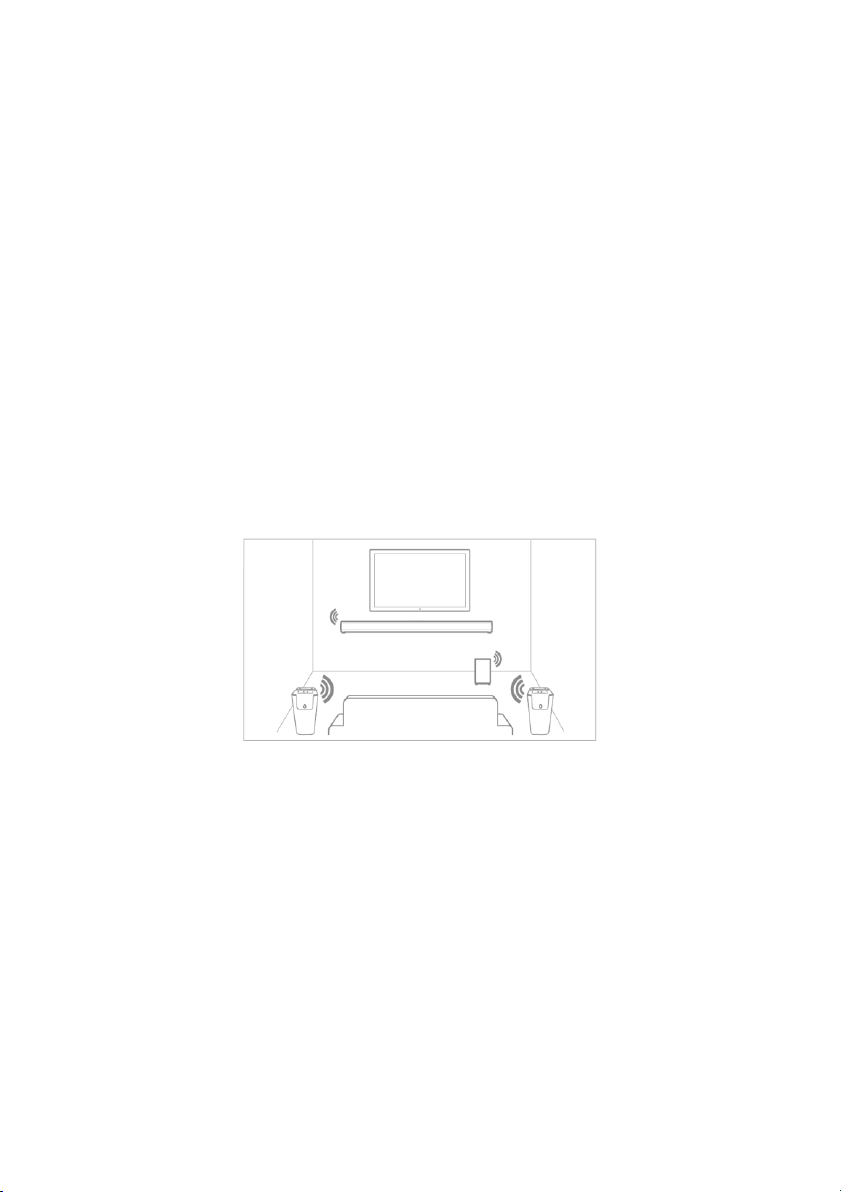
Positioning
• The soundbar should be placed or mounted below the TV.
• The subwoofer should be placed on the ground at least 3 feet from the
soundbar and about 4" (10cm) from the nearest wall.
• The surround speakers should be placed or mounted to the left and right
of the listening position and at or slightly above your ear height. If
directly to the sides is not possible, place or mount them slight behind
the listening position.
Refer to the diagram below.
Table/Shelf Placement
Rather than mounting the soundbar and/or surround speakers to the wall, they
can be simply placed on a table or shelf.
• Place the soundbar below the TV and in front of the TV stand. The feet
on the soundbar will protect your surface from scratches.
• Place the surround speakers on a table or shelf. Ensure that the
connecting cables are routed through the notch in the base, so that the
speaker sits evenly on the surface.
Page 14

14
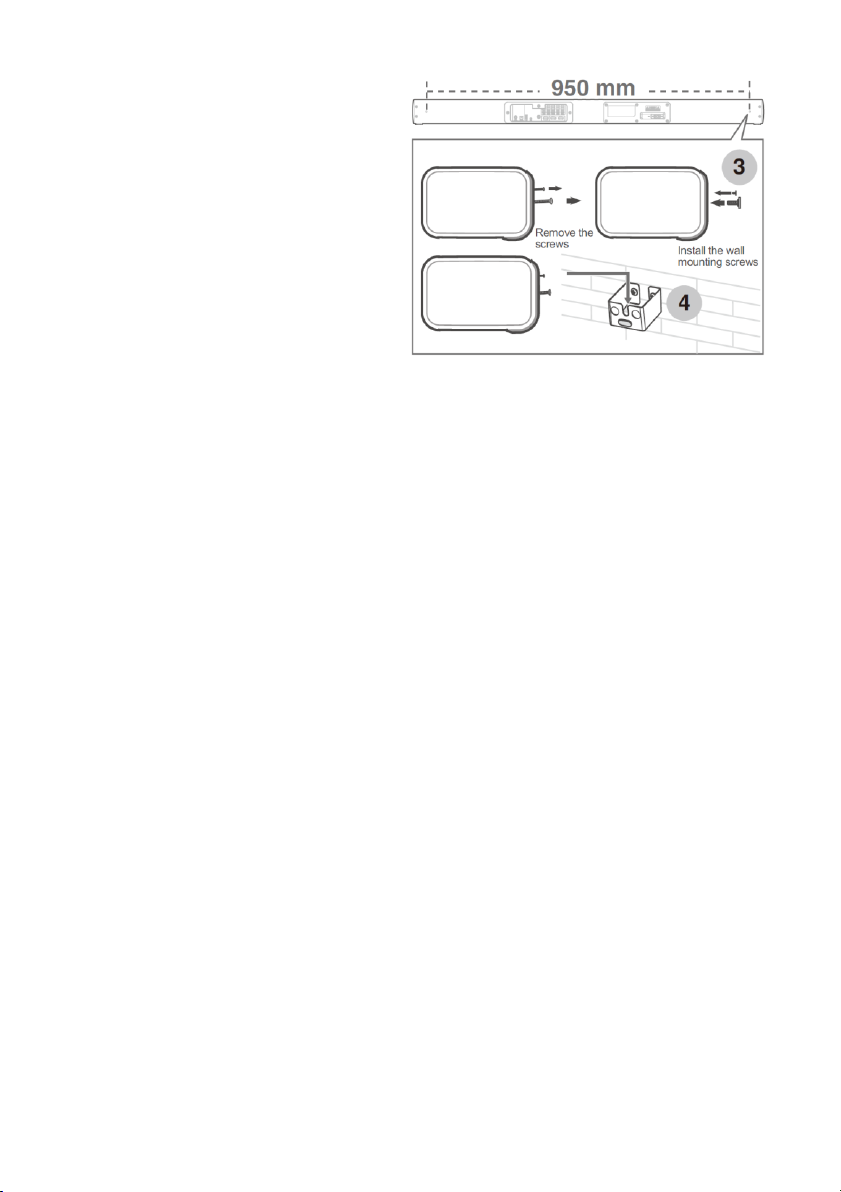
Soundbar Wall Mounting
Perform the following steps to mount the soundbar to the wall. Use common
sense at all times.
1. Using a pencil, a carpenter's
level, and a tape measure,
mark two positions on the
wall exactly 950mm apart.
Use the level to ensure that
these marks are at the same
height on the wall. These
marks will be at the center
of each wall mount bracket.
2. For each mark, place one of
the wall mount brackets
against the wall, with the mark in the center of the notch. Use the level
to ensure the bracket is level, then mark each hole in the bracket, which
is where the two screws will be used to secure the bracket to the wall.
3. Use a ø5.5 ~ 6.0 mm drill bit to drill a hole at each of the four marked
screw hole locations.
4. If using wall anchors, insert an anchor into each hole. If they do not
insert fully by hand, lightly tap each anchor with a small hammer to drive
them completely into the wall.
5. Position each bracket over the holes, then use a #2 Phillips screwdriver
and the wall mount bracket screws to secure each bracket to the wall.
Take care not to overtighten the screws. Ensure that the opening of the
notch is at the top of the bracket.
Page 15
15
6. Remove the two screws at
the wall mount mounting
locations on the rear of the
subwoofer. Store them in a
safe place in case you need
to use them in the future.
7. Install the soundbar
mounting screws into the
screw holes at the wall
mount mounting locations.
8. Position the soundbar so the soundbar mounting screws are positioned
over the notches in the brackets, then slide it down into place.
Surround Speaker Wall Mounting
Perform the following steps to mount the surround speakers to the wall. Use
common sense at all times.
1. Determine where the surrounds will be located. Use a pencil to mark a
location on the wall(s). Use a tape measure to ensure that each location
is at the same height on the wall(s).
2. Use a ø5.5 ~ 6.0 mm drill bit to drill a hole at each of the marked
locations.
3. If using wall anchors, insert an anchor into each hole. If they do not
insert fully by hand, lightly tap each anchor with a small hammer to drive
them completely into the wall.
4. Using a #2 Phillips screwdriver, screw the surround speaker wall mount
screws into the wall, but do not screw them all the way in. Leave about
3mm of screw body showing, as shown in the image below.
5. Plug one end of the 2.5mm surround speakers interconnect cable into
the Speaker (L) jack on the left surround speaker.
Page 16

16
6. Use two of the surround speaker mounting screws to attach one of the
surround speaker wall mount brackets to the left surround, as shown in
the image below.
7. Plug the other end of the 2.5mm surround speakers interconnect cable
into the Speaker (R) jack on the right surround speaker. Note that if the
surround speakers are further apart than the included 4 meter cable can
reach, you can use an extension cable or substitute a longer cable.
8. Plug the included AC power adapter into the DC IN jack on the right
surround speaker. Do not plug it into an AC power outlet yet.
9. Use two of the surround speaker mounting screws to attach one of the
surround speaker wall mount brackets to the right surround, as shown in
the image below.
10. Use the keyholes on the wall mount brackets to hang each surround
speaker from the surround speaker wall mount screws in the wall(s).
Page 17

17
Remote Control
Perform the following steps to prepare the remote control for use.
1. Press and slide back the battery compartment cover on the remote
control.
2. Insert two AAA batteries (included). Take care to match the polarity of
the batteries with the markings inside the battery compartment.
3. Slide the battery compartment cover back into place.
Notes:
• Remove the batteries from the controller if it will go unused for a
lengthy period of time.
• You can use either rechargeable or non-rechargeable batteries.
• Do not mix new and old batteries or batteries of different types.
• Do not mix alkaline, standard, or rechargeable batteries with this
product.
SOUNDBAR ENHANCED FEATURES
Dolby Atmos
One of the primary features of this soundbar is support for Dolby Atmos®. Dolby
Atmos is an audio encoding method that delivers an immersive listening
experience. It does this by using height speakers to create sound in three
dimensional space. However, rather than requiring speakers physically mounted
Page 18

18
in the ceiling or high on the walls, it uses upward firing drivers that bounce
sound off the ceiling to create the three dimensional audio experience. Please
visit https://www.dolby.com/technologies/dolby-atmos for more details.
The following elements are required for Dolby Atmos® support:
• Full Atmos support is only available when using one of the HDMI® inputs.
• You must use an HDMI cable that complies with the HDMI version 2.0
specification, such as the included Premium High Speed HDMI Cable.
• The HDMI source devices should have No Encoding selected for the
audio bitstream.
• If using the eARC/ARC audio input, the TV must support Dolby Atmos.
eARC/ARC
This soundbar supports the HDMI® Audio Return Channel (ARC) and Enhanced
Audio Return Channel (eARC) features, which allow it to receive and playback
audio that originates on the connected TV. This is useful for when you watch
broadcast TV or when using an app on a smart TV. When properly configured,
you can use your TV's remote control to adjust the volume level and mute status
of the soundbar.
The following elements are required to use the eARC/ARC feature:
• Your TV must support both the HDMI CEC (Consumer Electronics
Control) and eARC or ARC features.
• You must enable CEC and ARC on your TV.
• The HDMI cable between the TV and the soundbar must comply with
the HDMI version 1.4 specification or later.
• Your TV's digital sound output S/PDIF mode must be set to PCM.
• To use eARC/ARC, select the HDMI eARC input on the soundbar.
Page 19

19
CONNECTIONS
HDMI OUT
Use the included Premium High Speed HDMI® Cable to connect your TV to the
soundbar. Plug one end of the cable into an HDMI input on your TV, then plug
the other end into the HDMI OUT TV eARC/ARC port on the soundbar.
Notes:
• Some 4K HDR TVs require the HDMI input or picture settings to be set
for HDR content reception. Please refer to your TV's user's manual for
setup details.
• To use the eARC/ARC feature, you must connect to the HDMI input on
your TV that supports ARC. Please refer to your TV's user's manual.
• If you want to use Dolby Atmos® with the eARC/ARC feature, your TV
must support Dolby Atmos and you must use a Premium High Speed
HDMI Cable, such as the one included with the soundbar.
Page 20

20
HDMI IN 1/HDMI IN 2
Use Premium High Speed HDMI® Cables, such as the one included in the package,
to connect your video source devices to the soundbar. Plug one end of the cable
into the HDMI IN 1 or HDMI IN 2 port on the soundbar, then plug the other end
into the HDMI output on your video source device.
Notes:
• Only one of the two HDMI inputs can be used at a time.
• If you will not be using Dolby Atmos® encoded content from either
video source device, you can connect using a High Speed HDMI® Cable
instead of a Premium High Speed HDMI Cable.
OPTICAL
Use a digital optical S/PDIF cable (not included) to connect your TV or other
audio source device to the soundbar. First, remove the protective plug from the
OPTICAL connector on the soundbar. Put it in a safe place for later use. Plug one
end of an optical cable into the OPTICAL connector on the soundbar, then plug
the other end into the optical output on your TV or other audio source device.
Notes:
• You can use either the OPTICAL input or the COAXIAL input, but not
both at the same time.
Page 21

21
• The OPTICAL input does not fully support Dolby Atmos®. For Dolby
Atmos playback, use one of the HDMI® inputs.
• The soundbar is not capable of decoding all digital audio formats. If an
unsupported format is detected, the audio will be muted. Ensure that
the audio format of the input source device is set to Dolby Digital™ or
PCM.
COAXIAL
Use a digital coaxial cable (not included) to connect your TV or other audio
source device to the soundbar. Plug one end of a digital coaxial cable into the
COAXIAL connector on the soundbar, then plug the other end into the coaxial
output on your TV or other audio source device.
Notes:
• You can use either the OPTICAL input or the COAXIAL input, but not
both at the same time.
• The COAXIAL input does not fully support Dolby Atmos®. For Dolby
Atmos playback, use one of the HDMI® inputs.
• The soundbar is not capable of decoding all digital audio formats. If an
unsupported format is detected, the audio will be muted. Ensure that
the audio format of the input source device is set to Dolby Digital™ or
PCM.
Page 22

22
AUX
The AUX input is used to connect an analog audio source, such as the headphone
output of your smartphone, to the soundbar.
To connect the headphone output of a device, plug one end of the included
3.5mm audio cable into the AUX input on the soundbar, then plug the other end
into the headphone output of your source device.
To connect the stereo RCA outputs of a device to the soundbar, plug the 3.5mm
end of a 3.5mm to RCA stereo audio cable (not included) into the AUX input on
the soundbar, then plug the RCA end into the left and right RCA outputs of your
source device.
Surround Speakers
If you mounted the surround speakers to the wall(s), you already connected to
two speakers using the 2.5mm surround speakers interconnect cable and the AC
power adapter to the right surround speaker.
Page 23

23
If you did not mount the surround speakers, perform the following steps to
connect them.
1. Plug one end of the included 2.5mm surround speakers interconnect
cable to the SPEAKER (L) jack on the left surround speaker, then plug the
other end into the SPEAKER (R) jack on the right surround speaker.
2. Plug the included AC power adapter into the DC IN jack on the right
surround speaker. Do not plug it into an AC power outlet yet.
3. Ensure that the connecting cables are routed through the notch in the
base, so that the speaker sits evenly on the surface.
PAIRING THE SUBWOOFER AND SURROUNDS
Automatic Pairing
The automatic pairing process occurs when the soundbar, subwoofer, and
surrounds are first powered on. DO NOT press the PAIR button on either the
subwoofer or right surround speaker during the automatic pair process.
1. Ensure that all connections have been made and that the soundbar,
subwoofer, and surrounds are not plugged into an AC outlet.
2. Ensure that the subwoofer is located less than 19.6 feet (6 meters) from
the soundbar and that there are no obstructions between the
subwoofer and the soundbar.
3. Plug one end of one of the included AC power cords into the AC INPUT
jack on the subwoofer, then plug the other end into a nearby AC power
Page 24

24
outlet. The PAIR INDICATOR will start blinking slowly, indicating that it is
not paired and is not actively pairing.
4. Plug one end of the other AC power cord into the AC INPUT jack on the
soundbar rear panel, then plug it into a nearby AC power outlet.
5. Press the button on the soundbar top panel or on the remote control.
The PAIR INDICATOR on the subwoofer will begin flashing rapidly,
indicating that pairing is in progress. When pairing is complete, the PAIR
INDICATOR on the subwoofer will illuminate steadily, indicating that the
subwoofer is paired with the soundbar.
6. Press the button on the soundbar top panel or on the remote control
to put the system into standby mode.
7. Unplug both the subwoofer and the soundbar, then wait for 3 minutes.
8. Ensure that the surround speakers are located less than 19.6 feet (6
meters) from the soundbar and that there are no obstructions between
the surround speakers and the soundbar.
9. Plug the AC power adapter connected to the right surround speaker into
a nearby AC power outlet. The PAIR INDICATOR will start blinking slowly,
indicating that it is not paired and is not actively pairing.
10. Plug the AC power cord connected to the soundbar into a nearby AC
power outlet.
11. Press the button on the soundbar top panel or on the remote control.
The PAIR INDICATOR on the right surround speaker will begin flashing
rapidly, indicating that pairing is in progress. When pairing is complete,
the PAIR INDICATOR on the right surround speaker will illuminate
steadily, indicating that the surround speakers are paired with the
soundbar.
12. Plug the AC power cord connected to the subwoofer into a nearby AC
power outlet. The PAIR INDICATOR on the subwoofer should illuminate
steadily, indicating that it is paired with the soundbar.
Page 25

25
Congratulations, your system is now ready for use!
Manual Pairing
If the automatic pairing process fails or if the subwoofer and/or surround
speakers lose their pairing, you can manually pair them. Note that the surrounds
must be powered off when pairing the subwoofer, and the subwoofer must be
powered off when pairing the surrounds.
1. Ensure that the soundbar is not powered on. If it is, press the button
on the soundbar top panel or on the remote control to put the system
into standby mode.
2. Unplug the soundbar, subwoofer, and surround speakers from the AC
power outlet, then wait for 3 minutes.
3. Plug the subwoofer or surround speakers into a nearby AC power outlet.
The PAIR INDICATOR will begin blinking slowly, indicating that it is not
paired with the soundbar is not actively pairing.
4. Press and hold the PAIR button on the subwoofer or right surround
speaker for about 3 seconds. The PAIR INDICATOR will begin flashing
rapidly, indicating that it is in pairing mode.
5. Plug the soundbar into a nearby AC power outlet, then press the
button on the soundbar top panel or on the remote control to turn the
system on.
6. Once pairing is complete, the PAIR INDICATOR will illuminate steadily,
indicating that pairing is complete.
7. If you are manually pairing both the subwoofer and surround speakers,
repeat steps 1-6 with the remaining unpaired speaker.
8. Once pairing is complete, plug the subwoofer and surround speakers
into nearby AC power outlets.
Congratulations, your system is now ready for use!
Page 26

26
POWER SAVING
• After about 15 minutes of no detected audio or video signal, the
soundbar will automatically enter standby mode to save power.
• If the soundbar is in standby mode, any detected audio or video signal
will cause the soundbar to turn on.
• After about 10 minutes of no buttons being pressed on the soundbar or
remote control, the display will automatically dim. Pressing a button will
cause the display to return to full brightness.
AV SYNC
Because video signals can take longer to process than audio signals, a delay
between the audio and corresponding video can occur. The AV SYNC function
can be used to eliminate this delay.
If you detect a delay, use the AV SYNC ╋ and ━ buttons to adjust the audio
delay until the audio syncs with the corresponding video. You can adjust the
delay from 0 ~ 200 milliseconds. By default, the delay is set to 0 milliseconds.
Note that the AV SYNC function works only with digital audio sources (HDMI® 1,
HDMI 2, HDMI eARC, OPTICAL, and COAXIAL).
Page 27

27
BLUETOOTH OPERATION
The soundbar features a Bluetooth® radio, which allows you to wirelessly stream
audio from a connected mobile device. Note that the connected device must
supported the Advanced Audio Distribution Profile (A2DP) to stream audio. If the
connected device supports the Audio Video Remote Control Profile (AVRCP),
you can use the soundbar's remote control to control playback.
Perform the following steps to pair your device with the soundbar:
1. With the soundbar powered on, repeatedly press the button on the
soundbar top panel or the BT button on the remote control to select
Bluetooth® mode. The display will show NO BT, indicating that the
soundbar is not paired with any nearby device.
2. Open the Bluetooth settings on your mobile device and scan for nearby
Bluetooth devices.
3. Locate the SB-600 entry. If you cannot find the SB-600 entry, press and
hold the or BT button on the remote control for about 3 seconds, to
reinitiate Bluetooth pairing. The soundbar will emit an audio prompt and
the display will show PAIR.
4. Select the SB-600 entry from the list. If prompted for a passcode, enter
0000 (four zeros). Once the connection is made, the display will show BT.
5. If your mobile device supports the AVRCP profile, press the button
on the remote control to start or pause playback. Use the and
buttons on the remote control to skip tracks. If your device does not
support AVRCP, you will need to control playback directly on your
device.
Notes:
• The effective Bluetooth range is about 19 feet (8 meters) in clear air. Any
obstructions between the soundbar and the mobile device can reduce
that range.
Page 28

28
• If a connected device is moved out of range, it will automatically
disconnect. To reconnect, simply move the device back to within range
of the soundbar.
• If your device fails to reconnect, perform the Bluetooth® pairing process
again.
To disconnect your device from the soundbar, perform one of the following:
• Switch to a different mode on the soundbar.
• Disable Bluetooth or manually disconnect the soundbar in your device's
Bluetooth settings.
• Press and hold the or BT button on the remote control for about 3
seconds.
USB OPERATION
This soundbar features a USB port with the ability to playback audio from mp3
files stored on a USB flash drive. The maximum supported drive capacity is 32GB
and the drive must be formatted with either the FAT16 or FAT32 file system. The
files can be stored in subdirectories and/or the root directory.
1. Plug your flash drive into the USB port on the soundbar rear panel.
2. With the soundbar powered on, repeatedly press the button on the
soundbar top panel or the USB button on the remote control to select
USB mode. The display on the front panel will show USB.
3. Press the button on the remote control to start or pause playback.
Use the and buttons on the remote control to skip tracks.
Page 29

29
TROUBLESHOOTING
This section contains potential solutions to commonly issues.
There is no power to the soundbar.
• Ensure that the soundbar is plugged into a nearby AC power outlet.
• Ensure that the outlet is live by plugging another device into it, such as a
lamp.
The remote control doesn't work.
• Reduce the distance between the remote control and the soundbar.
• Reduce the angle and aim directly at the IR RECEIVER on the front of the
soundbar.
• Replace the batteries in the remote control.
There is no sound.
• Press the button or the volume ╋ button to ensure that the system
is not muted.
• Press the button the soundbar top panel or remote control to put the
system into standby mode, then press it again to turn the system back
on.
• Unplug the soundbar and subwoofer from the wall outlet, wait 30
seconds, then plug them back in again. Press the button the soundbar
top panel or remote control to turn the system back on.
• The system cannot decode all digital audio formats and will mute if an
unsupported format is detected. Ensure that the audio setting of the
HDMI®, OPTICAL, or COAXIAL source device is set to PCM or Dolby
Digital™.
Page 30

30
• Ensure that the subwoofer is within range of the soundbar. Move it
closer to the soundbar.
• The pairing between the soundbar and subwoofer may have been lost.
Perform the manual pairing procedure to pair the soundbar and
subwoofer.
The TV has display problems when viewing HDR content from an HDMI source.
• Some 4K HDR TVs require the HDMI input or picture settings be
configured for HDR content. Refer to your TV's user's manual for
instructions on configuring this setting.
I cannot find the SB-600 entry in my Bluetooth® connections list.
• Ensure that Bluetooth is enabled on your device.
• Perform a scan for active Bluetooth devices to connect to.
• Press and hold the or BT button to put the soundbar into Bluetooth
pairing mode, then scan for active Bluetooth devices.
The system entered standby mode without pressing the button the soundbar
top panel or remote control.
• This is normal operation. This system supports the ERPII requirement for
power saving and automatically goes into standby mode after 15
minutes of no detected input signal. If you were playing audio, increase
the output volume of your source device.
The subwoofer is idle or the PAIR INDICATOR is not illuminated.
• Unplug the subwoofer from the power outlet, wait 4 minutes, then plug
it back in again to reset it.
Page 31

31
TECHNICAL SUPPORT
Monoprice is pleased to provide free, live, online technical support to assist you
with any questions you may have about installation, setup, troubleshooting, or
product recommendations. If you ever need assistance with your new product,
please come online to talk to one of our friendly and knowledgeable Tech
Support Associates. Technical support is available through the online chat button
on our website www.monoprice.com or through email by sending a message to
tech@monoprice.com. Check the website for support times and links.
To download the latest drivers, firmware, manuals, etc., go to
www.monoprice.com and type the P/N into the search bar. If available, support
files are linked at the bottom of the product page.
SPECIFICATIONS
P/N
42034
Video Inputs
2x HDMI®
Video Output
HDMI with eARC
Audio Inputs
Digital Coaxial, Digital Optical, 3.5mm
Analog
Audio Input Sensitivity
500mV
System Frequency Response
40Hz ~ 20kHz
Soundbar Frequency Response
120Hz ~ 20kHz
Subwoofer Frequency Response
40 ~ 120 Hz
Surround Speakers Frequency
Response
120Hz ~ 20kHz
Page 32

32
Soundbar Drivers
Center: 2x 2.0" cone
L/R Midrange: 2x 2.5" cone
L/R Tweeters: 2x 20mm cone
L/R Up-Firing: 2x 2.0" cone
Soundbar Output Power
Center: 50 watts
L/R Midrange: 25 watts each
L/R Tweeters: 25 watts each
L/R Up-Firing: 25 watts each
Subwoofer Driver
8" down-firing cone
Subwoofer Output Power
180 watts
Surround Speakers Output Power
2x 15 watts
Bluetooth® Version
4.2
Supported Bluetooth Profiles
A2DP, AVRCP
Bluetooth Frequency Range
2400 ~ 2483.5 MHz
Bluetooth Maximum Transmission
Power
≤ 5dBm
Wireless Frequency Range
5725 ~ 5850 MHz
Wireless Maximum Transmission
Power
≤ 3dBm
USB Version
2.0
Supported USB Formatting
FAT32, FAT16
Maximum Supported USB Capacity
32GB
Supported USB File Format
mp3
Remote Control Range
up to 19.6 feet (6 meters)
Remote Control Operating Angle
0 ~ 30°
Page 33

33
Remote Control Power Source
2x AAA batteries (included)
Soundbar Input Power
100 ~ 240 VAC, 50/60 Hz
Subwoofer Input Power
100 ~ 240 VAC, 50/60 Hz
Surround Speakers Input Power
24 VDC, 1500mA
AC Adapter Input Power
100 ~ 240 VAC, 50/60 Hz, 1A
Soundbar Maximum Power
Consumption
30 watts
Soundbar Standby Power
Consumption
≤ 0.5 watts
Subwoofer Maximum Power
Consumption
80 watts
Subwoofer Standby Power
Consumption
≤ 0.5 watts
Soundbar Dimensions
40.6" x 4.3" x 3.0" (1032 x 110 x 75 mm)
Subwoofer Dimensions
9.4" x 9.4" x 16.5" (240 x 240 x 420 mm)
Surround Speakers Dimensions (each)
2.8" x 2.8" x 5.9" (71 x 71 x 150 mm)
Soundbar Weight
8.8 lbs. (4.0 kg)
Subwoofer Weight
13.2 lbs. (6.0 kg)
Surround Speakers Weight (each)
1.1 lbs. (0.5 kg)
Page 34

34
REGULATORY COMPLIANCE
Notice for FCC
This device complies with Part 15 of the FCC rules. Operation is subject to the
following two conditions: (1) this device may not cause harmful interference, and
(2) this device must accept any interference received, including interference that
may cause undesired operation.
Modifying the equipment without Monoprice's authorization may result in the
equipment no longer complying with FCC requirements for Class B digital
devices. In that event, your right to use the equipment may be limited by FCC
regulations, and you may be required to correct any interference to radio or
television communications at your own expense.
This equipment has been tested and found to comply with the limits for a Class B
digital device, pursuant to Part 15 of the FCC Rules. These limits are designed to
provide reasonable protection against harmful interference in a residential
installation. This equipment generates, uses and can radiate radio frequency
energy and, if not installed and used in accordance with the instructions, may
cause harmful interference to radio communications. However, there is no
guarantee that interference will not occur in a particular installation. If this
equipment does cause harmful interference to radio or television reception,
which can be determined by turning the equipment off and on, the user is
encouraged to try to correct the interference by one or more of the following
measures:
• Reorient or relocate the receiving antenna.
• Increase the separation between the equipment and receiver.
• Connect the equipment into an outlet on a circuit different from that to
which the receiver is connected.
• Consult the dealer or an experienced radio/TV technician for help.
Page 35

35
Radio Notice for FCC
Caution
This FCC Part 15 radio device operates on a non-interference basis with other
devices operating at this frequency. Any changes or modification to said product
not expressly approved by Monoprice, including the use of non-approved
antennas, could void the user’s authority to operate this device.
This device complies with Part 15 of the FCC Rules. Operation is subject to the
following two conditions: (1) this device may not cause harmful interference, and
(2) this device must accept any interference received, including interference that
may cause undesired operation.
RF Exposure Statement for FCC
Caution
This equipment complies with radiation exposure limits set forth for an
uncontrolled environment. End users must follow the specific operating
instructions for satisfying RF exposure compliance. This transmitter must be at
least 20 cm from the user and must not be collocated or operated in conjunction
with any other antenna or transmitter.
Notice for Industry Canada
This Class B digital apparatus complies with Canadian ICES-003.
Cet appareil numérique de la classe B est conforme à la norme NMB-003 du
Canada.
Page 36

36
Radio Notice for Industry Canada
Caution
This IC RSS-210 radio device operates on a non-interference basis with other
devices operating at this frequency. Any changes or modification to said product
not expressly approved by Monoprice, including the use of non-approved
antennas, could void the user’s authority to operate this device.
This device complies with IC RSS-210. Operation is subject to the following two
conditions: (1) this device may not cause harmful interference, and (2) this device
must accept any interference received, including interference that may cause
undesired operation.
RF Exposure Statement for Industry Canada
Caution
This equipment complies with radiation exposure limits set forth for an
uncontrolled environment. End users must follow the specific operating
instructions for satisfying RF exposure compliance. This transmitter must be at
least 20 cm from the user and must not be collocated or operated in conjunction
with any other antenna or transmitter.
Monoprice™ and all Monoprice logos are trademarks of Monoprice Inc.
Dolby®, Dolby Atmos®, Dolby Digital™, the Dolby Atmos logo, and the double-D symbol
are trademarks of Dolby Laboratories.
HDMI®, the HDMI Logo, and High-Definition Multimedia Interface are trademarks or
registered trademarks of HDMI Licensing LLC in the United States and other countries.
The Bluetooth® word mark and logos are registered trademarks of Bluetooth SIG, Inc.
Blu-ray Disc™, Blu-ray™, and the logos are trademarks of the Blu-ray Disc Association.
 Loading...