

Page 1

SB-200 Premium Slim Soundbar
P/N 34949
User's Manual
Page 2

CONTENTS
SAFETY WARNINGS AND GUIDELINES ....................................................................................................................................... 4
INTRODUCTION ................................................................................................................................................................................................ 6
FEATURES .............................................................................................................................................................................................................. 6
CUSTOMER SERVICE .................................................................................................................................................................................... 6
PACKAGE CONTENTS ................................................................................................................................................................................. 7
PRODUCT OVERVIEW ................................................................................................................................................................................. 7
Front View...................................................................................................................................................................................................... 7
Rear View ........................................................................................................................................................................................................ 8
Side View ........................................................................................................................................................................................................ 8
IR Remote Control ................................................................................................................................................................................... 9
USING THE REMOTE ..................................................................................................................................................................................... 9
First Time Use .............................................................................................................................................................................................. 9
Replacing the Battery ........................................................................................................................................................................ 10
PHYSICAL CONNECTIONS .................................................................................................................................................................... 10
HDMI ARC ..................................................................................................................................................................................................... 10
Digital Optical ............................................................................................................................................................................................ 11
Digital Coaxial ........................................................................................................................................................................................... 12
AUX ..................................................................................................................................................................................................................... 12
Power ............................................................................................................................................................................................................... 12
BLUETOOTH ....................................................................................................................................................................................................... 13
Pairing .............................................................................................................................................................................................................. 13
Disconnecting ........................................................................................................................................................................................... 14
Playback ......................................................................................................................................................................................................... 14
OPERATION ........................................................................................................................................................................................................ 14
2
Page 3

Power ............................................................................................................................................................................................................... 14
Source .............................................................................................................................................................................................................. 15
Volume ............................................................................................................................................................................................................ 16
EQ ......................................................................................................................................................................................................................... 16
TROUBLESHOOTING .................................................................................................................................................................................. 17
TECHNICAL SUPPORT ............................................................................................................................................................................... 18
SPECIFICATIONS ............................................................................................................................................................................................ 19
REGULATORY COMPLIANCE ............................................................................................................................................................. 20
Notice for FCC ......................................................................................................................................................................................... 20
Radio Notice for FCC ......................................................................................................................................................................... 20
Radio Notice for Industry Canada ........................................................................................................................................... 21
3
Page 4

SAFETY WARNINGS AND GUIDELINES
Please read this entire manual before using this device, paying extra attention to these
safety warnings and guidelines. Please keep this manual in a safe place for future reference.
This device is intended for indoor use only.
Do not expose this device to water or moisture of any kind. Do not place drinks or
other containers with moisture on or near the device. If moisture does get in or on
the device, immediately unplug it from the power outlet and allow it to fully dry
before reapplying power.
Do not touch the device, the power cord, or any other connected cables with wet
hands.
If operating this speaker in a humid environment, ensure that no condensation
occurs. Condensation could cause damage to the speaker cones and could cause a
short in the amplifier, which in turn could cause fire or severe electric shock.
Do not expose this device to excessive vibration.
Do not subject the product to extreme force, shock, or fluctuations in temperature
or humidity.
Do not expose this device to excessively high temperatures. Do not place it in, on,
or near heat sources, such as a fireplace, stove, radiator, etc. Do not leave it in direct
sunlight.
This device ventilates excessive heat through the slots and openings in the case. Do
not block or cover these openings. Ensure that the device is in an open area where
it can get sufficient airflow to keep from overheating.
Prior to operation, check the unit and power cord for physical damage. Do not use if
physical damage has occurred.
Before plugging the unit into a power outlet, ensure that the outlet provides the
same type and level of power required by the device.
Unplug this device from the power source when not in use.
4
Page 5

Take care to prevent damage to the power cord. Do not allow it to become
crimped, pinched, walked on, or become tangled with other cords. Ensure that the
power cord does not present a tripping hazard.
Never unplug the unit by pulling on the power cord. Always grasp the connector
head.
Ensure that power is turned off and disconnected before making any electrical
connections.
Remove the battery from the controller if it will go unused for a lengthy period of
time.
If the remote control battery leaks, wipe away the leakage inside the battery
compartment before replacing the old battery with a new one.
Do not heat or attempt to disassemble the battery.
Dispose of the old battery in accordance with local, State, or Federal guidelines for
disposal of electronic waste. Never throw the battery into a fire or water.
Do not carry or store batteries with other metallic objects. Doing so can cause the
batteries to short circuit, leak, or explode.
Never recharge a battery unless it is confirmed to be a rechargeable type.
Clean using a soft, dry cloth only. Do not use chemical cleaners, solvents, or
detergents. For stubborn deposits, moisten the cloth with warm water.
This device has no user serviceable parts. Do not attempt to open, service, or
modify this device.
5
Page 6

INTRODUCTION
Thank you for purchasing this SB-200 Premium Slim Soundbar! This soundbar features a
Bluetooth® connection for audio streaming from a mobile device. It also includes an HDMI®
port for connecting an Audio Return Channel (ARC) and Consumer Electronics Channel
(CEC) enabled television using an ARC/CEC capable cable (not included). Its audio
connection capabilities are rounded out with 3.5mm TRS stereo analog, digital optical, and
digital coaxial inputs. An IR remote control is included.
FEATURES
Bluetooth®, HDMI®, 3.5mm analog, digital optical, and digital coaxial audio inputs
Supports the Audio Return Channel (ARC) and Consumer Electronics Control (CEC)
HDMI features
Supports the A2DP and AVRCP Bluetooth profiles
40Hz ~ 20kHz frequency response
8 ohms nominal impedance
Compliant with the Bluetooth 4.2 specification
Includes IR remote control
Accepts 100 ~ 240 VAC, 50/60 Hz input power
CUSTOMER SERVICE
The Monoprice Customer Service department is dedicated to ensuring that your ordering,
purchasing, and delivery experience is second to none. If you have any problem with your
order, please give us an opportunity to make it right. You can contact a Monoprice
Customer Service representative through the Live Chat link on our website
www.monoprice.com during normal business hours (Mon-Fri: 5am-7pm PT, Sat-Sun: 9am-
6pm PT) or via email at support@monoprice.com
6
Page 7
PACKAGE CONTENTS
Please take an inventory of the package contents to ensure you have all the items listed
below. If anything is missing or damaged, please contact Monoprice Customer Service for a
replacement.
1x SB-200 Premium Slim Soundbar
1x IR Remote Control
1x AC Power Cord
1x 3.5mm Audio Cable
1x RCA to 3.5mm Audio Cable
1x User's Manual
PRODUCT OVERVIEW
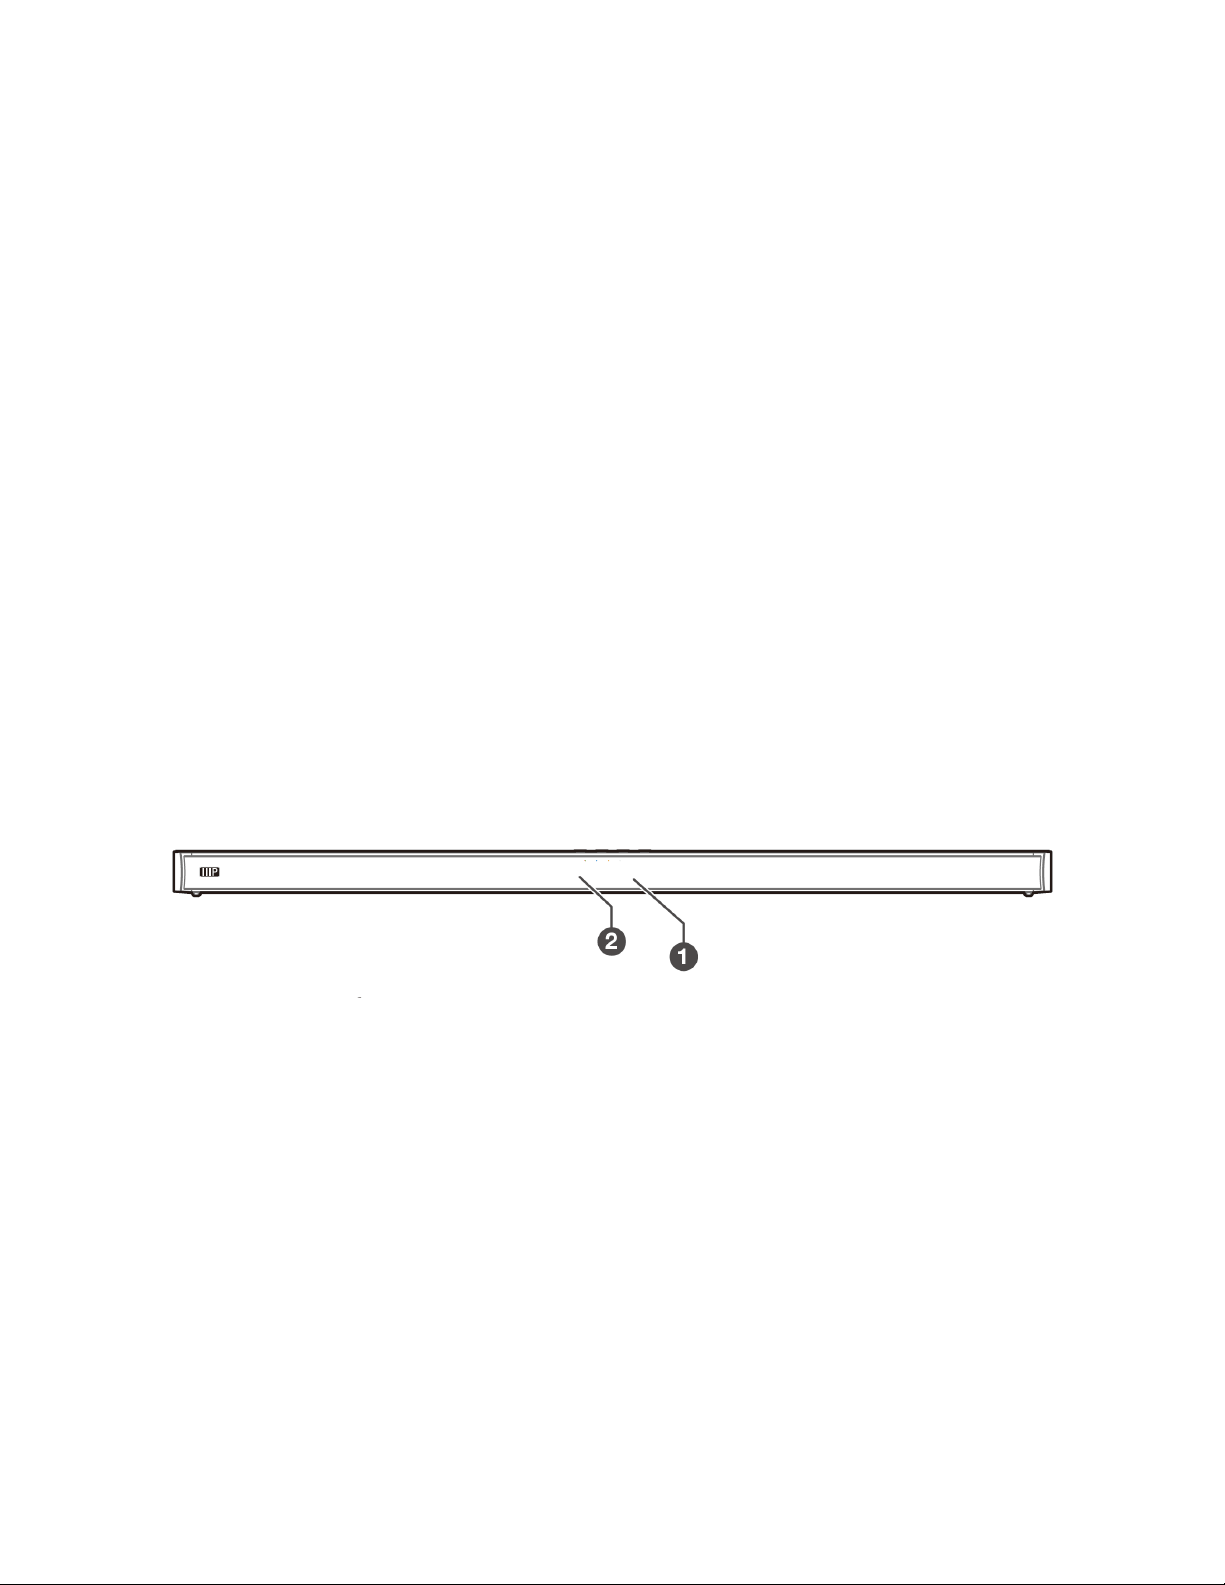
Front View
1. LED Indicators: A series of four LEDs that indicate the status of the soundbar.
Solid Red: The soundbar is in Standby mode.
Solid Green: The AUX (3.5mm TRS analog stereo) input is selected.
Solid Blue: The Bluetooth® input is selected.
Solid Orange: The digital optical input is selected.
Flashing Orange: The digital coaxial input is selected.
Solid White: The HDMI® (ARC) input is selected.
2. IR Receiver: IR "eye" for receiving signals from the included IR remote control.
7
Page 8

Rear View
3. Power: Pressing the button turns the soundbar On or puts it into Standby mode.
When in Standby mode, the first LED illuminates solid red.
4. Source: Repeatedly press the button to cycle through the different inputs. The cycle
order is AUX, OPTICAL, COAXIAL, HDMI® (ARC), and BT (Bluetooth®).
5. Volume: Press the buttons to increase (+) or decrease (-) the volume level.
Side View
6. AC~: AC power socket for connecting the included AC power cord.
7. COAXIAL: Digital coaxial input.
8. OPTICAL: Digital optical input.
9. SERVICE ONLY: USB port for servicing at the factory.
10. AUX: 3.5mm TRS stereo analog input.
11. HDMI ARC: HDMI® connector for receiving audio from the television over an HDMI
cable. Note that both the cable and the television must support the Audio Return
Channel (ARC) and Consumer Electronics Control (CEC) HDMI features.
8
Page 9

IR Remote Control
1. POWER: Press the button to turn the soundbar
On or to put it into Standby mode.
2. SOURCE: Press one of the buttons to select the
indicated audio source.
3. VOLUME: Press the buttons to increase (VOL+)
or decrease (VOL-) the volume level.
4. EQ: Press one of the buttons to select one of
the three preset EQ settings.
5. MUTE: Press the button to turn audio muting
on or off.
6. PREV/NEXT: Press the buttons to skip ahead to
the next track or to skip back to the previous
track when in Bluetooth® mode.
7. PLAY/PAUSE/PAIR: Momentarily press the button to pause or resume audio
playback in Bluetooth® mode. Press and hold the button to activate the pairing
function in Bluetooth mode or to disconnect the existing paired Bluetooth device.
USING THE REMOTE
First Time Use
The included IR remote control has a preinstalled
CR2025 battery. To prevent the battery from
depleting during shipment and storage, a small plastic
film prevents the battery from making electrical
contact. Prior to using the remote control for the first
time, this film should be removed. To remove the
protective film, grasp the tab and pull the film out of
the remote control. The film can be discarded after it
is removed.
9
Page 10

Replacing the Battery
The remote control uses a CR2025 battery. Perform the following steps to replace the
battery.
1. Push the tab on the side of the battery tray towards the tray.
2. Pull the battery tray out of the remote control.
3. Remove the old battery, then place a new CR2025 battery into the battery tray with
the + side up, as shown in the accompanying image.
4. Push the battery tray back into the remote control until the tab on the left side
engages and locks the tray in place.
PHYSICAL CONNECTIONS
This soundbar features four different physical audio inputs, which can be connected as
detailed in this section. You can use and switch between multiple connections.
you have the HDMI® ARC, OPTICAL, or COAXIAL input selected and no sound is present,
you may need to activate PCM audio output on your audio source device.
HDMI ARC
Assuming that your HDTV supports the Audio Return Channel (ARC) and Consumer
Electronics Control (CEC) features of the HDMI® specification, the HDMI ARC input is the
ideal audio input for audio when watching TV. The ARC feature allows audio to be
Note that if
10
Page 11

distributed from the TV to the soundbar and the CEC feature allows you to use your TV's
remote control to control the volume level of the soundbar.
To use the HDMI® ARC audio input your HDTV must support both the ARC and CEC
features and the ARC feature must be turned on. You will also need a High Speed HDMI
Cable (not included) that supports both the ARC and CEC features. Check your TV's user's
manual to ensure ARC and CEC support and to see how to turn ARC on.
Perform the following steps to connect your TV to the soundbar.
1. Plug one end of a compatible High Speed
HDMI Cable into the HDMI (ARC) port on the
soundbar, then plug the other end into the
HDMI ARC port on your TV. The port may be
labeled differently on your TV.
2. Use your TV's menu system to turn ARC on.
Check your TV's user's manual to determine
how this is done.
Digital Optical
Perform the following steps to connect the soundbar using the digital optical input.
1. Remove the protective plug from the OPTICAL
input on the soundbar.
2. Using a digital optical audio cable (not
included), plug one end into the OPTICAL input
on the soundbar, then plug the other end into
the digital optical output on your audio source
device (TV, AV receiver, etc.).
11
Page 12

Digital Coaxial
Perform the following steps to connect the soundbar using the digital coaxial input.
1. Using a digital coaxial audio cable (not
included), plug one end into the COAXIAL
input on the soundbar, then plug the other end
into the digital coaxial output on your audio
source device (TV, AV receiver, etc.).
AUX
This soundbar includes both 3.5mm to 3.5mm and RCA to 3.5mm analog audio cables.
Perform the following steps to connect the soundbar using the AUX input.
1. Check your audio source device to determine if it
uses 3.5mm or RCA audio outputs.
2. Using the appropriate cable, plug one end into the
AUX input on the soundbar, then plug the other
end into the appropriate (3.5mm or RCA) output
on your audio source device.
Power
Once all physical audio connections have been made, perform the following steps to
connect the soundbar to AC power.
1. Ensure that the soundbar is physically
installed in its intended location near an
AC power outlet and that all desired
physical audio connections have been
made.
12
Page 13

2. Ensure that the AC power outlet provides AC voltage in the 100 ~ 240 VAC, 50/60
Hz input voltage range of the soundbar.
3. Plug one end of the included AC power cord to the AC~ socket on the soundbar,
then plug the other end into the nearby AC power outlet. The LED Indicator on the
soundbar will glow solid red.
BLUETOOTH
This soundbar includes a Bluetooth® radio, which allows you to stream audio from a
Bluetooth enabled device. It complies with the 4.2 version of the Bluetooth specification
and has a clear air radio range of up to 26.2 feet (8 meters). The presence of obstacles can
reduce the radio range, which can cause your device to disconnect from the soundbar.
Note that to stream audio, your device must support the A2DP Bluetooth profile. To
control audio playback on your device using the soundbar's remote control, your device
must support the AVRCP Bluetooth profile.
Pairing
Before you can stream audio to the soundbar, you must pair the soundbar with your
Bluetooth enabled device. Perform the following steps to pair your device with the
soundbar.
1. Ensure that your device's Bluetooth feature is turned on and that your device is
within 3 feet (1 meter) of the soundbar.
2. Turn the soundbar On.
3. Repeatedly press the Source button on the soundbar until the LED Indicator on the
soundbar starts flashing blue. Alternatively, press the BT button on the remote
control.
4. On your Bluetooth enabled device, search for nearby Bluetooth devices. If the
MP34949 entry is not displayed, press and hold the PLAY/PAUSE/PAIR button until
you hear the voice prompt say Pairing and the LED Indicator on the soundbar
begins flashing blue.
13
Page 14

5. Select the MP34949 entry in the list. If you are prompted for a password, enter 0000
(four zeros). The voice prompt will say Paired and the LED Indicator will stop
flashing and will glow solid blue.
Disconnecting
Use one of the following methods to disconnect your device from the soundbar.
Use the Source button on the soundbar or one of the non-BT SOURCE buttons on
the remote control to switch to a different input.
Disable Bluetooth® on your device. The soundbar's voice prompt will say
Disconnected.
Press and hold the PLAY/PAUSE/PAIR button on the remote control.
Move your device out of Bluetooth radio range.
Playback
If your Bluetooth® device supports the AVRCP feature, you can use the PLAY/PAUSE/PAIR
button on the remote control to pause or resume playback. You can also use the
PREV/NEXT buttons on the remote to skip back to the previous track or forward to the
next track.
OPERATION
Power
When you first connect the soundbar with AC power, it will automatically enter
Standby mode and the LED Indicator on the soundbar will glow solid red.
Press the Power button on the soundbar or the POWER button on the remote
control to turn the soundbar On. The red LED Indicator on the soundbar will
extinguish and one of the other colored LEDs will illuminate to indicate the select
input.
14
Page 15

Press the Power button on the soundbar or the POWER button on the remote
control again to put the soundbar back into Standby mode. The colored LED
Indicator on the soundbar will extinguish and the red LED will illuminate.
Unplug the soundbar from the AC power outlet to turn the soundbar completely
Off.
If the soundbar is in Standby mode and audio playback starts on a source device
connected to the AUX port, the soundbar will automatically turn On.
If the soundbar receives no input signal for more than 15 minutes, it will
automatically enter Standby mode.
Source
Repeatedly press the Source button on the soundbar to cycle through the inputs.
The LED Indicator will change color to indicate the selected input.
Alternatively, press one of the SOURCE buttons on the soundbar to select the input
indicated by the button label.
The cycle order when using the Source button on the soundbar is AUX, OPTICAL,
COAXIAL, HDMI® (ARC), and BT (Bluetooth®).
The LED Indicator will show which mode is currently active:
o Solid Red: The soundbar is in Standby mode.
o Solid Green: The AUX (3.5mm TRS analog stereo) input is selected.
o Solid Blue: The Bluetooth® input is selected.
o Solid Orange: The digital optical input is selected.
o Flashing Orange: The digital coaxial input is selected.
o Solid White: The HDMI® (ARC) input is selected.
15
Page 16

Volume
Press the + or - buttons on the soundbar or the VOL+ or VOL- buttons on the
remote control to increase or decrease the volume level.
Press the MUTE button on the remote control to turn audio muting on. Press the
MUTE button again, the + or - buttons on the soundbar, or press the VOL+ or VOL-
buttons on the remote control to turn audio muting off.
The LED Indicator flashes rapidly when the volume is adjusted.
If the volume level is at the maximum level, pressing the + button on the soundbar
or the VOL+ button on the remote control will result in the LED Indicator flashing
once.
If the volume level is at the minimum level, pressing the - button on the soundbar
or the VOL- buttons on the remote control will result in the LED Indicator flashing
once.
If using the HDMI (ARC) input option and your TV supports the CEC HDMI feature,
you can use the volume buttons on your TV to adjust the volume level of the
soundbar.
EQ
Press the NEWS, MOVIE, or MUSIC buttons on the remote control to select the
indicated preset EQ setting.
The NEWS EQ setting is recommended for watching news broadcasts.
The MOVIE EQ setting is recommended for watching movies.
The MUSIC EQ setting is recommended for listening to music.
16
Page 17

TROUBLESHOOTING
Q1: Pressing the Power button on the soundbar or the POWER button on the remote
control does not turn the soundbar On.
A1: Ensure that the AC power cord is completely plugged into the soundbar and the AC
power outlet. Check that the AC outlet is live by plugging something else (e.g. lamp)
into it.
Q2: The soundbar is On, but there is no sound.
A2: Check the following potential solutions:
Increase the volume level by pressing the + button on the soundbar or the VOL+
button on the remote control.
Press the MUTE button on the remote control to ensure that audio muting is not
on.
Ensure that the source device for the selected input is on and playing audio.
Try selecting a different source/input by pressing the Source button on the
soundbar or one of the SOURCE buttons on the remote control.
If using one of the digital source/input options (HDMI® ARC, OPTICAL, or
COAXIAL), try setting the output to PCM.
If using the Bluetooth® input, try increasing the output volume level of your
source device.
If your TV is the audio source, ensure that variable audio output is not enabled. Try
setting it to FIXED or STANDARD audio output.
17
Page 18

Q3: The remote control is not working.
A3: Check the following potential solutions:
Reduce the distance from the remote control to the soundbar.
Aim the remote control directly at the sensor on the soundbar.
Ensure that the protective film for the battery compartment has been removed.
Ensure that the battery is installed correctly with the + side up.
Replace the battery with a new one.
Q4: I cannot find the soundbar's ID MP34949 in my device's Bluetooth® settings.
A4: Check the following potential solutions:
Ensure that Bluetooth is enabled on your device.
Rescan for nearby Bluetooth® devices.
Press and hold the PLAY/PAUSE/PAIR button to disconnect any other connected
devices and enter pairing mode, then re-pair your device with the soundbar.
TECHNICAL SUPPORT
Monoprice is pleased to provide free, live, online technical support to assist you with any
questions you may have about installation, setup, troubleshooting, or product
recommendations. If you ever need assistance with your new product, please come online
to talk to one of our friendly and knowledgeable Tech Support Associates. Technical
support is available through the online chat button on our website www.monoprice.com
during regular business hours, 7 days a week. You can also get assistance through email by
sending a message to tech@monoprice.com
18
Page 19

SPECIFICATIONS
Model
34949
Frequency Response
40Hz ~ 20kHz
Nominal Impedance
8 ohms
Audio Inputs
1x HDMI®, 1x 3.5mm TRS analog stereo,
1x digital optical, 1x digital coaxial
Audio Input Sensitivity
500mV
Bluetooth® Pairing Name
MP34949
Bluetooth Version
4.2
Supported Bluetooth Profiles
A2DP, AVRCP
Bluetooth Transmission Power
5dBm
Bluetooth Frequency
2402 ~ 2480 MHz
Bluetooth Connection Range
up to 26.2 feet (8 meters)
IR Remote Control Range
up to 19.7 feet (6 meters)
IR Reception Angle
30°
Remote Control Battery
1x CR2025
Input Power
100 ~ 240 VAC, 50/60 Hz
Maximum Power Consumption
60 watts
Dimensions
35.4" x 3.4" x 1.8" (900 x 86 x 45 mm)
19
Page 20

REGULATORY COMPLIANCE
Notice for FCC
This device complies with Part 15 of the FCC rules. Operation is subject to the following
two conditions: (1) this device may not cause harmful interference, and (2) this device must
accept any interference received, including interference that may cause undesired
operation.
Modifying the equipment without Monoprice’s authorization may result in the equipment
no longer complying with FCC requirements for Class A digital devices. In that event, your
right to use the equipment may be limited by FCC regulations, and you may be required to
correct any interference to radio or television communications at your own expense.
This equipment has been tested and found to comply with the limits for a Class A digital
device, pursuant to Part 15 of the FCC Rules. These limits are designed to provide
reasonable protection against harmful interference in a commercial installation. This
equipment generates, uses and can radiate radio frequency energy and, if not installed and
used in accordance with the instructions, may cause harmful interference to radio
communications. Operation of this equipment in a residential area is likely to cause harmful
interference, in which case the user will be required to correct the interference at his own
expense.
Radio Notice for FCC
Caution
This FCC Part 15 radio device operates on a non-interference basis with other devices
operating at this frequency. Any changes or modification to said product not expressly
approved by Monoprice, including the use of non-approved antennas, could void the user’s
authority to operate this device.
20
Page 21

This device complies with Part 15 of the FCC Rules. Operation is subject to the following
two conditions: (1) this device may not cause harmful interference, and (2) this device must
accept any interference received, including interference that may cause undesired
operation.
Radio Notice for Industry Canada
Caution
This IC RSS-210 radio device operates on a non-interference basis with other devices
operating at this frequency. Any changes or modification to said product not expressly
approved by Monoprice, including the use of non-approved antennas, could void the user’s
authority to operate this device.
This device complies with IC RSS-210. Operation is subject to the following two conditions:
(1) this device may not cause harmful interference, and (2) this device must accept any
interference received, including interference that may cause undesired operation.
HDMI®, the HDMI Logo, and High-Definition Multimedia Interface are trademarks or
registered trademarks of HDMI Licensing LLC in the United States and other countries.
The Bluetooth® word mark and logos are registered trademarks of Bluetooth SIG, Inc.
21
 Loading...