

Page 1
MP Voxel 3D Printer
P/Ns 33820, 35880, 35881
User's Manual
Page 2

CONTENTS
SAFETY WARNINGS AND GUIDELINES ....................................................................................................................................... 4
FEATURES .............................................................................................................................................................................................................. 6
CUSTOMER SERVICE .................................................................................................................................................................................... 6
PACKAGE CONTENTS ................................................................................................................................................................................. 7
PRODUCT OVERVIEW ................................................................................................................................................................................. 8
Internal View ................................................................................................................................................................................................ 8
Exterior View ............................................................................................................................................................................................... 9
OSD MENU SYSTEM .................................................................................................................................................................................... 9
Main Menu ..................................................................................................................................................................................................... 9
Build Menu ................................................................................................................................................................................................... 10
File Screen .................................................................................................................................................................................................... 10
Multiple File Selection Screen .................................................................................................................................................... 11
Tools Menu .................................................................................................................................................................................................. 12
Network Menu ......................................................................................................................................................................................... 12
WiFi Screen .................................................................................................................................................................................................. 13
Hotspot Screen ........................................................................................................................................................................................ 14
Setup Hotspot Screen ....................................................................................................................................................................... 14
Input Keypad Screen .......................................................................................................................................................................... 15
Cloud Menu ................................................................................................................................................................................................. 15
Ethernet Screen ....................................................................................................................................................................................... 16
Preheat Menu ............................................................................................................................................................................................ 16
Preheating Screen ................................................................................................................................................................................. 17
Setting Menu ............................................................................................................................................................................................. 17
Status Screen ............................................................................................................................................................................................. 19
2
Page 3

Language Menu ..................................................................................................................................................................................... 20
Calibration Screen ................................................................................................................................................................................. 21
Home Screen ............................................................................................................................................................................................. 22
Move Screen ............................................................................................................................................................................................. 22
Camera Screen ........................................................................................................................................................................................ 23
About Screen ............................................................................................................................................................................................ 24
Filament Menu ........................................................................................................................................................................................ 25
CALIBRATION .................................................................................................................................................................................................. 26
LOADING FILAMENT ................................................................................................................................................................................ 27
PRINTING MODELS .................................................................................................................................................................................... 29
REMOVING THE PRINTED MODEL ................................................................................................................................................ 30
REPLACING FILAMENT ............................................................................................................................................................................ 31
USING THE CAMERA ................................................................................................................................................................................. 32
Camera Mode ........................................................................................................................................................................................... 32
Using the Camera with PolarCloud ...................................................................................................................................... 33
Turning the Camera On or Off with PolarCloud ........................................................................................................ 36
Error Handling .......................................................................................................................................................................................... 37
CLEARING A CLOGGED NOZZLE ................................................................................................................................................... 38
REPLACING THE NOZZLE ..................................................................................................................................................................... 38
FAQ .......................................................................................................................................................................................................................... 39
TECHNICAL SUPPORT ............................................................................................................................................................................... 41
SPECIFICATIONS ........................................................................................................................................................................................... 42
REGULATORY COMPLIANCE ............................................................................................................................................................. 43
Notice for FCC ......................................................................................................................................................................................... 43
Radio Notice for FCC ......................................................................................................................................................................... 43
3
Page 4

RF Exposure Statement for FCC ............................................................................................................................................. 44
Notice for Industry Canada ......................................................................................................................................................... 44
Radio Notice for Industry Canada ......................................................................................................................................... 44
RF Exposure Statement for Industry Canada .............................................................................................................. 45
EU Declaration of Conformity ................................................................................................................................................... 45
WEEE Information ................................................................................................................................................................................ 46
Safety Notice ............................................................................................................................................................................................ 47
SAFETY WARNINGS AND GUIDELINES
Please read this entire manual before using this device, paying extra attention to these
safety warnings and guidelines. Please keep this manual in a safe place for future reference.
Do not reach inside the printer during operation.
Always allow the printer and extruded filament to cool before reaching inside.
Take care to avoid touching hot parts, including heat blocks, extruder nozzle, and
extruded filament.
Do not wear gloves when operating or repairing to avoid entanglement.
Keep the printer and all accessories out of reach of children.
Do not force or tear anything when unpacking and during setup. This may cause
damage to the printer and/or its accessories.
Ensure that the printer is turned off and unplugged from its power source before
making repairs or performing service.
Do not install this device on an unstable surface where it could fall and cause either
personal injury or damage to the device and/or other equipment.
4
Page 5

Do not subject the product to extreme force, shock, or fluctuations in temperature
or humidity.
This device is intended for indoor use only.
Do not expose this device to water or moisture of any kind. Do not place drinks or
other containers with moisture on or near the device. If moisture does get in or on
the device, immediately unplug it from the power outlet and allow it to fully dry
before reapplying power.
Do not touch the device, the power cord, or any other connected cables with wet
hands.
Prior to operation, check the unit and power cord for physical damage. Do not use if
physical damage has occurred.
Before plugging the unit into a power outlet, ensure that the outlet provides the
same type and level of power required by the device.
Unplug this device from the power source when not in use.
Take care to prevent damage to the power cord. Do not allow it to become
crimped, pinched, walked on, or become tangled with other cords. Ensure that the
power cord does not present a tripping hazard.
Never unplug the unit by pulling on the power cord. Always grasp the connector
head or adapter body.
Use only in a well-ventilated area. Do not use in close, confined spaces.
Take care when using the scraper to remove a model. Never direct the scraper
towards your fingers or body.
The printer is designed to operate with an ambient temperature ranging from +59°F
(+15°C) to +86°F (+30°C), with a relative humidity from 20-70%. Printing outside
these limits may result in low quality prints.
Use eye protection when cleaning or sanding the printed models to avoid getting
small particles in your eyes.
5
Page 6

FEATURES
Can print any 1.75mm filament
Graphical user interface displayed on a 2.8" IPS touch screen
Removable build plate
Quick disconnect nozzle
Illuminated interior
5.9" x 5.9" x 5.9" (150 x 150 x 150 mm) build area
±0.2mm build accuracy
0.05-0.4 mm layer resolution
10 ~ 100 mm/second build speed
Can print from internal memory, Wi-Fi®, Ethernet, USB flash drive, or cloud
Compatible with Windows® XP/Vista®/7/8/10, Mac® OS X®, and Linux®
8GB internal memory
CUSTOMER SERVICE
The Monoprice Customer Service department is dedicated to ensuring that your ordering,
purchasing, and delivery experience is second to none. If you have any problem with your
order, please give us an opportunity to make it right. You can contact a Monoprice
Customer Service representative through the Live Chat link on our website
www.monoprice.com during normal business hours (Mon-Fri: 5am-7pm PT, Sat-Sun: 9am-
6pm PT) or via email at support@monoprice.com
6
Page 7
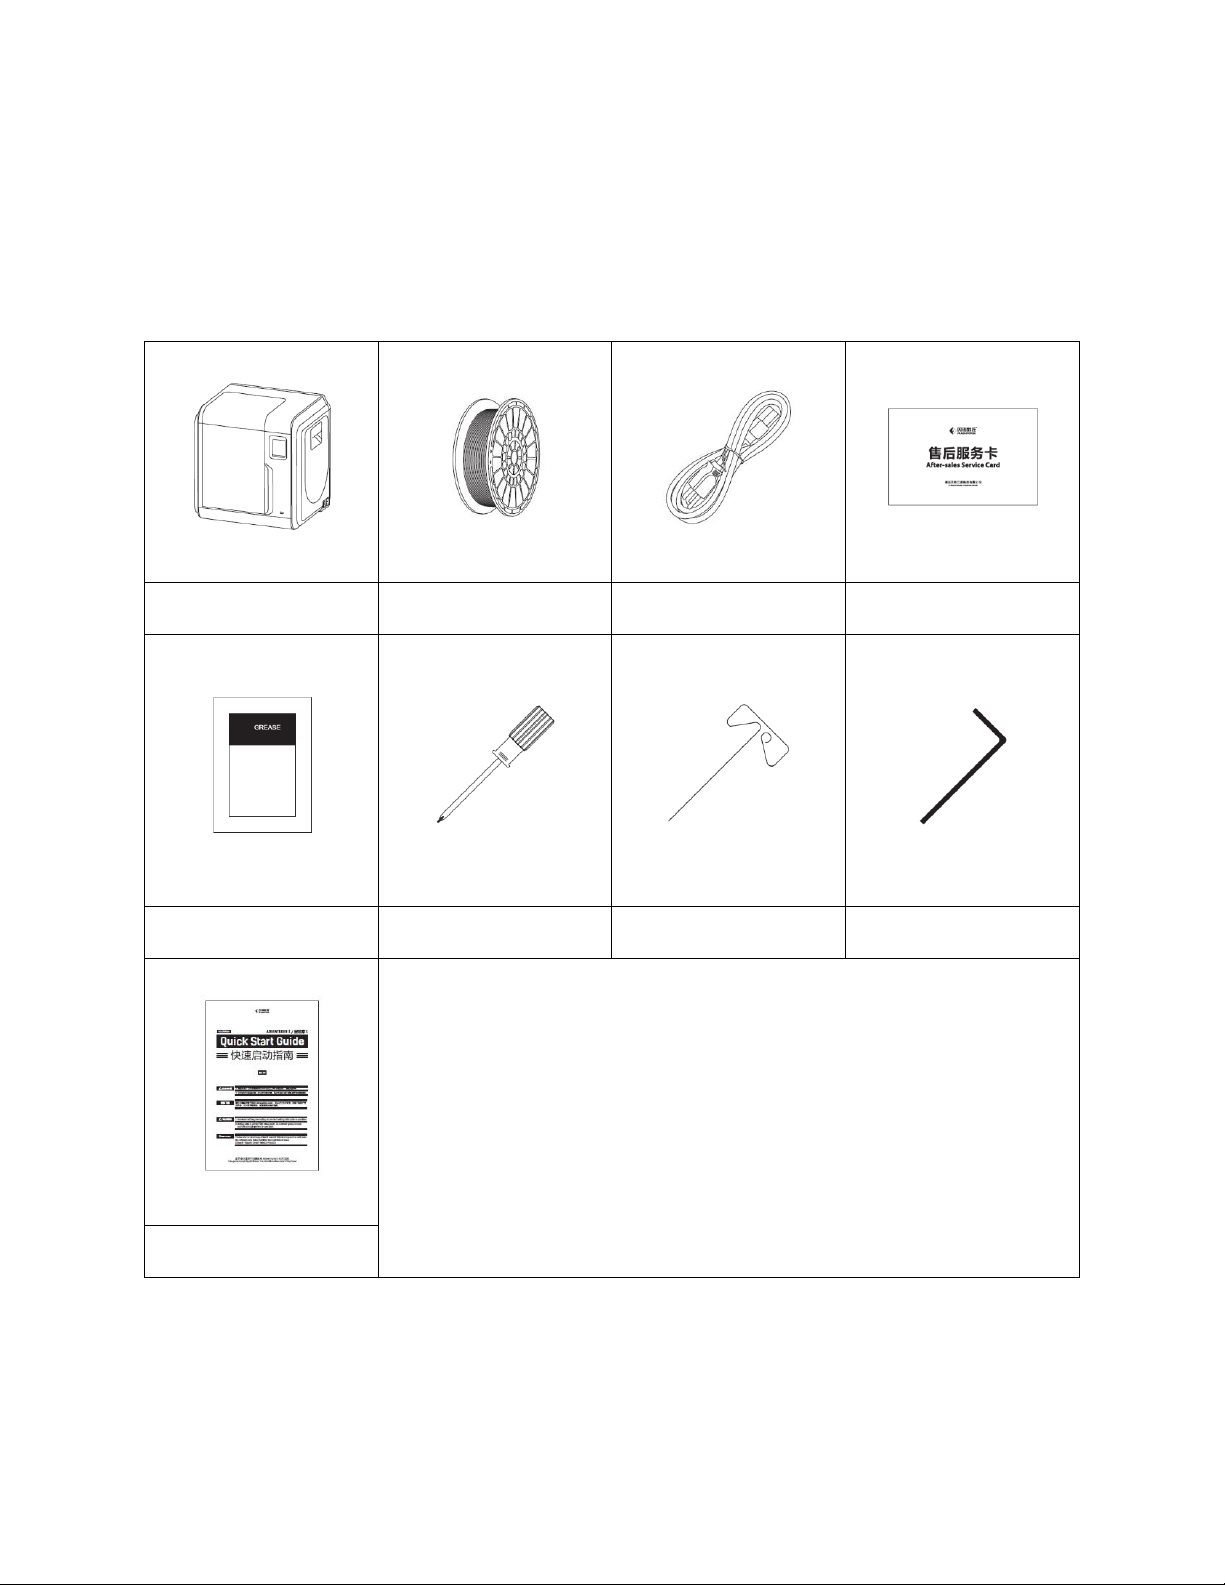
PACKAGE CONTENTS
1x 3D Printer
1x Spool Filament
1x AC Power Cord
1x Thank You Card
1x Package Grease
1x Screwdriver
1x Unclogging Tool
1x Allen Wrench
1x User's Manual
Please take an inventory of the package contents to ensure you have all the items listed
below. If anything is missing or damaged, please contact Monoprice Customer Service for a
replacement.
7
Page 8
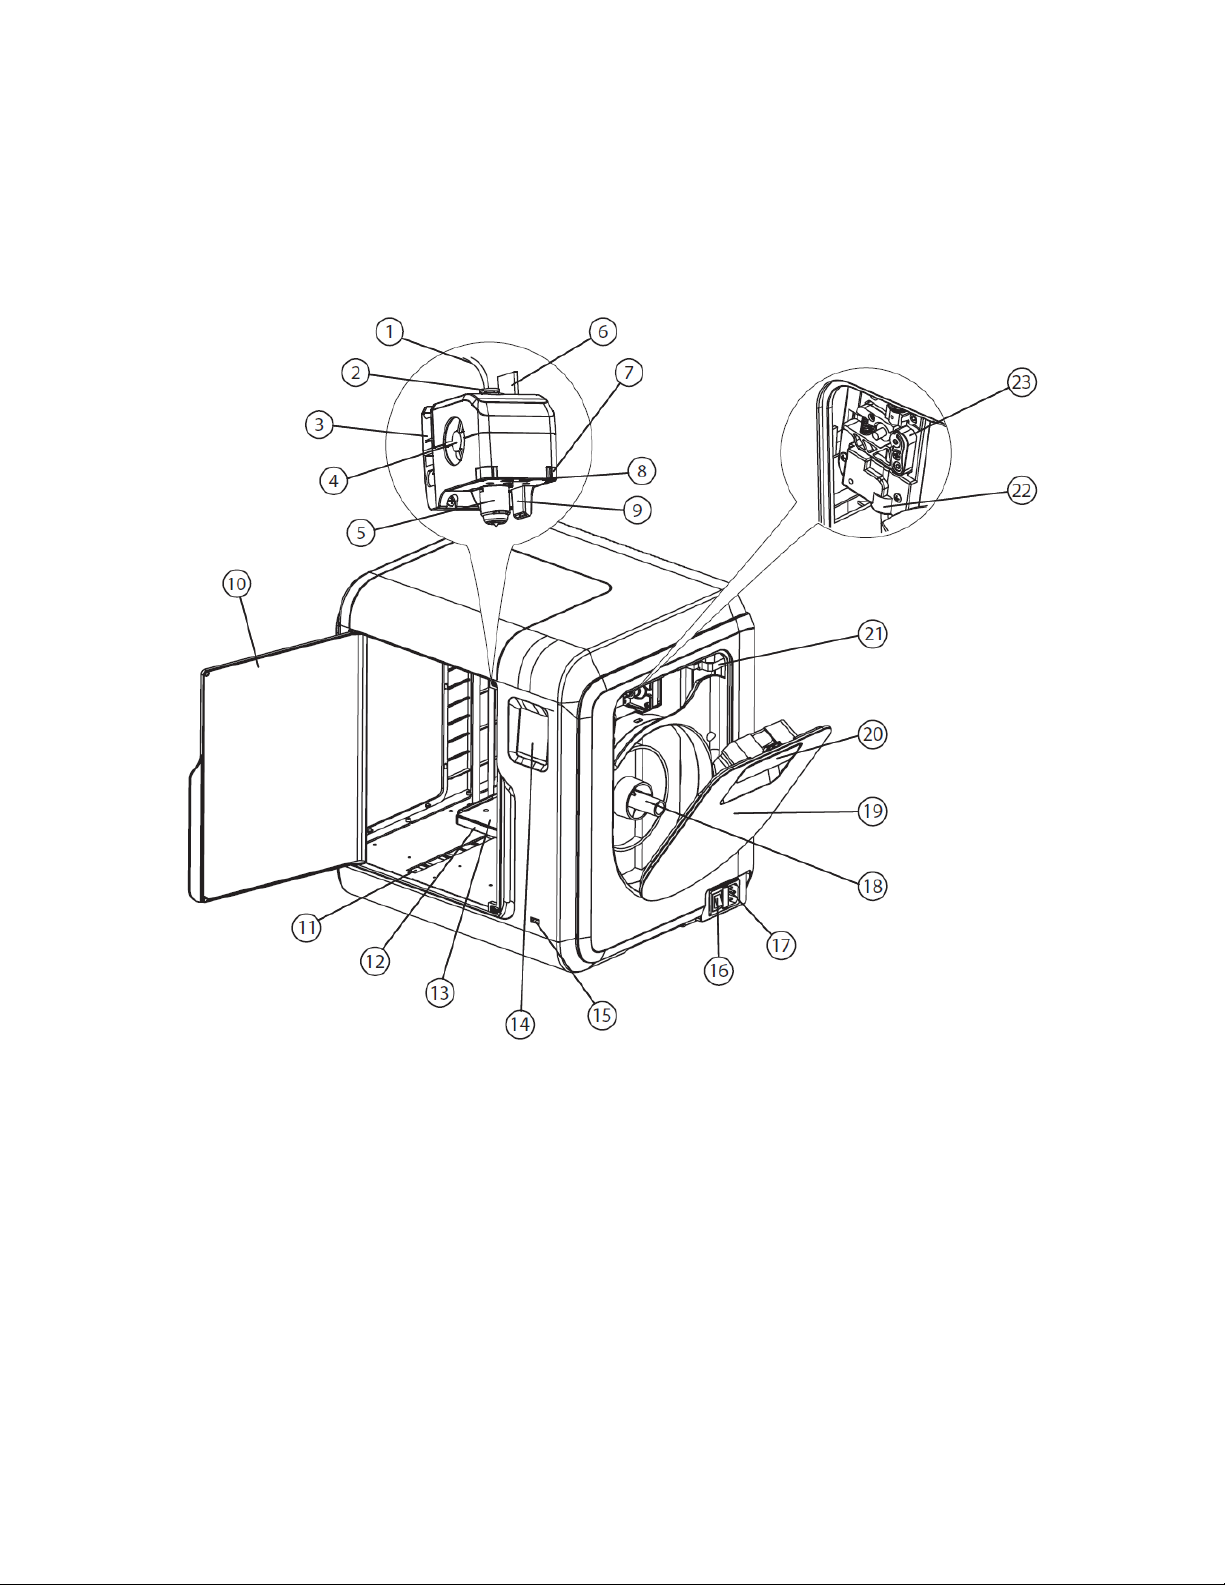
PRODUCT OVERVIEW
Internal View
1. Filament Guide Tube
2. Filament Guide Tube Joint
3. Extruder Base
4. Cooling Fan
5. Removable Nozzle
6. Extruder Cables
7. Clip
8. LED Lamp
9. Fan Duct
10. Front Door
11. Y-Axis Sliding Slot
12. Platform Base
13. Removable Build Plate
14. Touch Screen
8
Page 9
15. USB Port
20. Filament Cover Handle
16. Power Switch
17. Power Input
18. Spool Holder
19. Filament Cover
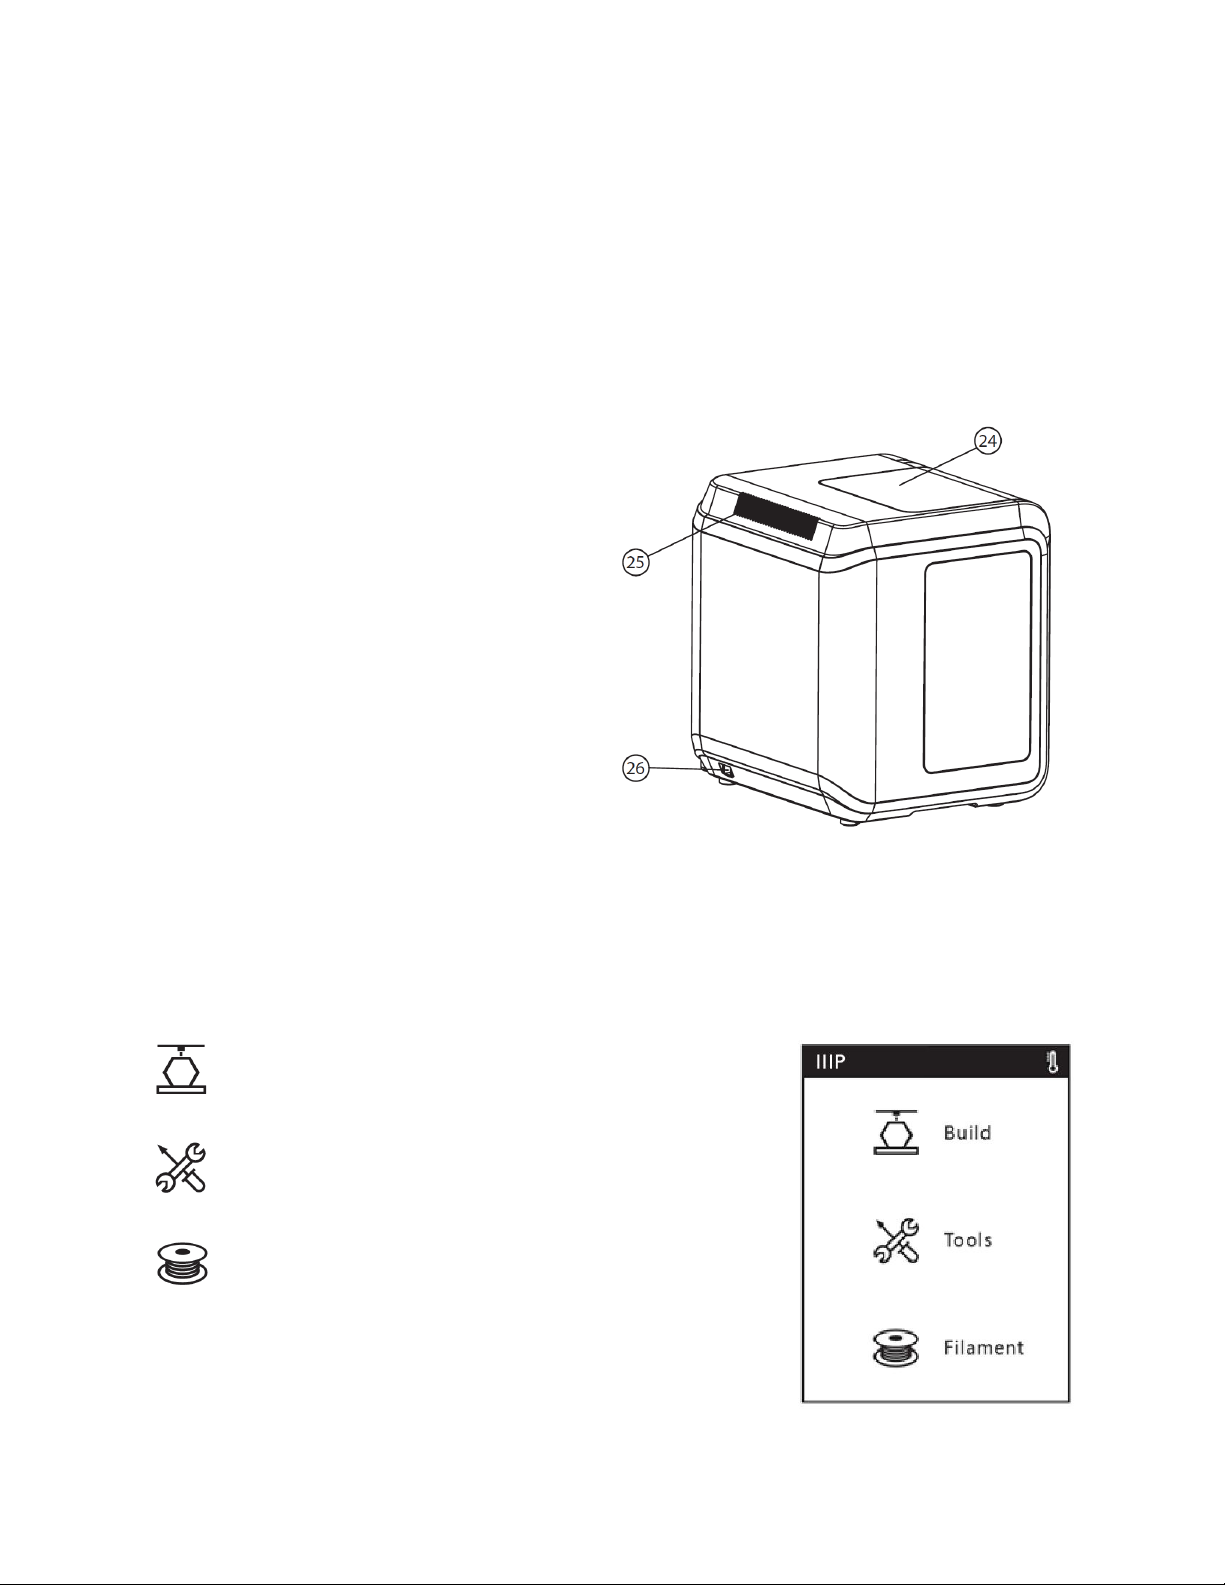
Exterior View
24. Top Cover
25. Air Outlet
26. Ethernet Port
21. Motor
22. Filament Intake
23. Filament Feeding Wheel
OSD MENU SYSTEM
Main Menu
Touch the Build icon to enter the Build Menu.
Touch Tools icon to enter the Tools Menu.
Touch the Filament icon to enter the Filament Menu.
9
Page 10
Build Menu
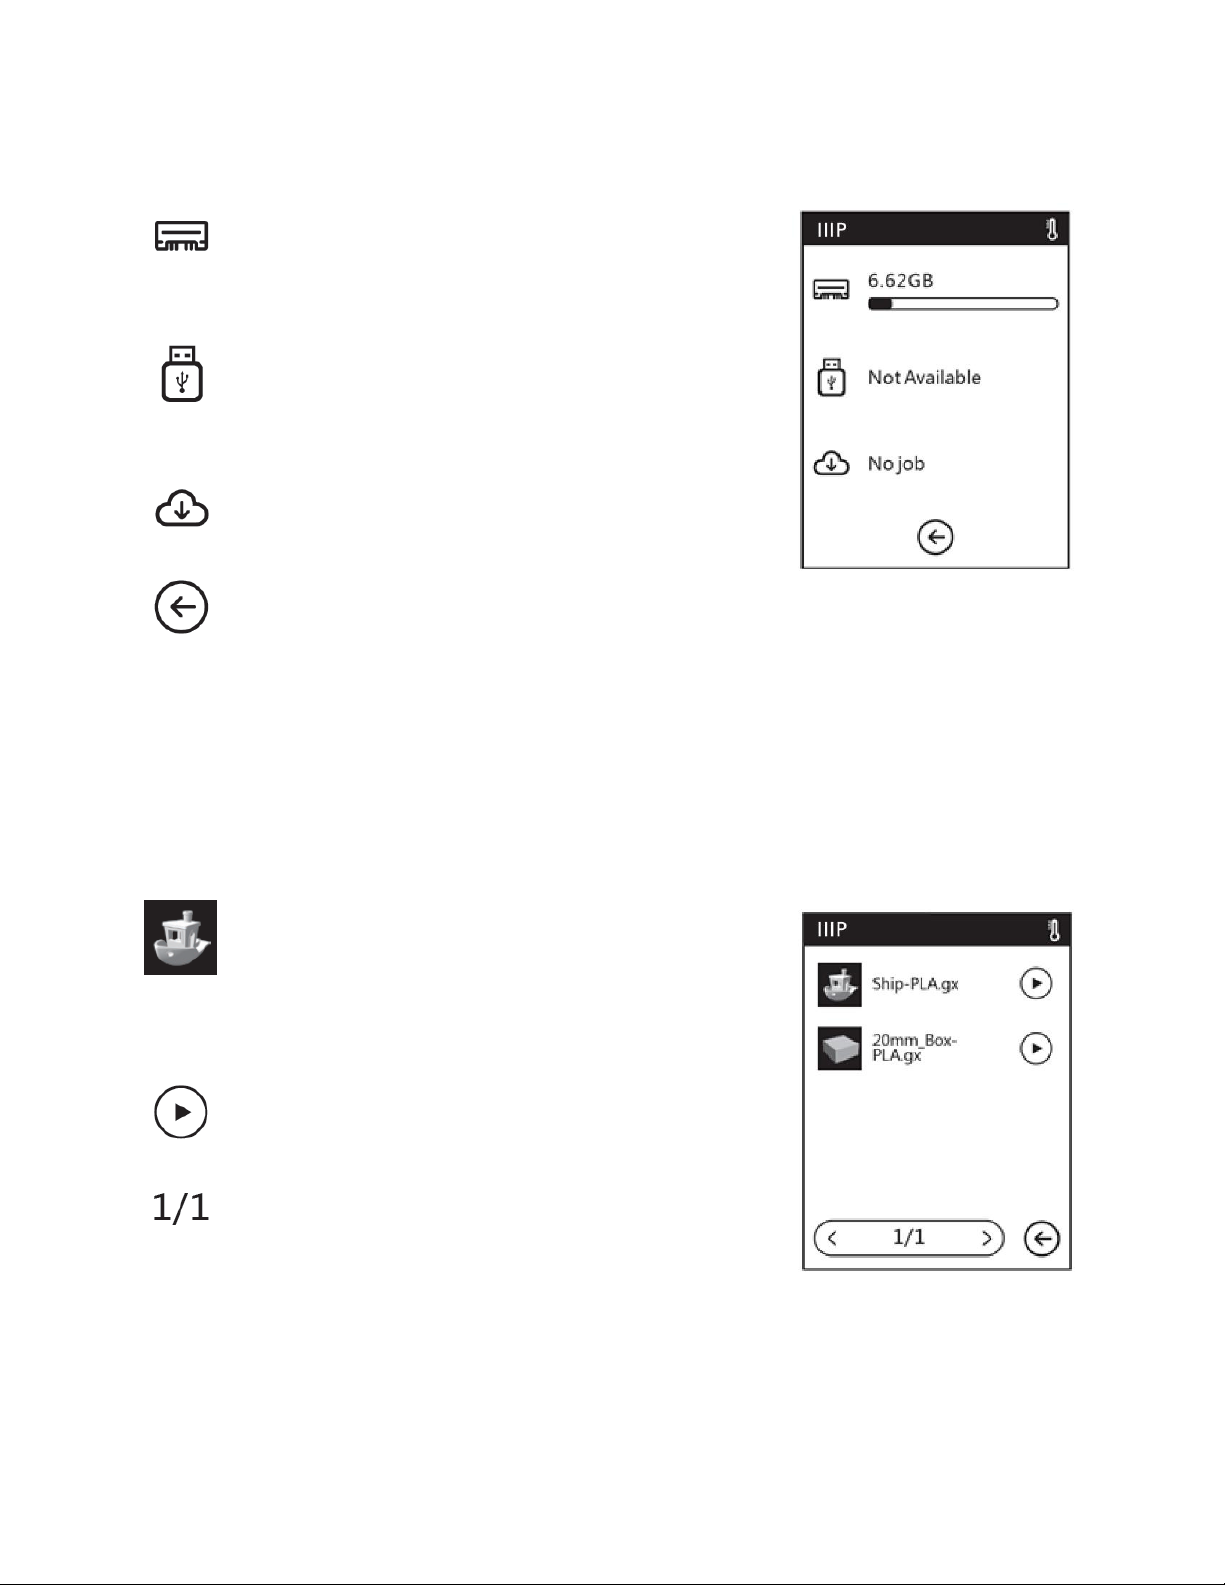
Touch the Memory icon to read files from the
printer's internal memory.
Touch the USB Drive icon to read files from a USB
flash drive plugged into the printer's USB port.
Touch the Cloud icon to read files from the cloud.
Touch the Back icon to return to the Main Menu.
File Screen
Regardless of which file source you choose, the files at the selected location are displayed
on the File Screen. The screen displays a small image of the model, the model filename,
print buttons, and navigation controls.
Momentarily touch the model image to display the
File Details Screen. Touch and hold the model image
to display the Multiple File Selection Screen.
Touch the ► icon to print the model.
If the selected storage location contains more files
than can be displayed on the File Screen, this
number will indicate the selected page number on the left and the total number
of pages on the right.
10
Page 11
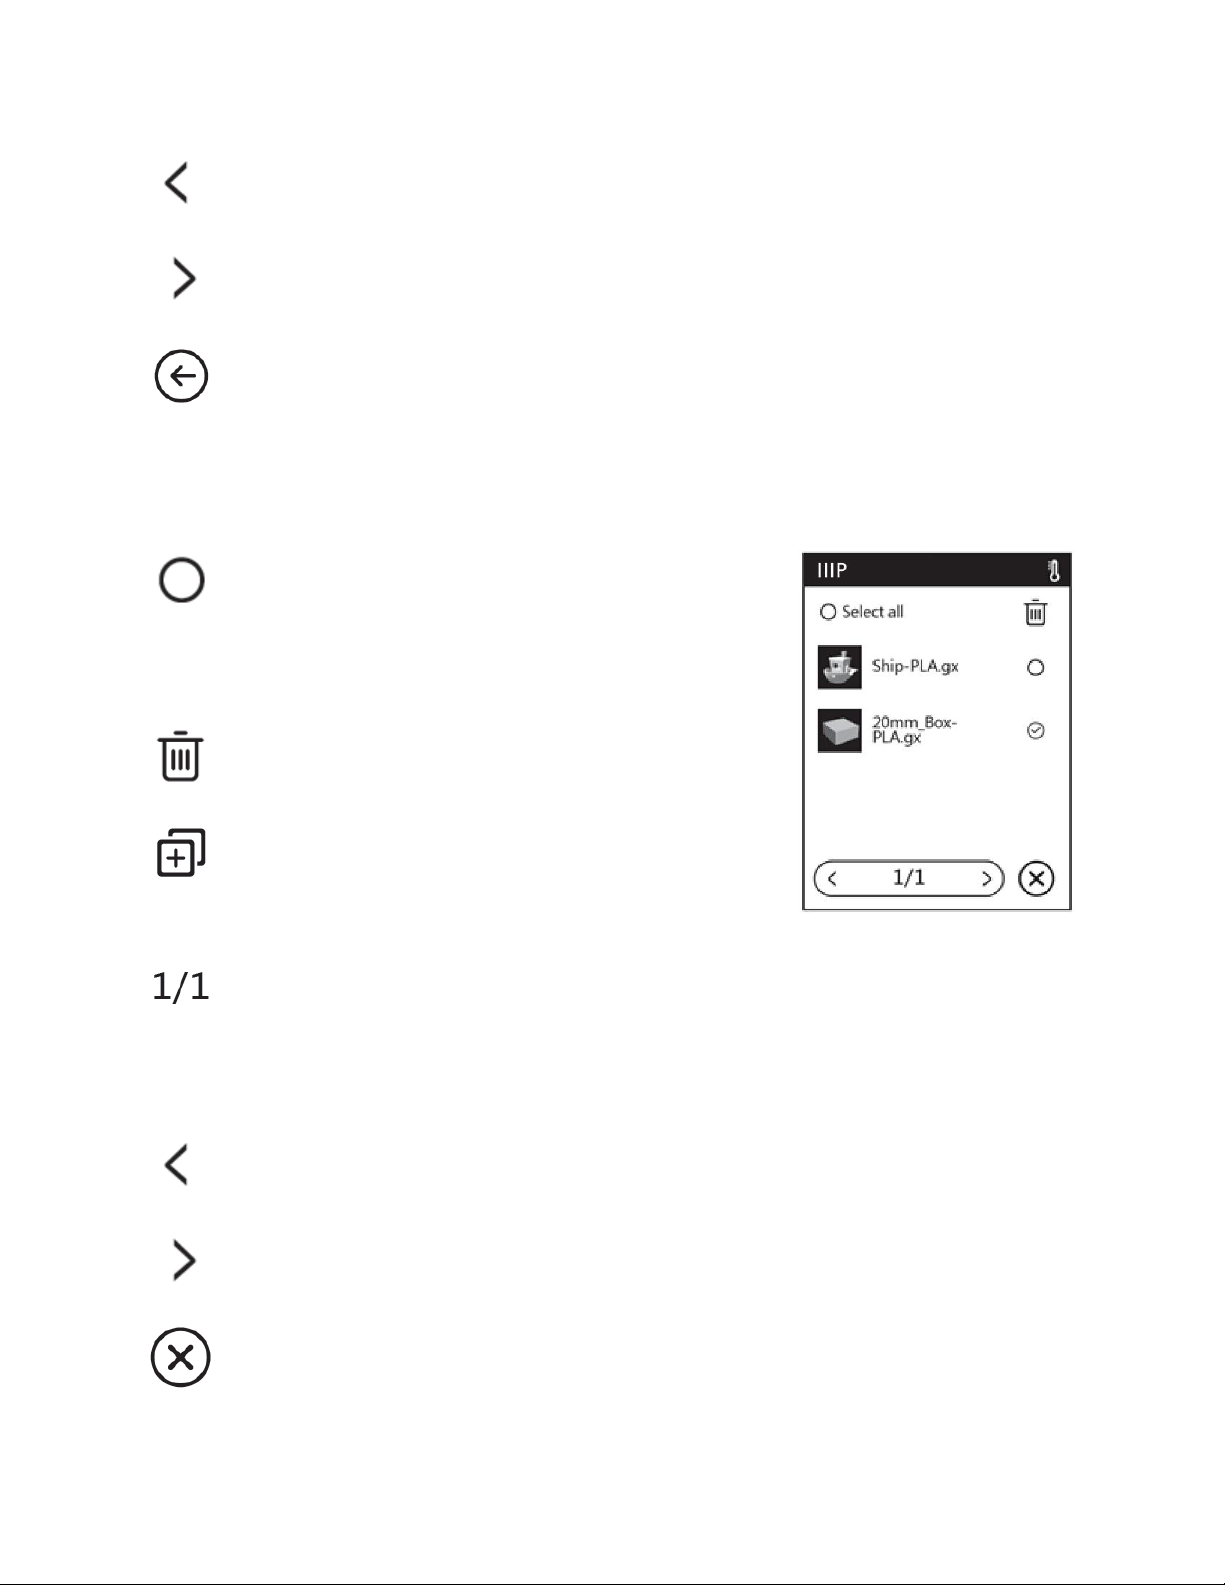
Touch the ᐸ icon to go back to the previous page.
Touch the ᐳ icon to advance to the next page.
Touch the ← icon to return to the Network Menu.
Multiple File Selection Screen
Touch the button to the right of a file to select that
file. Touch the button to the left of the Select all
label to select all files on the page.
Touch the Trash icon to delete the selected file(s).
Touch the + icon to copy the selected file(s) to the
printer's internal memory.
If the selected storage location contains more files than can be displayed on the
File Screen, this number will indicate the selected page number on the left and
the total number of pages on the right.
Touch the ᐸ icon to go back to the previous page.
Touch the ᐳ icon to advance to the next page.
Touch the X icon to exit the Multiple File Selection Screen.
11
Page 12
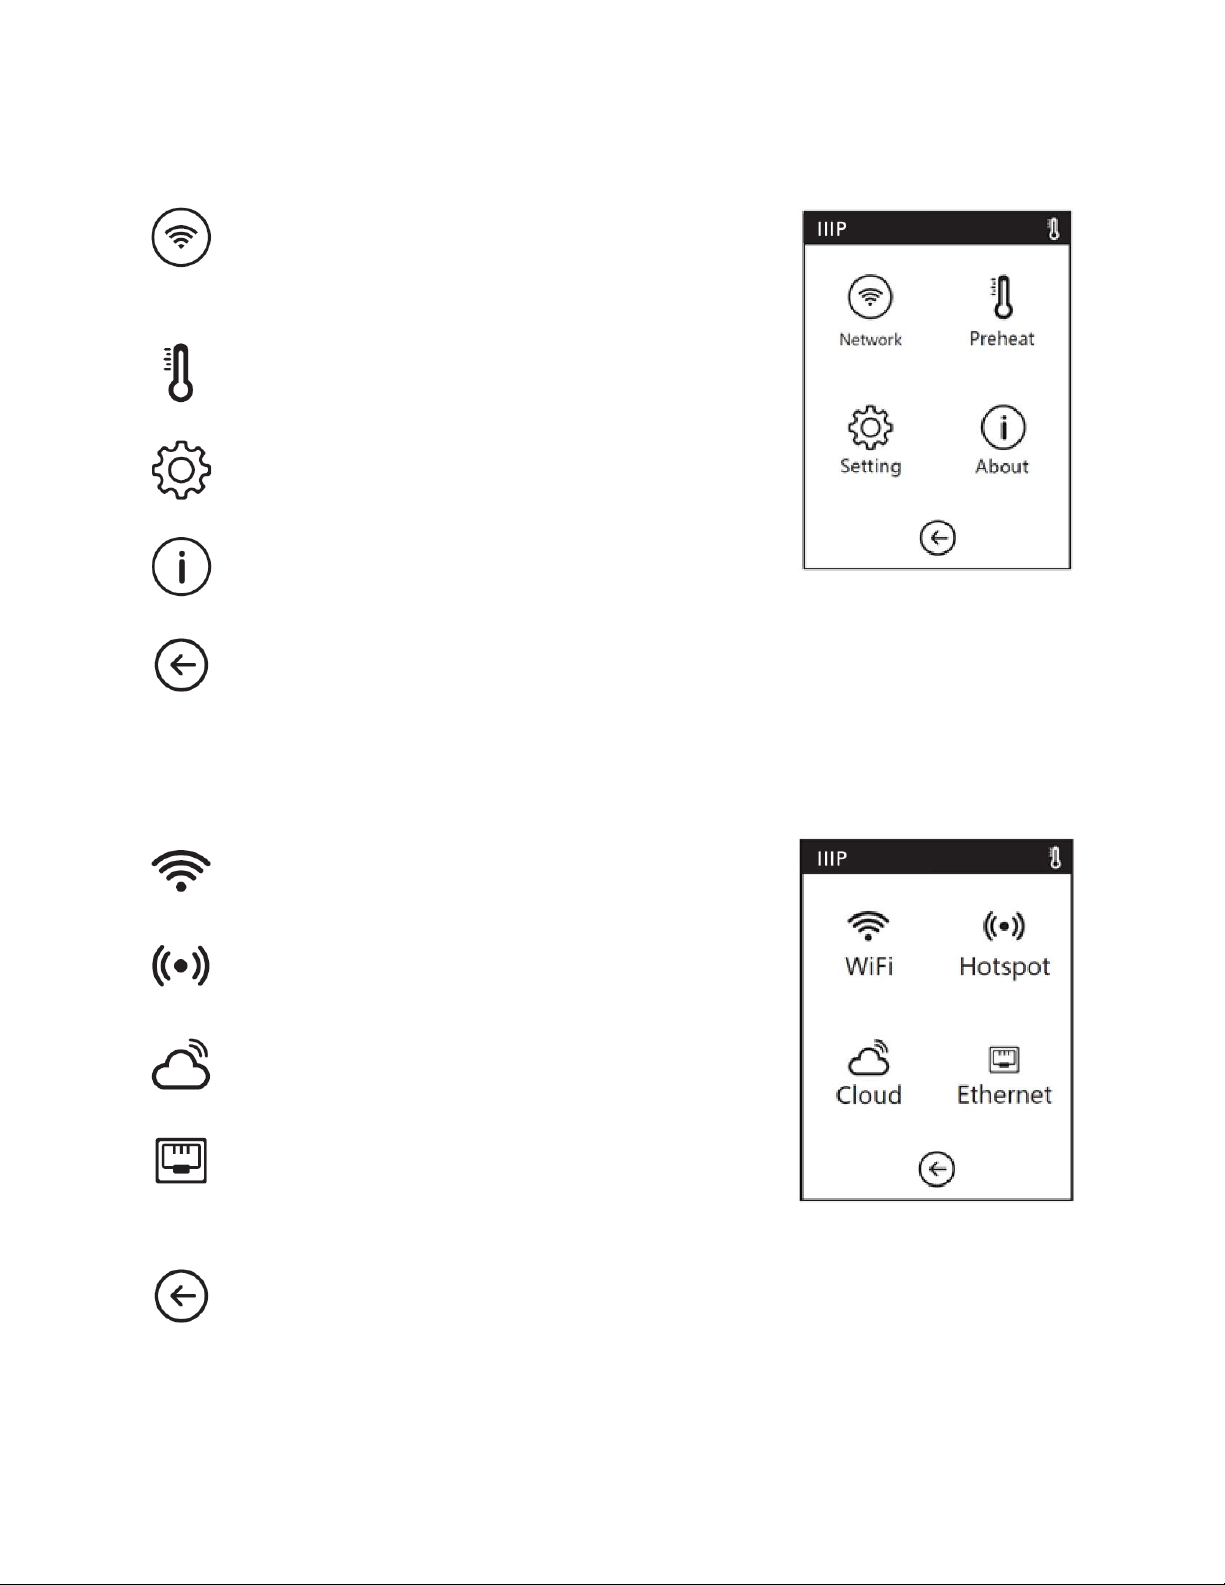
Tools Menu
Touch the Network icon to enter the Network
Menu.
Touch the Preheat icon to enter the Preheat Screen.
Touch the Setting icon to enter the Setting Menu.
Touch the About icon to enter the About Screen.
Touch the Back icon to return to the Main Menu.
Network Menu
Touch the WiFi icon to enter the WiFi Screen.
Touch the Hotspot icon to enter the Hotspot Screen.
Touch the Cloud icon to enter the Cloud Menu.
Touch the Ethernet icon to enter the Ethernet
Screen.
Touch the Back icon to return to the Main Menu.
12
Page 13
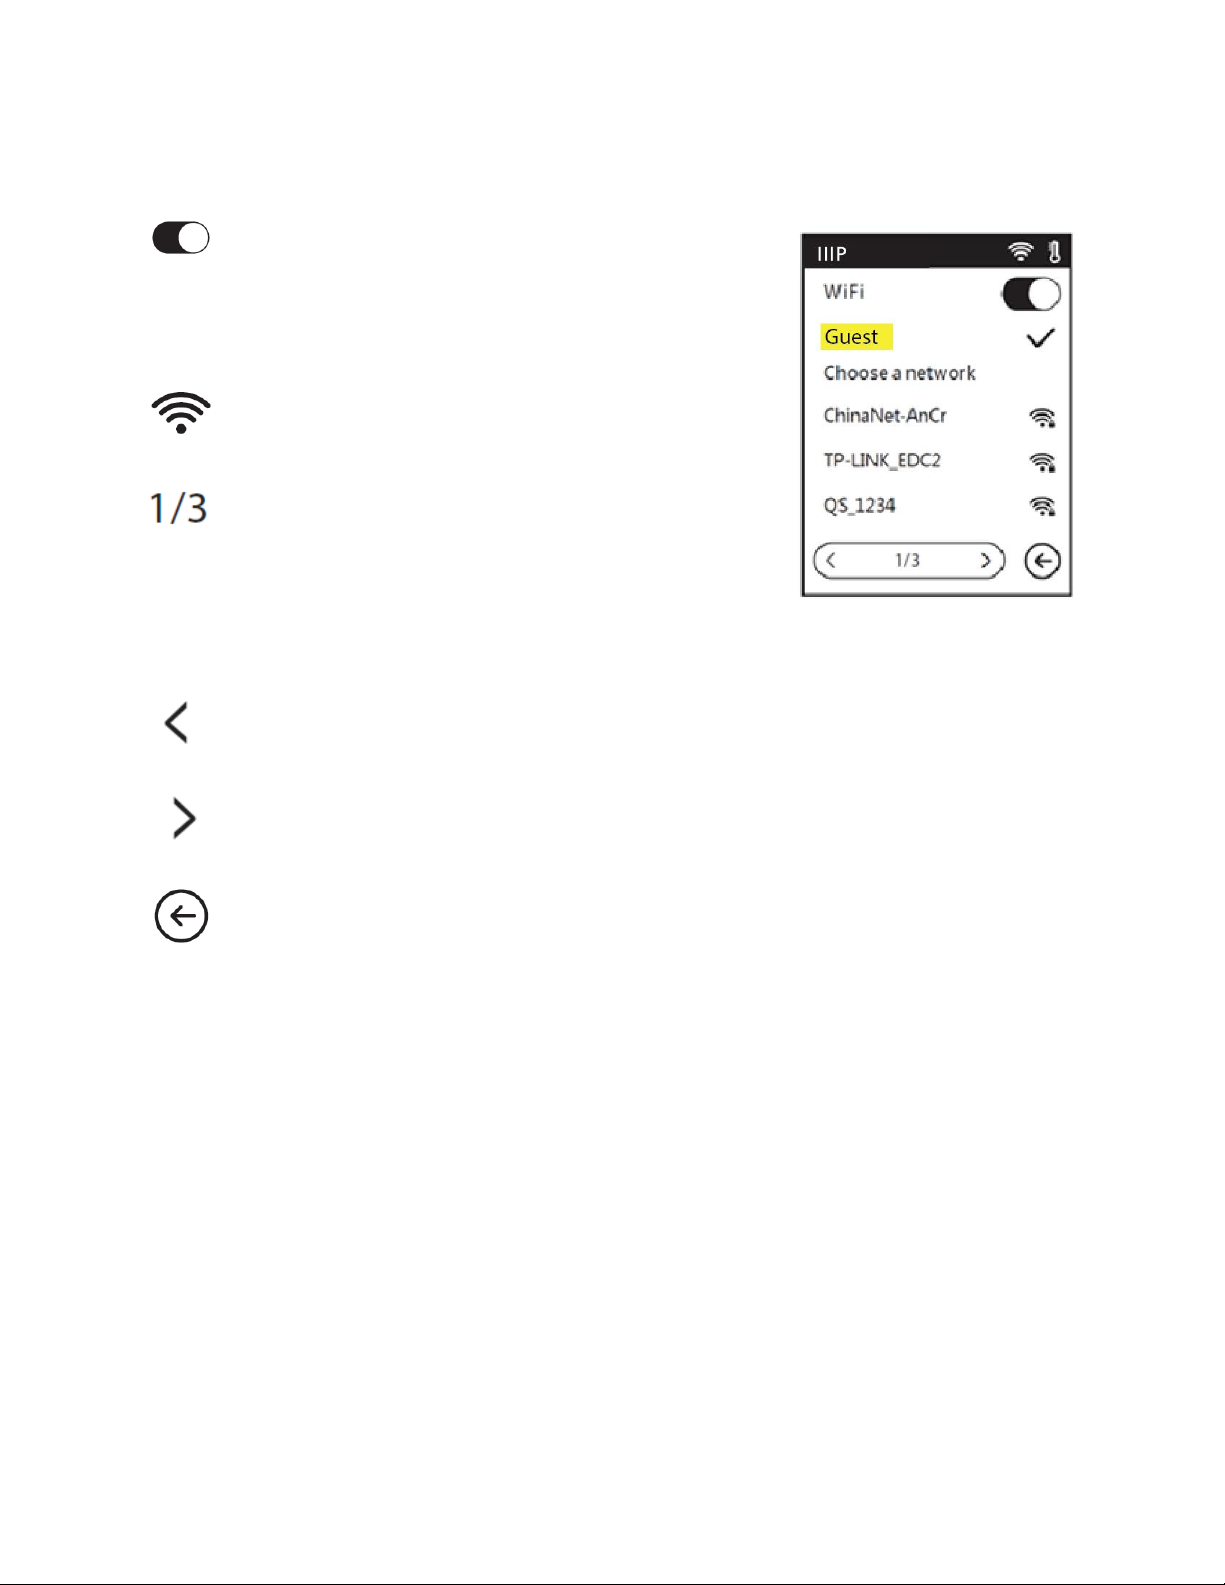
WiFi Screen
Touch the slider to turn Wi-Fi® on or off. Wi-Fi is on
when the white ball is to the right and off when it is
to the left.
Touch a Wi-Fi icon to select a Wi-Fi network.
If there are more available Wi-Fi networks than can
fit on the Wi-Fi Screen, this number will indicate the
selected page number on the left and the total
number of pages on the right.
Touch the ᐸ icon to go back to the previous page.
Touch the ᐳ icon to advance to the next page.
Touch the Back icon to return to the Main Menu.
13
Page 14
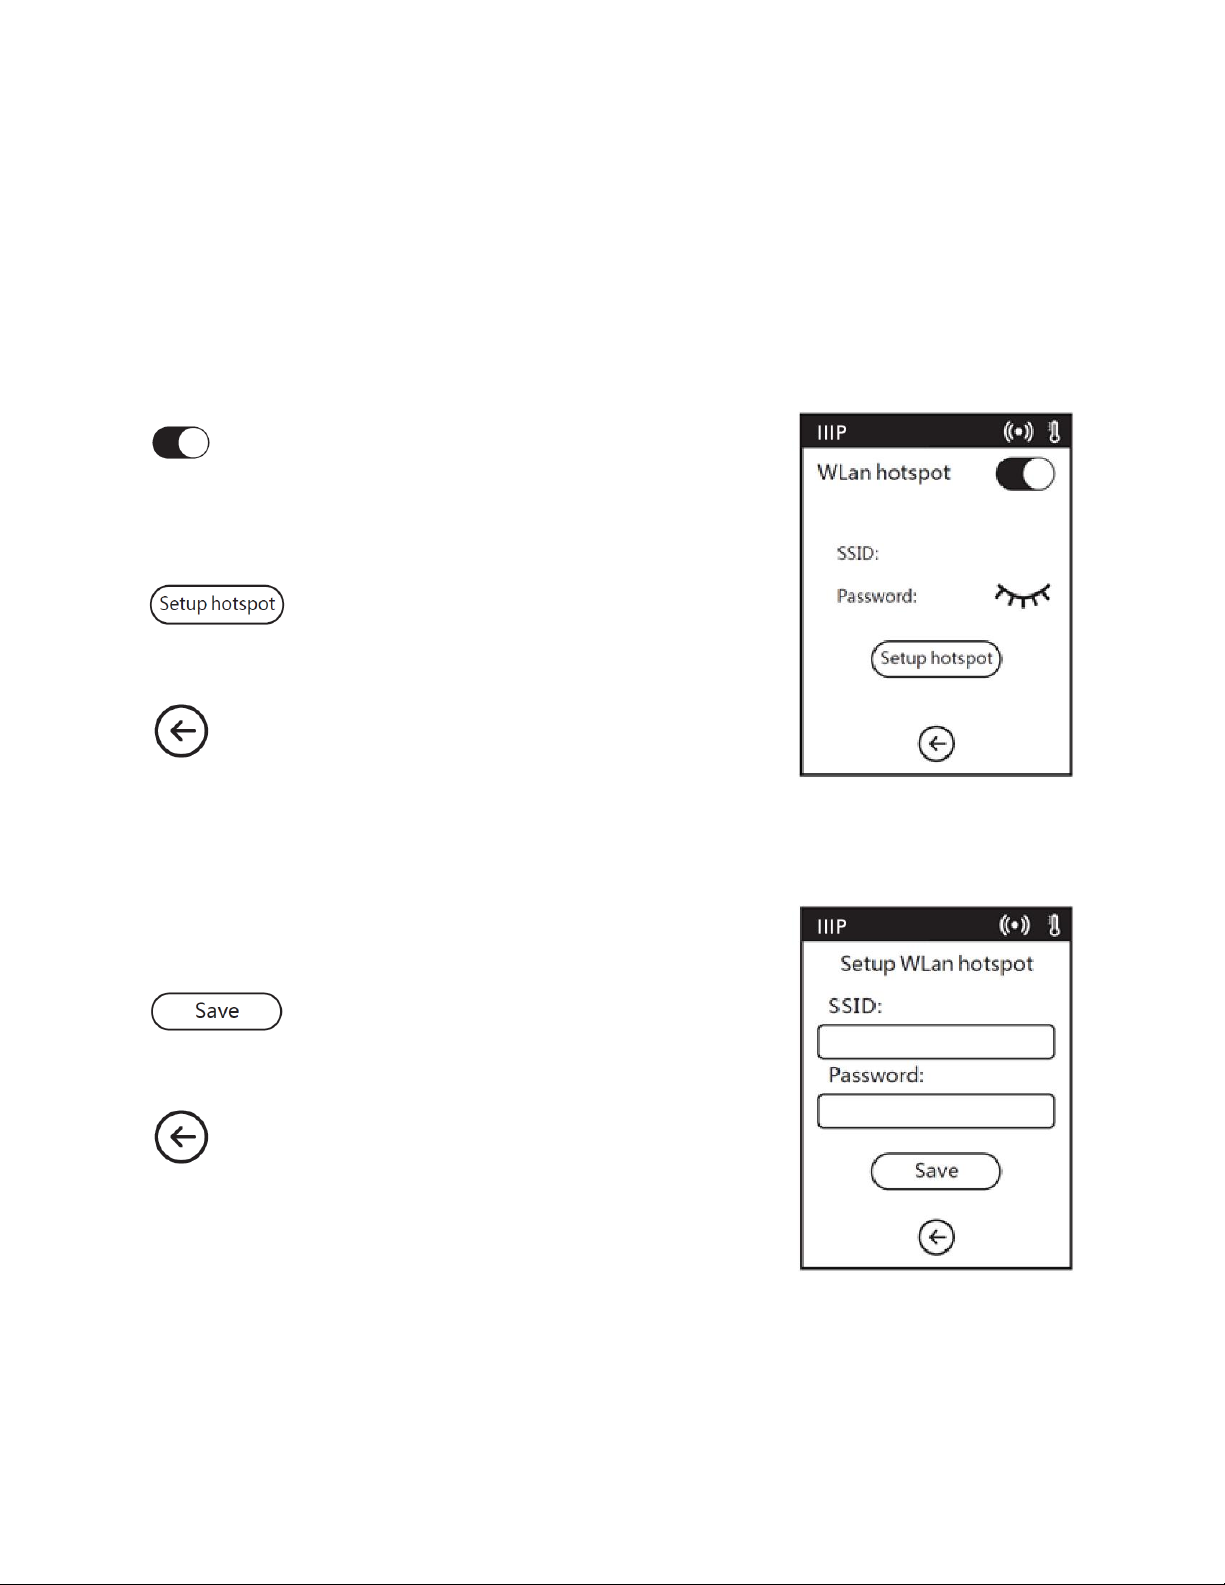
Hotspot Screen
The hotspot feature sets up your printer as a wireless access point (AP). You can then
connect your mobile device to use it as the wireless network, allowing it to communicate
directly with the printer. If you have already used the hotspot feature, this screen will
display the hotspot information you used the last time, otherwise you will need to setup
the hotspot.
Touch the slider to turn the hotspot feature on or
off. Hotspot is on when the white ball is to the right
and off when it is to the left.
Touch the Setup hotspot button to enter the
Setup Hotspot Screen.
Touch the Back icon to return to the Main Menu.
Setup Hotspot Screen
Touch the SSID and Password fields to display the Input
Keypad Screen.
Touch the Save button to save the SSID and
Password.
Touch the Back icon to return to the Hotspot
Screen.
14
Page 15
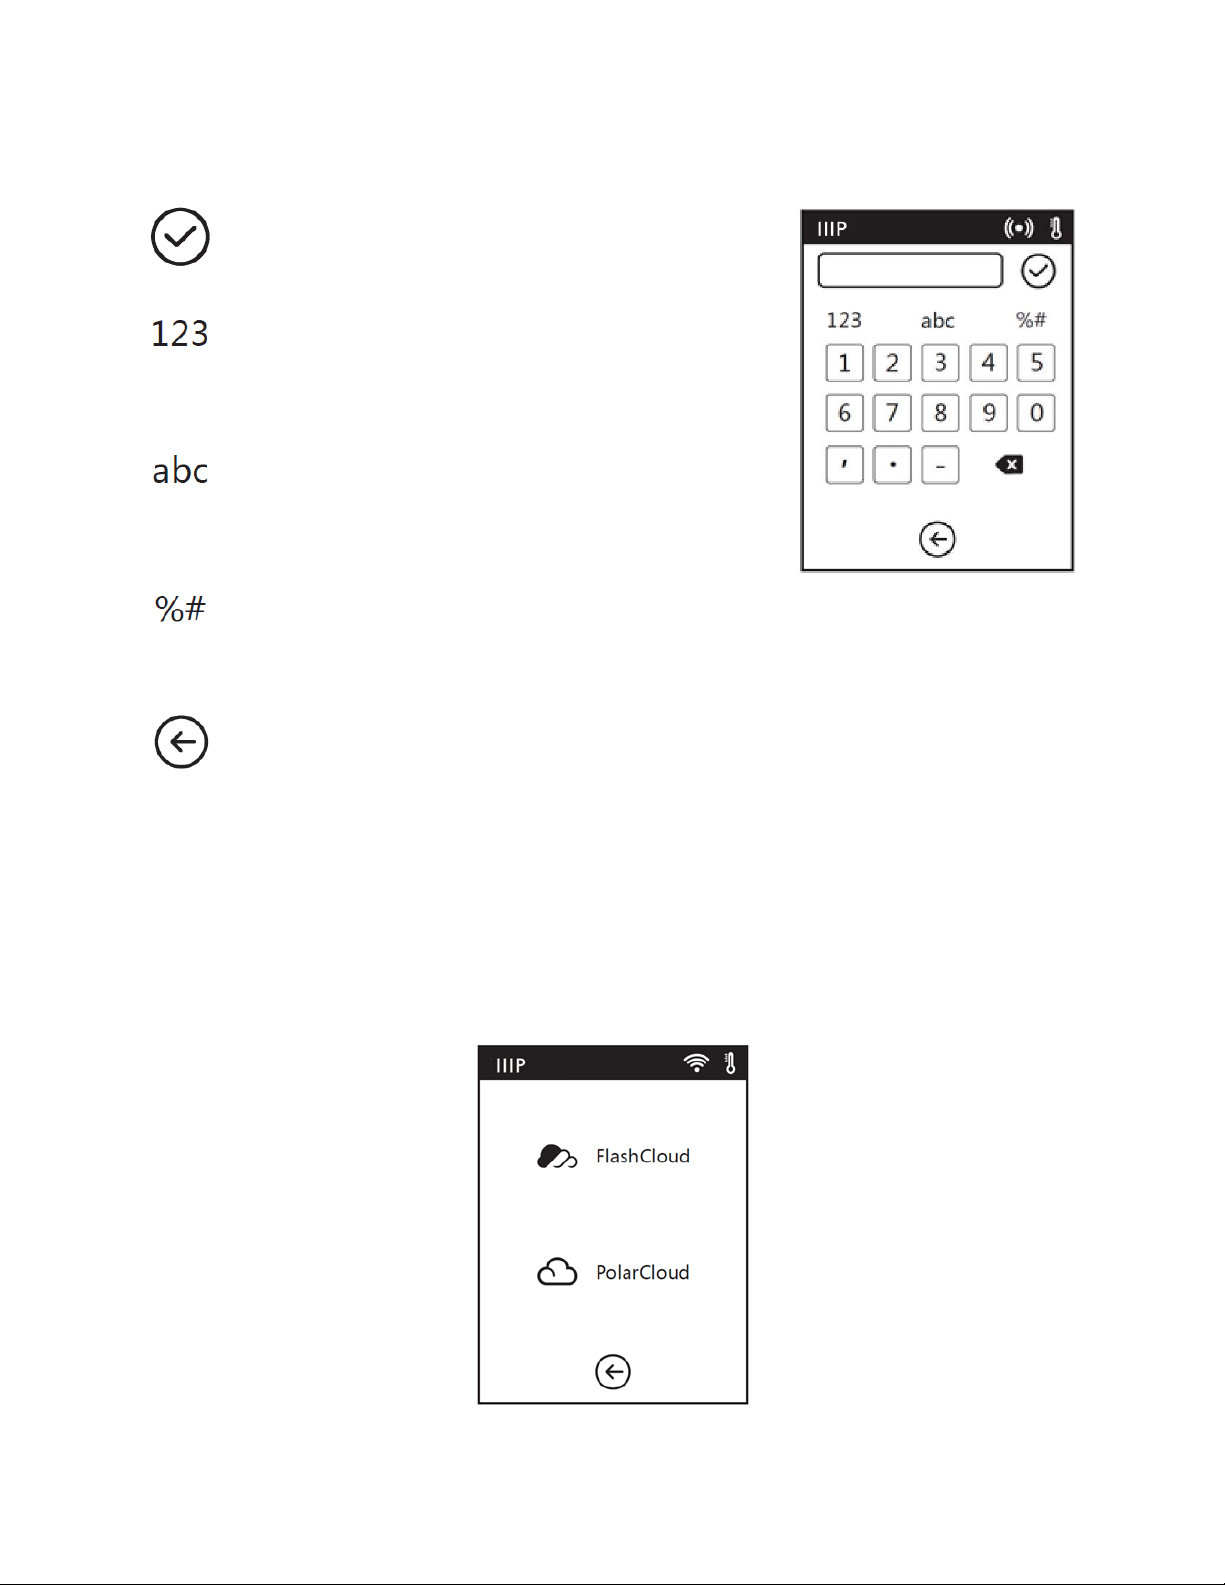
Input Keypad Screen
Touch the Check Mark icon to save the input value.
Touch the Numbers icon to change the keypad to
show numbers.
Touch the Letters icon to change the keypad to
show letters.
Touch the Symbols icon to change the keypad to
show special symbols.
Touch the Back icon to return to the Setup Hotspot Screen.
Cloud Menu
The Cloud Menu allows you to select which cloud you will connect to. The FlashCloud
option is only for use in China, while US, EU, and UK users will use PolarCloud. To create a
PolarCloud account, go to https://www.polar3d.com
15
Page 16
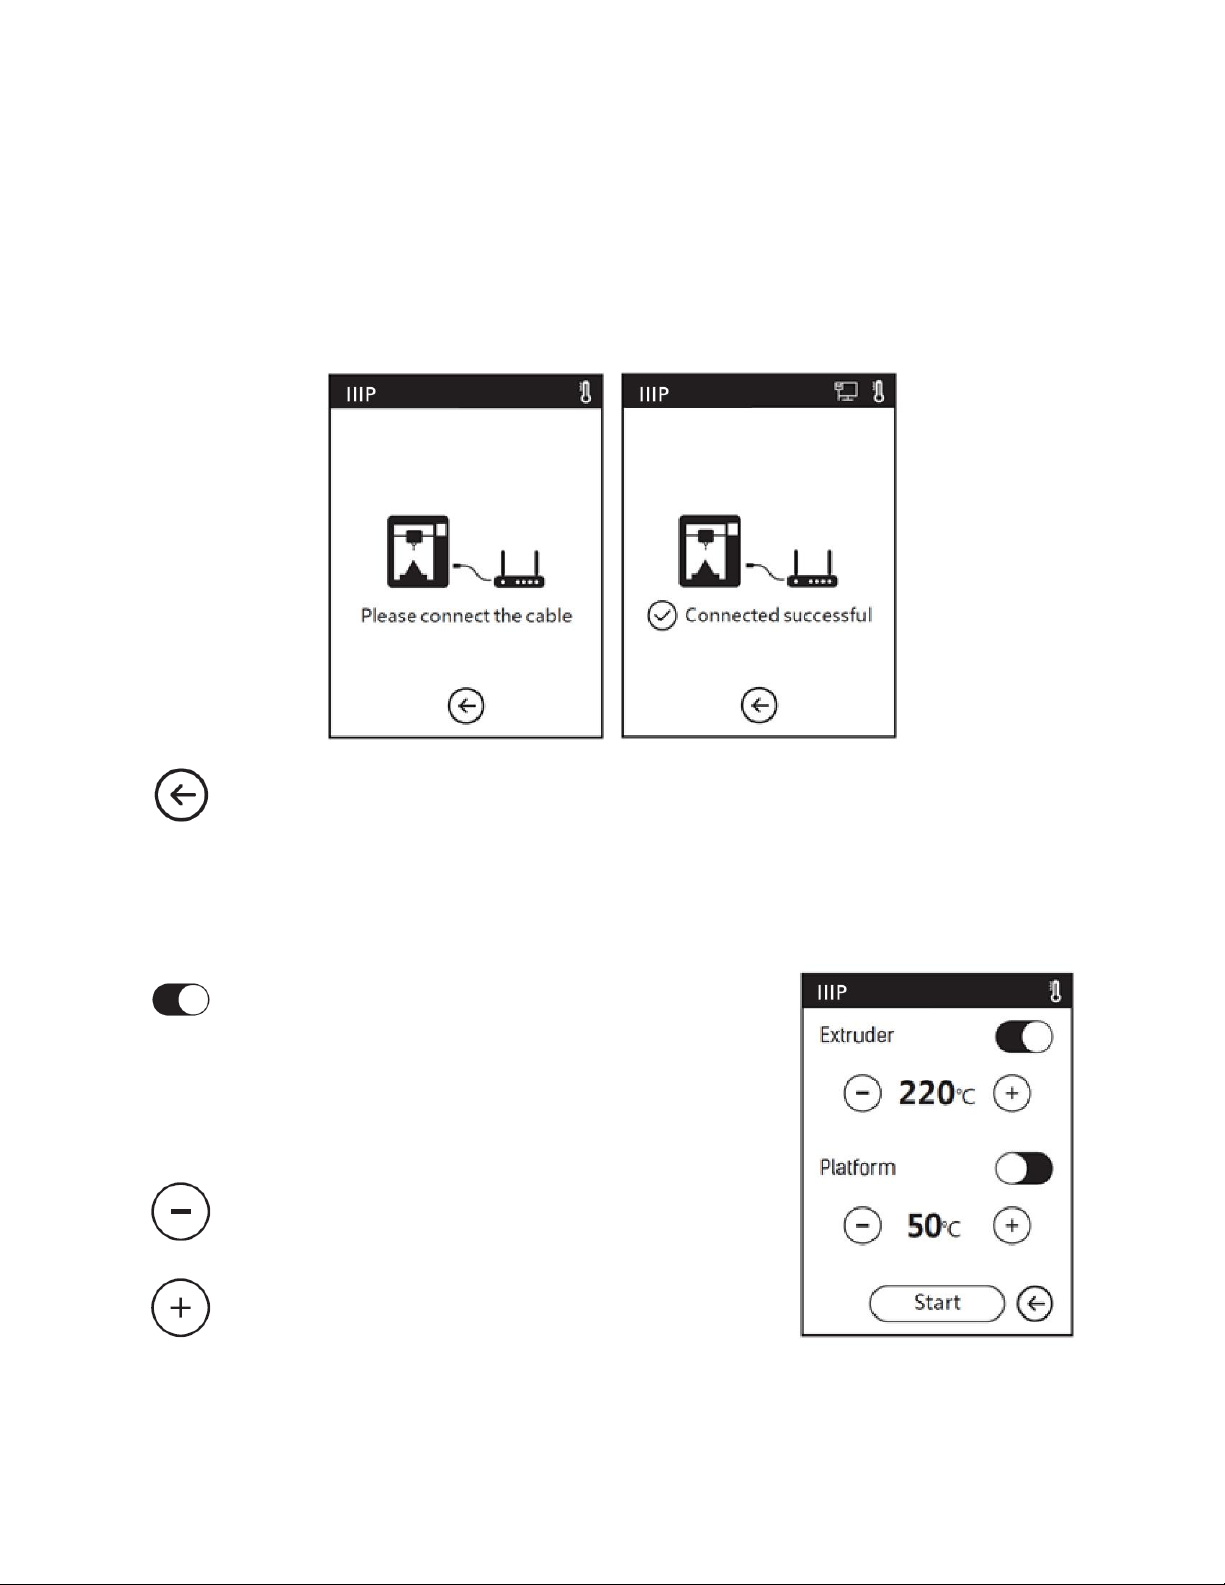
Ethernet Screen
When the Ethernet Screen opens, the printer will attempt to establish a connection with
the network. If it fails to find a network, it will prompt you to connect the printer to the
network using an Ethernet cable. Once a connection is established, the screen will indicate
that the connection was successful.
Touch the Back icon to return to the Main Menu.
Preheat Menu
Touch the sliders next to the Extruder and Platform
entries to turn Preheating on or off. Preheating is on
when the white ball is to the right and off when it is
to the left.
Touch the - icon to decrease the displayed value.
Touch the + icon to increase the displayed value.
The maximum temperature for the Extruder is 250°C and the maximum
temperature for the Platform is 100°C.
16
Page 17
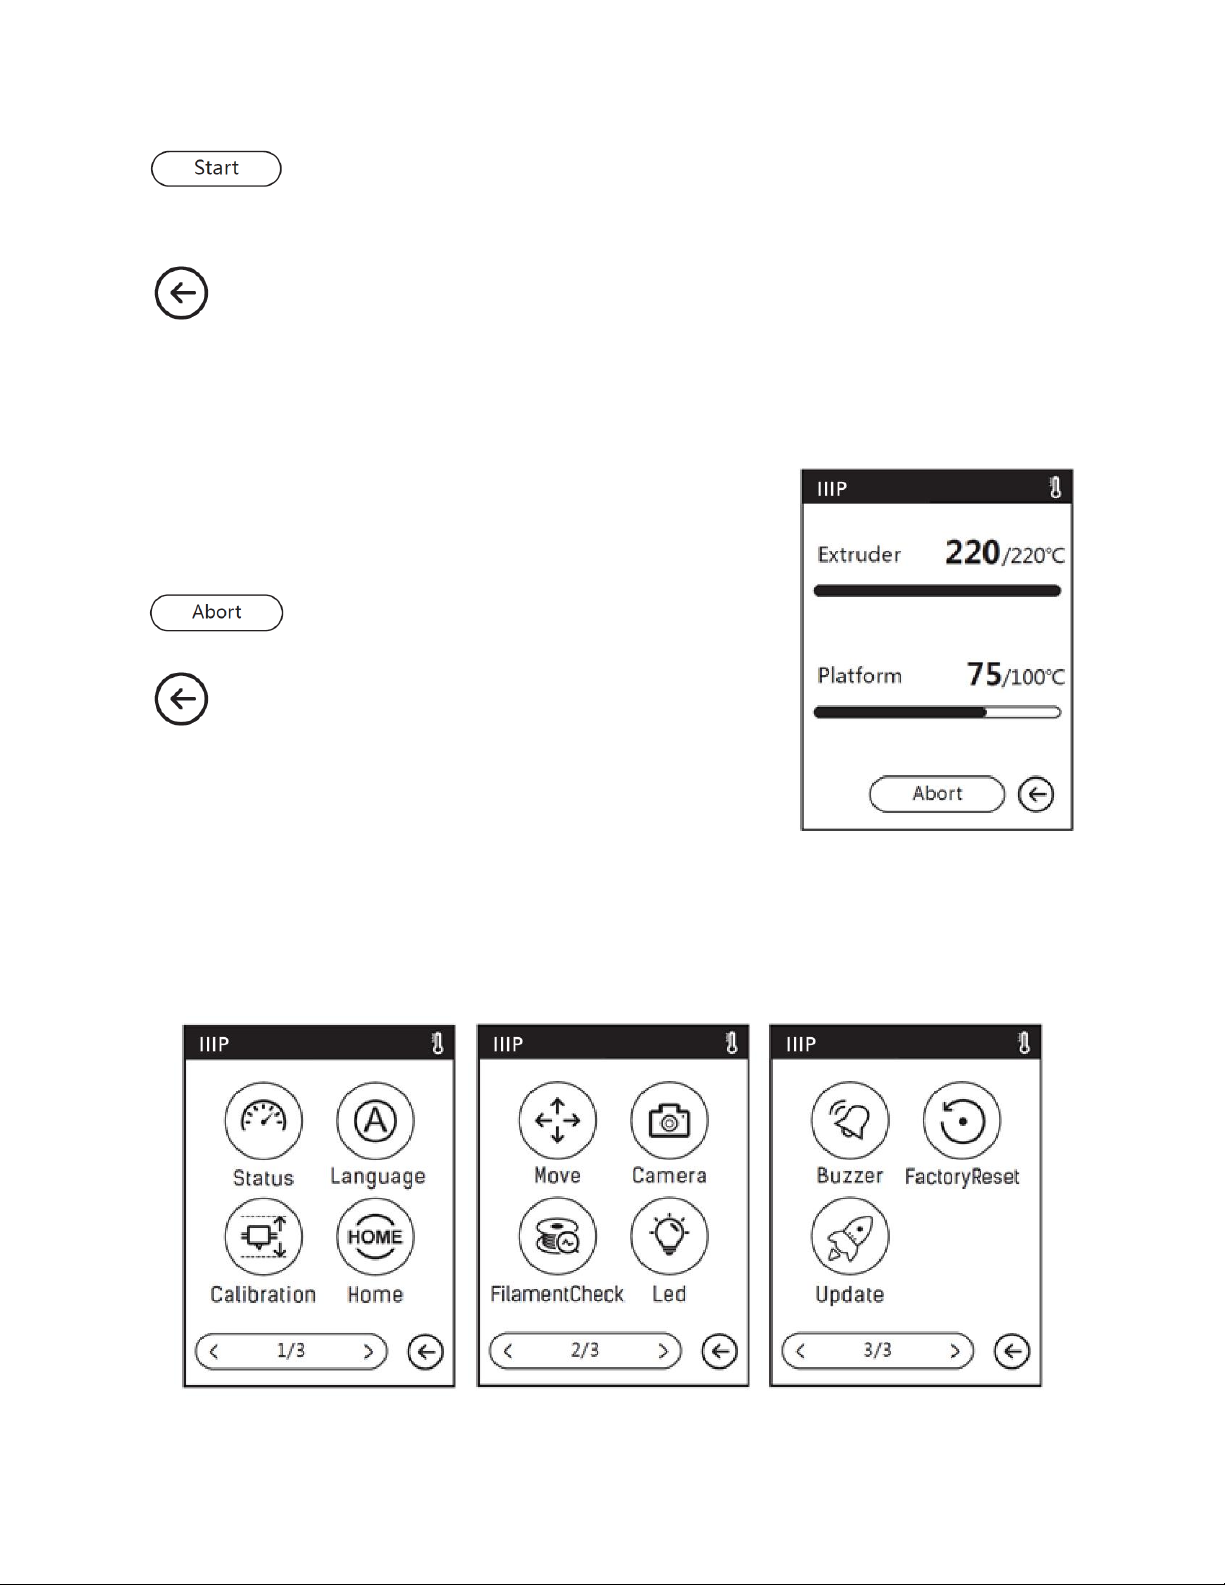
Touch the Start button to start preheating and display the Preheating
Screen.
Touch the Back icon to return to the Main Menu.
Preheating Screen
The Preheating Screen is displayed while preheating is in
progress. The screen shows the actual and target
temperature(s), while showing progress bars.
Touch the Abort button to cancel preheating.
Touch the Back icon to return to the Preheat Menu.
Setting Menu
The Setting Menu consists of the three pages of options shown below.
17
Page 18

Touch the Status icon to enter the Status Screen.
Touch the Language icon to enter the Language Menu.
Touch the Calibration icon to enter the Calibration Screen.
Touch the Home icon to move extruder and build platform back to the mechanical
zero point.
Touch the Move icon to enter the Move Screen.
Touch the Camera icon to enter the Camera Screen.
Touch the FilamentCheck icon to turn filament checking on or off.
Touch the Led icon to turn the internal illumination on or off.
Touch the Buzzer icon to turn the Warning Chimes on or off. The Warning Chimes
will sound whenever the printer has completed its given task and is ready for
input from you.
Touch the FactoryReset icon to enter the Factory Setting Screen.
Touch the Update icon to update the firmware. Follow the on screen instructions.
18
Page 19

There are three pages in the Setting Menu. This number indicates which of the
three pages is being displayed.
Touch the ᐸ icon to go back to the previous page.
Touch the ᐳ icon to advance to the next page.
Touch the Back icon to return to the Setting Menu.
Status Screen
The Setting Screen shows the real-time extruder and
platform temperatures, whether filament is loaded or not,
and the real-time X, Y, and Z axis coordinates.
Touch the Back icon to return to the Setting Menu.
19
Page 20
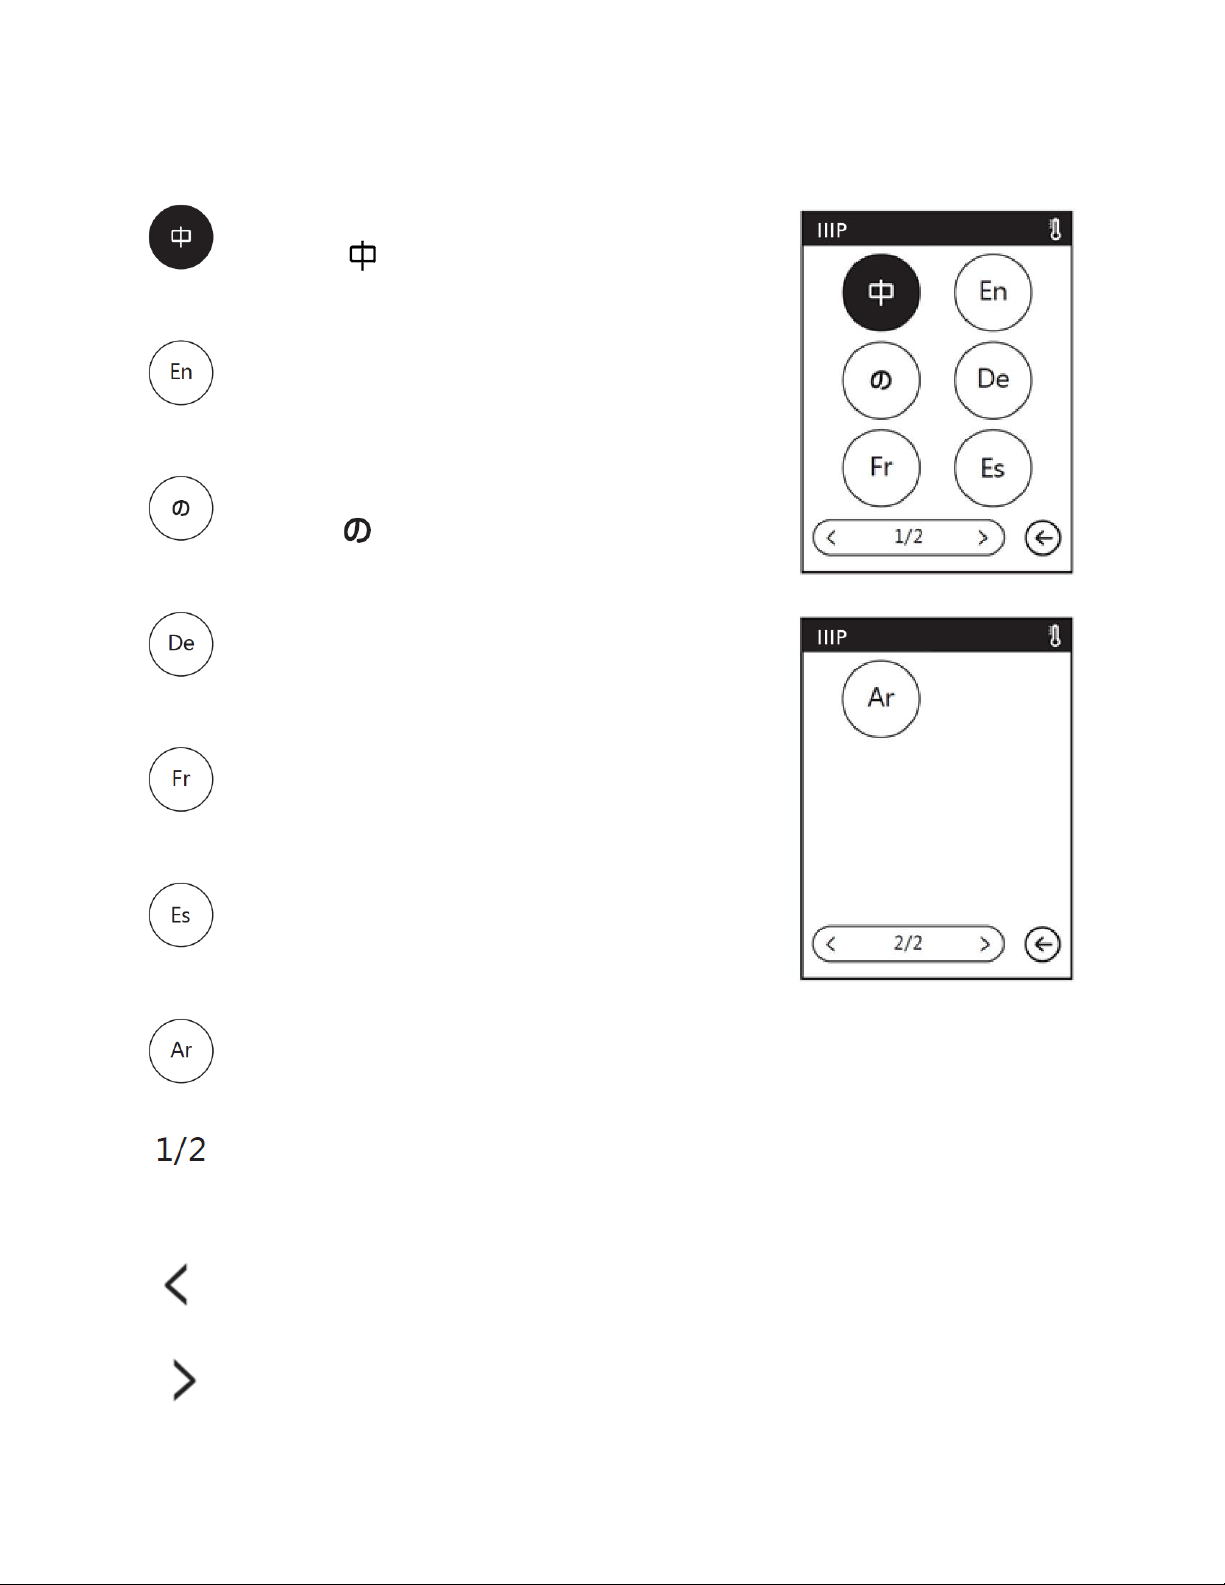
Language Menu
Touch the icon to select Chinese for the OSD
menu system.
Touch the En icon to select English for the OSD
menu system.
Touch the icon to select Japanese for the OSD
menu system.
Touch the De icon to select German for the OSD
menu system.
Touch the Fr icon to select French for the OSD menu
system.
Touch the Es icon to select Spanish for the OSD
menu system.
Touch the Ar icon to select Arabic for the OSD menu system.
The Language Menu has two pages. This number indicates which of the two pages
is being displayed.
Touch the ᐸ icon to go back to the previous page.
Touch the ᐳ icon to advance to the next page.
20
Page 21
Touch the Back icon to return to the Setting Menu.
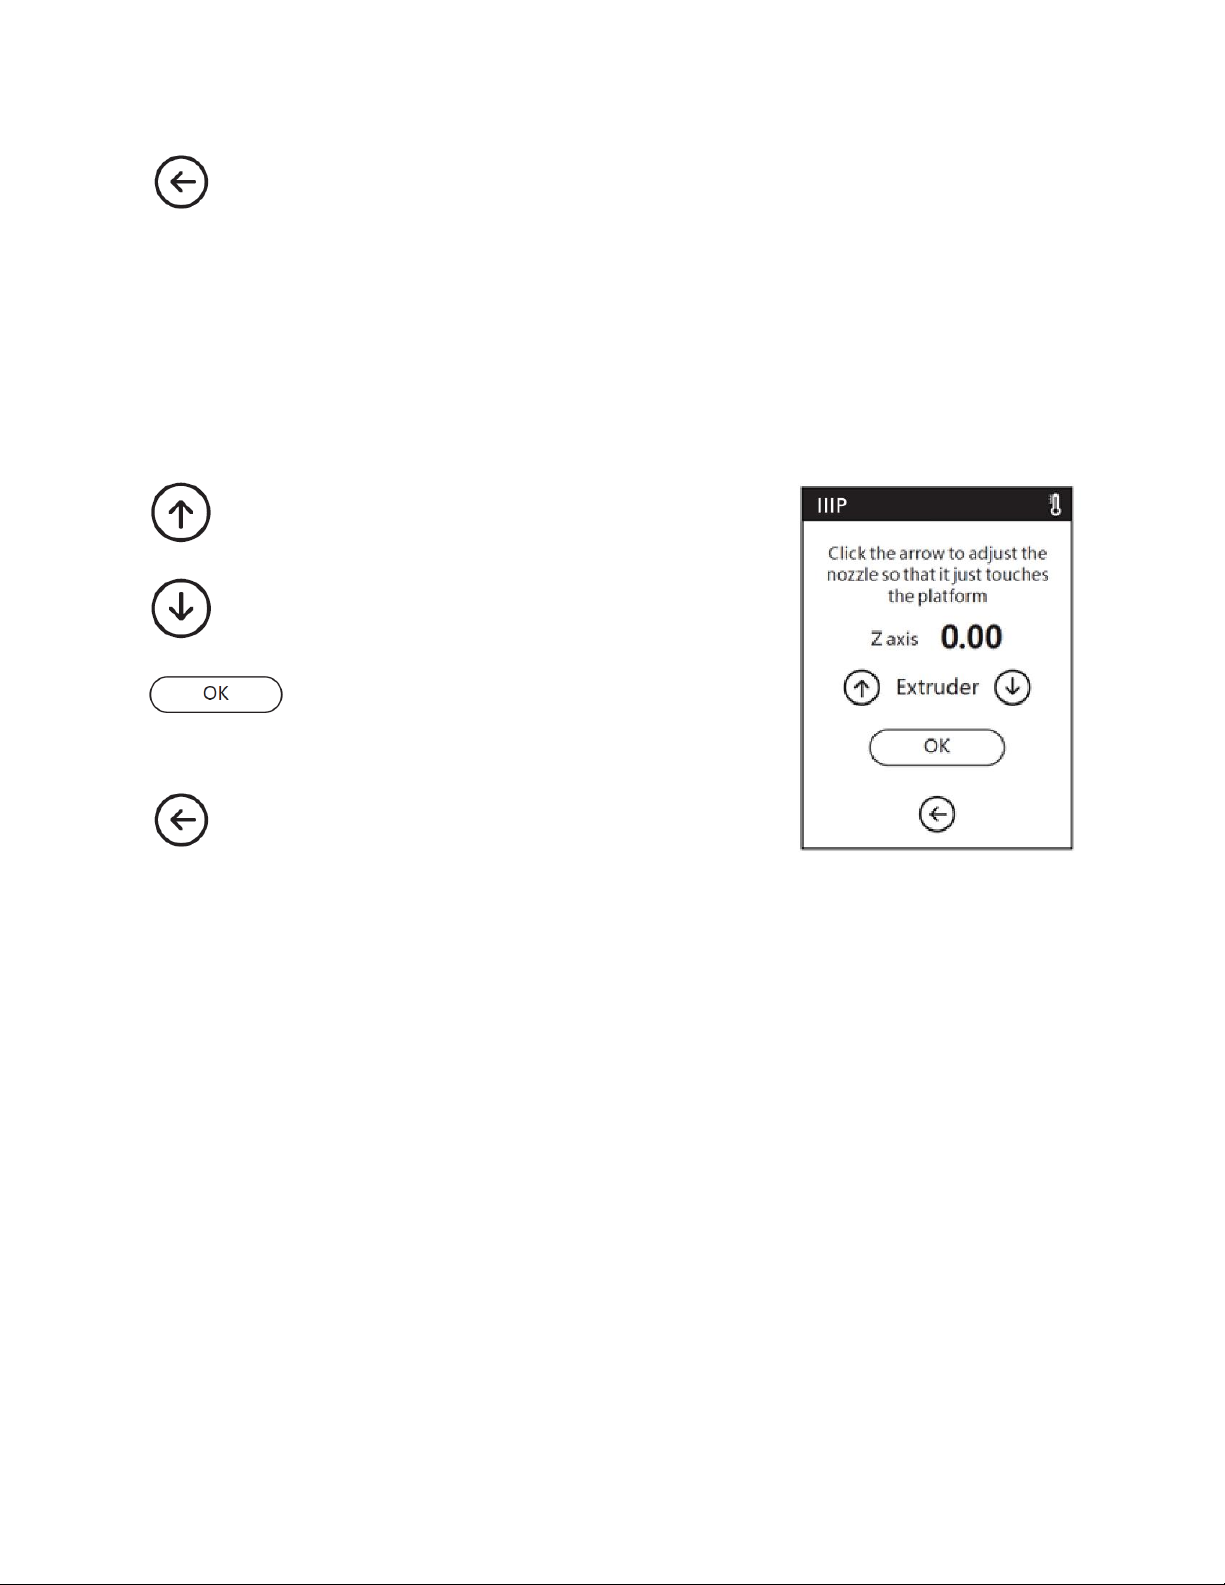
Calibration Screen
When the Calibration option is selected, the printer will move the extruder and platform to
the mechanical zero (Home) position, then will display the Calibration Screen. See the
CALIBRATION
Touch the Up icon to raise the extruder.
Touch the Down icon to lower the extruder.
Touch the Back icon to cancel any changes and
section for calibration instructions.
Touch the OK button to save any changes and
return to the Setting Menu.
return to the Setting Menu.
21
Page 22
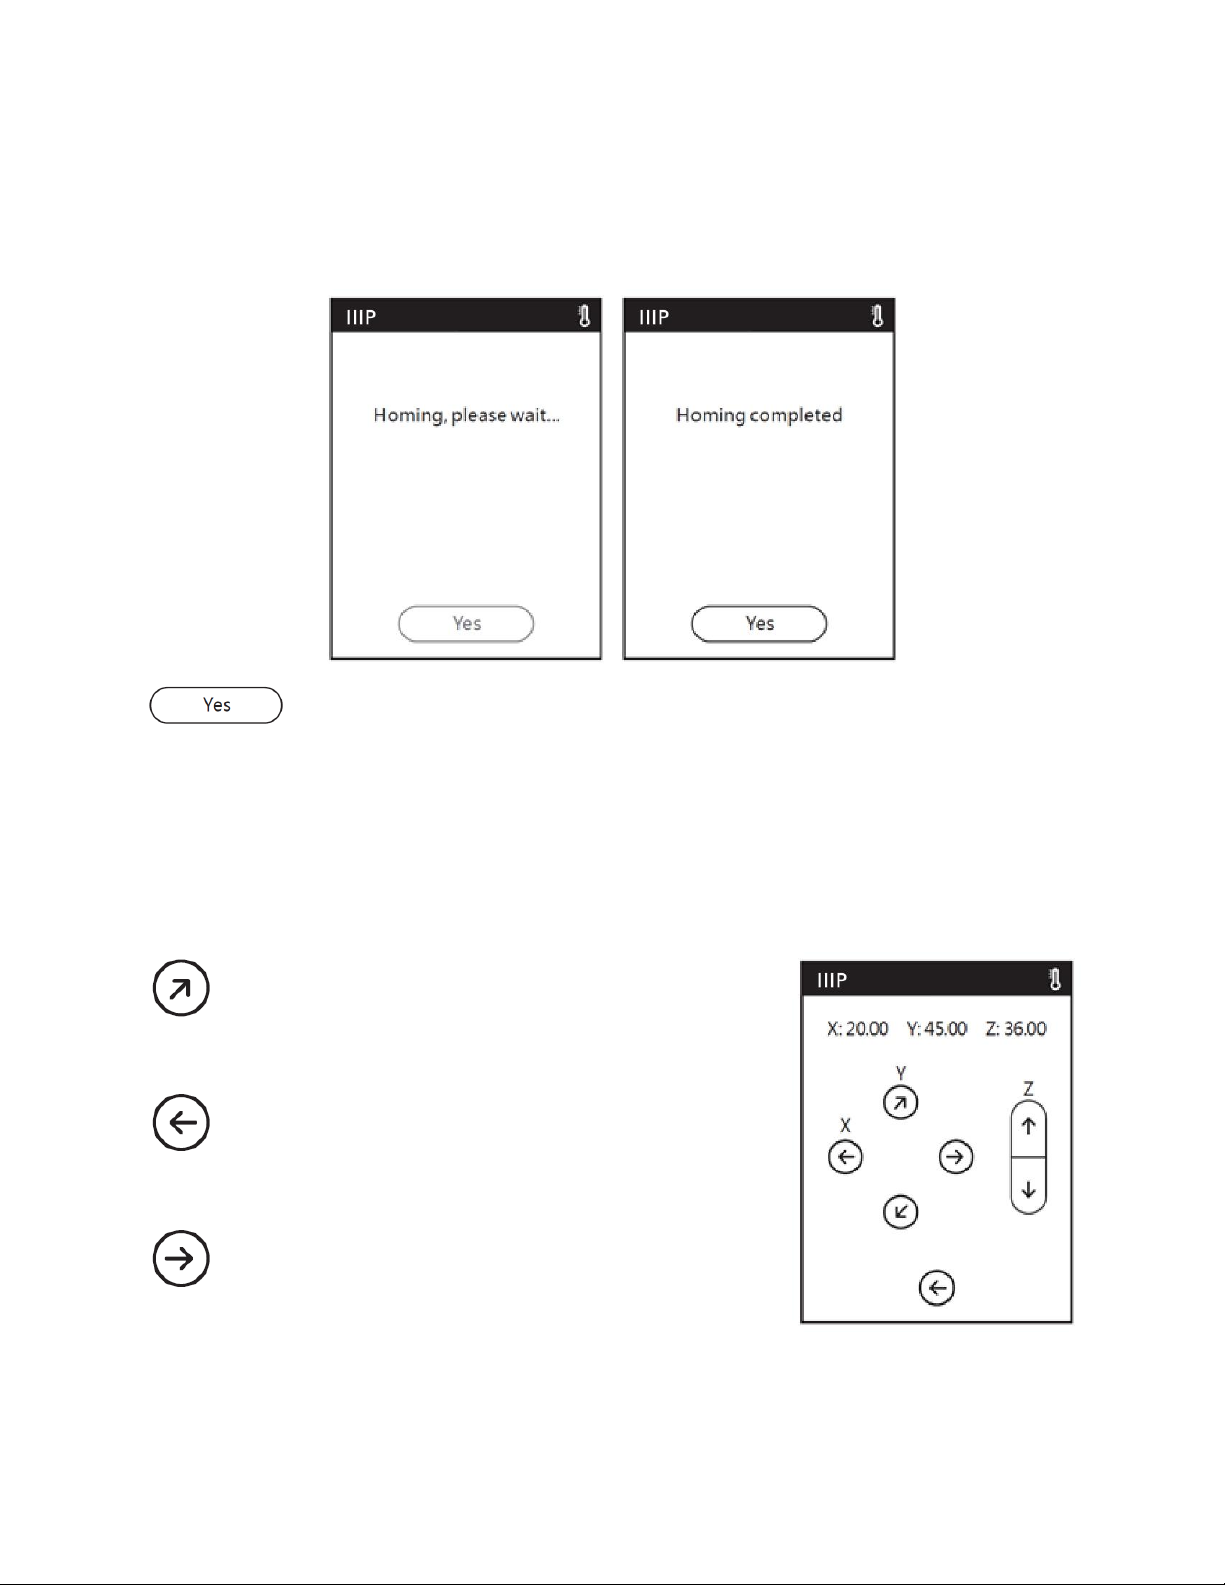
Home Screen
When the Home option is selected, the printer will move the extruder and build platform
to the mechanical zero (home) position.
Touch the Yes button to return to the Setting Menu.
Move Screen
The Move Screen allows you to manually move the extruder and build plate. In addition to
the controls, the screen shows the real-time X, Y, and Z positions.
Touch the ↗ icon to move the build platform
towards the back of the printer.
Touch the ← icon under the X label to move the
extruder to the left.
Touch the → icon to move the extruder to the right.
22
Page 23
Touch the ↙ icon to move the build platform towards the front of the printer.
Touch the ↑ icon to move the extruder up.
Touch the ↓ icon to move the extruder down.
Touch the Back icon to return to the Setting Menu.
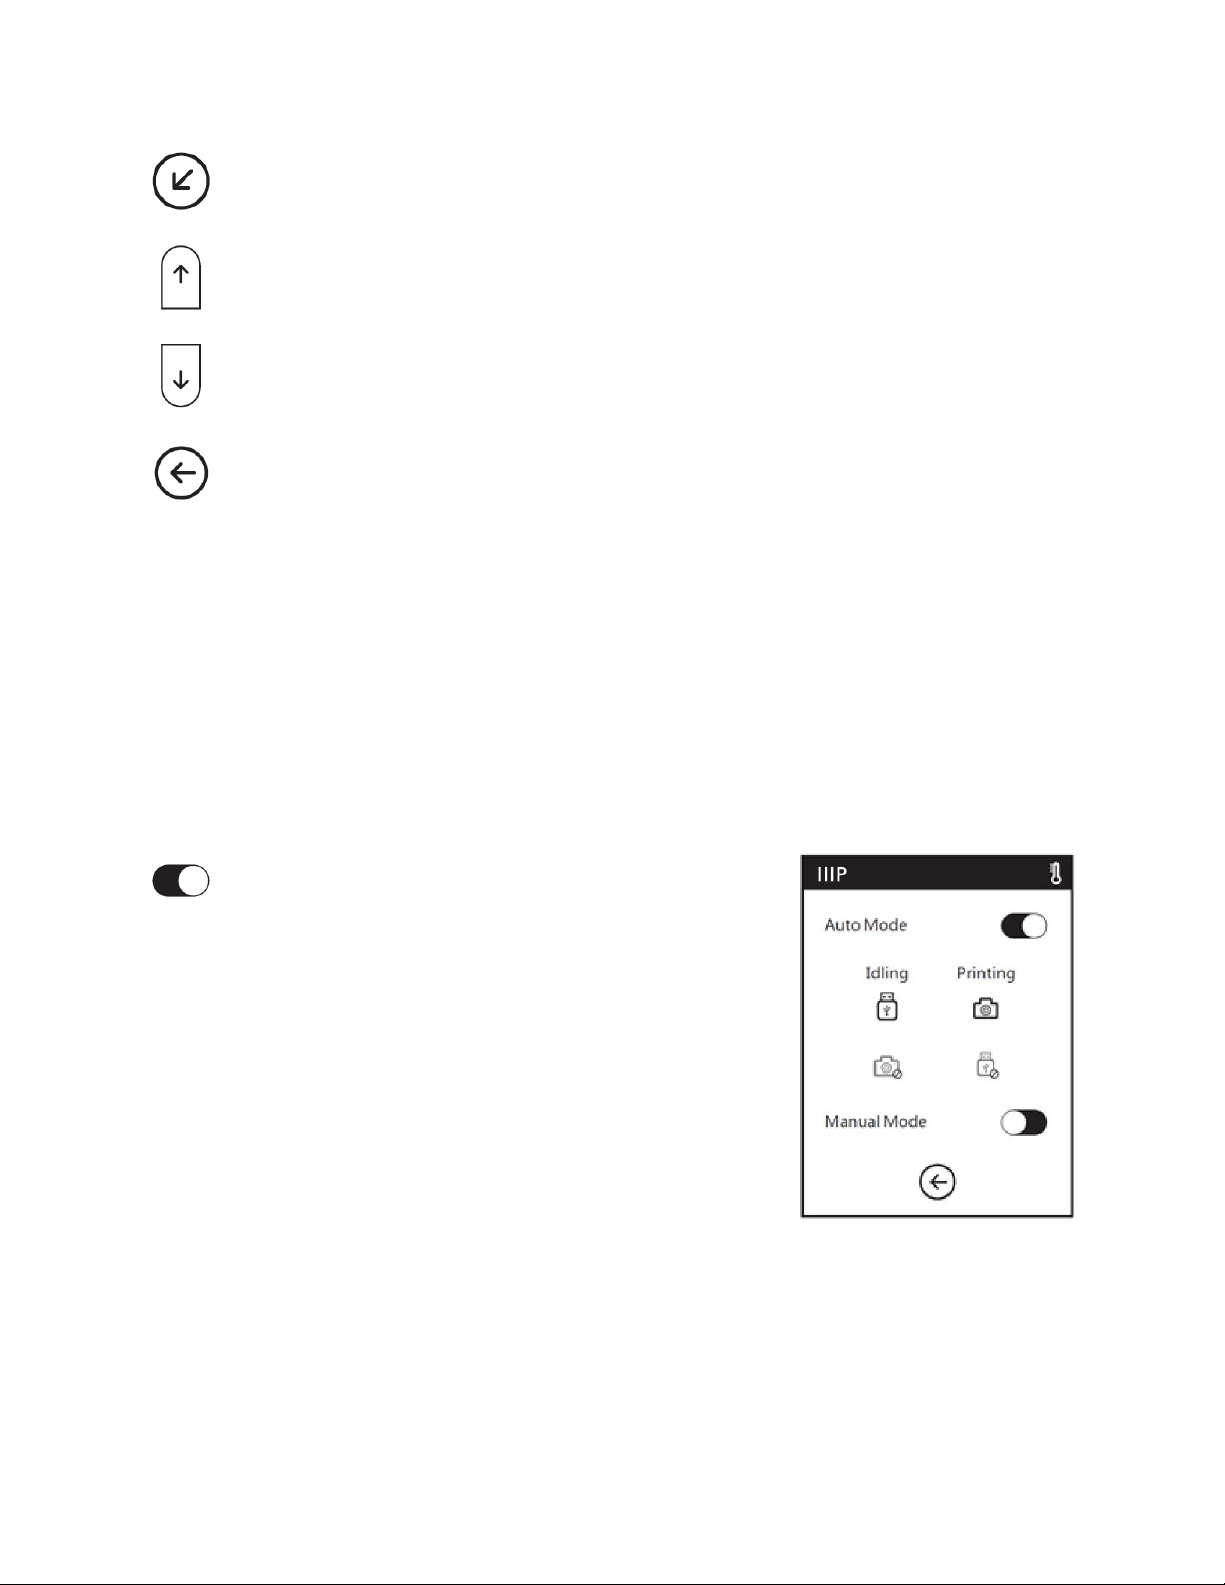
Camera Screen
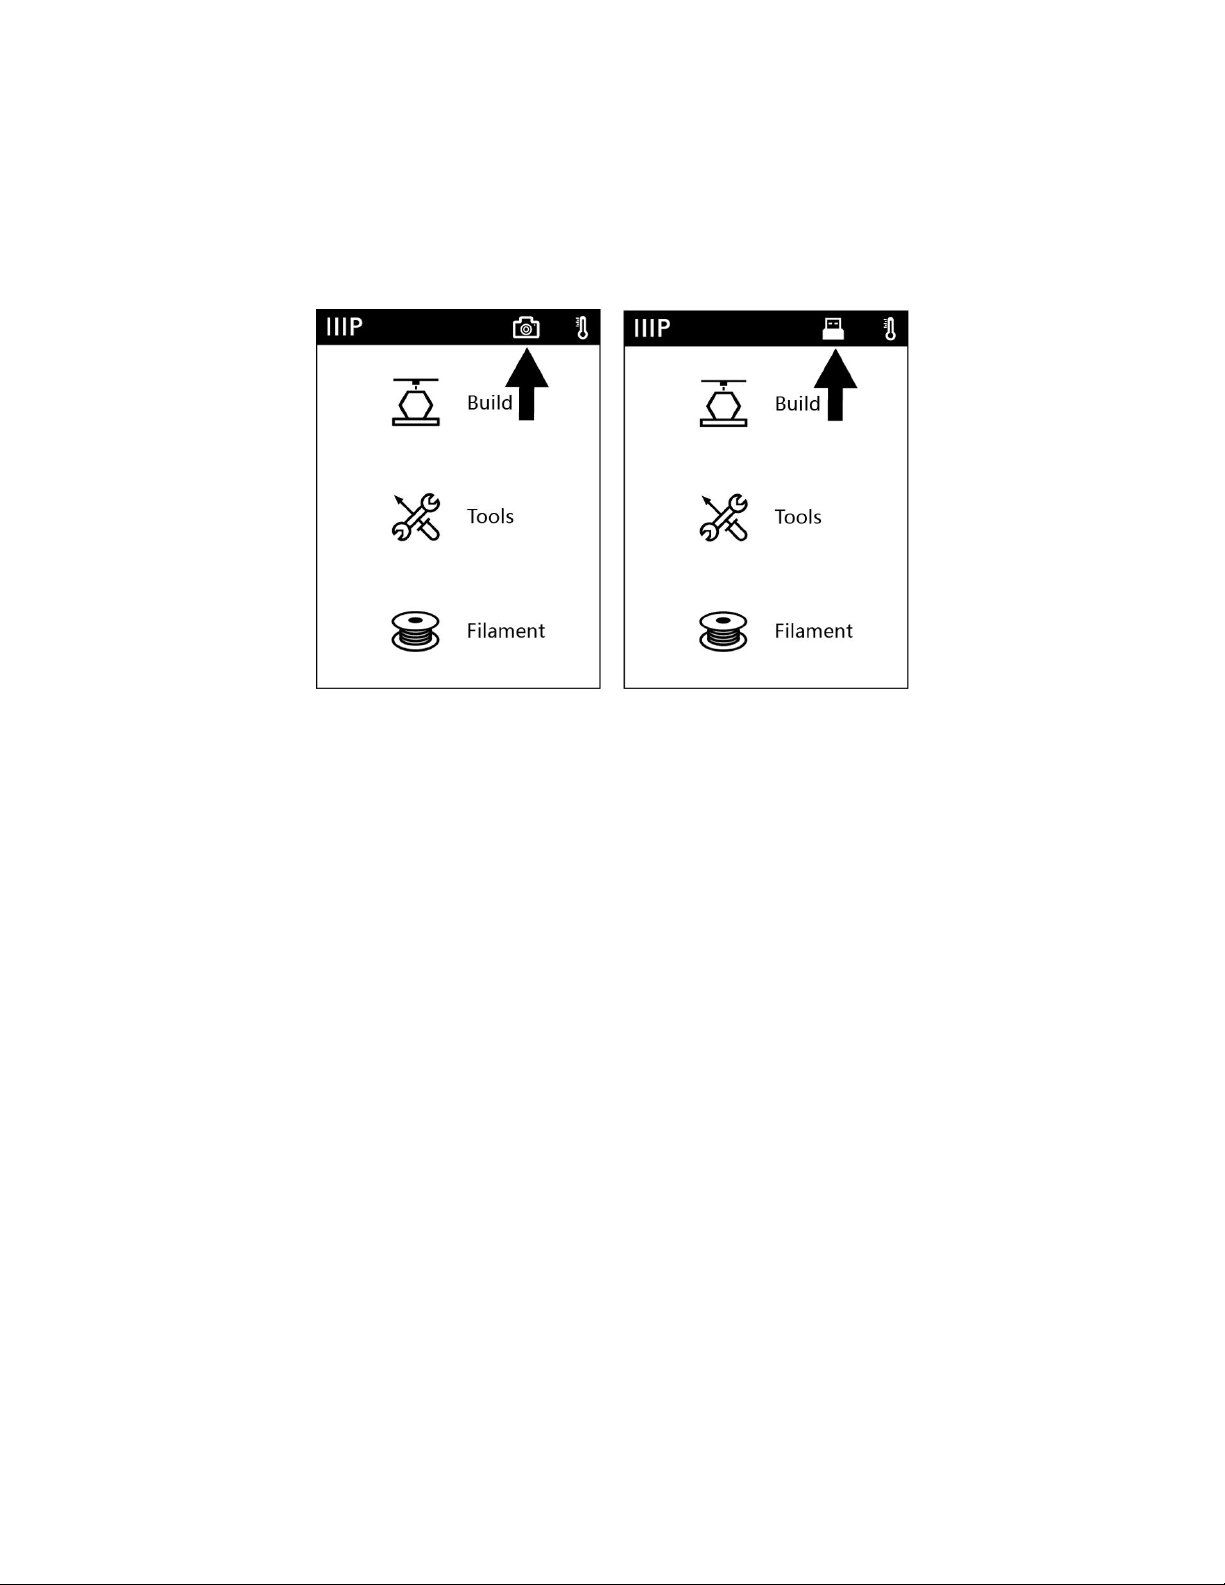
The Camera Screen allows you to determine whether the built-in camera is on or off. You
can manually turn the camera on and off or can choose Auto Mode, where the camera
automatically turns on or off, depending on what the printer is doing at the moment. Note
that the camera and the USB port cannot be on at the same time. When the camera is on,
access to the USB port is off, and when the USB port is on, the camera is off.
Use the sliders to turn Auto Mode or Manual Mode
on or off. The two options cannot be on at the same
time. When one is turned on, the other
automatically turns off. When Auto Mode is
enabled, the camera will automatically turn on (with
the USB port off) when actively printing and will
turn off (with the USB port on) when not actively
printing. The option is on when the white ball is to
the right and off when it is to the left.
23
Page 24
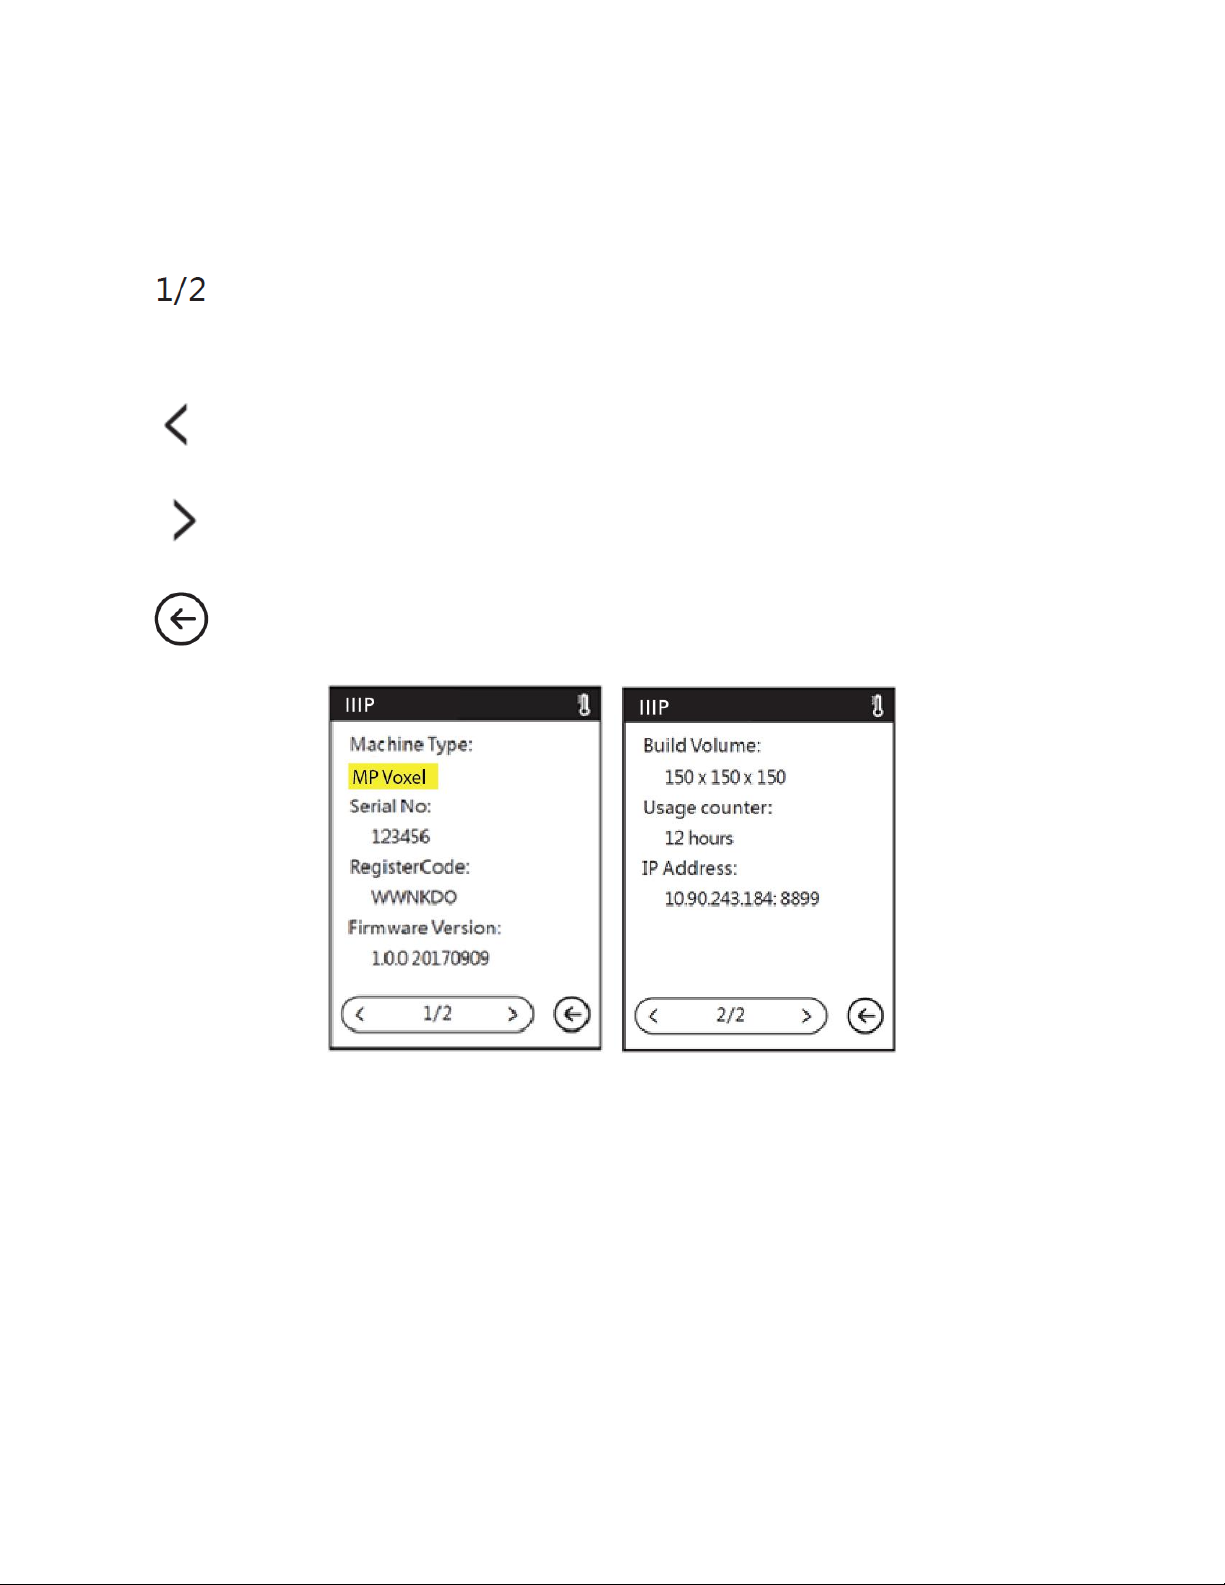
About Screen
The About Screen shows basic information about the printer.
The About Screen has two pages. This number indicates which of the two pages is
being displayed.
Touch the ᐸ icon to go back to the previous page.
Touch the ᐳ icon to advance to the next page.
Touch the Back icon to return to the Setting Menu.
24
Page 25

Filament Menu
Touch the Load icon to load filament.
Touch the Change icon to unload filament.
Touch the Back icon to return to the Main Menu.
25
Page 26

CALIBRATION
Prior to making any prints, it is a good idea to calibrate the printer to ensure that the print
nozzle is the proper distance above the build platform when in the Home position. Perform
the following steps to calibrate the printer.
1. With the printer turned on, touch Tools > Calibration to display the Calibration
screen. The extruder and build platform will move to the Home position.
2. Slide a sheet of printer paper between the nozzle and the removable build plate.
Use the Up and Down arrow buttons to raise or lower the nozzle until there is slight
resistance to moving the paper.
3. Touch OK to save the calibration settings.
26
Page 27

LOADING FILAMENT
1. Open the Filament Door on the printer.
2. Insert filament into the filament intake. Push the filament into the feeding wheel
until some resistance is felt.
27
Page 28

3. With the printer turned on, touch Filament > Load. The printer will begin preheating,
then will load the filament. Touch the OK button after a couple of centimeters of
filament have been extruded.
4. Place the spool of filament on the filament holder, then close the door. Ensure that
the filament is installed so that it feeds in a clockwise direction.
28
Page 29

PRINTING MODELS
Perform the following steps to print a model.
1. With the printer turned on, touch Build, then select either Internal Memory, USB
Stick, or Cloud for the source.
2. Locate the model you want to print, then either touch the model picture to see file
details or touch the ► button to begin printing. The printer will automatically begin
preheating, then will begin printing once preheating is complete. When printing is
complete, the printer will beep. Touch OK on the Build completed dialog.
29
Page 30

REMOVING THE PRINTED MODEL
1. Once the print is complete, allow the printer and finished model to fully cool before
attempting to remove the model.
2. Grab the front of the removable build platform and pull it out of the printer.
3. Bend the build platform to separate the model from the plate. Use the scraper to
help with removal, as needed.
30
Page 31

REPLACING FILAMENT
1. With the printer powered on, touch Filament > Change. The printer will
automatically begin preheating the extruder, then will unload the filament.
2. Once the printer has finished unloading the filament from the extruder, it will
prompt you to remove the filament, then will prompt you to insert new filament.
Touch OK once several centimeters of filament has been extruded.
31
Page 32

USING THE CAMERA
The MP Voxel 3D Printer features a built-in camera, which allows you to monitor the print.
Camera Mode
The built-in camera is incompatible with the USB port in that only one can be used at a
time. There are two modes that control whether the camera or the USB port is in use: Auto
Mode and Manual Mode.
In Auto Mode, the printer automatically switches between activating the camera or USB
port, depending on what the printer is doing at the time. If it is idle, the camera is off and
the USB port is active, allowing you to transfer files to the printer's built-in memory. While
printing, the USB port is disabled and the camera is available for use. Auto Mode is the
default mode. When in Auto Mode, the OSD menu will display the screen below and to the
left.
In Manual Mode, you can switch between using the camera or USB port at will. To switch,
simply touch the icon of the one you want to use. When in Manual Mode, the OSD menu
will display the screen above and to the right.
32
Page 33
When the camera is on, a camera icon will appear in the status bar, as shown in the image
below and to the left. When the USB port is activated and a USB drive has been
successfully connected, a USB disk icon will appear in the status bar, as shown in the image
below and to the right.
Note that if you want to view the video and images from the camera using a web browser,
the printer and the local computer must be part of the same network (connected to the
same router).
Using the Camera with PolarCloud
You can view the video and images from the camera by connecting to PolarCloud, which
allows you to monitor the print from any location. Perform the following steps to use the
camera with PolarCloud.
1. If you have not done so already, register an account with PolarCloud. Enter
www.polar3D.com in your web browser, then click the Sign Up button and follow
the on-screen instructions to register your account.
33
Page 34
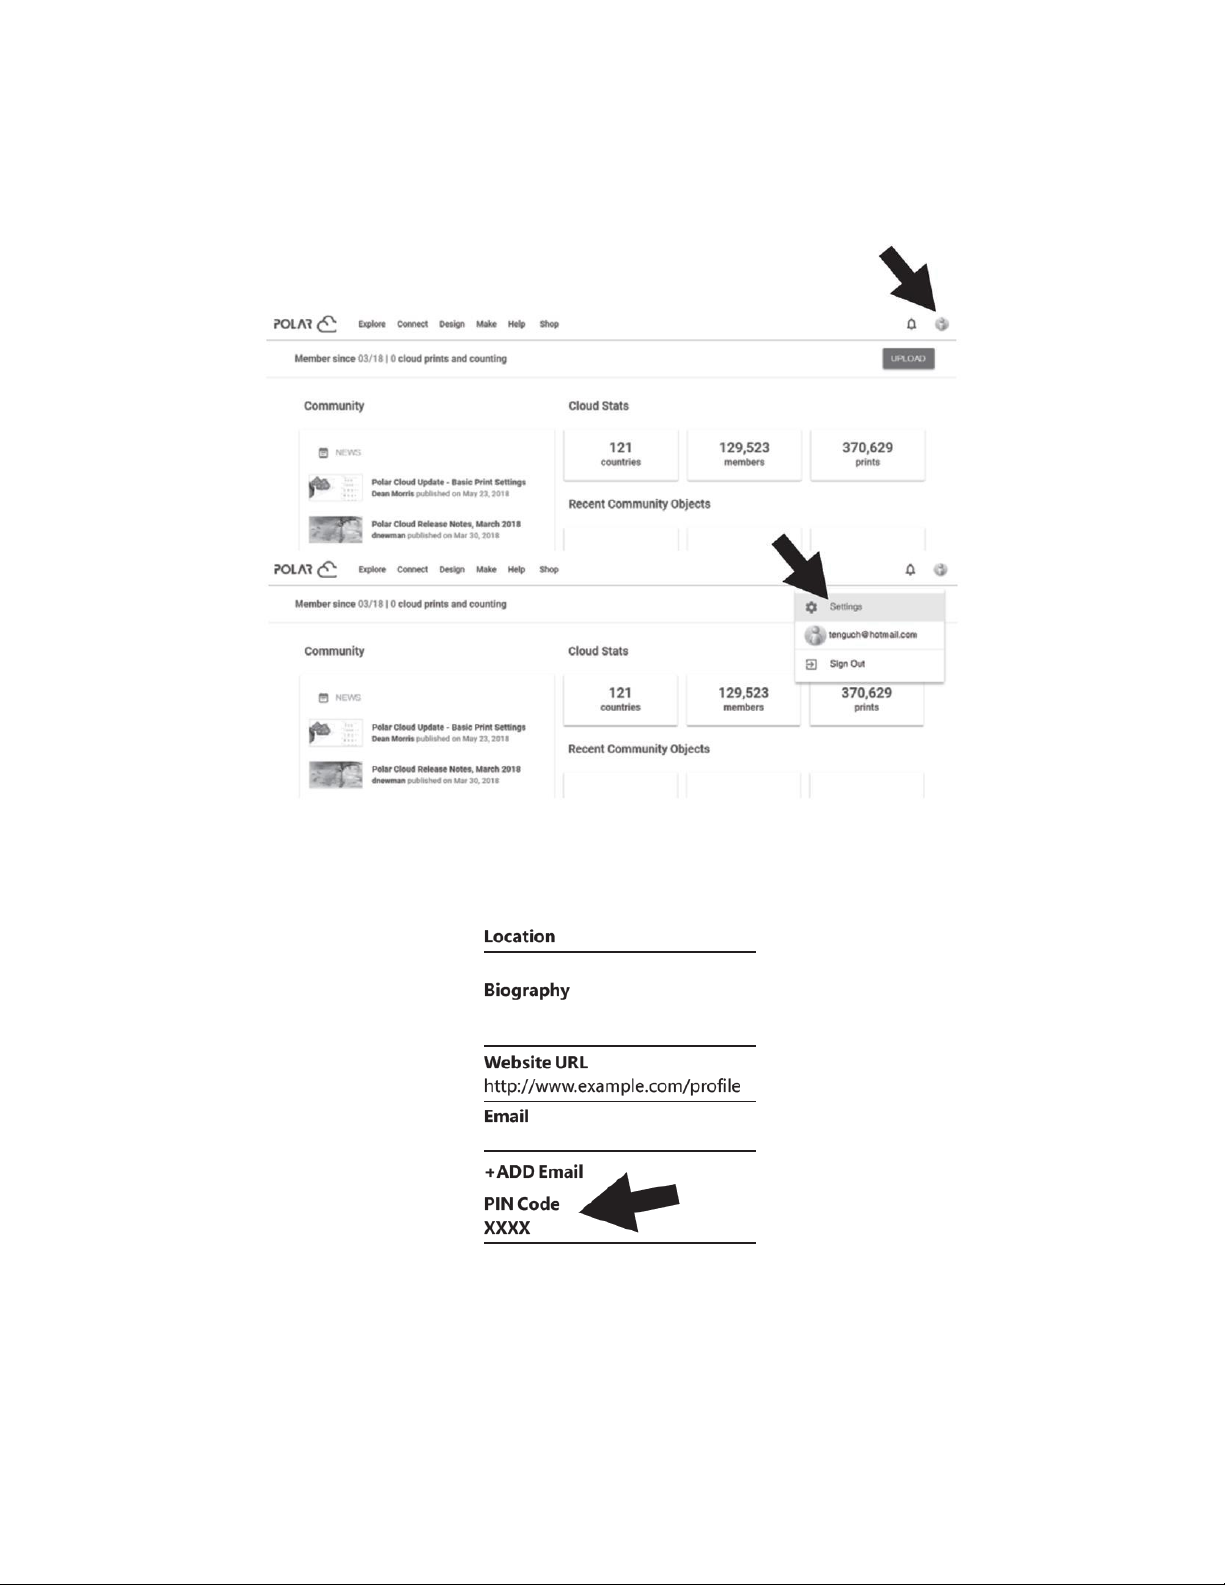
2. Once you have registered your account and logged in to PolarCloud, click the
Account icon in the upper right, then click the Settings option.
3. Locate the PIN Code at the bottom left of the screen, as represented by the XXXX
in the image to the right.
4. Connect your printer to the internet.
34
Page 35
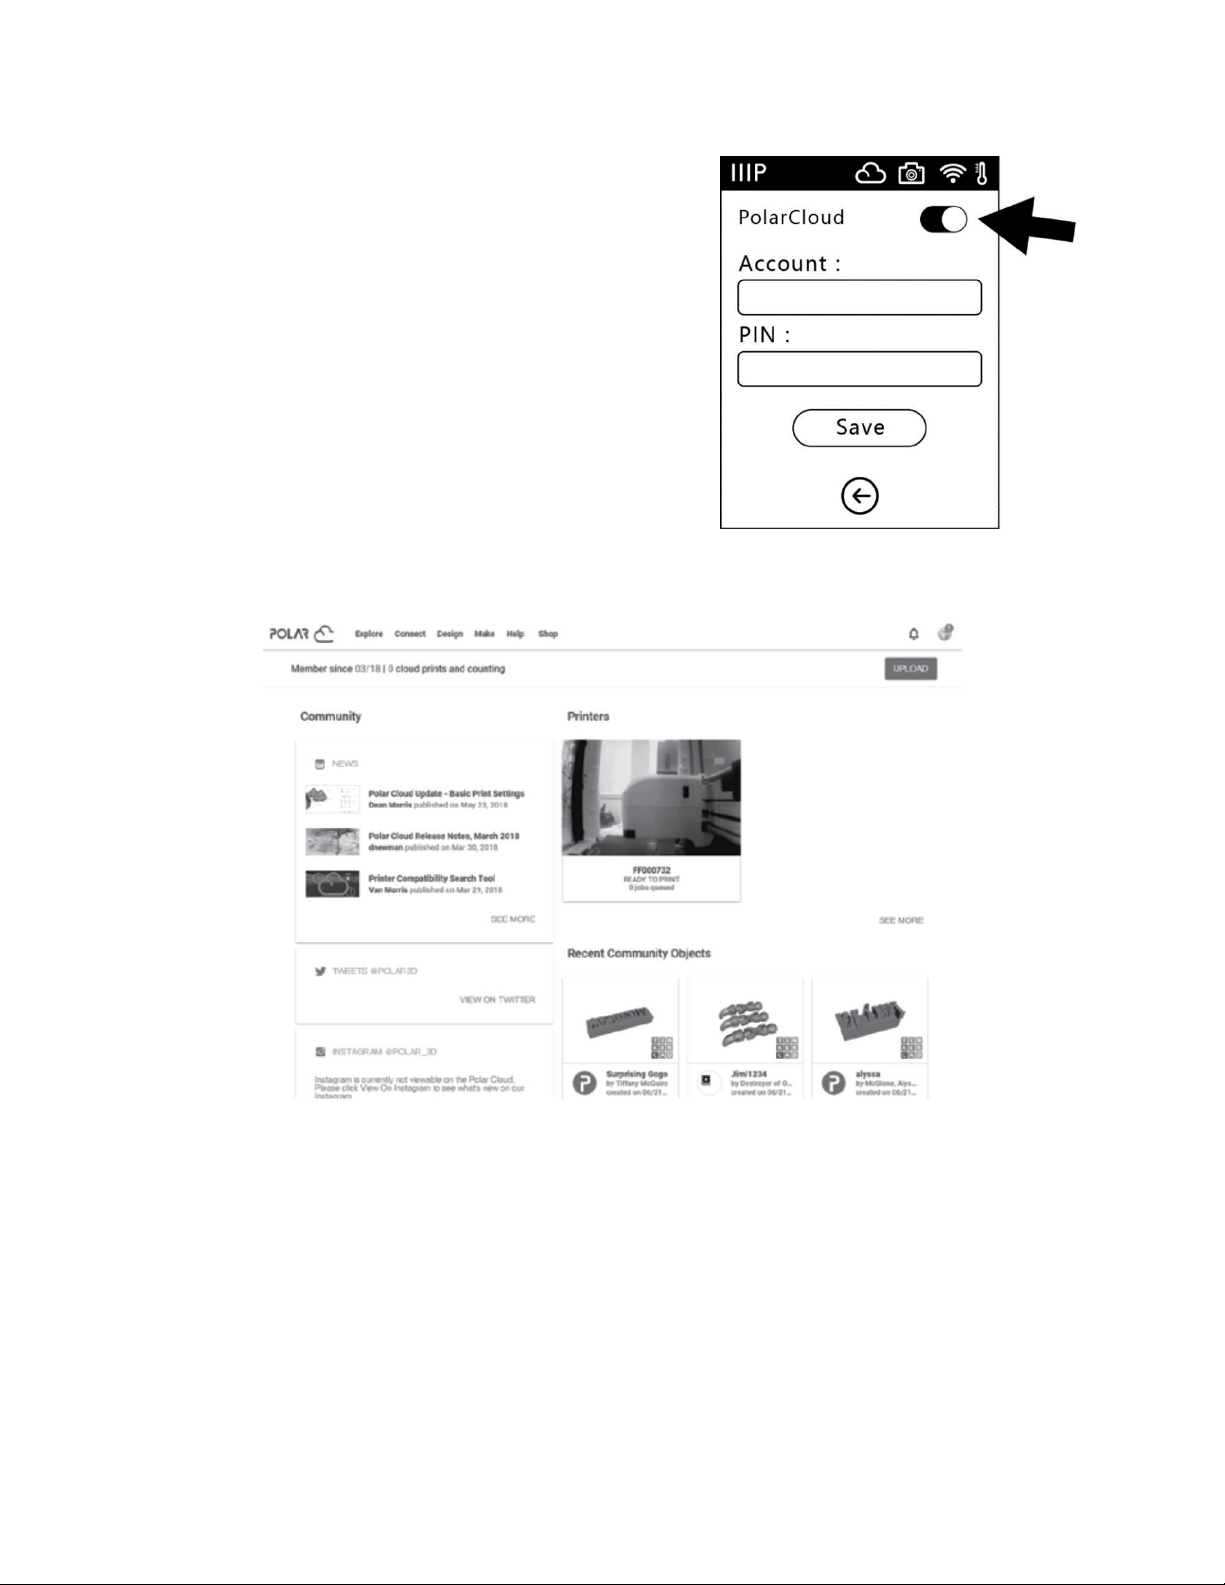
5. With the printer powered on, touch Tools >
Network > Cloud > PolarCloud to display the
PolarCloud menu.
6. Touch the PolarCloud switch to turn
PolarCloud on, then enter your Account
information and the PIN from step 3 above.
7. Touch the Save button to save your PolarCloud
account information.
8. Once the connection is completed, you can see
the video from the camera on the PolarCloud
website.
35
Page 36
Turning the Camera On or Off with PolarCloud
1. Once you have logged in to PolarCloud and can view the video from the camera,
click the camera image to display the following screen.
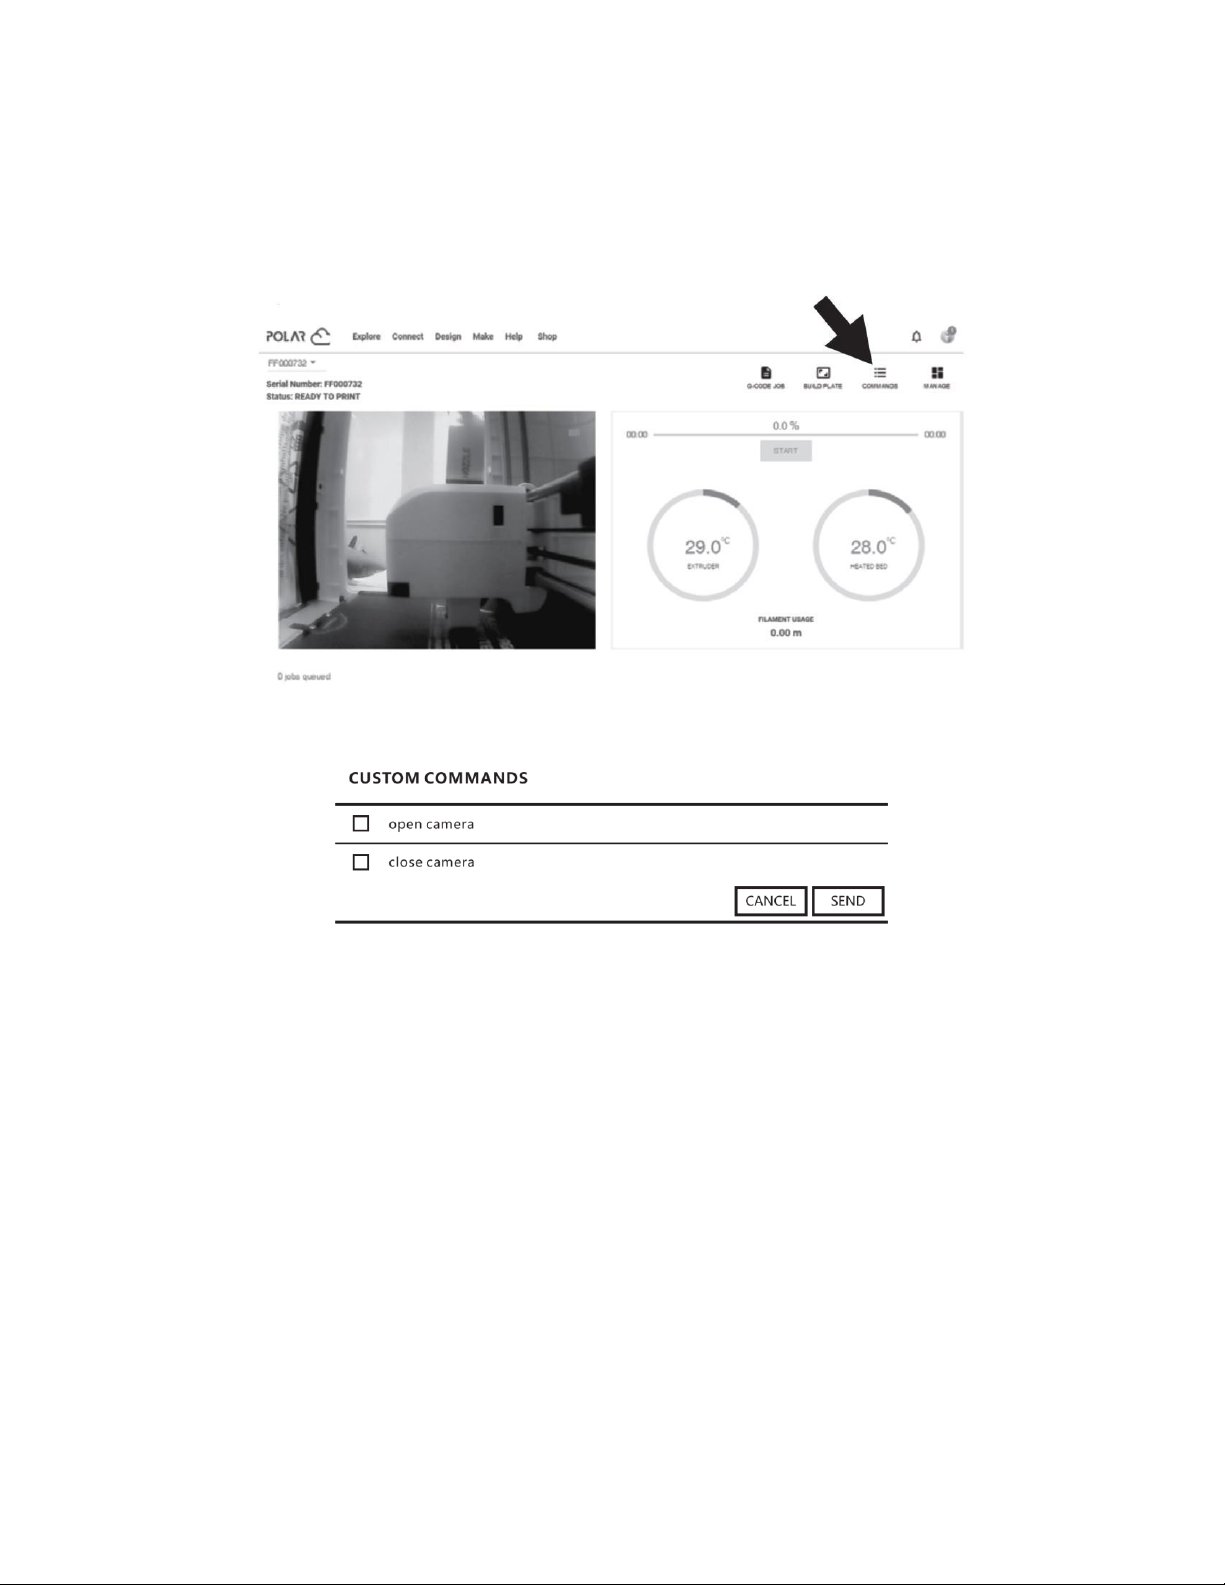
2. Click the COMMANDS icon to display the following interface.
3. Click the checkbox to the left of the open camera or close camera label, then click
the SEND button to turn the camera on or off.
Notes:
For best results using the camera through PolarCloud, use a wired Ethernet
connection.
If PolarCloud is on the same network (i.e., the local computer and printer connect to
the same router), the video is shown and the state of printing is displayed in real
time. If PolarCloud is not on the same network, still images will be sent every 20
seconds while printing or every 60 seconds when the printer is idle.
36
Page 37
When the camera is turned on or off, the local computer will disconnect and then
reconnect to PolarCloud, so it will not respond for a while. The recovery speed
depends on the state of the network.
After the camera is operated through the Cloud, the local computer will set the
camera to operate in Manual Mode. To return to Auto Mode, use the OSD menu to
enable Auto Mode.
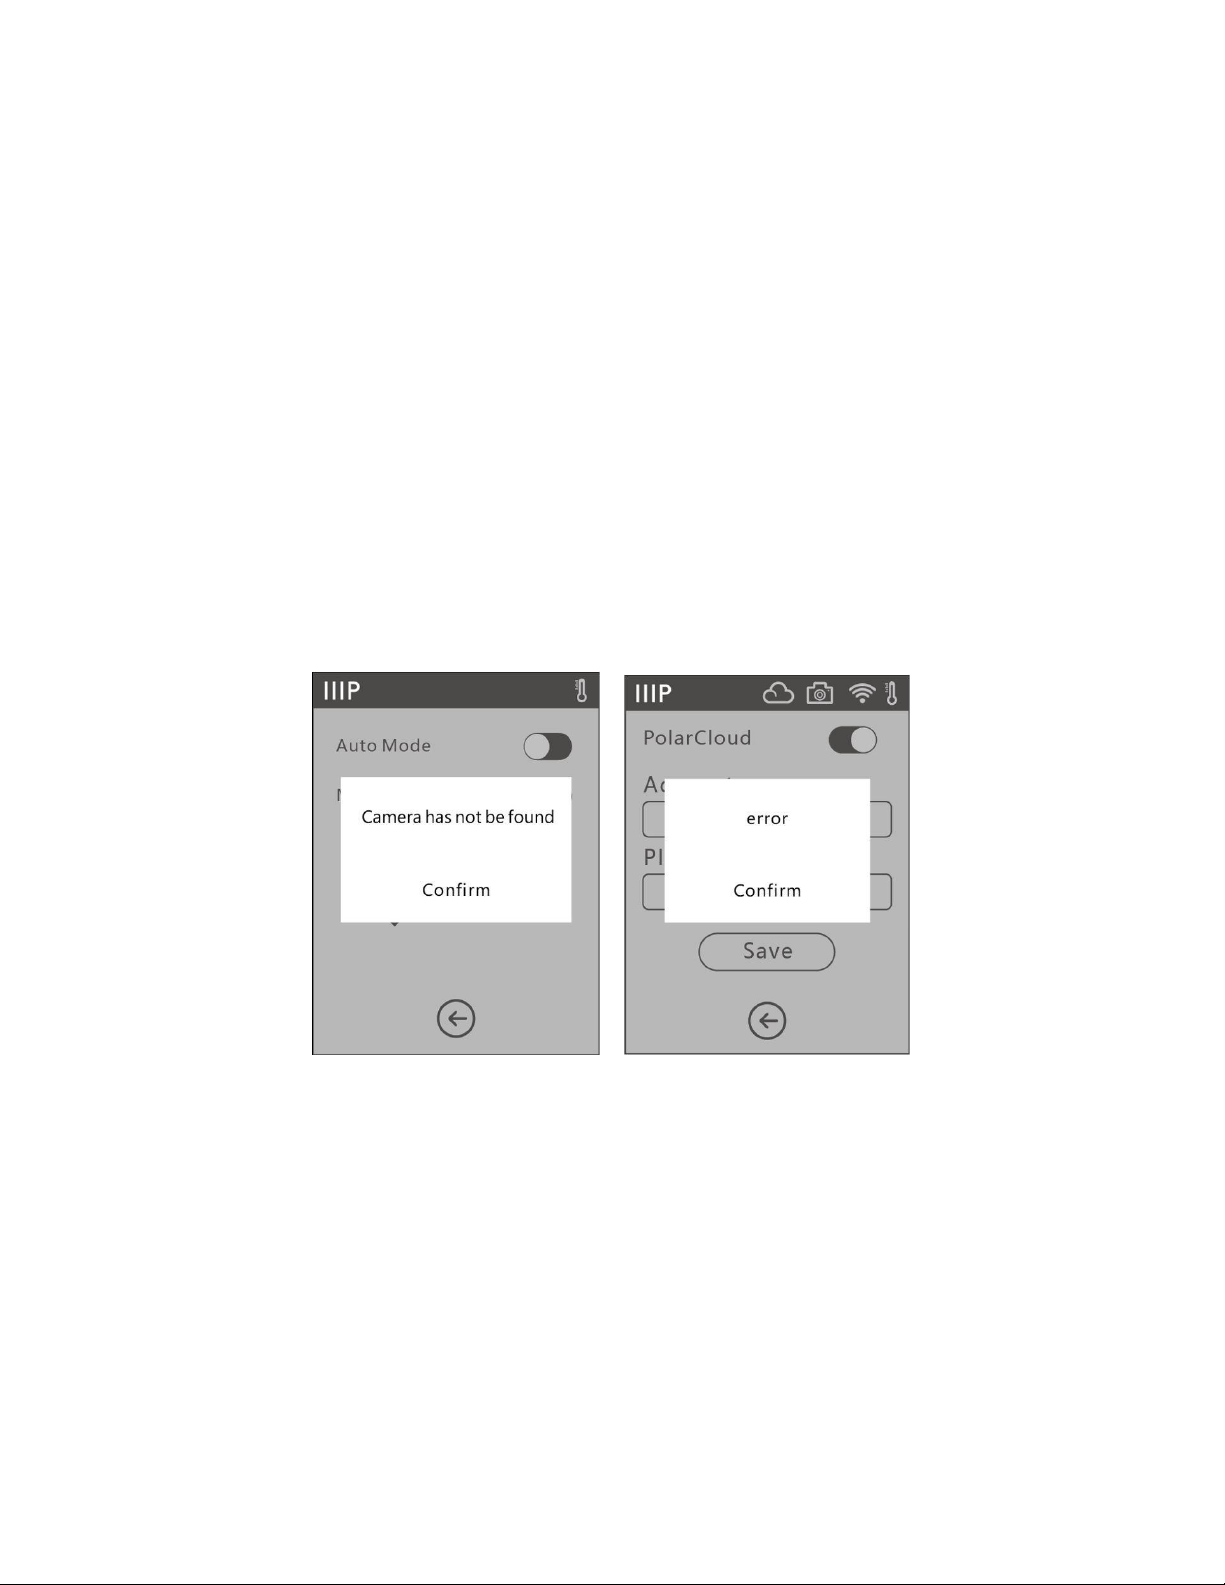
Error Handling
If the camera is damaged or otherwise inoperable, the camera screen will display the error
message shown in the image below and to the left. At this point, the local computer will
automatically set the camera to Manual Mode and will turn it off. Touch Confirm to clear
the error message.
If the local computer does not connect to PolarCloud and the printer is deleted from the
Cloud, the camera screen will display the error message shown in the image above and to
the right. Touch Confirm to clear the error message. To fix the error, restore the factory
default settings. After the local computer connects to the printer and the printer is deleted
from the Cloud, you will need to sign up for PolarCloud again.
37
Page 38

CLEARING A CLOGGED NOZZLE
From time to time, the nozzle will become clogged with filament material. Perform the
following steps to clear a clogged nozzle.
1. With the printer powered on, touch Filament > Change to remove the currently
loaded filament. Pull out the filament once preheating has finished.
2. Carefully insert the included Unclogging Tool into the nozzle while turning it to
"drill" into the material, then pull it out while turning. Repeat several times.
3. Using a pair of scissors or side cutters, diagonally cut the end of the filament so that
it comes to a point.
4. Insert the new filament into the feed mechanism, then touch the OK button to
allow the printer to feed filament to the extruder.
5. Once several centimeters of filament has been extruded, touch the OK button to
stop extrusion.
REPLACING THE NOZZLE
This printer features a quick disconnect nozzle, allowing for easy replacement. Perform the
following steps to replace the nozzle.
1. Remove any installed filament, then turn the printer
off and allow all parts to cool before touching the
extruder and nozzle.
2. Squeeze the two clips at the bottom of the extruder,
then pull out the old nozzle.
3. While still squeezing the clips, insert the new nozzle.
Ensure that it is fully inserted and fully seated in the
extruder. After inserting the nozzle, run your finger
around the housing. When the nozzle is properly
installed, the clips will be flush with the housing.
38
Page 39

4. Turn the printer on and perform calibration to ensure that the nozzle and build
platform have the correct distance when in the home position.
5. Load filament back into the printer.
6. Perform extruder calibration as detailed in the
Note that if the extruder temperature does not read correctly or reaches an unusual
temperature (e.g. 300°C), the new nozzle has not been properly installed. Repeat the above
steps to reinstall the nozzle.
CALIBRATION
section above.
FAQ
Q1: Do I need to perform extruder calibration after replacing the nozzle?
A1: Yes, perform extruder calibration as detailed in the
Q2: What do I do if the displayed extruder temperature is abnormal (e.g. 300°C) or is not
showing at all?
A2: The nozzle is not installed correctly. Reinstall the nozzle as detailed in the
THE NOZZLE
section above.
CALIBRATION
section above.
REPLACING
Q3: What do I do if no filament extrudes when trying to build a model?
A3: Perform the steps in the
Q4: How do I replace the filament?
A4: Perform the steps in the
Q5: How do I remove a finished model?
A5: Perform the steps in the
CLEARING A CLOGGED NOZZLE
REPLACING FILAMENT
section above.
REMOVING A PRINTED MODEL
39
section above.
section above.
Page 40

Q6: What do I do if the distance between the nozzle and the build platform is too much
or too little?
A6: Perform the steps in the
Q7: Is the printer compatible with AC voltages other than 110-120 VAC?
A7: Yes, the printer uses an AC power adapter, which can accept voltages from 100~240
VAC, 50/60 Hz.
Q8: Can the printer automatically turn off after a print job is complete?
A8: No.
Q9: Which file formats does the printer support?
A9: The slicing software can accept .3mf, .stl, .obj, .fpp, .bmp, .png, .jpg, and .jpeg files. The
printer itself can accept .gx or .g files, which are created by the slicing software.
CALIBRATION
section above.
Q10: Is ABS printing safe?
A10: ABS filament creates a noxious, poisonous gas when heated. Only use ABS filament in
a well-ventilated location. We recommend using non-toxic PLA when printing in the
presence of children.
Q11: What do I do if the printed model edges are warped?
A11: Activate the Raft option in the slicing software, then reslice the model. Try heating
the platform to the recommended temperature to increase model adhesion. Try
applying a solid glue to the platform before printing.
40
Page 41

Q12: What do I do if the extruder makes a chugging noise, but no filament is extruded?
A12: Check to see if filament is loaded properly and that the guide tube is seated properly.
If filament is loaded and guide tube is seated properly, the nozzle is probably clogged.
Perform the steps in the
Q13: What is the difference between Filament Load and Filament Replace?
A13: Loading is performed when no filament is currently loaded. Replacing is a two-step
process that first unloaded the currently loaded filament, then loads another filament.
CLEARING A CLOGGED NOZZLE
section above.
TECHNICAL SUPPORT
Monoprice is pleased to provide free, live, online technical support to assist you with any
questions you may have about installation, setup, troubleshooting, or product
recommendations. If you ever need assistance with your new product, please come online
to talk to one of our friendly and knowledgeable Tech Support Associates. Technical
support is available through the online chat button on our website www.monoprice.com
during regular business hours, 7 days a week. You can also get assistance through email by
sending a message to tech@monoprice.com
41
Page 42

SPECIFICATIONS
Model
33820, 35880, 35881
Print Technology
Fused Filament Fabrication (FFF)
Screen Type
2.8" Color IPS Touch Screen
Filament Size
1.75 mm
Supported Filament Types
ABS, PLA, Wood, Copper Fill, Steel Fill, Bronze Fill
Nozzle Diameter
0.4 mm
Build Area
6.9" x 6.9" x 6.9" (150 x 150 x 150 mm)
Layer Resolution
0.05 ~ 0.4 mm
Build Accuracy
±0.2 mm
Positioning Accuracy
Z: 0.0025 mm, XY: 0.011 mm
Build Speed
10 ~ 100 mm/second
Internal Memory
8GB
Software
MP FlashPrint
Supported Input Formats
.3MF, .STL, .OBJ, .FPP, .BMP, .PNG, .JPG, .JPEG
Supported Output Formats
.GX, .G
Connectivity
USB Flash Drive, Wi-Fi®, Ethernet
Operating System Compatibility
Windows® XP/Vista®/7/8/10, Mac® OS X®, Linux®
Input Power
24 VDC, 6.5A
AC Adapter Input Power
100 ~ 240 VAC, 47 ~ 63 Hz
Maximum Power Consumption
150 watts
Dimensions
15.7" x 15.0" x 15.9" (400 x 380 x 405 mm)
Weight
19.8 lbs. (9.0 kg)
42
Page 43

REGULATORY COMPLIANCE
Notice for FCC
Modifying the equipment without Monoprice’s authorization may result in the equipment
no longer complying with FCC requirements for Class A digital devices. In that event, your
right to use the equipment may be limited by FCC regulations, and you may be required to
correct any interference to radio or television communications at your own expense.
This equipment has been tested and found to comply with the limits for a Class A digital
device, pursuant to Part 15 of the FCC Rules. These limits are designed to provide
reasonable protection against harmful interference in a commercial installation. This
equipment generates, uses and can radiate radio frequency energy and, if not installed and
used in accordance with the instructions, may cause harmful interference to radio
communications. Operation of this equipment in a residential area is likely to cause harmful
interference, in which case the user will be required to correct the interference at his own
expense.
Radio Notice for FCC
Caution
This FCC Part 15 radio device operates on a non-interference basis with other devices
operating at this frequency. Any changes or modification to said product not expressly
approved by Monoprice, including the use of non-approved antennas, could void the user’s
authority to operate this device.
This device complies with Part 15 of the FCC Rules. Operation is subject to the following
two conditions: (1) this device may not cause harmful interference, and (2) this device must
accept any interference received, including interference that may cause undesired
operation.
43
Page 44

RF Exposure Statement for FCC
Caution
This equipment complies with radiation exposure limits set forth for an uncontrolled
environment. End users must follow the specific operating instructions for satisfying RF
exposure compliance. This transmitter must be at least 20 cm from the user and must not
be collocated or operated in conjunction with any other antenna or transmitter.
Notice for Industry Canada
This Class A digital apparatus complies with Canadian ICES-003.
Cet appareil numérique de la classe A est conforme à la norme NMB-003 du Canada.
Radio Notice for Industry Canada
Caution
This IC RSS-210 radio device operates on a non-interference basis with other devices
operating at this frequency. Any changes or modification to said product not expressly
approved by Monoprice, including the use of non-approved antennas, could void the user’s
authority to operate this device.
This device complies with IC RSS-210. Operation is subject to the following two conditions:
(1) this device may not cause harmful interference, and (2) this device must accept any
interference received, including interference that may cause undesired operation.
44
Page 45

RF Exposure Statement for Industry Canada
Caution
This equipment complies with radiation exposure limits set forth for an uncontrolled
environment. End users must follow the specific operating instructions for satisfying RF
exposure compliance. This transmitter must be at least 20 cm from the user and must not
be collocated or operated in conjunction with any other antenna or transmitter.
EU Declaration of Conformity
Monoprice, Inc. declares the product described within this user guide or manual is in
compliance with below applicable directives. The full text of the EU Declaration of
Conformity is available at the following internet address:
https://www.monoprice.com/product?c_id=107&cp_id=10724&cs_id=1072403&p_id=33820
&seq=1&format=2 or the CE DoC can be found within this user manual
EMC Directive 2004/108/EC
Low Voltage Directive 2014/35/EU
RoHS2 Directive 2011/65/EU
WEEE Directive 2012/19/EC
Packaging & Packaging Waste Directive 94/62/EC
REACH Directive 1907/2006/EC
45
Page 46

WEEE Information
User information for consumer products covered by EU Directive 2012/19/EU on Waste
Electric and Electronic Equipment (WEEE)
This document contains important information for users with regards to the proper
disposal and recycling of Monoprice products. Consumers are required to comply with this
notice for all electronic products bearing the following symbol:
For Consumers in the European Union: This EU Directive requires that the product bearing
this symbol and or its packaging must not be disposed of with unsorted municipal waste.
The symbol indicates that this product should be disposed of separately from regular
household waste streams. It is your responsibility to dispose of this and other electrical and
electronics products via designated collection facilities appointed by the government or
local authorities. Correct disposal and recycling will help prevent potential negative
consequences to the environment and human health. For more detailed information about
the disposal of your unwanted product, please contacts your local authorities, waste
disposal service, or the shop where you purchased the product.
46
Page 47

Safety Notice
WARNING: Do not use this product near water, for example, in a wet basement or near
swimming pool or in an area where accidental contact with water or liquid might occurs
WARNING: Avoid using this product during an electrical storm. There may be a remote risk
of electric shock from the surge caused by lightning
WARNING: The external power adapter or AC power cord is the equipment's disconnection
device. The power outlet must be located nearby the equipment and its access must be
easy
WARNING: Use this product in a well-ventilated area
Wi-Fi® and Wi-Fi Alliance® are registered trademarks of Wi-Fi Alliance.
Microsoft®, Windows®, and Vista® are either registered trademarks or trademarks of
Microsoft Corporation in the United States and/or other countries.
Apple®, Mac®, and OS X® are trademarks of Apple Inc., registered in the U.S. and other
countries.
Linux® is the registered trademark of Linus Torvalds in the U.S. and other countries.
47
 Loading...