

Monoprice extrusion i3 13860, 13860 Maker Select User Manual

CONTENTS
SAFETY WARNINGS AND GUIDELINES .............................................................................................................................................................. 3
INTRODUCTION ....................................................................................................................................................................................................................... 4
FEATURES ..................................................................................................................................................................................................................................... 4
CUSTOMER SERVICE ........................................................................................................................................................................................................... 4
PACKAGE CONTENTS ........................................................................................................................................................................................................ 5
USING THE MENU SYSTEM ........................................................................................................................................................................................... 6
UNPACKING, ASSEMBLY, AND SETUP ............................................................................................................................................................... 6
FINE TUNING PLATFORM HEIGHT .........................................................................................................................................................................17
SOFTWARE ................................................................................................................................................................................................................................ 19
Installation .......................................................................................................................................................................................................................... 19
Quickprint View ............................................................................................................................................................................................................ 26
Full Settings View ....................................................................................................................................................................................................... 29
Basic Tab .............................................................................................................................................................................................................................. 30
Advanced Tab .................................................................................................................................................................................................................. 33
Plugins Tab ........................................................................................................................................................................................................................ 35
Expert Settings ............................................................................................................................................................................................................... 37
TECHNICAL SUPPORT ..................................................................................................................................................................................................... 43
REGULATORY COMPLIANCE .................................................................................................................................................................................... 43
Notice for FCC ................................................................................................................................................................................................................ 43
Notice for Industry Canada ................................................................................................................................................................................ 44
APPENDIX A: CONTROL BOX MENU REFERENCE ................................................................................................................................. 45
Main Menu ........................................................................................................................................................................................................................ 45
Quick Settings Menu ............................................................................................................................................................................................... 45
Position Menu ................................................................................................................................................................................................................ 46
Extruder ................................................................................................................................................................................................................................ 46
Fan Speed ........................................................................................................................................................................................................................... 47
SD Card ................................................................................................................................................................................................................................. 47
Debugging ......................................................................................................................................................................................................................... 47
Configuration .................................................................................................................................................................................................................. 48
Configuration >> General .................................................................................................................................................................................... 48
Configuration >> Acceleration ........................................................................................................................................................................ 49
Configuration >> Feedrate ................................................................................................................................................................................. 49
Configuration >> Extruder .................................................................................................................................................................................. 50

SAFETY WARNINGS AND GUIDELINES
The printer is very sensitive to static electricity. Always contact a grounded object
before working with this device. It is recommended to wear an anti-static wrist
strap when working with this device.
Power off and unplug the printer from the power source prior to making repairs or
alterations.
The printer operates at high temperatures. Always allow the nozzle, the extruded
material, and build plate to cool before touching.
Some types of filament can emit a strong odor when heated. Always use this printer
in a well-ventilated area.
Do not leave the printer unattended when in operation.
Do not expose this printer to excessive vibration.
Do not expose this printer to water or moisture of any kind. Do not place drinks or
other containers with moisture on or near the printer. If moisture does get in or on
the printer, immediately unplug it from the power outlet and allow it to fully dry
before reapplying power.
Do not place the printer near a heat source, such as a fireplace, heating vent,
radiator, etc.
The power supply for this monitor uses a NEMA 5-15 three prong, grounded plug. Do
not use a "cheater" plug or otherwise bypass the grounding pin.
Do not allow the power cord to be crimped, pinched, stepped on, etc. Ensure that
the power cord does not present a tripping hazard.
Never unplug the unit by pulling on the power cord. Always grasp the connector
head.
This device should only be operated by qualified adults.
In the event of serious operating problem, stop using the unit immediately.
3

INTRODUCTION
Thank you for purchasing this 3D printer from Monoprice! This printer features a single
extruder, which is capable of printing in PLA, ABS, and other materials. You can print from a
Windows® or Mac® PC using a USB connection or can print from 3D model files stored on a
micro SD card, without the need for a PC connection of any kind. This printer is easy to
setup and easy to use following the instructions in this manual.
FEATURES
Single extrusion print head
Can print PLA, ABS, and other materials
Open frame design for ease of use and maintenance
Includes PLA filament for printing right out of the box
Includes 4GB micro SD card with preinstalled sample 3D models
CUSTOMER SERVICE
The Monoprice Customer Service department is dedicated to ensuring that your ordering,
purchasing, and delivery experience is second to none. If you have any problem with your
order, please give us an opportunity to make it right. You can contact a Monoprice
Customer Service representative through the Live Chat link on our website
www.monoprice.com during normal business hours (Mon-Fri: 5am-7pm PT, Sat-Sun: 9am-
6pm PT) or via email at support@monoprice.com
4
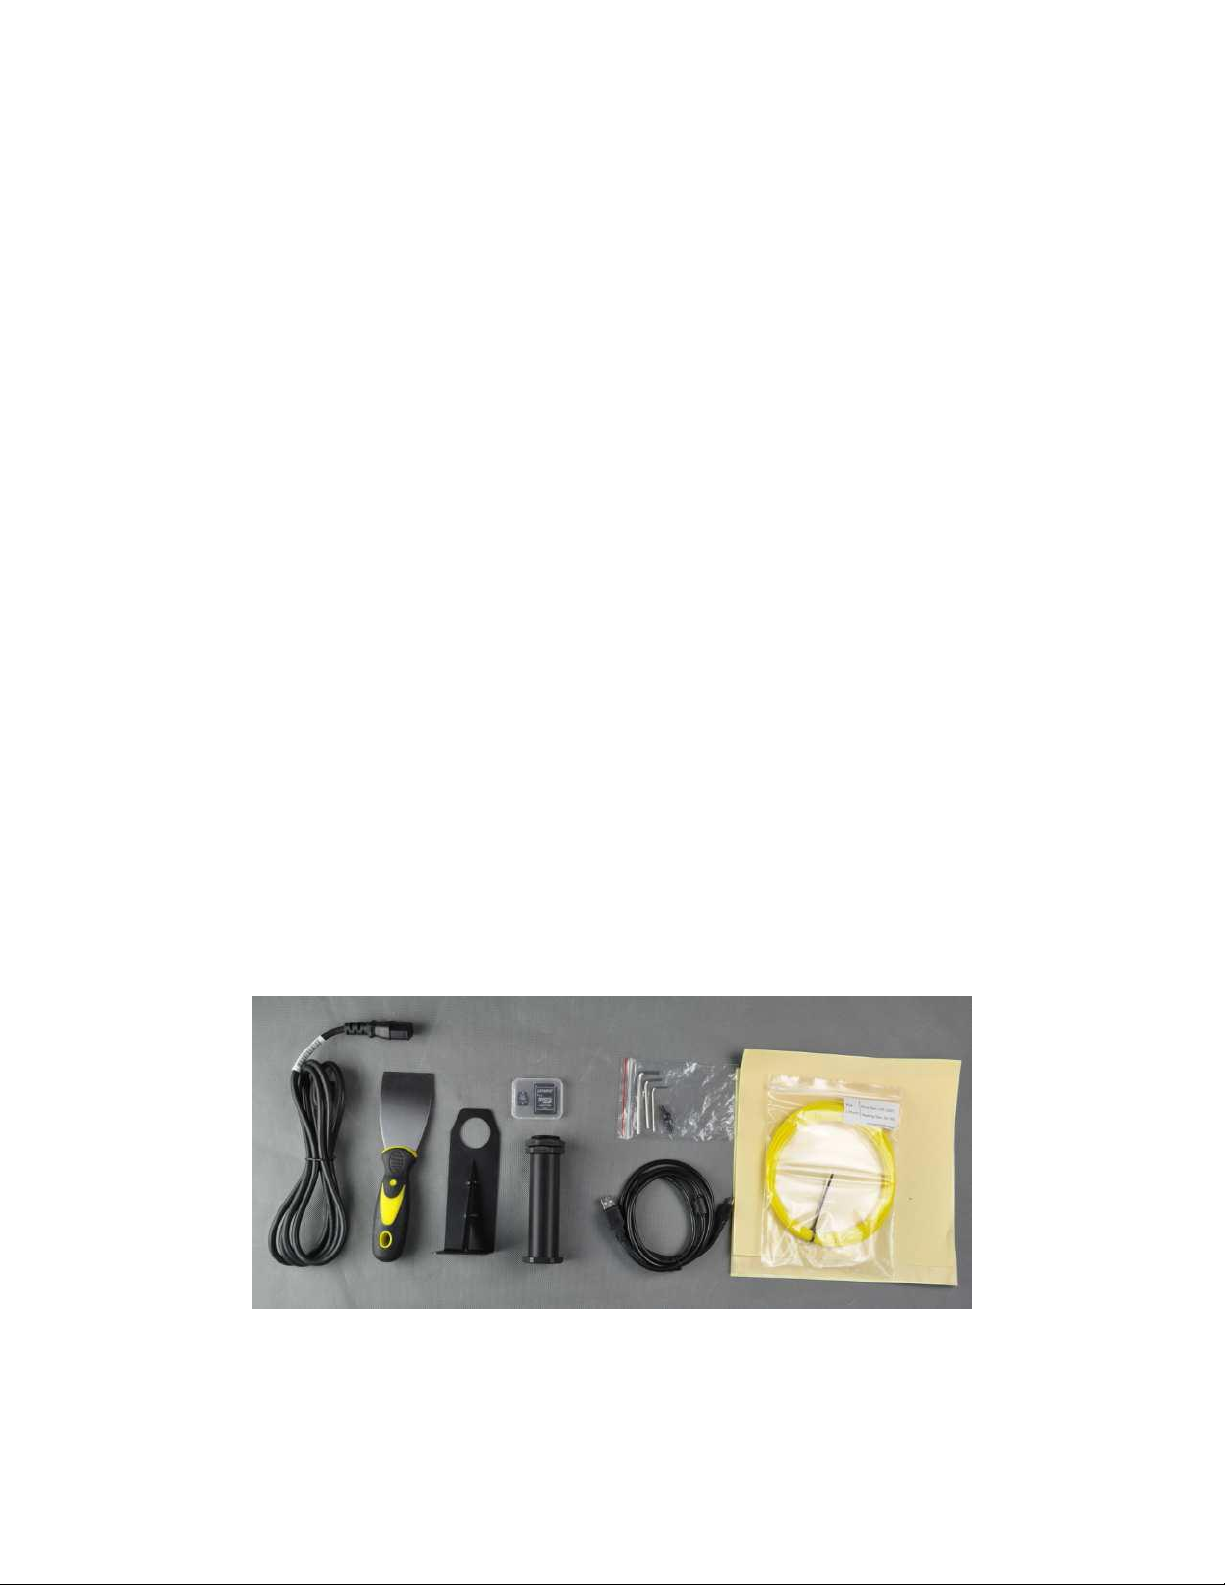
PACKAGE CONTENTS
Please take an inventory of the package contents to ensure you have all the items listed
below. If anything is missing or damaged, please contact Monoprice Customer Service for a
replacement.
1x Monoprice i3 3D printer tower assembly with attached MK10 single step extruder
1x Monoprice i3 3D printer base assembly
1x Monoprice i3 3D printer power supply/control box
1x Spool holder
1x Filament stand
1x 4mm hex wrench
6x Hex bolts
1x Putty knife
1x 4GB Micro SD card with sample 3D model files
2x Sheets of platform tape
1x Sample roll of PLA filament (10m/32ft)
1x AC power cord (NEMA 5-15 to IEC 60320 C13)
1x USB cable (A to B)
5

USING THE MENU SYSTEM
The Power Supply/Control Box features a knob and an LCD display. Throughout this manual
you will be asked to navigate the menu system and select specific menu entries. For
example, you may be told to select:
Quick Settings > Home All
To do this, first press the knob to activate the menu
system. Rotate the knob until the highlight is on the
Quick Settings entry, then press the knob to select it.
Next, rotate the knob until the Home All entry is
highlighted, then press the knob to select it.
Most menus have a Back option to return to the
previous menu. If no option is available, pressing the
knob will often return to the previous menu.
Additionally, the control box will automatically exit
the menus and return to the home screen after about 30 seconds of inactivity.
UNPACKING, ASSEMBLY, AND SETUP
1. Open the box, remove the cardboard accessories box, then remove the top layer
foam insert.
6
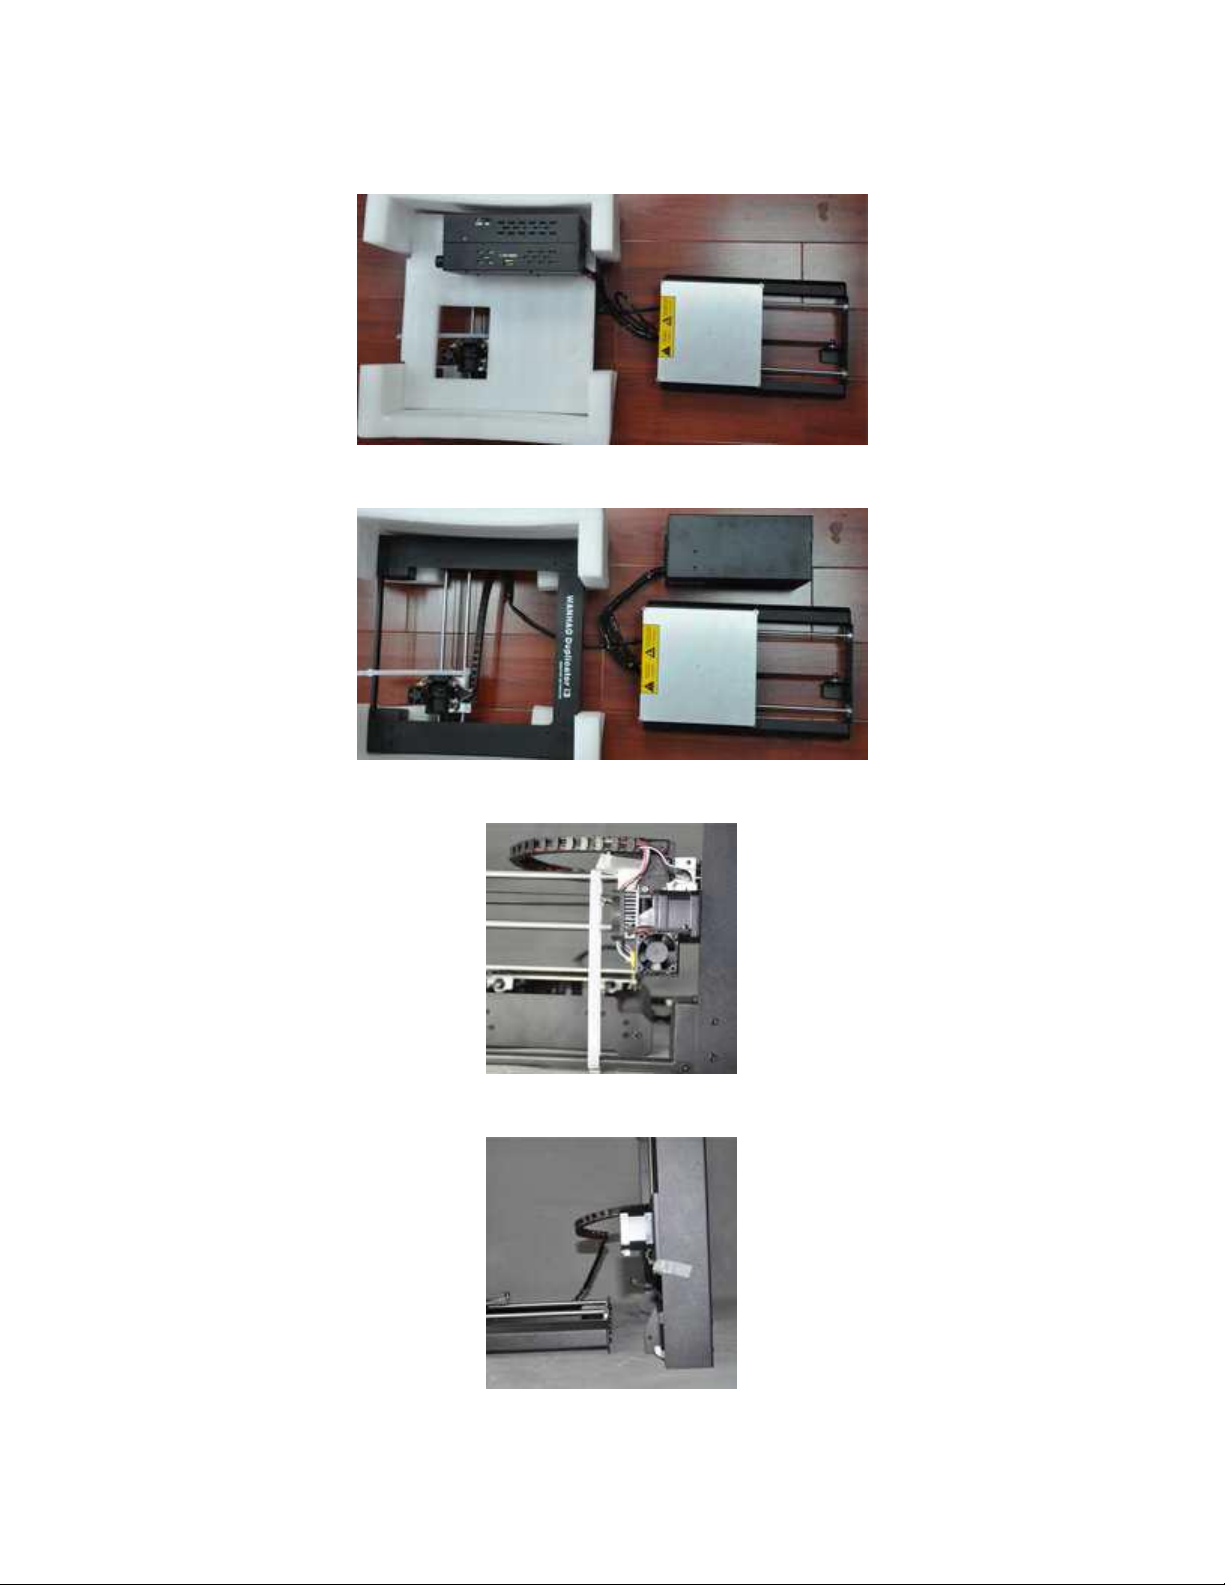
2. Remove the Printer Base from the foam packaging and place it onto a flat surface.
3. Remove the Power Supply/Control Box and place it next to the base.
4. Cut the white ribbon that secures the Extruder Assembly to the Tower Frame.
5. Remove the Tower Frame and stand it up vertically on the flat surface.
7

6. Insert the Printer Base into the Tower Frame and align the screw holes on the frame
with those on the base.
7. Open the accessories box and remove four Hex Screws and the Hex Wrench. Insert
a screw into hole on the frame on the left side and tighten it using the hex wrench.
Repeat the process on the right side.
8. Flip the printer onto its left side, then insert a screw from inside the base and secure
it to the frame using the hex wrench. Flip the printer onto the other side and repeat
the process.
8

9. Use a carpenter's level to ensure that your flat surface is level. If it is not level, locate
a level surface and place the printer on top of it. Next use the carpenter's level to
check that the X-axis guide rods are level. If not, raise or lower either side by
manually turning the Z-axis couplers on either side of the frame.
10. Remove one of the plastic nuts from the threaded end of the Spool Holder, but
leave the second nut in place. Insert the threaded end of the spool holder through
the Filament Stand, from the side opposite the base support. Thread the plastic nut
onto the spool holder and tighten the plastic nuts on each side of the filament
stand.
9
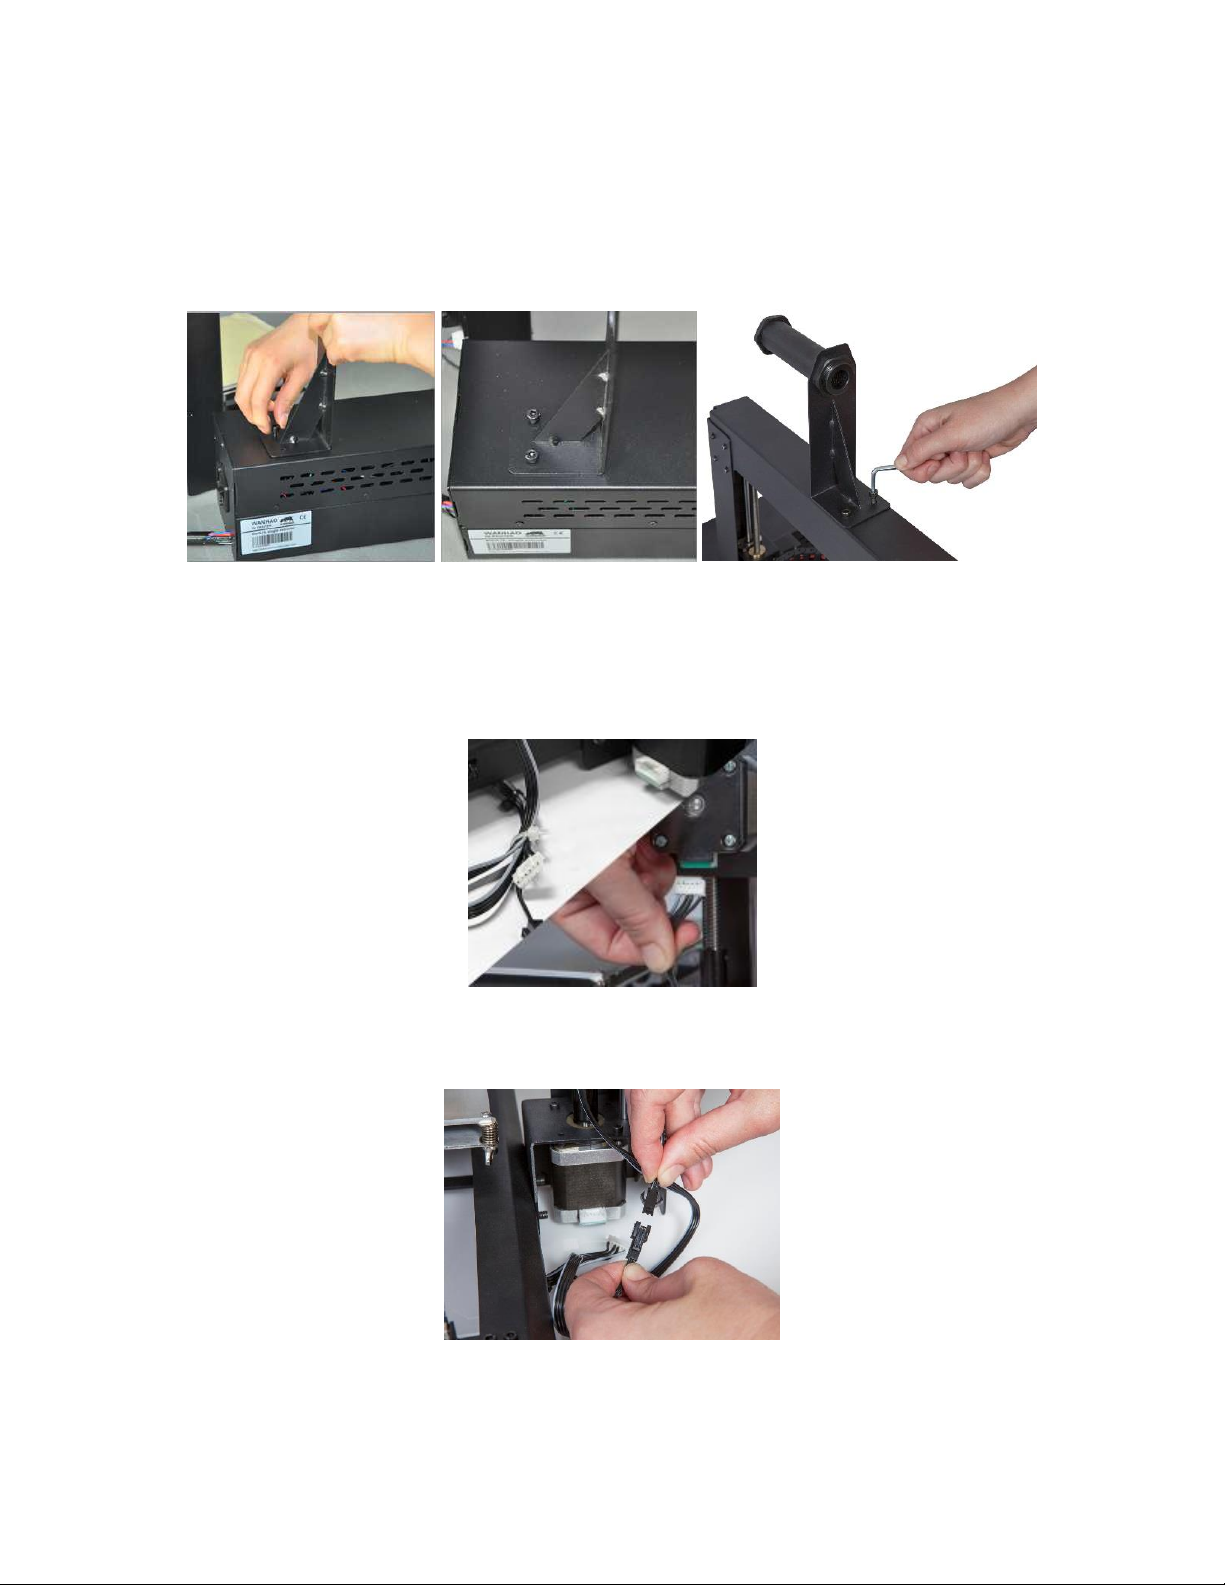
11. You can mount the Filament Stand and Spool Holder onto either the Tower Frame
or the Power Supply/Control Box. Use two hex and the hex wrench to secure it to
your desired location. If mounting it to the tower frame, ensure that the spool
holder is mounted over the center of the tower frame.
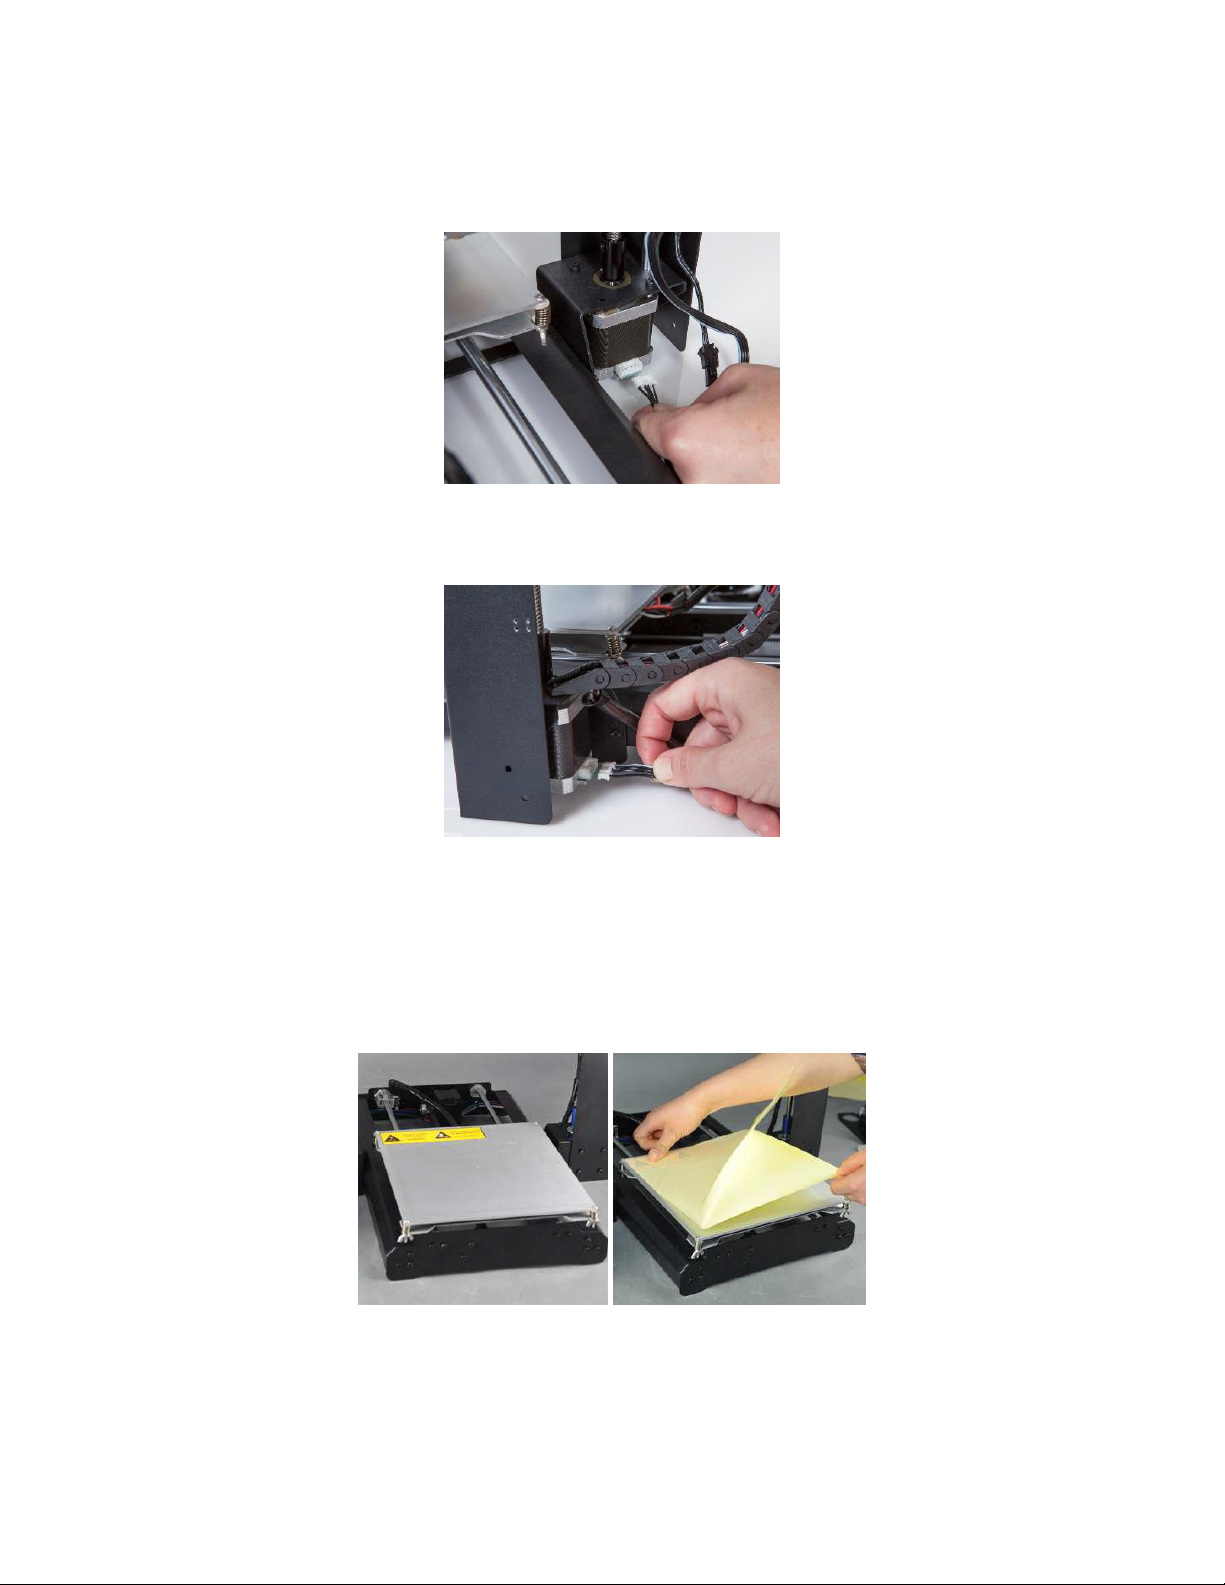
12. The cable assembly on the left side of the base has three cables coiled and secured
with a zip tie. Carefully remove the zip tie, then insert the white connector on the
longest of the three cables into the white connector on the bottom of the X-axis
stepper motor.
13. Mate the two-pin black cable connector in the cable bundle with the corresponding
black connector on the cable attached to the stop switch.
10
14. Insert the white connector on the shortest of the three cables into the
corresponding white connector on the left side Z-axis stepper motor.
15. Insert the white connector on the short cable on the right side of the base into the
corresponding white connector of the right side Z-axis stepper motor.
16. Use a lint-free cloth to wipe the top of the aluminum build plate to ensure that no
dust or other particles are present. Remove the protective backing from one of the
sheets of platform tape and carefully apply it to the platform, ensuring that no
bubbles are present. Note that you can also use painter's tape or Kapton® tape
instead of the included platform sheets.
11

17. The printer can be operated in either 110V or 220V environments. It ships from the
factory set for 110V, however you should double check the switch on the side of the
Power Supply/Control Box and flip it to the proper position, as necessary.
18. Ensure that the power switch is in the OFF position (O side depressed). Plug the C13
end of the included AC Power Cable into the C14 panel connector on the Power
Supply/Control Box, then plug the other end into a nearby AC power outlet.
Depress the I side of the power switch to power the printer ON.
12
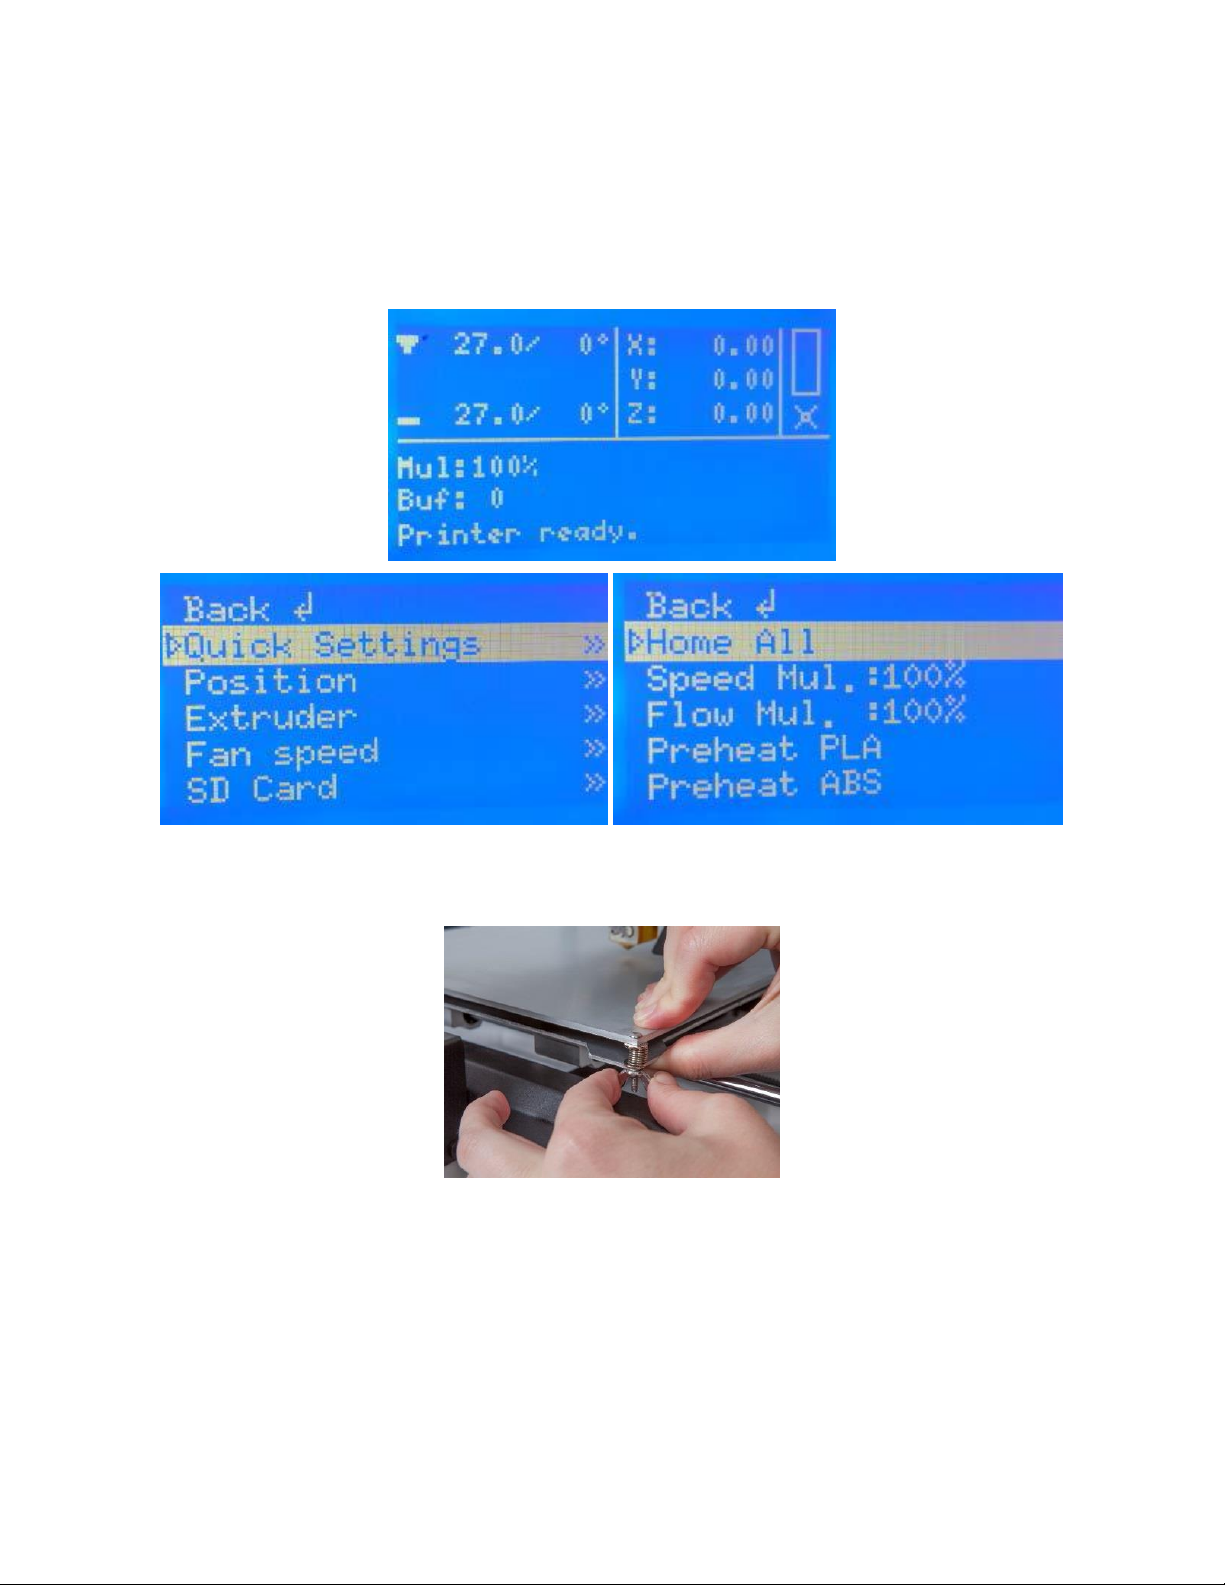
19. Wait for the printer to warm up and initialize. When it is ready, it will display
ready
at the bottom of the LCD display. Select Quick Settings > Home All. Wait for
the printer to move the build platform and extruder to the home position, then turn
the printer off.
Printer
20. One by one, squeeze each corner of the built platform and tighten the wingnut to
compress the spring and reduce the distance between plates to the minimum.
13
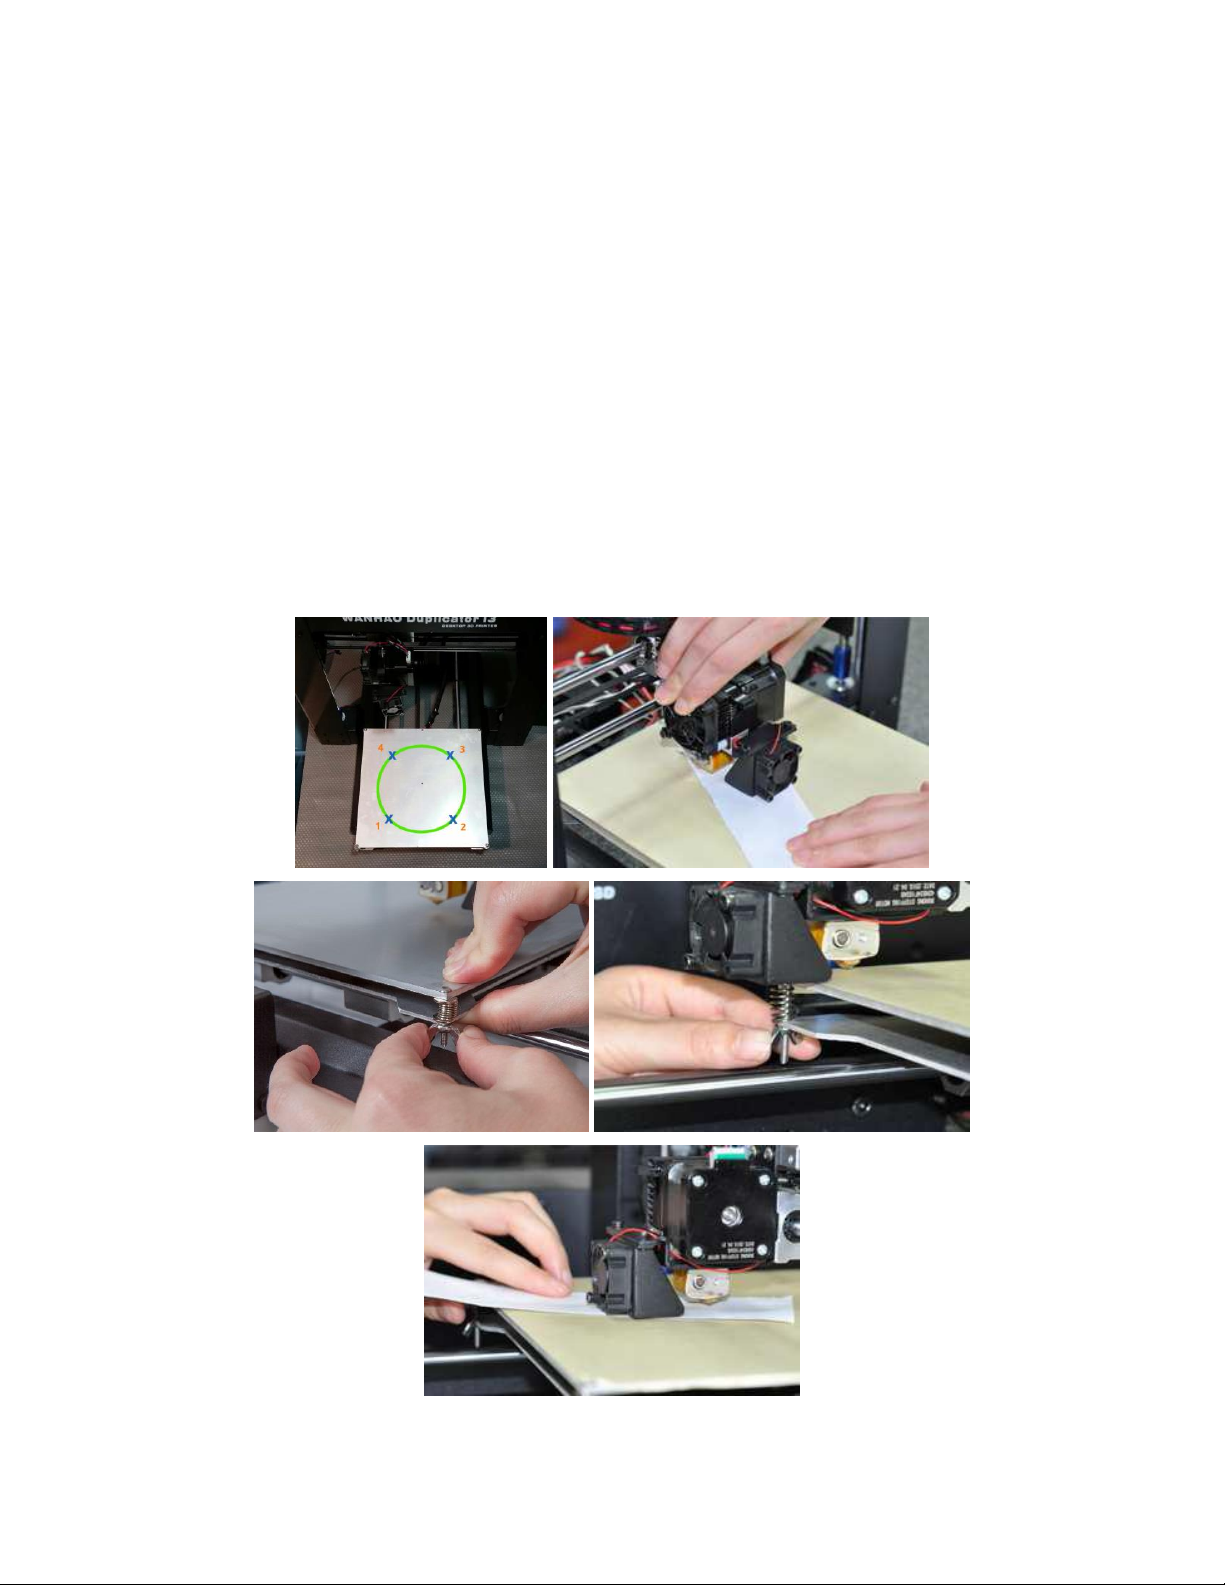
21. Now that the printer is off you can manually move the extruder around the build
platform. Because most printing is done near the center of the platform, you should
check the nozzle height at points about 2 inches from each corner, as indicated by
the blue X marks in the diagram below.
Use a single sheet of ordinary printer paper as a guide. The nozzle is at the correct
height when you can just slide a single sheet of paper between the build platform
and the nozzle.
To raise the build platform, loosen the wingnuts under the build platform. To lower
the build platform, tighten the wingnuts under the build platform. Note that you
may need to slightly squeeze the platform to more easily tighten the wingnuts.
Continue adjusting the platform height until it is at the correct height at all points
on the platform.
14

22. Switch the printer on and wait for it to initialize. Select Position > Z. Pos. Fast, then
turn the knob to raise the extruder so that it is at least an inch above the build
plate.
23. Select Quick Settings > Preheat PLA. Note that the screen will not change
immediately, but will return to the home screen and display
bottom after about 30 seconds.
24. Monitor the temperatures of the extruder and plate on the LCD display. When they
reach to within a few degrees of the targets, you are ready to insert filament. (Note
that the display will still show
reached the target values.) Carefully insert the included filament sample into the
hole on the extruder, as shown.
Preheat PLA
, even after the temperatures have
Preheat PLA
at the
15
 Loading...