

Page 1

Blackbird™ 4K HDMI® KVM Switch
P/N 36633
User's Manual
Page 2

SAFETY WARNINGS AND GUIDELINES
Please read this entire manual before using this device, paying extra
attention to these safety warnings and guidelines. Please keep this
manual in a safe place for future reference.
This device is intended for indoor use only.
Do not expose this device to water or moisture of any kind. Do
not place drinks or other containers with moisture on or near
the device. If moisture does get in or on the device, immediately
unplug it from the power outlet and allow it to fully dry before
reapplying power.
Do not touch the device, the power cord, or any other
connected cables with wet hands.
Do not subject the product to extreme force, shock, or
fluctuations in temperature or humidity.
Prior to operation, check the unit and power cord for physical
damage. Do not use if physical damage has occurred.
Before plugging the unit into a power outlet, ensure that the
outlet provides the same type and level of power required by
the device.
Unplug this device from the power source when not in use.
Take care to prevent damage to the power cord. Do not allow it
to become crimped, pinched, walked on, or become tangled
with other cords. Ensure that the power cord does not present a
tripping hazard.
Never unplug the unit by pulling on the power cord. Always
grasp the connector head or adapter body.
2
Page 3

Ensure that power is turned off and disconnected before
making any electrical connections.
Clean using a soft, dry cloth only. Do not use chemical cleaners,
solvents, or detergents. For stubborn deposits, moisten the
cloth with warm water.
This device has no user serviceable parts. Do not attempt to
open, service, or modify this device.
INTRODUCTION
Thank you for purchasing this Blackbird™ 4K HDMI® KVM Switch! This
switch allows you to connect up to four computers with HDMI video
output and control them using a remote keyboard and mouse. It
supports video resolutions up to 4K@60Hz with 4:4:4 color sampling and
can upscale lower resolutions to 4K@60Hz. Up to 5 units can be
cascaded, allowing for control of up to 16 computers in total. It supports
fullscreen and quadview layouts and includes an IR remote control, as
well as RS-232, and Web UI control options.
3
Page 4

FEATURES
Supports fullscreen and quadview modes
Supports input and output resolutions up to 4K@ 60Hz with
4:4:4 color sampling
Can upscale to 4K@60Hz
Up to 5 units can be cascaded, allowing for control of up to 16
computers
Supports seamless movement of the mouse across four screens
in quadview mode
Fast switching between input channels or screen layout modes
Supports keyboard/mouse, front panel button, IR remote
control, RS-232 control, and web UI control options
Complies with the HDMI® 2.0 and HDCP™ 2.2 standards
CUSTOMER SERVICE
The Monoprice Customer Service department is dedicated to ensuring
that your ordering, purchasing, and delivery experience is second to
none. If you have any problem with your order, please give us an
opportunity to make it right. You can contact a Monoprice Customer
Service representative through the Live Chat link on our website
www.monoprice.com or via email at support@monoprice.com. Check
the website for support times and links.
4
Page 5
PACKAGE CONTENTS
Please take an inventory of the package contents to ensure you have all
the items listed below. If anything is missing or damaged, please contact
Monoprice Customer Service for a replacement.
1x 4K HDMI® KVM switch
1x IR remote control
1x AC power adapter (12 VDC, 2A)
2x Rack mount brackets
4x Rubber feet
1x Bag of screws
1x User's manual
PRODUCT OVERVIEW
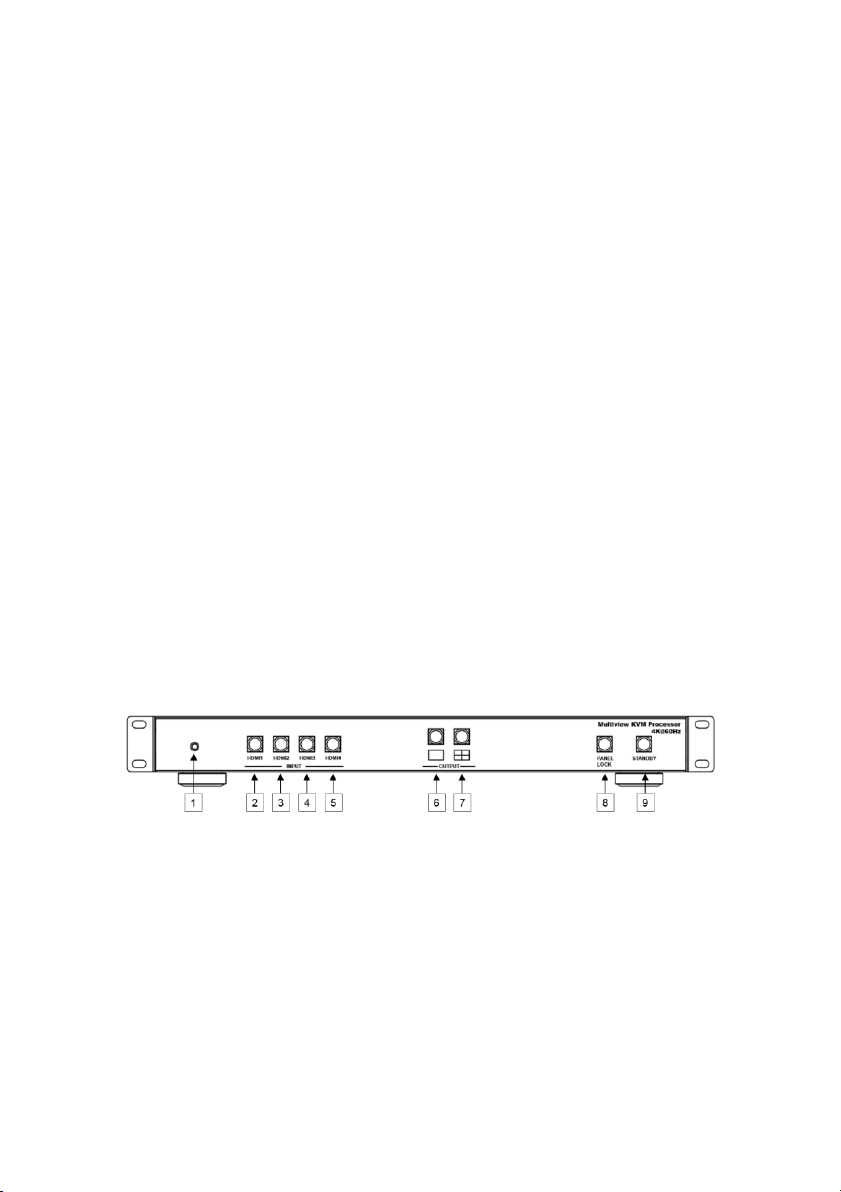
Front Panel
1. IR Receiver: IR receiver for accepting signals from the included
IR remote control.
2. HDMI1 Input: Press the button to select the HDMI® 1 input and
its corresponding USB input.
3. HDMI2 Input: Press the button to select the HDMI 2 input and
its corresponding USB input.
5
Page 6
4. HDMI3 Input: Press the button to select the HDMI® 3 input and
its corresponding USB input.
5. HDMI4 Input: Press the button to select the HDMI 4 input and
its corresponding USB input.
6. Fullscreen Output: Press the button to select the fullscreen
output layout.
7. Quadview Output: Press the button to select the quadview
output layout.
8. Panel Lock: Press the button to lock or unlock the front panel
buttons.
9. Standby: Press the button to put the system into standby mode
or to power it on.
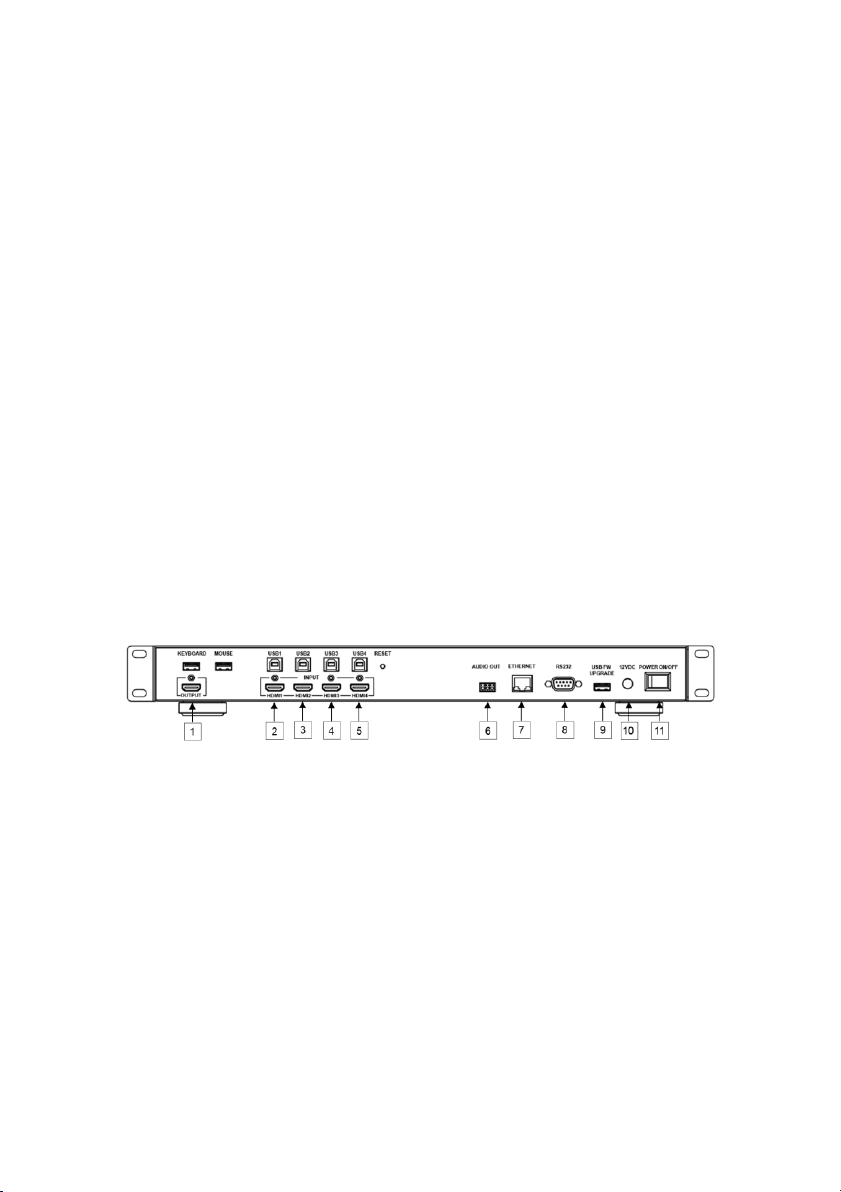
Rear Panel
1. Output: HDMI® video connector and two USB Type-A ports for
the keyboard and mouse.
2. HDMI1/USB1: HDMI video and USB Type-B ports for connecting
the first computer.
3. HDMI2/USB2: HDMI video and USB Type-B ports for connecting
the second computer.
4. HDMI3/USB3: HDMI video and USB Type-B ports for connecting
the third computer.
6
Page 7
5. HDMI4/USB4: HDMI® video and USB Type-B ports for
connecting the fourth computer.
6. Audio Out: 3-pin Euroblock connector for connecting an
external amplifier.
7. Ethernet: RJ45 port for connecting a computer or Ethernet
network.
8. RS232: 9-pin DB-9 serial connector for connecting a computer
for RS-232 control.
9. USB FW Upgrade: USB Type-A port for connecting a USB flash
drive to perform a firmware upgrade.
10. 12VDC: DC barrel connector for connecting the included AC
power adapter.
11. Power On/Off: Master power switch for turning the unit on or
off.
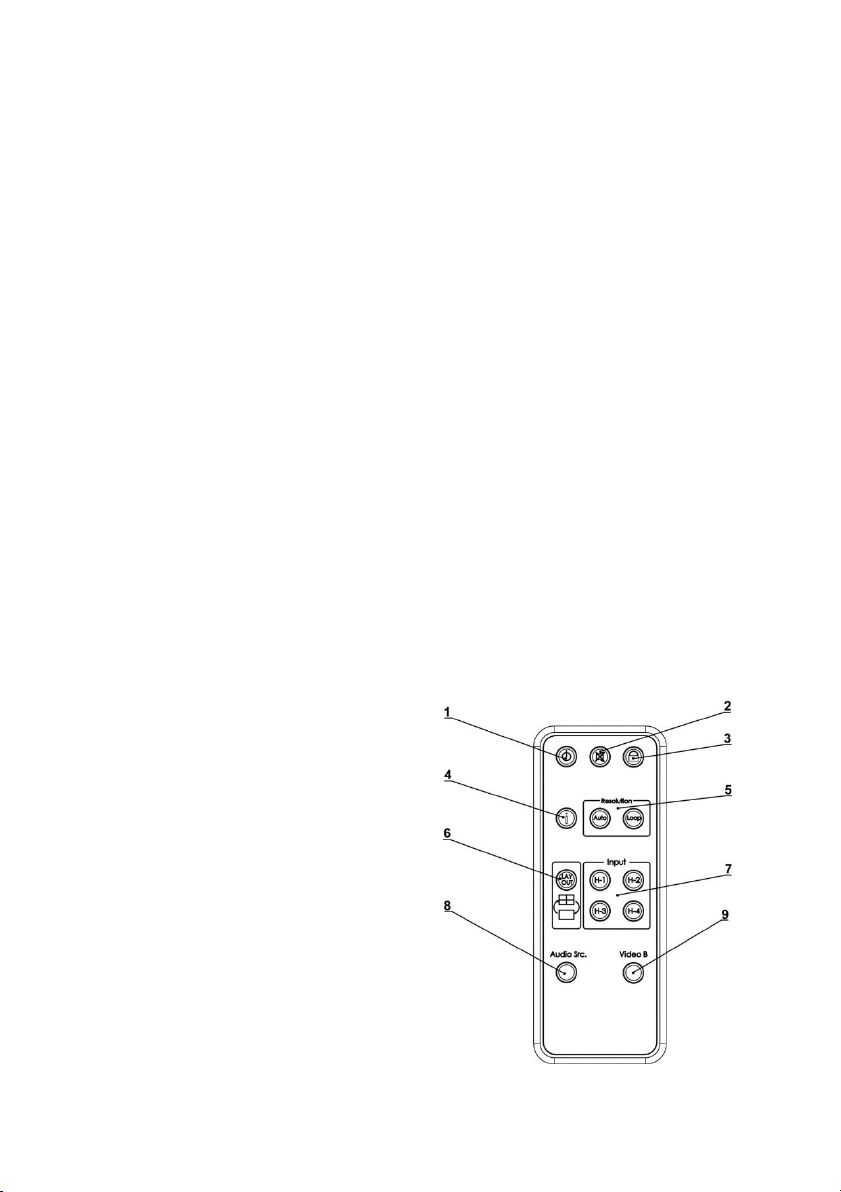
IR Remote Control
1. Standby: Press the button
to put the system into
standby or to power it on.
2. Mute: Press the button to
turn audio muting on or off.
3. Lock: Press the button to
lock or unlock the front
panel buttons.
4. Info: Press the button to
view the system
information.
7
Page 8
5. Resolution: Press the Auto button to set the output resolution
to Auto. Press the Loop button to cycle through the available
output resolutions.
6. Layout: Press the button to toggle between the fullscreen and
quadview layouts.
7. Input: Press one of the buttons to select the corresponding
input. When in fullscreen mode, it selects the entire
corresponding input (audio and video). In quadview mode, it
selects the corresponding audio only.
8. Audio Src: Cycle the output audio through the available audio
inputs.
9. Video B: Not used.
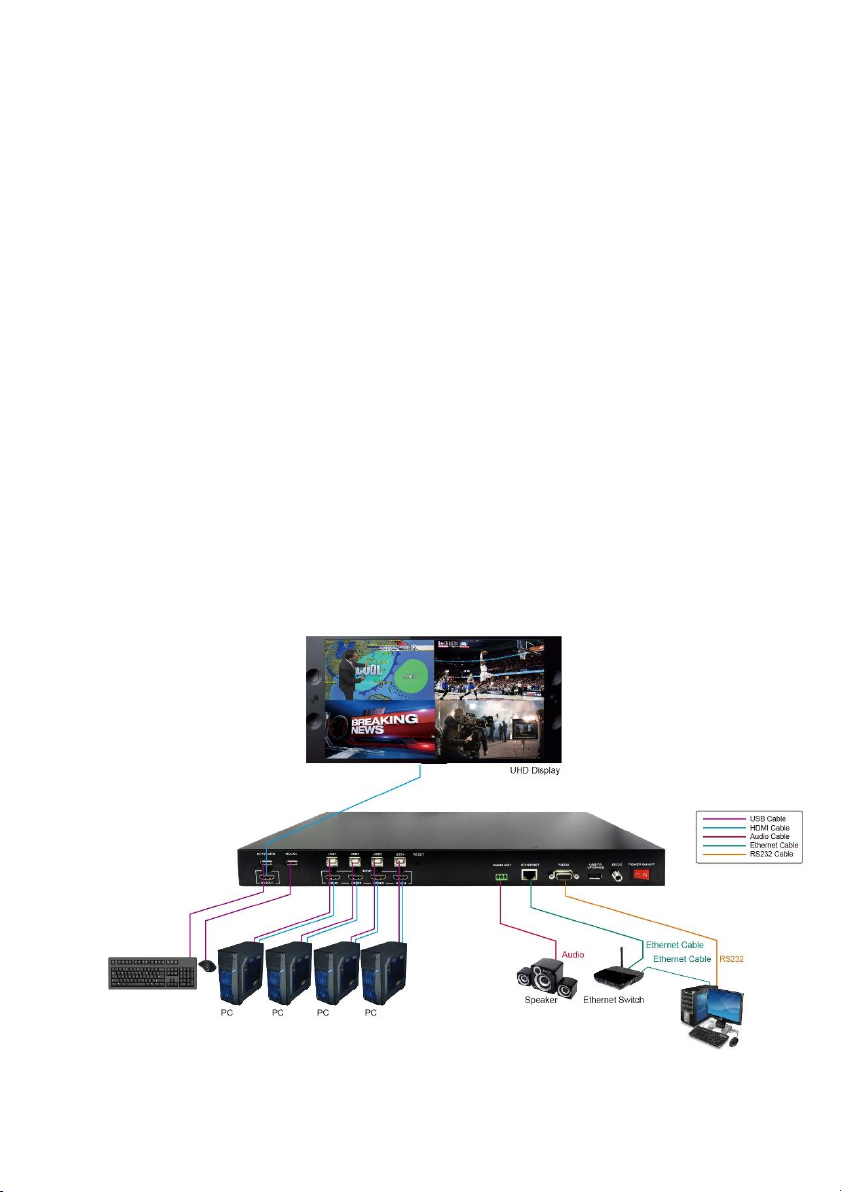
SAMPLE CONNECTION DIAGRAM
8
Page 9

KVM FUNCTIONALITY
The KVM switch can be controlled using the connected mouse and
keyboard without any special configuration. A mouse with a scroll wheel
is highly recommended for maximum KVM control functionality.
When quadview mode is enabled, the top left screen (HDMI® 1) is active
by default. Moving the mouse cursor to the border of the screens in
quadview will automatically switch the active window. The KVM switch
responds to the following mouse actions:
Scroll Wheel: Scrolling syncs the coordinates between the
source computer and the KVM switch.
Scroll Wheel/Middle Mouse Button: When in quadview mode,
double-clicking the Scroll Wheel/Middle Mouse Button switches
to fullscreen mode with the active window. When in fullscreen
mode, double-clicking the Scroll Wheel/Middle Mouse Button
switches to quadview.
As with other KVM switches, the mouse cursors on inactive windows
remain on screen.
9
Page 10

WEB UI CONTROL
You can control the KVM switch using a computer connected through
the Ethernet port on the rear panel. You can connect directly or through
an existing Ethernet network.
Direct Connection
Perform the following steps to connect your computer directly to the
KVM switch. These instructions assume the use of the Windows®
operating system.
1. Plug one end of an Ethernet cable (not included) into the
Ethernet port on the rear panel of the KVM switch, then plug
the other end into the Ethernet port on your computer.
2. On your computer, click Start > Control Panel > Network and
Sharing Center.
3. Click the Change adapter settings option.
4. Right click Local Area Connection, then select the Properties
option.
5. Highlight Internet Protocol
Version 4 (TCP/IPv4), then
click the Properties button.
6. Select Use the following IP
Address for static IP
address. Set the IP Address
to any address between
192.168.1.1 to 192.168.1.255,
except 192.168.1.202.
10
Page 11

7. Set the Subnet Mask to 255.255.255.0.
8. Click the OK button to close the Internet Protocol Version 4
(TCP/IPv4) window.
9. Click the OK button to close the Local Area Connection
Properties window.
10. To access the Web UI interface, type 192.168.1.202 into your
internet browser.
Network Connection
Perform the following steps to connect using an existing Ethernet
network.
1. Plug one end of an Ethernet cable (not included) into the
Ethernet port on the rear panel, then plug the other end into
your network router or an Ethernet hub.
2. To access the Web UI interface, type 192.168.1.202 into your
internet browser.
3. On the Sys Settings Screen, set the Network Type to DHCP.
Refer to the following section for details.
11
Page 12

Sys Settings Screen
1. F/W Version: Displays the firmware version of the KVM switch.
2. MAC Addr: Displays the MAC address of the KVM switch.
3. Telnet CMD: Command window for typing in a telnet command.
Refer to the
commands. Click the Confirm button to send the typed
command to the KVM switch.
4. Reboot: Click the Reboot button to reboot the KVM switch.
5. Network: Select either the Static IP or DHCP option, depending
on whether you are using a direct connection (static) or
connecting through your existing Ethernet network (DHCP).
TELNET COMMANDS
12
section for a list of valid
Page 13

Multi View KVM Screen
1. Resolution: Selects the output resolution. The possible settings
are:
Auto (default)
3840x2160@60Hz
3840x2160@50Hz
3840x2160@30Hz
1920x1080@60Hz
1280x720@60Hz
480p@60Hz
Click Confirm to save the changes or Cancel to abort the
changes.
13
Page 14

2. Audio Source: Select the output audio source. The possible
settings are:
HDMI® 1 (default)
HDMI 2
HDMI 3
HDMI 4
Click Confirm to save the changes or Cancel to abort the
changes.
3. Flip: Allows you to flip the view display in fullscreen mode. The
possible options are On and Off (default). Click Confirm to save
the changes or Cancel to abort the changes.
4. Rotate: Allows you to rotate the video display in fullscreen
mode. The possible options are Off (default), L90°, and R90°.
Click Confirm to save the changes or Cancel to abort the
changes.
5. Color Setting: Allows you to adjust the Brightness, Contrast,
Hue, and Saturation values from 0 to 100. The default value for
each is 50. Click Confirm to save the changes or Cancel to abort
the changes.
14
Page 15

Layout Setting Screen
6. Pre-defined: Allows you to select either Layout A (fullscreen,
default) or Layout B (quadview). Click Confirm to save the
change or Cancel to abort the change.
7. Window Info: Displays the input source for each window.
Window A is the main screen and windows B, C, and D are the
subscreens. The default assignments are as follows:
Window A: HDMI® 1
Window B: HDMI 2
Window C: HDMI 3
Window D: HDMI 4
8. Layout A Gear Icon: Clicking the gear icon allows you to set the
input source for Layout A. HDMI® 1 is the default. Click Confirm
to save the changes or Cancel to abort the changes.
15
Page 16

Load Default Screen
Click the Load Default icon to load the factory default settings.
16
Page 17

RS-232 CONTROL
Perform the following steps to connect to the KVM switch using an
RS-232 connection.
1. Plug one end of a DB-9 serial cable (not included) into the RS232
port on the rear panel, then plug the other end into a serial port
on your computer.
2. Use the following settings to enable serial port communication.
Baud Rate: 115200
Data Bits: 8
Stop Bits: 1
Parity: None
Flow Control: None
HOTKEY CONTROL
Fullscreen Mode
When in fullscreen mode, use the following hotkeys to control the KVM
switch. Note that MMB is short for clicking the Scroll Wheel/Middle
Mouse Button.
MMB + MMB + 1: Switches to the HDMI® 1/USB 1 input.
MMB + MMB + 2: Switches to the HDMI 2/USB 2 input.
MMB + MMB + 3: Switches to the HDMI 3/USB 3 input.
MMB + MMB + 4: Switches to the HDMI 4/USB 4 input.
MMB + MMB + Backspace: Switches to the last used input. For
example, if you are actively using the HDMI® 1/USB 1
17
Page 18

input and the previously used input was HDMI 4/USB 4,
the command will swap between input 1 and input 4.
Note that MMB + MMB indicates two separate clicks, not a double-click.
Quadview Mode
When in quadview mode, use the following hotkeys to control the KVM
switch. Note that MMB is short for clicking the Scroll Wheel/Middle
Mouse Button.
MMB + MMB + 1: Switches the keyboard and mouse to the USB
1 input.
MMB + MMB + 2: Switches the keyboard and mouse to the USB
2 input.
MMB + MMB + 3: Switches the keyboard and mouse to the USB
3 input.
MMB + MMB + 4: Switches the keyboard and mouse to the USB
4 input.
MMB + MMB + Backspace: Switches to the last used USB input.
For example, if you are actively using the USB 1 input
and the previously used input was USB 4, the command
will swap between input 1 and input 4.
Note that MMB + MMB indicates two separate clicks, not a double-click.
Swapping Modes
Double-click the Scroll Wheel/Middle Mouse Button to swap between
fullscreen and quadview modes.
18
Page 19

Command
Description
Parameters
?/HELP
Displays a list of all available
telnet commands.
SPOW #
Turns the KVM switch on or
off.
0=Off
1=On
RPOW
Displays the current power
state.
SRES #
Sets the output resolution.
0=Auto
1=3840x2160@60Hz
2=3840@2160@30Hz
3=1920x1080@60Hz
4=1280x720@60Hz
5=640x480@60Hz*
6=3840x2160@50Hz
RRES
Displays the current output
resolution.
SIOSDD #
Enables or disables the
onscreen information display.
0=Off
1=Always On
2=Disappears after 5
seconds (default)
SBRI #
Sets the brightness value.
0~100 (50 default)
RBRI
Displays the current
brightness value.
TELNET COMMANDS
The KVM switch can respond to the following telnet commands for the
Web UI and RS-232 control modes.
19
Page 20

Command
Description
Parameters
SCON #
Sets the contrast value.
0~100 (50 default)
RCON
Displays the current contrast
value.
SSAT #
Sets the saturation value.
0~100 (50 default)
RSAT
Displays the current saturation
value.
SHUE #
Sets the hue value.
0~100 (50 default)
RHUE
Displays the current hue value.
SIMRE #
Resets the color settings to
the factory default values (50).
0=All
1=Brightness
2=Contrast
3=Saturation
4=Hue
SIN2CH 1 #
Sets the input source. Note
that this command only works
in fullscreen mode.
1=HDMI® 1
2=HDMI 2
3=HDMI 3
4-HDMI 4
SRECALL #
Selects Layout A (fullscreen)
or Layout B (quadview).
1=Layout A
2=Layout B
SROTATE #
Sets the video rotation. Note
that SRECALL 1 must be used
to select Layout A before this
command is issued.
0=Rotate off
(default)
1=L90
2=R90
3=Flip on
4=Flip off
20
Page 21

Command
Description
Parameters
RROTATE
Displays the current video
rotation setting
SIPM #
Sets the IP mode.
0=DHCP
1=Static (default)
RIPM
Displays the current IP mode.
SIPADD N M
X Y
Sets the static IP address.
N=0~255
M=0~255
X=0~255
Y=0~255
RIPADD
Displays the current static IP
address.
SMAADD N
M X Y
Sets the static subnet mask
address.
N=0~255
M=0~255
X=0~255
Y=0~255
RMAADD
Displays the current static
subnet mask address.
SGAADD N
M X Y
Sets the static gateway
address.
N=0~255
M=0~255
X=0~255
Y=0~255
RGAADD
Displays the current static
gateway address.
IPCONFIG
Displays the Ethernet address.
DEFAULT
Resets all settings to the
factory default values.
21
Page 22

Command
Description
Parameters
SMUTE #
Turns audio muting on or off.
0=Mute off
1=Mute on
RMUTE
Displays the current mute
value.
SAUDIO #
Sets the output audio to a
specific source.
1=HDMI® 1
2=HDMI 2
3=HDMI 3
4=HDMI 4
RAUDIO
Displays the current audio
source.
RFW
Displays the firmware version.
REBOOT
Reboots the KVM switch.
READEDID
Reads the EDID information
from the connected output
display.
SASPECT #
Sets the aspect mode.
0=Full (default)
1=Aspect
2=1x1
RASPECT
Displays the current aspect
mode.
SBF #
Sets the border.
0=Disable (default)
1=Enable
RBF
Displays the current border
setting.
22
Page 23

Command
Description
Parameters
SBFC #
Sets the border color.
0=White (default)
1=Gray
2=Yellow
3=Blue
4=Green
5=Red
6=Purple
7=Orange
8=Pink
9=Black
Input Resolution
Layout A
Layout B
3840x2160@60Hz
Rotate
Rotate and Flip
3840x2160@30Hz
Rotate
Rotate and Flip
1920x1080p@60Hz
Rotate and Flip
1280x720p@60Hz
Rotate and Flip
640x480@60Hz
Rotate and Flip
FUNCTION AVAILABILITY
The following tables display the functions that are NOT allowed when
using Layout A (fullscreen) and Layout B (quadview) for each resolution.
23
Page 24

Output Resolution
Layout A
Layout B
3840x2160@60Hz
3840x2160@30Hz
1920x1080p@60Hz
1280x720p@60Hz
640x480@60Hz
N/A
The 640x480@60Hz output resolution is not allowed with Layout B
(quadview). All other output resolutions are allowed for both Layouts.
TECHNICAL SUPPORT
Monoprice is pleased to provide free, live, online technical support to
assist you with any questions you may have about installation, setup,
troubleshooting, or product recommendations. If you ever need
assistance with your new product, please come online to talk to one of
our friendly and knowledgeable Tech Support Associates. Technical
support is available through the online chat button on our website
www.monoprice.com or through email by sending a message to
tech@monoprice.com. Check the website for support times and links.
24
Page 25

Model
36633
Inputs
4x HDMI video, 4x USB Type-B
Outputs
1x HDMI video, 2x USB Type-A
HDMI® Version
2.0
HDCP™ Version
2.2
Maximum Video Resolution
3840x2160@60Hz 4:4:4
Control Options
Keyboard/mouse, front panel
buttons, IR remote control, RS-232,
web UI
Input Power
12 VDC, 2A
AC Adapter Input Power
100 ~ 240 VAC, 50/60 Hz
Power Consumption
Up to 15 watts
Operating Temperature
+32 ~ +113°F (0 ~ +45°C)
Storage Temperature
-4 ~ +140°F (-20 ~ +60°C)
Operating Humidity
20 ~ 90% RH, noncondensing
Dimensions
17.3" x 9.1" x 1.8" (440 x 230 x 45 mm)
Weight
6.2 lbs. (2.8 kg)
SPECIFICATIONS
Blackbird™ is a trademark of Monoprice Inc.
HDMI®, the HDMI Logo, and High-Definition Multimedia Interface are
trademarks or registered trademarks of HDMI Licensing LLC in the
United States and other countries.
HDCP™ is a trademark of Digital Content Protection LLC.
25
 Loading...