

Page 1

Blackbird™ 4K 4x1 Scaler and Switch
P/N 31057
User's Manual
Page 2

CONTENTS
SAFETY WARNINGS AND GUIDELINES ................................................................................................................................................................................... 3
INTRODUCTION .......................................................................................................................................................................................................................................... 4
FEATURES ........................................................................................................................................................................................................................................................ 4
CUSTOMER SERVICE .............................................................................................................................................................................................................................. 4
PACKAGE CONTENTS ............................................................................................................................................................................................................................. 5
PRODUCT OVERVIEW ............................................................................................................................................................................................................................ 5
Front Panel ............................................................................................................................................................................................................................................... 5
Rear Panel .................................................................................................................................................................................................................................................6
SAMPLE CONNECTION DIAGRAM .............................................................................................................................................................................................. 7
CONTROLS ...................................................................................................................................................................................................................................................... 8
Manual Switching ............................................................................................................................................................................................................................. 8
Auto Switching ................................................................................................................................................................................................................................... 8
Volume Control .................................................................................................................................................................................................................................. 8
Output Resolution Selection ................................................................................................................................................................................................... 8
Output Resolution Reset ............................................................................................................................................................................................................. 9
Display Control ..................................................................................................................................................................................................................................... 9
RS-232 CONTROL ....................................................................................................................................................................................................................................... 9
System Configuration ..................................................................................................................................................................................................................10
Signal Switching ................................................................................................................................................................................................................................ 11
Audio Setting ....................................................................................................................................................................................................................................... 11
Output Resolution Selection .................................................................................................................................................................................................. 12
EDID Management .......................................................................................................................................................................................................................... 12
Baud Rate Setting ............................................................................................................................................................................................................................ 13
CONFIGURING DISPLAY CONTROL .......................................................................................................................................................................................... 13
Learning by Sending RS-232 Commands ..................................................................................................................................................................... 13
IR Learning ............................................................................................................................................................................................................................................. 15
TECHNICAL SUPPORT .......................................................................................................................................................................................................................... 15
SPECIFICATIONS ....................................................................................................................................................................................................................................... 16
2
Page 3

SAFETY WARNINGS AND GUIDELINES
Please read this entire manual before using this device, paying extra attention to these
safety warnings and guidelines. Please keep this manual in a safe place for future reference.
This device is intended for indoor use only.
Do not expose this device to water or moisture of any kind. Do not place drinks or
other containers with moisture on or near the device. If moisture does get in or on
the device, immediately unplug it from the power outlet and allow it to fully dry
before reapplying power.
Do not expose this device to excessively high temperatures. Do not place it in, on,
or near heat sources, such as a fireplace, stove, radiator, etc. Do not leave it in direct
sunlight.
Do not place or install this device in an area where it can be exposed to excessive
amounts of dust, humidity, oil, smoke, or combustible vapors.
Prior to operation, check the unit and power cord for physical damage. Do not use if
physical damage has occurred.
Before plugging the unit into a power outlet, ensure that the outlet provides the
same type and level of power required by the device.
Never unplug the unit by pulling on the power cord. Always grasp the connector
head or adapter body.
Ensure that power is turned off and disconnected before making any electrical
connections.
Take care to prevent damage to the power cord. Do not allow it to become
crimped, pinched, walked on, or become tangled with other cords. Ensure that the
power cord does not present a tripping hazard.
Clean using a soft, dry cloth only. Do not use chemical cleaners, solvents, or
detergents. For stubborn deposits, moisten the cloth with warm water.
This device has no user serviceable parts. Do not attempt to open, service, or
modify this device.
3
Page 4

INTRODUCTION
This Blackbird™ 4K 4x1 Scaler and Switch features two HDMI®, one DisplayPort, and one
VGA video input, with an accompanying audio input for the VGA signal. It accepts HDMI
and DisplayPort inputs at resolutions up to 4K@60Hz 4:2:0, and VGA at resolutions up to
1920x1200@60Hz. It supports selectable output resolutions of 4K@30Hz, 1080p@60Hz, and
720p@60Hz, and scales the source video up or down to the selected resolution. It delivers
10.2 Gbps of video bandwidth, has built-in EDID management, and is compliant with the
HDMI 1.4 specification.
FEATURES
Features 2x HDMI®, 1x DisplayPort, and 1x VGA inputs
Includes a corresponding stereo analog audio input for the VGA input
Output resolution can be set to 4K@30Hz 4:4:4, 1080p@60Hz, or 720p@60Hz
Supports IR learning to control the connected display
Supports Auto Switching
Supports RS-232 serial control
Supports IR pass-through
Includes front panel volume controls
CUSTOMER SERVICE
The Monoprice Customer Service department is dedicated to ensuring that your ordering,
purchasing, and delivery experience is second to none. If you have any problem with your
order, please give us an opportunity to make it right. You can contact a Monoprice
Customer Service representative through the Live Chat link on our website
www.monoprice.com during normal business hours (Mon-Fri: 5am-7pm PT, Sat-Sun: 9am-
6pm PT) or via email at support@monoprice.com
4
Page 5
PACKAGE CONTENTS
Please take an inventory of the package contents to ensure you have all the items listed
below. If anything is missing or damaged, please contact Monoprice Customer Service for a
replacement.
1x Blackbird™ 4K 4x1 scaler and switch
2x Mounting ears
4x Screws
4x Plastic feet
1x 3-pin Euroblock connector
1x User's manual
PRODUCT OVERVIEW
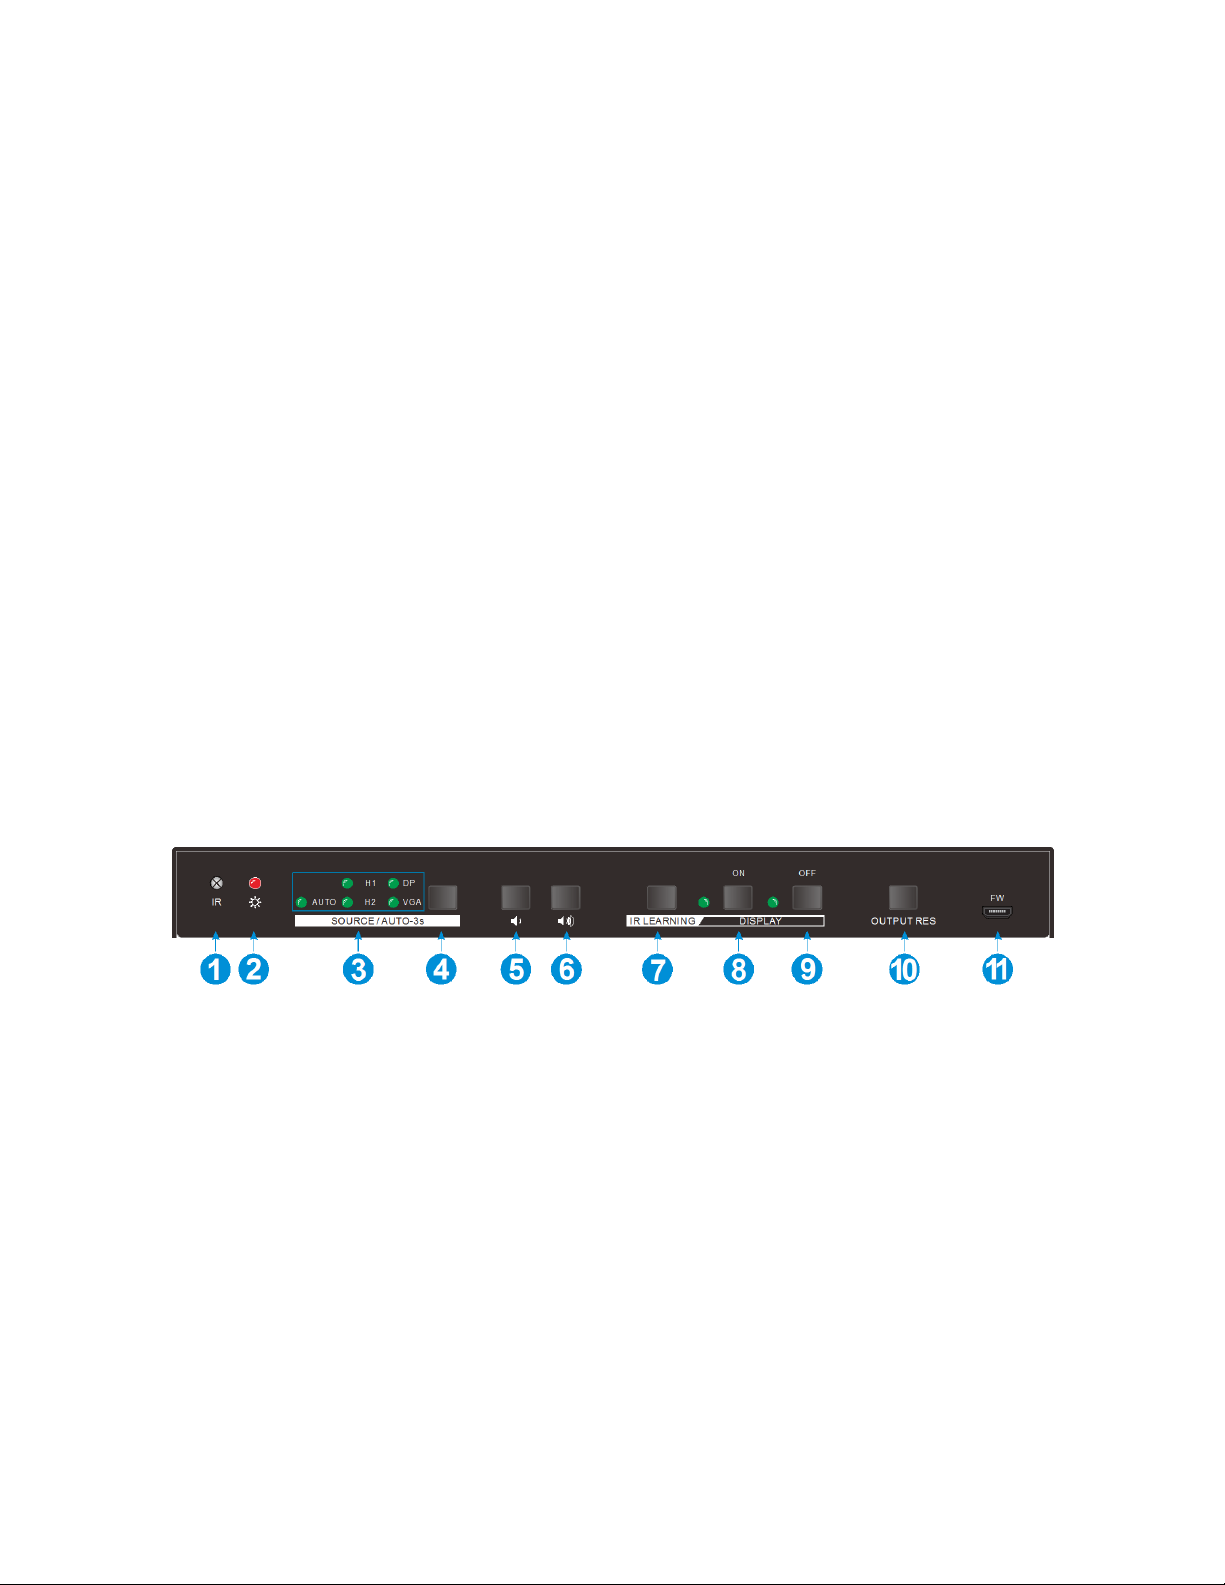
Front Panel
1. IR: IR receiver window for reception of IR control signals.
2. POWER LED: The LED illuminates red when power is applied.
3. SIGNAL LED: The AUTO LED illuminates green when Auto Switching is enabled. The
H1, H2, DP, and VGA LEDs illuminate green when there is activity on the
corresponding input.
4. SOURCE/AUTO-3s: Momentarily press the SOURCE/AUTO-3s button to cycle
forward to the next available input. The corresponding LED will illuminate green to
indicate the selected input. If Auto Switching is enabled, this will turn it off. Press
5
Page 6

and hold the SOURCE/AUTO-3s button for at least 3 seconds to turn Auto Switching
ON.
5. VOLUME DOWN: Press the VOLUME DOWN button to decrease the output volume
level.
6. VOLUME UP: Press the VOLUME UP button to increase the output volume level.
7. IR LEARNING: Press the IR LEARNING button to enter IR Learning mode.
8. DISPLAY ON: Press the DISPLAY ON button to turn the connected display on. The
LED to the left of the button will illuminate green.
9. DISPLAY OFF: Press the DISPLAY OFF button to turn the connected display off. The
LED to the left of the button will illuminate green.
10. OUTPUT RES: Momentarily press the OUTPUT RES button to display the OSD
Resolution Menu. Momentarily press the OUTPUT RES button again to move the
highlight down through the list. Once the desired resolution is highlighted, press
and hold the OUTPUT RES button for at least 2 seconds to set the output resolution
to the highlighted value. Press and hold the OUTPUT RES button for at least 5
seconds to reset the output resolution to 720p@60Hz.
11. FW: Micro USB port for performing firmware updates.
Rear Panel
1. HDMI OUT: HDMI® output port for connecting an HDMI display.
2. HDMI IN: Two HDMI ports for connecting two HDMI video source devices.
3. DP IN: DisplayPort connector for connecting a DisplayPort video source device.
4. VGA IN: VGA port for connecting a VGA video source device.
6
Page 7

5. AUDIO IN: 3.5mm stereo analog jack for connecting the audio output of the VGA
video source device.
6. IR OUT: 3.5mm jack for connecting an IR transmitter (not included).
7. RS232: 3-pin Euroblock connector for connecting a computer for RS-232 control.
8. AUDIO OUT: 3-pin Euroblock connector for connecting a speaker.
9. DC 12V: DC barrel connector for connecting the included AC power adapter.
SAMPLE CONNECTION DIAGRAM
7
Page 8

CONTROLS
Manual Switching
Momentarily press the SOURCE/AUTO-3s button to switch to the next available input. The
corresponding LED will illuminate green. If Auto Switching is enabled, this will turn it off
and the AUTO LED will extinguish.
Auto Switching
Press and hold the SOURCE/AUTO-3s button for at least 3 seconds to turn Auto Switching
on. The AUTO LED will illuminate green. Auto Switching abides by the following principles:
New Input: When a new source is detected, the unit will automatically switch to the
new input.
Rebooting: The unit saves its status and will automatically enter the last mode used,
in the event that power is lost. If the last displayed signal is still available, the unit
will switch to that input. Otherwise, the unit will scan the inputs in order (1-4), then
will switch to the first input found.
Signal Loss: If the currently displayed signal is lost, the unit will scan the inputs in
order (1-4), then will switch to the first input found.
Volume Control
Use the VOLUME UP and VOLUME DOWN buttons to adjust the output volume level.
Output Resolution Selection
Momentarily press the OUTPUT RES button to display the
OSD Resolution Menu. Momentarily press the OUTPUT RES
button again to move the highlight down the list. Once the
desired output resolution is highlighted, press and hold the
OUTPUT RES button for at least 2 seconds to set the output
resolution to the highlighted value.
8
Page 9

Output Resolution Reset
Press and hold the OUTPUT RES button for at least 5 seconds to reset the output resolution
to 720p.
Display Control
Press the DISPLAY ON and DISPLAY OFF buttons to turn the connected display on or off.
Note that the system must be configured to issue the proper CEC commands to the
connected display. See the
CONFIGURING DISPLAY CONTROLS
section for details.
RS-232 CONTROL
This switch features an RS-232 connector with the ability be controlled by a third party RS-
232 control software, as well as to pass RS-232 control signals through to a third party
HDBaseT™ matrix or receiver (not included). It supports serial communications rates of
2400, 4800, 9600 (default), 19200, 38400, 57600, or 115200 baud.
To use RS-232 control, plug one end of the included RS-232 cable in to the RS232 Euroblock
connector on the switch, then plug the other end into an available serial port on your
computer. The RS-232 communications protocol is as follows:
Baud Rate: 9600 (default)
Data Bits: 8
Stop Bits: 1
Parity: None
Download and install a third party RS-232 control software, such as
CommWatch.exe, whose interface is shown below as an example.
9
Page 10

Command
Function
Feedback
SFUD<CR><LF>
Software upgrade
Software Update
GET VER<CR><LF>
Check the software version
Version Vx.x.x
FRST<CR><LF>
Restore factory default settings
Factory Reset
WAKE<CR><LF>
Wake up the system
Wake Up
STBY<CR><LF>
Put the system in standby mode
Go To Standby
The switch can respond to the following RS-232 commands:
System Configuration
10
Page 11

GET STA<CR><LF>
Get the system status
Input: VGA
Resolution: 1920x1080
Manual Switching
Source Volume: 60
EDID: Initial
HDCP: ON
SWIN H1<CR><LF>
Switch to the HDMI® 1 input
Switch to hdmi
SWIN H2<CR><LF>
Switch to the HDMI® 2 input
Switch to hdmi2
SWIN DP<CR><LF>
Switch to the DisplayPort input
Switch to dp
SWIN VG<CR><LF>
Switch to the VGA input
Switch to vga
AUTO 01<CR><LF>
Enable Auto Switching mode
Auto Switching
AUTO 00<CR><LF>
Disable Auto Switching mode
Manual Switching
AUMT S1<CR><LF>
Mute source audio
Audio Mute Source: Enable
AUMT S0<CR><LF>
Unmute source audio
Audio Mute Source: Disable
VOLS AP<CR><LF>
Increase the source volume to
xx (xx=0~60)
Source Volume: xx
VOLS AN<CR><LF>
Decrease the source volume to
xx (xx=0~60)
Source Volume: xx
Signal Switching
Audio Setting
11
Page 12

VOLS xx<CR><LF>
Set the source volume to xx
(xx=0~60)
Source Volume: xx
SRES 01<CR><LF>
Change output resolution to
3840x2160
Resolution: 3840x2160
SRES 02<CR><LF>
Change output resolution to
1920x1080
Resolution: 1920x1080
SRES 03<CR><LF>
Change output resolution to
1280x720
Resolution: 1280x720
VGAA<CR><LF>
Automatic image correction for
the VGA input
VGA Input Auto
EDID DF<CR><LF>
EDID default
EDID: Initial
EDID MN<CR><LF>
Get the EDID data from the
display
EDID: Manage
EDID US<CR><LF>
When the command is sent, the
system prompts to upload the
user-defined EDID file (.bin)
from the U-disk
EDID: User
Output Resolution Selection
EDID Management
12
Page 13

Baud Rate Setting
BAUD 115200<CR><LF>
Set RS-232 baud rate to 115200
Set Baudrate 115200
BAUD 57600<CR><LF>
Set RS-232 baud rate to 57600
Set Baudrate 57600
BAUD 38400<CR><LF>
Set RS-232 baud rate to 38400
Set Baudrate 38400
BAUD 19200<CR><LF>
Set RS-232 baud rate to 19200
Set Baudrate 19200
BAUD 9600<CR><LF>
Set RS-232 baud rate to 9600
Set Baudrate 9600
BAUD 4800<CR><LF>
Set RS-232 baud rate to 4800
Set Baudrate 4800
BAUD 2400<CR><LF>
Set RS-232 baud rate to 2400
Set Baudrate 2400
Command Format
Description and Example
Feedback
/-ax:XX XX XX XX
"x" represents the baud rate: x=0(2400),
1(4600), 2(9600), 3(19200), 4(38400).
5(57600), 6(115200)
XX XX XX XX
(30 31 32 33)
CONFIGURING DISPLAY CONTROL
The DISPLAY ON and DISPLAY OFF buttons on the front panel can be used to turn the
connected display on or off. The system must be configured to issue the proper CEC
commands to the connected display. You can configure the system by sending RS-232
commands or by using IR Learning.
Learning by Sending RS-232 Commands
Search your display's user manual for the control commands used to turn the display on
and off, then send RS-232 commands as shown in the following tables:
Display ON
13
Page 14

"XX XX XX XX" is the display control
command (HEX, max 48 byte)
Example: /-ax:30 31 32 33
/+ax:XXXXXXX
"x" represents the baud rate: x=0(2400),
1(4600), 2(9600), 3(19200), 4(38400).
5(57600), 6(115200)
"XXXXXXX" is the display control
command (ASCII, max 48 byte)
Example: /+ax:0123456
XXXXXXX (0123456)
Command Format
Description and Example
Feedback
/-Ax:XX XX XX XX
"x" represents the baud rate: x=0(2400),
1(4600), 2(9600), 3(19200), 4(38400).
5(57600), 6(115200)
"XX XX XX XX" is the display control
command (HEX, max 48 byte)
Example: /-ax:30 31 32 33
XX XX XX XX
(30 31 32 33)
/+Ax:XXXXXXX
"x" represents the baud rate: x=0(2400),
1(4600), 2(9600), 3(19200), 4(38400).
5(57600), 6(115200)
"XXXXXXX" is the display control
command (ASCII, max 48 byte)
Example: /+ax:0123456
XXXXXXX (0123456)
Display OFF
14
Page 15

IR Learning
Perform the following steps to configure the DISPLAY ON and DISPLAY OFF buttons using
the display's IR remote control.
1. Press the IR LEARNING button to enter IR Learning mode. The DISPLAY ON and
DISPLAY OFF LEDs will both illuminate.
2. Press the DISPLAY ON button. The DISPLAY ON LED will start to flash.
3. Point the display's IR remote at the IR receiving window on the front panel, then
press the Power On button on the remote. The DISPLAY ON LED will turn off.
4. Press the IR LEARNING button again to re-enter IR Learning mode. The DISPLAY ON
and DISPLAY OFF LEDs will both illuminate.
5. Press the DISPLAY OFF button. The DISPLAY OFF LED will start to flash.
6. Point the display's IR remote at the IR receiving window on the front panel, then
press the Power Off button on the remote. The DISPLAY OFF LED will turn off.
7. Press the DISPLAY ON and DISPLAY OFF buttons to verify that they turn the
connected display on and off.
TECHNICAL SUPPORT
Monoprice is pleased to provide free, live, online technical support to assist you with any
questions you may have about installation, setup, troubleshooting, or product
recommendations. If you ever need assistance with your new product, please come online
to talk to one of our friendly and knowledgeable Tech Support Associates. Technical
support is available through the online chat button on our website www.monoprice.com
during regular business hours, 7 days a week. You can also get assistance through email by
sending a message to tech@monoprice.com
15
Page 16

SPECIFICATIONS
Model
31057
Video Inputs
2x HDMI®, 1x DisplayPort, 1x VGA
Video Outputs
1x HDMI
Maximum Input Resolution
HDMI: up to 4K@60Hz 4:2:0
VGA: up to 1920x1200@60Hz
Output Resolutions
4K@30Hz, 1080p@60Hz, 720p@60Hz
Bandwidth
10.2 Gbps
HDMI Version
1.4
HDCP Version
Input: 2.2
Output: 1.4
Input Power
12 VDC, 2A
AC Adapter Input Power
100 ~ 240 VAC, 50/60Hz
Maximum Power Consumption
10 watts
Operating Temperature
+14 ~ +104°F (-10 ~ +40°C)
Storage Temperature
+5 ~ +131°F (-15 ~ +55°C)
Relative Humidity
10 ~ 90% RH, non-condensing
Dimensions
9.1" x 3.9" x 0.9" (230 x 100 x 24 mm)
Weight
11.3 oz. (320 g)
Blackbird™ is a trademark of Monoprice Inc.
HDMI®, the HDMI Logo, and High-Definition Multimedia Interface are trademarks or registered
trademarks of HDMI Licensing LLC in the United States and other countries.
Blu-ray Disc™ and Blu-ray™ are trademarks of the Blu-ray Disc Association.
Apple®, Apple TV®, and MacBook® are trademarks of Apple Inc., registered in the U.S. and other
countries.
16
 Loading...