

Page 1
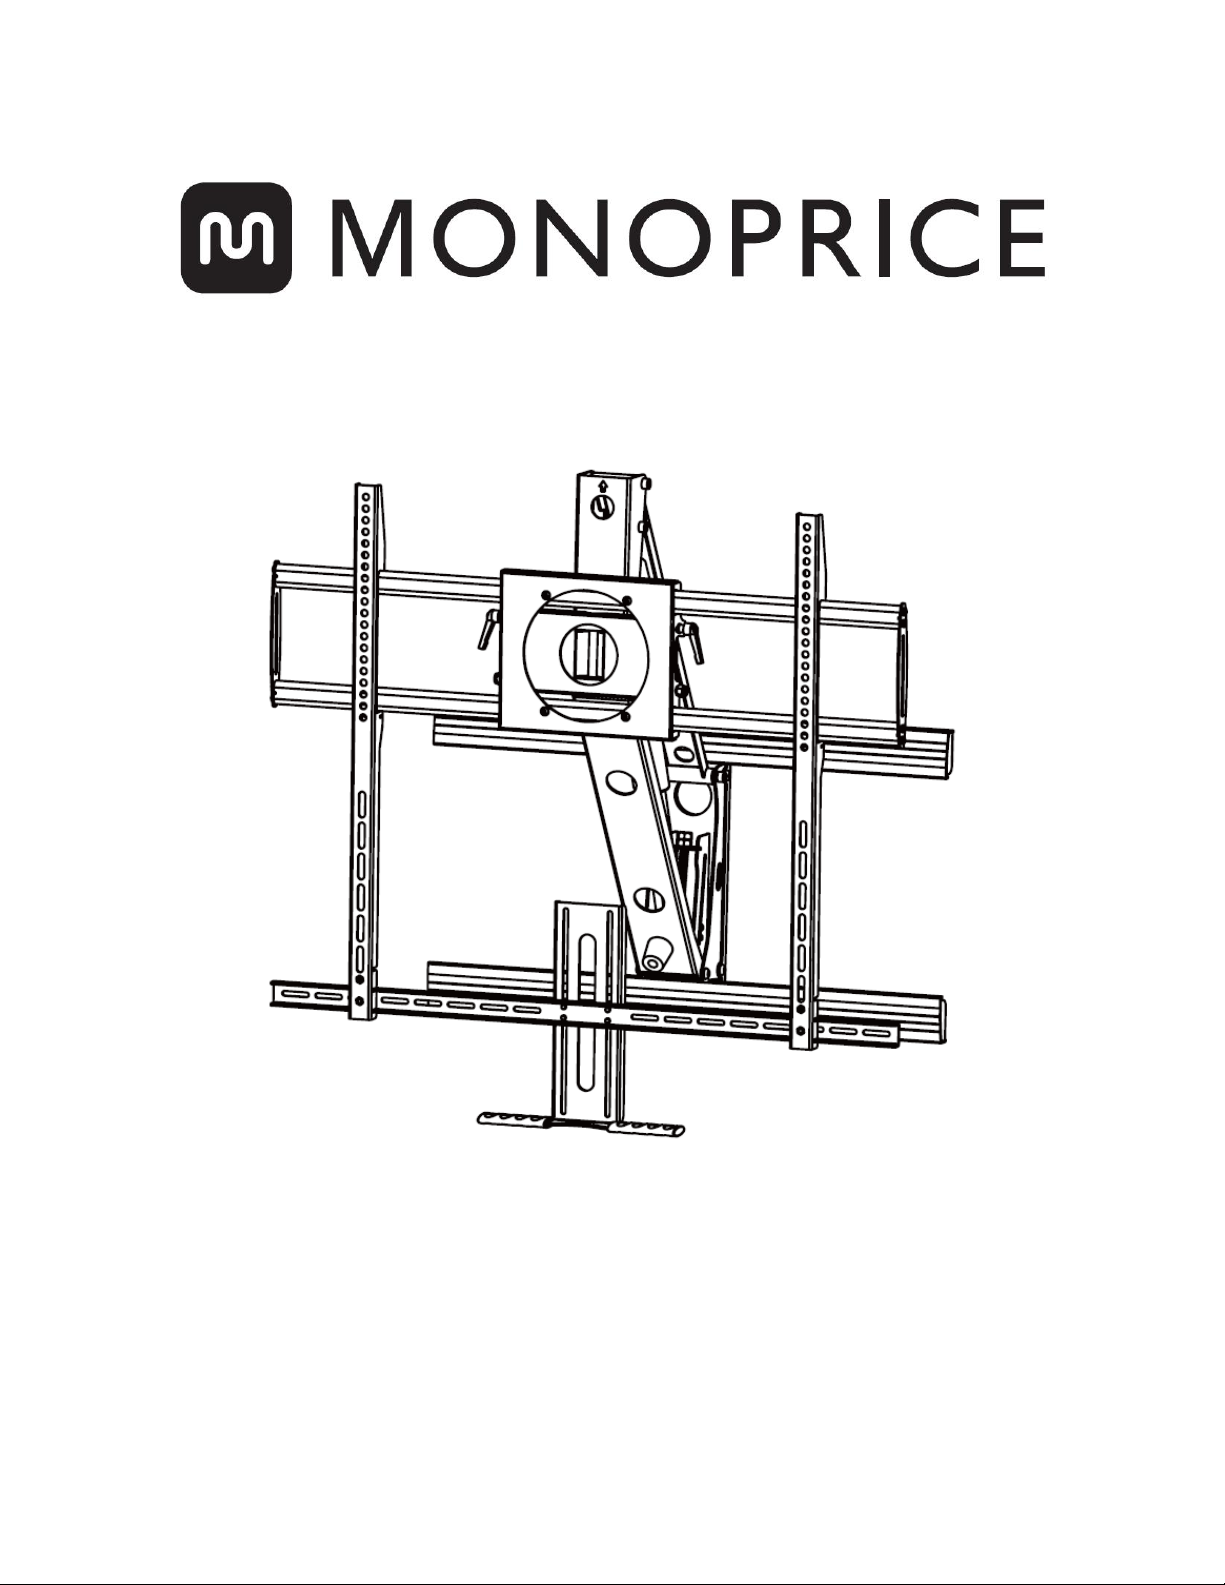
Above Fireplace Pull-Down Full-Motion TV Wall Mount
P/N 27773
User's Manual
Page 2

2
CONTENTS
SAFETY WARNINGS AND GUIDELINES ....................................................................................................................................... 3
INTRODUCTION ................................................................................................................................................................................................ 4
FEATURES .............................................................................................................................................................................................................. 4
CUSTOMER SERVICE .................................................................................................................................................................................... 4
PACKAGE CONTENTS ................................................................................................................................................................................. 5
REQUIRED TOOLS ........................................................................................................................................................................................... 9
PRODUCT DIMENSIONS ......................................................................................................................................................................... 10
INSTALLATION CONSIDERATIONS ................................................................................................................................................. 11
INSTALLATION ................................................................................................................................................................................................ 12
SPECIFICATIONS ........................................................................................................................................................................................... 23
REGULATORY COMPLIANCE ............................................................................................................................................................. 23
Notice for FCC ......................................................................................................................................................................................... 23
Notice for Industry Canada .......................................................................................................................................................... 24
Page 3

3
SAFETY WARNINGS AND GUIDELINES
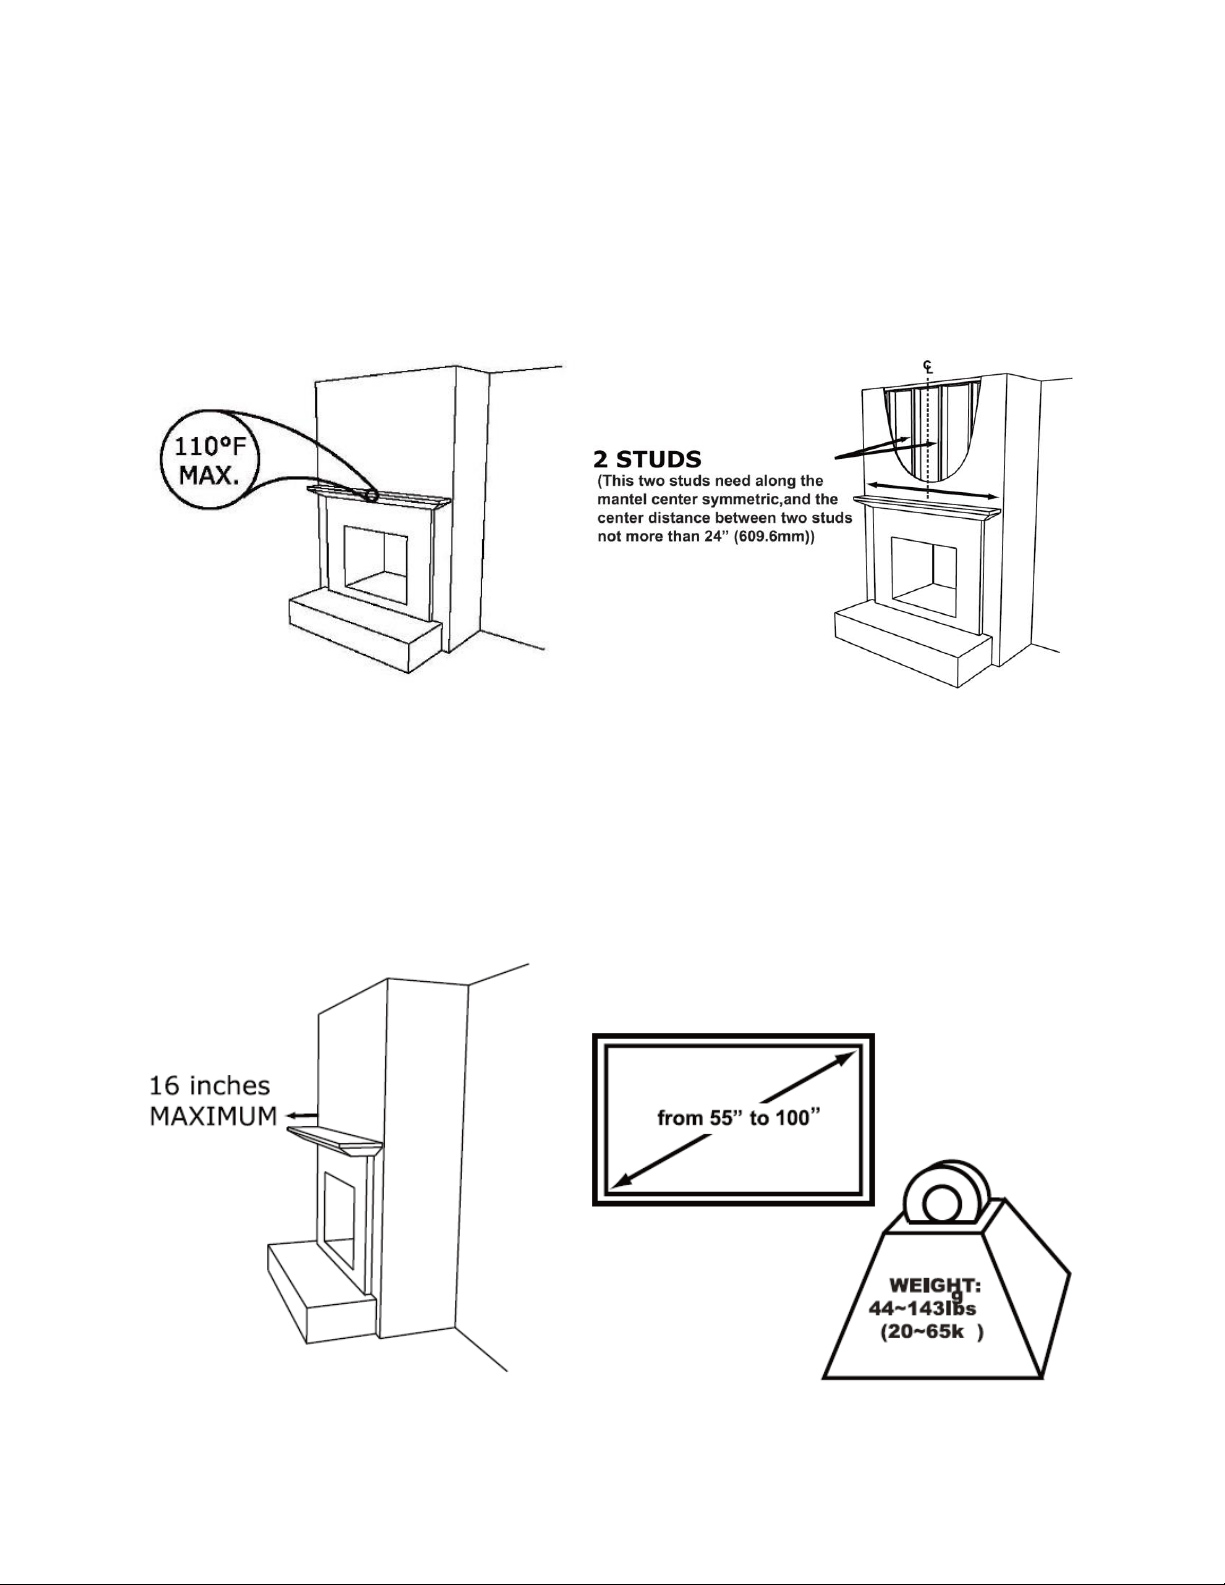
• The maximum temperature at the front of the fireplace mantle should never be
more than 110°F (43°C).
• The fireplace mantle should not extend more than 16" (406mm) from the mounting
surface.
• This mount can support displays weighing between 44 ~ 143 lbs. (20 ~ 65 kg).
• The mounting surface should be a wood stud frame wall with studs spaced no more
than 24" (609mm) apart. The wall must not exceed 5/8" (16mm) thick.
• Ensure that the mounting surface is capable of supporting the combined weight of
the mount and any mounted display.
• This mount should only be installed by persons with a basic knowledge of building
construction and installations.
• This bracket should only be installed by two people. Do not attempt to install it by
yourself.
• If mounting to a wall of wood stud construction, ensure that mounting bolts are
anchored in the center of the studs. When installing the TV mount on a concrete
wall, the wall must be at least 8.0" (203mm) thick with a minimum compressive
strength from 2500 to 3000 psi (17.2 to 20.7 Mpa) and must meet the ASTM C39
specification. When installing the TV mount on a cinder block wall, the cinder blocks
must meet the ASTM C216 specifications and have a minimum nominal width of 8.0"
(203mm). Be sure to mount it in a solid part of the block, generally 1" (25mm)
minimum from the side of the block. Do not drill into mortar joints! If plaster/dry
wall is thicker than 5/8" (16mm), custom fasteners must be supplied by the installer.
Note that hardware and instructions are provided for installation to wood stud
walls only.
Page 4

4
INTRODUCTION
Mount your television conveniently above your fireplace using this Above Fireplace Wall
Mount. It is capable of supporting televisions with VESA® patterns from 300x200 and
800x600 and weighing between 44 ~ 143 lbs. (20 ~ 65 kg). The mount allows you to keep
the TV safely up and out of the way when not in use, then you can pull it down to eye level
for comfortable viewing.
FEATURES
• Designed for flat screen televisions from 55" ~ 100"
• Supports televisions weighing between 44 ~ 143 lbs. (20 ~ 65 kg)
• Supports VESA® mounting patterns between 300x200 and 800x600
• Designed to mount to a wood stud frame or concrete/cinderblock wall above the
fireplace mantle
• Television can be pulled down to eye level for comfortable viewing
• Full motion mount allows for ±35° swivel, ±5° rotation, and -3° ~ +15° tilt
CUSTOMER SERVICE
The Monoprice Customer Service department is dedicated to ensuring that your ordering,
purchasing, and delivery experience is second to none. If you have any problem with your
order, please give us an opportunity to make it right. You can contact a Monoprice
Customer Service representative through the Live Chat link on our website
www.monoprice.com or via email at support@monoprice.com. Check the website for
support times and links.
Page 5
5
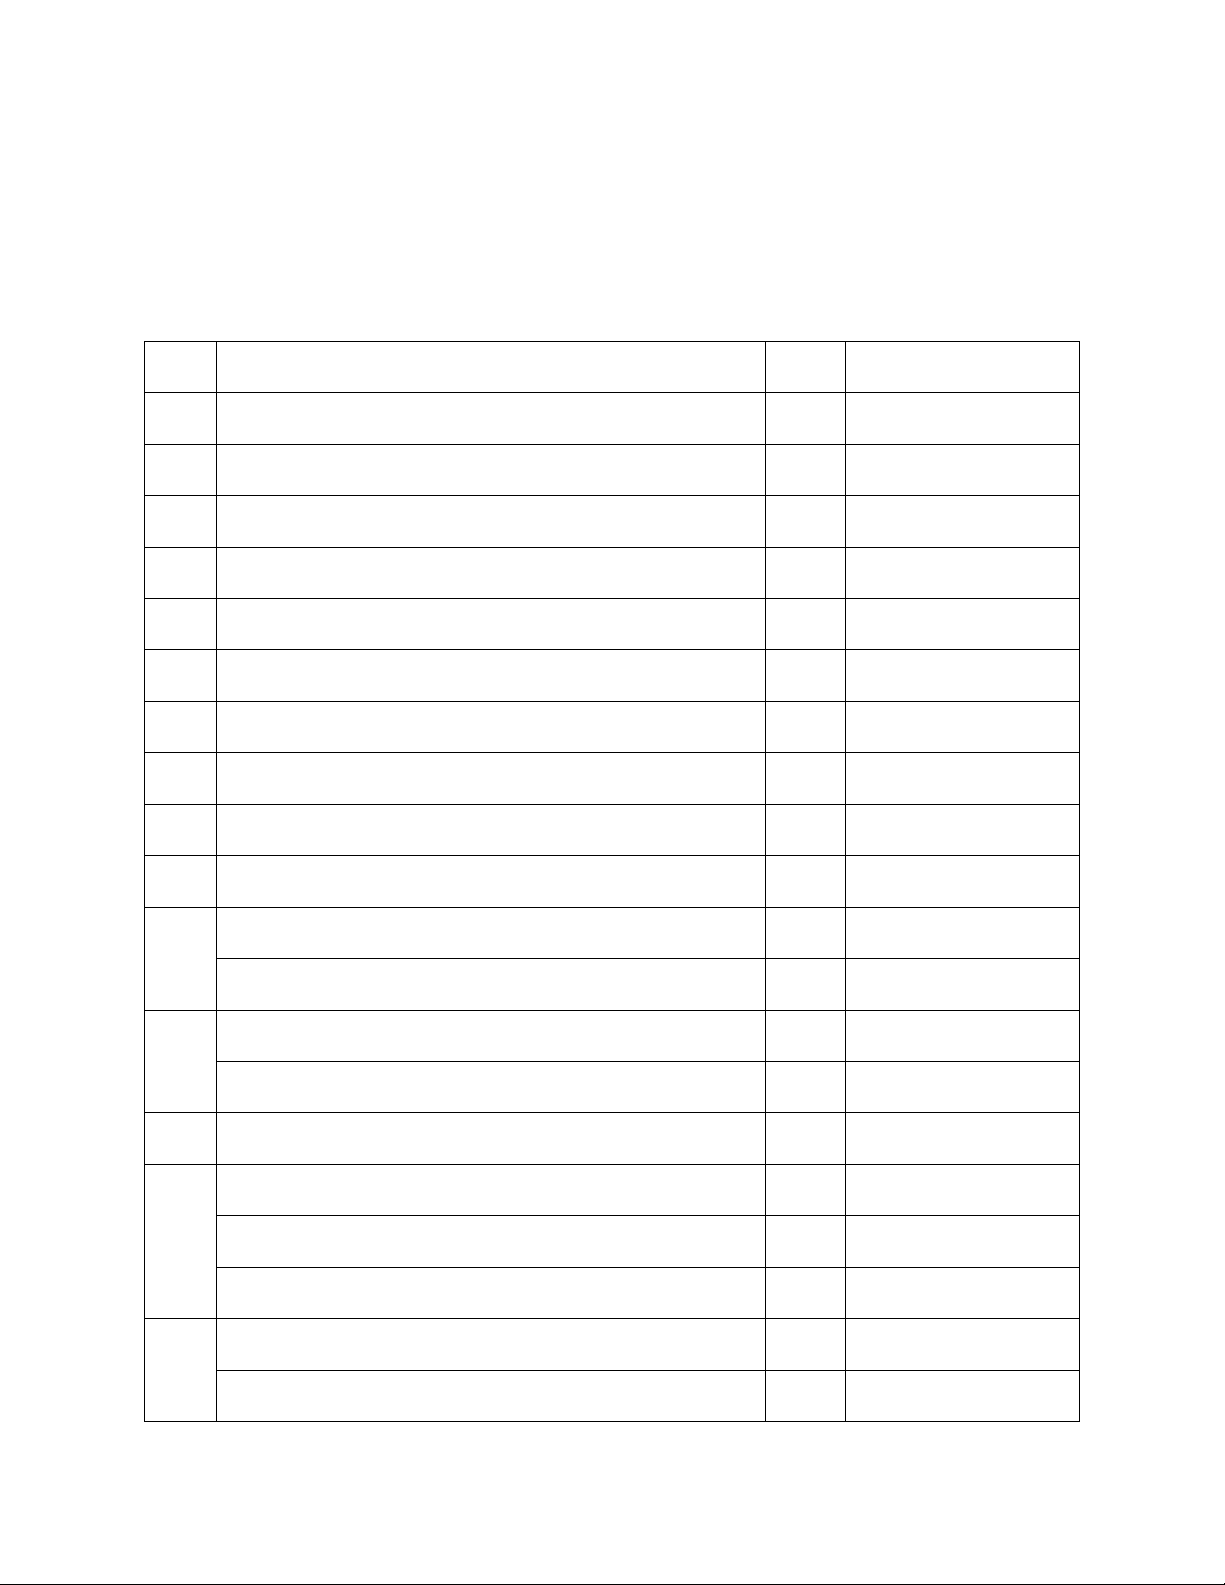
PACKAGE CONTENTS
Please take an inventory of the package contents to ensure you have all the items listed
below. If anything is missing or damaged, please contact Monoprice Customer Service for a
replacement.
#
Item
Qty
Size
A
Magnetic spirit level
1
15x15x40
B
Philips pan head screw
4
M6x12
C
Philips pan head screw
4
M6x25
D
Philips pan head screw
4
M8x12
E
Philips pan head screw
4
M8x25
F
Washer 1 4 6.2x16x1.5
G
Spacer 4 17x9x14
H
Philips pan head screw
4
M6x8
I
Philips pan head screw
2
M6x25
J
Allen pan head screw
4
M8x10
K
Non-slip nuts
4
M6
Plastic washer
4
6.2x1.4x12
L
Washer 2 4 8.2x2x16
Hex bolt screw
4
M8x63.5
M
Wall anchor
4
M10x60
N
Spanner wrench
1
M10
Hexagon wrench
1
M5
Cable ties 2 L150
O
Hexagon wrench
1
M8
Hexagon wrench extender
1
M8x180
Page 6
6
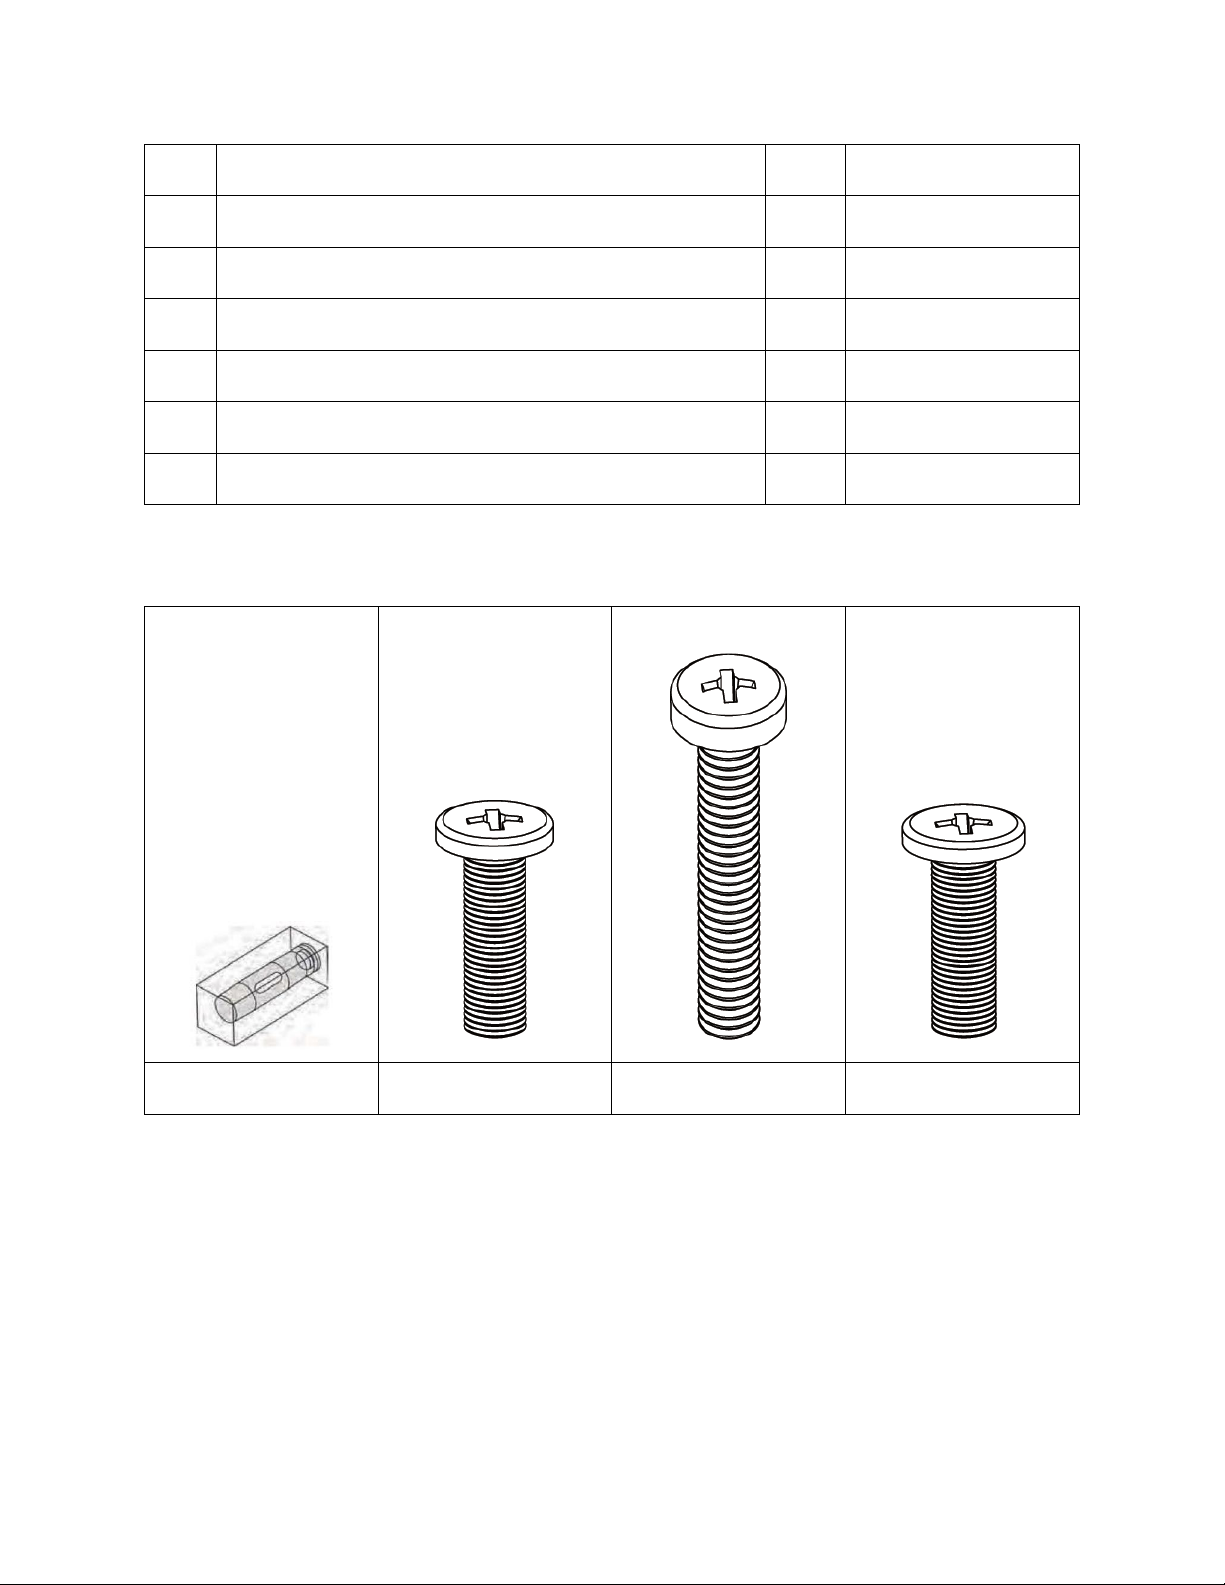
AA
Handle 1 N/A
BB
Hook 2 N/A
CC
Wallboard 1 N/A
DD
Connecting rod
1
N/A
EE
Front panel 1 N/A
FF
Bracket 1 N/A
GG
Wall panel cover
2
N/A
A B C
D
Page 7
7
E F G
H
I
J
K
L
M
Page 8
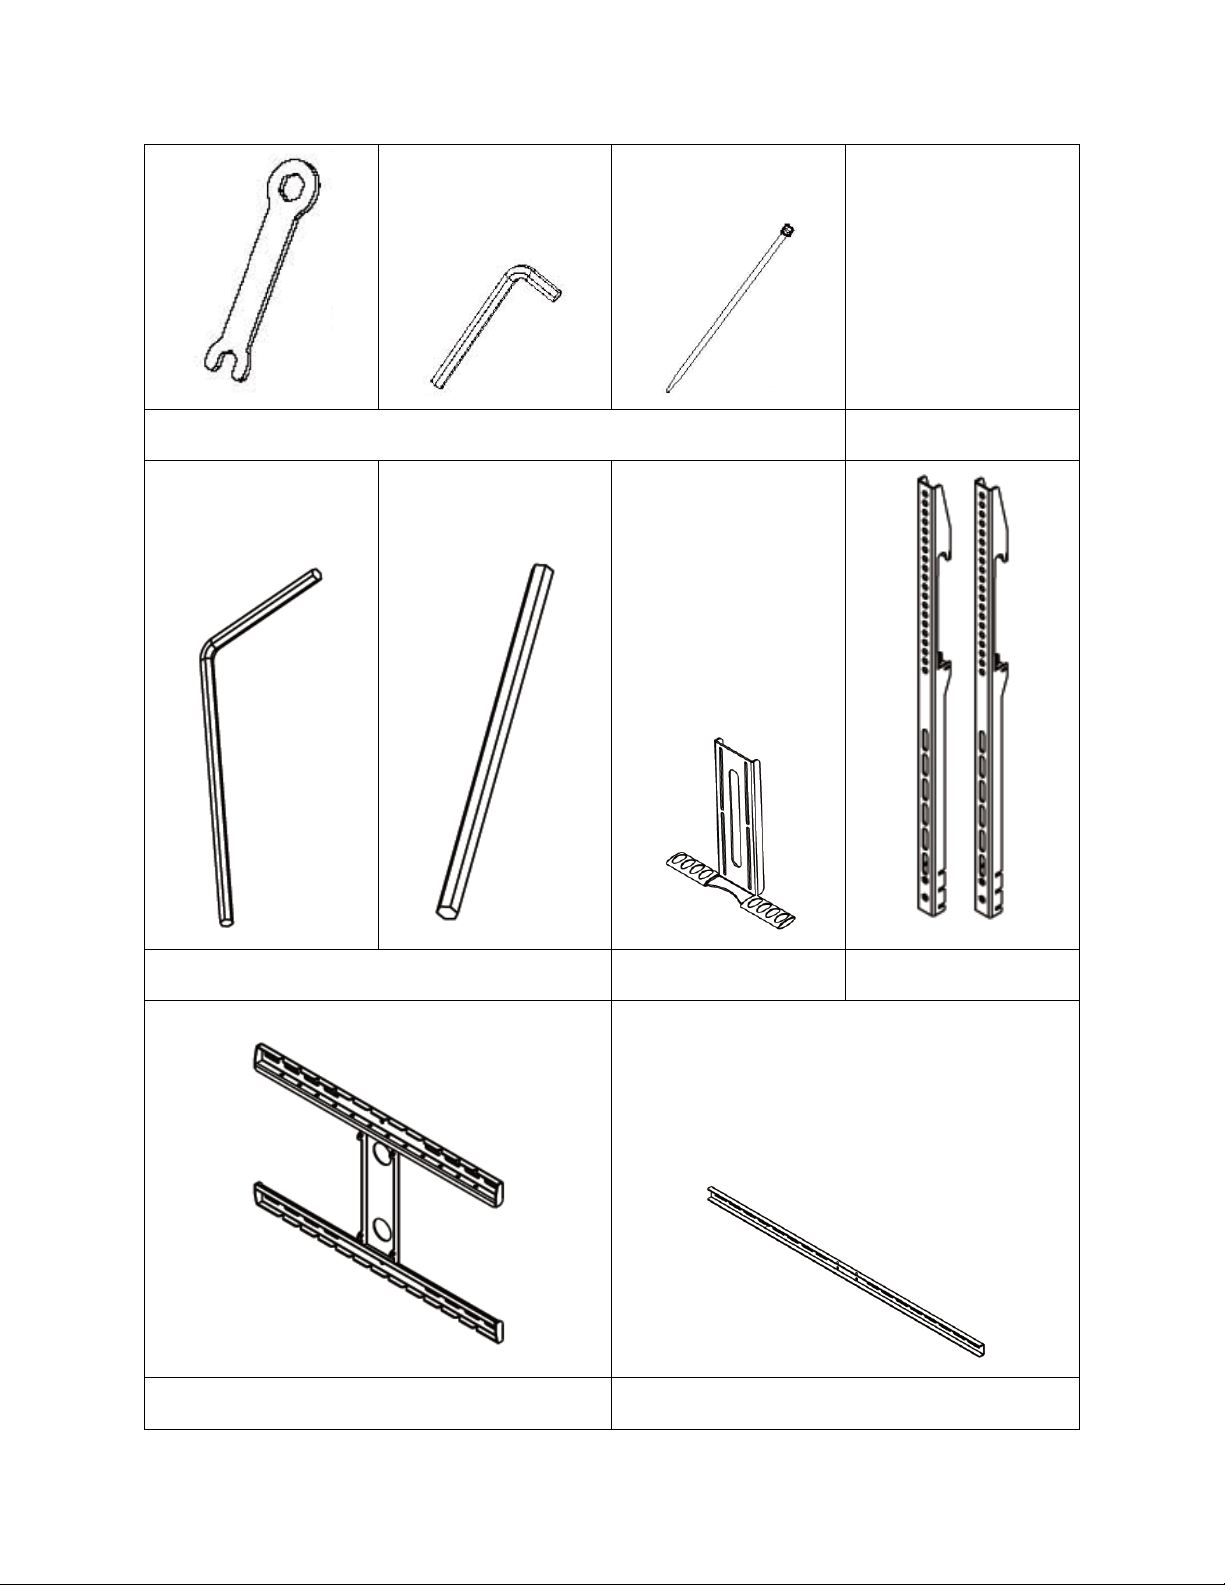
8
N
O
AA
BB
CC
DD
Page 9
9
EE
FF
GG
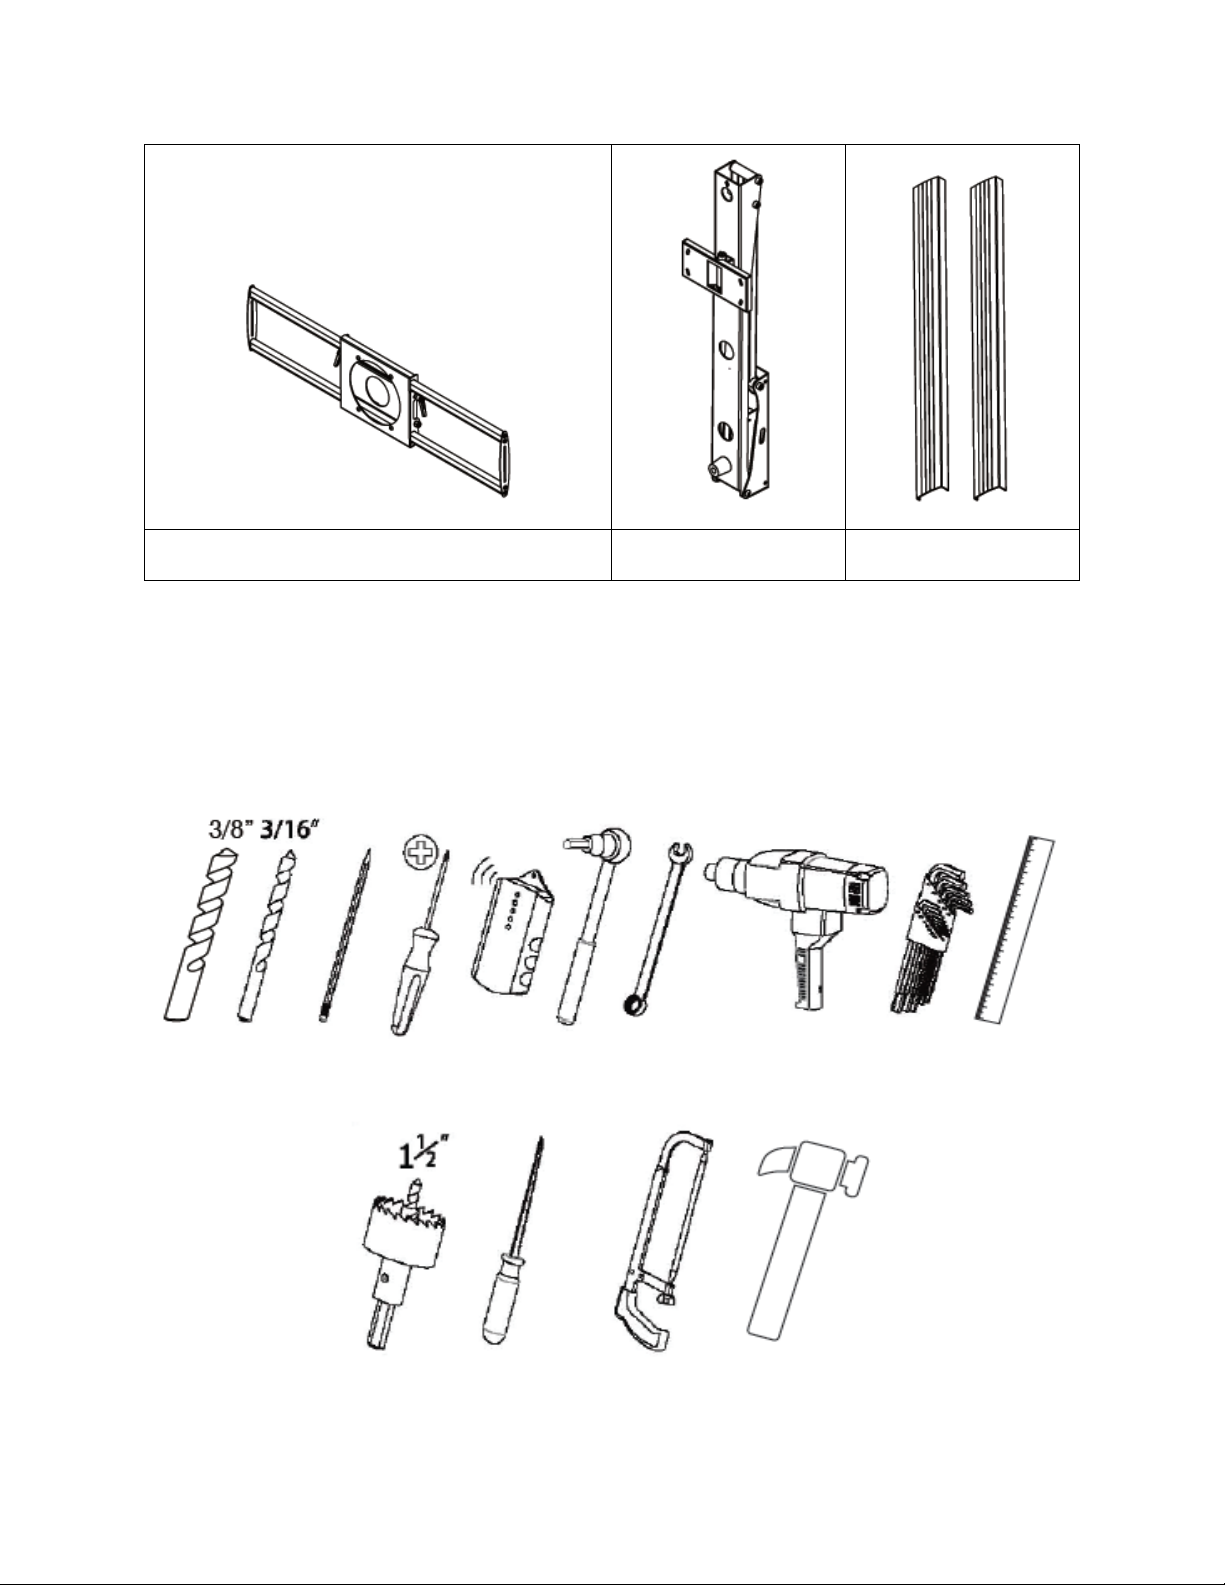
REQUIRED TOOLS
The following tools are required for installation.
The following tools are not required, but are highly recommended.
Page 10

10
PRODUCT DIMENSIONS
Page 11
11
INSTALLATION CONSIDERATIONS
Warning! Ensure that the mounting surface can safely support the combined weight of the
assembled mount and installed display. The bracket installation step requires two people.
1. The temperature at the front of the fireplace mantle must never exceed 110°F (43°C).
2. The wall to which this mount will be attached must be a wood stud type, with studs
spaced no more than 24" (609mm) apart. These studs should be symmetrically
positioned or the installation will not be symmetrical to the fireplace mantle. The
wall must be no more than 5/8" (16mm) thick.
3. The fireplace mantle must extend no more than 16.0" (406 mm) from the surface of
the wall.
Page 12

12
4. This mount is intended for flat screen televisions (LCD, LED, Plasma) only. The
mounted television should be between 55 ~ 100" and weigh between 44 ~ 143 lbs.
(20 ~ 65 kg).
5. The vertical space above the mantle must be greater
than the height of the wallboard. The required vertical
space depends on how far the mantle extends out
from the wall.
Mantle Size
Space Height
Less than 8"
Wallboard height + 4"
8" - 11"
Wallboard height + 5"
11" - 13"
Wallboard height + 7"
13" - 16"
Wallboard height + 8"
INSTALLATION
1. Use a tape measure to determine the center point of the mantle. Mark the
centerline with a pencil or tape.
Page 13

13
2. For wood stud frame walls, use a stud finder to locate the studs closest to the
centerline. Use a sharp awl or finishing nail to locate the edges of each stud, then
mark the centerline of the two studs.
3. Refer to the table in step 5 in the
Installation Considerations
section above.
Determine the Space Height adjustment based on the depth of your fireplace
mantle. For example, if your fireplace mantle is 11" deep, the offset height is 7".
Mark drill holes in the center of each stud at a point this distance above the mantle.
Then mark two more drill holes in the center of the studs 372mm above the first
marks.
(Optional) Mark a drill hole in the center of the centerline 281mm above the first
marks.
Using a 3/16" bit, drill pilot holes into the studs at the marked points.
(Optional) Using a 1-1/2" hole saw, drill a hole at the marked point in the centerline.
Wood Stud or Plywood Wall
Page 14

14
Concrete or Cinder Block Wall
4. (Optional) Route the power and video cables through the wall and feed the ends
through the hole in the centerline.
Page 15
15
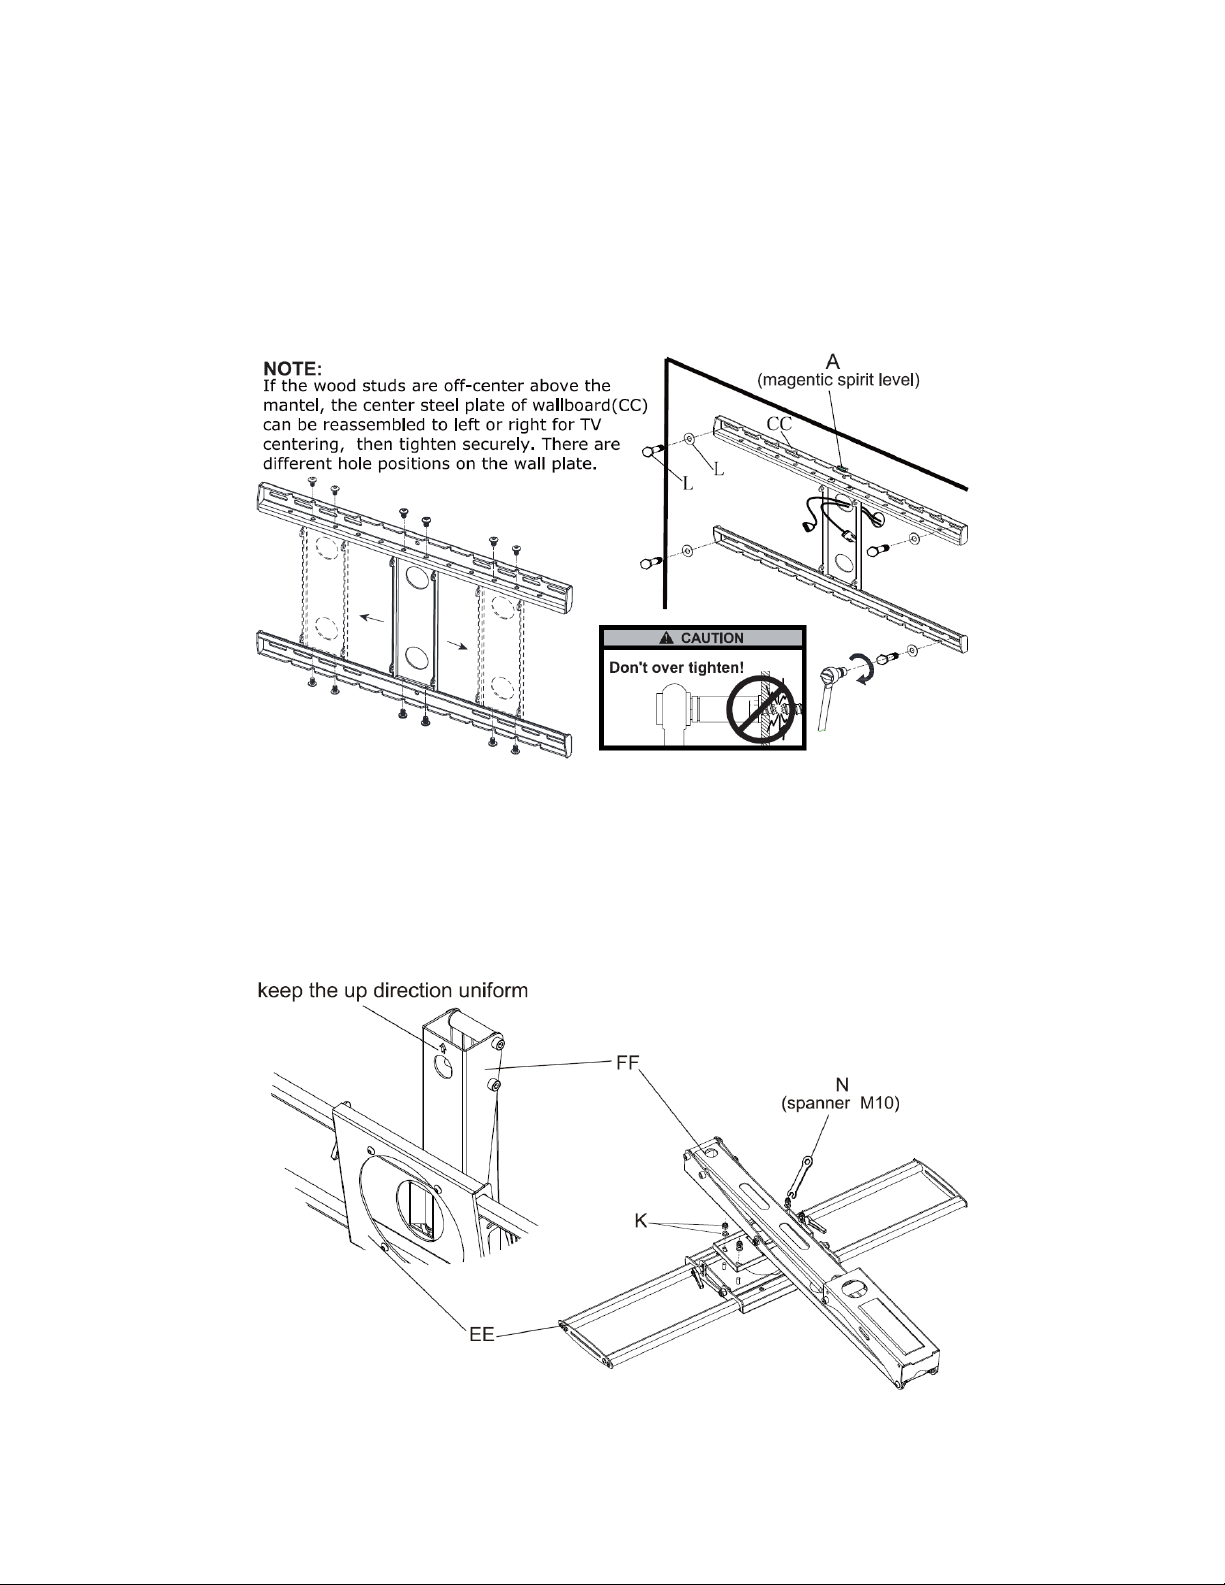
5. Place the magnetic spirit level (A) on top of the wallboard (CC), then place the
wallboard against the wall, with the mounting holes over the drilled pilot holes.
Thread the four hex bolt screws and washers (L) into the pilot holes, then screw
them into the studs using an appropriately sized socket wrench, while ensuring that
the mount is level. Do not over tighten!
6. Place the front panel (EE) face down on a flat surface, then position the holes in the
bracket (FF) over the four threaded rods on the back of the front panel. Using the
plastic washers and non-slip nuts (K), place the washers on each threaded rod, then
thread one non-slip nut on each of threaded rods. Using the M10 spanner (N),
tighten each threaded nut to secure the bracket to the front panel.
Page 16
16
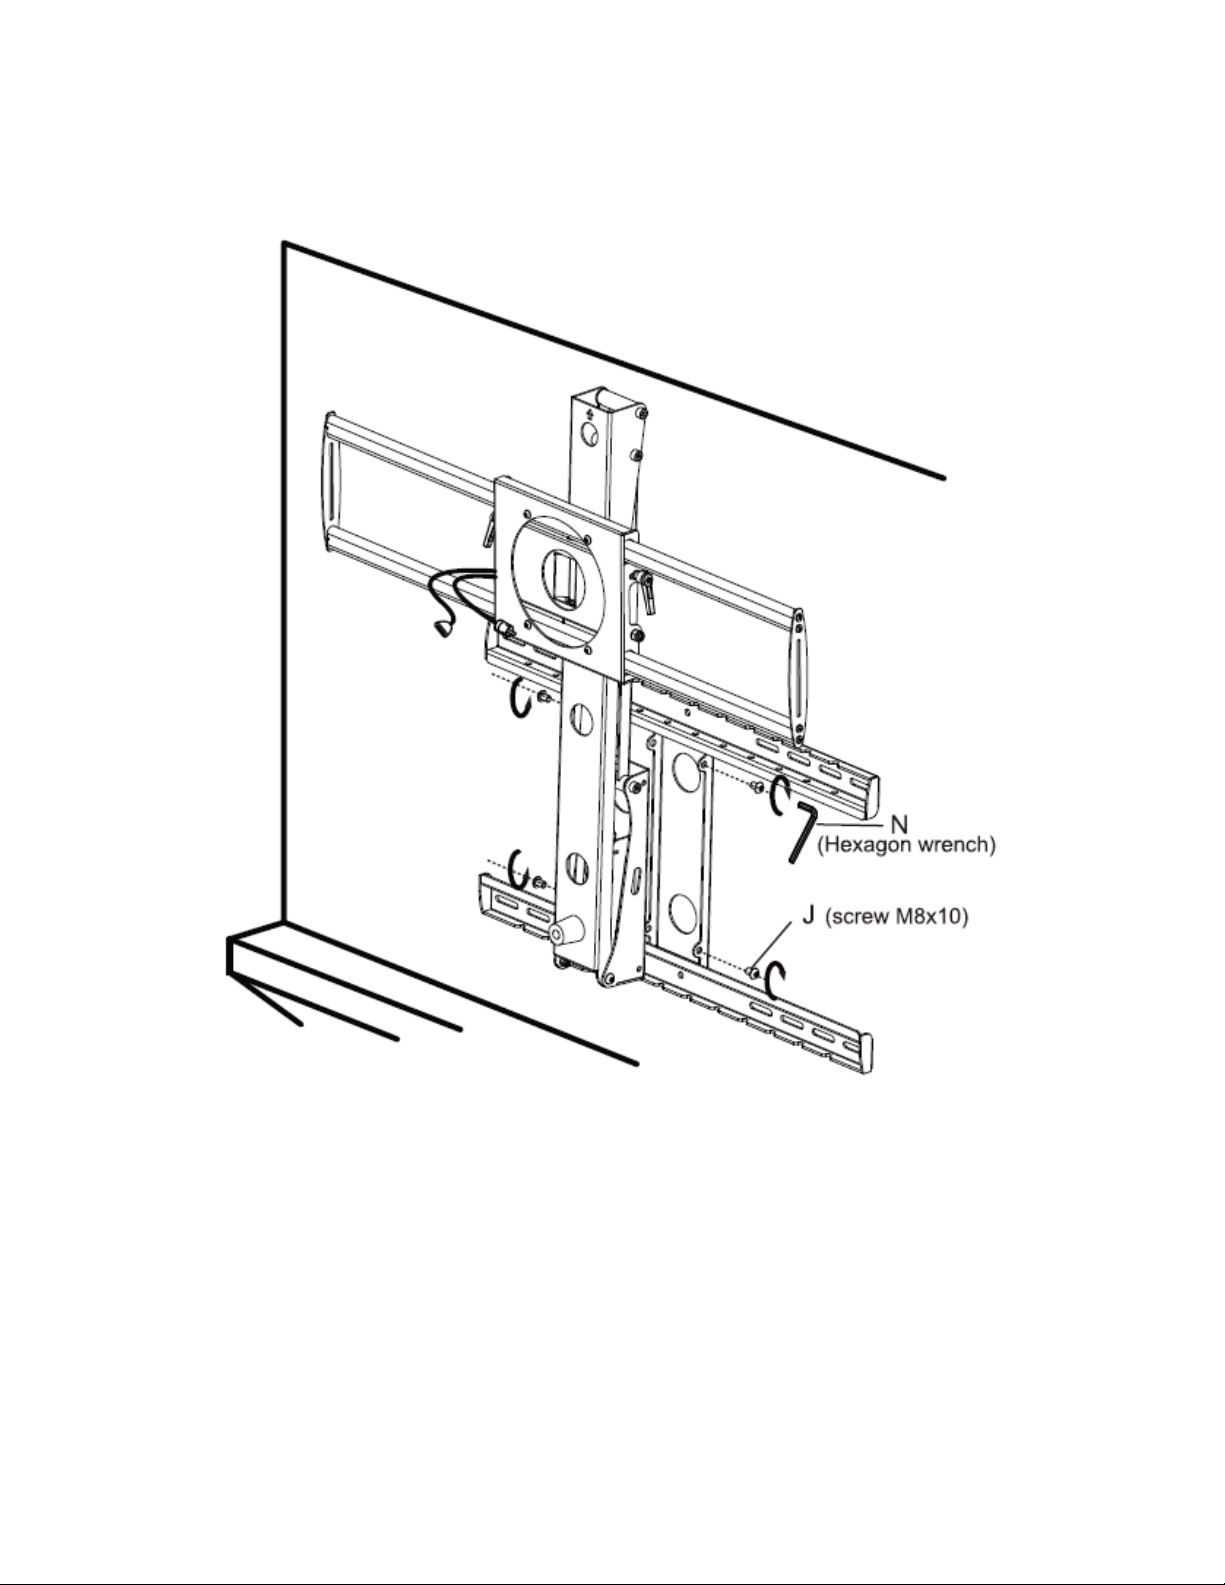
7. Using the four Allen pan head screws (J) and the hexagon wrench (N), secure the
bracket and front panel assembly to the wallboard.
Page 17

17
8. (Optional) Route the video and power cables along the bracket, then secure them in
place using the cable ties (N), as shown.
Page 18
18
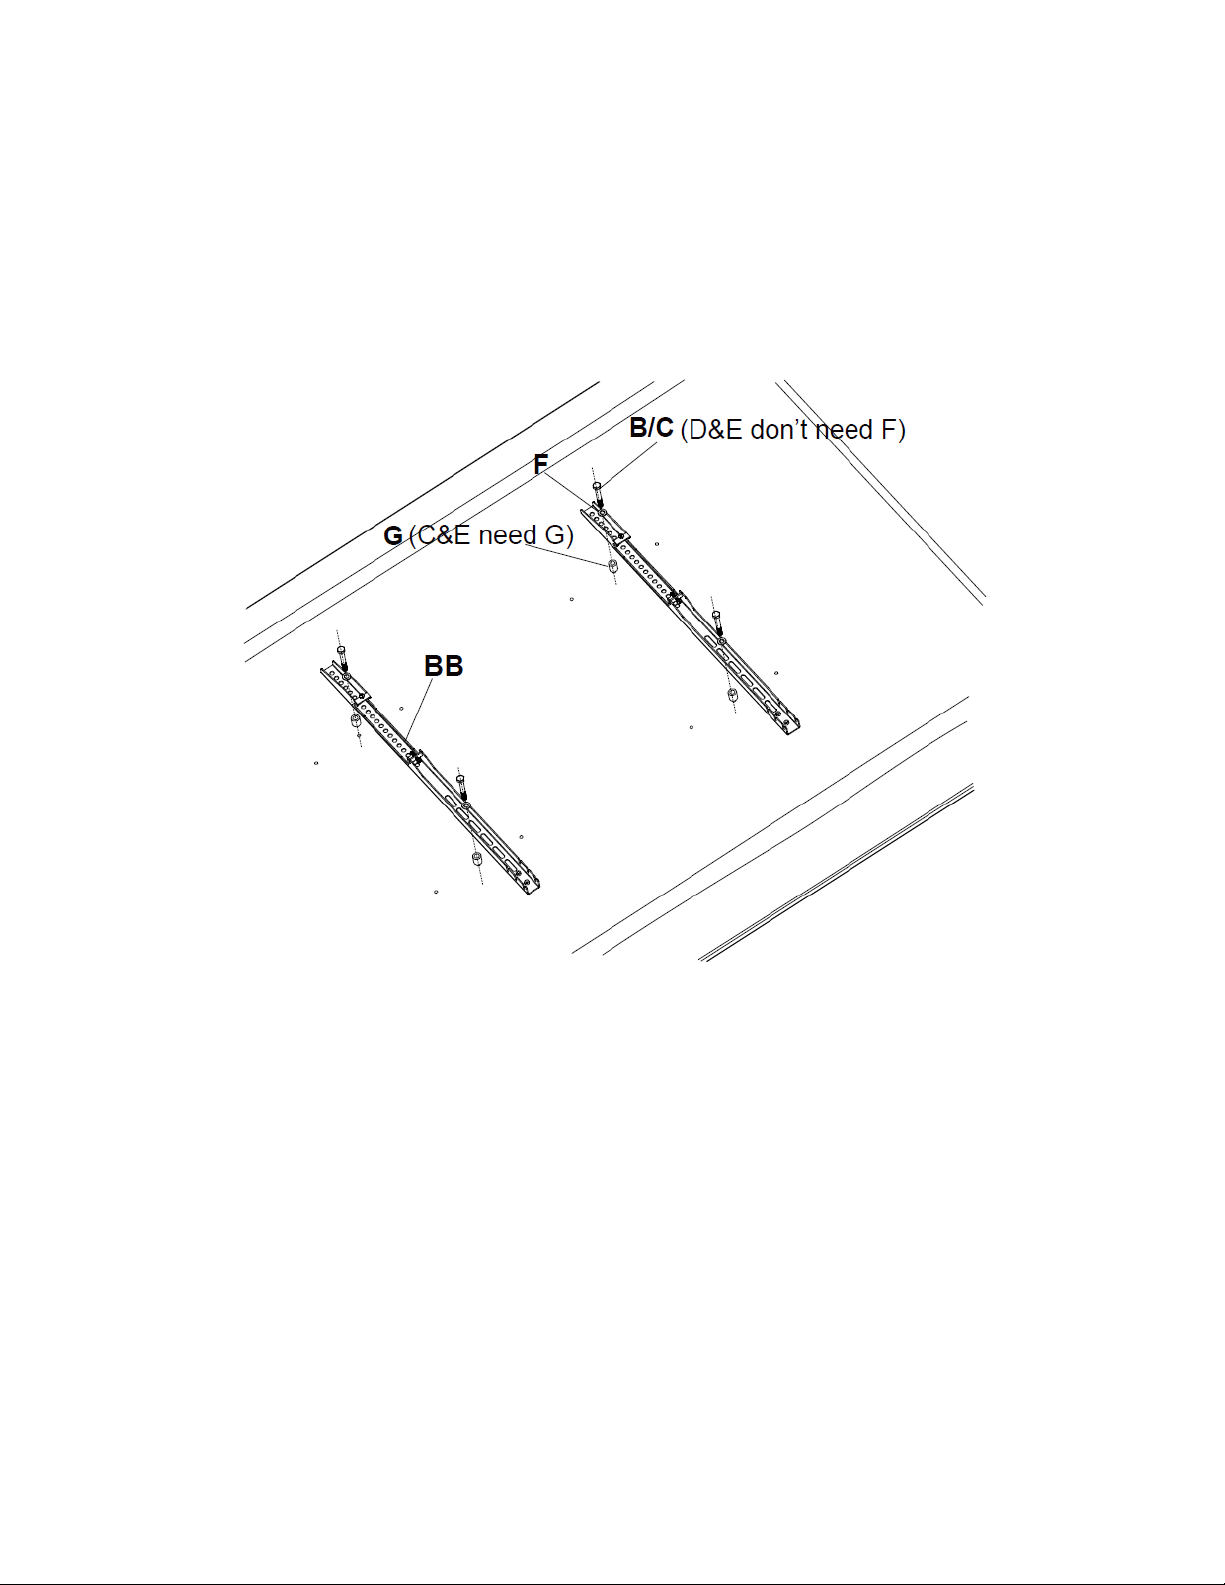
9. Place a towel or blanket on a flat surface, then place your television face down on
it. Attach the hooks (BB) to the back of the television using the appropriate screws,
washers, and/or spacers. The proper combinations to use are the Philips pan head
screws (B) and washer 1 (F), Philips pan head screws (C) and washer 1 (F) and spacer
(G), Philips pan head screw (E) only, or Philips pan head screw (E) and spacer (G).
Page 19
19
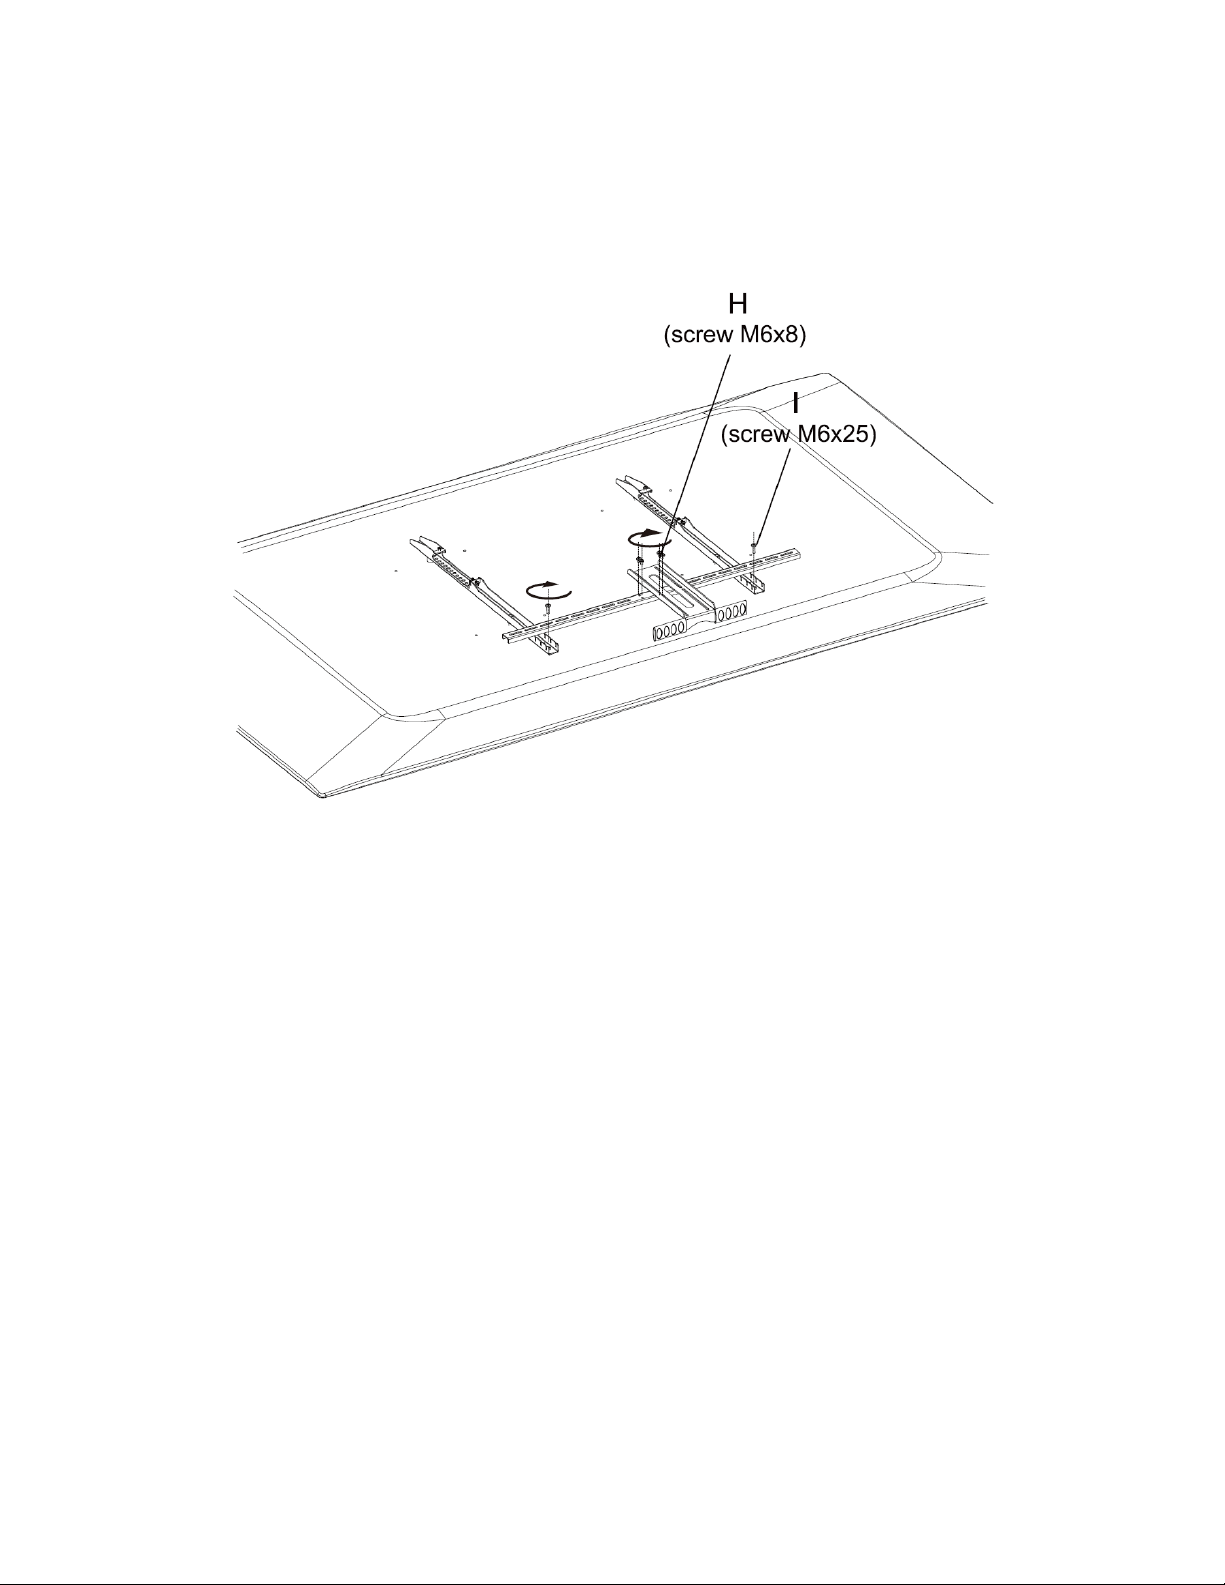
10. Using the two Philips pan head screws (I), attach the connecting rod (DD) to the
hooks (BB). Then, using the four Philips pan head screws (H), attach the handle (AA)
to the connecting rod.
Page 20

20
11. Using two people, lift the television and hang the hooks on the front panel. Use a
Philips screwdriver to tighten the two locking screws on each bracket, which
secures the brackets to the front panel.
Page 21
21
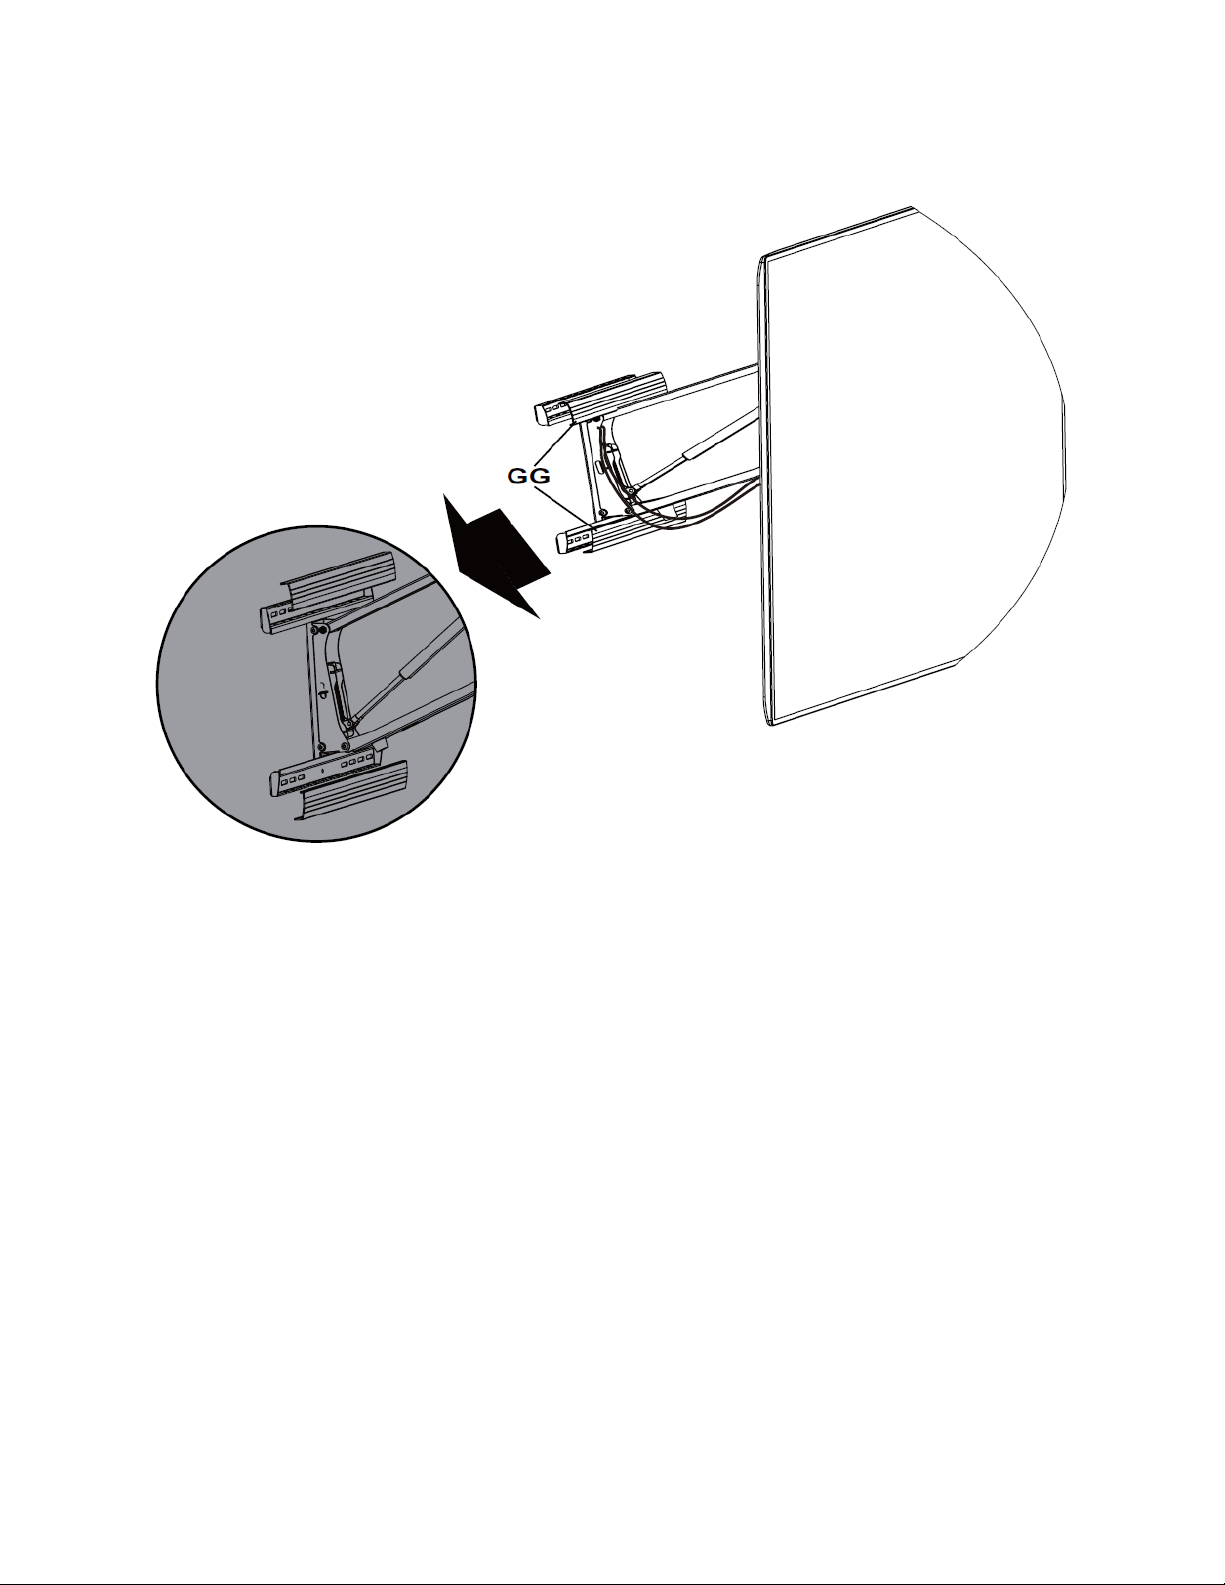
12. Attach the wall panel covers (GG) to the wallboard.
Page 22
22
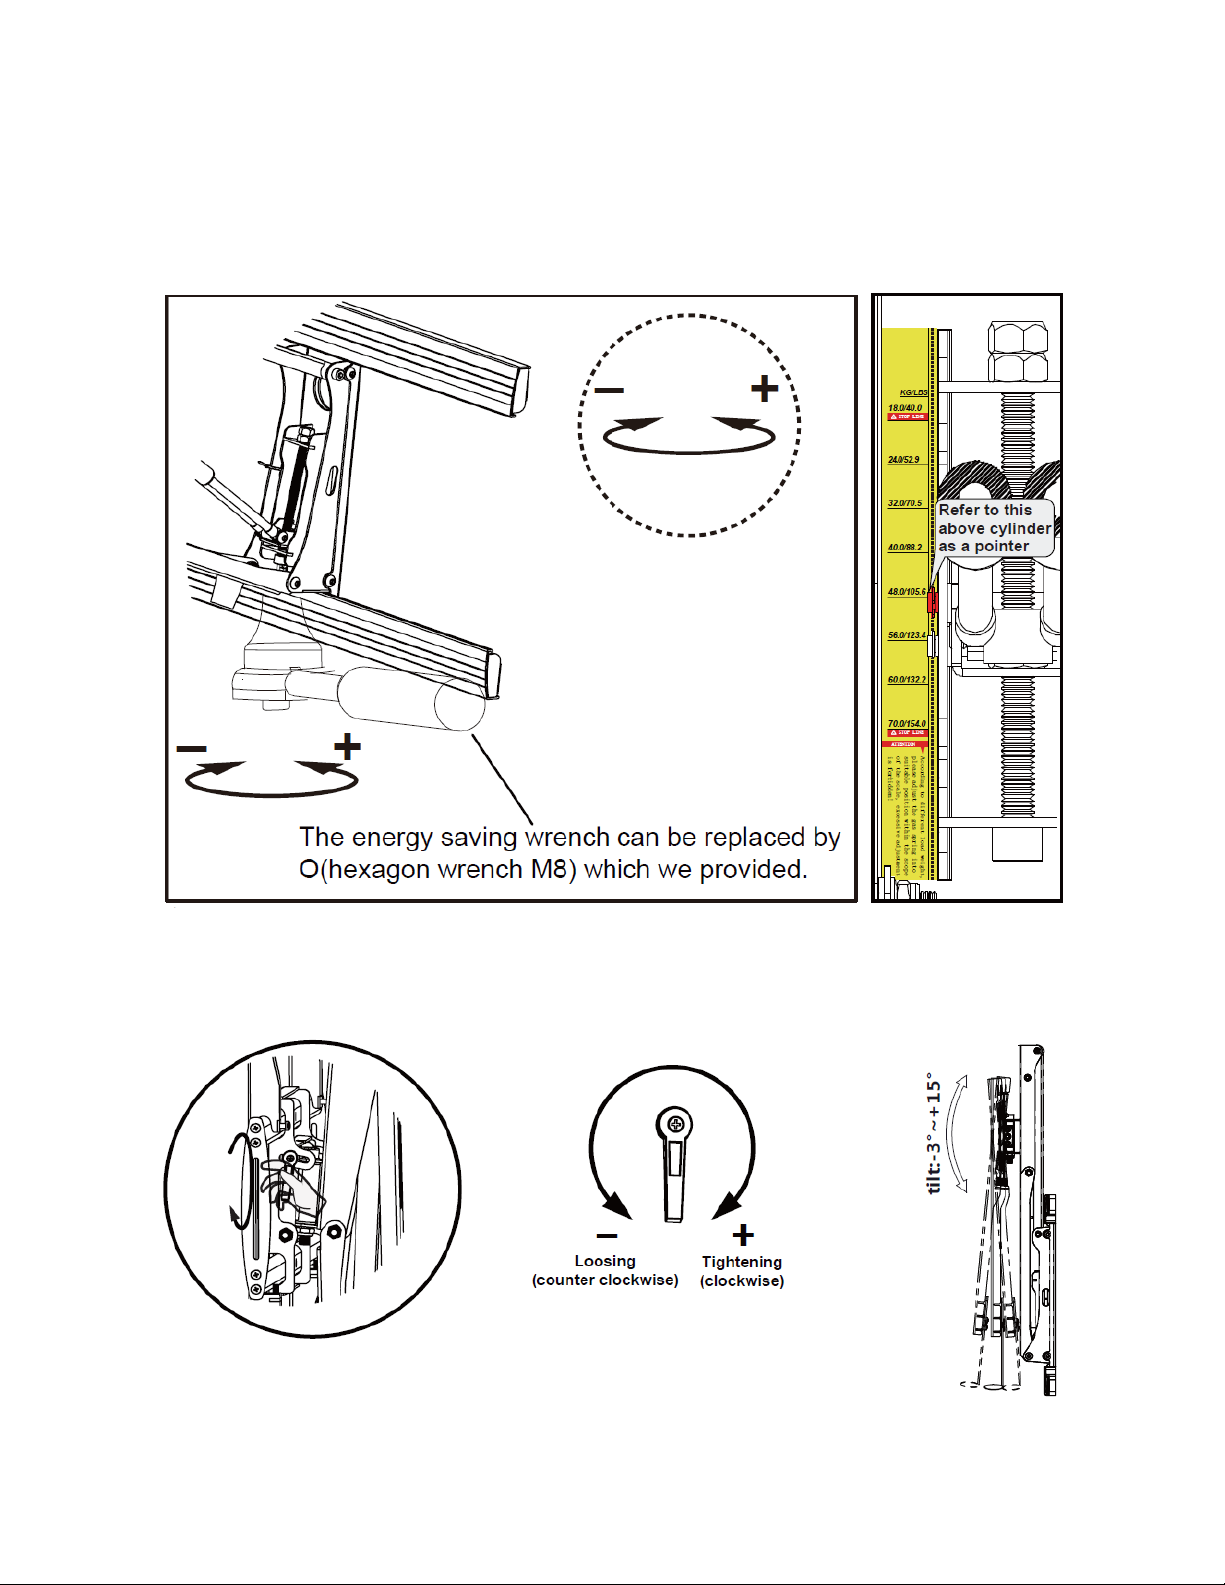
13. Adjust the spring pressure to balance the weight of the display so that it can be
easily moved and will maintain its position using either a ratchet wrench or the
hexagon wrench (O) provided.
14. If you want to adjust the tilt, loosen the tilt lock lever, adjust the tilt to the desired
angle, then tighten the tilt lock lever.
Page 23
23
15. Connect the video and power cables to your television.
Congratulations, your television is now mounted and ready for use!
SPECIFICATIONS
Model
27773
Display Size
55" ~ 100"
Minimum Display Weight
44 lbs. (20 kg)
Maximum Display Weight
143 lbs. (65 kg)
Minimum VESA® Size
300x200
Maximum VESA Size
800x600
Swivel Range
±35°
Tilt Range
-3° ~ +15°
Rotation Range
±5°
Wall Plate Dimensions
33.6" x 12.8"
REGULATORY COMPLIANCE
Notice for FCC
This device complies with Part 15 of the FCC rules. Operation is subject to the following
two conditions: (1) this device may not cause harmful interference, and (2) this device must
accept any interference received, including interference that may cause undesired
operation.
Modifying the equipment without Monoprice's authorization may result in the equipment
no longer complying with FCC requirements for Class B digital devices. In that event, your
Page 24

24
right to use the equipment may be limited by FCC regulations, and you may be required to
correct any interference to radio or television communications at your own expense.
This equipment has been tested and found to comply with the limits for a Class B digital
device, pursuant to Part 15 of the FCC Rules. These limits are designed to provide
reasonable protection against harmful interference in a residential installation. This
equipment generates, uses and can radiate radio frequency energy and, if not installed and
used in accordance with the instructions, may cause harmful interference to radio
communications. However, there is no guarantee that interference will not occur in a
particular installation. If this equipment does cause harmful interference to radio or
television reception, which can be determined by turning the equipment off and on, the
user is encouraged to try to correct the interference by one or more of the following
measures:
• Reorient or relocate the receiving antenna.
• Increase the separation between the equipment and receiver.
• Connect the equipment into an outlet on a circuit different from that to which the
receiver is connected.
• Consult the dealer or an experienced radio/TV technician for help.
Notice for Industry Canada
This Class B digital apparatus complies with Canadian ICES-003.
Cet appareil numérique de la classe B est conforme à la norme NMB-003 du Canada.
Monoprice and all Monoprice logos are trademarks of Monoprice Inc.
VESA® is a trademark of the Video Electronics Standards Association.
 Loading...