

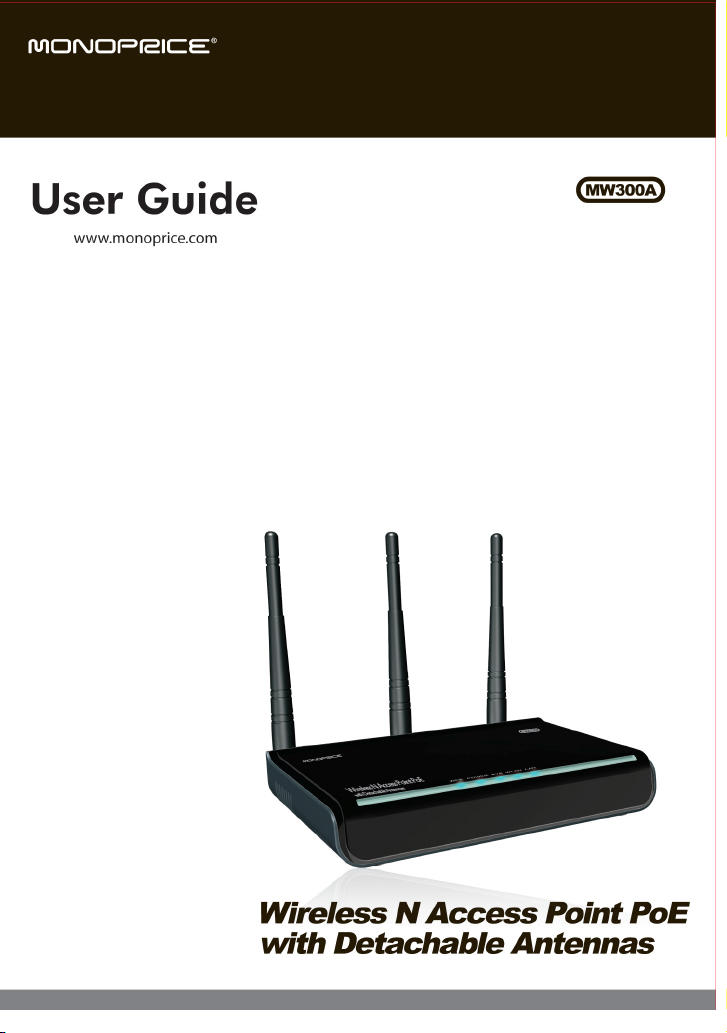
Page 1
Page 2

Copyright Statement
is the registered trademark of
Monoprice. All the products and product names
mentioned herein are the trademarks or registered
trademarks of their respective holders. Copyright of
the whole product as integration, including its
accessories and software, belongs to Monoprice.
Without the permission of Monoprice, any individual or
party is not allowed to copy, plagiarize, imitate or
translate it into other languages.
All the photos and product specifications mentioned in
this manual are for references only. As the upgrade of
software and hardware, there will be changes. And if
there are changes, Monoprice is not responsible for
informing in advance. If you want to know more about
our product information, please visit our website at
www.monoprice.com.
Page 3

Table of Contents
Chapter 1 Product Overview.......................... 1
1.1 Features........................................... 2
1.2 Package Contents .............................. 3
1.3 LED Indicator and Panel Description .... 3
Chapter 2 Hardware Installation .................... 7
Chapter 3 Web Configuration ........................ 9
3.1 Web Login ........................................ 9
3.2 Setup Wizard .................................. 11
3.3 System Status ................................ 12
3.4 LAN Settings ................................... 13
Chapter 4 Wireless Settings ........................ 15
4.1 Working Mode ................................. 15
4.1.1 Access Point (AP) Mode .............. 16
4.1.2 P2P (Point to Point) Bridge Mode . 33
4.1.3 P2MP Bridge Mode ..................... 38
4.1.4 Wireless Repeater Mode ............. 43
4.1.5 Wireless Client Mode .................. 50
4.2 Advanced Settings ........................... 53
Page 4

4.3 WPS Settings .................................. 56
4.4 Access Control ................................ 58
4.5 Connection Status ........................... 59
4.6 PING ............................................. 60
Chapter 5 SNMP Setting ............................. 61
5.1 SNMP Introduction .......................... 61
5.2 SNMP Configuration ......................... 61
Chapter 6 System Tools .............................. 63
6.1 Password Change ............................ 63
6.2 Restore to Factory Default Settings .... 64
6.3 Backup/Restore............................... 65
6.4 Time Settings ................................. 66
6.5 Reboot System ............................... 67
6.6 Firmware Upgrade ........................... 67
6.7 Syslog ........................................... 69
Appendix I: Glossary.................................. 70
Appendix II: Setting the TCP/IP Address in
Windows XP .............................................. 73
Page 5

Chapter 1 Product Overview
The MW300A adds flexibility and extended wireless
range to your existing wired or wireless network.
When configured as a Repeater, the MW300A fills holes
in your existing wireless network coverage or extends
your coverage over a wider area, thereby allowing a
continuous wireless connection across the area
covered by the original wireless router and multiple
repeaters.
When configured as a Wireless Access Point (WAP), the
MW300A allows you to create a new wireless LAN, with
a different network name and password. Multiple units
can be connected to an existing network to give
customized access points to different clients, making it
ideal for large offices sharing a common internet
connection, hotel/motel operations for access to
individual rooms, or even to control access times and
limits for your kids!
The MW300A is fully IEEE802.11n compliant with the
full range of security options and encryption methods,
including 64/128 bit WEP, WPA, and WPA2, with AES or
TKIP. It supports up to 300 Mbps speeds for both
reception and transmission and can be powered with
either the included AC adapter or using a Power over
1
Page 6

Ethernet (PoE) wired connection, for coverage to areas
where external power is unavailable.
1.1 Features
Complies with IEEE802.11n, IEEE802.11g, and
IEEE802.11b standards
Configurable as Wireless Access Point, Repeater,
P2P, P2MP, and Wireless Client
Provides up to 300 Mbps reception and up to 300
Mbps transmission rates
Includes MIMO technology to improve data
throughput and minimize signal errors
Supports 64/128-bit WEP, WPA, and WPA2 with
AES or TKIP encryption and security protocols
Powered by included AC adapter or Power Over
Ethernet (PoE)
Provides Intelligent QoS for higher-bandwidth
applications, such as online gaming, VOIP, and
streaming multimedia
Supports 802.1x user authentication in
conjunction with an external RADIUS server
Supports both Simple Network Management
Protocol (SNMP) and Web-based management
interfaces
Includes one Gigabit auto-negotiating RJ45 port
for direct LAN connection (up or down)
2
Page 7
1.2 Package Contents
The following items should be included in the package:
One MW300A Wireless AP
One AC Power Adapter
One RJ45 Network Cable
One Quick Installation Guide
One CD-ROM
If any of listed items are missing or damaged, please
contact the Monoprice reseller from whom you
purchased this product for immediate replacement.
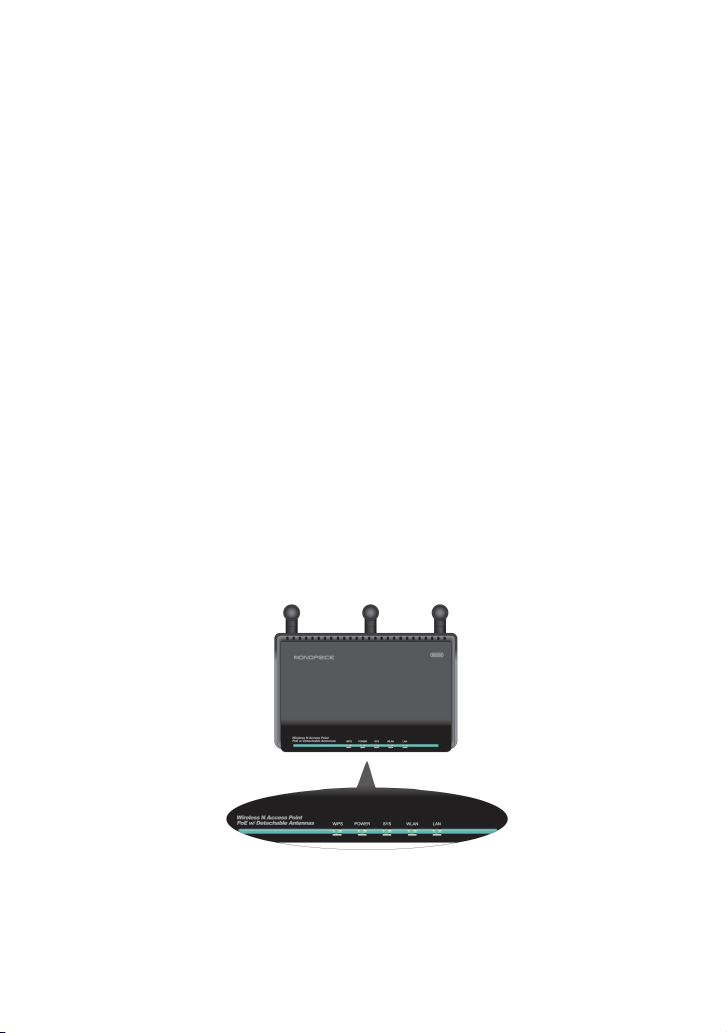
1.3 LED Indicator and Panel Description
3
Page 8

LED indicator description on front panel
(from L to R)
WPS
A blinking LED indicates that the device is
negotiating with clients in WPS mode.
POWER
A steady green LED indicates that the device is
properly connected to a power source.
SYS
A blinking LED indicates that the system is
operating properly.
WLAN
A steady green LED indicates that the wireless
function is enabled, but that there is no current
transmission or reception activity. A blinking
green LED indicates that the device is actively
transmitting and/or receiving data.
LAN
A steady LED indicates that the device is properly
connected to an Ethernet source. A blinking LED
indicates that the device is transmitting and/or
4
Page 9
receiving data. If the LED is green it indicates that
the device is operating with a link speed of
1000Mbps. If it is orange, the link speed is
10/100Mbps.
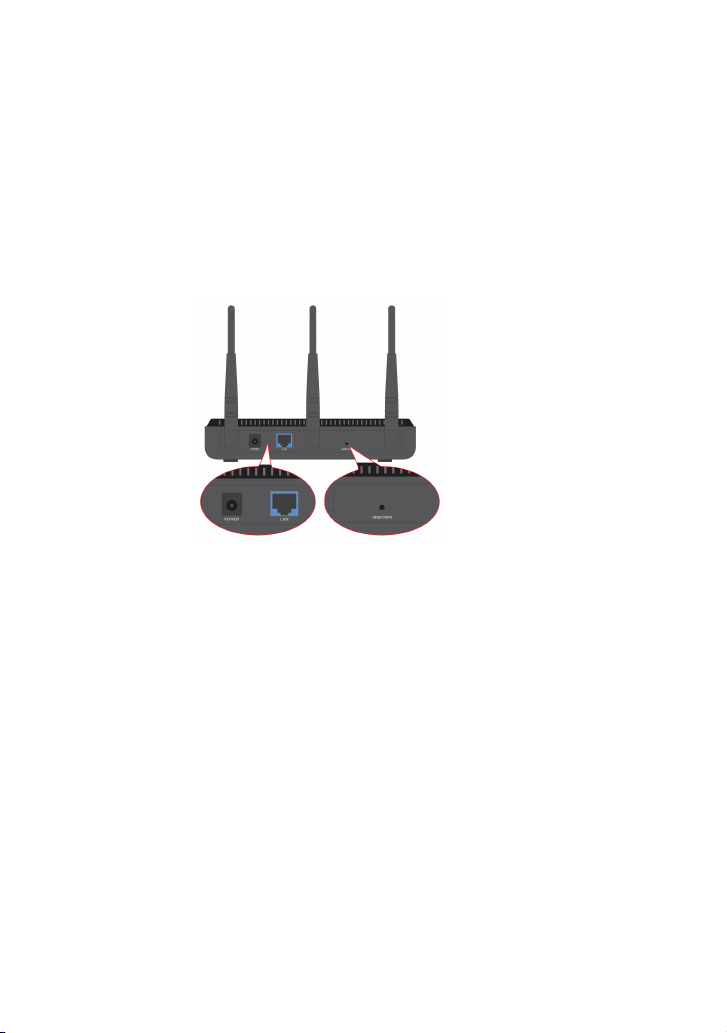
Rear Panel:(From L to R)
POWER
The power jack is for the power adapter
connection. Please use the included 12V DC
power adapter.
LAN
The Gigabit Ethernet port is for connection to a
computer’s NIC or an Ethernet switch. It can
also be used as a PoE interface. When both PoE
5
Page 10

and the external power adapter power are
connected, the device will draw power from the
physical power adapter.
RESET/WPS
This multifunction button is for both the system
reset function and to activate WPS. When you
press and hold this button for 7 seconds, the
device will restore the configured settings to
factory default settings. When you press and
hold the button for only 1 second, the WPS
function will be enabled.
Antennas
The detachable antennas are for the wireless
radio communications. Keep these antennas
securely attached to the system to maintain
optimal wireless performance.
6
Page 11
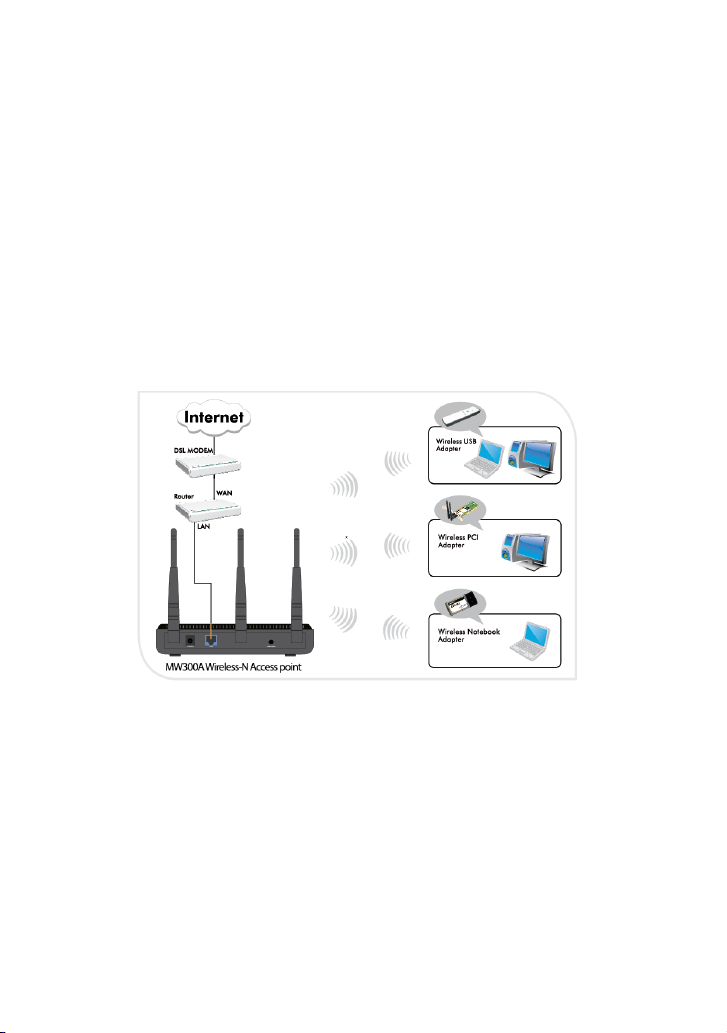
Chapter 2 Hardware Installation
This chapter explains how to connect the Access Point
when using AP mode. For other modes, please refer to
the Quick Installation Guide for connection examples.
For details on the settings to use for each mode, refer
to Chapter 4.
The topology plan of AP mode connection
1. Connect one end of the network cable to your
Ethernet broadband router, switch, or PC, and the
other end to the MW300A’s LAN port.
7
Page 12

2. Connect the power adapter to the AP’s Power jack.
Then plug the power adapter into an electrical
outlet. The power LEDs on the front panel will light
up as soon as the AP is powered on.
3. Configure your computer's wireless adapter and
LAN settings to connect to the Access Point.
8
Page 13

Chapter 3 Web Configuration
3.1 Web Login
Connect your computer to the MW300A using a
network cable. Set your PC's IP address to
192.168.0.x (x ranges 2-253) and the subnet mask to
255.255.255.0. Please refer to Appendix II for
additional details on the TCP/IP setting.
Launch Internet Explorer or another web browser. In
the address bar, enter the AP’s default IP address,
192.168.0.254, then press the Enter key. The login
screen will appear.
Enter admin into both the user name and password
fields. After logging into the Web-based management
interface, you can set a new user name and password
on the System Tool – Change password tab.
9
Page 14
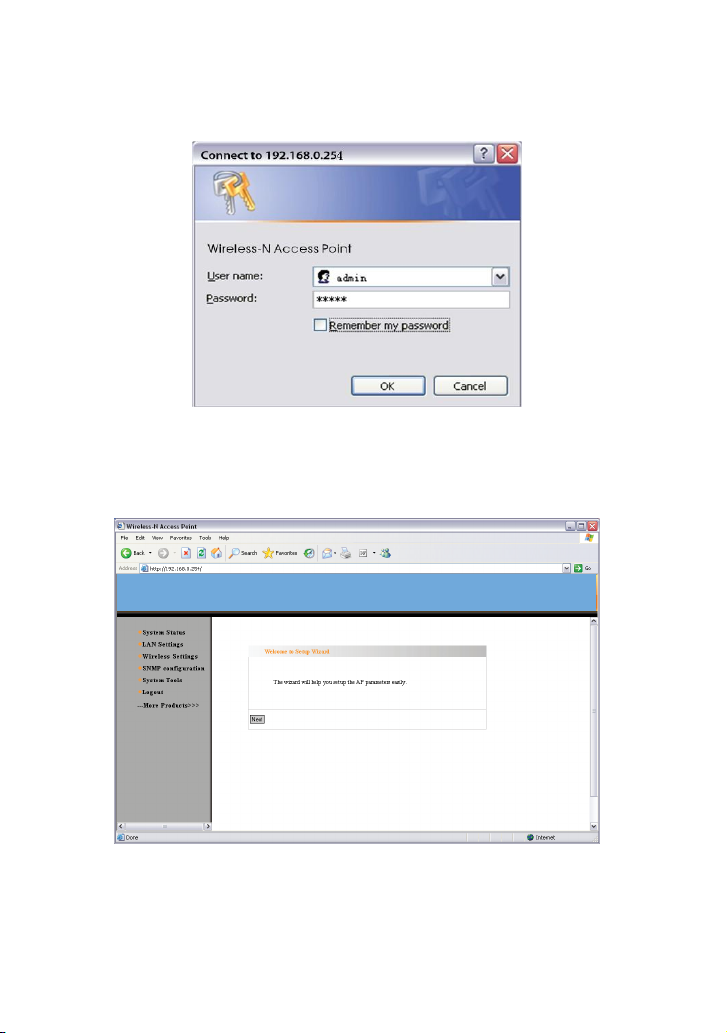
Click OK to continue with the first web page of the
Setup Wizard.
10
Page 15
3.2 Setup Wizard
Click Next on the Setup Wizard's first page to
continue.
On this page, you can select one of the five wireless
network modes: Wireless AP, P2P Bridge Mode, P2MP
Bridge Mode, Repeater Mode, and Client. Configure
the corresponding security settings to secure your
network.
11
Page 16

3.3 System Status
The System Status page shows the wireless AP’s
current status, including the Wireless status, LAN
interface information, and System information.
Wireless Status
This section shows the current working mode,
wireless network mode, main and minor SSIDs,
12
Page 17

security mode, and the wireless channel.
LAN Interface information
This section displays the type of IP, the MAC
address, IP address, subnet mask, and default
gateway.
System information
This section displays the software and hardware
versions in use for the AP, as well as the amount of
time the AP has been operating.
3.4 LAN Settings
The LAN Settings screen allows you to view and
change the various settings that control the AP's
access to your local area network.
13
Page 18
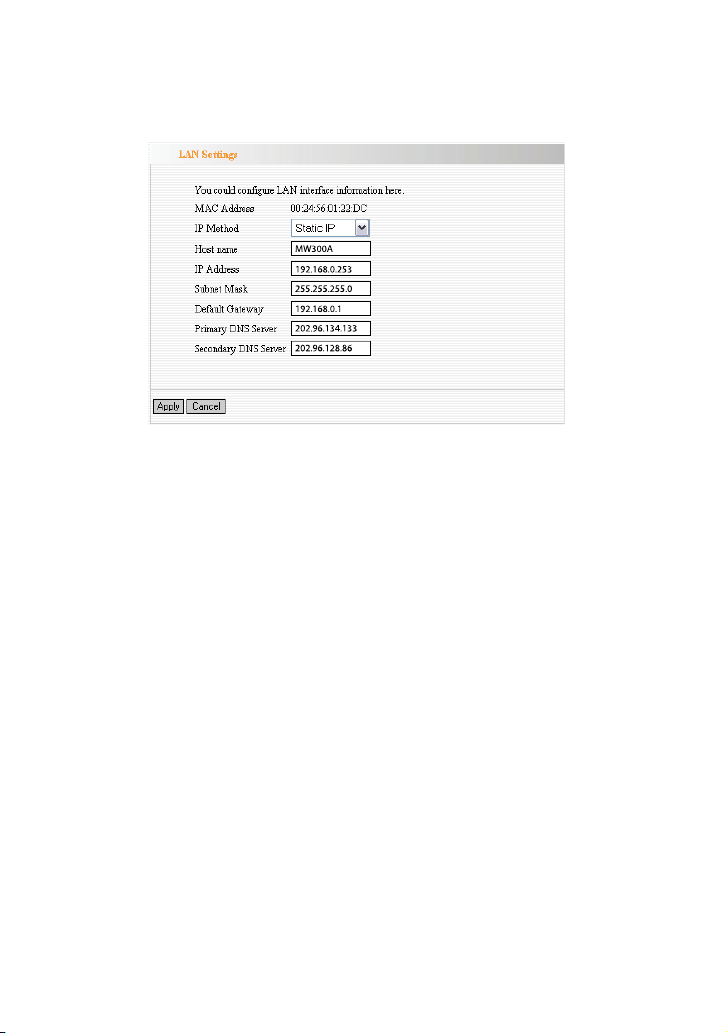
Static IP: The default IP address is 192.168.0.253. If
necessary, you can configure a new IP
address, subnet mask and gateway
manually for the device.
Dynamic IP: Automatically obtains the IP address,
subnet mask, and gateway from the DHCP
server. This is only recommended if you have
permission to obtain this information from
the uplink device, otherwise it is best to use
the Static IP option.
Note: If the LAN IP address is changed, you need to
use the new IP address to login to the wireless AP’s
Web interface the next time.
14
Page 19
Chapter 4 Wireless Settings
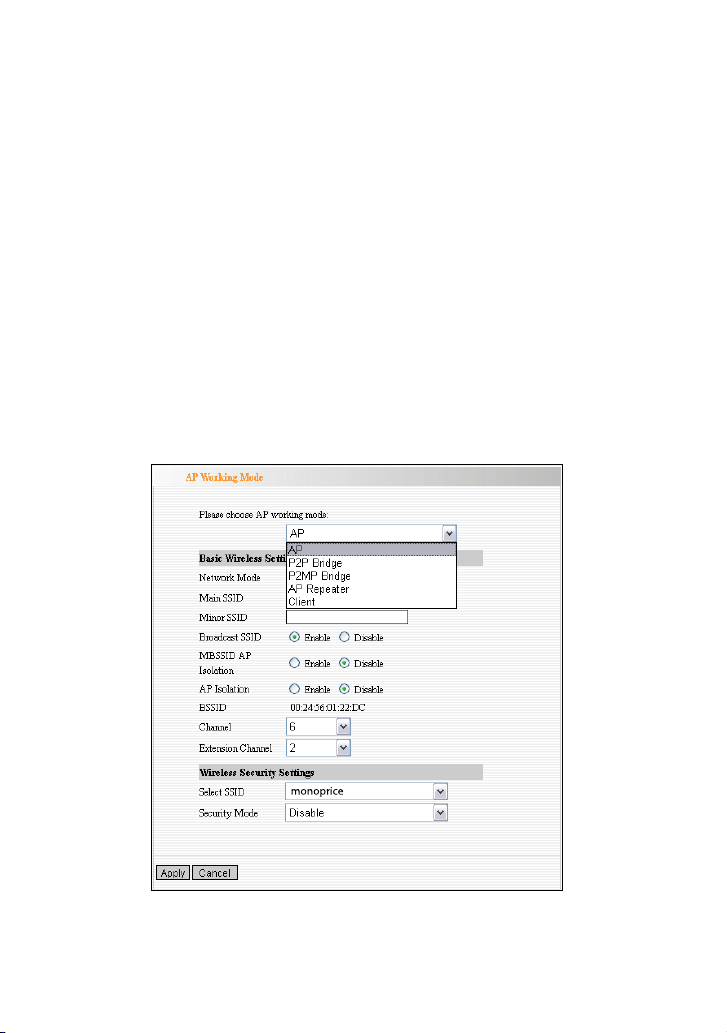
4.1 Working Mode
Select Wireless Setting->Working Mode to display
the following screen. From the drop-down menu,
select one of the five working modes supported by this
device: AP, P2P Bridge, P2MP Bridge, AP Repeater, or
Client. The following sections explain each of the five
modes and their relevant settings.
15
Page 20

4.1.1 Access Point (AP) Mode
The AP mode is the default and most basic mode for
operating this device. In this mode, the AP will act as a
central hub for different wireless LAN clients, allowing
them access to the local area network. For example,
when traveling to a hotel that has high-speed internet
access, you can connect to the internet through the AP
which is connected to an Ethernet cable in the room.
4.1.1.1 Application and Topology Plan
The AP mode can convert a wired connection into
wireless signals. If you have one wired cable
connecting to the Internet, and want to access the
Internet via wireless signals connecting to your
notebook computer, this mode fits perfectly.
16
Page 21
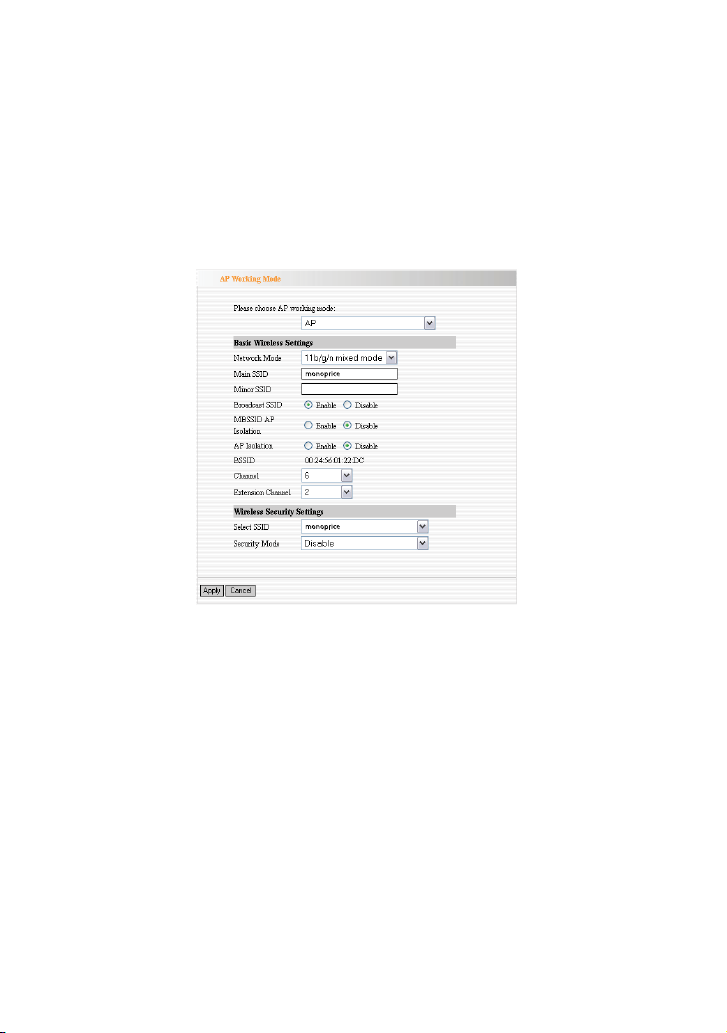
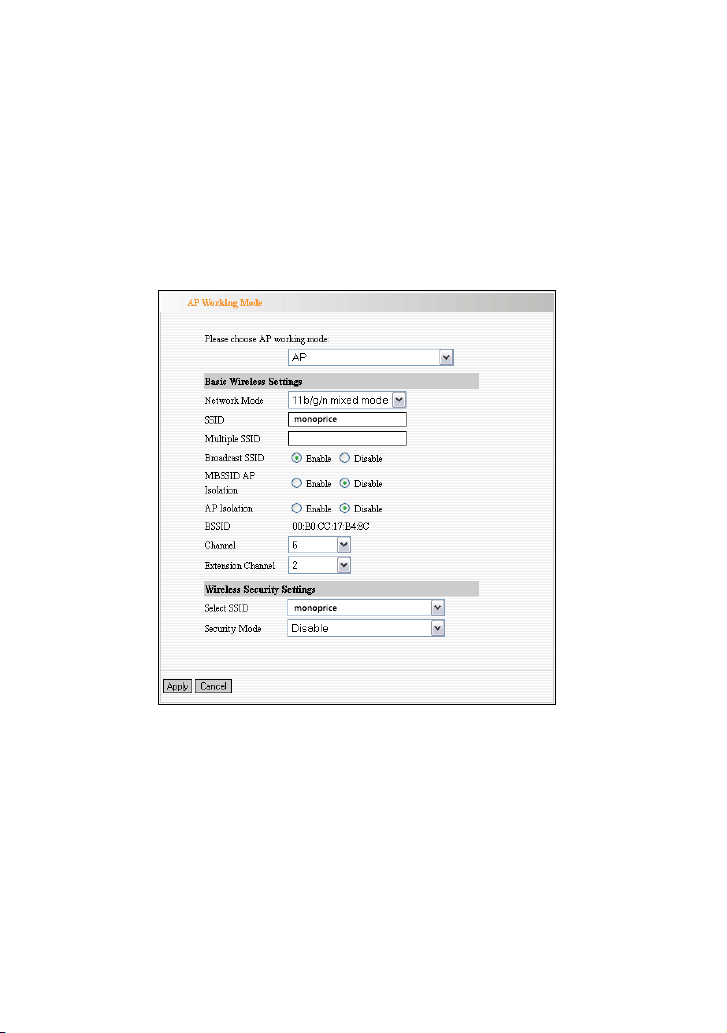
4.1.1.2 AP Mode Settings
In the working mode, select AP to obtain the following
screen.
Basic Wireless Settings
Network Mode:Select one mode from the
following. The default is 11b/g/n mode.
11b mode: Allows a wireless client to connect
with the device in 11b mode at the
maximum speed of 11Mbps.
11g mode: Allows an 11g/11n-compliant
client device to connect with the AP at the
17
Page 22

maximum speed of 54Mbps.
11b/g mode: Allows an 11b/g-compliant
client device to connect with the AP with
auto-negotiation speed, and an 11n wireless
client to connect to the device at 11g speed.
11b/g/n mode: Allows 11b/g/n-compliant
client devices to connect to the AP with auto-
negotiation speeds, up to 300Mbps.
Main SSID: The SSID (Service Set Identifier)
is the unique name for the wireless network.
This device supports up to two SSIDs. The
Main SSID is required.
Minor SSID: A secondary SSID is optional.
MBSSID AP Isolation: This feature is
designed to isolate clients accessing the AP
using the same SSID. When this feature is
enabled, wireless clients connected to the AP
using the same SSID cannot communicate
with each other. For example, configuring the
main SSID as AP1 and the minor SSID as AP2:
PC1 and PC2 are connected to AP1 and PC3 is
connected to AP2. PC1 and PC2 cannot
communicate with each other, but each can
18
Page 23

communicate with PC3.
AP Isolation: This feature is designed to
isolate communications between clients
using different SSIDs. When this feature is
enabled, each of your SSIDs will operate as if
it is a virtual network of its own and PCs on
one SSID will not be able to communicate
with PCs on the other. For example,
configuring the main SSID as AP1 and the
minor SSID as AP2: PC1 and PC2 are
connected to AP1, while PC3 connects to AP2.
PC1 and PC2 can communicate with each
other, but neither can communicate with
PC3.
Tip: If you want to isolate all connected
wireless client's communication, enable both
MBSSID AP Isolation and AP Isolation.
BSSID: Basic Service Set Identifier for the
wireless network. In IEEE802.11, BSSID is
the MAC address of wireless access point.
Channel: Specifies the effective channel
(from 1 to 13 or Auto) of the wireless
network. Each wireless device on the same
19
Page 24

wireless frequency should use a different
channel. In most cases the Auto function will
ensure there is no conflict between devices.
Extension channel: To increase data
throughput of the wireless network when in
11n mode, the extension channel range is
used.
Wireless Security Setting:
This option allows you to select one of several
common data encryption methods to use in your
network, as explained in the following pages.
Mixed WEP
WEP (Wired Equivalent Privacy) is a basic
encryption method, which usually encrypts
wireless data using a series of digital keys (64 bits
or 128 bits in length). By using the same keys on
each of your wireless network devices, you can
prevent unauthorized wireless devices from
monitoring your transmissions or using your
wireless resources. WEP is the original and
weakest encryption method available, so it is
20
Page 25

recommended not to use this method. Selecting
Mixed WEP displays the following options:
Select SSID: Select the main SSID or
minor SSID to configure the security
settings for.
Security Mode: From the drop-down
menu select the desired security
encryption method.
WEP Key1~4: Set the WEP keys using
either ASCII or Hex characters. You can
use 5 to 13 ASCII characters (illegal
characters, such as “/” are not allowed)
or 10/26 hex characters (0-9 and A-F).
21
Page 26

Default Key: Select one of the four
configured keys as the currently active
key.
WPA- PSK
WPA (Wi-Fi Protected Access) is a Wi-Fi standard,
which is designed to improve upon the basic
security features provided by the WEP method.
Selecting WPA-PSK displays the following
options:
Select SSID: Select the main SSID or
minor SSID to configure the security
settings for.
Security Mode: From the drop-down
22
Page 27

menu select the desired security
encryption method.
WPA Algorithms: Allows selection of
the TKIP (Temporal Key Integrity
Protocol) or AES (Advanced Encryption
Standard) methods, or both. The default
is TKIP mode.
Pass Phrase: Enter 8-63 ASCII
characters to serve as the pass phrase.
Key Renewal Interval: This option
determines the amount of time the AP
will use the temporal key before it
generates a new key. Note that this is
not the same as the pass phrase and no
additional configuration is required
when a new key is generated. This
increases security by making it more
difficult for someone to hack into and
access your network without knowing
your pass phrase. You should not need
to change this from the default 3600
seconds.
23
Page 28

WPA2-PSK
WPA2 provides even more security than either
WEP or WPA. Selecting WPA2-PSK displays the
following options:
Select SSID: Select the main SSID or
minor SSID to configure the security
settings for.
Security Mode: From the drop-down
menu select the desired security
encryption method.
WPA Algorithms: Allows selection of
the TKIP (Temporal Key Integrity
Protocol) or AES (Advanced Encryption
Standard) methods, or both. The default
24
Page 29

is TKIP mode.
Pass Phrase: Enter 8-63 ASCII
characters to serve as the pass phrase.
Key Renewal Interval: This option
determines the amount of time the AP
will use the temporal key before it
generates a new key. Note that this is
not the same as the pass phrase and no
additional configuration is required
when a new key is generated. This
increases security by making it more
difficult for someone to hack into and
access your network without knowing
your pass phrase. You should not need
to change this from the default 3600
seconds.
WPA
WPA is a MAC address based security mode used
when a RADIUS server is used to provide user
authentication. Selecting WPA displays the
following options:
25
Page 30

Select SSID: Select the main SSID or
minor SSID to configure the security
settings for.
Security Mode: From the drop-down
menu select the desired security
encryption method.
WPA Algorithms: Allows selection of
the TKIP (Temporal Key Integrity
Protocol) or AES (Advanced Encryption
Standard) methods, or both. The default
is TKIP mode.
Key Renewal Interval: This option
determines the amount of time the AP
will use the temporal key before it
generates a new key. Note that this is
26
Page 31

not the same as the pass phrase and no
additional configuration is required
when a new key is generated. This
increases security by making it more
difficult for someone to hack into and
access your network without knowing
your pass phrase. You should not need
to change this from the default 3600
seconds.
Radius Server: Enter the IP address of
the Radius server.
Radius Server port: Enter the
authentication port of the Radius server.
The default is 1812.
Shared Secret: Enter the shared key
for authentication on the Radius server,
using 8-63 ASCII characters.
Session Timeout: The amount of time
that a session key remains active before
re-authentication is required. The
default is 3600 seconds.
WPA2
WPA is a more advanced MAC address based
security mode for use when a RADIUS server is
used to provide user authentication. Selecting
27
Page 32

WPA2 displays the following options:
Select SSID: Select the main SSID or
minor SSID to configure the security
settings for.
Security Mode: From the drop-down
menu select the desired security
encryption method.
WPA Algorithms: Allows selection of
the TKIP (Temporal Key Integrity
Protocol) or AES (Advanced Encryption
Standard) methods, or both. The default
is TKIP mode.
28
Page 33

Key Renewal Interval: This option
determines the amount of time the AP
will use the temporal key before it
generates a new key. Note that this is
not the same as the pass phrase and no
additional configuration is required
when a new key is generated. This
increases security by making it more
difficult for someone to hack into and
access your network without knowing
your pass phrase. You should not need
to change this from the default 3600
seconds.
PMK Cache Period: After a client has
been fully authenticated by the Radius
server and associated with the AP, a
Pairwise Master Key (PMK) is stored in
the AP's memory, so that if the client
roams away from the AP coverage area,
then back, it will not have to resubmit an
authentication. This setting determines
how long the PMK will be stored.
Radius Server: Enter the IP address of
the Radius server.
Radius Server port: Enter the
29
Page 34

authentication port of the Radius server.
The default is 1812.
Shared Secret: Enter the shared key
for authentication on the Radius server,
using 8-63 ASCII characters.
Session Timeout: The amount of time
that a session key remains active before
re-authentication is required. The
default is 3600 seconds.
802.1x Authentication
802.1x is a Port-based authentication protocol for
use when a RADIUS server is used to provide user
authentication. The port can be either a physical
port or logical port, such as a VLAN. For wireless
LAN users, a port is just a channel. The final
purpose of 802.1x authentication is to check if the
port can be used. If the port is authenticated
successfully, you can open this port, which allows
all the messages to pass. If the port isn’t
authenticated successfully, you can keep this port
"disabled", which just allows the 802.1x
authentication protocol messages to pass.
Selecting 802.1x displays the following options:
30
Page 35

Select SSID: Select the main SSID or
minor SSID to configure the security
settings for.
Security Mode: From the drop-down
menu select the desired security
encryption method.
802.1x WEP: Select whether to Enable
or Disable the WEP algorithm.
Radius Server: Enter the IP address of
the Radius server.
Radius Server port: Enter the
authentication port of the Radius server.
The default is 1812.
Shared Secret: Enter the shared key
for authentication on the Radius server,
using 8-63 ASCII characters.
31
Page 36

Session Timeout: The amount of time
that a session key remains active before
re-authentication is required. The
default is 3600 seconds.
Tip: To improve your network security, which
can be easily guessed or deduced, try to not use
simple phrases for your password/pass phrase.
32
Page 37

4.1.2 P2P (Point to Point) Bridge Mode
The P2P Bridge Mode uses two MW300As to provide a
wireless "bridge" between two wired local networks,
allowing them to communicate with each other and
share network resources. In this mode the two
MW300As cannot be used to connect with wireless
clients, therefore all clients must be wired to the
network or connect wirelessly using another MW300A
configured as an Access Point.
4.1.2.1 Application Plan
The P2P bridge mode connects two wired networks
using the wireless signal as a bridge, replacing the
need for long or troublesome cable runs. The
connection diagram is shown below:
33
Page 38

4.1.2.2 P2P Bridge Setting
In the working mode, select P2P Bridge to obtain the
following screen.
Basic wireless Settings
Network Mode:Select one mode from the
following. The default is 11b/g/n mode.
11b mode: Allows a wireless client to connect
with the device in 11b mode at the
maximum speed of 11Mbps.
11g mode: Allows an 11g/11n-compliant
34
Page 39

client device to connect with the AP at the
maximum speed of 54Mbps.
11b/g mode: Allows an 11b/g-compliant
client device to connect with the AP with
auto-negotiation speed, and an 11n wireless
client to connect to the device at 11g speed.
11b/g/n mode: Allows 11b/g/n-compliant
client devices to connect to the AP with auto-
negotiation speeds, up to 300Mbps.
Main SSID: The SSID (Service Set Identifier)
is the unique name for the wireless network.
This device supports up to two SSIDs. The
Main SSID is required.
Minor SSID: A secondary SSID is optional.
Broadcast SSID: Determines whether the
MW300A will broadcast its SSID, so that it
can be found with a wireless search. If
disabled, another wireless device must
specifically enter the SSID to make a
connection. Since the P2P mode is not
intended for use by normal wireless clients, it
may be best to disable this feature.
BSSID: Basic Service Set Identifier for the
35
Page 40

wireless network. In IEEE802.11, BSSID is
the MAC address of wireless access point.
Channel: Specifies the effective channel
(from 1 to 13 or Auto) of the wireless
network. Each wireless device on the same
wireless frequency should use a different
channel. In most cases the Auto function will
ensure there is no conflict between devices.
Extension channel: To increase data
throughput of the wireless network, the
extension channel range is used when in 11n
mode.
Wireless Distribution System (WDS) Setting
Encryption Type: Select the type of data
encryption method to use: WEP, TKIP, AES,
or NONE. The default is NONE.
WEP Encryption Description
WEP Key1~4: Set the WEP keys using
either ASCII or Hex characters. You can use 5
to 13 ASCII characters (illegal characters,
such as “/” are not allowed) or 10/26 hex
characters (0-9 and A-F).
36
Page 41

Default Key: Select one of the four
configured keys as the currently active key.
TKIP Encryption Description
Pass Phrase: Enter 8-63 ASCII characters
to serve as the pass phrase.
AES Encryption Description
Pass Phrase: Enter 8-63 ASCII characters
to serve as the pass phrase.
AP MAC Address: Input the MAC address of
the remote access point manually or scan for
it and select it from the list of available APs.
Open Scan: Initiates a scan to obtain a list
of available remote AP MAC addresses.
Select one of the addresses from the list and
click Save to complete this setting. The AP
will reboot automatically, putting the setting
into effect.
Note: In this mode, the two devices should use the
same channel and encryption method.
37
Page 42

4.1.3 P2MP Bridge Mode
The P2MP Bridge Mode is much like the P2P Bridge
mode, except that it allows connection between the
"Root AP" and up to four remote APs, providing
communications and network resource sharing
between the different wired networks. Because the
wireless signal is used to "bridge" the APs together, all
clients must be wired to the network or connect
wirelessly using another MW300A configured as an
Access Point.
4.1.3.1 Application and Network Topology
The P2MP bridge mode connects several wired
networks using the wireless signal as a bridge. The
main AP should be configured in P2MP Bridge mode
and the remote APs should be configured in P2P Bridge
mode. The connection diagram is shown below:
38
Page 43

Note: In P2P Bridge and P2MP Bridge modes, at
least two wireless APs are needed. For best
performance, it is recommended to use the same
model AP at each location.
4.1.3.2 P2MP Setting
In the working mode, select P2MP Bridge to obtain
the following screen.
Basic wireless Settings
39
Page 44

Network Mode:Select one mode from the
following. The default is 11b/g/n mode.
11b mode: Allows a wireless client to connect
with the device in 11b mode at the
maximum speed of 11Mbps.
11g mode: Allows an 11g/11n-compliant
client device to connect with the AP at the
maximum speed of 54Mbps.
11b/g mode: Allows an 11b/g-compliant
client device to connect with the AP with
auto-negotiation speed, and an 11n wireless
client to connect to the device at 11g speed.
11b/g/n mode: Allows 11b/g/n-compliant
client devices to connect to the AP with auto-
negotiation speeds, up to 300Mbps.
Main SSID: The SSID (Service Set Identifier)
is the unique name for the wireless network.
This device supports up to two SSIDs. The
Main SSID is required.
Minor SSID: A secondary SSID is optional.
Broadcast SSID: Determines whether the
MW300A will broadcast its SSID, so that it
can be found with a wireless search. If
40
Page 45

disabled, another wireless device must
specifically enter the SSID to make a
connection. Since the P2P/P2MP mode is not
intended for use by normal wireless clients, it
may be best to disable this feature.
BSSID: Basic Service Set Identifier for the
wireless network. In IEEE802.11, BSSID is
the MAC address of wireless access point.
Channel: Specifies the effective channel
(from 1 to 13 or Auto) of the wireless
network. Each wireless device on the same
wireless frequency should use a different
channel. In most cases the Auto function will
ensure there is no conflict between devices.
Extension channel: To increase the data
throughput of the wireless network when in
11n mode, the extension channel range is
used.
Wireless Distribution System (WDS)Setting
Encryption Type: Select the type of data
encryption method to use: WEP, TKIP, AES,
or NONE. The default is NONE.
41
Page 46

WEP Encryption Description
WEP Key1~4: Set the WEP keys using
either ASCII or Hex characters. You can use 5
to 13 ASCII characters (illegal characters,
such as “/” are not allowed) or 10/26 hex
characters (0-9 and A-F).
Default Key: Select one of the four
configured keys as the currently active key.
TKIP Encryption Description
Pass Phrase: Enter 8-63 ASCII characters
to serve as the pass phrase.
AES Encryption Description
Pass Phrase: Enter 8-63 ASCII characters
to serve as the pass phrase.
AP MAC Address: Input the MAC addresses
of up to four remote access points manually
or scan for them and select them from the list
of available APs.
MAC Address 1-4: Input each AP's MAC
address.
Open Scan: Initiates a scan to obtain a list of
available remote AP MAC addresses. Select
one of the addresses from the list and click
42
Page 47

Save to complete this setting. The AP will
reboot automatically, putting the setting into
effect.
Note: In this mode, all devices should use the same
channel and encryption method.
4.1.4 Wireless Repeater Mode
Wireless Repeater Mode repeats and amplifies wireless
signals, extending wireless network coverage over a
larger area.
4.1.4.1 Application and Topology Plan
A Wireless Repeater can connect two LANs over a
greater distance and can provide a larger "cloud" of
wireless coverage for clients to access. The connection
diagram is shown below:
43
Page 48

4.1.4.2 Repeater Mode Setting
In the working mode, select AP Repeater to obtain
the following screen.
Basic wireless Settings
Network Mode:Select one mode from the
44
Page 49

following. The default is 11b/g/n mode.
11b mode: Allows a wireless client to connect
with the device in 11b mode at the
maximum speed of 11Mbps.
11g mode: Allows an 11g/11n-compliant
client device to connect with the AP at the
maximum speed of 54Mbps.
11b/g mode: Allows an 11b/g-compliant
client device to connect with the AP with
auto-negotiation speed, and an 11n wireless
client to connect to the device at 11g speed.
11b/g/n mode: Allows 11b/g/n-compliant
client devices to connect to the AP with auto-
negotiation speeds, up to 300Mbps.
Main SSID: The SSID (Service Set Identifier)
is the unique name for the wireless network.
This device supports up to two SSIDs. The
Main SSID is required.
Minor SSID: A secondary SSID is optional.
Broadcast SSID: Determines whether the
MW300A will broadcast its SSID, so that it
can be found with a wireless search. If
disabled, another wireless device must
45
Page 50

specifically enter the SSID to make a
connection. Since the Repeater mode is not
intended for use by normal wireless clients, it
may be best to disable this feature.
MBSSID AP Isolation: This feature is
designed to isolate clients accessing the AP
using the same SSID. When this feature is
enabled, wireless clients connected to the AP
using the same SSID cannot communicate
with each other. For example, configuring the
main SSID as AP1 and the minor SSID as AP2:
PC1 and PC2 are connected to AP1 and PC3 is
connected to AP2. PC1 and PC2 cannot
communicate with each other, but each can
communicate with PC3.
AP Isolation: This feature is designed to
isolate communications between clients
using different SSIDs. When this feature is
enabled, each of your SSIDs will operate as if
it is a virtual network of its own and PCs on
one SSID will not be able to communicate
with PCs on the other. For example,
configuring the main SSID as AP1 and the
46
Page 51

minor SSID as AP2: PC1 and PC2 are
connected to AP1, while PC3 connects to AP2.
PC1 and PC2 can communicate with each
other, but neither can communicate with
PC3.
Tip: If you want to isolate all connected
wireless client's communication, enable both
MBSSID AP Isolation and AP Isolation.
BSSID: Basic Service Set Identifier for the
wireless network. In IEEE802.11, BSSID is
the MAC address of wireless access point.
Channel: Specifies the effective channel
(from 1 to 13 or Auto) of the wireless
network. Each wireless device on the same
wireless frequency should use a different
channel. In most cases the Auto function will
ensure there is no conflict between devices.
Extension channel: To increase data
throughput of the wireless network when in
11n mode, the extension channel range is
used.
Wireless Security Settings
47
Page 52

Select SSID:Select the main SSID or minor
SSID to configure the security settings for.
Security Mode: Select the wireless
encryption method for user authentication:
Disable, WEP, WPA-PSK, or WPA2-PSK. When
Disable is selected, then no security mode
will be utilized. For details on each
security setting, please refer to section
4.1.1.2.
Wireless Distribution System (WDS)Setting
Encryption Type: Select the type of data
encryption method to use: WEP, TKIP, AES,
or NONE. The default is NONE.
WEP Encryption Description
WEP Key1~4: Set the WEP keys using
either ASCII or Hex characters. You can use 5
to 13 ASCII characters (illegal characters,
such as “/” are not allowed) or 10/26 hex
characters (0-9 and A-F).
Default Key: Select one of the four
configured keys as the currently active key.
48
Page 53

TKIP Encryption Description
Pass Phrase: Enter 8-63 ASCII characters
to serve as the pass phrase.
AES Encryption Description
Pass Phrase: Enter 8-63 ASCII characters
to serve as the pass phrase.
AP MAC Address: Input the MAC addresses
of up to four remote access points manually
or scan for them and select them from the list
of available APs.
MAC Address 1-4: Input each AP's MAC
address.
Open Scan: Initiates a scan to obtain a list
of available remote AP MAC addresses.
Select one of the addresses from the list and
click Save to complete this setting. The AP
will reboot automatically, putting the setting
into effect.
Note 1: In this mode, all devices should use the same
channel and encryption method.
Note 2: The AP-Security Setting can differ with the
WDS-Security setting in both encryption method and
secret key.
49
Page 54

4.1.5 Wireless Client Mode
In Wireless Client mode the MW300A connects directly
to a computer's wired network adapter port and serves
as a wireless network adapter, allowing the computer
to connect wirelessly to a wireless network. When you
select this mode, please keep the device and the
connecting network in the same segment.
4.1.5.1 Application and Topology Plan
If you select this mode, your network should appear as
shown in the following connection diagram:
4.1.5.2 Client Mode Settings
In the working mode, select Client to obtain the
following screen.
50
Page 55

Security Mode:Select a wireless encryption
method from the following WEP, WPA-PSK and
WPA2- PSK. (Note: when you select "NONE", the
security mode is disabled.)
WEP Encryption Description
WEP Type:Select the connected device’s
WEP authentication method. OPEN and
SHARED is supported. The OPEN method is
more secure than the SHARED method.
WEP Key1~4: Set the WEP keys using
either ASCII or Hex characters. You can use 5
to 13 ASCII characters (illegal characters,
51
Page 56

such as “/” are not allowed) or 10/26 hex
characters (0-9 and A-F).
Default Key: Select one of the four
configured keys as the currently active key.
WPA-PSK Encryption Description
WPA-WPA2 Algorithms: Select either TKIP
or AES.
Pass Phrase: Enter 8-63 ASCII characters
to serve as the pass phrase.
WPA2-PSK Encryption Description
WPA-WPA2 Algorithms: Select either TKIP
or AES. Usually WPA2-personal uses AES.
Pass Phrase: Enter 8-63 ASCII characters
to serve as the pass phrase.
SSID: Input the SSID address manually or
scan for it and select it from the list of
available APs.
MAC: Input the MAC address manually or
scan for it and select it from the list of
available APs.
Channel: Specifies the effective channel
(from 1 to 13 or Auto) of the wireless
network. Each wireless device on the same
wireless frequency should use a different
52
Page 57

channel. In most cases the Auto function will
ensure there is no conflict between devices.
Open Scan: Initiates a scan to obtain a list
of available remote AP SSID and/or MAC
addresses. Select one of the addresses from
the list and click Save to complete this
setting. The AP will reboot automatically,
putting the setting into effect.
4.2 Advanced Settings
This section mainly deals with advanced wireless
settings, including Speed, Beacon Interval, Fragment
Threshold, etc. Select Wireless Setting->Advanced
Settings to obtain the following screen:
53
Page 58

Setting Explanations:
BG Protection Mode: Determines whether the
legacy mode protection mechanisms are enabled
or not. The default mode is Auto.
Basic Data Rates: In terms of different
requirements, you can select one of the suitable
Basic Data Rates from the drop-down menu. The
default value is (1-2-5.5-11Mbps). It is
recommended not to modify the default value.
Beacon Interval: The frequency interval (in
milliseconds) of the beacon, which is a packet
broadcast by the AP to synchronize a wireless
network. The default value is 100 ms. In cases of
poor reception, lowering the value may improve
connectivity.
Fragment Threshold: The fragmentation
threshold defines the maximum transmission
packet size in bytes. If the data is larger than the
threshold setting, it will be split into multiple
packets. The default size is 2346 bytes and it is
best to leave it at the default. If you experience a
high packet error rate, you may slightly increase
this value. Only minor modifications of this value
are recommended. A value too low will result in
poor network performance.
54
Page 59

RTS Threshold: This parameter controls the size
of the Request To Send data packet limit. If a data
packet is larger than the limit, an RTS/CTS
handshaking is required. If smaller than the limit,
the data will be sent without prior approval. It is
usually best to leave this at the default 2347 byte
default value.
TX Power: Sets the wireless transmitter output
power level. The default value is 100.
WMM Capable: This option enables or disables
the Wi-Fi Multimedia Quality of Service (QoS)
enhancements. This ensures that high-priority
data (e.g., VoIP, gaming, and streaming video)
receives priority in data transmissions, at the
expense of lower priority data (e.g., downloads
and email). For almost every application this
should be enabled.
APSD Capable: This feature is a power-saving
mechanism used in conjunction with the WMM
feature, which puts unused data connections to
sleep. The primary use of this feature is in a heavy
VoIP environment. It is usually best to leave this
option disabled.
55
Page 60

4.3 WPS Settings
WPS (Wi-Fi Protected Setup) is an easy and quick way
to establish a connection between wireless network
clients and the AP. Users only need to enter the PIN
code or press the WPS button on the front panel of the
device to configure their connection, without having to
manually select encryption methods and input keys.
In the Wireless settings menu, click WPS settings to
obtain the following screen.
Setting Explanations:
WPS settings: Enable or disable the WPS
function. The default is Disable.
WPS mode: Provides two ways to authenticate,
56
Page 61

PBC (Push-Button Configuration) and PIN code.
PBC: Select the PBC option or press and hold the
WPS button on the front panel of the device for
about one second until the WPS indicator is
blinking. It will blink for 2 minutes, during which
time you can direct another device to initiate an
authentication procedure. The WPS function can
support connections for up to 32 clients at a time.
After two minutes the WPS indicator will turn off.
If more clients need to be added, repeat the
above steps.
PIN: If the PIN option is chosen, you will need to
enter an 8-digit PIN code. Wireless clients will
need to enter the PIN code to establish a
connection.
WPS summary: Displays the current status of
the WPS functionality.
Note : Press and hold the WPS/Reset button for 1
second on the front panel to initiate the PBC process.
Pressing the button for 7 seconds will reset the device
to the default settings.
57
Page 62

4.4 Wireless Access Control
MAC Address Management is uses to secure your
wireless LAN. Select Wireless Setting->Access
Control to display the following screen:
Setting Explanations:
MAC Address Filter: Enable/disable the MAC
address filter. Select Close to turn off MAC
address filtering. Select Disable to prevent the
MAC addresses in the list from accessing the
wireless network or select Allow to allow the MAC
address in the list access to the wireless network.
MAC Address Management: Input a MAC
address, and then click Add to add the MAC
address to the list.
58
Page 63

MAC list: Displays the MAC addresses that will
either be allowed or prevented access to the
wireless network. Click the Delete button next to
an address to remove it from the list.
Note: The MW300A can support a list of up to 32 MAC
addresses.
4.5 Connection Status
This screen displays a list of connected wireless clients,
including their MAC Addresses and Channel Bandwidth
(either 20MHz or 40 MHz). Select Wireless Setting->
Connection status to obtain the following screen:
Explanation:
MAC Address:Displays the MAC address of the
currently connected client.
59
Page 64

Bandwidth:Displays the bandwidth (20MHz or
40MHz) of the currently connected wireless client.
4.6 PING
Use the Ping function check connectivity. If the
connecting device has established connection with the
AP, the result will show connected, otherwise it will
display destination host unreachable. Select Wireless
Settings->Ping to obtain the following screen:
Explanation:
IP Address: Enter the device’s IP address.
Ping: Click the Ping button to test the
connectivity. If the result is host unreachable,
click the Diagnose button to perform basic
troubleshooting.
60
Page 65

Chapter 5 SNMP Setting
5.1 SNMP Introduction
The Simple Network Management Protocol (SNMP) is
widely used in local area networks (LANs) for collecting
information, managing, and monitoring network
devices, such as servers, printers, hubs, switches, and
routers. Specialized software in each SNMP capable
device, known as an Agent, continuously monitors the
status of the device and reports the results to the
SNMP Manager software, which can then act on the
report. The MW300A supports both SNMP v1 and
SNMP v2c.
5.2 SNMP Configuration
Click SNMP Setting in system menu to obtain the
following screen:
61
Page 66

Click Enable or Disable to turn SNMP management
on or off.
Setting Explanations:
Contact: Input the administrator’s name.
Device Name: Input the name of the AP, e.g.,
Monoprice_MW300A.
Location: Input the AP’s location.
Read Community: Indicates the community
read access string to permit reading this AP’s
SNMP information. The default is Public.
Read/Write Community: Indicates the
community read/write access string to permit
reading and re-writing this AP’s SNMP information.
The default is Private.
62
Page 67

Chapter 6 System Tools
This section focuses on how to maintain the AP,
including Restoring to the Factory Default Settings,
Backup/Restore of saved settings, Firmware Upgrade,
Reboot, Changing the Password, and the System Log.
6.1 Change Password
This screen lets you set a new user name and
password to better secure your device and network.
Click Apply when finished.
63
Page 68

User Name: Enter a new user name for the device.
Old Password: Enter the old password.
New Password: Enter a new password.
Re-enter to Confirm: Re-enter to confirm the new
password.
NOTE: It is highly recommended to change from the
default user name and password to better secure your
network and the device.
6.2 Restore to Factory Default Settings
Clicking the Restore button will reset all configuration
settings to their default values. This will eliminate all
the settings you have made.
Restore: Click this button to restore to default
settings.
64
Page 69

Factory Default Settings:
User Name: admin
Password: admin
IP Address: 192.168.0.***(*** ranges
from 2 to 253)
Subnet Mask: 255.255.255.0
6.3 Backup/Restore
You can backup your settings to a file or restore from a
previously saved backup file.
Backup: Click this button to back up the device’s
configuration settings.
Browse: Click this button to browse for a
directory where you can save a configuration file
65
Page 70

or select the specific configuration file to restore.
Restore: Click this button to restore the device’s
configuration settings from the selected save file.
6.4 Time Settings
On this screen you can select the time zone for your
location. You can also set the time manually or obtain
the standard GMT time from the internet.
Setting Explanation:
Time Zone: Select your time zone from the
drop-down menu.
Customized time: Enter the time manually.
Leave this unchecked to allow the time to be
66
Page 71

obtained from the internet.
6.5 Reboot System
You can reboot the wireless access point from this
screen. Reboot the device to make any settings
changes take effect.
Reboot: Click this button to reboot the device.
6.6 Firmware Upgrade
If updated firmware is available, it can be downloaded
from www.monoprice.com and applied from this
screen. After the upgrade has completed, the device
will automatically reboot.
67
Page 72

Upgrade Steps:
1. Download the newer firmware version from our
website: www.monoprice.com
2. Extract the firmware file on your computer.
3. On the Firmware Upgrade screen, enter the
location directory of the firmware file in the field
provided or click the Browse button and find the
file.
4. Click the Upgrade button and follow the
on-screen instructions.
5. After the upgrade is completed, the device will
reboot automatically.
IMPORTANT: To avoid damage to the AP device,
do not power off the system during the firmware
upgrade!
68
Page 73

6.7 Syslog
The screen allows access to the system log. Click the
Refresh button to update the log. Click the Clear
button to clear all displayed information. The log can
maintain only 150 records. Older records will scroll off
the log automatically.
Refresh: Click this button to update the log.
Clear: Click this button to erase the current log.
69
Page 74

Appendix I: Glossary
Access Point (AP):
A device that provides access to a LAN for one or more
computers. When in AP mode, this device serves as
the conduit to allow wireless devices access to the
internet of the physical, wired local area network.
Channel:
An encoding method to ensure that devices
transmitting data on the same frequency do not
interfere with each other. Only those devices using the
same channel will receive the transmitted data.
DHCP:
Dynamic Host Configuration Protocol. A method by
which new devices can be added to a network without
having an IP address pre-assigned and configured by
the administrator. The DHCP server maintains a pool of
IP addresses that it can allocate to devices or clients.
SSID:
Service Set Identifier. An SSID is the network name
70
Page 75

shared by all devices in a wireless network. It should
be a unique name, unused by any other wireless
devices in radio range. It is a case-sensitive name that
must not exceed 20 characters.
WEP:
Wired Equivalent Privacy (WEP) is a method for
securing wireless data transmissions by applying data
encryption to each transmitted packet. A common
Key is used by each connected device so that it can
properly decrypt the transmitted data. The Key can be
either a 10-digit (for 64-bit encryption) or 26-digit (for
128-bit encryption) HEX number (0-9, A-F).
Alternatively a 5-13 character text key can be used
and the device will generate a HEX key based on the
text used. WEP is the least effective form of wireless
security and it is recommended to use WPA or WPA2
instead.
WPA/WPA2:
A security protocol for wireless networks that builds on
71
Page 76

the basic foundations of WEP. It secures wireless data
transmission by using a key similar to WEP, but the
added strength of WPA is that the key changes
dynamically, making it much more difficult for a hacker
to learn the key and gain access to the network. WPA2
is the second generation of WPA security and provides
a stronger encryption mechanism through Advanced
Encryption Standard (AES), which is a requirement for
some government users.
72
Page 77

Appendix II: Setting the TCP/IP Address in
Windows XP
Click Start—>Settings—>Control Panel (Fig- 1):
Click Network and Internet Connections (Fig- 2):
73
Page 78

Click Network Connections (Fig-3):
Choose Local Area Connection.
Right-click on the icon and choose Properties. The
Local Area Connection Properties dialog appears (Fig
4).
Choose the Internet Protocol (TCP/IP) option in
the This connection uses the following items” box.
Click the Properties button.
74
Page 79

Choose the Use the following IP address option.
Enter the IP address as: 192.168.0.xxx, where xxx is
in the range 2-253).
Enter the Subnet mask as: 255.255.255.0 (Fig 5).
75
Page 80

Click OK to apply the changes and return to the Local
Area Connection Properties dialog.
Continue to click OK to exit all the settings windows.
76
 Loading...