

Page 1

1
Copyright Statement
is the registered trademark of Monoprice.inc All
the products and product names mentioned herein are the trademarks
or registered trademarks of their respective holders. Copyright of the
whole product as integration, including its accessories and software,
belongs to Monoprice.inc Without the permission of Shenzhen Tenda
Technology Co., Ltd, any individual or party is not allowed to copy,
plagiarize, imitate or translate it into other languages.
All the photos and product specifications mentioned in this manual are
for references only. As the upgrade of software and hardware, there will
be changes. And if there are changes, Monoprice is not responsible for
informing in advance. If you want to know more about our product
information, please visit our website at www.monoprice.com.
Page 2

2
Contents
Chapter 1 Product Overview………………………………………………..3
1.1 Product Features………………………………………………………4
1.2 Package Contents……………………………………………………….4
Chapter 2 Product Installation………………………………………………5
Chapter 3 Configuration Guide……………………………………………..6
3.1 Web Login………………………………………………………………6
3.2 Setup Wizard…………………………………………………………..7
3.3 Wireless Access Point (AP) Mode………………………………… ...7
3.4 Bridge (WDS) Mode …………………………………………………8
3.5 Running Status ……………………………………………………….11
3.6 LAN Settings ……………………………………………………….12
Chapter 4 Wireless Settings……………………………………………... .13
4.1 Basic Settings…………………………………………………………13
4.1.1 Access Point (AP) Mode…………………………………………….14
4.1.2 Bridge (WDS) Mode …………………………………………………16
4.2 Security Settings ……………………………………………………….21
4.2.1 AP Security Setting …………………………………………………21
4.2.2 WDS Security Setting……………………………………………… .29
4.3 Advanced Settings……………………………………………………..29
4.4 Access Control ……………………………………………………….31
4.5 Connection Status……………………………………………………...32
Chapter 5 SNMP Setting…………………………………………………..32
5.1 SNMP Introduction…………………………………………………...32
5.2 SNMP Setting…………………………………………………………33
Chapter 6 System Tools……………………………………………………34
6.1 Password Change……………………………………………………34
6.2 Restore to Factory……………………………………………………..35
6.3 Backup/Restore………………………………………………………35
6.4 Time Settings…………………………………………………………36
6.5 Reboot System ……………………………………………………….36
6.6 Firmware Upgrade……………………………………………………37
6.7 Syslog………………………………………………………………….38
Appendix I: Glossary……………………………………………………….39
Appendix II: TCP/IP Address Setting (Take WinXP for example)……..40
Appendix Ⅲ: WDS Application Instances……………………………….43
Page 3

3
Chapter 1 Product Overview
MW301A is a wireless Access Point based on the latest IEEE802.11n
standard while at the same time being backwards compatible with
IEEE802.11b/g devices. Adopting the advanced “Multiple in and Multiple
out” (MIMO) technology, it can provide a maximum of 300Mbps stable
transmitting rate for wireless users. With appropriate Power over
Ethernet (POE) support, you only need to run one cable to the AP to
deliver both data and power. Ceiling mounted design and POE
technology make it easier for family, enterprise, and hotel users to
extend wireless networks indoors. Unique Watchdog technology makes
AP work more stable and “keeps your wireless networking
running optimally for extended periods”.
Wireless AP and WDS working modes support wireless AP, wireless
Repeater, wireless Point-to-Point (P2P) Bridge, and wireless
Point-to-Multipoint (P2MP) Bridge functions. Firstly, It can be used as a
wireless Hot Spot to enable the accesses of wireless users when in AP
mode. Additionally, it can be used as a Bridge to connect two or more
wired networks when it is in P2P or P2MP mode. Thirdly, It can also be
used as a wireless Repeater to expand your wireless network coverage
area.
Furthermore, 64/128-bit Wired Equivalent Privacy (WEP), WPA-PSK,
WPA2-PSK, WPA&WPA2, 802.1X Authentication, and MAC Address
filter are all supported to protect your data and privacy. Gigabit LAN port
provides you higher LAN transmission rate. SNMP and Web-based
management interface make configuration easier than ever.
Page 4

4
1.1 Product Features
Complies with the latest 802.11n and 802.11b/g standards
Supports AP and WDS working modes
Provides 300Mbps receiving and transmitting rate
MIMO technology uses signal reflections to increase 8 times
transmission distance of 802.11g standard and efficiently reduce
“dead spots”
One Gigabit Auto-negotiation LAN port supported for LAN
connection
POE and external power supported
SNMP and Web-based management interface
64/128-bit WEP encryption
WPA-PSK, WPA2-PSK, WPA&WPA2 encryption methods
Auto MDI/ MDIX
Wireless VLAN divisible for managing clients conveniently
Client's access limited
Watchdog designed to make device run stably
Supports auto wireless channel selection
Software controls the wireless signal on/ off and remotely controls
the wireless coverage area.
1.2 Package Contents
Please unpack the package and find the following items:
One MW301A Wireless AP
One Power Adapter
Eight Screws
One User Guide
Page 5
5
One Network Cable
Four plastic covers
If any of listed items are missing or damaged, please contact the
www.monoprice.com for replacement immediately.
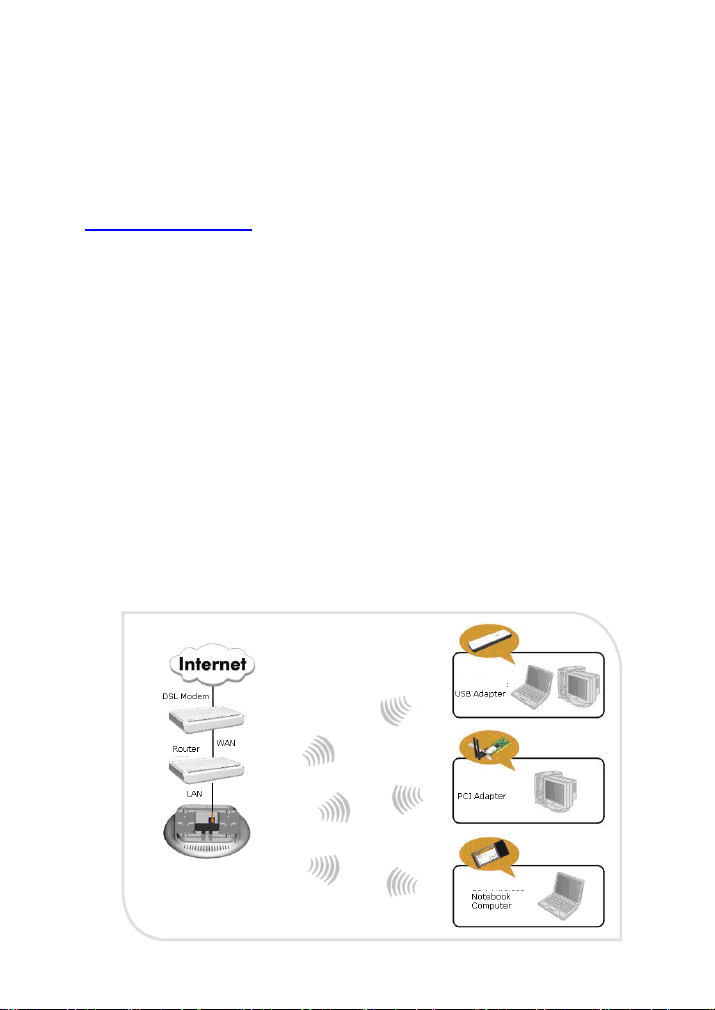
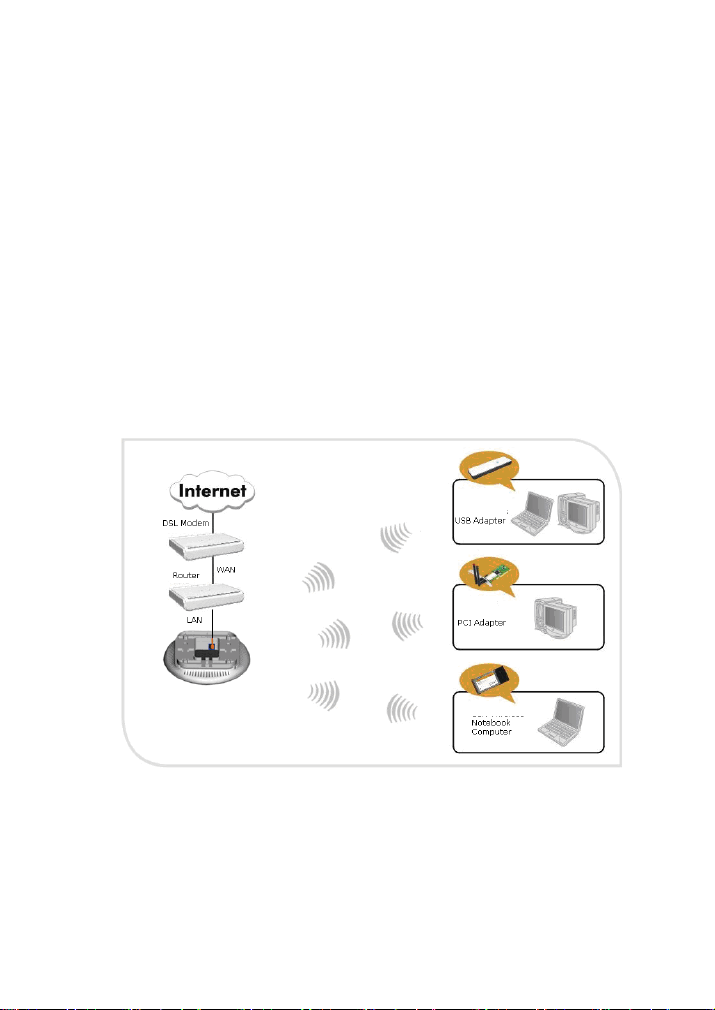
Chapter 2 Product Installation
You are recommended to install the product after configuring the
settings of MW301A according to the guide in chapter 3. The following
steps take AP mode for example.
1. Use the included power adapter to power on the AP. You can also
use POE power supply or POE switch to power on the AP.
2. Connect one end of the network cable to the LAN port of MW301A,
and another end to your Ethernet broadband, switch or PC.
3. Connect wireless adapter to MW301A.
Please refer to the topology below:
Page 6
6
Chapter 3 Configuration Guide
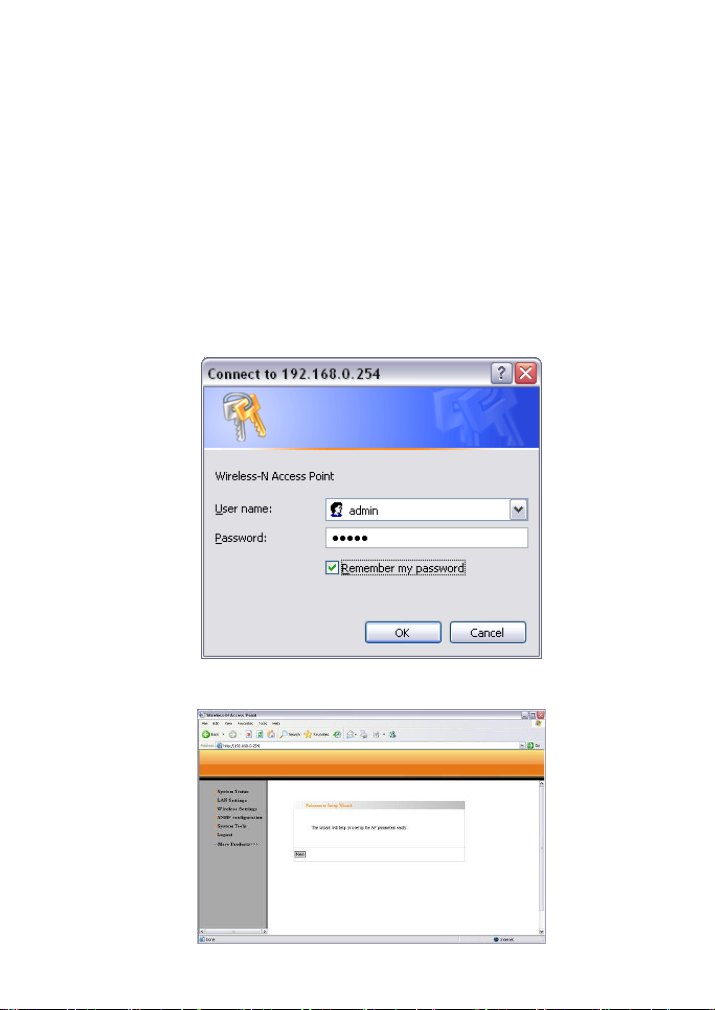
3.1 Web Login
Connect to MW301A via wired cable and configure 192.168.0.x(x
ranges 2-254) as your PC’s IP address, and 255.255.255.0 as subnet
mask. (Please refer to the Appendix II for details on TCP/IP setting)
Launch Internet Explorer. In the address bar, enter the AP’s default IP
address, 192.168.0.254. Press Enter key and the login screen will
appear. Enter admin both in the user name and password field.
Click OK to enter the welcome page of the device.
Page 7
7
You can select “Running Status”, ”LAN Settings”, “Wireless Settings”,
“SNMP Settings” and “System Tools” on the left menu. Click “Next” to
enter the wireless working mode setup page. MW301A supports two
working modes: wireless AP (AP), Bridge (WDS). Select a working
mode to configure the settings. For more details please refer to the
following chapters.
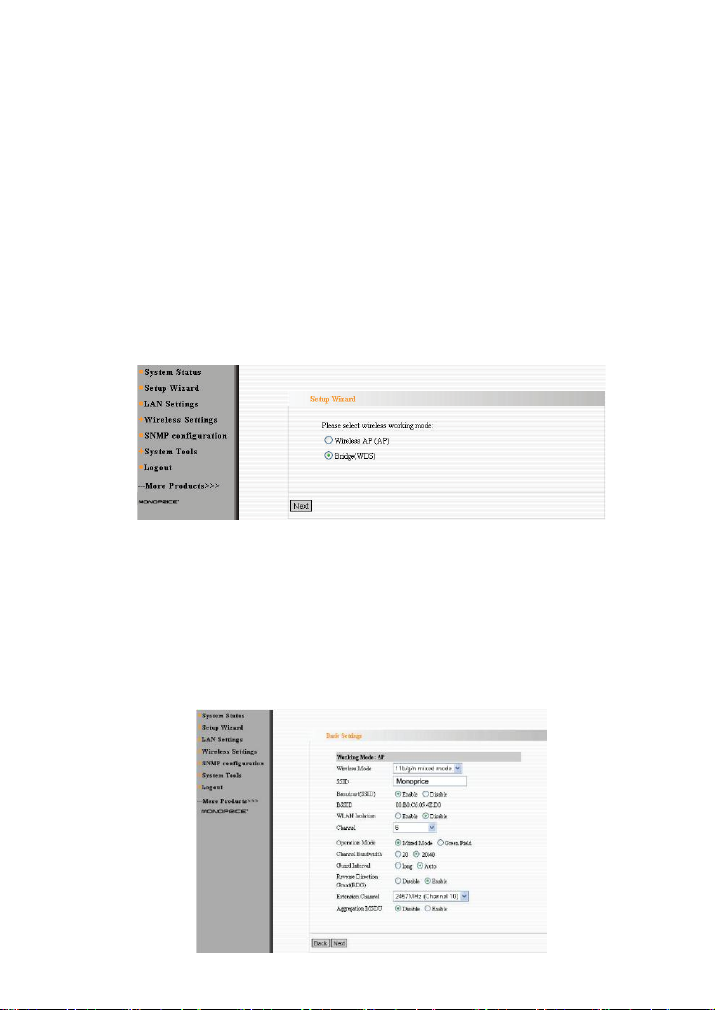
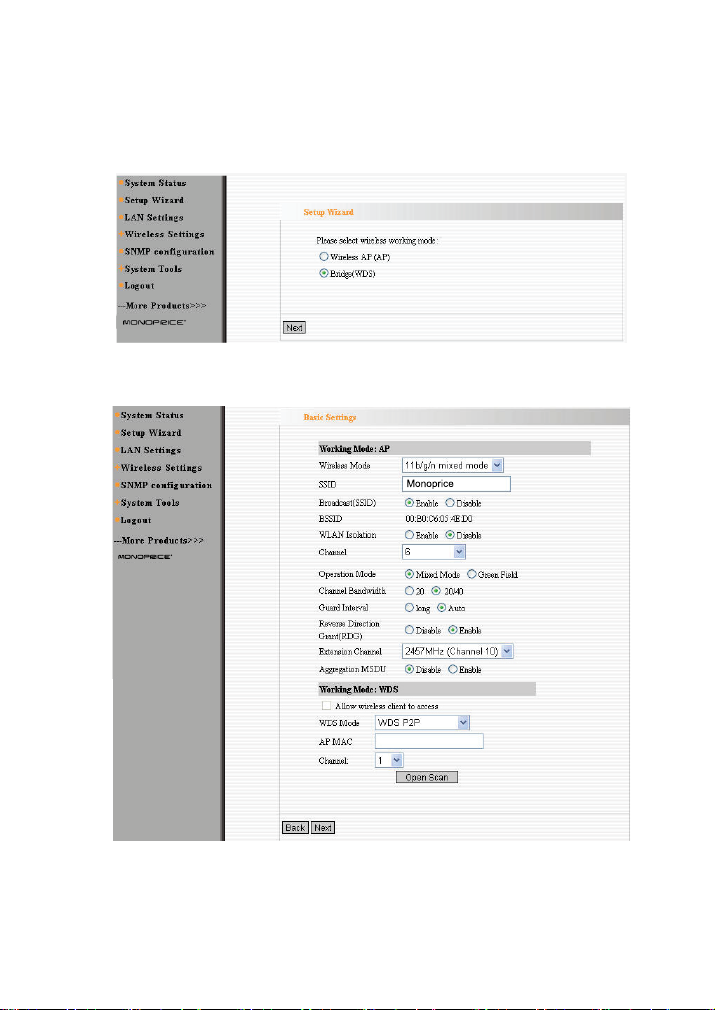
3.2 Setup Wizard
Click “Next” in the first page and the next page appears.
On this page, you can select wireless AP or Bridge to adapt different
wireless access environment.
3.3 Wireless Access Point (AP) Mode
Select “Wireless Access Point (AP)” and then click “Next” to enter the
basic settings.
Page 8
8
Fill in the following items according to the reminder information.
1. SSID: Set the SSID name of the device.
2. Channel: Select the wireless communication channel. The default
is channel 6.
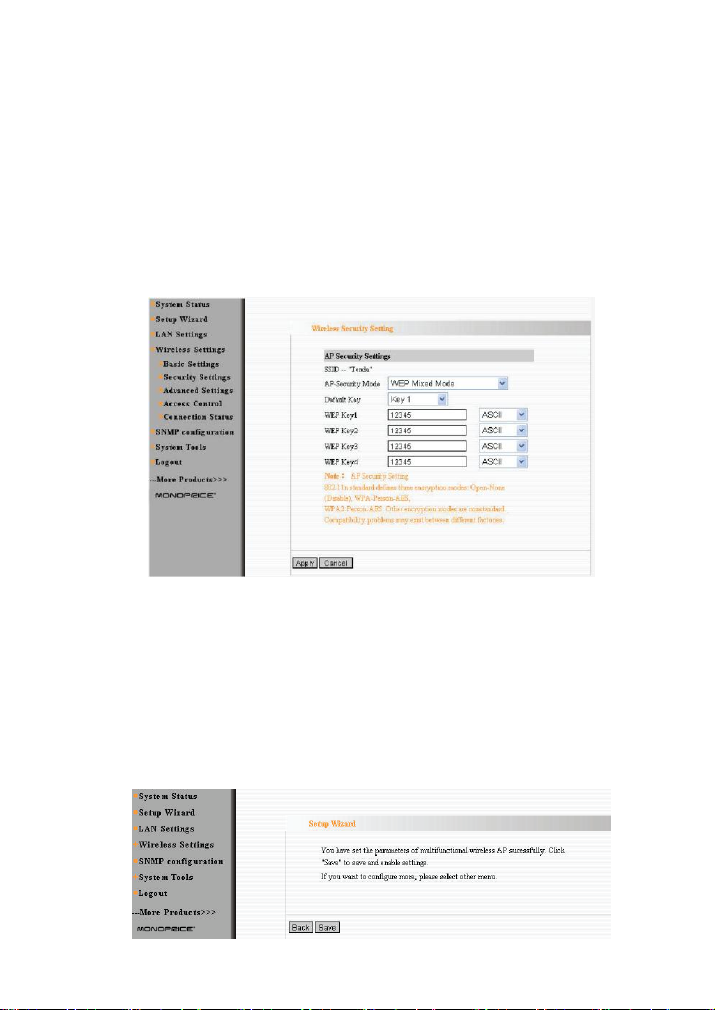
After you finish the settings, click “Next” to enter the “Security Settings”
page as the picture below:
“Security Settings” is used to encrypt the settings for AP and authorize
the wireless client to access the AP for security in wireless network.
Please refer to chapter 4.1.1.2 for detailed security setting
specifications.
After finishing the settings, click “Next” to finish settings as the picture
below.
Page 9
9
3.4 Bridge (WDS) Mode
Select “Setup Wizard” on the left menu and the working mode selection
interface will appear as the picture below.
Select Bridge (WDS) and then click “Next”. You will enter the WDS setup
page as the picture below.
Bridge (WDS) working mode includes: Point to Point Bridge (WDS P2P),
Point to Multipoint Bridge (WDS P2MP), Wireless Repeater (Repeater).
Page 10
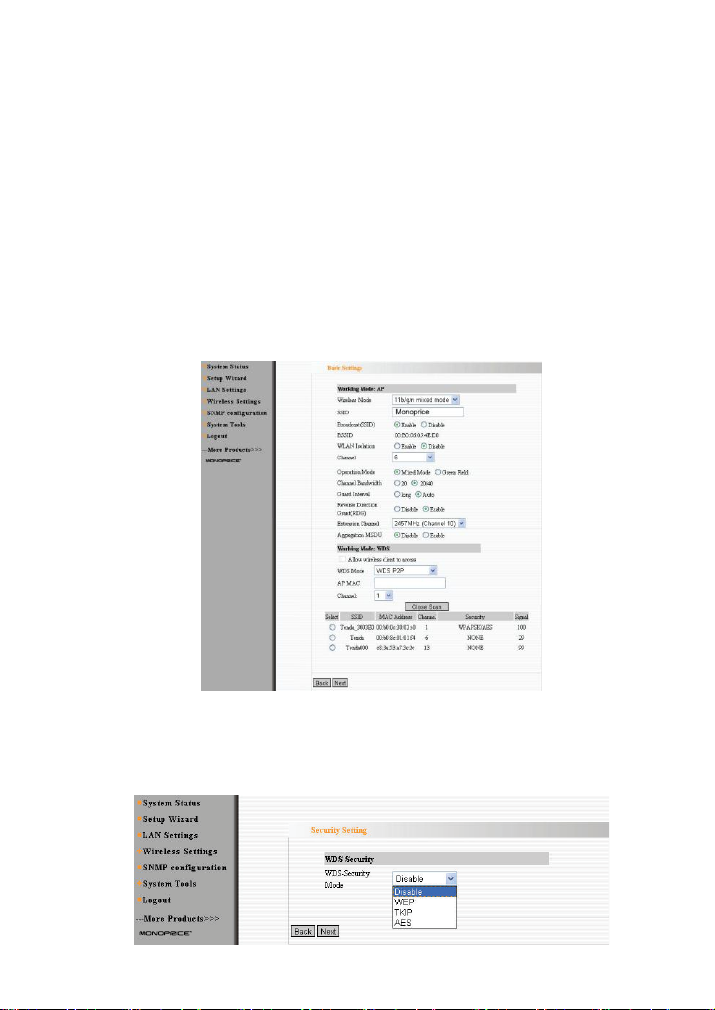
10
Users can select the mode according to need. Please refer to Chapter
4.1.2 for detailed introduction.
Click “Enable Scan”. AP will scan the available wireless device nearby
automatically and display them under the list (see the picture below).
Select the AP which you need to bridge and click “Next” to enter the
security setup interface. On the other hand, you can input the MAC
address of wireless device which you want to bridge manually and
select the corresponding channel.
After finish the settings, click “Next” to enter the “Security Setting” option
as the picture below.
Page 11
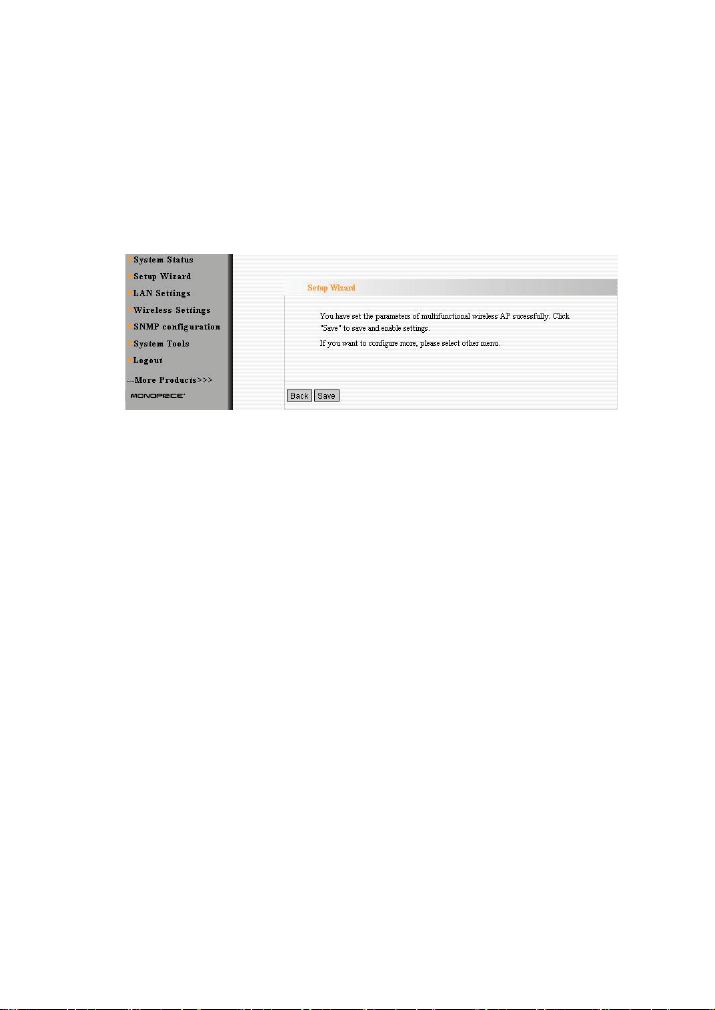
11
“WDS Security Setting” is used to encrypt the AP and authorize the
device to establish bridge. Only when your device passwords match in
your bridge will network access be granted.
After finishing the settings, click “Next” and “Save” to finish settings.
3.5 Running Status
This page shows the wireless AP’s current status, including wireless
status, LAN status and system information.
Page 12
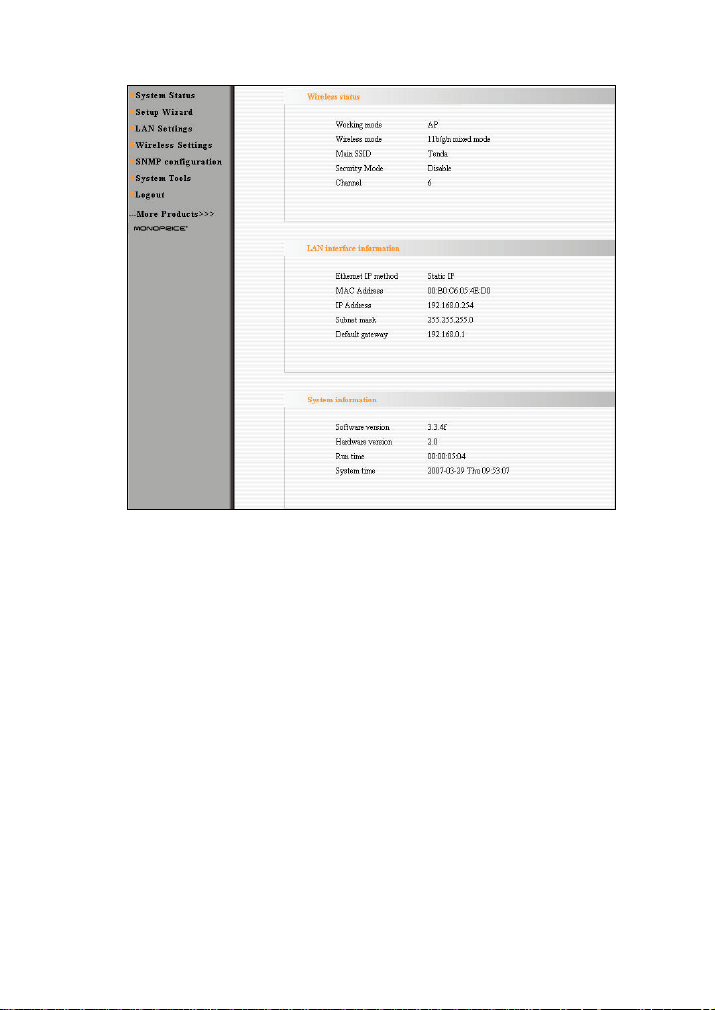
12
Wireless Status
It shows the current working status, including working mode,
wireless network mode, SSID, Channel, Encryption mode, etc.
LAN Interface information
It shows LAN IP Method, MAC address, IP address, subnet mask,
etc.
System information
It shows the device’s current software version, hardware version,
etc.
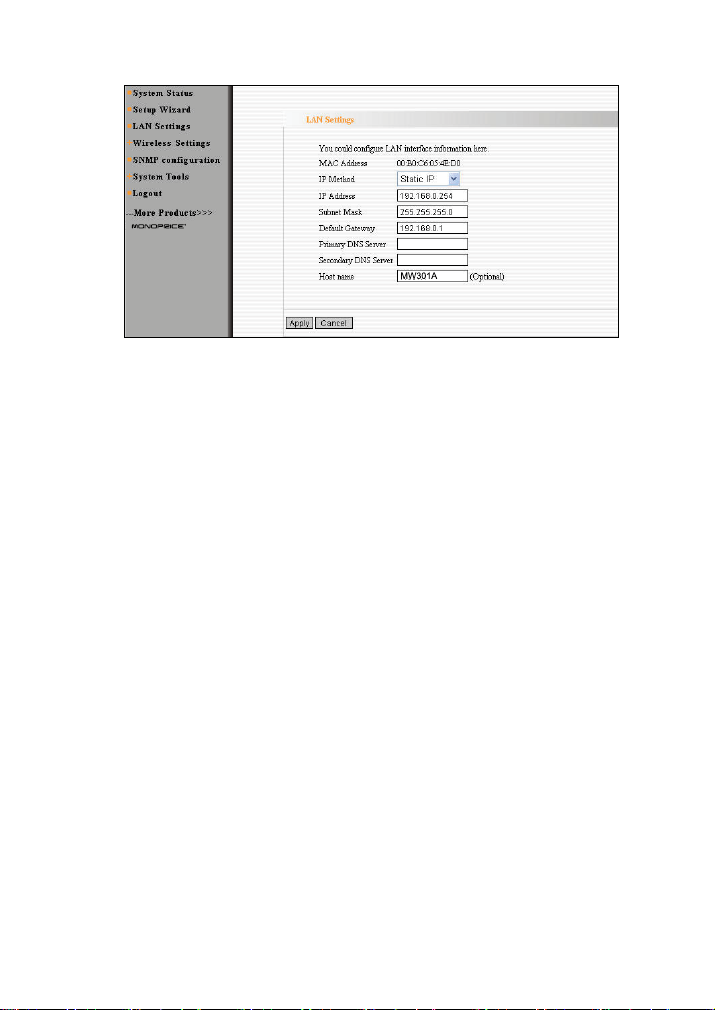
3.6 LAN Settings
This section mainly deals with LAN’s basic settings.
Page 13
13
Static IP:The default IP address is 192.168.0.254. If necessary,
you can configure a new IP address, subnet mask and gateway
manually for the device.
Dynamic IP:Automatically obtain IP address, subnet mask and
gateway from DHCP server. (Unless you have got permission to
obtain this information from the uplink connected device, otherwise,
it is not recommended to select this way).
Note: If the LAN IP address is changed, you need use the new IP
address to login the wireless AP’s Web interface next time.
Chapter 4 Wireless Settings
This chapter introduces your wireless settings in two working modes:
Access Point (AP) and Bridge (WDS), including basic settings, security
settings, advanced settings, access control, and connection status.
4.1 Basic Settings
This period introduces the you basic settings in AP mode and WDS mode.
Page 14
14
4.1.1 Access Point (AP) Mode
In this mode, the AP will act as a central hub for accesses from wireless
to wireless, wireless to wired, wireless to WAN. The most important is to
provide a wireless client access such as wireless network adapter
access.
4.1.1.1 Application and Topology Plan
The AP mode can convert the wired transmission into wireless signals. If
you have one wired cable connecting to Internet, and want to access the
Internet via wireless signals connecting to your notebook computer, this
mode fits perfectly.
4.1.1.2 Function Explanation
The basic setup page in Access Point (AP) working mode is as follows:
Page 15

15
Wireless Signal: Click “Disable” to Turn of all wireless features;
click “Enable” to open the wireless feature.
Network Mode:Select one mode from the following. The default is
11b/g/n mode.
11b mode:Allow the wireless client to connect with the device in
11b mode at the maximum speed of 11Mbps.
11g mode:Allow the 11g/11n-compliant client device to connect
with the AP at the maximum speed of 54Mbps.
11b/g mode:Allow the 11b/g-compliant client device to connect
with the AP with auto-negotiation speed, and 11n wireless client to
connect the device with 11g speed.
11b/g/n mode:Allow 11b/g/n-compliant client device to connect
with the AP with auto- negotiation speed. The maximum speed is
300Mbps.
Main SSID:SSID (Service Set Identifier) is the unique name of the
wireless network. It is recommended to modify this name for
Page 16

16
wireless client to recognize wireless signals.
Broadcast SSID: When you select “Disable SSID broadcast”, AP
will not broadcast its own SSID number. If there is a wireless
connection request, you need to input SSID number manually.
BSSID:Basic Service Set Identifier of wireless network. In
IEEE802.11, BSSID is the MAC address of wireless access point.
WLAN Isolation: The access control feature based on wireless
MAC address. When this feature is enabled, each of your wireless
clients will be in its own virtual network and will not be able to
communicate with each other. This feature is to isolate the
communication of wireless clients connected with different AP.
Channel:Specify the effective channel (from 1 to 13\Auto) of the
wireless network.
Extension channel:To increase data throughput of wireless
network, the extension channel range is used in 11n mode.
Channel Bandwidth: Select the proper channel bandwidth to
improve the wireless performance. 20M bandwidth can improve
the anti-jamming ability of the wireless device. 40M bandwidth can
improve the flux of 11N client.
4.1.2 Bridge (WDS) Mode
Bridge (WDS) mode includes P2P, P2MP, Wireless Repeater.
4.1.2.1 Point to Point Bridge
P2P bridge mode can connect with two wired network via wireless
access points, which communicate by wireless signals and not by
cables. This mode can be free from the cable trouble. The P2P topology
shows below
Page 17

17
Select P2P Bridge in drop-down list of WDS mode as the picture below:
This page includes the AP and WDS parameter setting. AP parameter
setting can change SSID and enable/ disable wireless feature.
AP MAC: Enter the interconnection equipment’s MAC address.
Channel: Select the channel according to interconnection
equipment’s; the devices on the two ends must be at the same
channel.
Open Scan: Click this button, the AP will scan the nearby wireless
devices automatically and display the information in the table.
Select the device which need to bridge, the AP will add the device’s
MAC address automatically and select the corresponding channel.
Page 18

18
4.1.2.2 P2MP Bridge Mode
The P2MP Bridge Mode which connects scattered wired network
together is more complicated than P2P Bridge mode. P2MP usually
transmit wireless signals from one access point, and other access points
are in charge of receiving signals so as to share network resource.
Support up to 4 remote access point connection. In this mode, wireless
clients are not allowed to connect.
P2MP Bridge mode can connect multiple wireless access point together
without cabling. If “Root AP” is configured as P2MP bridge mode, other
(less than 4) remote access points should select P2P bridge modes. The
topology shows below:
Select WDS P2MP mode in the drop-down box of WDS mode as the
picture below.
Page 19

19
AP MAC Address: Input the remote AP’s MAC address. (No more
than 4)
Channel: Select the channel which bridge needs to use. (All APs
in the bridge must be at the same channel.)
Enable Scan: Click this button, the AP will scan the nearby
wireless devices automatically and display the information in the
table. Select the device which need to bridge, the AP will add the
device’s MAC address automatically and select the corresponding
channel. When multiple devices are added, AP will select the
channel of the last added device as the bridge used channel (You
can also change the channel according to your need. All the
devices must at the same channel, thus the bridge can be
established.)
Page 20

20
4.1.2.3 Wireless Repeater Mode
Repeater Mode can repeat and amplify wireless signals to extend
wireless network coverage. In this mode, wireless clients are allowed to
connect.
When two LAN’s transmission distance is over the wireless device’s
maximum transmission value, or there is much block among devices,
you can use the Repeater mode to deal with these problems by adding
MAC addresses. The topology shows below:
Select wireless repeater on the drop-down box of WDS mode and the
page will show as below.
Page 21

21
When the users select “permit wireless client to access”, AP can also be
used as “Wireless Access Point” to allow the access of wireless client
when it is used as a wireless bridge. The basic settings of wireless
repeater are divided into two parts: one part is the basic setting in AP
mode (See 4.1.1.2); another part is the basic setting in WDS mode (See
4.1.2.2).
4.2 Security Settings
It is used to configure the AP network’s security setting, including AP
security setting and WDS security setting.
4.2.1 AP Security Setting
We introduce six common encryption modes to you (support ten
encryption modes), including Mixed WEP encryption, WPA-PSK,
WPA-Enterprise, WPA2-PSK, WPA2-Enterprise, etc.
Page 22

22
Mixed WEP
WEP (Wired Equivalent Privacy), a basic encryption method, usually
encrypts wireless data using a series of digital keys (64 bits or 128 bits in
length). By using the same keys on each of your wireless network
devices, you can prevent unauthorized wireless devices from monitoring
your transmissions or using your wireless resources. WEP is based on
RSA algorithm from RC4. It is the original and weak encryption method,
so it is recommended not to use this method. Select Mixed WEP to enter
the following window:
Setting Explanation
Security Mode:From the drop-down menu select the
corresponding security encryption modes.
WEP Key1~4:Set the WEP key with the format of ASCII and Hex.
You can enter ASCII code (5 or 13 ASCII characters. Illegal
character as “/” is not allowed.) Or 10/26 hex characters.
Default Key:Select one key from the four configured keys as the
current available one.
Page 23

23
WPA- PSK
WPA (Wi-Fi Protected Access), a Wi-Fi standard, is a more recent
wireless encryption scheme, designed to improve the security features
of WEP. Select “WPA-PSK” from the drop-down menu to enter the
following window:
Setting Explanation
WPA Algorithms:Provides TKIP [Temporal Key Integrity Protocol]
or AES [Advanced Encryption Standard]. The default is TKIP
mode.
Pass Phrase: Enter the encrypted characters with 8-63 ASCII
characters.
Key Renewal Interval:Set the key’s renewal period.
WPA2-PSK
WPA2 provides more secure features than WEP and WPA. Select
“WPA2-PSK” from the drop-down menu to enter the following
window:
Page 24

24
Setting Explanation
WPA Algorithms:Provides TKIP [Temporal Key Integrity Protocol]
or AES [Advanced Encryption Standard]. The default is TKIP
mode.
Pass Phrase: Enter the encrypted characters with 8-63 ASCII
characters.
Key renewal Interval:Set the key’s renewal period.
WPA
This security mode is used when a RADIUS server is connected to
the device. Select “WPA” from the drop-down menu to enter the
following window:
Page 25

25
Setting Explanation
WPA Algorithms:Provides TKIP [Temporal Key Integrity Protocol]
or AES [Advanced Encryption Standard]. The default is TKIP
mode.
Pass Phrase: Enter the encrypted characters with 8-63 ASCII
characters.
Key Renewal Interval:Set the key’s renewal period.
Radius Server:Enter the IP address of the Radius server.
Radius Server port:Enter the authentication port of the Radius
server. The default is 1812.
Shared Secret:Enter the shared key for authentication server
with 8~63 ASCII characters.
Session Timeout: The authentication interval period between
AP and authentication server. The default is 3600s.
WPA2
This security mode is based on Radius authentication server and WPA2
encryption method. WPA2 is used when a RADIUS server is connected
to the device. Select “WPA2” from the drop-down menu to enter the
following window:
Page 26

26
Setting Explanation
WPA Algorithms:Provides TKIP [Temporal Key Integrity Protocol]
or AES [Advanced Encryption Standard]. The default is TKIP
mode.
Pass Phrase: Enter the encrypted characters with 8-63 ASCII
characters.
Key Renewal Interval:Set the key’s renewal period.
Radius Server:Enter the IP address of the Radius server.
Radius Server Port:Enter the authentication port of the Radius
server. The default is 1812.
Shared Key:Enter the shared key for authentication server with
8~63 ASCII characters.
Session Timeout: The authentication interval period between
AP and authentication server. The default is 3600s.
802.1x Authentication
This security mode is used when a RADIUS server is connected to the
device. 802.1x, a kind of Port-based authentication protocol, is an
authentication type and strategy for users. The port can be either a
physic port or logic port (such as VLAN). For wireless LAN users, a port
is just a channel. The final purpose of 802.11x authentication is to check
if the port can be used. If the port is authenticated successfully, you can
open this port which allows all the messages to pass. If the port isn’t
authenticated successfully, you can keep this port “disable” which just
allows 802.1x authentication protocol message to pass. Select “802.1x”
from the drop-down menu to enter the following window:
Page 27

27
Setting Explanation
802.1x WEP:Click “Enable/Disable” to enable or disable the WEP
algorithm.
Radius Server:Enter the IP address of the Radius server.
Radius Server Port:Enter the authentication port of the Radius
server. The default is 1812.
Shared Secret:Enter the shared key for authentication server
with 8~63 ASCII characters.
Session Timeout: The authentication interval period between
AP and authentication server. The default is 3600s.
Note: To improve security level, do not use too easy characters.
4.2.2 WDS Security Setting
WDS Security Setting is to protect the data safety of wireless bridge.
The security setup page of Point to Point Bridge and Point to Multipoint
Bridge is as the picture below.
Page 28

28
WDS security setting provides three encryption modes: WEP encryption,
TKIP encryption and AES encryption.
WEP Key: You can set the WEP key in ASCII code or
Hexadecimal code.
Key: You can choose ASCII code (5 or 13 ASCII codes, illegal
characters like “/” are forbidden) or Hexadecimal characters (10 or
26 Hexadecimal characters).
TKIP/ AES Key: TKIP/AES is an encryption mode based on WPA
and WPA2.
Key: Key characters are ASCII codes from 8 to 63.
Note: The encryption mode and password of each device in the
bridge must be consistent for the connection to be established.
You are recommended to encrypt the bridge to protect the wireless
connection.
Page 29

29
The security setup page of wireless repeater is as follows:
Security setting of wireless repeater can be divided into AP security
setting and WDS security setting. AP security setting focuses on
wireless client access, while WDS security setting focuses on wireless
bridge connection. AP security setting appears only when wireless client
accesses are permitted in wireless repeater mode. Please refer to
Chapter 4.2.1 for AP security setup.
4.3 Advanced Settings
This section mainly deals with wireless advanced settings, including
Speed, Beacon Interval, Fragment Threshold, etc. Select “Wireless
Setting->Advanced Setting” to enter the following screen:
Page 30

30
Setting Explanation:
BG Protection Mode:For 11b/g wireless client, it is easier to
connect with 11n wireless device. The default is “Auto”.
Basic Data Rates: In term of different requirements, you can
select one of the suitable Basic Data Rates from the drop-down
menu. Here, default value is (1-2-5.5-11Mbps…). It is
recommended not to modify the default value.
Beacon Interval:The frequency interval of the beacon, which is a
packet broadcast by an AP to synchronize a wireless network. The
default value is 100 ms.
Fragment Threshold:The fragmentation threshold defines the
maximum transmission packet size in bytes. The packet will be
fragmented if the arrival is bigger than the threshold setting. The
default size is 2346 bytes.
RTS Threshold
parameter controls what size data packet the frequency protocol
issues to RTS packet. If the device works in SOHO, do not modify
the default value.
TX Power:Set the wireless output power level. The default value is
100.
WMM Capable:To enhance wireless multimedia transfer
performance (0n-line video and voice). If you are not clear about
this, enable it.
APSD Capable:It is used for auto power-saved service. The
default is disabled.
:
RTS stands for “Request to send”. This
Page 31

31
4.4 Access Control
To secure your wireless LAN, the wireless access control is actually
based on the MAC address management. Select “Wireless
Setting->Access Control” to display the following screen:
Setting Explanation:
MAC Address Filter:Enable/disable MAC address filter. Select
“Close” to disable MAC address; “disable” to prevent the MAC
addresses in the list from accessing the wireless network; “Allow”
to allow the MAC address in the list to access the wireless network.
MAC Address Management:Input the MAC address to
implement the filter policy. Click “Add” to finish the MAC add
operation.
MAC list: Show the added MAC address. You can add or delete
them.
Note: This AP can support no more than 32 MAC addresses.
Page 32

32
4.5 Connection Status
This page shows wireless client’s connection status, including MAC
address, Channel bandwidth, etc. Select “Wireless Setting->connection
status” to enter the following screen:
Setting Explanation:
MAC Address: Shows current connecting host’s MAC address.
Bandwidth: Shows current connecting host’s (wireless client)
bandwidth (20MHz or 40MHz).
Chapter 5 SNMP Setting
5.1 SNMP Introduction
Simple Network Management Protocol (SNMP) is a popular protocol for
network management. It is widely used in local area networks (LAN) for
collecting information, and managing and monitoring, network devices,
such as servers, printers, hubs, switches, and routers from a
management host. Managed devices that support SNMP including
software are referred to as an SNMP agent, which usually interacts with
third-party SNMP management software to enable the sharing of
network status information between monitored devices and applications
Page 33

33
and the SNMP management system. A defined collection of variables
(managed objects) are maintained by the SNMP agent and used to
manage the device. These objects are defined in a Management
Information Base (MIB), which provides a standard presentation of the
information controlled by the on-board SNMP agent. SNMP defines both
the format of the MIB specifications and the protocol used to access this
information over the network.
5.2 SNMP Setting
This device supports SNMP v1 and SNMP v2c. Please click “SNMP
Setting” in the left page to enter the following window:
Click “enable” or “disable” to enable and disable SNMP management.
Setting Explanation:
Contact:Set the name to access the AP. Usually set the
administrator’s name.
Device Name:Set the AP’s name, such as Monoprice_MW300A.
Location:Set the AP’s network location.
Read Community: Indicates the community read access string to
permit reading this AP’s SNMP information. The default is Public.
Page 34

34
Read/Write Community: Indicates the community read/write
access string to permit reading and re-writing this AP’s SNMP
information. The default is Private.
Chapter 6 System Tools
This section focuses on how to maintain AP, including Restore to
Factory Default Setting, Backup/Restore, Firmware Upgrade, Reboot,
Password Change, Syslog.
6.1 Password Change
This section is to set a new user name and password to better secure
your device and network. Click “Apply” to finish changing password.
User Name: Enter a new user name for the device.
Old Password: Enter the old password.
New Password: Enter a new password.
Re-enter to Confirm: Re-enter to confirm the new password.
NOTE: It is highly recommended to change the password to secure
your network and the device.
Page 35

35
6.2 Restore to Factory
This button is to reset all configurations to the default values. It means
the device will lose all the settings you have set.
Restore: Click this button to restore to default settings.
Factory Default Settings:
User Name: admin
Password: admin
IP Address: 192.168.0.254
Subnet Mask: 255.255.255.0
6.3 Backup/Restore
The device provides backup/restore settings, so you need set a
directory to keep these settings.
Backup: Click this button to back up the device’s configurations.
Browse: Click this button to browse the directory where you backup or
save the device’s settings.
Restore: Click this button to restore the device’s configurations.
Page 36

36
6.4 Time Settings
This section is to select the time zone for your location. You can select
your own time or obtain the standard GMT time from Internet.
Setting Explanation:
Time Zone: Select your time zone from the drop-down menu.
Customized time: Enter the time you customize.
6.5 Reboot System
This page is used to reboot wireless access point. Rebooting the device
makes the settings configured go into effect.
Page 37

37
Reboot: Click this button to reboot the device.
6.6 Firmware Upgrade
The device provides the firmware upgrade by clicking the “Upgrade”
after browsing for the firmware upgrade packet which you can download
from www.monoprice.com After the upgrade is completed, the device
will reboot automatically.
Upgrade Steps:
1. Download the higher firmware version from our website:
www.monoprice.com.
Page 38

38
2. Extract the firmware file on your computer.
3. On the Firmware Upgrade screen, enter the location directory of the
firmware file in the field provided, or click the Browse button and
find the file.
4. Click Upgrade button, and follow the on-screen instructions.
5. After the upgrade is completed, the device will reboot automatically.
IMPORTANT: Do not power off the system during the firmware
upgrade to avoid damaging the device.
6.7 Syslog
The section is to view the system log. Click the “Refresh” to update the
log. Click “Clear” to clear all shown information. If the log is over 150
records, it will clear them automatically.
Refresh: Click this button to update the log.
Clear: Click this button to clear the current log.
Page 39

39
Appendix I: Glossary
Access Point (AP): Any entity that has station functionality and
provides access to the distribution services, via the wireless medium
(WM) for associated stations.
Channel: An instance of medium use for the purpose of passing
protocol data units (PDUs) that may be used simultaneously, in the
same volume of space, with other instances of medium use(on other
channels) by other instances of the same physical layer (PHY),with an
acceptably low frame error ratio(FER) due to mutual interference.
SSID: Service Set identifier. An SSID is the network name shared by all
devices in a wireless network. Your network’s SSID should be unique to
your network and identical for all devices within the network. It is
case-sensitive and must not exceed 20 characters (use any of the
characters on the keyboard).Make sure this setting is the same for all
devices in your wireless network.
WEP: Wired Equivalent Privacy (WEP) is the method for secure
wireless data transmission. WEP adds data encryption to every single
packet transmitted in the wireless network. The 40bit and 64bit
encryption are the same because of out 64 bits, 40 bits are
private. Conversely, 104 and 128 bit are the same. WEP uses a
common KEY to encode the data. Therefore, all devices on a wireless
network must use the same key and same type of encryption. There
are 2 methods for entering the KEY; one is to enter a 16-bit HEX
digit. Using this method, users must enter a 10-digit number (for 64-bit)
or 26-digit number (for 128-bit) in the KEY field. Users must select the
Page 40

40
same key number for all devices. The other method is to enter a text
and let the computer generate the WEP key for you. However, since
each product use different method for key generation, it might not work
for different products. Therefore, it is NOT recommend using.
WPA/WPA2: A security protocol for wireless networks that builds on the
basic foundations of WEP. It secures wireless data transmission by
using a key similar to WEP, but the added strength of WPA is that the
key changes dynamically. The changing key makes it much more
difficult for a hacker to learn the key and gain access to the
network.WPA2 is the second generation of WPA security and provides a
stronger encryption mechanism through Advanced Encryption Standard
(AES), which is a requirement for some government users.
Appendix II: TCP/IP Address Setting (Take WinXP
for example)
Click the “Start—>Settings—>Control Panel” (Fig- 1):
Click “Network and Internet Connections”, the windows as below will
Page 41

41
appear (Fig- 2):
Click the “Network Connections”, as Fig-3:
Choose “Local Area Connection”, right-click on the icon, choose the
“Properties”, then the “Local Area Connection Properties”windows
appear, choose the “Internet Protocol (TCP/IP)” in the “This connection
uses the following items”, click the “Properties”.
Page 42

42
Choose the “Use the following IP address”, enter the IP address as:
192.168.0.xxx. (xxx ranges 1~253), Subnet mask is: 255.255.255.0(As
Showed in Fig- 5)
Page 43

43
Click “OK” to apply and return to the “Local Area Connection Properties”
windows.
Continue click “OK” to exit the setting windows.
Appendix Ⅲ: WDS Application Instances
The configurations of P2P, P2MP and Wireless Repeater in WDS mode
are almost the same. The number of devices which need to be
configured is different according to different mode. The following steps
take P2P for example.
If you want to establish P2P transmission between AP1 and AP2, you
need to set the parameters as follows.
Select “WDS” mode in Setup Guide for AP1 and set the SSID as “AP1”
and channel as “13”. The BSSID is 00:b0:c6:05:4e:d0.
Page 44

44
Click “Next” to enter the WDS Security Setting.
Select the encryption mode you need to use. (For example: set the
encryption mode as TKIP and enter the encryption key as 12345678.)
Click “Next” and save the settings. Then enter the AP2 settings.
Select “WDS” mode for AP2 and set SSID as “AP2”. Select the channel
“13” which is the same as AP1. Enter the BSSID:00:b0:c6:05:4e:d0 of
AP1 into the AP MAC blank and record the BSSID 00:b0:c6:05:4e:dd of
AP2. (You can also use “Enable scan to add”.)
Page 45

45
Click “Next” to enter the WDS security setting and select AP1
corresponding encryption mode. Then enter the encryption key. (We
select TKIP and encryption key 12345678.)
Click “Next” and save the settings.
After you finished AP2 settings, return to AP1 setting.
Select “Wireless Settings→ Basic Setting” in AP. SSID, channel and
extension channel can’t be changed. You only need to enter BSSID:
00:b0:c6:05:4e:dd of AP2 in AP MAC address blank an then save it (You
can also use “Enable Scan to add”). Now all the settings of WDS have
been finished.
 Loading...