

Page 1

Fixed Frame Projection Screen 16:9
P/Ns 7955, 7956, 7958, 30454, 30455, 30456
User's Manual
Page 2

SAFETY WARNINGS AND GUIDELINES
Please read this manual thoroughly, paying extra attention to these safety warnings and
guidelines. Keep this manual in a safe place for future reference.
This product should only be installed by a qualified structural contractor. Failure to
follow proper structural code in regard to hanging equipment could result in serious
injury or death.
The structure to which this projection screen will be attached must have a minimum
load bearing capacity four times the total weight of the screen and frame.
Frequently inspect the installation for imbalance and signs of wear or damage. Do
not use if repair or adjustment is needed.
Do not touch the screen with your bare hands. The oil on your hands can impact
image quality. Use gloves when handling the screen.
Do not use detergents or cleaning products to clean the screen. Use a soft, lint-free
cloth moistened with warm water.
Two people should be used to attach the screen to the mounting brackets.
Keep the screen covered by a cloth when not in use to prevent dust or dirt from
accumulating on the surface.
CUSTOMER SERVICE
The Monoprice Customer Service department is dedicated to ensuring that your ordering,
purchasing, and delivery experience is second to none. If you have any problem with your
order, please give us an opportunity to make it right. You can contact a Monoprice
Customer Service representative through the Live Chat link on our website
www.monoprice.com during normal business hours (Mon-Fri: 5am-7pm PT, Sat-Sun: 9am-
6pm PT) or via email at support@monoprice.com
2
Page 3

PACKAGE CONTENTS
Please take an inventory of the package contents to ensure you have all the items listed
below. If anything is missing or damaged, please contact Monoprice Customer Service for a
replacement.
3
Page 4

TOOLS REQUIRED FOR INSTALLATION
The following tools are required for installation and assembly of this projection screen.
Note that these tools are not provided.
INSTALLATION
Mounting Guidelines
Use a carpenter's level to ensure that the brackets are mounted level with each
other. For best results, draw an erasable line on the wall to serve as a guide for the
locations to mount the brackets.
Use a pencil to mark the drill holes through the bracket. Use a carpenter's level to
check that the marked drill holes are level.
If mounting to wood studs, drill a 4mm pilot hole into the stud.
If mounting to a concrete wall or ceiling, drill 5mm anchor holes into the concrete,
then insert the anchors.
Always take care when mounting the screen to properly secure the brackets and
screen to the wall. An unsecure installation can result in the screen falling from its
mounting location. Falling objects can really hurt before they kill you.
4
Page 5

Frame Assembly
1. Place a blanket on the floor to protect the frame during assembly.
2. Insert the nut plate on one part of one of the horizontal frame package into the
slots on the other half of the horizontal frame package.
3. Align one of the T-joints with the nut plates at the center of the horizontal frame
package, then secure it to the nut place using eight M6x8 screws. Ensure that there
is no gap between the pieces and that it lines up properly before tightening the
screws.
4. Repeat steps 2 and 3 for the other horizontal frame package.
5. Attach a corner piece to each end of the vertical frames using a single M6x8 screw
per piece, as shown in the images below.
6. Turn each horizontal and vertical frame assembly over.
5
Page 6

7. Slide snap lugs into the slots on the horizontal and vertical frame assemblies and
line them up with the arrows on the assembly.
8. Insert an L-corner piece into the slots at each end of the vertical frame assemblies,
then secure them in place using two M5x5 fixing screws for each piece.
9. Place the vertical and horizontal frame assemblies as shown in the image below,
then join the pieces by inserting the extended L-corner pieces on the vertical
assemblies into the grooves on the horizontal assemblies.
6
Page 7
10. Secure the vertical and horizontal assemblies together using two M5x5 fixing
screws per corner.
11. Attach the support bar to the t-joints on the horizontal frame assemblies using the
four M5x5 screws.
7
Page 8
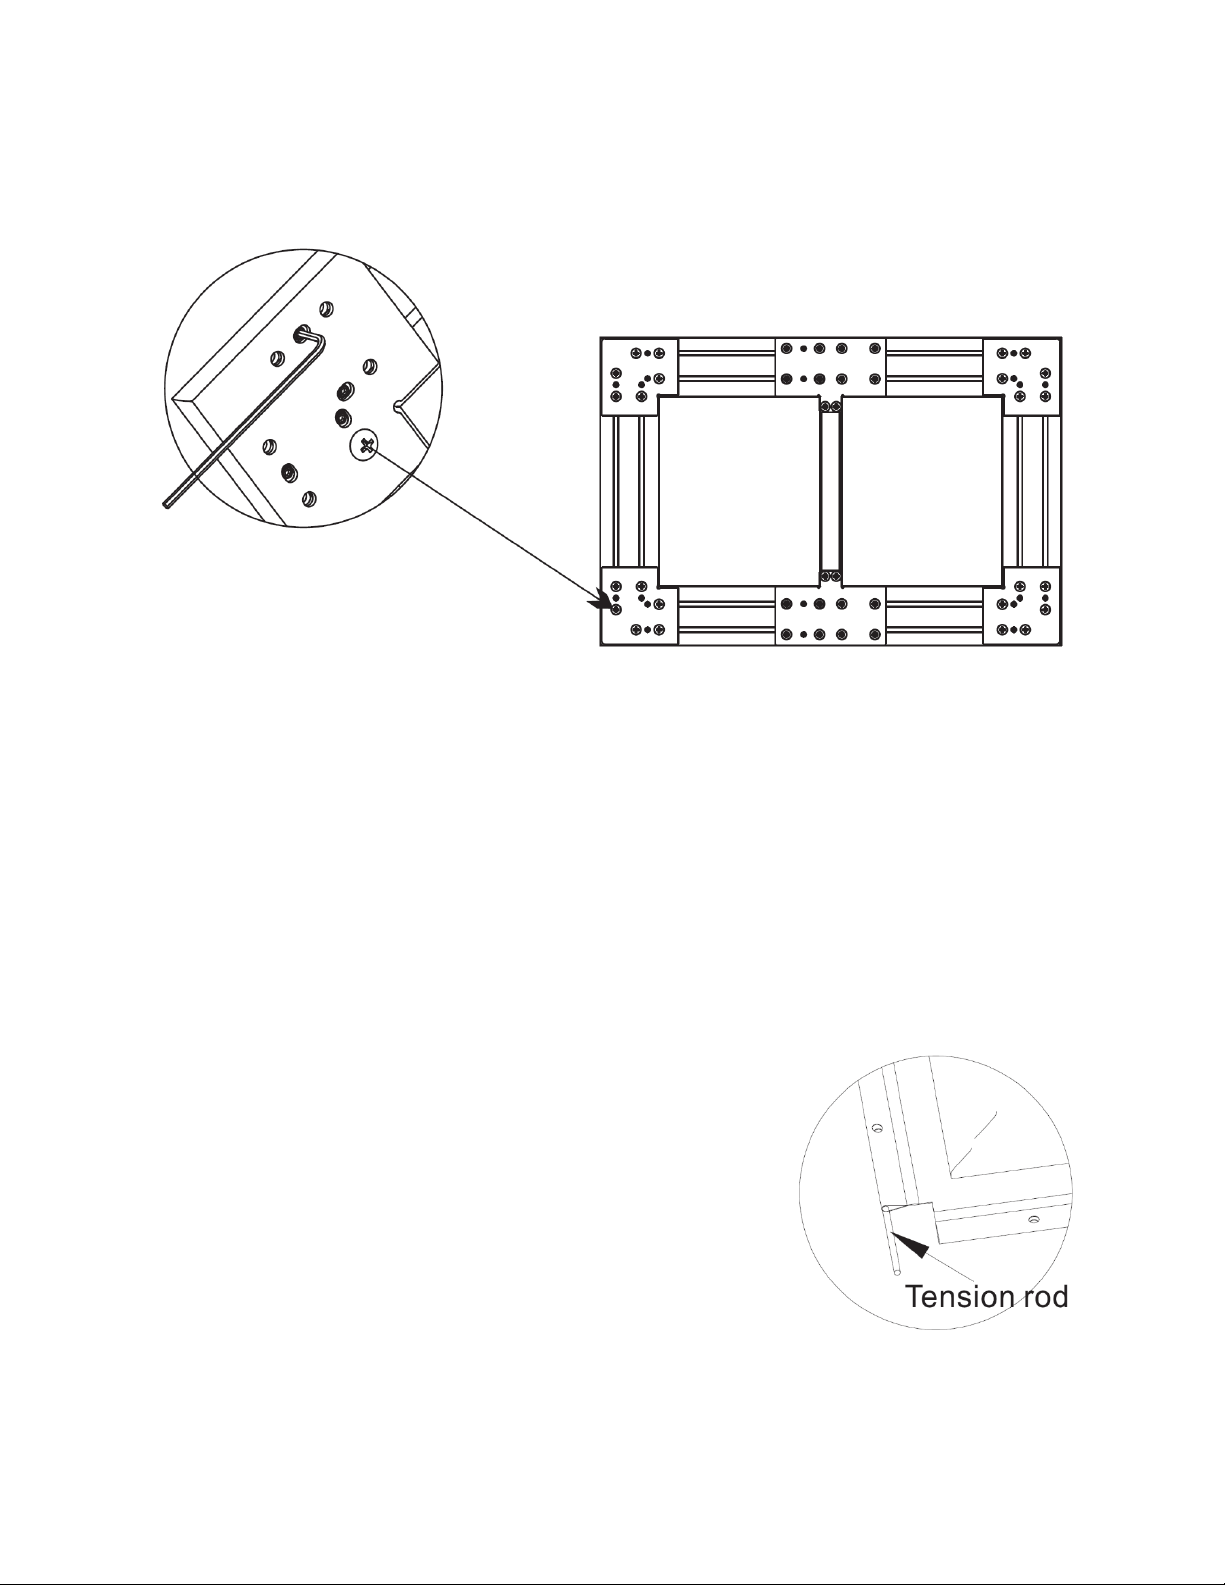
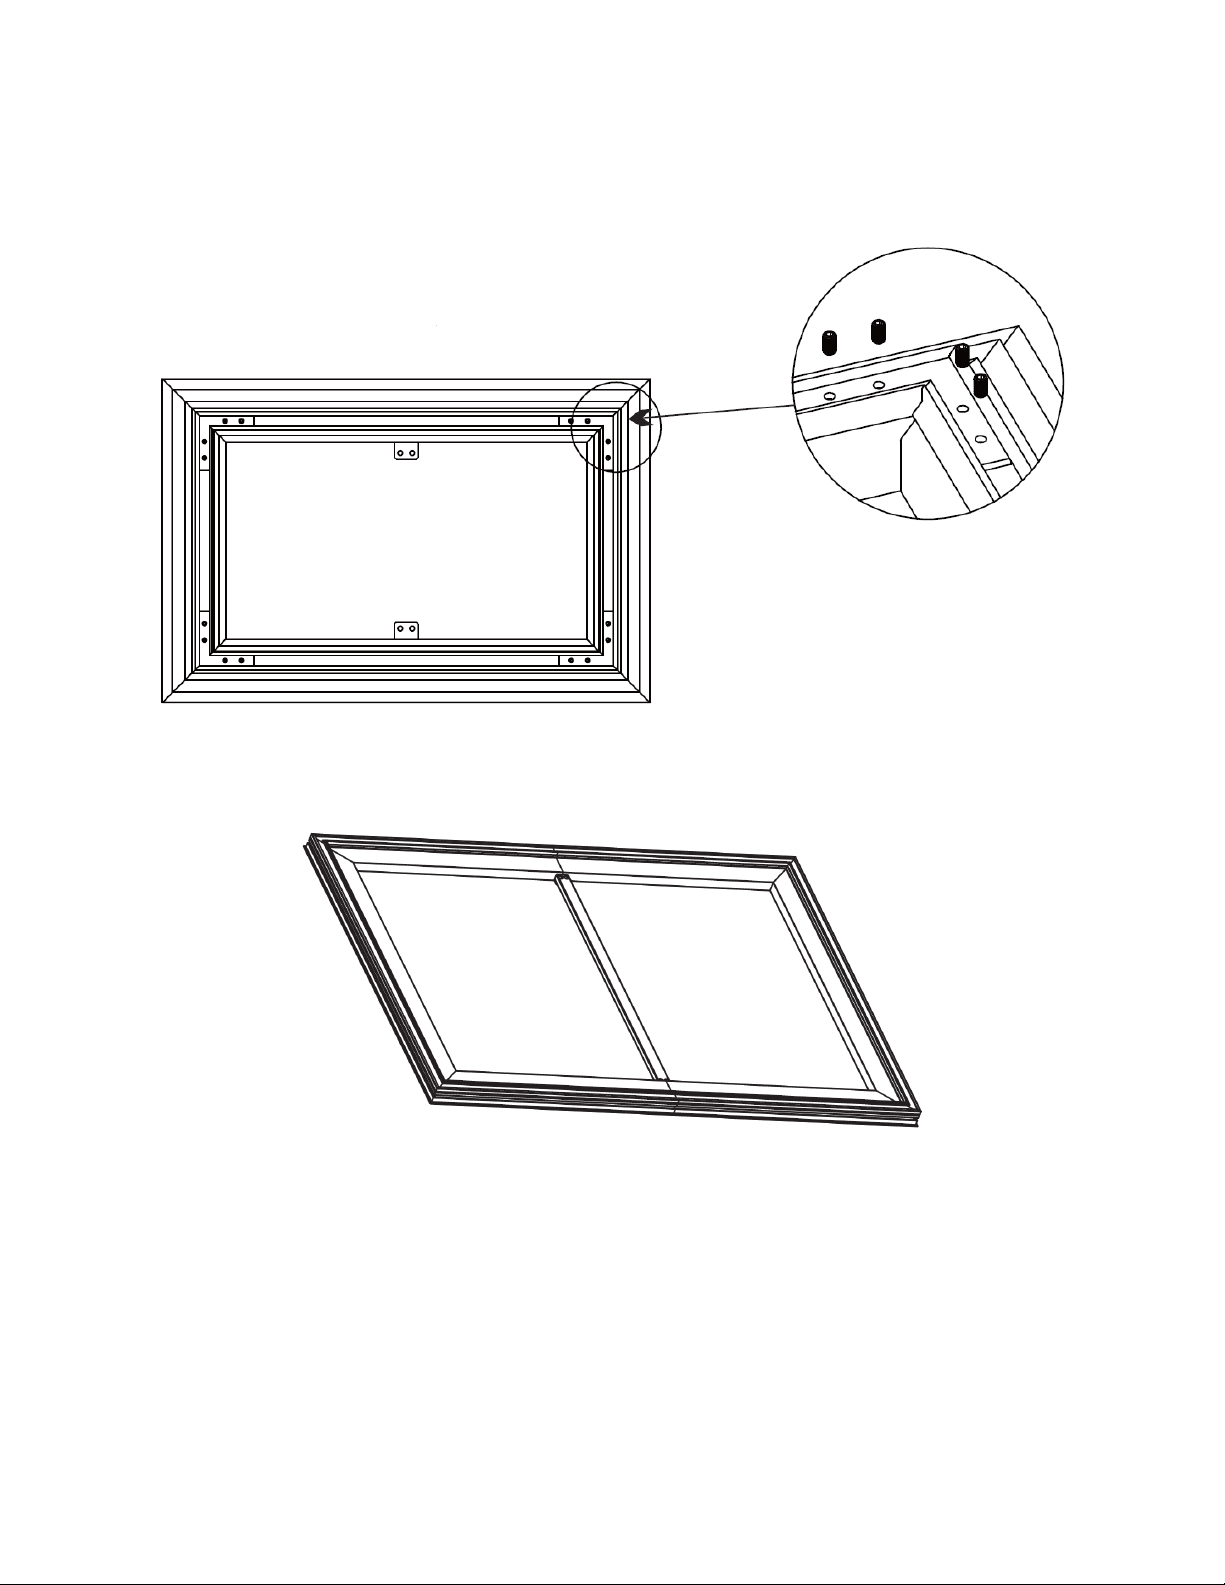
12. Turn the assembly over, then secure the four corners using the remaining M6x8
screws.
Screen Material Installation
1. Wear a pair of gloves to prevent the oils on your hands from contacting the screen.
2. Lay the EPE cotton mat flat on the floor, then unroll the screen material onto the
mat with the rear side up (the rear side is black). Ensure that the screen material is
flat with no wrinkles.
3. Place the frame assembly on the center of the screen materials with the corner
pieces and t-joints on the underside. The snap lugs should be visible.
4. Insert the tension rods through the holes at the
corners of the screen materials. Note that the two
long tension rods are to be used on the vertical edges
and the four short rods are for the horizontal edges.
8
Page 9

5. Starting at the center of the assembly, wrap the edge of the screen material with
the tension rods over the edge of the frame, then over the snap lugs to hold the
screen material taut. Ensure that the screen material is taut with no wrinkles. The
snap lugs should go through the holes in the edges of the screen material.
6. Assemble the horizontal frame covers by attaching two pieces together, then
attaching corner covers the each end of the horizontal frame covers.
7. Attach the two horizontal frame cover assemblies to the top and bottom of the
frame assembly, then attach the two vertical cover pieces to the sides.
9
Page 10

Mounting Assembly to the Wall
1. Carefully measure the distance from the top of the top horizontal frame cover and
the bottom of the bottom horizontal frame cover. Write this number down.
2. Measure the width of the frame assembly and write this number down.
3. If mounting to a wood stud wall, use a stud finder to locate the edges of the studs
within the wall. The mounting brackets should be mounted to the wood studs.
4. Use a carpenter's level to draw a level, horizontal line on the wall to serve as the
location for the top mounting brackets.
5. Use one of the mounting brackets to mark drill holes for the two top screw holes
along the line drawn in the previous step.
10
Page 11

6. Mark the location of the second bracket along the same horizontal line. The two top
brackets should be spaced a distance of about one-half the width of the frame
assembly. This horizontal distance is not as critical as the vertical distances. Verify
that the marked holes are level.
7. Use a carpenter's level to mark a lower horizontal line for the location of the lower
mounting brackets. Note that this line should be spaced at a distance equal to the
distance measured in step 1 above, minus 32mm.
8. Verify that the marked holes are level and at the exact distance apart as calculated
in the previous step. Once verified, drill pilot holes into the wall. If you will mount
the brackets to wall studs, drill 4mm pilot holes. If you will be mounting to a
concrete wall, drill 5mm holes for the anchors.
9. Use the ø5x18 screws and anchors (if applicable) to secure the brackets to the wall.
10. Use a #2 Phillips screwdriver to "unlock" the two lower brackets, while keeping the
upper brackets "locked".
11. Using two people, lift the frame and hang the upper edge on the two upper
brackets. Ensure that the bottom of the frame is in the locking edge of the lower
brackets, then use a #2 Phillips screwdriver to "lock" the two lower brackets to
secure the assembled projection screen in place.
11
Page 12
TECHNICAL SUPPORT
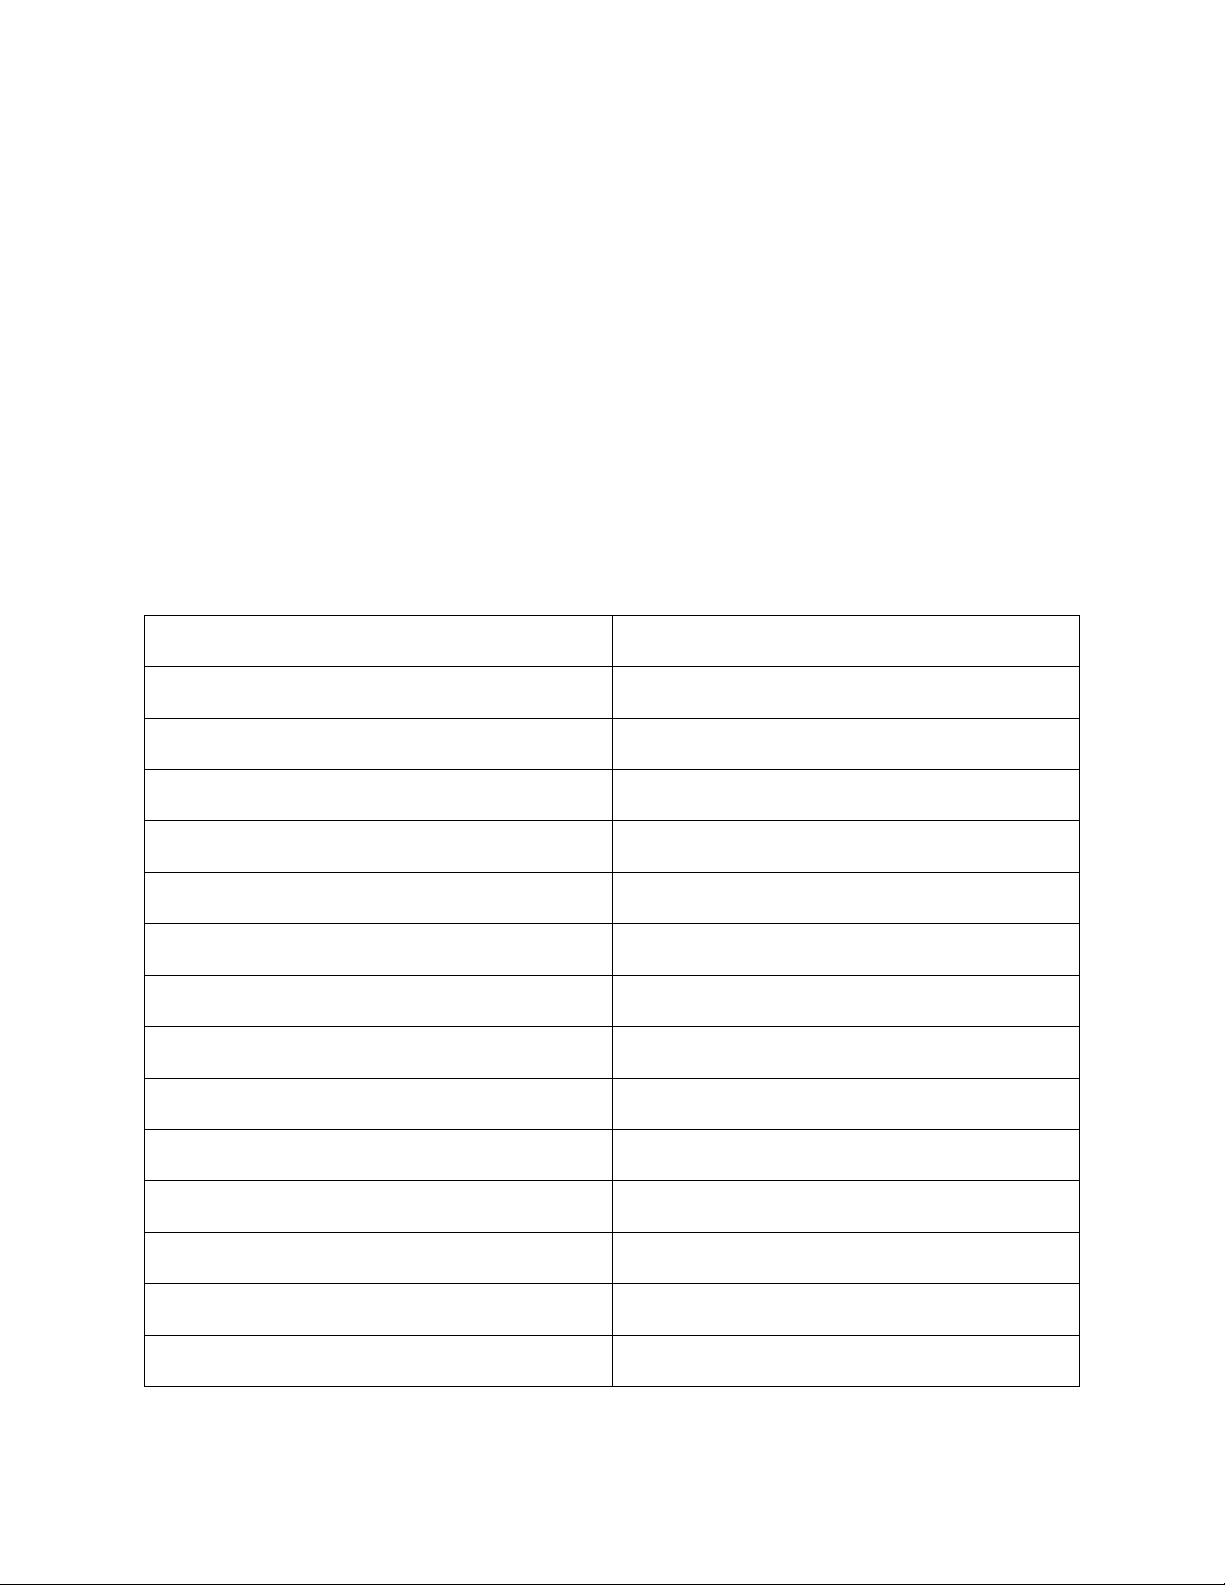
Model
7955
Screen Size
106"
Aspect Ratio
16:9
Screen Material
Fabric
Screen Color
HD white
Screen Gain
1.0
Viewing Angles
160°
Viewing Area
92.4" x 52.0" (2347 x 1320 mm)
Total Screen Height
52.9" (1344mm)
Left/Right Borders
0.5" (12mm)
Top Border
0.5" (12mm)
Bottom Border
0.5" (12mm)
Frame Material
Aluminum
Frame Dimensions
93.3" x 52.9" x 2.0" (2371 x 1344 x 52 mm)
Weight
31.5 lbs. (14.3 kg)
Monoprice is pleased to provide free, live, online technical support to assist you with any
questions you may have about installation, setup, troubleshooting, or product
recommendations. If you ever need assistance with your new product, please come online
to talk to one of our friendly and knowledgeable Tech Support Associates. Technical
support is available through the online chat button on our website www.monoprice.com
during regular business hours, 7 days a week. You can also get assistance through email by
sending a message to tech@monoprice.com
SPECIFICATIONS
12
Page 13

Model
7956
Screen Size
120"
Aspect Ratio
16:9
Screen Material
Fabric
Screen Color
HD white
Screen Gain
1.0
Viewing Angles
160°
Viewing Area
104.6" x 58.8" (2657 x 1494 mm)
Total Screen Height
59.8" (1518mm)
Left/Right Borders
0.5" (12mm)
Top Border
0.5" (12mm)
Bottom Border
0.5" (12mm)
Frame Material
Aluminum
Frame Dimensions
131.7" x 59.8" x 2.0" (3345 x 1518 x 52 mm)
Weight
35.9 lbs. (16.3 kg)
13
Page 14
Model
7958
Screen Size
150"
Aspect Ratio
16:9
Screen Material
Fabric
Screen Color
HD white
Screen Gain
1.0
Viewing Angles
160°
Viewing Area
130.7" x 73.5" (3321 x 1868 mm)
Total Screen Height
74.5" (1892mm)
Left/Right Borders
0.5" (12mm)
Top Border
0.5" (12mm)
Bottom Border
0.5" (12mm)
Frame Material
Aluminum
Frame Dimensions
131.7" x 74.5" x 2.0" (3345 x 1892 x 52 mm)
Weight
39.3 lbs. (17.8 kg)
14
Page 15

Model
30454
Screen Size
106"
Aspect Ratio
16:9
Screen Material
ISF Ultra HD
Screen Color
White
Screen Gain
1.3
Viewing Angles
160°
Viewing Area
92.4" x 52.0" (2347 x 1320 mm)
Total Screen Height
52.9" (1344mm)
Left/Right Borders
0.5" (12mm)
Top Border
0.5" (12mm)
Bottom Border
0.5" (12mm)
Frame Material
Aluminum
Frame Dimensions
93.3" x 52.9" x 2.0" (2371 x 1344 x 52 mm)
Weight
31.5 lbs. (14.3 kg)
15
Page 16

Model
30455
Screen Size
120"
Aspect Ratio
16:9
Screen Material
ISF Ultra HD
Screen Color
White
Screen Gain
1.3
Viewing Angles
160°
Viewing Area
104.6" x 58.8" (2657 x 1494 mm)
Total Screen Height
59.8" (1518mm)
Left/Right Borders
0.5" (12mm)
Top Border
0.5" (12mm)
Bottom Border
0.5" (12mm)
Frame Material
Aluminum
Frame Dimensions
105.6" x 59.8" x 2.0" (2681 x 1518 x 52 mm)
Weight
35.9 lbs. (16.3 kg)
16
Page 17

Model
30456
Screen Size
150"
Aspect Ratio
16:9
Screen Material
ISF Ultra HD
Screen Color
White
Screen Gain
1.3
Viewing Angles
160°
Viewing Area
130.7" x 73.5" (3321 x 1868 mm)
Total Screen Height
74.5" (1892mm)
Left/Right Borders
0.5" (12mm)
Top Border
0.5" (12mm)
Bottom Border
0.5" (12mm)
Frame Material
Aluminum
Frame Dimensions
131.7" x 74.5" x 2.0" (3345 x 1892 x 52 mm)
Weight
39.3 lbs. (17.8 kg)
17
 Loading...