

Page 1
Page 2

H.264 Realtime DVR – QUICK USER GUIDE
Use the designated HDD
Please use the designated HDD. Otherwise, recording may be operated improperly.
Maker HDD Capacity
Western Digital
80,160,250,320,500,750,1000GB each and Totally up to
3TB is supported.(3pcs X HDDs)
Seagate
But, please combine same size HDDs (i.e 80GB x 80GB)
USB2.0 for Memory Stick & External CD/DVD RW
* USB compatibility: the following models have been tested by manufacturer.
Lexar JumpDrive 128/256MB
SanDisk Mini Cruzer 128MB
SanDisk Cruzer Micro 256MB, 512GB, 1GB
DVD/RW Plextor PX-716UFL
Lite-On CD/RW LTR-52327SX
KINGSTONE 2GB
A-DATA 2GB
IMATION 2GB
MARUZEN 1GB
FRONT PANEL
(1) LED
- REC: Recording status (When recording is on, the red light will flash)
- POWER: System Power On/Off (When power is on, the green light will be illuminated)
- NET: Network status (When network is connected, the light will lash)
- HDD: HDD status (When the system is reading or writing to the HDD, the light will flash)
(2) USB 2.0 PORT
- USB2.0 connector, for downloading to USB pens / drives (upgrading firmware)
(3) POWER BUTTON
- System Power On/Off
(5) MENU
- Displays the menu on the screen
(7) PLAY ( )
- Playback of the recorded data
- When in play mode press again to enter fast forward mode.
(9) PAUSE ( ▌▌)
- To freeze picture on playback mode and live mode.
(11) REC (●)
- It starts & stop manual recording, password protected.
(13) ARROW KEY
- Moves the cursor while in menu mode
(15) Screen Split
- Selection of multi screen functions
(16) PTZ Selection
- PTZ Channel selection
2
(4) NUMERIC & CHARACTER
- Input for numbers & letters within the
setup menus and searches
(6) SEARCH
- Entering search mode
(8) REWIND ( )
- Reverse play of recorded data
- When in play mode press again to enter
fast rewind mode.
(10) STOP / EJECT ( █ )
- To stop playback and go back to live
mode.
- To eject DVD-RW
(12) SELECT
- Menu selection
(14) Screen Split
- Selection of multi screen functions
Page 3
H.264 Realtime DVR – QUICK USER GUIDE
(17) ZOOM
- ZOOM P/T/Z camera in and out
(19) AUDIO Selection
- Switches between audio channels
(18) PAN / TILT
- To control P/T/Z, press this button to
browse virtual key on screen.
(20) VOLUME UP & DOWN ( )
- To increase or decrease the volume.
**NOTE: (19)&(20) are dependent on Front Panel specification
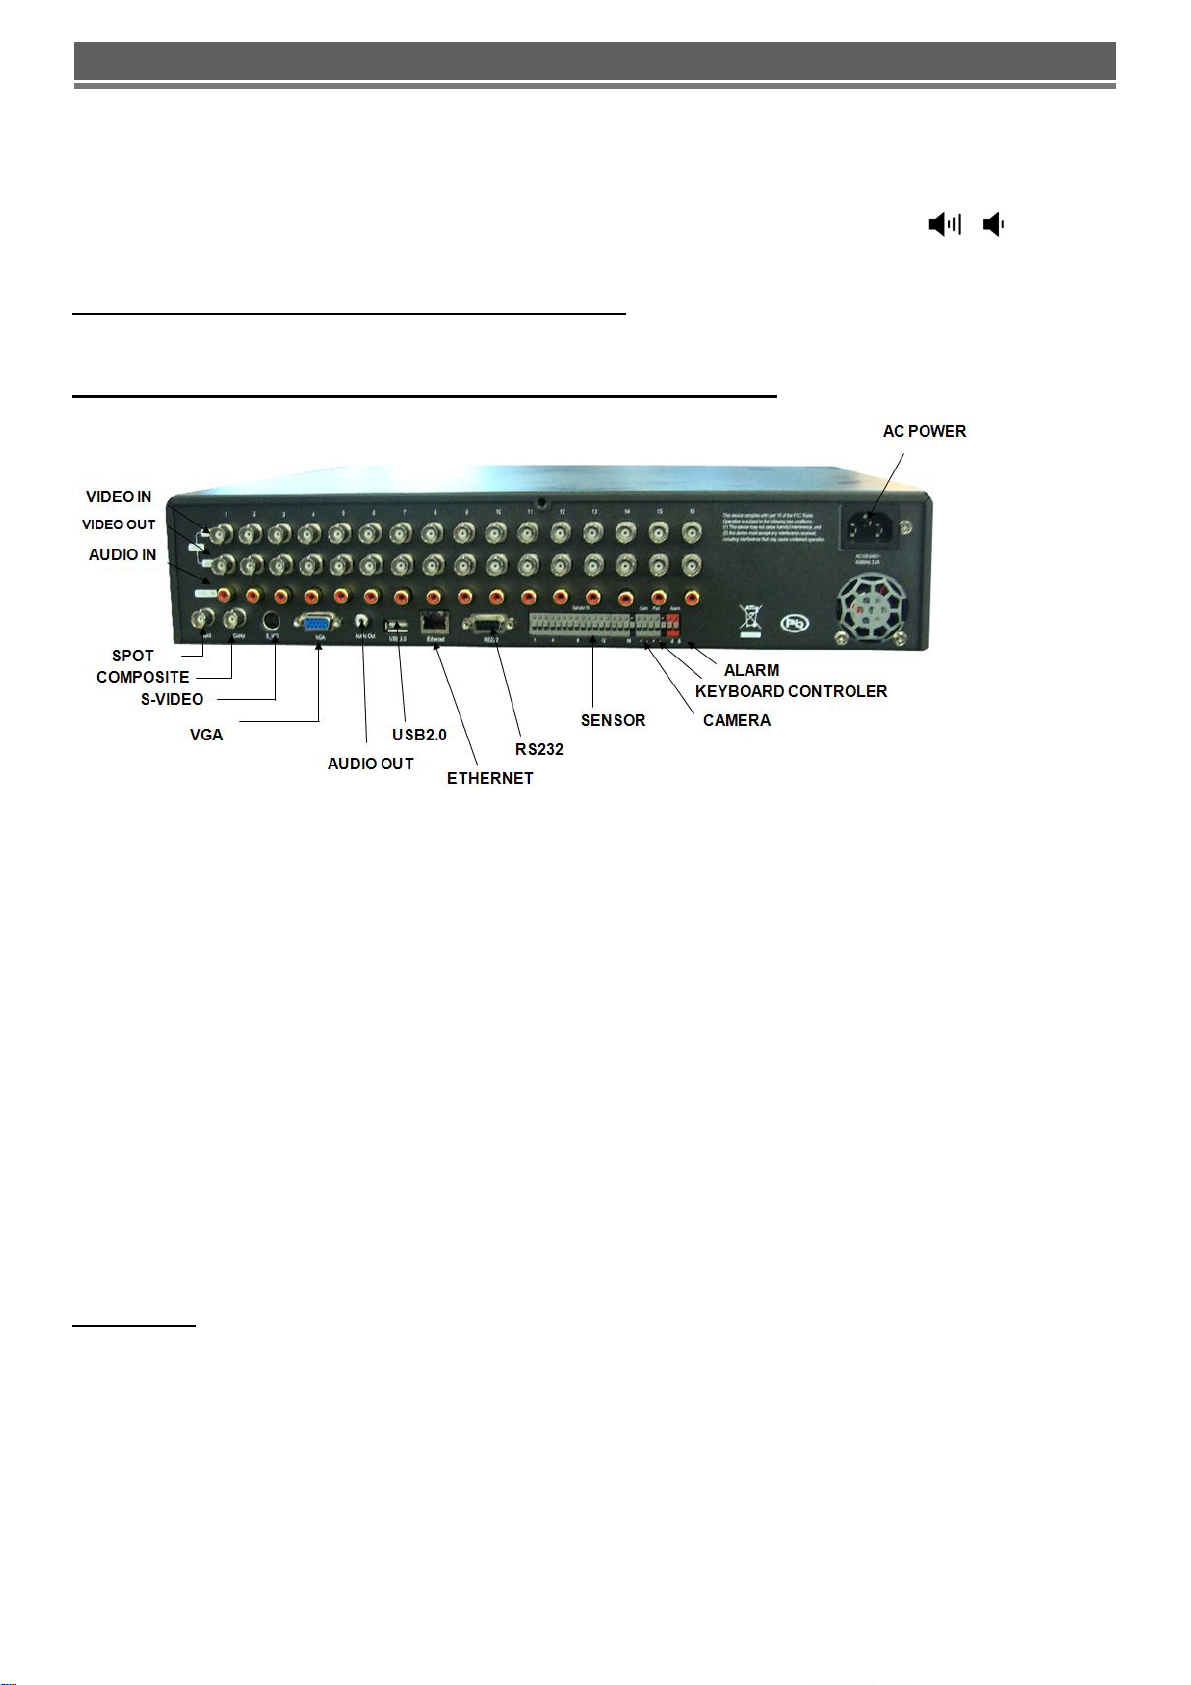
Description of Rear Panel Parts and Functions
(1) VIDEO IN (BNC)
- 16/8/4 Camera input (1.0v p-p, 75
(3) LINE AUDIO INPUT
- 16/8/4 Audio input through line
(5) RS232
- 1 Serial Communication
(7) USB 2.0
-USB 2.0 connector for mouse control.
(9) CAMERA / KEYBOARD CONTROLLER
- 1 Serial Communication for Pan / Tilt Camera
Ω)
(2) VIDEO OUT
- 16/8/4 LOOP / SPOT / Composite / S-VIDEO /
VGA
(4) AUDIO OUTPUT
- 1 Audio output
(6) Network Port (RJ-45)
- Connecting to the DVR through Internet or LAN
(8) ALARM / SENSOR
- ALARM / 16/8/4 SENSOR INPUT / 1 OUTPUT
PORT
- 1 Serial Communication for P/T/Z Control Keyboard
(10) AC POWER
- AC 110~240 V
ATTENTION
When the video format is changed, the system should be re-booted
3
Page 4

H.264 Realtime DVR – QUICK USER GUIDE
DEFAULT PASSWORDS
Front Panel
A Password is required if you need to: enter the menus; search; down
power; playback; stop recording or changing an IP setting.
A prompt will be displayed asking for password.
The default Password is: 00000000 (8 zeros)
Viewer Software
When using the supplied Viewer software, the following password will be required.
User ID is “admin” (not case sensitive).
Password is “00000000” i.e. 8x Zero’s
(Admin ID cannot be changed, as this is the full
administrator ID)
IR Remote Controller
1.Power : Power ON/OFF
2. Rec : Start & Stop Recording
3.ⓞ~⑨:Key for figure and character
4. P/T/Z: Entering PTZ menu directly
5. OSD : Operating OSD ON/OFF
6. SEQ : Direct access for Spot
7. LOG : Direct access for Log list
8. INFO: Direct access for system Info.
9. ID : Remote controller ID setting
10. MUTE : Audio Mute
11. AUDIO : Available audio switching when user select this key
12. MENU : Entering system menu
13. SEARCH : Entering search
14. ARROW & SPLIT : Key moving left, right, up and down. Also, Screen
split display shows
15. VOL”+,-“ : Up, down volume
16. CH “+,-“ : Up, down channel(s)
17. ▶(▶) : Play(or fast forward)
18. ◀ (◀ ) : Reverse play
19 II : Pause
4
20. █ : Stopping playback
21. Cam : Changing PTZ icon
22. P/T : Pan &Tilt
23. Z/F : Zoom/ & Focus
24. DIS : Channel Division
Page 5
H.264 Realtime DVR – QUICK USER GUIDE
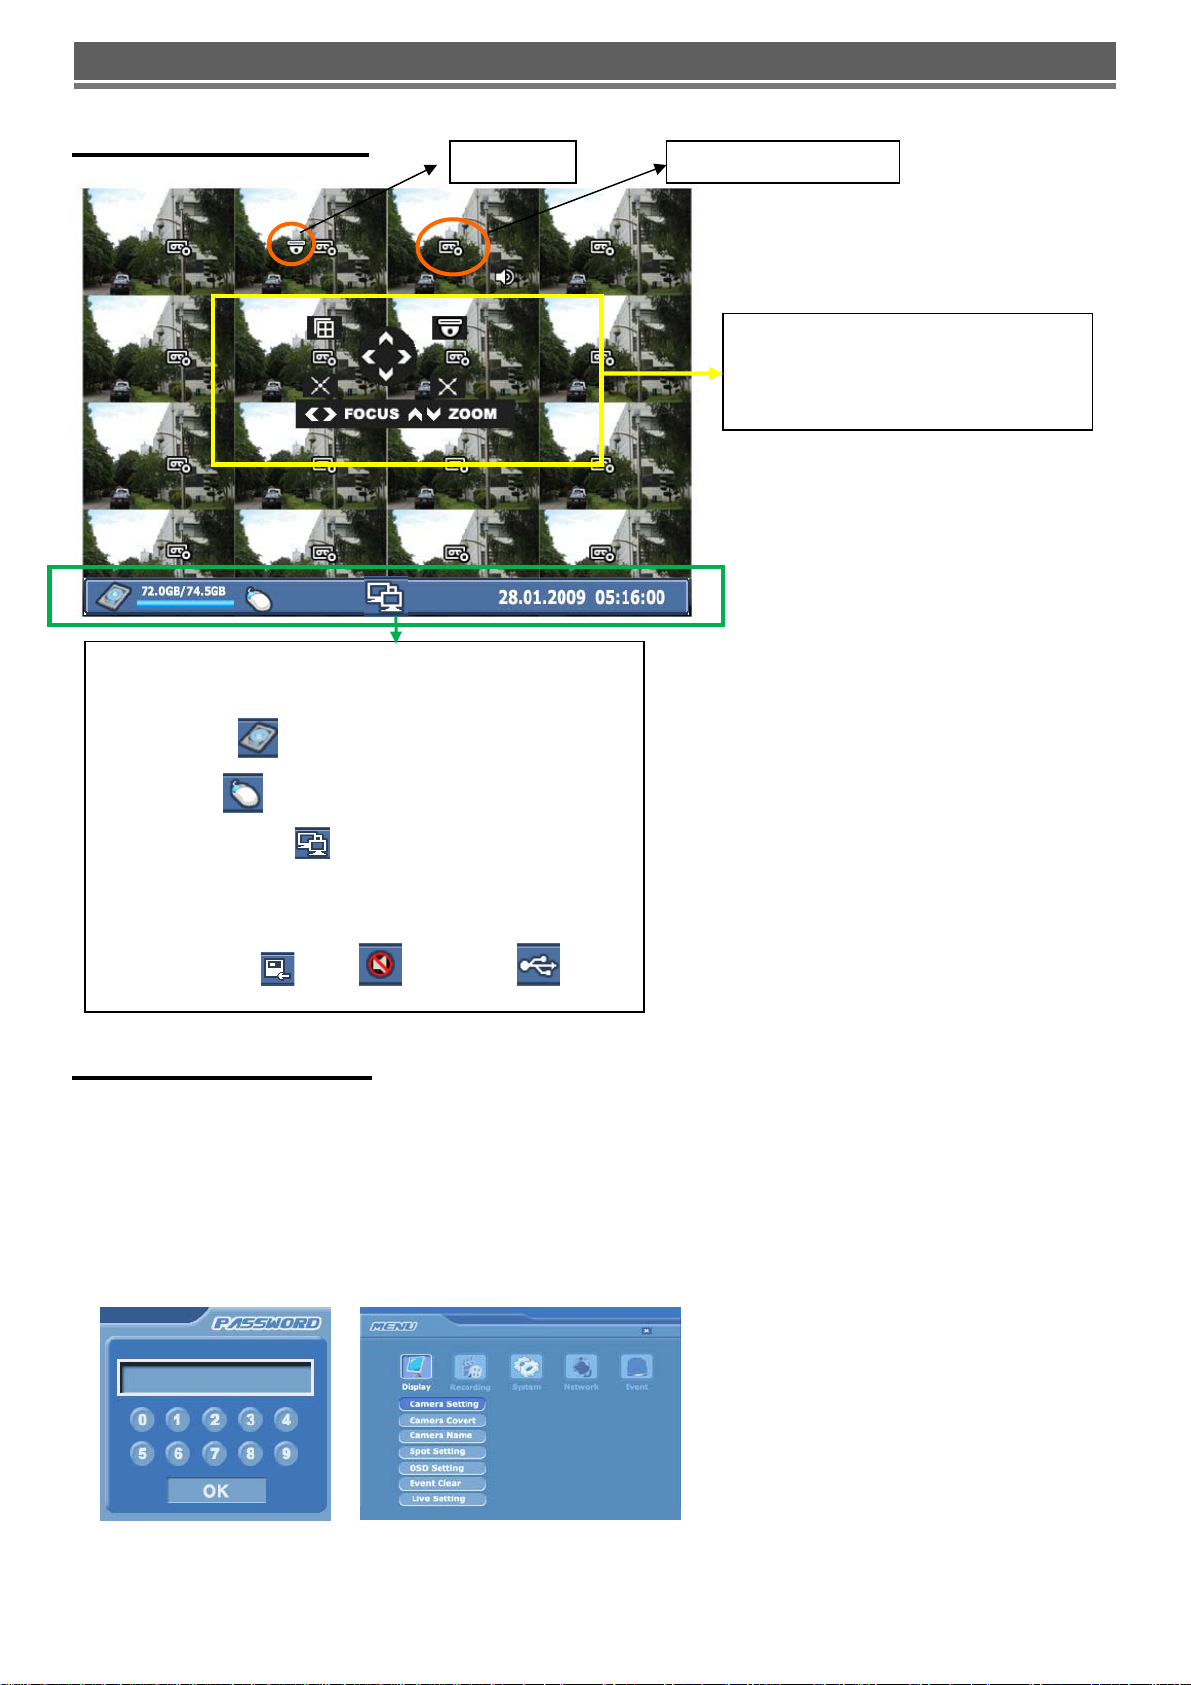
OSD DESCRIPTION
PTZ icon
The Status Bar shows HDD capacity, Network connection,
Time, etc using by icons.
Recording Standby
This screen shows PTZ control of
camera 2. The on screen arrows will
allow control of this camera.
-HDD capacity
-USB Mouse
-Network connection
: 72GB is used out of 74.5GB
: It is shown USB mouse is connected.
: It is shown that admin or user
is connected.
-Date/Time
*Others : Backup
, Mute , USB Stick:
MENU Navigation
To enter the set-up menu press the Menu button or right click with mouse on screen The following screen will be
displayed.
Enter the password (default password is 00000000 – 8 zeros) and click ‘OK’ to confirm.
Front Panel or IR remote control
All menus are navigated around using the left / Right / Up / Down and the Select button.
To step back through the menus press MENU
button
5
Page 6

H.264 Realtime DVR – QUICK USER GUIDE
Mouse control
Using the mouse allows the operator to enter the Menus to set up the DVR or enter the Search functions to play back
and archive recorded data..
Right Clicking will bring up the following screen:
Left click the required icon
from:
Menu, Search, Record,
Power down, Play Forward,
Audio Eject, Channel Select
and Multi Screen
If Menu has been selected the left screen will be displayed.
Select Sub menus by clicking on the relevant title.
Change Values/settings by either double clicking to bring up the following
keyboard:
Or to change other values simply multi click the segments, which will toggle
through available settings
SAVE/EXIT: In order to save any modified setting value or get out from the Sub Menu, please press “MENU” key on
the front or click Right on the mouse. This action can be carried out within each Sub Menu.
RECORDING
All recorded data is watermarked to ensure that it is not tampered with. Using the software supplied the
legitimacy of this data can be verified.
6
Page 7

H.264 Realtime DVR – QUICK USER GUIDE
Global
Within this section:
1. Watermarking should be set to on, this allows the supplied software to verify the downloaded information to
ensure it has not been tampered with or changed.
2. Repeat recording can be set to continually overwrite or stop when the drives are full.
3. Pre Recording resolution can be set to 4CIF (D1) – 720 X 576 (giving 100fps recording) or 2CIF -720 X 288
(200fps) or CIF - 360 X 288 (400fps).
4. Pre FPS/Pre Duration/Post Duration is recommended to set active to get data just before event occurs.
Post Duration is selectable.
-Pre FPS: Value dependant on Pre resolution setting (up to 25 FPS)
-Pre Duration & Post Duration: 5/30/60/90/120/150/180/210/240 sec.
5. Quality options are High, Middle or Low
6. Alarm/Event Mode is used for EVENT(Alarm, Audio, Motion) Recording. Default is ‘Exclusive’ which is only
recorded event channel.
1) “Exclusive” setting,
Only event channels will be recorded. These settings are applied to all channels.
2) “Normal” setting,
Basically, “Normal” is for all channel recording including Non-Event channel unless “Normal(T/L)” is not set as “0”fps.
-Non Event Channel: 1fps @ Normal(T/L) recording resolution( *If Normal(T/L) is set as “0”fps, it won’t record)
-Event Channel: Frame is calculated to available maximum rate by the number of event channel.
Normal (TL)
This configures the continuous recording settings per channel
Record rates available:
In 360x240 modes, 30fps is available to each channel
(total 480fps_NTSC).
In 720x240 mode 15fps is available to each channel
(Total 240fps_NTSC).
In 720x480 mode 7.5fps is available to each channel
(Total 120fps_NTSC).
Each channel can be individually configured for record rate and Audio on/off.
7
Page 8

H.264 Realtime DVR – QUICK USER GUIDE
Alarm
There are 16 Alarm inputs on the rear of the unit these can be used to initiate the Alarm record mode.
The Alarm recording is set up in the same way as Normal Recording.
Motion
Motion on any channel can trigger recording of that camera.
Resolution, Images Per second, Audio, and Quality can all be configured individually per channel. As per Normal and
Alarm Recording Modes.
To setup the motion detection grid per channel select the “Sel” button.
Motion Sensitivity
It consists of High, Mid or Low.
Motion Region
The following will be displayed when “Sel” is selected.
The detection area is divided into a grid of 11x8 cells. Default is
all cells in active mode.
Use the Left right up down to move cursor and the Select key
to toggle between active and inactive.
The mouse can also be used to select cells and toggle them on
and off.
Double clicking on one of the 4 dots in the corner of the
selected cell, will toggle between all cells being active or inactive.
Care must be taken in setting of the motion sensitivity. It is recommended that each level is testing to find out which
one suits that particular camera site. The motion detection is not recommended for external cameras.
Schedule
The schedule allows the DVR to be set to only record at particular times of the day. This timing setting is global for all
channels. However the Resolution, Images per second and Audio can be configured per channel.
To set the timetable select the large SET box(PRESS SELECT KEY) on the right of the menu page, the following page
will appear. It allows each hour within the week to be set to be either Active (Yellow) or Inactive (Pink&Blank)
“SEL” button is used for selecting relevant time and day. Arrow Key will
be used for movement. Or toggle between on and off with the mouse.
Audio Event
16 Audio Inputs and 1 Output are available. Recording can be triggered when Audio is detected. As with Normal and
Alarm recording the Resolution, Images per second can be set per channel. Individual channels can be enabled or
disabled and the sensitivity set to either Low, Middle or High.
8
Page 9

H.264 Realtime DVR – QUICK USER GUIDE
Duration
The Duration mode allows the user to set the number of days that they require to record for. The resolution; whether
cameras are active or not and whether audio is being recorded can each be set per channel. The user then sets the
number of days of recording required, then the DVR will automatically calculate best record rate to achieve these
settings
NOTE: If recording is in Standby mode, the following icon is displayed.
Priority
The RECORD PRIORITY allows the mixing of the various record
methods to customise the individual site requirements.
Example: A site may require Alarm recording at night, then a standard
FPS recording during the day. In this case the Schedule would be set
for required FPS and resolution, and the timetable set for this
recording between 8am and 8pm each day. Schedule would be set as
st
Priority. The Alarm settings would be configured as required and
1
nd
this would be set as the 2
The DVR would then record between 8am and 8pm at the Scheduled rate, then once beyond 8pm would look to the
second priority and only record Alarm Events.
priority.
Program Update
Always turn off: Recording, Playback and Network access while upgrading the unit
The latest firmware version can be upgraded through
USB 2.0 Port using Memory Stick or CD/DVD Media.
When a memory stick is connected to the USB port, this
symbol
screen.
Enter “menu”-> “System Set”-> “Program Update”. If the
system recognizes the new firmware then, “New program
found” will be displayed on the screen.
Next press the “SELECT” button.
Processing percentage will be displayed.
NOTE.
1. If the system doesn’t recognize the new firmware, “New program not found” will be displayed.
will be shown in the status bar of the
2. USB compatibility has been tested successfully with: Lexar Jumpdrive 128/256MB, Sandisk Mini Cruzer & Cruzer
Micro 2GB, KINGSTONE 2GB, A-DATA 2GB, IMATION 2GB, SANDISK 1GB, SANDISK 512MB, MARUZEN 1GB
3. For system stability, please turn off 1) recording 2) playback 3) network connection during upgrading.
4. After updating program, reboot the DVR
. The simplest way is press POWER button and enter the password.
9
Page 10

H.264 Realtime DVR – QUICK USER GUIDE
SEARCHING VIDEO FOOTAGE
To access the search option, press the SEARCH button on the front panel or right click the mouse and select Search,
(A password may have to be entered) after which the following screen will be displayed.
Date / Time Search
If you select date/time search, the following will be shown. Use the numerical number on the front panel or the mouse
to select the time and date required, then select Play.
EVENT
This allows the user to select between ALARM, MOTION or AUDIO. Select required option by pressing the right arrow,
or selecting with the mouse.
ALARM – The search is for any alarm activation within the times defined.
MOTION – The search is for any motion events within the times defined.
AUDIO – The search is for any audio activations within the times defined.
Calendar Search
Following screen is displayed when “Calendar” search is selected.
The Calendar search gives a graphical representation of
when video is recorded on the hard drive.
The year and month can be selected. This month is shown
as a calendar on the screen, any day which contains
recorded video will be indicated by a highlighted number in
white.
Move to the desired day by using the up / down / left / right
buttons, Select the day by pressing SEL.
The following screen will be displayed.
The hours which have recorded data are displayed as a coloured bar. Select the hour which you want to review, the
following screen will be displayed.
10
Page 11

H.264 Realtime DVR – QUICK USER GUIDE
The minutes which have recorded data will be displayed as a coloured bar, click on the time required; the recorded
data will be played back from this point.
* Preview function
Before actual viewing of recorded data from the calendar menu, it is possible to preview the selected time and date on
the screen behind the search window. This is done by selecting a time and pressing the “ZOOM” button on the front
panel. If a different time is required, select it and press “ZOOM “again.
Archiving Evidence to DVD/CD or USB
Once the required video has been found, it may be necessary to down load it for evidential purposes. This can be
done either onto the internal CD/DVD-R writer or via the USB port on the front of the DVR.
To do this press the SEARCH button and using the down button move to ARCHIVE, once highlighted press SEL, the
following screen will be displayed.
Device
This allows selection between the internal CD /DVD-R writer and the FLASH option via the USB port, when
highlighted use the right arrow to toggle between the options.
Device Format
Format for CD/DVD-R is not needed. When using a USB pen, the format should be done first.
Type
EXCLUSIVE file type
If evidence is downloaded as an Exclusive file, the DVR will download bespoke player software on to the CD / DVD or
USB device along with the evidence. This means that no special software is required, by the reviewing PC. This
format is secure and watermarked.
LOG
The Log file can be downloaded from this menu screen, simply tick the LOG box and do not select any camera
channels, then select transfer.
From/ To
You can set up the start and stop time which is required to be backed up to the internal
Highlight this option, then press SEL, then use the alphanumeric buttons or the mouse to set the time and date.
Repeat for the end time.
CD/DVD-R or USB device.
Channel
As long as the EXCLUSIVE file format is selected, the number of channels to be down loaded can be selected.
Anything from a single channel to all 16 can be selected.
11
Page 12

H.264 Realtime DVR – QUICK USER GUIDE
Calculate Archive size
Once the time and date and file format have been entered, it is necessary to confirm that the size of file created will
not exceed the size of memory available on the disk or USB device. Move to Calculated Archive size and press SEL.
The DVR will then calculate storage space required for download file. This will be displayed in the Required Size
section. As long as the Required Size is smaller than the Free/ total space, then move to Transfer and select it.
Transfer
When Transfer is highlighted press SEL, the downloading will start. Percentage done during downloading will be
shown.
* PC Playback
1. Insert USB device
2. Folders & Files on device: Download(fold), autorun.inf,clientD4.bin, ComMark.bmp, DDVR4000.exe,
DdvrRes.dll,H264_D4.dll, LogoD.bmp,VdoLoss.bmp
3. Double Click “DDVR4000”
4. Local search > Click Recor ded Date -> Click ”playback” button
Client Viewer software – H.264 Real
Minimum PC specification
> CPU: Core 2 Duo 1.8GHz, > Graphic Memory: 256MB
1) Installing software
When you put DVR Network installation CD into your PC, it will auto run and lead you through an installation wizard.
Follow the instructions. Once the software is loaded it will automatically run.
2) IP Insertion through IE
Connection will be done just writing DVR IP address:Web port on the Internet Explorer window. If domain is kept to
reach DVR by DDNS server, it is allowed to write domain name directly.
*Downloading Active X Control
When DVR connects network, the window to download active X control will be displayed in case that no downloading
“Active X control” has been done or once installed DVR is higher version than PC Client Software. Then, select “Yes”.
Explanation of Screen Buttons
12
Page 13

H.264 Realtime DVR – QUICK USER GUIDE
Appendix 1
INSTALLING WEB CLIENT ON WINDOW XP/2000 & VISTA SERVICE PACK 2.
1) Security Setup
> Window XP / 2000 > Window Vista
Tools-> Internet Options-> Security
-> Select “Customer Level”
Tools-> Internet Options-> Security
-> Unselect square box ->
Select “Customer Level”
Select “ Allow script-initiated windows
without Size or position constraints”
-> Enable.
13
Page 14

H.264 Realtime DVR – QUICK USER GUIDE
Select “ Automatic Prompting for
Active X controls”-> Disable
2) Connection
Click here as described
Select “ Download unsigned Active X
controls”-> Prompt
Select “ Temporary Allow
Pop-ups”
Click “ To help protect security,
Internet Explorer stopped this site
from installing an Active X control
on your computer. Click here for
options…”
Select “Install Active X Control”
Select “Install” and then Log-In
box will be shown
14
Page 15

H.264 Realtime DVR – QUICK USER GUIDE
APPENDIX 2
DYNAMIC IP (Supporting DDNS Server)
With DDNS Server, This allows a user to connect to the unit remotely without the need for a fixed IP address.(Please
register your ID & Domain at www.ddns-dvr.com
in which you can use their DDNS server as free of charge)
1. Visit www.ddns-dvr.com to get the DDNS user
ID & PW as well as Host name.
2. Click “Login”
3. Create Account.
> Fill in all blanks in order to create new account.
ID & Password will be emailed to you when the account is setup
correctly.
Once the DDns-Dvr account has been setup, it is necessary to
add the details in the Network section of the DVR’s menus.
DDNS SET
To enter Network set menu, system ask password (Default
is 00000000).
In DDNS environment, need to be changed DVR & Web
server port, please refer to IP set.
Set up DDNS
1. Change DDNS to ON
2. Input User ID
3. Input User PW
4. Input Domain
5. Click “DDNS Status Check” if it is “ok” Click “Apply”
> Note; In DDNS Setup, The Domain Name has to be filled in.
15
Page 16

H.264 Realtime DVR – QUICK USER GUIDE
Appendix 3
SETUP FOR DVR PORT/ WEB SERVER PORT USING IP SHARING ROUTER
(Port Forwarding)
1) To use IP sharing Router, “Use Dynamic IP” should be set to “NO”.
- DVR Port: This can be set to any number between 2000 to 65535.
- Web Server Port: this can be set to any number between 2000~65535, as long as it is not the same as the DVR
Port number
2) Setup “virtual server” on IP sharing Router
It is for setting virtual server to forward IP which is allotted to DVR.
> For example,
D4000, IP : 192.168.10.15, DVR Port : 2000, Web Server Port : 2200
If DVR-1 is configured as above, the virtual server on IP sharing router is as follows.
1) PC Server Name : D4000(IP 192.168.10.15)
Protocol : TCP, Internal Port : 2000, External Port : 2000
2) PC Server Name : D4000 (IP 192.168.10.15)
Protocol : TCP, Internal Port : 2200, External Port : 2200
* For more detail, please refer to relevant IP sharing manual.
(3) ‘DDNS’ Setup on IP sharing router
DDNS configuration is not needed in case of fixed IP.
(4) To connect D4000 with Internet Explorer, http://d4000.ddns-dvr.com:2200
to connect D4000 with CD installer, http://d4000.ddns-dvr.com:2000
.
16
,
 Loading...