

Page 1
USB Docking station Installation Guide
USB Docking station Installation Guide
USB Docking station Installation GuideUSB Docking station Installation Guide
INTRODUCTION
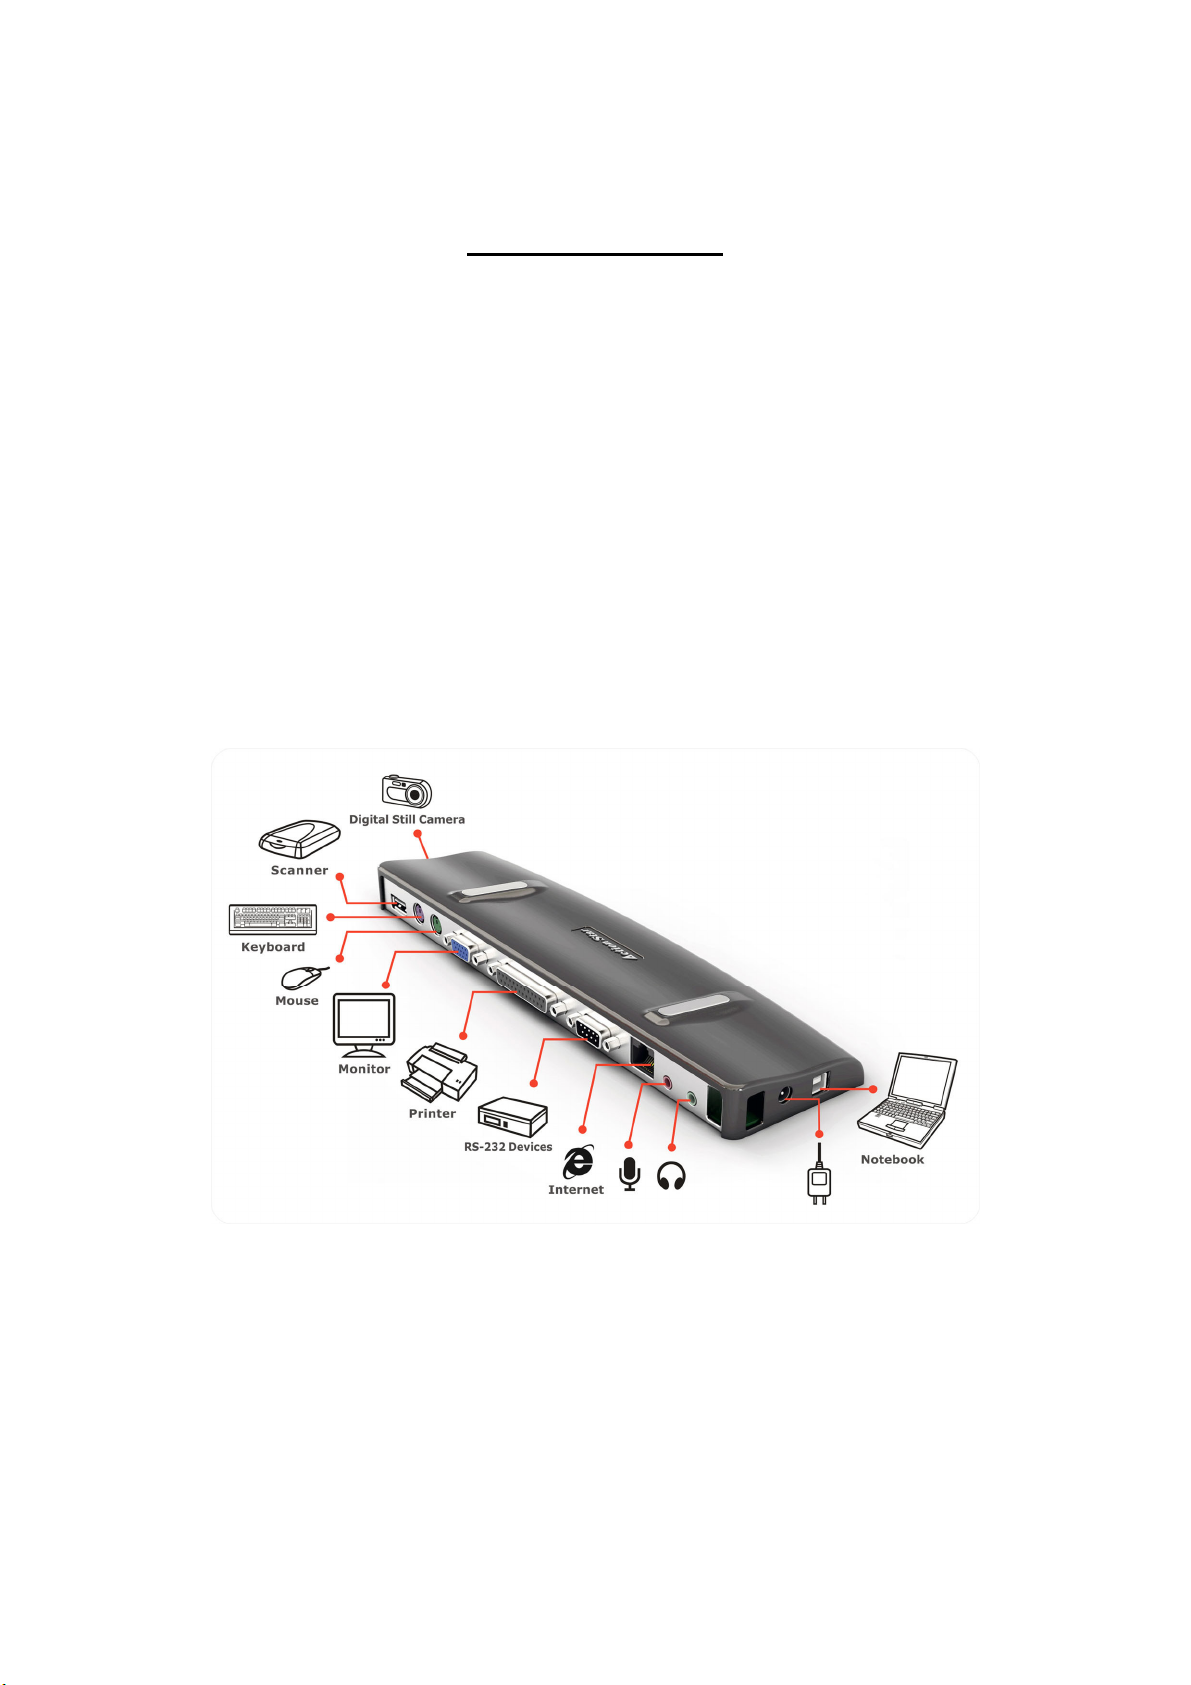
The USB 2.0 Docking Station is a unique expansion unit specially designed to accompany
notebook or desktop computers which have extra connectivity demands. With only one USB
port required from a notebook or PC computer such devices as PIO, SIO, LAN, PS/2
peripheral devices can be accessed and operated freely from the docking station. The
Docking station support Audio, 100Base-T Ethernet, parallel port, serial port, VGA and 2 USB
ports.
The USB 2.0 Docking Station allows you to add multiple high-performance USB 2.0
peripheral devices to your PC. Moreover, this product is fully backwards compatible with the
USB Revision 1.1 products, which means your previous USB 1.1 devices can continue to
function as well.
Page 2

1 x USB Docking
1 x Power adapter
1 x Driver CD
1 x USB 2.0 Cable
Package contents
System Requirements
Hardware
PC with an Intel Pentium processor or equivalent
CD-ROM or DVD drive
USB version 2.0 port
AC power source (AC adapter required)
NOTE: When connected to a USB version 1.1 port on your computer, the USB Docking’s performance
level will be less than optimal. For best results, connect it to a USB version 1.1 port.
Operating System
Windows 2000
Windows XP with Service Pack 1 or higher
Windows Vista
NOTE: To download the latest Service Packs, please visit your computer manufacturer’s website or
Microsoft’s download site.
http://www.microsoft.com/windowsxp/pro/downloads/servicepa
Page 3

Installation Instructions
To use the USB Docking Station, you must first install the driver onto your computer.
IMPORTANT: The devices connected to USB Docking work only after the installation process is
completed. You must complete the installation instructions before using any device connected to
USB Docking.
After installing your software, connect the docking station to your computer and
Windows plug-and-play will install the hardware drivers for each port.
Installation
1. Turn on your computer.
2. Insert the CD into your computer’s CD-ROM drive.
If setup does not begin automatically, click Start, Run, and enter D:\ USBDocking.exe (where D: is the
path of your CD-ROM drive) and then click OK.
Page 4

Click USB to VGA
1. The Installation Wizard window of the docking station will pop up. Click I Accept
to proceed.
NOTE: When you connect to USB Docking, icon on task bar
Resolution:
4 : 3 Wide-screen
640×480 1280×720
800×600 1280×768
1024×768 1280×800
1280×960 1360×768
1280×1024
1400×1050
1600×1200 1680×1050
NOTE: Boldface of UD-D1A0-A and UD-V1A0-A
1440×900
1600×1200
Page 5

Click USB to AUDIO
1. Before setup usb to audio driver please connect USB Docking first.
2. The Installation Wizard window of the docking station will pop up. Click Next to
proceed.
3. Click Next to proceed.
Page 6

4. Click Next to proceed.
5. Choose Yes, I want to restart my computer now.
Click Finish and restart your computer when prompted.
Page 7

6. Click this Icon on task bar
7. Set the Audio Output from the Tray
Page 8

Click USB-Ethernet Adapter driver
1. Click Install to proceed.
2. Click Continue Anyway to continue the installation.
3. Click Exit when prompted.
Page 9

Click Compound Driver
1. Click Install to proceed.
2. Click Continue Anyway to continue the installation.
3. Click Exit when prompted.
Page 10

Using USB Docking
After installing the docking station software, you are ready to connect USB Docking
to your computer.
1. Connect the supplied AC power adapter to the AC power jack on USB Docking.
2. Connect one end of the USB cable to USB Docking and the other end into an
available USB 2.0 port on your computer.
IMPORTANT: USB Docking will not function properly without the AC adapter plugged into an AC
outlet. Do not connect any devices to USB Docking until the installation is completed.
Installing the Default Device Drivers
Once you connect the docking station to your computer, the default drivers begin
installing for each of the ports automatically.
NOTE: Please ensure you have the latest service packs installed.
Some hardware devices may prompt you to install the drivers.
To install the drivers:
1. Select “Install the software automatically (Recommended)” and click Next.The Found
New Hardware Wizard program begins installing the hardware drivers.The
Completing the Found New Hardware Wizard screen appears.
2. Click Finish and repeat as needed for each device.
3. Restart your computer.
 Loading...