

Page 1

MP Cadet 3D Printer
P/N 40108
User's Manual
Page 2

2
CONTENTS
SAFETY WARNINGS AND GUIDELINES .............................................................................................................................................................. 4
CUSTOMER SERVICE ........................................................................................................................................................................................................... 5
PACKAGE CONTENTS ........................................................................................................................................................................................................ 6
PRODUCT OVERVIEW ........................................................................................................................................................................................................ 6
GETTING STARTED .................................................................................................................................................................................................................7
OSD MENU MAP .................................................................................................................................................................................................................. 10
BASIC MENU CONTROL .................................................................................................................................................................................................. 11
OSD MENU SYSTEM .......................................................................................................................................................................................................... 11
Welcome/Info Screen ............................................................................................................................................................................................... 11
Main Menu .......................................................................................................................................................................................................................... 11
Prepare Menu ................................................................................................................................................................................................................... 11
Control Menu ................................................................................................................................................................................................................... 12
Wi-Fi Network Menu ................................................................................................................................................................................................ 12
Move Axis Menu ........................................................................................................................................................................................................... 13
Move X/Y/Z/Extruder Menu ............................................................................................................................................................................. 13
Print Control Menu ..................................................................................................................................................................................................... 13
Tune Menu .......................................................................................................................................................................................................................... 14
Power Loss Recovery Menu ............................................................................................................................................................................... 15
COMMON MENU OPERATIONS ............................................................................................................................................................................. 15
Print from SD .................................................................................................................................................................................................................... 15
Loading Filament .......................................................................................................................................................................................................... 16
Unloading Filament .....................................................................................................................................................................................................17
Changing Filament .......................................................................................................................................................................................................17
Auto Home ..........................................................................................................................................................................................................................17
Move Axis ............................................................................................................................................................................................................................ 18
Level Bed ............................................................................................................................................................................................................................. 19
Page 3

3
Disable Steppers ........................................................................................................................................................................................................... 19
Adjusting Target Temperature ........................................................................................................................................................................ 20
Z Offset Setting ............................................................................................................................................................................................................ 20
Connect to Wi-Fi® ........................................................................................................................................................................................................ 21
Show Wi-Fi® IP ............................................................................................................................................................................................................... 24
Wi-Fi Device/Machine Info ................................................................................................................................................................................ 25
Firmware Update ......................................................................................................................................................................................................... 25
Changing Parameters While Printing ........................................................................................................................................................ 26
Pausing and Resuming Print .............................................................................................................................................................................. 26
Changing Filament While Printing ............................................................................................................................................................... 27
Saving a Print .................................................................................................................................................................................................................. 28
Continuing a Print After Power Loss ......................................................................................................................................................... 29
Canceling a Print in Progress ............................................................................................................................................................................ 29
Printing with the App.............................................................................................................................................................................................. 30
WIIBUILDER SLICING SOFTWARE ......................................................................................................................................................................... 31
Installation .......................................................................................................................................................................................................................... 31
TECHNICAL SUPPORT ..................................................................................................................................................................................................... 35
SPECIFICATIONS.................................................................................................................................................................................................................. 36
REGULATORY COMPLIANCE ..................................................................................................................................................................................... 37
Notice for FCC ................................................................................................................................................................................................................. 37
Radio Notice for FCC ................................................................................................................................................................................................ 38
RF Exposure Statement for FCC .................................................................................................................................................................... 38
Notice for Industry Canada ................................................................................................................................................................................ 38
Radio Notice for Industry Canada ................................................................................................................................................................ 39
RF Exposure Statement for Industry Canada .................................................................................................................................... 39
Page 4

4
SAFETY WARNINGS AND GUIDELINES
Please read this entire manual before using this device, paying extra attention to these
safety warnings and guidelines. Please keep this manual in a safe place for future reference.
• This device is intended for indoor use only.
• Do not expose this device to water or moisture of any kind. Do not place drinks or
other containers with moisture on or near the device. If moisture does get in or on
the device, immediately unplug it from the power outlet and allow it to fully dry
before reapplying power.
• Do not touch the device, the power cord, or any other connected cables with wet
hands.
• Do not expose this device to excessively high temperatures. Do not place it in, on,
or near a heat source, such as a fireplace, stove, radiator, etc. Do not leave it in
direct sunlight.
• Use only in a well-ventilated area. Do not use in close, confined spaces.
• Prior to operation, check the unit and power cord for physical damage. Do not use if
physical damage has occurred.
• Before plugging the unit into a power outlet, ensure that the outlet provides the
same type and level of power required by the device.
• Unplug this device from the power source when not in use.
• Take care to prevent damage to the power cord. Do not allow it to become
crimped, pinched, walked on, or become tangled with other cords. Ensure that the
power cord does not present a tripping hazard.
• Never unplug the unit by pulling on the power cord. Always grasp the connector
head or adapter body.
• Clean using a soft, dry cloth only. Do not use chemical cleaners, solvents, or
detergents. For stubborn deposits, moisten the cloth with warm water.
• This device has no user serviceable parts. Do not attempt to open, service, or
modify this device.
Page 5

5
• Take care to avoid touching hot parts, including heat blocks, extruder nozzle, and
extruded filament.
• Do not wear gloves when operating or repairing to avoid entanglement.
• Keep the printer and all accessories out of reach of children.
• Do not reach inside the printer during operation.
• Always allow the printer and extruded filament to cool before reaching inside.
• Ensure that the printer is turned off and unplugged from its power source before
making repairs or performing service.
• Do not install this printer on an unstable surface where it could fall and cause either
personal injury or damage to the device and/or other equipment.
• Do not subject the printer to extreme force, shock, or fluctuations in temperature or
humidity.
CUSTOMER SERVICE
The Monoprice Customer Service department is dedicated to ensuring that your ordering,
purchasing, and delivery experience is second to none. If you have any problem with your
order, please give us an opportunity to make it right. You can contact a Monoprice
Customer Service representative through the Live Chat link on our website
www.monoprice.com or via email at support@monoprice.com. Check the website for
support times and links.
Page 6
6
PACKAGE CONTENTS
Please take an inventory of the package contents to ensure you have all the items listed
below. If anything is missing or damaged, please contact Monoprice Customer Service for a
replacement.
1x 3D Printer
1x Package of Filament
1x AC Power Adapter
1x AC Power Cord
1x USB Cable
1x microSD™ Card
1x microSD Card Reader
1x Platform Sticker
1x Stick of Glue
1x 1.5mm Hex Wrench
1x 2.0mm Hex Wrench
1x 2.5mm Hex Wrench
1x Phillips Screwdriver
1x M6 Brass Nozzle
1x 8mm Wrench
1x Quick Start Guide
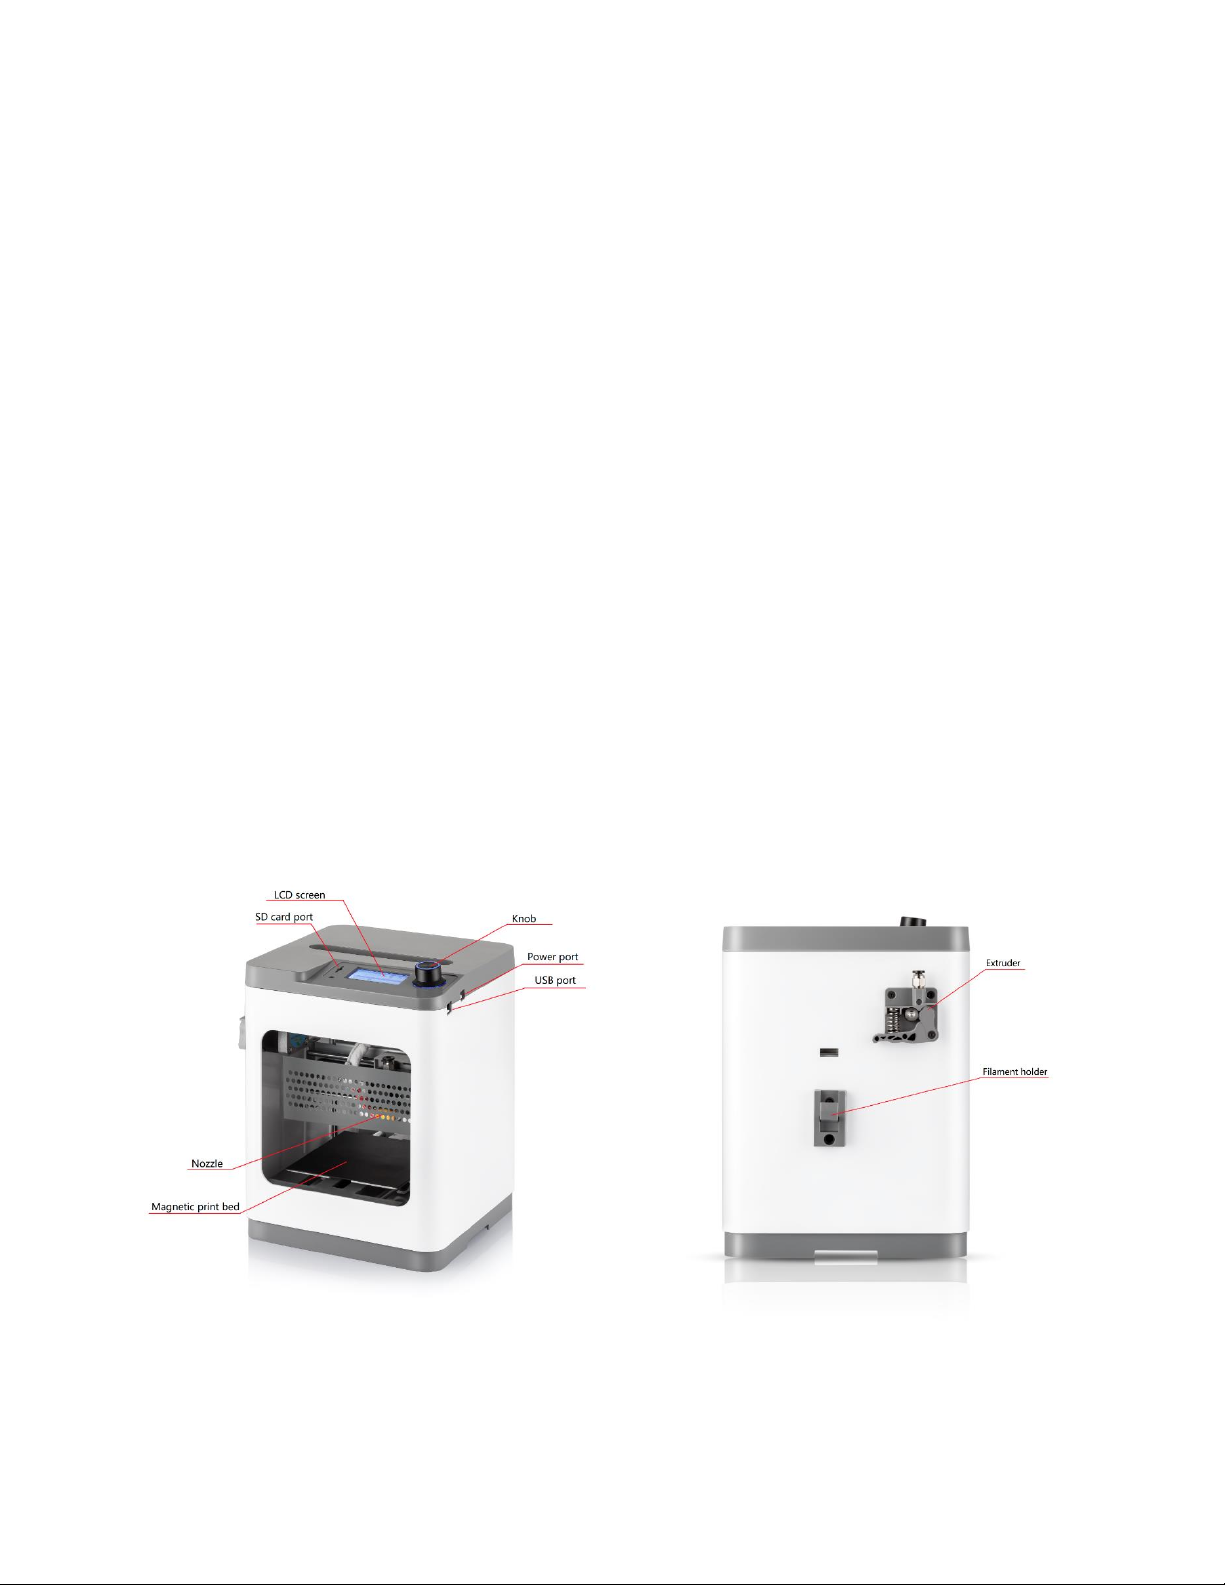
PRODUCT OVERVIEW
Page 7
7
GETTING STARTED
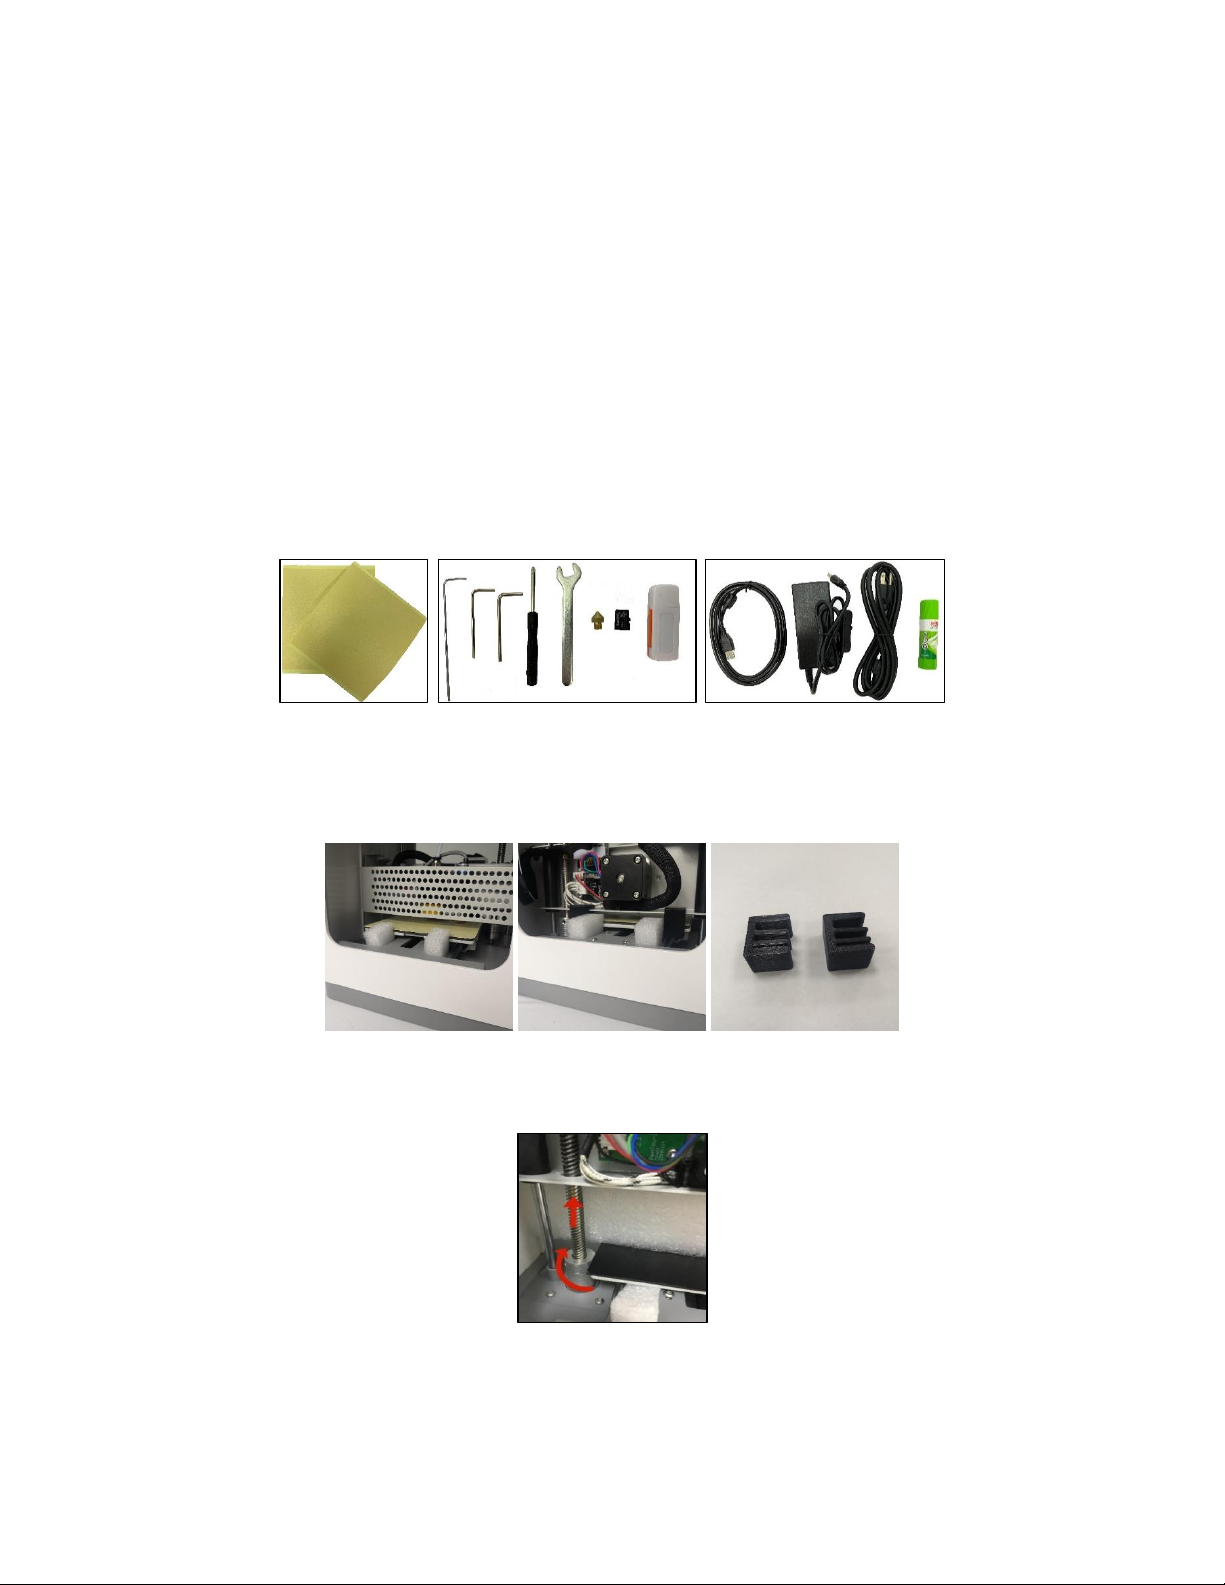
1. Remove the printer and Accessory Box from the packaging. Remove the foam and
plastic from the printer and place it on a table or desk.
2. Open the Accessory Box and verify that you have all the parts listed below:
2x Stickers, 1x 1.5mm Hex Wrench, 1x 2.0mm Hex Wrench
1x 2.5mm Hex Wrench, 1x Phillips Screwdriver, 1x 8mm Wrench
1x M6 Brass Nozzle, 1x MicroSD™ Card, 1x MicroSD Card Reader
1x USB Cable, 1x AC Power Adapter, 1x AC Power Cord
1x Stick of Glue, 1x Package Sample Filament, 1x Quick Start Guide
3. Remove the two foam blocks on the Magnetic Print Bed from the front of the
printer, then remove the two black fixing clips and two foam blocks from the back
of the printer.
4. Rotate the Coupling Screw clockwise to lift the Magnetic Print Bed, then remove
the foam block from under the print bed.
Page 8
8
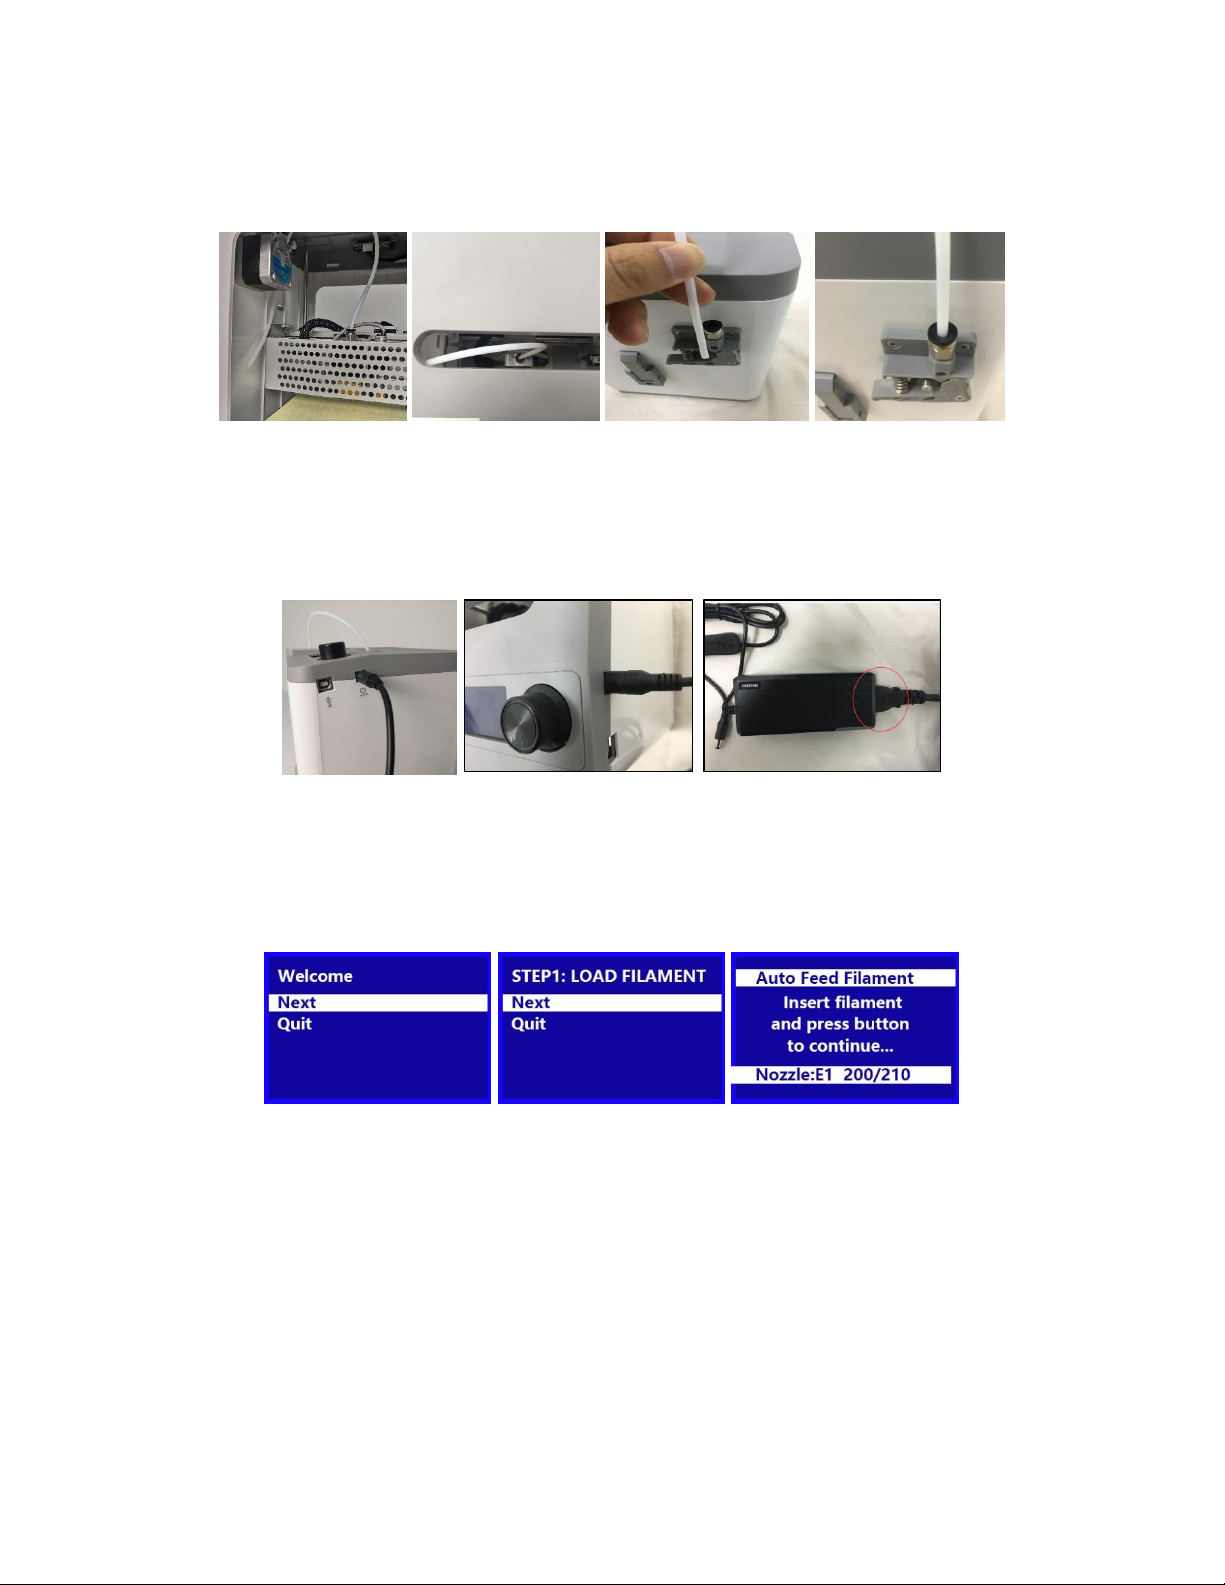
5. Insert the Filament Guide Tube into the black pneumatic connector on top of the
Extruder.
6. Ensure that the power switch on the inline control on the AC Power Adapter is in
the OFF position (O). Plug the DC barrel connector on the AC Power Adapter into
the Power Port on the right side of the printer. Plug the included AC Power Cord
into the AC Power Adapter, then plug the other end into a nearby AC power outlet.
7. Flip the power switch on the inline control to the ON position (I). After the printer
finishes booting, you will see the following wizard. Depress the Knob on top of the
printer to select Next on the Welcome Screen, then again to select Next on the
STEP 1: LOAD FILAMENT Screen.
Page 9
9
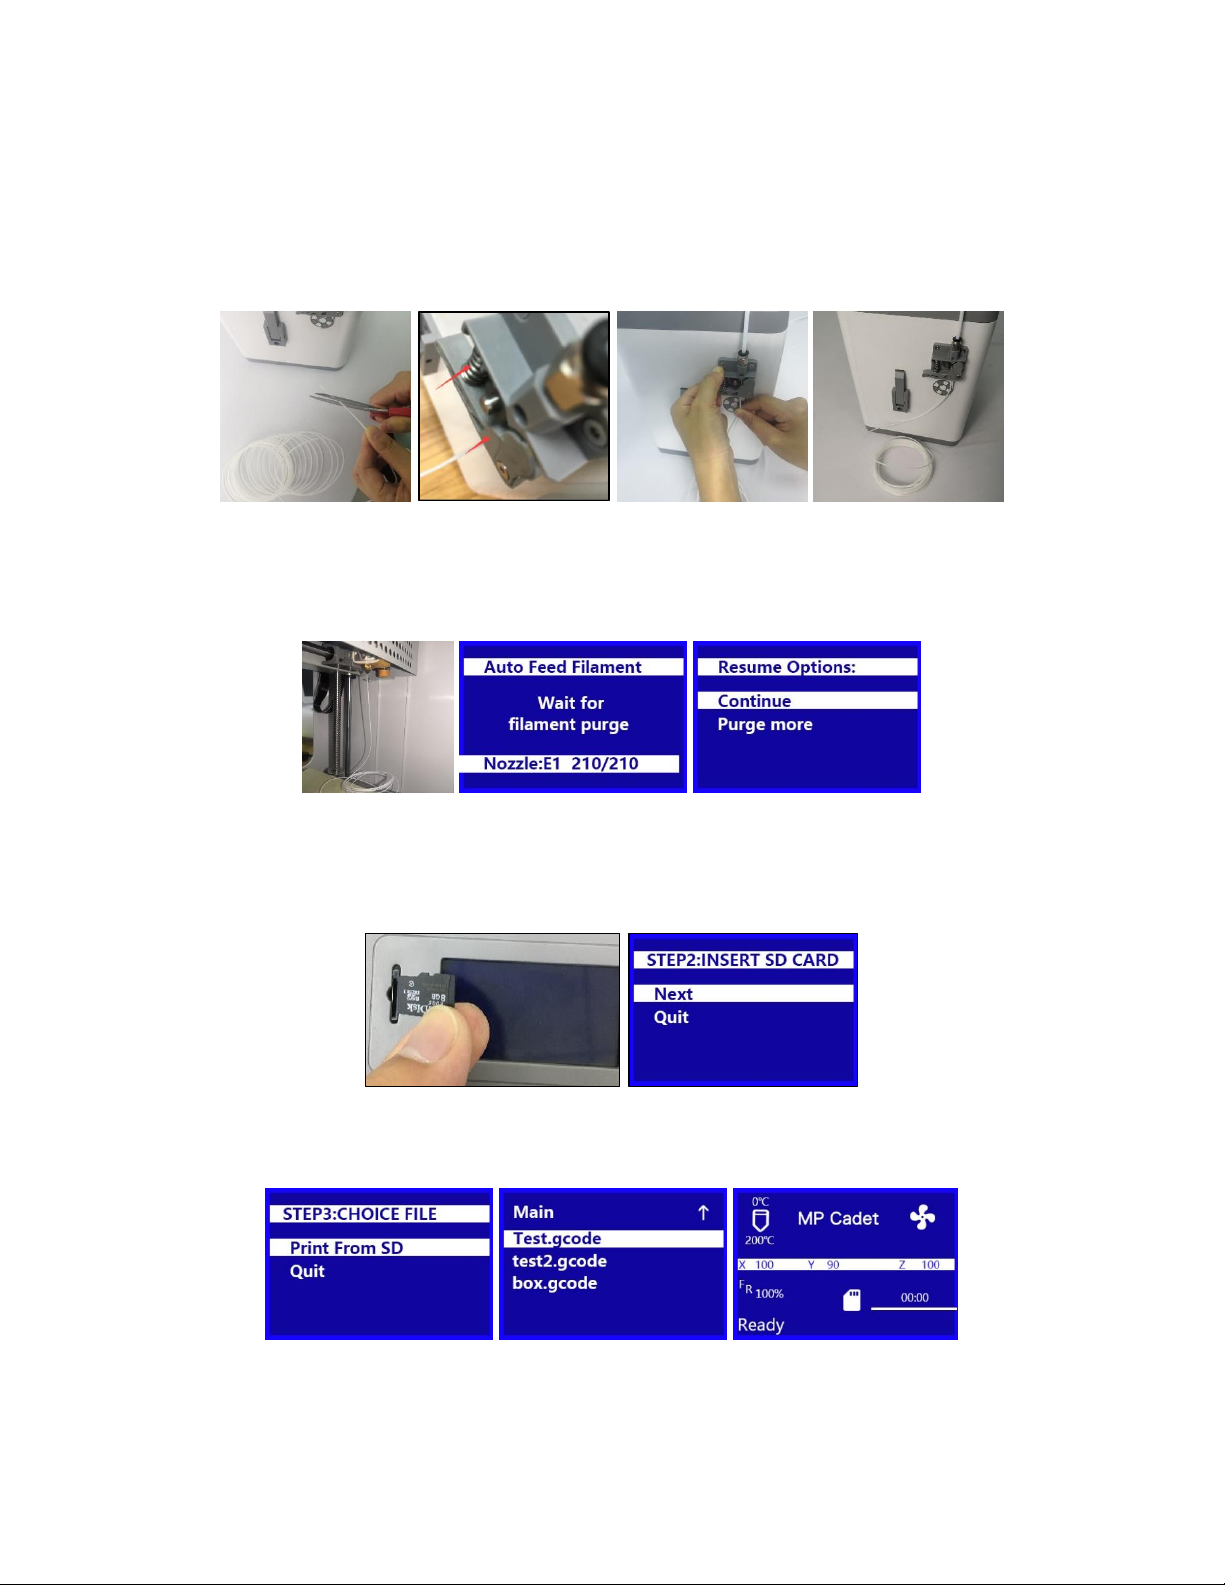
8. Using a pair of scissors or side cutters, cut about an inch off the end of the filament,
then gently straighten the end of the filament. Squeeze the lever on the Extruder,
insert the filament into the bottom until you encounter resistance, then release the
lever.
9. Press the Knob to start loading filament. Once filament starts extruding from the
Nozzle, press the Knob again to stop extrusion, then press the Knob to select the
Continue option.
10. Remove the included microSD™ card from the Accessory Box, then insert it into the
microSD card slot to the left of the LCD Screen. Press the Knob to select Next on
the wizard.
11. Press the Knob to select Print From SD. Rotate the Knob to highlight a .gcode file on
the microSD card, then press the Knob to begin printing the highlighted model.
Page 10
10
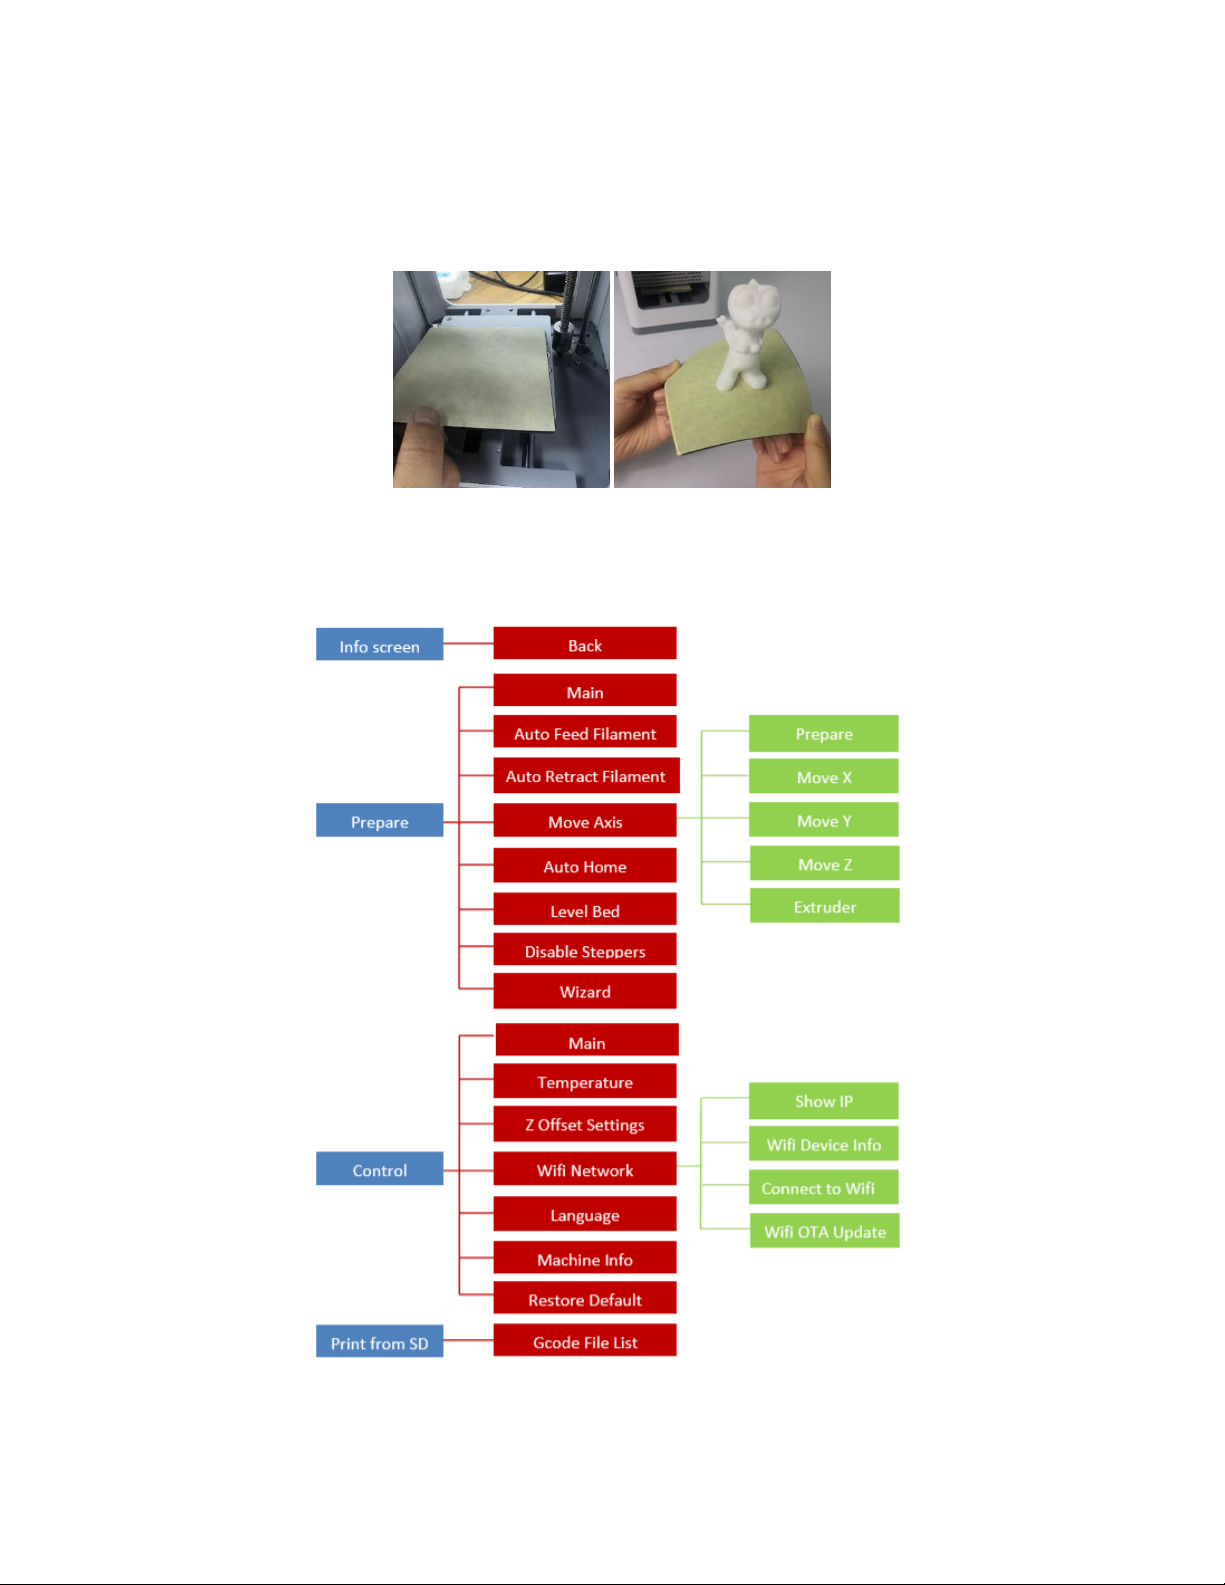
12. Once the print is finished, remove the Magnetic Print Bed from the metal print
platform, then bend it to remove the model. Replace the Magnetic Print Bed on the
metal print platform.
OSD MENU MAP
Page 11
11
BASIC MENU CONTROL
• Rotate the Knob clockwise to move the highlight down on the menus or to
decrease a value.
• Rotate the Knob counterclockwise to move the highlight up on the menus or to
increase a value.
• Press the Knob to enter the highlighted menu, select the highlighted option, or
accept the edited value.
OSD MENU SYSTEM
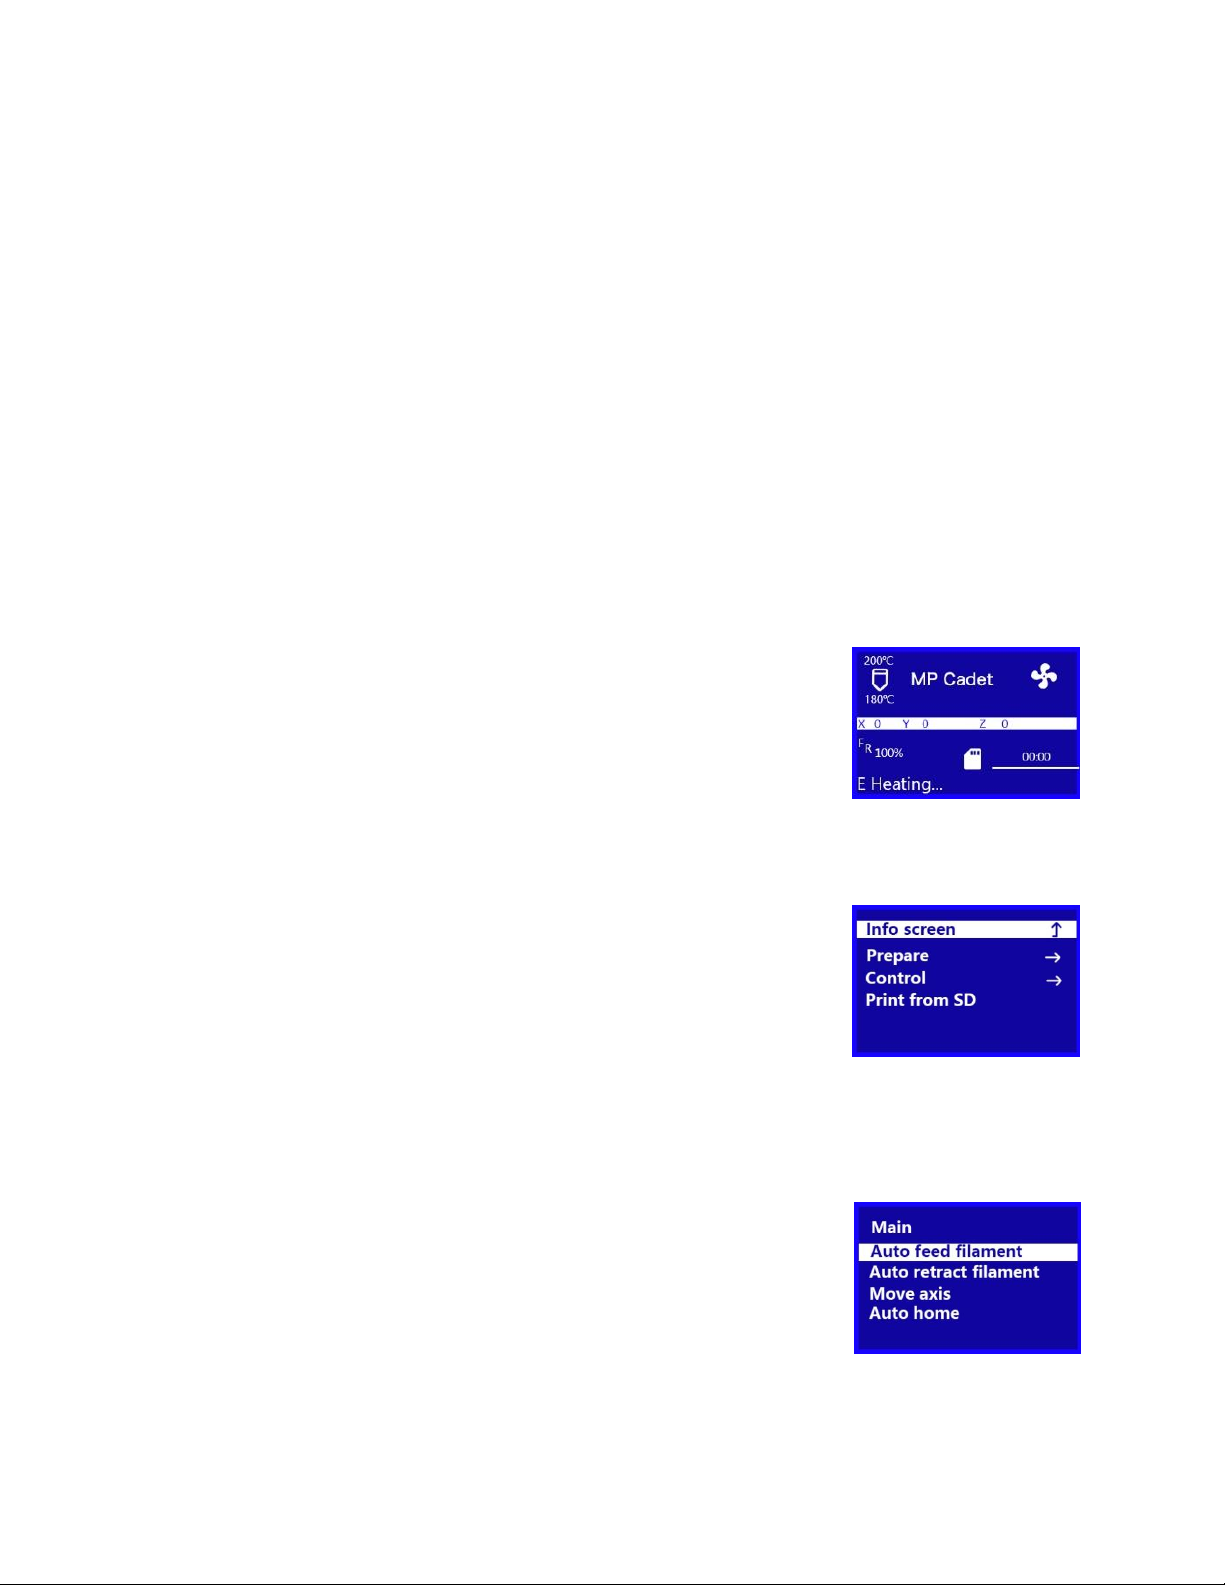
Welcome/Info Screen
• After the MP Cadet starts up, the Welcome/Info Screen is
displayed. Press the Knob to continue to the Main Menu.
Main Menu
• Info Screen: Displays the Welcome/Info Screen.
• Prepare: Displays the Prepare Menu.
• Control: Displays the Control Menu.
• Print From SD: Displays the File Selection Screen.
Prepare Menu
• Main: Returns to the Main Menu.
• Auto Feed Filament: Starts the Loading Filament process.
• Auto Retract Filament: Starts the Unloading Filament
process.
• Move Axis: Displays the Move Axis Menu.
Page 12

12
• Auto Home: Moves the Extruder and the X, Y, and Z axes to
their "home" positions.
• Level Bed: Levels the Print Bed.
• Disable Steppers: Disables the Stepper Motors. To re-
engage the motors, turn the printer off, then back on again.
• Wizard: Starts the Initial Setup Wizard.
Control Menu
• Main: Returns to the Main Menu.
• Temperature: Displays the Adjust Temperature Screen.
• Z Offset Setting: Tests the current distance between the
Nozzle and the Print Bed, then displays the Adjust Z Offset
Screen.
• Wi-Fi Network: Displays the Wi®-Fi Network Menu.
• Language: Displays the Language Select Screen. The
available languages are English, Chinese, French, German,
Spanish, Italian, Japanese, Portuguese, Dutch, Turkish, and
Korean.
• Machine Info: Displays the Machine Info Screen.
• Restore Default: Restores the printer's settings to their factory default values.
Normally, this will not be needed, but should be done after performing a firmware
update.
Wi-Fi Network Menu
• Control: Returns to the Control Menu.
• Show IP: Displays the IP address.
• Wi-Fi Device Info: Displays the Wi-Fi® module name, Wi-Fi
module firmware version number, and IP address.
Page 13

13
• Connect to Wi-Fi: Displays the Connect to Wi-Fi Screen.
• Wi-Fi OTA Update: Checks the internet for the existence of a firmware update and
performs the update if one is found.
Move Axis Menu
• Prepare: Returns to the Prepare Menu.
• Move X: Displays the Move X Menu.
• Move Y: Displays the Move Y Menu.
• Move Z: Displays the Move Z Menu.
• Extruder: Displays the Move Extruder Menu.
Move X/Y/Z/Extruder Menu
• Move Axis: Returns to the Move Axis Menu.
• Move 10mm: Displays the Move Screen, which allows you to
adjust the X/Y/Z/Extruder position by 10mm each time the
Knob is turned.
• Move 1mm: Displays the Move Screen, which allows you to adjust the
X/Y/Z/Extruder position by 1mm each time the Knob is turned.
• Move 0.1mm: Displays the Move Screen, which allows you to adjust the
X/Y/Z/Extruder position by 0.1mm each time the Knob is turned.
Print Control Menu
While printing is in progress, press the Knob while on the Printing...
Screen to display the Print Control Menu.
• Info Screen: Returns to the Printing... Screen.
• Tune: Displays the Tune Menu.
Page 14

14
• Pause Print: Pauses the print and displays an alternate Print
Control Menu, which allows you to resume the print and
change the filament.
• Resume Print: Resumes the paused print.
• Saving Print and Off: Saves the state of the print, so you can
turn the printer off. The next time the printer is powered on,
it will display the Power Loss Recovery Menu.
• Auto Feed Filament: Performs the Loading Filament
function.
• Auto Retract Filament: Preforms the Unloading Filament function. This allows you to
change the filament in the middle of a print.
• Stop Print: Cancels the print in progress without saving its state.
Tune Menu
While printing is in progress, you can access the Tune Menu to make adjustments.
• Main: Returns to the Main Menu.
• Speed: Displays the Adjust Print Speed Screen, which allows
you to change the printing speed on the fly.
• Nozzle: Displays the Adjust Temperature Screen, which
allows you to change the Nozzle temperature on the fly.
• Fan Speed: Displays the Adjust Fan Speed Screen, which allows you to adjust the
cooling fan speed on the fly.
• Flow: Displays the Adjust Flow Screen, which allows you change the speed at which
filament is extruded on the fly. Note that reducing the speed too much can cause
clogs in the Nozzle.
• Z Offset Setting: Displays the Z Offset Setting Screen, which allows you to adjust
the Z offset on the fly.
Page 15

15
Power Loss Recovery Menu
If power is lost during printing or if you previously selected the Saving Print and Off
function from the Print Control Menu, the next time to turn the printer on, the Power Loss
Recovery Menu is displayed, which allows you to continue the print from where it left off.
• Resume Print: Resumes the saved print.
• Stop Print: Cancels the saved print.
COMMON MENU OPERATIONS
Print from SD
1. On the Main Menu, rotate the Knob until the Print From SD option is highlighted,
then press the Knob to enter the File Selection screen.
2. The File Selection screen shows all the .gcode files on the microSD™ card, sorted
with the newest file at the top. Rotate the Knob to highlight the file you want to
print, then press the Knob to start printing the file.
Note that files stored on the microSD card are limited to 20 characters, not counting
the .gcode file extension.
Page 16

16
Loading Filament
1. On the Main Menu, rotate the Knob until the Prepare option is highlighted, then
press the Knob to enter the Prepare Menu.
2. Rotate the Knob until the Auto Feed Filament option is highlight, then press the
Knob to continue.
3. Using a pair of scissors or side cutters, cut about an inch off the end of the filament,
then gently straighten the end of the filament. Squeeze the lever on the Extruder,
insert the filament into the bottom until you encounter resistance, then release the
lever.
4. Press the Knob to start loading filament. Once filament starts extruding from the
Nozzle, press the Knob again to stop extrusion. Clean the extruded filament, then
press the Knob to select the Continue option.
Page 17

17
Unloading Filament
On the Main Menu, rotate the Knob until the Auto Retract Filament option is
highlighted, then press the Knob. The Nozzle will heat to the target temperature. Once
the target temperature is reached, the Extruder motor will retract the existing filament.
Changing Filament
1. Perform the steps in the
Unloading Filament
section above.
2. Remove the filament spool from the Filament Holder, then place the new spool on
the Filament Holder.
3. Perform the steps in the
Loading Filament
section above.
Auto Home
The Auto Home function moves the Nozzle and Print Bed to the "home" positions.
1. On the Main Menu, rotate the Knob until the Prepare option is highlighted, then
press the Knob to enter the Prepare Menu.
2. Rotate the Knob until the Auto Home option is highlighted, then press the Knob.
The Nozzle and Print Bed will move to the "home" positions.
Page 18

18
Move Axis
1. Perform the steps in the
Auto Home
section above.
2. On the Main Menu, rotate the Knob until the Prepare option is highlighted, then
press the Knob to enter the Prepare Menu.
3. Rotate the Knob until the Move Axis option is highlighted, then press the Knob to
enter the Move Axis Menu.
4. Rotate the Knob until the Move X, Move Y, Move Z, or Extruder option is
highlighted, then press the Knob to enter the Move X, Move Y, Move Z, or Move
Extruder Menu.
5. Rotate the Knob until the Move 10mm, Move 1mm, or Move 0.1mm option is
highlighted, then press the Knob to move the selected axis by the indicated
amount.
Page 19

19
Level Bed
IMPORTANT! Ensure that the Magnetic Print Mat is installed on the Print Bed before
performing the Level Bed procedure. Performing a Level Bed function without the
Magnetic Print Mat will produce an invalid result.
1. On the Main Menu, rotate the Knob until the Prepare option is highlighted, then
press the Knob to enter the Prepare Menu.
2. Rotate the Knob until the Level Bed option is highlighted, then press the Knob to
begin the Level Bed procedure.
Disable Steppers
1. On the Main Menu, rotate the Knob until the Prepare option is highlighted, then
press the Knob to enter the Prepare Menu.
2. Rotate the Knob until the Disable Steppers option is highlighted, then press the
Knob to disable the Stepper Motors. The X, Y, and Z axes can now be independently
moved by hand. To re-enable the Stepper Motors, turn the printer off, then turn it
back on.
Page 20

20
Adjusting Target Temperature
The Target Temperature is the temperature to which the printer will heat the Nozzle. By
default, the Target Temperature is set to 210°C.
1. On the Main Menu, rotate the Knob until the Control option is highlighted, then
press the Knob to enter the Control Menu.
2. Rotate the Knob until the Temperature option is highlighted, then press the Knob to
enter the Adjust Temperature Screen.
3. Rotate the Knob until the Nozzle option is highlighted, then press the Knob to edit
the value.
4. Rotate the Knob to change the Target Temperature, then press the Knob to save
the value.
Z Offset Setting
The Z Offset Setting is used to adjust the distance between the Nozzle and the Print Bed.
This can be done before printing or during printing. If the distance between the Nozzle and
the Print Bed is too small, increase the Z Offset. if the distance between the Nozzle and the
Print Bed is too large, decrease the Z Offset. The proper distance between the Print Bed
and the Nozzle is when there is a slight amount of resistance when moving a piece of
ordinary printer paper between the Nozzle and the Print Bed.
If you changed the Z Offset prior to printing, turn the printer off and then back on to save
the setting as the default.
Page 21

21
1. On the Main Menu, rotate the Knob until the Control option is highlighted, then
press the Knob to enter the Control Menu.
2. Rotate the Knob until the Z Offset Setting option is highlighted, then press the
Knob. The printer will test the distance from the Nozzle to the Print Bed in several
places to determine the current Z offset. When it is done testing, the Adjust Z
Offset Screen is displayed.
3. Place a sheet of ordinary printer paper between the Nozzle and the Print Bed.
Rotate the Knob to adjust the Z offset until there is a slight amount of resistance
when moving the paper around between the Nozzle and Print Bed.
4. When the proper Z offset is set, press the Knob to return to the Control Menu.
Connect to Wi-Fi®
Note that the MP Cadet printer does not support 5G Wi-Fi® networks and cannot connect
if there are already 10 or more Wi-Fi connections.
1. On the Main Menu, rotate the Knob until the Control option is highlighted, then
press the Knob to enter the Control Menu.
2. Rotate the Knob until the Wi-Fi Network option is highlighted, then press the Knob
to enter the Wi-Fi® Network Menu.
3. Rotate the Knob until the Connect to Wi-Fi option is highlighted, then press the
Knob to display the Connect to Wi-Fi Screen.
Page 22

22
4. Download and install the PoloPrint app from the Google Play™ store. During
installation, the app will ask for permissions to access Storage and Location
information. Slide the controls to the right to allow access, then touch DONE to
continue.
5. Open the PoloPrint app on your mobile device. The app will display a wizard
interface, which will introduce you to its features. Touch Next to go through the
tutorial pages, then touch Finish on the last page.
Page 23

23
6. The wizard will now prompt you to input your Wi-Fi® network settings. Input your
network's Wi-Fi SSID and password, but do not touch OK yet. Note that 5G
networks are not supported.
7. Press the Knob on the printer. The printer will connect to your Wi-Fi network.
8. Once the connection has been successfully made, touch OK in the app.
Page 24

24
9. After configuring the Wi-Fi® connection, the wizard will now prompt you to input
the printer's name (optional) and IP address. Use the Machine Type pull-down list
box to select MP Cadet. Touch the Add Printer button to complete the process.
Show Wi-Fi® IP
1. On the Main Menu, rotate the Knob until the Control option is highlighted, then
press the Knob to enter the Control Menu.
2. Rotate the Knob until the Wi-Fi Network option is highlighted, then press the Knob
to enter the Wi-Fi® Network Menu.
3. Rotate the Knob until the Show IP option is highlighted, then press the Knob to
display the network IP address.
4. Press the Knob to return to the Wi-Fi Network Menu.
Page 25

25
Wi-Fi Device/Machine Info
1. On the Main Menu, rotate the Knob until the Control option is highlighted, then
press the Knob to enter the Control Menu.
2. Rotate the Knob until the Wi-Fi Network option is highlighted, then press the Knob
to enter the Wi-Fi® Network Menu.
3. Rotate the Knob until the Wi-Fi Device Info option is highlighted, then press the
Knob to display the Machine Info Screen, which shows the Wi-Fi module name,
Wi-Fi module firmware version number, and the IP address.
4. Press the Knob to return to the Wi-Fi Network Menu.
Firmware Update
In the event that a firmware update is available, it will be made available on the internet.
Perform the following steps to check for the existence of a firmware update and to
perform the update, if one is available.
1. On the Main Menu, rotate the Knob until the Control option is highlighted, then
press the Knob to enter the Control Menu.
2. Rotate the Knob until the Wi-Fi Network option is highlighted, then press the Knob
to enter the Wi-Fi® Network Menu.
3. Rotate the Knob until the Wi-Fi OTA Update option is highlighted, then press the
Knob. The OTA Update Screen will display. If new firmware has been found, press
Page 26

26
the Knob to begin updating the MP Cadet firmware. If no new firmware is available,
press the Knob to return to the Wi-Fi Network Menu.
Changing Parameters While Printing
1. With the Printing... Screen displayed, press the Knob to display the Print Control
Menu.
2. Rotate the Knob until the Tune option is highlighted, then press the Knob to display
the Tune Menu.
3. Rotate the Knob until the parameter you want to adjust is highlighted, then press
the Knob to displays that Adjust Screen for the selected parameter.
4. Change the value as desired, then select the Tune option to return to the Tune
Menu.
5. Repeat for other parameters, as desired.
Pausing and Resuming Print
1. With the Printing... Screen displayed, press the Knob to display the Print Control
Menu.
Page 27

27
2. Rotate the Knob until the Pause Print option is highlighted, then press the Knob to
pause the print. The printer will finish the current layer, then will pause printing.
3. When you are ready to resume the print, rotate the Knob until the Resume Print
option is highlighted, then press the Knob to resume the print. The printer will heat
the Nozzle to the target temperature, extrude a small amount of filament, then
display the Resume Options Menu.
4. Clean the extruded filament, rotate the Knob until the Continue option is
highlighted, then press the Knob to resume printing.
Changing Filament While Printing
1. With the Printing... Screen displayed, press the Knob to display the Print Control
Menu.
2. Rotate the Knob until the Pause Print option is highlighted, then press the Knob to
pause the print. The printer will finish the current layer, then will pause printing.
3. Rotate the Knob until the Auto Retract Filament option is highlighted, then press
the Knob to start the Unloading Filament process.
5. Once the filament has been unloaded, replace the spool of filament on the Filament
Holder with a new spool of filament.
Page 28

28
6. Using a pair of scissors or side cutters, cut about an inch off the end of the filament,
then gently straighten the end of the filament. Squeeze the lever on the Extruder,
insert the filament into the bottom until you encounter resistance, then release the
lever.
7. Rotate the Knob until the Auto Feed Filament option is highlighted, then press the
Knob to start the Loading Filament function. The Nozzle will heat to the target
temperature, if necessary, then will load the filament and extrude a small amount.
Clean the extruded filament.
8. Rotate the Knob until the Continue option is highlighted, then press the Knob to
continue printing with the new filament.
Saving a Print
The MP Cadet printer features the ability save a print in progress, so that you can turn the
printer off and resume printing at a later time. Perform the following steps to save and
resume a print in progress.
1. With the Printing... Screen displayed, press the Knob to display the Print Control
Menu.
Page 29

29
2. Rotate the Knob until the Save Printing and Off option is highlighted, then press the
Knob to save the print.
3. Wait for printing to stop, then turn the printer off.
4. When you are ready to continue the print, turn the printer on. The Power Loss
Recovery Menu will display.
5. Rotate the Knob until the Resume Print option is highlighted, then press the Knob
to continue the print. The printer will heat the Nozzle to the target temperature,
then will resume the print.
Continuing a Print After Power Loss
In the event that power is lost for any reason, the printer will remember where it was in
the print process when power was lost. Perform the following steps to continue the
interrupted print.
1. Turn the printer on. The Power Loss Recovery Menu will display.
2. Rotate the Knob until the Resume Print option is highlighted, then press the Knob
to continue the print. The printer will heat the Nozzle to the target temperature,
then will resume printing.
Canceling a Print in Progress
1. With the Printing... Screen displayed, press the Knob to display the Print Control
Menu.
Page 30

30
2. Rotate the Knob until the Stop Print option is highlighted, then press the Knob to
cancel the print.
Printing with the App
1. Launch the PoloPrint app. The app will list models on the cloud. Each model's "card"
shows the approximate amount of time it will take to print. To print a model, touch
the model's "card", then touch the icon that appears in the lower right corner of the
"card". The app will download the model file from the cloud. When the download is
finished, it will start printing automatically.
2. If you want to view the files on the microSD™ card, touch the SD FILES tab at the
top of the screen. The app will display the files on the microSD card. To print a file,
touch the "card", then touch the icon in the bottom right corner of the "card".
Page 31

31
3. While the model is printing, you can see the progress of the print by touching the
STATE tab at the top of the screen.
WIIBUILDER SLICING SOFTWARE
Installation
This printer includes a copy of WiiBuilder Slicing Software to turn 3D models into .gcode
files for printing from the microSD™ card. The software on the included microSD card has
been configured for use with the MP Cadet printer.
To install the software, double click the Wiibuilder2.0.6.3_Monoprice_setup.exe installation
file on the microSD card, then follow the steps below.
1. The installation wizard will first prompt you to select
the installer language. The available languages are
English, Japanese, and Simplified Chinese. Select your
preferred language and click the OK button to
continue.
Page 32

32
2. The installer will then prompt you to select the directory to which WiiBuilder will be
installed. If you do not want to use the default directory, click the Browse... button
to open the file browser and select your preferred directory. Click the Next > button
to continue.
3. The installer will prompt you to select the components you want to install. If you
are unsure of which components you need, select all components. Click the Install
button to start the installation process. If you already have a component installed,
the installer will inform you and skip installation of that component.
Page 33

33
4. The install wizard will extract the installation files and install the program. After
installation is complete, click the Next > button to continue.
5. By default, the installer has the Start Wiibuilder 2.0.6.3 option should be checked. If
not, check the box, then click the Finish button to close the installer and launch
WiiBuilder.
Page 34

34
6. Once WiiBuilder launches, it will launch a wizard that will display a series of six
animated pages that show how to perform several common functions. Click the
next button button to view the next page. If you want to see a previous page, click
the last button. Once all six pages have been displayed, click the finish button to
close the wizard.
Page 35

35
7. WiiBuilder now prompts you to select the Machine Type. Select the MP Cadet entry,
then click the OK button to continue.
8. WiiBuilder is now configured and ready for use! If you want to see the wizard again,
click Help > RunWizard. If you want to read the product manual, click Help > Manual.
TECHNICAL SUPPORT
Monoprice is pleased to provide free, live, online technical support to assist you with any
questions you may have about installation, setup, troubleshooting, or product
recommendations. If you ever need assistance with your new product, please come online
to talk to one of our friendly and knowledgeable Tech Support Associates. Technical
support is available through the online chat button on our website www.monoprice.com
or through email by sending a message to tech@monoprice.com. Check the website for
support times and links.
Page 36

36
SPECIFICATIONS
Model
40108
Printing Technology
Fused Filament Fabrication (FFF)
Supported Filament Types
PLA, PLA Pro
Filament Diameter
1.75mm
Nozzle Diameter
0.4mm
Maximum Nozzle Temperature
250°C
Build Volume
3.9" x 4.1" x 3.9" (100 x 105 x 100 mm)
Printing Accuracy
0.1 - 0.4 mm
Leveling Method
Automatic
Supported Slicing Software
WiiBuilder, Cura
Supported Model File Types
.STL, .OBJ, .gcode
Supported Inputs
microSD™ card, Wi-Fi®, WLAN, USB
Maximum microSD Card Capacity
8GB
Supported microSD Card Formatting
FAT32, 4096 bytes per sector
Dimensions
8.5" x 7.9" x 10.6" (215 x 200 x 270 mm)
Weight
6.6 lbs. (3.0 kg)
Page 37

37
REGULATORY COMPLIANCE
Notice for FCC
This device complies with Part 15 of the FCC rules. Operation is subject to the following
two conditions: (1) this device may not cause harmful interference, and (2) this device must
accept any interference received, including interference that may cause undesired
operation.
Modifying the equipment without Monoprice's authorization may result in the equipment
no longer complying with FCC requirements for Class B digital devices. In that event, your
right to use the equipment may be limited by FCC regulations, and you may be required to
correct any interference to radio or television communications at your own expense.
This equipment has been tested and found to comply with the limits for a Class B digital
device, pursuant to Part 15 of the FCC Rules. These limits are designed to provide
reasonable protection against harmful interference in a residential installation. This
equipment generates, uses, and can radiate radio frequency energy and, if not installed
and used in accordance with the instructions, may cause harmful interference to radio
communications. However, there is no guarantee that interference will not occur in a
particular installation. If this equipment does cause harmful interference to radio or
television reception, which can be determined by turning the equipment off and on, the
user is encouraged to try to correct the interference by one or more of the following
measures:
• Reorient or relocate the receiving antenna.
• Increase the separation between the equipment and receiver.
• Connect the equipment into an outlet on a circuit different from that to which the
receiver is connected.
• Consult the dealer or an experienced radio/TV technician for help.
Page 38

38
Radio Notice for FCC
Caution
This FCC Part 15 radio device operates on a non-interference basis with other devices
operating at this frequency. Any changes or modification to said product not expressly
approved by Monoprice, including the use of non-approved antennas, could void the user’s
authority to operate this device.
This device complies with Part 15 of the FCC Rules. Operation is subject to the following
two conditions: (1) this device may not cause harmful interference, and (2) this device must
accept any interference received, including interference that may cause undesired
operation.
RF Exposure Statement for FCC
Caution
This equipment complies with radiation exposure limits set forth for an uncontrolled
environment. End users must follow the specific operating instructions for satisfying RF
exposure compliance. This transmitter must be at least 20 cm from the user and must not
be collocated or operated in conjunction with any other antenna or transmitter.
Notice for Industry Canada
This Class B digital apparatus complies with Canadian ICES-003.
Cat appareil numérique de la classe B est conforme à la norme NMB-003 du Canada.
Page 39

39
Radio Notice for Industry Canada
Caution
This IC RSS-210 radio device operates on a non-interference basis with other devices
operating at this frequency. Any changes or modification to said product not expressly
approved by Monoprice, including the use of non-approved antennas, could void the user’s
authority to operate this device.
This device complies with IC RSS-210. Operation is subject to the following two conditions:
(1) this device may not cause harmful interference, and (2) this device must accept any
interference received, including interference that may cause undesired operation.
RF Exposure Statement for Industry Canada
Caution
This equipment complies with radiation exposure limits set forth for an uncontrolled
environment. End users must follow the specific operating instructions for satisfying RF
exposure compliance. This transmitter must be at least 20 cm from the user and must not
be collocated or operated in conjunction with any other antenna or transmitter.
Wi-Fi® and Wi-Fi Alliance® are registered trademarks of Wi-Fi Alliance.
microSD™ is a trademark of SD-3C, LLC.
 Loading...