

Page 1
Techn ical da ta is sub ject to c hange w ithou t notice .。
No. 1 Xiahe Rd , Jiang gao Town,
Bai yun Dis trict , Guang zhou, C hina
Tel: 02 0-813 01427 / 8 13000 45
Com pany web site: w ww.aux dio.c om
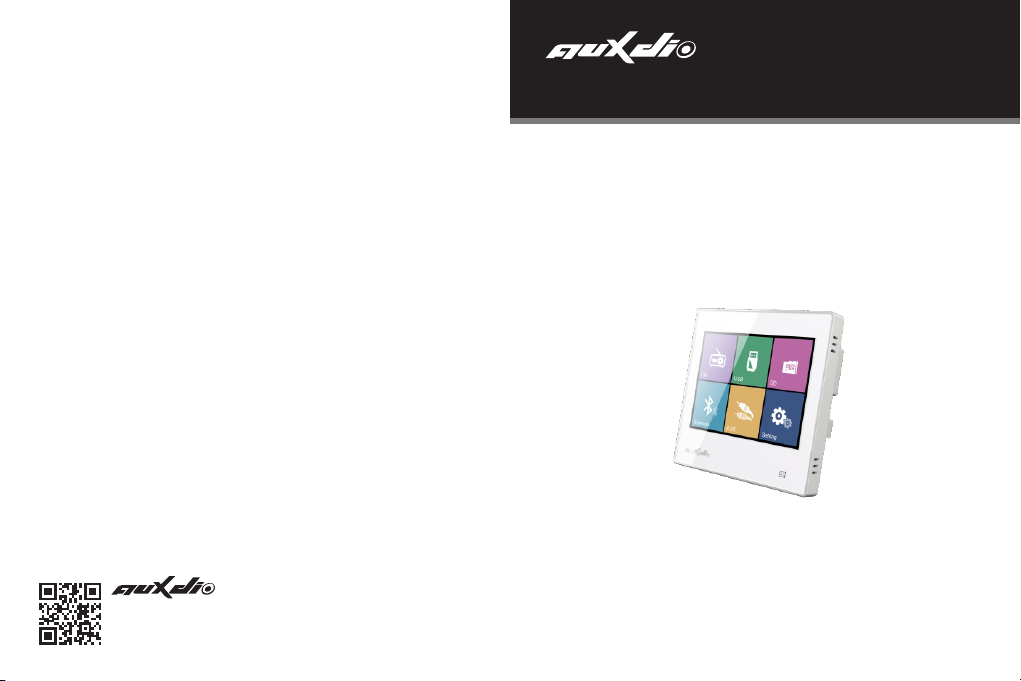
High Fidelity Digital Amplifier
DM837
User's Manual
Gua ngzho u DSPPA Au dio Co. , Ltd.
Page 2
Content
Featur es
Basic fu ncti ons
Control panel desc ript ion
ON/OFF a nd sta ndby oper atio n
Play fun ctio n
FM play
USB play
SD play
Bluetooth pl ay
AUX p lay
Set
Set the sy stem
Bluetooth an d volu me config urat ion
Rem ote de scr ipti on
Specif icat ion
Size
Instal lati on and conn ecti on
Cartri dge insta llat ion
Box i nstalla tion
Disass embl y
Pac king list
1
2
2
2
3
3
4
6
6
7
8
8
9
10
11
11
12
13
15
16
16
Page 3

Features
Basic Functions
● With music c ontrol center, convenient and easy-ope ratin g
● Lux uriou s desig n, 3.5- inch TF T LCD screen, capaciti ve touc h opera tion
● Five mode options : FM radi o, USB , SD, Bluetooth, AUX .
● With compressed and lossless au dio for mats MP 3, WMA , WAV, FLAC
● Support auxiliary in put sen sitiv ity (ad justa ble).
● Support FM radio; can search channels manually and au tomat icall y
; can save 20 channel s at most .
● Wide voltage inpu t, fit in w ith 100 ~ 2 40VAC, 50 / 60Hz.
● Class D diff erential output
● Support infrared remot e control oper ation
● Support RS485 control
- 1 -
1. Cont rol Pa nel In structi ons
Ope ratio n scree n
Inf rared r eceiv ing por ts
USB p ort
Swi tch
SD po rt
*Fo r produ ct app earan ce colo r, th e real ob ject in k ind pre vail
2. Opera tion o f on/o ff and stan dby
ON: Tur n the ke y to the r ight a nd start the boo t.
OFF: Turn th e key to t he lef t and turn it off
ONOFF
- 2 -
Page 4
Play function
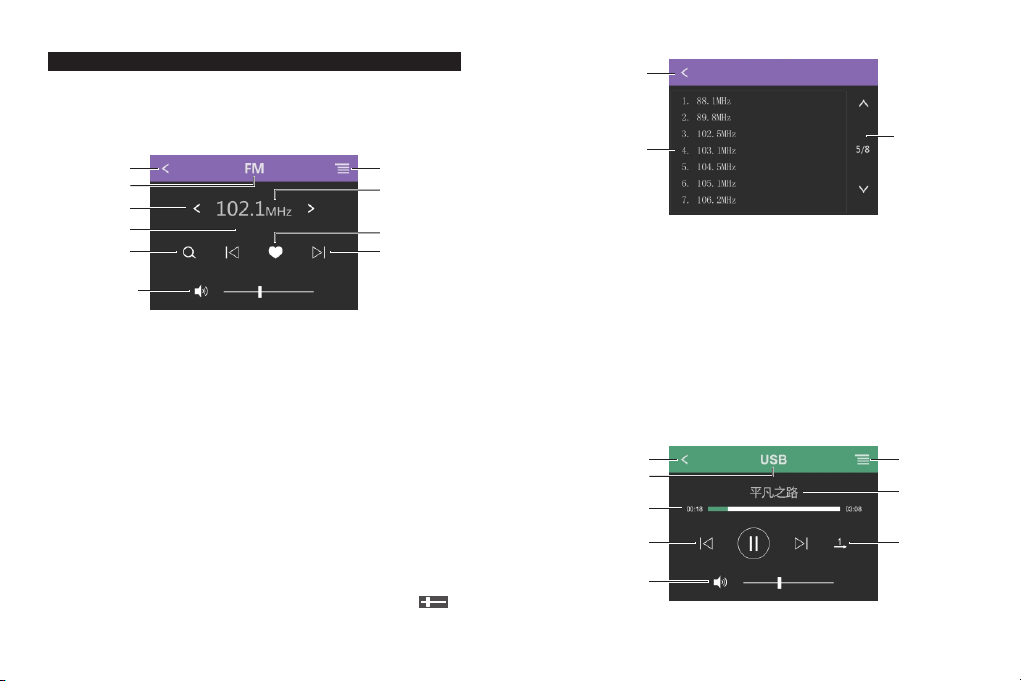
1. FM play
Twice-c lick t he "FM" key to e nter the ra dio mo de
1 2
3
4
6
Pla ying
8
10
Pic. 1
1. B utton of "Retur n "; clic k it and it w ill r eturn to homepage.
2. Radio list button; click it and it will enter radio list interfa ce(Pi c.2).
3. It displays the current mode.
4. Button of ra dio fre quenc y subtl e tuning: pres s ”<“ and t he
frequency will go down; press ">" a nd it wil l go up. Long pres s
“<”or “> ”and i t can hal f-automatically se arch radio’s
frequency and the searching will stop when avail able ch annel is searc hed .
5. Displays the current radio freq uency.
6. Display t he stat us
7. Button to sa ve/keep the radio channel. P ress it and the channel w ill be
saved .Press it again and it will be cancele d
8. Button of fu lly automati c chann el searching . Availa ble fre quenc y will
be saved to the radio list when it is searched
9. Radio channel switch button. Pr ess it to m ove for ward or backwa rd.
10. Volume button, press it a nd it wil l be mute ; slide t he“ ”a nd
the volume will be ad justed.
- 3 -
。
5
7
9
1
3
Radio list
2
Pic.2
1. B utt on of "Return "; press it an d it wil l retu rn to FM i nterfac e.
2. Ra dio list na viga tion bar, it ca n turn the page up an d down w hen
there are m any pages ,
3. Th e radio lis t disp lay area. It disp lays t he stored radio s tati ons.
( Save / cancel th e savi ng in the FM in terface t o add or d elete the
statio n in the l ist.)
2. USB pla y
Twice cli ck “ USB ” in the home page a nd it wi ll enter US B play m ode.
1 2
3
4
5
6
7
8
Pic.3
- 4 -
Page 5

1. Re turn b utton. Press it to retu rn to ho mepa ge.
2. Play li st but ton. C lick it to en ter th e play l ist inter face (Fig ure 4) .
3. Displ ays th e current mode.
4. Infor mati on of th e song bein g play ed.
5. The pla ying p roce ss bar.
6. Playi ng con trol b utton: the prev ious s ong, play / pause , the ne xt song.
7. Playi ng mod e button
8. Vol ume butto n. Pre ss it an d it will go mu te; sl ide the bar “ “ and
it will ad just t he vol ume
1
3
Pla ying li st
2
Pic. 4
1. Bu tton of "Ret urn" . Pres s it and return USB p layi ng interf ace.
2. Pl ay list nav igat ion ba r . It can tu rn pag e up and d own when
there are m any pages.
3.Play ing li st are a, i t show s the mu sic list in U SB .
- 5 - - 6 -
3. SD play
Twice cli ck "SD " to use S D playing m ode
。
1 2
3
4
5
6
7
8
Pic.5
1. Re turn b utton. Press it to retu rn to ho mepa ge.
2. Play li st but ton. C lick it to en ter th e play l ist inter face (Fig ure 4) .
3. Displ ays th e current mode.
4. Infor mati on of th e song bein g play ed.
5. The pla ying p roce ss bar.
6. Playi ng con trol b utton: the prev ious s ong, play / pause , the ne xt
song.
7. Playi ng mod e button
8. Vol ume butto n. Pre ss it an d it will go mu te; sl ide the bar “ “
and it wil l adju st the volume
4. Bluet ooth p lay
Twice cli ck “Bl ueto oth ”to use B luet ooth p lay mode.
Page 6

1
Blueto oth
2
Con necte d
3
4
5
Pic. 6
1. Re turn b utton. Press it to retu rn to ho mepa ge.
2. Displ ays th e current mode.
3. Di splays th e Blue tooth connect ion status
4. Infor mati on of th e song bein g play ed.
5. Playi ng con trol b utton: the prev ious s ong, play / pause , the ne xt song.
6. Vol ume butto n. Pre ss it an d it will go mu te; sl ide the bar “ “
and it wil l adju st the volume
5. AU X play
Twice cli ck "AU X" ico n to use AUX play mod e。
1
2
3
- 7 -
1. Re turn b utton. Press it to retu rn to ho mepa ge.
2. Displ ays th e current mode.
3. Volum e butt on. Press it and it w ill go m ute; slide the ba r “ ”,
and it wil l adju st the volume
Setting
Set the sy stem
Twice cli ck“ ” ic on to en ter system sett ing in ter face .。
There are f ollowin g info rmation i n the se tting int erface:
1. Address
2. Langu age: , switchable sy stem l anguage
3. Backl ight :you c an set when t o stan d by the system wit hout
operat ion fo r a cer tain p eriod of time
4. Treble/ bass a djustme nt set ting
5. AU X sensiti vity :, you can se t the AU X sens itivity l evel
6. Baud ra te set ting
7. Sy stem i nformat ion di splay: It d ispl ays syste m vers ion No, dev ice
Bluetooth na me and c onnecti on pas swor d
- 8 -
Page 7

Blueto oth an d volu me config uration
Pre pare a c omputer first a nd connect it to th e devi ce through the US B
cable. Tur n on the DM83 7 conf igurati on sof tware in the comp uter.
1. Modif y the pa ssword and set th e Blue tooth name
① Click th e "Fin d DM837" bu tton o n the le ft si de of th e home page
of th e software,an d then d evice’s in form ation wil l show u p in the top.
② Fill the n ame an d pass word t ha 's to b e changed b elow “ Bluetoo th”.
t
Click “C onfi gure ” and it will b e fini shed (Pass word c an be empty ).
XXX
②
①
DM8 37 Conf igura tion
Findin g DM 837. ..
Read ID O K, as fo llow:
VendorI D:0x A5A
Produc tID: 0x201
Version Numbe r:0x1 00
Find D M837
Blue toothBlue toothBlue tooth
Name Pwd
Conf igure
Maxi mum vol ume lim itMaxi mum vol ume lim itMaxi mum vol ume lim it
25% 50% 75% 100%
Conf igure
Sof tware h omepa ge
2. Maxim um vol ume limit for the d evice
Here you can lim it the t otal o utput vol ume of t he dev ice, you ca n set th e
tot al volume of "25% " "50% ”
DM8 37 Conf igura tion
Findin g DM 837. ..
Read ID O K, as fo llow:
VendorI D:0x A5A5
Produc tID: 0x201
Version Numbe r:0x1 00
Config uring blue tooth
name=D M837 ,pwd= 12345 6
Send d ata ok!
Find D M837
Hom epage o f the sof tware
Click “C onfi gure ” and it will b e fini shed
Blue toothBlue toothBlue tooth
Name Pwd
DM837
Conf igure
Maxi mum vol ume lim itMaxi mum vol ume lim itMaxi mum vol ume lim it
25% 50% 75% 100%
Conf igure
- 9 -
XXX
1236456
Volu me limi t setti ng area
Rem ote d escription
1
4
6
1. Standby switch
2. Mode selection. Cl ick the button to cy cle thro ugh the mode: FM,
USB, SD, Bluetooth, AUX .
3. Mute
4. Sound mode selecti on.
5. Menu (not ava ilable).
6. Play controlling area. Can play / pause, the previous so ng, the
next song, the volume contro l.
7. Play mode selectio n. Click the button to cycle through the
display: single cyc le, the order of play
8. Numeric key pad: In th e USB/SD card mode, the number keys
dire ctly select the track to play .In the F M radio mode, the
number keys di rectly e nters the FM frequency .
* The input range is 0870 ~ 1 080. If the input frequency is out of
range, it will not respond. For e xample: 0875 input mean s 87.5MHz
- 10 -
2
3
5
7
8
Page 8

Par ame ter s
In sta lla tion and co nne cti on
Powe r Suppl y Input
Out put Powe r
Rat ed Impe dance 8Ω
Total H armon ic Dist ortio n ≤0.0 3% (1KH z, 1W, 8Ω)
Sig nal to No ise Rat io >81 dB
Fre quenc y Respon se 20H z – 20KHz
Aux iliar y input s ensit ivity ( adjus table ) AUX
Con troll er
Aud io form at MP3,W MA,WAV,FLAC e tc
Blu etoot h input
Con trol in terfa ce
Stor age typ e SD 、US Bcard
Pro duct si ze 86×86×3 8mm
Remo te cont rol eff ectiv e firin g area an gle 60°
Remo te
Eff ectiv e remote c ontro l dista nce 10m
con trol
Remo te cont rol bat tery
Pr odu ct Size
- 11 -
~10 0-240 V/50/ 60Hz
2 ×10W
AUX: 1 .0V / 500 mV
BT4. 1
RS4 85
CR2 032
① ⑤ ⑥③② ④
Rea r of the a mpli fier
Coonec tion p ort d escr iption:
① ~100-2 40VPower inp ut
② Fmantenna
③ Signal g roun d line
④ Audio in put 1 (2 × 0 .3mm² dua l shie lded audi o cabl e)
⑤ RS485 in terf ace⑥ Ampl ifie r output (o xyge n-free copper )
Note: All wire c onne ctions mu st not b e exposed .
- 12 -
Page 9

Interf ace te rminal su b-fu nction ta ble
Powe r
Fun ction
Ico n
Nam e
N L
Zero
Lin e
FM AUX
ANT
Fire
FM
Wire
Ant enna
GND
Sig nal
grou nd
R L A B
Aud io
Aud io
inp ut
inp ut
rig ht
lef t
RS4 85
A B
Powe r Outpu t 8Ω
OUT L+
Lef t
spe aker
pos itive
end
OUT L-
Lef t
spe aker
neg ative
end
OUT R-
Rig ht
spe aker
neg ative
end
OUT R+
Rig ht
spe aker
pos itive
end
②
Put he con nect or thr ough t he res erve d hole a roun d the box, an d put
the m oun ting b ox int o the wa ll gro ove by usi ng fou r self -tap ping
scr ews to fix th e moun ting b ox fir mly in t he wal l groo ve.
gro ove in
the w all
Instal lati on
●Mount ing bo x inst allatio n Note : The size of the mou nting
box y ou hav e purchas ed can n ot be less th an 40m m.
①
Dig a groove fit i n with t he box i n the wall an d dril l holes in
the groove in th e wall f or connec tion l ater a ccording to the
screw holes at t he fou r corners of the box bott om.
*Reserved
openings
* Please a rran ge the alig nmen t with the op enin g positio n of
the actu al mou nting box.
Gro ove in
the w all
- 13 -
③
As shown i n the de monstra tion b elow, sele ct two b uckles in t he
direction of A or B, and p ull th e outer edge out of it so tha t the
snap is di seng aged; careful ly dis connect t he fro nt pan el of th e
Bluetooth di gita l amplifi er fro m the ba se.
A B
bas e
Fro nt pane l
④
Connec t the co nnector to the in terface of the Blueto oth di gital
amplif ier ba se, an d then fix th e Blue tooth dig ital a mplifie r base
with two screw s on the t wo mounti ng pos ts of th e mounting box
- 14 -
Page 10

⑤
Connec t the fr ont pa nel of t he Blu etooth di gita l amplifi er in
par allel wit h the fi xed ba se, and clo se it ti ghtly and c aref ully
and chec k the st ability.
Not e: When t he fron t panel a nd the ba se is fas tened , inser t the pi n
int o the fro nt pane l hole . The nee dle can n ot be ben t or dama ged,
oth erwi se it wil l cause s erio us dama ge to the a mpli fier.
● Note on box inst alla tion:th e dept h of the b ox must not be
less tha n 40mm。
①
Put the co nnec tor th rough the reser ved h oles a roun d the box,
and put th e moun ting box into the wall gr oove b y using four
self-ta ppin g scre ws to fix the m ount ing box firmly in t he wal l
gro ove.
*re serv ed
hol es
* Ple ase arr ange th e align ment wi th the op en posi tion of t he box
②
Please refer y o step 3 ,ste p 4 and step 5 of th e mountin g box
instal lati on to co mplete th e inst allatio n.
groo ve in the w all
groo ve in the w all
- 15 -
●Disassembly
①
Fin d the g ap of th e comb inat ion po siti on bet ween t he right of f ront
panel of a mpli fier a nd the b ase.
②
Use a flat tene d scre wdri ver to aim at the buc kle beside the ga p
and carefull y pry t he buc kle, and th en gra sp the front pane l with
both han ds, so t hat the front panel of the ampl ifie r is as pa rallel
as possi ble to t he bas e. Be careful not to dama ge the p ins on the
bas e.
Scr ewdri ver
Pac kag e Lis t
Compon ent quanti ty
Digita l powe r amplifier
Rem ote Co ntro l
Pro duct Manu al
- 16 -
1
1
1
Page 11

Warning Statement
This device complies with part 15 of the FCC Rules. Operation is subject to the
following two conditions: (1) This device may not cause harmful interference, and (2)
this device must accept any interference received, including interference that may cause
undesired operation.
Any Changes or modifications not expressly approved by the party responsible for
compliance could void the user's authority to operate the equipment.
Note: This equipment has been tested and found to comply with the limits for a Class B
digital device, pursuant to part 15 of the FCC Rules. These limits are designed to
provide reasonable protection against harmful interference in a residential installation.
This equipment generates uses and can radiate radio frequency energy and, if not
installed and used in accordance with the instructions, may cause harmful interference
to radio communications. However, there is no guarantee that interference will not
occur in a particular installation. If this equipment does cause harmful interference to
radio or television reception, which can be determined by turning the equipment off and
on, the user is encouraged to try to correct the interference by one or more of the
following measures:
-Reorient or relocate the receiving antenna.
-Increase the separation between the equipment and receiver.
-Connect the equipment into an outlet on a circuit different from that to which the
receiver is connected.
-Consult the dealer or an experienced radio/TV technician for help.
This equipment complies with FCC radiation exposure limits set forth for an
uncontrolled environment. This equipment should be installed and operated with
minimum distance 20cm between the radiator & your body.
 Loading...