

Page 1

The t ech nical data may be changed without prior notice
SMART HOME MUSIC SYSTEM
No.1 , ,
Address: Xiahe Rd,Jianggao Baiyun,Guangzhou China
Post Code:510450
Tel:+86-20-37166501
Web sit e:w ww.d spp ate ch. com
M
-
+
USER MANUAL
Guang zhou DS PPA Audi o Co., Lt d.
Page 2

Packing List
Component
Smart mus ic a mplifier
Box
Remote cont rol
Ceiling lou dspeakers
User manual
Quantity
1
1
1
2
1
Gua ngzhou DSPPA Audio Co., Ltd
16
Page 3
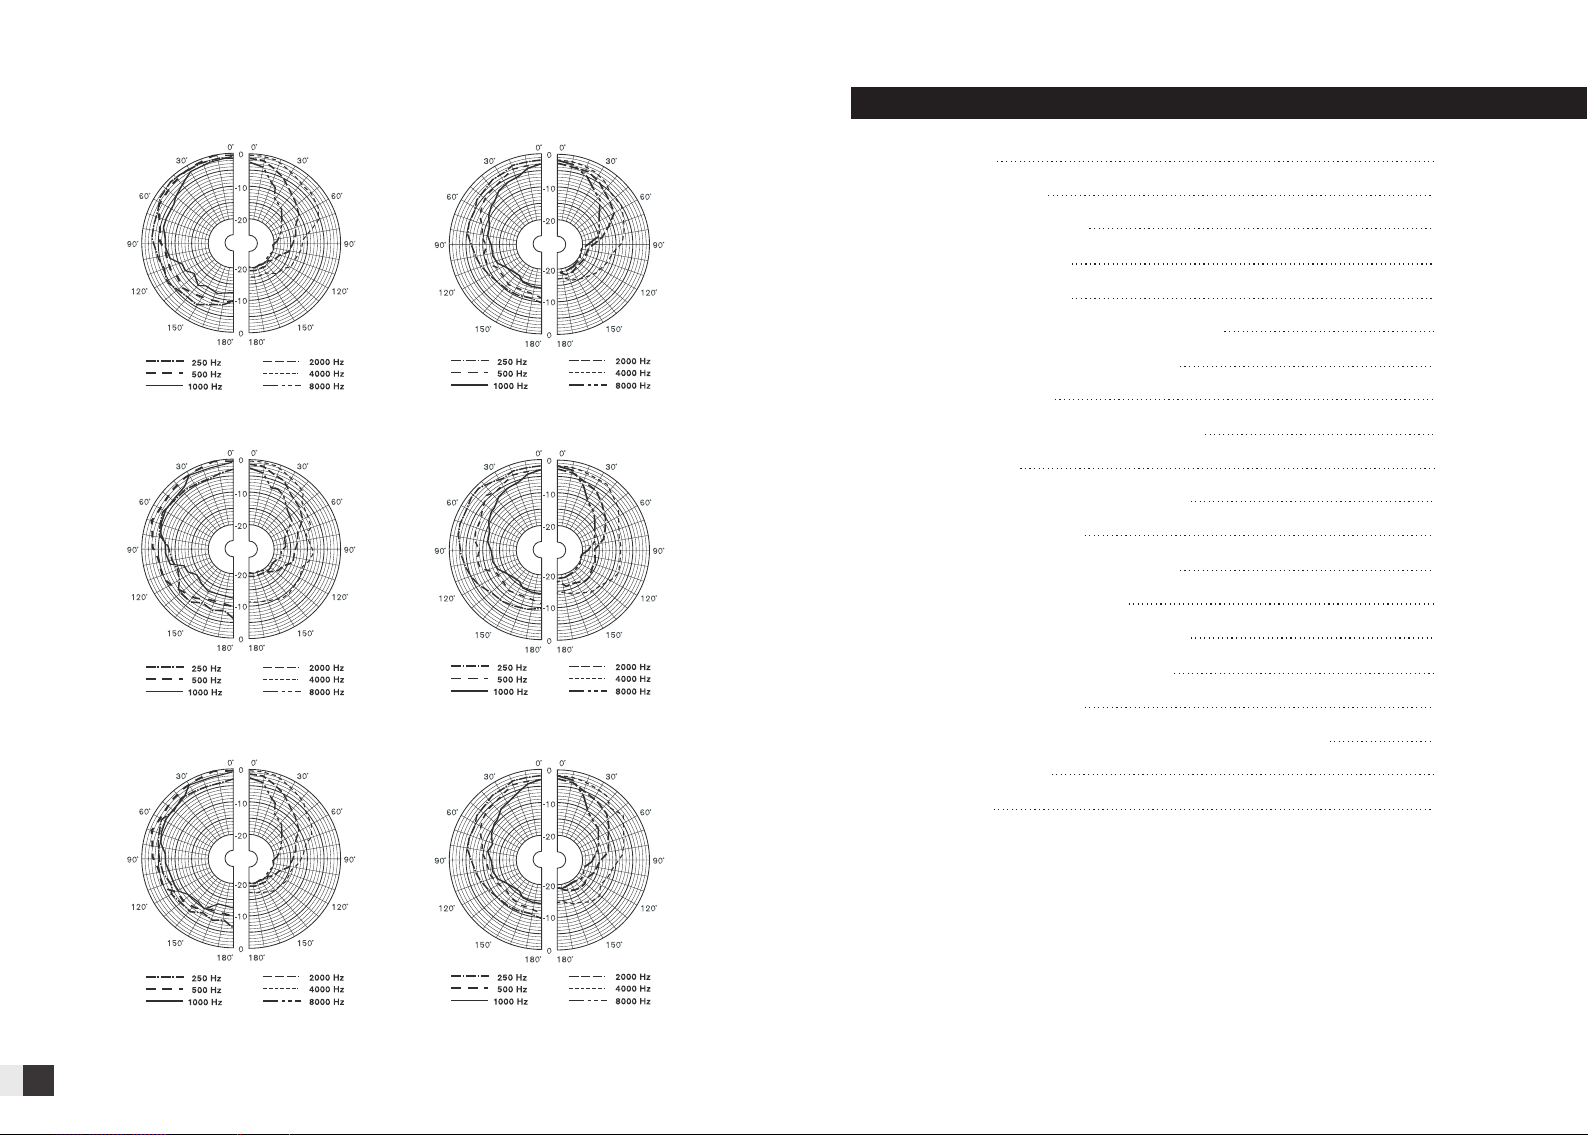
Directivity curves
Cont ents
M1 Verti cal dir ectiv ity p atter n M1 Hori zonta l dir ec tiv ity pat tern
M2 Verti cal dir ectiv ity p atter n M2 Ho rizon tal dir ectiv ity p atter n
Introduction
Profile of product
Smart music amplifier
Ceiling loudspeaker
Product Information
Smart music amplifier basic functions
Descriptions of music controller
On & Off, Standby
Smart music amplifier play function
System settings
Descriptions of remote controller
Installation and wired
Ceiling loudspeaker installation
Smart music amplifier wired
Functions of connection terminals
Smart music amplifier installation
Technical parameters
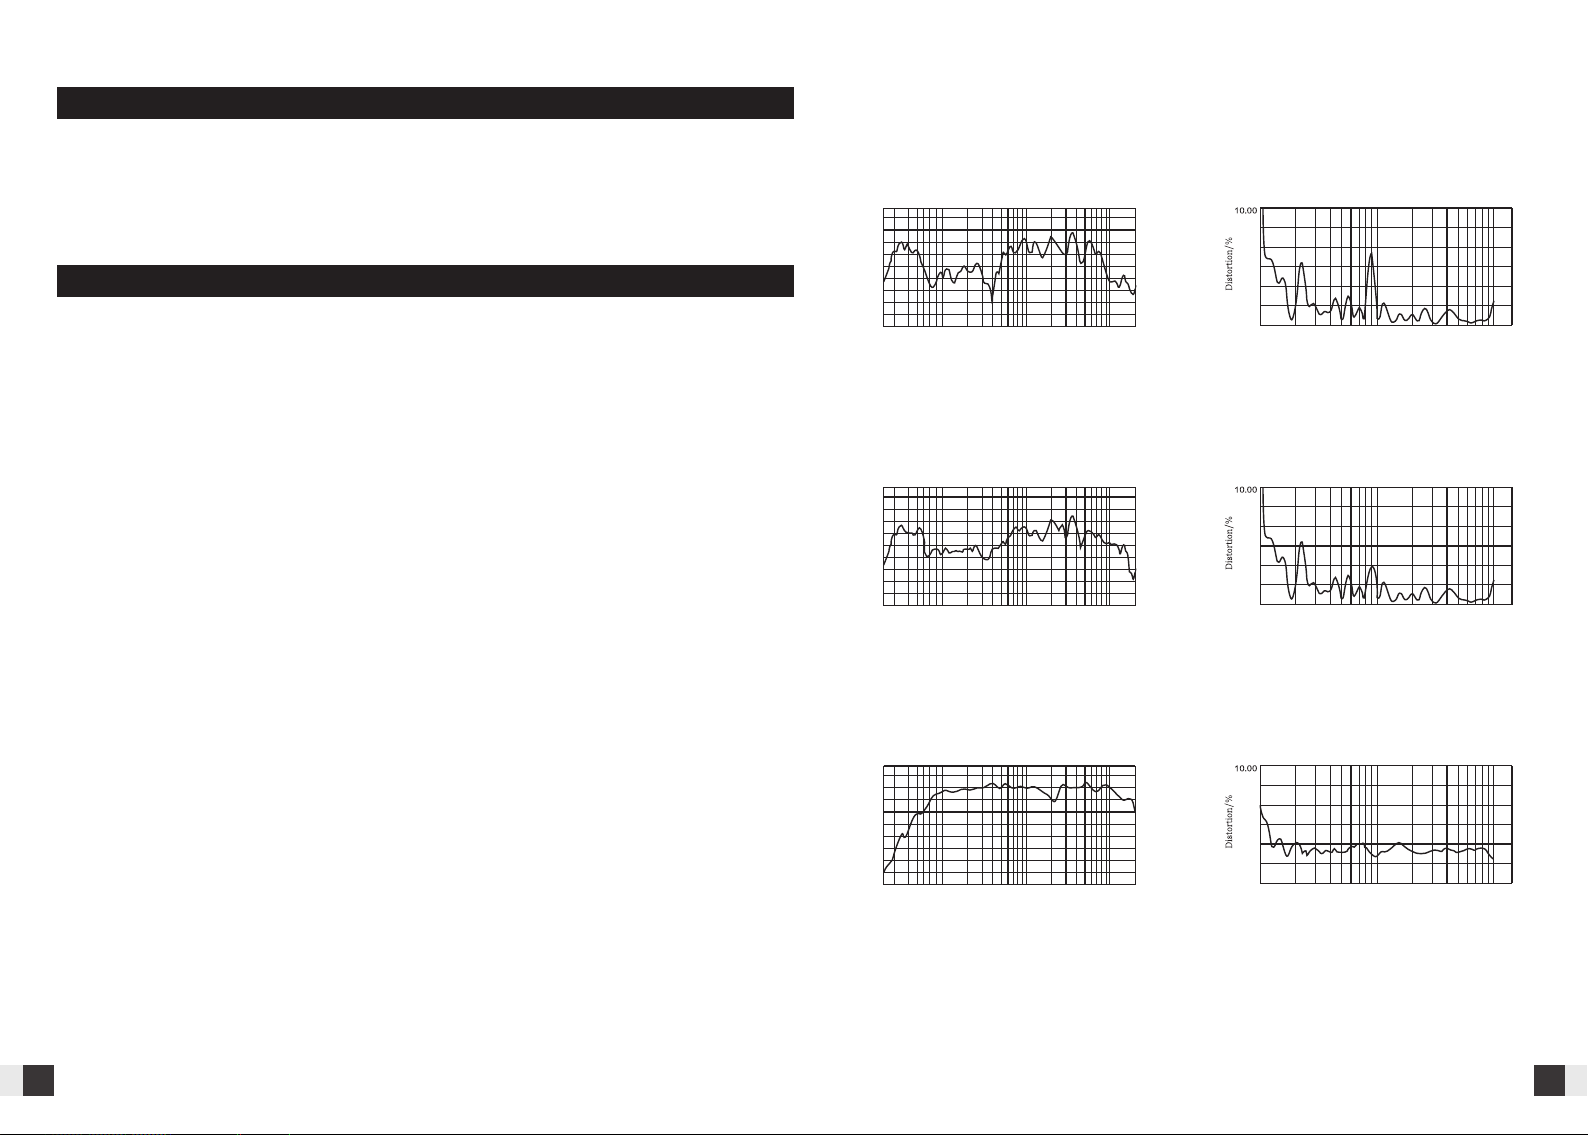
Frequency response and distortion characteristics
Directivity curves
1
1
1
1
2
3
3
3
4
5
6
7
7
9
10
10
13
14
15
15
www.dsppatech.com
M3 Verti cal dir ectiv ity p atter n M3 Ho rizon tal dir ectiv ity p atter n
Packing list
16
Page 4
Intr oduction Frequency response and sdistortion characteristic
Thanks fo r us ing our produ cts. All our pro ducts are tes ted strictl y before leav ing
the facto ry, with gua ra nteed qua li ty.
For bette r in stallatio n, commissi oning and use o f the product , please read t his manual in
detail befo re installa tion.
Prof ile of Produc t
This system con sists of a smart music amplifie r and two ceiling loudspe akers,
excellent sou nd quality, sleek design, s mall size and easy to ins tall features.
Suitable fo r small build ing environ ments, incl uding house , small off ice, reta il s hop, etc.
This system has t hree models available: M1, M2, M3. to meet your differe nt needs.
Smart music amplifier
Music sourc es: FM, USB , SD , AUX, Bluet oo th.
●
● Support MP3 , WAV, FLA C etc. compre ssion & lossl ess audio for mats.
● Support FM ra dio, suppor t automatic & m anual searc hing, can sto re 20 channel s.
Support AUX OUT.
●
● Wide volt ag e input, AC 100- 240V, 50 /60Hz.
● Built-i n 2x 10W class D amp lifier.
● Support inf rared remot e control ope ration.
● Luxurious a ppearance , touch butto n operation , visible LCD d isplay.
Ceiling lo ud sp ea ke r
●
Carbon allo y aluminum gr ille, with RA L whi te l ayer, can pe rf ectly com pl y with
any indoor ve nue.
● 6.5 inch driv er unit, larg e and special m agnetic cir cuit ensure s strong powe r.
(M3 model for c oaxial unit s, or 6.5-inc h woofer and 0. 75-inch twe eters)
● Full range dr iver unit des ign; perfec tly realize t he reproduc tion of voice a nd music.
● Highly flam e resistant m aterial, co mply with IEC 2 68-5 (PHC) st andards, ca n work with
RMS power f or 1 00 hours co nt inuously, can suppo rt i nstant ou tp ut of twice R MS p ower.
M1 freq uency r espon se ch aract erist ics
(dB SPL、1 W、1m)
100
90
80
70
60
50
50
200 500
100
5K
10K
2K
1K
M2 freq uency r espon se ch aract erist ics
(dB SPL、1 W、1m)
100
90
80
70
60
50
50
200 500
100
5K
10K
2K
1K
M3 freq uency r espon se ch aract erist ics
(dB SPL、1 W、1m)
100
90
80
70
60
50
50
200 500
100
5K
10K
2K
1K
M1
disto rtion c har ac ter istic
(THD< 1 .5% 1W、1m、1 00Hz- 10k Hz)
5.00
4.00
3.00
2.00
1.00
0.01
Hz
20K
200100 500
M2
1K
2K
disto rtion c har ac ter istic
10K5K
Hz
(THD< 1 .5% 1W、1m、1 00Hz- 10k Hz)
5.00
4.00
3.00
2.00
1.00
0.01
Hz
20K
200100 500
M3
1K
2K
disto rtion c har ac ter istic
10K5K
Hz
(THD< 1 .5% 1W、1m、2 00Hz- 10k Hz)
5.00
4.00
3.00
2.00
1.00
0.01
Hz
20K
200100 500
2K
1K
10K5K
Hz
1
www.dsppatech.com
Gua ngzhou DSPPA Audio Co., Ltd
14
Page 5

Technical parameters
Technical index
Power input
Output power
Rated impedance
Smart m usic am plifi er
Total harmonic distortion
Signal-to-noise ratio
Frequency response
Sensitivity of auxiliary
input (adjustable)
Sensitivity of auxiliary
output (adjustable)
Audio format
Bluetooth
Storage type
Product dimension
Driver unit
Frequency response
Ceili ng loud spe ak er
Rated power (RMS)
Max power (RMS)
Max. SPL(1m)
Sensitivity (1m, 1W)
Storage temperature
product size
Weight
contr oller
Remot e
Included angle of effective
emitter region
Effective remote-controlled
distance
Battery of remote controller
Model
6.5” 1×
140 -16kH zHz
5W
10W
92 2d B±
100 2dB±
-25℃~ +55℃
186mm 70mm×
0.5kg
~100- 240V
2 ×10W
8Ω
≤0.03% ( 1KHz, 1 W, 8Ω)
>81dB
20Hz – 20 KHz
AUX:1 .0V/5 00mV
AUX:0 -1.0V
MP3 WAV FLA C,e tc.
, ,
BT2.1 +EDR
USB SD card,
86×86×38m m
6.5” 1×
140 -16kH zHz
5W
10W
92 2d B±
100 2dB±
-25℃~ +55℃
190mm 70mm×
0.52k g
60°
8-12m
Cr203 2
6.5” 1, 0 75 ” 1× . ×
90 - 18kHzH z
10W
20W
93±2dB
103 2dB±
-25℃~ +55℃
190mm 75mm×
0.68k g
Production Information
Smart mus ic a mplifier
Ceiling lou dspeakers
186mm
13
www.dsppatech.com
Gua ngzhou DSPPA Audio Co., Ltd
2
Page 6

Smart music amplifier basic functions
Descriptions of music controller
● Concealed i nstalla ti on
Note: you b uy t he box dept h of n ot less tha n 40 mm.
①
Open a groove s uitable for t he box dimens ion on the wall n eeding inst allation, a nd
based on the po sitions of sc rew holes at th e four corner s of the bottom s urface of
the box, dril l holes on the wa ll groove, an d prepare to co nnect lines .
Displ ay scre en
Play/ Pause
Volume d own
Previ ous
SD port
USB por t
On-off key
Infra red rec eivin g hol e
Mode (s ource s witch ing )
Volume u p
Next
On & Off, Standby
Tur n the on-off key left, and c onnect th e AC te rminal to ele ctric suppl y.
Tur n the on-off key right, it w ill be powere d on. And turn the o n-off k ey
left, it wi ll b e powered off.
Standby:l ong press “M” t o enter stand by state,pr ess once t o ge t stard.“M”
Tur n off Tur n on
Reserved
hole position
Wal l groov e
*Please arrange the line connection according to the actual hole position of the
purchased box.
②
Please refe r to Conceale d install at ion of step 3 , st ep 4 and step 5 c om plete
Setup.
● Dismoun ti ng
①
Find the righ t side of the fro nt panel and th e base bindin g site of gap.
3
www.dsppatech.com
②
Slotted scr ewdriver wi th buckle par t of the alignm ent gap, care fully pry the c lips.
Gua ngzhou DSPPA Audio Co., Ltd
12
Page 7

③
As show in th e fo llowing fig ure, Select t he two clips in t he directio n of A or B,
outer open ed ge outward, s o snap out of and b e careful to se parate the
amplifier f ront panel an d the base.
Base
A B
Front pane l
④
Connect the l ine end with th e port on the bas e of the amplif ier, and fix the b ase
shell on the tw o mounting co lumns with tw o screws.
⑤
Buckle the am plifier fro nt panel on the b ase on the wall , and check if th e front
panel buckl es the base com pletely.
Pa ral le l
Smart music amplifier play function
1.FM
Press “M” k ey t o choose FM m od e.
Automatic S earch: long p ress “ ” to start the a utomatic ch annel recei ving, and
the syste m wi ll automati cally save th e effec ti ve radio st at ions.
Manual fine t uning mode: l ong press “ ” or “ ” to enter t he m anual fin e tu ning
mode; and the n short press “ ” or “ ” to manu ally adjust t he current ch annel. If
no key operta ion within 5 se conds, it wil l save the curr ent channel a nd exit the
mode.
Mute: sho rt p ress “ ” for mute FM pl ay.
Channel swi tching: sho rt press “ ” or “ ” to switch t he s aved chan ne l.
Volume adjus tment: shor t press “ ” or “ ” to increas e or r educe the c ur rent
volume.
2. USB devic e
Press “M” k ey t o choose USB mo de. When th er e is no USB devic e, the screen w ill
display “NO ” and flicker ; and when ther e is a USB, it will r ead the card, a nd the
screen will d isplay “--- -” when there i s no music or una ble to decode , and it will
play music au tomatical ly when there i s music and abl e to decode.
Play contro l: short pres s short press “ ” o r “ ” to switch t o pr evious or n ex t
songs, and lo ng press to fas t forward or fa st reverse; a nd short pres s “ ” to play
or pause.Vol ume adjustm ent: short pr ess “ ” or “ ” to inc re ase or redu ce
the current v olume.
3.SD
Press “M” k ey t o choose SD m od e. When there i s no SD, the sc re en will displ ay
“NO” and fl ic ker; and when t here is a SD, it wi ll read the car d, and the scre en will
display “-- --” when ther e is no music or un able to decod e, and it will pl ay music
automatic ally, an d th e screen wi ll d isplay th e pl ay time pro gr ess when th er e is
music and abl e to decode.
Play contro l: short pres s “ ” or “ ” to switc h to p revious o r ne xt songs, a nd l ong
press to fa st f orward or f as t reverse ; an d short pre ss “ ” t o play or pau se .
Volume adjus tment: shor t press “ ” or “ ” to i nc rease or re du ce the curr en t
volume.
+
+
-
+
-
-
Caution : Wh en the curr en t panel and f as ten the bas e, w here pins a re
inserted in f ront pane l ho les and pin s mu st not be ben t or d amaged,
otherwi se i t will caus e da mage to the a mp lifier se ri ously.
11
www.dsppatech.com
Pa ral le l
4. AU X
Press “M” k ey t o choose AUX mod e.
Play contro l: short pres s “ ” to play or mu te . When it is mu te , the LCD scr ee n will flic ke r.
Volume adjus tment: shor t press “ ” or “ ” to i nc rease or re du ce the curr en t volume.
Sensitivi ty adjustme nt: long pres s “ ” or “ ” to enter t he s ensitiv it y adjuste mn t,
which can be sw itched betw een S1 and S2.
(S1: input 50 0mV, S2: input 1000 mV)
+
-
Gua ngzhou DSPPA Audio Co., Ltd
4
Page 8

5.AUX OUT
This device c an be used as a aud io source out put to other am plifier dev ices. when
the AUX OUT in terface i s co nnected w it h other dev ic es and the FM \U SB\SD\A UX I N\
Bluetooth i s selected fo r playback, t he audio sign al can be outpu t to these devi ces
to play synch ronously.
6. Blueto ot h connect io n
Press “M” k ey t o choose BT m ode. When t he re is no conn ec tion, the s cr een will
display “BT ” and flicker ; and when the de vice is conne cted succes sfully, “B T” will
be always on. The name o f th is produc t’s bluet oo th displa ye d on other de vi ces is
“DABA adding s ix address co des”.
Volume adjus tment: shor t press “ ” or “ ” to i nc rease or re du ce the curr en t
+
-
volume.
System settings
First ple as e prepare a com puter, The d evice is co nn ected to co mp uter thro ug h the
USB cable, op en the config uration sof tware in the co mputer.
Functions of connection terminals
Function
Symbol
Name
Power input
N
Zero
Live
line
wire
FM
ANT
FM
GND
GND
L
anten na
AUX IN AU X OUT
L
R
Right
Left
R
Right
Power amplifier output 8 Ω
Left
L
OUTL+
Positive
terminal
of left
speaker
OUTL-
Negative
terminal
of left
speaker
OUTR-
Negative
terminal
of right
speaker
OUT +R
Positive
terminal
of right
speaker
Smart music amplifier installation
● Concealed i nstalla ti on
Note: you b uy t he box dept h of n ot less tha n 40 mm.
①
Open a groove s uitable for t he box dimens ion on the wall n eeding inst allation, a nd
based on the po sitions of sc rew holes at th e four corner s of the bottom s urface of the
box, drill ho les on the wall g roove, and pr epare to conn ect lines.
DM8 35 Conf igura tion
Sta tusSta tus
VID
Blu etoot hB lueto oth
Nam eNam e
Max imum vo lume li mitMax imum vo lume li mit
25% 50% 75% 100%
PID
0xA 5A5 0x02 01 Statu s
Blu etoot h 123 4
Con figur e
Con figur e
PwdPwd
XX
①
②
③
① Display dev ice informa tion connec tion status .
② Device Blue tooth name an d password se ttings. ent er the Blueto oth name and
password nu mber you want i n the name and pa ssword box, c lick “Confi gure” to
complete th e modificat ion.
5
www.dsppatech.com
Reserved
hole position
Wal l groov e
*Please arrange the line connection according to the actual hole position of the purchased
box.
②
Thread the li ne end throug h the reserve d hole positi ons around th e box, Put the bo x
in the wall gro ove, and fix th e box in the wall g roove secur ely with four e xpansion
screws.
Wal l groov e
Gua ngzhou DSPPA Audio Co., Ltd
10
Page 9

5. Finally, c heck the inst allation is s ecure.
Smart music amplifier wired
③ Device maxi mum volume li mit setting . allow users t o set the maxim um volume siz e of
a device, the re are 25%, 50% , 75%, 100% fou r options , to se lect one and cl ick
“Configur e” to complet e the modific ation.
Descriptions of remote controller
2
1
4
6
3
5
7
8
FM
ANT
GND
AUX IN
R
③② ④
L
AUX OUT
R
SPEA KER 8Ω
OUT L+
L
OUTR +
OUT R-
OUTL -
~100-240V
① ⑤ ⑥
Descripti ons of the conn ection port :
1. Power inpu t: ~100-240 V (2×RV 1 .0 mm² multi st randed co pp er core
flexibl e wi re)
2. FM anten na
3. Signal gro und
4. Audio input ( 2×0.3mm² do uble-shie lded audio ca ble)
5. Audio outpu t (2×0.3mm² d ouble-shi elded audio c able)
6. Power ampl ifier outpu t (2×0.3mm² d ouble-shi elded audio c able)
Note: All wire con nections sh all not be nake d.
9
www.dsppatech.com
1.Standby s witch.
2. Mode sel ec tion. Click t he key, it w il l success iv ely and cir cu larly
display FM ra dio receive r, USB, SD card, AU X, Bluetoot h.
3. Mute.
4. Voice mode se lection.
5. Menu (no t av ailable yet ).
6. Play con tr ol area. Able to p lay/pause , move to previ ous and next so ngs, and cont rol
the volume.
7. Play mod e se lection. Cl ick the key, it will succ es sively an d ci rcularl y di splay sin gl e
cycle and ord er play.
8. Number key a rea. When it is u nder SD card mo de, you can cho ose a track to pl ay
directly by p ressing the n umber key; an d when it is unde r FM mode, you ca n input an
FM freque nc y directly by p ressing the n umber key.
Input r ange is 0 870~1 080 , if the fr equen cy is out o f ran ge.
*
For exa mple : in put 087 5 is 87 .5MHz .
Gua ngzhou DSPPA Audio Co., Ltd
6
Page 10

Inst allation an d wired
Ceiling loudspeakers installation
The size of the Space that best sound playback : .50m² (Includ ing 2 speaker s)
The w all dis tance o f not
les s than1 000mm
Not l ess tha n
200 0-300 0mm
Cei ling lo udspe aker
The w all dis tance o f not
les s than1 000mm
1.Please re fer to the foll owing figur e, Select the c orrespond ing size, ins tall the
mounting ho le in the desir e position .
The w all dis tance o f not
les s than1 000mm
Cei ling lo udspe aker
The w all dis tance o f not
les s than1 000mm
2. Connect th e audio broad cast transm ission line . and select th e proper term inal for
connection acco rding to the actu al p ower needs.
Signal line
Red line--- Po sitive el ec trode
Blue line --- Ne gative po le
3. Pushing th e loudspeak er on both side s of the spring c lip up and main tain this sta tus
( To avoid spring b reak, it is rec ommended th at this opera tion while we aring work gl oves ).
M1
M2
M3
7
www.dsppatech.com
186mm
190mm
190mm
70mm
70mm
75mm
Openi ng size
165mm-170mm
Openi ng size
165mm-170mm
Openi ng size
165mm-170mm
Ceili ng
Ceili ng
Ceili ng
4. Carefull y push the loud speaker mou nting hole, t hen slowly re lease the spr ing clips,
push the loud speaker so th at it is embedd ed in the ceili ng( see figur e below ).
Gua ngzhou DSPPA Audio Co., Ltd
8
Page 11

Warning Statement
This device complies with part 15 of the FCC Rules. Operation is subject to the
following two conditions: (1) This device may not cause harmful interference, and (2)
this device must accept any interference received, including interference that may cause
undesired operation.
Any Changes or modifications not expressly approved by the party responsible for
compliance could void the user's authority to operate the equipment.
Note: This equipment has been tested and found to comply with the limits for a Class B
digital device, pursuant to part 15 of the FCC Rules. These limits are designed to
provide reasonable protection against harmful interference in a residential installation.
This equipment generates uses and can radiate radio frequency energy and, if not
installed and used in accordance with the instructions, may cause harmful interference
to radio communications. However, there is no guarantee that interference will not
occur in a particular installation. If this equipment does cause harmful interference to
radio or television reception, which can be determined by turning the equipment off and
on, the user is encouraged to try to correct the interference by one or more of the
following measures:
-Reorient or relocate the receiving antenna.
-Increase the separation between the equipment and receiver.
-Connect the equipment into an outlet on a circuit different from that to which the
receiver is connected.
-Consult the dealer or an experienced radio/TV technician for help.
 Loading...