

Monogram ZlC360N RH, ZlC360N LH, ZlCS360N RH, ZlCS360N LH Design Manual

Installation
Instructions
Built-In Bottom-Freezer
Refrigerators
ZlC360NRH,ZlC360NLH,
ZlCS360NRH,ZlCS360NLH
DesignGuide
With InstallationInstructions
Monogram:_
Safety Information
BEFORE YOU BEGIN
Read these instructions completely and carefully.
•IMPORTANT - heseinstructions
for h)cal inspector's use. Obserxe all goxerning codes
and ordinances.
• Note to Installer -- Be sure to leaxe these
instructions with the (:onsmner.
• Note to Consumer -- Kee I) these instructions
with your Owner s Manual for flmue reference.
WARNING:
This appliance must be properly grounded. See
"(;tom, cling tile Refrigerator," page 9.
AVERTISSEMENT
Cet appareil (hilt &tre correctement mis _'lla terre.
Consulter <_ Mise a la terre du rg_frig_ratem" _>,I)age, 9.
If you receixed a damaged refrigerator, you should
immediatelx contact xom" dealer or builder.
CAUTION:
Due to tile weight and size of this refrigerator, and
to reduce tile risk of personal ii_jur) or damage to
tile product--THREE PEOPI,E ARE REQUIRED
FOR PROPER ]NSTAI,I,ATION.
PRUDENCE
_ cause du poids et de la taille de ce r_frig&'ator et
pore" r&luire le risque de blessure et de dommages,
li, E&UT TROIS PERSONNES POUR EMILE
I,'INSTAI,LATION CORRECTEMENT.
Skill Level -- Installation of this refrigerator
requires basic mechanical, carpent_ T and plmnl)ing
skills. Proper installation is tile responsibility of tile
installer. Product tailure due to improper installation
is not covered trader tile GE Appliance Warranty.
See tile Owner's Manual fin" warranty inlm'mation.
WARNING:
• These refl'igerators are top-heavy and must
be secm'ed to prevent the possibili W of tipping
forward. Anti-Tip protection is required. See page
11 for details,
• Use this appliance only fin" its intended purl)ose.
• hmnediately repair or replace electric se_wice cords
that become fl'aved or damaged.
• /Jnl)lug tile refl'igerator heft)re cleaning or making
repairs.
• Repai_ should be made by a qualified service
technician.
AVERTISSEMENT
• Ces r_frig_rateurs sont lourds en haut et il taut les
arrimer pore" _\'iter leur basculement. 11 taut avoir
tm syst_)me de protection contre le renversement.
Voir les d_tails page 11.
• 11 ne faut utiliser cet appareil que pour l'utilisation
aI)I)ropri_e.
• R_parer ou remplacer imm&liatement tout cordon
_lectrique efliloch_ ou endommag_,
• 11 taut d_brancher le r_flJg_rateur awmt le
nettoyage ou route intervention.
• i,es r_parations doivent _tre taites par tm
technicien qualifi_,
For Monogrmn local service in your area, call
1.800.444.1845.
For Monogrmn service in Canada, call
1.888.880.3030
For Monogrmn Parts and Accessories, call
1.800.626.2002.
www. monogram.corn
CONTENTS
PlanningGuide
The Installation Space ............................3
Dimensions and Clearances ..................3
130° Door Swing ......................................4
90° DoorSwing ........................................5
Customization Basics ..............................6
Panel Dimensions....................................7
Side Panels................................................8
ZU62 Grille PanelDimensions ..............8
InstallationInstructions
Tools,Hardware, Materials ....................9
6rounding the Refrigerator ....................9
Step 1, RemovePackaging ..................10
Step 2, Install Water Line......................10
Step 2A, R0 Water Line ........................11
Step3, Install Side Panels....................11
Step4, Install Anti-Tip Brackets ..........11
Step 5, Level Refrigerator ....................12
Step6, Alternate Anti-Tip Procedure..12
Step7, Secure Refrigeratorto
Cabinetry....................................12
Step 8, Adjust Door Swing....................13
Step 9, Install Grille Panel ....................13
Step 10, Install Framed Panels ............14
Step 10A, Install Overlay Panels..........15
Step 11, ConnectWater Supply ..........16
Step 12, ConnectPower ........................16
Step 13,Start Icemaker ........................16
Step 14, Install Toekick..........................17
2
Design Guide
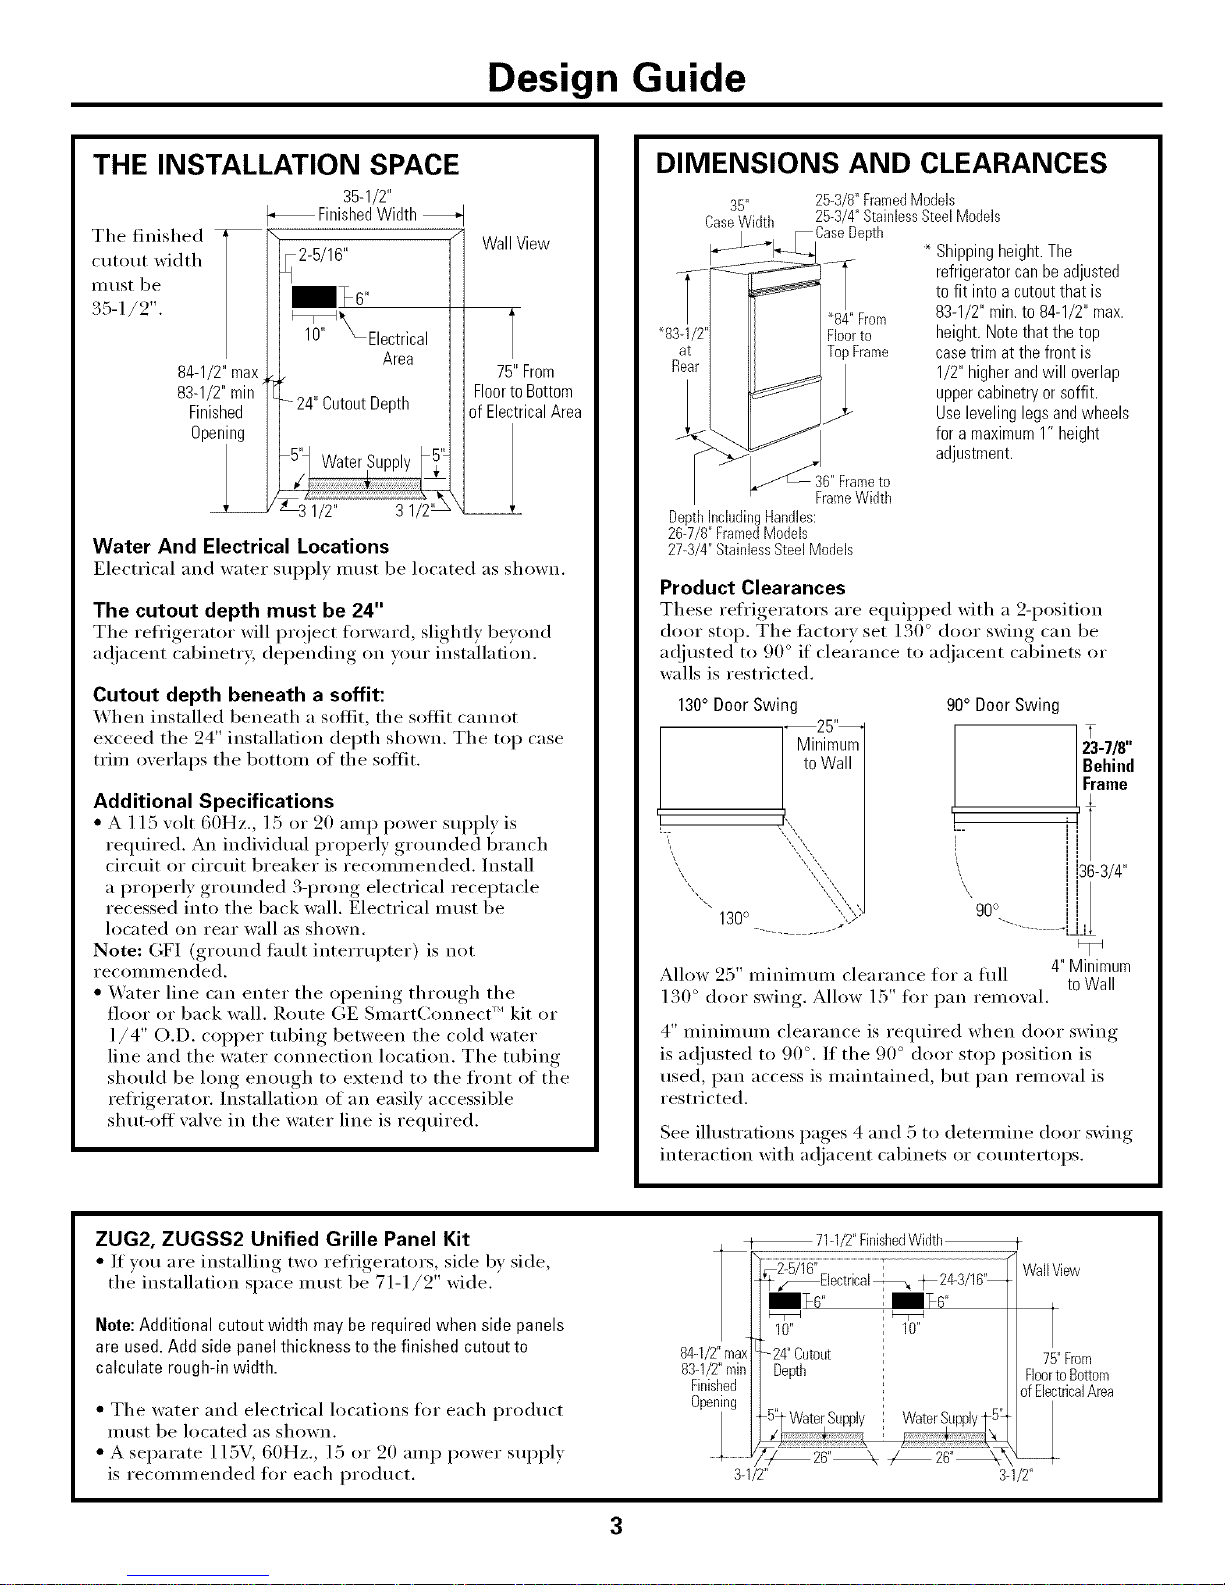
THE INSTALLATION SPACE
35-I/2"
Finished Width
The 1inished _1_ Wal,View
.to.t,,,i lth 2-8/16''
mustbe /11 _T .
. 5,j2- / Im :8
maxL10
84-1/ ]] 75" From
83-1/2" min of Electrical Area
Finished ]L_24" Cutout Depth ]] Floor to Bottom
Opening I ] E
I 115' Water Supply _
| ])'0 _:: (_
_' 31/2" 31/2" '
Water And Electrical Locations
Electrical and water suppl) must be located as shown.
The cutout depth must be 24"
Tile refrigerator will project forward, slighfl} bexond
ac!iacent cabinetry, dei)ending, on _our installafilm.
Cutout depth beneath a soffit:
When installed beneath a soffit, the soffit cannot
exceed the 24" installation depth shown. The top case
trim overlaps the bottom of the soffit.
Additional Specifications
• A l 15 volt 60Hz., 15 or 20 amp power supply is
required. An indMdual properly grotmded branch
circuit or circuit breaker is recommended. Install
a properly gromMed B-prong electrical receptacle
recessed into tile back wall. Electrical must be
located on rear wall as shown.
Note: GFI (grotmd tault interrupter) is not
i'ecoi/llllended.
• _&'_ter line can enter the opening through the
floor or back wall. Route GE SmartConnect'" kit or
]/4" O.D. copper tubing between the cold water
line and tile water connection location. Tile tubing
should be long enough to extend to tile fl'ont of the
refl'igerator. Installation of an easily accessible
sh m-off wflve in the water line is required.
DIMENSIONS AND CLEARANCES
35" 25-3/8" FramedModels
CaseWidth 25-3/4" StainlessSteelModels
__ CaseDepth
]_z_____ _ Shipping height. The
refrigerator can be adjusted
to fit into a cutout that is
_84"From 83-1/2" min. to 84-1/2" max.
_83-12"] Floorto height. Note that the top
at II TopFrame case trim at the front is
Re__1/_ 1/2" higher and will overlap
upper cabinetry or soffit.
Use leveling legs and wheels
for a maximum 1" height
adjustment.
" meto
FrameWidth
DepthIncludingHandles:
26-7/8" FramedModels
274/4" StainlessSteelModels
Product Clearances
These refrigerators are equipped with a 2-position
door stop. The factory set ] 30 ° door swing can be
ac!justed to 90 ° if clearance to a(!jacent cabinets or
walls is restricted.
130° Door Swing
, 25"_
Minimum
to Wall
i
[,,,
130° ,
Allow 25" minimmn clearance for a flfll
130 ° door swing. Allow 15" fl_r pan remoxal.
90° Door Swing
,
] Behind
]Frame
L_ 'l
(
!36-3/4"
90° :j
4" Minimum
to Wall
4" minimum clearance is required when door swing
is a(!justed to 90 °. If the 90 ° door stop position is
used, pan access is maintained, but pan remowfl is
restricted.
See illustrations pages 4 and 5 to detemfine door swing
interaction with a(!iacent cabinets or cotmtertops.
ZUG2, ZUGSS2 Unified Grille Panel Kit
• If you are installing two refl'igerators, side b_,side,
the installation space must be 71-1/2" wide.
Note:Additional cutout width may be required when side panels
are used. Addside panelthickness to the finished cutout to
calculate rough-in width.
• The water and electrical locations fl)r each product
must be located as shown.
• A separate l I5V, 60Hz., 15 or 20 amp power supply
is recommended fin" each product.
-_71-1/2"FinishedWidth--
84-1/2"max
83-1/2"rain
Finished
Opening
.............................
_}6" ; F6"
10" 10"
24"Cutout
Depttl
WaterSupply_5
_-/ 26"_ _26 "_
3-1/2"
WallView
75"From
FloortoBottom
of ElectricalArea
3-1/2"
3
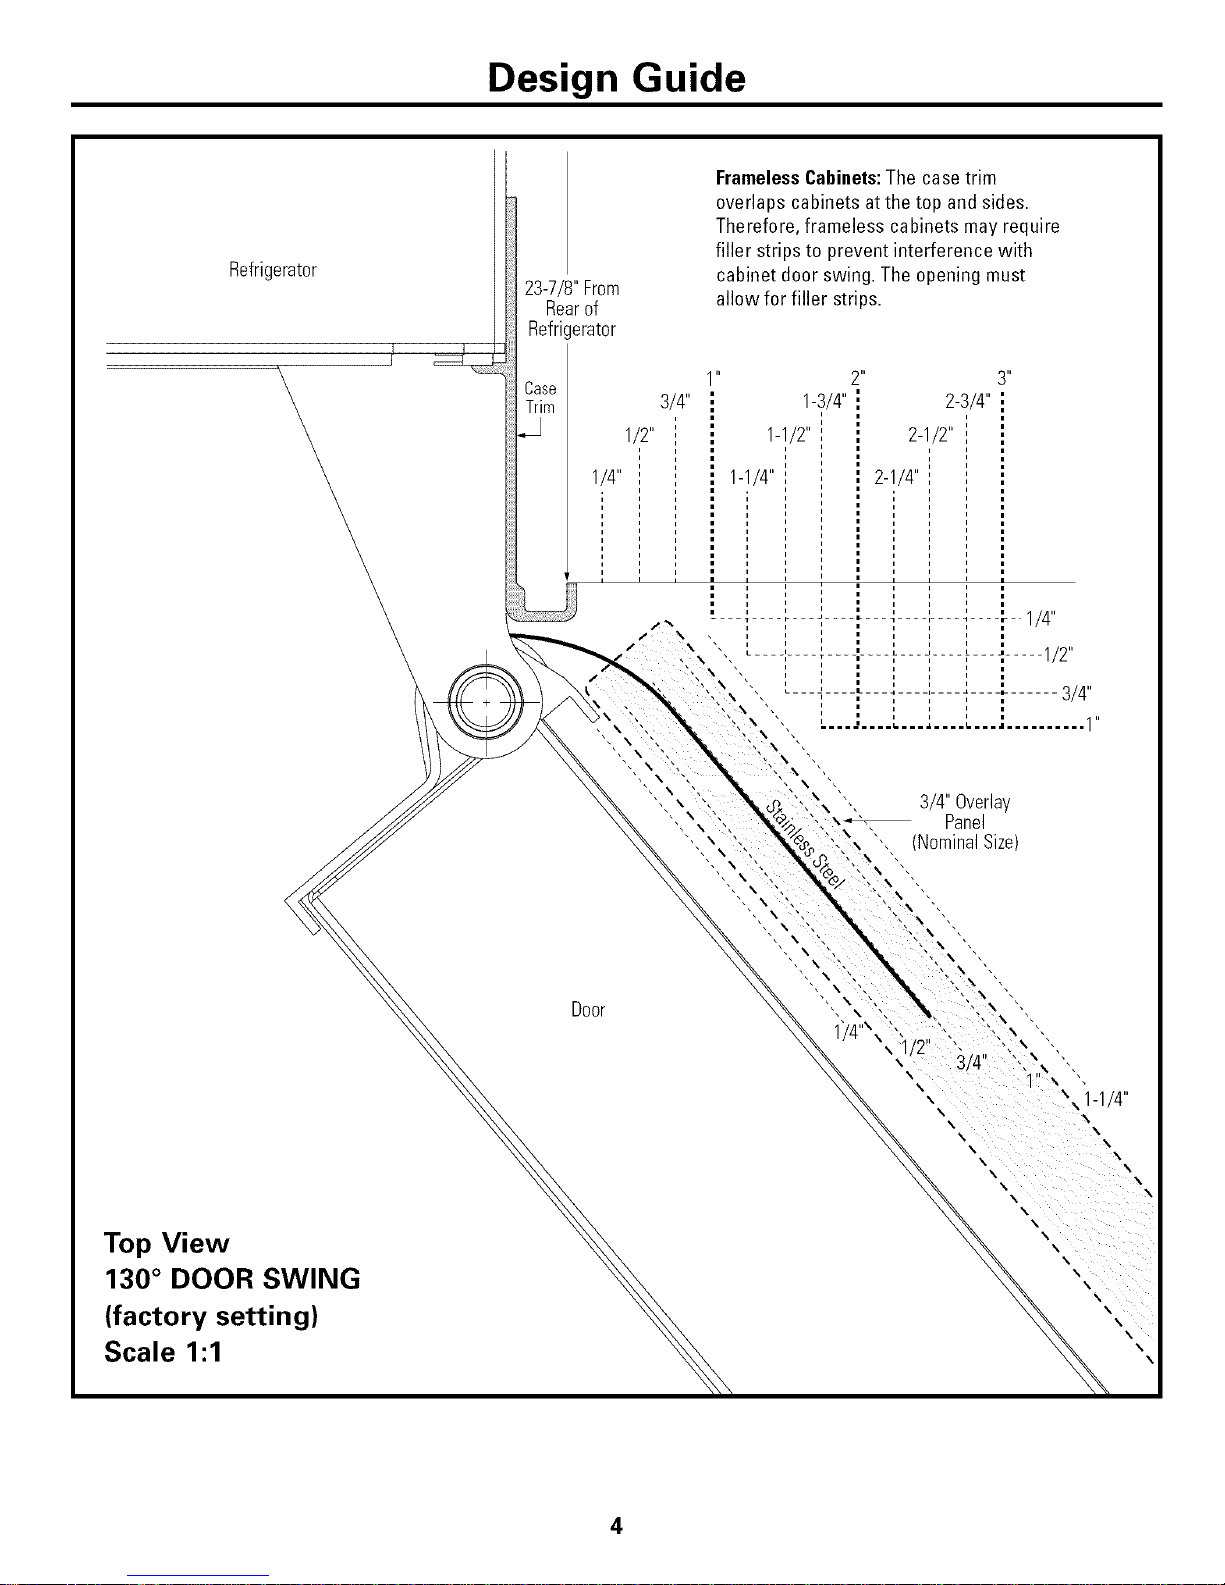
Design Guide
Refrigerator
Top View
130 ° DOOR SWING
(factory setting)
Scale 1:1
23-7/8"From
Rearof
Refrigerator
Case
Trim
1/4"
3/4"
1/2"
FramelessCabinets:The casetrim
overlaps cabinets atthe top and sides.
Therefore, frameless cabinets may require
filler strips to prevent interference with
cabinet door swing. The opening must
allow for filler strips.
2_1/2 I'
2-1/4"
Door
3/4" Overlay
Panel
(NominalSize)
4
Design Guide
Refrigerator
Top View
90 ° DOOR SWING
(optional setting)
Scale 1:1
Door
_Case Trim
23-7/8"
FromRearof
Refrkerator
FramelessCabinets:The
case trim overlaps cabinets
atthe top and sides.
Therefore, frameless
cabinets may require filler
strips to prevent interference
with cabinet door swing. The
opening must allow for filler
strips.
1/2"
i
i
i
i
, ,]
i
i i
i I 1-1/4"
I I
I I
1-1/2"
3/4" Overlay
Panel
(NominalSize)
5
Design Guide
CUSTOMIZATION BASICS:
Framed Or Overlay Panels, Custom Handles and Accessory Kits
Models Available
Stainless Steel Wrapped Models:
ZICS360N RH (right-handed door)
ZICS360N I,H (left-handed door)
Trimmed models:
ZICS60N RH (fight-handed door)
ZIC360N I,H (lett-handed door)
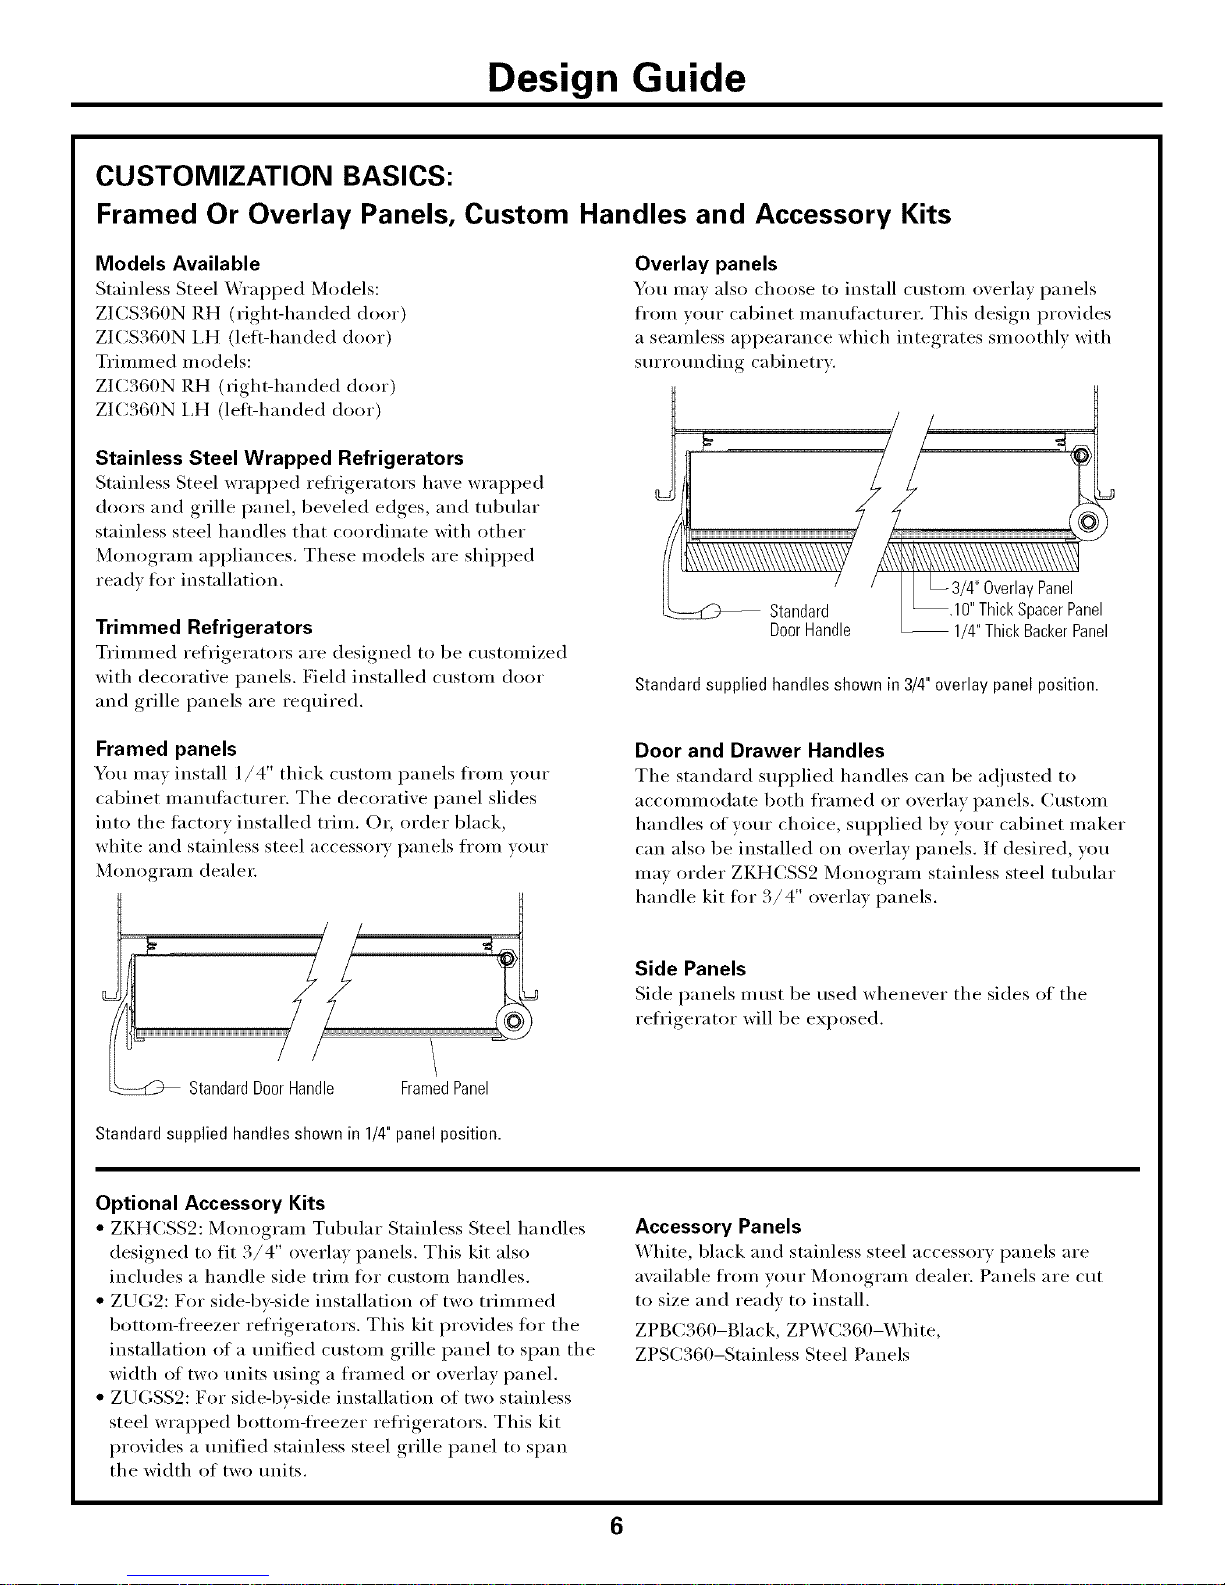
Overlay panels
You may also choose to install custom overlay panels
from vom" cabinet manufhctm'er. This design provides
a seamless appearance which integrates smoothly with
SmTom_ding cabinetry.
Stainless Steel Wrapped Refrigerators
Stainless Steel wrapped refi'igerators have wrapped
doors and grille panel, beveled edges, and tubular
stainless steel handles that coordinate with other
Monogram appliances. These models are shii)ped
ready fl)r installation.
Trimmed Refrigerators
Trimmed refrigerators are designed to be customized
with decorative panels. Field installed custom door
and grille panels are required.
Standard supplied handles shown in 3/4"overlay panel position.
Framed panels
You may install I/4" thick custom panels Ii'om yore"
cabinet manufhcturer. The decorative panel slides
into the factory installed trim. Or, order black,
white and stainless steel accesso_ T panels fl'om your
Monogram deale_:
J
Door and Drawer Handles
The standard supplied handles can be a(!iusted t(>
accommodate both framed or overlay panels. Custom
handles of yore" choice, SUl_plied by yore" cabinet maker
can also be installed on overlay panels. If desired, you
may order ZKHCSS2 Monogram stainless steel tubular
handle kit for 3/4" overlay panels.
Side Panels
Side panels must be used whenever the sides of the
refl'igerator will be exposed.
StandardDoorHandle FramedPanel
Standard supplied handles shown in 1/4"panel position.
Optional Accessory Kits
• ZKHCSS2: Monogram Tubular Stainless Steel handles
designed to fit 3/4" overlay panels. This kit also
includes a handle side trim for custom handles.
• ZUG2: For side-by-side installation of two trimmed
bottom-ti'eezer refrigerators. This kit provides fl)r the
installation of a tmified custom grille panel to span the
width of two milts using a framed or overlay panel.
• ZUGSS2: For side-by-side installation of two stainless
steel wrapped bottom-ti'eezer refrigerators. This kit
provides a ratified stainless steel grille panel to span
the width of two milts.
Accessory Panels
White, black and stainless steel accessory panels are
available fl'om your Monogram dealer. Panels are cut
to size and ready to install.
ZPBC360-Black, ZPWC360-_.Vhite,
ZPSC360-Stainless Steel Panels
6
 Loading...