

Page 1
Installation
ZKUN
Heater Unification Kit
Instructions
Before you begin - Read these instructions completely and carefully.
Note to Installer: Be sure to leave these instructions with the Consumer.
Note to Consumer: Keep these instructions with your Installation Instructions for future reference.
WARNING
To avoid the risk of electric shock, make sure the power
cord is not plugged into the wall outlet.
This kit provides for the installation of the Heater Unification components when installing 2 Column units side by side.
Parts List:
Adhesive Heater
Transformer
Front Mullion
Trim Bracket
Top Unification Bracket
Bottom Front Unification Bracket
3 1/4” Hex Head 8-18 5/8” Long Screws
5 1/4” Hex Head 8-32 5/8” Long Screws
5 3/8” Hex Head 1/4-20 1/2” Long Screws
4 wire clips
Electrical Shock Hazard.
WARNING
appliance is top heavy. Use extreme caution with moving
to prevent tipping over which could result in death or
serious injury.
Tools and Materials Required:
1/4” and 3/8” driver / sockets
#2 Phillips screwdriver
Rubbing alcohol
Tip Over Hazard. This
Instructions for this kit are also included in the full installation instructions included with the unit.
Ŷ Unpack the heater Unification Kit (ZKUN) and make sure all of the components on the list are included.
1
31-1000195 Rev. 2 12-19 GEA
Page 2
Installation Instructions
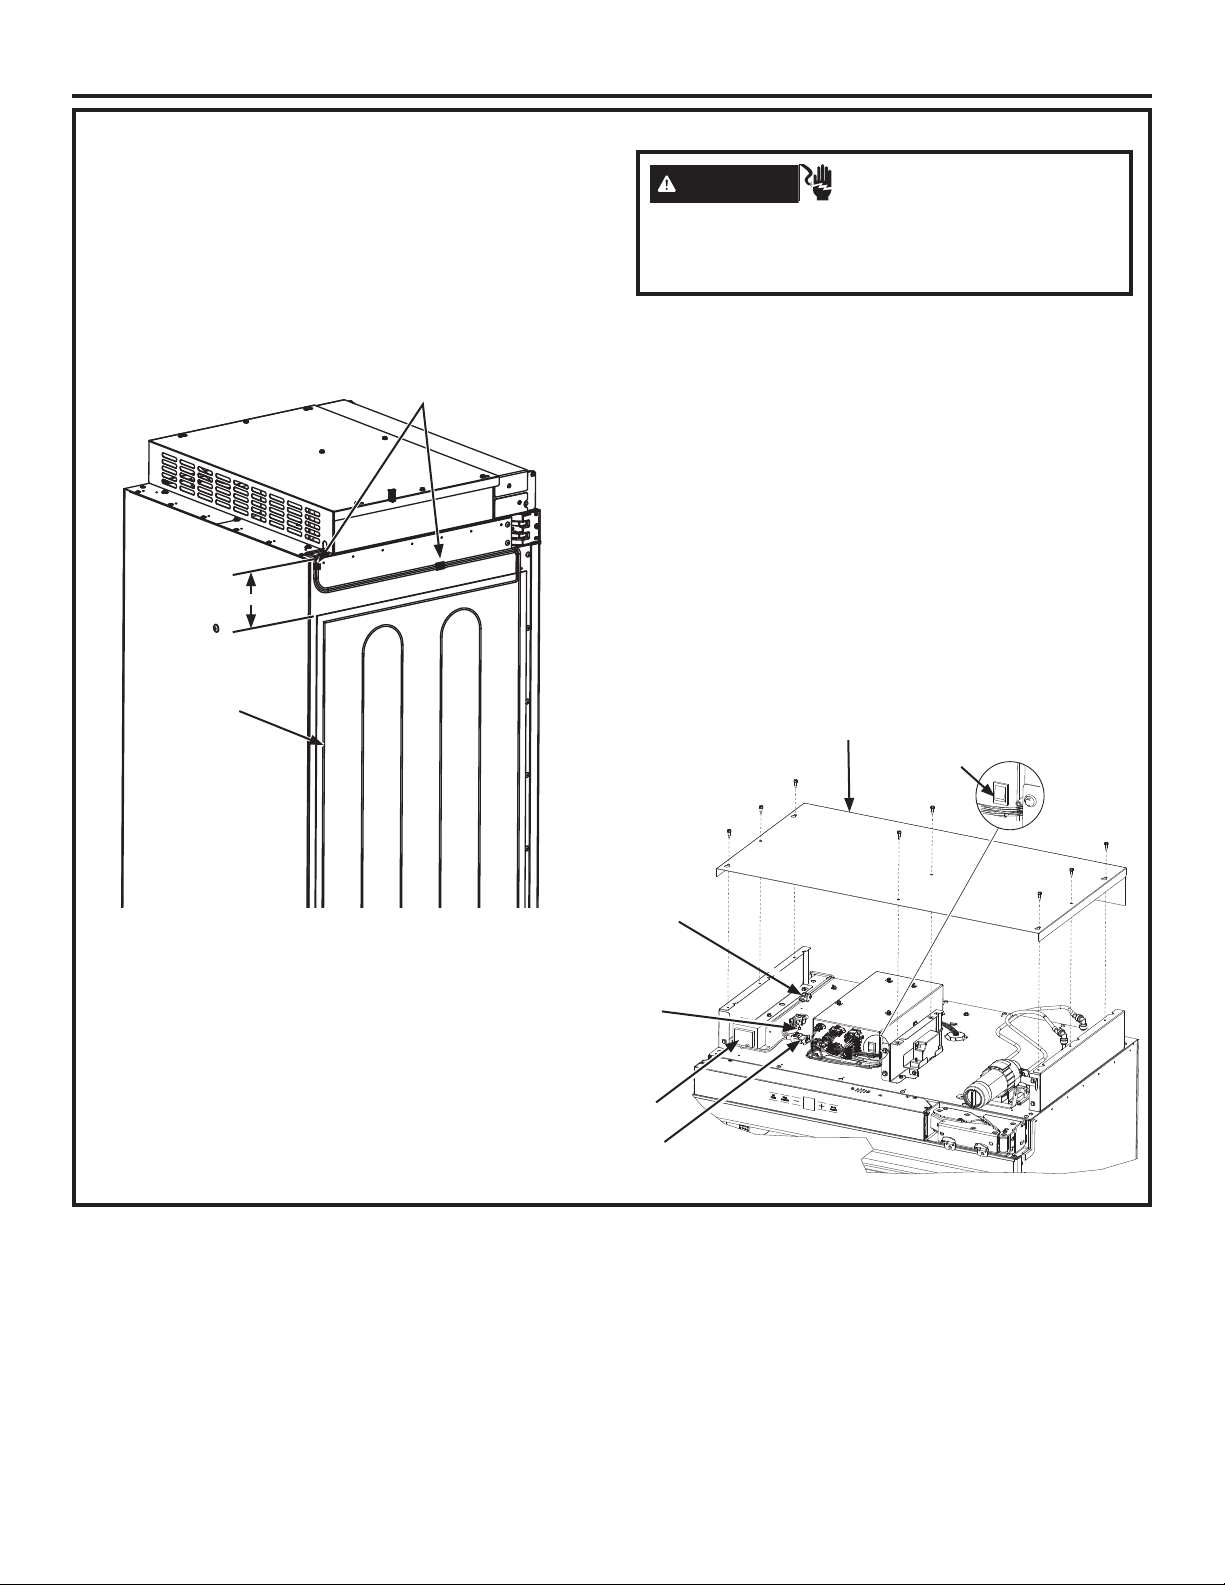
HEATER INSTALLATION
NOTE: Ensure the heater connector cord is toward
the top of the unit when installed.
Ŷ Place the right hand unit in front of the installation
opening in a way that the unit is in front of the intended
installed location.
Ŷ Install adhesive heater on the outside of the unit to the
left side of the case. Install heater 4” below the case
top. Heater should be centered front to back on the
metal case.
Clips
4”
Adhesive
Heater
WARNING
Electrical Shock
Hazard. To avoid the risk of electric shock, make
sure the power cord is not plugged into the wall
outlet.
Ŷ Use clips to adhere loose wire tightly to side of case as
shown. Clean the side using rubbing alcohol to ensure
proper clip adhesion.
Ŷ Install the transformer into the case top assembly:
1. Remove cover top by removing eight #8 hex screws
and keep aside for assembling back the cover top.
2. Place the transformer into the case top provided in
ZKUN kit and secure it with the existing (1/4”) hex
screws to left front of case top.
3. Connect the 2 pin transformer connector to the
heater connector and 3 pin connector to panel
control, make sure locking tabs are engaged.
4. NOTE: Verify the master switch is on.
5. Assemble the cover top with screws save from
previous step.
Cover Top
Master Switch
Enclosure assembly upper is
hidden for clarity.
2 Pin Connector
to Heater
Connector
Do NOT
Remove Wire
Standoff
Transformer
3 Pin Connector
2
31-1000195 Rev. 2
Page 3

Installation Instructions
UNIFICATION BRACKET INSTALLATION
BOTTOM FRONT UNIFICATION
Ŷ Install the bottom front unification bracket using a 3/8”
driver (4 screws).
TOP UNIFICATION
Ŷ/RRVHQWKHPLGGOHWZRVFUHZVUHPRYHWKHWZRUHDU
screws.
Ŷ$VVHPEOHWKHEUDFNHWWRWKHPLGGOHVFUHZVDQG
reassemble the rear screws.
Ŷ7LJKWHQVFUHZVWRWLHXQLWVWRJHWKHU
Unification Bracket
BOTTOM BACK UNIFICATION
Ŷ Loosen the two bottom screws of rear access covers of
both units and remove the top screws.
Ŷ Hang the unification bracket to the bottom screws and
reassemble the screws at the top
Ŷ Tighten screws to tie units together.
Unification
Bracket
Front of appliances
Unification
Bracket
TRIM BRACKET INSTALLATION
Ŷ Open both water filter access doors to 90°.
Ŷ Snap the trim bracket between the water filter access
enclosures above displays.
31-1000195 Rev. 2
Trim
3
Page 4

Installation Instructions
MULLION / ACCESS COVER TRIM INSTALLATION
Ŷ Drive 2 screws into sides of both lower access covers
WARNING
Tip Over Hazard.
These appliances are top heavy, especially
with any doors open, and must be secured to
prevent tipping forward which could result in
death or serious injury. Read and follow the entire
installation instructions for securing the appliance
with the anti-tip system before installing trim.
Ŷ Install front mullion trim between the 2 units. Open the
doors and push the flexible “dart” in the area between
units.
Ŷ Top dart of the mullion trim must align with the bottom
edge of the case trim.
Mullion
Trim
between the products to enhance attachment of the
mullion trim.
Drive 2 screws into sides of
both lower access covers
between the appliances to
enhance attachment of the
mullion trim.
“Dart”
Top
“Dart”
FOLLOW ALL INSTALLATION INSTRUCTIONS PROVIDED WITH THE APPLIANCE
TO COMPLETE THE DUAL INSTALLATION.
4
31-1000195 Rev. 2
 Loading...