

Monogram ZIC36N RH, ZIC36N LH Custom Options Manual And Installation Instructions

GE Monogram
®
36" Bottom Mount
Refrigerators
Custom
Options Guide
and
Installation
Instructions
With Custom Panel Dimensions
These Monogram refrigerators are
designed to be customized with decorator
door and grille panels. Field installed
panels are required.
Factory installed trim will accommodate
1/4" thick custom panels or optional
Lexan® and stainless steel panel kits.
Optional trim kits allow an even broader
range of custom appearance options.
Read this booklet carefully to accomplish the
desired appearance and to insure a trouble free
installation.
This booklet contains information and
illustrations to demonstrate custom
possibilities. Custom door and grille panel
sizes vary to accommodate the kit being
used. Dimensions for each application are
included and can be faxed or sent to the
cabinet manufacturer so that the panels can
be constructed accurately.
and Trim Kit Installation Instructions
Models:
ZIC36N RH
ZIC36N LH

Monogram
36" Bottom Mount Refrigerator
Before you begin - Read these instructions completely and carefully.
IMPORTANT - Save these instructions for local inspector’s use.
IMPORTANT - OBSERVE ALL GOVERNING CODES AND ORDINANCES.
Note to Installer - Be sure to leave these instructions with the Consumer.
Note to Consumer - Keep these instructions with your Use and Care Book for future reference.
This appliance must be properly grounded. See “Grounding the Refrigerator,” page 12.
Contents
If you have a question concerning the installation of this
product, call the GE Answer Center
Information Service at 800.626.2000, 24 hours a day,
7 days a week.
If you received a damaged refrigerator, you should
immediately contact your dealer or builder.
Proper installation is the responsibility of the installer.
Product failure due to improper installation is not
covered under the GE Appliance Warranty. See the
Use & Care Guide for warranty information.
Design Information
Flush or Semi-Flush Enclosure Installations ...............................................................................................................................3
Enclosure Cutout and Product Dimensions................................................................................................................................. 3
Installation Examples, Between Base & Wall Cabinets ........................................................................................................... 4
Installation at End-of-Run ............................................................................................................................................................... 4
Frameless Cabinets .......................................................................................................................................................................... 4
Accessory Panel Kits ....................................................................................................................................................................... 4
Models Available .............................................................................................................................................................................. 5
Advance Planning Exterior Appearance Options....................................................................................................................... 5
Trim Kit Descriptions........................................................................................................................................................................ 6
®
Consumer
WARNINGS:
• Use this appliance only for its intended purpose.
• Immediately repair or replace electric service cords
that become frayed or damaged.
• Unplug the refrigerator before cleaning or making
repairs.
• Repairs should be made by a qualified service
technician.
For Monogram local service in your area,
1-800-444-1845.
For Monogram service in Canada
1-888-880-3030
For Monogram Parts and Accessories, call
1-800-626-2002.
Custom Panel Dimensions
Product and Cutout Information .................................................................................................................................................... 7
1/4" Thick Custom Panels or Panels Secured to 1/4" thick backing........................................................................................ 8
3/4" Thick Panels with Supplied Handle, ZKTC36L or ZKTC36R............................................................................................... 9
3/4" Thick Panels with Custom Handle ....................................................................................................................................... 10
Side Panel or Filler Options .......................................................................................................................................................... 11
Installation Instructions...........................................................................................................................................................12-17
Trim Kits
ZGC2 Trim Kit, Grille Panel Frame Adjustment .......................................................................................................................... 18
ZKHC1 Trim Kit (for 1/4" Panels), Support for Custom Handles.........................................................................................19-21
ZKTC36L/ZKTC36R Trim Kit, 3/4" Custom Panels ..................................................................................................................22-27
ZKHTC1 Trim Kit (for 3/4" Panels), Support for Custom Handles ......................................................................................28-31
ZKHCSS1 Trim Kit (for 1/4" Panels), Tubular Stainless Steel Handles.............................................................................32-35
ZKHTCSS1 Trim Kit (for 3/4" Panels), Tubular Stainless Steel Handles...........................................................................36-38
ZFC1 Trim Kit, for side to side installation.................................................................................................................................. 39
2
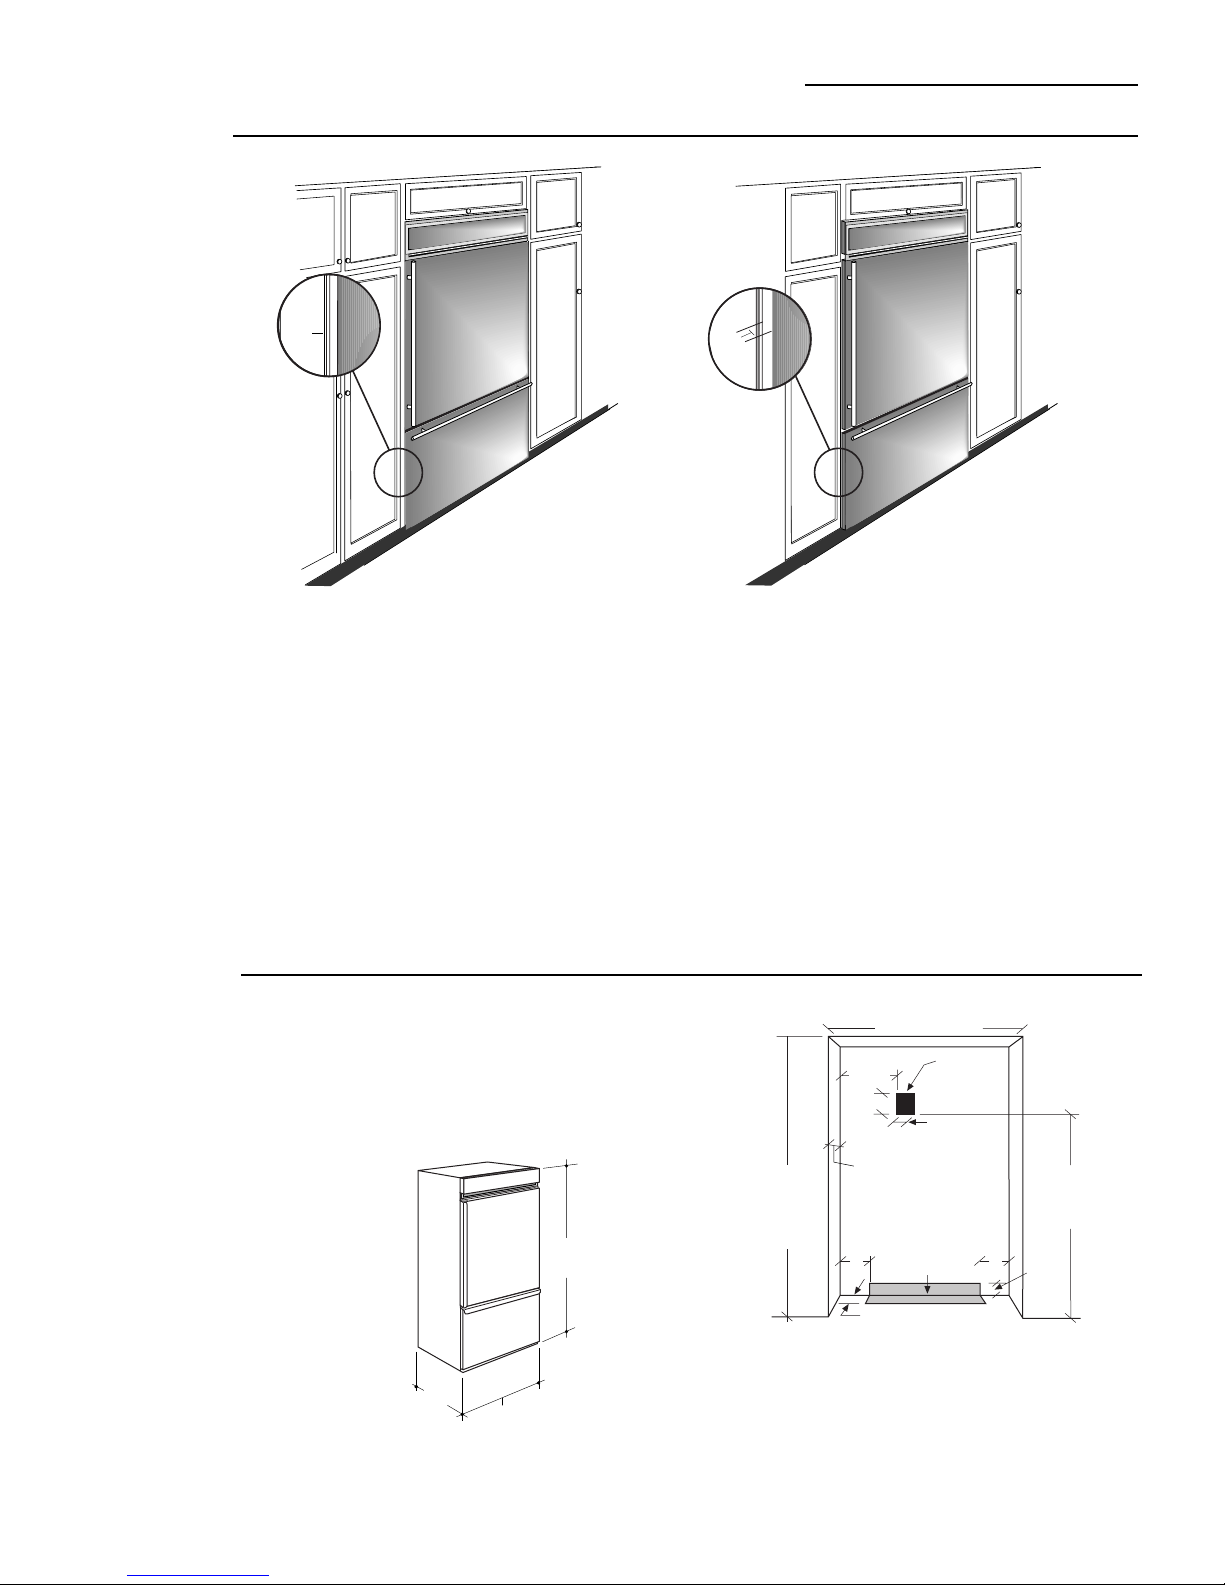
Flush or
7"
Wall View
Electrical
Area
84 1/2" max
83 1/2" min
Finished
Opening
74" From Floor
to
Bottom
of Electrical
5"
5"
3 1/2"
5"
3 1/2"
Water Supply
24 3/4" Total
Depth
*Finished Width
7 1/2"
Semi-Flush
Enclosure
Installations
Design Information
36" Bottom Mount Refrigerators
Advance Planning
0"
True Flush Installation
In a flush installation,
the refrigerator doors
will align evenly with the
front face of adjacent cabinet
doors. The refrigerator blends
into the surrounding cabinetry.
Monogram built-in refrigerators can be installed flush
with typical 24-3/4" deep cabinetry.
When installed semi-flush, the case trim will conceal
slight gaps around the enclosure. The refrigerator will
project forward approximately 3/4" beyond the front
face of surrounding cabinetry.
In any installation situation, a wide range of appearance options can be accomplished through the use of
one or more trim kits. See trim kit descriptions and
appearance options on page 6.
3/4"
Semi-Flush Installation
These refrigerators
can also be installed
semi-flush into an enclosure
using the minimum cutout
width. The case trim creates a
frame around the opening.
Side Panels Requirements:
• Side panels are not required whenever the
refrigerator is installed into an enclosure or between
pantry and oven cabinets.
• Side panels are required whenever the sides of the
refrigerator are exposed.
• Side panel sizes vary depending on the type of
installation being made.
To accomplish an attractive installation, you must:
1. Determine the need for side panels.
2. Determine side panel thickness.
3. Order matching side panels from the cabinet
manufacturer. Be sure to provide the exact dimensions.
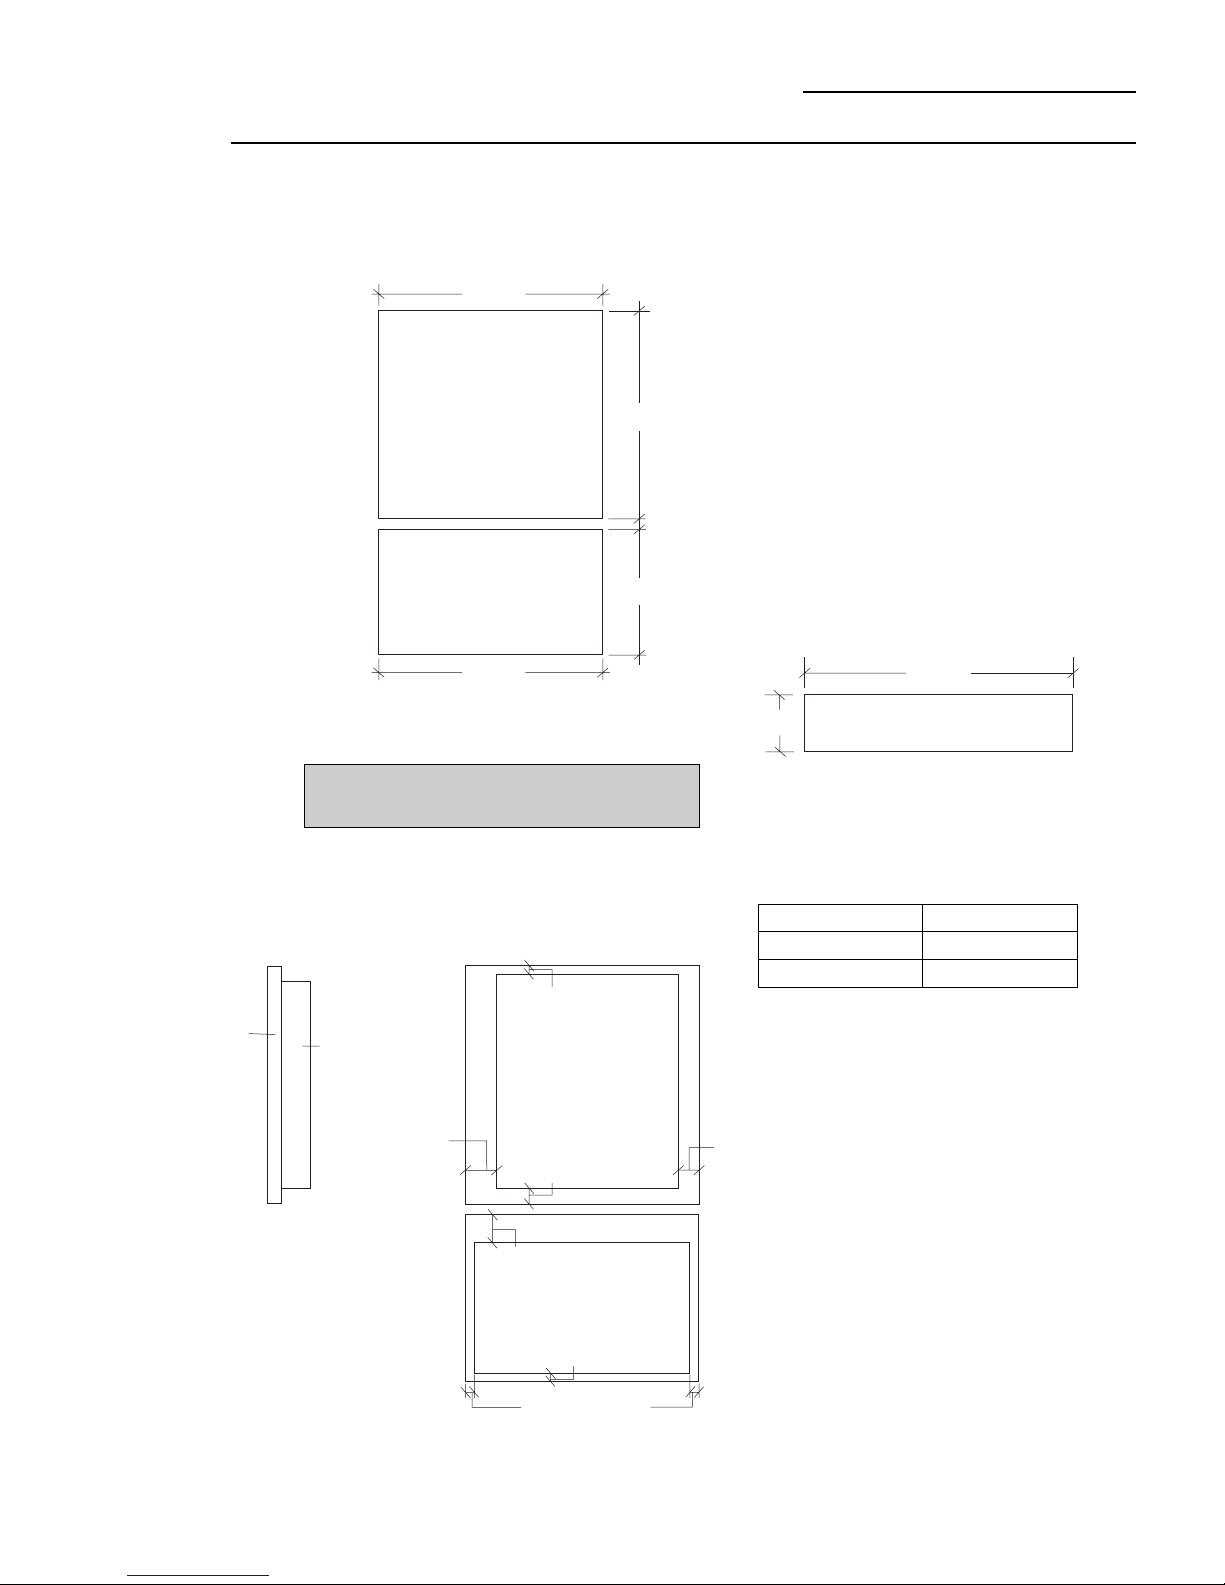
Enclosure
Cutout and
Product
Dimensions
• To achieve a flush fit the finished cutout width must
be at least 36" wide.
• A semi-flush installation requires 35-1/2" min. finished
cutout width.
• The electrical and water locations must be located as
shown for either type of installation.
24-3/4"
36"
83-1/2" Min
84-1/2" Max
*36" Min. for a flush installation
35-1/2" Min. for a semi-flush installation
Note: Additional cutout width may be required when
side panels are used. Add side panel thickness to the
finished cutout to calculate rough-in width. See
installation examples on the following page.
3
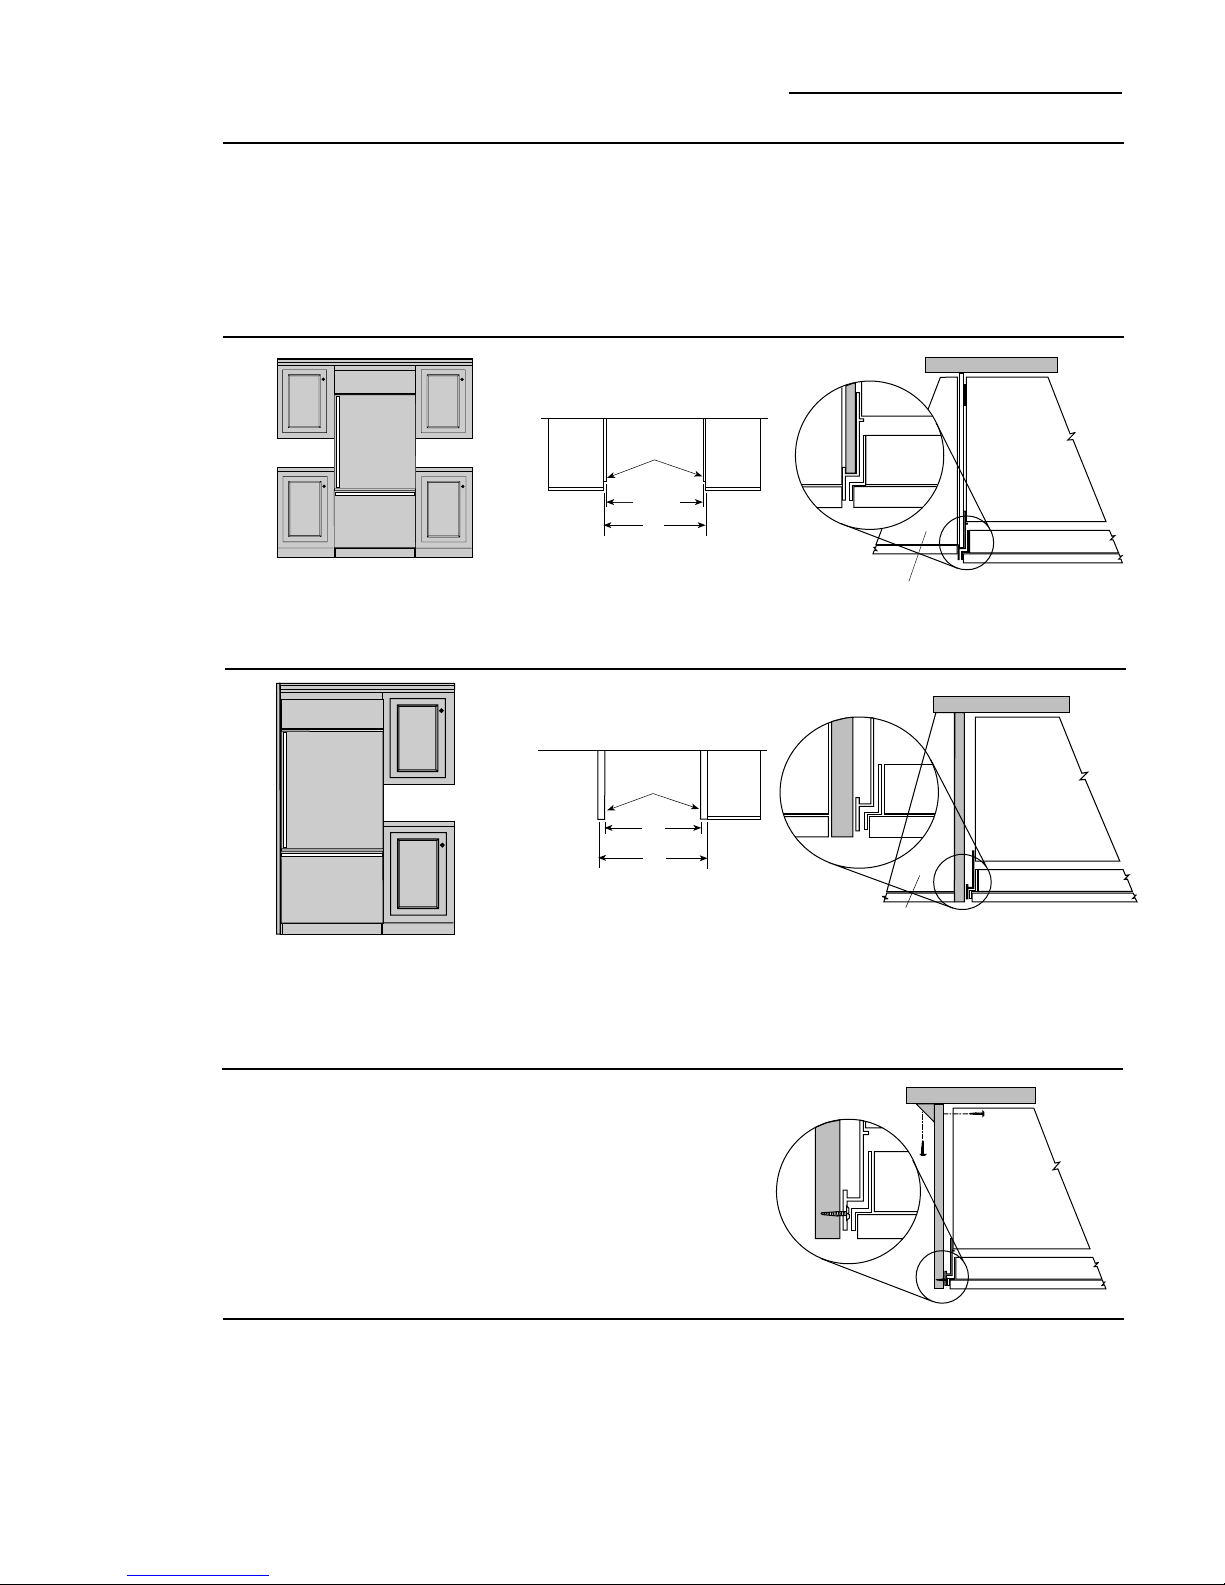
Installation Examples
Design Information
36" Bottom Mount Refrigerators
Installation
Between
Base &
Wall Cabinets
Installation
At End-of-Run
Side panels are required whenever the sides of the refrigerator will be exposed.
1/2" to 3/4" side panels are normally set into place and
fastened to adjacent cabinetry or to the back wall before
rolling the refrigerator into the opening.
Flush and Semi-Flush
Installations
1/4" Thick
Side Panels
Finished Dim.
Roughed-In Dim.
Note: 1/4" thick side panels can be
inserted into the case trim, making the
rough-in the same as the outside trim
width, 36”.
Flush and Semi-Flush
Installations
1/2" Thick
Side Panels
Finished Dim.
Roughed-In Dim.
Therefore, the rough-in dimensions must allow for side panel
thickness. In both a flush and semi-flush installation, the
finished dimension, (the width of the opening after side panels
are installed), must accommodate the full width of the
refrigerator.
See page 11 for side panel sizes.
Refrigerator
Cabinet
35-1/2"
36"
Refrigerator door
Cabinet
1/4" Side Panels. Insert end of
side panel into trim
Refrigerator
Cabinet
36"
37"
Refrigerator door
Note: 1/2" thick side panels shown. Side panels can
be any thickness. Add side panel thickness to outside
trim width (36”) to calculate the rough-in dimension.
The leading (front) edge must be finished to match
surrounding cabinetry.
Frameless
Cabinets
Accessory
Panel Kits
Side panels, 1/2" minimum thickness are required when
using frameless cabinets. The side panel acts as a
spacer between the cabinet and the case trim and
prevents interference with cabinet door swing. The
leading (front) edge must be finished to match
surrounding cabinetry.
These refrigerators require field installed door and grille
panels.The factory installed trim will accept accessory
panel kits. White or black Lexan® and stainless steel
kits are available. Panels are cut to size and ready to
install. These panel kits must be ordered separately.
ZWBC36, Black Lexan
ZWWC36, White Lexan
ZWSC36, Stainless Steel Panels
®
Panels
®
Panels
1/2" To 3/4" Side Panels. Leading
Edge Flush With Cabinet
A wide range of custom appearance options can be
created with optional trim kits. See page 6 for examples
and trim kit descriptions.
Cabinet
1/2" To 3/4" Side Panels. Leading
Edge Flush With Cabinet
Refrigerator
Cabinet
Refrigerator door
4

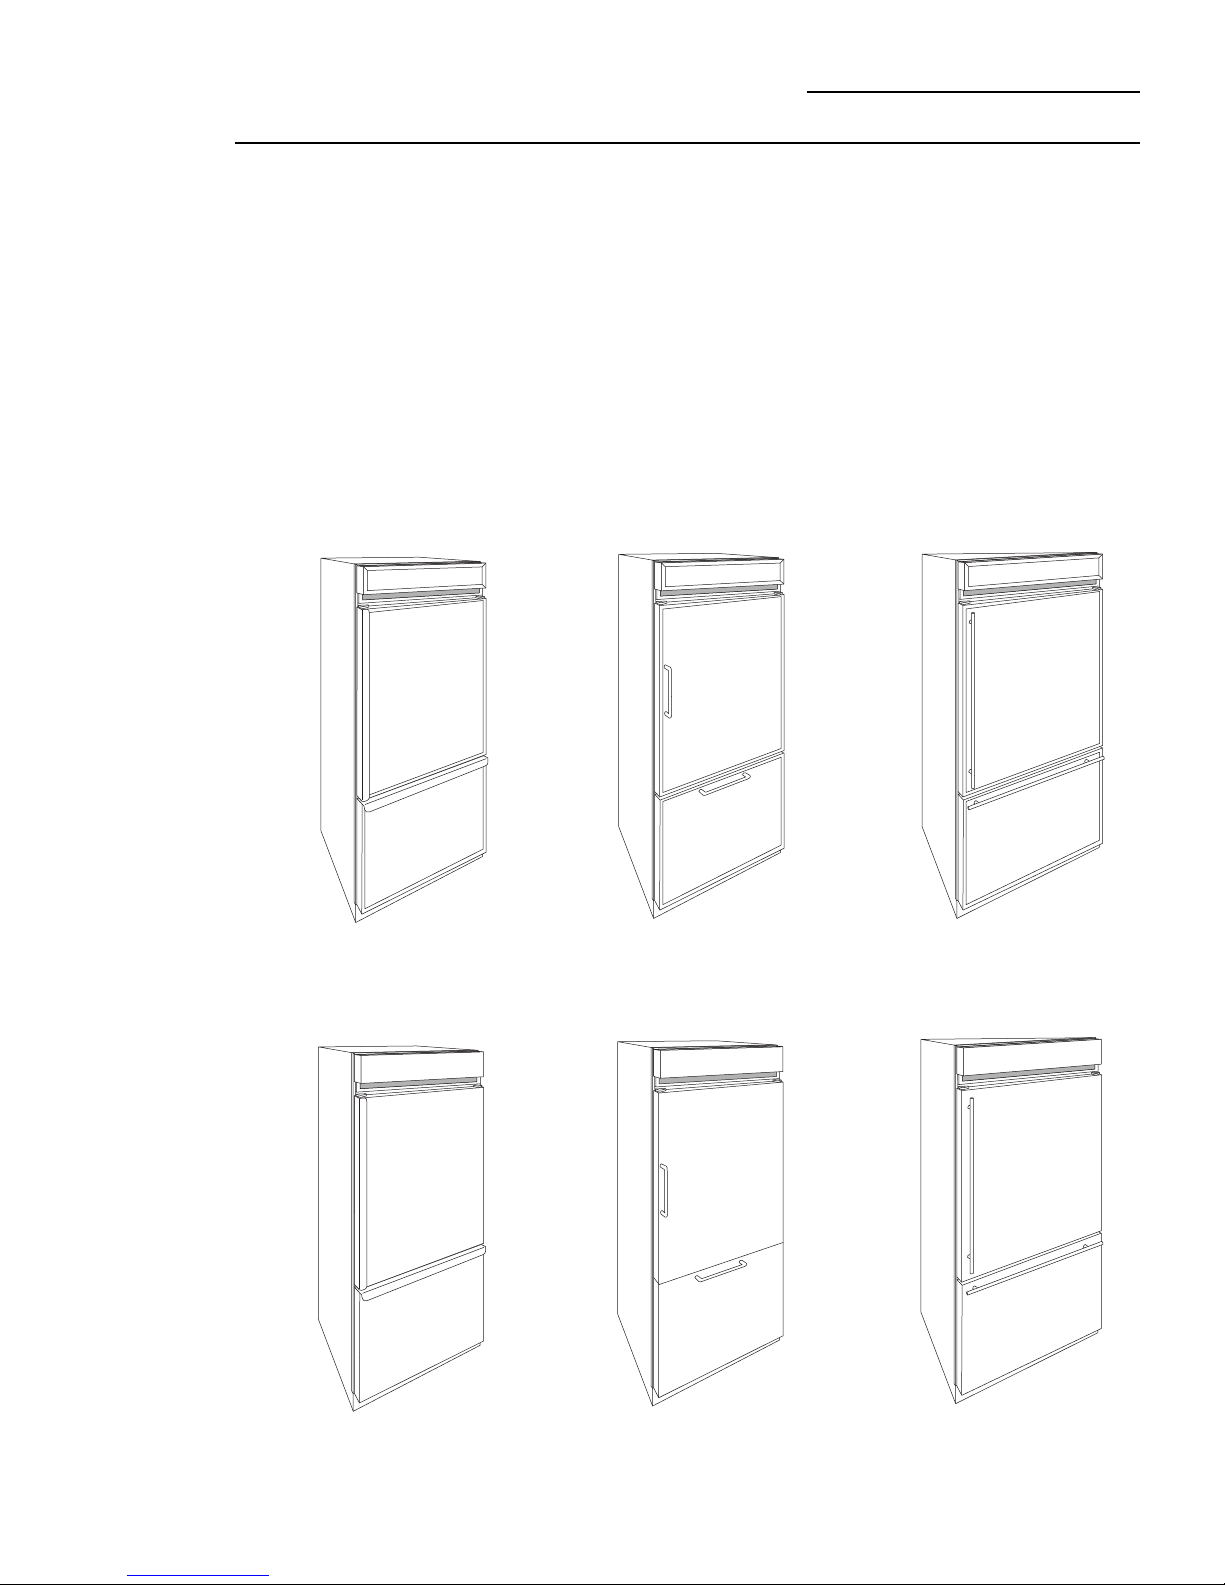
Design Information
36" Bottom Mount Refrigerator
Models
available
Advance
planning
exterior
appearance
options
ZIC36N RH
36" wide model with handle on the left side, the door
swings left to right.
These refrigerators are designed to be customized with
decorator door and grille panels. Field installed custom
door and grille panels are required for these models.
Factory installed trim will accommodate 1/4" thick
®
custom panels, Lexan
or stainless steel panel kits.
Door and grille panel sizes vary to accommodate the kit
being used. Sizes are provided in this booklet.
Caution: Maximum panel weight for fresh food door is
50 pounds and 30 pounds for freezer drawer panel.
Side panels must be used whenever the sides of the
refrigerator will be exposed. Side panel sizes vary
depending on the installation.
3/4" thick custom panels-Without trim kits
A raised panel design, screwed or glued to a 1/4" thick
backing can be used. See page 8 for panel sizes and
clearances.
ZIC36N LH
36" wide model with handle on the right side, the door
swings right to left.
You should:
1. Select the appearance option.
2. Order the trim kit for that option.
3. Order the custom door and grille panels from the
cabinet manufacturer. The exact dimension for each
trim kit application is provided in this booklet. Find
and pull out the page for your application and fax or
send it to the cabinet manufacturer. The cabinet
manufacturer must have this information to construct the panels accurately.
4. Determine the final installation situation and order
matching side panels.
5
Design Information
36" Bottom Mount Refrigerator
Trim kit
descriptions
ZGC2 - Provides 1/4" grille panel frame side pieces for
83-1/2" and 84-1/2" installation heights. The supplied
grille panel frame is factory set for 84".
ZKHC1 - Provides the necessary framework to install
custom handles,
(Handles not included.)
ZKHCSSI - Tubular stainless steel handles for 1/4" thick
panel installations.
ZKHTC1 - Provides the necessary framework to install
custom handles,
(Handles not included.) This kit must be used in
combination with ZKTC36L or ZKTC36R
of your choice
of your choice
, onto 1/4" thick panels.
, onto 3/4" thick panels.
ZKHTCSS1 - Tubular stainless steel handles for 3/4"
thick panel installations. This kit must be used in
combination with ZKTC36L or ZKTC36R
ZKTC36L (left opening models),
ZKTC36R (right opening models) - Provides for the
installation of 3/4" thick custom door and grille panels.
This kit provides a standard handle to fit 3/4" thick
panels.
ZFC1 Trim Kit - For side to side installation of 2
refrigerators. This kit provides a trim strip to cover the
side case trim for a finished appearance.
1/4" Panels with standard
handles. No kits required.
3/4" Custom panels with
supplied handle. Trim Kit
ZKTC36L (or ZKTC36R)
1/4" Custom panels with
custom handles. Trim Kit
ZKHC1.
3/4" Custom panels with
custom handles. Trim kits
ZKTC36L (or ZKTC36R)
and ZKHTC1.
1/4" Custom panels with
Tubular Stainless Steel
handles, Trim Kit
ZKHCSS1.
3/4" Custom panels with
Tubular Stainless Steel
handles, Trim Kits
ZKTC36L (or ZKTC36R)
and ZKHTCSSI
6
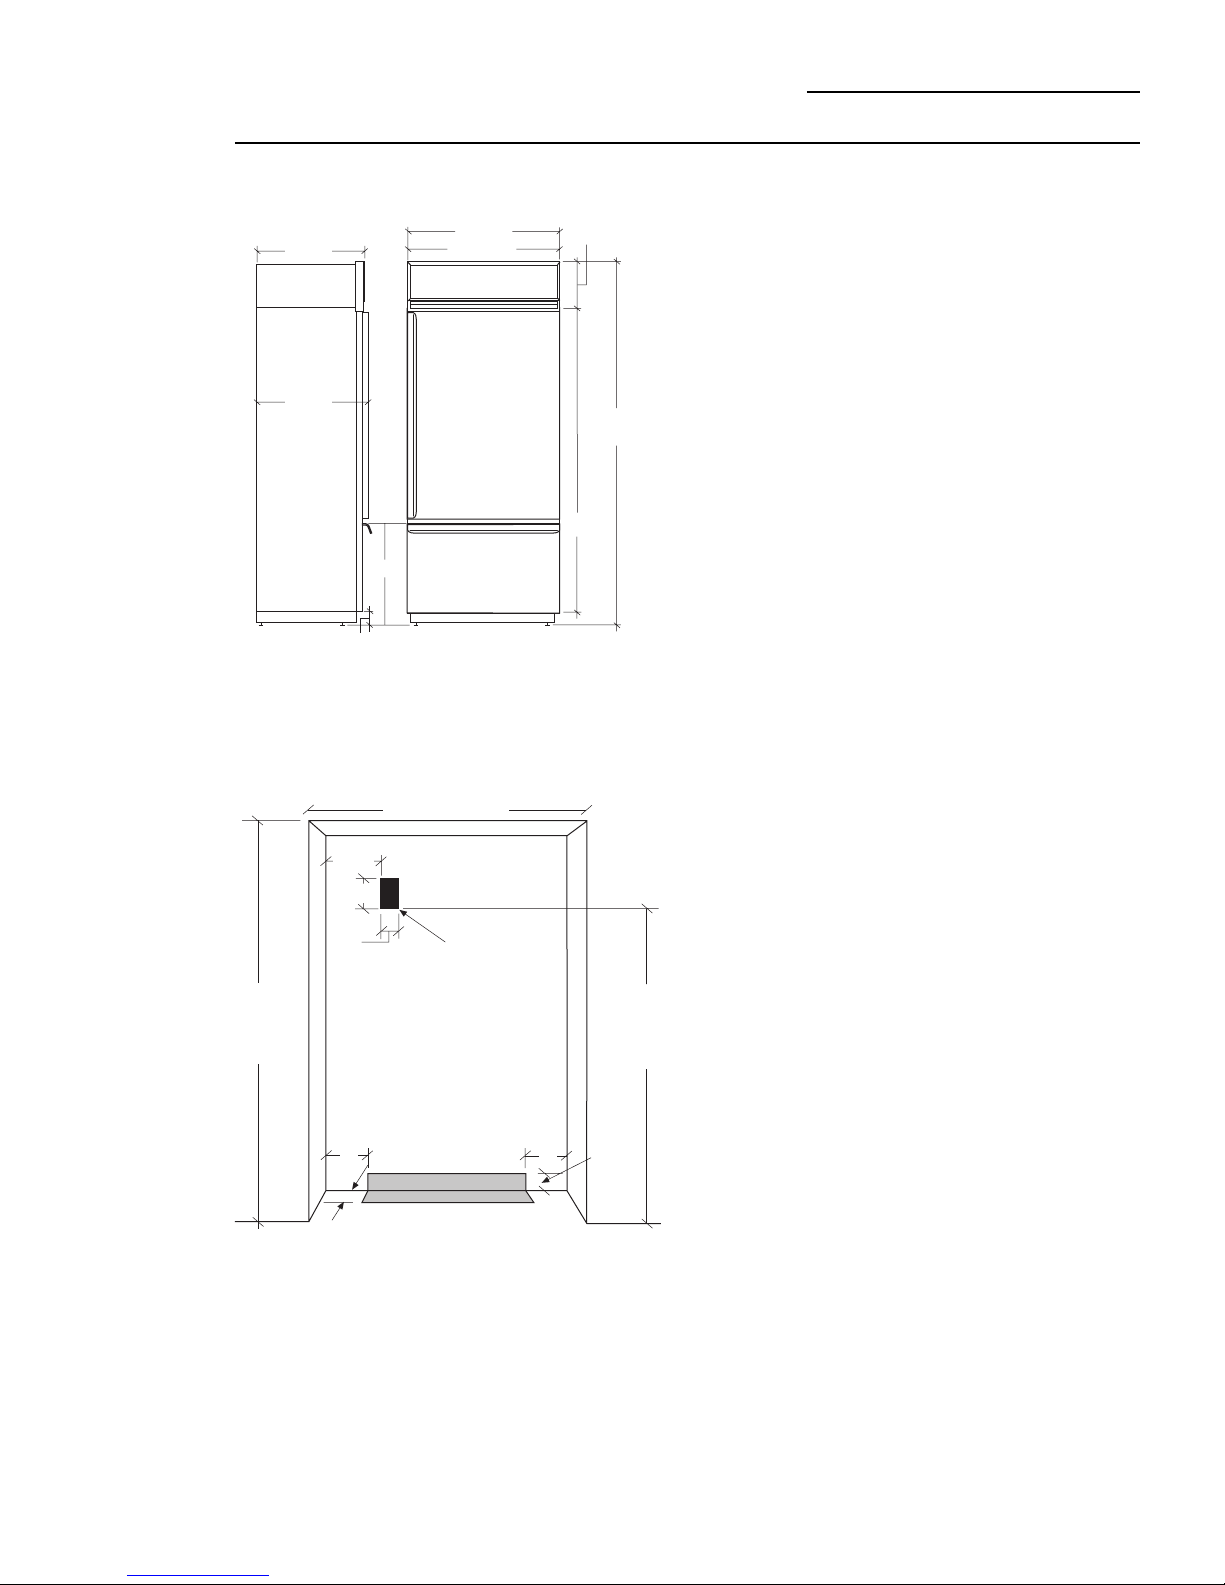
Side View
24 3/4"
26 3/4"
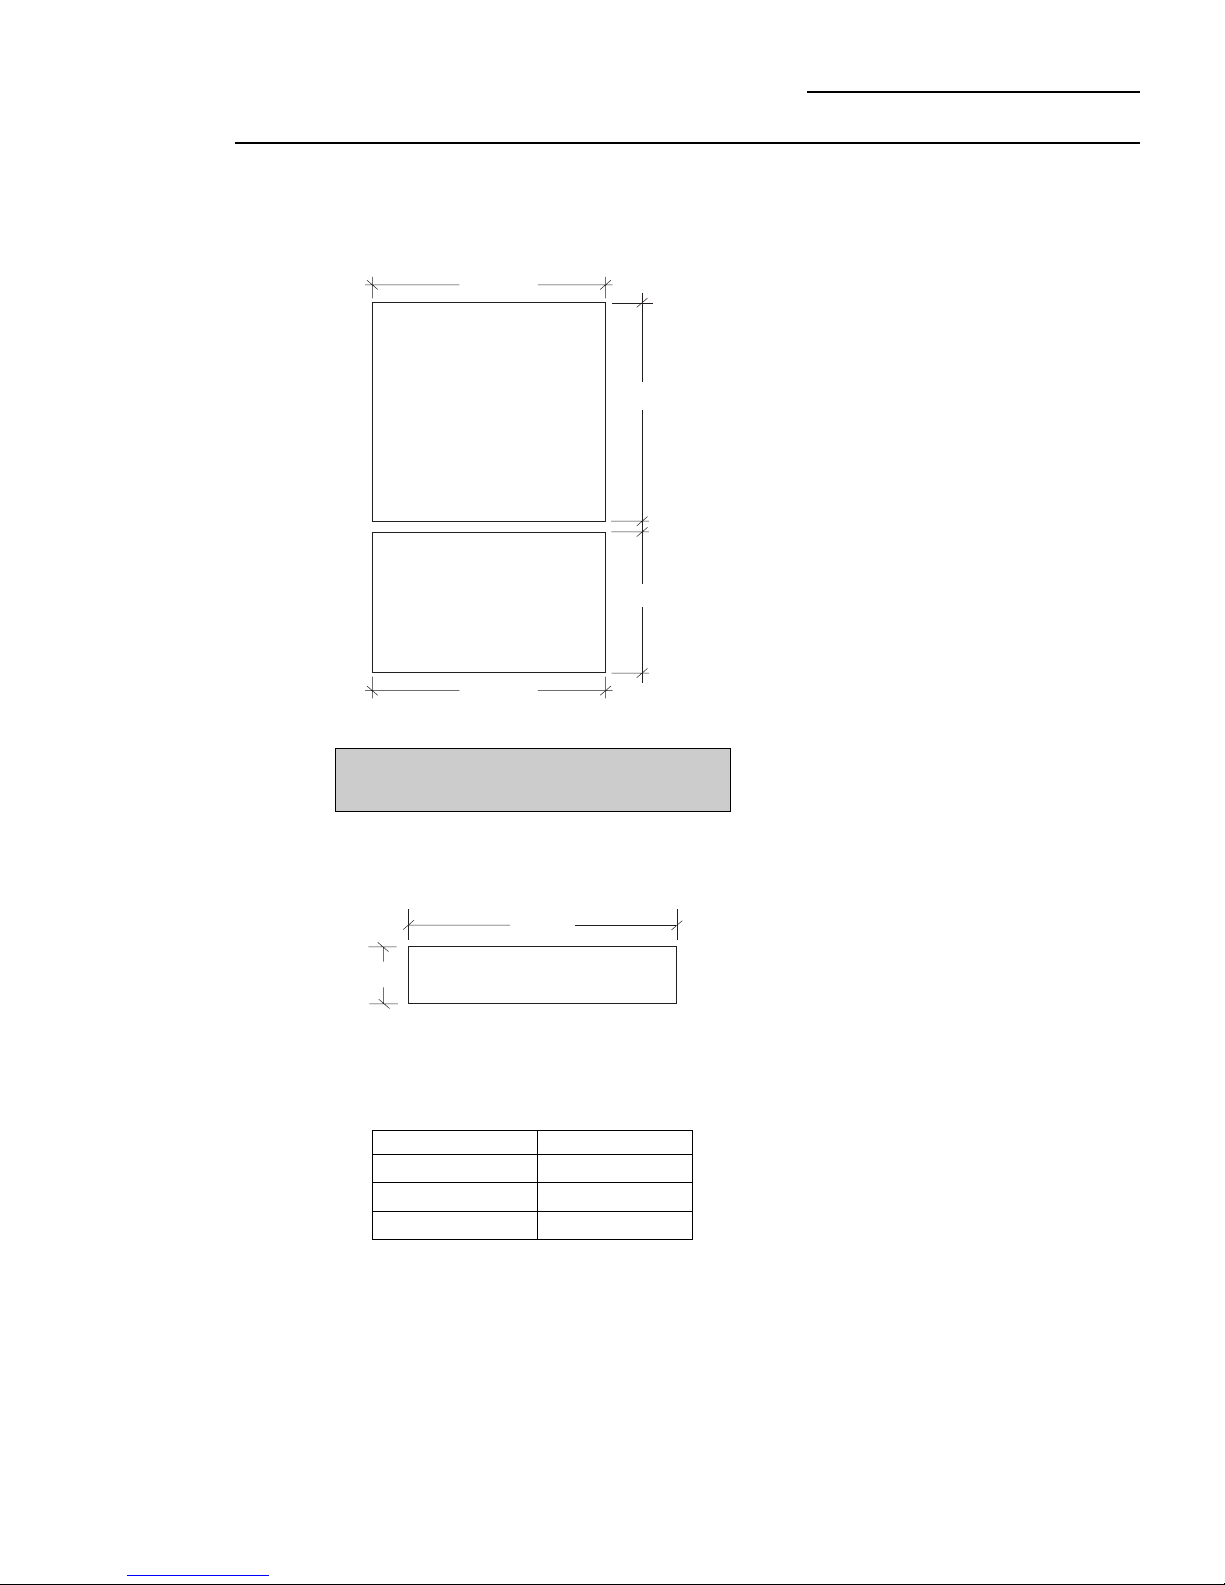
Custom Panel Dimensions
36" Bottom Mount Refrigerators
ZIC36N Bottom Mount Refrigerator
Front View
35" Case
36" Overall"
26"
4"
10 3/4" Max
10" Min
84 1/2" Max
83 1/2" Min
73-1/2"
Design Information
Designed to be installed flush or semi-flush with
surrounding cabinetry. Cutout dimensions, clearances
and side panel sizes are determined by the many
installation options available. Side panels must be used
whenever the sides of the refrigerator will be exposed.
Side panels are not required when refrigerator is
installed into an enclosure or between pantry and oven
cabinets. IMPORTANT - Side panels, 1/2" minimum
thickness are required when using FRAMELESS
CABINETS.
• Field installed custom panels, Lexan
steel panels are required. The door panels and grille
panel sizes vary to accommodate the kit being used.
• The supplied toekick is vented and must remain
unobstructed for proper air circulation.
®
or stainless
Optional Panel Kits:
• ZWBC36: Black Lexan® Panel Kit
• ZWWC36: White Lexan
• ZWSC36: Stainless Steel Panel Kit
®
Panel Kit
*Finished Width
Wall View
5"
(not to Scale)
74" From
Floor to
Bottom of
Electrical Area
3 1/2"
7 1/2"
7"
5"
Locate Grounded
Electrical outlet
84 1/2" max
83 1/2" min
Finished
Opening
5"
3 1/2"
* 36" Min. for a flush installation into an enclosure.
* 35-1/2" Min. for a semi-flush installation into an enclosure.
Note: Additional cutout width may be required when side panels are
used. Add side panel thickness to the finished cutout width to
calculate rough-in width. See installation examples on page 4.
Within Solid
Area Above
Locate Water
Supply Within
the Shaded
Area Below
Optional Custom Trim Kits:
• ZKHC1: For installation of a custom handle of your
choice onto 1/4" Panels.
• ZKTC36L or ZKTC36R: For installation of 3/4" thick
custom panels.
• ZKHTC1: For installation of a custom handle of your
choice onto 3/4" thick panels. (This kit must be used in
combination with ZKTC36L or ZKTC36R.
• ZKHCSS1: Tubular Stainless Steel handles for 1/4"
thick panels.
• ZKHTCSS1: Tubular Stainless Steel handles for 3/4"
thick panels.
• ZGC2: 1/4" grille panel frame side pieces for 83-1/2
and 84-1/2" installation heights. Factory set height is
84".
Additional Specifications
• A 115 volt 60Hz., 15 or 20 amp power supply is
required. An individual properly grounded branch
circuit or circuit breaker is recommended. Install a
properly grounded 3-prong electrical receptacle
recessed into the back wall. Electrical must be
located on rear wall as shown.
• Water line can enter opening through the floor or
back wall. The water line should be 1/4" O.D. copper
tubing between the cold water line and water
connection location, long enough to extend to the
front of the refrigerator. Installation of an easily
accessible shut off valve in the water line is
recommended.
Clearances:
• If the refrigerator is to be installed in a corner:
A 4" clearance is required on the hinge side for a 90°
door opening and access to fresh food drawers. A 10"
clearance is required on the hinge side for removal of
pans.
7
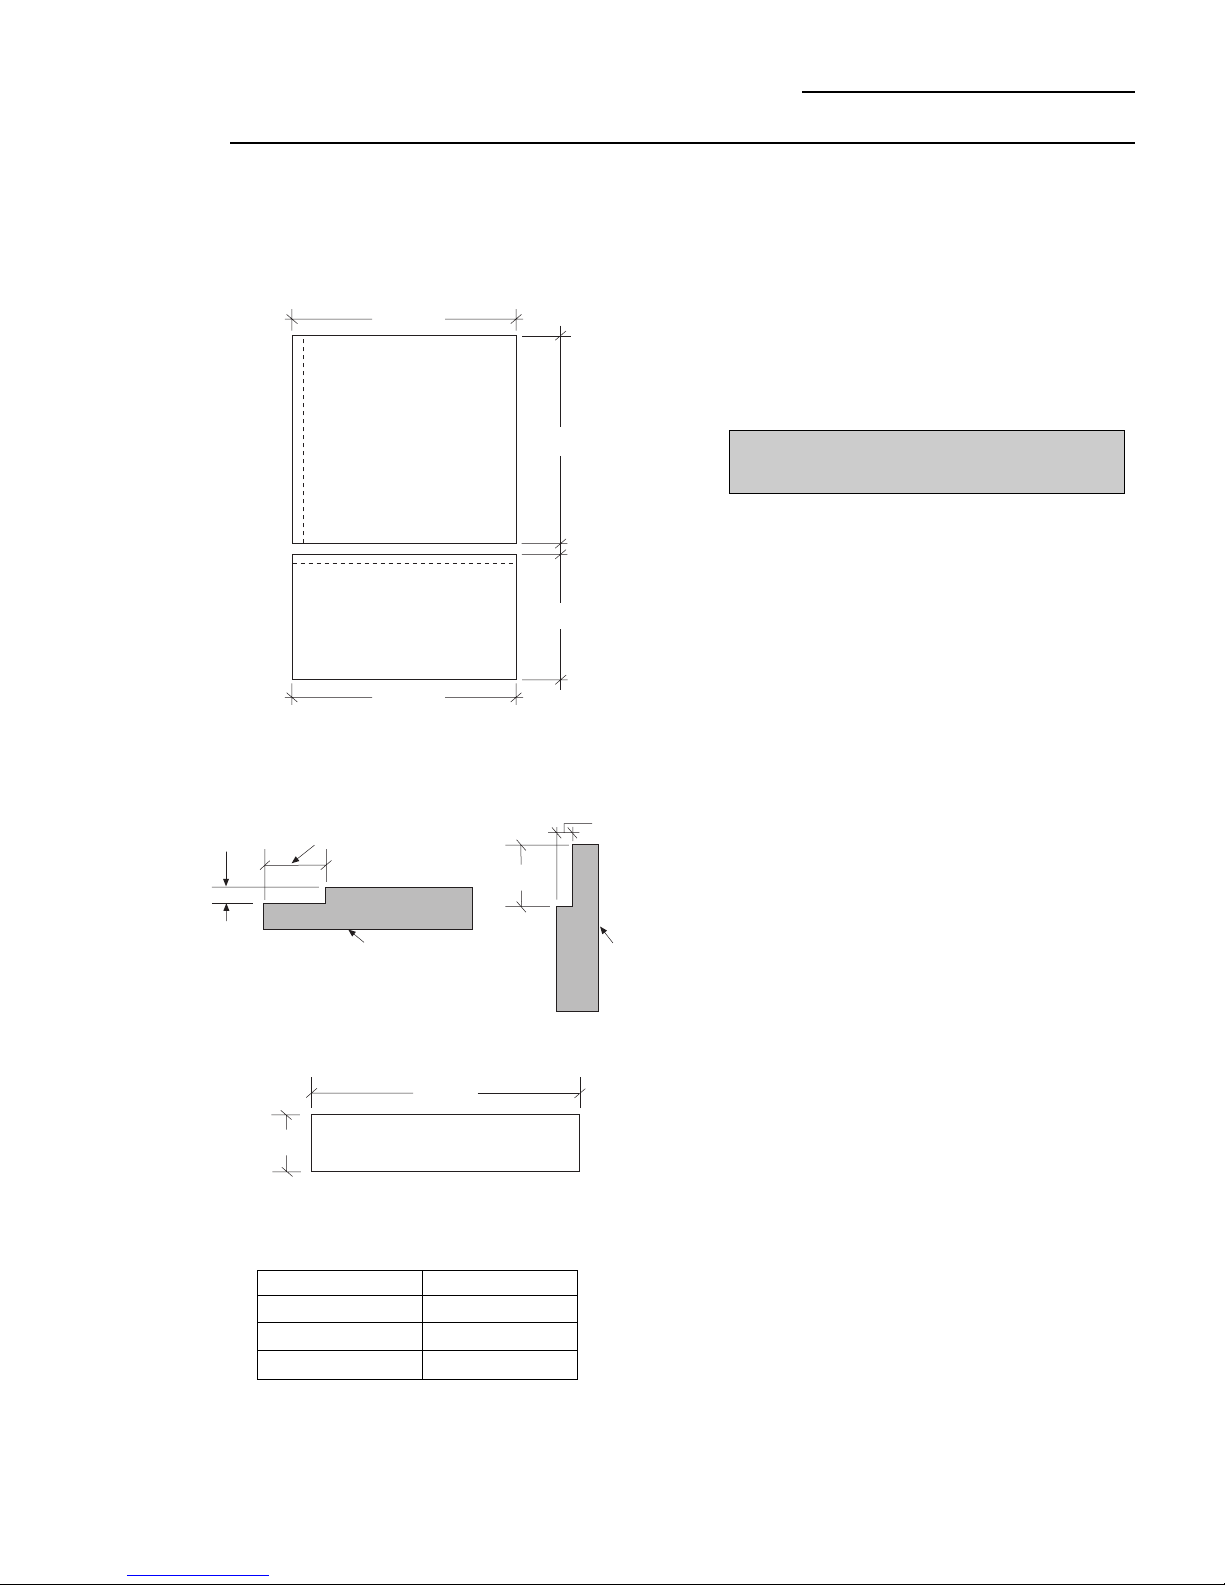
Custom Panel Dimensions
36" Bottom Mount Refrigerators
Custom Door Panel Dimensions Using Standard Trim
1/4" thick panels
or
Panels secured to 1/4" thick backing
35-1/16"
Fresh Food Panel
Freezer Panel
35 1/8"
45 1/2"
21 11/16"
ZIC36N Bottom Mount Refrigerator
• 1/4" Panels: Cut panels to size.
• Custom handles with 1/4" door panels require Trim kits
ZKHC1 or ZKHCSS1 for tubular stainless steel
handles).
Standard Trim with Panels secured
to 1/4" thick backing
• Applying a raised panel design to a 1/4" thick backing
(screws or glued): Cut 1/4" thick panels to size. On the
fresh food door, fabricate the raised panel to permit at
least 2" fingertip clearance of the standard handle. 11/4" clearance from the hinge side to avoid striking
adjacent cabinetry and 5/16" from the top and bottom
edges to allow for the trim flange. For the freezer
drawer, allow 2" clearance at the top handle end and
5/16" clearance on both sides and the bottom edge to
allow for trim flange.
Note:
ZKHTC1 custom handle kit cannot be used in
this configuration.
Custom Grille Panel
35 1/8"
8" 1/4" Thick Panel
1/4"
Thick
Backing
Caution: Maximum weight for fresh food panel is
50 pounds and 30 pounds for freezer drawer panel.
Raised Panel on 1/4" Thick Backing
Using Standard Handles
5/16" Clearance
Appearance
Panel
2" Clearance
handle Side
Fresh Food Panel
5/16" Clearance
2" Clearance
Handle End
Freezer Panel
5/16" Clearance
The grille panel frame is factory assembled for 84"
installation height. If installation height varies, order
ZGC2 trim kit that provides optional side trim pieces.
Cut grille panel to sizes shown below.
Installation Height Panel Height
83-1/2" 7-1/2"
84-1/2" 8-1/2"
1-1/4"
Clearance
hinge side
5/16" Clearance
8
Custom Panel Dimensions
36" Bottom Mount Refrigerator
Custom Door Panel Dimensions
Using Trim Kits ZKTC36L or ZKTC36R
3/4" thick panel with kit supplied handle
35 -1/16"
Fresh Food Panel
Freezer Panel
35 -1/4"
45-9/16"
21-11/16"
ZIS36N Bottom Mount Refrigerator
• The ZKTC36L (or ZKTC36R) trim kit provides for the
installation of 3/4" thick custom door and grille panels,
using the supplied handle. Cut panels to size and
install.
Caution: Maximum weight for fresh food panel is
50 pounds and 30 pounds for freezer drawer panel.
Custom Grille Panel
35 1/4"
A
Grille Panel height can vary to fill installation
height.
Installation Height Dimension A
Important:
top of door and bottom of grille panel.
3/4" Thick Panel
83-1/2" 7-3/4"
84" 8-1/4"
84-1/2" 8-3/4"
Maintain 1-1/2" min. gap between
9
Custom Panel Dimensions
36" Bottom Mount Refrigerators
Custom Door Panel Dimensions Using Standard Trim
Using Trim Kit ZKTC36L or ZKTC36R
3/4" thick panel
with custom handle
35 1/4 "
Fresh Food Panel
Freezer Panel
35 1/4 "
Rout panels to specification below on
the handle side of each panel
1 13/16"
45 9/16"
21 13/16"
1/4" max
ZIC36N Bottom Mount Refrigerator
• The ZKTC36L (or ZKTC36R) trim kit installed together
with a ZKHTC1 custom handle kit provides for the
installation of 3/4" thick custom door and grille panels
with a custom handle of your choice. Order
ZKHTCSS1 for tubular stainless steel handles. Cut
panels to size, rout the handle side of the panels as
shown below and install.
Caution: Maximum weight for fresh food panel is
50 pounds and 30 pounds for freezer drawer panel.
1/4"
max
Fresh Food Door Face
Custom Grille Panel
35 1/4"
A
Grille Panel height can vary to fill installation
height.
Installation Height Dimension A
83-1/2 " 7-3/4"
84-1/2" 8-3/4"
Important:
top of door and bottom of grille panel.
3/4" Thick Panel
84" 8-1/4"
Maintain 1-1/2" min. gap between
1 13/16"
Freezer
Door
Face
10
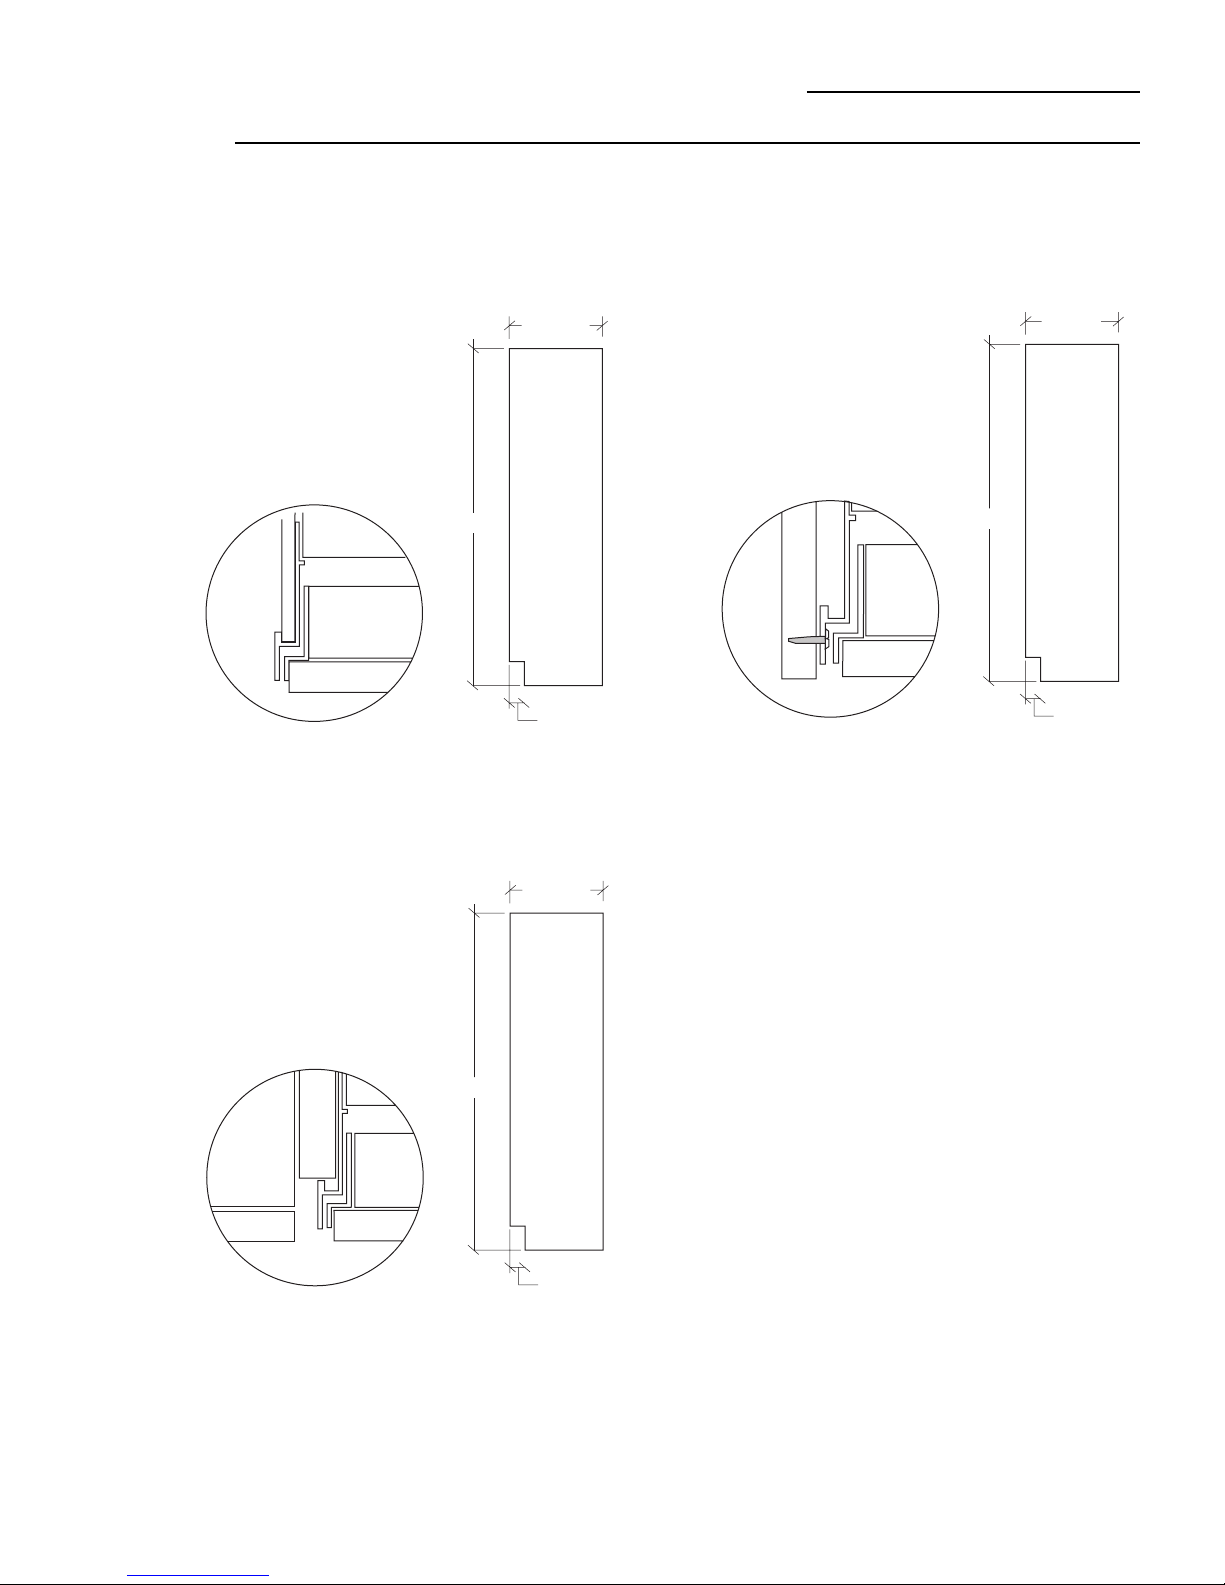
Side Panel or Filler Options
(Not to scale)
Side panels must be used whenever the sides of the
refrigerator will be exposed.
Custom Panel Dimensions
36" Bottom Mount Refrigerators
1/4" Side Panels
Insert end of
side panel into trim.
84"
T rim
Standard 4" high toekick or trim to fit.
Height may vary depending on application.
23 9/16"
2 9/16"
23 5/16"
1/2" to 3/4" Side Panels
Leading Edge
Flush with Cabinet
Front. The front or
leading edge must be
finished to match
cabinetry.
84"
Standard 4" high toekick or trim to fit.
Height may vary depending on application.
24 3/4"
3 3/4"
1/2" to 3/4" Side Panels
Recessed front edge.
Standard 4" high toekick or trim to fit.
Height may vary depending on application.
84"
2 5/16"
11
Installation
36" Bottom Mount Refrigerator
Tools
Required
Materials
Required
Hardware
Supplied
Flooring
Grounding
the
Refrigerator
• Tinsnips to cut banding
• Stepladder
• Bucket
• Level
• Appliance Hand Truck
• Tubing cutter
• Water shut-off valve (optional but recommended)
• Water filter WR97X0214 (optional but recommended)
• Custom panels for fresh food, freezer drawer, grille
panel
• 1-1/2" stamped open-end wrench
• Special Velcro adhesive strips for 1/4" side panels
• 1/4-1/4 union with nuts
For proper installation, this refrigerator must be placed
on a level surface of hard material that is at the same
height as the rest of the flooring. This surface should be
strong enough to support a fully loaded refrigerator.
IMPORTANT - (Please read carefully)
FOR PERSONAL SAFETY, THIS APPLIANCE MUST BE
PROPERLY GROUNDED.
The power cord of this appliance is equipped with a
three-prong (grounding) plug which mates with a
standard three-prong (grounding) wall receptacle to
minimize the possibility of electric shock hazard from
this appliance.
Have the wall outlet and circuit checked by a qualified
electrician to make sure the outlet is properly
grounded.
Where a standard 2-prong wall outlet is encountered, it
is your personal responsibility and obligation to have it
replaced with a properly grounded 3-prong wall outlet.
• 7/16" open-end wrench
• #2 Phillips screwdriver
• Stubby Phillips
screwdriver
• Drill and appropriate bits
• 7/16" socket with 3"
extension for ratchet
• Safety glasses
• Side panels
• Hardware for side panel installation.
• 36" long 2x4 for Anti-Tip support
• Anti-Tip Mounting Brackets
CAUTION: Protect the finish of the flooring. Cut a large
section of the cardboard carton and place under the
refrigerator where you are working.
CAUTION: Attaching the adapter ground terminal to a
wall outlet cover screw does not ground the appliance
unless the cover screw is metal, and not insulated, and
the wall outlet is grounded through the house wiring.
You should have the circuit checked by a qualified
electrician to make sure the outlet is properly
grounded.
When disconnecting the power cord from the adapter,
always hold the adapter in place with one hand and
pulling the power cord with the other hand. If this is not
done, the adapter ground terminal is very likely to break
with repeated use.
Should the adapter ground terminal break, DO NOT USE
the appliance until a proper ground has again been
established.
DO NOT, UNDER ANY
CIRCUMSTANCES, CUT
OR REMOVE THE THIRD
(GROUND) PRONG
FROM THE POWER CORD.
Use of Adapter plug
Because of potential hazards under certain conditions,
we strongly recommend against use of an adapter plug.
However, if you still elect to use an adapter, where
local codes permit, a TEMPORARY CONNECTION, may
be made to a properly grounded 2-prong wall outlet by
use of a UL listed adapter available at most hardware
stores.
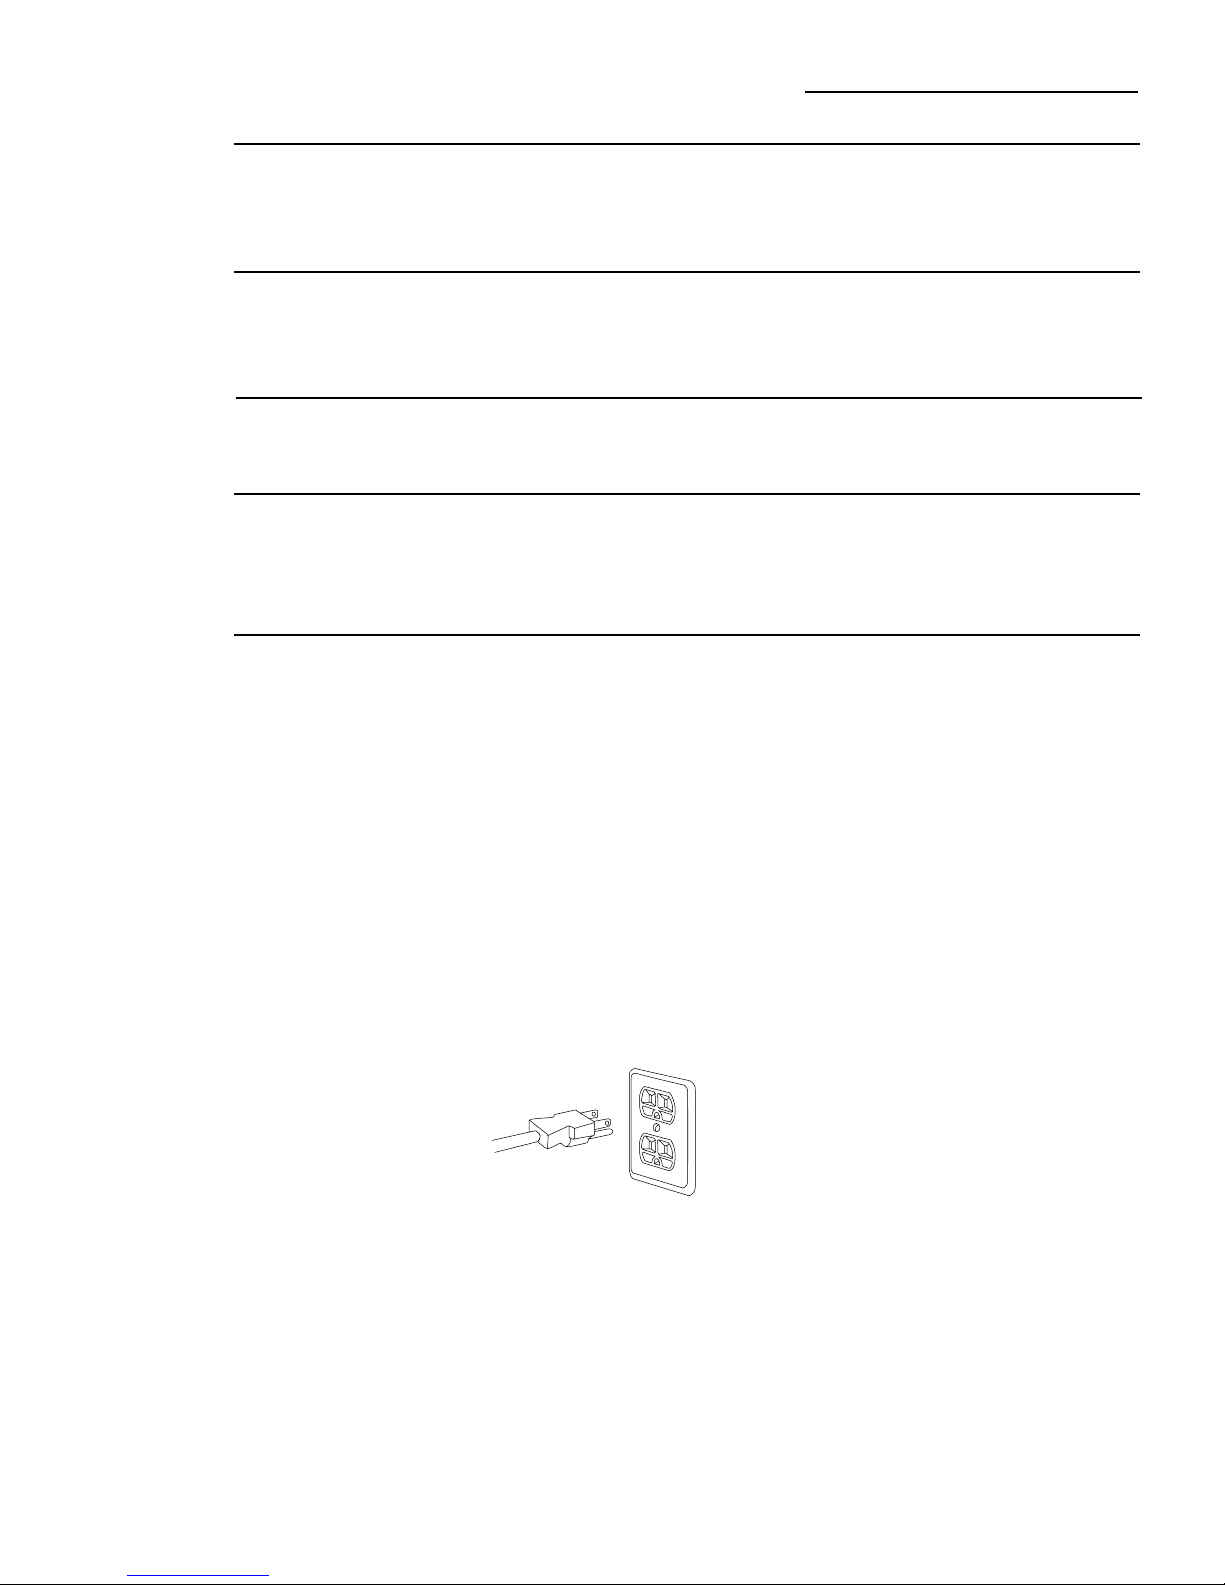
The larger slot in the adapter must be aligned with the
larger slot in the wall outlet to provide proper polarity in
the connection of the power cord.
Use of Extension Cords
Because of potential safety hazards under certain
conditions, we strongly recommend against the use of
an extension cord. However, if you still elect to use an
extension cord, it is absolutely necessary that it be a UL
listed 3-wire grounding type appliance extension cord
having a grounding type plug and outlet and that the
electrical rating of the cord be 15 amperes (minimum)
and 120 volts.
12
 Loading...