

Monogram ZET1PL1SS, ZET1SL1SS, ZET2PL1SS, ZET2SL1SS Technical Service Manual
GE Consumer & Industrial
Technical Service Guide
April 2006
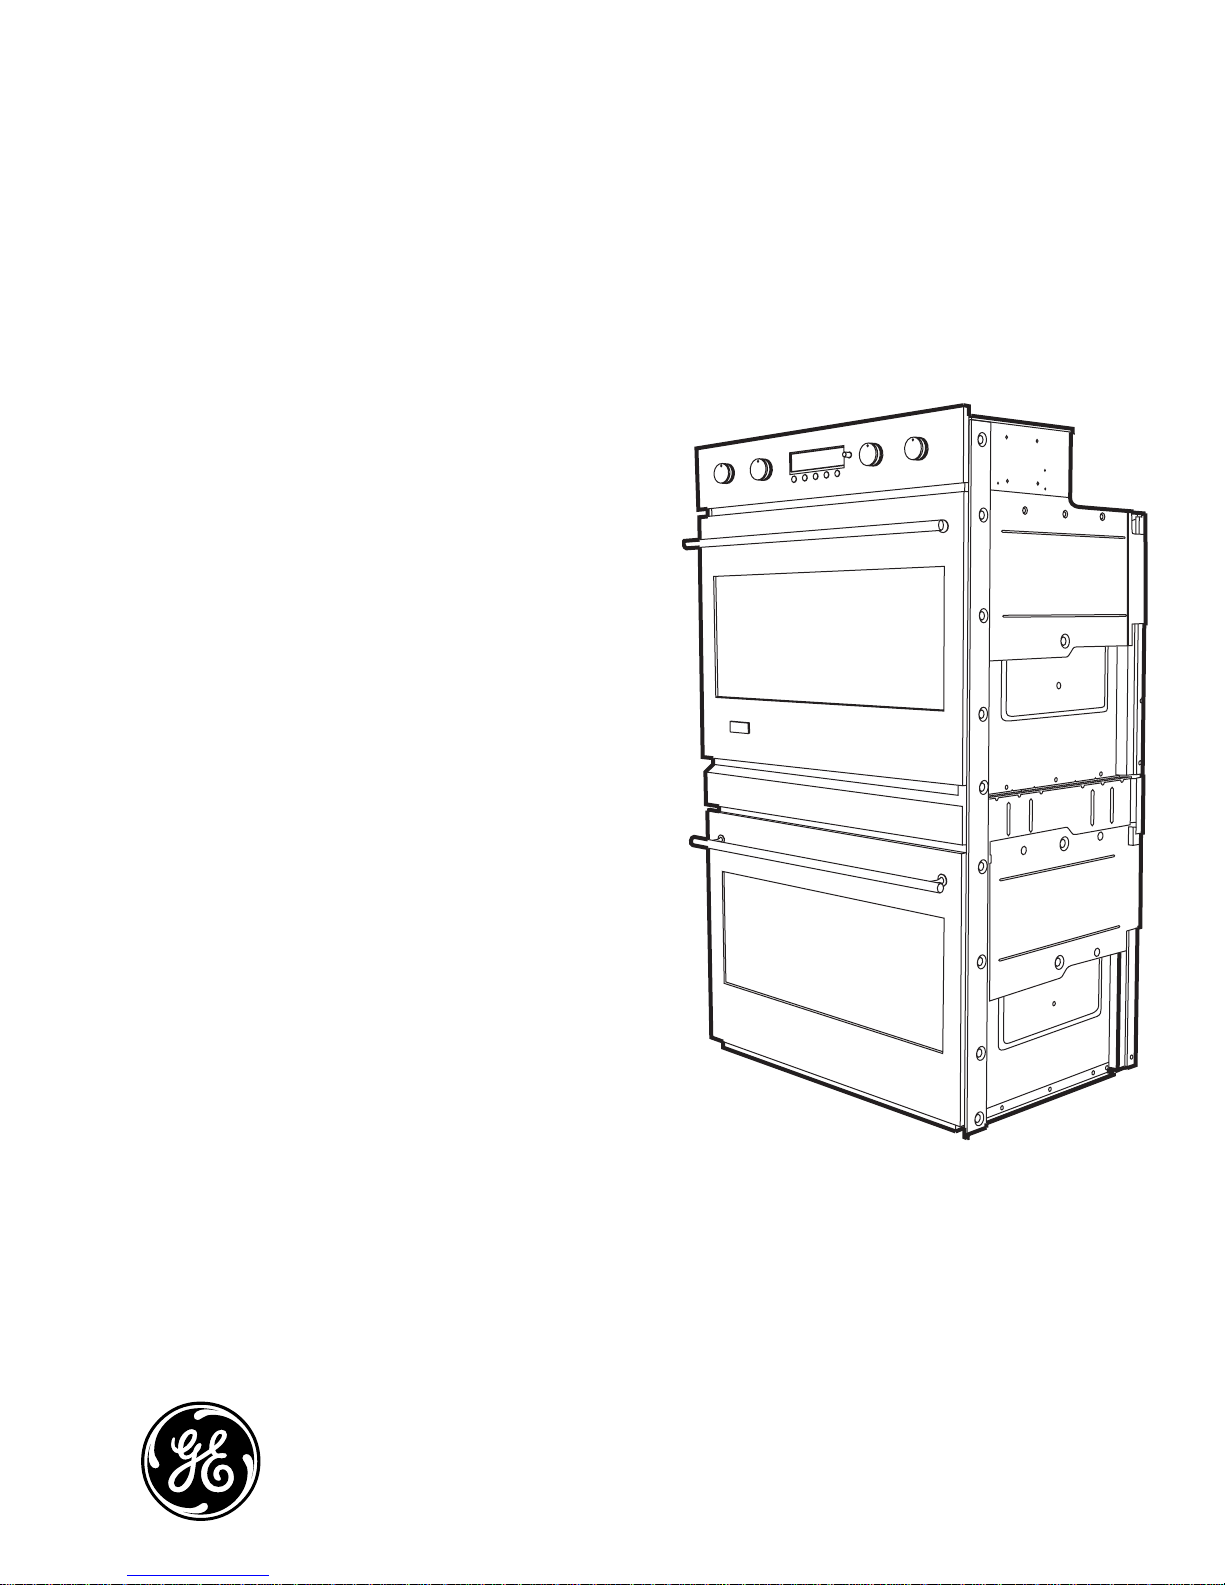
Monogram 30-in.
Single and Double
Convection Wall
31-9142
Ovens
ZET1PL1SS
ZET1SL1SS
ZET2PL1SS
ZET2SL1SS
GE Appliances
General Electric Company
Louisville, Kentucky 40225

IMPORTANT SAFETY NOTICE
The information in this service guide is intended for use by
individuals possessing adequate backgrounds of electrical,
electronic, and mechanical experience. Any attempt to repair a
major ap pli ance may result in personal injury and property
damage. The man u fac tur er or seller cannot be responsible for the
in ter pre ta tion of this in for ma tion, nor can it assume any liability in
connection with its use.
WARNING
To avoid personal injury, disconnect power before servicing
this prod uct. If electrical power is required for diagnosis or test
purposes, disconnect the power immediately after performing the
necessary checks.
RECONNECT ALL GROUNDING DEVICES
If grounding wires, screws, straps, clips, nuts, or washers used to
complete a path to ground are removed for service, they must be
returned to their original position and properly fastened.
GE Consumer & Industrial
Technical Service Guide
Copyright © 2006
All rights reserved. This service guide may not be reproduced in whole or in part
in any form without written permission from the General Electric Company.
– 2 –

Table of Contents
Bake Element ......................................................................................................................................................................35
Broil Element ....................................................................................................................................................................... 26
Component Locator Views ........................................................................................................................................... 14
Component Voltage Test ...............................................................................................................................................47
Control Boards Connector Locator ...........................................................................................................................44
Control Compartment Access ....................................................................................................................................30
Control Features ................................................................................................................................................................ 6
Control Voltage .................................................................................................................................................................. 46
Convection Bake Element .............................................................................................................................................28
Convection Fan Assembly ............................................................................................................................................28
Cooling Fan ..........................................................................................................................................................................37
Diagnostics and Service Information ......................................................................................................................46
Door Assembly ................................................................................................................................................................... 21
Door Hinge Receivers .....................................................................................................................................................37
Electronic Oven Control .................................................................................................................................................43
Error Codes ..........................................................................................................................................................................49
Introduction ......................................................................................................................................................................... 4
Lock Assembly ...................................................................................................................................................................33
Logic Board ........................................................................................................................................................................31
Lower Oven Control Compartment Access (Double Wall Oven) .................................................................30
Meat Probe and Outlet ................................................................................................................................................... 38
Mode and Temperature Encoders ...........................................................................................................................31
Nomenclature .................................................................................................................................................................... 5
Operational Notes ............................................................................................................................................................13
Oven Components ...........................................................................................................................................................21
Oven Component Access Chart ................................................................................................................................ 17
Oven Light Assemblies ...................................................................................................................................................40
Oven Racks ..........................................................................................................................................................................24
Oven Removal ....................................................................................................................................................................18
Oven Sensor and Door Switch Test .......................................................................................................................... 48
Oven Temperature Sensor ........................................................................................................................................... 26
Power Supply and Relay Boards ..............................................................................................................................32
Power Vent Assembly and FAD (Fan Apparency Device) ...............................................................................38
Sales Mode ........................................................................................................................................................................... 13
Schematics and Wiring Diagrams ............................................................................................................................ 50
Service Test Mode (Factory Test Mode in Mini-Manual) .................................................................................46
Thermal Line Break Thermal Cutout (TCO) .......................................................................................................... 40
Vent Tube/Smoke Eliminator ....................................................................................................................................... 27
Warranty .............................................................................................................................................................................. 53
– 3 –
Introduction
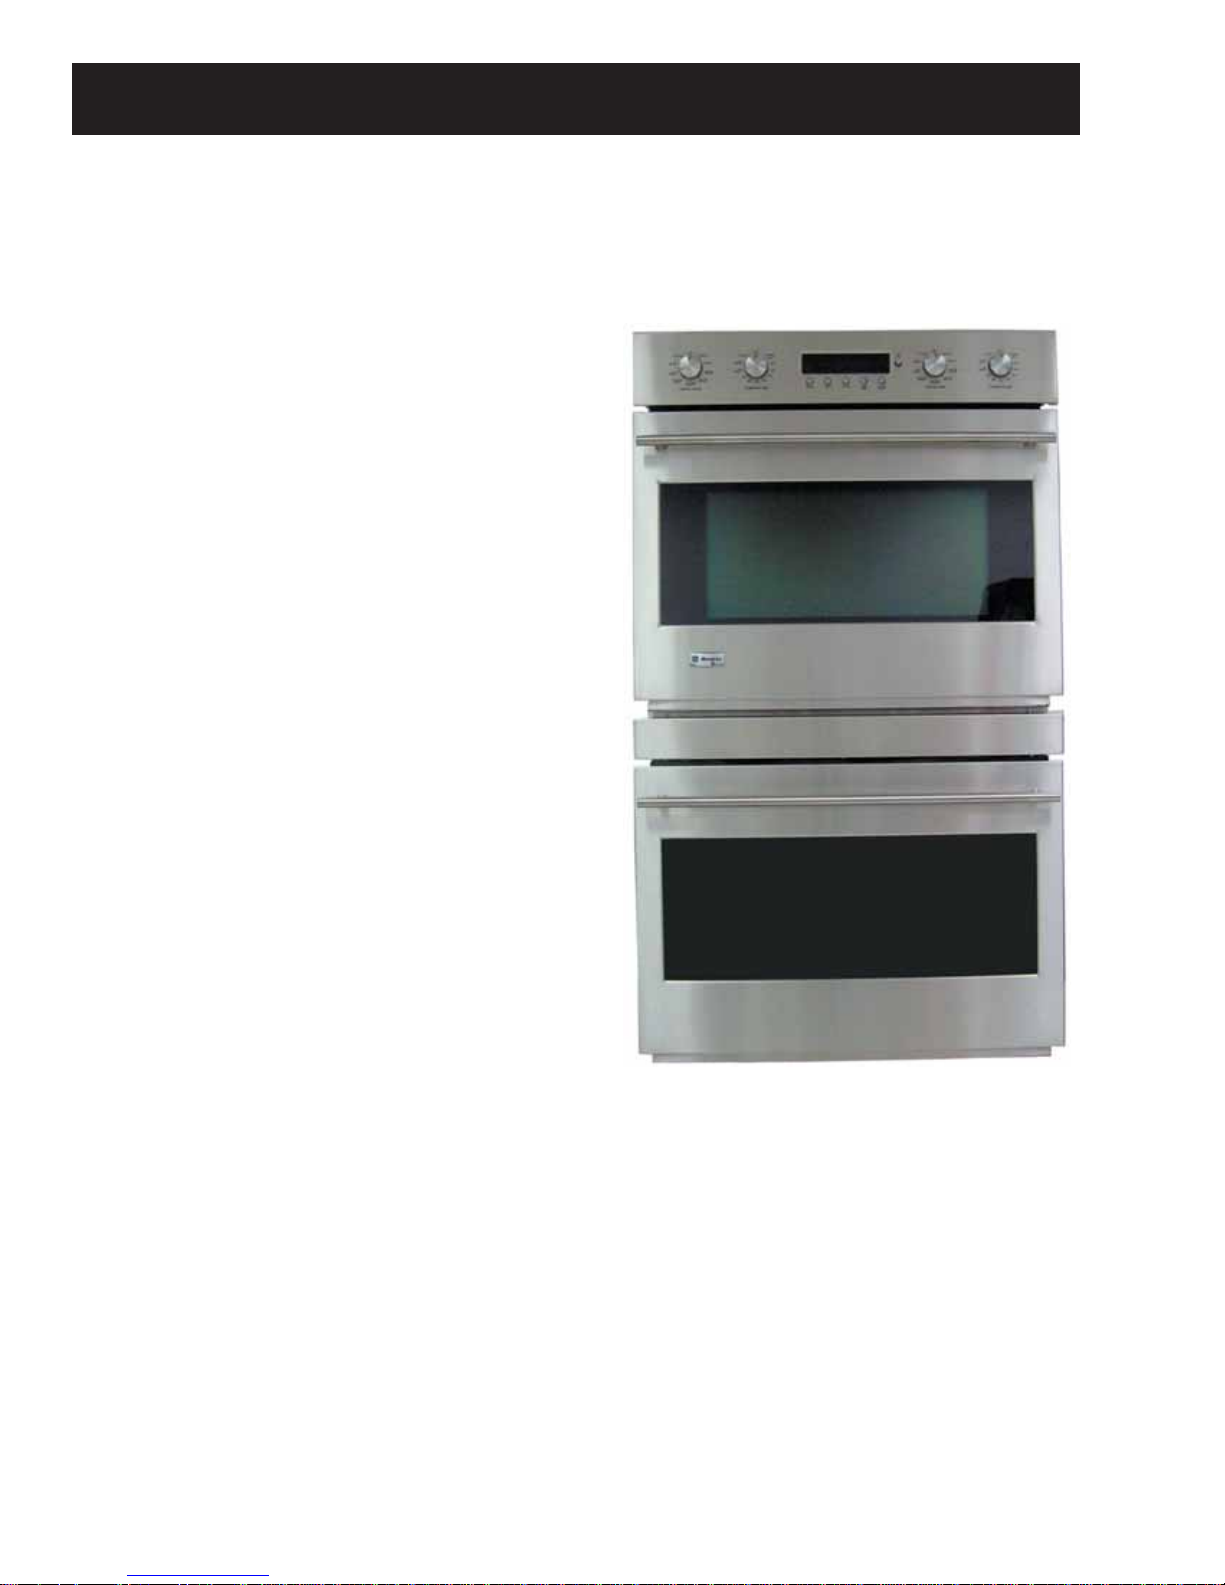
Monogram introduces the new GE Professional Wall Ovens. Their superior style and performance parallel
commercial ovens. Available in two design choices -- integrated and professional -- these ovens feature
electronic dial controls that combine the precision of modern digital technology with the simplicity of
traditional mechanical controls.
6 electronically controlled heating elements --
•
two bake, two broil, and two convection -- provide
precise cooking control with fast preheating.
Reverse-air convection technology utilizes a
•
bidirectional fan that works with a dedicated third
heating element to promote even heat circulation.
Performance compensation for 208-volt
•
installation boosts power as needed in multifamily
dwellings.
4.4 cu. ft. total capacity.
•
Recessed convection, low-profi le broil elements,
•
and hidden bake elements.
Halogen light columns located on both sides of
•
the oven interior.
Full-extension, self-cleaning porcelain-coated
•
racks that can be left in the oven during the selfclean cycle.
Hidden bake element, which is concealed
•
beneath the oven fl oor, allows quick and easy ash
removal following the self-clean cycle.
Both Monogram wall oven designs are available in
•
single and double confi gurations.
– 4 –

Model Number
GE Cooking Product
ZE = Monogram Electric
Nomenclature
Z E T 1 P L 1 S S
Product Color
SS = Stainless Steel
Confi guration
T = 30-in. Wall Oven
Feature Pack
Designates features–the higher
the number, the more features.
Single Wall Oven
Nomenclature
The nomenclature plate is located on the front
left behind the oven door in both the single
and double confi gurations.
The mini-manual is located in the control
compartment taped to the left side wall.
Indicator for Engineering and
Product Service Only
Model Year Designator
Glass Color
S = Integrated Stainless
P = Pro Stainless (Heavier knobs and handle)
Serial Number
The fi rst two characters of the serial number
identify the month and year of manufacture.
Example: AL123456S = January, 2006
A - JAN 2006 - L
D - FEB 2005 - H
F - MAR 2004 - G
G - APR 2003 - F
H - MAY 2002 - D
L - JUN 2001 - A
M - JUL 2000 - Z
R - AUG 1999 - V
S - SEP 1998 - T
T - OCT 1997 - S
V - NOV 1996 - R
Z - DEC 1995 - M
The letter des ig nat ing
the year re peats every
12 years.
Example:
T - 1974
T - 1986
T - 1998
– 5 –
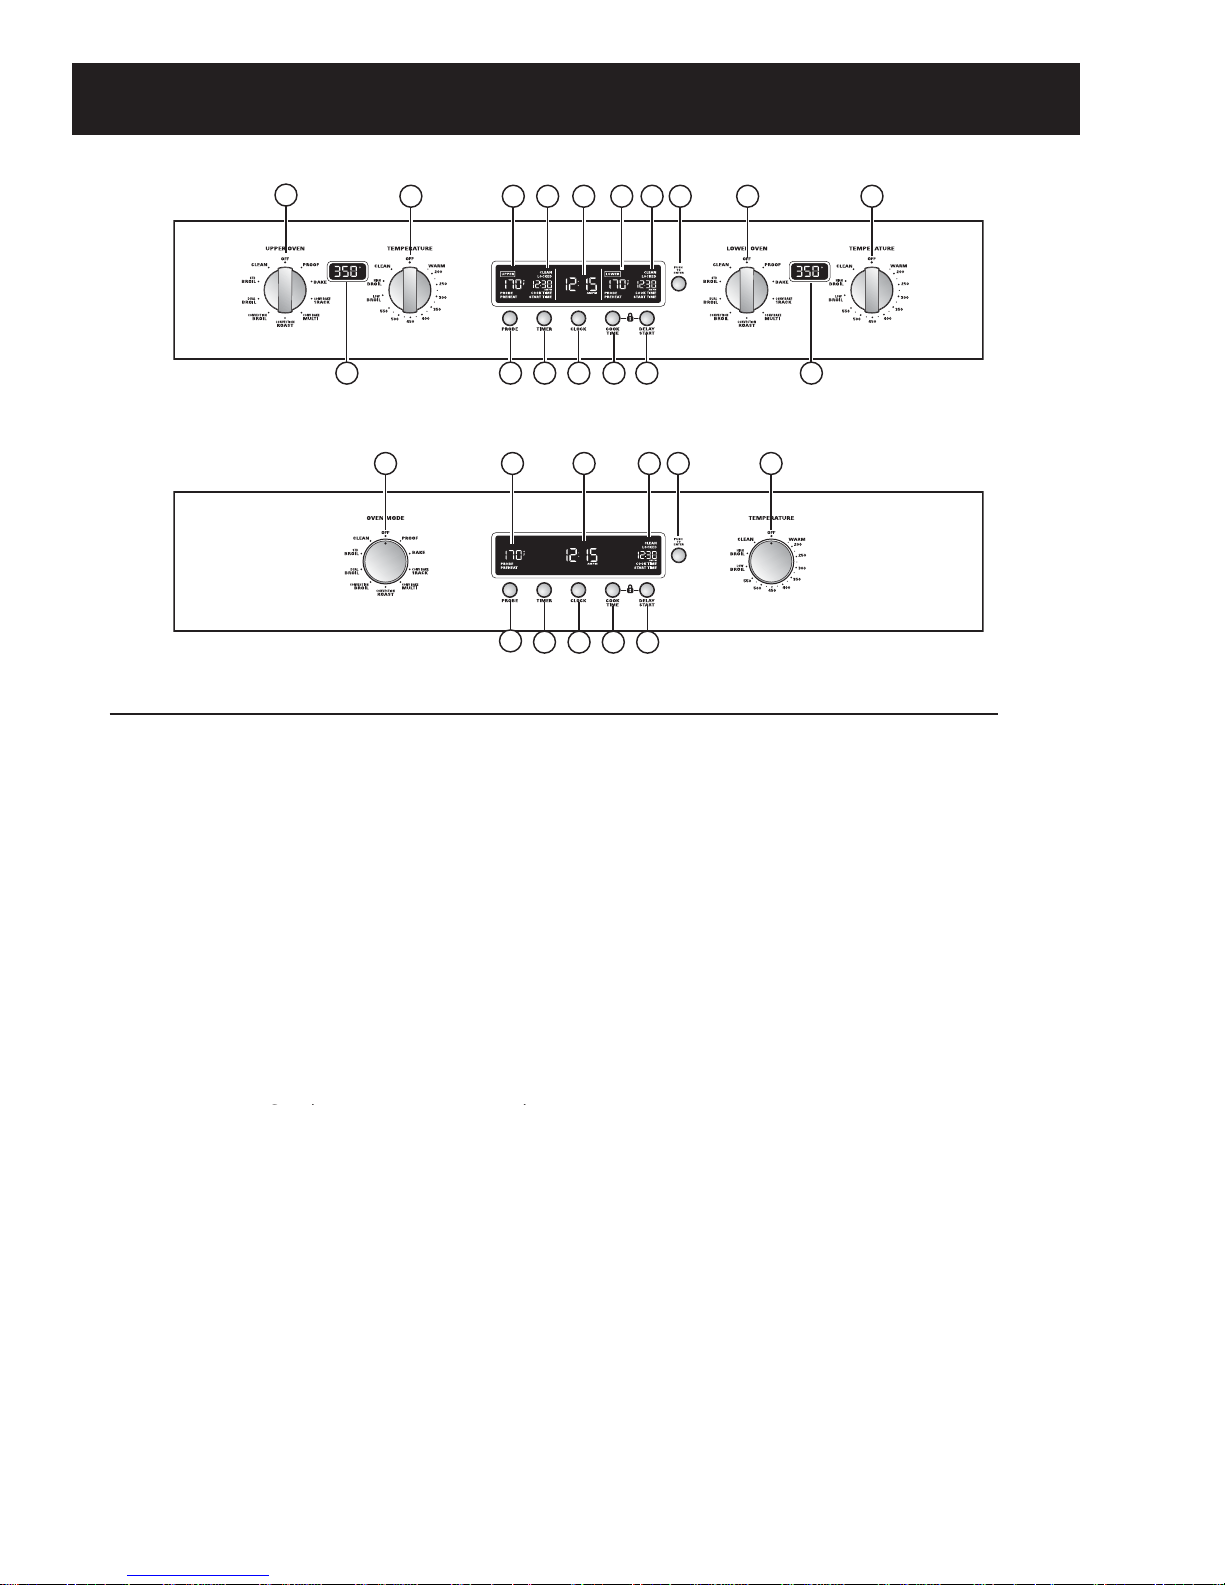
Control Features
1
9
Double oven control – Pro style shown (Appearance may vary)
Single Oven control – Integrated style shown (Appearance may vary)
2 10119 10 3 1 2
1 9 11 10 3 2
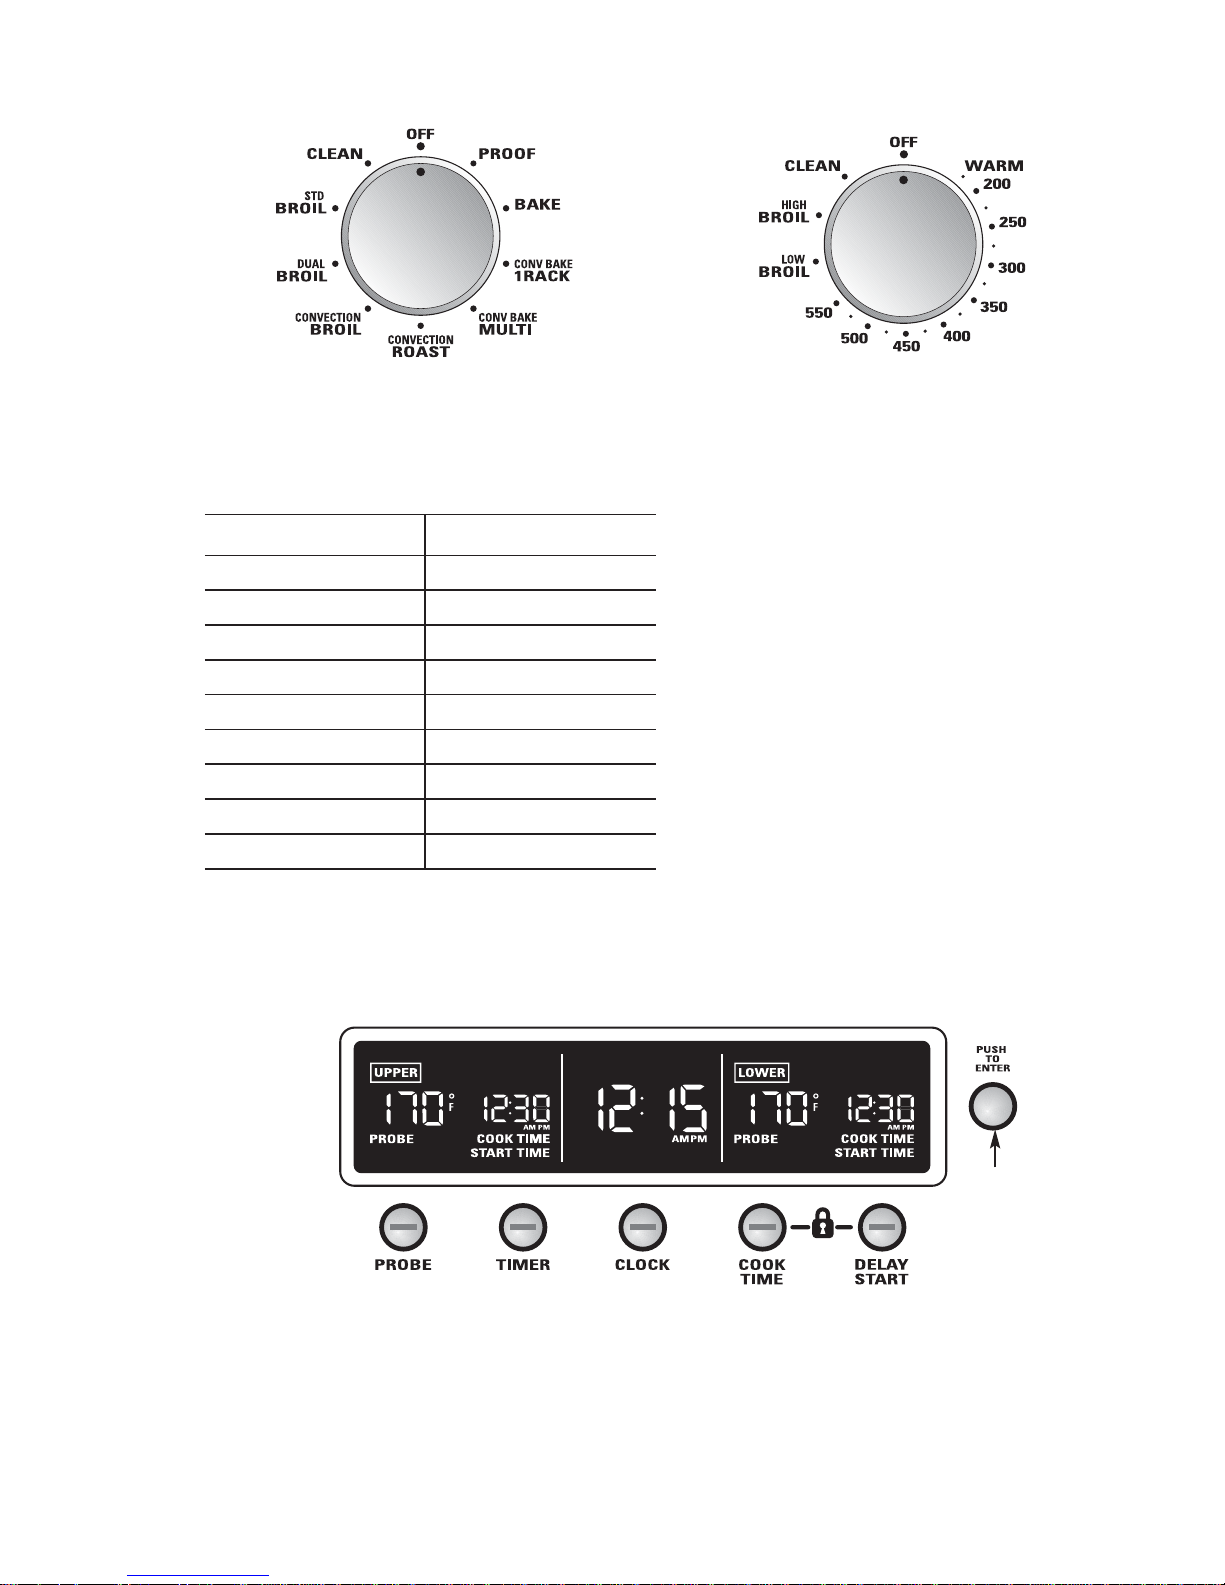
1 Oven Mode knob – Turn to select:
PROOF – Maintains a warm environment
useful for rising yeast-leavened products.
BAKE – Select for traditional baking.
CONV BAKE 1 RACK – Use for convection
baking on one rack.
CONV BAKE MULTI – Use for convection
baking on multiple racks.
CONV ROAST – Use for convection roasting.
CONV BROIL – Use for convection broiling.
DUAL BROIL – Select to provide traditional
broiling for a larger food quantity.
STD BROIL – Select to provide traditional
broiling for a smaller food quantity.
CLEAN – Select for the self-cleaning
function. See the Self-Cleaning Oven section.
2 Temperature knob – Turn to select:
Use to set baking temperatures from 200°F
to 550°F.
WARM – Keeps already cooked foods warm
for up to 2 hours after the cooking function
is finished.
LOW BROIL – A lower broiling temperature
is automatically set.
HIGH BROIL – A higher broiling
temperature is automatically set.
CLEAN – The self-clean temperature is
automatically set.
3 Mini-Knob
Turn to select and push to enter PROBE,
TIMER, CLOCK, COOK TIME and DELAY
START settings.
5 6 7
4
4
5 6 7 8
– 6 –
9
FF
8
9
4 PROBE – Push to select the probe to cook
food to a set internal temperature. Turn and
push the Mini-Knob to set.
5 TIMER – Push to select the timer function.
The timer does not control oven operations.
The timer can time up to 11 hours and 59
minutes. Turn and push the Mini-Knob
to set.
6 CLOCK – Push to enter the time of day.
Turn and push the Mini-Knob to set.
7 COOK TIME – Push to enter the desired
length of cooking time for baking (or
roasting), convection baking and convection
roasting. Turn and push the Mini-Knob
to set.
8 DELAY START – Push to delay the start
of cooking or the self-clean cycle. Turn and
push the Mini-Knob to set the time you want
the oven to start.
9 Temperature Display – Shows the oven set
temperature or probe set temperature and
if the oven is preheating. (On some double
wall oven models, UPPER and LOWER are
displayed above their respective settings.)
NOTE: On some wall oven models, the set
temperature shows in displays between their
respective control knobs.
10 Timing and Cleaning Status Display – If set,
shows the remaining COOK TIME and the
DELAY START time. Lights indicate the
status of the self-clean cycle.
11 Time of Day Display –
Shows set time of day.
(Continued next page)
Oven Controls Overview
For all modes except Proof, the oven will not
operate unless both the Oven Mode and the
Temperature knobs are set. See table.
To cancel a feature, turn either the Oven
Mode knob or the Temperature knob to OFF.
To cancel PROOF, turn the Oven Mode knob
to OFF.
Mode Knob Temperature Knob
PROOF OFF
BAKE WARM to 550°F
CONV BAKE/1 RACK WARM to 550°F
CONV BAKE/MULTI WARM to 550°F
CONVECTION/ROAST WARM to 550°F
CONVECTION/BROIL HIGH or LOW BROIL
DUAL BROIL HIGH or LOW BROIL
STD BROIL HIGH or LOW BROIL
CLEAN CLEAN
Oven Mode knob Temperature knob
Push the PROBE, TIMER, CLOCK, COOK
TIME or DELAY START buttons and set them
by turning and pushing the Mini-Knob. See
each respective section for details.
The Mini-Knob will select in increments of 1, 5
or 10 depending on how fast it is turned. Turn
it clockwise to increase probe set temperatures
and time or counterclockwise to reduce them.
Push to set.
See the Control lockout section for how to lock
and unlock the controls.
Mini-Knob
Turn to select
Push to enter
Double oven display shown
Probe Temperature Set and Time Controls
– 7 –
(Continued next page)
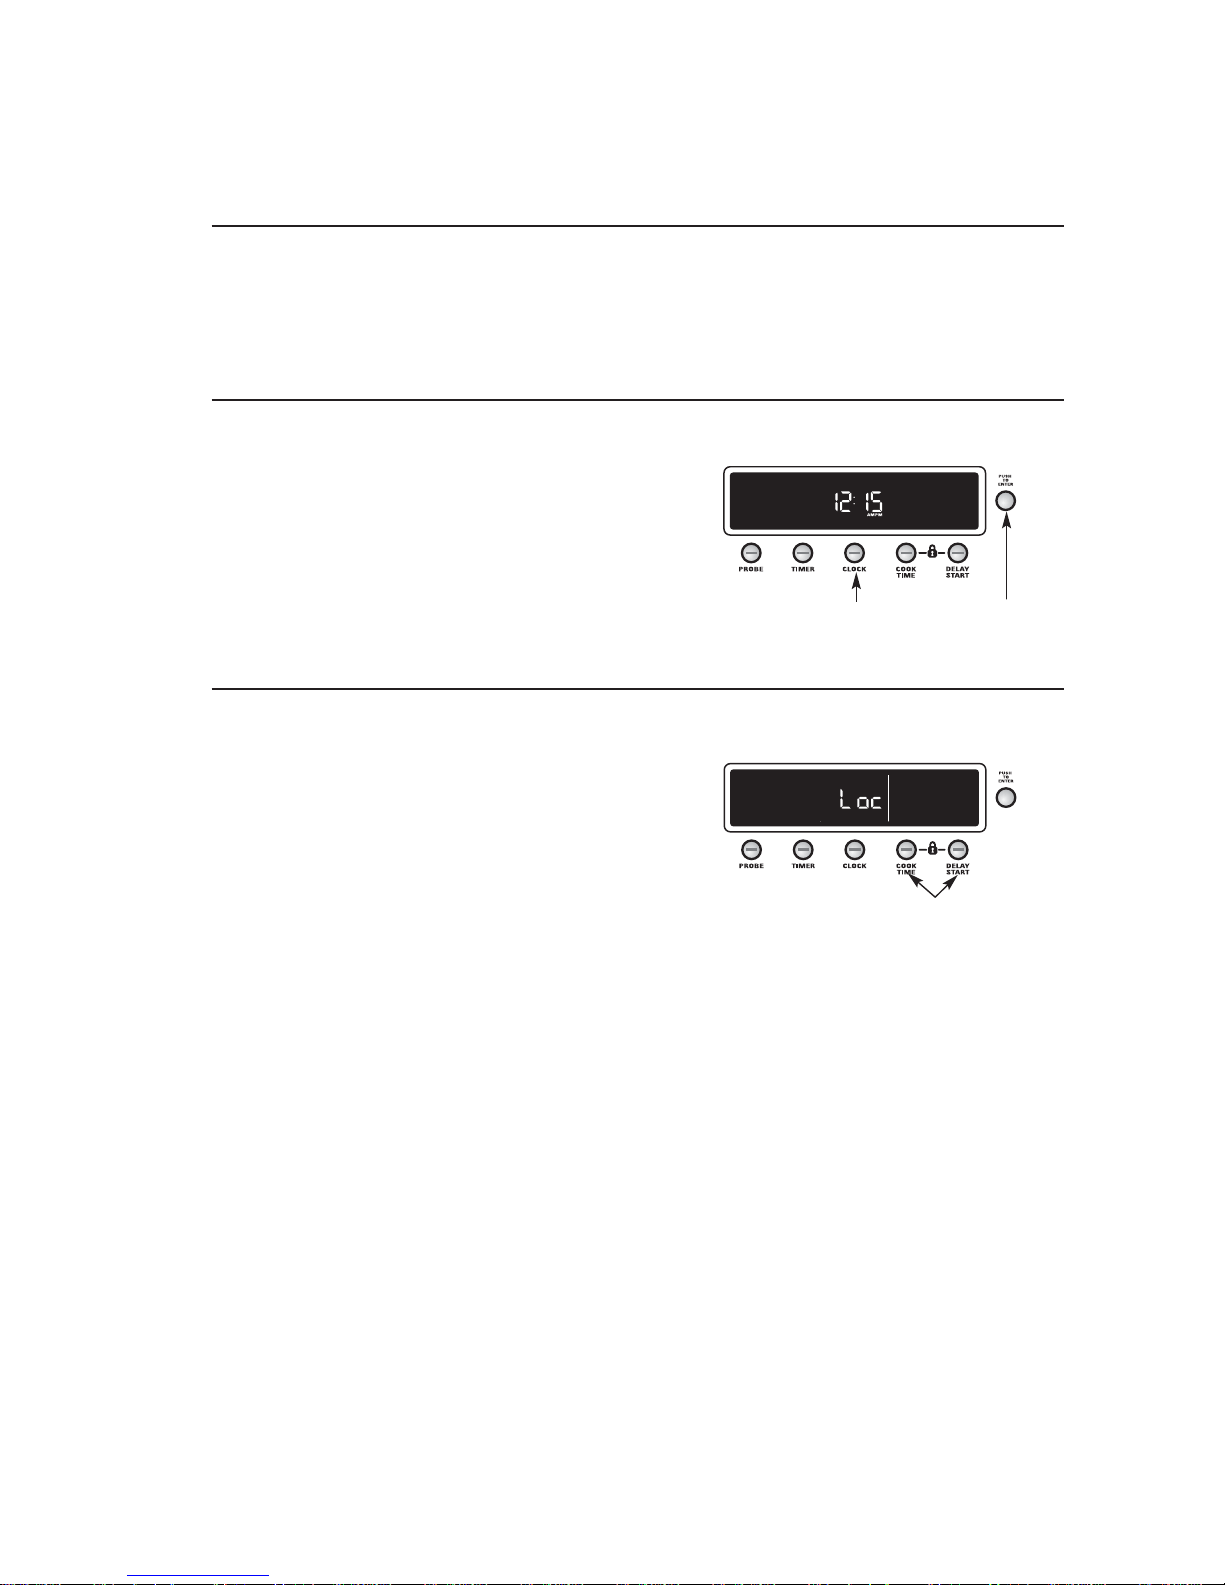
Clock and Control Lockout
To set
the clock
1 Push the CLOCK button.
2 Turn the Mini-Knob to select the time of day
and push it to enter.
NOTE: While setting, the time will roll
around from AM to PM.
Clock
The clock must be set for the automatic oven timing
functions to work properly.
The time of day clock cannot be changed
during Delay Start. (It can be changed during
a regular bake or broil operation.)
Power
failure
If a flashing time of day is in the display,
you have experienced a power failure.
Reset the clock.
Control
lockout
Allows you to lock out all controls so that
the Oven Mode knob, Temperature knob and
the control panel buttons cannot be activated
when set.
NOTE: On double oven models, this activates this
feature for both ovens.
To lock/unlock the controls:
1 Push and hold the COOK TIME and
DELAY START buttons at the same time
for 3 seconds until the control beeps and
the display shows “Loc.” After locking the
controls, the time of day will appear in the
display.
2 To unlock, push and hold the COOK TIME
and DELAY START buttons at the same time.
(“Loc” will appear in the display). Hold for
3 seconds until the control beeps and “Loc”
disappears from the display.
When this feature is on and the controls are
attempted to be set, the display will show “Loc.”
NOTES:
• If locked while a cooking, cleaning or timed function
are in operation, they will be cancelled.
• The adjustment will be retained in memory after a
power failure.
Double oven display shown.
Double oven display shown.
Mini-Knob
Turn to select
Push to enter
Push to
select
Push and hold at
the same time to
lock/unlock
(Continued next page)
– 8 –
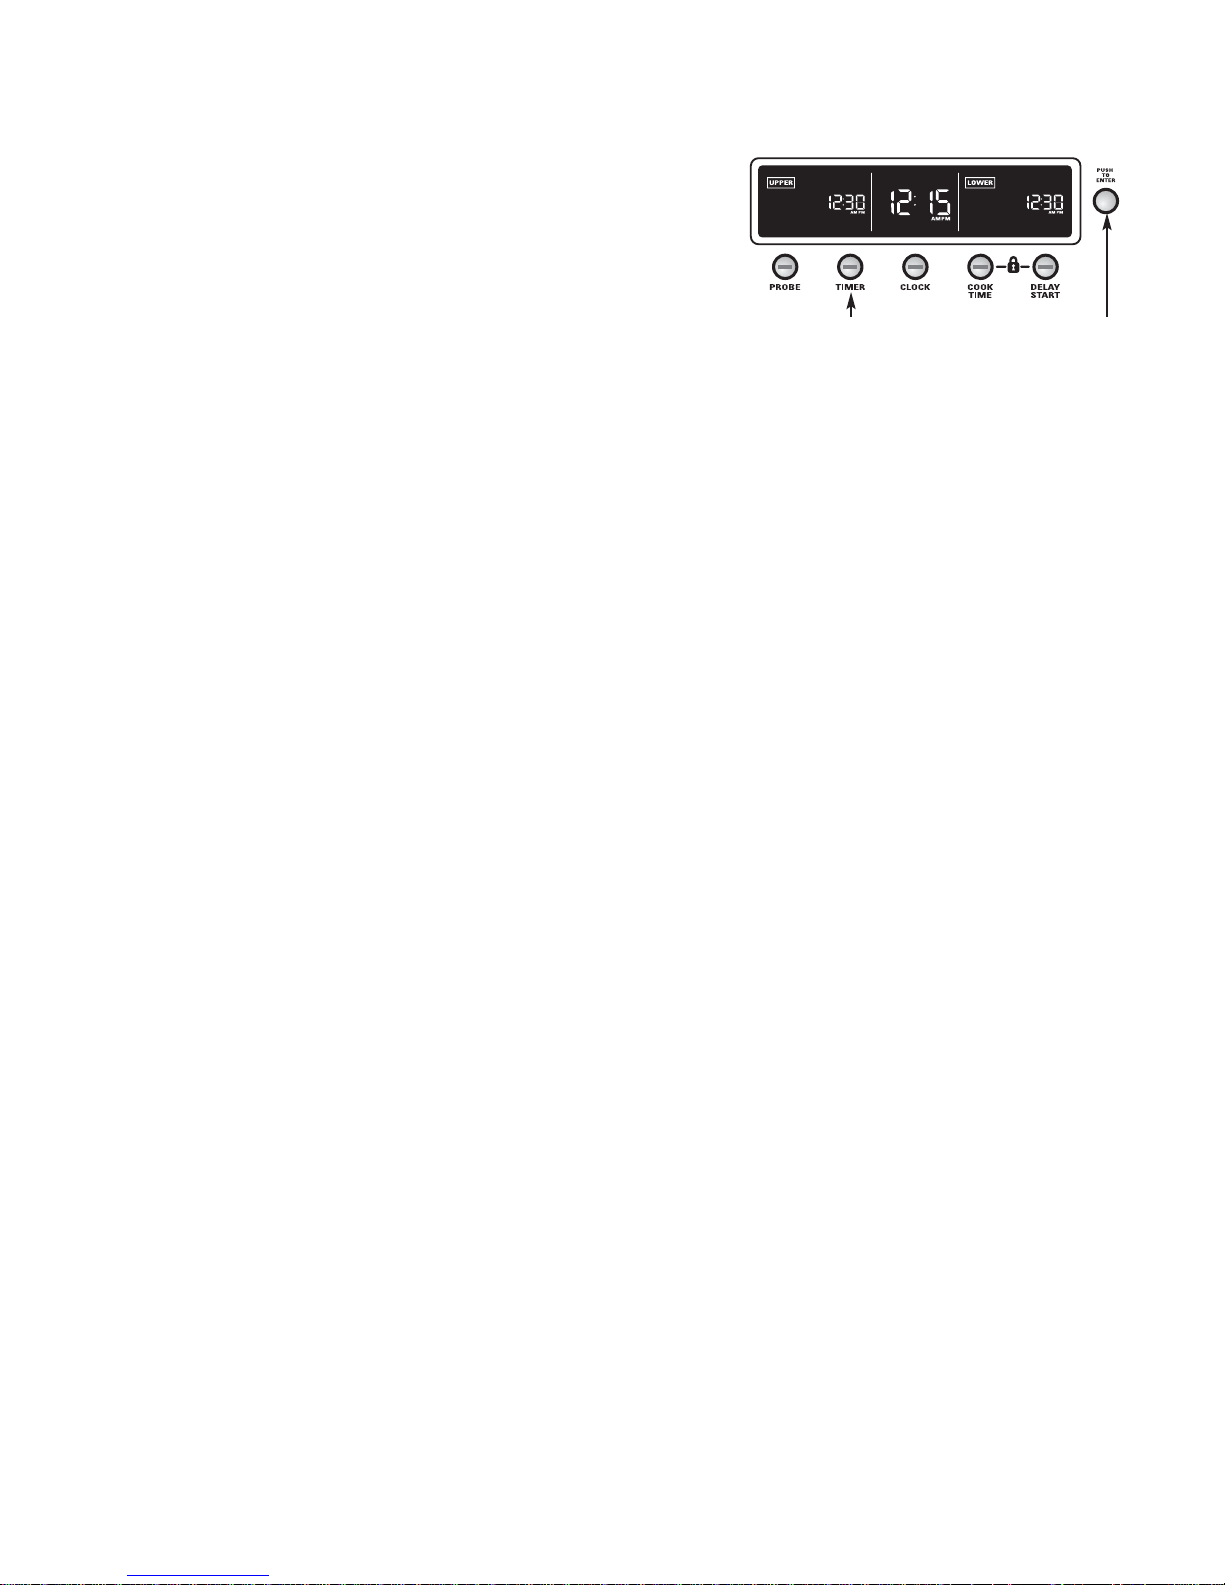
Timer Feature
NOTE: The timer is independent of all the other
functions and it does not control the oven.
You may program the timer to time cooking
or other household activities for up to 11 hours
and 59 minutes.
To set the timer:
1 Push the TIMER button.
2 Turn the Mini-Knob to select the length of
time for the timer up to 11 hours and 59
minutes and push to enter it.
On double oven models, a second timer may be set by
pressing the TIMER button twice.
The timer display will show hours and minutes
counting down 1 minute at a time from 24
hours to 1 hour. It will then change to show
minutes and seconds counting down until the
last minute is reached. The control will beep
and the display will show seconds until the
timer counts down to :00.
When the timer reaches :00, the control
will beep 3 times followed by one beep every
6 seconds until the TIMER button is pushed.
The 6-second tone can be cancelled by
following the steps in Tones at the end of a
timed cycle in the Special Features section.
To cancel the timer:
1 Push the TIMER button.
2 Turn the Mini-Knob to :00 and push to enter.
Mini-Knob
Turn to select
Push to enter
Push to select
Double oven display shown.
(Continued next page)
– 9 –
Special Features
Special
features of
your oven
control
Oven
thermostat
adjustment
Your oven has additional Special Features that you
may choose to use.
They remain in the control’s memory until
the steps are repeated. The Special Features
will remain in memory after a power failure.
Either the Oven Mode knob and/or the
Temperature knob must be turned
to OFF.
You may find that your new oven cooks differently than
the one it replaced. Use your new oven for a few weeks to
become more familiar with it. If you still think your new
oven is too hot or too cold, you can adjust the thermostat
yourself.
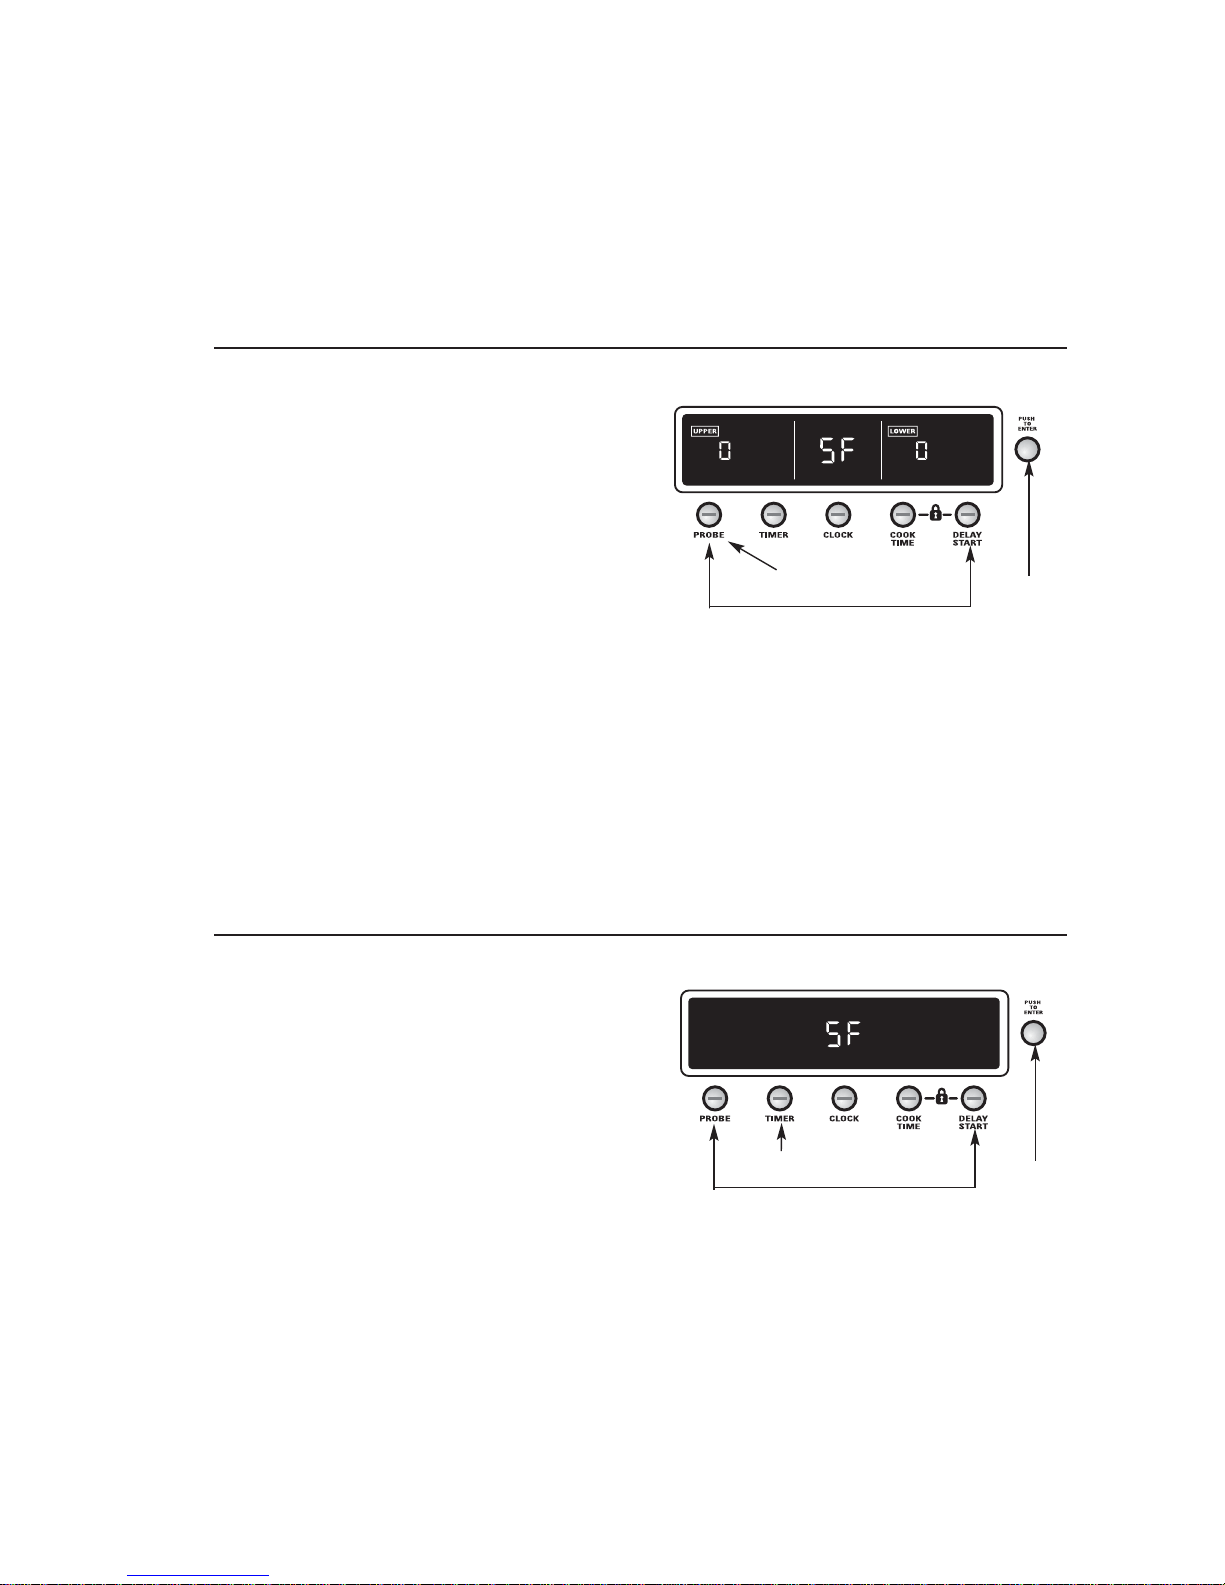
To adjust the oven thermostat:
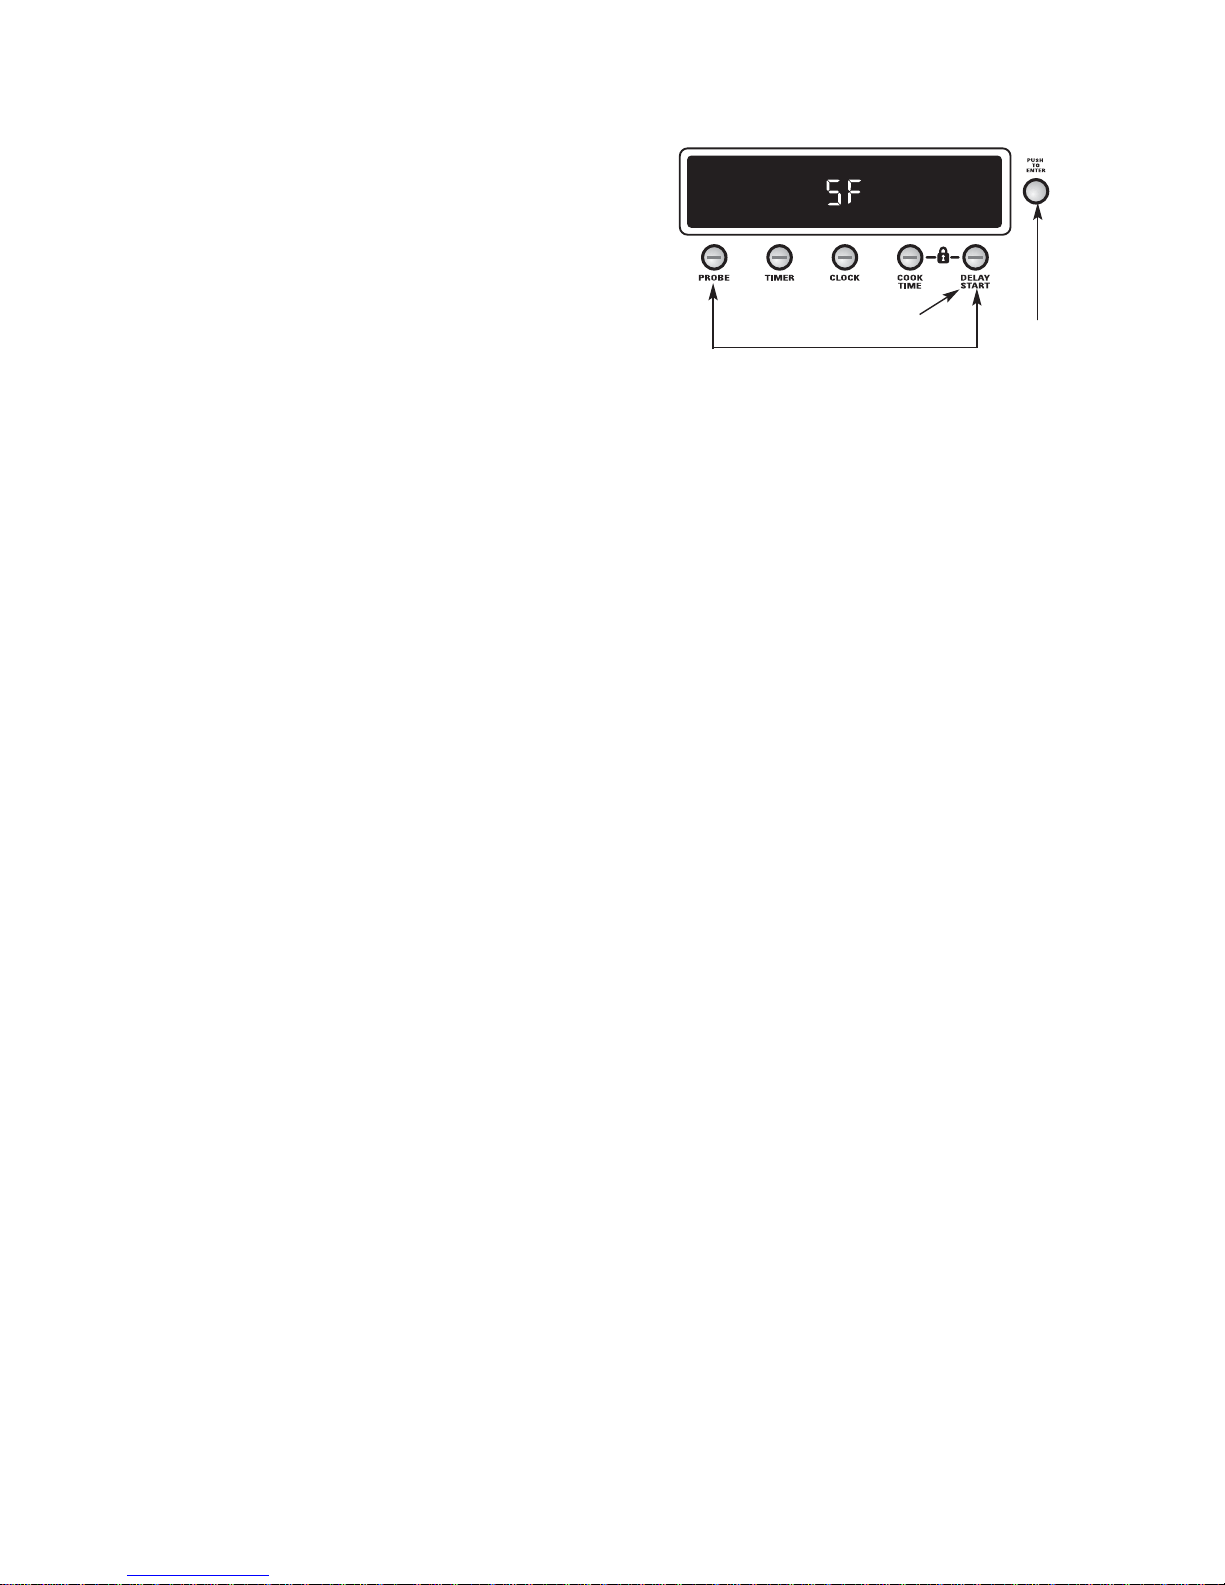
1 Push and hold the PROBE and DELAY START
buttons at the same time for 4 seconds until the
display shows SF (Special Features).
2 Push the PROBE button. A “0” will show in the
display.
On double wall oven models, a “0” will show in
both the upper and lower oven displays. Push the
PROBE button a 2nd time (“UPPER” will show in
the display) to set the upper oven, and push PROBE
a 3rd time (“LOWER” will show in the display) to
set the lower oven.
3 Turn the Mini-Knob to adjust the oven
thermostat up to 35°F hotter or (-) 35°F cooler
in 1°F increments.
4 Push the Mini-Knob to enter your choice.
On double oven models, either the Oven Mode knob or
the Temperature knob will have to be turned to OFF for
each oven.
NOTE: While in the Special Features mode, if the
Mini-Knob is not pushed to enter a choice after 60
seconds, the mode will be cancelled (without changes)
and the time of day will return to the display.
The following are the features and how you
may activate them.
Double oven display shown.
2. Push to choose.
1. Push and hold at the same time to enter/exit SF.
5 Push and hold the Mini-Knob for 5 seconds
to exit SF (Special Features) and return to the
time of day clock.
Do not use thermometers, such as those found in
grocery stores, to check the temperature setting of
your oven. These thermometers may vary 20–40
degrees.
NOTE: This adjustment will only affect baking
temperatures; it does not affect broiling, convection
or self-cleaning temperatures. The adjustment will
be retained in memory after a power failure.
3. Mini-
Knob
Push to
enter choice
Tones at
the end of a
timed cycle
At the end of a timed cycle, 3 short beeps will sound
followed by one beep every 6 seconds until the TIMER
button is pushed. This continuous 6-second beep may be
cancelled. To cancel the 6-second beep:
1 Push and hold the PROBE and DELAY START
buttons at the same time for 4 seconds until the
display shows SF (Special Features).
2 Push the TIMER button to choose between:
con SF bEEP – Continuous Beeps – Reminder
beeps will sound after a timed cycle has ended
until the TIMER button is pushed.
SF bEEP – No beeps – The reminder beeps
after a timed cycle is cancelled.
3 Push the Mini-Knob to enter your choice.
4 Push and hold the Mini-Knob for 5 seconds
to exit SF (Special Features) and return to the
time of day clock.
– 10 –
Double oven display shown.
2. Push to choose.
1. Push and hold at the same time to enter/exit SF.
NOTE: On double oven models, this cancels the
end-of-cycle tone for both ovens.
(Continued next page)
3. Mini-
Knob
Push to
enter choice
Special Features
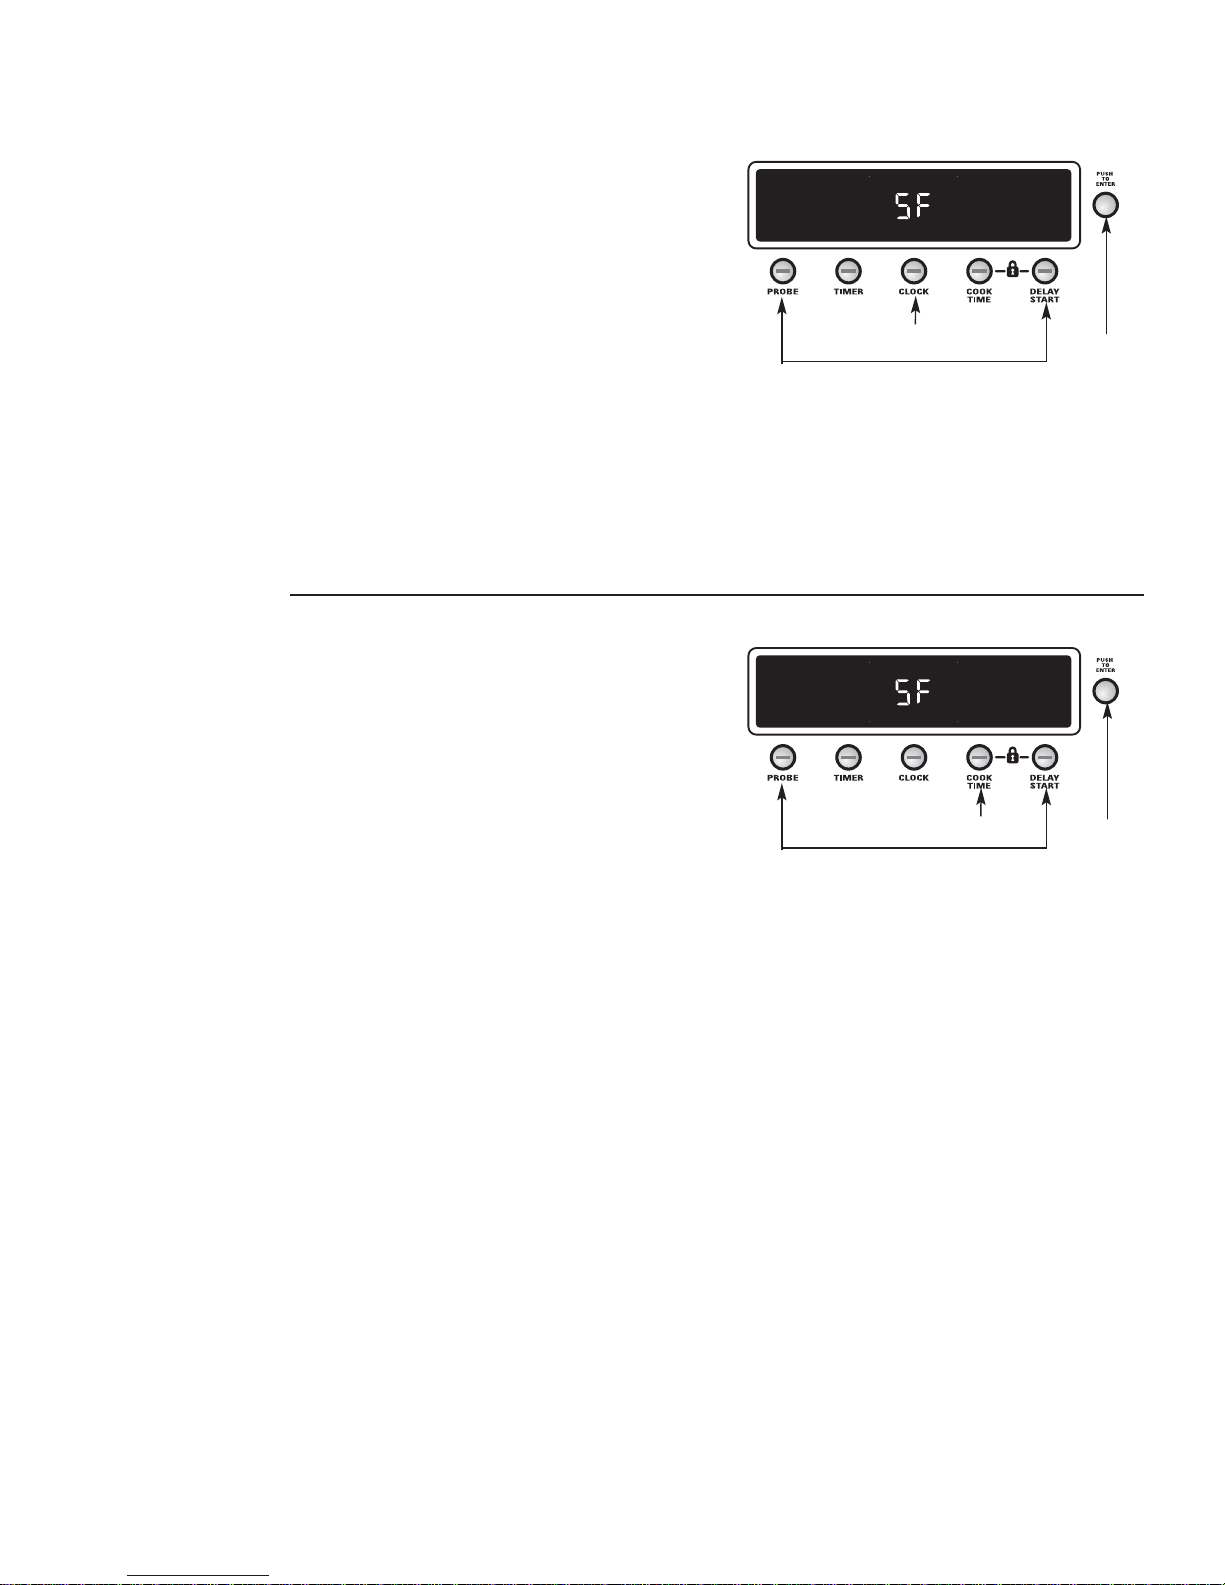
Tone
volume
This feature allows you to adjust the tone volumes to a
more acceptable volume. There are three possible volume
levels.
1 Push and hold the PROBE and DELAY
START buttons at the same time for
4 seconds until the display shows SF
(Special Features).
2 Push the COOK TIME button to choose
between:
1 SF bEEP – Quietest Beep Volume.
2 SF bEEP – Middle Beep Volume.
3 SF bEEP – Loudest Beep Volume.
3 Push the Mini-Knob to enter your choice.
4 Push and hold the Mini-Knob for 5 seconds
to exit SF (Special Features) and return to
the time of day clock.
NOTE: On double oven models, this activates this
special feature for both ovens.
12-hour,
24-hour
or clock
blackout
Your control is set to use a 12-hour clock. If you
would prefer to have a 24-hour military time clock or
black out the clock display, follow the steps below.
1 Push and hold the PROBE and DELAY
START buttons at the same time for
4 seconds until the display shows SF
(Special Features).
2 Push the CLOCK button to choose between:
12 hr – 12 hour clock with AM and PM.
24 hr – 24 hour clock – military time.
OFF – blacks out the clock from the disp1ay.
3 Push the Mini-Knob to enter your choice.
4 Push and hold the Mini-Knob for 5 seconds
to exit SF (Special Features).
NOTE: If the clock is in the black-out mode, you will
not be able to use the Delay Start function.
Double oven display shown.
Double oven display shown.
3. Mini-
Knob
Push to
enter choice
2. Push to choose.
1. Push and hold at the same time to enter/exit SF.
3. Mini-
Knob
Push to
enter choice
2. Push to choose.
1. Push and hold at the same time to enter/exit SF.
– 11 –
(Continued next page)
Special Features
Sabbath
Feature,
12-hour
shut-off or
no shut-off
With this feature, should you forget and leave the
oven on, the control will automatically turn off the
oven after 12 hours during baking functions. If you
wish to turn off this feature, follow the steps below.
1 Push and hold the PROBE and DELAY
START buttons at the same time for
4 seconds until the display shows SF
(Special Features).
2 Push the DELAY START button to choose
between:
12 SF Shdn – The oven will automatically
turn off after 12 hours.
no SF Shdn – The oven will not
automatically turn off after 12 hours.
SAbbAth – Designed for use on the Jewish
Sabbath and Holidays.
The Sabbath feature can be used for
baking/roasting only. It cannot be used for
convection, broiling, self-cleaning or Delay
Start cooking.
When the Sabbath Feature is set, the
oven light and all audible beeps will be
disabled. The feature will also provide a
random delay period, of approximately
30 seconds to 1 minute, before the oven
will turn on once it is set to BAKE.
3 Push the Mini-Knob to enter your choice.
4 Push and hold the Mini-Knob for 5 seconds
to exit SF (Special Features) and return to
the time of day clock.
NOTE: On double oven models, this activates this
special feature in both ovens.
Double oven display shown.
3. Mini-
Knob
Push to
enter choice
2. Push to choose.
1. Push and hold at the same time to enter/exit SF.
– 12 –
Sales Mode
The oven control can be operated in SALES MODE.
When the unit is connected to 120 VAC from L1–L2,
the control will function normally. The 240 VAC
relays will not function.
Operational Notes
Certain modes, when selected, will automatically
enter into a preheat. The PREHEAT light will turn
on and 100°F will appear in the display. (The
temperature display will start to change once the
oven temperature reaches 100°F.) The convection
fan will turn on several seconds into the preheat
cycle and remain on until the oven has reached the
set temperature. The control will beep when the
oven is preheated―this will take approximately 10
to 15 minutes. The PREHEAT light will turn off and
the display will show the set temperature.
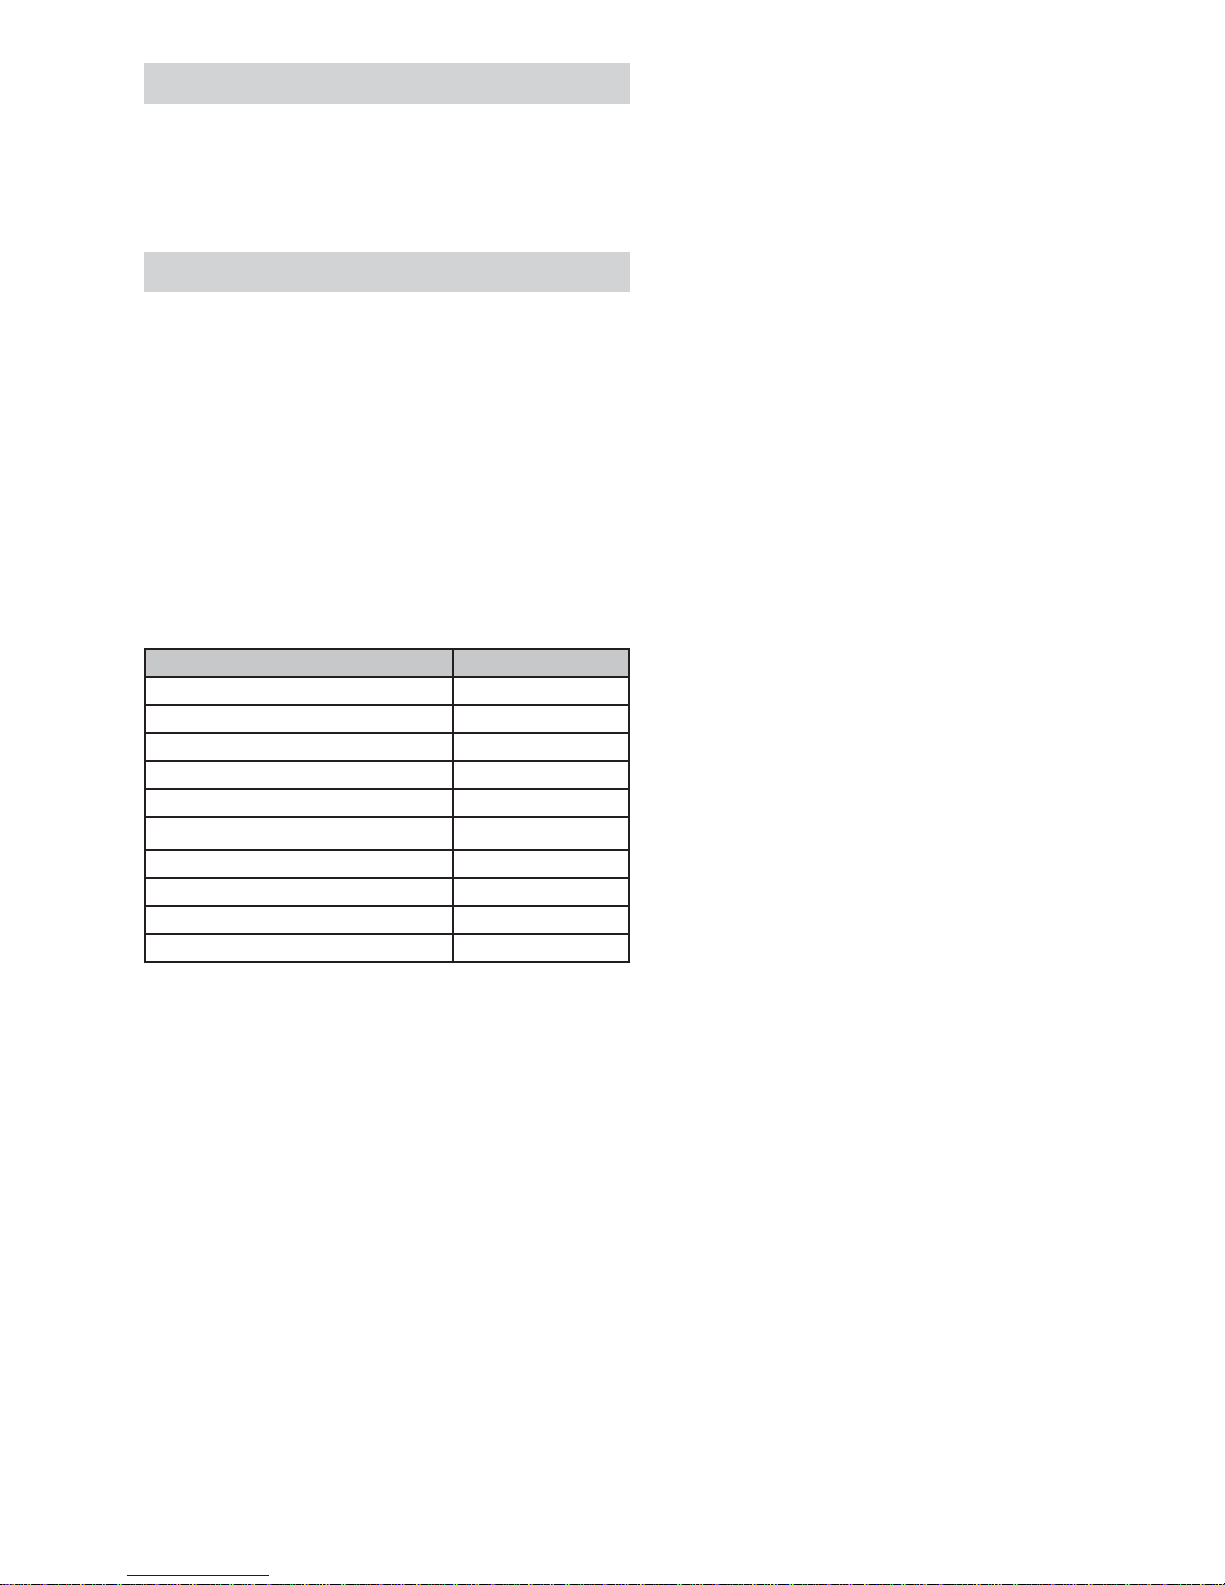
Preheat Chart
Mode Preheat
Proof No
Bake Yes
Convection Bake - 1 Rack Yes
Convection Bake - Multi Yes
Convection Roast Yes
Convection Broil No
Dual Broil No
Std Broil No
Clean No
Probe Usage No
Different broil elements are used in each broil
•
mode. There are 3 different broil modes, each
providing a HI and a LO setting.
The Dual Broil mode uses both the inside and
•
outside broil elements.
The Standard Broil mode uses the inner element
•
only.
The Convection Broil mode uses both the inside
•
and outside broil elements and convection fan.
Broil will not work if the temperature probe is
•
plugged in.
When using the probe, you can use the timer,
•
but you cannot use timed oven operations.
On the double wall oven, the oven control will
•
automatically set the oven that has the probe
plugged into it.
In Convection Bake, the rear bake element and
•
the fan operate whenever the oven is heating.
Convection Broil will not work if the temperature
•
probe is plugged in. Never leave your probe
inside the oven during a broil cycle.
On the double wall oven, you can use timed
•
baking in both ovens at the same time. Turn the
Oven Mode knob and the Temperature knob of
the second oven to the desired settings. Push
the COOK TIME button and turn and push the
Mini-Knob to enter. Push the DELAY START button
and turn and push the Mini-Knob to enter.
Preheat operation consists of multiple phases
•
which are time and/or temperature dependant.
Each phase of preheat utilizes combinations
of inner and outer bake, broil, and convection
elements. For example, one phase may use
inner convection, outer convection, and outer
broil simultaneously. Another phase may use
inner broil and outer bake simultaneously.
The oven and the oven interior lights will turn on
•
immediately and stay on until the oven is turned
off.
The convection fan will cycle on and off while
•
cooking to best distribute hot air in the oven. The
convection fan shuts off when the oven door is
opened.
A cooling fan will turn on to cool internal parts.
•
This is normal, and the fan may continue to run
even after the oven is turned off.
•
•
•
•
– 13 –
The Clean cycle can be set for a minimum of 3
hours and a maximum of 5 hours. The default
setting is 5 hours. The 5 hour set time consists
of 4 hours and 20 minutes of cleaning and 40
minutes of cool down. The door will unlock at an
approximate temperature of 450°F.
On the double wall oven, you can set a clean
cycle in both ovens at the same time. The last
oven set will automatically delay its start until
the fi rst oven's clean cycle cools to 400°F. On
the double wall oven, you can bake or broil in
one oven and self-clean in the other at the same
time.
Self-Clean will not work if the temperature probe
is plugged in or if the Sabbath feature is set.
Proofi ng will not operate when oven is above
125°F. The display will show “too hot”. Allow the
oven time to cool.
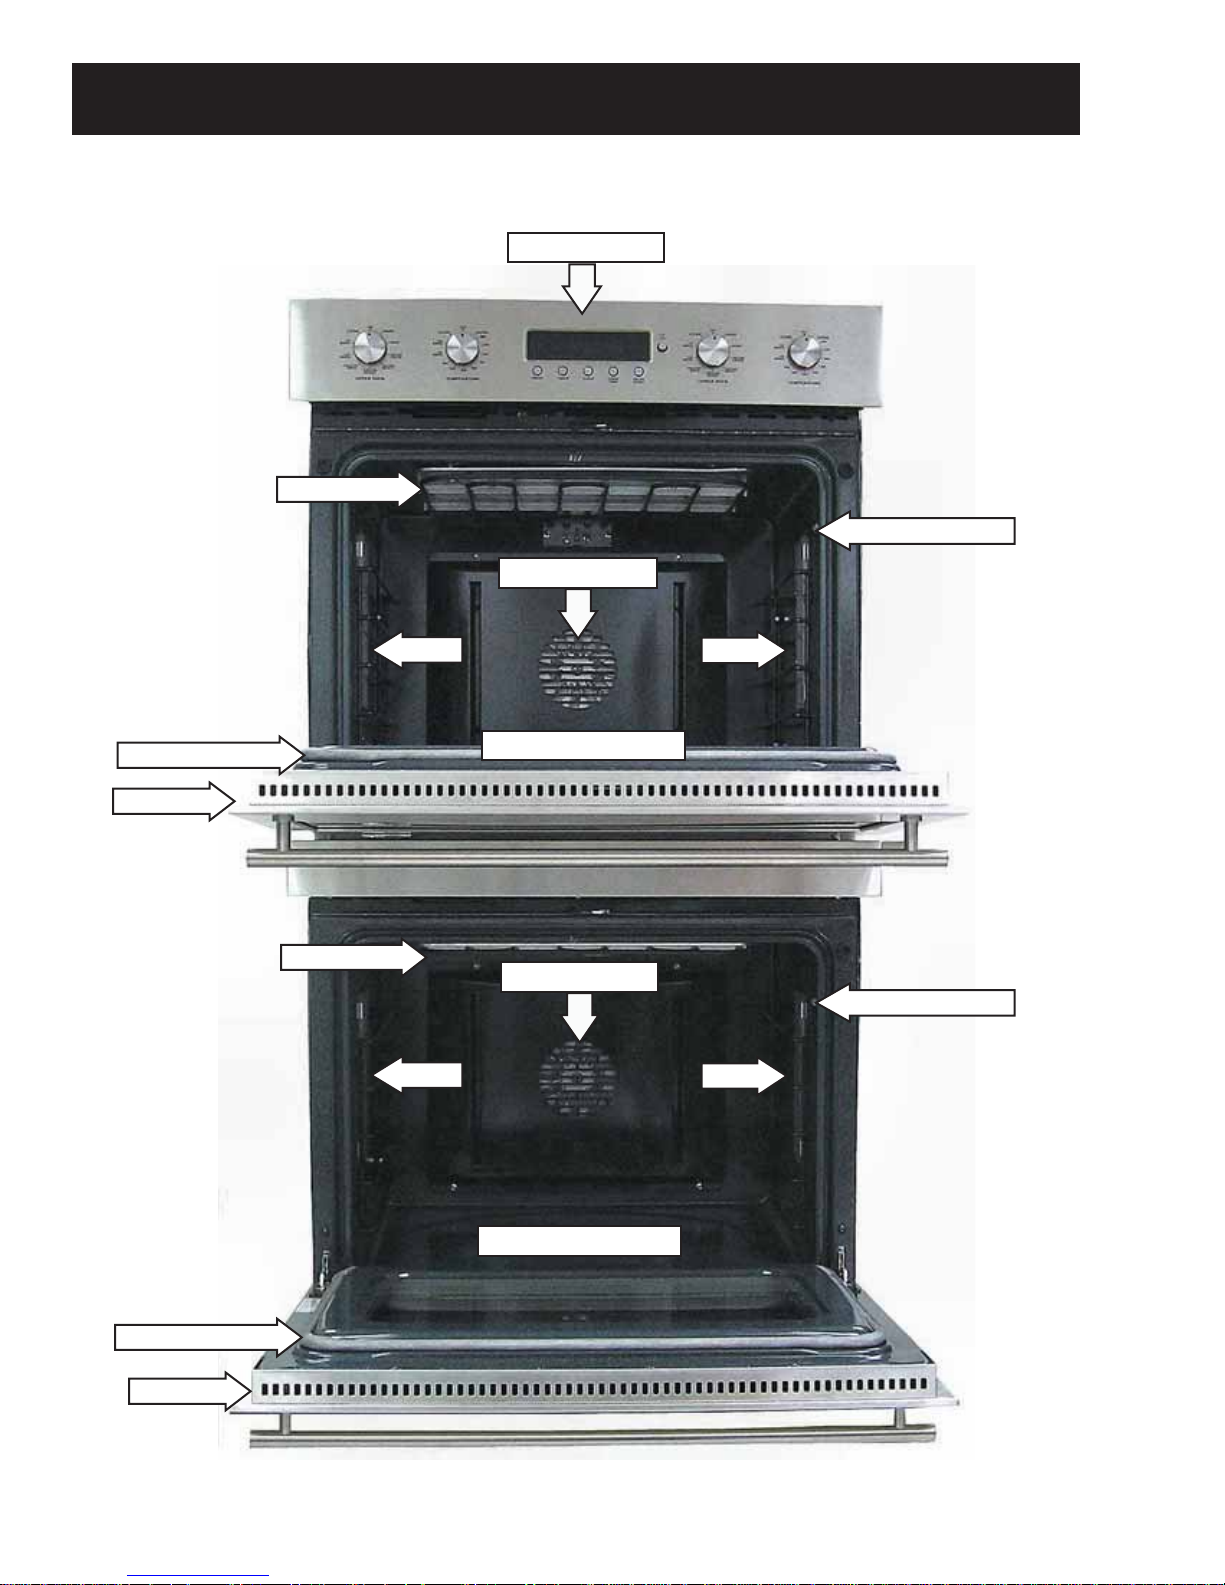
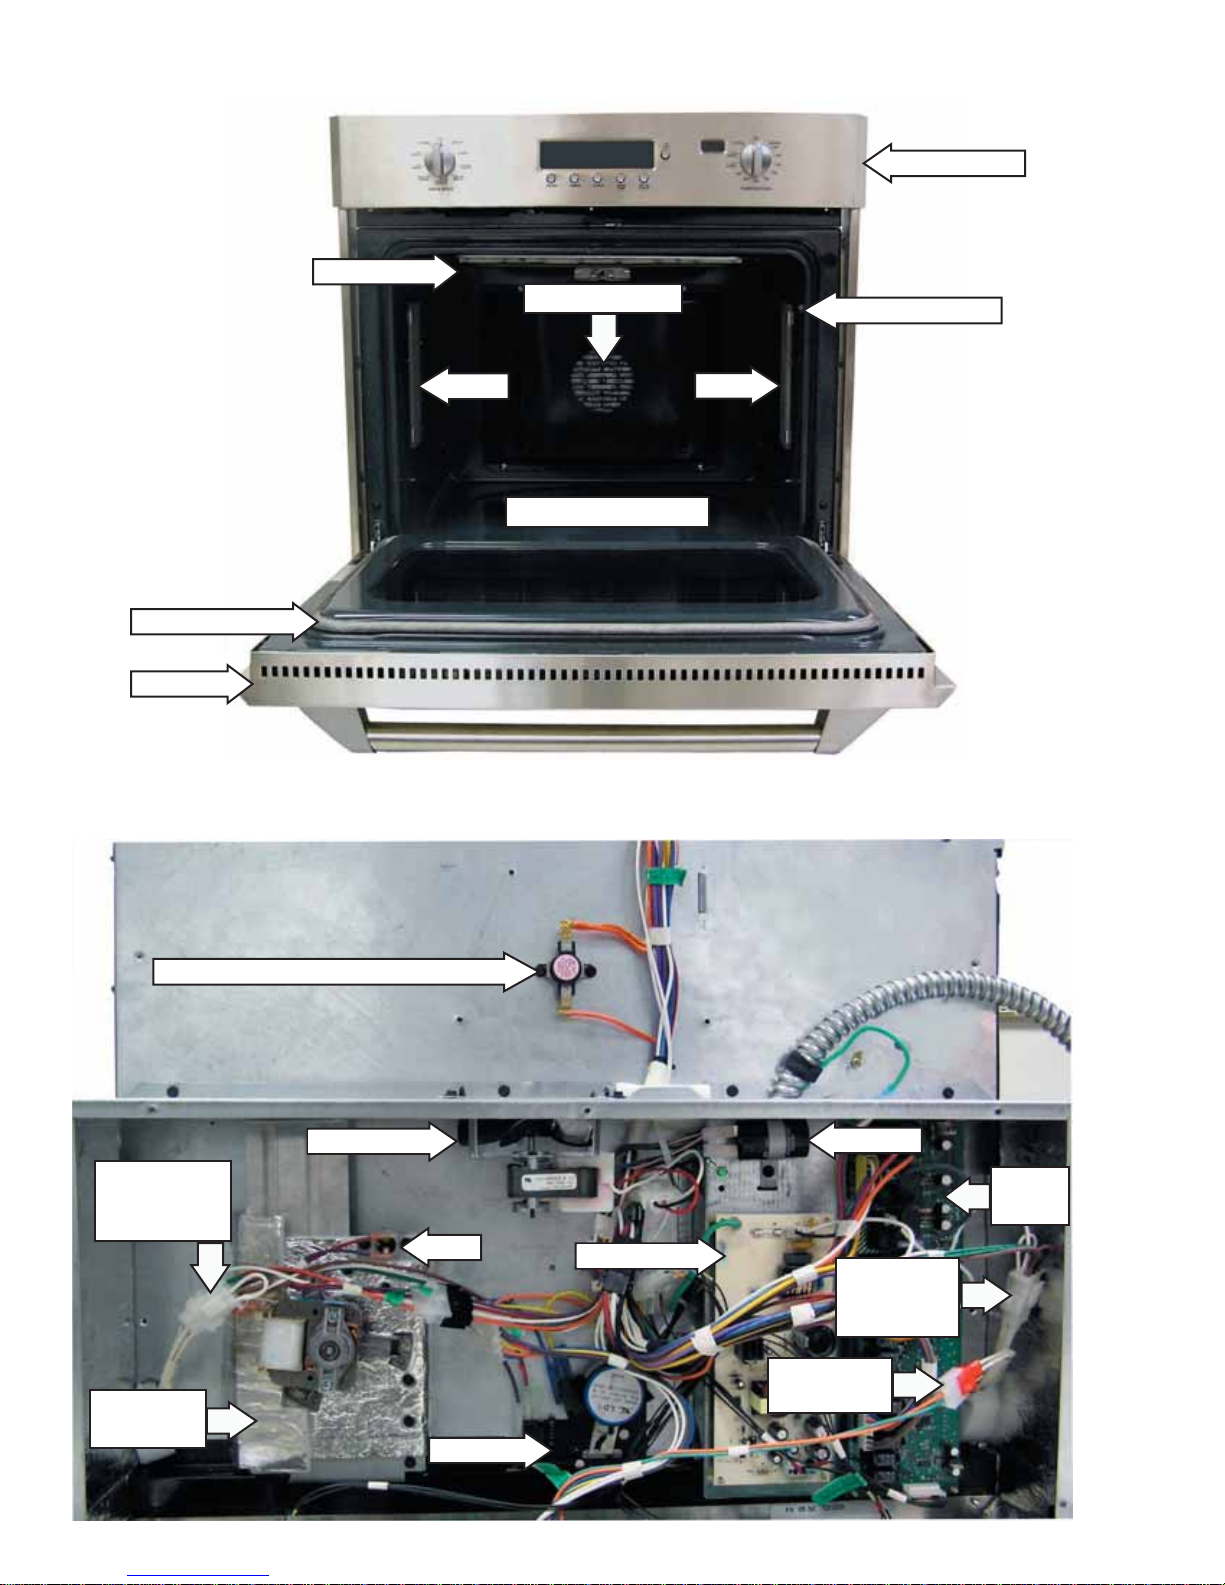
Component Locator Views
30-in. Double Wall Oven (Integrated Stainless shown)
Control Panel
Broil Element
Convection Fan
Meat Probe Outlet
Oven Door Gasket
Oven Door
Broil Element
Lights
Lights
Lights
Hidden Bake Element
Convection Fan
Meat Probe Outlet
Lights
Oven Door Gasket
Oven Door
Hidden Bake Element
(Continued next page)
– 14 –
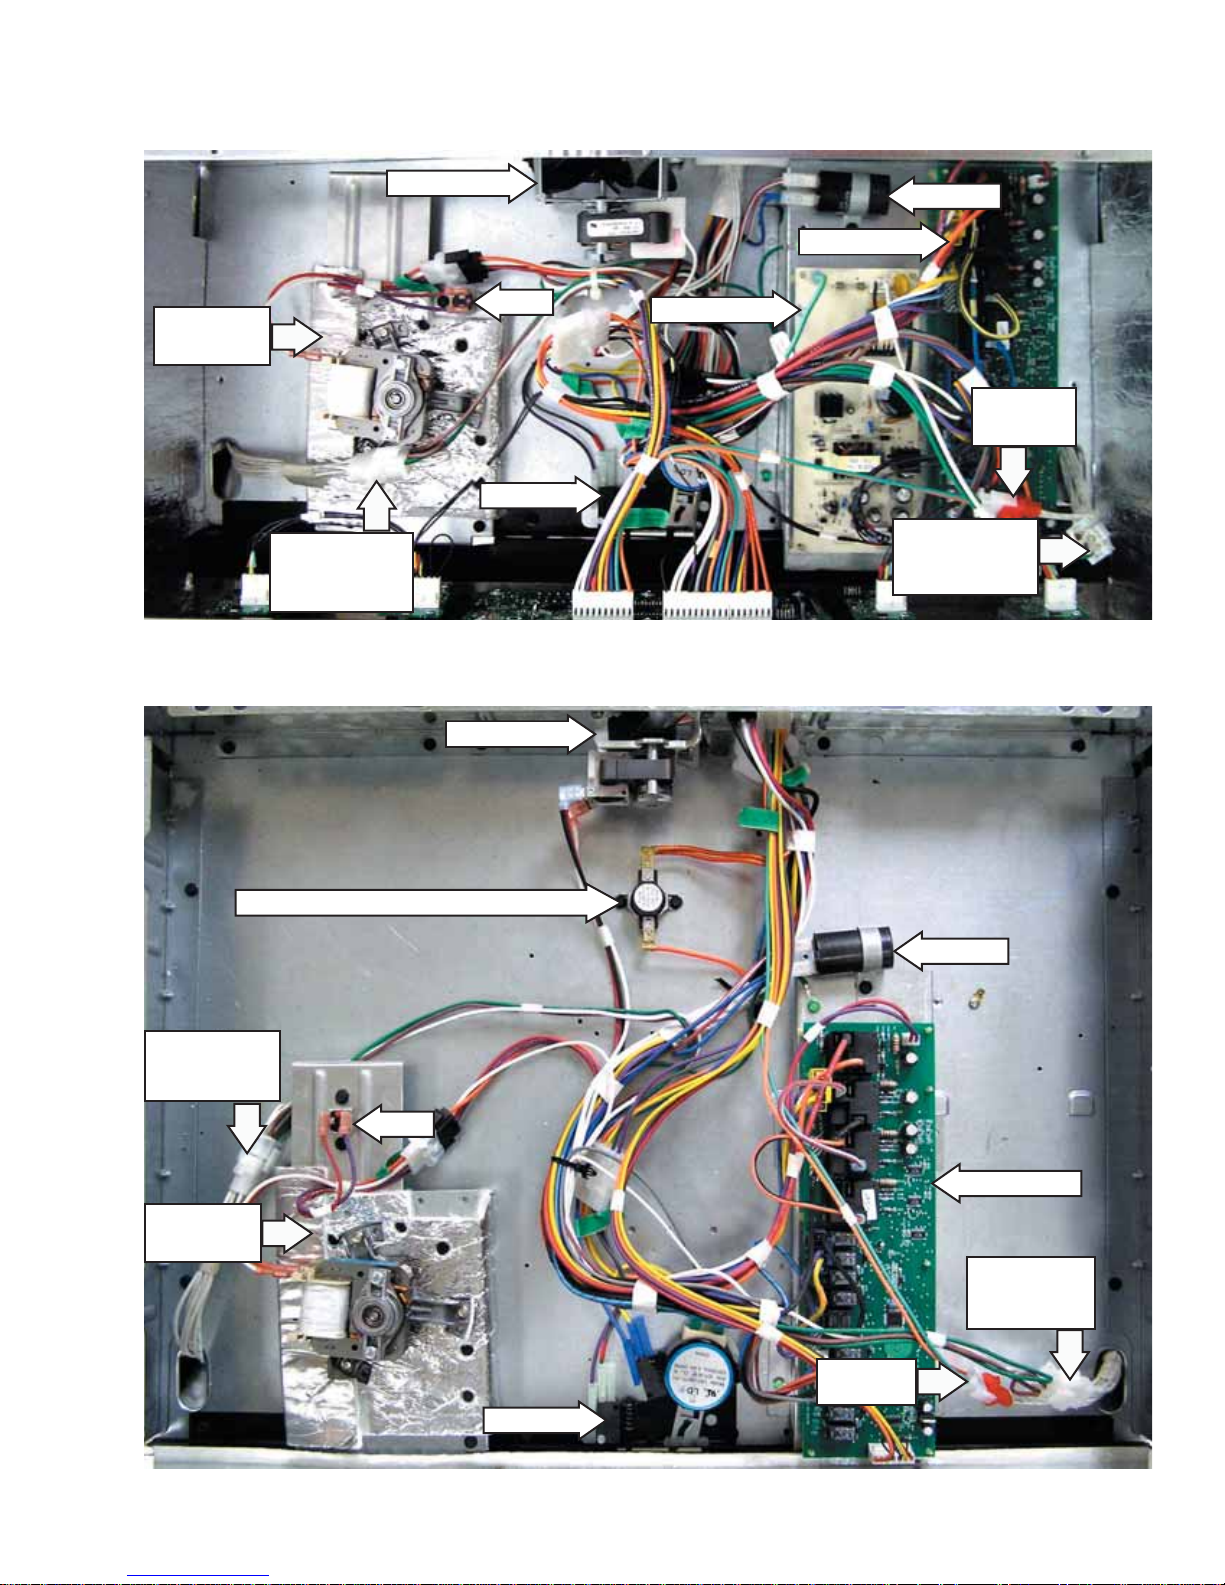
Control Compartment
Top Oven
Power Vent
Assembly
Bottom Oven
Left Side Oven
Lights Wire
Harness
Cooling Fan
Cooling Fan
FAD
Door Lock
Capacitor
Relay Board
Power Board
Probe Wire
Harness
Right Side Oven
Lights Wire
Harness
Thermal Line Break Thermal Cutout (TCO)
Left Side Oven
Lights Wire
Harness
Power Vent
Assembly
Capacitor
FAD
Relay Board
Right Side
Oven Lights
Wire Harness
Probe Wire
Harness
Door Lock
– 15 –
(Continued next page)
30-in. Single Wall Oven (Pro Stainless shown)
Broil Element
Convection Fan
Control Panel
Meat Probe Outlet
Oven Door Gasket
Oven Door
Control Compartment
Lights
Lights
Hidden Bake Element
Thermal Line Break Thermal Cutout (TCO)
Cooling Fan
Left Side Oven
Lights Wire
Harness
Power Vent
Assembly
FAD
Door Lock
Capacitor
Relay
Board
Power Board
Right Side
Oven Lights
Wire Harness
Probe Wire
Harness
– 16 –
 Loading...