

Monogram ZDBG240S, ZDWG240S Design And Installation Manual

Installation
Instructions
Wine Chiller
and
Beverage Center
Design Guide
With Installation Instructions
Safety Information
BEFORE YOU BEGIN:
Read these instructions completely and carefully.
IMPORTANT – Save these instructions
for local inspector’s use.
IMPORTANT – Observe all governing
codes and ordinances.
Note to Installer – Be sure to leave these
instructions with the Consumer.
Note to Consumer – Keep these instructions with
your Owner’s Manual for future reference.
WARNING – This appliance must be
properly earthed. See “Electrical Supply”, page 4.
If you received a damaged wine chiller or beverage
center, you should immediately contact your dealer
or builder.
Skill Level – Installation requires basic mechanical
skills. Proper installation is the responsibility of the
installer. Product failure due to improper installation
is not covered under the Warranty.
WARNINGS:
• Use this appliance only for its intended purpose.
• Immediately repair or replace electrical service
cords that become frayed or damaged.
• Unplug the unit before cleaning or making repairs.
• Repairs should be made by a qualified service
technician.
CONTENTS
Design Guide
The Installation Space ............................3
Product Clearances ................................ 3
Side-by-Side Installation ........................3
Installation Instructions
Tools, Hardware ....................................... 4
Grounding the Product ........................... 4
Staining Wood Drawer Fronts ...............4
Step 1, Remove Packaging .................... 4
Step 2, Reverse Door Swing .................. 5
Step 3, Leveling ........................................6
Step 4, Connect Power ........................... 6
Step 5, Slide Product into Cutout .......... 6
Step 6, Install Nameplate ....................... 6
Step 7, Set Temperature Controls .........6
Template for Nameplate ...... Back Cover
2
Design Guide
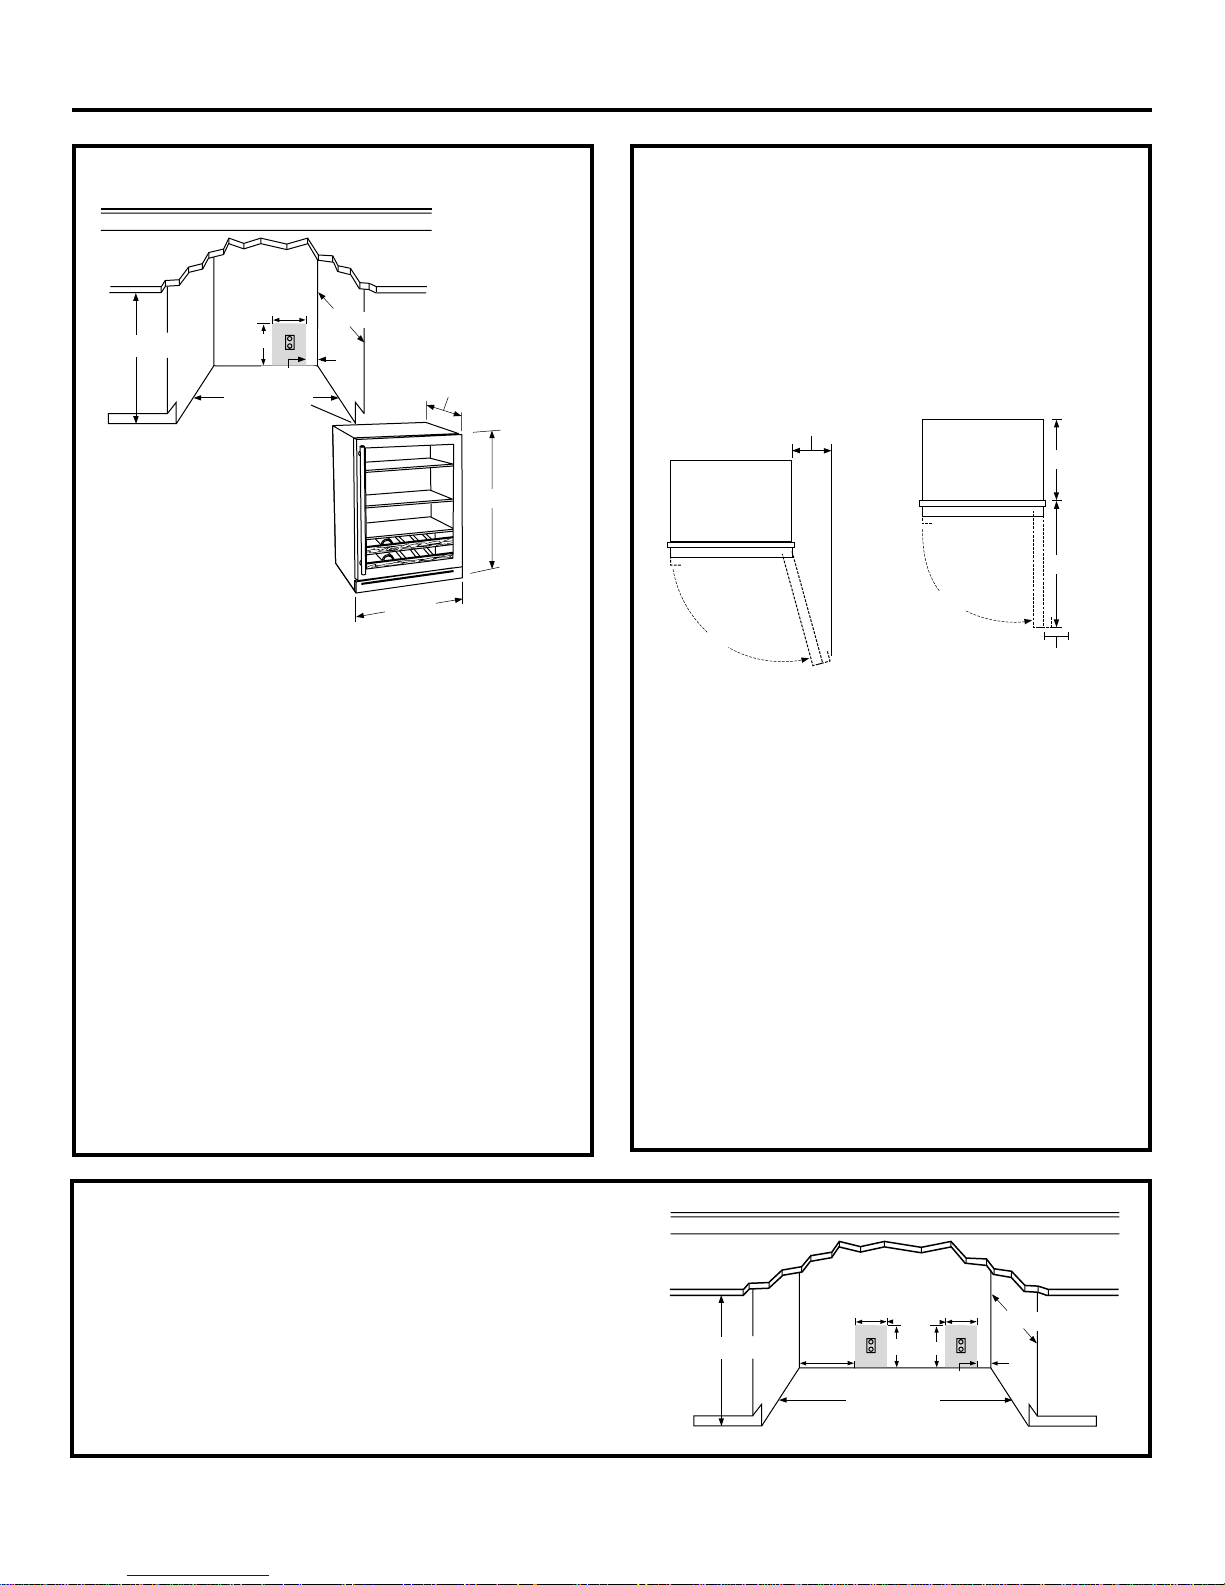
THE INSTALLATION SPACE
Locate
Outlet
267 mm
875–890 mm
229 mm
Max.
603 mm Min.
NOTE:
Handle and
handle standoff
depth is 45 mm
The cutout depth should be 600 mm
The cutout dimensions shown allow for a full door
swing and access to the pull-out racks when installed
as a built-in in standard 600 mm deep cabinets.
• The wine chiller, wine reserve and beverage center
can be installed freestanding.
• If installing between frameless cabinets, a 13 mm
wide filler strip or side panel may be needed on
hinge side. The filler strip will act as a spacer
between the case and adjacent cabinet door swing.
The width of the opening must include the filler
panels. NOTE: The door should protrude 25 mm
beyond the surrounding cabinets.
38 mm
610 mm
580 mm
875 mm
596 mm
PRODUCT CLEARANCES
The wine chiller and beverage center is factory set for
a 110° door swing.
When installed in a corner:
• Allow 100 mm minimum clearance on the hinge side
for the 90° door swing and to allow racks to slide out.
• Allow 360 mm minimum clearance on the hinge side
for a full 110° door swing.
360 mm Min.
to Wall
110°
• The door swing is reversible on all models. If
desired, change the door swing before installation.
Choose the location:
• These products may be closed in on the top and
three sides as long as the front is unobstructed for
air circulation and proper access to the door.
• Do not install these products where the temperature
will go below 55°F (13°C) or above 90°F (32°C).
• Do not install where it will be subject to direct
sunlight, heat or moisture.
90° Door Swing
530 mm
600 mm
90°
100 mm Min.
to Wall
Additional Specifications
• A 230V 50Hz, 13–16 amp power supply is required.
An individual properly earthed branch circuit or
circuit breaker is recommended. Ensure a properly
earthed electrical supply outlet has been installed
into the back wall as illustrated.
SIDE-BY-SIDE INSTALLATIONS
Increase storage capacity by installing two Monogram
beverage centers or wine chillers together. Or, for a
complete refreshment center, install any two of these
units together.
• A side-by-side installation requires at least a 1206 mm
wide opening. No trim kits required.
• Products must operate from separate outlet, properly
earthed receptacles.
Black or Stainless Steel Toekick Options
• These products are shipped with a black toekick
installed. An optional stainless steel toekick is also
supplied with each product. For shipping purposes,
the stainless steel toekick is secured to the back
of the unit.
Locate
Outlet
875–890 mm
267 mm
298 mm
1206 mm Min.
336 mm
229 mm
267 mm
38 mm
3
610 mm
 Loading...