

Monogram ZDWC240NBS, ZDBC240NBS Installation Instructions Manual

Installation
Instructions
If you have questions, call 800.626.2000 or visit our website at: www.monogram.com
Wine Chiller
ZDWC240NBS
and
Beverage Center
ZDBC240NBS
Design Guide
With Installation Instructions
Monogram.
®
We bring good things to life.

Safety Information
BEFORE YOU BEGIN:
Read these instructions completely and carefully.
IMPORTANT - Save these instructions for
local inspector’s use.
IMPORTANT - Observe all governing codes
and ordinances.
Note to Installer - Be sure to leave these instructions
with the Consumer.
Note to Consumer - Keep these instructions with
your Owner’s Manual for future reference.
WARNING - This appliance must be
properly grounded. See “Electrical Supply” page 4.
ATTENTION - Cet appareil doit être
correctement mis à la terre. Consulter
<<Alimentation électrique>>, page 4.
If you received a damaged wine chiller or beverage
center, you should immediately contact your dealer or
builder.
Skill Level - Installation requires basic mechanical
skills. Proper installation is the responsibility of the
installer. Product failure due to improper installation is
not covered under the GE Appliance Warranty.
WARNINGS:
• Use this appliance only for its intended purpose.
• Immediately repair or replace electrical service
cords that become frayed or damaged.
• Unplug the wine chiller or beverage center before
cleaning or making repairs.
• Repairs should be made by a qualified service
technician.
ATTENTION:
• Il ne faut utiliser cet appareil que pour l’usage
pour lequel il a été construit.
• Il faut réparer ou remplacer immédiatement tout
cordon d’alimentation électrique effiloché ou
endommagé.
• Débrancher le bar ou le réfrigérateur a vin avant le
nettoyage ou toute intervention.
• Les réparations doivent être faites par un
technicien qualifié.
For Monogram local service in your area,
1-800-444-1845
For Monogram service in Canada
1-888-880-3030
For Monogram Parts and Accessories, call
1-800-626-2002.
CONTENTS
Design Guide
The Installation Space ....................................3
Product Clearances ........................................ 3
Side-by-Side Installation ................................3
www. monogram.com
Installation Instructions
Tools, Hardware ...............................................4
Grounding the Product ................................... 4
Step 1, Remove Packaging ............................ 4
Step 2, Reverse Door Swing .......................... 5
Step 3, Leveling ................................................6
Step 4, Connect Power ................................... 6
Step 5, Slide Product into Cutout .................. 6
Step 6, Install Badge ....................................... 6
Step 7, Set Temperature Controls .................6
Template for Badge...................... Back Cover
2
Design Guide
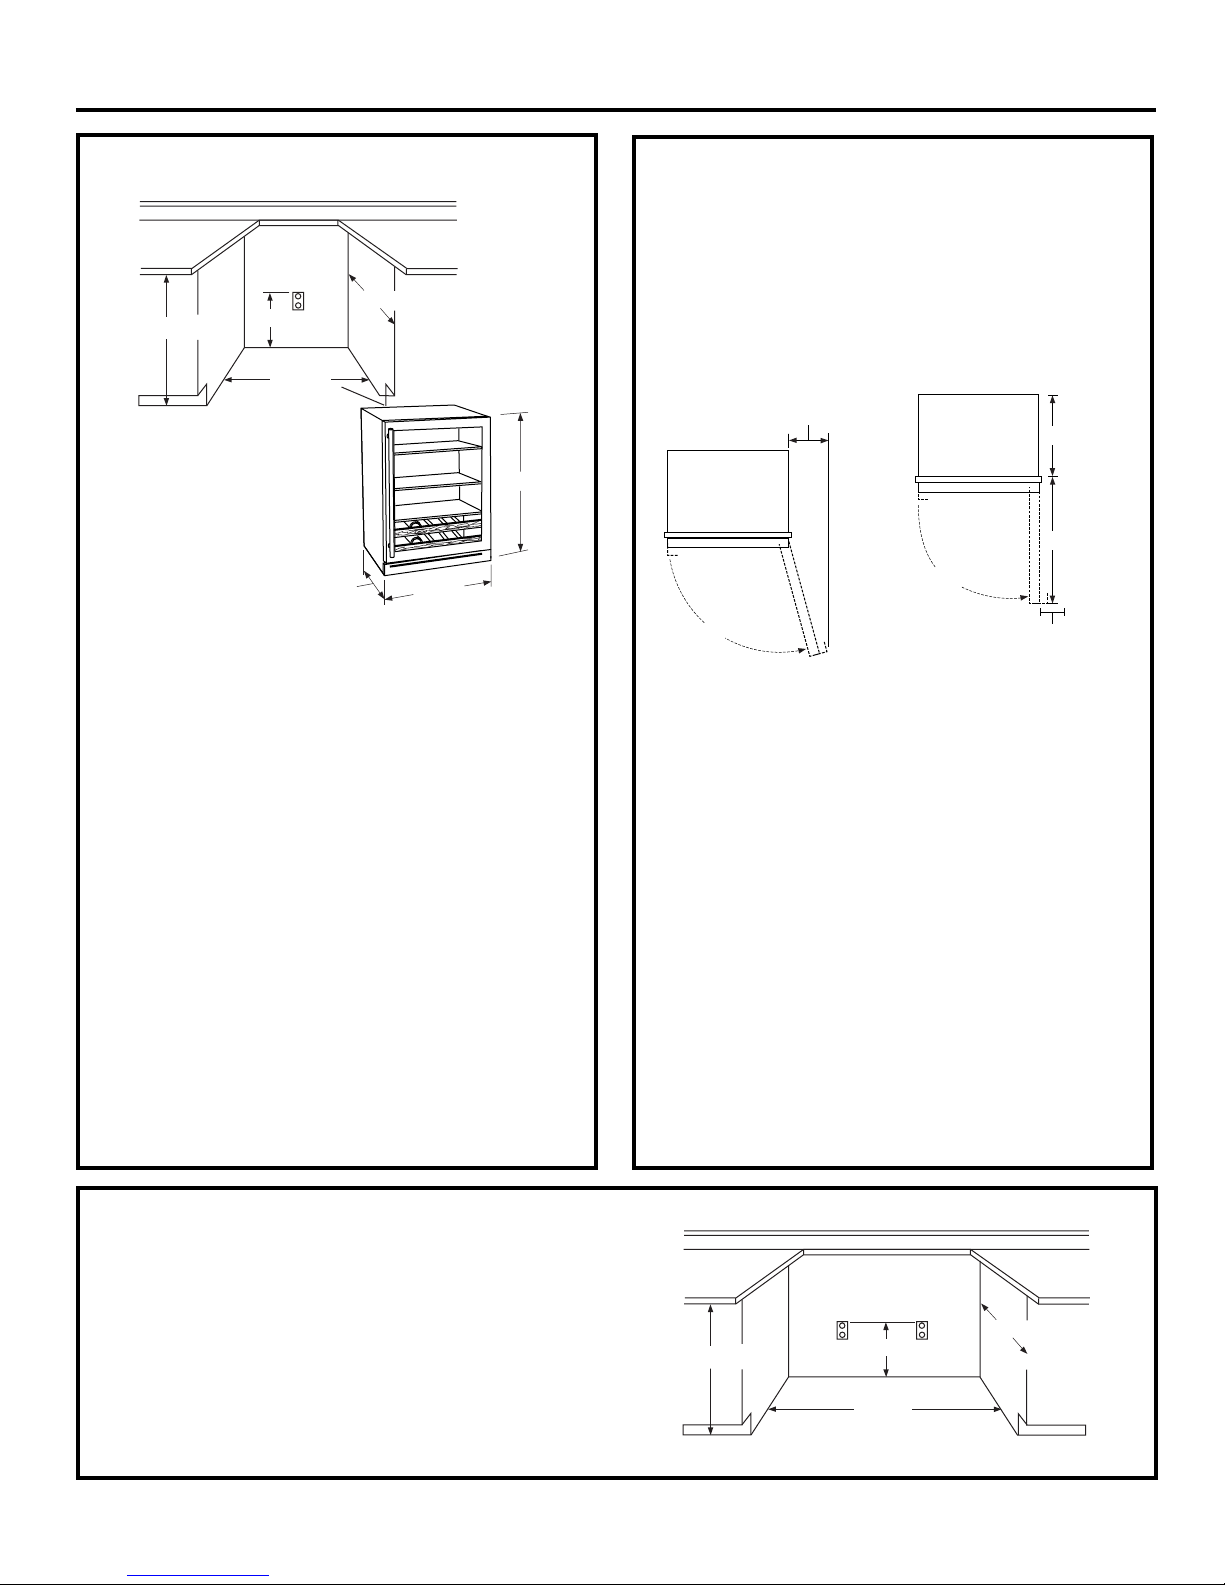
THE INSTALLATION SPACE
Locate
Outlet
24" Min.
34-1/2"-35"
24" Min.
34-1/4"
24-1/8"
The cutout depth must be 24"
The cutout dimensions shown allows for a full door
swing and access to the pull-out racks when installed
as a built-in.
• The wine chiller and beverage center can be
installed freestanding.
• If installing between frameless cabinets, a 1/2" wide
filler strip or side panel may be needed on hinge
side. The filler strip will act as a spacer between the
wine chiller case and adjacent cabinet door swing.
The width of the opening must include the filler
panels. Note: The door should protrude 1" beyond
the surrounding cabinets.
Additional Specifications
• A 120 volt 60Hz., 15 or 20 amp power supply is
required. An individual properly grounded branch
circuit or circuit breaker is recommended. Install a
properly grounded 3-prong electrical receptacle
recessed into the back wall as shown. Electrical must
be located on rear wall as shown. Note: GFI (ground
fault interrupter) is not recommended.
23-7/8"
PRODUCT CLEARANCES
The wine chiller and beverage center is factory set for
a 110° door swing.
When installed in a corner:
• Allow 4" min. clearance on the hinge side for the
90° door swing and to allow racks to slide out.
• Allow 10" minimum clearance on the hinge side for
a full 110° door swing.
10" Minimum
to Wall
110°
• The door swing is reversible on all models. If
desired, change the door swing before installation.
Choose the location:
• The beverage center or wine chiller may be closed
in on the top and three sides as long as the front is
unobstructed for air circulation and proper access
to the door.
• Do not install the wine chiller where the tempera-
ture will go below 55°F (13°C) or above 90°F
(32°C).
• Do not install where it will be subject to direct
sunlight, heat or moisture.
Staining Wood Drawer Fronts
The wood drawer fronts on the wine chiller and
beverage center may be stained to match adjacent
cabinetry.
• The tinted glass will make the stained wood appear
darker. A true color match can be seen only when
the door is opened.
90° Door Swing
20-3/32"
23-11/16"
90°
4" Minimum
to Wall
SIDE-BY-SIDE INSTALLATIONS
Increase storage capacity by installing two Monogram
beverage centers or wine chillers together. Or for a
complete refreshment center, install a beverage center
and wine chiller together.
• A side-by-side installation requires a 48" wide opening.
No trim kits required.
• Products must operate from properly grounded
separate receptacles.
Locate
Outlet
24" Min.
34-1/2"-35"
6" Max.
48" Min.
3
 Loading...