

Monogram ZDP484NG, ZDP486NR, ZDP486ND, ZDP484LG, ZDP486LR Installation Instructions Manual
...
Installation
Instructions
30", 36" and 48"
Professional Ranges
Cuisinières professionnelles
de 30’’ (76 cm) 36" (91 cm)
et de 48" (121 cm)
Instructions d’installation
La section française commence à la page 24
31-10689
04-08 JR
Cocinas profesionales
de 30", 36" y 48"
Instrucciones de instalación
La sección en español empieza en la página 46
Installation Instructions
BEFORE YOU BEGIN
Read these instructions completely and carefully.
•
IMPORTANT— Save these instructions for
local inspector’s use.
•
IMPORTANT— Observe all governing
codes and ordinances.
• Note to Installer — Be sure to leave these
instructions with the Consumer.
• Note to Consumer — Keep these instructions
with your Owner’s Manual for future reference.
• Completion Time — 1 to 3 hours.
• Proper installation is the responsibility of the
installer. Product failure due to improper
installation is not covered under the warranty.
See Owner’s Manual for warranty information.
WARNING:
This appliance must be properly grounded.
See ”Electric Supply.
For Monogram local service in your area,
1.800.444.1845.
For Monogram Ser
1.800.561.3344.
For Monogram Parts and Accessories, call
1.800.626.2002.
If you r
contact your dealer.
In the Commonwealth of Massachusetts:
•
• When using ball type gas shut off valves, they
•
eceived a damaged range, you should
This product must be installed by a licensed
plumber or gas fitter.
shall be T-handle type.
A flexible gas connector
exceed 3 feet.
”
vice in Canada, call
, when used, must not
WARNING:
. Install the
y could r
All ranges can tip
supplied Anti-Tip Bracket provided. See instructions
in this manual or with the bracket.
. Injur
esult
Vent hood Combinations:
It is recommended that these ranges be installed
in conjunction with a suitable overhead vent hood.
• Install a hood with at least 1200 CFM above a 48"
wide range.
• Install a hood with at least 600 CFM above a 30”
or 36” range.
Due to the high heat capacity of this unit, particular
attention should be paid to the hood and ductwork
installation to assure it meets local building codes.
WARNING:
Clearances to horizontal surfaces above the range,
measured to the cooking surface:
• Installations without a hood require 48” minimum
to combustibles.
• A custom hood installation with exposed
horizontal combustibles surfaces must have
an Auto-On feature.
• For other installations with a hood, r
installation instructions for specific hood
clearances.
efer to hood
CAUTION:
These ranges weigh up to 700 pounds. Some
disassembly will reduce the w
Due to the weight and size of the range and to
reduce the risk of per
the product:
TWO PEOPLE ARE REQUIRED FOR PROPER
ALLATION OF 36" AND 30" RANGES.
INST
THREE PEOPLE ARE REQUIRED FOR PROPER
ALLATION OF 48" RANGES.
INST
Leak testing of the appliance shall be conducted
according to the manufacturer’s instructions.
Installation must conform with local codes. In the
absence of local codes, the range must comply with
the National Fuel Gas Code, ANSIZ223.1/NFPA 54,
latest edition and National Electrical Code
ANSI/NFPA 70 latest addition. In Canada, installation
must conform with the current Natural Gas
Installation Code, CAN/CGA-B149.1 or the current
Propane Installation Code, CAN/CGA-B149.2, and
with local codes where applicable. This range has
been design-certified by CSA International according
to ANSI Z21.1, latest edition and Canadian Gas
Association according to CAN/CGA-1.1 latest edition.
sonal injury or damage to
eight considerably.
2
Design Information
CONTENTS
Design Information
Models Available......................................................................3
Backsplash Accessories ......................................................3
Product Dimensions and Clearances........................4-7
Tools and Materials Required .......................................... 8
Installation Preparation
Power Supply Locations ..............................................9, 10
MODELS AVAILABLE
These Monogram ranges are factory set for either
natural gas or LP gas. Order the model for your
installation situation.
48" Natural Gas Models:
ZDP484NG – 4 gas burners, grill and griddle
ZDP486NR – 6 gas burner
ZDP486ND – 6 gas burners and griddle
48" LP Gas Models:
ZDP484L
ZDP486LR – 6 gas burner
ZDP486LD – 6 gas burners and griddle
G – 4 gas burners, grill and griddle
s and grill
s and grill
Installation Instructions
Step 1, Remove Packaging ..............................................11
Step 2, Move Range Indoors ..........................................12
Step 3, Install Anti-Tip Device ........................................13
Step 4, Connect Range to Gas........................................14
Step 5, Connect Electrical ................................................14
Step 6, Roll Range into Position ....................................14
Step 7, Level the Range ....................................................15
Step 8, Replace Oven Doors............................................15
Step 9, Check Burners ........................................................16
Finalize Installation ..............................................................16
Installation Checklist ..........................................................16
Accessories..............................................................................17
Accessory Installation ................................................18–20
Gas Conversion ............................................................21-23
36" Natural Gas Models:
ZDP366N – 6 gas burners
ZDP364NR – 4 gas burners and grill
ZDP364ND – 4 gas burners and griddle
36" LP Gas Models:
ZDP366L – 6 gas burner
ZDP364LR – 4 gas burner
ZDP364LD – 4 gas burners and griddle
s
s and grill
30" Natural Gas Model: ZDP304N
30" LP Gas Model: ZDP304L
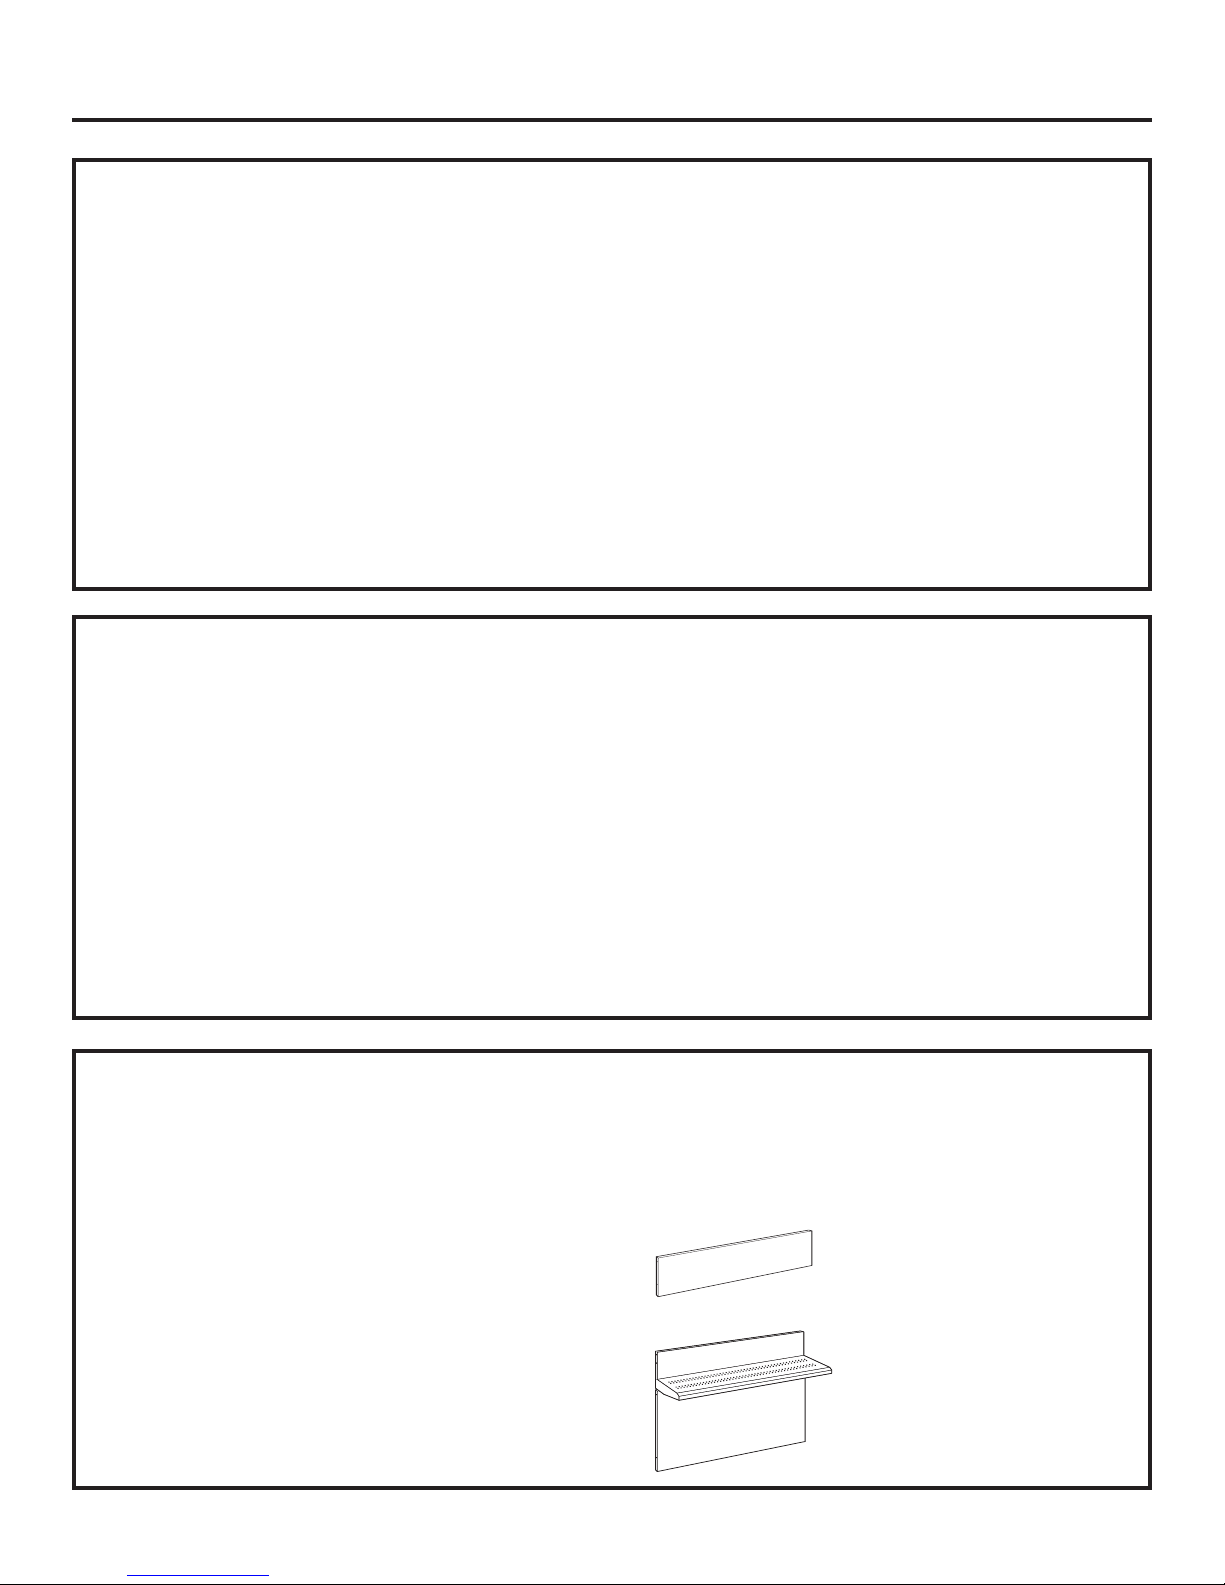
BACKSPLASH ACCESSORIES
All models require 12" minimum clearance to a
vertical combustible surface at the rear. If clearance
is less than 12”, the entire surface of the back wall
above and the full width of the range must be
protected by a backsplash. The backsplash must be
constructed of non-combustible material, such as
metal, ceramic tile, brick, marble or other stone.
Two Backsplash Accessories Available:
• The 12" high stainless steel backsplash accessory
is available. Use this backsplash in combination
with a custom, non-combustible backsplash built
beyond the 12” height
the backsplash accessory and the custom
backsplash must reach the bottom of a hood,
or when there is no hood, to 48” above the
cooking surface.
. The combined height of
An adjustable 30" to 36" high backsplash with
•
shelf is also available. This backsplash fills in the
space betw
bottom of the hood. The shelf is positioned so that
heat lamps from the bottom of a Monogram
ofessional hood are directed towards the shelf.
pr
een the top of the range and the
12" High Backsplash
ZX12B48PSS, for 48" wide ranges
ZX12B36PSS, for 36" wide ranges
ZX12B30PSS, for 30" wide ranges
30" to 36" Adjustable Height
Backsplash With Shelf
ZXADJB48PSS
ZXADJB36PSS
ZXADJB30PSS, for 30" wide ranges
, for 48" wide ranges
, for 36" wide ranges
3
Design Information
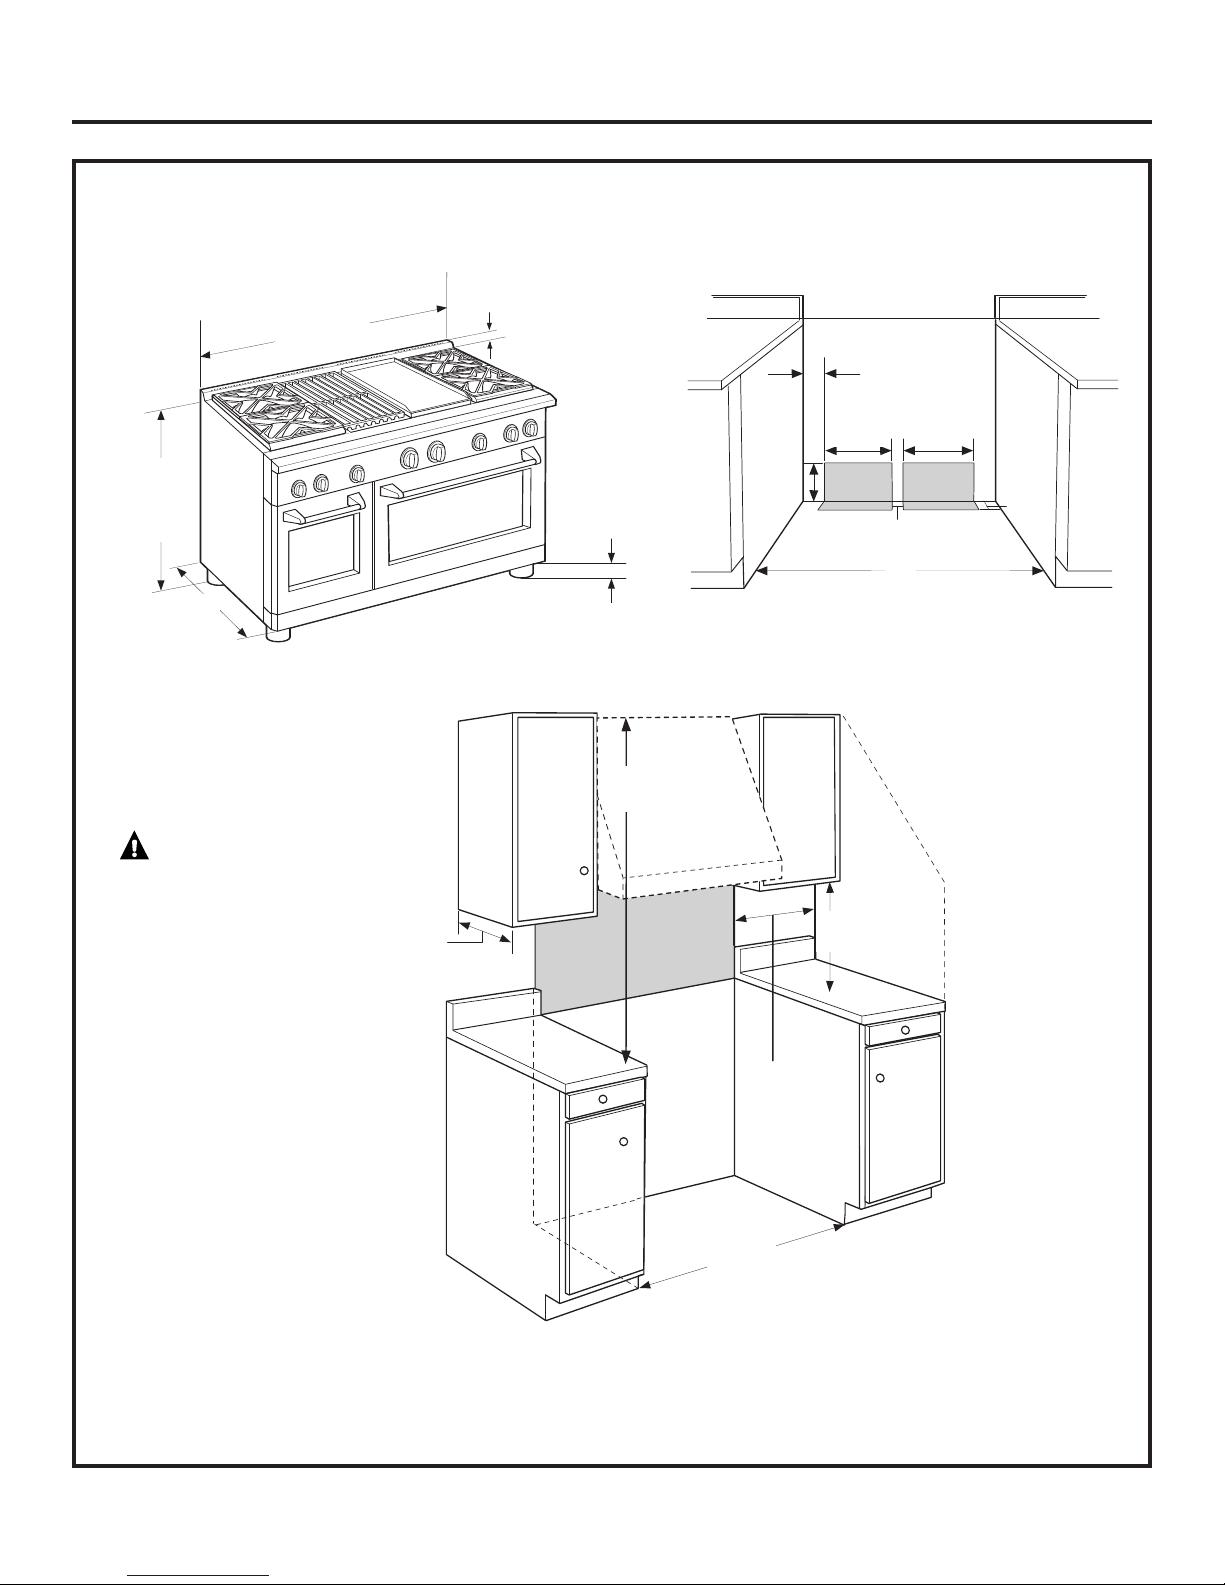
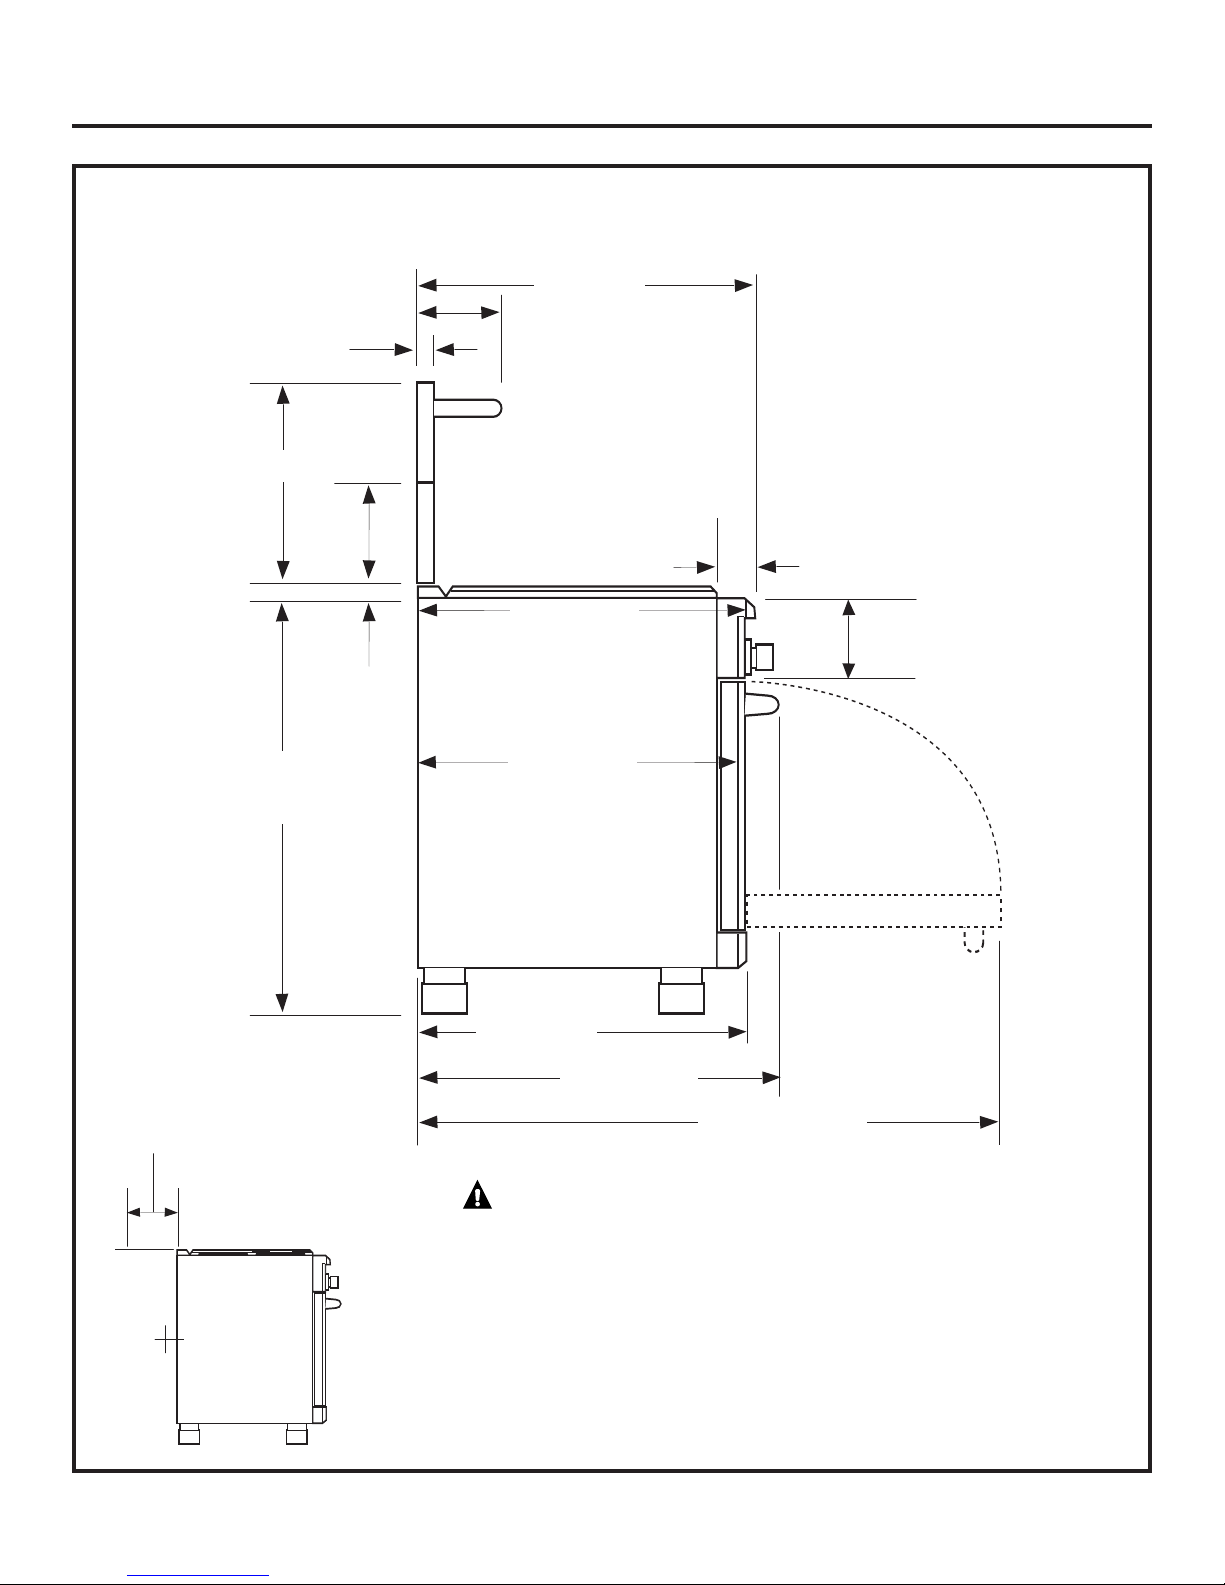
PRODUCT DIMENSIONS AND CLEARANCES
48" Range Models
1”
47-7/8” Width
Countertop
to Cooking
Surface
Universal Utility Locations
8”
35-1/4”
to
36-3/4”
Height
28-1/4”
Depth
to Front
of Door
WARNING:
Installations without a hood require
48” minimum to combustibles.
A custom hood installation with
exposed horizontal combustible
surfaces must have an Auto-On
feature. Refer to hood installation
instructions for specific hood
clearances.
The surface of the entire back wall
above the range and below the
hood must be covered with a noncombustible material such as metal,
ceramic tile, brick, marble or other
stone.
13”
Max.
to 4-3/4”
Toekick/leg
Height
3-1/4”
48” Minimum
to Combustibles
Non-Combustible
Material
6-1/2”
12” Minimum
Each Side
18”
Min.
14”
Gas/
Electric
16”
Electric
2”
48”
12” Minimum
to Adjacent W
2”
all
48” Min.
ADDITIONAL CLE
Allow 12" minimum clearance to an adjacent wall
on each side.
eas adjacent to the rangetop should hav
ing ar
Work
18" minimum clearance betw
the bottom of the wall cabinet.
ARANCES:
een countertop and
4
e

Design Information
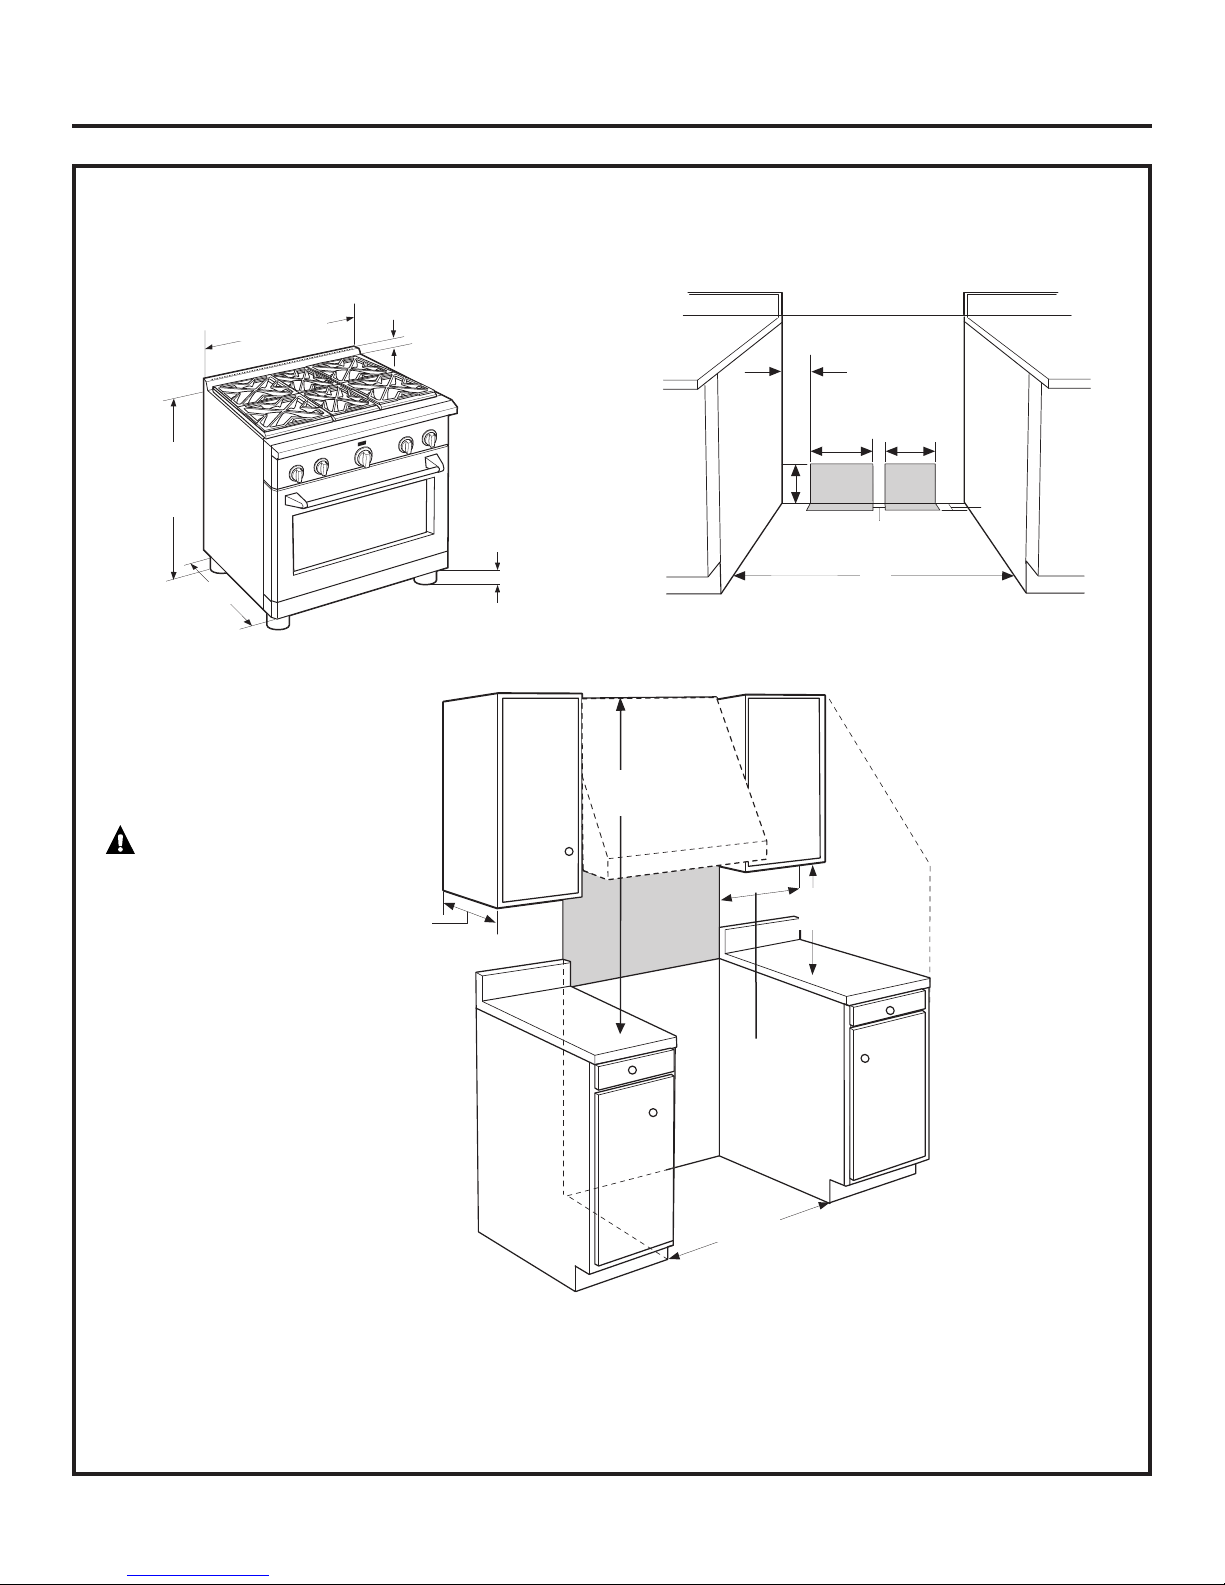
PRODUCT DIMENSIONS AND CLEARANCES
36" Range Models
35-7/8” Width
1”
Countertop
to Cooking
Surface
niversal Utility Locations
U
4-5/8”
35-1/4”
to
36-3/4”
Height
28-1/4”
Depth
to Front
of Door
WARNING:
Installations without a hood require
48” minimum to combustibles.
A custom hood installation with
exposed horizontal combustible
surfaces must have an Auto-On
feature. Refer to hood installation
instructions for specific hood
clearances.
The sur
face of the entire back wall
above the range and below the
hood must be covered with a noncombustible material such as metal,
ceramic tile, brick, marble or other
stone.
Toekick/leg
Height
13”
Max.
3-1/4”
to 4-3/4”
48” Minimum
to Combustibles
Non-Combustible
Material
6-1/2”
12” Minimum
Each Side
13-3/8”
Gas/
Electric
18”
Min.
11-3/8”
Electric
2”
2”
36”
12” Minimum
to Adjacent Wall
36” Min.
ADDITIONAL CLEARANCES:
Allow 12" minimum clearance to an adjacent w
on each side.
Working areas adjacent to the rangetop should have
18" minimum clearance betw
the bottom of the wall cabinet.
een counter
all
top and
5
Design Information
PRODUCT DIMENSIONS AND CLEARANCES
30" Wide Range Models
29-7/8” Width
35-1/4”
to
36-3/4”
Height
28-1/4”
Depth
to Front
of Door
1”
Toekick/leg
Countertop
to Cooking
Surface
3-1/4”
to 4-3/4”
Height
48” Minimum
to Combustibles
Universal Utility Locations
11-3/8”
6-1/2”
Gas/
Electric
4-5/8”
7-3/8”
Electric
2”
2”
30”
12” Minimum
to Adjacent Wall
WARNING:
Installations without a hood require
48” minimum to combustibles.
A custom hood installation with
exposed horizontal combustible
surfaces must have an Auto-On
feature. Refer to hood installation
instructions for specific hood
clearances.
The surface of the entire back wall
above the range and below the
hood must be covered with a noncombustible material such as metal,
ceramic tile, brick, marble or other
stone.
13”
Max.
Non-Combustible
Material
12” Minimum
Each Side
30” Min.
18”
Min.
ADDITIONAL CLEARANCES:
Allow 12" minimum clearance to an adjacent wall
on each side.
Working areas adjacent to the rangetop should have
18" minimum clearance between countertop and
the bottom of the wall cabinet.
6
Design Information
PRODUCT DIMENSIONS AND CLEARANCES
48", 36" and 30" Range Models
28-7/8”
10-1/2”
13/16”
To Front Edge
Optional
Backsplash
Accessories
12" Min. to combustibles or 0" to
a non-combustible material above
the cooking surface
30-36”
35-1/4”
to
36-3/4”
12”
1”
28-1/4” To
Beveled
Edge of Control
Panel Bullnose
27-1/2” To
Beveled Edge –
Maximum
Adjacent Cabinet
Depth for
Flush Installation
28-1/4”
To Front of Door
To Front of Handle
3-3/16”
Control Panel
Depth
7” Control Panel
Height
31-1/16”
48-1/4”
With Oven Door Open
0” Clearance
to a back or
side wall below
the cooking
surface
WARNING:
The 12” high stainless steel
backsplash accessor
installed in combination with a
custom non-combustible backsplash.
The finished backsplash must cov
the entire back wall up to the bottom
of a hood, or when ther
48” to combustibles.
y must be
er
e is no hood,
7

Installation Information
WB28K10553 HIGH ALTITUDE KIT
For operation above 3,000 feet, order WB28K10553
Conversion Kit. This kit includes orifices for both LP
and Natural gas operation.
WB28K10554 DE-RATE KIT
(For a small kitchen environment.)
De-rate conversion kit for use with model
ZDP304N (natural gas only). This kit includes
orifices to reduce surface burner output
to 40,800 BTU’s.
MATERIALS PROVIDED
Anti-Tip
Bracket, Brace
and Screws
1/2” Pipe
Elbow
Oven Rack
Lubricant
Runners
(to protect
flooring)
TOOLS REQUIRED
Saber Saw
Measuring Tape
Carpenter’s Square
Safety Glasses
Phillips #2 Screwdriver
rill and
D
Appropriate Bits
Adjustable Wrench
1/4” Driver or Wrench
Level
Hand Truck
MATERIALS REQUIRED (not provided)
Joint
Sealant
Pipe Fittings
5-foot maximum length, 5/8" O.D. CSA-approved flexible
metal gas supply
(3-foot maximum length in Massachusetts only)
NOTE: Pur
chase new flexible line; do not use
eviously used flexible gas line.
pr
Shut Off Valve
8
 Loading...