

Monogram ZDIC150, ZDIS150 Installation Manual

Installation
Instructions
Automatic Icemaker
ZDIC150
ZDIS150
Design Guide
With Installation Instructions
monogram.com
Installation Instructions
• BEFORE YOU BEGIN:
Read these instructions completely and carefully.
•
IMPORTANT:
Save these instructions for local inspector’s use.
•
IMPORTANT:
Observe all governing codes and ordinances.
• Note to Installer – Be sure to leave these
instructions with the Consumer.
• Note to Consumer – Keep these instructions
with your Owner’s Manual for future reference.
WARNING:
This appliance must be properly grounded.
Failure to do so can result in death, fire or
electrical shock. See “Power Supply,” page 5.
AVERTISSEMENT :
Cet appareil doit être correctement
mis à la terre. Le non-respect de ces
instructions peut causer la mort, un
incendie ou un choc électrique. Consulter
« Alimentation électrique », page 5.
If you received a damaged icemaker, you should
immediately contact your dealer or builder.
Proper installation is the responsibility of the
installer. Product failure due to improper installation
is not covered under the GE Appliance Warranty.
See the Owner’s Manual for warranty information.
• Use this appliance only for its intended purpose.
Check with local utilities for electrical codes that
apply in your area. Local codes vary. Installation,
electrical connections and grounding must comply
with applicable codes. In the absence of local codes,
the icemaker should be installed in accordance with
National Electrical Code ANSI/NFPA 70-1990 or
latest edition.
For Monogram local service in your area, call
1.800.444.1845.
For Monogram Service in Canada, call
1.800.561.3344.
For Monogram Parts and Accessories, call
1.800.626.2002.
2
CONTENTS
Design Information
Models Available ....................................................................3
Cutout & Product Dimensions..........................................3
Optional Accessories............................................................3
Tools and Materials Required ........................................ 3
Installation
Advance Planning..................................................................4
Power Supply ..........................................................................5
Remove Packaging................................................................5
Adjust Height of Icemaker ................................................5
Water Supply ..........................................................................6
Connect the Drain..................................................................6
Connect Water Supply ........................................................7
Reverse Door Swing ........................................................7, 8
Accessories
ZIP75WW, ZIP75BB Kit for 3/4″ thick panels ....9, 10
ZTBSS1 Tubular Handle Kit ............................................11
Design Information
MODELS AVAILABLE
ZDIC150, ZDIS150
Available in black, white and stainless steel.
The icemaker may be installed below a countertop
or used free-standing.
OPTIONAL ACCESSORIES
ZIP75WW White and ZIP75BB Black—For the
installation of a trimless 3/4″ thick custom panel
on white and black models (not for stainless steel
models). This kit provides a handle that can be
installed with the custom panel. A custom handle
of your choice may be installed onto the 3/4″ panel.
See installation instructions on pages 9 and 10.
ZTBSS1—Monogram tubular stainless steel handle
for 3/4″ thick custom panels. Order this kit from your
Monogram supplier.
ZPK1—Drain Pump Kit. For use when a floor drain is
not available. The drain pump must be installed inside
the unit and can operate at a maximum vertical
height of 10 feet. 10 feet of tubing is supplied with
the kit.
TOOLS AND MATERIALS REQUIRED
• 1/4″ socket
• 3/4″ adjustable wrench
• Level
• GE SmartConnect
™
Refrigerator Tubing Kit or 1/4″ O.D.
copper tubing, of sufficient length to reach the installation
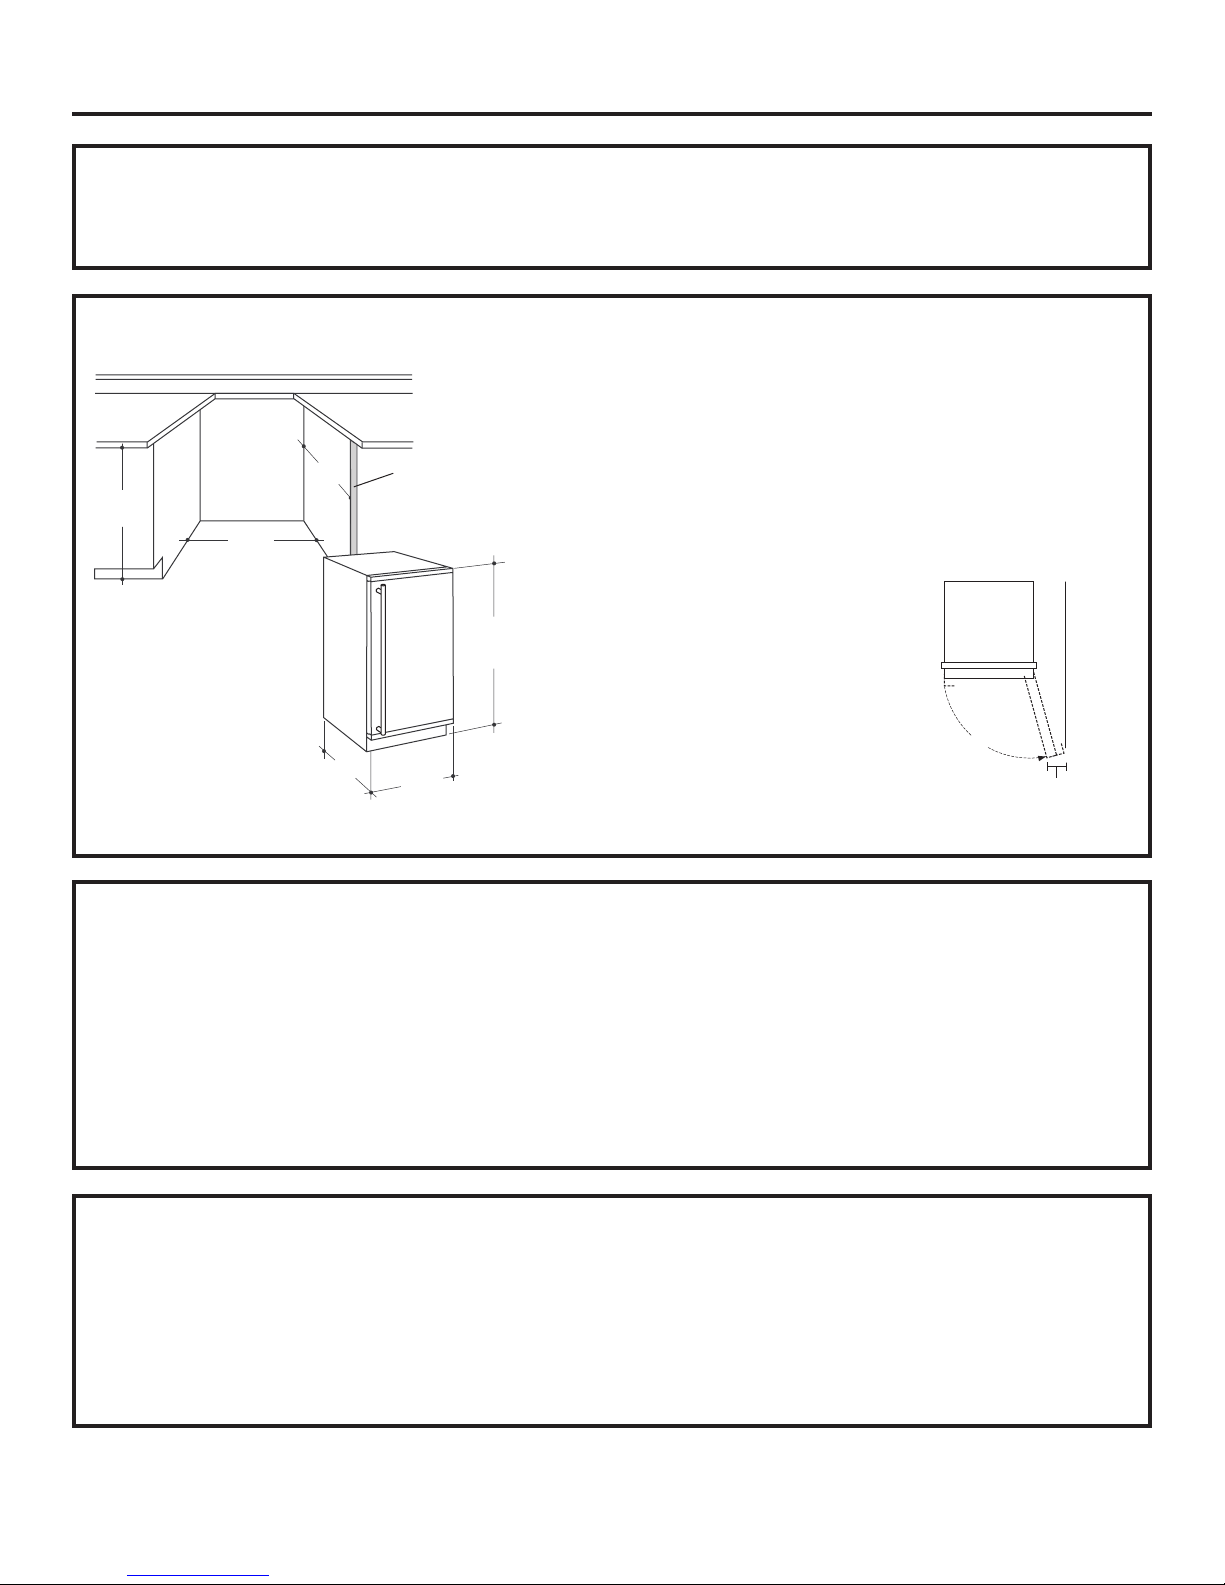
CUTOUT & PRODUCT DIMENSIONS
Cutout dimensions shown allow for a full door swing.
Additional Clearances:
• The installation of a 3/4″ thick custom panel will
require an additional 1-1/2″ wide filler strip on the
hinge side. The filler strip will act as a spacer
between the icemaker case and an adjacent
cabinet. The filler strip will prevent interference
with the icemaker door swing when it is installed
between frameless or framed cabinetry. The width
of the opening must
include the filler strip.
NOTE: The addition of
a 3/4″ thick front panel
will result in a front to
back depth of 24-1/16.″
The product cannot be
installed flush to
adjacent 24″ deep
cabinets with a
3/4″ thick custom panel.
3
k
Factory set
for 110° door
swing. Allow 2″
min. to wall for
90° door swing
24"
min.
34" to
34-1/2"
15"*
*16-1/2" with a 3/4" thick
*custom panel
23-5/16" to
Door Front
The installation of a 3/4” thic
custom panel will require an
additional 1-1/2” wide filler
strip on the hinge side.
34" min.
Adjustable
to 34-1/2"
14-13/16"
110 °
5-1/2" Minimum
WALL
to Wall
Installation Instructions
ADVANCE PLANNING
CAUTION: Due to excessive
weight, TWO PEOPLE ARE REQUIRED
TO MOVE AND INSTALL THIS ICEMAKER.
Failure to do so can result in back or
other injury.
MISE EN GARDE :
A cause de son poids élevé, IL FAUT
DEUX PERSONNES POUR DÉPLACER
ET INSTALLER CETTE MACHINE À
GLAÇONS. Le non-respect de ces
instructions peut causer des blessures
au dos ou d'autre nature.
WATER SUPPLY
A cold water supply with water pressure of between
30 and 120 psi is required to operate the icemaker.
If you have questions about your water pressure,
call a licensed, qualified plumber.
REVERSE OSMOSIS WATER SUPPLY
IMPORTANT: The performance of the icemaker
may be affected when it is connected to a reverse
osmosis system.
• The pressure of the water supply coming out of a
reverse osmosis system going to the water inlet
valve of the icemaker needs to be between 30 and
120 psi.
• If a reverse osmosis water filtration system is
connected to your cold water supply, the water
pressure to the reverse osmosis system needs to
be a minimum of 40 to 60 psi. The reverse osmosis
system must provide 1 gal. of water per hour to
the icemaker for proper icemaker operation.
• Do not use copper tubing when the icemaker is
connected to a reverse osmosis water system.
Choose the location:
• Not designed for outdoor installation.
• The icemaker must be installed in an area
protected from elements such as wind, rain, water
spray or drip. The area should be ventilated with
temperatures above 55°F (13°C) and below 110°F
(43°C). Best results are obtained between 70°F
(21°C) and 90°F (32°C).
• The icemaker may be closed in on the top and
three sides as long as the front is unobstructed
for air circulation and proper operation.
–Installation should be such that the icemaker
can be moved forward for servicing, if necessary.
–The bottom grille on the front must be
unobstructed to provide proper air flow.
ADVANCE PLANNING (cont.)
Before you begin:
1. If a custom panel is to be installed, follow the
instructions shown on pages 9 and 10.
–Order ZIP75 (black or white) panel kit.
–Order the custom panel from the cabinet
manufacturer.
–Secure the custom panel onto the icemaker.
2. Determine a method of drainage. If a floor drain
is to be installed, the drain must be accurately
located. The installation of a custom door panel
will affect the drain location. See page 6 to
determine the exact location of the floor drain,
front to back, with or without a custom door
panel.
–A drain pump kit, ZPK1, is available and will not
interfere with placement of the icemaker.
3. The door swing is reversible. If desired, change
the door swing before installation.
4. Slide the icemaker into the installation location.
–Open and close the door to be sure there is no
interference.
–Check to be sure the icemaker can be moved
back into the opening, flush with adjacent
cabinetry. There should be no interference
with the floor drain.
–Check to be sure the icemaker is level. The
icemaker will not operate properly if it is not
level. See page 5.
4
 Loading...