

Page 1

Owner’s Manual
Precision Cooking Probe
JXSOUSV1
For Use With 30” and 36” Induction Cooktop Models:
ZHU30RSJSS
ZHU36RSJSS
ZHU30RDJBB
ZHU36RDJBB
CHP9530SJSS
CHP9536SJSS
49-80776
06-15 GE
monogram.com
Printed in the United States
Page 2

Consumer Information
Precision Cooking Probe
Introduction
Contents
Thank you for purchasing the new Precision Cooking Probe for use with your GE Café or Monogram
Induction Cooktop! This device works in conjunction with your induction cooktop to accurately control
the temperature within ±1 degree Fahrenheit. You can select any temperature within the range of
85°F to 200°F. This will enable you to perform such cooking operations as slow cooking, simmering
liquids, and even sous vide cooking. Precision cooking has been used by high-end restaurants and
steakhouses for decades to achieve precise internal temperatures and consistently cooked proteins
and vegetables. When done properly it essentially eliminates the possibility of overcooked foods and
locks in juices to guarantee a moist, tender creation every time.
The Precision Cooking Probe is designed to work on the largest
induction element. For 36” models, this is the center element. For 30”
models, this is the rightmost element. When selecting a stockpot,
choose one large enough to hold your food. We recommend using a
pot at least 4 inches tall with a minimum diameter of 7 inches.
If you have any questions, visit our Website at: monogram.com
Care and Cleaning
Glass Cooktop ...................................................... 19–20
Consumer Services
Before You Call for Service .....................................20
Important Phone Numbers ...................................... 7
Model and Serial Number ........................................ 2
Safety Instructions ................................................... 4–5
Warranty .......................................................................... 6
Operating Instructions
Cookware Recommendations .......................16–17
Features of Your Cooktop .....................................8-9
How Induction Cooking Works ..................................15
Kitchen Timer .........................................................12-13
Locking the Cooktop ..................................................12
Setting the Controls............................................10–14
Surface Elements ....................................................... 10
7” min.
4” min.
Before
using your
Read this manual carefully. It is intended to help
you operate and maintain your new precision
cooking probe properly.
precision
cooking
Keep it handy for answers to your questions.
probe
Write
down the
model
& serial
You’ll find them on a label under the cooktop.
Fill out and return the Consumer Product
Registration Card that is packed with this
product.
numbers
2
If you don’t understand something or need more
help, there is a list of toll-free on Consumer
Service page.
OR
Visit our Website at: monogram.com
Before sending in the card, please write the
numbers here:
Model Number
Serial Number
Use these numbers in any correspondence
or service calls concerning your precision
cooking probe.
Page 3

Consumer Information
Precision Cooking Probe
If you
received a
damaged
precision
cooking
probe
Save time
& money
If you
need
service
Immediately contact the dealer (or builder) that
sold you the precision cooking probe.
Read this manual. Inside you will find many helpful
hints on how to use and maintain your precision
cooking probe properly. Just a little preventive
care on your part can save you a great deal of
time and money over the life of your precision
cooking probe.
To obtain service, see the Consumer Services page.
We’re proud of our service and want you to be
pleased. If for some reason you are not happy
with the service you receive, here are some
steps to follow for further help.
FIRST, contact the people who serviced your
accessory. Explain why you are not pleased.
In most cases, this will solve the problem.
You’ll find many answers to common problems
in the Before You Call for Service section. If you
review our chart of Troubleshooting Tips first,
you may not need to call for service at all.
NEXT, if you are still not pleased, write all the
GHWDLOV³LQFOXGLQJ\RXUSKRQHQXPEHU³WR
Manager, Customer Relations
GE Appliances
Appliance Park
Louisville, KY 40225
3
Page 4

IMPORTANT SAFETY INSTRUCTIONS
WARNING!
Read all safety instructions before using the product. Failure to follow these instructions may result in fire, electrical
shock, serious injury or death.
• This device shall only be used for its intended
purpose as described in this Owner’s Manual.
• Consuming raw or undercooked meats, poultry,
seafood, shellfish, or eggs may increase your
risk of foodborne illness, especially if you have a
medical condition. Consult the guidelines for safe
minimum internal cooking temperatures provided by
the U.S. Department of Health & Human Services at
www.foodsafety.gov.
'RQRWOHDYHFKLOGUHQDORQH³FKLOGUHQVKRXOGQRW
be left alone or unattended in an area where the
appliance is in use. They should never be allowed to
climb, sit or stand on any part of the cooktop.
• Use of equipment or accessories not included with
this kit is prohibited and may compromise the
built in protections and safeguards.
RADIO FREQUENCY INTERFERENCE
This device complies with Industry Canada’s licenseexempt RSSs. Operation is subject to the following two
conditions: (1) This device may not cause interference;
and (2) This device must accept any interference,
including interference that may cause undesired
operation of the device.
This device complies with Part 15 of the FCC Rules.
Operation is subject to the following two conditions. (1)
This device may not cause harmful interference, and
(2) this device must accept any interference received,
including interference that may cause undesired
operation.
This product has been tested and found to comply
with the limits of a Class B digital device, pursuant to
Part 15 of the FCC Rules. These limits are designed
to provide reasonable protection against harmful
interference in a residential installation. This equipment
generates, uses, and can radiate radio frequency
energy and if not installed and used according to the
instructions, may cause harmful interference to radio
• Do not use a flammable liquid as a bath fluid; do
not use with any non-food products.
• Do not operate in Precision Cooking Mode without
bath fluid in the cooking vessel.
• Periodically check to ensure that the liquid depth
is within the acceptable range. Refill bath fluid if it is
nearing the probe tip.
• Do not touch hot surfaces. Use of an oven
mitt when handling probe and cooking vessel is
recommended.
• Do not allow cooking vessel or any cords to hang
over the edge of cooktop or counter.
®
• If the Precision Cooking Probe or Bluetooth
Module is damaged or malfunctioning, cease use
of the device.
communications. However, there is no guarantee that
interference will not occur in a particular installation.
If this equipment does cause harmful interference to
radio or television reception, which is found by turning
the equipment off and on, the user is encouraged to
try to correct the interference by one or more of the
following measures:
•
Reorient or relocate the receiving antenna.
•
Increase the separation between the equipment or
devices.
•
Connect the equipment into an outlet on a
circuit different from that to which the receiver is
connected.
•
Consult a dealer or experienced radio/TV technician
for assistance.
FCC CAUTION: Any changes or modifications not
expressly approved by the party responsible for
compliance could void the user’s authority to operate
the equipment.
4
READ AND SAVE THESE INSTRUCTIONS
Page 5

Page 6

Warranty
Precision Cooking Probe
YOUR MONOGRAM PRECISION COOKING PROBE WARRANTY
Staple sales slip or canceled check here. Proof of original
purchase date is needed to obtain service under warranty.
WHAT IS
COVERED
From the Date
of the Original
Purchase
6
LIMITED ONE-YEAR WARRANTY
Your use of the GE Precision Cooking Probe Accessory (“Hardware”), online product registration of the Hardware, or your
return of the enclosed Registration Card acknowledges that you have read and agree to the terms of this warranty
agreement. GE’s warranty obligations for this Hardware are limited to the terms set forth herein.
GE warrants that this Hardware shall be free of defects in materials and workmanship under normal use for a period of
one (1) year from the date of original retail purchase (“Warranty Period”). If a Hardware defect arises and a valid claim
is received within the Warranty Period, your sole and exclusive remedy will be for GE, in its sole discretion and to the
extent permitted by law, to (1) repair the Hardware defect at no charge, using new parts or refurbished parts that are
equivalent to new in performance and reliability, (2) exchange the Hardware with Hardware that is new or refurbished that
is equivalent to new in performance and reliability and is at least functionally equivalent to the original Hardware, or (3)
refund the purchase price of the Hardware. Any repaired or replacement Hardware will be warranted for the remainder
of the original warranty period or thirty (30) days, whichever is longer. In order to receive the remedy set forth above, you
must contact GE during the Warranty Period at 800-444-1845 in the US (800-561-3344 in Canada) and provide the model
number, serial number, and date of purchase of the Hardware. Upon GE’s determination that the Hardware should be
returned to GE, return the Hardware and include with each returned Hardware (i) a copy of your original purchase invoice
or receipt to verify your warranty; (ii) your name, address, and telephone number; and (iii) the Return Materials Authorization
(RMA) number. You are responsible for properly packaging and shipping the Hardware to GE at your cost and risk.
Please note that the above warranty obligations of GE do not include any in-home installation or service.
Important: Do not open the Hardware. Opening the Hardware may cause damage that is not covered by this warranty.
Only GE or a GE authorized service provider should perform service on this Hardware.
TO THE EXTENT PERMITTED BY LAW, THIS WARRANTY AND THE REMEDIES SET FORTH ABOVE ARE EXCLUSIVE AND IN LIEU
OF ALL OTHER WARRANTIES, REMEDIES AND CONDITIONS, WHETHER ORAL, WRITTEN, STATUTORY, EXPRESS OR IMPLIED, AS
PERMITTED BY APPLICABLE LAW, GE SPECIFICALLY DISCLAIMS ANY AND ALL STATUTORY OR IMPLIED WARRANTIES, INCLUDING,
WITHOUT LIMITATION, WARRANTIES OF MERCHANTABILITY AND FITNESS FOR A PARTICULAR PURPOSE AND WARRANTIES
AGAINST HIDDEN OR LATENT DEFECTS. IF GE CANNOT LAWFULLY DISCLAIM STATUTORY OR IMPLIED WARRANTIES THEN
TO THE EXTENT PERMITTED BY LAW, ALL SUCH WARRANTIES SHALL BE LIMITED IN DURATION TO THE DURATION OF THE
EXPRESS WARRANTY AND TO THE REPAIR OR REPLACEMENT SERVICE AS DETERMINED BY GE. No oral or written information or
advice given by GE or a GE-authorized representative shall modify or extend this warranty. If any term is held to be illegal or
unenforceable, the legality or enforceability of the remaining terms shall not be affected or impaired.
(;&/86,212),03/,(':$55$17,(6³7KLVZDUUDQW\DSSOLHVRQO\WRWKH+DUGZDUHPDQXIDFWXUHGE\RUIRU*(WKDWFDQEH
identified by the “GE” trademark, trade name, or logo affixed to it. This warranty does not apply to any non-GE Hardware
or any software, even if packaged or sold with the GE Hardware. Software distributed by GE with or without the GE brand
name (including, but not limited to system software) is not covered under this warranty. Refer to the End User Licensing
Agreement accompanying the software for details of your rights with respect to its use.
GE does not warrant that the operation of the Hardware will be uninterrupted or error-free. GE is not responsible for
damage arising from failure to follow instructions relating to the Hardware’s use.
This warranty does not apply: (a) to consumable parts, such as batteries, or protective coatings designed to diminish over
time unless failure has occurred due to a defect in materials or workmanship; (b) to cosmetic damage; (c) to damage
caused by use with non-GE products; (d) to damage caused by accident, abuse, misuse, liquid contact, fire, earthquake or
other external causes; (e) to damage caused by operating the Hardware outside the permitted or intended uses described
by GE; (f) to damage caused by service (including upgrades and expansions) not performed by GE, a GE-authorized service
provider, or an authorized representative of GE; (g) to a Hardware or a part that has been modified to alter functionality
or capability without the written permission of GE; (h) to defects caused by normal wear and tear or otherwise due to the
normal aging of the Hardware; (i) if any GE serial number has been removed or defaced; or (j) to damage caused by or via
the network on which the Hardware is used including, but not limited to, any online intrusion or attack.
EXCEPT AS PROVIDED IN THIS WARRANTY AND TO THE MAXIMUM EXTENT PERMITTED BY LAW, GE IS NOT RESPONSIBLE
FOR DIRECT, SPECIAL, INCIDENTAL OR CONSEQUENTIAL DAMAGES RESULTING FROM ANY BREACH OF WARRANTY OR
CONDITION, OR UNDER ANY OTHER LEGAL THEORY, INCLUDING BUT NOT LIMITED TO LOSS OF USE; LOSS OF REVENUE OR
ACTUAL OR ANTICIPATED PROFITS OR SAVINGS; LOSS OF, DAMAGE TO, COMPROMISE OR CORRUPTION OF DATA; OR ANY
INDIRECT OR CONSEQUENTIAL LOSS OR DAMAGE HOWSOEVER CAUSED INCLUDING THE REPLACEMENT OF EQUIPMENT AND
PROPERTY AND ANY COSTS OF RECOVERING, PROGRAMMING OR REPRODUCING ANY PROGRAM OR DATA STORED IN OR
USED WITH THE GE PRODUCT. THE FOREGOING LIMITATION SHALL NOT APPLY TO DEATH OR PERSONAL INJURY CLAIMS, OR
ANY STATUTORY LIABILITY FOR INTENTIONAL AND GROSS NEGLIGENT ACTS AND/OR OMISSION.
Warrantor in USA: General Electric Company, Louisville, KY 40225
Warrantor in Canada: Mabe Canada Inc.
Page 7

Jay and Peter,
Do you want this page?
GE Answer Center
In the USA:
800.626.2000
®
Consumer Services
Precision Cooking Probe
With the purchase of your new Monogram appliance, receive
the assurance that if you ever need information or assistance
IURP*(ZH·OOEHWKHUH$OO\RXKDYHWRGRLVFDOO³WROO IUHH
Whatever your question about any Monogram major appliance, GE Answer Center® information service
LVDYDLODEOHWRKHOS<RXUFDOO³DQG\RXUTXHVWLRQ³ZLOOEHDQVZHUHGSURPSWO\DQGFRXUWHRXVO\$QG\RX
can call any time. GE Answer Center® service is open 24 hours a day, Monday through Saturday.
OR
Visit our Website at: monogram.com
In Canada, call 800.561.3344.
,Q+RPH
Repair Service
In the USA:
800.444.1845
In Canada:
800.561.3344
For Customers With
Special Needs…
In the USA:
800.626.2000
Service Contracts
In the USA:
800.626.2224
In Canada:
800.561.3344
A GE consumer service professional will provide expert repair service, scheduled at a time that’s
convenient for you. Many GE Consumer Service company- operated locations offer you service
today or tomorrow, or at your con venience (7:00 a.m. to 10:00 p.m. week days, 8:00 a.m. to 6:00
SP6DWXUGD\DQG6XQGD\2XUIDFWRU\WUDLQHGWHFKQLFLDQVNQRZ\RXUDSSOLDQFHLQVLGHDQGRXW³
so most repairs can be handled in just one visit.
In Canada: Monday to Friday, 7:00 a.m. to 8:00 p.m. and Saturday, 8:00 a.m. to 5:00 p.m. EDST.
GE offers, free of charge, a brochure to assist in planning a barrier-free
kitchen for persons with limited mobility.
Consumers with impaired hearing or speech who have access to a
TDD or a conventional teletypewriter may call 800.TDD.GEAC
(800.833.4322) to request information or service.
You can have the secure feeling that GE Consumer Service will still be there after your
warranty expires. Purchase a GE contract while your warranty is still in effect and you’ll
receive a substantial discount. With a multiple -year contract, you’re assured of future
service at today’s prices.
Parts and
Accessories
In the USA:
800.626.2002
In Canada:
800.561.3344
Individuals qualified to service their own appliances can have parts or accessories sent directly
to their home. The GE parts system provides access to over 47,000 parts…and all GE Genuine
Renewal Parts are fully warranted. VISA, MasterCard and Discover cards are accepted.
User maintenance instructions contained in this manual cover procedures intended to be
performed by any user. Other servicing generally should be referred to qualified service
personnel. Caution must be exercised, since improper servicing may cause unsafe operation.
7
Page 8

Kit Contents
Using Your Cooktop
Precision Cooking Probe
Bluetooth® Indicator
USB Micro Port
(for charging)
Ethernet Cable
Low Battery
Indicator
Precision Cooking Probe
Bluetooth® Module
Probe
Power Button
Button
Status Indicator
I need a
better picture
8
3 foot USB Micro Cable
Owner’s Manual
Precision Cooking Probe
JXSOUSV1
For Use With 30” and 36” Induction Cooktop Models:
ZHU30RSJSS
ZHU36RSJSS
ZHU30RDJBB
ZHU36RDJBB
CHP9530SJSS
CHP9536SJSS
49-80776
06-15 GE
monogram.com
Printed in the United States
Owner’s Manual
Page 9

Using Your Cooktop
Precision Cooking Probe
Initial Setup
1. Charge the Precision Cooking Probe using the
provided Micro USB cable and a computer or
USB charger (not included).
2. Locate the input connector jack on the bottom
side of the cooktop. It can be found in the front
left corner.
3. Connect the Bluetooth® Module. Stick the
module to the bottom of the cooktop. It
contains magnets which will allow it to adhere
to the bottom of the cooktop.
4. Power on the Precision Cooking Probe by
pressing and holding the Power button for 3
seconds. The Bluetooth® Indicator will turn on
and flash 3 times.
5. Wait 5-10 seconds while the devices join. Once
the joining process is complete the Bluetooth®
Module indicator shall turn on solid and the
Precision Cooking Probe Indicator shall flash
once every 5 seconds.
6. CONGRATULATIONS! Setup is complete.
Side View of Cooktop
Ethernet Cable Connector
on the Bluetooth
Input Connector Jack Located
on Bottom Side of Cooktop
®
Module
9
Page 10

Using Your Cooktop
Precision Cooking Probe
Precision
Cooking
Mode
Operation
1. Add liquid.
Select stockpot and add liquid. If cooking sous
vide, fill the pot with water to create a water
bath. Place stockpot on largest induction burner.
2. Add the Precision Cooking Probe.
Attach the Precision Cooking Probe to the side
of the stockpot, preferably towards the top.
Position the Precision Cooking Probe such that
at least half of the probe tip is submerged in
the liquid.
3. Power on the Precision Cooking Probe.
Press and hold the Power button for 3
seconds. The Bluetooth® Indicator will flash
3 times. The Precision Cooking Probe will
automatically connect to the cooktop and the
Bluetooth® Indicator will begin to flash once
every 5 seconds.
4. Power on the Cooktop.
Touch and hold the cooktop On/Off pad for 3
seconds. A multi tone sound will be played.
Touch anywhere along the gray arc, the +,or
the - pad to enter Precision Cooking Mode.
Precision
Cooking Probe
Probe Tip
Submerged
in the Liquid
Liquid
10
Page 11
Using Your Cooktop
Precision Cooking Probe
Precision
Cooking
Mode
Operation
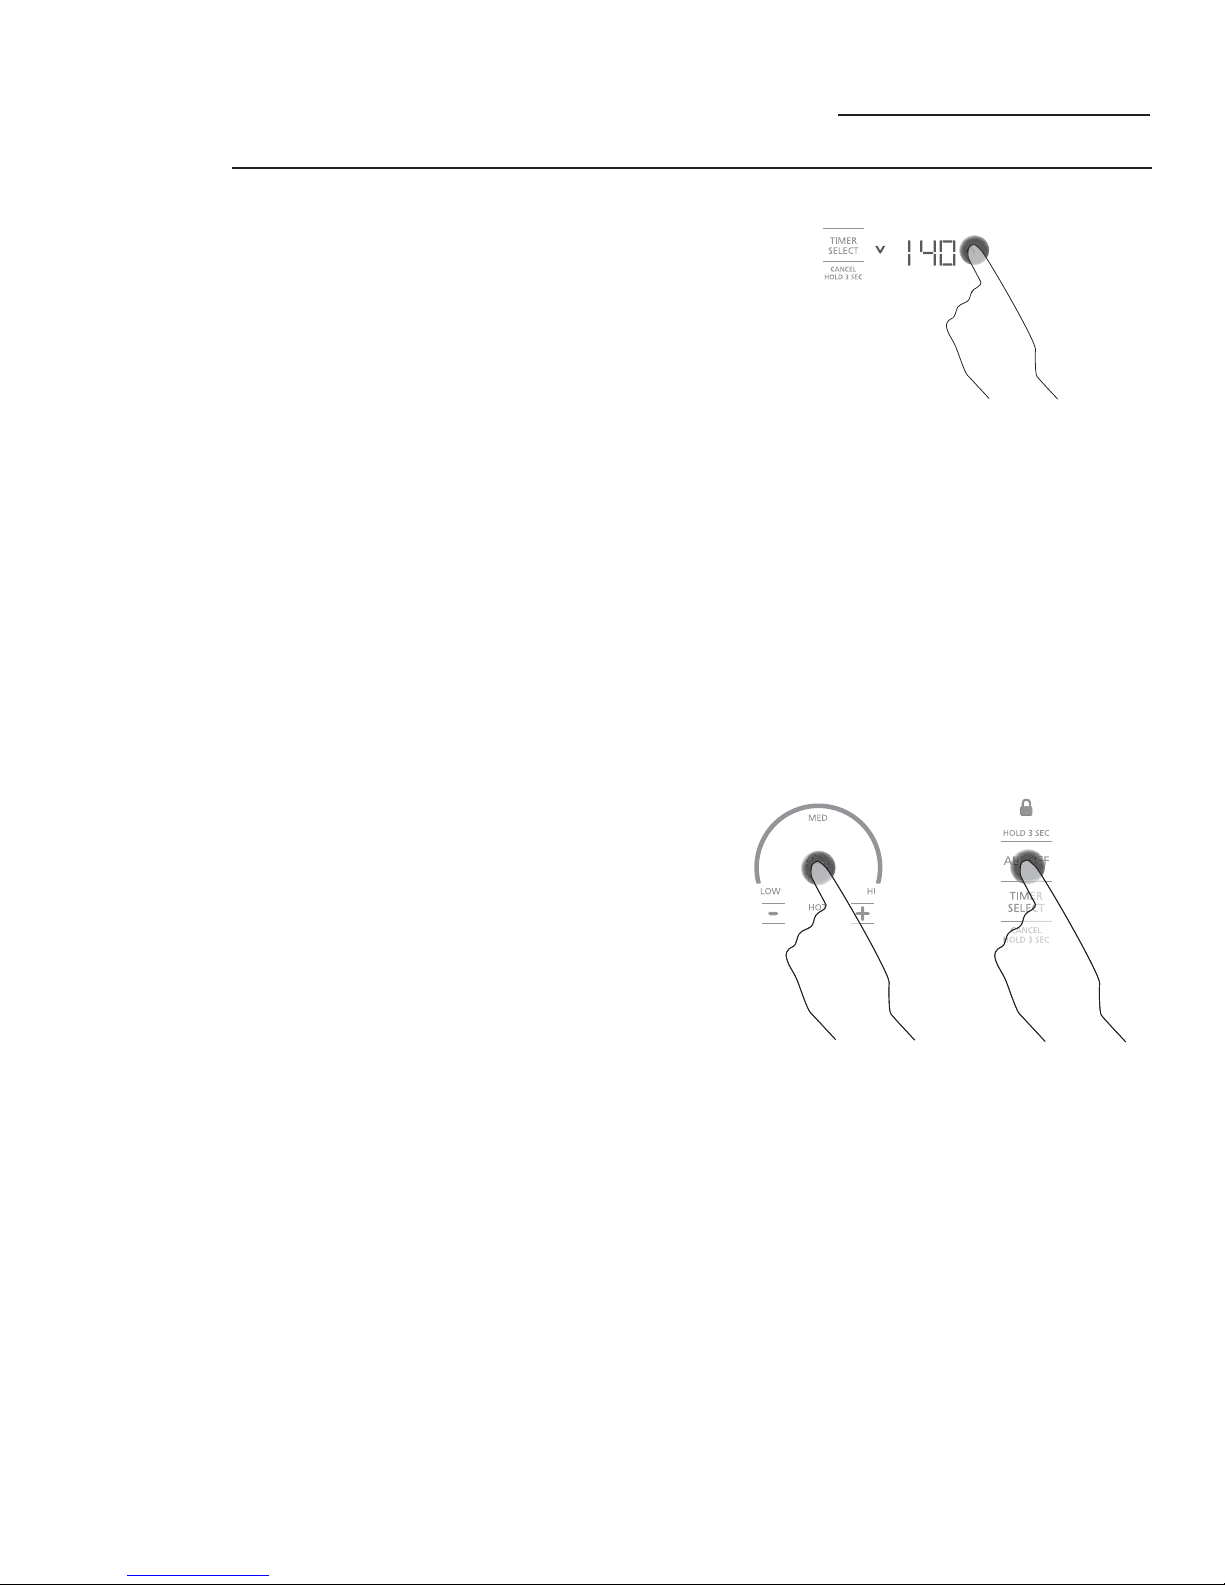
5. Set the desired cook temperature
(85°F to 200°F).
The cook temperature is displayed on the
Kitchen Timer display. Touch the
arrow pads to select the desired cooking
temperature. The Precision Cooking Mode will
begin automatically.
NOTE: The Kitchen Timer will be disabled while
running in Precision Cooking Mode.
6. Wait for the liquid to heat up.
The cooktop will begin to heat the liquid to
the desired temperature. Once preheat is
complete, it will play a multi tone sound.
7. Add your food (sous vide cooking).
If cooking sous vide, seal your food in FDA
approved food-grade plastic vacuum sealable
pouches. Add pouches to the water bath.
Optional: We recommend covering the stock
pot with aluminum foil to help retain heat
and water. Use caution when removing the
aluminum foil as hot steam and water may
be released.
7. Turn off the system.
Once the desired cook time is reached, touch
the On/Off pad on the cooktop to turn off the
element and exit Precision Cooking Mode. Also
turn off the Precision Cooking Probe by pressing
and holding the Power button for 3 seconds.
The Bluetooth® Indicator will flash 3 times.
or V
11
Page 12

Care and Cleaning
Precision Cooking Probe
Care and
Cleaning
First unplug and power off the Precision Cooking Probe, then wipe the probe surface with a clean,
damp cloth as needed. A mild detergent may be used on the metal probe tip. DO NOT submerse or
hold under running water.
IMPORTANT:
• Allow Precision Cooking Probe to cool before cleaning.
• Unplug and power down devices before cleaning. Do not use liquid cleaners or aerosol cleaners. Use
a damp cloth for cleaning. A mild detergent may be used on the metal probe tip only.
• Always clean and dry the Precision Cooking Probe before storing.
• Do not submerge the included devices in liquids.
• Do not use chlorine bleach to clean any of the contents of this kit.
• Do not use cleaning pads or hard utensils to clean the Precision Cooking Probe.
• No user-serviceable parts are located inside of the devices. Do not disassemble.
• Precision Cooking Probe is NOT dishwasher safe.
ATTENTION: This kit contains printed circuit boards and a lithium-ion battery which must be disposed
of properly through an appropriate e-waste recycling program. DO NOT dispose of these electronics as
unsorted municipal waste bound for a landfill. Contact your local authorities to learn about available
recycling programs.
12
Page 13

Notes
Precision Cooking Probe
13
Page 14

Notes
Precision Cooking Probe
14
Page 15

Notes
Precision Cooking Probe
15
Page 16

Before You Call For Service
Precision Cooking Probe
Questions?
Before you
call for
service…
Problem Possible Cause What To Do
Probe doesn’t turn on Probe not charged Charge probe using the included USB cable.
Not pressing probe power button
for 3 seconds
Cooktop does not enter
Precision Cooking Mode
Burner enters Precision
Cooking Mode but does
not heat
&RRNWRSWXUQVRȹZKLOH
cooking
Temperature unstable Cooking vessel uncovered Covering the cooking vessel with aluminum foil
Using wrong burner Only attempt to operate in Precision Cooking
Not touching large burner power
icon for 3 seconds
®
Bluetooth
into cooktop
Probe and Bluetooth
paired
User not completing two-step on After entering Precision Cooking Mode, touch the
Water level dropped too low Cover the cooking vessel with aluminum foil to
Loss of communication between
Probe and Bluetooth
Module not plugged
®
Module not
®
Module
Press and hold the probe’s power button for 3
seconds to turn on.
Mode using the largest burner.
Touch the power icon of the largest burner for 3
to 5 seconds to enter Precision Cooking Mode.
Verify that Bluetooth® Module is plugged into
bottom of cooktop.
Turn probe on, plug in Bluetooth® Module, and
press button on Bluetooth® Module.
plus (+) icon corresponding to the largest burner,
then set temperature using arrows on either side
of display.
slow evaporation or add water periodically to
keep probe tip submersed.
Ensure that probe is charged.
will help to keep the temperature of the water
bath uniform and stable.
Precision
Cooking
Probe LED
Behavior
Bluetooth
®
Module LED
Behavior
Device Status LED Behavior
Button pressed Bluetooth® Indicator blinks rapidly
®
Connecting Bluetooth
Connected and operating Bluetooth
2Ⱥ /('VRȺ
Low battery Low battery indicator blinks at 5 second intervals
Device Status LED Behavior
Connecting Status Indicator blinks at 1 second intervals
Connecting to phone TBD
Connecting to probe and phone TBD
Connected Status Indicator On
Disconnected 6WDWXV,QGLFDWRU2Ⱥ
Indicator blinks at 1 second intervals
®
Indicator blinks at 5 second intervals
16
 Loading...