

Page 1
Your Monogram
Electronic DoubleOven
Page 2
Help us helpyou...
Before using your oven,
read this book carefully.
It is intended to help you operate
and maintain your new oven
properly.
Keep it handy for answers to your
questions.
If you don’t understand something
or need more help, write (include
your phone number):
Consumer Affairs
GE Appliances
Appliance Park
Louisville, KY 40225
Write down the model
and serial numbers.
You’ll find them on a label on the
front of the oven behind the upper
oven door.
These numbers are also on the
Consumer Product Ownership
Registration Card that came with
your oven. Before sending in this
card, please write these numbers
here:
Model Number
Serial Number
Use these numbers in any
correspondence or service calls
concerning your oven.
GE Answer Center@
800.626.2000
If you received
a damaged oven...
Immediately contact the dealer (or
builder) that sold you the oven.
Save time and money.
Before you request
service...
Check the Problem Solver on
pages 25 and 26. It lists causes of
minor operating problems that you
can correct yourself.
If you need service...
To obtain service, see the
Consumer Services page in the
back of this book.
We’re proud of our service and
want you to be pleased. If for some
reason you are not happy with the
service you receive, here are three
steps to follow for ftu-ther help.
FIRST, contact the people who
serviced your appliance. Explain
why you are not pleased. In most
cases, this will solve the problem.
NEXT, if you are still not pleased,
write all the details-including
your phone number—to:
Manager, Consumer Relations
GE Appliances
Appliance Park
Louisville, Kentucky 40225
FINALLY, if your problem is still
not resolved, write:
Major Appliance
Consumer Action Panel
20 North Wacker Drive
Chicago, Illinois 60606
Page 3
IMPORTMT SAFETY INSTRUCTIONS
Rmd allinstructions before using thisappliance.
IMPomm
Q~~not]eav~childrenalo~~—
sDOmot
tiuch heatingelements
SAFETY NOTICE
Childrenshouldnotbeleftalone
or interior surfaceof oven.
TheCalifornias~f~ Dfinkino
m unattendedinanareawhere
Thesesurfacesmaybehot
WaterandTOX
Actrequirestl
Califcm;ntfiI
Substa
- ---- - . ... . ..
~icEnforcerne~t
apphance1smuse.‘l’heyshould
enoughto bum eventhough they I
heGovernorof
neverbeallowedtositor standon
aredarkincolor.Duringand
.....-.~ publisha listof
anypartoftheappliance.
afkr use,donottouch,or let
mcesknowntothestate
@
Don’tallowanyoneto cIimb,
clothing orotherflammable
I
tocausecancer,birthdefectsor
standor hang on the door.They
materialscontact a] “ “
areaoftheoven;
all
otherreproductiveharm,and
could damage the oven.
timeforcooling,fiI
requiresbusinessestowarn
● CAUTION:ITEMS OF
customersofpotentialexposure
INTERESTTOCHILDREN
Potentiallyhotsurfacesinclude
I
tosuchsubstances.
SHOULDNOTBE STORED
the
ovenventopeni -
Thefiberglassinsulationinself-
INCABINETSABOW
surfkes neartheq
cleanovensgivesoffa verysmall
AN OVEN. CHILDREN
crevices amyndtheovendoorand I
amount ofcarbonmonoxide
thed,
*
CLIMBINGONTHE OWN
. .
duringthe cleaningcycle.
TO
REACHITEMSCC)ULD
Remember:
Theinsidesurface I
Exposurecanbeminimizedby
BE SERIOUSLYINJURED.
oftheovenmaybehotwhenthe
ventingwithanopenwindowor
Q
Neverwearloose-fitting or
dooris opened.
usingaventilationfanor hood.
hanginggarments while using
oWhencooking park,
fol]ow
Whenusingelectricalappliances,
the appliance. Flammable
thedirectionsexactlyandalways
I
basicsaf&&precautions”~hould
.
,
itwillbe
■
followed,kluding thefollowing:
broughtincontactwithhot
temperatureofat Ieast17Wl?.This
heating elementsandmaycause
assuresthat,inthe remote
L
● Usethisappliance only for its
severebums.
intendeduse asdescribedinthis
possibilitythattrichinamaybe
I
manual.
o
Useonly dry pot holders—
presentinthemeat,~ ----
Moistordamppotholdersonhot
killedandthemeatWIHDesa~eto
a
Ra mmn vmm ca~plian~e is
surfacesmayresultinbumsfrom
eat.
.4
andgrounded
technicianin
steam.Donotletpotholders
touchhotheatingelements.Do
Oven
U-w withtheprovided
14+fim
Trkdmu+inna
notusea towelorotherbulky
● Wandawavfrom fi=mwh~m
I
#d buildup and tie container {
——
aye w%?abpwA
*Neveruse your appliancefor
or steam which escapes can
‘=’-U4 *@=*fi*tr
ly
warmingor heatingthe room.
burn hinds, face andhx eyes.
recommendedin-thisbook.
All
● Storagein or on appliance—
*Dan’theat unopened f~d
otherservicingshouldbereferred
Donotstoreflammablematerials
containersin the oven.Pressure
toa qualifiedtechnician.
intheoven.
mu”-- ““-
(XiUma UKMWY umMIEg BIl ~JWJ%
.
Beforeperforminganyservice,
Q
Keep hoodand grease fi]ters
DISCONNECTTHE OWN
clean
tomaintaingoodventing
*
K&p oven vent ducts
POWERSUPPLYATTHE
andtoavoidgreasefires.
unobstructed.
HOUSEHOLDIMSTRIBUTK)N
s Do not let cooking grease
*Keep
mm free from grease
P~L BYREMOVINGTHE
orother flammable materials
buildup.
FUSEORSWITCHINGOFF
THE CIRCUITBREAKER.
accumulatein or nearthe oven.
* Place oven shelf in desired ~
*
DO not use wateron grease
pm- “ - ““
fires. Flame in ovencanbe
shelvesmustbehandledwhen
smotheredby(wmpl?tely
hot, donotlet potholder contact
closing door andtouching
heatingunitsintheoven.
CLEAM)FF pad,
I ,
,.-
;ition
while oven is cod. If
1
Page 4
Energy-SavingTips
● Preheat the oven only when
necessary. Most foods will cook
satisfactorily without preheating.
If you find preheating is necessary,
keep an eye on the indicator light,
and put food in the oven promptly
after the light goes out.
● Always turn oven off before
removing food.
● During baking, avoid frequent
door openings. Keep door open as
short a time as possible if it is
opened.
● Be sure to wipe up excess spillage
before self-cleaning operation.
● Cook complete oven meals instead
of just one food item. Potatoes,
other vegetables and some desserts
will cook together with a main-dish
casserole, meat loaf, chicken or
roast. Choose foods that cook at
the same temperature and in
approximately the same time.
● Use residual heat in oven
whenever possible to finish
cooking casseroles, oven meals,
etc. Also add rolls or precooked
desserts to warm oven, using
residual heat to warm them.
Page 5
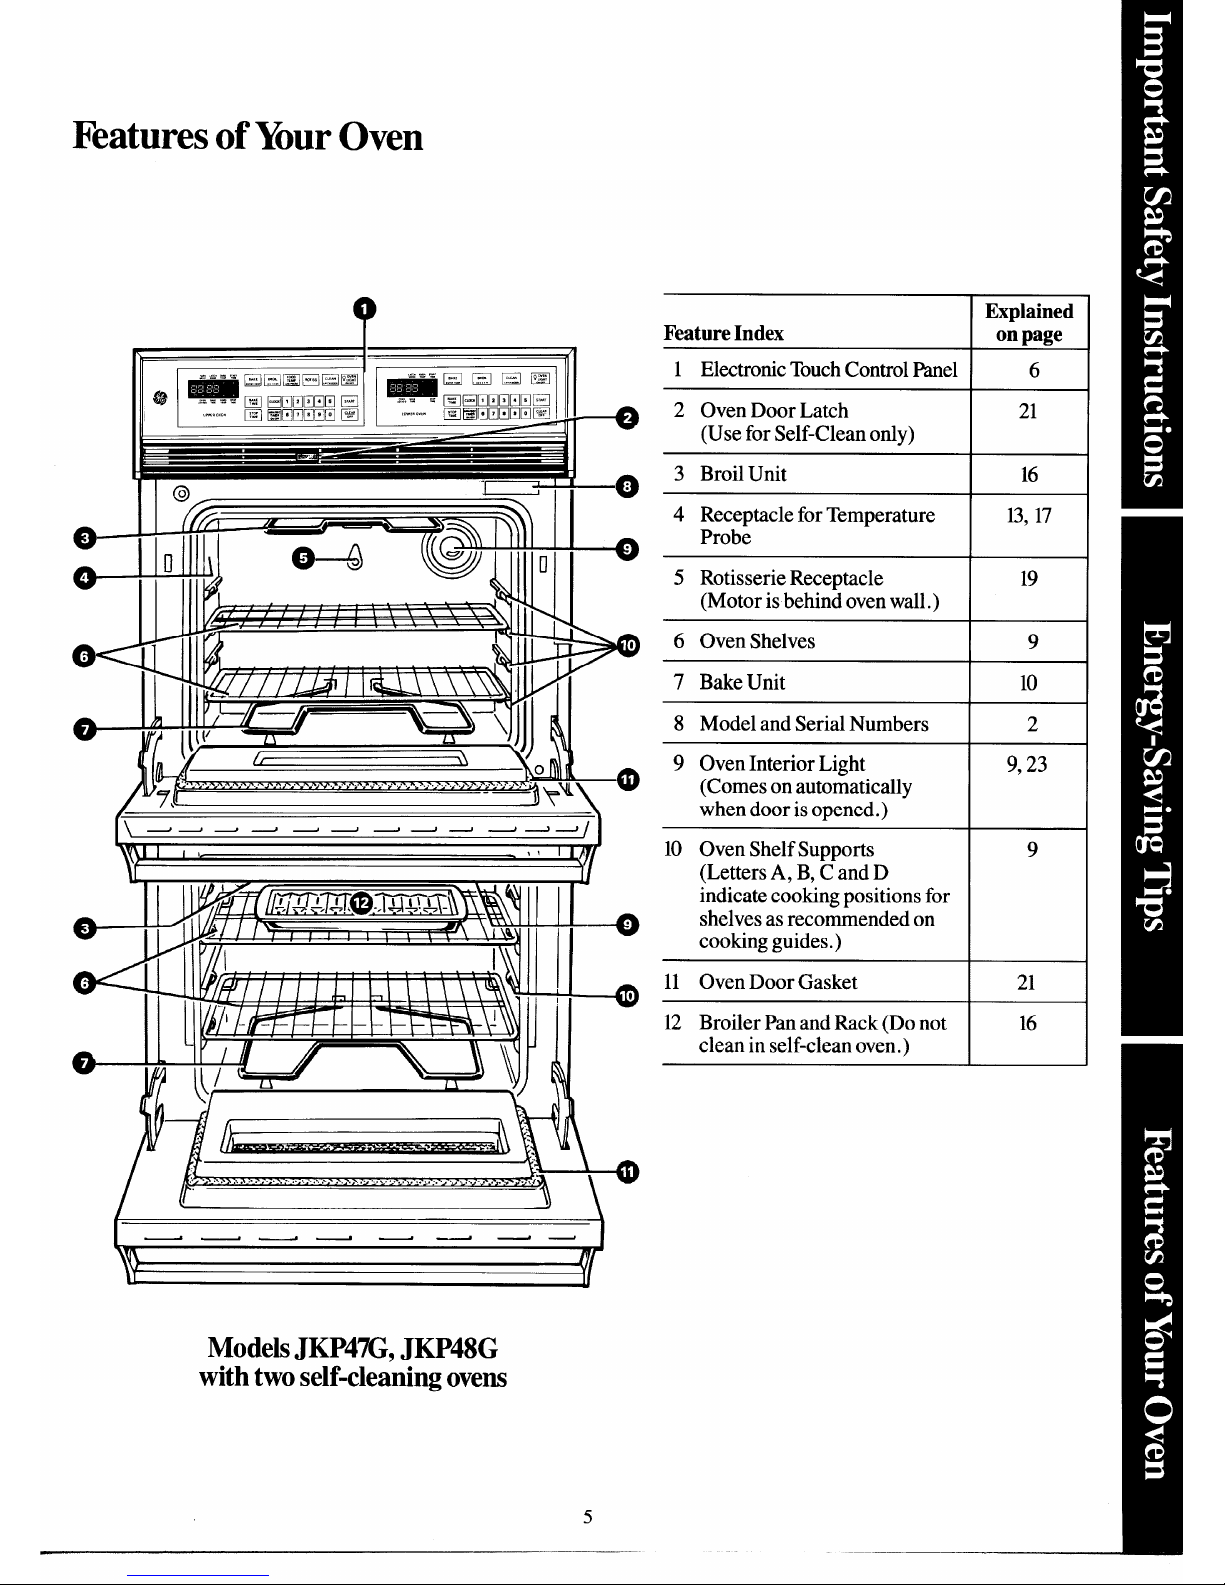
Featuresof YourOven
Explained
on page
6
Feature Index
1 Electronic Touch Control Panel
2 Oven Door Latch
(Use for Self-Clean only)
21
3 Broil Unit
16
II
–r.
\
11
4 Receptacle for Temperature
Probe
5 Rotisserie Receptacle
(Motor is behind oven wall.)
6 Oven Shelves
13, 17
19
9
7 Bake Unit
10
8 Model and Serial Numbers
9 Oven Interior Light
(Comes on automatically
when door is opened.)
10 Oven Shelf Supports
(Letters A, B, C and D
indicate cooking positions for
shelves as recommended on
cooking guides. )
11 Oven Door Gasket
2
9,23
/ ‘“ “ \
h
-——— —— — --
—~d
/1
9
21
12 Broiler Pan and Rack (Do not
clean in self-clean oven. )
16
Ilv -i’’””’”I /n\’ “\\”\’w II
W ill N
/ +- “-------=------;J
.........>..-..................................................
++)
1———4— ——— 1
Models JKP47G, JKP48G
with two self-cleaning ovens
5
Page 6
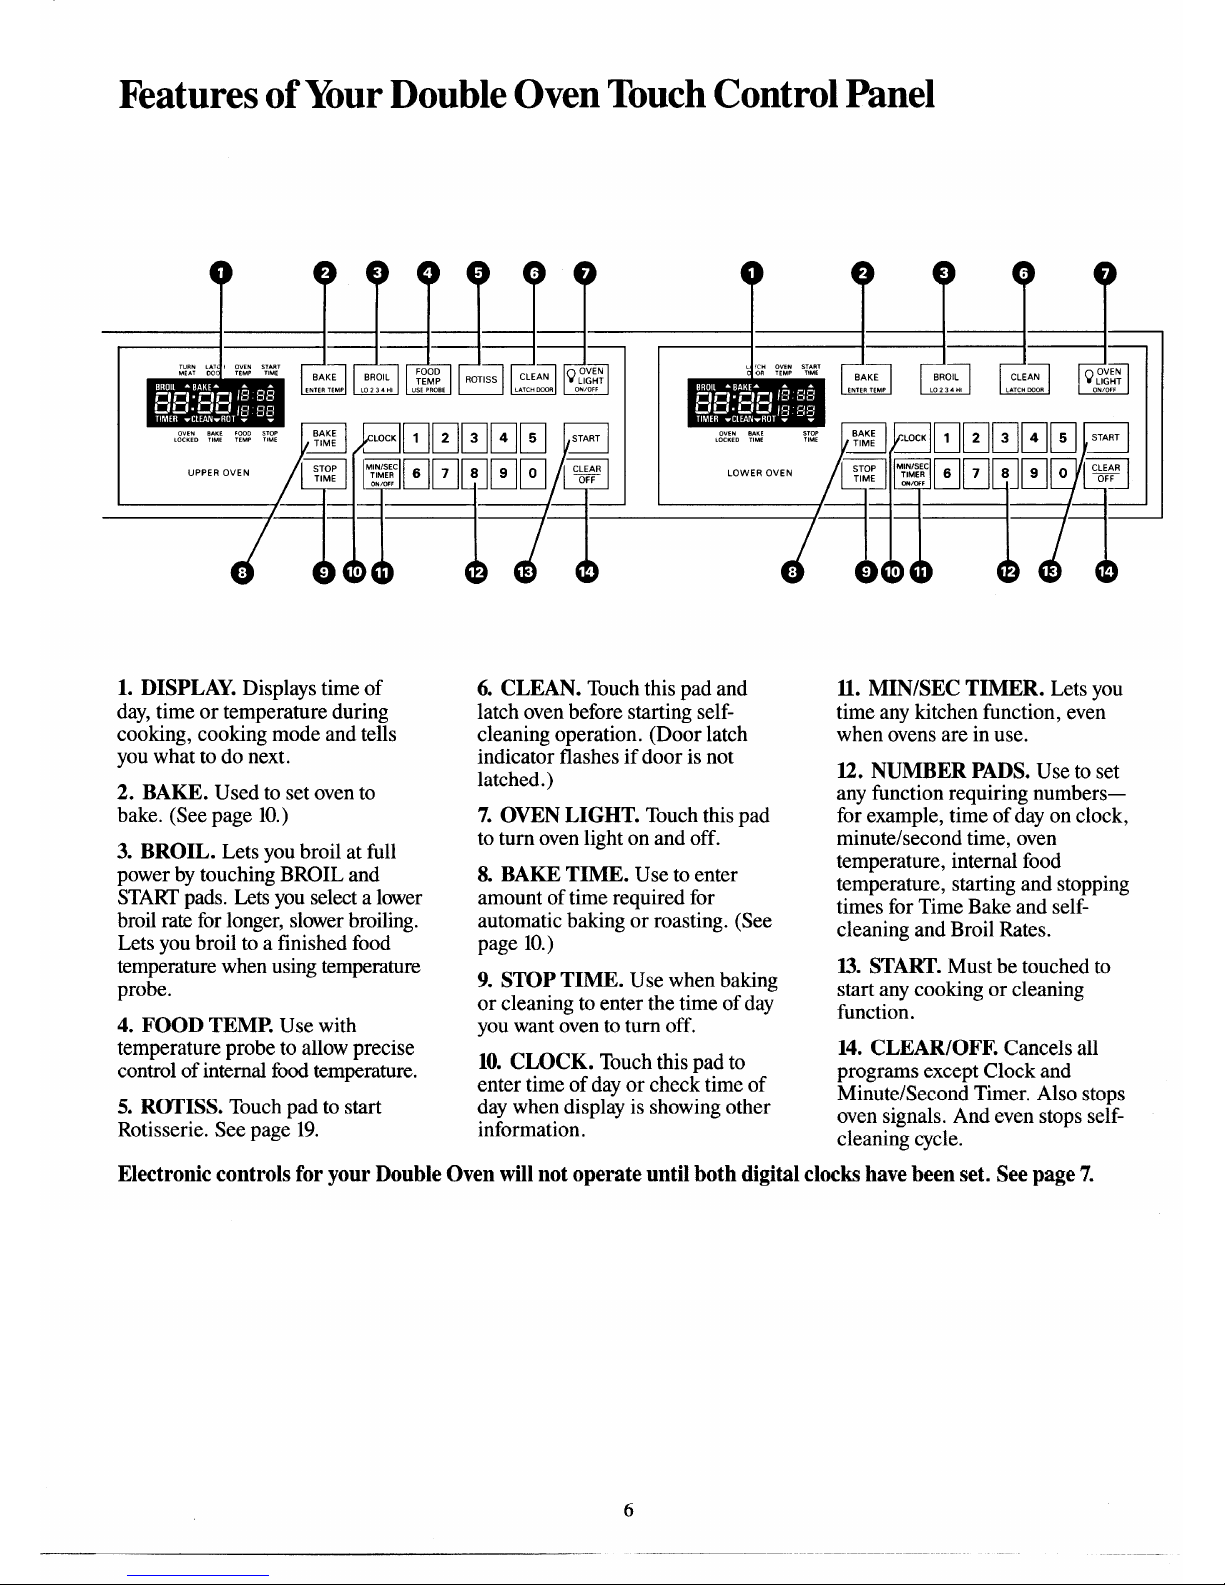
Features of YourDouble Oven TouchControl Panel
1. DISPLAY. Displays time of
day, time or temperature during
cooking, cooking mode and tells
you what to do next.
2. BAKE. Used to set oven to
bake. (See page 10.)
3. BROIL. Lets you broil at full
power by touching BROIL and
START pads. Lets you select a lower
broil rate for longer, slower broiling.
Lets you broil to a finished food
temperature when using temperature
probe.
4. FOOD TEMP. Use with
temperature probe to allow precise
control of internal food temperature.
5. RUHSS. Touch pad to start
Rotisserie. See page 19.
6. CLEAN. Touch this pad and
latch oven before starting selfcleaning operation. (Door latch
indicator flashes if door is not
latched.)
7. OVEN LIGHT. Touch this pad
to turn oven light on and off.
& BAKE TIME. Use to enter
amount of time required for
automatic baking or roasting. (See
page 10.)
9. STOP TIME. Use when baking
or cleaning to enter the time of day
you want oven to turn off.
10. CLOCK. Touch this pad to
enter time of day or check time of
day when display is showing other
information.
L/i
,
U. MIN/SEC TIMER. Lets you
time any kitchen function, even
when ovens are in use.
12. NUMBER PADS. Use to set
any function requiring numbers—
for example, time of day on clock,
minute/second time, oven
temperature, internal food
temperature, starting and stopping
times for Time Bake and selfcleaning and Broil Rates.
13. START. Must be touched to
start any cooking or cleaning
function.
14. CLEAR/OFF. Cancels all
programs except Clock and
Minute/Second Timer. Also stops
oven signals. And even stops selfcleaning cycle.
Electronic controls for your Double Oven will not operate until both digital clocks have been set. See page 7.
6
Page 7
Digital Clock and Minute Timer
The Electronic Digital Clocks on
your oven are accurate, solid-state
devices that serve several purposes.
As clocks, they display the time of
day on the display panel. When
functioning as a minute timer, they
count down the time you set to
“0:00” and signal when they reach
the end of the time.
NOTE: Clock must be set on each
oven before electronic controls
will work in the oven.
To Set the Clock
When you first plug in your
range, or after a power failure of
any kind, the digital displays show
“88: 88” for about 15seconds, then
automatically change to “PF” (for
Power Failure). Your Electronic
Digital Clocks are now ready to
be set.
1
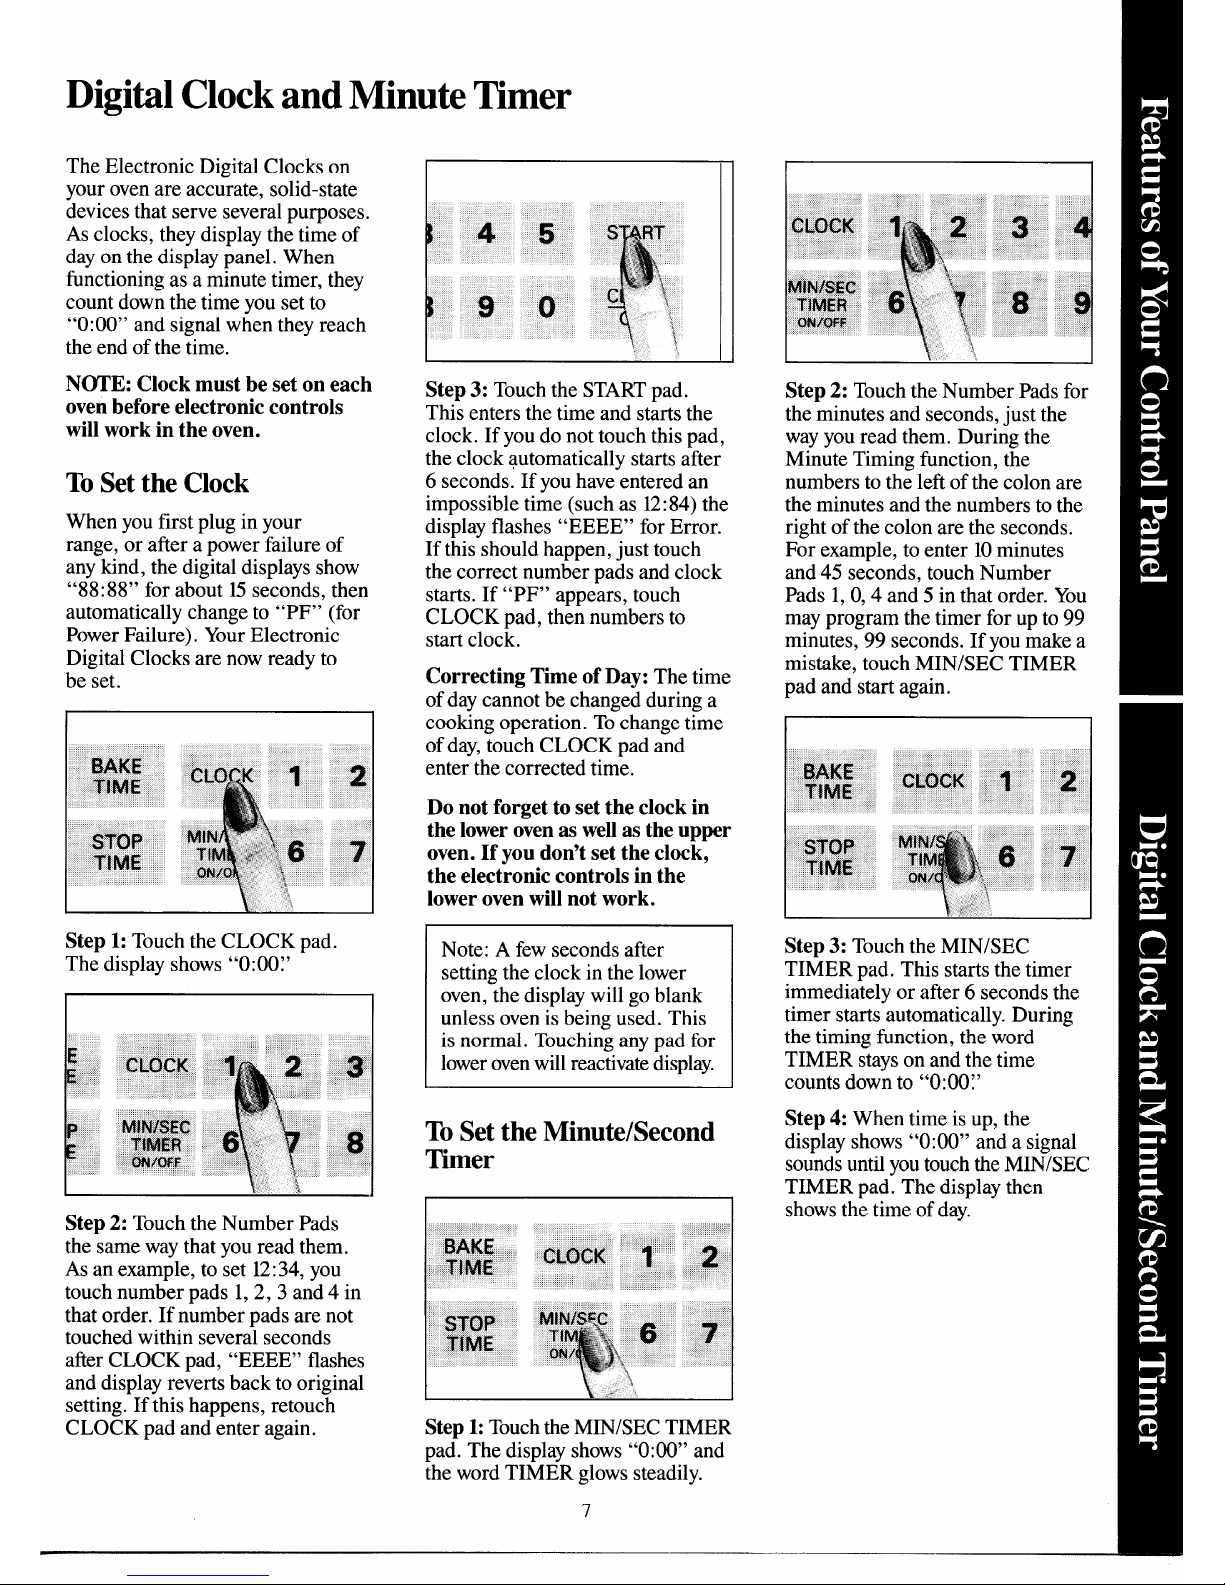
Step 1: Touch the CLOCK pad.
The display shows “0:00~’
s
Step 2: Touch the Number Pads
the same way that you read them.
As an example, to set 12:34, you
touch number pads 1,2, 3 and 4 in
that order. If number pads are not
touched within several seconds
after CLOCK pad, “EEEE” flashes
and display reverts back to original
setting. If this happens, retouch
CLOCK pad and enter again.
Step 3: Touch the START pad.
This enters the time and starts the
clock. If you do not touch this pad,
the clock automatically starts after
6 seconds. If you have entered an
impossible time (such as 12:84) the
display flashes “EEEE” for Error.
If this should happen, just touch
the correct number pads and clock
starts. If “PF” appears, touch
CLOCK pad, then numbers to
Sti3rt clock.
Correcting Time of Day: The time
of day cannot be changed during a
cooking operation. To change time
of day, touch CLOCK pad and
enter the corrected time.
Do not forget to set the clock in
the lower oven as well as the upper
oven. If you don’t set the clock;
the electronic controls in the
lower oven will not work.
Note: A few seconds after
setting the clock in the lower
oven, the display will go blank
unless oven is being used. This
is normal. Touching any pad for
lower oven will reactivate display.
To
Set the Minute/Second
Timer
Step 1: Touch the MIN/SEC TIMER
pad. The display shows “0:00” and
the word TIMER glows steadily.
7
Step 2: Touch the Number Pads for
the minutes and seconds, just the
way you read them. During the
Minute Timing function, the
numbers to the left of the colon are
the minutes and the numbers to the
right of the colon are the seconds.
For example, to enter 10minutes
and 45 seconds, touch Number
Pads 1, 0,4 and 5 in that order. You
may program the timer for up to 99
minutes, 99 seconds. If you make a
mistake, touch MIN/SEC TIMER
pad and start again.
Step 3: Touch the MIN/SEC
TIMER pad, This starts the timer
immediately or after 6 seconds the
timer starts automatically. During
the timing function, the word
TIMER stays on and the time
counts down to “O:OOV
Step 4: When time is up, the
display shows “0:00” and a signal
sounds until you touch the MIN/SEC
TIMER pad. The display then
shows the time of day.
Page 8
Questions and Answers
Q. Can I check the time of
day while the display is showing
Minute/Second Time?
A. Yes, simply touch CLOCK pad
and the display shows time of day
until you remove your finger, then
the display reverts back to
Minute/Second Time.
Q. When I came home the other
day, the display showed “PF”
instead of the time of day. What
happened?
A. Your home had a power failure
while you were gone. There is
nothing wrong with the clock on
your oven. Just reset the proper
time as described on page 7 and
then the oven controls can be used.
Q. Can I use the Minute/Second
Timer during oven cooking?
A. The MIN/SEC Timer can be
used during any cooking function.
(You can check–but not change–
the time of day by merely touching
the CLOCK pad.)
Q. How can I use my Minute
Timer to make my surface
cooking easier?
A. Your Minute Timer will help
time total cooking which includes
time to boil food and change
temperatures. Do not judge cooking
time by visible steam only. Food
will cook in covered containers
even though you can’t see any steam.
Q. If I start to change the time
of day and touch the CLOCK
pad, then discover that the time
shown is right, do I have to reset
the clock?
A. No. The original time of day
will reappear about 15 seconds
after “EEEE” flashes.
Q. Can I change the clock while
I’m cooking in the oven?
A. No. The clock cannot be
changed during any program that
uses the oven timer or the display.
You must either stop those programs
or wait until they are finished
before changing time.
Page 9
Using YourDouble Oven
Your double oven is designed
to give best results in baking,
roasting and broiling when used
as recommended.
Before using your double oven,
look at the directions in this book
for setting the electronic controls.
Then open the oven and take note
of the abbreviated instructions on
the inside of the door. Look at the
shelves. Take a practice run at
removing and replacing them.
And, while you’re at it, locate the
broil unit at the top of each oven
and bake unit just off each oven
floor.
Oven Interior Lights
The light comes on automatically
when an oven door is opened.
Touch OVEN LIGHT pads on
control panels to turn the lights on
and off when the doors are closed.
Oven Shelves
The shelves are designed with
stop-locks. When you place them
correctly on the supports, they’ll
stop before coming completely
out of the oven. What’s more, they
will not tilt when you’re removing
food or when you are placing food
on them.
To remove shelves from the oven,
make sure they’re cool. Then lift
up the rear of the shelf and pull it
forward with the stop-locks along
the top of the shelf support.
To replace shelves in the oven,
insert the shelf with stop-locks
resting on the shelf supports. Push
shelf toward rear of oven until it
falls into place. When shelf is in
proper position, stop-locks on shelf
will run under the shelf support
when the shelf is pulled forward.
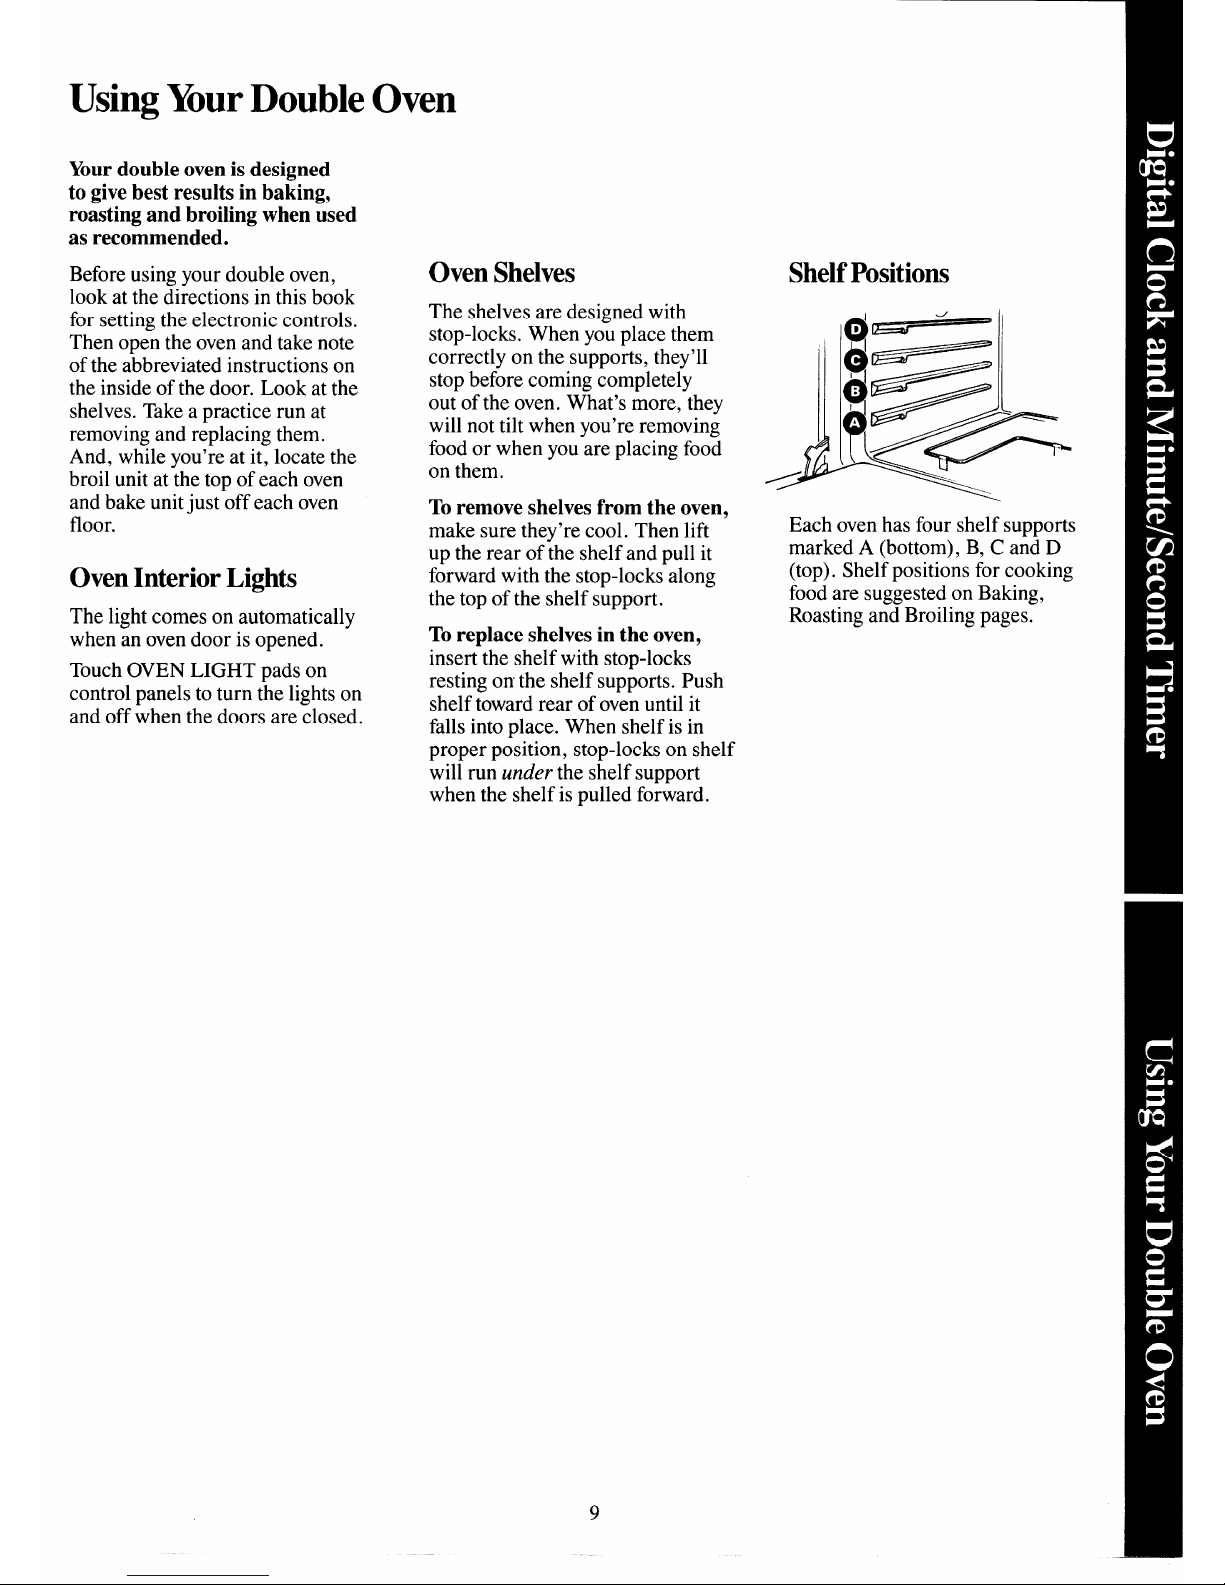
Shelf Positions
Each oven has four shelf supports
marked A (bottom), B, C and D
(top). Shelf positions for cooking
food are suggested on Baking,
Roasting and Broiling pages.
9
Page 10

How toBake and TimeBake in YourDouble Oven
SeeBaking Guideon page 12.
When set to bake, the double
oven cooks by dry heat. Bake and
broil units are both energized (the
broil unit at reduced wattage)
until the oven temperature you
select (from 150 to 550°F.) is
reached. The temperature control
then turns the oven heating units
off and onto maintain the desired
oven temperature. In a quiet
kitchen, you may hear a slight
“click” sound during cooking as the
heating units are turned off and on.
The oven temperature display will
show—90°F. or higher than actual
room temperature until the oven
temperature reaches 150”F. This
is normal.
As the oven heats, the temperature
on the display may seesaw a few
degrees. This, too, is normal,
because the electronic control
accurately indicates slight changes
in air temperature.
Most foods cook satisfactorily
without preheating the oven. If
preheating is required, put your
food in the oven promptly when
oven signals that the desired
temperature has been reached.
When cooking food for the first
time, use the time given in your
recipe as a guide,
the
Don’t open the oven door to check
on foods any more often than
necessary—doing so could cause
undesirable baking results. Check
when minimum time shown on
recipe is up. Then cook food
longer, if necessary.
Note: Cooking controls will not
work after automatic oven cleaning
until the oven has cooled and you
unlatch the door.
How to Set‘YourOven
for Baking
Step 1: Place oven shelf on shelf
support called for in Baking Guide,
page 12.
OVEN START
TEMP TIME
STOP
TIME
Step 2: Make sure the oven door
is closed. Then touch BAKE pad.
Display shows “BAKE” and a
flashing indicator points to OVEN
TEMP.
Step 3: Touch the number pads
in the order that you read them to
enter the temperature called for in
your recipe. The temperature you
set shows on the display.
Step 4: Touch START pad to begin
baking. Display shows “BAKE” and
actual oven temperature as the oven
heats. The control “beeps” six times
when set temperature has been
reached. The display then shows
the set temperature continuously.
Step 5: Center food on the shelf.
Make sure at least 1inch of space
is left between the cooking container
and the oven wall for proper heat
circulation. Close the oven door.
Step 6: If you wish, you may set
the Minute/Second Timer to the
desired cooking time as indicated
in your recipe (see page 7). When
the set time is up, the control signals
until the MIN/SEC TIMER pad
is touched again.
Step Z When baking is done, touch
CLEAR/OFF pad to turn the oven
off. Be sure foods are done before
taking them out of the oven.
How to Time Bake
Your oven can be set to turn on
and off automatically. However,
foods will continue to cook when
left in the oven, even though it’s
turned off. That’s why you
should not use the Bake Time or
Stop Time feature when timing is
critical unless you’ll be on hand
to take foods out of the oven
when they’re done.
To set Immediate Start (oven
starts immediately and turns off
automatically at later time):
I
OVEN S;~}T
TEMP
STOP
TIME
Step 1: Touch BAKE pad.
Step 2: Touch number pads to enter
oven temperature. For example, for
250°F. touch 2,5 and O. -
10
Page 11

Step 3: Touch BAKE TIME pad.
1
Step 4: Touch number pads to enter
baking time. Set hours and minutes
only—any time from 1minute to 11
hours and 59 minutes. For example,
to enter 1 hour and 30 minutes, touch
1,3 and O.The oven automatically
calculates the correct stopping time.
R%Et@Ml! cllw!aw
Step 6: Touch number pads to enter
time of day you want oven to turn
off. For example, to enter 6:00,
touch pads 6,0 and O.
Step %Touch START pad, Oven
calculates correct starting time and
turns on at that time. Display shows
Start and Stop times until oven turns
on. Then the oven temperature and
Stop Time are shown.
You may enter Stop Time before
Bake Time after completing Steps
1 and 2. Oven still calculates
“turn on” time correctly.
Enter Stop Time instead of Bake
Time starts the oven immediately
and oven turns off automatically
at Stop Time.
To check oven temperature that
you set, touch BAKE pad and it
will show briefly.
To check baking time that you set,
touch BAKE TIME pad and it will
show briefly.
At the end of Time Bake, the word
End is displayed in place of time of
day, the oven is turned off and the
control beeps once a minute until
you touch the CLEAR OFF pad.
Example of How to
Bake Brownies
Step 1: Prepare brownie batter
according to your recipe or
directions’on packaged mix. Use
either a metal or oven-proof 8“
glass pan. Place oven shelf in
B position.
Step 2: Preheat oven. Close oven
door and touch BAKE pad. Use
number pads to set oven temperature
to 350”F. if using a metal pan, 325”F.
if using a glass pan. Touch START
pad. Preheating begins. Display
shows actual oven temperature as
oven heats.
Step 3: Pour brownie batter into
greased pan.
Step 4: When preset temperature is
reached, oven signals. Center the
pan on the oven shelf.
Step 5: Touch MIN/SEC TIMER
and number pads 2, 5, 0 and Oto
enter 25 minutes cooking time.
Timing begins automatically in six
seconds.
Step 6: When oven signals, touch
MIN/SEC TIMER pad to stop
signal. Check to make sure brownies
are done. Remove the pan. Touch
CLEAR/OFF to turn oven off.
Step %Let brownies cool and then
cut into squares.
11
Questions and Answers
Q. Why aren’t my foods done
even though they’ve cooked the
full time.
A. There are various causes for this
problem. You may have opened the
oven door too often during cooking.
Or perhaps you didn’t remove all
containers other than those in use for
baking. Check for these conditions
and follow the suggested baking tips
to avoid this problem in the future.
Q. If the display doesn’t show the
correct time of day, may I use
Bake Time and Stop Time?
A. Yes, but to start and stop at the
time you wish to serve your meal,
you should reset the clock to the
correct time. Do it before you enter
Bake Time and Stop Time.
Q. How do I bake at high
altitudes?
A. You’ll have to change the
temperature and time of cooking as
well as alter your measurements.
For best results and further
information, check your cookbook
or state agricultural station.
Q. How do I use the automatic
oven timer if I want to begin
cooking immediately but want
the oven to shutoff while I’m gone?
A. Touch BAKE pad and enter the
desired oven temperature by touching
the number pads. Then touch
STOP TIME pad and enter the time
at which you want the oven to shut
off. Touch START pad to begin
cooking.
Note: Food will continue to cook if
left in a hot oven.
Q. Are there certain foods that are
not recommended for Time Bake?
A. Foods that are highly perishable
such as milk, eggs, fish, stuffings,
poultry and pork should not be
cooked automatically unless the
standing time in the oven is not
more than two hours before or after
cooking. Foods should always be
chilled in the refrigerator before
cooking when you use a Delayed
start.
—
Page 12

Baking Guide
1. Aluminum pans conduct heat
2. Dark or non-shiny finishes and 3. Preheating the oven is not always
quickly. For most conventional
glass cookware generally absorb
necessary, especially for foods
baking, light, shiny finishes give best
heat, which may result in dry, crisp which cook longer than 30 to 40
results because they help prevent
crusts. Reduce oven heat 25°F, if
minutes. For foods with short
overbrowning. For best browning
lighter crusts are desired. Rapid
cooking times, preheating gives
results, we recommend dull bottom browning of some foods can be best appearance and crispness.
surfiices for cake pans and pie plates.
achieved by preheating cast iron
4. ODen the oven door to check
cookware.
food’as little as possible to prevent
uneven heating and to save energy.
Shelf Oven Time,
Food Container
Position Temperature Minutes Comments
Bread
Biscuits (%-in. thick) Shiny Cookie Sheet
B, C 400°-4750 15-20 Canned, refrigerated biscuits take
2 to 4 minutes less time.
Coffee cake
Shiny Metal Pan with
B, A
350°-4000 20-30
satin-finish bottom
Corn bread or muffins Cast Iron or Glass
B 400°-4500 20-40 Preheat cast iron pan for crisp crust.
Gingerbread Shiny Metal Pan with
B 350° 45-55
satin-finish bottom
Muffins Shiny Metal Muffin Pans
A, B 400°-4250 20-30 Decrease about 5 minutes for muffin
Popovers Deep Glass or Cast Iron Cups
B
375°
45-60 mix, or bake at 450°F. for 25 minutes,
then at 350”F. for 10to 15minutes.
Quick loaf bread Metal or Glass Loaf Pans B 350°-3750 45-60
Yeast bread (2 loaves)
Metal or Glass Loaf Pans A, B 375°-4250 45-60 Dark metal or glass give deepest
browning.
Plain rolls Shiny Oblong or Muffin Pans
A, B
375°-4250 10-25 For thin rolls, Shelf B maybe used.
Sweet rolls Shiny Oblong or Muffin Pans
B, A
350°-3750
20-30 For thin rolls, Shelf B maybe used.
Cakes
(without shortening)
Angel food Aluminum Tube Pan A 325°-3750 30-55
Two-piece pan is convenient.
Jelly roll Metal Jelly Roll Pan B 375°-400” 10-15 Line pan with waxed paper,
Sponge
Metal or Ceramic Pan A 325°-3500 45-60
Cakes
Bundt cakes Metal or Ceramic Pan A, B 325°-3500 45-65
Cupcakes Shiny Metal Muffin Pans
B 350°-3750 20-25 Paper liners produce more moist
crusts.
Fruit cakes Metal or Glass Loaf or A, B 275°-3000 2-4 hrs. Use 300”F. and Shelf B for small or
Tube Pan
individual cakes.
Layer Shiny Metal Pan with B 350°-3750 20-35
satin-finish bottom
Layer, chocolate Shiny Metal Pan with
B
350”-375°
25-30
satin-finish bottom
Loaf
Metal or Glass Loaf Pans B
350°
40-60
Cookies
Brownies Metal or Glass Pans B, C 325°-3500 25-35 Bar cookies from mix use same time.
Drop
Cookie Sheet
B, C
350°-4000
10-20
Use Shelf C and increase temp.
Refrigerator
Cookie Sheet
B, C 400°-4250
6-12 25°F, to 50°F. for more browning.
Rolled or sliced Cookie Sheet
B, C
375°-4000 7-12
Fruits,
OtherDesserts
Baked apples
Glass or Metal Pan
A, B, C 350°-4000 30-60
Custard Glass Custard Cups or Casserole B 300°-3500 30-60 Reduce temp. to 300”F. for large
(set in pan of hot water) custard, Cook bread or rice pudding
Puddings, Rice Glass Custard Cups or
B
325° 50-90
with custard base 80 to 90 minutes.
and Custard Casserole
Pies
Frozen Foil Pan on Cookie Sheet
A
400°-4250
45-70 Large pies use 400”F. and increase
time.
Meringue Spread to crust edges B, A 325°-3500 15-25 To quickly brown meringue, use
400”F. for 8 to 10minutes.
One crust Glass or Satin-finish Metal A, B 400°-4250 40-60
Custard fillings require lower
Two crust
Glass or Satin-finish Metal B 400°-4250 40-60 temperature, longer time.
Pastry shell
Glass or Satin-finish Metal
B 450°
12-15
Miscellaneous
Baked potatoes Set on Oven Shelf A, B, C 325°-4000
60-90
Increase time for large amount
Scalloped dishes Glass or Metal Pan A, B, C 325°-3750 30-60 or size.
Souffles
Glass B 300°-3500 30-75
12
Page 13

How toRoast in YourDouble Oven
See Roasting Guide on page K.
Roasting is cooking by dry heat.
It’s really a baking procedure
used for meats. That’s why you
use the Bake controls for roasting.
Roasting temperatures, which
should be low and steady, keep
spattering to a minimum. When
roasting, it’s not necessary to
sear, baste, cover or add water to
your meat. Tender meat or poultry
can be roasted uncovered.
Check the weight of the meat and
place it, fat side up, on the rack in
the broiler pan that came with your
range. This helps the meat to baste
itself.
Always use a roasting pan that
fits the size of your meat. A roast
placed in a pan too small for its size
will drip over the edge.
Most meats continue to cook
slightly while standing in the
oven or after being removed from
it. Take this into consideration
when determining your cooking
time.
To cook frozen meat roasts
without thawing, allow more
cooking time. For large roasts, add
10to 25 minutes per pound. For
roasts under 5 pounds, add 10
minutes per pound.
To slow down surface browning
on turkeys, you can use a foil
“tent!’ The tent-shaped foil should
be laid loosely over the poultry so
the heat can circulate under the foil.
Most frozen poultry should be
thawed before cooking to make
sure it’s done evenly. Some,
however, can be cooked successfully
without thawing. Check the packer’s
label for specific directions.
How to Set Oven
for Roasting
Step 1: Use shelf position indicated
on the Roasting Guide on page 15.
For very tall roasts, remove the
second oven shelf.
Step 2: Place meat inside the oven
and close the door.
I
OVEN START
TEMP
TIME
STOP
TIME
Step 3: Touch BAKE pad. Display
shows “BAKE” and a flashing
indicator light points to OVEN
TEMP.
Step 4: Touch number pads 3,2 and
5
toenter 325”F. oven ~emperature.
(The exception is small p<ry
which is roasted at 375“F.)
I
I
!
,—
—
—
Step 5: Touch START pad to begin
roasting. Display shows oven
temperature as it rises, and signal
sounds when desired temperature
is reached.
Step 6: When food is cooked,
touch CLEAR/OFF pad to turn
oven off.
13
How to Set Oven When
Using Temperature Probe
For many foods, especially
roasts and poultry, internal food
temperature is the best test for
doneness. The temperature probe
takes the guesswork out of roasting
by cooking foods to the exact
doneness you want. When the
internal temperature of the food
reaches the temperature you set,
oven automatically shuts off,
“End” appears on display and oven
beeps once a minute until
CLEAR/OFF pad is touched.
Step 1: Insert probe into meat.
Then plug probe into receptacle on
oven wall.
Step 2: Touch BAKE pad. Display
shows “BAKE” and a flashing
indicator light points to OVEN
TEMP. Touch number pads 3,2
and 5 to enter the desired oven
temperature of 325”F.
Step 3: Touch FOOD TEMP pad.
Flashing indicator points to FOOD
TEMP on display. Use number
pads to enter desired finished meat
temperature from 90° to 199”F.
Probe must be inserted into
receptacle or “PROB” flashes on
display.
Step 4: Touch START pad. Display
shows oven temperature rising to
preset temperature. Display also
shows actual food temperature
rising. When desired temperature
is reached oven automatically shuts
off, “End” appears on display and
oven beeps once a minute.
Step 5: Touch CLEAR/OFF pad to
turn signal off. Remove the probe.
Page 14

Correct Placement of
the Temperature Probe
for Roasting
The temperature probe may be
used only in the upper oven. It has
a skewer-like probe at one end and
a plug at the other end that goes
into a receptacle on the oven wall.
Use handles of the probe and plug
when inserting and removing these
parts from meat and wall receptacle.
Do not use tongs to pull on cable
when removing probe at end of
cooking—they might damage it.
After preparing meat and placing
it on the roasting pan rack, follow
these steps for proper probe
placement.
Step 1: Lay the probe on the
outside of the meat along the top
or side and mark with your finger
where the edge of the meat comes
to on the probe. Point should rest in
the cente; of the thickest meaty part
of the roast.
Step 2: Insert the probe into the
meat up to the point marked off
with your finger. It should not
touch bone, fat or gristle. No more
than two inches of the probe, not
counting the handle, should be lejl
exposed outside the meat.
Step 3: Plug the other end of the
cable into the receptacle, making
sure that it is securely seated, all
the way in. Close the oven door.
Poultry
Insert probe into meatiest part of
inner thigh from below and parallel
to the leg of a whole turkey.
Casseroles or Fish
Insert probe into center of dishes
such as meat loaf or casseroles.
When cooking fish, insert probe
from just above gill into meatiest
area, parallel to backbone.
Ham or Lamb
Insert probe into cut end, meatiest
part of ham or lamb without a
bone. For bone-in ham or lamb,
insert probe into center of lowest
large muscle or joint.
Questions and Answers
Q. When buying a roast, are
there any special tips that would
help me cook it more evenly?
A. Yes. Buy a roast as even in
thickness as possible or buy a
rolled roast.
Q. Can I seal the sides of my foil
“tent” when roasting a turkey?
A. You shouldn’t. Sealing it will
steam the meat. Leaving the “tent”
unsealed lets air circulate and
brown the meat.
Q. Why does my roast crumble
when I try to carve it?
A. It’s probably too warm. Roasts
are easier to slice if you let them
cool for 10 to 20 minutes after you
take them out of the oven. Be sure
to cut across the grain of the meat.
Q. Can the temperature probe
stay in the oven when it’s not
inserted in food?
A. It shouldn’t. Remove it from the
receptacle when it’s not in use. You
could damage the probe by leaving
it in the oven during cooking
operations that do not require its use.
Q. May I insert the probe into
frozen foods?
A. No. It could break. Foods must
be completely defrosted first.
14
Page 15

Roasting Guide
Roasting
1. Position oven shelf at B for
small-size roasts (3 to 7 lbs.) and
at A for larger roasts.
2. Place meat fat-side up, or poultry
breast-side up, on broiler pan or
other shallow pan with trivet. Do
not cover. Do not stuff poultry until
3. Remove fat and drippings as
necessary. Baste as desired.
4. Standing time recommended for
roasts is 10to 20 minutes toallow roast
to firm up and make it easier to
carve. Internal temperature will rise
about 5° to 10°F.; to compensate for
just before roasting. Use meat
temperature rise, if desired, remove
probe for more accurate doneness.
roast from oven at 5° to 10°F. less
Control signals when food has
than temperature on guide.
reached set temperature. (Do not
place probe in stuffing.)
5. Frozen roasts can be
conventionally roasted by adding
10to 25 minutes per pound more
time than given in guide for
refrigerated roasts. (10minutes
per pound for roasts under 5 pounds.)
Defrost poultry before roasting.
Oven
ApproximateRoastingTime,
Internal
NW
Temperature
Doneness in Minutes per Pound
Temperature“F
Meat
3 to5-lbs.
6 to8-lbs.
Tender cuts; rib, high quality sirloin tip,
325°
Rare: 24-30 18-22
130°-1400
rump or top round*
Medium: 30-35 22-25 150°-1600
Well Done: 35-45
28-33 170°-1850
Lamb Leg or bone-in shoulder*
325°
Rare: 21-25 20-23
130°-1400
Medium: 25-30
24-28
150°-160”
,Well Done: 30-35 28-33
170°-1850
Veal shoulder, leg or loin* 325°
Well Done:
35-45
30-40
170°-1800
Pork loin, rib or shoulder*
325°
Well Done:
35-45 30-40
170°-1800
Ham, precooked
325° To Warm: 10minutes per pound (any weight)
125°-130”
Under
10-lbs.
10to 15-lbs.
Ham, raw
325°
Well Done:
20-30
17-20 170°
*For boneless rolled roasts over 6-inches thick, add 5 to 10 minutes per pound to times given above.
Poultry
3
to5-lbs.
Over5-lbs.
Chicken or Duck
325°
Well Done:
35-40
30-35
185°-1900
Chicken pieces
375°
Well Done: 35-40 185°-1900
10to 15-lbs. Over15-lbs.
In thigh:
Turkey
325°
Well Done: 20-25 15-20
185°-1900
15
—
Page 16

How toBroil in YourDouble Oven
See Broiling Guide on page 18.
Broiling is cooking foods by
intense radiant heat from the
upper heating unit in the oven.
When food is broiled, only one
side at a time is exposed to the
heating source. Most fish steaks
or fillets and tender cuts of meat
such as steaks or chops are best
when broiled.
You can broil in either oven
and you can choose between two
convenient broiling methods.
With the first method, you touch
the BROIL pad, then the START
pad and the oven broils on the
fastest rate (HI) automatically.
The second method, or Variable
Broil, gives you the option of
choosing a lower broil rate (less
heat) from LO to 4.
No matter which method you use,
the following suggestions apply:
● Place meat on the broiler rack
on the broiler pan. Always use the
rack so fat drips into the pan.
● Place pan in oven on shelf
in position C. If your oven is
connected to 208 volts, rare steaks
may be broiled by preheating the
broil heater and placing the oven
shelf one position higher.
● Leave the door ajar a few inches
(except when broiling chicken).
The door stays open by itself yet the
proper temperature is maintained
in the oven.
● Turn food only once during
cooking.
Broil Rate Settings
HI-High . . . . . . . . . . .100% power
4-Medium High . . . ...97 % power
3-Medium . . . . . . . . ..90 % power
2-Medium Low . . . . ..84 % power
LO-Low . . . . . . . . . . ..78 % power
How to Set Oven forBroiling
For regular broiling, like you’ve
always been used to, do this:
Step 1: Touch the BROIL pad.
Display shows “BROIL:’
I
Step 2: Touch the START pad to
begin cooking. Oven is automatically
set to broil at the high rate, with
100% power.
Step 3: When cooking is done,
touch the CLEAR/OFF pad. Serve
food immediately. Leave pan outside
oven to cool for easy cleaning.
How to Adjust Oven for
a Lower Broil Rate
You can also set your oven to
broil at a lower rate from LO
(low) to 4 (medium high). Foods
broil slower, and the broil flavor
develops over a longer time.
Step 1: Place food in oven on shelf
in C position. Touch the BROIL
pad. Display shows “BROIL:’
Step 2: Touch a number pad–
1 (LO), 2, 3 or 4—for the desired
Broil Rate. Display shows “BROIL”
and the selected code number.
Step 3: Touch the START pad to
begin cooking.
Step 4: Turn meat over when
recommended broiling time for
first side is up.
Step 5: Touch CLEAR/OFF pad to
shut broil heater off when cooking
is finished.
Use of Aluminum Foil
1. If desired, broiler pan maybe
lined with foil and broiler rack may
be covered with foil for broiling.
ALWAYSBE CERTAIN IT) MOLD
FOIL THOROUGHLY TO
BROILER RACK, AND SLIT
FOIL TO CONFORM WITH
SLITS IN RACK. Broiler rack is
designed to minimize smoking and
spattering, and to keep drippings
cool during broiling. Stopping fat
and meat juices from draining to
the broiler pan prevents rack from
serving its purpose, and juices may
become hot enough to catch fire.
2. DO NOT place a sheet of
aluminum foil on shelf. To do so
may result in improperly cooked
foods, damage to oven finish and
increase in heat on outside surfaces
of the oven.
16
—
———
Page 17

Broilingwith the TemperatureProbe
A variety of foods maybe broiled
using the temperature probe
including steaks, chops, ham steaks
and chicken breast fillets. Foods
broiled using temperature probe
should be approximately 1“ to 1%”
thick.
Use hotpads when removing probe
after cooking is done. Do not use
tongs to pull on it—-they might
damage it.
Do not unplug probe from oven
receptacle during cooking. Cooking
program will be cancelled if you do.
C and place pan in middle of shelf.
Plug other end of probe into
receptacle on oven wall. Leave
door ajar about 3 inches.
How to
Set Oven
for Broiling a Steak Using
Temperature Probe
Step 1: Place 1“to 1%” thick steak
on top of rack in broiler pan. Lay
probe on top of steak to determine
position of probe and distance from
edge to center of largest muscle.
Mark with thumb where edge of
meat or fat meets probe.
Make sure that no more than 2“ of
probe, not counting the handle,
will stick out of the meat.
—
Step 2: Lift probe from meat,
keeping thumb in place on probe.
Insert probe as near as possible to
the center of thickness of steak.
Push probe into steak to where
thumb meets meat or fat.
Step 3: Place oven shelf in position
Step 4: Touch BROIL pad.
BROIL will appear on display.
Step 5: Touch a number pad—
1 (LO), 2, 3 or 4—for the desired
broil rate. Display shows broil rate
selected.
Step 6: Touch FOOD TEMP pad.
Flashing indicator points to FOOD
TEMP on display. Use number pads
to enter desired finished meat
temperature from 90° to 199”F. For
example, touch 1, 5, and 5 (155”F.)
for steak medium. Probe must be
inserted into receptacle or “PROB”
will flash on the display.
Step %Touch START pad to begin
cooking. For six seconds, display
shows “BROIL;’ selected variable
broil power level and programmed
finished food temperature,
TURN
LATCH OVEN START
MEAT DOOR TEMP TIME
OVEN BAKE
FOOD
STOP
LOCKED
TIME
TEMP TIME
Step 8: At end of first cooking
period, oven signals and “TURN
MEAT” indicator flashes. Turn
meat over. DO NOT unplug the
probe or program will be cancelled.
Leave oven door ajar about 3 inches.
Step 9: When desired finished
temperature is reached, oven signals
by displaying END and beeping,
and turns off automatically. Touch
CLEAR OFF to shut off signal,
unplug probe and remove steak
from oven. Remove probe.
(Caution: Probe will be hot.)
17
Page 18

Broiling Guide
Broiling
To slash, cut crosswise through 6. Broiler does not need to be
1. Always use broiler pan and rack
that comes with your oven. It is
designed to minimize smoking and
spattering by trapping juices in the
shielded lower part of the pan.
2. Oven door should be ajar for all
foods except chicken; there is a
special position on door which
holds door open correctly.
3. For steaks and chops, slash fat
evenly around outside edges of meat.
outer fat surface just to the e~ge of
the meat. Use tongs to turn meat
over to prevent piercing meat and
losing juices.
4. Ifdesired, marinate meatsor
chicken before broiling. Or brush
with barbecue sauce last 5 to 10
minutes only.
5. When arranging food on pan,
do not let fatty edges hang over
sides, which could soil oven with
fat dripping.
preheated. However, for very thin
foods, or to increase browning,
preheat if desired.
7.
Frozen Steaks can be
conventionally broiled by
positioning the oven shelf at next
lowest shelf position and increasing
cooking time given in this guide
1% times per side.
8. If your oven is connected to
208 volts, raresteaks may be broiled
by preheating broil heater and
positioning the oven shelf one
position higher.
Quantity and/or Shelf
Variable First Side
Second Side
Food Thickness Pbsition
Broil Rate Time, Minutes
Time, Minutes Comments
Bacon
%-lb. (about 8
c
HI
3% 3%
Arrange in single layer.
thin slices)
GroundBeef Mb. (4 patties) Space evenly.
Well Done % to %-in. thick
c
LO 7 4-5 Up to 8 patties take about same time.
Beef Steaks
Rare
l-inch thick
c
HI 7 7 Steaks less than 1 inch cook through
Medium
(1 to 1%-lbs.)
c
3
9 9
before browning. Pan frying is
Well Done
c LO 13 13
recommended.
Rare 1%-in.thick c
HI 10 7-8 Slash fat.
Medium
(2 to 2%-lbs.) c
3 15 14-16
Well Done
c
LO 25 20-25
Chicken 1 whole A HI 35 10-15 Reduce times about 5 to 10minutes per
(2 to 2%-lbs.),
side for cut-up chicken. Brush each side
split lengthwise
with melted butter. Broil with skin
down first and broil with door closed.
Bakery Products
Bread (Toast) or 2 to 4 slices c
HI
1~-z
% Space evenly. Place English muffins
Toaster Pastries 1pkg. (2) cut-side-up and brush with butter, if
English Muffins 2 (split)
c
HI 3-4
desired.
Lobster‘lhils 2-4 B
4 13-16 Do not Cut through back of shell. Spread
(6 to 8-02. each)
turn over.
open. Brush with melted butter
before and after half time.
Fish l-lb. fillets % to c
4 5 5 Handle and turn very carefully.
%-in. thick
Brush with lemon butter before and
during cooking if desired. Preheat
broiler to increase browning.
Ham Slices l-in. thick B 3 8 8
Increase times 5 to 10minutes per side
(precooked)
for 1%-inch thick or home cured.
Ibrk Chops 2(% inch) c
HI 10 10 Slash fat.
Well Done 2 (l-in. thick) B
LO 13 13
about 1 lb.
LambChops
Medium
2(1 inch)
c
3 8 4-7 Slash fat.
Well Done
about 10to 12 oz.
c
LO 10
10
Medium
2 (1% inch)
c
3 10 4-6
Well Done
about 1 lb. B
LO 17 12-14
Wienersand similar l-lb. pkg. (10)
c
HI 6 1-2 If desired, split sausages in half
precooked sausages,
lengthwise; cut into 5 to 6-inch pieces.
bratwurst
18
Page 19

Rotisserie (upPer Oven)
Food is cooked by revolving on
a spit under the (upper) broil unit.
As food turns, it bastes itself to
produce a succulent brown and
tender roast. Meat tender enough
for roasting may be rotissed.
$%/
/
‘An
Finish securing food on spit by
gliding second 2-pronged fork onto
spit with prongs toward food. Tighten
screws to a flat surface on spit.
1. Assemble rotisserie. Insert
curved ends of frame into large
holes of broiler pan handles. Lock
frame in place by fitting straight
ends of support into holes in center
handles.
2. Secure food on spit. When
secured correctly, food will be
located in center area of spit
leaving 4 inches free at the pointed
end (this part goes into motor).
3. To secure food on spit: Push
2-pronged fork onto spit near
handle end. Tighten with screw.
Push spit through food (tie food
securely and compactly), distributing
weight evenly on each side of spit.
To check weight distribution on
spit, hold spit (and food) between
hands, palms up; spit should roll
smoothly from palms to fingertips
when palms are tipped forward.
4. Place spit on frame so handle end
is in narrow support, and pointed
end is in wide U-shaped support.
Rotissing the Food
1. Put oven shelf in lowest position
in oven. With food on spit, place
spit on oven shelf.
2. The oven temperature is
automatically set at 400”F. See
approximate rotissing times and
meat thermometer temperatures
listed in Rotisserie Guide on page
20 to help you get foods juicy and
done without overbrowning.
3. Touch ROTISS pad and then
START pad. This starts broil unit
and rotisserie motor operating. Spit
can be inserted and removed more
easily when motor is operating.
N~E: Make certain when touching
spit that no part of body or pot
holder touches coils of broil unit.
4. Insert spit into motor: Grasp
handle on spit. Using point of spit,
move to one side the cover over
motor outlet in rear of oven; push
spit firmly into motor outlet as far
as it will go. Remove handle,
5. Check rotation of food. Tighten
or adjust forks if necessary. During
cooking, forks may need tightening
due to normal meat shrinkage.
6. As food cooks, leave door ajarin
“Broil” position; door stays open
by itself.
7. Baste food if desired. With pot
holders, pull out pan and shelf
together to shelf stop. Attach
handle to spit to revolve food by
hand while basting. To continue
cooking push shelf and broiler pan
into oven, insert spit into motor,
remove handle.
Rotisserie Notes
● Do not use electric meat
thermometer while operating the
rotisserie. A regular, nonelectric
meat thermometer may be used
while rotissing providing it doesn’t
touch the oven, frame or pan while
meat revolves. (Or, if desired, cook
to estimated doneness then pull
meat from oven to insert meat
thermometer. Wait about 2 minutes
for temperature to register. If meat
is not done, remove thermometer
and continue cooking if necessary.)
● If rotissing turkey, let stand in
warm oven 10to 20 minutes after
cooking to assure juicy meat and
complete doneness.
● At end of cooking pull out pan
and shelf together, using pot
holders. Touch CLEAR/OFF pad.
Remove food from spit. Cool pan
outside oven; soak forks and screws
for easiest cleanup.
19
Page 20

Rotisserie Guide
Approximate Meat
RotissingTime Thermometer
Food
Minutes PerLb. Temperatures GeneralDirections
Beef
Rolled Rib NOTE: 1. For roasts OVER 10pounds, cook about 1/2
Rare
19-23 130-140 estimated time, then check at 1/2 hour intervals with meat
Medium
22-27 150-160 thermometer for internal doneness.
Well Done 24-29
170-185 2. Thin roasts, 3 to 4 pounds, may require slightly longer
times per pound than those given on guide.
Lamb
Leg, boned and rolled
20-22 175-185 175 for medium.
185 for well done.
Pork, fresh
Loin
20-25 170-195
Buy ribs split down center. Thread on spit. To barbecue,
Spareribs (barbecued) 30-35
brush with sauce every 15 minutes.
Spareribs (plain)
30-35
Pork, cured
Ham (picnic)
Cook-Before-Eating bone in
13-15 160
Fully Cooked 10-13 130
Poultry
Capon* (6-8 Ibs.)
18-25 185-190 Brush with melted butter or margarine, basting or
barbecue sauce several times during cooking.
Chicken* (2-3 lbs.)
20-25
t
Same as above.
Chicken7 (1%-2 lbs.)
48-62
t
If desired, thread 4 to 5 of this size chicken crosswise on
spit. Let revolve to within 1/2 hour of doneness time, then
brush every 10minutes with barbecue sauce.
Cornish Hen* (1 lb.) 45-60
t
Brush with butter, or butter and lemon juice mixed.
Thread hens on spit either lengthwise or crosswise.
Duckling* (4-5 lbs.)
15-21
185-190 Do not brush with fat.
Turkey* (8-12 lbs.)
14-20 180-185 Cook without brushing with fat, or brush with butier or
margarine as desired. When cooked, press CLEAR/OFF
pad, close door, let turkey stand 10to 20 minutes IN
OVEN. Remove from oven and carve.
Veal
Shoulder, boned and rolled
30-33 180
Bologna 18-20
130
Brush with sauce if desired.
CanadianBacon
20-23 160
LuncheonMeat
(12-02.
can)
15-20(total time) 140 Brush with sauce if desired.
Wieners, large 10-15(total time)
140
Brush with sauce if desired.
70n small poultry, test doneness by moving leg gently back and forth, and press leg muscle to be certain it is soft.
*Ready-to-cook weight. IMPORTANT. Tie legs and wings close to body to make doneness of bird as uniform as possible. All times given are for unstuffed birds,
N~E: Spillage of marinades, fruit juices and basting materials containing acids may cause discoloration on oven liner or door so should be wiped up immediately
with a paper towel. When surface is cool, clean and rinse.
Page 21

Operating the
Self-Cleaning Double Oven
Note: Upper and Lower Ovens
cannot be self-cleaned at the same
time. However, while self-cleaning
one oven you can use the other one
for baking or broiling.
Before Setting Oven
Controls, Check These
Things:
Step 1:
Remove broiler pan, broiler rack
and other cookware from the oven.
(Oven shelves may be left in oven.
Note: Shelves wiil discolor after
the self-clean cycle.)
Step 2:
Wipe up heavy soil on oven
bottom.
A. Oven Front Frame
B. Oven Door Gasket
C. Openings in Door
D. Rotisserie Receptacle
E. Oven Light
Step 3:
Clean spatters or spills on oven
front frame (A) and oven door
outside gasket (B) with a dampened
cloth. Polish with a dry cloth. Do
not clean gasket (B). Do not allow
waterto rundown through openings
in top of door (C). Never use a
commercial oven cleaner in or
around self-cleaning oven.
Step 4:
Close rotisserie receptacle (D)
when self-cleaning the upper oven.
Step 5:
Close oven door and make sure
oven light (E) is off.
ToSet YourOven
for Self-Cleaning
Step 1:
Touch the CLEAN pad. Display
shows “CLEAN” and flashing
indicator points to DOOR LATCH.
If door is not latched within 15
seconds, display reverts to OFF
and you have to start over.
Step 2:
Move door latch all the way to the
right as far as it will go.
To change cleaning time to as
little as 1%hours or as much as 4%
hours, don’t touch START pad yet.
● First, touch BAKE TIME pad.
. Next, touch Number Pads to enter
the cleaning time. For example, to
enter 2% hours, touch pads 2, 3
and O.
● Now touch START to begin
cleaning immediately. Stop Time is
calculated and displayed until
cleaning ends.
Note: You might smell a slight
odor, especially during the first few
cleanings. This is normal during
the self-cleaning cycle and is no
cause for alarm.
When cleaning temperature is
reached, the Indicator Light points
to OVEN LOCKED and the door
cannot be unlatched.
Step 4:
When cleaning is done, the oven
turns off automatically. When it
cools down, which takes about 30
minutes, the OVEN LOCKED
light goes out andthe door can be
opened. Unlatch the door by moving
it to the left as far as it will go.
Display shows time of day.
To delay start of cleaning:
(If temperature probe is accidentally
left pluged into the oven receptacle,
display shows “PROB” until you
remove it. Touch CLEAR/OFF pad,
unlatch door and remove probe.
Repeat steps 1 and 2 to reset.)
Step 1:
Touch CLEAN pad and latch door.
Step 3:
Touch START to begin cleaning
immediately. Cleaning cycle takes
three hours and Display Panel shows
Stop Time.
21
Page 22

Step 2:
Then touch STOP TIME pad. Display
shows “CLEAN” and flashing indicator points to Stop Time.
Step 3:
Use number pads to enter desired
Stop Time. (You may enter any
time not more than 11hours and 59
minutes and not less than 3 hours
from the current time of day.)
Step 4:
Touch START pad and the oven
calculates the proper Start Time
and Stop Time until cleaning
begins. Then only Stop Time is
shown.
When cleaning is done, the oven
turns off automatically. Step 4 on
page 21 tells you when and how to
open the door.
Questions and Answers
Q. Why won’t my oven start
cleaning even though I’ve set all
the controls correctly?
A. Check to be sure the display
shows the correct time of day. Also
check to be sure the oven latch is
closed securely and you have
touched the START pad.
Q. If the display does not show
the time of day, can I still selfclean my oven?
A. No. You must set your clock.
Time of day must be showing in the
display because the clock starts and
stops the self-cleaning cycle.
Q. Why can’t I latch the oven
door to start the self-clean cycle
even though I’ve touched the
CLEAN pad?
A. The electronic control will not
let you set up the clean cycle when
the oven is hotter than 500”F. Let
the oven cool and try again.
Q. What should I do if excessive
smoking occurs during cleaning?
A. Excessive grease is the cause.
Touch the CLEAR/OFF pad. Open
windows and doors to rid the room
of smoke. Let the oven cool for at
least one hour before opening the
door. Unlatch door, wipe up excess
grease and reset the cleaning cycle.
Q. Is the “crackling” sound I
hear during cleaning normal?
A. Yes. Metal heating and cooling
during cooking and cleaning
functions makes this sound.
Q. What causes the hair-like
lines on the enameled surface of
my oven?
A. Heating and cooling during
cleaning. It’s common. The hairlike lines don’t affect your oven’s
performance.
Q. Why do I have ash left in my
oven after cleaning?
A. Some types of soil leave a
deposit of ash. You can remove it
with a damp sponge or cloth.
22
Q. My oven shelves do not slide
easily. What’s the matter?
A. After cleaning, oven shelves
may be so clean that they will not
slide easily. They will again if you
dampen your fingertips with a little
cooking oil and rub lightly over the
sides of the shelf.
Q. My oven shelves became gray
after the self-clean cycle. Is this
normal?
A. Yes. And after the self-clean
cycle, they’ll lose their luster and
change to a deeper gray color.
Q. Can I stop an oven cleaning
cycle after cleaning has begun?
A. Yes, but you won’t be able
to open the door until the oven
cools to a safe temperature. Touch
CLEAR/OFF pad to cancel the
cleaning cycle. When Door Locked
indicator light goes out, unlatch
the door.
Q. If the inside of my oven door
is soiled, will it be cleaned during
the cleaning cycle?
A. Yes. The raised section of the
oven door inside the gasket will be
cleaned automatically. The area
outside the oven gasket must be
cleaned by hand as described in the
Cleaning Guide on page 24.
Q. Why would I want to set my
oven to start cleaning at a later
time of day?
A. Some utility companies offer
lower rates at times when electrical
consumption is lowest. Since these
times often occur late at night, you
can set your oven before going to bed
so cleaning is done while you sleep.
Q. After interrupting the self-
cleaning cycle in the middle, I let
the oven cool but still cannot set
the self-clean cycle again. Why?
A. Youmust unlatch the door, touch
the CLEAN pad, latchthe door and
touch the START pad before the
self-clean cycle starts again.
Page 23

Careand Cleaning
(See Cleaning Guide on page 24.)
Proper care and cleaning
procedures are essential for a
long and satisfactory life for your
ovens. Included in this section are
directions and a Cleaning Guide
(on next page) for cleaning all parts
of the ovens. When cleaning an
oven manually, wearing of rubber
gloves is recommended to protect
the hands.
Porcelain Enamel Finish
The porcelain enamel finish is
essentially glass fused on steel at
high temperature and is breakable
if misused. This finish is acidresistant. However, any acid foods
spilled (such as lemon or other
citrus fruit juices, or mixtures
containing tomato or vinegar)
should be wiped up immediately.
See guide for cleaning suggestions.
Lamp Replacement
CAUTION: BEFORE
REPLACING ANY LAMP,
DISCONNECT ELE~RIC
POWER TU OVEN AT THE
MAIN FUSE OR CIRCUIT
BREAKER PANEL. LET LAMP
(OR BULB) AND LAMP COVER
COOL COMPLETELY.
The oven lamp (bulb) is covered with
To remove:
● Hold hand under cover so it
doesn’t fall when released. With
fingers of same hand, firmly push
back wire bail until it clears cover.
Lift off cover. DO N(YI’REMOVE
ANY SCREWS TO REMOVE
COVER.
● Replace bulb with 40-watt home
appliance bulb.
To replace cover:
● Place it into groove of lamp
receptacle. Pull wire bail forward
to center of cover until it snaps into
place. When in place, wire holds
cover firmly. Be certain wire bail is
in depression in center of cover.
● Connect electric power to oven.
a glass removable cover which is
held in place with a bail-shaped wire.
23
Page 24

Cleaning Guide
Note: Let oven parts cool before touching or handling.
Part
Materials to Use General Directions
Bake Unit and
Do not clean the bake unit or broil unit. Any soil will burn off when the unit is
Broil Unit
heated.
NOTE: The bake unit is hinged and can be lifted gently to clean the oven
floor. If spillover, residue, or ash accumulates around the bake unit, gently wipe
around the unit with warm water.
Broiler Pan and Rack
● Soap and Water
Drain fat, cool pan and rack slightly. (Do not let soiled pan and rack stand in oven to
● Soap-Filled Scouring Pad
cool. ) Sprinkle on detergent. Fill the pan with warm water and spread cloth or paper
● Plastic Scouring Pad
towel over the rack. Let pan and rack stand for a few minutes. Wash; scour if
necessary. Rinse and dry. OITION: The broiler pan and rack may also be cleaned in
a dishwasher.
Control Panel
● Damp Cloth Wipe with damp cloth to remove soil. Do not wipe when oven is in use. Do not use
● Paper Towel abrasives, such as cleaning powders or steel or plastic balls. They will mar surface.
Outside Finish
Glass
● Soap and Water
Washall glass with cloth dampened in soapy water. Rinse and polish with a dry
cloth.
Metal, including
● Soap and Water
Wash, rinse, and then polish with a dry cloth. DO NOT USE steel wool, abrasives,
Chrome
ammonia, acids, or commercial oven cleaners which may damage the finish.
Porcelain Enamel*
● Paper Towel Avoid cleaning powders or harsh abrasives which may scratch the enamel. If acids
QDry Cloth should spill in the oven while it is hot, use a dry paper towel or cloth to wipe up right
● Soap and Water away. When the surface has cooled, wash and rinse. For other spills, such as fat
smatterings, etc.,
wash with soap and water when cooled and then rinse. Polish with
a dry cloth.
Inside Oven Door*
● Soap and Water Clean ONLY the door liner outside the gasket. Door is automatically cleaned when
oven is in self-cleaning cycle. If spillover or spattering occurs when cooking, wipe
door with soap and water. DO NOT rub or damage gasket. Avoid getting soap and
water on gasket or in slots on door.
Oven Gasket*
Avoid getting ANY cleaning materials on the gasket.
Oven Liner*
● Soap and Water
Cool before cleaning. Frequent wiping with mild soap and water will prolong the
time between major cleanings. Be sure to rinse thoroughly. For heavy soiling, use
your self-cleaning cycle often.
CAUTION: When in use, light bulbs can become warm enough to break if touched with moist cloth
or towel. When cleaning, avoid warm lamps with cleaning cloths if lamp cover is removed.
Shelves
● Soap and Water
Your shelves can be cleaned in the oven with the self-cleaning operation. For heavy
(See Self-Cleaning
soil, clean by hand and rinse thoroughly.
Oven Directions)
Meat Thermometer
● Soap and Water
Cool before cleaning. DO NOT IMMERSE IN WATER. Scour stubborn spots with
● Soap-Filled Scouring Pad
soap-filled scouring pad, rinse and dry. DO NOT STORE [N OVEN.
Rotisserie
Spit, Forks
● Soap and Water
Soak in hot, sudsy water; scour to remove cooked-on food or sauces; wash.
Screws, Frame
● Commercial Oven Cleaner
*Spillage of marinades, fruit juices, tomato sauces and basting materials containing acids may cause discoloration. Spillovers should be wiped up
immediately, with care being taken not to touch any hot portion of the oven. When the surface is cool, clean and rinse.
Page 25

_~ ~
~,
QU@iOIM?
‘~” Use This Problem Solver
I
PROBLEM
I
POSSIBLE CAUSE AND REMEDY
I
OVEN WILL
@Difficulty may b~ in the main distribution pane~ of your house by a Mown oven
NUl!’OPERATE circuit fuse, a tripped oven circuit breaker, the main fuse or the main circuit breaker,
depending an nature of the power supply. If a circuit breaker is involved, reset it. If the
control box uses fuses, the oven fuse (a cartridge-type) should be changed BUT ONLY
BY SOMEONE FAMILIAR WITH ELECTRICAL CIRCUITS. If after doing one of
these procedures, the fuse blows or circuit breaker trips again, cd for service.
N~E: Apartment tenants or condmninium owners should request their building
management to perform this check before calling for service.
* Oven controls not properly set.
* IXmr left in locked position after cleaning.
OVEN LIGHT
● Light bulb is ioose or bulb is burned out.
DOES NCII’“WORK
ELECTRONIC
* Clocks not set. Touch CLOCK pad and enter time on both display panels.
?KWCH PADS
WILL NOT WORK
ELECTRONIC
* If it carmot be reset by touching pads, electrical service to your residwwe has caused
DISPLAY PANEL
interference signals cm the main power line. Disconnect ym.woven at the main fuse or
GOES BLANK circuit breaker panel. Wait one mirmte and reconnect power. Reset clock cm both
OR ELINKS display panels.
FOOD DOES NOT
* BROIL and START pads not touched.
BROIL PROPERLY
* If using a lower broil rate, the correct setting from LU to HI was not touched
afier BROIL.
* Probe riot filly inserted into the oven receptacle or fbod when using FOOD TENIP pad.
● Improper shelf position is being used.
* Food is being cooked on a hot pan.
* Utensils are not suited for broiling.
● Aluminum foil used on the broil rack has not been fitted properly and slit.
FOOD DOES NOT @BAKE and START pads not touched.
ROAST PROPERLY
* Oven temperature not set correctly. Incorrect number pads touched.
● Probe not fully inserted into the oven receptacle or food when using FOOD T13MP pad.
* Shelf position is incorrect. Check Roasting Guide.
* Roasting pan is too small+
● Improper cookware is being used.
* A foil tent was not used when needed to slow down browning.
FOOD DOES NOT
● 13AKEand START pads not touched.
i3AKE PROPERLY
@Oven shelf is not level.
* Shelf position is incorrect, Check Baking Guide.
● The wrong cookware is being used.
● Temperature setting is incorrect.
Page 26

Problem solver (continued)
I
PROBLEM
I
POSSIBLE CAUSE AND REMEDY
I
If you need more help.. call, toll free:
GE Answer Center@
800.626.2000
consumer information service
—
Page 27

We’llBe There
With the purchase of your new GE appliance, receive the
assurance that if you ever need information or assistance
from GE, we’ll be there. All you have to do is call-toll-free!
GEAnswerCenter@
801626.2000
In-HomeRepak
Service
800-GE-CARES
(BOO-B2-273fl
AGE Consumer Service professional
will provide expert repair service,
scheduled at a time that’s convenient
for you. Many GE Consumer Service
companyoperated locations offer you
service today or tomorrow, or at your
convenience (700 a.m. to 700 p.m.
weekda~ 9:00 a.m. to 2:00 p.m. Satur-
days). Our factory-trained technicians
know your appliance inside and out—
so most repairs can be handled in just
one visit.
ServiceContracts
800-626-2Z4
Whatever your question about any GE
major appliance, GE Answer Cente@
information service is available to
help. Your call-and your question—
will be answered promptly and
courteously And you can call any
time, GE Answer Cente~ service is
open 24 hours a day, 7 days a week.
You can have the secure feeling that
GE Consumer Service will still be
there after your warranty expires. Purchase a GE contract while your war-
ranty is still in effect and you’ll receive
a substantial discount. With a multiple
year contract, you’re assured of future
service at today’s prices.
Telecommunication Device for the Deaf
PatisandAccessories
800-626-2002
Individuals qualiiled to service their
own appliances can have needed
parts or accessories sent directlyto
their home, free of shipping charge!
The GEparts system provides access
to over 47,000 parts...and all GE
Genuine Renewal Partsare filly
warranted.VISA,MasterCardand
Discover cards are accepted.
User maintenance instructions
contained in this booklet coverprocedures intended to be performed by
any user. Other servicing generally
should be referred to qualiiied service personnel. Caution must be
exercised, since improper servicing
may cause unsafe operation.
!. -— - . . . . . ,.>. ,”.-. —.4
.!..
-.s ..- 09 “.--...
44. ...
I
ForCustomersW8h
Special/Keels...
80~62E2000
Upon request, GE will provide Braille
controls for a variety of GE appliances,
and a brochure to assist in planning a
barrier-free kitchen for persons with
limited mobility To obtain these item%
free of charge, call 800.626.2000.
Consumers with impaired hearing
or speech who have access to a TDD
or a conventional teletypewriter may
call 800-TDD-GEAC (800-833-4322)
to request information or service.
Page 28

YOUR GENERAL ELECTRIC RANGE
WARRANTY
Save proof of original purchase date such as your sales slip or cancelled check to establish warranty period.
WHAT IS COVERED
FULL ONE-YEAR WARRANTY
This warranty is extended to
For one year from date of original
the original purchaser and any
purchase, we will provide, free of
succeeding owner for products
charge, parts and service labor
purchased for ordinary home use
in your home to repair or replace
in the 48 mainland states, Hawaii
any part of the range that fails
and Washington, D.C. In Alaska the
because of a manufacturing defect.
warranty is the same except that it is
LIMITED because you must pay to
ship the product to the service shop
or for the service technician’s travel
costs to your home.
All warranty service will be provided
by our Factory Service Centers or
by our authorized Customer Care@
servicers during normal working
hours.
Look in the White or Yellow Pages
of your telephone directory for
GENERAL ELECTRIC COMPANY,
GENERAL ELECTRIC FACTORY
SERVICE, GENERAL ELECTRICHOTPOINT FACTORY SERVICE or
GENERAL ELECTRIC CUSTOMER
CARE@ SERVICE.
WHAT IS N~ COVERED ● SerViCetripstOyourhometO
● Replacement of house fuses or
teach you how to use the product. resetting of circuit breakers.
Read your Use and Care material.
If you then have any questions
. Failure of the product if it is used
for other than its intended purpose
about operating the product,
please contact your dealer or our
or used commercially.
Consumer Affairs office at the
. Damage to product caused
address below, or call, toll free:
by accident, fire, floods or acts
GE Answer CenteP
of God.
800.626.2000
consumer information service
WARRANTOR IS NOT RESPONSIBLE
FOR CONSEQUENTIAL DAMAGES.
● Improper installation.
If
you have an installation problem,
contact your dealer or installer.
You are responsible for providing
adequate electrical, gas, exhausting
and other connecting facilities.
Some states do not allow the exclusion or limitation of incidental or consequential damages, so the above limitation or exclusion
may not apply to you. This warranty gives you specific legal rights, and you may also have other rights which vary from state to state.
To know what your legal rights are in your state, consult your local or state consumer affairs office or your state’s Attorney General.
Warrantor: General Electric Company
If further help is needed concerning this warranty, write:
Manager—Consumer Affairs, GE Appliances, Louisville, KY 40225
Part No. 164D2092P161
Pub.
No.49-8122
JKP47G
JKP48G
7-90 CG
 Loading...