

Page 1

W
Ow
ers
I
Double-Door, Bottom-Drawer,
Free-Standing Refrigerators
239D4535P003
49-60718
08-14GE
monogram.com
Fran(;ais
The French section begins on page 23.
La section franc aise commence _ la page 23
Espahol
The Spanish section begins on page 43
La seccion en espar]ol empieza en la p_'_gina43,
Page 2
Consumer Information
Stainless Steel Refrigera tot
/ntroduct/on
Contents
Your new Monogram refrigerator makes an eloquent statement of style, convenience and kitchen
planning flexibility, Whether you chose it for its purity of design, practical storage arrangements or
assiduous attention to detail-or for all of these reasons-you'll find that your Monogram refrigerc_tor's
superior blend of form and function will delight you for years to come,
The information on the following pages will help you operate and maintain your refrigerator properly,
If you have any other questions, visit our Website at: monogram.com
Consumer Services
Important Phone Numbers .................. 20
Model and Serial Numbers .................... 3
Performance Data Sheet .................... 18
Problem Solver ........................... 16-17
Product Registration .......................... 3
Safety Instructions ........................ 4-5
Warranty ........................... Back Cover
Water Filter Warranty ....................... 14
Operating Instructions
Automatic Icemaker ......................... 13
Additional Features ........................... 6
Internal Water Dispenser ..................... 7
Shelves and Bins .......................... 9-11
Temperature Controls ........................ 6
Temperature Controlled Drawer .............. 12
Water Filter .................................. 8
Care and Cleaning
Cleaning-Outside and Inside ................ 14
Light Bulb Replacement ..................... 15
Moving ..................................... 14
Vacation .................................... 14
Before
using
your
rehrigera tot
Read this manual carefully, It is intended to help
you operate and maintain your new refrigerator
properly,
Keep it handy for answers to your questions,
If you don't understand something or need more
help, there is a list of toll-free consumer service
numbers included in the back section of this
manual,
OR
Visit our Website at: monogram,com
Page 3
Consumer Information
Stainless Steel Refrigera tot
Write
down
the model
& serial
numbers
ff j/ou
received a
damaged
rehrigera tot
Save time
& money
You'll see them on (_label inside the fresh food
compartment at the top on the right side,
Please write these numbers on the Consumer
Product Ownership Registration Card included
with the packing material,
Immediately contact the dealer (or builder) that
sold you the refrigerator,
Before you request service, check the Problem
Solver in the back of this manual,
Before sending in this card, please also write
these numbers here:
Model Number
Serial Number
Use these numbers in any correspondence
or service calls concerning your refrigerator,
It lists causes of minor operating problems that
you can correct yourself,
/f you
need
service
To obtain service, see the Consumer Services
page in the back of this manual,
We're proud of our service and want you to be
pleased, If for some reason you are not happy
with the service you receive, here are steps to
follow for further help,
For customers in the USA:
FIRST,contact the people who serviced your
appliance, Explain why you are not pleased, In
most cases, this will solve the problem,
NEXT,if you are still not pleased, write all the
details-including your phone number-to:
Manager, Customer Relations
GEAppliances
Appliance Park
Louisville, KY40225
For customers in Canada:
FIRST,contact the people who serviced your
appliance, Explain why you are not pleased,
In most cases, this will solve the problem,
NEXT,if you are still not pleased, write all the
details-including your phone number to:
Manager, Consumer Relations
Mabe Canada Inc,
1 Factory Lane, Suite 310
Moncton, N,B, E1C 9M3
Page 4
IMPORTANTSAFETYINSTRUCTIONS
READAND SAVETt-tESEINSTRUCTIONS
A This is the safety alert symbol. This symbol alerts you to potential hazards that can kill or hurt you and others. All safety
messages will follow the safety alert symbol and the word "DANGER", "WARNING", or "CAUTION". These words are defined as:
Indicates a hazardous situation which, if not avoided, will result in death or serious injury.
Indicates a hazardous situation which, if not avoided, could result in death or serious injury.
Indicates a hazardous situation which, if not avoided, could result in minor or moderate injury.
When using this appliance, always exercise
basic safety precautions, including the following:
• Use this appliance only for its intended purpose as described
in this Owner's Hanual.
• This refrigerator must be properly installed in accordance
with the Installation Instructions before it is used.
• Do not allow children to climb, stand or hang on the shelves
in the refrigerator. They could damage the refrigerator and
seriously injure themselves.
• Do not store or use gasoline or other flammable vapors and
liquids in the vicinity of this or any other appliance.
• Unplug your refrigerator before cleaning and making repairs.
NOTE: We strongly recommend that any servicing be performed
by a qualified individual.
NOTE: Power to the refrigerator cannot be disconnected by any
setting on the control panel.
• Because of potential safety hazards under certain conditions,
we strongly recommend against the use of an extension cord.
However, if you must use an extension cord, it is absolutely
necessary that it be a UL-listed (in the United States) or a CSA
certified (in Canada), 3-wire grounding type appliance extension
cord having a grounding type plug and outlet and that the
electrical rating of the cord be 15 amperes (minimum) and 120
volts.
• Replace all parts and panels before operating.
• Do not touch the cold surfaces in the freezer compartment
when hands are damp or wet. Skin may adhere to these
extremely cold surfaces.
• In refrigerators with automatic icemakers,
avoid contact with moving parts of the ejector mechanism,
or with the heating element located on the bottom of the
icemaker. Do not place fingers or hands on the automatic
icemaking mechanism while the refrigerator is plugged in.
• Keep fingers out of the "pinch point" areas: clearances
between the doors and between the doors and cabinet are
necessarily small. Be careful closing doors when children are in
the area.
o
Do not refreeze frozen foods which have thawed completely.
o
Do not clean glass shelves or covers with warm water when
they are cold. Glass shelves and covers may break if exposed
to sudden temperature changes or impact, such as bumping
or dropping. Tempered glass is designed to shatter into many
small pieces if it breaks.
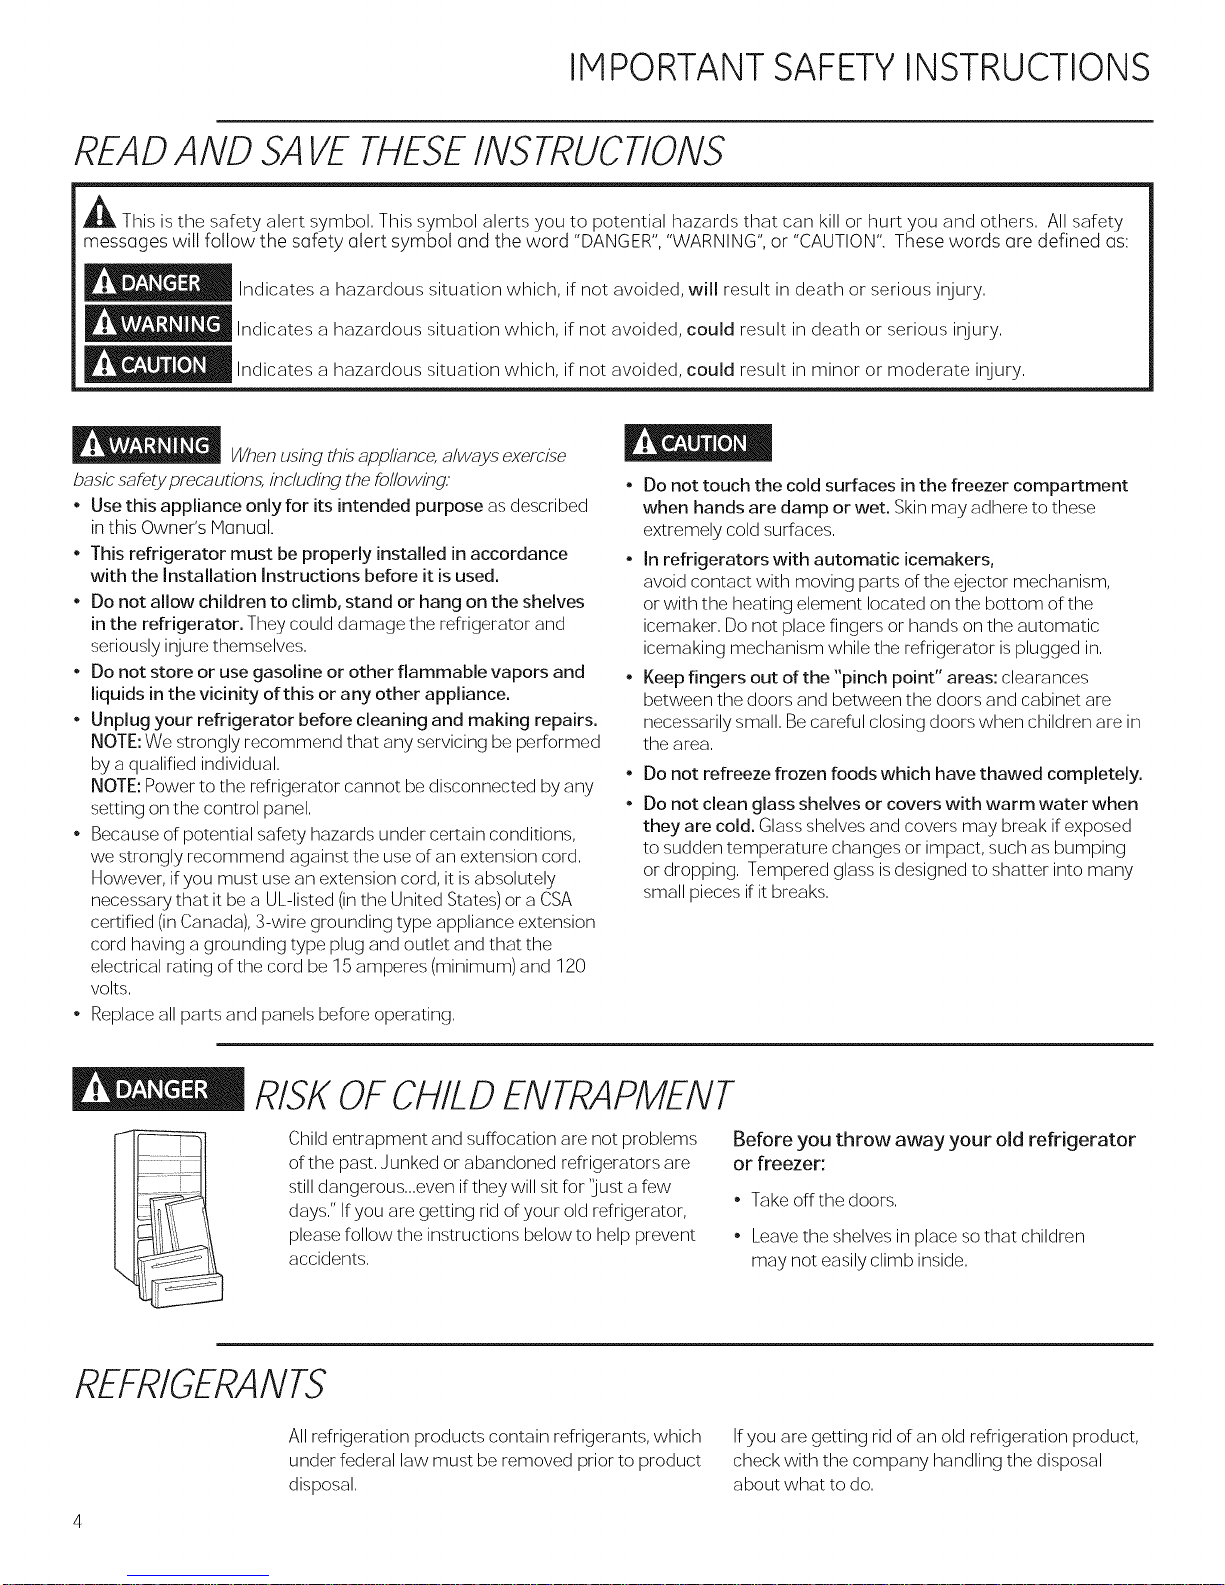
RISKOFCHILDENTRAPMENT
Child entrapment and suffocation are not problems
of the past. Junked or abandoned refrigerators are
still dangerous...even if they will sit for 'lust a few
days." Ifyou are getting rid of your old refrigerator,
please follow the instructions below to help prevent
accidents.
REFRIGERANTS
All refrigeration products contain refrigerants, which
under federal law must be removed prior to product
disposal.
Before you throw away your old refrigerator
or freezer:
• Take offthe doors.
• Leave the shelves in place so that children
may not easily climb inside.
Ifyou are getting rid of an old refrigeration product,
check with the company handling the disposal
about what to do.
Page 5
IMPORTANTSAFETYINSTRUCTIONS
_Explosion Hazard.
Keep flammable materials and vapors, such as gasoline, away from refrigerator. Failure to do so can
result in fire, explosion, or death.
Tip Over Hazard,
Built-in style models (model PYE, CYE, GYE, PWE, CWE, and ZWE) are top heavy, especially with any doors
open. These models must be secured with the anti-tip floor bracket to prevent tipping forward, which
could result in death or serious injury. Read and follow the entire installation instructions for installing the
anti-tip floor bracket packed with your refrigerator.
Electrical Shock Hazard,
Plug into a grounded 3-prong outlet.
Do not remove the ground prong.
Do not use an adapter.
Failure to follow these instructions can result in
death, fire, or electrical shock.
HOW TOCONNECTE1ECTRIC/TY
Do not, under any circumstances, cut or remove
the third (ground) prong from the power cord.
For personal safety, this appliance must be
properly grounded.
The power cord of this appliance isequipped with
a 3-prong (grounding) plug which mates with a
standard 3-prong (grounding) wall outlet to minimize
the possibility of electric shock hazard from this
appliance.
Have the wall outlet and circuit checked by a
qualified electrician to make sure the outlet is
properly grounded.
Where a standard 2-prong wall outlet is
encountered, it is your personal responsibility
and obligation to have it replaced with a properly
grounded 3-prong wall outlet.
The refrigerator should always be plugged into its
own individual electrical outlet which has a voltage
rating that matches the rating plate.
A 115 Volt AC, 60 Hz, 15- or 20-amp fused, grounded
electrical supply is required. This provides the best
performance and also prevents overloading house
wiring circuits which could cause a fire hazard from
overheated wires.
Never unplug your refrigerator by pulling on the
power cord, Always grip plug firmly and pull straight
out from the outlet,
Repair or replace immediately all power cords that
have become frayed or otherwise damaged, Do not
use a cord that shows cracks or abrasion damage
along its length or at either end,
When moving the refrigerator away from the wall,
be careful not to roll over or damage the power cord,
USEOFEXTENSIONCORDS
Because of potential safety hazards under certain
conditions, we strongly recommend against the
use of an extension cord.
However, if you must use an extension cord,
it is absolutely necessary that it be a UL-listed,
3-wire grounding type appliance extension cord
having a grounding type plug and outlet and that
the electrical rating of the cord be 15 amperes
(minimum) and 120 volts.
Page 6
Operating Instructions
Sta in/ess Stee/ Refrigera tor
Tempera ture
controls
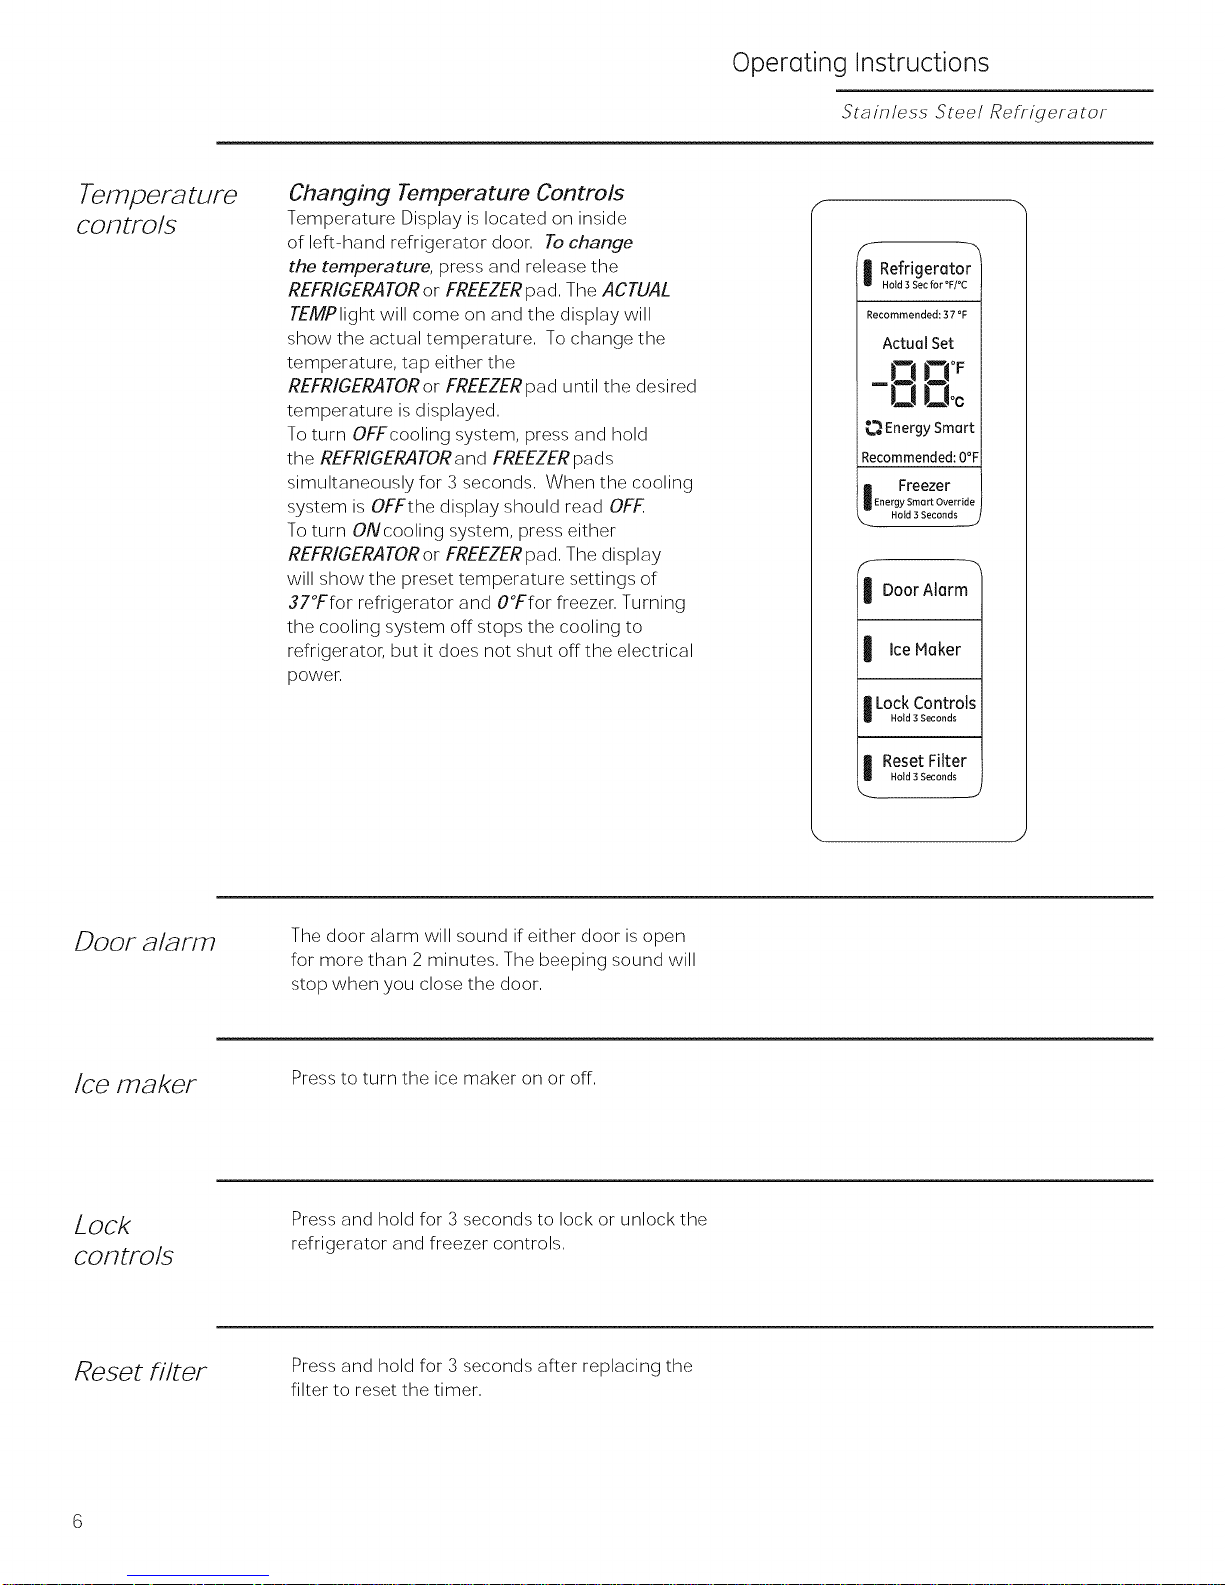
Changing Temperature Controls
Temperature Display is located on inside
of left-hand refrigerator door, To change
the temperature, press and release the
REFRIGERATOR or FREEZER pad, The ACTUAL
TEMPlight will come on and the display will
show the actual temperature, To change the
temperature, tap either the
REFRIGERATOR or FREEZER pad until the desired
temperature is displayed,
To turn OFFcooling system, press and hold
the REFRIGERATOR and FREEZER pads
simultaneously for 3 seconds, When the cooling
system is OFFthe display should read OFF
To turn ONcooling system, press either
REFRIGERATOR or FREEZER pad, The display
will show the preset temperature settings of
37°Ffor refrigerator and O°Ffor freezer, Turning
the cooling system off stops the cooling to
refrigerator, but it does not shut offthe electrical
power,
Refrigerator
i -m
Hold 3 Sec for °F/°C
Recommended: 37 °F
ActuaJSet
ID!3
-00°c
_._EnergySmart
Recommended:O°F
i Freezer
Energy Smart Override
_. Hold 3 Seconds ..2
f
I DoorAlarm
I Ice Maker
I LockControls
Hold 3 Seconds
I Reset Filter
Hold 3 Seconds
DOOF a/al?rFI
Ice maker
Lock
COFltFO/S
Reset filter
The door alarm will sound if either door is open
for more than 2 minutes, The beeping sound will
stop when you close the door,
Press to turn the ice maker on or off,
Press and hold for 3 seconds to lock or unlock the
refrigerator and freezer controls,
Press and hold for 3 seconds after replacing the
filter to reset the timer,
Page 7
Dispensers
Sta in less Steel Refrigera tot
internal water
dispenser
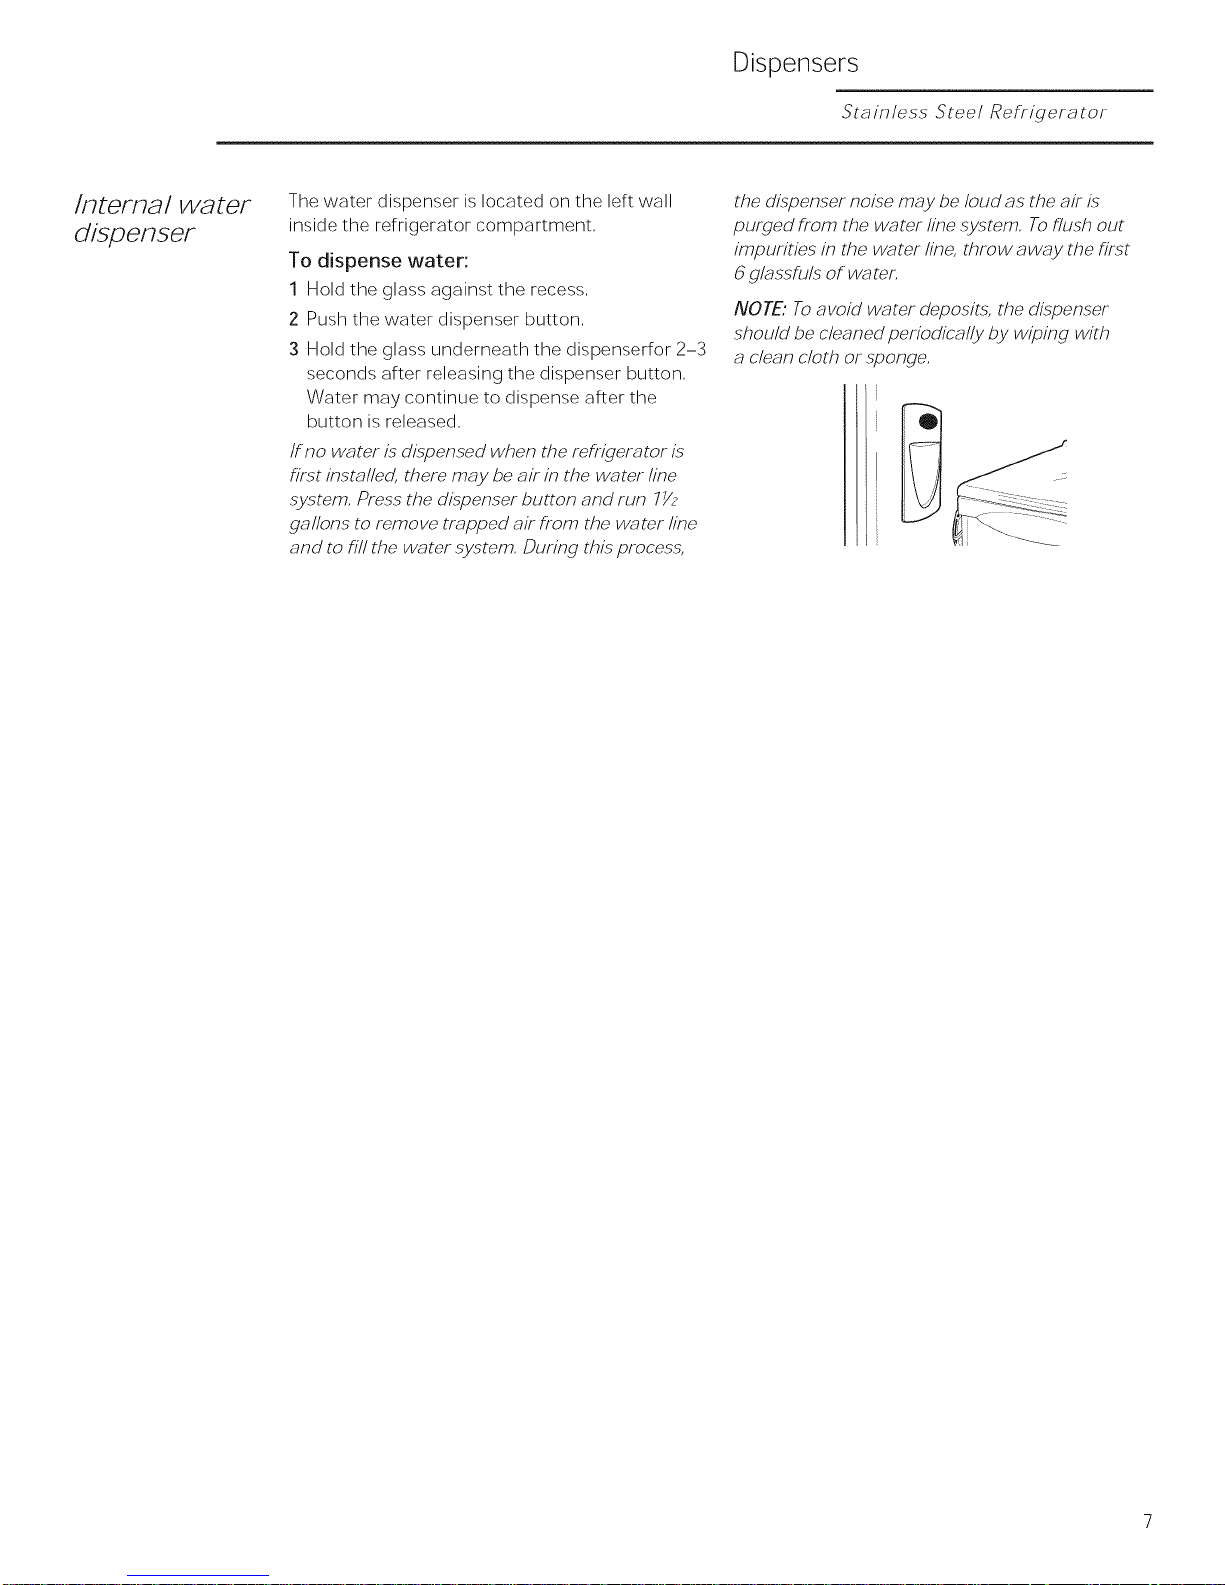
The water dispenser is located on the left wall
inside the refrigerator compartment,
To dispense water:
1 Hold the glass against the recess,
2 Push the water dispenser button,
3 Hold the glass underneath the dispenserfor 2-3
seconds after releasing the dispenser button,
Water may continue to dispense after the
button is released,
if no water is dispensed when the refrigerator is
first installed, there may be air in the water line
system, Press the dispenser button and run 77/z
gallons to remove trapped air from the water line
and to fill the water system, During this process,
the dispenser noise may be loud as the air is
purged from the water line system, To flush out
impurities in the w_Tter line, throw away the first
6 glassfi_ls of wa ter,
NOTE: To avoid water deposits, the dispenser
should be cleaned periodically by wiping with
a clean cloth or sponge,
Page 8

Water Filter
5"ta in less 5"tee/Refrigera tor
Water
filter
Water Filter Cartridge
The water filter cartridge is located in the fresh food
interior on the left side wall, near the top.
Select models use radio frequency identification
(RFID) to detect leaks and monitor filter status. The
RFID technology is certified by the FCC.
FCCID:ZKJ-EBX1532P001 ICID:
10229A-EBX1532P001
"This device complies with part 15of the FCC Rules.
Operation is subject to the following two conditions: (1)
This device may not cause harmful interference, and
(2) this device must accept any interference received,
including interference that may cause undesired
opera tion, "
"This device complies with Industry Canada licence-
exempt R$S standard(s). Operation is subject to the
following two conditions: (1} this device may not cause
interference, and (2) this device must accept any
interference, including interference that may cause
undesired operation of the device. "
When to replace the filter cartridge
The filter cartridge should be replaced every six
months or earlier if 170 gallons of water has been
dispensed or the flow of water to the dispenser or
icemaker decreases.
Touch Screen Models: A filter status message will
appear on the screen when the water filter needs
to be replaced. The filter status will automatically
update when the filter is replaced.
Non-touch Screen Models: A filter indicator light will
illuminate on the screen when the water filter needs
to be replaced.
Removing the filter cartridge
To replace the filter, first remove the old cartridge by
opening the filter door and pulling on the bottom of
the cartridge to allow it to swing outward. When the
cartridge can no longer swing, gently pull to unseat it
from the cartridge holder. DO NOT TWIST CARTRIDGE.
A small amount of water may drip out.
Installing the Filter Cartridge
1.Align top of filter with cartridge holder and push
until cartridge is fully seated. The arrow on the
label should point up if cartridge is oriented
correctly.
2. While continuing to ensure cartridge is fully seated
in the holder, gently swing the filter inward until it
is in position. If filter will not swing easily, check to
ensure filter is properly aligned and fully seated
within the cartridge holder.
f
Push \Puil
©
3, Run two gallons of water through the cold water
dispenser (about 5 minutes) to remove air from
the system. A newly installed filter cartridge will
cause water to spurt from the dispenser. Use a
large pitcher or sports bottle to catch the water
spray,
4, Reset Filter Status message (non-touch screen
models).
Note: It is normal for water to appear discolored
during the initial system flush, Water color will return
to normal after first few minutes of dispensing,
Filter Bypass Plug
To reduce the risk of property damage due to water
leakage, you MUST use the filter bypass plug when
a replacement filter cartridge is not available, The
dispenser and icemaker will not operate without
either the filter or bypass plug installed, The bypass
plug is installed in the same way as a filter cartridge,
To reduce the risk associated with choking, do not allow children under 3 years of age to have access to
small parts during the installation of this product. The disposable filter cartridge should be replaced every 6
months at the rated capacity, or sooner if a noticeable reduction in flow rate occurs.
For the maximum benefit of your filtration system, GE recommends the use of GE-branded filters only. Using
GE-branded filters in GEand HotpoinP' refrigerators provides optimal performance and reliability. GE filters
meet rigorous industry NSF standards for safety and quality that are important for products that are filtering
your water. GE has not qualified non-GE-branded filters for use in GE and Hotpoint refrigerators and there is no
assurance that non-GE-branded filters meet GE's standards for quality, performance and reliability.
If you have questions, or to order additional filter cartridges, visit our website at www.geapplianceparts.
com or call GE Parts and Accessories, 8003626.2002.
Customers in Canada should consult the yellow pages for the nearest Camco Service Center.
Page 9
Shelves and Bins
Stainless Steel RefHgera tot
Rearranging
the shelves
Spillproof
shelves
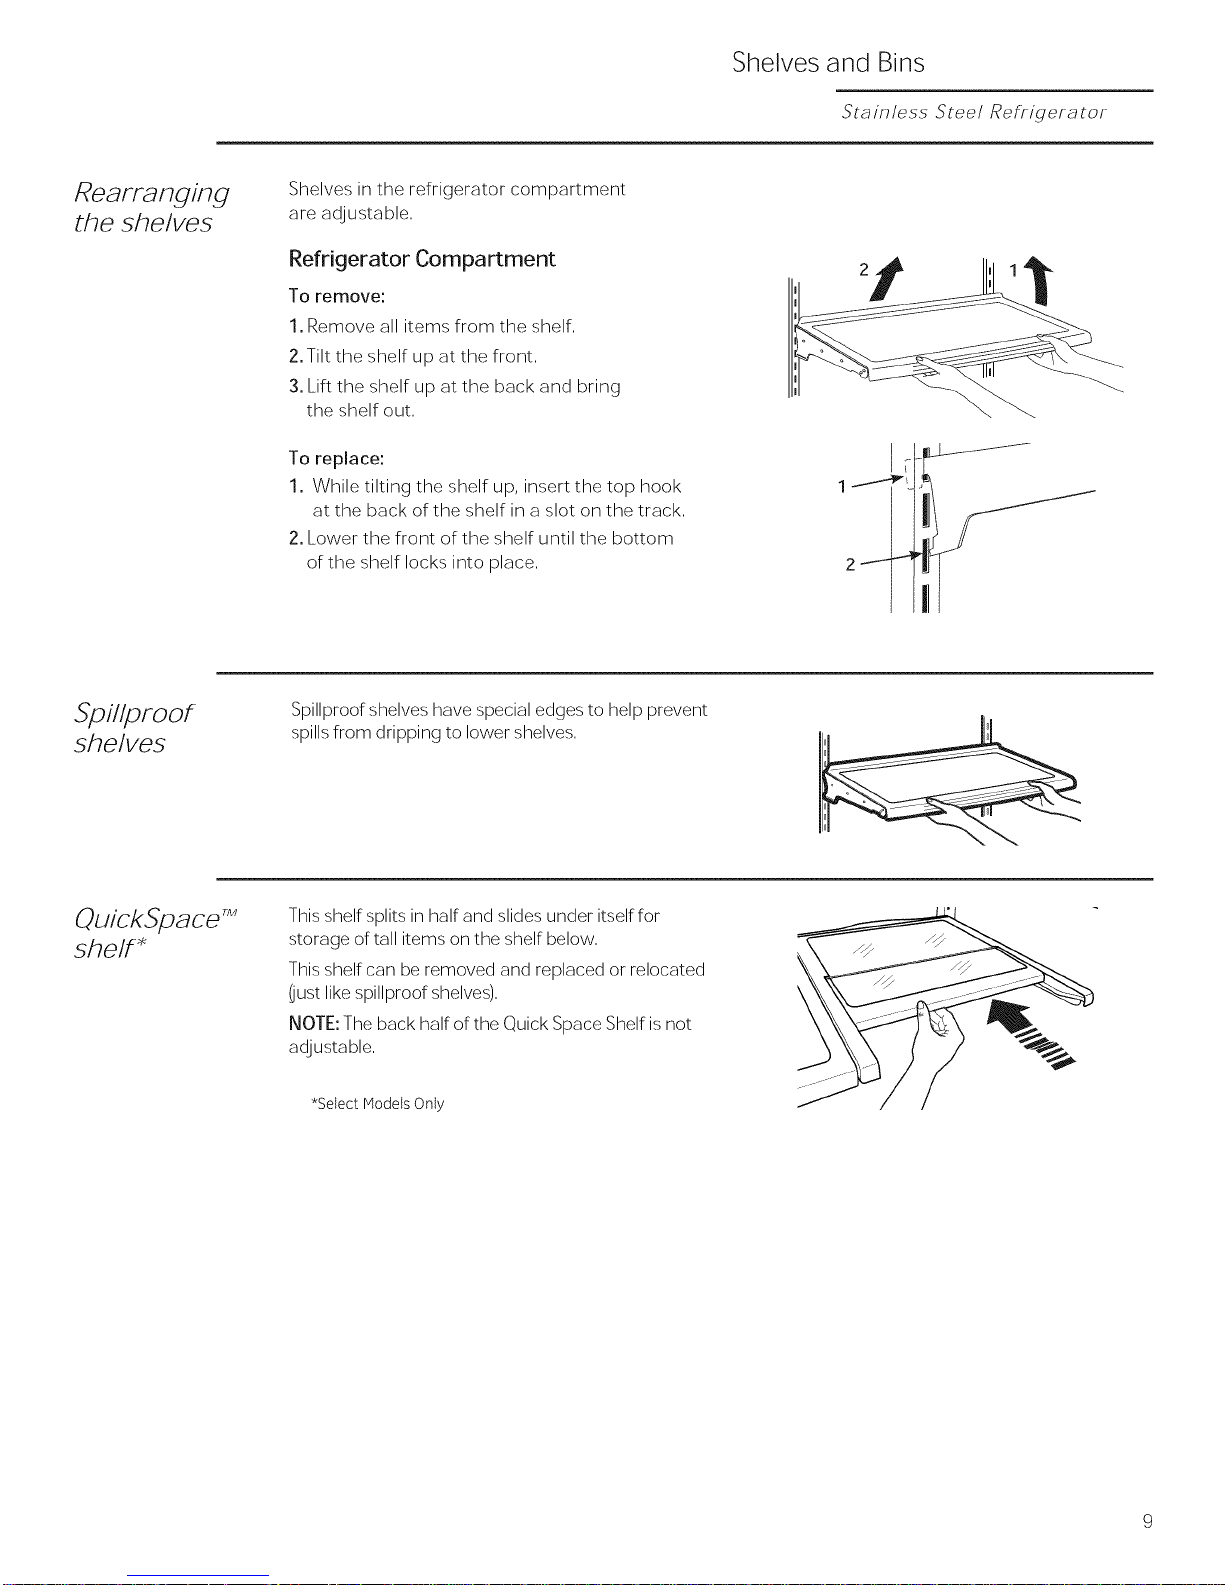
Shelves in the refrigerator compartment
are adjustable,
Refrigerator Compartment
To remove:
1. Remove all items from the shelf,
2. Tilt the shelf up at the front,
3. Lift the shelf up at the back and bring
the shelf out,
To replace:
1. While tilting the shelf up, insert the top hook
at the back of the shelf in a slot on the track,
2. Lower the front of the shelf until the bottom
of the shelf locks into place,
Spillproof shelves have special edges to help prevent
spills from dripping to lower shelves,
1 / p'_'
QuickSpace TM
she/f*
This shelf splits in half and slides under itself for
storage of tall items on the shelf below,
This shelf can be removed and replaced or relocated
(just like spillproof shelves),
NOTE: The back half of the Quick Space Shelf is not
adjustable,
*Select Models Only
\
\
Page 10

Shelves and Bins
5"ta inless Steel Refrigera tot
Non-
adjustable
dairy bin
Adjustable
bins on doors
Toremove: Lift the dairy bin straight up,
then pull out.
To replace: Engage the bin in the molded door
supports and push down. The bin will lock in place.
Adjustable bins can easily be carried from
refrigerator to work area.
To remove: Lift bin straight up, then pull out.
To replace or relocate: Slide in the binjust above the
molded door supports, and push down. The bin will
lock in place.
Ii iiii
Drop down tray *
(tray open)
1. Open right fresh food door
2. Depress both buttons on lower sides of bin and
bin will drop down.
3. Reverseto reinstall.
*Select Models Only
i
Freezer basket
and drawer
10
Dispense Models
(Right Hand Door)
1. Basket.
2. Drawer
3. Ice Bucket*
*Select Models Only
Non-Dispense Models
(Left Hand Door)
Page 11
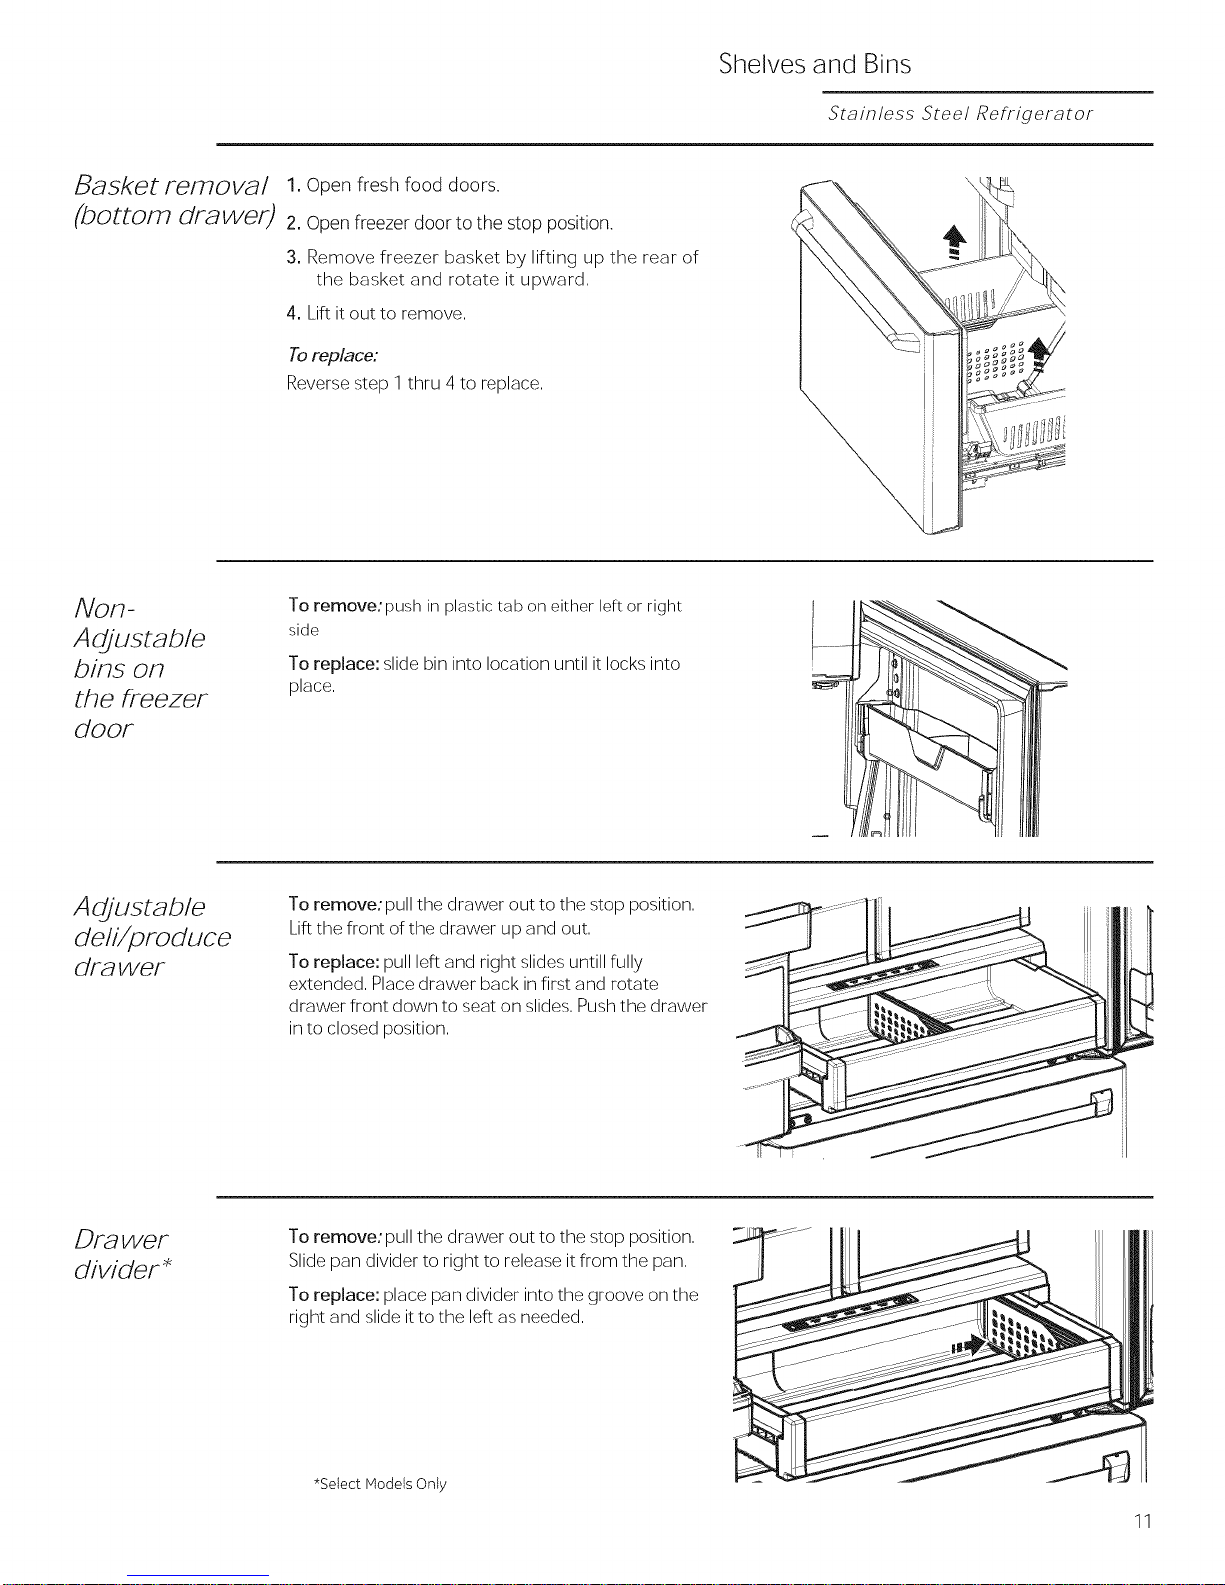
Basket removal 1. Open fresh food doors.
(bottom drawer) 2. open freezer door to the stop position.
3. Remove freezer basket by lifting up the rear of
the basket and rotate it upward,
4. Lift it out to remove,
Toreplace:
Reverse step 1 thru 4 to replace,
Shelves and Bins
Stain/ess Stee/ Refrigerator
Non-
Adjustab/e
bins on
the freezer
door
Adjustab/e
de/i/produce
drawer
Toremove:push in plastic tab on either left or right
side
To replace: slide bin into location until it locks into
place,
To remove:pull the drawer out to the stop position,
Lift the front of the drawer up and out,
To replace: pull left and right slides untill fully
extended, Place drawer back in first and rotate
drawer front down to seat on slides, Push the drawer
in to closed position,
Drawer
divider _
To remove:pull the drawer out to the stop position,
Slide pan divider to right to release it from the pan,
To replace: place pan divider into the groove on the
right and slide it to the left as needed,
*Select Models Only
11
Page 12
Climate Zone and Temperature Controlled Drawer
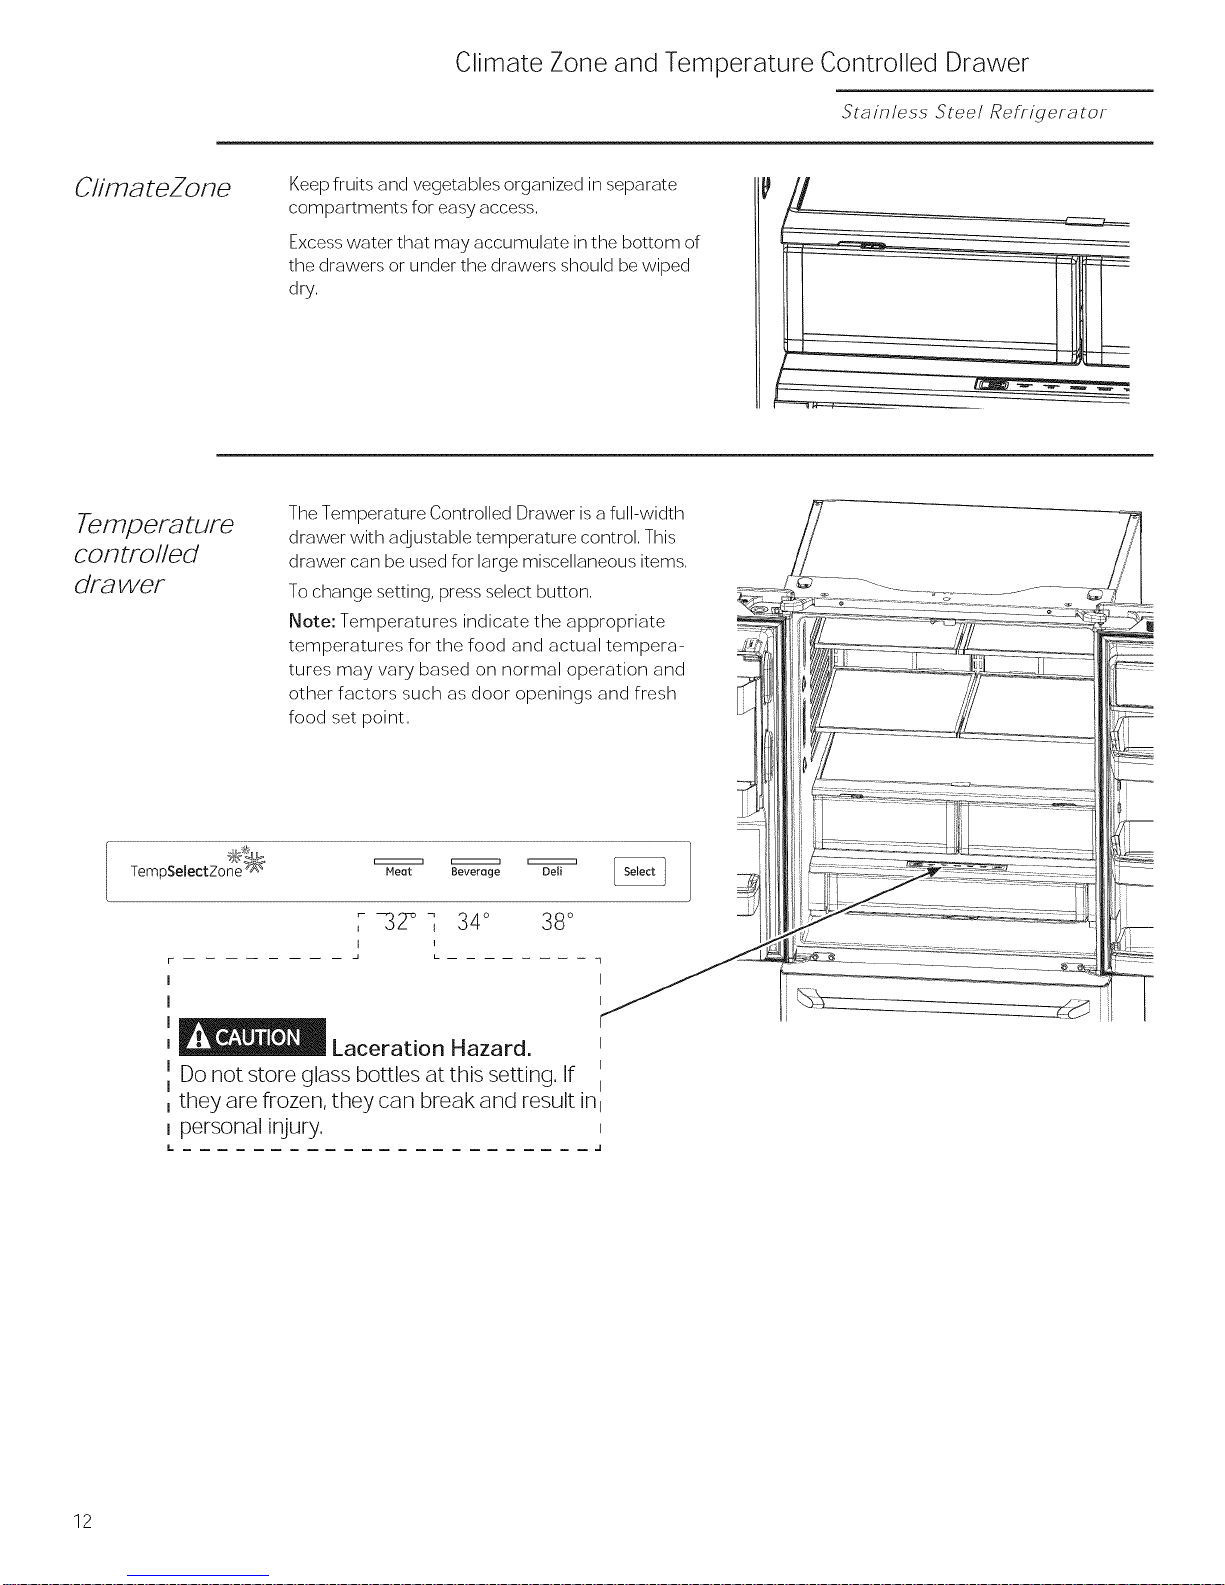
CfimateZone Keep fruits and vegetables organized in separate
compartments for easy access,
Excess water that may accumulate in the bottom of
the drawers or under the drawers should be wiped
dry,
Stainless Steel Refrigera tot
Temperature
controlled
dFawer
TempSelectZone Meot Beveroge Dell
I
I
I
I
I
Do not store glass bottles at this setting. If
The Temperature Controlled Drawer is a full-width
drawer with adjustable temperature control, This
drawer can be used for large miscellaneous items,
To change setting, press select button,
Note: Temperatures indicate the appropriate
temperatures for the food and actual tempera-
tures may vary based on normal operation and
other factors such as door openings and fresh
food set point,
r-
, 732_ 34° 38°
I I
Laceration Hazard,
they are frozen, they can break and result in
i personal injury.
L J
L qF
12
Page 13
Automatic Icemaker
Stainless Steel Refrigera tot
Automatic
/cemaker
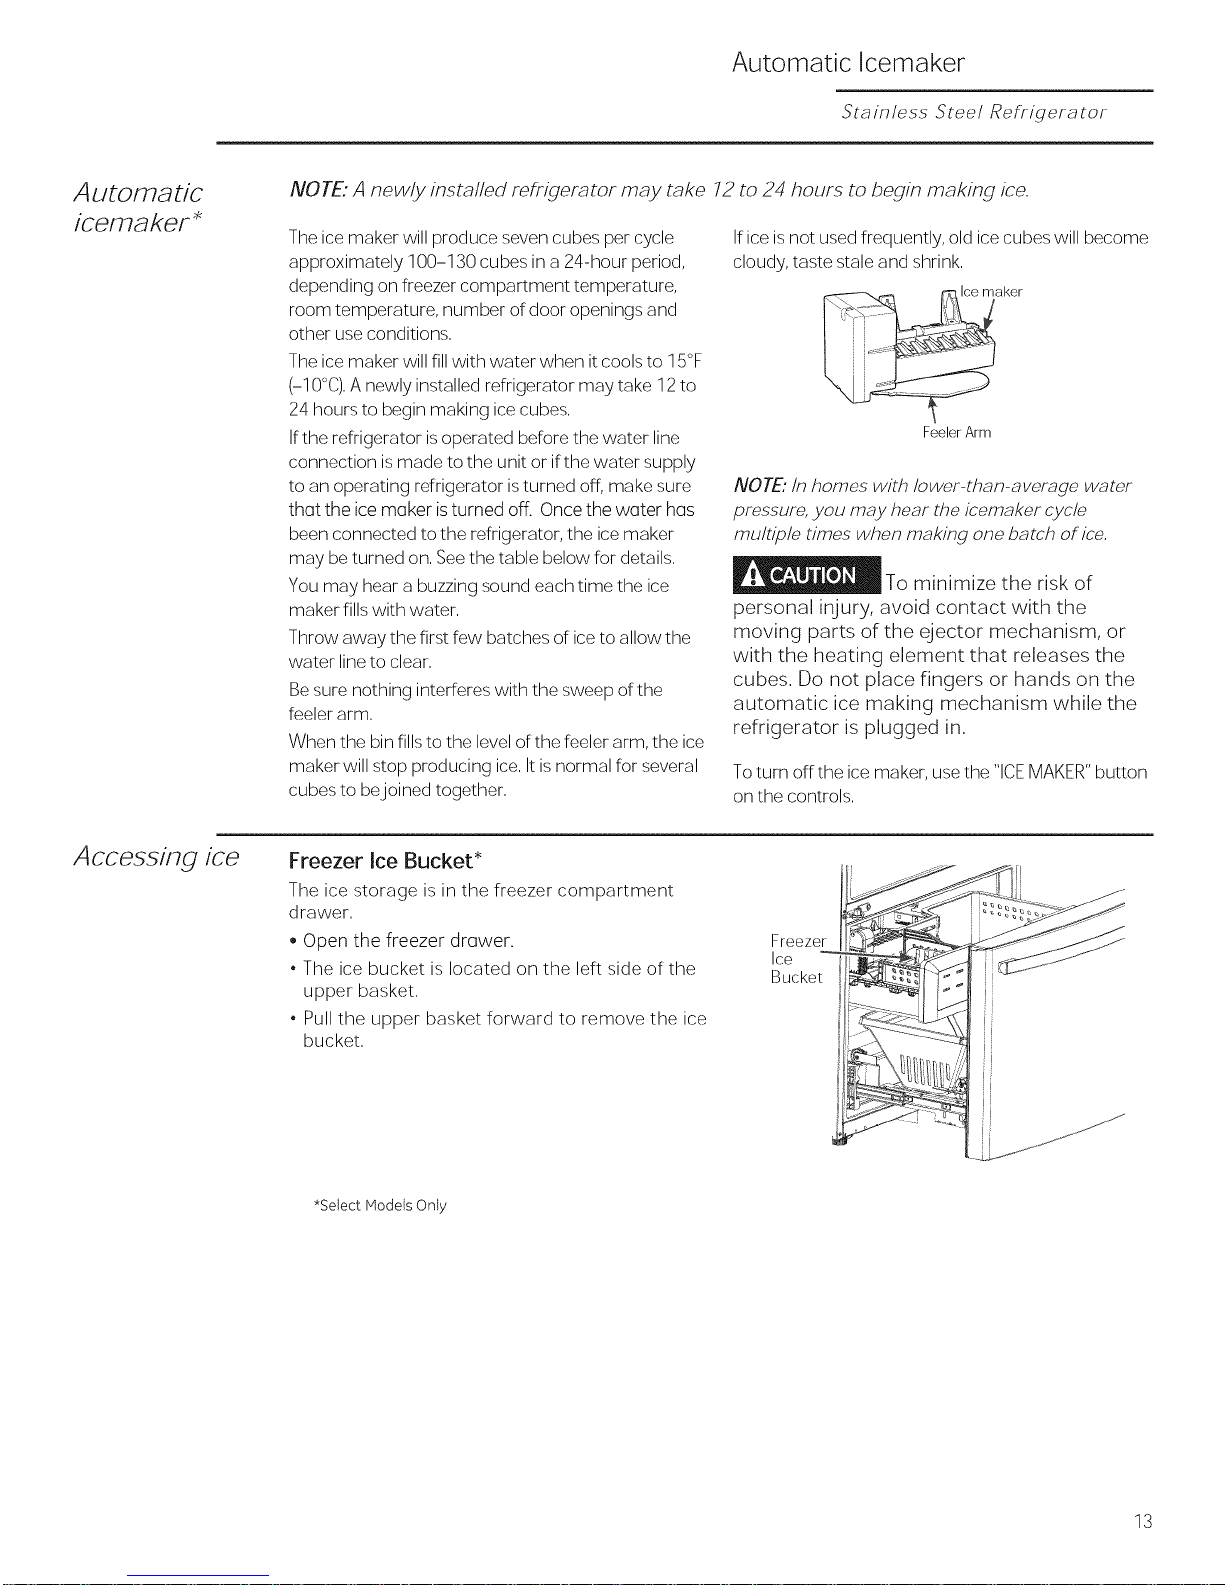
NOTE: A newly installed refrigerator may rake 72 to 24 hours to begin making ice.
The ice maker will produce seven cubes per cycle
approximately 100-130 cubes in a 24-hour period,
depending on freezer compartment temperature,
room temperature, number of door openings and
other use conditions.
The ice maker will fill with water when it cools to 15°F
(-10°C). A newly installed refrigerator may take 12 to
24 hours to begin making ice cubes.
Ifthe refrigerator isoperated before the water line
connection is made to the unit or if the water supply
to an operating refrigerator is turned off, make sure
that the ice maker isturned off. Once the water has
been connected to the refrigerator, the ice maker
may be turned on. See the table below for details.
You may hear a buzzing sound each time the ice
maker fills with water.
Throw away the first few batches of ice to allow the
water line to clear.
Be sure nothing interferes with the sweep of the
feeler arm.
When the bin fills to the level of the feeler arm, the ice
maker will stop producing ice. It isnormal for several
cubes to be joined together.
If ice is not used frequently, old ice cubes will become
cloudy, taste stale and shrink.
aker
FeelerArm
NOTE:/n homes with lower-than-average water
pressure, you may hear the icemaker cycle
multiple times when making one batch of ice,
To minimize the risk of
personal injury, avoid contact with the
moving parts of the ejector mechanism, or
with the heating element that releases the
cubes. Do not place fingers or hands on the
automatic ice making mechanism while the
refrigerator is plugged in.
Toturn offthe ice maker, use the "ICE MAKER" button
on the controls.
Accessing ice
Freezer Ice Bucket*
The ice storage is in the freezer compartment
drawer.
o Open the freezer drawer.
. The ice bucket is located on the left side of the
upper basket.
. Pull the upper basket forward to remove the ice
bucket.
*Select Models Only
Freezer
Ice
Bucket
13
Page 14
Care and Cleaning
5"ta inless Steel RefHgera tot
Cleaning
the outside
Cleaning
the inside
The stainless steel panels and handles can be
cleaned with a commercially available stainless
steel cleaner such as Stainless SteelMagic, TM
St_inless Steel Magic is available at Ace, True
Value, Servistar, HWI and other leading stores.
It is also available through GE Parts and
Accessories, 800.626.2002. Order port number
WXlOX15.
Do not use appliance wax or polish on the
stainless steel.
To help prevent odors, leave an open box
of baking soda in the fresh food and freezer
compartments.
Unplug the refrigerator before cleaning. If this
is not practical, wring excess moisture out of
sponge or cloth when cleaning around switches,
lights or controls.
Use worm woter ond boking sodo solution-
about a tablespoon (15 ml) of baking soda to
a quart (1 liter) of water. This both cleans and
neutralizes odors. Rinse and wipe dry.
Silver-accented plastic parts should be washed
with soap or other mild detergents. Wipe clean with
a sponge, damp cloth or paper towel.
Do not use scouring pads, powdered cleaners,
bleach or cleaners containing bleach because
these products can scratch and weaken the paint
finish.
Use of any cleaning solution other than that
which is recommended, especially those that
contain petroleum distillates, can crack or
damage the interior of the refrigerator.
Avoid cleaning cold glass shelves with hot
water because the extreme temperature
difference may cause them to break. Handle
glass shelves carefully. Bumping tempered
glass can cause it to shatter.
Do not wash any plastic refrigerator parts in
the dishwasher.
Behind the
rehrigera tor
Preparing
for vacation
Preparing
to mo ve
Be careful when moving the refrigerator away
from the wall, All types of floor coverings can be
damaged, particularly cushioned coverings and
those with embossed surfaces,
Raise the leveling legs located at the bottom front of
the refrigerator.
Pull the refrigerator straight out and return it
to position by pushing it straight in. Moving the
For long vacations or absences, remove food and
unplug the refrigerator. Clean the interior with a
baking soda solution of one tablespoon (15 ml) of
baking soda to one quart (1 liter) of water. Leave the
doors open.
If the temperature can drop below freezing, have a
qualified service technician drain the water supply
system to prevent serious property damage due to
flooding.
1) Turn refrigerator off(pg. 6) or unplug the
refrigerator.
Secure all loose items such as shelves and
drawers by taping them securely in place
to prevent damage.
refrigerator in a side direction may result in
damage to the floor covering or refrigerator.
Lower the leveling legs until they touch the floor.
When pushing the refrigerator back, make sure
you don't roll over the power cord or icemaker
supply line.
2) Empty ice bucket
3) Turn water supply off
If you cut the water supply off, turn off the ice
maker (pg. 13).
Upon returning from vacation:
1) Replace the water filter.
2) Run 2 gallons of water through the cold water
dispenser (about 5 minutes) to flush the system.
refrigerator against the hand truck. This could
damage the refrigerator. Handle only from the
sides of the refrigerator.
When using a hand truck to move the
refrigerator, do not rest the front or back of the
14
Be sure the refrigerator stays in an upright
position during moving.
Page 15
Replacing the Light Bulbs
5"ta inless Steel Refrigera tot
Fresh food
compartment i
upper light
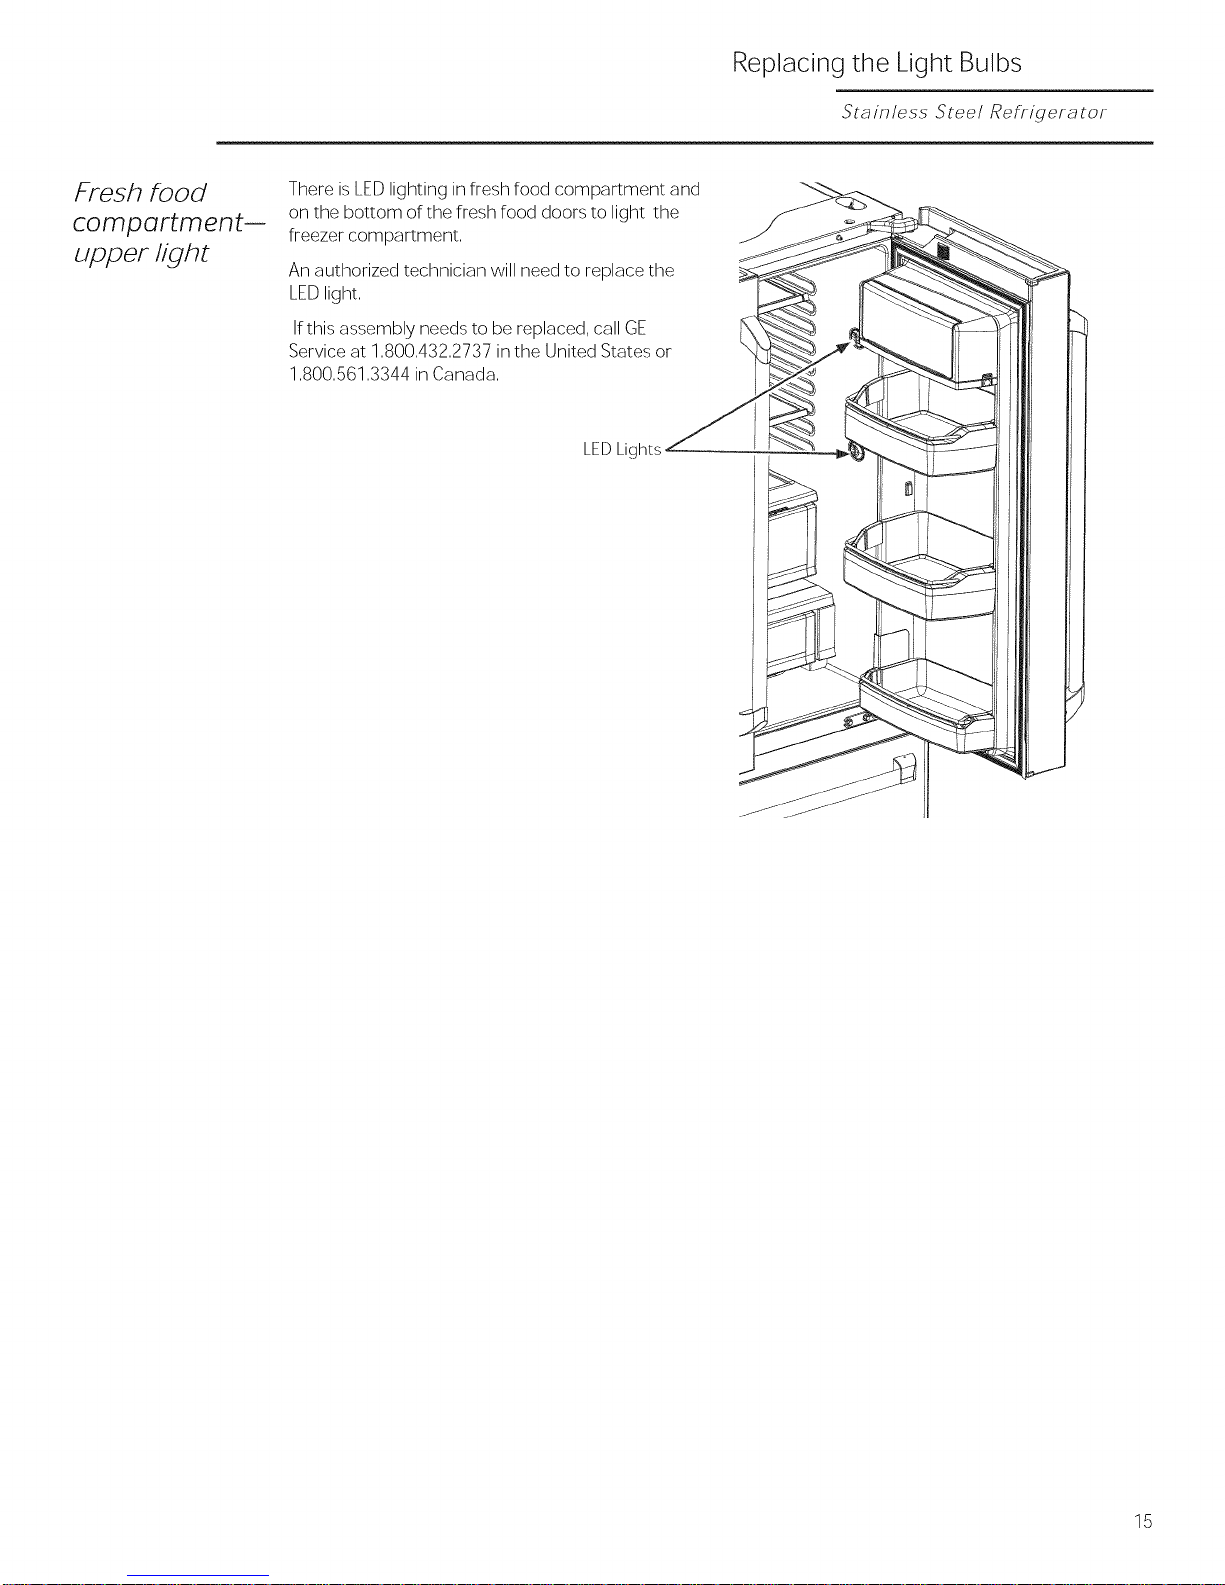
There is LEDlighting in fresh food compartment and
on the bottom of the fresh food doors to light the
freezer compartment,
An authorized technician will need to replace the
LED light,
Ifthis assembly needs to be replaced, call GE
Service at 1,800,432,2737 in the United States or
1,800,561,3344 in Canada,
LEDLights
15
Page 16
The Problem Solver
5"ta inless 5reel Ref?igera tot
Normal
operating
sounds
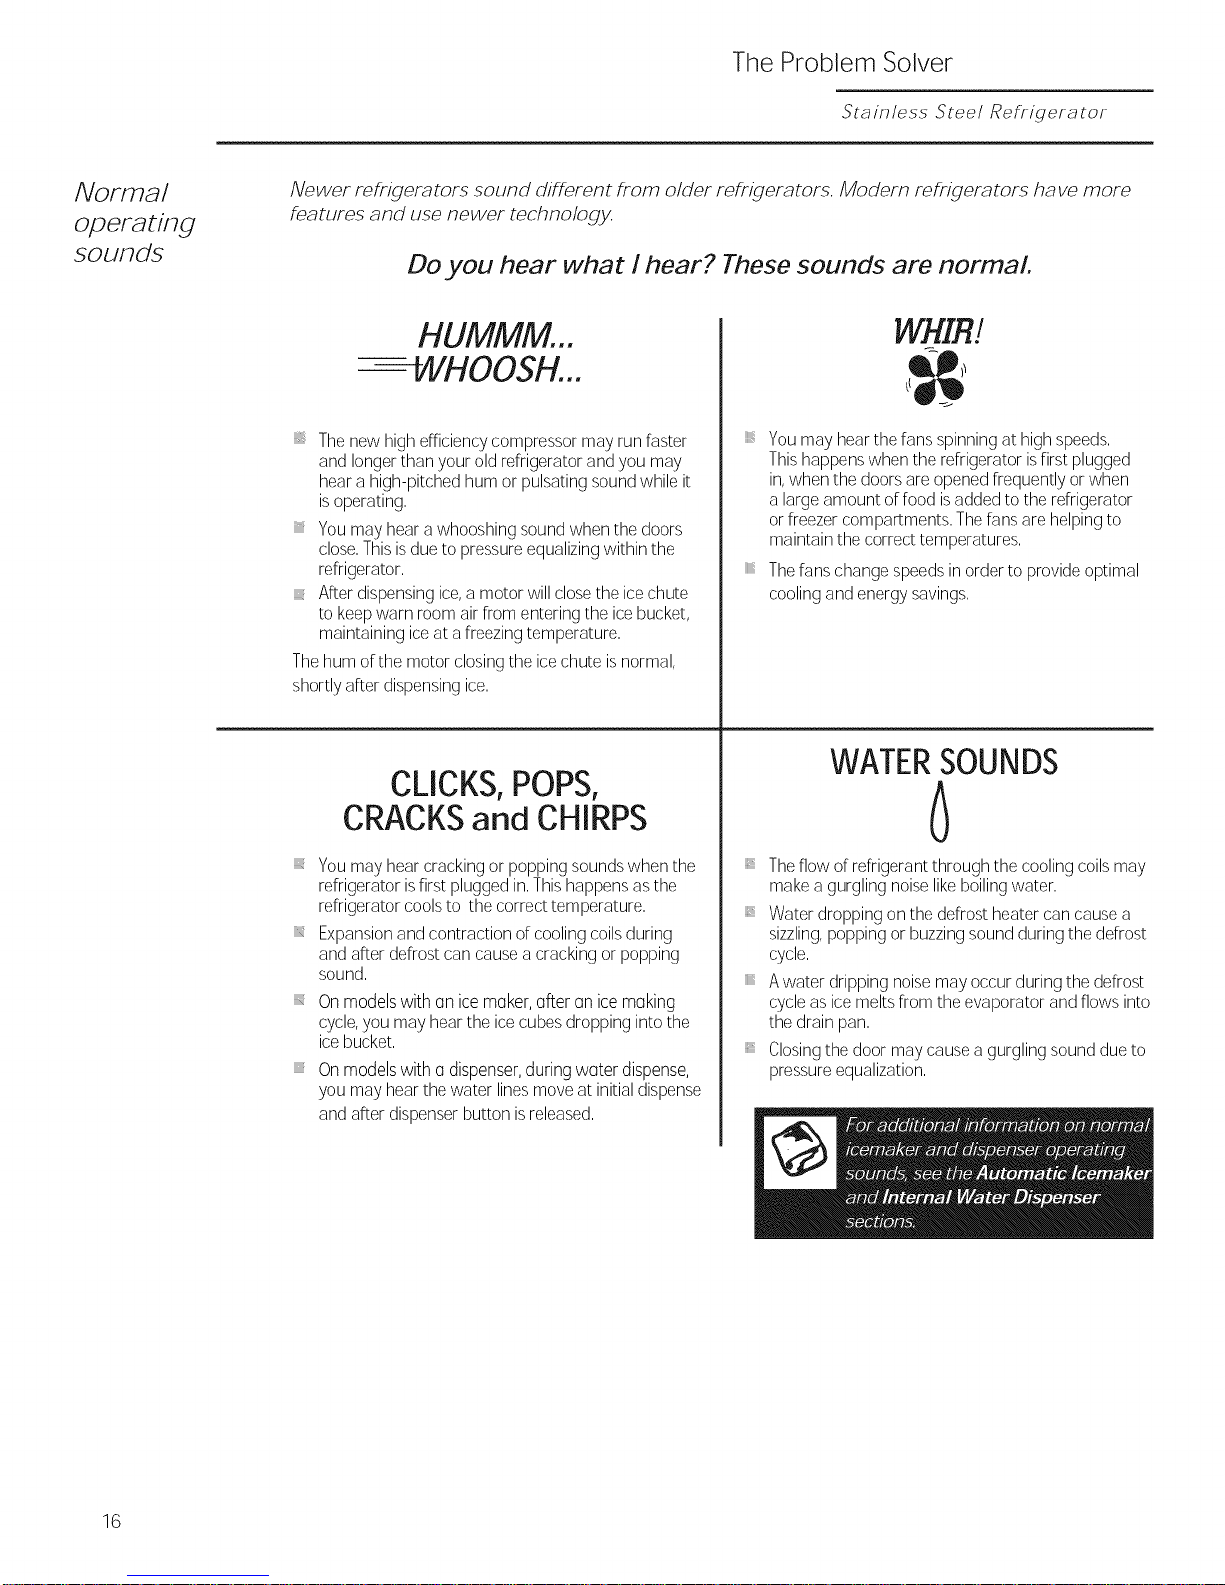
Newer refrigerators sound different from older refrigerators. Modern refrigerators have more
features and use newer technology.
Do you hear what ! hear? These sounds are normal
HUMMM...
WHIR!
-- WHOOSH...
Thenew high efficiencycompressor may run faster
and longer than your old refrigerator andyou may
hear a high-pitched hum or pulsating sound while it
is operating,
You may hear a whooshing sound when the doors
close,Thisisdue to pressureequalizing within the
refrigerator,
After dispensing ice,a motor will closethe ice chute
to keep warn room air from entering the ice bucket,
maintaining iceat a freezing temperature,
Thehum of the motor closing the ice chute isnormal,
shortly after dispensing ice,
iiiiiii_i¸
You may hear the fans spinning at highspeeds,
Thishappens when the refrigerator isfirstplugged
in,when the doors are opened frequently or when
a large amount offood is added to the refrigerator
or freezer compartments, The fans are helping to
maintain the correct temperatures,
iiiiiii_i¸
Thefans change speeds in order to provide optimal
cooling and energy savings,
WATERSOUNDS
CLICKS,POPS,
CRACKSand CHIRPS
6
You may hear cracking or popping sounds when the
refrigerator isfirst plugged in,Thishappens asthe
refrigerator coolsto the correct temperature,
Expansionand contraction of cooling coilsduring
and after defrost can cause a cracking or popping
sound,
iiiiiii_i¸
On models with an ice maker, after an ice making
cycle,you may hear the ice cubes dropping into the
ice bucket,
iiiiiii_i¸
On models with a dispenser,during water dispense,
you may hear the water lines move at initialdispense
and after dispenser button isreleased,
Theflow of refrigerant through the cooling coils may
make a gurgling noise like boiling water,
Water dropping on the defrost heater can cause a
sizzling,popping or buzzing sound during the defrost
cycle,
Awater dripping noise may occur during the defrost
cycle as icemelts from the evaporator and flows into
the drain pan,
Closingthe door may cause a gurgling sound due to
pressure equalization,
16
Page 17
The Problem Solver
Stainless Steel Refrigera tot
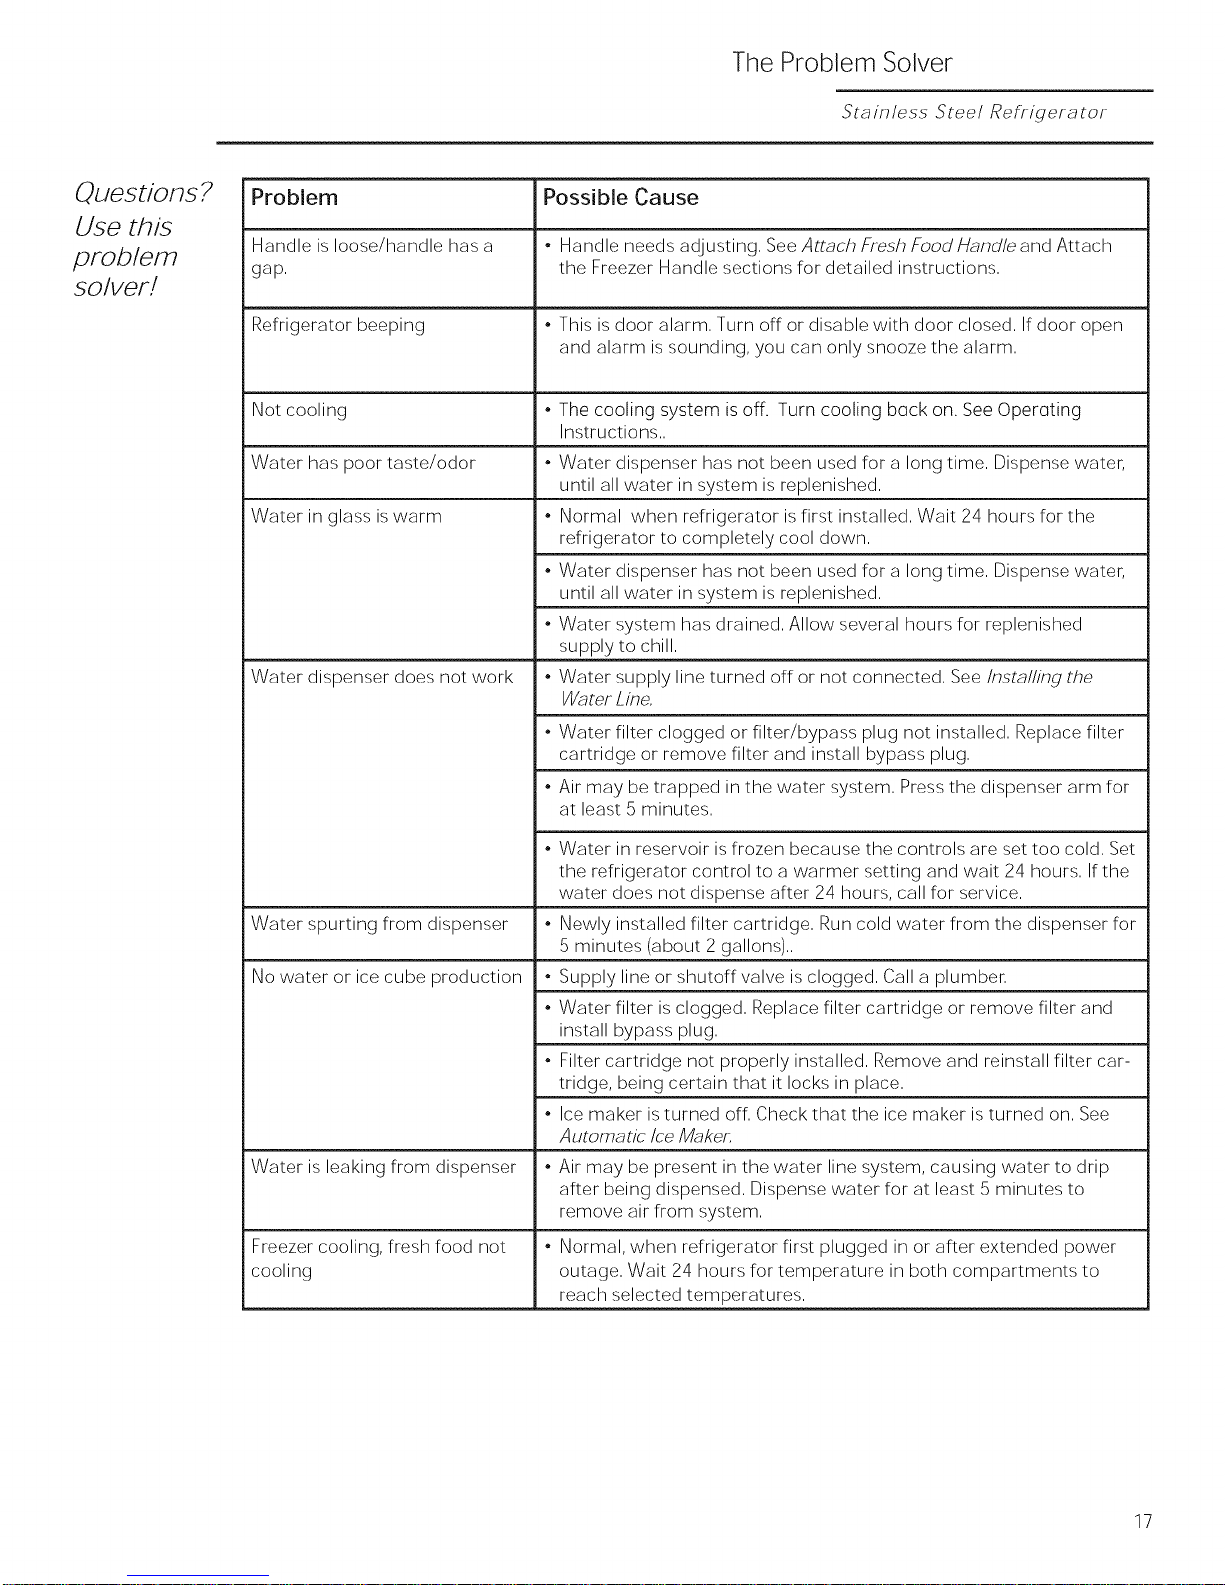
Questions?
Use this
problem
solver./
Problem
Handle is loose/handle has a
gap,
Refrigerator beeping
Possible Cause
. Handle needs adjusting, See Attach Fresh Food Handle and Attach
the Freezer Handle sections for detailed instructions,
. This is door alarm, Turn off or disable with door closed, If door open
and alarm is sounding, you can only snooze the alarm,
Not cooling . The cooling system is off. Turn cooling back on. See Operating
Instructions,,
Water has poor taste/odor
Water dispenser has not been used for a long time, Dispense water,
until all water in system is replenished,
Water in glass is warm
Normal when refrigerator is first installed, Wait 24 hours for the
refrigerator to completely cool down,
o
Water dispenser has not been used for a long time, Dispense water,
until all water in system is replenished,
o
Water system has drained, Allow several hours for replenished
supply to chill,
Water dispenser does not work
Water supply line turned off or not connected, See/nst_//lng the
W_ter Line,
. Water filter clogged or filter/bypass plug not installed, Replace filter
cartridge or remove filter and install bypass plug,
. Air may be trapped in the water system, Press the dispenser arm for
at least 5 minutes,
Water spurting from dispenser .
No water or ice cube production
Water is leaking from dispenser
Freezer cooling, fresh food not
cooling
. Water in reservoir is frozen because the controls are set too cold, Set
the refrigerator control to a warmer setting and wait 24 hours, If the
water does not dispense after 24 hours, call for service,
Newly installed filter cartridge, Run cold water from the dispenser for
5 minutes (about 2 gallons),,
o
Supply line or shutoff valve is clogged, Call a plumber,
o
Water filter is clogged, Replace filter cartridge or remove filter and
install bypass plug,
o
Filter cartridge not properly installed, Remove and reinstall filter car-
tridge, being certain that it locks in place,
Ice maker is turned off, Check that the ice maker is turned on, See
o
Automatic ice M_ker,
Air may be present in the water line system, causing water to drip
after being dispensed, Dispense water for at least 5 minutes to
remove air from system,
Normal, when refrigerator first plugged in or after extended power
outage, Wait 24 hours for temperature in both compartments to
reach selected temperatures,
17
Page 18
Performance Data Sheet
Model: GERPWFE
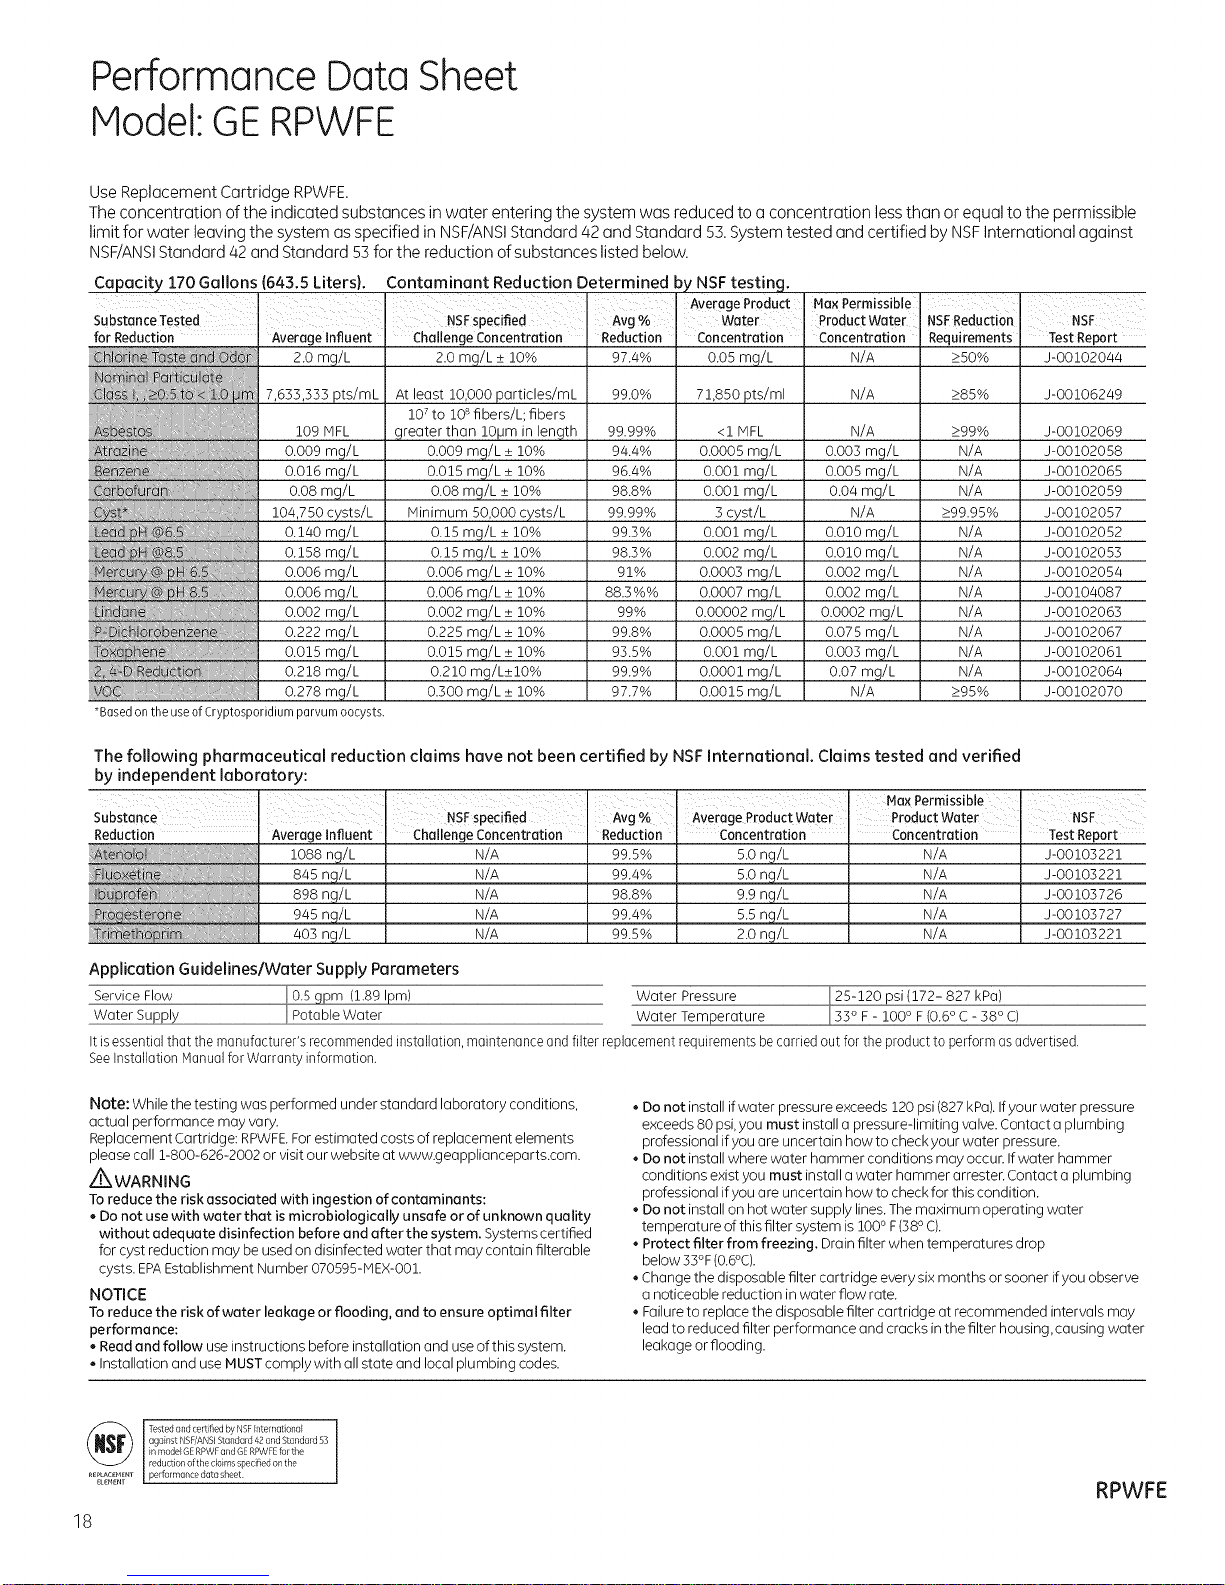
UseReplacement Cartridge RPWFE.
Theconcentration of the indicated substances in water entering the system was reduced to a concentration lessthan or equal to the permissible
limit for water leaving the system as specified in NSF/ANSIStandard/42 and Standard 53.Systemtested and certified by NSFInternational against
NSF/ANSIStandard/42 and Standard 53for the reduction of substances listed below.
Capacity 170 Gallons (643.5 Liters).
Substance TeSte d
for Reduction Average Influent
0.278 m( 0.300 m(
*Basedon the use ofCryptosporidium parvum oocysts.
Contaminant Reduction Determined
NSFspecif Avg%
Challenge Concentration Reduction
97.4%
99.0%
99.99%
9/4.4%
96.4%
98.8%
99.99%
99.3%
98.3%
91%
88.3 % %
99%
99.8%
93.5%
99.9%
97.7%
py NSF testing.
Average Product
Water
Concentration
0.05 mg/L
71,850 pts/ml
<1 MFL
0.0005 mg/L
0.001 mg/L
0.001 mg/L
3 cyst/L
0.001 mg/L
0.002 mg/L
0.0003 mg/L
0.0007 mg/L
0.00002 mg/L
0.0005 mg/L
0.001 mg/L
0.0001 mg/L
0.0015 mg/L
Max Permissible
Product Water
Concentration
N/A
N/A 285% J-00106249
N/A
0.003 mg/L
0.005 mg/L
0.0/4mg/L
N/A
0.0!0 mg/L
0.0!0 mg/L
0.002 mg/L
0.002 mg/L
0.0002 mg/L
0.075 mg/L
0.003 mg/L
0.07 mg/L
N/A
NSF Reduction NSF
Requirements
_>50%
299%
N/A
N/A
N/A
299.95%
N/A
N/A
N/A
N/A
N/A
N/A
N/A
N/A
295%
Test Report
J-00102044
J-00102069
J-00102058
J-00102065
J-00102059
J-00102057
J-00102052
J-00102053
J-00102054
J-00104087
J-00102063
J-00102067
J-00102061
J-00102064
J-00102070
The following pharmaceutical reduction claims have not been certified by NSFInternational. Claims tested and verified
by independent laboratory:
Substance I I NSFsPecified Avg % Average P[oduct Water [ Product Water I NSF
Reduction Average Influent Challenge Concentration Reduction Concentration ' Concentration Test Report
Application Guidelines/Water Supply Parameters
Service Flow Water Pressure (172- 827 kPa)
Water SU_ Water Temperature ] 33 ° F- 100°F _6_ : _ C)
It is essential that the manufacturer's recommended installation, maintenance and filter replacement requirements be carried out for the product to perform as advertised.
See Installation Hanual for Warranty information.
Note: While the testing was performed under standard laboratory conditions,
actual performance may vary.
Replacement Cartridge: RPWFE. For estimated costs of replacement elements
please call 1-800-626-2002 or visit our website at www.geapplianceparts.com.
/_WARNING
To reduce the risk associated with ingestion of contaminants:
• Do not use with woter that is microbiologically unsafe or of unknown quality
without adequate disinfection before and after the system. Systems certified
for cyst reduction may be used on disinfected water that may contain filterable
cysts. EPA Establishment Number 070595-MEX-O01.
NOTICE
To reduce the risk of water leakage or flooding, and to ensure optimal filter
performance:
Read and follow use instructions before installation and use of this system.
Installation and use MUST comply with all state and local plumbing codes.
= I I I HaxPermissible
1088 ng/L N/A 99.5% 5.0 ng/L N/A J-00103221
845 n,g/L N/A 99.4% 5.0 ng/L N/A J-00103221
898 ng/L N/A 98.8% 9.9 ng/L N/A J-00103726
945 ng/L N/A 99.4% 5.5 n,g/L N/A J-00103727
403 ng/L N/A 99.5% 2.0 ng/L N/A J-00103221
• Do not install ifwater pressure exceeds 120 psi (827 kPa). Ifyour water pressure
exceeds 80 psi, you must install a pressure-limiting valve. Contact a plumbing
professional if you are uncertain howto checkyour water pressure.
Do not install where water hammer conditions may occur. If water hammer
conditions exist you must install a water hammer arrester. Contact a plumbing
professional if you a re uncertain how to check for this condition.
Do not install on hot water supply lines. The maximum operating water
temperature of this filter system is 100° F (38°C).
Protect filter from freezing. Drain filter when temperatures drop
below 33OF(0.6°C).
Change the disposable filter cartridge every six months or sooner if you observe
a noticeable reduction in water flow rate.
Failure to replace the disposable filter cartridge at recommended intervals may
lead to reduced filter performance and cracks in the filter housing, causing water
leakage or flooding.
| against NSF/ANSIStandard 42and Standard 53
(_ [ Tested and certified by NSFInternational
/ in model GERPWF and GERPWFE fol the
/ reduction of the claims specified on the
RE_EE_NT Jpeffo .......... data sfieet
18
RPWFE
Page 19

RPWFE
Water Filter Cartridge Limited Warranty.
Contact us at www.geapplianceparts.com,
or call 800.GE.CARES.
Staple your receipt
here, Proofof the
original purchase
date is needed to
obtain service
under the warranty.
We Will Replace, At No Charge To You:
ThirtyOoys Any port of the water filter cartridge which fails due to a defect in materials or
From the date of the workmanship during this limited thirty-day warranty.*
original purchase
• Service trips to your home to teach you how to use the product.
Improper installation.
Failure of the product if it is abused, misused, used for other than the intended
purpose or used commercially.
Replacement of house fuses or resetting of circuit breakers.
Replacement of the water filter cartridge due to water pressure that is outside the
specified operating range or due to excessive sediment in the water supply.
Damage to the product caused by accident, fire, floods or acts of God.
Incidental or consequential damage caused by possible defects with this appliance.
This warranty is extended to the original purchaser and any succeeding owner for products purchased for
home use within the U.S.A. In Alaska, the warranty excludes the cost of shipping or service calls to your home.
Some states do not allow the exclusion or limitation of incidental or consequential damages. This warranty
gives you specific legal rights, and you may also have other rights which vary from state to state. To know
what your legal rights are, consult your local or state consumer affairs office or your state's Attorney General.
For Purchases Mode In Iowa: This form must be signed and dated by the buyer and seller prior to the
consummation of this sale.
This form should be retained on file by the seller for a minimum of two years.
Buyer: Seller:
Name Name
Address Address
City State Zip City State Zip
Signature Date Signature Date
*If your GE port fails because of a ma nufacturing defect within thirty days from the dote of original purchase for use, we will give you o new or, at our option, o rebuilt port without charge.
Return the defective part to the parts su pplier from whom it was purchased together with a copy of the "proof of purchase" for the part. If the part is defective o nd shows no signs of abuse,
it will be exchanged. The warranty does not cover the failure of ports which a re damaged while in your possession, are abused, or hove been installed improperly. It does not cover the cost
of returning the port to the supplier from whom it was pu rchased nor does it cover the cost of labor to remove or install it to diag nose the fault. It does not cover ports used in products in
commercial use except in the case of air conditioning equipment. In no event shall GE be liable for consequential damages. Warrantor: General Electric Company
EXCLUSION OFIMPLIED WARRANTIES:Your sole and exclusive remedy is port exchange as provided in this Limited Warranty. Any implied warranties, including the implied warranties of
merchantability or fitness for o particular purpose, ore limited to six months or the shortest period allowed by low.
Appliances RPWFE
Appliance Park 3a-8715-2704-9
Louisville, KY/40225 EPA#070595-HEX-001
GE
geapplianceparts.com 0 2014 General Electric Company PC78863
19
Page 20
Consumer Services
Stainless Steel RefHgera tot
With the purchase of your new Monogram appliance, receive
the assurance that if you ever need information or assistance
from GE, we'll be there. All you have to do is call--toll- free!
GE Answer
Center ®
In the USA:
800.626.2000
In-Home Repair
Service
In the USA:
800. 444. 1845
In Canada:
1.800. 561.3344
For Customers
With Special
Needs...
In the USA:
800.626.2000
Whatever your question about any Monogram major appliance, GE Answer Cente¢ _ information
service is available to help. Your call-and your question-will be answered promptly and
courteously. Call the GE Answer Cente¢ " Monday to Friday, 8 a.m. to 10 p.m. EST,and Saturday,
8 a.m. to 7 p.m. EST.
OR
Visit our Website at: monogram.corn
In Canada, call 1.800.561.3344.
A GEconsumer service professional will provide expert repair service, scheduled at a time that's
convenient for you. To schedule service,call Monday to Friday, 7 a.m. to 10 p.m. EST,or Saturday
and Sunday, 8a.m. to 6 p.m. EST.Many GEConsumer Service company-operated locations offer
you service today or tomorrow, or at your convenience. Our factory-trained technicians know
your appliance inside and out-so most repairs can be handled injust one visit.
In Canada: Monday to Friday, 7 a,m, to 8 p,m, and Saturday, 8 a,m, to 5 p,m, EDST,
71 I /I I i
GE offers Braille controls for a variety of GE appliances, and a brochure to
assist in planning a barrier-free kitchen for persons with limited mobility.
Consumers with impaired hearing or speech who have access to a TDD
or a conventional teletypewriter may call 800.TDD.GEAC (800.833.4322)
to request information or service.
Service
Contracts
In the USA:
800. 626. 2224
In Canada:
1.800. 561.3344
Parts and
Accessories
In the USA:
800.626.2002
In Canada:
1.800. 561.3344
20
You can have the secure feeling that GEConsumer Service will still be there after your
warranty expires. Purchase a GEcontract while your warranty is still in effect and you'll
receive asubstantial discount. With a multiple-year contract, you're assured of future
service at today's prices.
Individuals qualified to service their own appliances can have parts or accessories sent directly
to their home. The GEparts system provides access to over 47,000 parts...and all GE Genuine
Renewal Parts are fully warranted. VISA, MasterCard and Discover cards are accepted.
Visit www.gea pplianceparts.com.
User maintenance instructions contained in this manual cover procedures intended to be
performed by any user. Other servicing generally should be referred to qualified service
personnel. Caution must be exercised, since improper servicing may cause unsafe operation.
Page 21

Notes
Sta in/ess Stee/ Refrigera tot
21
Page 22

Warranty
Sta in less Steel Refrigerator
YOUR MONOGRAM REFRIGERATOR WARRANTY
Staple sales slip or cancelled check here. Proof of original
purchase date is needed to obtain service under warranty.
WHAT IS
COVERED
From the Date
of the Original
Purchase
WHAT IS/VO T
COVERED
LIMITEDONE-YEARWARRANTY
For one year from date of original purchase, we will provide, free of charge, parts and service labor in your home
to repair or replace anypart of the refrlgemtorthat fails because of a manufacturing defect.
LIMITEDFIVE-YEARWARRANTY
For five years from date of original purchase, we will provide, free of charge, parts and service labor
in your home to repair or replace anypart of the sea/edrefilgeratlng system (the compressor, condenser,
evaporator and all connecting tubing) that fails because of a manufacturing defect.
LIMITED THIRTY-DAY WARRANTY ON WATER FILTER CARTRIDGE (Water filter, if included)
From the date of the original purchase we will provide, free of charge, replacement parts for anypart
of the water filter cartridge that fails because of a manufacturing defect. During this limited thirty-day warranty,
we will also provide, free of charge, a replacement water filter cartridge.
Q O ® ® ® ® • Q ® _ ® ® ® I e ® _ ® ® ® • • ® O O ® ® • Q Q O ® ® ® ® • e ® _ ® ® ® • e ® O O
This warranty is extended to the original purchaser and any succeeding owner for products purchased for
ordinary home use in the 48 mainland states, Hawaii, Washington, D.C. or Canada. If the product is located in an
area where service by a GE Authorized Servicer is not available, you may be responsible for a trip charge or you
may be required to bring the product to an Authorized GE Service location for service. In Alaska the warranty
is the same except that it is LIMITED because you must pay to ship the product to the service shop or for the
service technician's travel costs to your home.
All warranty service will be provided by our Factory Service Centers or by our authorized Customer Care "
servicers during normal working hours.
Should your appliance need service, during warranty period or beyond, in the USA call 800.444.1845.
In Canada; 800.561.3344. Please have your serial number and model number available when calling for service.
- Service trips to your home to teach you how
to use the product.
- Replacement of house fuses or resetting of circuit
breakers.
- Damage to the product caused by accident, fire,
floods or acts of God.
- Failure of the product if it is used for other than
its intended purpose or used commercially.
- Damage caused after delivery.
- Improper installation, delivery or maintenance.
If you have an installation problem, contact
your dealer or installer. You are responsible for
providing adequate electrical, plumbing and
other connecting facilities.
- Replacement of the light bulbs, if included,
or water filter cartridge, if included, other than
as noted above.
- Replacement of the water filter cartridge,
if included, due to water pressure that is outside
the specified operating range or due to excessive
sediment in the water supply.
- Loss of food due to spoilage (in the USA only).
Incidental or consequential damage caused
by possible defects with this appliance.
- Product not accessible to provide required
service.
in this Limited Warranty. Any implied warranties, including the implied warranties of merchantability
or fitness for a particular purpose, are limited to one year or the shortest period allowed by law.
[ EXCLUSION OF IMPLIED WARRANTIES--Your sole ond exclusive remedy is product repuir us provided
Some states/provinces do not allow the exclusion or limitation of incidental or consequential damages,
so the above limitation or exclusion may not apply to you. This warranty gives you specific legal rights, and you
may also have other rights which vary from state to state/province to province. To know what your legal rights
ere in your stote/province, consult your Iocol or stote/provinciol consumer offuirs office or your stote's Attorney
General.
Warrantor in USA:General Electric Company,
Warrantor in Canada: Mabe Canada Inc.
Louisville, KY40225
GE Consumer & Industriel
Applionces
Generol Electric Compong
Louisville, KY40225
GEApplionces.com
Page 23

Informations au consommateur
Refrig4rateur en acier inoxj/dable
/ntroduction
Sommaire
Votre nouveau refrigerateur Monogram constitue une eloquente demonstration de style, de
commodite et de polyvalence en amenagement de cuisine. Que vous le choisissiez pour la purete
de sa ligne, son syst#me de rangement pratique ou I'attention port6e aux d6tails -ou pour toutes
ces raisons- vous constaterez que la combinaison sup6rieure de forme et de fonctionnalit6 de votre
r6frig6rateur Monogram vous combler(] pour les (]nn6es (_venir.
L'information qui suit vous aidera (_utiliser et entretenir votre r6frig6r(]teur correctement.
Pour toute question, visitez notre site Web sur monogram,corn
Services aux consommateurs
Numeros de telephone importants ........... 41
Numeros de modele et de serie .............. 24
Fiche technique de performance ............. 39
R6solveur de probl_mes .................. 37-38
Enregistrement du produit ................... 24
Consignes de securite .................... 25-26
Oarantie ................................... 42
Garantie du filtre (_e(]u ...................... 40
Entretien et nettoyage
Nettoy(]ge - Ext6rieur et int6rieur ........... 35
Remplacement des lampes .................. 36
Demenagement ............................. 35
Vacances ................................... 35
Mode d'emploi
Machine 6 glaqons automatique ............. 34
Fonctions supplementaires .................. 27
Tiroir (_temp6rature contr616e................ 33
Distributeur d'eau int6rieur .................. 28
Tablettes et balconnets ................... 30-32
Commandes de temperature ................ 27
Filtre (_eau.................................. 29
Avant
d'uti/iser
votre
rdh igera teur
Lisez ce manuel attentivement II est conqu pour
vous aider (_utiliser et entretenir correctement
votre nouveau refrigerateur.
G(]rdez-le (_port6e de I(] main pour r6pondre (_
vos questions.
Si quelque chose vous 6chappe ou avez besoin
d'aide, une liste de numeros d'assistance au
consommateur sans frais se trouve dans la
derniere section de ce manuel,
OU
Visitez notre site Web sur monogram,com
23
Page 24

Renseignements du consommateur
R4frig4ra teur en a cier inoxydable
Notez les
numeros
de mode/e
et de serie
Si vous avez
regu un
re,_rigera teur
endommage
Economisez
temps et
argent
IIsfigurent sur une #tiquette 6 I'int#rieur du
compartiment r#frig#rateur dans le haut du c6t#
droit,
Veuillez inscrire ces numeros sur la fiche
d'inscription de propriete du produit du
consommateur incluse dans la materiel
d'emballage.
Communiquez immediatement avec le
concessionnaire (ou I'entrepreneur) qui vous a
vendu le refrigerateur.
Avant de demander un service technique,
consultez le R6solveur de probl#mes au dos de ce
manuel.
Avant de nous faire parvenir cette carte,
veuillez aussi inscrire ces numeros ici :
Numero de modele
Numero de serie
Utilisez ces numeros dans route correspondance
ou appels de service concernant votre
refrigerateur..
Vous y trouverez une liste des probl#mes de
fonctionnement mineurs que vous pouvez
resoudre par vous-m6me,
Si VOUS
a vez
besoin d'un
service
technique
Pour obtenir un service technique, consultez la
page Services au consommateur au dos de ce
manuel.
Nous sommes tiers de notre assistance technique
et nous souhaitons votre satisfaction. Si pour une
raison quelconque vous n'6tes pas satisfait du
service requ, voici la marche 6 suivre pour obtenir
de I'aide supplementaire.
Consommateurs aux I_tats-Unis :
D'ABORD, communiquez avec les personnes qui
ont repare votre appareil. Expliquez la raison de
votre mecontentement. Dans la plupart des cas,
cette d#marche r#soudra le probl_me.
ENSUITE, si vous n'6tes toujours pas satisfait,
ecrivez tousles details, incluant votre numero de
t#l#phone, 6 I'adresse suivante:
Manager, Customer Relations
GEAppliances
Appliance Park
Louisville, KY40225
Consommateurs au Canada :
D'ABORD, communiquez avec les personnes qui
ont repare votre appareil. Expliquez la raison de
votre mecontentement. Dans la plupart des cas,
cette d#marche r#soudra le probl_me.
ENSUITE, si vous n'6tes toujours pas satisfait,
ecrivez tous les details, incluant votre numero de
t#l#phone, 6 I'adresse suivante:
Manager, Consumer Relations
IVlabe Canada Inc.
1 Factory Lane, Suite 310
Moncton, N.B. E1C 9M3
24
Page 25

MESURESDESECURITEIMPORTANTES
LIREETCONSERVERCESINSTRUCtiONS
_Ce symbole repr@senteune alerte de s@curit@.Cesymbole vous avise de dangers possibles pouvant causer la mort, des
blessures ou autres. Tousles messages de s@curit@seront pr@c@d@sdu symbole d'alerte de s@curit@ainsi que des mots <<
DANGER>>,<<AVERTISSEMENT>>ou <<MISEENGARDE>>.Ces messages sont lessuivants :
Signale une situation qui pr6sente un danger imminent et qui, si elle n'est pas 6vit6e, entraTnerades bles
sures graves, voire la mort.
Signale une situation qui presente un danger imminent et qui, si elle n'est pas evitee, peut entrainer des
blessures graves, voire la mort..
Signale une situation qui presente un danger imminent et qui, si elle n'est pas evitee, peut entrainer des
blessures mineures ou graves.
Lorsque vous uti/isez lerefrigerateur, observez
tol_ours certaines pro.cautions de base, notamment ,'
• N'utilisez le refrigerateur que pour son usage prevu, comme
decrit dans le present manuel.
• Installez le refrigerateur conformement aux directives
d'installation avant de I'utiliser.
• Ne laissez pas les enfants grimper, s'asseoir, se tenir debout
ni se pendre aux clayettes du refrigerateur. IIspourraient
endommager le r6frig@ateur et se blesser gravement.
• N'entreposez et n'utilisez pas d'essence ou autres vapeurs et
liquides inflammables a proximite de cet appareil ou de tout
autre appareil electromenager.
• Debranchez votre refrigerateur avant de le nettoyer et de le
reparer.
REMARQUE :Nous vous recommandons vivement de confier
toute r_paration 6 un technicien qualifi6.
REMARQUE :L'alimentation electrique du rGrigerateur ne peut
pas 6tre coupee par I'intermediaire du panneau de commande.
• Nous d_conseillons fortement I'utilisation d'une rallonge 6 cause
des risques potentiels dans certaines conditions. Cependant, si
I'utilisation d'un cordon prolongateur est ne.cessaire,ce demier doit
obligatoirement _tre homologu_ UL(aux USA}ou CSA (auCanada},
6 trois brins avec mise 6 laterre pour appareil _lectrom_nager et
doit _tre 6.quipe d'une fiche et dune prise femelle avec terre. Les
caracteristiques electriques du cordon prolongateur doivent etre
de 15 amperes (minimum) et de 120 volts.
• Remettez routes les pieces et panneaux en place avant d'utiliser
I'appareil.
• Une lois le refrigerateur en marche, ne touchez pas les
surfaces froides du congelateur, surtout si vous avez les
mains humides ou mouillees :
la peau risque d'adh@er 6 ces surfaces tr_s froides.
• Pour les refrigerateurs dotes d'une machine a gla_:ons
automatique, 6vitez le contact avec les pi_ces mobiles du
m_canisme _jecteur, ou avec I'_l_ment chauffant situ_ 6 la
partie inf@ieure de la machine 6 glaqons. Ne posez pas les
doigts ou les mains sur le m_canisme de la machine 6 glaqons
pendant que le r_frig@ateur est branch,.
• Eloignez les doigts des parties du refrigerateur ou I'on peut
facilement se pincer :les espaces entre les portes et entre
les portes et les placards sont toujours etroits. Soyez prudent
Iorsque vous fermez les portes de I'appareil en presence des
enfants.
• Ne faites pas recongeler des aliments surgeles qui ont
completement degele.
• Ne nettoyez pas les clayettes ou les couvercles en verre
avec de I'eau tiede quand ceux-ci sont froids. Les clayettes et
couvercles en verre peuvent se casser s'ils sont exposes 6 des
changements soudains de temperature ou si vous les cognez
ou lesfaites tomber. Le verre tremp_ est conqu pour se briser en
petits morceaux en cas de casse.
RISQUESPOUR ENFANTS
Les enfants pris au piege ou morts d'asphyxie sont
toujours d'actualite. Les appareils de rGrigeration
abandon_s sont toujours aussi dangereux, m_me
si on n'attend que "quelquejours" pour s'en
d_barasser. Sivous ne gardez pas votre ancien
appareil, veuillez suivre les directives ci-dessous
afin de prevenir les accidents.
REFRIGERANTS
Tousles appareils de rGrigeration contiennent
des refrigerants qui, conformement aux lois
federales, doivent _tre enleves avant route
elimination de I'appareil.
Avant de vous debarasser de votre vieux
appareil de refrigeration :
• Demontez les portes.
• Laissez les clayettes en place afin d'emp_cher
les enfants de grimper 6 I'int@ieur.
Si vous vous d_barrassez de vieux appareils de
rGrigeration, verifiez, aupres de la societe qui
s'occupe de leur elimination, ce que vous
devez faire.
25
Page 26

MESURESDESECURiTEIMPORTANTES
,_Risque d'explosion.
Conservez les m@t_ri@ux et v@peurs inflammables tels que I'essence (_ 1'6c@rt de votre r6frig6r@teur.
Une explosion, un incendie voire la mort pourrait en resulter.
Risque de basculement
Les modeles encastres (modeles PYE,CYEet PWE)sont plus Iourds au niveau de bur pattie superieure, surtout
avec les portes ouvertes. Ces modules doivent _tre fix6s a I'aide du syst_me enti-basculement par fixation
au sol pour @iter que I'appareil ne bascule vers I'avant, ce qui pourrait entraTner des blessures graves,
voire mortelles. Lisez et suivez les instructions d'installation completes pour I'installation du systeme anti-
basculement par fixation au sol livr_ avec votre rdrig_rateur.
Risque de choc electrique.
Branchez I'appareil dans une prise triple avec terre.
Ne retirez p@s I@broche de terre.
N'utilisez pas d'adaptateur.
RACCORDEMENTE1ECTRIQUE
Ne coupez ni retirez en aucun cas ia troisieme
broche (raise a ia terre) de la fiche du cordon
d'alimentation. Pour votre securite, cet appareil
doit etre correctement misa ia terre.
Lecordon d'alimentation decet appareil est muni
d'une fiche a 3 broches (miseaI(]terre)qui se
branche dansune prisemural ordin(]ire a :3alv#oles
(miseala terre)pour r#duire @uminimum les risques
du chocs electriques.
Faites examiner la prise de courant et le circuit par
un electricien qualifie pour vous assurer que la prise
est correctement mise a la terre.
Sik]prisemumle est du type standard a 2 alv#oles,
il vous incombe de la faire remplacer par uneprise
(_:3alv#olescorrectement mise a laterre.
La machine a glaqons doit toujours _tre brunch#
dans sa propre prise de courant, dont la tension
nomin(]le est identique (_celle indiqu#e sur la plaque
signaletique.
Le non-respect de ces instructions peut entrainer des
risques d'incendies, des chocs electriques ou la mort.
Une alimentation #lectrique a 115 volts CA, 60
Hz, avec un fusible de 15 ou 20 amperes et une
mise (_laterre est n#cessaire. Cette precaution
est recommandee pour garantir un rendement
optimum et eviter une surcharge des circuits
electriques de la residence, ce qui pourrait creer un
risque d'incendie par surschauffe des fils.
Ne d#branchezjamais I'appareil en tirant le cordon
d'alimentation. Saisissez fermement la fiche
du cordon et tirez droit pour la retirer de la prise.
Reparez ou remplacez immediatement tout cordon
effiloche ou endommage. N'utilisez pas un cordon
fendille ou presentant des signes d'usure.
Lorsque vous deplacez I'appareil du mur, faites
attention de ne pas la faire rouler sur le cordon
d'alimentation afin de ne pas I'endommager.
CORDONSPROLONGATEURS
Nous vous recommandons fortement de ne pas
utiliser de cordons prolongateurs a cause des
risques potentiels qu'ils presentent darts certaines
conditions.
26
Toutefois si vous decidez d'utiliser tout de m6me un
cordon prolongateur, il est absolument n#cessaire
qu'il s'@gissed'un cordon a 3 ills avec mise 5 la terre
pour appareils electromenagers homologue ULaux
Etats-Unis) ou homologue CSA (au Canada), pourvu
d'une fiche et d'une prise mises a la terre de 15
amperes (minimum) et de 120 volts.
Page 27

Mode d'emploi
R6fHg6rateur en acier inoxj/dable
Commandes de
temp6ra ture
Modification des commandes de
temp#rature
L'affichage de temperature est situe sur
I'interieur de la porte refrigerateur gauche, Pour
modifier la temp#rature, appuyez et rehchez
la touche REFRIGERATOR(Refrigerateur) ou
FREEZER (Congelateur), Le temoin ACTUAL TEMP
(Temperature actuelle) s'allumera et I'affichage
indiquera la temperateure actuelle, Pour modifier
la temperature, tapotez la touche REFRIGERATOR
ou FREEZERjusqu'5 ce que la temp6rature voulue
soit affichee,
Pour eteindre (OFf] le systeme de refroidissement,
maintenez une pression simultanement sur les
touches REFRIGERATOR et FREEZER pendant 3
secondes, Lorsque le systeme de refroidissement
est eteint, I'affichage devrait indiquer OFF
Pour rallumer le systeme de refroidissement,
pressez la touche REFRIGERATORou FREEZER,
L'affichage indiquera les reglages de temperature
predefinis de 37 °Fpour le refrigerateur et de O°F
pour le congelateur, L'extinction du systeme de
refroidissement met fin au refroidissement du
refrigerateur, mais ne coupe pas I'alimentation
electrique,
Refrigerator
Hold 3 Sec for °F/°C
Recommended: 37 °F
Actual Set
ID!3
-00°c
_._EnergySmart
Recommended:O°F
i Freezer
Energy Smart Override
_. Hold 3 Seconds ..2
f
I DoorAlarm
I Ice Maker
I LockControls
Hold 3 Seconds
I Reset Filter
Hold 3 Seconds
A/ar.me de
porte
Machine
L'alarme de porte retentira si I'une des portes est
ouverte pendant plus de 2 minutes, La sonnerie
s'arr6te Iorsque vous fermez la porte,
Pressezpour (]llumer ou 6teindre la machine 5
glaqons.
glaGons
Comrn3ndes Maintenez la pression pendant 3 secondes pour
de
verr°umdue refrigerateur et du congelateur,
;11_
Re/n /t/a l/sa t/on
du f//tre
verrouiller ou deverrouiller les commandes du
Maintenez la pression pendant 3 secondes apres
le remplacement du filtre pour reinitialiser la
minuterie
27
Page 28

Distributeurs
Refrig4rateur en acier inoxj/dab/e
D/str/buteur
d'eau interieur
Le distributeur d'eau est situ6 sur la paroi gauche
(_I'int@ieur du compartiment r6frig@ateur.
Pour distribuer I'eau :
1 Tenir le verre contre le renfoncement.
2 Pousser lebouton du distributeur d'eau.
3 Tenir le verre sous le distributeur pendant 2 (_3
secondes apr6s le rel_chement du bouton, car
il est possible que I'eau continue de couler une
lois le bouton relech6.
L_bsence d_coulement d_eau Mrs de/'installation
initiale du r4Mg4ra teur peut s _expliquer par la
presence d_ir dans la conduite d_au, Pressez le
bouton du distributeur et fbites couler 7,5 gallons
(5 b 6 fitres) d_au pour expulser I_ir emprisonne
dans la conduite et remplir le systeme d_eau,
Durant ce processus, le distributeur peut devenir
bruyant en raison de I_oir expulse du systeme,
Ensuite, jetez les premiers 6 verres d_au pleins
pour expulser les irnpuretes de la conduite,
REMARQUE : Pour pmvenir les depots, le
distributeur doit _tre nettoye regulMrement a I_ide
dbne eponge ou dbn linge proves
28
Page 29

Filtronte 6 Eou
RefYigera teur en a cier inoxj/da b/e
Cartouche filtrante ,_eau
La cartouche filtrante 6 eau est situ6e sur la paroi gauche de
I'interieur du compartiment refrigerateur, dans le haut,
Certains modeles utilisent I'identification par radiofrequence
(IRF) pour d6tecter les fuites et contr61er 1'6tat du filtre. Lo
technologie IRF est homologuee par la FCC.
FCCID: ZKJ-EBX1532P001 ICID: 10229A-EBX1532P001
<<Cet apparel/est conforme aux prescriptions de/a pattie 15
des reg/es de/a FCC.Le fonctionnement de cet equipement est
assujetd aux deux conditions suivantes : (1}Cet apparei/ ne dolt
pas causer de brouillage prejudiciab/e; et (2)cet apparel/dolt
accepter tout broui//age qu'i/ re#oit, y compris ce/ui pouvant
entra[ner un fonctionnement indesirable. _>
<<Cet appareil est conforme aux normes RSSd'lndustrie Canada
relatives aux dispositifs exempts de licence. Le fonctionnement
de cet equipement est assujetd aux deux conditions suivantes
: (1)Cet apparefl ne dolt pas causer de brouillage; et (2)cet
appareil dolt accepter tout broui!lage, y compris celui pouvant
entrainer un fonctionnement indesirable. >>
A quel moment remplacer la cartouche filtrante
La cartouche filtrante doit 6tre remplacee tousles 6 mois ou
plus t6t si 644 litres (!70 gallons) d'eau ant 6t_ distribu_s ou
si le d6bit d'eau du distributeur ou de la machine 6 glaqons
diminue.
Modeles a ecran tactile : Un message d'etat du filtre
apparaTtra 6 1'6cran Iorsqu'il faudra remplacer le filtre 6 eau.
L'6tat du filtre sera mis 6jour d_s le remplacement du filtre.
Modeles sans ecran tactile : Un remains lumineux s'allumera
sur 1'6cran Iorsqu'il faudra remplacer le filtre 6 eau.
Remplacement de la cartouche filtrante
Pour remplacer le filtre, retirer d'abord la cartouche us6e en
ouvrant le panneau d'acc_s du filtre puis tirer sur le bas de
la cartouche pour permettre son pivotement vers I'exterieur.
Lorsque la cartouche ne peut plus pivoter, tirer delicatement
pour la degager de son support. NE PAS TORDRE LA
CARTOUCHE. Une petite quantite d'eau pourrait s'echapper.
Installation de la cartouche filtrante
1. Aligner le dessus de la cartouche sur son support puis
pousser la cartouche 6 fond. La fl_che de 1'6tiquette
pointant vers le haut indique une orientation adequate.
2. Tout en s'assurant que la cartouche se trouve bien au fond
de son support, pivoter delicatement la cartouche vers
I'interieurjusqu'en position. Sila cartouche ne pivote pas
ais_ment, s'assurer qu'elle est correctement align6e et bien
6 fond dons son support.
Pivoter/Tirer
@
3. Foites circuler 8 litres (2 gallons) d'eau dons le distributeur
d'eau froide (environ 5minutes) afin d'evacuer I'air
du systeme, De I'eaujaillira du distributeur suite
I'installation d'une nouvelle cartouche. Utiliser une grande
cruche ou une bouteille d'eau pour lesport pour recueillir
lejet d'eau. NEPASutiliser ledistributeur d'eau chaude tant
que I'air n'est pas totalement evacu6 du systeme,
4, Reinitialiser le message d'etat du filtre (modeles sans ecran
tactile),
A Risque d'ebouillantement.
L'utilisotion du distributeur d'eou choude ovont 1'6vocuotion
de I'air du systeme peut provoquer unjaillissement d'eau
tr_s choude cousont des brOlures.Veiller 6 observer les
instructions ci-dessus pour evacuer latotalite de I'air du
syst_me par le distributeur d'eou froide ovont d'utiliser le
distributeur d'eou choude.
REMAROUE:11est normal d'apercevoir un changement de la
couleur de I'eau lots de la purge initiale du systeme, Lacouleur
de I'eou reviendro 6 Ionormole opr_s quelques minutes
d'ecoulement,
Bouchon de derivation du filtre
Pour r6duire le risque de dommage 6 la propri6t6 en raison
de fuites d'eau, vous DEVEZ utiliser un bouchon de d6rivation
du filtre Iorsqu'une cartouche filtrante de rechange n'est
pas disponible. Le distributeur et la machine 6 glaqons ne
fonctionneront pas sans que ne soient installes le filtre ou le
bouchon de d6rivation. Le bouchon de d_rivation s'installe de
la m_me maniere que la cartouche filtrante.
Pour reduire le risque d'etouffement pendant I'installation de ce produit, ne pas laisser les petites pieces a la portee des
enfants _ges de moins de 3 ans. La cartouche de filtrejetable doit _tre remplac_e tousles 6 mois, si sa capacit_ nominale est
atteinte ou si une r_duction notable du d_bit est observ_e
Pour les meilleurs resultats de votre systeme de filtration, GE recommande I'utilisation de filtres de marque GE seulement.
L'utilisation de filtres de marque GE dons les r_frig_rateurs GE et Hotpoint® procure les meilleurs rendement et fiabilit& Les
filtres GE satisfont aux rigoureuses normes NSF de I'industrie relatives 6 la sOret_ et la qualitY, facteur important pour les
produits qui filtrent votre eau. GE n'a pas evalue le rendement des filtres d'autres marques dans les refrigerateurs GE et Hotpoint
et il n'existe aucune assurance qu'ils satisferont les normes de qualit_ et de fiabilit_ GE.
Pour toute question ou pour commander des cartouches filtrantes de rechange, visitez notre site Web au www.
geapplianceparts.com ou composez le 800.626.2002 pourjoindre le service des Pieces et accessoires GE.
Les consommateurs du Canada doivent consulter les pagesjaunes pour connaftre le centre de service Camco le plus proche.
29
Page 30

Tablettes et balconnets
R4fHg4rateur en acier inoxydab/e
Reorganisation
des tab/ettes
Tab/ettes
antigouttes
Lestablettes du compartiment r6frig6rateur sont
r6glables.
Compartiment refrigerateur
Pour enlever :
1, Enleveztousles articles de la tablette.
2, Inclinez la tablette vers le haut (_I'avant.
3,Soulevez la tablette (_I'arri_re et sortez-la.
Pour replacer :
1, Tout en inclinant la table vers lehaut, ins#rez
le crochet sup#rieur (_I'arri_re dans une fente
du rail,
2.Abaissez I'avant de la tablette jusqu'(_ ce que le
bas severrouille en place.
Lestablettes antigouttes sont dot6es de rebords
speciaux qui previennent I'egouttement sur les
tablettes inf6rieures.
1 / p'_'
2--"
Tab/ette
QuickSpace _ _
Cettetablette se diviseendeux et seglissesous elle-
m6me pour lerangement d'articles en hauteur sur la
tablette du dessous.
Cette tablette peut _tre retir6e et replac#e ou
repositionn#e (comme les tablettes antigouttes).
REMARQUE :La moitie arriere de la tablette
QuickSpace n'est pas reglable.
_Certains modeles seulement
\
\
3O
Page 31

Tablettes et balconnets
Refrigerateur en acier inoxj/dab/e
Balconnet
produits
/aiders non
reglable
Balconnets
reglab/es
Pour enlever : Soulevez le balconnet (_produits
laitiers en ligne droite, puis tirez vers I'exterieun
Pour replacer :Introduisez le balconnet dansles
supports de porte moul6set poussezvers lebos.Le
bolconnet severrouillero en place.
Lesbalconnets r6glables peuvent facilement se
transporter du refrigerateur vers la zonede travail,
Pour enlever :Soulevezlebalconnet en ligne droite,
puissortez-le,
Pour replacer ou repositionner :Glissezle
balconnetjuste au-dessus dessupports deporte
moul6s,et poussezversle bas. Lebalconnet se
verrouillera en place,
li iiii
Balconnet tombant*
(b(]lconnet ouvert)
1. Ouvrez la porte du compartiment refrigerateur
droite
2. Enfoncez les deux boutons sur les c6t6s
inf6rieurs du balconnet pour faire abaisser
celui-ci,
3. Inversez la manceuvre pour remettre en place,
*Certains modeles seulement
'i
Panier et droir
du congelateur
Modeles a distributeur
(Porte droite)
1. Panier,
2. Tiroir
3. R6cipient (_glace*
*Certains modeles seulement
Modeles sans distributeur
(Porte gauche)
31
Page 32

Tablettes et balconnets
Refrigerateur en acier inoxj/dab/e
Retra/t du
panier (tiroir
inferieur)
Balconnets
non reg/ab/es
sur porte
conge/ateur
1. Ouvrez les portes du compartiment
refrigerateur,
2. Ouvrez la porte du compartiment congelateur
jusqu'(_laposition d'arr_t.
3, Enlevez la panier du congelateur en le
soulevant (_I'arri_re et en le pivotunt vers le
haut,
4, Soulevez-le pour le retirer,
Pour replacer:
Inversezles6tapes ! a/4 pour le replacer.
Pour enlever : Poussezdans leslanguettes en
plustique du c6t6 gauche oudroit.
Pour replacer :Glissezle bulconnet (_la position
jusqu'(_ce qu'il se verrouille en place.
Tiroir pour
charcuterie
Separateur
de tiroir _
Pour enlever :Tirezletiroirjusqu'a lu position d'arr_t.
SoulevezI'avant dutiroir puissortez-le,
Pour replacer : Tirez totalement les rails gauche et
droit, Placez I'arriere du tiroir en premier et pivotez
I'avant pour le deposer sur les rails, Poussez le tiroir
en position fermee,,
Pour enlever : Tirez le tiroirjusqu'en position d'arr6t,
Glissez le separateur vers la droite pour le degager
du plateau,
Pour replacer :Placezleseparateur dans le sillonsur
la droite et glissez-leversla gauche au besoin.
_Certains modeles seulement
32
Page 33

Espace ClimateZone et tiroir 6 temp@rature contr61@e
R6frig6rateur en acier inoxj/dable
Espace
CfimateZone
Tiroir
temperature
contrOlee
Une zone pour conserver fruits et legumes disposes
dans des compartiments separes pour faciliter
I'acces,
L'eau excedentaire qui peut s'accumuler dans le
fond des tiroirs ou en dessous doit 6tre essuyee pour
I'ass6chen
Letiroir 6 temp6rature contr616epleinelargeur est
dot6 d'une commande detemp6rature r6glable.II
peut servir pour divers articlesde grande taille.
Pourchanger le r6glage,pressezle bouton de
selection.
REMARQUE : Les temperatures indiquent les
valeurs pour les types d'aliments et les tempera-
tures reelles peuvent varier selon le fonction-
nement normal et d'autres facteurs tels que le
nombre d'ouvertures de porte et le r6glage de
temperature du compartiment refrigerateur,
TempSelectZone Meot Beveroge Dell
r
, _3_7°_ 34° 38 °
r J [-
I
I
I i
Risque de laceration.
, Ne conservez pas les bouteilles de verre
6 ce r6gloge. Sielles g_lent, elles peuvent
I
,6clater et provoquer des blessures.
I
L
33
Page 34

Machine 6 glagons automatique
Refrig4rateur en acier inoxydable
Machine
glagons
automa t/que _
REMARQUE: Un r6frig6rateur nouvellement install6 peut prendre 12 6 24 heures pour
commencer 6 produire de la glace.
La machine 6 glaqons produira sept cubes par cycles,
soit environ !00 6 !30 cubespendant une p6riode
de 24 heures,selon latemperature du compartiment
cong61ateur,latemp@ature de la pi@ce,lenombre
d'ouverturesde porteet d'autres conditions
Silaglacen'est pasutilis6esouvent,lesvieux cubes
deviendront marbr6s,ser@r6cirontet perdront leur
frafcheu_
6glaqons
d'utilisation.
La machine 6 glaqons seremplira d'eauIorsqu'elle
serefroidira6 15 °F(-10°C).Unr6frig6rateur
ine
nouvellement install6peut prendre 126 24 heures
pour commencer 6 produire desglaqons.
Bras palpeur
Silerefrigerateur est utiliseavant leraccordement
de la conduite d'eau 6 I'appareilou siI'alimentation
d'eau 6 un r6frig6rateur en serviceestcoup6e,
assurez-vousque lamachine 6glaqons est 6teinte.
Unefois I'eauraccordeeau refrig6rateur,on peut
REMARQUE : D_ns les domiciles ou I_ pression
d_au se situe sous I_ moyenne, plusieurs cycles
de production de glz_ce peuvent se finite entendre
pour un seul lot de glz_gons,
allumer la machine 6 glaqons.Consultezletableau
ci-dessouspour lesdetails.
Unbourdonnement peut sefaire entendre 6 chaque
lois que la machine 6 glaqonsse remplit d'eau.
Jetezlespremierslots de glace pour permettre 6 la
conduite de se nettoyen
Assurez-vousque rien neg6ne lemouvement du
bras palpeur.
Lorsquelebac seremplitjusqu'au niveaudu bras
palpeur,la machine cessedeproduire desglaqons.II
est normal que plusieursglaqonssejoignent.
de blessure, 6vitez tout contact ovec les
pi_ces mobiles du m6canisme d'6jection
ou avec 1'616ment chauffont qui lib_re les
cubes. Ne plocez pos les doigts ou les mains
sur le mecanisme de production de glace
automatique Iorsque le refrig6rateur est
bronch6 6 Io prise 61ectrique.
Pour@eindrela machine 6 glaqons,utilisezle bouton
"ICEMAKER"sur les commandes.
Pour reduire le risque
Recipient ,_ glace du congelateur*
Le rangement de glace se trouven dans letiroir
du compartiment congelateur.
. Ouvrez le tiroir du congelateur.
o Ler6cipient 6 glace est situ6 du c6t6 gauche du
panier superieur.
. Tirez le panier superieur pour retirer le recipient
6 glace.
_Certains modeles seulement
34
Recipient
6 glace
congelateur
Page 35

Entretien et nettoyage
Refrigerateur en acier inoxj/dable
Nettoj/age de
/'exterieur
Nettoj/age de
/'/nterieur
Les panneaux et les poignees en acier
inoxydable peuvent _tre nettoy6s 5 I'aide d'un
nettoyant pour acier inoxydoble du commerce tel
que Stainless Steel Magic TM,
Stainless Steel Magic rMest offert chez Ace, True
Value, Servistar, HWI et d'autres commerces
reconnus.On peut aussi se le procurer aupres du
service Pieces et accessoires GE, 800.626.2002.
Commandez la piece numero WXl 0Xl 5.
Pour prevenir les odeurs, laissez ouverte
une boTte de bicarbonate de soude dans les
compartiments refrigerateur et congelateur.
Debranchez le refrigerateur avant le nettoyage.
Si cela n'est pas pratique, tordez I'eponge ou le
chiffon pour evacuer I'exces d'humidite Iors du
nettoyage autour des interrupteurs, des lampes
et des commandes.
Utilisez une solution d'eau chaude et de
bicarbonate de soude, environ une cuiller_e a table
(15 ml) de bicarbonate de soude dans un litre d'eau.
Vous pourrez ainsi nettoyer tout en neutralisant les
odeurs. Rincez et essuyez pour assecher.
N'utilisez pas de la cire ou un agent de
polissage pour electromenager sur de I'acier
inoxydable.
Les pieces en plastique aux accents argentes
doivent _tre lav6s 5 I'eau savonneuse ou d'autres
detergents doux. Essuyez-les avec une eponge,
un linge imbib6 ou une serviette de papier.
N'utilisez pas de tampons 5 r6curer, de nettoyunts
en poudre, dejavellisants ni de nettoyants
contenant dujavellisant car ils peuvent rayer et
fragiliser le fini.
L'utilisation d'une solution de nettoyage
differente de celle recommandee, en particulier
si elle contient des distillats de petrole, peut
entrainer I'endommagement de I'interieur du
refrigerateur par craquelement ou autrement.
l_vitez de nettoyer les tablettes de verre froides
avec de I'eau tres chaude, la difference de
temperature peut causer leur bris. Manipulez
les tablettes de verre avec precaution. Le verre
trempe peut eclater suivant un choc.
Ne lavez aucune piece en plastique du
refrigerateur au lave-vaisselle.
Derriere le
refrigerateur
Preparation
pour les
vacances
Preparation
pour un
demenagement
Usez de prudence Iorsque vous eloignez
le refrigerateur du mur. Tousles types de
rev6tement de sol peuvent s'en trouver
endommages, en particulier s'ils sont coussines
ou presentent une surface gaufree.
Levez les pieds de nivellement situ6s duns le bus
avant du refrigerateur.
Tirez le refrigerateur en ligne droite; poussez-le
en ligne droite pour le remettre 5 sa place. Le
g,I'occasionde vacances ou d'@bsencesprolong_es,
retirez lesaliments etd_branchez le r_frig_rateur.
LavezI'interieur avec une solution composee deune
cuiller_e5 table (15ml)de bicarbonate de soude
dans un litred'eau. Laissezlesportes ouvertes.
Silatemperature peut chuter sous le seuil de
cong_lation, demandez 5 un technicien qualifi_
de purger lesysteme d'alimentation d'eau afin de
pr_venir les dommages li_s5 I'inondation.
1)Eteignezle r_frig_roteur (p.27)ou d_bronchez le
refrigerateu_
g,I'aide de ruban adh_sif, fixez s@rementen place
tousles articles mobiles tels que les tablettes et
les tiroirs afin de prevenir les dommages.
Pour prevenir lesdommages, placez le
r_frig_ruteur sur un de ses c6t_s Iorsque vous
deplacement du refrigerateur dans une direction
laterale peut endommager le couvre-plancher ou
le refrigerateur.
Baissez les pieds de nivellementjusqu'5 ce qu'ils
touchent le planchen
Lors de la remise en place du refrigerateur,
assurez-vous de ne pas ecraser le cordon
d'alimentation electrique ni la conduite d'eau
de la machine a gla_;ons.
2) Videz le recipient de glace.
3) Coupez I'alimentation d'eau.
Si vous coupez ['alimentation d'eau, eteignez [a
machine a gla_ons (p. 34).
Au retour de vacances :
1) Remplacez le filtre 5 eau.
2) Faites circuler 2 gallons (8 litres) d'eau par le
distributeur d'eau froide (environ 5 minutes) pour
rincer le systeme.
utilisez un chariot manuel pour le deplacement et
non sur I'arriere ou I'avant,
Assurez-vous de maintenir le refrigerateur en
position droite durant le transport.
35
Page 36

Remplacement des lampes
Refrigerateur en acier inoxj/dab/e
Compartiment
rehrigera teur
-- Lompe
superieure
Un6clairage 6 DELsetrouve dans lecompartiment
r6frig6rateur et dans lebasdes portes r6frig6rateur
pour eclairerle compartiment congelateu_
IIfaut faire appel 6 un technicien agr66pour
remplacer unelampe DEL,
Si cet assemblage doit 6tre remplac6, oppelez le
service GE au 1,800,432,2737 aux Etats-Unis ou le
1,800, 561,3344 au Canada,
Lampes DEL
36
Page 37

Le r_solveur de probl_mes
Ref?igerateur en acier inoxydable
Bruits de
fonct/onnement
normaux
Les refr/gerateurs neufs s 'entendent differemment des plus anc/ens. Les refr/gerateurs
d%_ujourd'hui comportent davantage de fonctions et utilisent des technologies plus evoluees.
Entendez-vous ce que f entends? Ces sons sont normaux.
WHIRl
HUMMM...
-- WHOOSH...
iiiiiii#
Le nouveau compresseur haute efficacite pout
fonctionner plusvite et plus Iongtemps que I'ancien
et un bourdonnement oigu ou un son pulsotif peut
en @suitor.
Unsoufflesou@peutseIoisserentendre5Io
fermeturedesportes.Cesonestcausepar
I'6quilibr%ede Iopression5 I'int6rieurdu
@ffigerateur.
Ap@sIodistributiondegloce,un moteurfermero
la chutedeglacepourempecherI'airchaudde la
piecedepen6trerdansle@cipientdeglaceafinde
maintenirlaglacedansI%tatdecongelation.
Lebourdonnementdu moteurfermontIochuteest
normol,peudetempsopr6sIodistributiondegloce.
Cliquetis, eclatements,
craquements et gazouillis,
Vous pouvez entendre lesventiloteurs tourner
houte vitesse.Celosurvient Iorsdu bronchement
initial du @ffigerateur, Iorsque les portes sont
ouvertes ffequemment ou Iorsqu'une grande
quantite d'aliments est _!jouteeau compartiment
@ffigerateur ou congelateur.
iiiiiii#
La vitessedes ventilateurs varie afin de procurer un
refroidissement optimal et d%conomiser I%nergie.
Bruits d'eau
6
Dessonsdecraquementoud%clatementpeuventse
produirelotsdu bronchementinitioldurdrig#roteur.
Cola@suitedu reffoidissementdu @ffigerateurvers
satemperaturedeservice.
L'expansionetlacontractiondesserpentinsdurant
etsuivantledegivragepoutaussiemettrelememe
typedebruit.
Surlesmodules#quip#sdemochine5gl%ons,
vouspouvezentendreIochutedesgl%onsdonsle
@cipientap@suncycledeproductiondeglace.
Surlesmodules#quip#sd'undistributeur,vous
pouvezentendrelemouvementdesconduitesd'eau
IorsdeIodistributioninitioleousuiteoureBchement
du boutonde distribution.
La circulation de fluide ffigorigene dans les
serpentins pout prod@reun son de gargouillis
sembloble 5 de I'eou qui bout.
L%gouttement d'eau sur I%Bmentchauffant du
degivreur pout causer un son de g@sillement,
d'#clotement ou de bourdonnement duront le cycle
de degivrage.
Un son d%gouttement pout aussisurvenir durant
le cycle de d#givroge (3mesure que Ioglocefond
depuis I%vaporateur et que I'eaus%couledans le
plateau de degivrage.
Lo fermeture de Ioporte peut produire un bruit sou@
en roison de I'#quilibr%e de Iopression.
37
Page 38

Le r solveur de probl mes
R4frig4ra teur en a cier inoxj/dable
Questions?
Uti/isez ce
reso/veur de
prob/emes
Probleme
La poignee est I_che/presente
unjeu
Le r6frig6rateur 6met un bip
Pas de refroidissement
Le goOt/l'odeur de I'eau est
douteuse
L'eau dans le verre est tiede
Le distributeur d'eau ne
fonctionne pas
Cause probable
La poignee necessite un ajustement, Consultez les sections Fix_tion
de I_ poignee du cornpartiment refrigemteur et Fix_tion de I_ poignee
du cornpartiment cong4A_teur pour des instructions detaill6es,
IIs'agit d'une alarme de porte, Eteignez I'alarme ou desactivez-la en
fermant la porte, Si la porte s'ouvre et que I'alarme retentit, vous ne
pouvez que la faire cesser momentanement,
Le systeme de refroidissement est desactive, Activez le
refroidissement (_nouveau. Consultez le mode d'emploi.
Le distributeur d'eau n'a pas 6t6 utilis6 depuis Iongtemps. Distribuez
de I'eau jusqu'(_ ce que le syst_me ne contienne que de I'eau fratche.
Normal Iors de I'installation initiale du refrigerateur, Attendez 24
heures que le refrigerateur se refroidisse completement,
. Le distributeur d'eau n'a pas 6t6 utilis6 depuis Iongtemps. Distribuez
de I'eau jusqu'(_ ce que le syst_me ne contienne que de I'eau fratche.
. Le systeme d'eau a ere purge, Plusieurs heures sont necessaires
pour refroidir le nouvel approvisionnement,
. L'alimentation d'eau est coupee ou n'est pas raccordee, Consultez I_
section/nst_llz_tion de la conduite d'eau,
. Le filtre (_eau est obstru6 ou le filtre/le bouchon de d@ivation n'a
pas ete pose, Remplacez la cartouche filtrante ou retirez le filtre et
posez le bouchon de d@ivation.
. De I'air peut _tre emprisonn_ dans le syst_me d'eau. Pressez le bras
du distributeur pendant au moins 5 minutes.
L'eau gicle du distributeur
Aucune production d'eau ou de
glace
Le distributeur pr6sente une
fuite d'eau
Seul le congelateur se refroidit,
pas le refrigerateur
L'eau dans le reservoir est gelee en raison d'un reglage de
temp@ature trop froide. R_glez la commande (_une temp@ature
plus elevee et attendez 24 heures, Si I'eau ne coule pas apres 24
heures, faites un appel de reparation,
. Un nouvelle cartouche filtrante a ete posee, Faites circuler de I'eau
froide par le distributeur pendant 5 minutes (env. 8 litres).
. La conduite d'alimentation ou le robinet d'arr_t est obstru_. Appelez
un plombier.
. Le filtre (_eau est obstru_. Remplacez la cartouche filtrante ou retirez
le filtre et posez le bouchon de d@ivation.
. La cartouche filtrante n'est pas posee correctement, Retirez la car-
touche et reposez-la en vous assurant qu'elle se verrouille en place,
. La machine (_glaqons est _teinte. Assurez-vous qu'elle est allum_e.
Consultez la section Mz_chine 8 garcons automatique,
. De I'air peut se trouver dans le systeme d'eau occasionnant un
_gouttement d'eau apr_s une distribution. Distribuez de I'eau
pendant au moins 5 minutes pour expulser I'air du systeme,
Normal Iors du branchement initial du r_frig@ateur ou suite (_
une panne de courant prolongee, Attendez 24 heures pour que
la temperature des deux compartiments atteigne les valeurs
selectionnees,
38
Page 39

Fichetechnique de performance
Modele' GERPWFE
Utilisez une cartouche de rechange RPWFE,
La concer_tratior_ des substances mentiormees dans I'eau penetrar_t dans le systeme a ere reduite a une valeur inferieure ou egale a la
limite permissible relative a reau quittant le systeme, selon les specifications des normes NSF/ANSI 42 et 53, Le systeme a 6t6 mis a I'essai
et homologue par NSF Interrlatiorlal conformemerlt aux normes NSF/ANSI 42 et 53 relatives a la reduction des substances enumerees
ci-dessous,
Capacite 170 643,5 Reduction des contaminants determinee )ar essai NSF.
Substance testee I Concentr. Reduction Concentr. I Spec, de
pour reduction Influent moyen d'essai selon NSF moy. (%) moyenne ' permissible reduction NSF d'essai NSF
2,0 mg/L 2,0 mg/L _+10% 97,4% 0,05 mg/L N/A ->50% J-00102044
Au moins 10 000
7,633,333 pts/mL particules/mL 99,0% 71,850 pts/ml N/A ->85% J-00106249
107to 108 [ibres/L ; fibres
109 MFL sup. a 10urn de long 99,99% <1 HFL N/A ->99% J-00102069
0,009 mg/L 0,009 mg/L ± 10% 94,4% 0,0005 mg/L 0,003 mg/L N/A J-00102058
0,016 mg/L 0,015 mg/L _+10% 96,4% 0,001 mg/L 0,005 mg/L N/A J-00102065
0,08 mg/L 0,08 mg/L ± 10% 98,8% 0,001 mg/L 0,04 mg/L N/A J-00102059
104,750 oocystes/L Minimum 50,000 cysts/L 99,99% 3 cyst/L N/A ->99,95% J-00102057
0,140 mg/L 0,15 mg/L ± 10% 99,3% 0,001 mg/L 0,010 mg/L N/A J-00102052
0,158 mg/L 0,15 mg/L ± 10% 98,3% 0,002 mg/L 0,010 mg/L N/A J-00102053
0,006 mg/L 0,006 mg/L ± 10% 91% 0,0003 mg/L 0,002 mg/L N/A J-00102054
0,006 mg/L 0,006 mg/L ± 10% 88,3%% 0,0007 mg/L 0,002 mg/L N/A J-00104087
0,002 mg/L 0,002 mg/L ± 10% 99% 0,00002 mg/L 0,0002 mg/L N/A J-00102063
0,222 mg/L 0,225 mg/L ± 10% 99,8% 0,0005 mg/L 0,075 mg/L N/A J-00102067
0,015 mg/L 0,015 mg/L ± 10% 93,5% 0,001 mg/L 0,003 mg/L N/A J-00102061
0,218 mg/L 0,210 mg/L±10% 99,9% 0,0001 mg/L 0,07 mg/L N/A J-00102064
0,278 mg/L 0,300 mg/L ± 10% 97,7% 0,0015 mg/L N/A ->95% J-00102070
D'apresI'utilisationd'oocystesdeCryptosporidiumparvum.
Concentr I
Les resultats de reduction pharmaceutique suivants n'ont pas ete certifies par NSF International. Ils ont ere testes et verifies
par un labor_toir_J_ae_, filtre, entra?nant ainsi des fuites ou I'inondation.
desubstance
Conditions d'application/Parametres d'alimentation d'eau
Debit de service (1,89 I/rain.) Pression d'eau
Alimentation d'eau Temjoerature de I'eau
Le rendement du produit sera conforme 3 ce qui est promis 3 condition que I'installation, I'entretien et le remplacement du riltre s'erfectuent selon
les recommandations du rabricant.
Remarque : Bien que les tests aient ere realises dans des conditions
Bien que les tests aient ete realises dans des conditions de laboratoire.
Cartouche de rechange : RPWFE. Pour une estimation du coot des pieces
de rechange, veuillez composer le 1-800-626-2002 ou visitez notre site
Web au www.geapplianceparts.com.
Pour reduire le dsque associe a I'ingestion de contaminants:
- N'utHisez pas rappareil avec de I'eau d'une qualite incertaine ou non potable
sur le plan microbiologique sans une desinfection en amont et en aval
du systerne. Les systemes hornologues relativement a la reduction d'oocystes
peuvent etre utilises avec de I'eau desinrectee pouvant contenir des oocystes
oocystes filtrables. Nume.ro d'etablissement EPA 070595-MEX-001.
AVIS
Pour reduire le dsque de fuite ou d'inondation et pour garantir un rendement
optimal du filtre :
- Lisez et observez les instructions d'utilisation avant I'installation et I'utilisation de ce syste.me.
- L'installation et I'utilisation DOIVENT satisfaire tousles codes de plomberie Iocaux et nationaux.
Influent moyen .............. selonNSF
1088ng/L N/A
845 ng/L N/A
898 ng/L N/A
945 ng/L N/A
403 ng/L N/A
moy.(%)
99,5%
99,4%
98,8%
99,4%
99,5%
• Ne procedez pas a rinstallation si la pression d'eau excede 120 psi (827 kPa).
Sivotre pression d'eau excede 80 psi, vous devez poser une valve de limitation
de pression. Faites appel 3 un plombier si vous avez des doutes sur la fa(;on
de mesurer votre pression d'eau.
• Ne procedez pas a rinstallation si une condition de coup de belier est susceptible
de survenir. Si cette condition existe, vous devez poser un antibelier. Faites appel
un plombier si vous avez des doutes sur la maniere d'identirier cette condition.
" Ne procedez pas a rinstallation sur des conduites d'eau chaude. La temperature
temperature de service maximale de I'eau pour ce systeme de filtre est de 100 °F (38 °C).
• Protegez le filtre contre legel. Drainez lefiltre Iorsque la temp0rature tombe sous 33 °F (0,6 °C).
- Remplacez lacartouche riltrantejetable tousles six tools, ou plus tot si vous vous
constatez une reduction appreciable du debit d'eau.
- L'omission de remplacer la cartouche riltrante jetable aux intervalles recommandes
peut mener 3 une reduction du rendement du filtre et au rendillement du boitier
du filtre, entrainant ainsi des ruites ou I'inondation.
Concerltr. moyenne
5,0 ng/L
5,0 ng/L
9,9 ng/L
5,5 ng/L
2,0 ng/L
C0ncentr. I Rapport
max.permissible d'essaJNSF
N/A J-00103221
N/A J-00103221
N/A J-00103726
N/A J-00103727
N/A J-00103221
against NSF/ANSIS[andard 42 and Standard 53
(_ ested and ceIflfied by NSF Intematiorml
in model GERPWFandGERPWFEtul the
reduction of tile cklims specified on the
REI_ILEACEE_N__NT performance data slee[
RPWFE
39
Page 40

Certificat de garantie de ia cartouche
RPWFE du filtre a eau
d3': _ C°mmuniquez avec n°us sur wwwgeappliancepartsc°m'!@_" i.......... ou appelez le 800.GE.CARES.
Agrafez votre facture
ici, Pour obtenir le
service sous garantie,
une preuve de la date
d'achat initial est
necessaire,
Nous remplacerons gratuitement •
Toute piece de la cartouche filtrante qui s'avere ddectueuse en raison dun ddaut
d'achat initial
de materiau ou de fabrication pendant cette periode de garantie de trentejours.*
• Les deplacements a votre domicile pour vous expliquer I'utilisation de ce produit.
• Une installation incorrecte.
• Une panne d u produit par abus d'utilisation, par mauvaise utilisation, par modification ou s'il a et6 utilise dans un but
autre que celui pour lequel ila et6 fabriqu6 ou s'il a et6 utilise a des fins commerciales.
• Le remplacement des fusibles ou le @enclenchement du disjoncteur du domicile.
• Le remplacement de la cartouche filtrante a cause d'une pression d'eau en dehors de la gamme de fonctionnement
recommandee ou a cause d'une concentration excessive de sediments dans I'eau d'alimentation.
• Tout dommage cause par accident, incendie, inondation ou catastrophe naturelle.
• Tout dommage fortuit ou indirect cause par des defauts eventuels de cot appareil.
Cette garantie eat #tendue b I'acheteur dbrigine et aux propri#taires suivants pour tout produit achet# pour une utilisation
domestique aux Etats-Unis, En Alaska, cette garantie exclut le coot d'exp#dition ou de d#pannage b votre domicile,
Certains #tats n'acceptent pas d'exclusion ou de limites aux dommages indirects cons#cuff&, Certains droits particuliers
vous sont d#volus en vertu de la pmsente garantie et peuvent s'accompagner d'autres droits qui varient d'un #tat b un
autre, Pour connaftre vos droits, veuillez consulter votre bureau local ou le bureau d_tat des affaires aux consommateurs
ou le Procureur G#n#ral de votre #tat.
Pour les achats effectu#s en Iowa : Ce formulaire doit #tre sign# et dat# par/'acheteur et /e vendeur a vant la r#alisation de
cette vente,
Ceformulaire doit #tre conserv# au dossier par le vendeur pendant une p#riode minimale de deux ans.
Acheteur" Vendeur"
Nom Nom
Adresse Adresse
Ville Etat Code postal Ville Etat Code postal
Signoture Dote Signoture Dote
* Si votre piece GE s'avere detectueuse en raison d'un defaut de fabrication dans ]es trente]ours a compter de la date d'achat initiaJe, nous vous tournirons gratuitement une nouve]]e piece, ou, a notre gre,
une piece reconstruke, Renvoyez la piece detectueuse au tournisseur de pieces aupres duque] cette piece a ere achetee avec une copie de la preuve d'acbat de ]a piece, Si la piece est detectueuse et n'indique
aucun signe d'une utilisation abusive, celle ci sera ecbangee, La garantie ne couvre pas la deft@Jance de pieces qui sont endommagees en votre possession, sont utilisees de tK:on abusive ou ont ere mal instaJJees,
ElJe ne couvre pas los frais de retour de la piece au fournisseur aupres duquel eJie a ere achetee EJie ne couvre pas non plus ]e coot de main d'oeuvre pour retirer ou instaJJer cette piece pour diagnostiquer la panne,
ElJe ne couvre pas ]es pieces utilisees darts les produits a usage commercial, sauf darts le cas des equipements de cJimatisation En aucun cas, GE ne pout etre tenu responsaNe des dommages indirects
Garant : Genera] Electric Company
EXCLUSION DES GARANTIES TACiTES :Votre recours exdusif est ]'ecbange du produit suivant ]es modalites de ]a Garantie Limitee Toutes garanties tacites, y compris les garanties de valeurs marchandes
ou d'adequation a des fins particulieres, sont limitees a une duree de six mois ou a la duree la plus courte autorisee par la Ioi,
GE
Applionces
Applionce Pork
Louisville, KY 40225
gewoterfilters.com
4O
Page 41

Services aux consommateurs
R4fHg4rateur en acier inoxydab/e
Avec I'achat de votre nouvel electromenager Monogram,
nous vous assurons de notre soutien en cos de besoin de
renseignements ou d'assistance de la part de GE. Vous n'a vez
qu'a nous appeler, sans frais!
Centre de
renseignements
GE
Aux Etats-Unis "
800.626.2000
Service de
reparation
domicile
Aux Etats-Unis "
800. 444. 1845
Au Canada •
1.800. 561.3344
Pour les
consommateurs
necessitant
des a ttentions
particulieres
Aux Etats-Unis "
800.626.2000
Quelle que soit la question concernant un electromenager Monogram, leCentre de
renseignements GEest pr_t 6 vous aider. Votre appel -et votre question- sera r6pondu
promptement et avec courtoisie. Appelez leCentre de renseignements du lundi au vendredi, de
8 h00 6 22 h 00 HNE,le samedi de 8 h 00 6 19 h 00 HNE.
OU
Visitez notre site Web sur monogram.com
Au Canada, appelez le 1,800,561,3344,
Un technicien du service au consommateur GE offrira un service de reparation professionnel,
programme au moment qui vous convient, Pour planifier une reparation, appelez-nous du
lundi au vendredi, de 7 h 00 6 22 h 00 HNE, ou le samedi et le dimanche de 8 h 00 6 18 h 00
HNE, Plusieurs installations du service au consommateur GE offrent un service lejour m6me ou
le lendemain, ou selon votre disponibilit& Nos techniciens form6s en usine connaissent votre
61ectrom6nager sur le bout des doigts, de sorte que les r6parations s'effectuent la plupart du
temps en une seule visite,
Au Canada, du lundi au vendredi de 7 h 00 6 20 h 00 et le samedi de 8 h 00 6 17 h00 HAE.
GEoffre des commandes en braille sur une vari6t6 d'61ectrom6nagers
GEainsi qu'une brochure facilitant la planification d'une cuisine sans
obstacles destin6e aux personnes 6mobilit6 r6duite.
Lesconsommateurs affect_s d'une alteration auditive ou d'un trouble
d'_locution et qui ont acc_s 6 un appareil pour malentendants ou (_
un tel6imprimeur conventionnel peuvent composer le 800.TDD.GEAC
(800.833.4322)pour demander des renseignements ou un service.
SEt.ON A-A
I
Contrats de
service
Aux Etats-Unis :
800. 626. 2224
Au Canada •
1.800. 561.3344
Pieces et
a ccessoires
Aux Etats-Unis :
800.626.2002
Au Canada •
1.800. 561.3344
Vous pouvez avoir acces au service aux consommateurs GE m6me apres I'expiration de votre
garantie, Procurez-vous un contrat GE pendant que votre garantie est toujours en vigueur et
vous b6n6ficierez d'un rabais substantiel. Un contrat sur plusieurs ann6es vous assurera dans
I'avenir d'un service au prix d'aujourd'hui,
Les personnes ayant les competences pour reparer leurs propres electromenagers peuvent se
faJre livrer des pieces et des accessoJres directement a leur domicile. Le systeme de gestion de
pieces GE permet I'acces a plus de 47 000 pieces.., et toutes les pieces de rechange d'origine
GE sont totalement couvertes par une garantie. Les cartes VISA, MasterCard et Discover sont
acceptees. VisJtez www.geapplJances.com.
User maintenance instructions contained in this manual cover procedures intended to be
performed by any user. Other servicing generally should be referred to qualified service
personnel. Caution must be exercised, since improper servicing may cause unsafe operation.
41
Page 42

Garantie
Refrigera teur en a cier inoxydab/e
GARANTIE DE VOTREREFRIGERA TEUR MONOGRAM
Agrafez votre facture du client ou votre cheque paye ici. Une preuve
d'achat initial est requise pour obtenir un service sous garantie
Ce qui est
couvert
/4partir de/a date
d'achat initial
Ce qui n'est pas
couvert
GARANTIE LIMITEE DE UN (1) AN
Pendant une p@riode de un (1) an 5 partir de la date d'achat initial, nous couvrirons les frais de pi@ces et de
main-d'ceuvre du service (3domicile relatifs (3la r@paration ou au remplacement de toute piece defectueuse du
refrider_'_teur r@sultant d'un vice de fabrication.
GARANTIE LIMITEE DE ClNQ (5) ANS
Pendant une p@riode de cinq (5) ans (3 partir de la date d'achat initial, nous couvrirons les frais de pi@ces et de
main-d'ceuvre du service (3domicile relatifs (3 la r@paration ou au remplacement de toutepiece du slysteme
de r#frig#ration hermetique (compresseur, condensateur, _vaporateur et toute tubulure de raccordement)
r_sultant d'un vice de fabrication.
GARANTIELIMITEEDE30JOURSSURLACARTOUCHEFILTRANTEAEAU(filtre a eau, si inclus)
A partir de la date d'achat initial, nous couvrirons les frais de remplacement de toutepiece defectueuse de/a
cartouche filtn_nte 2Jeau r_sultont d'un vice de fabrication. Pendant la dur_e de cette gorantie de trente jours,
nous assumerons aussi les frais de remplacement de la cartouche filtrante.
• • • • • ® g • • ® Q 8 • • ® Q ® I I Q ® ® • ® ® ® Q ® • • ® • Q Q ® • ® • ® Q I l ® ® • ® B
Cette garantie est offerte (3I'acheteur initial et (3tout propri_taire successif d'un produit achet_ dans le but d'en faire un
usage domestique standard dans les 48 Etats am_ricains continentaux, (3Hawaii, dans le district f_d_ral de Columbia
ou au Canada. Si le produit est situe dans un lieu ou le service par un reparateur GEautorise n'est pas offert, vous
pourriez devoir acquitter les frais de transport ou transporter le produit par vos propres moyensjusqu'(3 I'installation
d'un reparateur GE autorise. En Alaska, la garantie est similaire mais LIMITEE puisque vous devez acquitter les frais de
transportjusqu'(3 I'atelier de r_paration ou les frais de d_placement du r_parateur (3votre domicile.
Tousles services sous garantie seront offerts par nos Centres de service (3I'usine ou par nos r_parateurs Customer
Care_) autorises durant les heures de travail normales.
Encasde besoinde r_paration de votre _lectrom_nager, pendant lap_riodede garantie ou au-del(3,composez le
800.444.1845aux Etats-Unis.AuCanada,composez le800.561.3344.Veuilleztenir vos numeros de modele et de serie
(3port_e de la main Iorsd'un appel de service.
• Une visite de service ,_votre domicile pour vous
apprendre a utiliser le produit.
• Un remplacement de fusible ou un rearmement de
disjoncteur a domicile.
• Un dommage cause par un accident, un incendie, une
inondation ou une catastrophe naturelle.
• Une defectuosite du produit s'il a ete utilise
commercialement ou ,_une autre fin que celle prevue.
• Un dommage survenu apres la Iivraison.
• Une installation, une livraison ou un entretien
inadequats.
En cas de prob[eme d'insta[lation, communiquez
avec votre revendeur ou votre installateur, Vous etes
responsable de fournir des equipements appropries en
ce qui a trait ,_I'electricite, la plomberie et aux autres
types de branchement,
• S'il y a lieu, le remplacement des ampoules de lampe,
ou de la cartouche filtrante ,_eau si elle differe de celle
mentionnee plus haut.
• Le remplacement de la cartouche filtrante ,_eau, si
incluse, en raison d'une pression d'eau hors des limites
de service specifiees ou d'une sedimentation excessive
dans I'alimentation d'eau.
• La perte de nourriture causee par son alteration
(Etats-Unis seu[ement}.
• Les dommages accessoires ou indirects causes par de
possibles defectuosites de cet e[ectromenager.
• Product not accessible to provide required service.
EXCLUSION DES GARANTIES Ih4PLICITES -- Votre seul et unique reeours consiste en la r#paration du
produit en vertu de cette garantie limitee. Toute garantie implicite, y compris les garanties implicites
relatives a la qualite marchande ou a I'adequation a un usage particulier, se limitera a une periode de
un (1)an ou a la periode la plus courte prescrite par la Ioi.
Certains Etats ou provinces ne permettant pas d'exclure ou de restreindre les dommages accessoires ou
indirects, il se peut que les limitations ci-dessus ne s'oppliquent pas (3votre cos. Certains droits porticuliers vous
sont devolus en vertu de la presente garantie et ils peuvent s'accompagner d'autres droits qui varient selon
votre lieu de residence. Pour connaitre la nature exacte de vos droits, consultez I'organisme de protection du
consommoteur de votre r_gion, ou encore le bureau du procureur g_n_ral de I'Etot.
Garant aux Etats-Unis : General Electric Company,
Garant au Canada : Mabe Canada inc.
42
Louisville, KY40225
GE
Appliances
Appliance Perk
Louisville, KY40225
GEAppfionces.com
Page 43

InformaciOn al Consumidor
Refrigerador de Acero /noxidab/e
/n troduccion
Contenidos
Su nuevo Refrigerador Monogram realiza una elocuente afirmacion de estilo, conveniencia y
flexibilidad de planificacion en la cocina, Si Io elige en base a su pureza de diser]o, arreglos para un
almacenamiento practico o atencion asidua al detalle (o por todas estas razones), observara que la
combinacion superior de forma y funcion de su homo microondas Monogram Io deleitara en los ar]os
venideros,
La informacion de las siguientes paginas le ayudara a realizar una correcta utilizacion y mantenimiento de
su refrigerador,
Ante cualquier otra consulta, visite nuestro sitio web en: monogram.corn
Servicios al Cliente
Numeros Telefonicos Importantes ........... 61
Numeros de Modelo y Serie .................. 44
Ficha Tecnica de Funcionamiento ............ 59
Solucionador de Problemas ............... 57-58
Registro del Producto ........................ 44
Instrucciones de Seguridad .............. 45-46
Garantia ................................... 63
Garantia del Filtro de Agua .................. 60
Cuidado y Limpieza
Limpieza - Interna y Externa ................. 55
Reemplazo de la Bombilla de Luz ............ 56
Mudanza ................................... 55
Vacaciones ................................. 55
Instrucciones de Funcionamiento
Maquina de Hielos Automatica .............. 54
Funciones Adicionales ....................... 47
Dispensador de Agua Interno ................ 48
Estantes y Recipientes .................... 50-52
Controles de Temperatura ................... 47
Cajon con Control de Temperatura ............ 53
Filtro de Agua ............................... 49
Antes de
US_F SU
rehrigera dot
Lea este manual cuidadosamente, La
finalidad del mismo es ayudarle a realizar un
uso y mantenimiento correctos de su nuevo
refrigerador,
Lea este manual cuidadosamente, La
finalidad del mismo es ayudarle a realizar un
uso y mantenimiento correctos de su nuevo
refrigerador,
Si no entiende algo o necesita mas ayuda, en la
seccion trasera de este manual figura un listado
de numeros gratuitos de servicio al consumidor,
OR
Visite nuestro sitio Web en: monogram.com
43
Page 44

InformaciOn al Consumidor
RefWgerador de Acero /noxidab/e
Escr/ba los
numeros
de modelo
y serie
Si recibio un
rehrigera dot
dahado
Ahorre
tiempo y
dinero
Los encontrara en una etiqueta dentro del
compartimiento de alimentos frescos, debajo en
la parte superior derecha,
Escriba estos numeros en la Tarjeta de Registro
de Posesion del Producto del Cliente, incluida con
el material de embalaje,
De forma inmediata, comuniquese con el
comerciante (o fabricante) que le vendio el
refrigerador,
Antes de solicitar el servicio tecnico, consulte
la seccion del Solucionador de Problemas en el
reverso de este manual,
Antes de enviar esta tarjeta, tambien escriba
estos numeros aqui:
N@mero de Modelo
N@mero de Serie
Use estos n@meros en cualquier correspondencia
o Ilamadas al servicio tecnico relacionadas con
su refrigerador
En el mismo figuran causas de problemas
menores de funcionamiento que usted puede
corregir,
S/ neces/ta
sol/c/tar
el servicio
tecnico
Para acceder al servicio tecnico, consulte la
pagina de Servicios al Cliente, en el reverso de
este manual,
Estamos orgullosos de nuestro servicio tecnico
y deseamos que este complacido, Si por alguna
razon no se siente a gusto con el servicio tecnico
que recibe, aqui figuran los pasos que debera
seguir para solicitar ayuda adicional,
Para clientes en EE.UU.:
PRIMERO, comuniquese con las personas
que le brindaron el servicio tecnico sobre su
electrodomestico, Explique por que no se siente a
gusto, En la mayoria de los casos, esto resolvera
el problema,
LUEGO, si a@n no se siente a gusto, escriba todos
los detalles, incluyendo su n@mero telefonico, a:
Manager, Customer Relations
GEAppliances
Appliance Park
Louisville, KY40225
Para clientes en Canada:
PRIMERO, comuniquese con las personas
que le brindaron el servicio tecnico sobre su
electrodomestico, Explique por que no se siente a
gusto, En la mayoria de los casos, esto resolvera
el problema,
LUEGO, si a@n no se siente a gusto, escriba todos
los detalles, incluyendo su n@mero telefonico, a:
Manager, Consumer Relations
Mabe Canada Inc,
1 Factory Lane, Suite 310
Moncton, N,B, E1C 9M3
44
Page 45

INSTRUCCIONESIMPORTANTESDESEGURIDAD
LEA YCUARDEESTASINSTRUCCIONES
_Este es el simbolo de alerta de seguridad. Elmismo alerta sobre potenciales riesgos de muerte o lesiones tanto para usted con
para otras personas. Todos los mensajes de seguridad estaran a continuacion del simbolo de alerta de seguridad y con la palabra
"PELIGRO","ADVERTENCIA" o "PRECAUCION". Estas palabras se definen como:
Signale une situation qui presente un danger imminent et qui, si elle n'est pas evitoe, entrainera des blessures
graves, voire la mort.
Signale une situation qui presente un danger imminent et qui, si elle n'est pas evitoe, peut entrainer des
blessures graves, voire la mort..
_ ignale une situation qui presente un danger imminent et qui, si elle n'est pas evitoe, peut entrainer des
blessures mineures ou graves.
A/usar este electrodomestico, siempre siga las
precauciones bbsicas de seguridad, inc/uyendo Iosiguiente:
• Use este electrodomestico solo para su proposito original,
como se describe en el Manual del Propietario.
• Este refrigerador se debe instalar de forma apropiada de
acuerdo con las ]nstrucciones de ]nstalacion antes de set
usado.
• No permita que los niffos se trepen, paten o cuelguen de los
estantes del refrigerador. Podrian dar_ar el refrigerador y sufrir
lesiones graves.
• No guarde ni use gasolina u otros vapores inflamables y
Iiquidos cerca de este ni de otros electrodomesticos.
• Desenchufe el refrigerador antes de reaiizar su limpieza y de
hacer reparaciones.
NOTA: Recomendamos en%ticamente que cualquier
reparacion sea realizada por un individuo calificado.
NOT#,: La corriente al refrigerador no puede ser desconectada
por ninguna configuracion del panel de control.
• Debido a los posibles riesgos sobre la seguridad bajo
ciertas condiciones, recomendamos enfaticamente no usar
prolongadores. Sin embargo, si se debe usar un prolongador,
es absolutamente necesario que sea un prolongador para
electrodomestico de la lista UL(en Estados Unidos) o uno
certificado por CSA(en Canada), de 3 cables con conexion a
tierra, que cuente con un enchufe con conexion a tierra y un
tomacorriente con una graduacion electrica del cable de 15
amperes (minimo) y 120 voltios.
• Reemplace todas las piezasy paneles antes de utilizar.
• No toque las superficies frias deI compartimiento del freezer
cuando las manos esten humedas o mojadas. La piel se
puede adherir a estas superficies extremadamente frias.
• En refrigeradores con maquina automatica de hielo, evite
el contacto con las partes en movimiento del mecanismo
expulsor o con elelemento de calefaccion ubicado en la parte
inferior de la maquina de hielos. No coloque los dedos ni las
manos en el mecanismo de la maquina de hielos automatica
mientras el refrigerador este enchufado.
• Mantenga los dedos alejados de las areas de "riesgo de
lastimaduras": los espacios entre las puertas y entre las
puertas y el gabinete son necesariamente pequer%s. Tenga el
cuidado de cerrar las puertas cuando los nitros se encuentren
en el area.
• No vuelva a congelar comidas que hayan estado totalmente
congeladas en forma previa.
• No limpie estantes de vidrio ni tapas con agua caliente
cuando esten frios. Los estantes de vidrio y lastapas se
pueden romper si son expuestos a cambios de temperatura
repentinos o impactos, tales como sacudones o caidas. Elvidrio
templado esta diser_ado para destruirse en pequer_as piezas en
caso de rotura.
RIESGODE QUE UN NINO QUEDEATRAPADO
Que un nitro quede atrapado o que sufra una asfixia
no son problemas del pasado. Los refrigeradores
antiguos o abandonados aun son peligrosos...
incluso aunque se conserven por "solo unos pocos
dias". Sise deshara de su antiguo refrigerador,
siga las siguientes instrucciones a fin de evitar
accidentes.
REFRIGERANTE
Todos los productos de refrigeracion cuentan con
refrigerantes, que de acuerdo con la ley federal
deberan ser eliminados antes de descartar el
producto.
Antes de descartar su antiguo refrigerador o
freezer:
• Retire las puertas.
• Deje las repisas en su lugar de modo que los nitros
no puedan trepar dentro con facilidad.
Si se deshara de un producto de refrigeracion
antiguo, consulte a la compar_ia a cargo sobre como
deshacerse del mismo.
45
Page 46

INSTRUCCIONESIMPORTANTESDESEGURIDAD
_{Riesgo de Explosion
Mantenga cualquier material y vapores inflamables, tales como gasolina, alejados del refrigerador. Si no
se cumple con esto se podra producir una explosion, incendio o la muerte.
Riesgo de CaJdas
Los modelos con estilo incorporado (modelo PYE,CYE, GYE, PWE, CWE, y ZWE) son inestables, especialmente
con las puertas abiertas. Estos modelos deben ser asegurados con el soporte antivolcaduras, a fin de evJtar
caidas hacia adelante, que podrian resultar en la muerte o lesiones graves. Lea y siga las instrucciones de
instalacion en su totalJdad, a fin de instalar el soporte de piso antivolcaduras embalado con su refrigerador.
Riesgo de Descarga Electrica
Enchufe en un tomacorriente con conexion a tierra
de 3 cables.
No elimine el cable de conexion a tierra.
No use un adaptador.
Si no se siguen estas instrucciones se podra
producir la muerte, incendios o descargas
electricas.
COMOCONECTARLA EIECTRICIDAD
Nunca, bajo ninguna circunstancia, corte o elimine
el tercer cable (tierra) del cable de corriente. Por
seguridad personal, este electrodomestico debe
estar adecuadamente conectado a tierra.
El cable de corriente de este electrodomestico
cuenta con un enchufe de 3 cables (conexion
a tierra) que se conecta a un tomacorriente de
pared estandar de 3 cables (conexion a tierra) para
minimizar la posibilidad de riesgos de descargas
electricas pot parte del mismo,
Contrate a un electricista calificado para que
controle el tomacorriente y el circuito electrico, a
fin de asegurar que el enchufe este correctamente
conectado a tierra,
En caso de contar con un tomacorriente de pared
de 2 cables, es su responsabilidad y obligacion
reemplazarlo pot un tomacorriente de pared de 3
cables correctamente conectado a tierra,
El refrigerador deberia estar siempre conectado
a un enchufe especifico con un indice de voltaje
equivalente al que figura en su etiqueta de
caractefisticas tecnicas,
Se requiere un suministro electrico con fusible y
conexion a tierra de 115 voltios de CA, 60 Hz,y 15 o
20 amperes, Esto garantiza el mejor funcionamiento
y ademas previene la sobrecarga de los circuitos del
hogar, Io cual podria ocasionar riesgos de incendio
debido al recalentamiento de cables,
Nunca desenchufe el refrigerador tirando del cable
de corriente, Siempre tome su enchufe firmemente y
empuje el mismo hacia afuera para retirarlo,
Repare o reemplace de inmediato todos los cables
de corriente pelados o con cualquier tipo de da_o,
No use un cable con cortaduras o abrasion sobre su
extension o extremos,
AIalejar el refrigerador de la pared, se debera tenet
cuidado de que no ruede sobre ni dane el cable de
corriente,
USODE PROLONGADORES
Debido a los posibles riesgos sobre la seguridad
bajo ciertas condiciones, recomendamos
enfaticamente no usar proiongadores.
46
Sin embargo, si aun es necesario usar un
prolongador, es absolutamente necesario que
sea un prolongador para electrodomesticos de
la lista UL, de 3 cables con conexion a tierra, que
cuente con un enchufe con conexion a tierra y un
tomacorriente, y que la graduacion electrica del
cable sea de 15 amperes (minimo) y 120 volts,
Page 47

Instrucciones de Funcionamiento
RefHgerador de Acero /noxidab/e
Contro/es de
tempera tufa
Controles de Cambio de Temperatura
La Pantalla de Temperatura esta ubicada en
la parte interior de la puerta izquierda del
refrigerador, Para cambiar la temperatura,
presione y libere las teclas REFRIGERATOR
(Refrigerador) o FREEZER(Freezer), La luz de
ACTUAL TEMP(Temperatura Real) se encendera
y la pantalla mostrara la temperatura real,
Para cambiar la temperatura, presione la tecla
REFRIGERATOR (Refrigerador) o la tecla FREEZER
(Freezer) hasta que se muestre la temperatura
deseada,
Para apagar el sistema de refrigeracion,
mantenga presionadas las teclas REFRIGERATOR
(Refrigerador) y FREEZER(Freezer) de forma
simultanea por 3 segundos, Cuando el sistema
de refrigeracion esta en OFF(Apagado), en la
pantalla se deberia leer OFF(Apagado), Para
encender el sistema de refrigeracion, presione
la tecla REFRIGERATOR(Refrigerador) o la tecla
FREEZER(Freezer), La pantalla mostrara la
configuracion de la temperatura programada de
37° F para el refrigerador y 0° F para el freezer,
Apagar el sistema de refrigeracion detiene el
enfriamiento del refrigerador, pero no corta la
corriente electrica,
Refrigerator
i -m
Hold 3 Sec for °F/°C
Recommended: 37 °F
ActuaJSet
ID!3
-00°c
_._EnergySmart
Recommended:O°F
i Freezer
Energy Smart Override
_. Hold 3 Seconds ..2
f
I DoorAlarm
I Ice Maker
I LockControls
Hold 3 Seconds
I Reset Filter
Hold 3 Seconds
A/arma de la
puerta
M_iquina de
hielos
Contro/es de
B/oqueo
Reinicio de/
fi/tro
Esta alarma sonara si una de las puertas
permanece abierta pot mas de 2 minutos, El
pitido se detiene al cerrar la puerta,
Presione esta tecla para encender o apagar la
maquina de hielos,
Mantenga presionada esta tecla por 3 segundos
para bloquear o desbloquear los controles del
refrigerador y del freezer,
Mantenga presionada esta tecla por 3 segundos
antes de reemplazar el filtro, a fin de reiniciar el
temporizador,
47
Page 48

Dispensadores
Refrigerador de Acero /noxidab/e
Oispensador
de agua
intemo
El dispensador de agua esta ubicado en la
pared izquierda dentro del compartimiento del
refrigerador,
Para dispensar agua:
1 Sostenga el vaso contra el hueco,
2 Presione el boron dispensador de agua,
3 Sostenga el vaso debajo del dispensador
entre 2 y 3 segundos luego de liberar el boron
del dispensador, Es posible que continue
dispensando agua luego de que el boron haya
sido liberado,
Si no se dispensa agua cuando e/refkigerador
se insmla por primera vez, es posible que la
caheria de agua posea aire, Presione el boron
de/dispensadory d_e cotter 7 _ galones para
eliminar el aire atrapado de la caheria de agua y
para Ilenar el sistema de agua,
Durante este proceso, es posible que e/
dispensador produzca un ruido fuerte a medida
que se elimina el aim de la caheria de agua, g fin
de Iimpiar las irnpurezas en la caheria de agua,
descarte los seis primeros vasos de agua,
NOTA: A fin de evimr depdsitos de agua, el
dispensador debe set Iimpiado en forma periddica
con un paho limpio o una espor_a,
I
I
48
Page 49

Filtro de Agua
RefHgerador de Acero /noxidab/e
Filtro de
Agua
Cartucho del filtro de agua
El cartucho del filtro de agua esta ubicado en el
interior de los alimentos frescos en la pared del lado
izquierdo, cerca de la parte superior,
Modelos selectos utilizan identificacion pot
frecuencia radial (RFID, segun sus siglas en ingles)
para detectar goteras y monitorear el estado del
filtro L__ficada orlaFCC
FCClD: ZKJ-EBX1532P001 IClD:
10229A-EBX1532P001
"Este dispositivo cumple con la Parte 15de la Normativa de
la FCC.Su funcionamiento esta su_eto alas dos condiciones
siguientes:. (1)Este dispositivo no podra ocasionar
interferencias nocivas, y (2)este dispositivo debe aceptar
cualquier interferencia recibida, incluyendo interferencias
que puedan ocasionar un funcionamiento no deseado'_
"Este dispositivo cumple el estandar(es) de exencion
de licencia de la t755 de la Industria de Canada. Su
funcionamiento esta sujeto a las dos condiciones
siguientes:. (1)Este dispositivo no podra ocasionar
interferencias, y (2)este dispositivo debe aceptar cualquier
interferencia recibida, incluyendo interferencias que puedan
ocasionar un funcionamiento no deseado'_
Cu_indo es necesario reemplazar el
cartucho del filtro
El cartucho del filtro se debe reemplazar cada seis meses
o antes si 170 galones de agua fueron dispensados o el
flujo de agua al dispensador o la maquina de hielos se ve
reducido,
Modelos con Pantalla Tactil: Un mensaje del estado
del filtro aparecera en la pantalla cuando sea necesario
reemplazar el filtro de agua, Elestado del filtro se
actualizara de forma automatica cuando el filtro sea
reemplazado
Modelos sin Pantalla Tactil: Una luz del indicador del
filtro se iluminara en la pantalla cuando sea necesario
reemplazar el filtro de agua,
Retiro del cartucho del filtro
Para reemplazar el filtro, primero retire el cartucho
gastado abriendo la puerta del filtro y empujando
la parte inferior del cartucho a fin de permitir que se
balancee hacia afuera, Cuando el cartucho ya no
se pueda balancear, de forma suave empuje para
desconectar el mismo del porta cartuchos, NO TUERZA
ELCARTUCHO, Es posible que gotee una pequena
cantidad de agua,
Instalacion del Cartucho del Filtro
Alinee la pare superior del filtro con el porta cartucho
y empuje hasta que el cartucho quede totalmente
insertado, La flecha en la etiqueta debe apuntar hacia
arriba si el cartucho esta orientado de forma correcta,
Mientras continL]a asegurando que el cartucho
este completamente insertado en el sosten, gire
suavemente el filtro hacia adentro hasta que se afirme
en su posicion, Siel filtro no gira facilmente, controle
para asegurar que el filtro este alineado de forma
adecuada y completamente insertado dentro del porta
cartuchos,
Balancee
C_
Q
3, Deje correr 2 galones de agua atraves del dispensador
de agua fria (aproximadamente 5 minutos) a fin de
eliminar elaire del sistema, Un cartucho del filtro de
agua instalado en forma reciente puede hacer que
chorree agua del dispensador. Use unaojarra grande o
una botella deportiva para atrapar el agua rociada,
4, Mensaje de Estado de Reinicio del Filtro (modelos sin
pantalla tactil),
Nota: Esnormal que el agua se vea descolorida durante
el flujo inicial del sistema, Elcolor del agua regresara
a su estado normal luego de unos pocos minutos de
comenzar a dispensar,
Tapon de Bypass del Filtro
A fin de reducir el riesgo de da_os sobre la propiedad
debido a perdidas de agua, usted DEBERA usar el
tapon del bypass del filtro cuando no se disponga de
un reemplazo del cartucho del filtro, El dispensador
y la maquina de hielos no funcionaran si el filtro o
el tapon del bypass del filtro no estan instalados, El
tapon del bypass se instala del mismo modo que un
cartucho del filtro,
A fin de reducir el riesgo asociado con asfixia, no permita que los nihos menores de 3 ahos tengan acceso a las partes
pequehas durante la instalaci6n de este producto. El cartucho del filtro descartable debera ser reemplazado cada 6 meses
luego de agotar su capacidad, o antes si se produce una reduccion notoria en el caudal,
Para obtener el maximo beneficio de su sistema de filtrado, GE recomienda el uso de los filtros de la mama GE unicamente, El
uso de filtros de la marca GE en refrigeradores GE y Hotpoint <R_brinda un optimo funcionamiento y confiabilidad, Los filtros GE
cumplen con rigurosos estandares NSF de la industria sobre seguridad y calidad, que son importantes para los productos que
estan filtrando su agua, GE no posee filtros de la mama GE que no esten calificados para su uso en refrigeradores GE y Hotpoint,
y no existe seguridad de que los filtros que no son de la marca GE cumplan con los estandares de GE en relacion a calidad,
funcionamiento y confiabilidad,
Ante cualquier consulta, o para ordenar cartuchos de filtros adicionales, visite nuestro sitio web en www.geapplianceparts.
tom, o Ilame a GE Parts and Accessories (Piezas y Accesodos de GE), 8003626.2002.
Los clientes de Canada deberan buscar el Centro de Servicio Tecnico Camco en las paginas amarillas
49
Page 50

Estantes y Recipientes
RefHgerador de Acero Inoxidable
Reorganizacidn
de/os Estantes
Estantes
An tiderra mes
Los estantes del compartimiento del refrigerador
son ajustables.
Compartimiento del Refrigerador
Para retirar:
1. Retire todos los articulos del estante.
2. Incline la repisa hacia arriba en la parte frontal.
3. Levante la repisa desde la parte trasera y retire
la misma.
Para reemplazar:
1. AI inclinar el estante hacia arriba, inserte el
gancho superior en la parte trasera del estante
en una ranura del soporte.
2. Incline la parte frontal de la repisa basra que la
parte inferior de la misma quede bloqueada.
Los estantes antiderrames poseen extremos
especiales que ayudan a evitar derrames sobre
estantes inferiores.
1 / p'_'
Repisa
QuickSpace TM
Esta repisa se divide a la mitad y se desliza por
debajo de s[misma para almacenar productos altos
en el estante de abajo.
Esta repisa puede ser retirada y reemplazada o
reubicada (al igual que las repisas antiderrame).
NOTA: La mitad trasera del Estante Quick Space no
es ajusta ble.adj ustable.
*Modelos Selectos 0nicamente
\
\
5O
Page 51

Estantes y Recipientes
Refiigerador de Acero Inoxidable
Recipiente
de lacteos o
ajustab/e
Recipientes
Ajustab/es en
Puertas
Para retirar: Levante el recipiente de forma recta y
luego empuje hacia afuera,
Para reemplazar: Adhiera el recipiente a los
soportes de puerta moldeados y empuje hacia
abajo, Elrecipiente se bloqueara en el lugar,
Los recipientes ajustables pueden ser Ilevados
f_cilmente del refrigerador al area de trabajo,
Para retirar: Levante el recipiente de forma recta y
luego empuje hacia afuera,
Para reemplazar o reubicar: Deslice el recipiente
justo sobre los soportes de puerta moldeados y
empuje hacia abajo, Elrecipiente se bloqueara en el
lugar,
li iiii
Bandeja desplegable*
(bandeja abierta)
1. Abra las puertas de alimentos frescos,
2. Presione ambos botones en los lados inferiores
del recipiente y este ultimo se desplegara,
3. De vuelta para reinstalar,
*Modelos Selectos Onicamente
Canasta y cajOn
de/freezer
I
Modelos con Dispensador
(Puerta Derecha)
1. Canasta,
2. Cajon
3. Hielera*
*Modelos Selectos Onicamente
Modeios sin Dispensador
(Puerta Izquierda)
f
51
Page 52

Estantes y Recipientes
RefHgerador de Acero Inoxidable
Retiro de/a
canasta
(cajOn inferior)
Recipientes
no ajustab/es
en la puerta
de/freezer
1. Abra las puertas de alimentos frescos,
2. Abra la puerta del freezer basra la posicion de
detencion,
3. Retire la canasta del freezer levantando la
parte trasera de la canasta y rotando la
misma hacia arriba,
4, Levante hacia afuera y retire la misma,
Para reemplazar:
Invierta el paso 1 al 4 para reemplazarla,
Para retirar: empuje hacia adentro la lengL]eta
plastica, ya sea hacia la izquierda o la derecha
Para reemplazar: deslice el recipiente en la
ubicacion basra que se bloquee,
CajOn
ajustab/e de
embutidos/
productos
cu/dvados
Divisor de/
cajOn _
Para retirar: empuje el cajon fuera de su posicion
final, Levante la parte frontal del cajon hacia arriba y
hacia afuera,
Para reemplazar: empuje los costados izquierdo
y derecho basra que esten completamente
extendidos, Primero vuelva a colocar el cajon y gire
el mismo del frente hacia abajo para que se apoye
en los deslizadores, Empuje el cajon hacia adentro
basra la posicion cerrada,
Para retirar: empuje el cajon fuera de su posicion
final, Deslice el divisor de cacerolas hacia la derecha
para liberar el mismo de la cacerola,
Para reemplazar: Coloque el divisor de cacerolas en
la ranura de la derecha y deslice el mismo hacia la
*Modelos Selectos Onicamente
isea necesario,
52
Page 53

Cajon ClimateZone y con Control de Temperatura
CfimateZone Mantenga las frutas y verduras organizadas en
compartimientos separados para un facil acceso,
El exceso de agua que se puede acumular en la
parte inferior de los cajones o debajo de los mismos
se debera limpiar,
Refrigerador de Acero /noxidab/e
Cajon con
Control de
Temperatura
TempSelectZone Meat Beverage Dell
El Cajon con Control de Temperatura es un cajon
de anchura completa con control de temperatura
ajustable, Este cajon puede ser usado para
productos grandes de tipos variados,
Para cambiar la configuracion, presione el boron
de seleccion,
Nota: Las temperaturas indican las temperaturas
adecuadas para la comida y la temperatura real
puede variar de acuerdo con el funcionamiento
normal y otros factores tales como aperturas de
puertas y el punto de configuracion de comidas
frescas,
r -3zo _ 34 ° 38°
i 1
I i
r- J L
_ Riesgo de kaceradon. '_
No guarde botellas de vidrio en esta
ubicacion. Si estan congeladas, se podran _
romper y producir lesiones personales. ,
L
I
I
53
Page 54

M iquina de Hielos Autom itica
Sta in/ess Stee/ Refrigera tor
M dquina
de Hielos
A utom ff t/ca
NOT,q: Puede Ilevar entre 72y 24 horas que un refrigerador recMn insmlado comience a
fabricar hielo.
La maquina de hielos producira siete cubos por ciclo,
y aproximadamente entre 100 y 130 cubos en un
periodo de 24 horas, dependiendo de la temperatura
del compartimiento del freezer, la temperatura
ambiente, la cantidad de veces que se abra la puerta
y otras condiciones de uso,
La maquina de hielos se Ilenara de agua cuando se
enfne y Ilegue a los 15°F (-10°C), Puede Ilevar entre
12 y 24 horas que un reffigerador recien instalado
comience a fabricar hielo,
Si el refrigerador es utilizado antes de realizar
las conexiones de la tuberia de agua a la unidad
o si el suministro de agua a un reffigerador en
funcionamiento es apagado, asegorese de que
la maquina de hielos este apagada, Una vez que
el agua haya sido conectada al reffigerador, la
maquina de hielos podra ser encendida, Para mas
detalles, lea la tabla que aparece mas ab_o,
Esposible que escuche un zumbido cada vez que la
maquina de hielos se Ilene de agua,
Descarte las primeras cantidades de hielo para
permitir que elsuministro de agua se despeje,
Asegorese de que nada interfiera con la extension del
interruptor de energia,
Cuando el cubo se Ilene hasta el nivel del interruptor
de energia, la maquina de hielos dejara de producir
hielo, Esnormal que varios cubos quedenjuntos,
Cuando el cubo se Ilene hasta el nivel del interruptor
de energia, la maquina de hielos dejara de producir
hielo, Esnormal que varios cubos quedenjuntos,
Interruptor de Energia
IVOTA: En hogares con un nivel de presiOn inferior
a la normal, es posible que escuche que la valvula
de agua de la maquina de hielos realice varios
ciclos parn producir una cnntidad de hielo,
Para minimizar el riesgo de
lesiones personales, evite el contacto con
las partes moviles del mecanismo eyector
o con el elemento de calefaccion que libera
los cubos. No coloque los dedos ni las manos
en el mecanismo de la maquina de hielos
automatica mientras el refrigerador este
enchufado.
Paraapagar lamaquina de hielos,presioneel boton
"ICEMAKER"(Maquinade Hielos)en loscontroles.
ina de hielos
Acceso a/
hielo
Hielera del Freezer*
El almacenamiento de hielo se encuentra en el
cajon del compartimiento del freezer,
, Abra el cajon del freezer,
, La hielera se encuentra ubicada en el lado
izquierdo de la canasta superior,
, Empuje la canasta superior hacia adelante para
retirar la hielera,
*Modelos Selectos Onicamente
54
Hielera
del
Freezer
Page 55

Cuidado y Limpieza
RefHgerador de Acero /noxidab/e
Limpieza
de la parte
exterior
Lirnpieza
de la parte
interna
Los paneles de acero inoxidable y las manijas
pueden set limpiados con un limpiador de acero
inoxidable de acceso comercial tal como St_inless
Steel Mz_gicrM.
Stainless SteelM_gicesta disponible en Ace, True
Value, Servistar, HWI y otras tiendas comerciales
lideres. Tambien esta disponible a traves de GE
Parts and Accessories (Piezas y Accesorios de
GE),800.626.2002. Ordene el numero de pieza
WX10X15.
Para evitar olores, deje abierta una caja de
bicarbonato de sodio en los compartimientos de
alimentos frescos y del freezer.
Desenchufe el refrigerador antes de limpiar.
Si esto no resulta practico, estruje el exceso de
humedad para eliminarlo de la esponja o tela
al limpiar alrededor de los interruptores, luces o
controles.
Use agua caliente y solucion de bicarbonato de
sodio - aproximadamente una cuchara sopera
(15 ml,) de bicarbonato de sodio para un cuarto
de galon (1 litro) de agua, Esto limpia y neutraliza
los olores, Enjuague y seque,
No use cera para electrodomesticos ni pula
sobre el acero inoxidable.
Las piezas de plastico plateadas deben set
limpiadas conjabon u otros detergentes suaves.
Limpie con una esponja, una tela humeda o
toallas de papel.
No use estropajos, limpiadores en polvo,
blanqueadores ni limpiadores que contengan
blanqueador, ya que estos productos pueden
rayar y debilitar la terminacion de la pintura.
El uso de cualquier otra solucion de limpieza
que no sea la recomendada, especialmente
aquellas que contengan destilados de
petroleo, puede quebrar o dahar el interior del
refrigerador.
Evite limpiar estantes de vidrio frios con
agua caliente, ya que la diferencia extrema
de temperatura puede ocasionar roturas.
Sostenga las repisas de vidrio con cuidado.
Los golpes sobre el vidrio templado podran
ocasionar roturas.
No lave ninguna parte plastica del refrigerador
en el lavavajillas.
Deb%is de/
reh igerador
Preparacidn
para /as
vacac/ones
Preparacidn
p_F_ una
mudanza
Tenga cuidado al alejar el refrigerador de la
pared. Cualquier tipo de cobertura de piso puede
set dar]ada, particularmente las coberturas
acolchonadas y aquellas con superficies con
relieves.
Levante las paras niveladoras ubicadas en la parte
frontal interior del refrigerador.
Empuje el refrigerador hacia afuera de
forma recta y regrese el mismo a su posicion
Si estara de vacaciones o ausente por tiempo
prolongado, retire la comida y desenchufe el
refrigerador. Limpie el interior con una solucion de
bicarbonato de sodio de una cuchara sopera (15 ml)
de bicarbonato de sodio para un cuarto de galon (1
litro) de agua. Deje las puertas abiertas.
Si la temperatura puede Ilegar a estar por debajo
de la congelacion, solicite a un tecnico calificado
que drene elsistema de suministro de agua a fin de
prevenir dar]os graves sobre la propiedad debido a
una inundacion,
Asegure todos los items tales como estantes y
cajones, pegando los mismos de forma segura en
sus respectivos lugares afin de evitar danos.
AI usar un carro manual para mover el refrigerador,
no deje que la parte frontal ni la parte trasera
descansen contra el carro manual. Esto podria
danar el refrigerador. Lleve el mismo solo sobre los
costados del refrigerador.
empujandolo hacia adentro. Mover el
refrigerador hacia una ubicacion lateral podra
ocasionar dar]os sobre la cobertura del piso o el
refrigerador.
Baje las paras niveladoras basra que toquen el piso.
AI volver a empujar el refrigerador, asegurese
de no aplastar el cable de corriente ni la
caheria de la maquina de hielos.
1) Apague el refrigerador (pag. 47) o desenchufe el
refrigerador.
2) Vacie la hielera.
3) Cierre el suministro de agua.
Si cierra el suministro de agua, apague la maquina
de hielos (pg. 54).
AI regresar de sus vacaciones:
1) Reemplace el filtro de agua.
2) Deje correr 2 galones de agua a traves del
dispensador de agua fria (aproximadamente 5
minutos) a fin de eliminar el aire del sistema.
AI usar un carro manual para mover el
refrigerador, no deje que la parte frontal ni la
parte trasera descansen contra el carro manual.
Esto podria dahar el refrigerador. Lleve el mismo
solo sobre los costados del refrigerador.
55
Page 56

Reemplazo de las Lamparas
Refrigerador de Acero /noxidab/e
Compa rtim iento
de comidas
frescas- luz
superior
Hay una luz LEDen el compartimiento de comidas
frescas y en la parte inferior de las puertas de
comidas frescas para iluminar el compartimiento
del freezer,
Sera necesario que un tecnico autorizado
reemplace la luz LED,
En caso de set necesario un reemplazo de
este ensamble, Ilame al Servicio Tecnico de GE
al 1,800,432,2737 en los Estados Unidos o al
1,800,561,3344 en Canada,
Luces LED
56
Page 57

Solucionador de Problemas
RefNgerador de Acero /noxidab/e
Sonidos de
Funcionarniento
Norma/
El sonicto de los refrigeradores nuevos es diferente al de aque//os rnas antiguos. Los
refrigeradores rnodernos cuentan con rnas funciones y utilizan una tecnolog/a rnas nueva.
Escuchas Io que yo escucho ? Estos sonidos son normales.
HUMMM...
-- WHOOSH...
iiiiiii_i¸
Esposible que el nuevo compresor de alta
efectividad funcione m_'_s@pidoy por m_'_stiempo
que aquel de sureffigerador antiguo, yes posible
que escuche un zumbido osonido de pulsacion
mientras est_'_funcionando,
Esposible que escuche sonidos de gorgoteos al
cerrar las puertas, Estosedebe al equilibrio de la
presion dentro del reffigerador
Luego de dispensar hielo,un motor cerra@el
vertedor de hielo para evitar que entre aire caliente
en el cubo de hielo,manteniendo el hieloen una
temperatura de congelamiento,
Elzumbido del motor al cerrar el cubo de hielo es
normal, poco despuesde dispensar hielo,,
SONIDOSDECLlC,
Esposible que escuche losventiladores girar en altas
velocidades,Esto sucedecuando elreffigerador
seenchufa pot primera vez,cuando laspuertas se
abren con ffecuencia ocuando una gran cantidad
de comida es agregada a loscompartimientos del
reffigerador o del freezer, Losventiladores est_n
ayudando a mantener las temperaturas correctas,
iiiiiii_i¸
Losventiladores cambian de velocidad a fin de
brindar un enfriamiento optimo yahorros de energia,
SONIDOSDELAGUA
ESTALLIDOS,ROTURASy
CHASQUIDOS
6
Esposible que escuche sonidos de roturas o
estallidoscuando seenchufe el reffigerador pot
primera vez,Estosucede mientras el refrigerador se
enfria basra la temperatura correcta,
La expansiony contraccion de las bobinas
de enfriamiento durante y despues de la
descongelacion pueden producir sonidos de roturas
o estallidos,
Enlos modelos con m_'_quinade hielos, luegode un
ciclo de produccion de hielo, es posible que escuche
los cubos de hielo caer al recipiente del hielo,
Enlos modelos con dispensador,cuando sedispense
el agua, es posibleque escuche el movimiento de las
tuberias de agua al iniciar el proceso y luego de que
el boron del dispensador sealiberado,
Esposible que el%jo de refrigerante a traves de
las bobinas de enffiamiento produzca un gorgoteo
similar aagua hirviendo,
Elagua que cae sobre el calentador de
descongelamiento puede producir un chisporroteo,
estallido o zumbido durante el ciclo de
descongelamiento,
Esposible que seescuche un sonido degoteo
durante elciclo de descongelacion, a medida que el
hielo sederrite desde el evaporador y fluye hasta la
olla de drenaje,
Esposible que seescuche un sonido degoteo
durante elciclo de descongelacion, a medida que el
hielo sederrite desde el evaporador y fluye hasta la
olla de drenaje,
57
Page 58

Solucionador de Problemas
Refiigerador de Acero /noxidab/e
gPreguntas?
/Use este
solucionador
de
problemas!
Problema Causa Posible
La manija esta floja/la manija , Es necesario ajustar la manija Para acceder a instrucciones
tiene un espacio de separacion, detalladas, consulte las secciones de Ajuste de I_ M_?nij_ de Cornid_?s
Frescas y Ajuste de I_ M_nij_ de/Freezer,
Pitido del refrigerador , Se trata de la alarma de la puerta, Apague o desactive la misma con
la puerta cerrada, Si la puerta esta abierta y la alarma esta sonando,
solo podra detener la alarma,
No enfr[a *
El agua tiene mal gusto/olor *
El agua en el vaso esta caliente ,
El dispensador de agua no
funciona
Elsistema de enfriamiento esta apagado, Vuelva a encender la
refrigeracion, Consulte las/nstrucciones de Funcionamiento,
El dispensador de agua no fue usado durante un tiempo prolongado,
Dispense agua hasta que toda el agua en el sistema sea repuesta,
Esnormal cuando el refrigerador es usado por primera vez luego
de su instalacion Espere 24 horas hasta que el refrigerador se enfrie
completamente,
, Eldispensador de agua no fue usado durante un tiempo prolongado,
Dispense agua hasta que toda el agua en el sistema sea repuesta,
, Elsistema de agua fue drenado, Espere varias horas hasta que el
suministro repuesto se haya enfriado,
, Elsuministro de agua esta apagado o no esta conectado, Consulte
sobre la/nsml_cidn de/Suministro de Agua,
, Elfiltro de agua esta atascado o el enchufe del filtro/bypass no fue
instalado, Reemplace el cartucho del filtro o retire el filtro e instale el
enchufe del bypass,
, Es posible que haya aire atrapado en el sistema de agua, Presione el
brazo dispensador durante por Io menos 5 minutos,
58
Chorrea agua del dispensador,
No hay produccion de agua ni
de cubos de hielo,
Gotea agua desde el dispensa-
dot
AI enfriarse el freezer, la comida
fresca no se enfria
, Elagua en la reserva esta congelada debido a que los controles
estan configurados en una temperatura demasiado fria, Configure
el control del refrigerador en una configuracion mas caliente y
espere 24 horas, Siel agua no es dispensada luego de 24 horas,
comuniquese al servicio tecnico,
, El cartucho del filtro fue instalado en forma reciente, Deje correr
agua del dispensador durante 5 minutos (aproximadamente 2
galones),
, La linea de suministro o la valvula de cierre estan atascadas, Llame a
un plomero,
, Elfiltro de agua esta atascado, Reemplace el cartucho del filtro o
retire el filtro e instale el enchufe del bypass,
, El cartucho del filtro no esta instalado de forma apropiada, Retire
y vuelva a instalar el cartucho del filtro, asegurandose de que se
puede bloquear en el lugar correcto,
, La maquina de hielos esta apagada, Controle que la maquina de
hielos este encendida, Consulte la seccion de Mz_quina de Hielos
Autornd tica,
, Puede haber aire presente en el sistema de entrada de agua,
haciendo que gotee agua luego de set dispensada, Dispense agua
durante por Io menos 5 minutos para eliminar el aire del sistema,
, Es normal, cuando el refrigerador se enchufa por primera vez
o luego de un corte de corriente prolongado, Espere 24 horas
hasta que se alcancen las temperaturas seleccionadas en ambos
compartimientos,
Page 59

Ficha Tecnica de Funcionamiento
del Modelo: GERPWFE
Use el Cartucho de Reemplazo de RPWFE,
La concentracion de las sustancias indicadas en el agua que ingresa al sistema fue reducida a la concentracion menor que o igual al limite
permisible para el agua que deja el sistema, como se especifica en el Estandar 42 }/en el Estandar 53 de NSF/ANSI, ,Sistema evaluado }/certificado
por NSF International contra el Estandar 42 }/el Estandar 53 de NSF/ANSI para la reduccion de sustancias que figuran a continuacion,
Capacidad de 170 galones (643.5 [itros). Reduccion de Contaminantes Determinada por [a evaluacion de NSF.
ustanciaEvaluada Concentracion Concentraci0nMaxima %Promedio Concentracionde! AutorizadaAceptable .deReduccion
i,arala Reduccion Promedio • Especificadapor NSF
2.0 rng/L 2.0 rng/L ± 10%
Por Io menos 10,000
7,633,333 pts/mL particulas/mL
109 MFL _uperiores Q 1OtJm de Iongitud
0.009 mg/L 0.009 mg/L ± 10%
0.016 mf!/L 0.015 mf!/L +_10%
0.08 mg/L 0.08 mg/L ± 10%
104,750 quistes/L Mirlimo de 50,000 quistes/L
0.140 mg/L 0.15 mg/L ± 10%
0.158 mg/L 0.15 mg/L ± 10%
0.006 mq/L 0.006 mq/L +_10%
0.006 mg/L 0.006 mg/L ± 10%
0.002 mq/L 0.002 mq/L +_10%
0.222 mg/L 0.225 mg/L ± 10%
0.015 mg/L 0.015 mg/L ± 10%
0.218 mg/L 0.210 mg/L±lO%
0.278 mg/L 0.300 mg/L ± 10%
Basado enel usode Cryptosporidiumparvumoocysts,
107 a 10 s fibras/L; fibras
deReducci6_
97.4%
99.0%
99.99%
94.4%
96.4%
98.8%
99.99%
99.3%
98.3%
91%
88.3%%
99%
99.8%
93.5%
99.9%
97.7%
Premedio de Concentracion Maxima Requisitos
Agua Procesada
0.05 mg/L
71,850 pts/ml
<1 MFL
0.0005 mg/L
0.001 mq/L
0.001 mg/L
3 quistes/L
0.001 mg/L
0.002 mg/L
0.0003 mq/L
0.0007 mg/L
0.00002 mf!/L
0.0005 mg/L
0.001 mg/L
0.0001 mg/L
0.0015 mg/L
de Agua Procesada de NSF
N/A
N/A
N/A
0.003 mg/L
0.005 mc!/L
0.04 mg/L
N/A
0.010 mg/L
0.010 mg/L
0.002 mc!/L
0.002 mg/L
0.0002 mc!/L
0.075 mg/L
0.003 mg/L
0.07 mg/L
N/A
>-99.95%
>-50%
>-85%
>-99%
N/A
N/A
N/A
N/A
N/A
N/A
N/A
N/A
N/A
N/A
N/A
>-95%
Informe de
Evaluacion
de NSF
J-00102044
J-00106249
J-00102069
J-00102058
J-00102065
J-00102059
J-00102057
J-00102052
J-00102053
J-00102054
J-00104087
J-00102063
J-00102067
J-00102061
J-00102064
J-00102070
Los siguientes reclamos de reduccion farmaceutica no fueron certificados por NSF International. Reclamos evaluados y verificados
por un laboratorio independiente:
I
._ Concentracion Concentracion Maxima % Promedio Pr0medio de Concentraci6n Autorizada Aceptable de Evaluacion
Reducclon de la Sustancla Promedlo del A ua Procesada i de A ua Procesada
1088 ng/L N/A 99.5% 5.0 ng/L N/A J-00103221
845 ng/L N/A 99.4% 5.0 ng/L N/A J-00103221
898 ng/L N/A 98.8% 9.9 ng/L N/A J-00103726
945 ng/L N/A 99.4% 5.5 ng/L N/A J-00103727
403 ng/L N/A 99.5% 2.0 ng/L N/A J-00103221
Pautas de Aplicacion/Par,imetros de Suministro de Agua
de Servicio Presion del qua !172- 827 kPa!
Suministro de ___ Temperatura del _a 33° F - 100 ° F (0.6° C - 38 ° C)
Esesencial clue se cumpla con los requisitos de instalaci0n, mantenimiento y reemplazo defiltros recomendados por el fabricante, a fin de clue el producto funcione deacuerdo a como
rue promocionado. Para acceder a informaci0n sobre la Oarantia, consulte el Manual de Instalaci0n.
Nota: Observe que aunque la evaluacion se realizo de acuerdo con condiciones . No se debera instalar si la presion del agua supera los 120 psi (827 kPa), Si la
estandares de laboratorio, el desempeno puede variar
Reemplazo del Cartucho: RPWFE. Para conocer costos estimados de elementos
de reemplazo, comuniquese al 1-800-626-2002 o visite nuestro sitio Web
en www.geapplianceparts.com.
_WARNING
A fin de reducir el riesgo asociado con la ingestion de contaminantes:
* No se deben usar con agua que no sea microbiologicamente segura o de calidad
desconocida sin una desinfeccion adecuada, antes o despues, del sistema.
Los sistemas certificados para la reduccion de quistes se podrian usar en aguas
desintectadas que puedan contener quistes filtrables. Numero de Establecimiento
de EPA070595-MEX-O01.
AVISO
A finde reducirelriesgo de perdidas de agua o inundacion, y para asegurar
un rendimiento optimo del filtro:
. Lea y siga las Instrucciones de uso antes de la instalacion y uso de este sistema.
. La instalacion y uso DEBERAN cumplir con todos los codigos estatales y locales
de plomeria.
Especificada por NSF de Reduccion g g de NSF
presion del agua es superior a los 80 psi, deber_i instalar una valvula limitadora
de presion. Si no esta seguro sobre como controlar la presion del agua,
comuniquese con un plomero profesional.
. No instale cuando se puedan producir condiciones de golpe de ariete. Si existen
condiciones de golpe de ariete, debera instalar un suspensor de golpes de ariete.
Si no esta seguro sobre como controlar esta condicion, comuniquese con un
plomero profesional.
" No instab en Ilneas de suministro de agua caliente. [a temperatura maxima de
funcionamiento del agua para este sistema de fiRro es de 100°F (37.8°C),
. Proteja el filtro de heladas. Drene el filtro cuando las temperaturas sean
infcriores a 33°F (0.6°C).
"Cambie el cartucho del filtro descartable cada seis meses o antes, si observa una
reduccion notoria en el promedio del flujo de agua,
. Si no se reemplaza el cartucho del filtro descartable en intervalos recomenda--
dos, se podra producir un rendimiento inferior del filtro y quebraduras en el
espacio de colocacion del filtro, ocasionando perdidas de agua o inundacion.
Concentracion Maxima Informe
lelEstandar42y elEstandar53de NSF/ANSIenel
(_ [EvaluadoyceSF,]cadoporNSHntemationalcontra
| modelo GERPWFpare la redL_cion de los redamos
d E_,_,,%;_O [e_pecificados en b ficha tecnica defunsionalnbnto
RPWFE
59
Page 60

Garantia Limitada del Cartucho del Filtro
de Agua RPWFE
@ ...........-, 1 Comuniquese con nosotros en www.geapplianceparts.com,
o Ilame a1800.GE.CARES.
Abroche surecibo aqui,
Paraacceder al servicio
tecnico de acuerdo con
la garantia debera contar
con laprueba de la fecha
original de compra,
Reemplazaremos, Sin Costo:
Treinta D/as Cualquierparte del cartucho del filtro de agua que falle debido a un defecto en los
Desde la fecha materiales o la fabricacion durante esta garantfa limitada de treinta dias.*
de comp_a original,
• Viajes del tecnico del servicio a su hogar para enseriarle sobre como usar el producto.
• Instalacion inadecuada.
• Fallas del producto en caso de abuso, real uso, o uso para propositos diferentes al original o uso comercial
• Reemplazo de fusibles de la casa o reinicio de disyuntores.
• Reemplazo del cartucho del filtro de agua debido a la presion del agua que esta fuera del rango de funcionamiento
especifico o debido a exceso de sedimentos en el suministro de agua.
• Darios ocasionados sobre el producto por accidente, incendio, inundaciones o catastrofes naturales.
• Darios consecuentes o incidentales causados por posibles defectos de este producto.
Esta garantia se extiende a/ comprador origina/ y a cualquier dueho subsiguiente de productos adquiridos para uso
hogareho dentro de EE,UU, EnAlaska, la garantia excluye el costo de envio o Ilamadas al servicio tecnico desde su hogar,
Algunos estados no permiten la exclusion o Iimitacion de dahos fortuitos o consecuentes, Esta garant/a le da derechos
legales especfficos yes posible que tenga otros derechos legales que w_rfan entre un estado y otto, Para conocer cubles
son sus derechos legales, consulte a la oficina de asuntos del consumidor local o estatal o al Fiscal de su estado,
Para Adquisiciones Realizadas en Iowa: Este formulario debe poseer la firma y fecha del comprador y del vendedor
antes de ia consumacion de esta venta.
Este formulario deberia ser retenido por el vendedor en un archivo durante un minimo de dos arios.
Comprador:
Nombre Nombre
Domicilio Domicilio
Ciudad Estado Codigo Postal Ciudad Estado Codigo Postal
Firma Fecha Firma Fecha
*Si su pieza de GE f_llla debido a un defecto en la fabricacion dentro de los treinta dias desde la fecha de compra original, le entregaremos una pieza nueva o, a su eleccion, una pieza reconstruida
sin cargo, Devuelva la pieza defectuosa al proveedor de piezas a quien le realizO la compra,junto con una copia de la "prueba de compra" de la pieza, Si la pieza es defectuosa y no muestra signos
de abuso, ser_/cambiada, La garantia no cubre la falla de las piezas que estan danadas mientras estan en su posesiOn, si son abusadas, o si fueron instaladas de forma incorrecta No cubre el costo
de regresar la pieza al proveedor a quien le realizO la compra ni cubre el costo del trabajo para retirar o instalar la misma a fin de diagnosticar la f_dla, No cubre las piezas usadas en productos
de uso comercial, excepto en el caso de equipos acondicionadores de aire En ningun caso GE sera responsable por daflos consecuentes, Garante: General Electric Company
EXCLUSION DE GARANT[AS IMPL[CITAS: Su unica y exclusiva alternativa es el cambio de la pieza, como se indica en esta Garantia Limitada Las garantias implicitas, incluyendo garantias
implicitas de comerciabilidad o conveniencia sobre un propOsito particular, se Iimitan a seis meses o al periodo mas corto permitido por la ley
Vendedor:
Appliances
Appliance Park
(_ E
Louisville, KY 40225
geapplianceparts.com
6O
RPWFE
r.
34-871>2704@
EPA#070595-MEX-O01
"_' 2014 General Electric Company PC78863
Page 61

Servicios al Cliente
RefHgerador de Acero /noxidab/e
Con la adquisicion de su nuevo electrodomestico Monogram,
este seguro de que si alguna vez necesita informaciOn o
asistencia de GE, allf estaremos, i Todo Io que tiene que hacer
es Ilamar sin costo!
GE Answer
Center ®
En EE.UU.:
800.626.2000
Servicio de
ReparaciOn en
el Hogar
En EE.UU.:
800.444. 1845
En Canada:
1.800. 561.3344
Para
Clientes con
fecesidades
Especiales...
En EE.UU.:
800.626.2000
Cualquiera sea su consulta sobre uno de los electrodomesticos principales de Monogram, el
servicio de informacion de GE Answer Center@) esta disponible para brindarle ayuda, Su Ilamada,
y su consulta, seran respondidas de forma inmediata y gentil, Llame a OE Answer Centere) de
lunes a viernes de 8 a,m, a 10 p,m, (Hora del Este), y los sabados de 8 a,m, a 7 p,m, (Hora del Este)
OR
Visite nuestro sitio Web en: monogram.com
En Canad& Ilame al 1.800.561.3344
Un profesional del servicio al cliente de GE le brindara el servicio de reparacion profesional
programado en el dia y horario que sea de su conveniencia, Para programar el servicio tecnico
comuniquese de lunes a viernes de 7 a,m, a 10 p,m, (Hora del Este), o los sabadosy domingos
de 8 a,m, a 6 p,m, (Hora del Este), Muchas ubicaciones de Servicio al Cliente de GE a cargo de
la empresa le ofrecen el servicio boy o marhana, o a su conveniencia, Nuestros tecnicos con
capacitacion en fabrica conocen su electrodomestico por dentro y fuera, de modo que la
mayoria de las reparaciones se pueden resolver en una sola visita,
En Canada: De lunes a viernes de 7 a,m, a 8 p,m, y los sabados de 8 a,m, a 5 p,m, (Hora del Este),
71 I /I I i
GE ofrece controles en Braille para una variedad de electrodomesticos
de GE,y un catalogo para planificar una cocina sin obstaculos para
personas con movilidad limitada,
Los consumidores con incapacidad auditiva o de die,logo que poseen
acceso a un TDD o a un teletipo convencional se pueden comunicar al
800,TDD,GEAC (800,833,4322) para solicitar informacion o el servicio
tecnico,
Contactos del
Servicio Tecnico
En EE.UU.:
800. 626. 2224
En Canada:
1.800. 561.3344
Piezas y
Accesorios
En EE.UU.:
800.626.2002
En Canada:
1.800. 561.3344
Puede estar seguro de que el Servicio al Cliente de GEaun estara alli una vez que su garantia
caduque, Adquiera un contrato de GE mientras su garantia aOn esta vigente y recibira un
importante descuento, Con un contrato a muchos athos, se asegura el acceso al servicio tecnico
futuro a los costos actuales,
Aquellos individuos calificados para realizar el servicio tecnico de sus propios electrodomesticos
pueden solicitar el env[o de piezas y accesorios directamente a sus hogares, El sistema de piezas
de GE brinda acceso a mas de 47,000 piezas,,, y todas las Piezas de Renovacion Genuina de GE
estan totalmente garantizadas, Se aceptan las tarjetas VISA, MasterCard y Discover,
Visite www.gea pplia nceparts.com.
Las instrucciones de mantenimiento del usuario que figuran en este manual cubren los
procedimientos que deberan set realizados pot cualquier usuario. Otros servicios tecnicos
generalmente deben ser dedvados a personal calificado del servicio. Se debera tener cuidado,
ya que una reparaci6n indebida podra ocasionar que el funcionamiento no sea seguro.
61
Page 62

Notas
62
Page 63

Garantia
Refrigerador de Acero /noxidab/e
GARANTiA DE SU REFRIGERADOR MONOGRAM
Abroche el recibo de venta o cheque cancelado aquL Para
acceder al servicio tecnico correspondiente a la garantfa,
debera contar con la prueba de la fecha original de compra.
QUE CUBRE LA
GARANT/A
Desde la Fecha
de la Compra
Origina/
QUE NO CUBRE
LA GAIRAN TiA
GARANTIALIMITADAPORUNANO
Por un ano desde la fecha original de cornpra, le brindarernos, sin costo, piezas y trabaqjos del servicio tecnico en
su hogar para la reparacion o reemplazo de cualquier parte del reffigerador que presente fallas debido a defectos
de fabricaciOn.
GARANTIALIMITADAPORClNCOAI'ilOS
Por cinco anos desde la fecha original de compra, le brindaremos, sin costo, piezas y trahajos de servicio tecnico
en su hogar para la reparacion o reemplazo de cualquier parte del sistema de refrigeracion sellado (el compresor,
condensador, evaporador y todos los tubos de conexion) que presente fallas debido a defectos de fabricacion.
GARANTIA LIMITADA DE TREINTA DIAS DEL CARTUCHO DEL FILTRO DE AGUA (Filtro de agua, si se incluye)
Desde la fecha de cornpra original le brindarernos, sin costo, el reernplazo de partes de cualquier pieza del
cartucho del filtro de agua que presente fallas debido a defectos de fabricacion. Durante la garantia limitada
por treinta dias, tambien le brindaremos, sin costo, el reemplazo de un cartucho del filtro de agua.
• ® • I ® ® ® • ® ® I ® ® ® • ® • I ® ® ® ® ® • • • ® • • • • ® a ® • a • • • 6 ® ® ® • • • Q
Esta garantia se extiende al comprador original y cualquier dueno subsiguiente para productos adquiridos para
uso normal en el hogar en los 48 estados contiguos, Hawai, Washington, D.C. o Canada. Si el producto esta
en un area donde no se encuentra disponible un Proveedor Autorizado del Servicio Tecnico de GE, usted sera
responsable por el costo de un viaje o se podra requerir que traiga el producto a una ubicacion del Servicio
Tecnico de GE Autorizado para recibir el servicio. En Alaska, la garantia es la misma excepto que es LIMITADA
debido a que usted debe pagar el costo del envio del producto hasta el negocio del servicio tecnico o por los
costos de viaje del tecnico del servicio a su hogar.
Todo el servicio de la garantia ser_] provisto por nuestros Centros del Servicio de Fabrica o por un proveedor
autorizado del servicio de Customer Care® durante el horario laboral normal.
Si es necesario realizar el servicio tecnico de su electrodomestico, durante el periodo de garantia o despues, en
EE.UU. comuniquese al 800.444.1845.
En Canada: 800.561.3344. Cuando Ilame para solicitar el servicio, tenga los numeros de serie y modelo
disponibles.
, Viajes del tecnico del servicio a su hogar para
ensenarle sobre como usar el producto.
, Reemplazo de fusibles de la casa o reinicio de
disyuntores.
, Danos ocasionados sobre el producto pot
accidente, incendio, inundaciones o catastrofes
naturales.
, Fallas del producto si su uso es para propositos
diferentes al original o uso comercial.
, Dano causado despues de la entrega.
, Instalacion, entrega o mantenimiento
inadecuados.
Si tiene un problema con la instalacion,
comuniquese con su vendedor o instalador.
Usted es responsable de brindar instalaciones
adecuadas de conexion electrica, plomeria u otras
instalaciones de conexion.
, Reemplazo de bombillas de luz, si se incluyen,
o el cartucho del filtro de agua, si se incluye, a
diferencia de Io detallado anteriormente.
, Reemplazo del cartucho del filtro de agua, si se
incluye, debido a la presion del agua que esta fuera
del tango de funcionamiento especifico o debido a
exceso de sedimentos en el suministro de agua.
, Perdida de comida debido a degradacion (en EE.UU.
unicamente).
, Dar_os consecuentes o incidentales causados pot
posibles defectos sobre este producto.
, Producto no accesible para que se brinde el
servicio requerido.
EXCLUSION DE GARANTiAS IMPLiCITAS- Su unica y exclusiva alternafiva es la reparacion del producto,
como se indica en la Garantia Limitada. Cualquier garantia imp!icita, incluyendo garant[as imp!icitas
de comerciabilidad o conveniencia sobre un proposito particular, se limitan a un at}o o al per[odo mas
corto permitido por la ley.
Algunos estados/provincias no permiten la exclusion o limitacion de danos incidentales o consecuentes, de
modo que es posible que dicha exclusion o limitacion no se aplique a usted. Esta garantia le da derechos legales
especificos, yes posible que tambien tenga otros derechos legales que varien entre un estado y otro, o entre una
provincia y otra. Para conocer cuales son sus derechos legales en su estado/provincia, consulte a la oficina de
asuntos del consumidor local o estatal/provincial o al Fiscal de su Estado.
Garante en EE.UU.: General Electric Company,
Garante en Canada: Mabe Canada Inc.
Louisville, KY40225
GE
Appliances
AppliancePark
Louisville,KY40225
GEAppfiances.com
63
Page 64

Warranty
Stainless Steel Refrigerator
YOUR MONOGRAM REFRIGERATOR WARRANTY
Staple sales slip or cancelled check here. Proof of original
purchase date is needed to obtain service under warranty.
WHAT IS
CO VERED
From the Date
of the Original
Purchase
WHAT IS NO T
COVERED
LIMITEDONE-YEARWARRANTY
For one year from date of original purchase, we will provide, free of charge, parts and service labor in your home
to repair or replace c_nypcfft of the refr/gerz_torthat fails because of a manufacturing defect,
LIMITEDFIVE-YEARWARRANTY
For five years from date of original purchase, we will provide, free of charge, parts and service labor
in your home to repair or replace anypart of the sea/ed refr/gernt/ng .system (the compressor, condenser,
evaporator and all connecting tubing) that fails because of a manufacturing defect,
LIMITEDTHIRTY-DAYWARRANTYONWATERFILTERCARTRIDGE(Water filter, if included)
From the date of the original purchase we will provide, free of charge, replacement parts for c_nypcfft
of the wz_terfiltercartridgethat fails because of a manufacturing defect. During this limited thirty-day warranty,
we will also provide, free of charge, a replacement water filter cartridge.
® • ® • • • Q Q Q ® • • • • Q Q ® ® • • • Q ® • ® • • ® Q Q Q ® • • • • Q Q ® • • • • Q • ® ®
This warranty is extended to the original purchaser and any succeeding owner for products purchased for
ordinary home use in the 48 mainland states, Hawaii, Washington, D,C, or Canada, If the product is located in an
area where service by a GE Authorized Servicer is not available, you may be responsible for a trip charge or you
may be required to bring the product to an Authorized GE Service location for service, In Alaska the warranty
is the same except that it is LIMITED because you must pay to ship the product to the service shop or for the
service technician's travel costs to your home,
All warranty service will be provided by our Factory Service Centers or by our authorized Customer Care _'
servicers during normal working hours,
Should your appliance need service, during warranty period or beyond, in the USA call 800,444,1845,
In Canada; 800,561,3344, Please have your serial number and model number available when calling for service,
- Service trips to your home to teach you how to
use the product.
- Replacement of house fuses or resetting of circuit
breakers.
- Damage to the product caused by accident, fire,
floods or acts of God.
- Failure of the product if it is used for other than its
intended purpose or used commercially.
- Damage caused after delivery.
- Improper installation, delivery or maintenance.
If you have an installation problem, contact
your dealer or installer. You are responsible for
providing adequate electrical, plumbing and other
connecting facilities.
- Replacement of the light bulbs, if included, or
water filter cartridge, if included, other than as
noted above.
- Replacement of the water filter cartridge, if
included, due to water pressure that is outside
the specified operating range or due to excessive
sediment in the water supply.
- Loss of food due to spoilage (in the USA only).
- Incidental or consequential damage caused by
possible defects with this appliance.
- Product not accessible to provide required
service.
EXCLUSION OF IMPLIED WARRANTIES--Your sole ond exclusive remedy is product repoir us provided
in this Limited Warranty. Any implied warranties, including the implied warranties of merchantability
or fitness for a particular purpose, are limited to one year or the shortest period allowed by law.
Some states/provinces do not allow the exclusion or limitation of incidental or consequential damages,
so the above limitation or exclusion may not apply to you. This warranty gives you specific legal rights, and you
may also have other rights which vary from state to state/province to province. To know what your legal rights
are inyour state/province, consult your local or state/provincial consumer affairs office or your state's Attorney
General.
Warrantor in USA:General Electric Company,
Warrantor in Canada: Mabe Canada Inc.
239D4535P003
49-60718
08-14 GE
Printed in the United States
Louisville, KY40225
GE
Appliances
AppliancePark
Louisville,KY40225
GEAppfionces.com
 Loading...