

Page 1
KIT5711 85571100200
B-29 Superfortress
The B-29 "Superfortress" that first took flight on September 21, 1942, was
the culmination of a war department request issued to aircraft manufacturers in January 1940. Production of the B-29 would become the single largest aircraft program of the war, and when production ceased nearly 4000
aircraft had been delivered to the USAAF.
With its’ wingspan over 141 feet, its’ length of 99 feet and its’ four 2,200
horsepower engines, this "Superbomber" designed by the Boeing aircraft
company would be in service with 61 (VH) Very Heavy Bombardment
squadrons when the war ended.
The island hopping campaign developed by the war department was
designated to liberate strategically located islands from the Japanese.
These islands would become home to the airfields of the vast airborne
armada of B-29 "Superfortresses".
Although initially deployed to remote airfields in China and India. The
liberation of the Marianas Islands during the summer of 1944 signaled the
beginning of the massive "Superfortress" build-up. Operating from hastily
constructed airfields on the islands of Guam, Saipan and Tinian, waves of
heavily laden B-29s initiated the strategic bombing campaign that would
cripple the Japanese war effort.
dropped the world’s first nuclear weapon on the city of Hiroshima. Followed
by the dropping of another such weapon on the city of Nagasaki, three days
later. Following the Japanese surrender, B-29s were retained as the United
States premier strategic bomber.
In the summer of 1950, the "Superfortress" returned to combat in the
skies over Korea. The first unit to see combat was brought up from Guam
to be stationed at Kadena AB on the Island of Okinawa. Other B-29 units
were deployed to Yokota AB in Japan. From these bases, the bombers
could easily range to any Korean target. The B-29 was in combat shortly
after the Korean War started through to the last day of the conflict.
The "Superfortress" was fitted with two pressurized crew compartments that were designed to improve aircrew comfort on the fatiguing
long-range missions. Nearly twenty thousand pounds of ordnance could be
carried in the two huge bomb bays; four powerful Wright "Cyclone" engines
equipped with dual exhaust driven superchargers, were nestled in streamlined nacelles. The "Superforts" were heavily armed with ten machine guns
mounted in four remote controlled turrets and two additional machine guns
and a twenty-millimeter cannon (deleted on later aircraft) were fitted in the
tail of each B-29.
On the morning of August 6, 1945 a single specially modified B-29
* REPEAT SEVERAL TIMES
* A REPETER PLUSIEURS FOIS
READ THIS BEFORE YOU BEGIN LIRE CE QUI SUIT AVANT DE COMMENCER
* Study the assembly drawings.
* Each plastic part is identified by a number.
* In the assembly drawings, some parts will be
marked by a star (★) to indicate chrome
plated plastic.
* For better paint and decal adhesion, wash
the plastic parts in a mild detergent solution.
Rinse and let air dry.
* Check the fit of each piece before
cementing in place.
* Use only cement for polystyrene plastic.
* Scrape plating and paint from areas
to be cemented.
* Allow paint to dry thoroughly before
handling parts.
* Any unused parts may be discarded.
DECAL APPLICATION INSTRUCTIONS
1. Cut desired decal from sheet.
2. Dip decal in water for a few seconds.
3. Place wet decal on paper towel.
4. Wait until decal is movable on paper backing.
5. Place decal in position on model, face up and
slide backing away.
6. Press out air bubbles with a soft damp cloth.
7. Milkiness that may appear is for better decal
adhesion and will dry clear. Wipe away any
excess adhesive.
8. Do not touch decal until fully dry.
9. Allow the decals 48 hours to dry before
applying clear coat.
NOTE: Decals are compatible with
setting solutions or solvents.
* OPTIONAL PARTS
* PIECES EN OPTION
* DECAL
* DECAL COMANIE
* Etudier les schémas de montage.
* Chaque pièce en plastique est identifiée par un numéro.
* Sur les schémas de montage, certaines pièces sont
marquées d'une étoile (★) pour indiquer qu'elles sont en
plastique chromé.
* Pour une meilleure prise de la peinture et des autocollants,
laver les pièces en plastique avec une solution détergente
peu concentrée. Les rincer et les laisser sécher à l'air.
* Vérifier que chaque pièce s'ajuste bien avant
de la coller en place.
* N'utiliser que de la colle pour polystyrène.
* Gratter les parties à coller pour enlever le chrome et la peinture.
* Laisser la peinture bien sécher avant de manipuler les pièces.
* Toute pièce inutilisée peut être jetée.
DIRECTIVES D'APPLICATION DES AUTOCOLLANTS
1. Découper l'autocollant désiré de la feuille.
2. Tremper l'autocollant dans de l'eau pendant quelques secondes.
3. Placer l'autocollant mouillé sur une serviette en papier.
4. Attendez que l'autocollant puisse être déplacé sur son support
en papier.
5. Mettre l'autocollant en position sur le modèle face sur
le dessus et faire glisser le support pour l'enlever.
6. Appuyer avec un chiffon doux humide pour éliminer les bulles d'air.
7. La substance laiteuse qui peut apparaître est destinée à
améliorer l'adhésion de l'autocollant et devient incolore au
séchage. Essuyer pour enlever tout excédent d'adhésif.
8. Ne pas toucher l'autocollant tant qu'il n'est pas bien sec.
9. Laisser l'autocollant sécher pendant 48 heures avant
d'appliquer une couche transparente.
REMARQUE: Les autocollants sont compatibles avec
* ALTERNATIVE ASSEMBLY
* ENSEMBLAGE ALTERNATIVE
les solutions de fixage ou les solvants.
* CEMENT TOGETHER
* A COLLER
* REMOVE AND THROW AWAY
* A RETIRER ET JETER
* DO NOT CEMENT
* NE PAS COLLER
This optional paint guide is provided if
you choose to detail paint your model.
Ce guide de peinture vous sera fourni si vous choisissez
de peindre votre modèle en détail.
Aircraft Gray
Aluminium
Blue Testors 1110
Emerald Green
Flat Black
Flat Brown
Flat Dark Green
Flat White
Flat Yellow
Gloss Black
Gunmetal
Leather
Light Gray FS 16492
Military Brown
Olive Drab
Red
Rubber
Silver
Steel
Tan
Wood
Yellow FS 13538
Gris aéronef
Aluminium
Bleu
Vert émeraude
Noir mat
Brun mat
Vert foncé mat
Blanc mat
Jaune mat
Noir brilliant
Bronze
Cuir
Gris clair
Brun miliaire
Olivet
Rouge
Caoutchouc
Argent
Acier
Havane
Bois
Jaune
If you have any questions or comments, call our hotline at: (800) 833-3570
Revell-Monogram Consumer Service Department, 725 Landwehr Road, Northbrook, Illinois 60062
Be sure to include the plan number (85571100200), part number, description, your return address and phone number.
REVELL-MONOGRAM, LLC Northbrook, IL. Copyright © 2003. All rights reserved.
or, please write to:
Visit our website: www.revell-monogram.com
Page 2
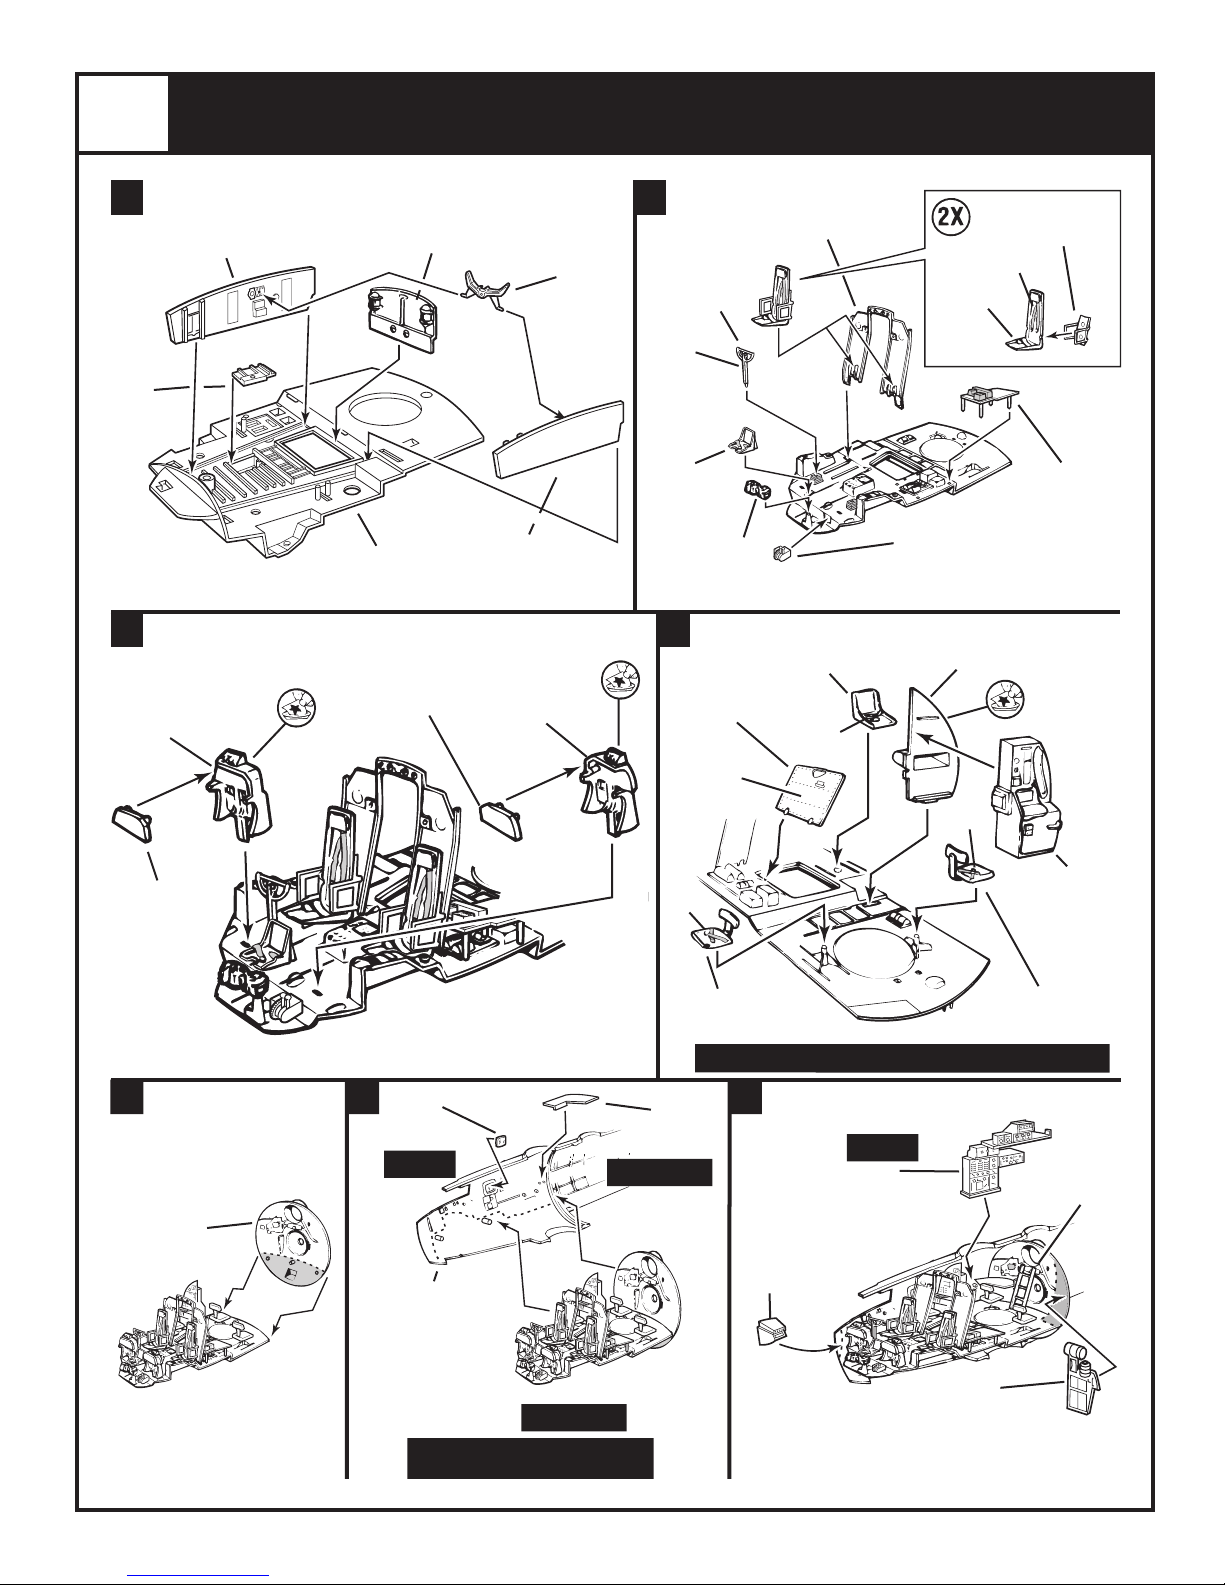
1
FLIGHT DECK ASSEMBLY
A B
167
SIDE PANEL
FLAT DARK GREEN
46
COVER
FLAT DARK
GREEN
FLIGHT DECK
FLAT DARK GREEN
REAR WALL
FLAT DARK
GREEN
15
45
OPERATOR
FLAT DARK
47
SIDE PANEL
FLAT DARK
GREEN
34
DOOR
GREEN
C D
77
65
INSTRUMENT
PANEL
FLAT BLACK
2
PANEL BACK
FLAT DARK
GREEN
64
INSTRUMENT
PANEL
FLAT BLACK
1
GLOSS
BLACK
125
CONTROL
COLUMN
FLAT DARK
GREEN
63
SEAT
FLAT DARK
GREEN
(PAINT BELTS
TAN)
FLAT BLACK
ENTRANCE
DOOR
FLAT DARK
GREEN
ARMOR PLATE
FLAT DARK GREEN
59
SIGHT
✱
17
16
BOMB RELEASE
FLAT DARK GREEN
(PAINT KNOBS FLAT BLACK)
127
BUCKET SEAT
MILITARY BROWN
TAN
123
TAN BELTS
SEAT
FLAT DARK
GREEN
62
68
CONSOLE PIECE
FLAT BLACK
124
SEAT SUPPORT
FLAT DARK GREEN
NAVIGATOR’S TABLE
66
FLAT DARK GREEN
(PAINT BOXES FLAT
BLACK)
3
ON REVERSE
SIDE
171
PANEL BACK
FLAT DARK
GREEN
E
10
BULK HEAD
FLAT DARK
GREEN
F
149
WINDOW
CLEAR
FIRST
1
FUSELAGE HALF
FLAT DARK GREEN
(INTERIOR)
NOTE: WIRING ON FUSELAGE
SECOND
HALF IS LIGHT GRAY
TAN
MILITARY BROWN
✱
67
TABLE
WOOD
THIRD
TAN
70
CONSOLE
PIECE
FLAT DARK
GREEN
126
SEAT
NOTE: DOOR (17) OPEN ON GROUND, CLOSED IN FLIGHT
126
SEAT
MILITARY BROWN
G
60
TABLE
FLAT BLACK
FIRST
71
RADIO PACKAGE
PAINT SHELVES FLAT
DARK GREEN AND
BOXES FLAT BLACK
FLAT DARK GREEN
72
NAVIGATION
CABINET
LADDER
SILVER
(SHOWN IN
PLACE)
69
Page 3
2
INTERIOR ASSEMBLY
A
B
12X
14
CATWALK
FLAT DARK
GREEN
THIRD
REPEAT FOR
OTHER SIDE
PAINT FUSE SILVER
10
BULKHEAD
FLAT DARK
GREEN
1
FUSELAGE
HALF
C
TUNNEL HALF
FLAT DARK
GREEN
11
BULKHEAD
FLAT DARK
GREEN
SECOND
108
FIRST
PAINT INTERIOR
ALUMINIUM
(REPEAT FOR
OTHER SIDE)
D
155
BLISTER
CLEAR
FIRST
REPEAT FOR
OTHER SIDE
135
BOMB HALF
OLIVE DRAB
128
GUNSIGHT
GLOSS BLACK
172
BOMB HALF
OLIVE DRAB
E
127
BUCKET SEAT
FLAT DARK GREEN
(PAINT BELTS TAN)
24
SEAT
SUPPORT
FLAT DARK
GREEN
110
SEAT
BACK
FLAT DARK
GREEN
PAINT BELTS TAN,
PAINT SEAT LEATHER
FLAT
WHITE
PILLOW
109
BED BACK
OLIVE DRAB
REPEAT FOR
OTHER SIDE
ARMOR PLATE
FLAT DARK GREEN
(PAINT BOXES FLAT BLACK)
110
SEAT BACK
FLAT DARK GREEN
FLAT WHITE
PILLOW
PAINT BELTS
TAN, PAINT
SEAT LEATHER
25
109
BED
BACK
OLIVE DRAB
22
WAIST GUN
COMPARTMENT
FLOOR
FLAT DARK GREEN
Page 4

2
INTERIOR ASSEMBLY
CONTINUED
F
H
27
TAIL SKID
BACK
ALUMINIUM
FIRST
REPEAT FOR
OTHER SIDE
USING 157
26
TAIL SKID
FRONT
FLAT DARK
GREEN
160
WINDOW
CLEAR
FLAT DARK
GREEN
12
BULKHEAD
FLAT DARK
GREEN
FLAT DARK
GREEN
G
I
151
WINDOW
CLEAR
LIGHT GRAY WIRING
13
BULKHEAD
FLAT DARK
GREEN
2
FUSELAGE
23
FLOOR
FLAT DARK GREEN
(PAINT BELTS TAN)
FLAT BLACK BOX
73
ARMOR PLATE
FLAT DARK GREEN
(PAINT GUNSIGHT
SIGHT GLOSS BLACK)
61
BOMBARDIER’S
PANEL
FLAT BLACK
FLAT DARK GREEN
4
J
FRONT SPAR
FLAT DARK GREEN
79
PLATE
FLAT DARK GREEN
L
150
WINDSHIELD
CLEAR
158
NOSE
CLEAR
7
FIRST
GUN SIGHT
GLOSS BLACK
K
8
REAR SPAR
FLAT DARK GREEN
58
SECOND
DETAILS OMITTED
FOR CLARITY
NOTE: REMOVE PORTION SHOWN IF YOU
DECIDE ON USING LEANING FIGURE
Page 5

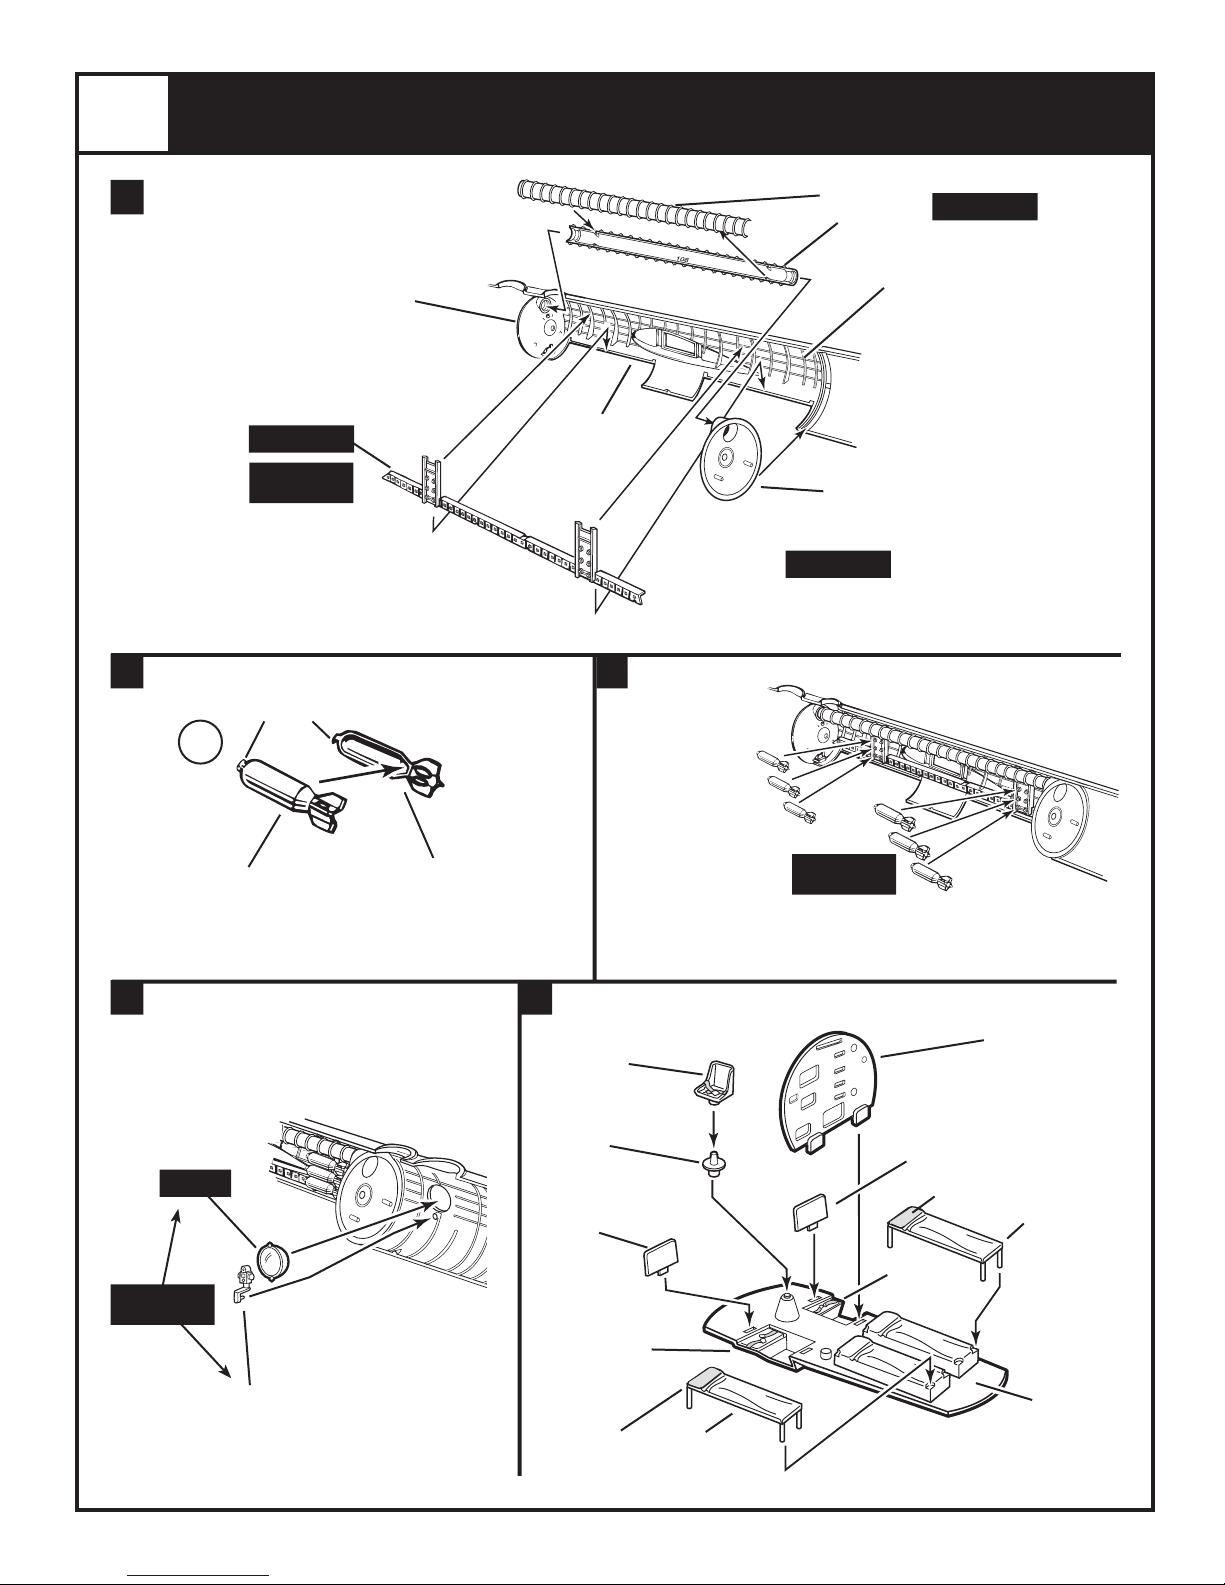
3
A
TAIL AND WING ASSEMBLY
101
STABILIZER HALF
STABILIZER HALF
B
100
75
MACHINE GUN
GUNMETAL
35
TAIL
TAN
75
MACHINE GUN
GUNMETAL
74
20MM CANNON
GUNMETAL
C
REMOVE SHADED AREA WHEN
DOING THE CREAM OF THE
CROP VERSION
152
WINDOW
CLEAR
100
STABILIZER HALF
101
STABILIZER HALF
NOTE: SHADED
AREA IS RECESSED
INTO TAIL SECTION
D
44
WHEEL PLATE
4
WING BOTTOM
REPEAT FOR OTHER SIDE
USING 43 AND 163
G
NOTE: USE THE TEM
PLATE ABOVE FOR
WHEEL COVERS FOR
WHEEL HALF 169 ON
THE HUMPING HONEY
VERSION ONLY, USE
.010 THICK PLASTIC
SHEET
NOSE WHEEL
ALUMINIUM
-
E
169
WHEEL HALF
RUBBER
55
WHEEL HALF
RUBBER
3
WING TOP
H
DRAG
STRUT
ALUMINIUM
REPEAT FOR
OTHER SIDE
USING 162
33
4
WING BOTTOM
32
NOSE
STRUT
ALUMINIUM
SILVER
F
REPEAT FOR
OTHER SIDE
I
5
DOOR
COMPLETED
WING
ASSEMBLY
FLAT DARK
GREEN
INSIDE
164
DOOR
Page 6

4
WHEEL AND DOORS ASSEMBLY
A
REPEAT FOR
OTHER SIDE
FLAT DARK GREEN
C
SILVER
SILVER
REPEAT FOR
OTHER SIDE
FLAT DARK
GREEN
113
RETRACTING
MOTOR
FLAT DARK GREEN
STRUT
ALUMINIUM
104
EXTENSION
DOOR
ALUMINIUM
114
B
MAIN WHEEL
ALUMINIUM
170
WHEEL HALF
RUBBER
RETRACTING
FLAT DARK
GREEN
112
SCREW
ALUMINIUM
168
DOOR
56
WHEEL HALF
RUBBER
D
FIRST
SILVER
DOOR CYLINDER
FLAT DARK GREEN
SECOND
102
DOOR
122
SUPERCHARGER
FLAT BROWN
SUPPORT
49
SILVER
6
BOMB DOOR
ALUMINIUM
(PAINT INTERIOR DOOR
FLAT DARK GREEN)
BOMB DOOR
ALUMINIUM
(PAINT INTERIOR DOOR
FLAT DARK GREEN)
✱
159
POST
CLEAR
176
78
OXYGEN BOTTLES
*
FLAT YELLOW
165
BOMB DOOR
ALUMINIUM
(PAINT INTERIOR DOOR
FLAT DARK GREEN)
*
42
RADOME
LIGHT GRAY
53
RADOME
LIGHT GRAY
BOMB DOOR
ALUMINIUM
(PAINT INTERIOR
DOOR FLAT DARK
GREEN)
✱
122
SUPERCHARGER
FLAT BROWN
✱
REPEAT SUPERCHARGER 122
FIRST
SILVER
175
USE WITH CREAM OF THE
ON OUTBOARD ENGINES
48
DOOR CYLINDER
FLAT DARK GREEN
SILVER
CROP VERSION ONLY
*
Page 7

5
BODY ASSEMBLY
A
38
GUN
PIVOT
GUNMETAL
C
MAGNETO AND ROCKER COVERS - GLOSS BLACK
75
GUN
BARRELS
GUNMETAL
115
TURRET
116
TURRET
RETAINER
FLAT DARK
GREEN
NOTE: ENGINE PAINTING
WIRING SHIELD - SILVER
CYLINDERS - FLAT GRAY/SILVER
CRANKCASE - AIRCRAFT GRAY
PUSH RODS TUBES - SILVER
121
BEARING
BLISTER
154
CLEAR
FLAT BLACK
SILVER
D
B
76
GUNS
GUNMETAL
39
GUN
RETAINER
116
TURRET
RETAINER
FLAT DARK
GREEN
161
POSITION LIGHT
CLEAR
36
TURRET
REPEAT FOR
OTHER SIDE
153
BLISTER
CLEAR
E
ANTENNA
FLAT BLACK
111
ANTENNA
F
SCR-729
ANTENNA
28
50
BASE
119
ENGINE
103
COWLING
YELLOW
55
PROPELLER
29
ANTENNA
HALF
30
ANTENNA
HALF
111
ANTENNA
NOTE: LOCATION
OF ANTENNA FOR
THE HUMPIN
HONEY VERSION
ONLY
29
ANTENNA
HALF
30
ANTENNA
HALF
FRONT VIEW FOR POSITIONING
NOTE: LOCATION OF
ANTENNA FOR THE
CREAM OF THE CROP
VERSION ONLY
52
SCR-729
ANTENNA
CENTER
51
SCR-729
ANTENNA
SCR-729
31
PITOTS
Page 8

6
DECAL PLACEMENT
85571100200
 Loading...