

Monogram 21, 25 Owner's Manual
Owner’s
Owner’s Manual
Models 21 and 25
Manual
Wine Reserve
Congélateur inférieur
Réfrigérateurs
Manuel d’utilisation
La section française commence à la page 45
Congelador inferior
Refrigeradores
Manual del propietario
y instalación
La sección en español empieza en la página 89
197D8243P002
49-60616
08-10 GE
monogram.com

Consumer Information
Wine Reserve
Introduction
Contents
Your new Monogram wine reserve makes an eloquent statement of style, convenience and kitchen
planning flexibility. Whether you chose it for its purity of design or the assiduous details, you will find
that your Monogram wine reserve’s superior blend of form and function will delight you for years to
come.
The information on the following pages will help you operate and maintain your wine reserve properly.
If you have any other questions, visit our Website at: monogram.com
Consumer Services
Important Phone Numbers . . . . . . . . . . . . . . . . . . . . .24
Model and Serial Numbers . . . . . . . . . . . . . . . . . . . . . . .2
Performance Data Sheet . . . . . . . . . . . . . . . . . . . . . . .19
Problem Solver . . . . . . . . . . . . . . . . . . . . . . . . . . . . .17, 18
Safety Instructions . . . . . . . . . . . . . . . . . . . . . . . . . . . . 4, 5
State of California Water
Treatment Device Certificate . . . . . . . . . . . . . . . . . . .20
Warrant y . . . . . . . . . . . . . . . . . . . . . . . . . . . . . .Back Cover
Care and Cleaning
Cleaning—Outside and Inside . . . . . . . . . . . . . . . . . .14
Light Bulb Replacement . . . . . . . . . . . . . . . . . . . . . . . 15
Vacation . . . . . . . . . . . . . . . . . . . . . . . . . . . . . . . . . . . . . . .15
Operating Instructions
Features . . . . . . . . . . . . . . . . . . . . . . . . . . . . . . . . . . . . . . . .6
Automatic Icemaker . . . . . . . . . . . . . . . . . . . . . . . . . . . . .7
Customizable Drawer . . . . . . . . . . . . . . . . . . . . . . . . . .11
Drawers/Shelves . . . . . . . . . . . . . . . . . . . . . . . . . . . . . . .10
External Moisture Control . . . . . . . . . . . . . . . . . . . . . .12
LED Display Lighting . . . . . . . . . . . . . . . . . . . . . . . . . . .12
Sabbath Mode . . . . . . . . . . . . . . . . . . . . . . . . . . . . . . . . .13
Temperature Controls . . . . . . . . . . . . . . . . . . . . . . . . . . .6
Water Filter . . . . . . . . . . . . . . . . . . . . . . . . . . . . . . . . . . . . . .9
Preparation
Clearances . . . . . . . . . . . . . . . . . . . . . . . . . . . . . . . . . . . . .16
Location . . . . . . . . . . . . . . . . . . . . . . . . . . . . . . . . . . . . . . .16
Before
using your
wine reserve
Write
down the
model &
serial
numbers
Read this manual carefully. It is intended to help
you operate and maintain your new wine reserve
properly.
Keep it handy for answers to your questions.
You will find them on a label on the ceiling inside
the wine reserve.
If you don’t understand something or need more
help, there is a list of toll-free consumer service
numbers included in the back section of this
manual.
OR
Visit our Website at: monogram.com
Please write these numbers here:
Model Number
Serial Number
Use these numbers in any correspondence or
service calls concerning your winereserve.
2

Consumer Information
Wine Reserve
If you
received a
damaged
appliance
Save time
& money
If you
need
service
The warranty does not cover damage caused
after delivery.
Before you request service, check the Problem
Solver in the back of this manual.
To obtain service, see the Consumer Services
page in the back of this manual.
We’re proud of our service and want you to be
pleased. If for some reason you are not happy
with the service you receive, here are steps to
follow for further help.
FIRST, contact the people who serviced your
appliance. Explain why you are not pleased.
In most cases, this will solve the problem.
Immediately contact the dealer (or builder) that
sold you the wine reserve.
It lists causes of minor operating problems that
you can correct yourself.
NEXT, if you are still not pleased, write all
the details—including your phone number—to:
Manager, Customer Relations
GE Appliances
Appliance Park
Louisville, KY 40225
3
IMPORT ANT SAFETY INSTRUCTIONS
READ AND SAVE THESE INSTRUCTIONS
W ARNING–When using this
appliance, always exercise basic safety precautions,
including the following:
• Use this appliance only for its intended purpose
as described in this Owner’s Manual.
• This wine reserve must be properly installed in
accordance with the Installation Instructions
before it is used.
• Do not allow children to climb, stand or hang
on the wine reserve full-extension drawers.
They could seriously injure themselves and
possibly cause damage to the wine reserve.
• Do not touch the cold surfaces in the freezer
compartment when hands are damp or wet.
Skin may adhere to these extremely cold surfaces.
• Do not store or use gasoline or other flammable
vapors and liquids in the vicinity of this or any
other appliance.
• Your freezer has an automatic icemaker
in the freezer drawer—avoid contact with the
moving parts of the ejector mechanism, or with
the heating element located on the bottom
of the icemaker. Do not place fingers or hands on
the automatic icemaking mechanism while the
freezer is plugged in.
• Turn off the circuit breaker to disconnect power
when cleaning or making repairs. Repairs should
be made by a qualified service technician.
• Do not try to replace a burned-out LED light.
An authorized technician will need to replace the
LED lights.
• Do not refreeze frozen foods which have thawed
completely.
DANGER: RISK OF CHILD ENTRAPMENT
Child entrapment and suffocation are not
problems of the past. Junked or abandoned
appliances are still dangerous…even if they will sit
for “just a few days.” If you are getting rid of your old
appliance, please follow these instructions to help
prevent accidents.
Before You Throw Away Your Old Appliance:
• Take off the door/drawers.
• Leave the shelves in place so that children may
REFRIGERANTS
All refrigeration products contain refrigerants, which under
federal law must be removed prior
to product disposal. If you are getting rid of an old
refrigeration product, check with the company handling the
disposal about what to do.
4
W ARNING–R600a Refrigerant
Warning: This appliance contains isobutane refrigerant,
R600a, a natural gas with high environmental compatibility.
However it is also combustible. Please adhere to the
warnings below:
1) When handling, installing and operating the appliance, care
should be taken to avoid
damage to the refrigerant tubing.
2) Servicing shall be performed by factory-authorized service
personnel and component parts shall be replaced with
manufacturer-authorized replacement components.
3) Refrigeration products contain refrigerants, which under
federal law must be removed prior
to product disposal.
4) Keep ventilation openings in the appliance enclosures or in
the built-in structure clear of obstruction.
5) Do not use mechanical devices or other means
to accelerate the defrosting process.
6) Do not damage refrigerant circuit.
7) Do not use electrical appliances inside the
food storage compartment of the appliance.
not easily climb inside.

IMPORT ANT SAFETY INSTRUCTIONS
HOW TO CONNECT ELECTRICITY
Do not, under any circumstances,
cut or remove the third (ground) prong
from the power cord. For personal safety,
this appliance must be properly grounded.
The power cord of this appliance is equipped
with a 3-prong (grounding) plug which mates
with a standard 3-prong (grounding) wall outlet
to minimize the possibility of electric shock
hazard from this appliance.
Have the wall outlet and circuit checked by
a qualified electrician to make sure the outlet
is properly grounded.
Where a standard 2-prong wall outlet is
encountered, it is your personal responsibility
and obligation to have it replaced with a properly
grounded 3-prong wall outlet.
The wine reserve should always be plugged into
its own individual electrical outlet which has a
voltage rating that matches the rating plate.
DO NOT USE AN ADAPTER PLUG TO C ONNECT
THE WINE RESERVE TO A 2-PRONG OUTLET.
DO NOT USE AN EXTENSION CORD WITH
THIS APPLIANCE.
This provides the best performance and also
prevents overloading house wiring circuits, which
could cause a fire hazard from overheated wires.
Never unplug your wine reserve by pulling on
the power cord. Always grip plug firmly and pull
straight out from the outlet.
Repair or replace immediately all power
cords that have become frayed or otherwise
damaged. Do not use a cord that shows cracks
or abrasion damage along its length or at
either end.
When moving the wine reserve away from
the wall, be careful not to roll over or damage
the power cord.
SAVE THESE
INSTRUCTIONS
5
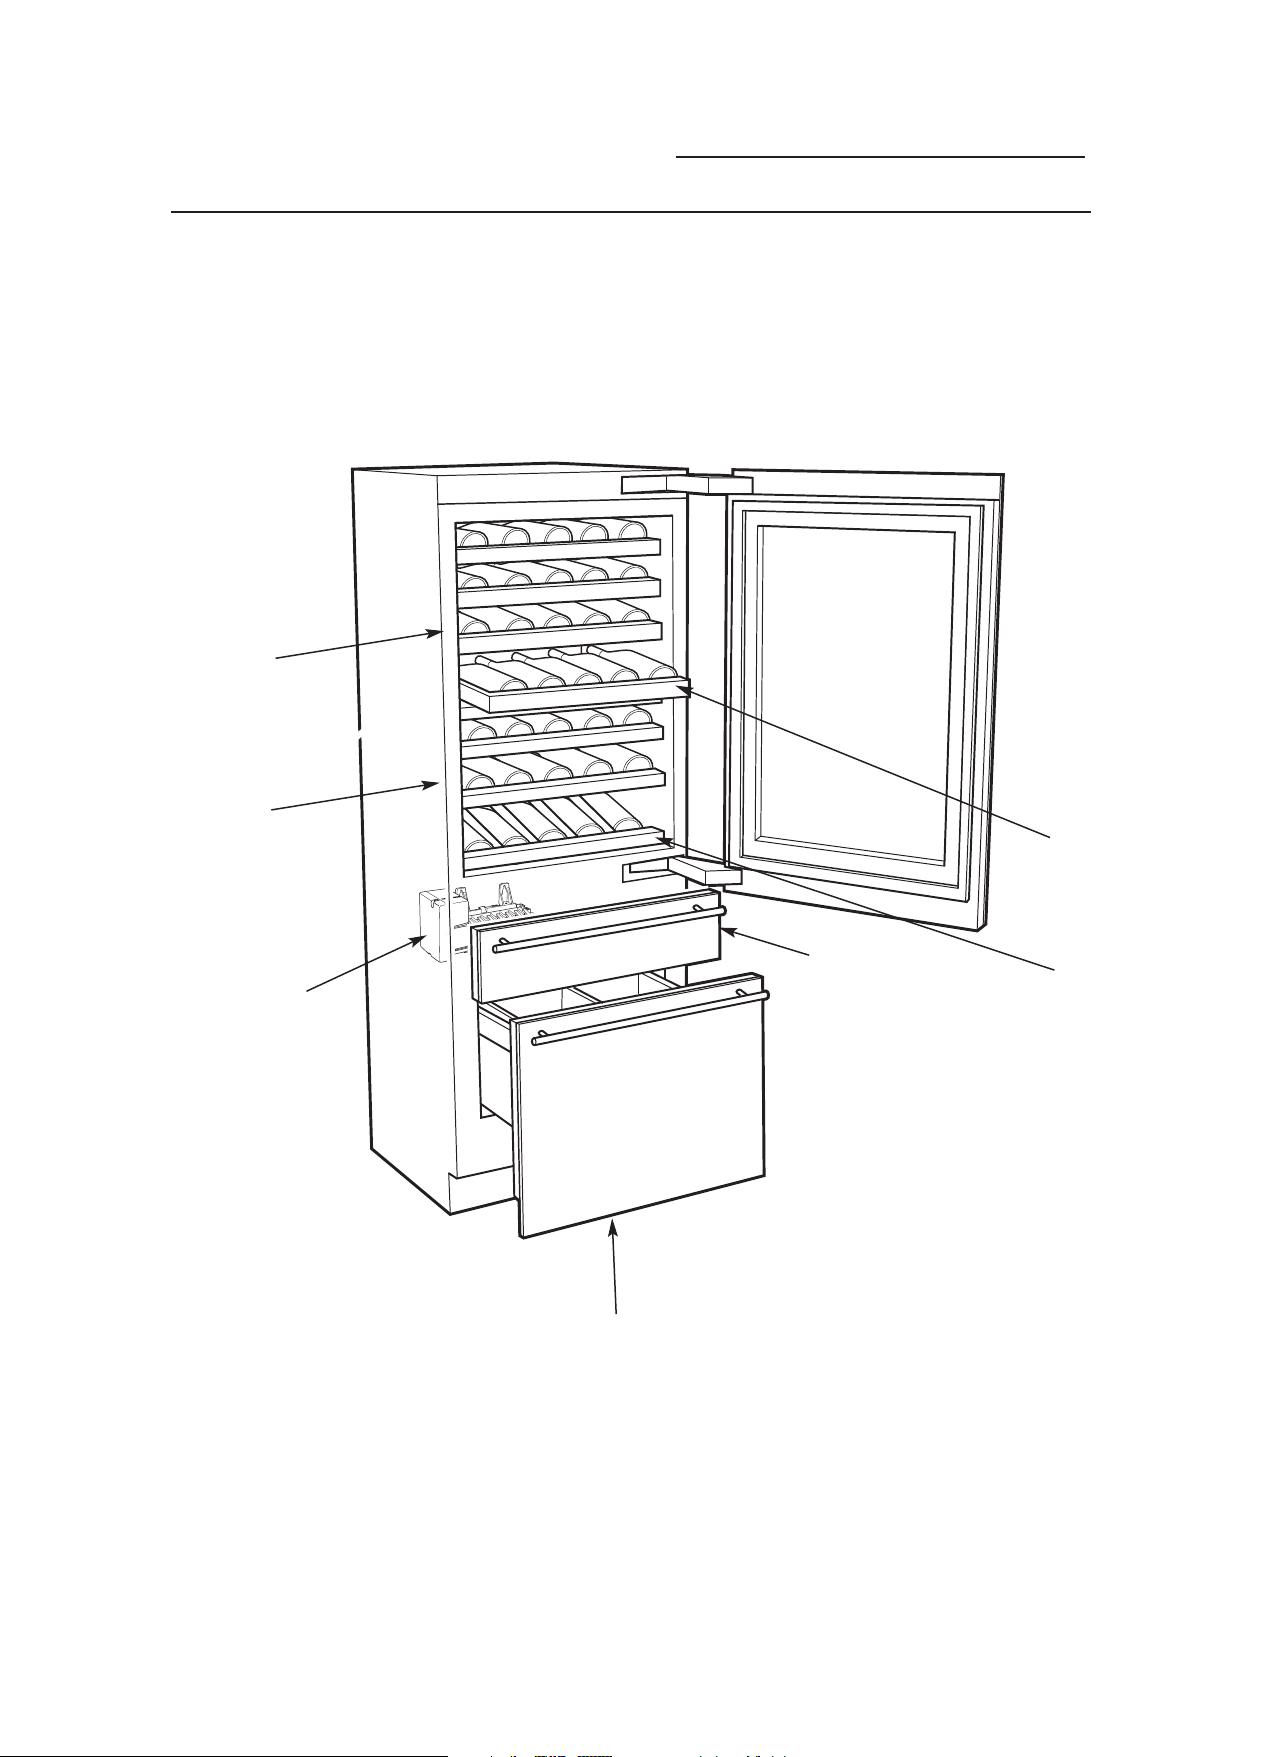
Upper Wine
Reserve
Temperature Controls
Wine Reserve
Lower Wine
Reserve
Icemaker
Full Extension
Drawers
Freezer Drawer
Wine Display
Shelf
Customizable Drawer
6

Temperature Controls
Wine Reserve
Temperature
controls
Wine – Upper Compartment
Wine – Lower Compartment
The temperature display shows the actual
temperature of the wine compartment, freezer
drawer or customizable drawer when each
one is selected by toggling the Zone indicator.
The actual temperature will vary from the set
temperature based on factors such as frequency
of door openings, amount of wine, defrost
cycling and room temperature.
NOTE: Frequent door openings or doors left open
for periods of time may increase the internal
temperature of the compartments temporarily.
To turn off the cooling system, toggle the ZONE
indicator to the wine mode. Press the plus (+) pad
until the display shows OFF.
To turn the cooling system on, toggle the ZONE
indicator to the wine mode and press the minus
(–) pad until the desired temperature is
displayed.
To check the current temperature setting for a
compartment, press the plus (+) or minus (–) pad
once. After 5 seconds, the display will return to
the actual temperature.
Upper Drawer – Freezer
Lower Drawer – Customizable
To change the temperature settings, press
the plus (+) or minus (–) pad for each increment
to the desired temperature set point. Allow
24 hours for the unit to reach the temperature
you have set.
Temperature Ranges
Low High
Wine
Freezer
Drawer
Customizable Drawer Temperature Ranges
Freezer
Chill
Wine
40°F
4°C
–6°F
–21°C
Low High
-6°F
–21°C
34°F
1°C
40°F
4°C
65°F
18°C
+6°F
–14°C
+6°F
–14°C
46°F
8°C
55°F
13°C
Changing
display
temperatures
from °F to °C
Alarm
To change the temperature display between
Fahrenheit and Celsius, press both the plus (+)
and minus (–) pads for 5 seconds.
To turn the Alarm feature on, press and hold
the ALARM button for 3 seconds. ALARM will
be underlined when active. To turn off, press
and hold the ALARM button for 3 seconds.
The underline will disappear.
NOTE: Setting the controls to OFF stops cooling,
but does not shut off electrical power to the unit.
All readings in °C will be rounded.
When the ALARM
is active, the alarm
will flash and beep
if you keep the door
open for more than 2 minutes.
7
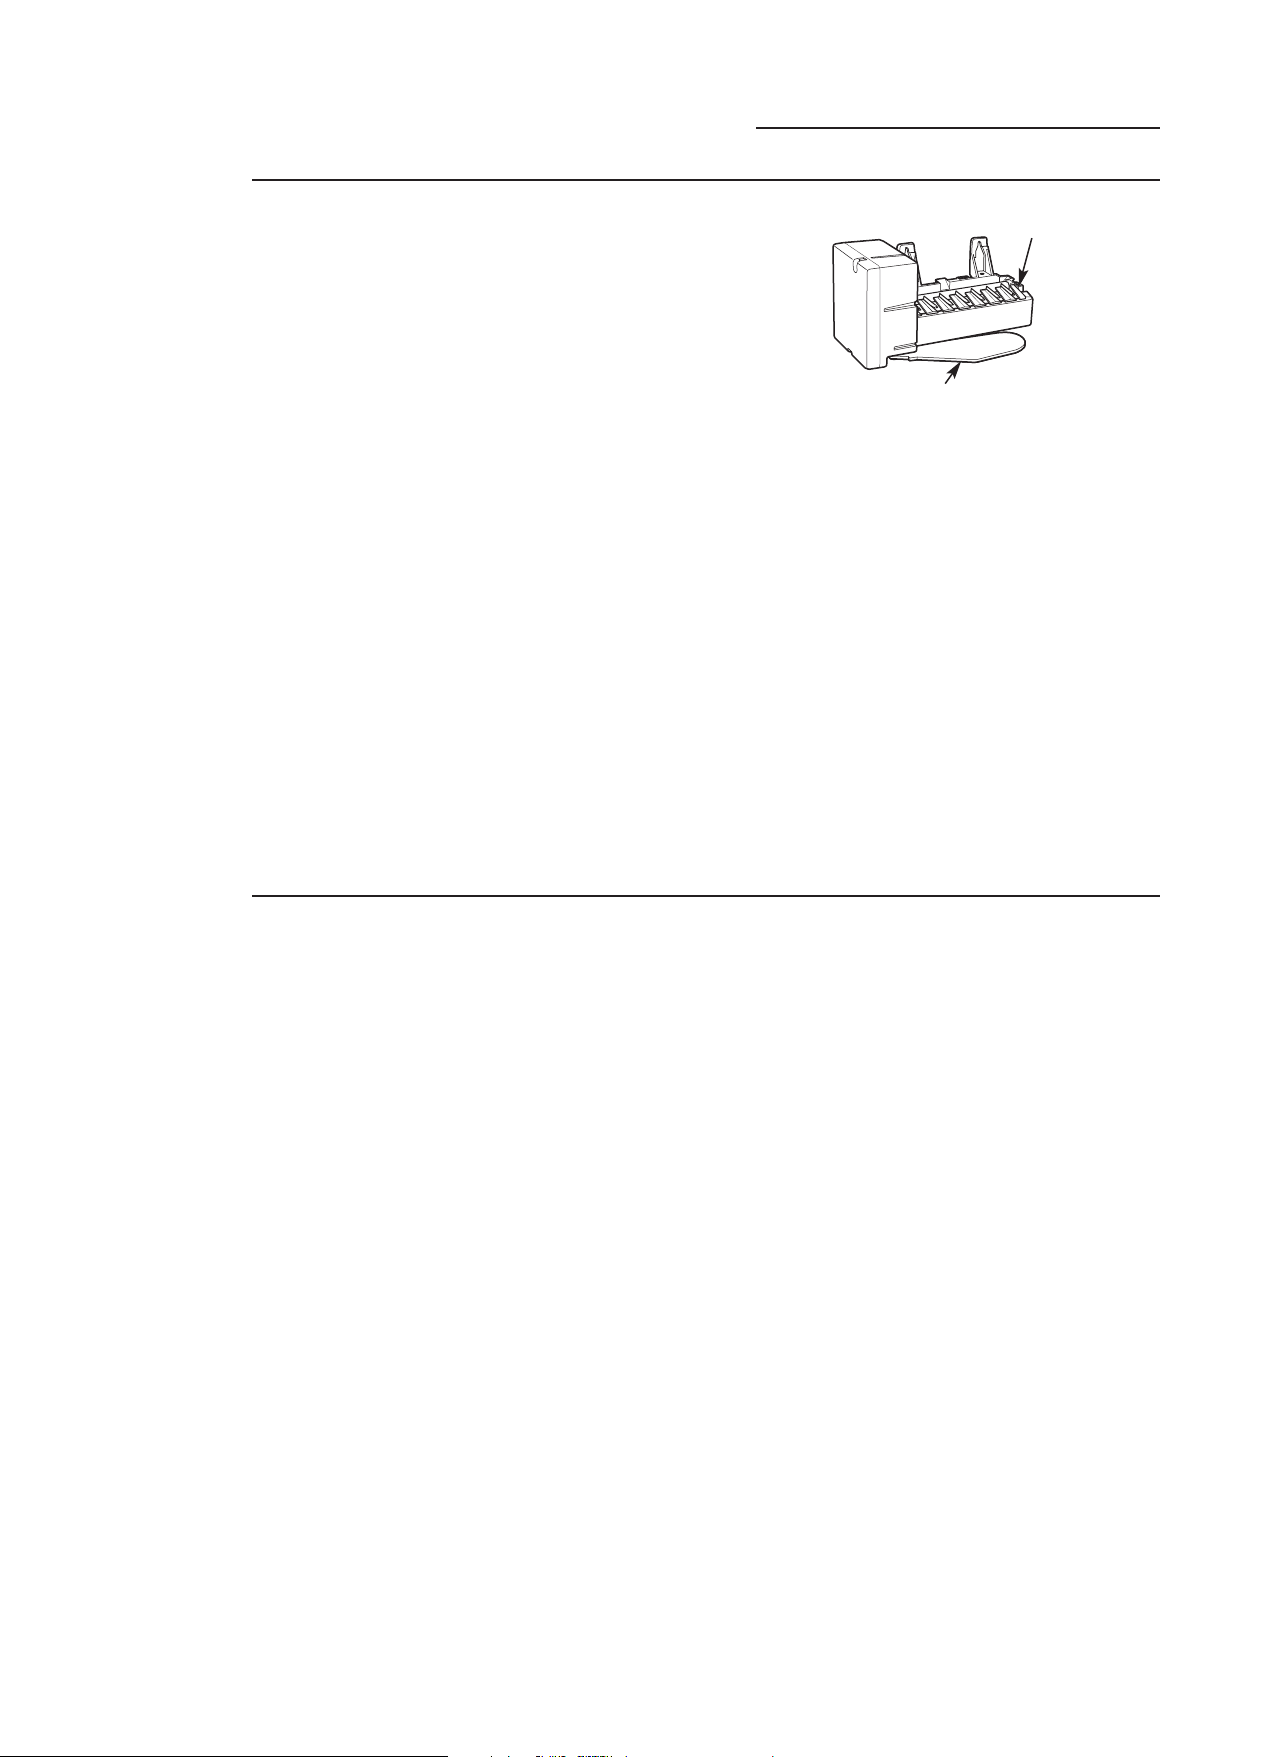
Automatic Icemaker
Wine Reserve
Automatic
icemaker
A newly installed wine reserve may take 12–24
hours to begin making ice. The wine reserve
is shipped with the icemaker set to ON.
The icemaker will produce seven cubes per
cycle—approximately 15 cycles in a 24-hour
period, depending on freezer compartment
temperature, room temperature, number of
door openings and other use conditions.
If the wine reserve is operated before the water
connection is made to the icemaker, set the
icemaker to OFF. To set the icemaker to OFF,
press the ZONE indicator on the control pad
three times to select the freezer drawer. Press
the ICE icon to the right. The line under ICE will
disappear and the word OFF will show under ICE.
Throw away the first full bucket of ice.
Be sure nothing interferes with the sweep
of the feeler arm.
When the bin fills to the level of the feeler arm,
the icemaker will stop producing ice.
It is normal for several cubes to be joined
together.
Icemaker
Feeler Arm
After the icemaker has been turned on again,
there will be a delay of about 45 minutes before
the icemaker resumes operations.
NOTE: In homes with lower-than-average
water pressure, you may hear the icemaker
water valve cycle on several times when
making one batch of ice.
NOTE: Icemaker works best between
40 and 120 PSI home water pressure.
Accessing
the icemaker
and freezer
drawer
If ice is not used frequently, old ice cubes
will become cloudy, taste stale and shrink.
The icemaker is located on the ceiling of the
freezer drawer and to the left rear. There is an
LED strip in the freezer drawer ceiling. The
freezer drawer contains 1 ice bin.
8
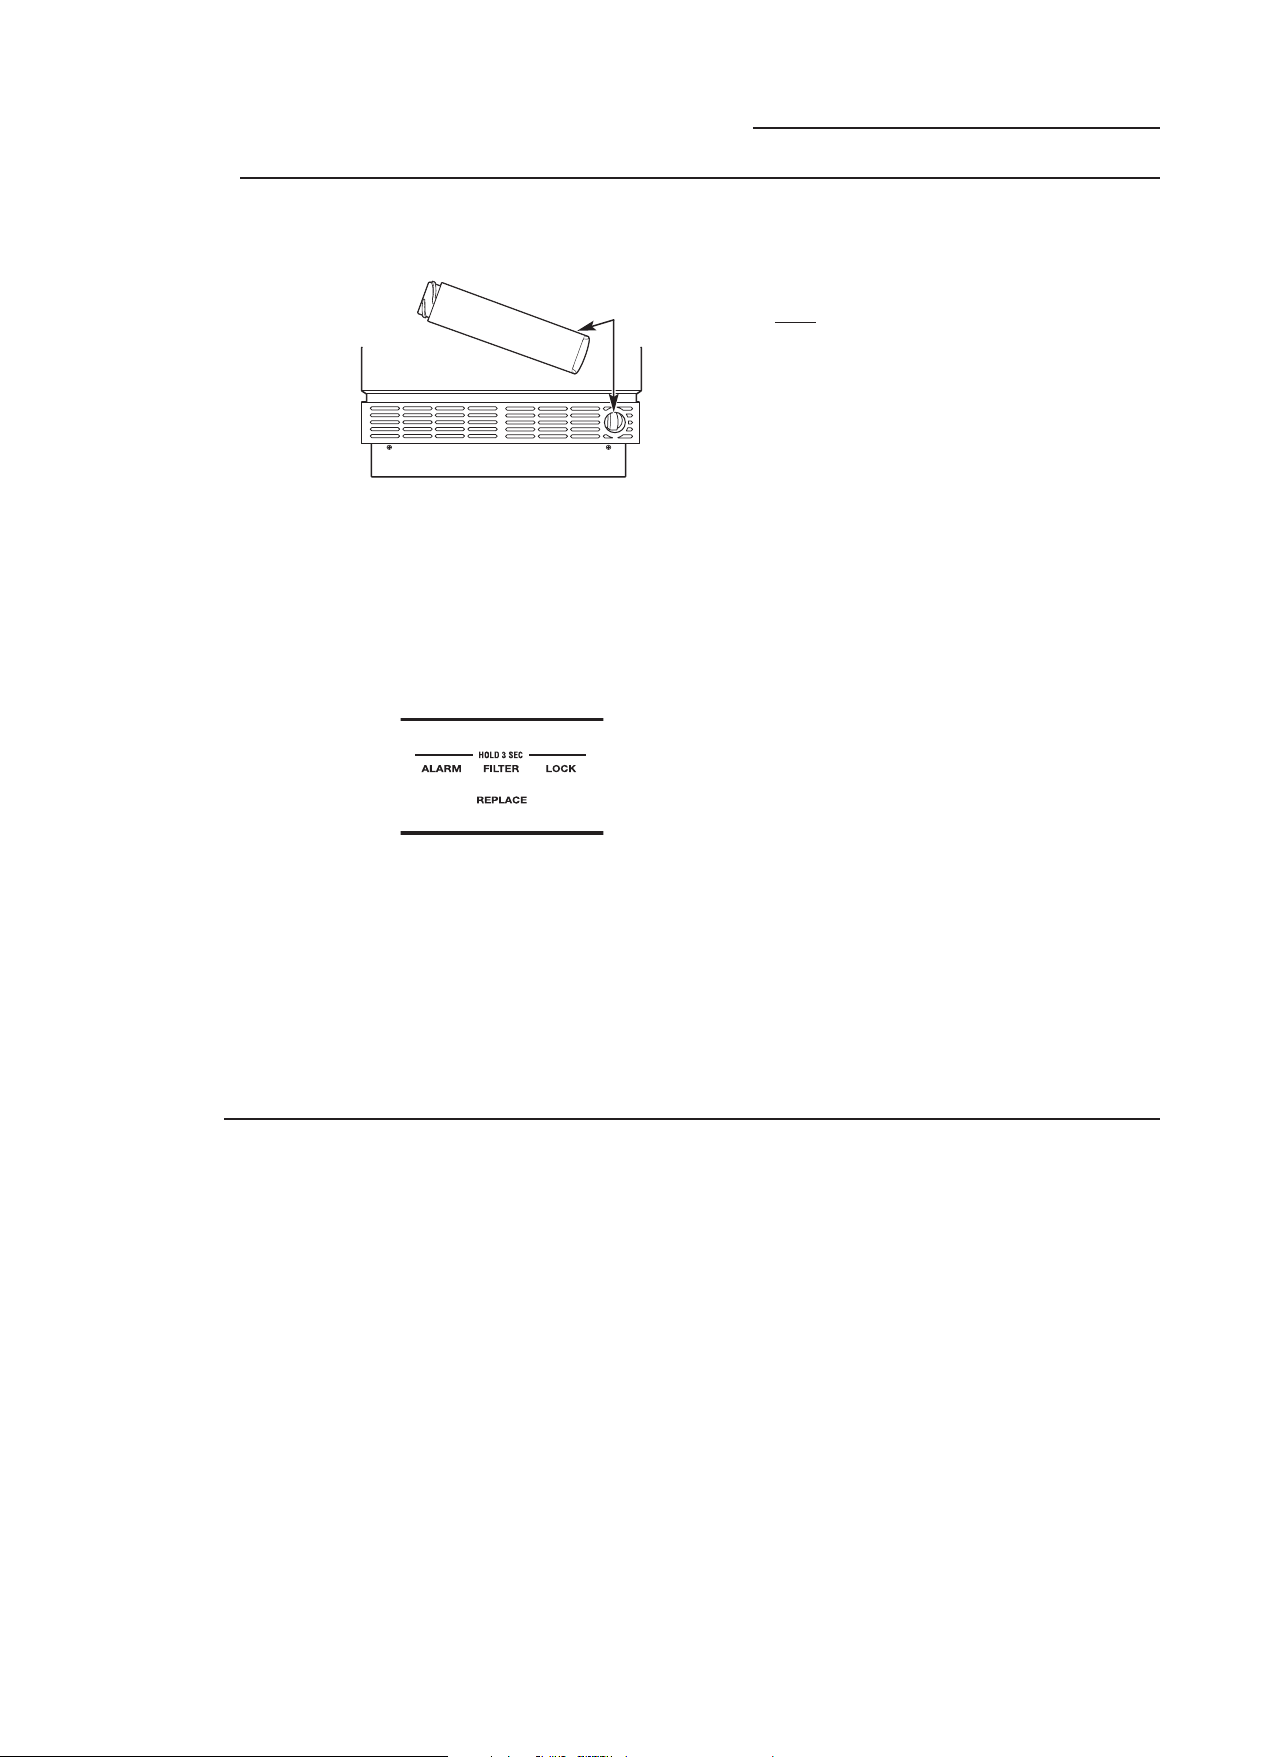
Water Filter
Wine Reserve
Water filter
cartridge
The water filter cartridge is located below
the customizable drawer on the lower-right side
of the appliance.
Water Filter
Cartridge
To Replace the Filter:
While the filter cartridge may last up to 1 year ,
replacement frenquency will depend on ice usage.
There is a replacement indicator light for the water
filter cartridge on the control panel. The filter
cartridge should be replaced when the word
REPLACE appears beneath FILTER on the control
panel.
To Reset the Filter Status Light:
Press and hold the FILTER button for 3 seconds.
Filter Bypass Plug:
You must use the filter bypass plug if:
a) you have a household reverse osmosis water
system and/or another form of home water
filtration system.
b) a replacement filter is not available.
The icemaker will not operate without the filter or
filter bypass plug installed.
The bypass plug and mini manual are located
in the bottom machine compartment.
Replacement filters:
To order additional filter cartridges, visit our
Website at monogram.com, or call GE Parts and
Accessories, 800.626.2002.
Filter Model Number GSWF
IMPORTANT NOTE: Remove the water filter
to immediately stop any water leak from the
icemaker. The water filter cartridge holder acts
as a cut-off valve when the filter
is removed and will prevent further leaking.
Child control
lockout
Installing the Filter Cartridge:
1. Open the customizable drawer to gain access
to the water filter cartridge.
2. Remove the old cartridge by twisting
counterclockwise. Pull forward on the filter
to remove.
3. Insert the new filter into the compartment and
twist clockwise until the cartridge stops.
This child control lockout feature prevents
unwanted changes to your temperature settings.
After the desired temperature is set, the
temperature can be locked. To lock, press and
hold the LOCK button for 3 seconds. To unlock,
press and hold the LOCK button for 3 seconds.
9
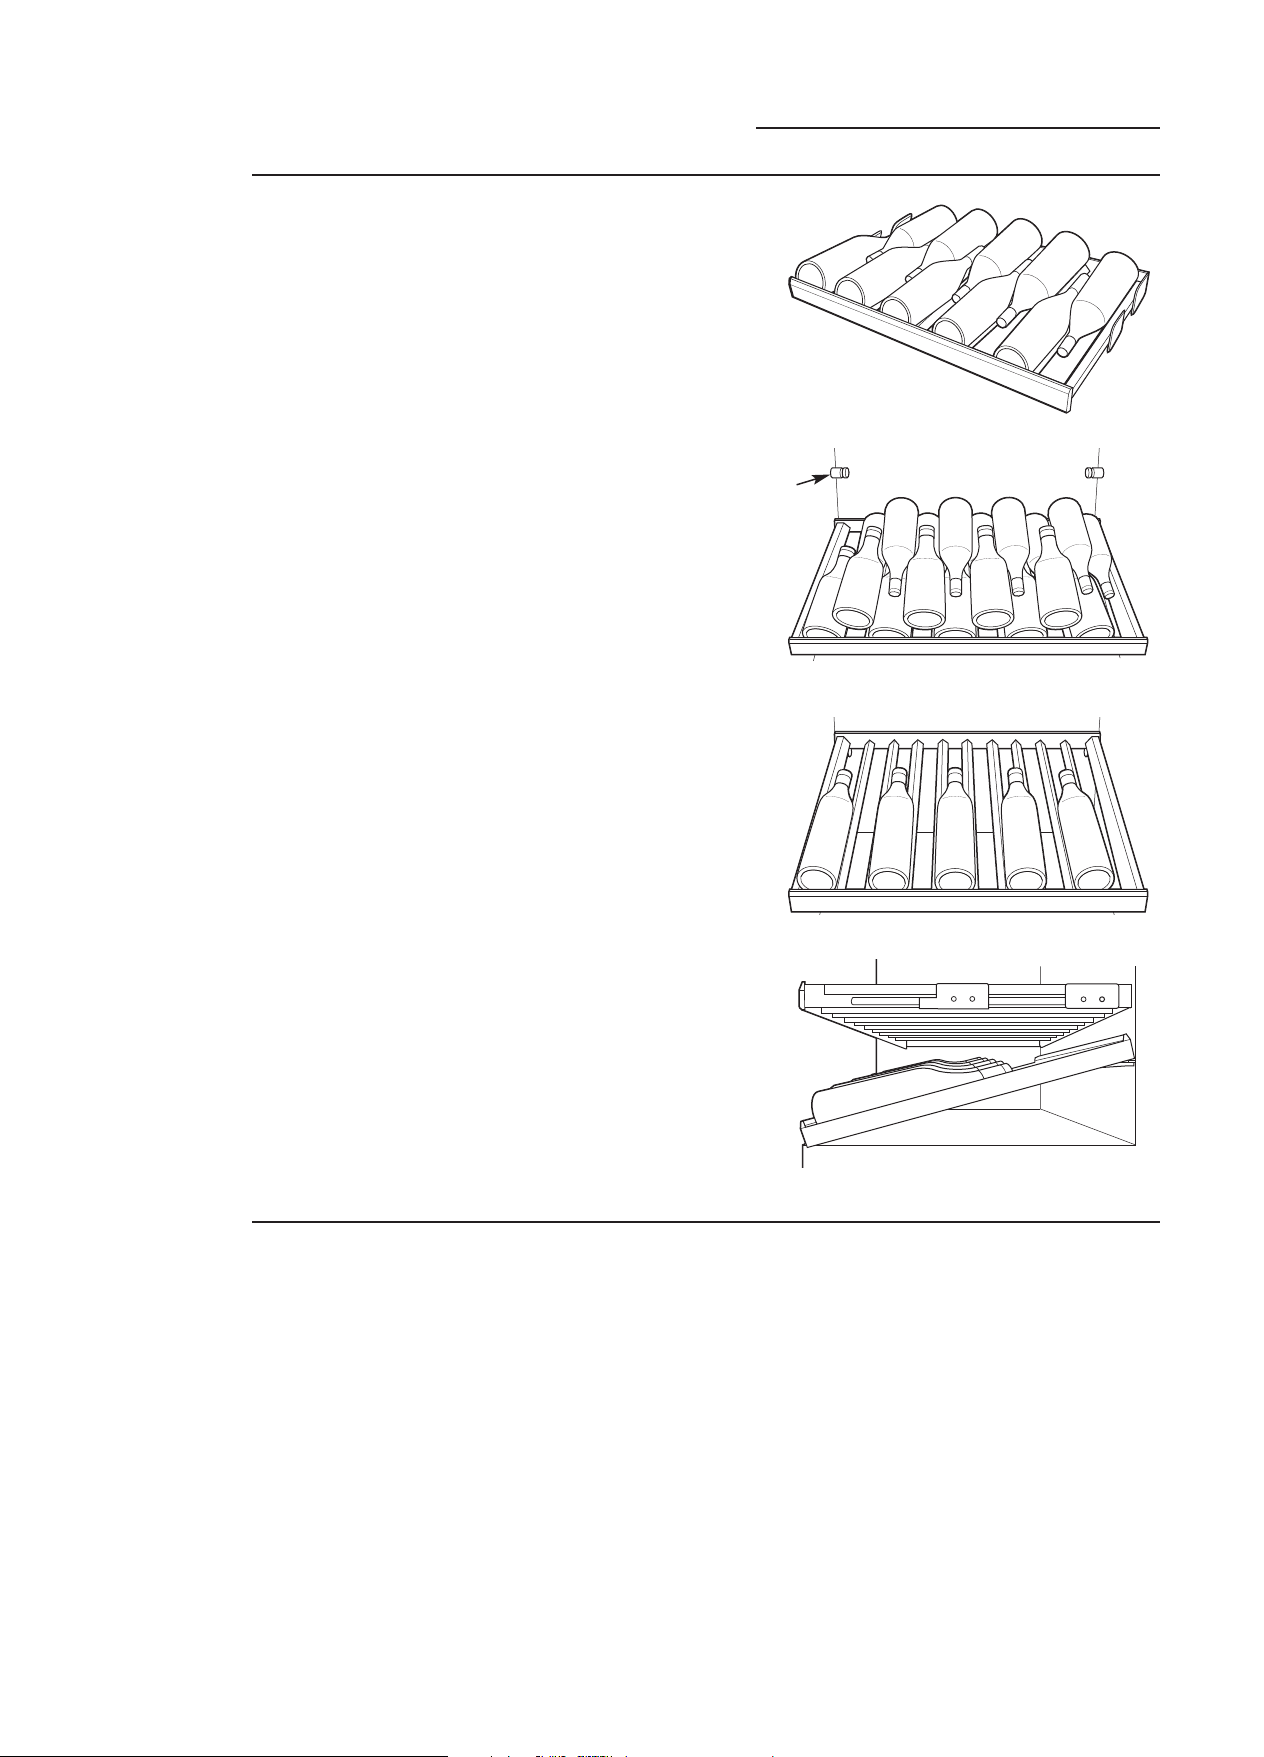
Drawers/Shelves
Wine Reserve
Wine bottle
arrangement
Full-Extension Drawers
The top 6 drawers are full-extension drawers, with
each drawer holding up to 10 bottles. The bottles
will be stored with necks alternating from front to
back.
Wine Display Shelf
The wine display shelf can either be in a
horizontal position or an angled position. The
horizontal position can hold 18 bottles. The
angled position holds 5 bottles. The shelf can be
angled by lifting the shelf onto pegs on the back
wall.
Peg
Horizontal Position
Wine bottle
loading
tips and
suggestions
• Keep wines that you plan to use for everyday
drinking and entertaining on the front half of
the full-extension drawers where labels are
completely visible. Place wines for aging or
longer-term storage in the rear.
• Do not allow children to climb, stand or hang
on the wine reserve full-extension drawers.
They could seriously injure themselves and
possibly cause damage to the wine reserve.
Angled Position
Angled Position
• Group your wine inventory according to type:
i.e., white wines in the cooler zones and red
wines in the warmer zones.
• Store red and white wines in separate zones so
you can keep them at different temperatures.
10
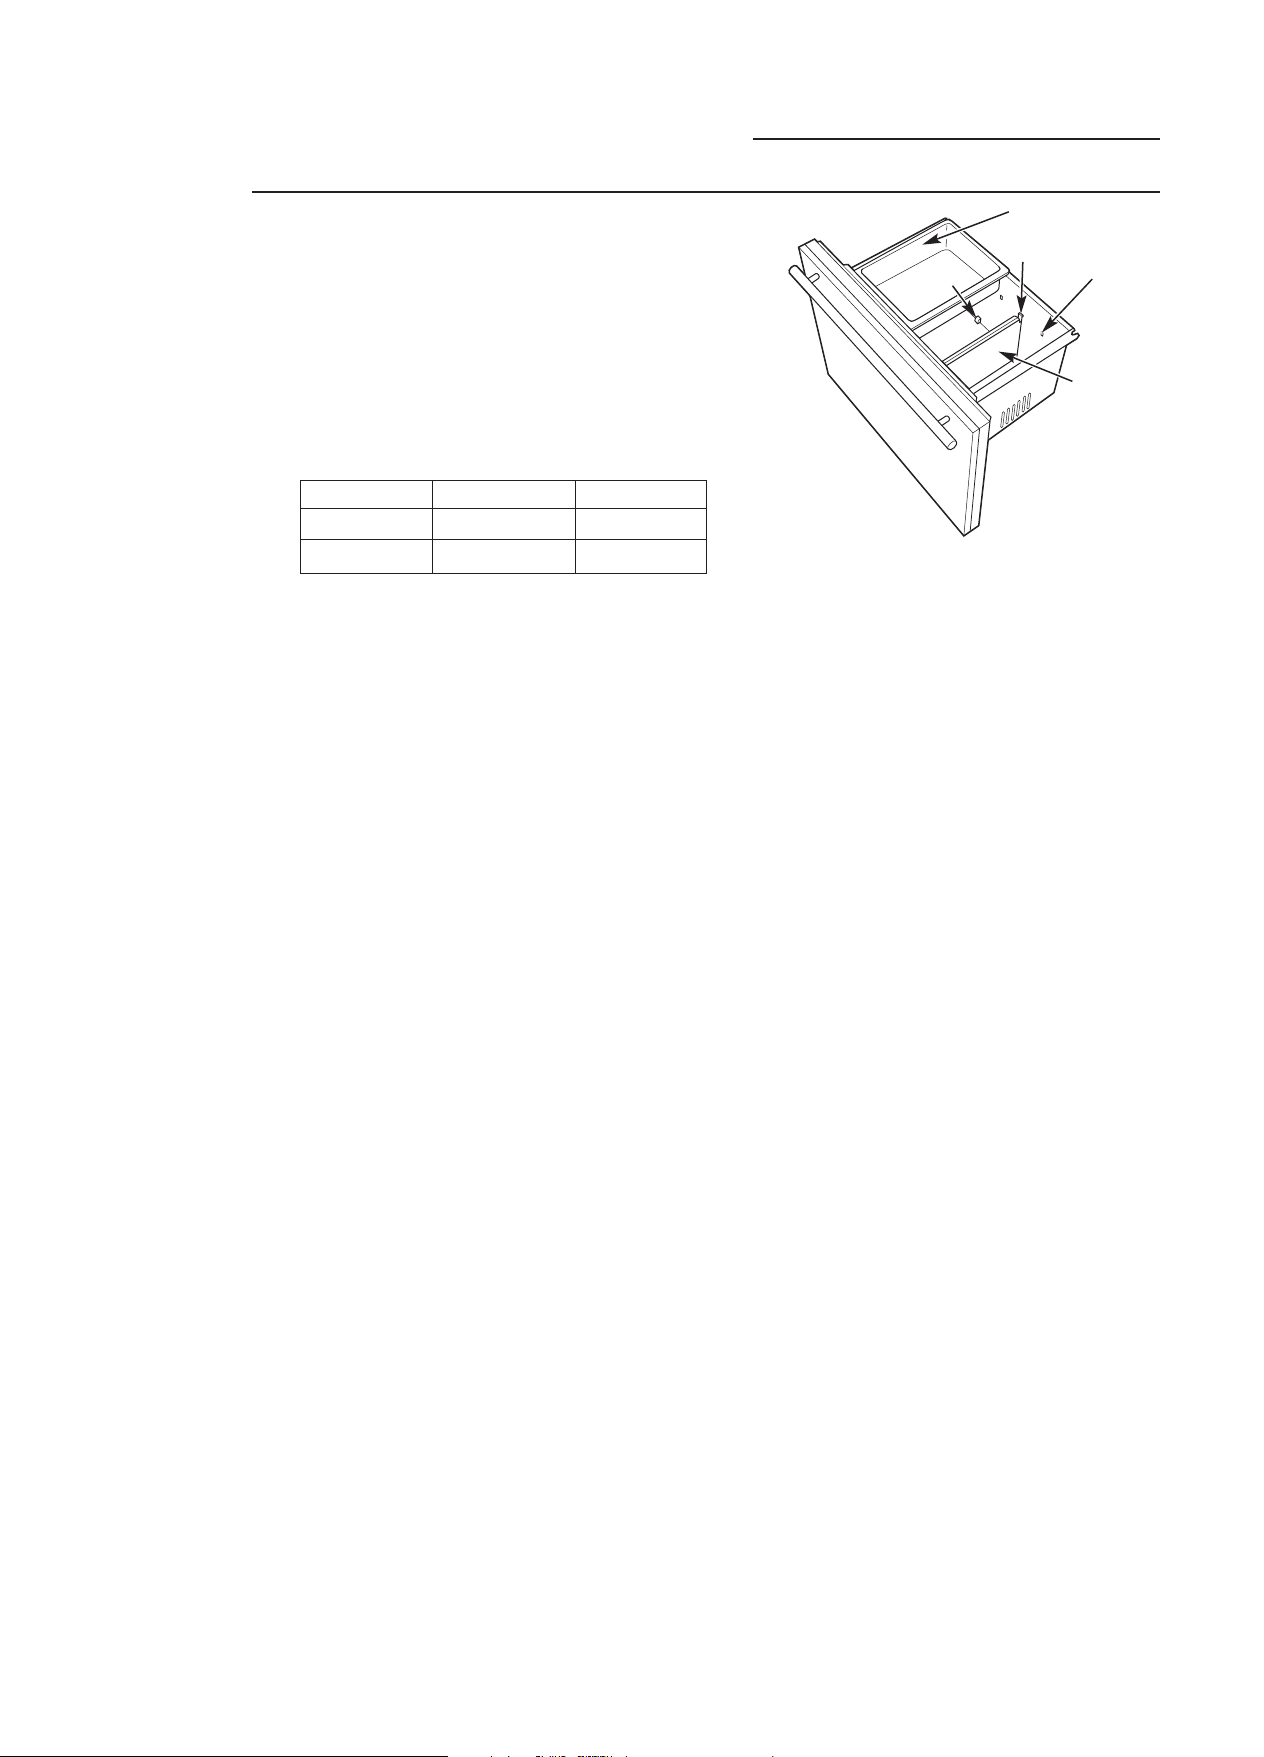
Customizable Drawer
Wine Reserve
Customizable
drawer
The customizable drawer can be used as
a freezer, as a fresh-food refrigerator or as
a wine/beverage drawer.
To customize your drawer:
Press the ZONE indicator on the control pad to
select the customizable drawer.
Recommended Temperatures for Customizable
Drawer:
Button Function Temperature
Chill
Freeze
Wine
This drawer has LED strip lighting above it. There
is also one adjustable divider that can be placed
in different positions and a bin that can slide left
or right in the drawer.
To change the divider position:
1. Pull in the tabs at the top of the divider to
release it from the tab holes at the front and
back of the drawer.
Fresh Food
Freezer
Wine Storage
37°F/3°C
0°F/–18°C
55°F/13°C
Raised Tab
Removable Sliding Bin
Tab
Tab Hole
Divider
2. Lift the divider off of the raised tabs at the
bottom of the drawer.
3. Move the divider to its new location and slide it
onto the raised tabs.
4. Pull in the tabs at the top of the divider and
position the divider so the tabs will fit into the
tab holes. Release the tabs so they lock into
place.
11

External Moisture Control/LED Lighting
Wine Reserve
External
moisture
control
LED display
lighting
This product is equipped with an external moisture
control feature. The wine reserve is shipped with
the external moisture control feature off.
In some humid environments, moisture can form
on the front surface of the wine reserve cabinet.
If moisture does appear on the front surface of the
wine reserve cabinet, turn
on the external moisture control feature by
pressing and holding the ALARM and LOCK
buttons on the control panel for 5 seconds. When
activated, a small picture of a water droplet with
a line through it will appear below the (+) and (–)
signs on the control panel.
This wine reserve has LED lighting on both sides
of the interior as well as above the freezer drawer
and above the customizable drawer.
The wine reserve has a display light option for the
interior side lights: full power and 1/2 power.
In display mode at either full or 1/2 power, the
lights will stay on after the door is closed and
automatically go off after 1 hour.
Lights at Full Power
Lights at 1/2 Power
To access the lighting options, press the ZONE
indicator on the control pad. In wine mode, the
LIGHTS button is to the right on the control pad.
When lights are at full power, there are 2 bars
under LIGHTS; at 1/2 power, there is 1 one bar;
when the lights are off, there are no bars.
Lights Off
12

Sabbath Mode
Wine Reserve
Sabbath
Mode
The Sabbath Mode was designed for use on the
Jewish Sabbath and Holidays. The Sabbath Mode
feature makes it possible for observant Jews to
refrigerate and freeze food during the duration
of the holiday.
The Sabbath Mode feature can be set to override
typical reactions caused by your interaction with
the wine reserve. While in the Sabbath Mode,
your wine reserve will still operate. However, the
wine reserve will not respond
to your actions.
While in the Sabbath Mode, you may notice
the fan running when the door is opened,
however, this is not a result of your actions.
The fan will operate at predetermined times.
The defrost heater will continue to defrost
the wine reserve and will be activated on a timer.
The defrost heater will not defrost as a result of
door openings or any consumer actions.
ON/OFF—To activate the Sabbath Mode, hold
down the ALARM button and (+) pad on the
control panel for 5 seconds. SAB will be displayed
on the control. SAB will remain in the display and
the (+) pad and alarm button will remain lit until
the Sabbath mode is deactivated. Controls and
lights do not work until the ALARM button and
(+) pad are held again for 5 seconds.
DISPLAYS, ALARMS and LIGHTS—The main
temperature control displays will be deactivated,
therefore they will not be lit, sound a tone or
operate when touched. Door alarms and lights
will be disabled.
ICEMAKER—The icemaker will continue
to operate. The icemaker can be disabled by
turning the icemaker OFF prior to the Sabbath
(see Automatic Icemaker).
13

Care and Cleaning
Wine Reserve
Cleaning
outside
Cleaning
inside
Door handles and trim—Clean with a cloth
dampened with soapy water. Dry with a soft cloth.
Keep the outside clean. Wipe with a clean
cloth lightly dampened with mild liquid dish
detergent. Dry with a clean, soft cloth.
Do n o t w i p e t h e wine reservewith a soiled dish
cloth or wet towel. These may leave a residue that
can damage the finish. Do not use scouring pads,
powdered cleaners, bleach or cleaners containing
bleach because these products can scratch and
damage the finish.
Turn off power at the circuit breaker or fuse box
before cleaning. If this is not practical, wring excess
moisture out of sponge or cloth when cleaning
around switches, lights or controls.
Use warm water and baking soda solution— about
a tablespoon (15 ml) of baking soda to a quart (1
liter) of water. This both cleans and neutralizes
odors. Thoroughly rinse and wipe dry.
Stainless steel—Regularly clean and polish
the Stainless Steel Door Panels and Handles
(on some models) with a commercially available
stainless steel cleaner such as Stainless Steel Magic
to preserve and protect the fine finish. Stainless Steel
Magicis available through GE Parts and Accessories,
800.626.2002, or GEAppliances.com. Order part
number WX10X15.
Do not use appliance wax or polish on the stainless
steel.
Wood—Clean the wood with a dampened rag.
Do not allow the wood to become overly wet.
Custom Wood Panels - please contact your custom
panel supplier for direction on cleaning and care.
Other parts of the wine reserve—including door
gaskets, ice storage bins and all plastic parts—can
be cleaned the same way. After cleaning the door
gaskets, apply a thin layer of petroleum jelly to the
door gaskets at the hinge side. This helps keep the
gaskets from sticking and bending out of shape.
Do not wash any plastic parts in the dishwasher.
™
Wooden Racks—Clean the wooden racks with a
dampened rag. Do not allow the racks to become
overly wet.
14

Care and Cleaning
Wine Reserve
Preparing
for vacation
Interior Light
replacement
For long vacations or absences, remove food
from the drawers. Adjust the temperature up (+)
until the unit turns off. Clean the interior with a
baking soda solution of one tablespoon (15 ml)
of baking soda to one quart (1 liter) of water.
Leave the door open.
Do not try to replace a burned-out LED light.
An authorized technician will need to replace
the LED lights.
For shorter vacations, remove perishable foods
and leave the control at the regular setting.
However, if the room temperature is expected
to drop below 60°F (16°C), follow the same
instructions as for extended vacations.
Turn off the icemaker and shut off the water
supply to the freezer.
15
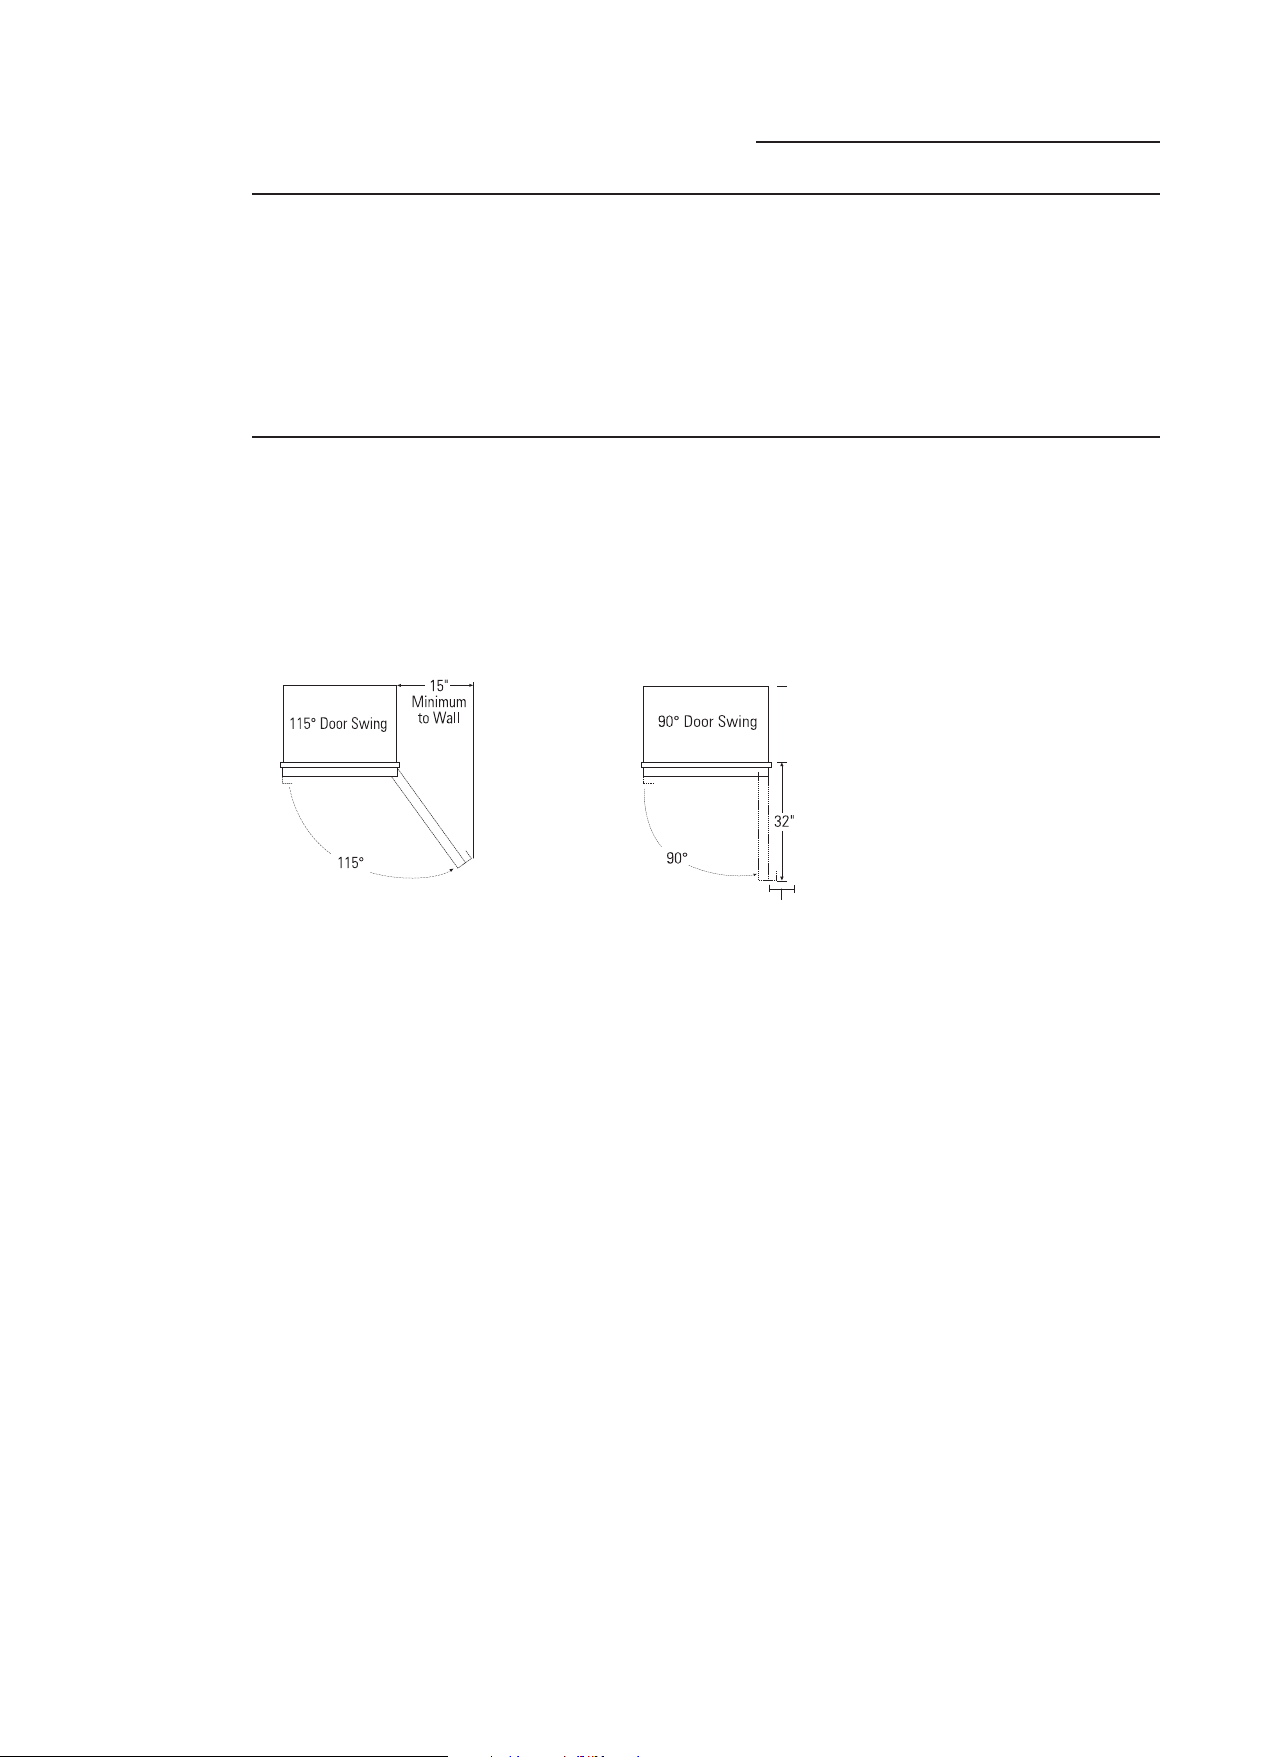
Preparation
Wine Reserve
Wine reserve
location
Clearances
Do not install the wine reserve where
temperatures will be below 60°F (16°C) because
it will not maintain proper temperatures, and the
wine reserve will develop high internal humidity.
Allow 15" minimum clearance between the door
and wall for a full 115° door swing. Allow 5" min.
clearance to a wall for a 90° door swing for
Monogram Stainless Steel (European) models.
For proper installation, the wine reserve must
be placed on a level surface of hard material
the same height as the rest of the flooring.
This surface should be strong enough to
support a fully loaded wine reserve,
or approximately 1,200 lbs. each. See
the Installation Instructions for complete
directions.
4” distance to Wall.
16

The Problem Solver
Wine Reserve
Questions?
Use this
problem
solver!
PROBLEM POSSIBLE CAUSE
WINE RESERVE DOES •May be in defrost cycle when refrigerating system does not operate
NOT OPERATE for about 45 minutes.
•Temperature control in the OFF position.
•If interior light is not on, wine reserve may not be plugged in at wall
outlet.
•The house fuse is blown/house circuit breaker is tripped. Replace fuse
or reset the breaker.
• Turn off the Sabbath Mode.
•If your control panel says SHO, then your showroom mode was
enabled. To turn this off, hold the ALARM button and (-) pad
simultaneously for 5 seconds.
REFRIGERA TING SYSTEM
OPERATES FOR LONG
PERIODS OR CYCLES ON
AND OFF FREQUENTLY
(Modern refrigerators
and freezers with more
storage space and a
larger freezer require
more operating time.
They start and stop
often to maintain
even temperatures.)
•Normal when wine reserve is first plugged in. Wait 24 hours
for the unit to completely cool down.
•Often occurs when large amounts of food are placed in drawers.
This is normal.
•Door left open or package holding door open.
•Hot weather or frequent door openings. This is normal.
•Temperature control set at the coldest setting. See Temperature
Control.
VIBRA TION OR RATTLING •Wine reserve may not be properly installed.
(Slight vibration – Anti-tip bracket may be loose.
is normal.) – Unit may not be level.
THUMPING SOUND • This is a normal operating sound.
WHEN CLOSING DOOR
OPERATING •The variable speed compressor.
SOUNDS
• Closing the door slowly will minimize the sound.
•Normal fan air flow—multiple fans blow cold air through the wine
and freezer compartments—other fans cool the compressor.
• The fans change speeds in order to provide optimal cooling and
energy savings.
• These NORMAL sounds will also be heard from time to time:
– You may hear a whooshing or gurgling sound when the door closes.
This is due to pressure equalizing within the wine reserve.
– A water dripping sound may occur during the defrost cycle as ice
melts from the evaporator and flows into the drain pan.
– The flow of refrigerant through the freezer cooling coils may make a
gurgling sound like boiling water.
– Water dropping on the defrost heater can cause a sizzling, popping
or buzzing sound during the defrost cycle.
– You may hear cracking or popping sounds when the wine reserve is
first plugged in or during/after the defrost cycle. This happens as the
unit cools to the correct temperature.
– The compressor may cause a clicking or chirping sound when
attempting to restart (this could take up to 5 minutes).
– The electronic control board may cause a clicking sound when relays
activate to control wine reserve components.
– Ice cubes dropping into the bin and water running in pipes as
icemaker refills.
– The icemaker water valve will buzz when the icemaker fills with
water.
17
The Problem Solver
Wine Reserve
PROBLEM POSSIBLE CAUSE
DOOR NOT CLOSING •Package or bottle may be holding door open.
PROPERLY • Check the door gasket; it may be out of position
• Wine Reserve is not level. See Installation Instructions.
• Hinge springs deactived. See Installation Instructions.
REFRIGERATOR •Temperature control not set cold enough. See Temperature Control.
TOO WARM •Hot weather or frequent door openings.
•Door left open for long time.
•Package may be holding door open.
ACTUAL TEMPERATURE •Wine Reserve just plugged in. Allow 24 hours for system to stabilize.
NOT EQUAL TO SET •Door open for too long. Allow 24 hours for system to stabilize.
TEMPERATURE •Warm food added to drawers. Allow 24 hours for system to stabilize.
•Defrost cycle is in process. Allow 24 hours for system to stabilize.
FROST OR ICE •Drawer left open or package holding door open.
CRYSTALS ON •Too frequent or too long door openings.
FROZEN FOOD •Drawer may have been left open.
(Frost within package •Ice cubes or some other object may be stuck behind the drawer.
is normal)
SLOW ICE CUBE •Drawer may have been left open.
FREEZING •Turn temperature control to a colder setting.
•Package may be holding drawer open.
ICE CUBES HAVE •Old cubes need to be discarded.
ODOR/TASTE •Ice storage bin needs to be emptied and washed.
•Unsealed packages in freezer may be transmitting odor/taste
to ice cubes.
•Interior of freezer needs cleaning. See Care and Cleaning.
•Poor-tasting incoming water. Change the water filter.
AUTOMATIC •Icemaker is turned off.
ICEMAKER •Water supply turned off or not connected.
DOES NOT WORK •Freezer too warm.
•Piled up cubes in storage bin may cause icemaker to shut off
too soon. Level cubes by hand.
•Ice bin is not in position
•Clogged water filter
MOISTURE FORMS •Not unusual during periods of high humidity. Wipe surface dry.
ON OUTSIDE OF •Turn on the External Moisture Control feature.
WINE RESERVE
MOISTURE •Too frequent or too long door openings.
COLLECTS INSIDE •In humid weather, air carries moisture into wine reserve when doors
are opened.
•Lower drawer switched from (freezer) to chill or wine.
WINE RESERVE • Foods with strong odors should be tightly covered.
HAS ODOR •Check for spoiled food.
•Interior needs cleaning. See Care and Cleaning.
18
INTERIOR LIGHTS • No power at outlet.
DO NOT WORK • LEDs need replacing. See Consumer Service Section.
•The Sabbath Mode may be operating. Turn off Sabbath Mode.
DOOR DIFFICULT TO •Tight door seal is due to pressure equalizing within the wine reserve.
REOPEN IMMEDIATELY After closing the door, wait 5–30 seconds to reopen.
AFTER CLOSING

Performance Data Sheet
NSF
SmartWater Filtration System
This system has been tested according to NSF/ANSI 42/53 for reduction of the substances listed below.
The concentration of the indicated substances in water entering the system was reduced to a concentration
less than or equal to the permissible limit for water leaving the system, as specified in NSF/ANSI 42/53.*
(100% safety factors built in for unmetered usage)
Parameter USEPA Influent Influent Challenge Effluent % Reduction Min. Required
Chlorine — 1.845 mg/L 2.0 mg/L+10% < 0.05 mg/L 0.05 mg/L > 97.29% 96.43% >50%
T & O — — — — — — — —
Particulate** — 143,333 #/mL
Parameter USEPA Influent
Turbidity 1 NTU*** 10.3 NTU*** 1+1 NTU*** 0.106 NTU 0.14 NTU 98.97% 98.61% 0.5 NTU
Cysts
Lead at pH 6.5 0.015 mg/L 0.15 mg/L 0.15 mg/L+10% < 0.001 mg/L < 0.001 mg/L > 99.33% > 99.33% 0.010 mg/L
Lead at pH 8.5 0.015 mg/L 0.14 mg/L 0.15 mg/L+10% 0.001 mg/L 0.003 mg/L > 99.29% 97.86% 0.010 mg/L
Lindane
Atrazine
MCL Average Concentration Average Maximum Average Minimum Reduction
at least 10,000 particles/mL
MCL Average Concentration Average Maximum Average Minimum Reduction
99.95% Reduction
0.0002 mg/L
0.003 mg/L
200,000 #/L
0.0216 mg/L 0.002 mg/L+10%
0.008 mg/L 0.009 mg/L+10% < 0.002 mg/L < 0.002 mg/L > 76.12% > 66.67% 0.003 mg/L
GSWF Cartridge
Standard No. 42: Aesthetic Effects
29.83 #/mL 140 #/mL 99.98% 99.91% > 85%
Standard No. 53: Health Effects
Influent Challenge
Minimum 50,000 L
< 0.00002 mg/L < 0.00002 mg/L
Effluent % Reduction Min. Required
0 0 > 99.99% > 99.99% > 99.95%
99.07% 98.75% 0.0002 mg/L
* Tested using a flow rate of 0.5 gpm; pressure of 60 psig; pH of 7.5 ± 0.5; temp. of 68° ± 5°F (20° ± 3°C)
** Measurement in Particles/ml. Particles used were 0.5-1 microns
*** NTU=Nephelometric Turbidity units
Operating Specifications
Capacity: certified for up to 750 gallons (2,838 l); up to six months
Pressure requirement: 40–120 psi (2.8–8.2 bar)
Temperature: 33–100ºF (0.6–38ºC)
Flow rate: 0.5 gpm (1.9 lpm)
General Installation/Operation/Maintenance Requirements
Flush new cartridge at full flow for 3 minutes to purge out trapped air.
Replace cartridge when flow becomes too slow.
Special Notices
Installation instructions, parts and service availability, and standard warranty are included with the product when shipped.
This drinking water system must be maintained according to manufacturer’s instructions, including replacement of filter
cartridges.
Do not use with water that is microbiologically unsafe or of unknown quality without adequate disinfection before or after
the system. Systems certified for cyst reduction may be used on disinfected water that may contain filterable cysts.
The contaminants or other substances removed or reduced by this water treatment system are not necessarily in your
water.
Check for compliance with the state and local laws and regulations.
Note that while the testing was performed under standard laboratory conditions, actual performance may vary. Systems
must be installed and operated in accordance with manufacturer’s recommended procedures and guidelines.
System tested and certified by NSF International against Standard 42 for the reduction of
chlorine, taste and odor, particulate Class I and Standard 53 for the reduction of cyst, lead,
Lindane, Atrazine and turbidity.
®
Manufactured for: General Electric Company, Louisville, KY 40225
19
State of California
Department of Health Services
Water Treatment Device
Certificate Number
155903 -
Date Issued: April 28, 2003
Trademark/Model Designation
GE GSWF GSWF
Manufacturer: General Electric Consumer Products
The water treatment device(s) listed on this certificate have met the testing requirements pursuant to Section
116830 of the Health and Safety Code for the following health related contaminants:
Microbiological Contaminants and Turbidity
Cysts
Turbidity
Organic Contaminants
Atrazine
Lindane
2,4-D
Replacement Elements
Inorganic/Radiological Contaminants
Asbestos
Lead
750 galRated Service Capacity: 0.5 gpm
Conditions of Certification:
Do not use where water is microbiologically unsafe or with water of unknown quality, except that systems certified for
cyst reduction may be used on disinfected waters that may contain filterable cysts.
20
Rated Service Flow:

Notes
Wine Reserve
21

Notes
Wine Reserve
22
 Loading...