

Page 1
Owner’s
Owner’s Manual
Models 21 and 25
Manual
Wine Reserve
Congélateur inférieur
Réfrigérateurs
Manuel d’utilisation
La section française commence à la page 45
Congelador inferior
Refrigeradores
Manual del propietario
y instalación
La sección en español empieza en la página 89
197D8243P002
49-60616
08-10 GE
monogram.com
Page 2

Consumer Information
Wine Reserve
Introduction
Contents
Your new Monogram wine reserve makes an eloquent statement of style, convenience and kitchen
planning flexibility. Whether you chose it for its purity of design or the assiduous details, you will find
that your Monogram wine reserve’s superior blend of form and function will delight you for years to
come.
The information on the following pages will help you operate and maintain your wine reserve properly.
If you have any other questions, visit our Website at: monogram.com
Consumer Services
Important Phone Numbers . . . . . . . . . . . . . . . . . . . . .24
Model and Serial Numbers . . . . . . . . . . . . . . . . . . . . . . .2
Performance Data Sheet . . . . . . . . . . . . . . . . . . . . . . .19
Problem Solver . . . . . . . . . . . . . . . . . . . . . . . . . . . . .17, 18
Safety Instructions . . . . . . . . . . . . . . . . . . . . . . . . . . . . 4, 5
State of California Water
Treatment Device Certificate . . . . . . . . . . . . . . . . . . .20
Warrant y . . . . . . . . . . . . . . . . . . . . . . . . . . . . . .Back Cover
Care and Cleaning
Cleaning—Outside and Inside . . . . . . . . . . . . . . . . . .14
Light Bulb Replacement . . . . . . . . . . . . . . . . . . . . . . . 15
Vacation . . . . . . . . . . . . . . . . . . . . . . . . . . . . . . . . . . . . . . .15
Operating Instructions
Features . . . . . . . . . . . . . . . . . . . . . . . . . . . . . . . . . . . . . . . .6
Automatic Icemaker . . . . . . . . . . . . . . . . . . . . . . . . . . . . .7
Customizable Drawer . . . . . . . . . . . . . . . . . . . . . . . . . .11
Drawers/Shelves . . . . . . . . . . . . . . . . . . . . . . . . . . . . . . .10
External Moisture Control . . . . . . . . . . . . . . . . . . . . . .12
LED Display Lighting . . . . . . . . . . . . . . . . . . . . . . . . . . .12
Sabbath Mode . . . . . . . . . . . . . . . . . . . . . . . . . . . . . . . . .13
Temperature Controls . . . . . . . . . . . . . . . . . . . . . . . . . . .6
Water Filter . . . . . . . . . . . . . . . . . . . . . . . . . . . . . . . . . . . . . .9
Preparation
Clearances . . . . . . . . . . . . . . . . . . . . . . . . . . . . . . . . . . . . .16
Location . . . . . . . . . . . . . . . . . . . . . . . . . . . . . . . . . . . . . . .16
Before
using your
wine reserve
Write
down the
model &
serial
numbers
Read this manual carefully. It is intended to help
you operate and maintain your new wine reserve
properly.
Keep it handy for answers to your questions.
You will find them on a label on the ceiling inside
the wine reserve.
If you don’t understand something or need more
help, there is a list of toll-free consumer service
numbers included in the back section of this
manual.
OR
Visit our Website at: monogram.com
Please write these numbers here:
Model Number
Serial Number
Use these numbers in any correspondence or
service calls concerning your winereserve.
2
Page 3

Consumer Information
Wine Reserve
If you
received a
damaged
appliance
Save time
& money
If you
need
service
The warranty does not cover damage caused
after delivery.
Before you request service, check the Problem
Solver in the back of this manual.
To obtain service, see the Consumer Services
page in the back of this manual.
We’re proud of our service and want you to be
pleased. If for some reason you are not happy
with the service you receive, here are steps to
follow for further help.
FIRST, contact the people who serviced your
appliance. Explain why you are not pleased.
In most cases, this will solve the problem.
Immediately contact the dealer (or builder) that
sold you the wine reserve.
It lists causes of minor operating problems that
you can correct yourself.
NEXT, if you are still not pleased, write all
the details—including your phone number—to:
Manager, Customer Relations
GE Appliances
Appliance Park
Louisville, KY 40225
3
Page 4
IMPORT ANT SAFETY INSTRUCTIONS
READ AND SAVE THESE INSTRUCTIONS
W ARNING–When using this
appliance, always exercise basic safety precautions,
including the following:
• Use this appliance only for its intended purpose
as described in this Owner’s Manual.
• This wine reserve must be properly installed in
accordance with the Installation Instructions
before it is used.
• Do not allow children to climb, stand or hang
on the wine reserve full-extension drawers.
They could seriously injure themselves and
possibly cause damage to the wine reserve.
• Do not touch the cold surfaces in the freezer
compartment when hands are damp or wet.
Skin may adhere to these extremely cold surfaces.
• Do not store or use gasoline or other flammable
vapors and liquids in the vicinity of this or any
other appliance.
• Your freezer has an automatic icemaker
in the freezer drawer—avoid contact with the
moving parts of the ejector mechanism, or with
the heating element located on the bottom
of the icemaker. Do not place fingers or hands on
the automatic icemaking mechanism while the
freezer is plugged in.
• Turn off the circuit breaker to disconnect power
when cleaning or making repairs. Repairs should
be made by a qualified service technician.
• Do not try to replace a burned-out LED light.
An authorized technician will need to replace the
LED lights.
• Do not refreeze frozen foods which have thawed
completely.
DANGER: RISK OF CHILD ENTRAPMENT
Child entrapment and suffocation are not
problems of the past. Junked or abandoned
appliances are still dangerous…even if they will sit
for “just a few days.” If you are getting rid of your old
appliance, please follow these instructions to help
prevent accidents.
Before You Throw Away Your Old Appliance:
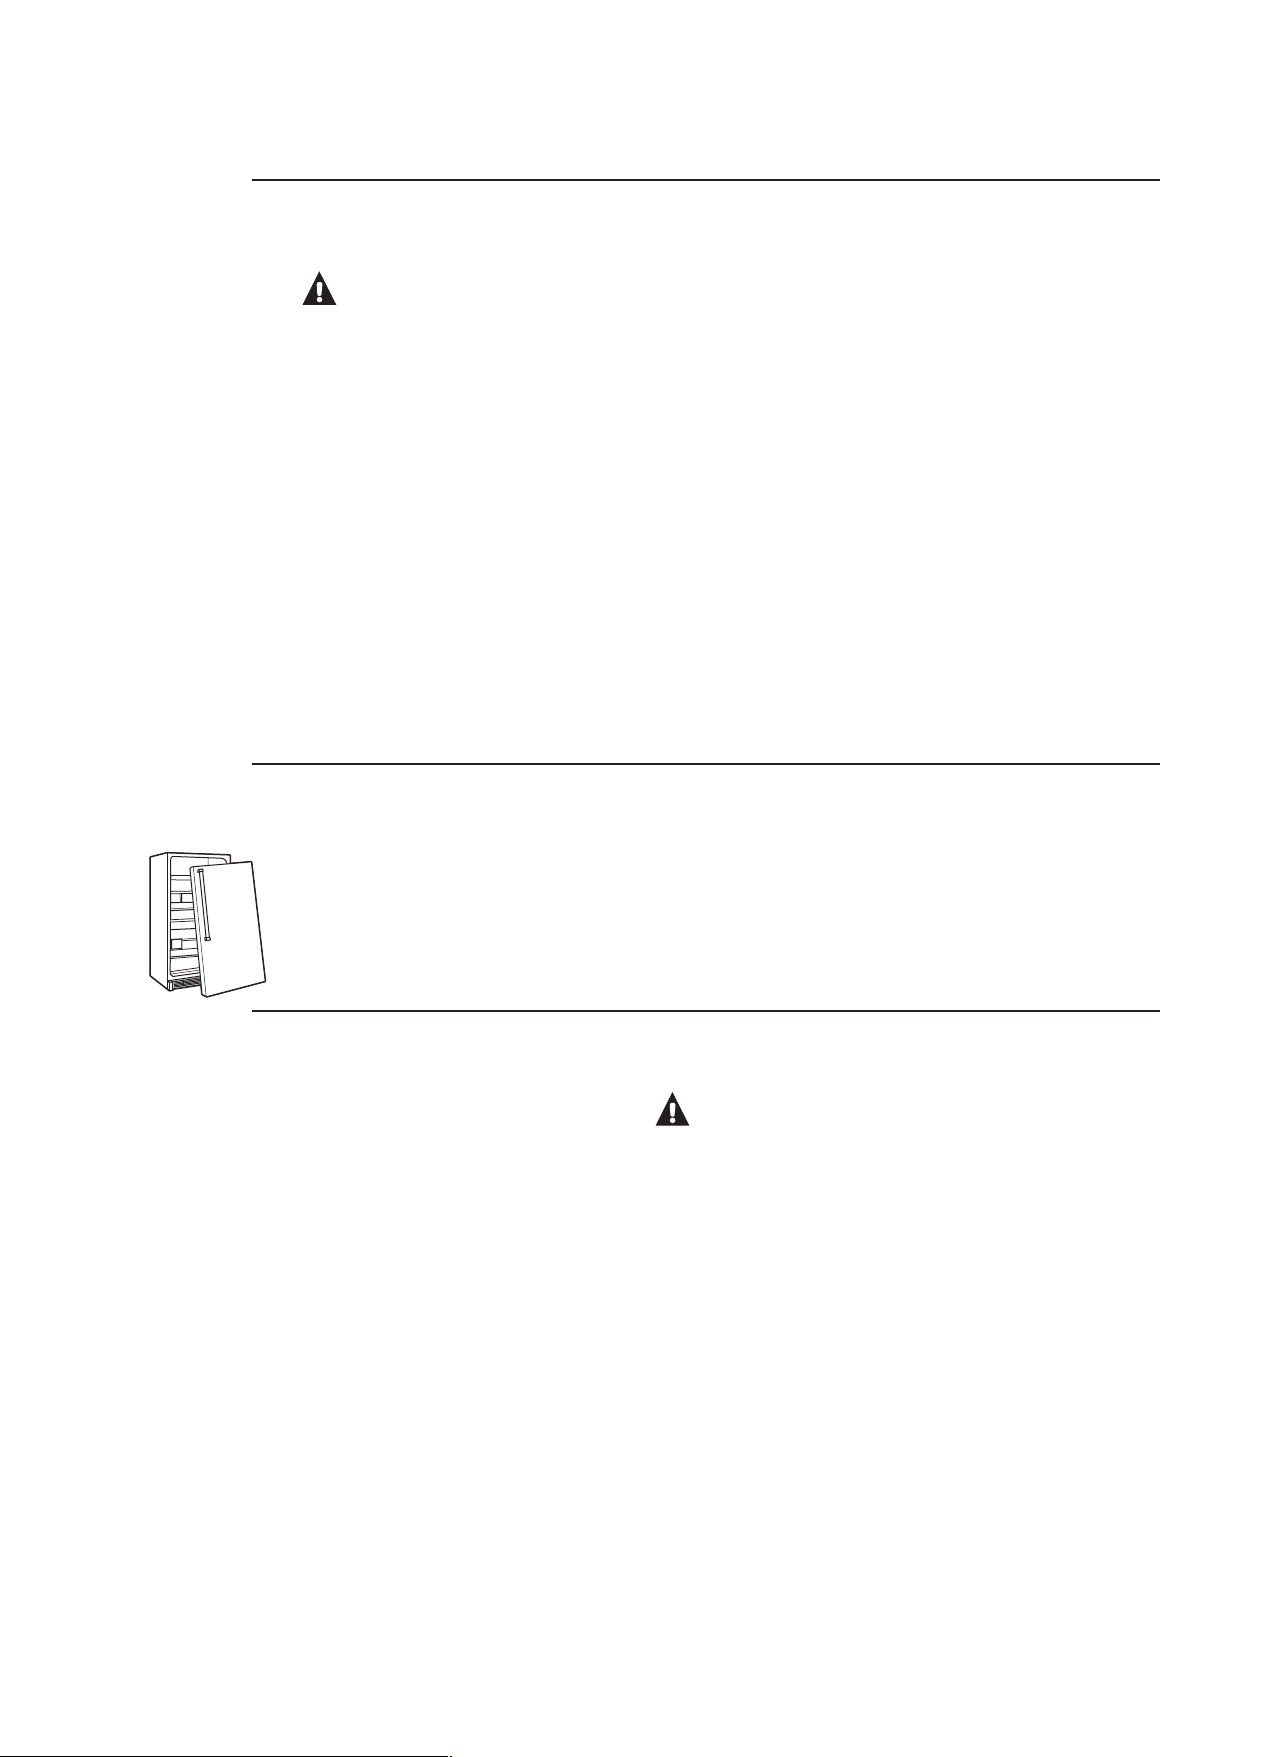
• Take off the door/drawers.
• Leave the shelves in place so that children may
REFRIGERANTS
All refrigeration products contain refrigerants, which under
federal law must be removed prior
to product disposal. If you are getting rid of an old
refrigeration product, check with the company handling the
disposal about what to do.
4
W ARNING–R600a Refrigerant
Warning: This appliance contains isobutane refrigerant,
R600a, a natural gas with high environmental compatibility.
However it is also combustible. Please adhere to the
warnings below:
1) When handling, installing and operating the appliance, care
should be taken to avoid
damage to the refrigerant tubing.
2) Servicing shall be performed by factory-authorized service
personnel and component parts shall be replaced with
manufacturer-authorized replacement components.
3) Refrigeration products contain refrigerants, which under
federal law must be removed prior
to product disposal.
4) Keep ventilation openings in the appliance enclosures or in
the built-in structure clear of obstruction.
5) Do not use mechanical devices or other means
to accelerate the defrosting process.
6) Do not damage refrigerant circuit.
7) Do not use electrical appliances inside the
food storage compartment of the appliance.
not easily climb inside.
Page 5

IMPORT ANT SAFETY INSTRUCTIONS
HOW TO CONNECT ELECTRICITY
Do not, under any circumstances,
cut or remove the third (ground) prong
from the power cord. For personal safety,
this appliance must be properly grounded.
The power cord of this appliance is equipped
with a 3-prong (grounding) plug which mates
with a standard 3-prong (grounding) wall outlet
to minimize the possibility of electric shock
hazard from this appliance.
Have the wall outlet and circuit checked by
a qualified electrician to make sure the outlet
is properly grounded.
Where a standard 2-prong wall outlet is
encountered, it is your personal responsibility
and obligation to have it replaced with a properly
grounded 3-prong wall outlet.
The wine reserve should always be plugged into
its own individual electrical outlet which has a
voltage rating that matches the rating plate.
DO NOT USE AN ADAPTER PLUG TO C ONNECT
THE WINE RESERVE TO A 2-PRONG OUTLET.
DO NOT USE AN EXTENSION CORD WITH
THIS APPLIANCE.
This provides the best performance and also
prevents overloading house wiring circuits, which
could cause a fire hazard from overheated wires.
Never unplug your wine reserve by pulling on
the power cord. Always grip plug firmly and pull
straight out from the outlet.
Repair or replace immediately all power
cords that have become frayed or otherwise
damaged. Do not use a cord that shows cracks
or abrasion damage along its length or at
either end.
When moving the wine reserve away from
the wall, be careful not to roll over or damage
the power cord.
SAVE THESE
INSTRUCTIONS
5
Page 6
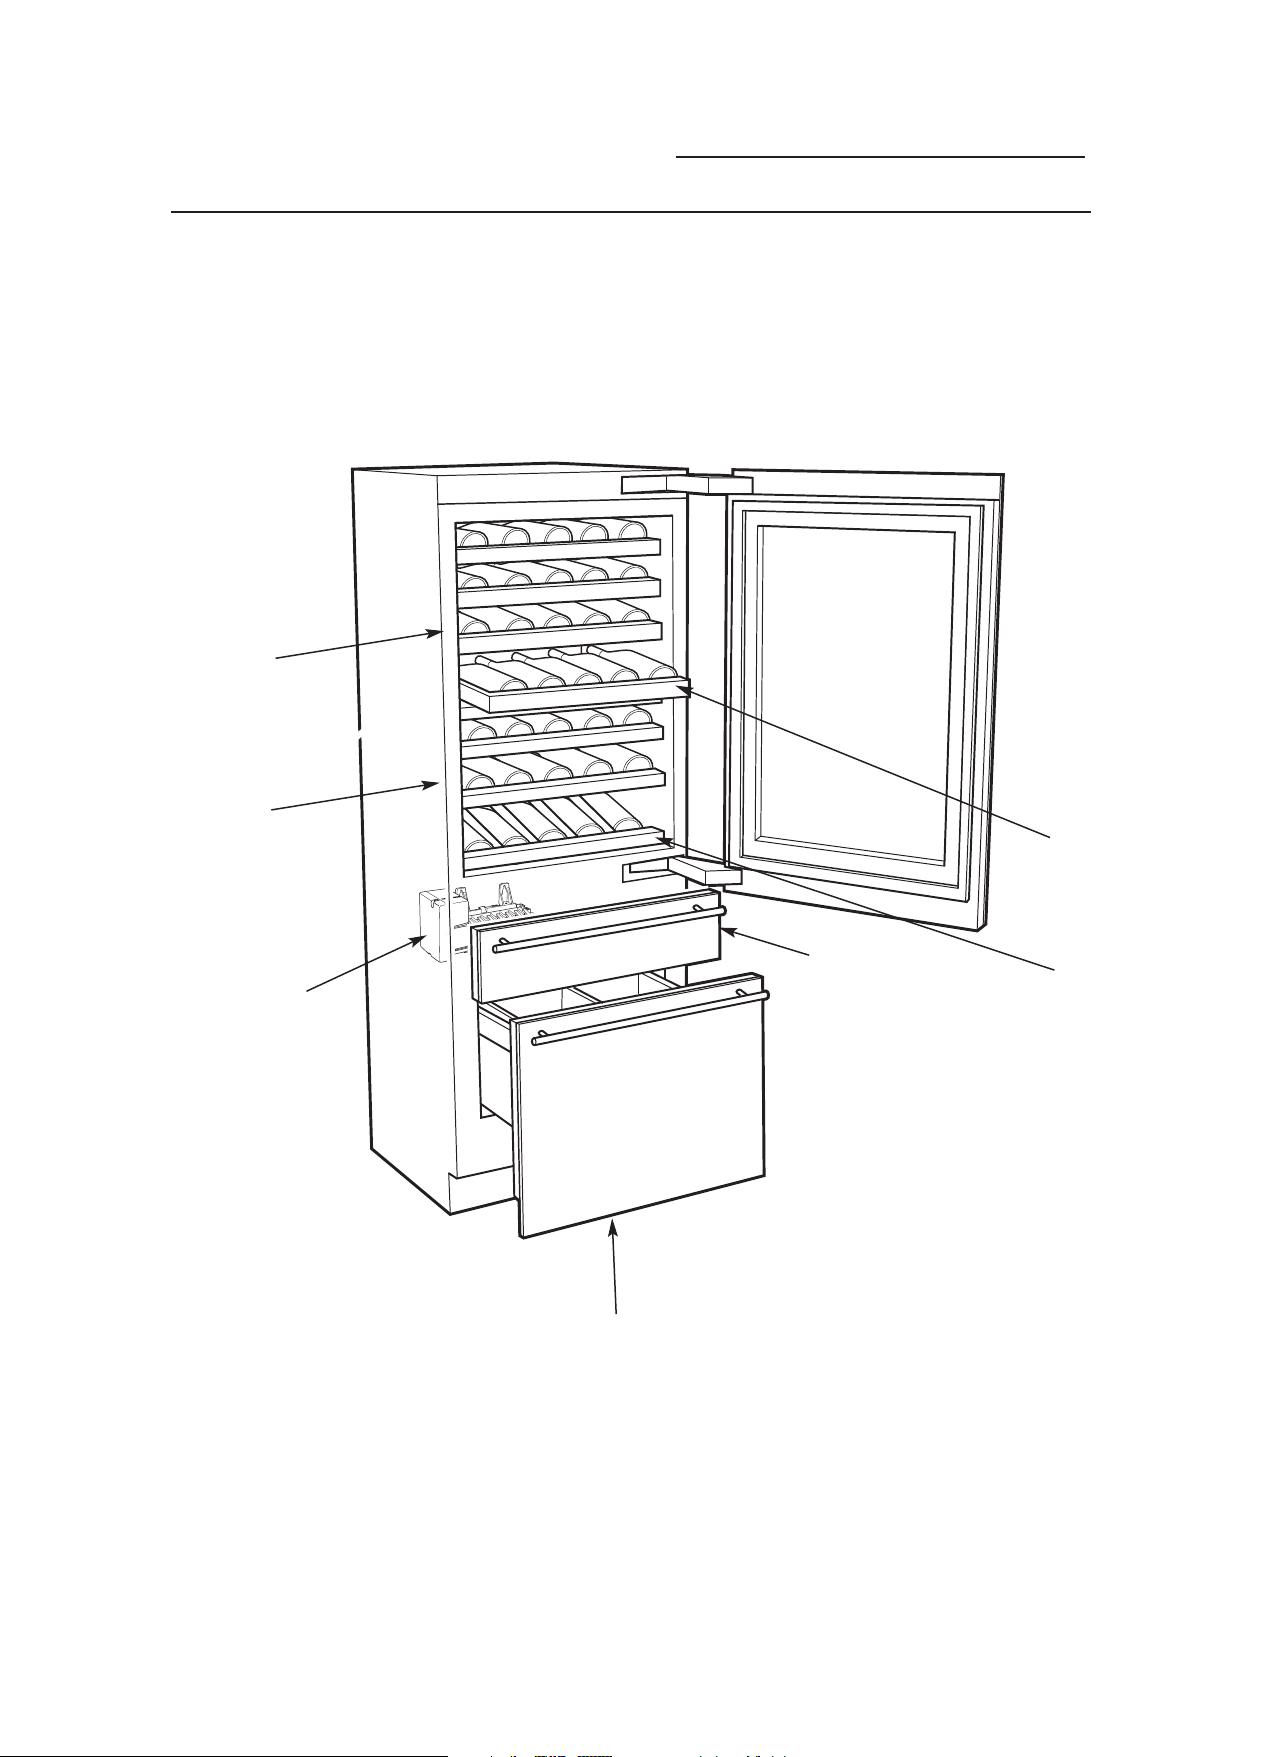
Upper Wine
Reserve
Temperature Controls
Wine Reserve
Lower Wine
Reserve
Icemaker
Full Extension
Drawers
Freezer Drawer
Wine Display
Shelf
Customizable Drawer
6
Page 7

Temperature Controls
Wine Reserve
Temperature
controls
Wine – Upper Compartment
Wine – Lower Compartment
The temperature display shows the actual
temperature of the wine compartment, freezer
drawer or customizable drawer when each
one is selected by toggling the Zone indicator.
The actual temperature will vary from the set
temperature based on factors such as frequency
of door openings, amount of wine, defrost
cycling and room temperature.
NOTE: Frequent door openings or doors left open
for periods of time may increase the internal
temperature of the compartments temporarily.
To turn off the cooling system, toggle the ZONE
indicator to the wine mode. Press the plus (+) pad
until the display shows OFF.
To turn the cooling system on, toggle the ZONE
indicator to the wine mode and press the minus
(–) pad until the desired temperature is
displayed.
To check the current temperature setting for a
compartment, press the plus (+) or minus (–) pad
once. After 5 seconds, the display will return to
the actual temperature.
Upper Drawer – Freezer
Lower Drawer – Customizable
To change the temperature settings, press
the plus (+) or minus (–) pad for each increment
to the desired temperature set point. Allow
24 hours for the unit to reach the temperature
you have set.
Temperature Ranges
Low High
Wine
Freezer
Drawer
Customizable Drawer Temperature Ranges
Freezer
Chill
Wine
40°F
4°C
–6°F
–21°C
Low High
-6°F
–21°C
34°F
1°C
40°F
4°C
65°F
18°C
+6°F
–14°C
+6°F
–14°C
46°F
8°C
55°F
13°C
Changing
display
temperatures
from °F to °C
Alarm
To change the temperature display between
Fahrenheit and Celsius, press both the plus (+)
and minus (–) pads for 5 seconds.
To turn the Alarm feature on, press and hold
the ALARM button for 3 seconds. ALARM will
be underlined when active. To turn off, press
and hold the ALARM button for 3 seconds.
The underline will disappear.
NOTE: Setting the controls to OFF stops cooling,
but does not shut off electrical power to the unit.
All readings in °C will be rounded.
When the ALARM
is active, the alarm
will flash and beep
if you keep the door
open for more than 2 minutes.
7
Page 8
Automatic Icemaker
Wine Reserve
Automatic
icemaker
A newly installed wine reserve may take 12–24
hours to begin making ice. The wine reserve
is shipped with the icemaker set to ON.
The icemaker will produce seven cubes per
cycle—approximately 15 cycles in a 24-hour
period, depending on freezer compartment
temperature, room temperature, number of
door openings and other use conditions.
If the wine reserve is operated before the water
connection is made to the icemaker, set the
icemaker to OFF. To set the icemaker to OFF,
press the ZONE indicator on the control pad
three times to select the freezer drawer. Press
the ICE icon to the right. The line under ICE will
disappear and the word OFF will show under ICE.
Throw away the first full bucket of ice.
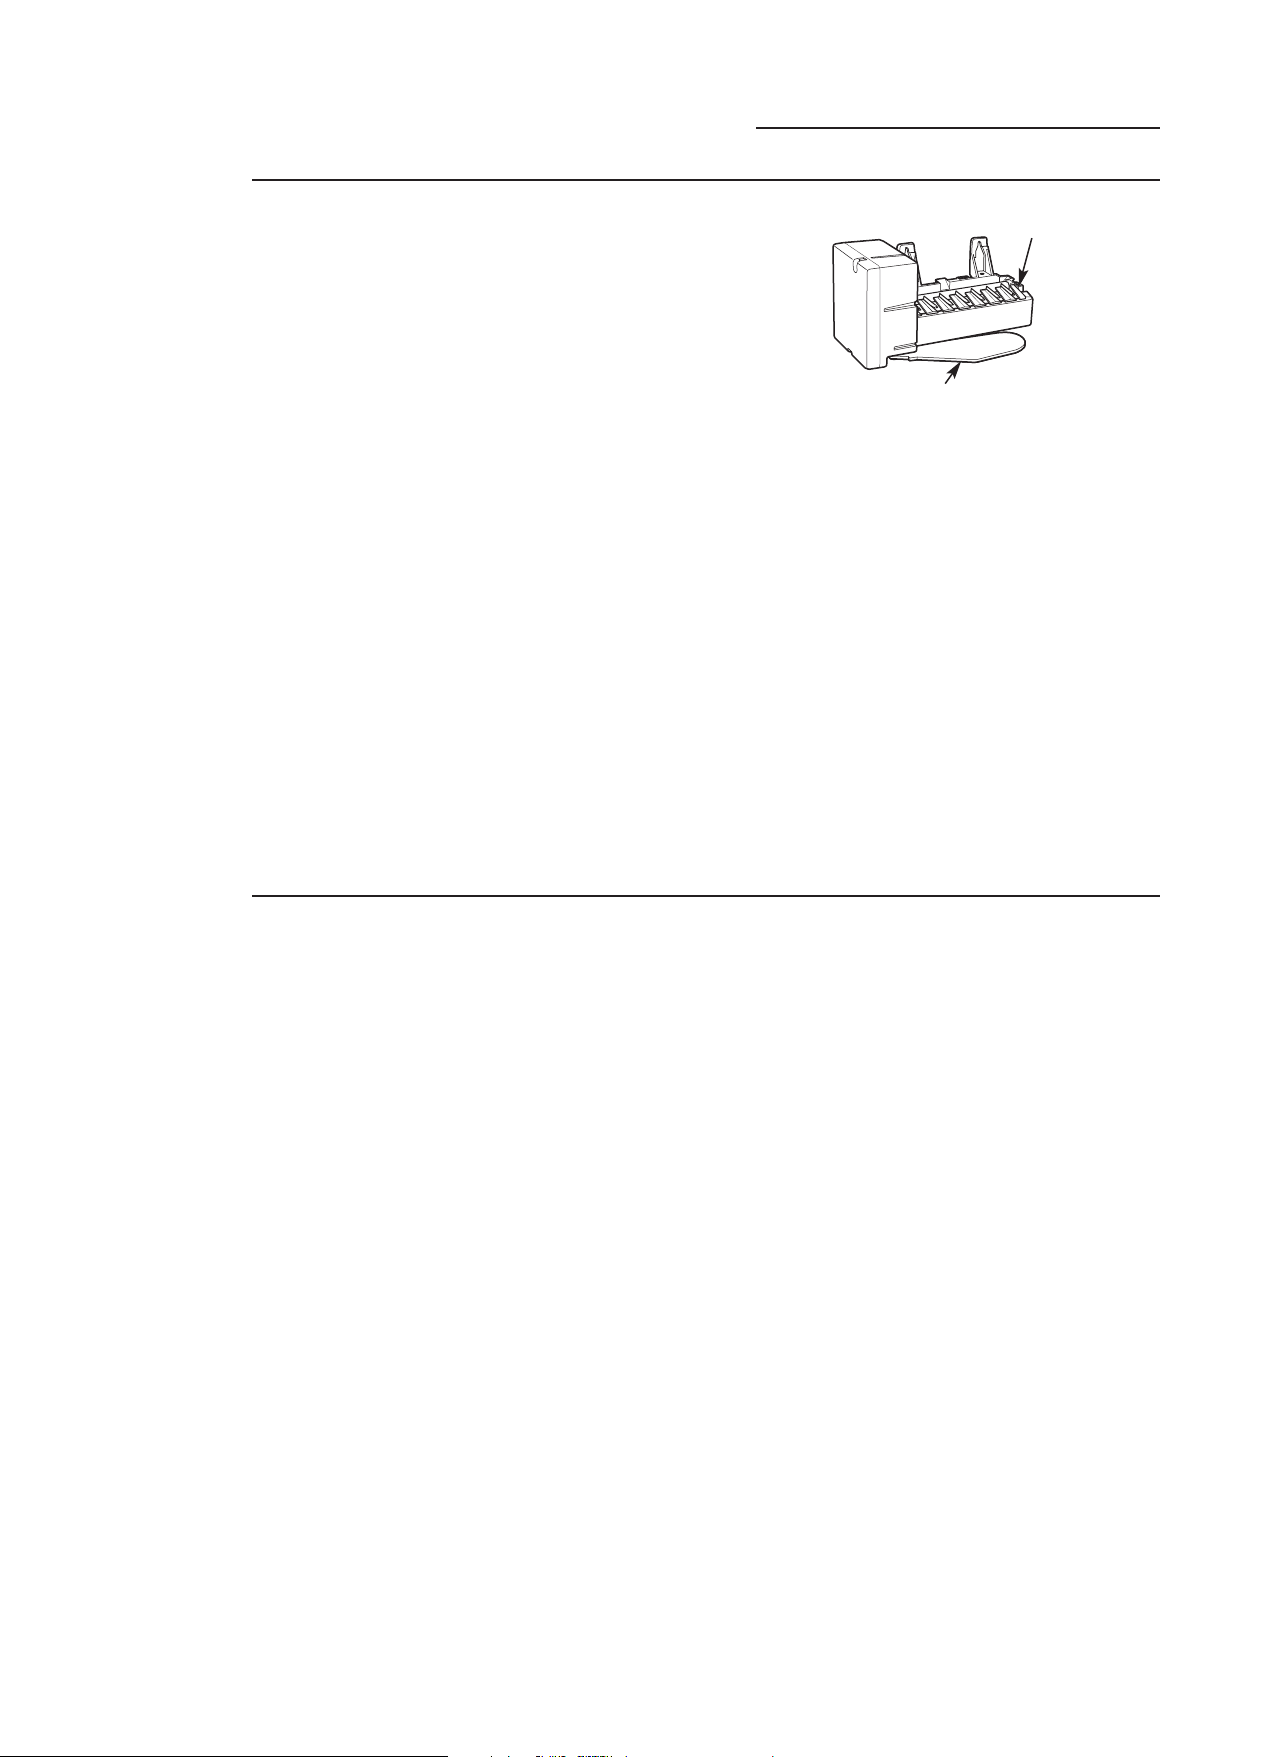
Be sure nothing interferes with the sweep
of the feeler arm.
When the bin fills to the level of the feeler arm,
the icemaker will stop producing ice.
It is normal for several cubes to be joined
together.
Icemaker
Feeler Arm
After the icemaker has been turned on again,
there will be a delay of about 45 minutes before
the icemaker resumes operations.
NOTE: In homes with lower-than-average
water pressure, you may hear the icemaker
water valve cycle on several times when
making one batch of ice.
NOTE: Icemaker works best between
40 and 120 PSI home water pressure.
Accessing
the icemaker
and freezer
drawer
If ice is not used frequently, old ice cubes
will become cloudy, taste stale and shrink.
The icemaker is located on the ceiling of the
freezer drawer and to the left rear. There is an
LED strip in the freezer drawer ceiling. The
freezer drawer contains 1 ice bin.
8
Page 9
Water Filter
Wine Reserve
Water filter
cartridge
The water filter cartridge is located below
the customizable drawer on the lower-right side
of the appliance.
Water Filter
Cartridge
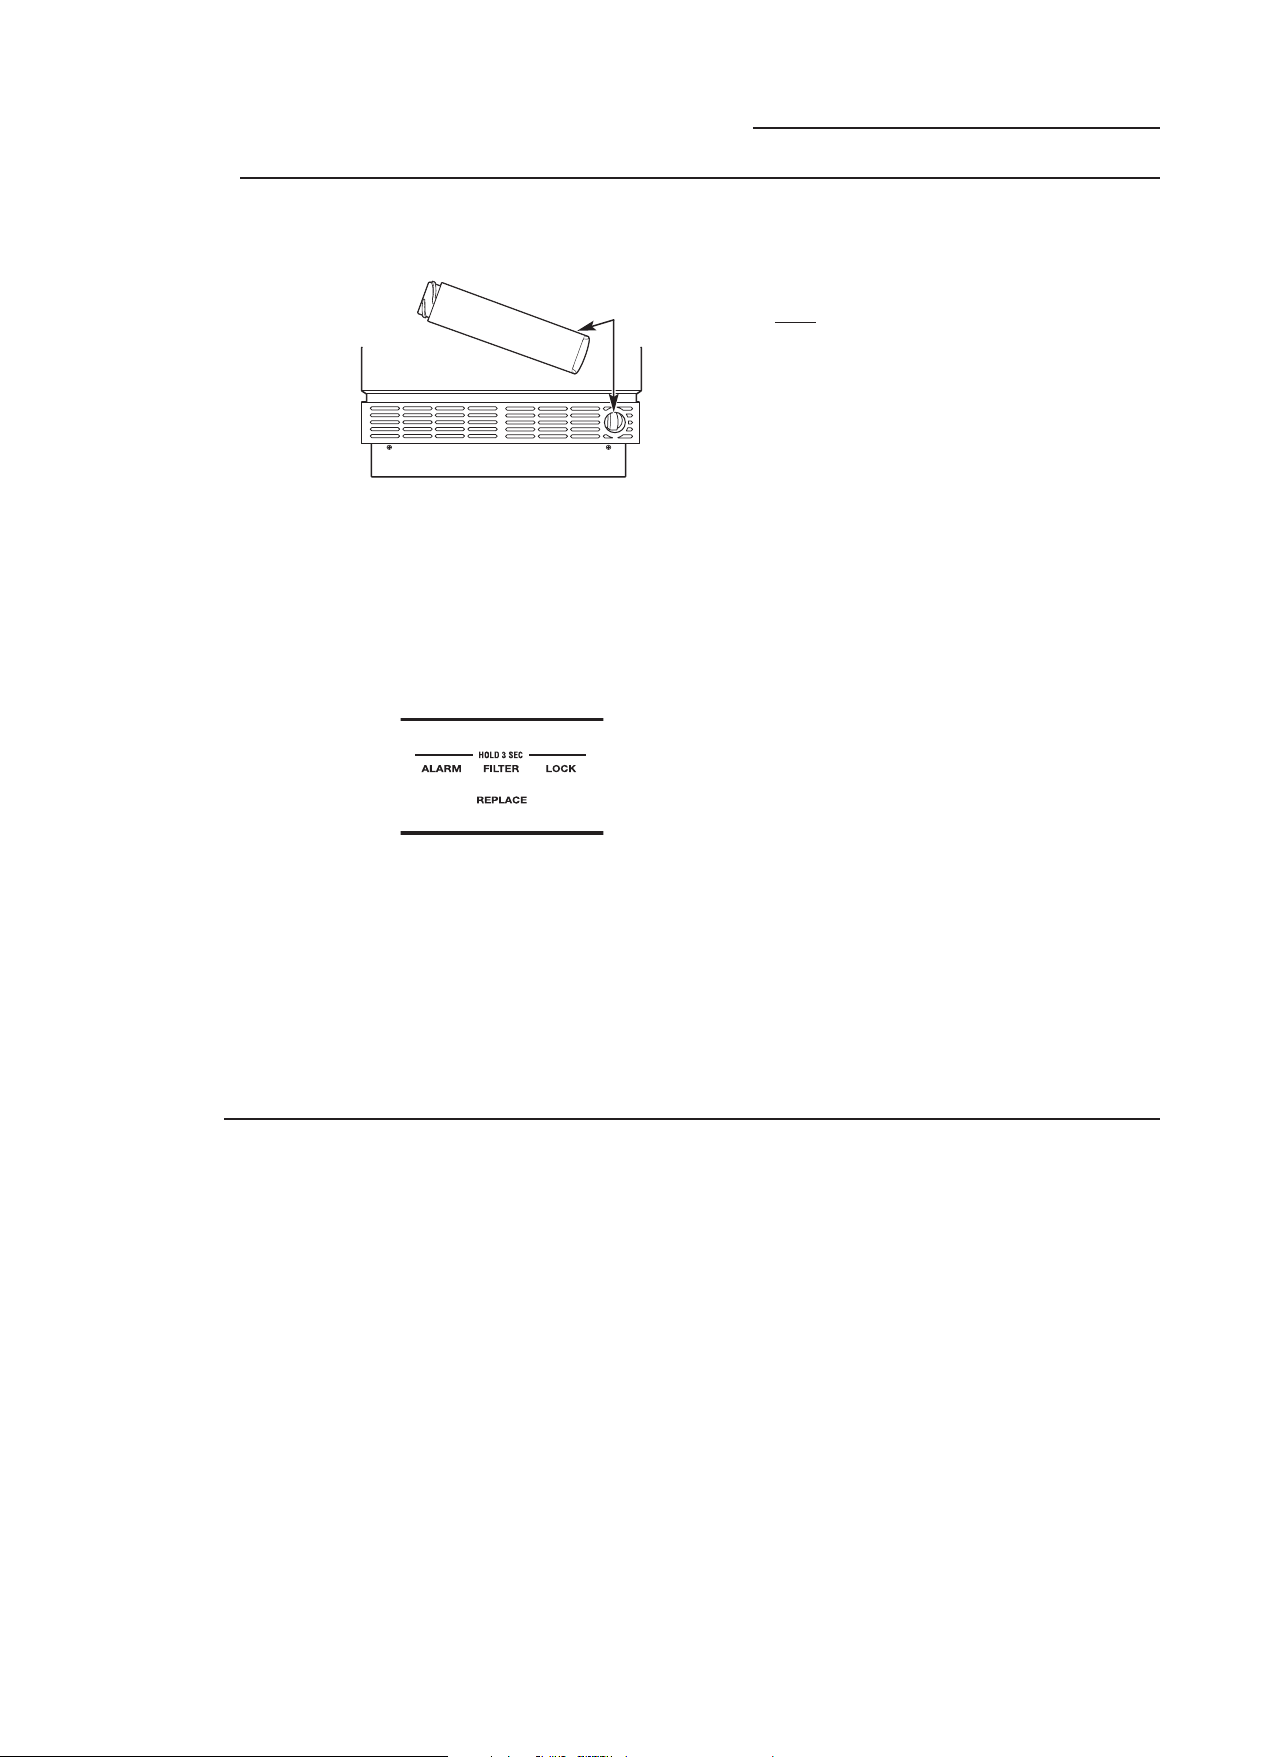
To Replace the Filter:
While the filter cartridge may last up to 1 year ,
replacement frenquency will depend on ice usage.
There is a replacement indicator light for the water
filter cartridge on the control panel. The filter
cartridge should be replaced when the word
REPLACE appears beneath FILTER on the control
panel.
To Reset the Filter Status Light:
Press and hold the FILTER button for 3 seconds.
Filter Bypass Plug:
You must use the filter bypass plug if:
a) you have a household reverse osmosis water
system and/or another form of home water
filtration system.
b) a replacement filter is not available.
The icemaker will not operate without the filter or
filter bypass plug installed.
The bypass plug and mini manual are located
in the bottom machine compartment.
Replacement filters:
To order additional filter cartridges, visit our
Website at monogram.com, or call GE Parts and
Accessories, 800.626.2002.
Filter Model Number GSWF
IMPORTANT NOTE: Remove the water filter
to immediately stop any water leak from the
icemaker. The water filter cartridge holder acts
as a cut-off valve when the filter
is removed and will prevent further leaking.
Child control
lockout
Installing the Filter Cartridge:
1. Open the customizable drawer to gain access
to the water filter cartridge.
2. Remove the old cartridge by twisting
counterclockwise. Pull forward on the filter
to remove.
3. Insert the new filter into the compartment and
twist clockwise until the cartridge stops.
This child control lockout feature prevents
unwanted changes to your temperature settings.
After the desired temperature is set, the
temperature can be locked. To lock, press and
hold the LOCK button for 3 seconds. To unlock,
press and hold the LOCK button for 3 seconds.
9
Page 10
Drawers/Shelves
Wine Reserve
Wine bottle
arrangement
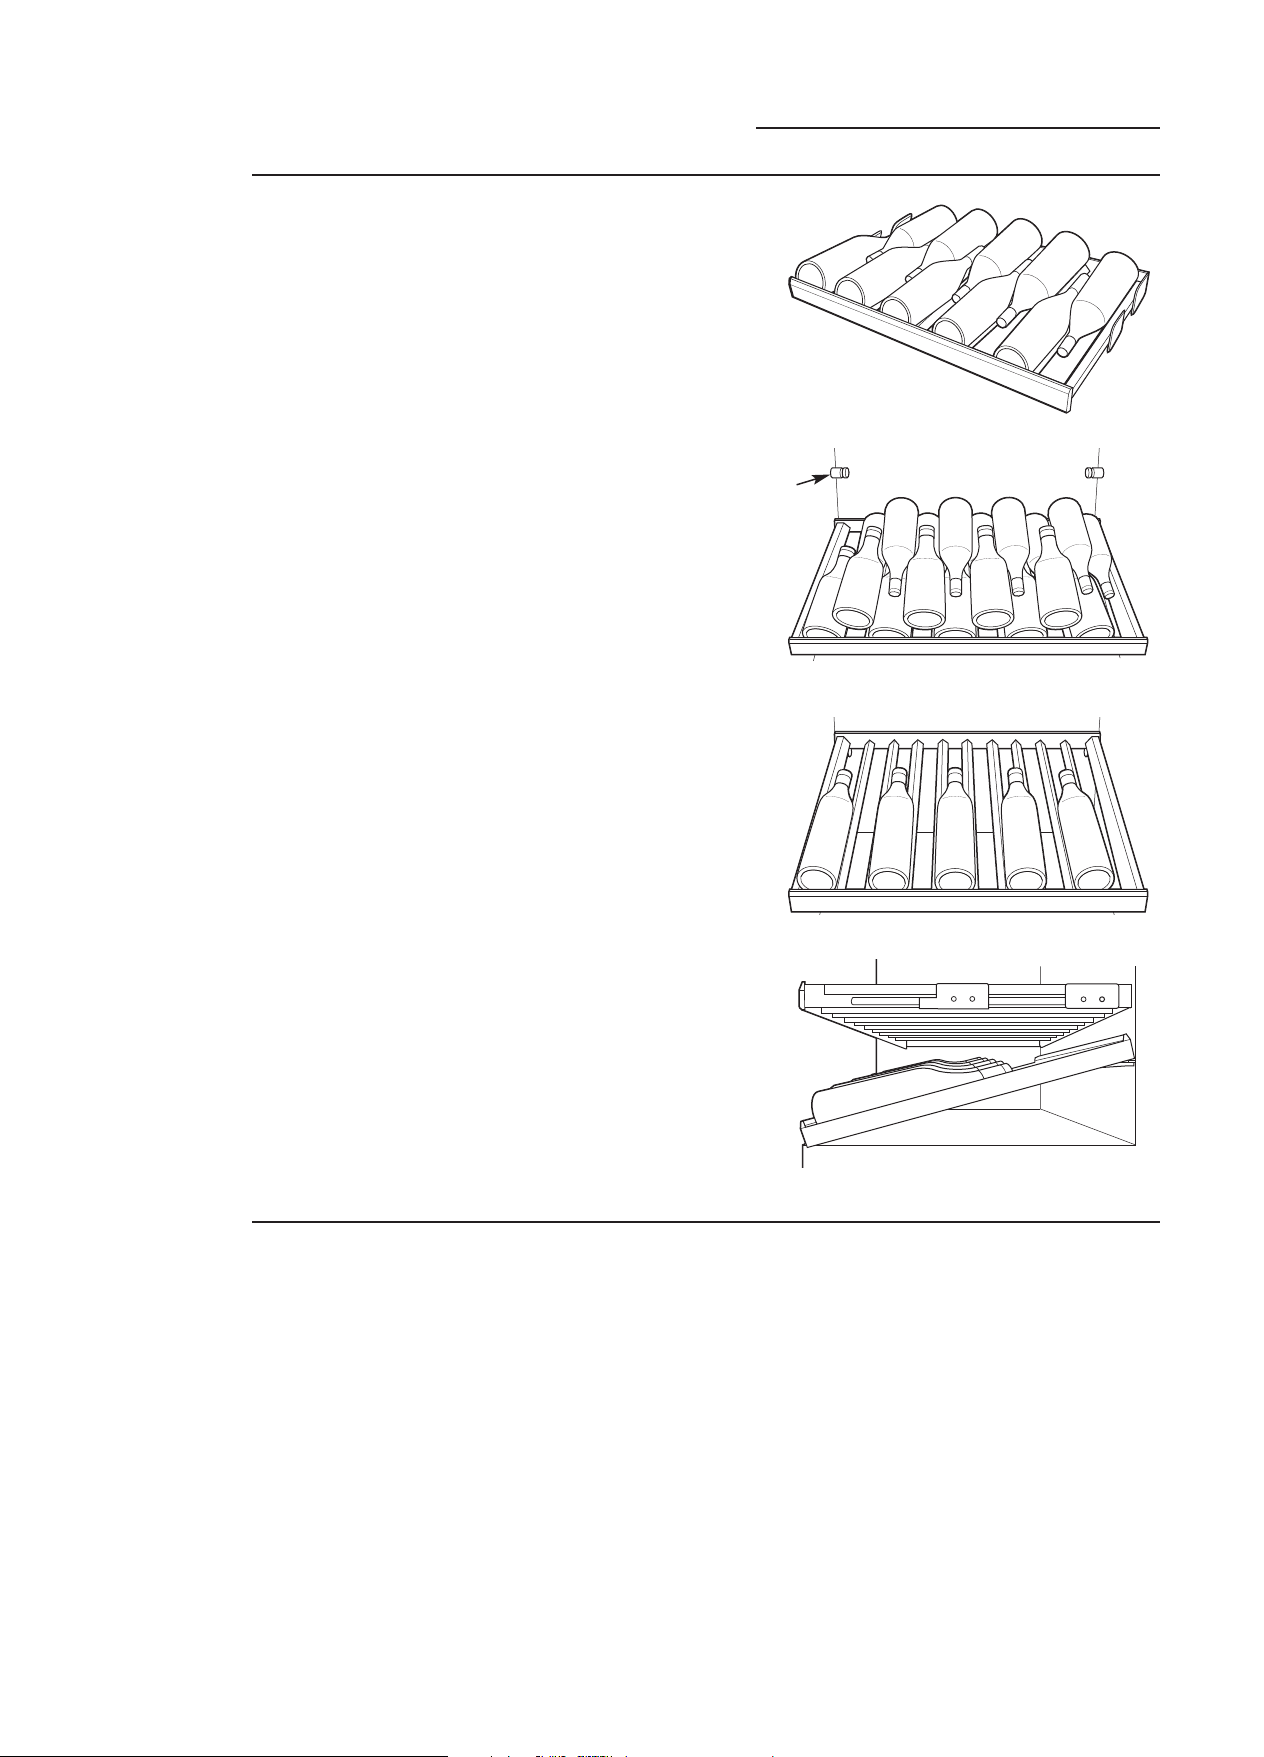
Full-Extension Drawers
The top 6 drawers are full-extension drawers, with
each drawer holding up to 10 bottles. The bottles
will be stored with necks alternating from front to
back.
Wine Display Shelf
The wine display shelf can either be in a
horizontal position or an angled position. The
horizontal position can hold 18 bottles. The
angled position holds 5 bottles. The shelf can be
angled by lifting the shelf onto pegs on the back
wall.
Peg
Horizontal Position
Wine bottle
loading
tips and
suggestions
• Keep wines that you plan to use for everyday
drinking and entertaining on the front half of
the full-extension drawers where labels are
completely visible. Place wines for aging or
longer-term storage in the rear.
• Do not allow children to climb, stand or hang
on the wine reserve full-extension drawers.
They could seriously injure themselves and
possibly cause damage to the wine reserve.
Angled Position
Angled Position
• Group your wine inventory according to type:
i.e., white wines in the cooler zones and red
wines in the warmer zones.
• Store red and white wines in separate zones so
you can keep them at different temperatures.
10
Page 11
Customizable Drawer
Wine Reserve
Customizable
drawer
The customizable drawer can be used as
a freezer, as a fresh-food refrigerator or as
a wine/beverage drawer.
To customize your drawer:
Press the ZONE indicator on the control pad to
select the customizable drawer.
Recommended Temperatures for Customizable
Drawer:
Button Function Temperature
Chill
Freeze
Wine
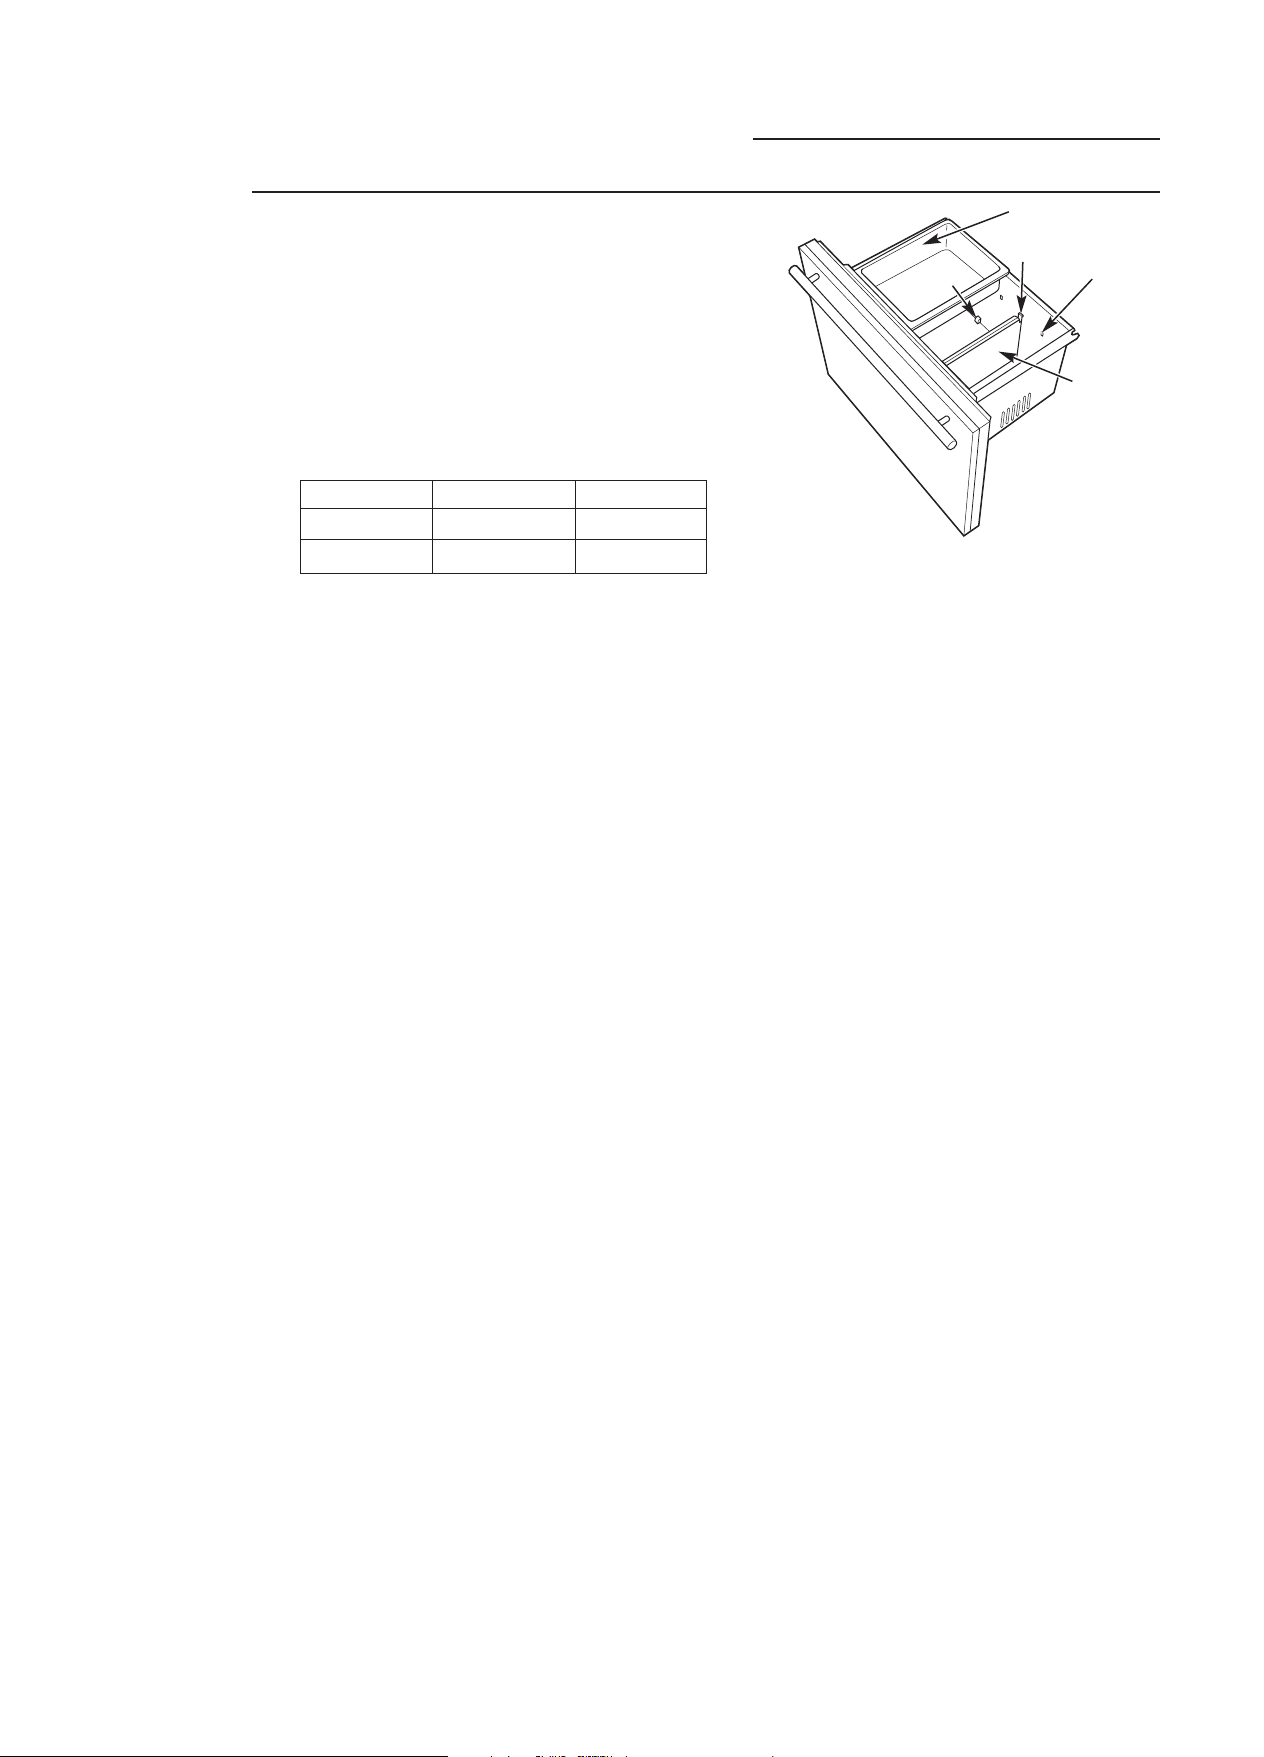
This drawer has LED strip lighting above it. There
is also one adjustable divider that can be placed
in different positions and a bin that can slide left
or right in the drawer.
To change the divider position:
1. Pull in the tabs at the top of the divider to
release it from the tab holes at the front and
back of the drawer.
Fresh Food
Freezer
Wine Storage
37°F/3°C
0°F/–18°C
55°F/13°C
Raised Tab
Removable Sliding Bin
Tab
Tab Hole
Divider
2. Lift the divider off of the raised tabs at the
bottom of the drawer.
3. Move the divider to its new location and slide it
onto the raised tabs.
4. Pull in the tabs at the top of the divider and
position the divider so the tabs will fit into the
tab holes. Release the tabs so they lock into
place.
11
Page 12

External Moisture Control/LED Lighting
Wine Reserve
External
moisture
control
LED display
lighting
This product is equipped with an external moisture
control feature. The wine reserve is shipped with
the external moisture control feature off.
In some humid environments, moisture can form
on the front surface of the wine reserve cabinet.
If moisture does appear on the front surface of the
wine reserve cabinet, turn
on the external moisture control feature by
pressing and holding the ALARM and LOCK
buttons on the control panel for 5 seconds. When
activated, a small picture of a water droplet with
a line through it will appear below the (+) and (–)
signs on the control panel.
This wine reserve has LED lighting on both sides
of the interior as well as above the freezer drawer
and above the customizable drawer.
The wine reserve has a display light option for the
interior side lights: full power and 1/2 power.
In display mode at either full or 1/2 power, the
lights will stay on after the door is closed and
automatically go off after 1 hour.
Lights at Full Power
Lights at 1/2 Power
To access the lighting options, press the ZONE
indicator on the control pad. In wine mode, the
LIGHTS button is to the right on the control pad.
When lights are at full power, there are 2 bars
under LIGHTS; at 1/2 power, there is 1 one bar;
when the lights are off, there are no bars.
Lights Off
12
Page 13

Sabbath Mode
Wine Reserve
Sabbath
Mode
The Sabbath Mode was designed for use on the
Jewish Sabbath and Holidays. The Sabbath Mode
feature makes it possible for observant Jews to
refrigerate and freeze food during the duration
of the holiday.
The Sabbath Mode feature can be set to override
typical reactions caused by your interaction with
the wine reserve. While in the Sabbath Mode,
your wine reserve will still operate. However, the
wine reserve will not respond
to your actions.
While in the Sabbath Mode, you may notice
the fan running when the door is opened,
however, this is not a result of your actions.
The fan will operate at predetermined times.
The defrost heater will continue to defrost
the wine reserve and will be activated on a timer.
The defrost heater will not defrost as a result of
door openings or any consumer actions.
ON/OFF—To activate the Sabbath Mode, hold
down the ALARM button and (+) pad on the
control panel for 5 seconds. SAB will be displayed
on the control. SAB will remain in the display and
the (+) pad and alarm button will remain lit until
the Sabbath mode is deactivated. Controls and
lights do not work until the ALARM button and
(+) pad are held again for 5 seconds.
DISPLAYS, ALARMS and LIGHTS—The main
temperature control displays will be deactivated,
therefore they will not be lit, sound a tone or
operate when touched. Door alarms and lights
will be disabled.
ICEMAKER—The icemaker will continue
to operate. The icemaker can be disabled by
turning the icemaker OFF prior to the Sabbath
(see Automatic Icemaker).
13
Page 14

Care and Cleaning
Wine Reserve
Cleaning
outside
Cleaning
inside
Door handles and trim—Clean with a cloth
dampened with soapy water. Dry with a soft cloth.
Keep the outside clean. Wipe with a clean
cloth lightly dampened with mild liquid dish
detergent. Dry with a clean, soft cloth.
Do n o t w i p e t h e wine reservewith a soiled dish
cloth or wet towel. These may leave a residue that
can damage the finish. Do not use scouring pads,
powdered cleaners, bleach or cleaners containing
bleach because these products can scratch and
damage the finish.
Turn off power at the circuit breaker or fuse box
before cleaning. If this is not practical, wring excess
moisture out of sponge or cloth when cleaning
around switches, lights or controls.
Use warm water and baking soda solution— about
a tablespoon (15 ml) of baking soda to a quart (1
liter) of water. This both cleans and neutralizes
odors. Thoroughly rinse and wipe dry.
Stainless steel—Regularly clean and polish
the Stainless Steel Door Panels and Handles
(on some models) with a commercially available
stainless steel cleaner such as Stainless Steel Magic
to preserve and protect the fine finish. Stainless Steel
Magicis available through GE Parts and Accessories,
800.626.2002, or GEAppliances.com. Order part
number WX10X15.
Do not use appliance wax or polish on the stainless
steel.
Wood—Clean the wood with a dampened rag.
Do not allow the wood to become overly wet.
Custom Wood Panels - please contact your custom
panel supplier for direction on cleaning and care.
Other parts of the wine reserve—including door
gaskets, ice storage bins and all plastic parts—can
be cleaned the same way. After cleaning the door
gaskets, apply a thin layer of petroleum jelly to the
door gaskets at the hinge side. This helps keep the
gaskets from sticking and bending out of shape.
Do not wash any plastic parts in the dishwasher.
™
Wooden Racks—Clean the wooden racks with a
dampened rag. Do not allow the racks to become
overly wet.
14
Page 15

Care and Cleaning
Wine Reserve
Preparing
for vacation
Interior Light
replacement
For long vacations or absences, remove food
from the drawers. Adjust the temperature up (+)
until the unit turns off. Clean the interior with a
baking soda solution of one tablespoon (15 ml)
of baking soda to one quart (1 liter) of water.
Leave the door open.
Do not try to replace a burned-out LED light.
An authorized technician will need to replace
the LED lights.
For shorter vacations, remove perishable foods
and leave the control at the regular setting.
However, if the room temperature is expected
to drop below 60°F (16°C), follow the same
instructions as for extended vacations.
Turn off the icemaker and shut off the water
supply to the freezer.
15
Page 16
Preparation
Wine Reserve
Wine reserve
location
Clearances
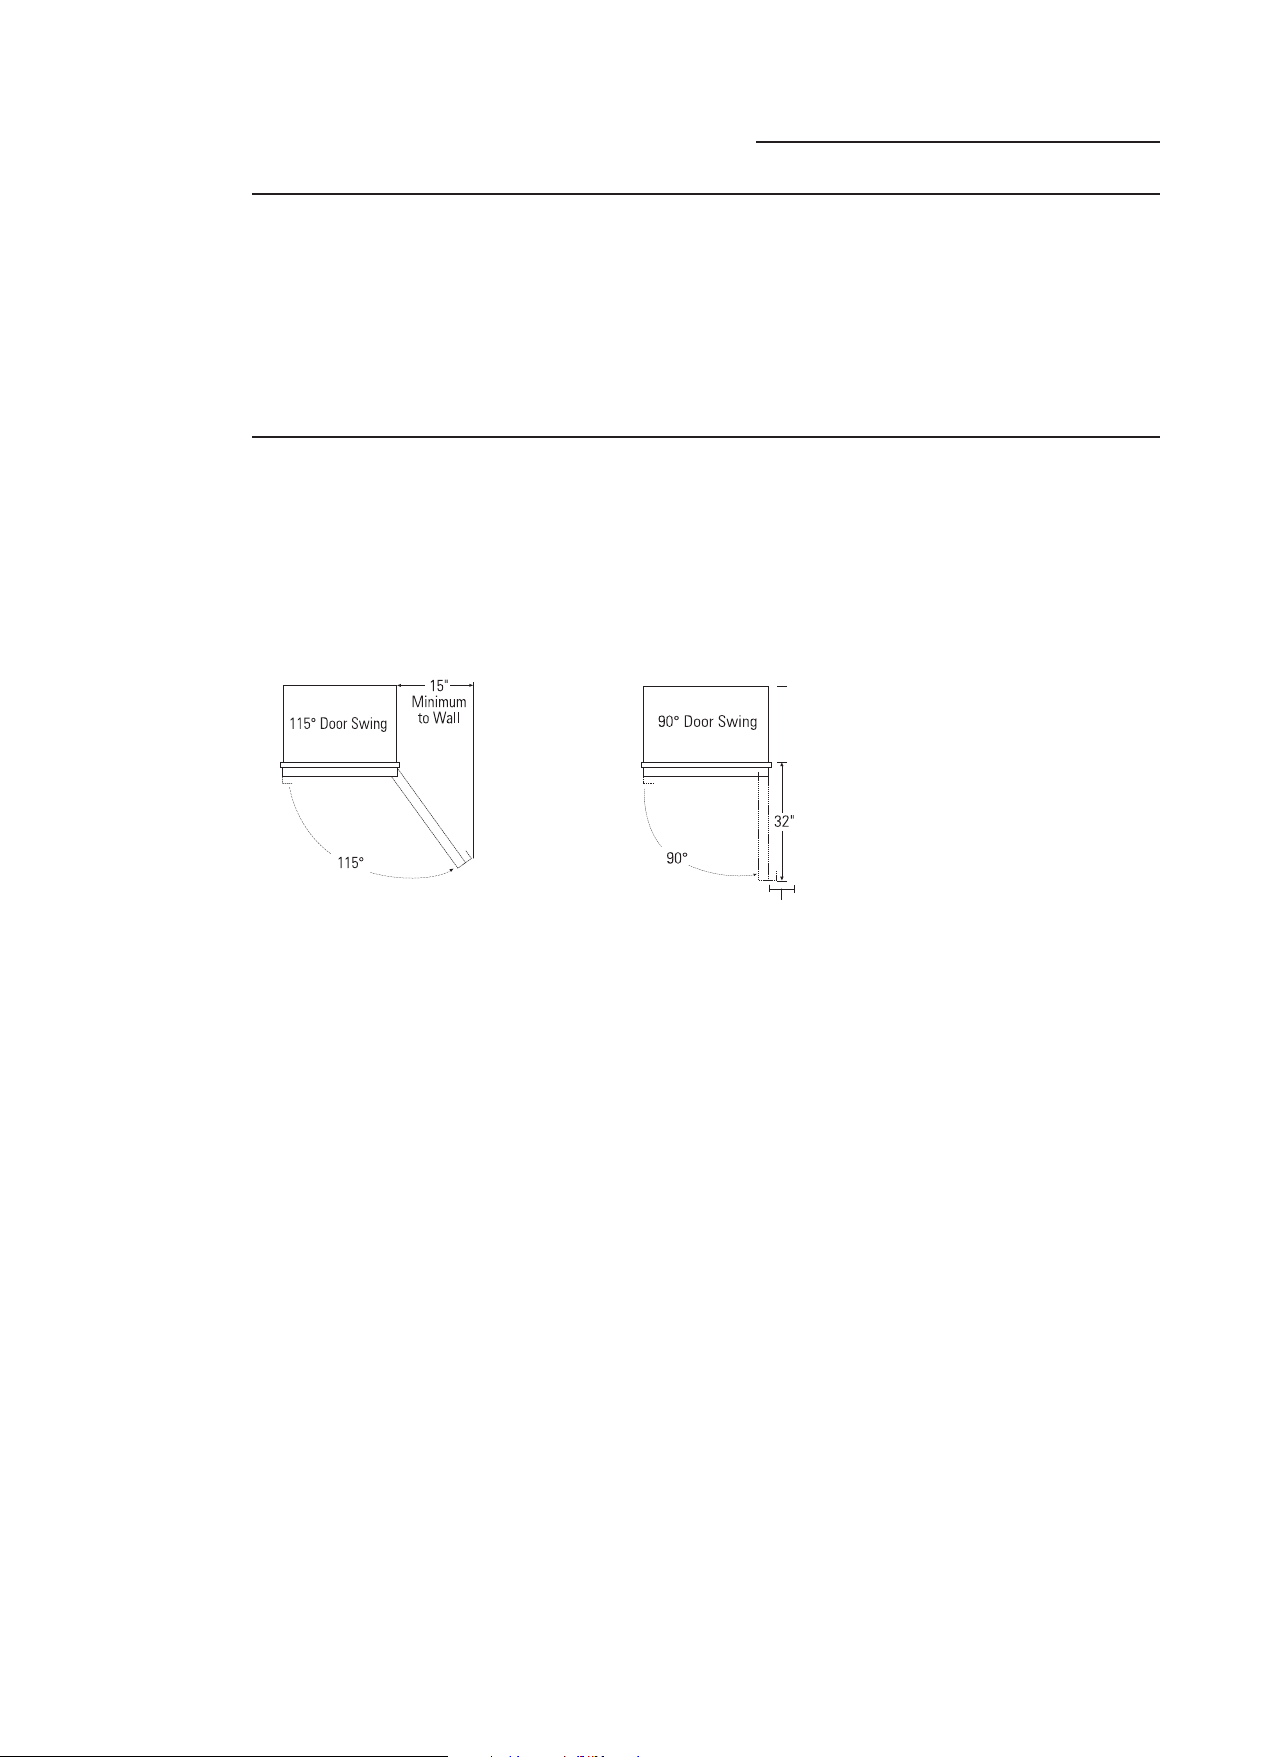
Do not install the wine reserve where
temperatures will be below 60°F (16°C) because
it will not maintain proper temperatures, and the
wine reserve will develop high internal humidity.
Allow 15" minimum clearance between the door
and wall for a full 115° door swing. Allow 5" min.
clearance to a wall for a 90° door swing for
Monogram Stainless Steel (European) models.
For proper installation, the wine reserve must
be placed on a level surface of hard material
the same height as the rest of the flooring.
This surface should be strong enough to
support a fully loaded wine reserve,
or approximately 1,200 lbs. each. See
the Installation Instructions for complete
directions.
4” distance to Wall.
16
Page 17
The Problem Solver
Wine Reserve
Questions?
Use this
problem
solver!
PROBLEM POSSIBLE CAUSE
WINE RESERVE DOES •May be in defrost cycle when refrigerating system does not operate
NOT OPERATE for about 45 minutes.
•Temperature control in the OFF position.
•If interior light is not on, wine reserve may not be plugged in at wall
outlet.
•The house fuse is blown/house circuit breaker is tripped. Replace fuse
or reset the breaker.
• Turn off the Sabbath Mode.
•If your control panel says SHO, then your showroom mode was
enabled. To turn this off, hold the ALARM button and (-) pad
simultaneously for 5 seconds.
REFRIGERA TING SYSTEM
OPERATES FOR LONG
PERIODS OR CYCLES ON
AND OFF FREQUENTLY
(Modern refrigerators
and freezers with more
storage space and a
larger freezer require
more operating time.
They start and stop
often to maintain
even temperatures.)
•Normal when wine reserve is first plugged in. Wait 24 hours
for the unit to completely cool down.
•Often occurs when large amounts of food are placed in drawers.
This is normal.
•Door left open or package holding door open.
•Hot weather or frequent door openings. This is normal.
•Temperature control set at the coldest setting. See Temperature
Control.
VIBRA TION OR RATTLING •Wine reserve may not be properly installed.
(Slight vibration – Anti-tip bracket may be loose.
is normal.) – Unit may not be level.
THUMPING SOUND • This is a normal operating sound.
WHEN CLOSING DOOR
OPERATING •The variable speed compressor.
SOUNDS
• Closing the door slowly will minimize the sound.
•Normal fan air flow—multiple fans blow cold air through the wine
and freezer compartments—other fans cool the compressor.
• The fans change speeds in order to provide optimal cooling and
energy savings.
• These NORMAL sounds will also be heard from time to time:
– You may hear a whooshing or gurgling sound when the door closes.
This is due to pressure equalizing within the wine reserve.
– A water dripping sound may occur during the defrost cycle as ice
melts from the evaporator and flows into the drain pan.
– The flow of refrigerant through the freezer cooling coils may make a
gurgling sound like boiling water.
– Water dropping on the defrost heater can cause a sizzling, popping
or buzzing sound during the defrost cycle.
– You may hear cracking or popping sounds when the wine reserve is
first plugged in or during/after the defrost cycle. This happens as the
unit cools to the correct temperature.
– The compressor may cause a clicking or chirping sound when
attempting to restart (this could take up to 5 minutes).
– The electronic control board may cause a clicking sound when relays
activate to control wine reserve components.
– Ice cubes dropping into the bin and water running in pipes as
icemaker refills.
– The icemaker water valve will buzz when the icemaker fills with
water.
17
Page 18
The Problem Solver
Wine Reserve
PROBLEM POSSIBLE CAUSE
DOOR NOT CLOSING •Package or bottle may be holding door open.
PROPERLY • Check the door gasket; it may be out of position
• Wine Reserve is not level. See Installation Instructions.
• Hinge springs deactived. See Installation Instructions.
REFRIGERATOR •Temperature control not set cold enough. See Temperature Control.
TOO WARM •Hot weather or frequent door openings.
•Door left open for long time.
•Package may be holding door open.
ACTUAL TEMPERATURE •Wine Reserve just plugged in. Allow 24 hours for system to stabilize.
NOT EQUAL TO SET •Door open for too long. Allow 24 hours for system to stabilize.
TEMPERATURE •Warm food added to drawers. Allow 24 hours for system to stabilize.
•Defrost cycle is in process. Allow 24 hours for system to stabilize.
FROST OR ICE •Drawer left open or package holding door open.
CRYSTALS ON •Too frequent or too long door openings.
FROZEN FOOD •Drawer may have been left open.
(Frost within package •Ice cubes or some other object may be stuck behind the drawer.
is normal)
SLOW ICE CUBE •Drawer may have been left open.
FREEZING •Turn temperature control to a colder setting.
•Package may be holding drawer open.
ICE CUBES HAVE •Old cubes need to be discarded.
ODOR/TASTE •Ice storage bin needs to be emptied and washed.
•Unsealed packages in freezer may be transmitting odor/taste
to ice cubes.
•Interior of freezer needs cleaning. See Care and Cleaning.
•Poor-tasting incoming water. Change the water filter.
AUTOMATIC •Icemaker is turned off.
ICEMAKER •Water supply turned off or not connected.
DOES NOT WORK •Freezer too warm.
•Piled up cubes in storage bin may cause icemaker to shut off
too soon. Level cubes by hand.
•Ice bin is not in position
•Clogged water filter
MOISTURE FORMS •Not unusual during periods of high humidity. Wipe surface dry.
ON OUTSIDE OF •Turn on the External Moisture Control feature.
WINE RESERVE
MOISTURE •Too frequent or too long door openings.
COLLECTS INSIDE •In humid weather, air carries moisture into wine reserve when doors
are opened.
•Lower drawer switched from (freezer) to chill or wine.
WINE RESERVE • Foods with strong odors should be tightly covered.
HAS ODOR •Check for spoiled food.
•Interior needs cleaning. See Care and Cleaning.
18
INTERIOR LIGHTS • No power at outlet.
DO NOT WORK • LEDs need replacing. See Consumer Service Section.
•The Sabbath Mode may be operating. Turn off Sabbath Mode.
DOOR DIFFICULT TO •Tight door seal is due to pressure equalizing within the wine reserve.
REOPEN IMMEDIATELY After closing the door, wait 5–30 seconds to reopen.
AFTER CLOSING
Page 19

Performance Data Sheet
NSF
SmartWater Filtration System
This system has been tested according to NSF/ANSI 42/53 for reduction of the substances listed below.
The concentration of the indicated substances in water entering the system was reduced to a concentration
less than or equal to the permissible limit for water leaving the system, as specified in NSF/ANSI 42/53.*
(100% safety factors built in for unmetered usage)
Parameter USEPA Influent Influent Challenge Effluent % Reduction Min. Required
Chlorine — 1.845 mg/L 2.0 mg/L+10% < 0.05 mg/L 0.05 mg/L > 97.29% 96.43% >50%
T & O — — — — — — — —
Particulate** — 143,333 #/mL
Parameter USEPA Influent
Turbidity 1 NTU*** 10.3 NTU*** 1+1 NTU*** 0.106 NTU 0.14 NTU 98.97% 98.61% 0.5 NTU
Cysts
Lead at pH 6.5 0.015 mg/L 0.15 mg/L 0.15 mg/L+10% < 0.001 mg/L < 0.001 mg/L > 99.33% > 99.33% 0.010 mg/L
Lead at pH 8.5 0.015 mg/L 0.14 mg/L 0.15 mg/L+10% 0.001 mg/L 0.003 mg/L > 99.29% 97.86% 0.010 mg/L
Lindane
Atrazine
MCL Average Concentration Average Maximum Average Minimum Reduction
at least 10,000 particles/mL
MCL Average Concentration Average Maximum Average Minimum Reduction
99.95% Reduction
0.0002 mg/L
0.003 mg/L
200,000 #/L
0.0216 mg/L 0.002 mg/L+10%
0.008 mg/L 0.009 mg/L+10% < 0.002 mg/L < 0.002 mg/L > 76.12% > 66.67% 0.003 mg/L
GSWF Cartridge
Standard No. 42: Aesthetic Effects
29.83 #/mL 140 #/mL 99.98% 99.91% > 85%
Standard No. 53: Health Effects
Influent Challenge
Minimum 50,000 L
< 0.00002 mg/L < 0.00002 mg/L
Effluent % Reduction Min. Required
0 0 > 99.99% > 99.99% > 99.95%
99.07% 98.75% 0.0002 mg/L
* Tested using a flow rate of 0.5 gpm; pressure of 60 psig; pH of 7.5 ± 0.5; temp. of 68° ± 5°F (20° ± 3°C)
** Measurement in Particles/ml. Particles used were 0.5-1 microns
*** NTU=Nephelometric Turbidity units
Operating Specifications
Capacity: certified for up to 750 gallons (2,838 l); up to six months
Pressure requirement: 40–120 psi (2.8–8.2 bar)
Temperature: 33–100ºF (0.6–38ºC)
Flow rate: 0.5 gpm (1.9 lpm)
General Installation/Operation/Maintenance Requirements
Flush new cartridge at full flow for 3 minutes to purge out trapped air.
Replace cartridge when flow becomes too slow.
Special Notices
Installation instructions, parts and service availability, and standard warranty are included with the product when shipped.
This drinking water system must be maintained according to manufacturer’s instructions, including replacement of filter
cartridges.
Do not use with water that is microbiologically unsafe or of unknown quality without adequate disinfection before or after
the system. Systems certified for cyst reduction may be used on disinfected water that may contain filterable cysts.
The contaminants or other substances removed or reduced by this water treatment system are not necessarily in your
water.
Check for compliance with the state and local laws and regulations.
Note that while the testing was performed under standard laboratory conditions, actual performance may vary. Systems
must be installed and operated in accordance with manufacturer’s recommended procedures and guidelines.
System tested and certified by NSF International against Standard 42 for the reduction of
chlorine, taste and odor, particulate Class I and Standard 53 for the reduction of cyst, lead,
Lindane, Atrazine and turbidity.
®
Manufactured for: General Electric Company, Louisville, KY 40225
19
Page 20
State of California
Department of Health Services
Water Treatment Device
Certificate Number
155903 -
Date Issued: April 28, 2003
Trademark/Model Designation
GE GSWF GSWF
Manufacturer: General Electric Consumer Products
The water treatment device(s) listed on this certificate have met the testing requirements pursuant to Section
116830 of the Health and Safety Code for the following health related contaminants:
Microbiological Contaminants and Turbidity
Cysts
Turbidity
Organic Contaminants
Atrazine
Lindane
2,4-D
Replacement Elements
Inorganic/Radiological Contaminants
Asbestos
Lead
750 galRated Service Capacity: 0.5 gpm
Conditions of Certification:
Do not use where water is microbiologically unsafe or with water of unknown quality, except that systems certified for
cyst reduction may be used on disinfected waters that may contain filterable cysts.
20
Rated Service Flow:
Page 21

Notes
Wine Reserve
21
Page 22

Notes
Wine Reserve
22
Page 23

Consumer Services
Wine Reserve
With the purchase of your new Monogram appliance, receive
the assurance that if you ever need information or assistance
from GE, we’ll be there. All you have to do is call!
GE Answer
Center
800.626.2000
®
In-Home Repair
Service
800.444.1845
For Customers
With Special
Needs…
800.626.2000
Whatever your question about any Monogram major appliance, GE Answer Center®information
service is available to help. Your call—and your question—will be answered promptly and
courteously. Call the GE Answer Center®Monday to Friday, 8 a.m. to 10 p.m. EST, and Saturday,
8 a.m. to 7 p.m.
OR
Visit our Website at: monogram.com
A GE consumer service professional will provide expert repair service, scheduled at a time that’s
convenient for you. To schedule service, call Monday to Friday, 7 a.m. to 10 p.m. EST, or Saturday
and Sunday, 8 a.m. to 6 p.m. Many GE Consumer Service company- operated locations offer you
service today or tomorrow, or at your con venience. Our factory-trained technicians know your
appliance inside and out—so most repairs can be handled in just one visit.
GE offers Braille controls for a variety of GE appliances, and a brochure to assist in planning
a barrier-free kitchen for persons with limited mobility.
Consumers with impaired hearing or speech who have access to a
teletypewriter may call 800.TDD.GEAC (800.833.4322) to request information or service.
TDD or a conventional
Service
Contracts
800.626.2224
Parts and
Accessories
800.626.2002
You can have the secure feeling that GE Consumer Service will still be there after your
warranty expires. Purchase a GE contract while your warranty is still in effect and you’ll
receive a substantial discount. With a multiple -year contract, you’re assured of future
service at today’s prices.
Individuals qualified to service their own appliances can have parts or accessories sent directly
to their home. The GE parts system provides access to over 47,000 parts…and all GE Genuine
Renewal Parts are fully warranted. VISA, MasterCard and Discover cards are accepted.
Visit www.GEAppliances.com.
User maintenance instructions contained in this manual cover procedures intended to be
performed by any user. Other servicing generally should be referred to qualified service
personnel. Caution must be exercised, since improper servicing may cause unsafe operation.
23
Page 24

Warranty
Wine Reserve
YOUR MONOGRAM WINE RESERVE AND FREEZER WARRANTY
Staple sales slip or cancelled check here. Proof of original
purchase date is needed to obtain service under warranty.
WHAT IS
COVERED
From the Date
of the Original
Purchase
LIMITED TWO-YEAR WARRANTY
For two years from date of original purchase, we will provide, free of charge, parts and service labor in
your home to repair or replace any part of the wine reserve or freezer that fails because of a manufacturing
defect.
LIMITED FIVE-YEAR WARRANTY
For five years from date of original purchase, we will provide, free of charge, parts and service labor
in your home to repair or replace any part of the sealed refrigerating system (the compressor, condenser,
evaporator and all connecting tubing) that fails because of a manufacturing defect.
LIMITED ADDITIONAL SIXTH- THROUGH TWELFTH-YEAR WARRANTY ON THE SEALED SYSTEM
For the sixth through twelfth year from the date of the original purchase, we will provide, free of charge,
replacement parts for any part of the sealed refrigerating system (the compressor, condenser, evaporator and
all connecting tubing) that fails because of a manufacturing defect. You pay for the service trip to your home
and for service labor charges.
LIMITED THIRTY-DAY WARRANTY ON WATER FILTER CARTRIDGE (Water filter, if included)
From the date of the original purchase we will provide, free of charge, replacement parts for any part of
the water filter cartridge that fails because of a manufacturing defect. During this limited thirty-day warranty,
we will also provide, free of charge, a replacement water filter cartridge.
This warranty is extended to the original purchaser and any succeeding owner for products purchased for
ordinary home use in the 48 mainland states, Hawaii, Washington, D.C. or Canada. If the product is located
in an area where service by a GE Authorized Servicer is not available, you may be responsible for a trip
charge or you may be required to bring the product to an Authorized GE Service location for service.
In Alaska the warranty is the same except that it is LIMITED because you must pay to ship the product
to the service shop or for the service technician’s travel costs to your home.
All warranty service will be provided by our Factory Service Centers or by our authorized Customer Care
servicers during normal working hours.
Should your appliance need service, during warranty period or beyond, call 800.444.1845. Please have your
serial number and model number available when calling for service.
®
WHAT IS NOT
COVERED
197D8243P002
49-60616
08-10 GE
• Service trips to your home to teach you how
to use the product.
• Replacement of house fuses or resetting of circuit
breakers.
• Damage to the product caused by accident, fire,
floods or acts of God.
• Failure of the product if it is used for other than
its intended purpose or used commercially.
• Damage caused after delivery.
• Improper installation, delivery or maintenance.
If you have an installation problem, contact
your dealer or installer. You are responsible
for providing adequate electrical, plumbing
and other connecting facilities.
EXCLUSION OF IMPLIED WARRANTIES—Your sole and exclusive remedy is product repair as provided
in this Limited Warranty. Any implied warranties, including the implied warranties of merchantability
or fitness for a particular purpose, are limited to one year or the shortest period allowed by law.
Some states do not allow the exclusion or limitation of incidental or consequential damages, so the above
limitation or exclusion may not apply to you. This warranty gives you specific legal rights, and you may also
have other rights which vary from state to state. To know what your legal rights are in your state, consult your
local or state consumer affairs office or your state’s Attorney General.
Warrantor: General Electric Company,
Louisville, KY 40225
• Replacement of the light bulbs, if included,
or water filter cartridge, if included, other
than as noted above.
• Replacement of the water filter cartridge,
if included, due to water pressure that is outside
the specified operating range or due to excessive
sediment in the water supply.
• Loss of food due to spoilage.
• Incidental or consequential damage caused
by possible defects with this appliance.
• Product not accessible to provide required
service.
Page 25

Manuel
d’utilisation
Refroidisseur à vin
197D8243P001
49-60616
12-10 GE
monogram.com
Page 26

Information pour le consommateur
Refroidisseur à vin
Introduction
Table des
matières
Votre nouveau réfrigérateur Monogram est un symbole éloquent de style, de confort et de souplesse
dans votre cuisine. Que vous le choisissiez pour sa pureté de ligne ou pour sa recherche approfondie
du détail, vous trouverez que la combinaison hors pair de formes et de fonctions de votre réfrigérateur
Monogram fera votre bonheur pendant des années.
Vous trouverez dans les pages suivantes des renseignements qui vous aideront à bien faire
fonctionner et à bien entretenir votre réfrigérateur.
En cas de questions supplémentaires, consultez notre site internet : monogram.com
Services à la clientèle
Numéros de téléphone importants . . . . . . . . . . . . .24
Numéros de modèle et de série . . . . . . . . . . . . . . . . .2
Fiche de données de performance . . . . . . . . . . . . .19
En cas de problème . . . . . . . . . . . . . . . . . . . . . . . .17, 18
Consignes de sécurité . . . . . . . . . . . . . . . . . . . . . . . . 4, 5
Certificat de l’état de Californie pour le dispositif de
traitement des eaux . . . . . . . . . . . . . . . . . . . . . . . . . . .20
Garantie . . . . . . . . . . . . . . . . . . . . . . . . . . . . . . . .Plat verso
Entretien et nettoyage
Entretien – Extérieur et intérieur . . . . . . . . . . . . . . . .14
Remplacement de l’ampoule . . . . . . . . . . . . . . . . . . 15
Congé . . . . . . . . . . . . . . . . . . . . . . . . . . . . . . . . . . . . . . . . . .15
Consignes d’utilisation
Fonctions . . . . . . . . . . . . . . . . . . . . . . . . . . . . . . . . . . . . . . . .6
Machine à glaçons automatique . . . . . . . . . . . . . . . .7
Tiroir convertible . . . . . . . . . . . . . . . . . . . . . . . . . . . . . . .11
Bacs de porte/Clayettes . . . . . . . . . . . . . . . . . . . . . . .10
Contrôle de l’humidité . . . . . . . . . . . . . . . . . . . . . . . . .12
Éclairage à DEL . . . . . . . . . . . . . . . . . . . . . . . . . . . . . . . .12
Mode Sabbat . . . . . . . . . . . . . . . . . . . . . . . . . . . . . . . . . .13
Commandes de réglage des températures . . . . . .6
Filtre à eau . . . . . . . . . . . . . . . . . . . . . . . . . . . . . . . . . . . . . .9
Préparation
Dégagements . . . . . . . . . . . . . . . . . . . . . . . . . . . . . . . . . .16
Emplacement . . . . . . . . . . . . . . . . . . . . . . . . . . . . . . . . . .16
Avant
d’utiliser votre
réfrigérateur
Écrivez les
numéros de
modèle et
de série
Lisez soigneusement ce manuel. Il a pour objet
de vous aider à bien faire fonctionner et
entretenir votre réfrigérateur.
Conservez-le à portée de main. Vous y trouverez
des réponses à vos questions.
Ils figurent sur l’étiquette qui se trouve à
l’intérieur du compartiment réfrigérateur, en
dessous du bac à légumes.
Si vous ne comprenez pas bien ce qui est décrit
ou avez besoin d’une aide supplémentaire, vous
trouverez une liste de numéros de service à la
clientèle dans la dernière section de ce manuel.
OU
Consultez notre site Internet à l’adresse
monogram.com
Avant d’envoyer cette carte, veuillez écrire ces
numéros ici :
Numéro du modèle
Numéro de série
Utilisez ces numéros dans toute correspondance
ou dans tous vos appels de service relatifs à votre
réfrigérateur.
2
Page 27

Information pour le consommateur
Refroidisseur à vin
Si vous avez
reçu un
réfrigérateur
endommagé
Economisez
votre temps
et votre
argent !
Si vous
devez
appeler
un
technicien
La garantie ne couvre pas les dommages causés
après la livraison. Contactez immédiatement
Avant d’appeler un dépanneur, vérifiez la section
de résolution des problèmes à la fin de ce
manuel. Vous y trouverez les causes de
Pour joindre un technicien, consultez la page de
service à la clientèle à la fin de ce manuel.
Nous sommes fiers de notre service et tenons à
ce que vous soyez satisfaits. Si, pour quelque
raison que ce soit, vous n’êtes pas heureux du
service que vous recevez, voici quelques mesures
à prendre pour obtenir davantage d’aide.
Pour commencer, appelez les gens qui ont fait
l’entretien de votre appareil électroménager.
Dites-leur pourquoi vous n’êtes pas satisfaits.
Dans la plupart des cas, cela suffira à régler
votre problème.
votre revendeur (ou le fabricant) qui vous a
vendu votre réfrigérateur.
problèmes de fonctionnement mineurs que vous
pourrez régler vous-même.
Ensuite, si vous n’êtes toujours pas satisfait,
écrivez tous les détails, y compris votre numéro
de téléphone, à l’adresse suivante :
Directeur, Relations Clientèle,
GE Appliances
Appliance Park
Louisville, KY 40225
3
Page 28

IMPORT ANTES C ONSIGNES DE SÉCURITÉ
LISEZ ET CONSERVEZ CES INSTRUCTIONS
A VERTISSEMENT–Lorsque vous
utilisez cet appareil, suivez toujours les consignes de
sécurité de base suivantes :
• N’utilisez cet appareil qu’aux fins prévues décrites
dans le manuel d’utilisation.
• Ce système doit être correctement installé
conformément aux Consignes d’Installation avant
toute utilisation.
• Ne laissez pas les enfants grimper, se mettre
debout ou se suspendre aux bacs de portes dans
Refroidisseur à vin. Ils pourraient endommager
Refroidisseur à vin et se blesser sérieusement.s.
• Ne touchez pas les surfaces froides du congélateur
lorsque vous avez les mains humides ou mouillées.
La peau risque d’adhérer à ces surfaces très froides.
• Ne stockez pas ou n’utilisez pas d'essence ou
d'autres vapeurs et liquides inflammables à
proximité de cet appareil ou de tout autre appareil
électroménager.
• Si votre réfrigérateur est doté d’une machine à
glaçons automatique évitez — le contact avec les
pièces mobiles du mécanisme éjecteur , ou avec
l’élément chauffant situé dans la partie inférieure de
la machine à glaçons. Ne posez pas les doigts ou les
mains sur le mécanisme de la machine à glaçons
pendant que Refroidisseur à vin est branché.
• Coupez l’alimentation électrique du réfrigérateur
au niveau du disjoncteur avant tout nettoyage ou
réparation. Les réparations doivent être effectuées
par un technicien de service qualifié.
• Ne tentez pas de remplacer une ampoule à DEL
grillée. Le remplacement des ampoules à DEL doit
être effectué par un technicien autorisé.
• Ne recongelez pas les aliments surgelés qui ont
complètement dégelé.
DANGER: RISQUE DE PIÈGE POUR LES ENFANTS
Les enfants pris au piège ou morts d’asphyxie sont
toujours d’actualité. Les réfrigérateurs jetés ou
abandonnés restent dangereux même si vous ne les
laissez au rebut que pour « quelques jours ». Si vous
voulez jeter votre vieux réfrigérateur, suivez les
instructions suivantes pour empêcher les accidents.
LIQUIDES FRIGORIGÈNES
Les appareils réfrigérants contiennent des fluides
frigorigènes qui conformément à la législation fédérale
doivent être retirés avant la mise au rebut de l'appareil.
Si vous mettez au rebut un ancien appareil contenant
des fluides frigorigènes, vérifiez la procédure à suivre
auprès de la compagnie responsable de l’élimination.
4
Avant de jeter votre vieux réfrigérateur :
• Démontez les portes / les tiroirs.
• Laissez les clayettes en place afin d’empêcher les
enfants de grimper à l’intérieur.
A VERTISSEMENT–Liquide
frigorigène R600
Avertissement: Cet appareil contient un fluide
frigorigène isobutane, R600a, un gaz naturel d’une
grande compatibilité environnementale. Il s’agit
toutefois d’un combustible. Veuillez respecter les
avertissements suivants :
1) Lors de la manipulation, de l’installation et de l’utilisation
de cet appareil, prenez soin de ne pas endommager les
tubes de circulation du fluide frigorigène.
2) L’entretien doit être effectué par un technicien de
service autorisé par le fabricant. Les pièces seront
remplacées par des pièces recommandées par le
fabricant.
3) Les appareils réfrigérants contiennent des fluides
frigorigènes qui conformément à la législation fédérale
doivent être retirés avant la mise au rebut de l'appareil.
4) N’obstruez pas les évents dans l’enceinte prévue pour
l’appareil.
5) N’utilisez pas d’appareils ou autres moyens mécaniques
pour accélérer le processus de dégivrage.
6) N’endommagez pas le circuit du fluide frigorigène.
7) N’utilisez pas d’appareils électriques dans le
compartiment réfrigérateur de cet appareil.
Page 29

IMPORT ANTES C ONSIGNES DE SÉCURITÉ
BRANCHEMENTS ÉLECTRIQUES
Ne coupez pas ou n’enlevez pas, sous aucun
prétexte, la troisième broche de mise à la terre
du cordon d’alimentation. Pour des raisons de
sécurité, cet appareil doit être correctement
mis à la terre.
Le cordon d’alimentation de cet appareil est
équipé d’une fiche à trois broches (pour une mise
à la terre) qui s’adapte à la prise de courant
standard à 3 broches (pour une mise à la terre)
pour minimiser les risques de chocs électriques
par cet appareil.
Faites vérifier la prise murale et le circuit
électrique par un électricien qualifié pour
s’assurer que le système est correctement mis à
la terre.
Dans le cas d’une prise biphasée, l’installateur a
la responsabilité et l’obligation de la remplacer
par une prise triphasée correctement mise à la
terre.
Refroidisseur à vin doit toujours être branché à
sa propre prise électrique d’une tension nominale
correspondant à celle indiquée sur sa plaque
signalétique.
Ceci permet d’obtenir un meilleur rendement du
réfrigérateur et évite de surcharger les circuits
électriques du domicile qui en surchauffant
posent un risque d’incendie.
Ne débranchez jamais Refroidisseur à vin en
tirant sur le cordon d’alimentation. Prenez
toujours fermement la fiche en main et tirez pour
la sortir de la prise.
Réparez ou remplacez immédiatement tout
cordon électrique usé ou endommagé. N’utilisez
pas un cordon fissuré ou présentant des
dommages dus aux frottements soit sur sa
longueur ou aux extrémités.
Lorsque vous éloignez votre réfrigérateur du mur,
faites attention à ne pas le faire rouler sur le
cordon d’alimentation afin de ne pas
l’endommager.
N’UTILISEZ PAS D’ ADAPTATEUR POUR BRANCHER
Refroidisseur à vin À UNE PRISE BIPHASÉE.
N’UTILISEZ PAS DE RALLONGE AVEC CET
APPAREIL.
CONSERVEZ CES
INSTRUCTIONS
5
Page 30

Refroidisseur à
vin supérieur
Refroidisseur à
vin inférieur
Commandes de réglage des températures
Refroidisseur à vin
Tiroirs à extension
complète
Machine à
glaçons
Tiroir convertible
Tiroir de congélation
Étagère de
présentation du vin
6
Page 31

Commandes de réglage des
Refroidisseur à vin supérieur
Refroidisseur à vin inférieur
supérieur - Tiroir de congélation
Tiroir inférieur - Tiroir convertible
températures
Refroidisseur à vin
Commandes
de réglage
des
températures
Le panneau de commande affiche la
température réelle du compartiment
réfrigérateur, du tiroir de congélation ou du
tiroir convertible lorsque ceux-ci sont
sélectionnés en les faisant défiler grâce au
voyant Zone. La température réelle peut différer
de la température réglée selon certains facteurs
comme la fréquence d’ouverture de la porte, la
quantité d’aliments stockés, le programme de
dégivrage et la température de la pièce.
REMARQUE: Des ouvertures de portes fréquentes
ou des portes laissées ouvertes peuvent
temporairement augmenter la température à
l’intérieur des compartiments.
Pour désactiver le système de refroidissement,
placez le voyant ZONE sur le mode réfrigération.
Appuyez sur le plus (+) jusqu’à ce que OFF (arrêt)
s’affiche.
Pour activer le système de refroidissement,
tplacez le voyant ZONE sur le mode réfrigération
et appuyez sur le moins (-) jusqu’à ce que la
température souhaitée s’affiche. La température
est préréglée à 0°F (-18°C) pour le compartiment
congélateur et à 37°F (+3°C) pour le compartiment
réfrigérateur.
Pour vérifier le réglage de température dans un
compartiment, appuyez une fois sur la touche
plus (+) ou moins (-). Au bout de 5 secondes,
l’affichage vous indiquera la température actuelle.
Pour modifier le réglage de la température,
appuyez sur la touche plus (+) ou moins (-) à
chaque incrément pour atteindre la température
souhaitée. Veuillez attendre 24 heures pour que
l’appareil atteigne la température requise.
Gammes de températures
Basse Élevée
vin
Tiroir de
congélation
Gamme de température du tiroir convertible
Congélation
Réfrigération
Vin
REMARQUE: En réglant les commandes sur OFF
(arrêt), le refroidissement est arrêté mais
l'alimentation électrique de l’appareil n'est pas
coupée. Toutes les températures en °C seront
arrondies.
34°F
1°C
–6°F
–21°C
Basse Élevée
-6°F
–21°C
34°F
1°C
40°F
4°C
46°F
8°C
+6°F
–14°C
+6°F
–14°C
46°F
8°C
55°F
13°C
Modification
de l’affichage
de
température
de °F aux °C
Alarme
Pour passer d’une température affichée en °F à
une température en °C, appuyez simultanément
sur les deux touches plus (+) et moins (-) pendant
5 secondes.
Pour activer l’alarme, appuyez et maintenez
appuyé le bouton ALARM (alarme) pendant 3
secondes. L’icône ALARM (alarme) sera soulignée
lorsque celle-ci sera activée. Pour la désactiver,
appuyez et maintenez appuyé le bouton ALARM
(alarme) pendant 3 secondes. L’icône ALARM
(alarme) ne sera plus soulignée.
Lorsque l’alarme est
activée, elle
clignotera et émettra
un bip sonore pour
signaler que la porte est restée ouverte pendant
plus de 2 minutes.
7
Page 32

Machine à glaçons automatique
(modèles avec compartiment de
congélation)
Refroidisseur à vin
Machine à
glaçons
automatique
Accès à la
machine à
glaçons et au
tiroir de
congélation
Il faut prévoir entre 12 et 24 heures avant
qu’un réfrigérateur nouvellement installé
commence à produire des glaçons.
Refroidisseur à vin est livré avec la machine à
glaçons sur ON (activé).
La machine à glaçons produit sept glaçons par
cycle - environ 15 cycles par 24 heures, selon la
température du compartiment de congélation, la
température de la pièce, le nombre d’ouverture
de porte et les autres conditions d’utilisation.
Si vous faites fonctionner Refroidisseur à vin
avant de raccorder l’eau à la machine à glaçons,
mettez-la en position OFF (arrêt). Pour désactiver
la machine à glaçons, appuyez deux fois sur le
voyant ZONE sur le panneau de commande pour
sélectionner le tiroir congélateur. Appuyez sur
l’icône ICE (Glaçon) sur la droite. La ligne sous
l’icône ICE (glaçon) disparaitra et le mot OFF
(arrêt) s’affichera sous ICE (glaçon).
Jetez le premier bac de glaçons.
Vérifiez que rien n’interfère avec le déplacement
du bras de détection.
Quand le bac se remplit jusqu’au niveau du bras
de détection, la machine à glaçons s’arrête de
produire des glaçons.
Il est normal de trouver des glaçons qui soient
soudés ensemble.
Si vous n’utilisez pas souvent vos glaçons, les
vieux glaçons deviennent opaques, prennent un
mauvais goût et rétrécissent.
La machine à glaçons est localisée dans le
plafond du tiroir de congélation et à l’arrière
gauche. Une bande de DEL est installée dans
le plafond du tiroir de congélation. Le tiroir de
congélation contient un bac à glaçons.
Machine à glaçons
Bras de détection
Lorsque vous réactivez la machine à glaçons, elle
se remettra en marche au bout de 45 minutes.
REMARQUE: Dans les maisons qui ont une
pression d’eau plus faible que la moyenne, vous
pouvez entendre la machine à glaçons
recommencer plusieurs fois son cycle pour
produire un lot de glaçons.
REMARQUE: Le fonctionnement de la machine à
glaçons est optimal pour une pression d’eau
variant de 40 à 120 lb/po².
8
Page 33

Filtre à eau
Refroidisseur à vin
Cartouche du
filtre à eau
La cartouche du filtre à eau est située en dessous
du tiroir convertible en bas à droite de l’appareil.
Cartouche du
filtre à eau
Remplacement du filtre :
Une cartouche de filtre peut durer 1 an mais sa
fréquence de remplacement va dépendre de la
quantité de glaçon utilisée.Un voyant lumineux est
situé sur le tableau de commande pour vous
indiquer la nécessité de remplacer le filtre à eau. La
cartouche du filtre doit être remplacée lorsque le
terme REPLACE (remplacer) apparait sous le terme
FILTER (filtre) sur le tableau de commande.
Réinitialisation du voyant d’état du filtre:
Appuyez et maintenez appuyé le bouton FIL TER
(filtre) pendant 3 secondes.
Bouchon de dérivation du filtre :
Il est nécessaire d’utiliser le bouchon de dérivation du
filtre dans les cas suivants:
a) vous avez un système de purification d’eau par
osmose inverse et/ou un autre type de filtration
sur votre alimentation en eau.
b) vous n’avez pas de filtre de rechange.
La machine à glaçons ne fonctionne pas sans filtre
ou sans bouchon de dérivation.
Le bouchon de dérivation ainsi que le mini manuel
d’utilisation est situé dans le compartiment inférieur
de la machine.
Filtres de rechange :
Pour commander un filtre supplémentaire,
consultez notre site internet monogram.com, ou
appelez le Centre de Pièces Détachées et
d’Accessoires GE au 800.626.2002.
Verrouillage
des
commandes
Installation de la Cartouche du Filtre:
1. Ouvrez le tiroir convertible pour accéder à la
cartouche du filtre à eau.
2. Retirez la cartouche usagée en la tournant dans
le sens inverse des aiguilles d’une montre. Tirez le
filtre vers vous pour le retirer.
3. Insérez le nouveau filtre dans le compartiment et
tournez dans le sens des aiguilles d’une montre
jusqu’à la butée.
Cette fonction de verrouillage des commandes
permet d’éviter toute modification non voulue
des réglages de température.
Numéro de modèle de filtre : GSWF
REMARQUE IMPORTANTE :Retirez le filtre à eau
si vous souhaitez arrêter immédiatement toute
fuite d’eau au niveau de la machine à glaçons.
Une fois que la température désirée est réglée,
cette température peut être verrouillée. Pour le
verrouillage, appuyez et maintenez appuyé le
bouton LOCK (verrouillage) pendant 3 secondes.
Pour le déverrouillage, appuyez et maintenez
appuyé le bouton LOCK (verrouillage) pendant 3
secondes.
9
Page 34

Tiroirs/Clayettes
Refroidisseur à vin
Rangement
des bouteilles
de vin
Tiroirs à extension complète
Les 6 tiroirs du haut sont à extension complète.
Chaque tiroir peut contenir jusqu’à 10 bouteilles.
Les bouteilles sont stockés goulot à culot en
alternant de l’avant vers l’arrière.
Étagère de présentation du vin
L’étagère de présentation du vin peut être placée
en position horizontale ou inclinée. La position
horizontale peut contenir 18 bouteilles. La
position inclinée peut contenir 5 bouteilles.
L’étagère peut être inclinée en plaçant l’étagère
sur les chevilles sur la paroi arrière.
Cheville
Position horizontale
Conseils et
suggestions
de rangement
des bouteilles
de vin
• Conservez les vins pour un usage quotidien ou
pour recevoir dans la moitié avant des tiroirs à
extension complète, là où les étiquettes sont
complètement visibles. Placez les vins à
conserver pour une durée plus longue à
l’arrière.
• Ne laissez pas les enfants grimper, s’asseoir ou
se suspendre aux tiroirs à extension complète
du refroidisseur à vin. Ils pourraient se blesser
Position inclinée
Position inclinée
sérieusement et potentiellement endommager
le refroidisseur à vin.
• Groupez votre vin par type : par ex., les vins
blancs dans les zones les plus froides et les vins
rouges dans les zones les moins froides.
• Stockez les vins rouges et les vins blancs dans
des zones séparées pour les conserver à des
températures différentes.
10
Page 35

Tiroir
convertible
Le tiroir convertible peut être utilisé comme
congélateur, comme réfrigérateur ou encore
comme tiroir à vin/à boisson.
Pour adapter votre tiroir:
Appuyez sur le voyant ZONE sur le panneau de
commande pour sélectionner le tiroir convertible.
Températures recommandées pour le tiroir
convertible:
Bouton Fonction Température
Bacs/Grille/Tiroir convertible
Refroidisseur à vin
Bac coulissant amovible.
Languette
Languettes en relief
Fente pour
languette
Séparateur
réfrigération
congélation
vin
Réfrigération
Congélation
Stockage du vin
37°F/3°C
0°F/–18°C
55°F/13°C
Le haut de ce tiroir est équipé d’une bande DEL.
Un séparateur réglable est également fourni qui
peut être positionné différemment. Un bac peut
également coulisser de droite à gauche dans le
tiroir.
Pour modifier la position du séparateur:
1. Tirez les languettes sur le haut du séparateur
pour le libérer des fentes à l’avant et à l’arrière
du tiroir.
2. Retirez le séparateur des languettes en relief au
fond du tiroir.
3. Déplacez le séparateur jusqu’à sa nouvelle
position et glissez-le sur les languettes en relief.
4. Rentrez les languettes sur le haut du
séparateur et positionnez le séparateur de
façon à ce que les languettes se glissent dans
les fentes. Relâchez les languettes pour qu’elles
mettent dans la bonne position.
11
Page 36

Contrôle de l’humidité extérieure / Éclairage à DEL
Refroidisseur à vin
Contrôle
de
l’humidité
extérieure
Éclairage à
DEL
Ce produit est équipé d’une fonction de contrôle
de l’humidité extérieure. La fonction de contrôle de
l’humidité extérieure est désactivée au moment de
l’expédition du refroidisseur à vin.
Dans une pièce humide, de la condensation peut
se déposer sur le devant du refroidisseur à vin. En
cas de condensation sur le devant du refroidisseur
à vin, activez cette fonction de contrôle de
l’humidité extérieure en appuyant et en
maintenant enfoncés pendant 5 secondes les
boutons ALARM (alarme) et LOCK (verrouillage) sur
le tableau de commande. Lorsque cette fonction
est activée, une icône représentant une petite
goutte d’eau barrée apparaitra sous les signes (+)
et (–) du tableau de commande.
Ce refroidisseur à vin est équipé d’éclairage à DEL
à l’intérieur du refroidisseur de chaque côté, mais
également au-dessus du tiroir congélateur et audessus du tiroir convertible.
Le refroidisseur à vin est équipé de deux options
pour l’éclairage intérieur des côtés de l’appareil :
pleine puissance et ½ puissance.
En mode affichage soit à pleine puissance ou à ½
puissance, les lumières resteront allumées après
fermeture de la porte et s’éteindront
automatiquement au bout d’une heure.
Pour accéder aux options d’éclairage, appuyez
sur le voyant ZONE sur le panneau de commande.
Dans le mode de refroidissement, les boutons
LIGHTS (éclairage) sont situés la droite sur le
tableau de commande.
Éclairage à pleine puissance
Éclairage à ½ puissance
Éclairage éteint
12
Lorsque l’éclairage est en pleine puissance, 2
barres s’affichent sous LIGHTS (Éclairage), à ½
puissance, une seule barre d’affiche. Quand
l’éclairage est éteint, aucune barre ne s’affiche.
Page 37

Mode Sabbat
Refroidisseur à vin
Mode
Sabbat
Le mode Sabbat est utilisé à l’occasion du Sabbat
et des fêtes juives. La fonction Mode Sabbat
permet aux personnes pratiquant la religion juive
de réfrigérer et de congeler des aliments
pendant les fêtes religieuses.
Le Mode Sabbat peut être activé pour neutraliser
les réactions normales de votre réfrigérateur
lorsque vous l’utilisez. En mode Sabbat, votre
réfrigérateur continuera à fonctionner. Toutefois,
Refroidisseur à vin ne répondra pas à vos
actions. En mode Sabbat, vous remarquerez
peut-être le ventilateur en marche lorsque la
porte est ouverte, mais ceci ne résulte pas de vos
actions. Le ventilateur fonctionne à intervalles
prédéterminés. Le chauffage de dégivrage
continuera à dégivrer Refroidisseur à vin et le
congélateur et sera activé sur minuterie. Dans ce
mode, le chauffage de dégivrage ne dégivre pas
après ouverture de la porte ou de toute autre
action de l’utilisateur.
MARCHE/ARRÊT—Pour activer le mode Sabbath
(Sabbat), appuyez sur la touche ALARM (alarme)
et sur la touche (+) du tableau de commande
pendant 5 secondes. SAB s'affiche sur le tableau
de commande. SAB restera affiché et les touches
(+) et ALARM (alarme) qui resteront allumés
jusqu’à ce que le mode Sabbat soit désactivé. Les
commandes ne fonctionneront qu’à partir du
moment où vous appuierez sur la touche ALARM
(alarme) et sur la touche (+) du tableau de
commande pendant 5 secondes.
AFFICHAGE, ALARMES ET
ÉCLAIRAGE—L’affichage principal des
commandes des températures sera désactivé et
donc ne sera pas affiché, n’émettra pas de bip
sonore ou ne fonctionnera pas. L’alarme de la
porte et l’éclairage seront désactivés.
MACHINE À GLAÇONS —La machine à glaçons
continuera à fonctionner. La machine à glaçons
peut être désactivée en appuyant sur OFF
(désactivé) avant d’activer le mode Sabbat (voir la
section Machine à glaçons automatique).
13
Page 38

Entretien et nettoyage
Refroidisseur à vin
Nettoyage
de
l'Extérieur
Nettoyage
de
l'intérieur
Poignées et garnitures de porte—Nettoyez-les à
l’aide d’un chiffon humecté d'eau savonneuse.
Séchez avec un chiffon doux.
Gardez l'extérieur du réfrigérateur propre.
Essuyez-le avec un chiffon propre légèrement
humecté de détergent liquide doux pour la vaisselle.
Séchez avec un chiffon propre et doux.
N'essuyez pas Refroidisseur à vin avec un chiffon à
vaisselle ou un torchon humide sale. Ils pourraient
laisser un résidu qui endommagerait la finition du
réfrigérateur. N'utilisez pas de tampons à récurer, de
produits nettoyants en poudre, de javellisant ou de
produits contenant du javellisant sous peine de
rayer la finition.
Coupez l’alimentation électrique du réfrigérateur
au niveau du disjoncteur avant tout nettoyage. S'il
est trop difficile de débrancher l'appareil, essorez
bien votre chiffon ou votre éponge pour enlever
l'excès d'eau lorsque vous nettoyez autour des
interrupteurs, des lampes ou des commandes.
Utilisez une solution d'eau tiède et de bicarbonate
de soude — environ une cuillère à soupe (15 ml) de
bicarbonate de soude dans un litre d'eau afin de
nettoyer tout en neutralisant les odeurs. Rincez bien
et essuyez.
Acier inoxydable—Nettoyez et polissez
régulièrement les panneaux de porte et les poignées
en acier inoxydable (sur certains modèles) à l’aide
d’un nettoyant pour acier inoxydable, tel que du
Stainless Steel Magic™ pour protéger la finition de
l’acier. Stainless Steel Magic est disponible par
l’intermédiaire de notre Centre de Pièces Détachées
et d’Accessoires GE au 800.626.2002, ou sur
GEAppliances.com. Numéro de pièce à commander
: WX10X15
N'utilisez pas de cire pour les meubles sur les
surfaces en acier inox.
Panneaux en bois sur mesure – veuillez contacter
votre fournisseur de panneau en bois pour toute
information concernant l’entretien.
Les autres parties du réfrigérateur (les joints, le bac à
légumes, les bacs de stockage des glaçons et toutes
les parties en plastique) peuvent être nettoyées de la
même façon. Après nettoyage des joints de porte,
enduisez de pétrolatum les joints de porte du côté
des charnières. Ceci permet d’éviter que les joints ne
collent et ne se déforment.
Évitez de nettoyer les clayettes en verre encore
froides avec de l'eau chaude parce qu'elles
risquent de se casser à cause des différences de
températures extrêmes. Manipulez les clayettes
en verre avec soin. Si vous cognez le verre trempé,
il pourrait se briser.
Ne lavez aucune pièce en plastique du
réfrigérateur dans le lave-vaisselle.
14
Page 39

Entretien et nettoyage
Refroidisseur à vin
Préparation
en cas de
vacances
Remplacement
de l’ampoule
intérieure
Encas d’absences ou de vacances prolongées,
retirez tous les aliments du réfrigérateur.
Augmentez la température à l’aide de la touche
(+) jusqu’à ce que l’appareil s’arrête. Nettoyez
l’intérieur avec une solution de bicarbonate de
soude (environ une cuillère à soupe (15 ml) de
bicarbonate de soude dans un litre d'eau).
Laissez la porte ouverte.
Ne tentez pas de remplacer une ampoule à DEL
grillée. Le remplacement des ampoules à DEL
doit être effectué par un technicien autorisé.
Pour des vacances plus courtes, retirez tous les
aliments périssables et laissez Refroidisseur à vin
aux réglages habituels. Toutefois, si la
température de la pièce risque de descendre en
dessous de 60°F (16°C), suivez la même
procédure que pour des vacances prolongées.
Éteignez la machine à glaçons et coupez l’arrivée
d’eau au congélateur.
15
Page 40

Préparation
Refroidisseur à vin
Emplacement
du
réfrigérateur
Dégagements
N’installez pas Refroidisseur à vin dans une
pièce où les températures descendent endessous de 60°F (16°C) parce qu’il serait difficile
d’y maintenir une température correcte et que
l’humidité à l’intérieur du réfrigérateur pourrait
être élevée.
Laissez un dégagement minimum de 15 po entre
la porte et le mur pour une ouverture de la porte
à 115°. Pour une ouverture de porte à 90°,
prévoyez un dégagement minimum de 5 po par
rapport au mur pour les modèles Monogram
Pour une installation correcte, Refroidisseur à
vin doit être placé sur une surface horizontale
en matériau dur qui est au même niveau que le
reste du sol. Cette surface doit être
suffisamment solide pour supporter le poids
d’un réfrigérateur rempli, soit environ 1,200
livres (550 kg). Consultez les Instructions
d’Installation pour toute information.
(Européen) en acier inoxydable.
4” distance to Wall.
16
Page 41

En cas de problème
Refroidisseur à vin
Des
Questions
? Utilisez
ce tableau
des
problèmes
les plus
fréquents
PROBLÈME CAUSE POSSIBLE
Refroidisseur à vin • Le cycle de dégivrage est peut être en cours si Refroidisseur à vin ne
NE FONCTIONNE PAS fonctionne pas pendant environ 45 minutes.
•Les commandes sont réglées sur OFF (Arrêt).
•Si l’éclairage intérieur n’est pas allumé, Refroidisseur à vin n’est
peut-être pas branché.
•Le fusible est grillé / le disjoncteur est déclenché.
Remplacez le fusible ou enclenchez le disjoncteur.
• Désactivez le mode Sabbat.
•Si votre tableau de commande affiche le terme SHO, le mode
d’exposition est activé. Pour le désactiver, appuyez sur la touche ALARM
(alarme) et sur la touche (-) simultanément pendant 5 secondes.
Refroidisseur à vin
FONCTIONNE PENDANT DE
LONGUES DURÉES OU SE MET
EN MARCHE RÉGULIÈREMENT
(Les réfrigérateurs et
congélateurs modernes
ont un espace de
stockage plus
volumineux, ceux-ci
fonctionnent donc plus
longtemps à cause de
ce volume
supplémentaire. Ils se
mettent donc en
marche plus souvent
pour maintenir les
températures).
•Ceci est normal lorsque Refroidisseur à vin vient d’être branché.
Attendez 24 heures pour que Refroidisseur à vin refroidisse
complètement.
•Ceci est fréquent lorsqu’une grande quantité d’aliments a été placée
dans Refroidisseur à vin. Ceci est normal.
•La porte est ouverte ou un paquet empêche la fermeture de la porte.
•Temps chaud ou ouverture fréquente des portes. Ceci est normal.
•La température est réglée sur la température la plus basse. Voir
Commandes de température.
VIBRA TION OU CLIQUETIS •Refroidisseur à vin n’est peut-être pas bien installé.
(Une légère vibration – la patte anti-basculement est peut-être desserrée.
est normale.) – l’appareil n’est peut-être pas de niveau.
BRUIT SOURD À LA • C’est un bruit de fonctionnement normal.
FERMETURE DE LA PORTE
BRUITS •Le compresseur à vitesse variable.
FONCTIONNEMENT •Bruit de ventilation normal —plusieurs ventilateurs envoient de l’air froid
• Le bruit sera minimisé en fermant la porte doucement.
dans les compartiments de réfrigération et de congélation, d’autres
ventilateurs refroidissent le compresseur.
• La vitesse des ventilateurs varie pour fournir un refroidissement et une
économie d’énergie optimum.
• Les bruits suivants sont NORMAUX et seront audibles de temps en
temps :
– Vous entendrez peut-être des gargouillements et des chuintements à
la fermeture de la porte. Ceci est dû à l’égalisation de la pression dans
Refroidisseur à vin.
– Vous entendrez peut-être des bruits de ruissellement pendant le
cycle de dégivrage quand la glace sur l’évaporateur fond et coule
dans le bac collecteur.
– La circulation du liquide frigorigène dans le système provoque parfois
des gargouillements comme de l’eau en ébullition.
– L’eau qui tombe sur le chauffage de dégivrage peut parfois
provoquer des crépitements, des bourdonnements pendant le cycle
de dégivrage.
– Vous entendrez peut-être des craquements ou des bruits secs
lorsque Refroidisseur à vin vient d’être branché ou pendant/après le
cycle de dégivrage. Ceci se produit lorsque Refroidisseur à vin se
refroidit pour corriger la température.
– Le compresseur peut provoquer des claquements ou des bruits
stridents au redémarrage (ceci peut prendre 5 minutes).
– Le tableau de commandes électroniques peut émettre des cliquetis
lorsque les relais sont activés pour contrôler certains composants du
réfrigérateur.
– La chute de glaçons dans le bac et la circulation de l’eau dans les
tuyaux lors du remplissage de la machine à glaçons.
– Le robinet d’eau de la machine à glaçons se met à bourdonner
lorsque la machine se remplit d’eau.
17
Page 42

En cas de problème
Refroidisseur à vin
PROBLÈME CAUSE POSSIBLE
LA PORTE NE SE FERME •Un paquet ou une bouteille empêche la fermeture de la porte.
PAS CORRECTEMENT • Vérifiez le joint de la porte, il a peut-être été déplacé.
• Refroidisseur à vin n’est pas de niveau. Voir les instructions
d’installation.
• Les ressorts des charnières sont désactivés. Voir les instructions
d’installation.
TEMPÉRATURE TROP •La température n’est pas réglée sur une température assez basse. Voir
ÉLEVÉE DANS LE Commandes de température
RÉFRIGÉRATEUR • Temps chaud ou ouverture fréquente des portes.
•La porte a été laissée ouverte trop longtemps.
•Un paquet empêche peut-être la fermeture de la porte.
LA TEMPÉRATURE RÉELLE •Refroidisseur à vin vient juste d’être branché. Attendez 24 heures que la
EST DIFFÉRENTE DE LA température se stabilise.
TEMPÉRATURE FIXÉE • La porte est restée ouverte trop longtemps. Attendez 24 heures que la
température se stabilise.
•Des aliments chauds ont été mis dans Refroidisseur à vin. Attendez 24
heures que la température se stabilise.
•Dégivrage en cours. Attendez 24 heures que la température se stabilise.
GIVRE SUR LES ALIMENTS •La porte est ouverte ou un paquet empêche la fermeture de la porte.
SURGELÉS (il est •Ouverture trop fréquente ou trop longue des portes.
normal de trouver du •Le tiroir est peut-être resté ouvert.
givre à l’intérieur des •Des glaçons ou d’autres objets sont peut-être coincés derrière le tiroir.
paquets)
FORMATION LENTE •Le tiroir est peut-être resté ouvert.
DES GLACONS •Réglez la commande sur une température plus basse.
•Un paquet empêche peut-être la fermeture du tiroir.
LES GLAÇONS ONT • Les vieux glaçons doivent être jetés.
UNE ODEUR / UN GOÛT •Le bac à glaçons doit être vidé et lavé.
•Des paquets mal fermés dans le congélateur peuvent transmettre une
odeur / un goût aux glaçons.
•L’intérieur du congélateur a besoin d’être nettoyé. Se référer à la
section ENTRETIEN Et NETTOYAGE.
•Mauvais goût de l’eau d’alimentation. Remplacez le filtre à eau.
LA MACHINE À GLAÇONS •La machine à glaçons est éteinte.
AUTOMATIQUE NE • Le robinet d’eau est fermé ou n’est pas branché.
FONCTIONNE PAS •La température dans le congélateur est trop élevée.
•Un empilement de glaçons dans le bac de stockage provoque l’arrêt de
la machine à glaçons. Etalez les glaçons à la main.
•Le bac à glaçons n’est pas bien positionné
•Le filtre à eau est bouché
DE LA CONDENSATION SE •Pas inhabituel lorsque le temps est très humide. Essuyez les surfaces.
FORME SUR L’EXTÉRIEUR •Activez la fonction de contrôle de l’humidité.
DU RÉFRIGÉRA TEUR
DE LA CONDENSATION •Ouverture trop fréquente ou trop longue des portes.
S’ACCUMULE À L’INTÉRIEUR •Par temps humide, l’air amène de l’humidité dans Refroidisseur à vin
lors de l’ouverture des portes.
•Le tiroir inférieur est passé du mode congélation au mode réfrigérateur
ou conservation du vin.
FORTE ODEUR DANS • Les aliments à forte odeur doivent être emballés hermétiquement.
Refroidisseur à vin •Vérifiez qu’aucun aliment ne soit gâté.
•L’intérieur a besoin d’être nettoyé. Se référer à la section Entretien et
Nettoyage
18
L’ÉCLAIRAGE INTÉRIEUR •Il n’y a pas d’électricité au niveau de la prise.
NE FONCTIONNE PAS •Les DEL doivent être remplacées. Voir la section Services à la Clientèle.
•Le mode Sabbat est peut-être activé. Désactivez le mode Sabbat.
LA PORTE EST DIFFICILE À •La fermeture hermétique de la porte est due à l’égalisation de la
OUVRIR IMMÉDIATEMENT pression dans Refroidisseur à vin. Après la fermeture de la porte,
APRÈS LA FERMETURE attendez 5 à 30 secondes avant de l’ouvrir de nouveau.
Page 43

DONNEES DE PERFORMANCE
NSF
Système de Filtration SmartWater
Ce système a été testé conformément aux Normes NSF/ANSI n°42 et 53 pour la réduction des substances indiquées cidessous. La concentration des substances indiquées dans l’eau alimentant le système a été réduite à une concentration
inférieure ou égale à la limite autorisée pour l'eau en sortie du système, telle que l’exigent les normes NSF/ANSI 42 et 53.*
(Un coefficient de sécurité 100% est ajouté au système pour les utilisations sans compteur)
Paramètre USEPA Concentration moyenne Concentration Effluent % Réduction Exigences de
Chlore — 1.845 mg/L 2.0 mg/L+10% < 0.05 mg/L 0.05 mg/L > 97.29% 96.43% > 50%
Goût & Odeur — — — — — — — —
Particule** — 143,333 #/mL
Paramètre USEPA Concentration moyenne
Turbidité 1 NTU*** 10.3 NTU*** 1+1 NTU*** 0.106 NTU 0.14 NTU 98.97% 98.61% 0.5 NTU
Spores
Plomb @ pH 6,5 0.015 mg/L 0.15 mg/L 0.15 mg/L+10% < 0.001 mg/L < 0.001 mg/L > 99.33% > 99.33% 0.010 mg/L
Plomb @ pH 8,5 0.015 mg/L 0.14 mg/L 0.15 mg/L+10% 0.001 mg/L 0.003 mg/L > 99.29% 97.86% 0.010 mg/L
Lindane
Atrazine
MCL pour l’eau d’alimentation max. à l’entrée Moyenne Maximum Moyenne Minimum réduction minimale
au moins 10 000 particules/ml
MCL pour l’eau d’alimentation max. à l’entrée Moyenne Maximum Moyenne Minimum réduction minimale
99,95% Réduction
0.0002 mg/L
0.003 mg/L
200,000 #/L
0.0216 mg/L 0.002 mg/L+10%
0.008 mg/L 0.009 mg/L+10% < 0.002 mg/L < 0.002 mg/L > 76.12% > 66.67% 0.003 mg/L
Cartouche GSWF
Norme n°42 : Paramètres esthétiques
29.83 #/mL 140 #/mL 99.98% 99.91% > 85%
Norme n°53 : Effets sur la santé
Concentration
Minimum 50,000 L
< 0.00002 mg/L < 0.00002 mg/L
Effluent % Réduction Exigences de
0 0 > 99.99% > 99.99% > 99.95%
99.07% 98.75% 0.0002 mg/L
* Testé utilisant un débit de 0,50 gpm; une pression de 60 psig; un pH de 7,5 ± 0,5; et une température de 20°C ± 3°C (68°F ± 5°F)
** Mesure en particules/ml. Les dimensions des particules utilisées variaient entre 0,5 et 1 micron.
*** NTU=Unité de turbidité néphélométrique
Spécifications de fonctionnement
■ Capacité: Certifiée jusqu’à 750 gallons (2,838 l); pendant six mois max.
■ Pression requise : 2.8–8.2 bar (40–120 lb/po²)
■ Température: 33–100ºF (0,6–38ºC)
■ Débit: 0,5 gpm (1,9 l/min)
Exigences d’installation / de fonctionnement/ de maintenance
■ Rincez la nouvelle cartouche à plein débit pendant 3 minutes afin de purger de l’air.
■ Remplacez la cartouche lorsque le débit devient trop faible.
Informations particulières
■ Les directives d’installation, la disponibilité de pièces et de service ainsi que la garantie standard sont expédiées avec le
produit. Le système d’eau potable doit être entretenu conformément aux instructions du fabricant. Ceci inclut le
remplacement des cartouches de filtre.
■ N’utilisez jamais votre système de filtration avec une eau microbiologiquement insalubre ou de qualité inconnue sans avoir
un dispositif de désinfection adéquate en amont ou en aval de votre système.
■ Les systèmes homologués pour la réduction des spores peuvent être utilisés sur une eau désinfectée pouvant contenir des
spores filtrables. Les substances contaminantes qui peuvent être réduites ou éliminées par votre système de traitement
d’eau ne sont pas obligatoirement présentes dans votre eau.
■ Vérifiez la conformité aux règlements et à la législation locale ou nationale.
■ Il est à noter que ces essais ont été effectués dans des conditions standards de laboratoire, la performance réelle peut varier.
Les systèmes doivent être installés et utilisés conformément aux procédures et directives données par le fabricant.
Le système a été testé et certifiée selon la norme 42 de l’ANSI/NSF pour la réduction du chlore,
du goût et de l’odeur, des particules de Classe I et selon la norme 53 pour la réduction des
spores, du plomb, du Lindane, de l’Atrazine et de la turbidité.
Fabriqué pour : General Electric Company, Louisville, KY 40225
®
19
Page 44

State of California
Department of Health Services
Water Treatment Device
Certificate Number
155903 -
Date Issued: April 28, 2003
Trademark/Model Designation
GE GSWF GSWF
Manufacturer: General Electric Consumer Products
The water treatment device(s) listed on this certificate have met the testing requirements pursuant to Section
116830 of the Health and Safety Code for the following health related contaminants:
Microbiological Contaminants and Turbidity
Cysts
Turbidity
Organic Contaminants
Atrazine
Lindane
2,4-D
Replacement Elements
Inorganic/Radiological Contaminants
Asbestos
Lead
750 galRated Service Capacity: 0.5 gpm
Conditions of Certification:
Do not use where water is microbiologically unsafe or with water of unknown quality, except that systems certified for
cyst reduction may be used on disinfected waters that may contain filterable cysts.
20
Rated Service Flow:
Page 45

Observations
Refroidisseur à vin
21
Page 46

Observations
Refroidisseur à vin
22
Page 47

Services à la clientèle
Refroidisseur à vin
Avec l’achat de votre nouvel appareil Monogram, soyez
assuré de recevoir toute l’information ou l’assistance dont
vous pourriez avoir besoin, de la part de GE. Tout ce que vous
avez à faire, c’est nous appeler !
Service
d’information
GE Answer
Center®
800.626.2000
Service de
réparations à
domicile
800.444.1845
Pour nos clients
qui ont des
besoins
spécifiques…
800.626.2000
Quelle que soit votre question sur les appareils Monogram, le service d’information GE Answer
Center® est à votre disposition pour vous assister. Nous répondrons rapidement et
courtoisement à votre appel — et à votre question. Appelez le service d'information GE Answer
Center® du lundi au vendredi de 8h00 à 22h00 (Heure normale de l’Est) et le samedi de 8h00 à
19h00 (Heure normale de l’Est).
OU
Consultez notre site Internet à l’adresse monogram.com
Un professionnel du service clientèle de GE vous offrira un service de réparation expert, prévu à
une heure qui vous convient. Pour programmer une réparation, appelez du lundi au vendredi de
7h00 à 22h00 (Heure normale de l’Est) et le samedi et le dimanche de 8h00 à 18h00 (Heure
normale de l’Est). Le Service à la Clientèle de GE, exploité par la compagnie dans de nombreuses
localisations vous offre un service aujourd’hui, demain, ou quand cela vous convient. Nos
techniciens, formés en usine, connaissent parfaitement votre appareil - la plupart des
réparations peuvent être effectuées en une seule visite.
GE offre des commandes en Braille pour un certain nombre d’appareils électroménagers GE ainsi
qu’une brochure pour aider à la planification d’une cuisine sans entrave pour les personnes à
mobilité réduite.
Les consommateurs malentendants ou muets qui ont accès à un TDD ou à un téléscripteur
conventionnel peuvent appeler le 800.TDD.GEAC (800.833.4322) pour solliciter des informations ou
un service
Contrats de
service
800.626.2224
Pièces
Détachées et
Accessoires
800.626.2002
Vous pouvez être rassuré de savoir que le service GE sera toujours là après l’expiration de votre
garantie. Souscrivez à un contrat GE pendant que votre garantie est toujours en vigueur et vous
bénéficierez d’une ristourne importante. Avec un contrat sur plusieurs années, vous êtes assuré
d’un futur service au prix d’aujourd’hui.
Les personnes qualifiées pour réparer leurs propres appareils peuvent commander des pièces
détachées et des accessoires et les faire envoyer directement à leur domicile. Le service de pièces
détachées GE permet un accès rapide à plus de 47000 pièces …et toutes les pièces GE sont sous
garantie. Les cartes VISA, MasterCard et Discover sont acceptées. Consultez
www.GEAppliances.com.
Les instructions contenues dans ce manuel détaillent les procédures à utiliser pour
n’importe quel utilisateur. Il est préférable que les autres réparations soient effectuées par
un réparateur qualifié. La prudence doit être de mise, toute maintenance incorrecte peut
entraîner un fonctionnement dangereux.
23
Page 48

CE QUI
COUVERT
A compter de la
date d'achat
initial
Garantie
Refroidisseur à vin
VOTRE GARANTIE DE RÉFRIGÉRATEUR ET DE CONGÉLATEUR
MONOGRAM. Agrafez votre facture ou votre chèque annulé ici.
Pour obtenir le service sous garantie, une preuve de la date
d’achat initial est nécessaire.
GARANTIE LIMITEE DE DEUX ANS
Pendant deux ans à compter de la date d’achat initial, nous fournirons, gratuitement, les pièces et la main
d’œuvre à domicile pour remplacer ou réparer toute pièce du réfrigérateur ou du congélateur qui se révèle
défectueuse en raison d’un vice de fabrication.
GARANTIE LIMITEE DE CINQ ANS
Pendant cinq ans à compter de la date d’achat initial, nous fournirons, gratuitement, les pièces et la main
d’œuvre à domicile pour remplacer ou réparer toute pièce provenant du circuit fermé de réfrigération
(compresseur, condenseur, évaporateur et tout autre tuyau de branchement) qui se révèle défectueuse en
raison d’un vice de fabrication.
GARANTIE LIMITÉE SUPPLÉMENTAIRE DE SIX À DOUZE ANS POUR LE CIRCUIT FERMÉ
De la sixième à la douzième année à compter de la date d’achat initial, nous fournirons, gratuitement, les
pièces pour remplacer ou réparer toute pièce provenant du circuit fermé de réfrigération (compresseur,
condenseur, évaporateur et tout autre tuyau de branchement) qui se révèle défectueuse en raison d’un vice de
fabrication. Les déplacements à votre domicile pour le dépannage ainsi que la main d’œuvre à domicile restent
à votre charge.
GARANTIE LIMITÉE DE TRENTE JOURS POUR LA CARTOUCHE DU FILTRE À EAU (Filtre à eau, si inclus)
A compter de la date d’achat initial, nous fournirons, gratuitement, les pièces pour remplacer toute pièce de la
cartouche du filtre à eau qui se révèle défectueuse en raison d’un vice de fabrication. Pendant la validité de la
présente garantie limitée de 30 jours, nous fournirons gratuitement une cartouche de filtre à eau.
Cette garantie est étendue à l’acheteur d’origine et aux propriétaires suivants pour tout produit acheté pour une
utilisation domestique dans les 48 états continentaux, à Hawaii, à Washington D.C. ou au Canada. Si le produit
est installé dans une région où ne se trouve aucun réparateur autorisé GE, vous devrez peut-être assumer les
frais de transport ou apporter l’appareil à un centre de service autorisé GE. En Alaska, cette garantie est
équivalente à l’exception des frais d’expédition de l’appareil au centre de réparation ou des frais de transport du
technicien pour un dépannage à domicile qui restent à la charge du propriétaire.
Tout le service en vertu de cette garantie sera fourni par nos centres de service de fabrique ou par nos
techniciens autorisés du service à la clientèle Customer Care ® pendant les heures de travail normales.
Si votre appareil électroménager a besoin d’une réparation pendant la période de garantie ou après cette
période, appelez le 1.800.444.1845. Veuillez avoir votre numéro de série et votre numéro de modèle à portée de
main lorsque vous appelez pour obtenir un service.
CE QUI N’EST
PAS COUVERT
197D8243P001
49-60616
12-10 GE
• Les déplacements à votre domicile pour vous
expliquer l’utilisation de ce produit
• Le remplacement des fusibles ou le
réenclenchement du disjoncteur du domicile.
• Tout dommage causé par accident, incendie,
inondation ou catastrophe naturelle.
• Une panne du produit s’il a été utilisé dans un but
autre que celui pour lequel il a été fabriqué ou s’il
a été utilisé commercialement.
• Les dommages causés après la livraison.
• Une installation, livraison ou maintenance
défectueuse.
En cas de problème d’installation, contactez votre
revendeur ou votre installateur. Vous êtes
EXCLUSION DES GARANTIES TACITES —Votre recours exclusif est l’échange du produit suivant les
modalités de la Garantie Limitée. Toutes garanties tacites, y compris les garanties de valeurs
marchandes ou d’adéquation à des fins particulières, sont limitées à une durée d’un an ou à la durée la
plus courte autorisée par la loi.
Certaines provinces n’acceptent pas d’exclusion ou de limites aux dommages indirects ou accessoires, cette
exclusion ou restriction pourrait ne pas s'appliquer à vous. Certains droits particuliers vous sont dévolus en vertu
de la présente garantie et peuvent s'accompagner d'autres droits qui varient selon votre lieu de résidence. Pour
connaître vos droits juridiques, veuillez consulter le bureau local ou d’état des affaires aux consommateurs ou le
Procureur Général de votre état.
Garant: General Electric Company,
Louisville, KY 40225
responsable de la provision d’un système
électrique, d’une plomberie et d’autres
connexions appropriés.
• Le remplacement des ampoules ou la cartouche
du filtre à eau, si inclus, et dans des conditions
autres que celles susmentionnées.
• Le remplacement de la cartouche du filtre à eau, si
inclus, à cause d’une pression d’eau en dehors de
la gamme de fonctionnement recommandée ou à
cause d’une concentration excessive de sédiment
dans l’eau d’alimentation.
• Détérioration des aliments.
• Tout dommage fortuit ou indirect causé par des
défauts éventuels de cet appareil.
• Le service s’il est impossible d’avoir accès au
produit.
Page 49

Manual del
Propietario
Reserva de Vinos
197D8243P001
49-60616
12-10 GE
monogram.com
Page 50

Información al Cliente
Reserva de Vinos
Introducción
Contenidos
El nuevo Refrigerador Monogram realiza una elocuente afirmación de estilo, conveniencia y
flexibilidad de planificación en la cocina. Ya sea que lo elija por su pureza de diseño o los
perseverantes detalles, descubrirá que la combinación superior de forma y función de su Refrigerador
Monogram lo deleitarán en años venideros.
La información de las siguientes páginas le ayudará a realizar una correcta utilización y
mantenimiento de su Refrigerador.
Ante cualquier otra consulta, visite nuestro sitio web en: monogram.com
Servicios al Cliente
Números Telefónicos Importantes . . . . . . . . . . . . . .24
Números de Modelo y Serie . . . . . . . . . . . . . . . . . . . . .2
Ficha Técnica de Funcionamiento . . . . . . . . . . . . . .19
Solución de Problemas . . . . . . . . . . . . . . . . . . . . .17, 18
Instrucciones de Seguridad . . . . . . . . . . . . . . . . . . . 4, 5
Certificado de Dispositivo de Tratamiento del Agua
del Estado de California . . . . . . . . . . . . . . . . . . . . . . . .20
Garantía . . . . . . . . . . . . . . . . . . . . . . . . . . . . .Tapa Trasera
Cuidado y Limpieza
Limpieza – Parte Exterior e Interior . . . . . . . . . . . . .14
Reemplazo de la Bombilla de Luz . . . . . . . . . . . . . . 15
Vacaciones . . . . . . . . . . . . . . . . . . . . . . . . . . . . . . . . . . . .15
Instrucciones de Funcionamiento
Funciones . . . . . . . . . . . . . . . . . . . . . . . . . . . . . . . . . . . . . . .6
Máquina de Hacer Hielo Automática . . . . . . . . . . . .7
Cajón Adaptable . . . . . . . . . . . . . . . . . . . . . . . . . . . . . . .11
Estantes de la Puerta\Repisas . . . . . . . . . . . . . . . . . .10
Control de Humedad Externa . . . . . . . . . . . . . . . . . .12
Iluminación con Luces LED . . . . . . . . . . . . . . . . . . . . .12
Modo Sabático . . . . . . . . . . . . . . . . . . . . . . . . . . . . . . . .13
Controles de Temperatura . . . . . . . . . . . . . . . . . . . . . .6
Olla para Verduras . . . . . . . . . . . . . . . . . . . . . . . . . . . . .10
Filtro de Agua . . . . . . . . . . . . . . . . . . . . . . . . . . . . . . . . . . .9
Preparación
Espacios Libres . . . . . . . . . . . . . . . . . . . . . . . . . . . . . . . .16
Ubicación . . . . . . . . . . . . . . . . . . . . . . . . . . . . . . . . . . . . . .16
Antes de usar
su
refrigerador
Escriba los
números de
modelo y
serie
Lea este manual detenidamente. La finalidad del
mismo es ayudarle a realizar un uso y
mantenimiento correctos de su nuevo
refrigerador.
Téngalo a mano para encontrar respuestas a sus
preguntas.
Los encontrará en una etiqueta dentro del
compartimiento de alimentos frescos, debajo de
la olla de verduras.
Si no entiende algo o necesita más ayuda, en la
sección trasera de este manual figura un listado
de números gratuitos de servicio al cliente.
O
Visite nuestro sitio web en: monogram.com
Antes de enviar esta tarjeta, escriba estos
números aquí:
Número de Modelo
Número de Serie
Use estos números en cualquier correspondencia o
llamadas al servicio técnico relacionadas con su
refrigerador.
2
Page 51

Información al Cliente
Reserva de Vinos
Si recibió un
refrigerador
dañado
Ahorre
tiempo y
dinero
Si
necesita
solicitar
el
servicio
técnico
La garantía no cubre daños ocasionados luego
de la entrega.
De forma inmediata, comuníquese con el
Antes de solicitar el servicio técnico, consulte la
sección de Solución de Problemas en el reverso
de este manual.
Para acceder al servicio técnico, consulte la
página de Servicio al Cliente en el reverso de
este manual.
Estamos orgullosos de nuestro servicio técnico y
deseamos que esté complacido. Si por alguna
razón no se siente a gusto con el servicio técnico
que recibe, aquí figuran los pasos que deberá
seguir para solicitar ayuda adicional.
PRIMERO, comuníquese con las personas que le
brindaron el servicio técnico sobre su
electrodoméstico. Explique por qué no se siente
a gusto. En la mayoría de los casos, esto
resolverá el problema.
comerciante (o fabricante) que le vendió el
refrigerador.
En el mismo figuran causas de problemas
menores de funcionamiento que usted puede
corregir.
LUEGO, si aún no se siente a gusto, escriba todos
los detalles, incluyendo su número telefónico, a:
Manager, Customer Relations
GE Appliances
Appliance Park
Louisville, KY 40225
3
Page 52

INSTRUCCIONES IMPORTANTES DE SEGURIDAD
LEA Y GUARDE ESTAS INSTRUCCIONES
ADVERTENCIA–Al usar este
electrodoméstico, siempre tenga las precauciones
básicas de seguridad, incluyendo lo siguiente:
• Use este electrodoméstico sólo para su
propósito original, como se describe en el
Manual del Propietario.
• Este refrigerador se debe instalar de forma
apropiada de acuerdo con las Instrucciones de
Instalación antes de ser usado.
• No permita que los niños se trepen, paren o
cuelguen de los estantes de la puerta del
refrigerador. Podrían dañar el refrigerador y/o
sufrir lesiones graves.
• No toque las superficies frías del
compartimiento del freezer cuando las manos
estén húmedas o mojadas. La piel se puede
adherir a estas superficies extremadamente frías.
• No guarde ni use gasolina u otros vapores
inflamables y líquidos cerca de éste ni de otros
electrodomésticos.
• Su freezer cuenta con una máquina de hacer
hielo automática en el cajón del freezer—evite el
contacto con las partes móviles del mecanismo
eyector , o con el elemento de calefacción ubicado
en la parte inferior de la máquina de hacer hielo.
No coloque los dedos ni las manos en el
mecanismo de la máquina de hacer hielo
automática mientras el refrigerador esté
enchufado.
• Antes de realizar su limpieza o hacer
reparaciones, apague el disyuntor para
desconectar la corriente. Cualquier reparación
deberá ser realizada por un técnico calificado del
servicio.
• No intente reemplazar una luz LED quemada.
Será necesario que un técnico autorizado
reemplace las luces LED.
• No vuelva a congelar comidas que hayan
estado totalmente congeladas en forma previa.
PELIGRO: RIESGO DE QUE UN NIÑO QUEDE ATRAPADO
Que un niño quede atrapado o que sufra una asfixia
no son problemas del pasado. Los refrigeradores
antiguos o abandonados aún son peligrosos…
incluso aunque se conserven por “sólo unos pocos
días”. Si se deshará de su antiguo refrigerador, siga
estas instrucciones a fin de evitar accidentes.
Antes de Descartar su Antiguo Refrigerador:
• Retire las puertas/ cajones.
• Deje las repisas en su lugar de modo que los niños
no puedan trepar dentro con facilidad.
REFRIGERANTES
Todos los productos de reserva de vinos cuentan con
refrigerantes, que de acuerdo con la ley federal
deberán ser eliminados antes de descartar el producto.
Si se deshará de un producto de reserva de vinos
antiguo, consulte a la compañía a cargo sobre cómo
deshacerse del mismo.
4
ADVERTENCIA–Refrigerante
R600a
ADVERTENCIA: Este electrodoméstico cuenta con
refrigerante isobutano, R600a, un gas natural con alto
nivel de compatibilidad medioambiental. Sin embargo,
también es inflamable. Se solicita el cumplimiento de
las siguientes advertencias:
1) Al mover , instalar y operar el electrodoméstico , se
deberá tener cuidado de no dañar la tubería del
refrigerante.
2) El servicio técnico deberá ser realizado por personal
autorizado del servicio de la fábrica, y los componentes
podrán ser reemplazados por componentes de reemplazo
autorizados por el fabricante.
3) Los productos de reserva de vinos cuentan con
refrigerantes, que de acuerdo con la ley federal deberán
ser eliminados antes de descartar el producto.
4) Mantenga las aberturas de ventilación en el espacio de
protección del electrodoméstico o en la estructura
incorporada libres de obstrucción.
5) No use dispositivos mecánicos u otros medios para
acelerar el proceso de descongelamiento.
6) No dañe el circuito del refrigerante.
7) No use dispositivos eléctricos dentro del
compartimiento de almacenamiento de comida del
electrodoméstico.
Page 53

INSTRUCCIONES IMPORTANTES DE SEGURIDAD
CÓMO CONECTAR LA ELECTRICIDAD
Nunca, bajo ninguna circunstancia, corte o
elimine el tercer cable (tierra) del cable de
corriente. Para su seguridad personal, este
electrodoméstico debe estar adecuadamente
conectado a tierra.
El cable de corriente de este electrodoméstico
cuenta con un enchufe de 3 cables (conexión a
tierra) que se conecta a un tomacorriente de
pared estándar de 3 cables (conexión a tierra)
para minimizar la posibilidad de riesgos de
descargas eléctricas por parte del mismo.
Contrate a un electricista calificado para que
controle el tomacorriente y el circuito eléctrico
para asegurar que el enchufe esté
correctamente conectado a tierra.
En caso de contar con un tomacorriente de
pared de 2 cables, es su responsabilidad y
obligación reemplazarlo por un tomacorriente de
pared de 3 cables correctamente conectado a
tierra.
El refrigerador debería estar siempre conectado
a un enchufe específico con un índice de voltaje
equivalente al que figura en su etiqueta de
características técnicas.
NO USE UN ENCHUFE ADAPT ADOR PARA
CONECT AR EL REFRIGERADOR A UN
TOMACORRIENTE DE 2 PA TAS. NO USE UN
PROLONGADOR CON ESTE ELECTRODOMÉSTICO.
Esto garantiza el mejor funcionamiento y
además previene la sobrecarga de los circuitos
del hogar, lo cual podría ocasionar riesgos de
incendio debido al recalentamiento de cables.
Nunca desenchufe el refrigerador tirando del
cable de corriente. Siempre tome su enchufe
firmemente y empuje el mismo hacia afuera
para retirarlo.
Repare o reemplace de inmediato todos los
cables de corriente pelados o con cualquier tipo
de daño. No use un cable con cortaduras o
abrasión sobre su extensión o extremos.
Al alejar el refrigerador de la pared, se deberá
tener cuidado de que no ruede sobre ni dañe el
cable de corriente.
GUARDE ESTAS
INSTRUCCIONES
5
Page 54

Reserva
Superior de
Vinos
Reserva
Inferior de
Vinos
Controles de Temperatura
Reserva de Vinos
Cajones con
ExtensiónCompleta
Máquina
de Hacer
Hielo
Cajón del Freezer
Estante de
Exhibición de
Vinos
Cajón Adaptable
6
Page 55

Controles de Temperatura
Reserva de Vinos
Controles de
temperatura
Vino - Compartimiento superior
Vino - Bajo Compartimiento
La pantalla de temperatura muestra la
temperatura actual del compartimiento de
alimentos frescos, del cajón del freezer o del
cajón adaptable cuando cada uno es
seleccionado al mover el indicador de Zona. La
temperatura actual variará con relación a la
temperatura programada, dependiendo de
factores tales como la frecuencia de apertura de
la puerta, cantidad de comida, ciclo de
descongelamiento y temperatura ambiente.
NOTA: La apertura frecuente de la puerta o si se
deja la puerta abierta durante un período de
tiempo podrán incrementar la temperatura
interior de los compartimientos en forma
temporaria.
Para apagar el sistema de enfriamiento, mueva
el indicador de ZONE (Zona) al modo de
alimentos frescos. Presione la tecla más (+) hasta
que la pantalla muestre OFF (Apagado).
Para encender el sistema de enfriamiento,
mueva el indicador de ZONE (Zona) al modo de
alimentos frescos y presione la tecla menos (–)
hasta que figure la temperatura deseada. La
temperatura programada de 0°F para el freezer
o de 37°F para la unidad de alimentos frescos
aparecerá en la pantalla.
Para controlar la configuración de
temperatura actual de un compartimiento,
presione la tecla más (+) o menos (–). Luego de 5
segundos, la pantalla regresará a la temperatura
actual.
Cajón superior - Congelador
Baja del cajón - Personalizable
Para cambiar las programaciones de
temperatura, presione la tecla más (+) o menos
(–) para cada incremento hasta el punto de
programación de temperatura deseado. Permita
que la unidad alcance la temperatura que
programó durante un período de 24 horas.
Rangos de Temperatura
Baja Alta
vino
Cajón del
Freezer
Cajón Adaptable Rangos de Temperatura
Freezer
Enfriar
Vino
NOTA: Configurar los controles en OFF (Apagar)
detiene el enfriamiento, pero no apaga la
corriente eléctrica de la unidad. Todas las
lecturas en ºC serán redondeadas.
34°F
1°C
–6°F
–21°C
BajaAlta
-6°F
–21°C
34°F
1°C
40°F
4°C
46°F
8°C
+6°F
–14°C
+6°F
–14°C
46°F
8°C
55°F
13°C
Cómo
cambiar las
temperaturas
de la pantalla
de ºF a ºC
Alarma
Para cambiar la pantalla de temperatura de
Fahrenheit a Celsius, presione las teclas más (+) y
menos (–) por 5 segundos.
Para encender la función de Alarma, mantenga
presionado el botón ALARM (Alarma) durante 3
segundos. ALARM (Alarma) aparecerá subrayado
cuando se active. Para apagarla, mantenga
presionado el botón ALARM (Alarma) durante 3
segundos. El subrayado desaparecerá
Cuando la función
ALARM (Alarma) esté
activa, ésta titilará y
emitirá un pitido si
mantiene la puerta
abierta por más de 2 minutos.
7
Page 56

Máquina de Hacer Hielo
Automática (modelos con freezer)
Reserva de Vinos
Máquina de
hacer hielo
automática
Puede tomar entre 12 y 24 horas que un
refrigerador recién instalado comience a
fabricar hielo. El refrigerador se envía con la
máquina de hacer hielo configurada en ON
(Encendido).
La máquina de hacer hielo producirá siete cubos
por ciclo, y aproximadamente 15 ciclos en un
período de 24 horas, dependiendo de la
temperatura del compartimiento del freezer, la
temperatura ambiente, la cantidad de veces que
se abra la puerta y otras condiciones de uso.
Si el refrigerador se utiliza antes de realizar la
conexión del agua a la máquina de hacer hielo,
configure la máquina de hacer hielo en OFF
(Apagado). Para configurar la máquina de hacer
hielo en OFF (Apagado), presione el indicador de
ZONE (ZONA) en la tecla de control dos veces
para seleccionar el cajón del freezer. Presione el
ícono ICE (Hielo) sobre la derecha. La línea
debajo de ICE (Hielo) desaparecerá y la palabra
OFF (Apagado) aparecerá debajo de ICE (Hielo).
Descarte el primer balde completo de hielo.
Asegúrese de que nada interfiera con la
extensión del brazo indicador.
Cuando el cubo se llene hasta el nivel del brazo
indicador, la máquina de hacer hielo dejará de
producir hielo. Es normal que varios cubos
queden juntos.
Si el hielo no se usa con frecuencia, los cubos de
hielo viejos se volverán turbios, con sabor rancio
y su tamaño se reducirá.
Máquina de hielo
Brazo
Una vez que la máquina de hacer hielo se
encienda nuevamente, habrá un retraso de 45
minutos antes de que ésta vuelva a entrar en
funcionamiento.
NOTA: En hogares con un nivel de presión
inferior a la normal, es posible que escuche que
la válvula de agua de la máquina de hacer hielo
realice varios ciclos para producir una cantidad
de hielo.
NOTA: La máquina de hacer hielo funciona mejor
con una presión hogareña de entre 40 y 120 PSI.
Cómo
acceder a la
máquina de
hacer hielo y
al cajón del
freezer
La máquina de hacer hielo se encuentra en el
techo del cajón del freezer, sobre la parte
trasera izquierda. El techo del cajón del
freezer cuenta con una tira de luces LED. El
cajón del freezer cuenta con 1 recipiente
para hielo.
8
Page 57

Filtro de Agua
Reserva de Vinos
Cartucho del
filtro de agua
El cartucho del filtro de agua se encuentra ubicado
debajo del cajón adaptable, del lado inferior
derecho del electrodoméstico.
Cartucho del
filtro de agua
Para Reemplazar el Filtro:
Mientras que el cartucho del filtro puede durar
hasta 1 año, la frecuencia del reemplazo
dependerá del uso del hielo. El panel de control
cuenta con una luz indicadora de reemplazo del
cartucho del filtro de agua. El cartucho del filtro
deberá ser reemplazado cuando la palabra
REPLACE (Reemplazar) aparezca debajo de FIL TER
(Filtro) en el panel de control.
Para Reiniciar la Luz de Estado del Filtro:
Mantenga presionado el botón FILTER (Filtro)
durante 3 segundos.
Tapón de Bypass del Filtro:
Deberá usar el tapón de bypass del filtro si:
a) posee un sistema hogareño de agua por ósmosis
inversa y/u otra forma de sistema hogareño de
filtrado de agua.
b) no cuenta con un filtro de reemplazo.
La máquina de hacer hielo no funcionará si el filtro o
el tapón del bypass del filtro no están instalados.
El tapón del bypass y el mini manual están ubicados
en el compartimiento del motor inferior.
Filtros de reemplazo:
Para ordenar cartuchos de filtros, visite nuestro
sitio web en monogram.com, o llame a GE Parts
and Accessories (Piezas y Accesorios de GE),
800.626.2002.
Número de Modelo de Filtro GSWF
NOTA IMPORTANTE: Reitre el filtro de agua para
detener de inmediato cualquier goteo de agua
de la máquina de hacer hielo
Bloqueo del
control
infantil
Cómo Instalar el Cartucho del Filtro:
1. Abra el cajón adaptable para tener acceso al
cartucho del filtro.
2. Retire el cartucho anterior doblando el mismo en
contra de las agujas del reloj. Empuje el filtro
hacia adelante para retirar el mismo.
3. Inserte el nuevo filtro en el compartimiento y
doble en dirección de las agujas del reloj, hasta
que el cartucho se detenga.
La función de bloqueo de control para niños
previene cambios no deseados en sus
configuraciones de temperatura.
Una vez establecida la temperatura deseada,
ésta puede ser bloqueada. Para bloquear,
mantenga presionado el botón LOCK (Bloquear)
durante 3 segundos. Para desbloquear,
mantenga presionado el botón LOCK (Bloquear)
durante 3 segundos.
9
Page 58

Cajones/ Estantes
Cajones/ Estantes
Distribución de
las botellas de
vino
Cajones con Extensión Completa
Los 6 cajones superiores cuentan con extensión
completa, donde cada cajón sostiene hasta 10
botellas. Las botellas se guardarán con sus
cuellos de forma alternada del frente hacia atrás.
Estante de Exhibición de Vinos
El estante de exhibición de vinos puede estar en
posición horizontal o en ángulo. En la posición
horizontal puede haber hasta 18 botellas. En la
posición en ángulo puede haber hasta 5 botellas.
El estante se puede angular levantando el estante
sobre los ganchos de la pared trasera.
Gancho
Posición Horizontal
Consejos y
sugerencias
para guardar
las botellas de
vino
• Guarde aquellos vinos para el consumo diario
en la mitad frontal de los cajones de extensión
completa, de modo que las etiquetas estén
totalmente visibles. Coloque los vinos de
guarda o que guardará por períodos
prolongados en la parte trasera.
• No permita que los niños se trepen, paren o
cuelguen de los cajones de extensión completa
con función de cava de vinos. Los niños podrán
Posición Angulada
Posición Angulada
sufrir lesiones graves y posiblemente dañar la
cava de vinos.
• Agrupe su inventario de vinos de acuerdo al
tipo; es decir: los vinos blancos en las áreas
más frías y los vinos tintos en las áreas más
cálidas.
• Guarde los vinos tintos y blancos en áreas
separadas, de modo que los pueda guardar a
diferentes temperaturas.
10
Page 59

Estantes/ Repisa/ Cajón Adaptable
Reserva de Vinos
Cajón
adaptable
El cajón adaptable se puede usar como freezer,
como refrigerador de alimentos frescos o como
cajón de vinos/ bebidas.
Para adaptar su cajón:
Presione el indicador de ZONE (ZONA) en la tecla
de control para seleccionar el cajón adaptable.
Temperaturas Recomendables para el Cajón
Adaptable:
Botón Función Temperatura
Enfriar
Congelar
Vino
Alimentos Frescos
Freezer
Almacenamiento de Vino
37°F/3°C
0°F/–18°C
55°F/13°C
Este cajón cuenta con una tira de iluminación LED
arriba de éste. También cuenta con un divisor
adaptable que se puede ubicar en diferentes
posiciones y un estante que se puede deslizar de
izquierda a derecha en el cajón.
Para cambiar la posición del divisor:
1. Empuje las lengüetas en la parte superior del
divisor para liberar el divisor de los agujeros de
las lengüetas en la parte frontal y trasera del
cajón.
Lengüeta
Levantada
Estante deslizable desmontable
Lengüeta
Agujero de la
Lengüeta
Divisor
2. Levante el divisor de las lengüetas levantadas
en la parte inferior del cajón..
3. Mueva el divisor hasta su nueva ubicación y
deslice el mismo en las lengüetas levantadas.
4. Empuje las lengüetas en la parte superior del
divisor y posicione el divisor de modo que las
lengüetas coincidan con los agujeros de éstas.
Libere las lengüetas de modo que queden
bloqueadas.
11
Page 60

Control de Humedad Exterior/ Iluminación con luces LED
Cava de Vinos
Control de
humedad
exterior
Iluminación
de la pantalla
con luces LED
Este producto está equipado con una función de
control de humedad exterior. La cava de vinos se
envía con la función de control de humedad
exterior apagada.
En algunos ambientes húmedos, se puede formar
humedad en la superficie frontal del gabinete de la
cava de vinos. Si aparece humedad en la
superficie frontal del gabinete de la cava de vinos,
encienda la función del control de humedad
exterior, manteniendo presionados los botones
ALARM (Alarm) y LOCK (Bloqueo) en el panel de
control por 5 segundos. Una vez activada,
aparecerá una pequeña imagen de una gotita de
agua con una línea debajo de los signos (+) y (–) en
el panel de control.
Esta cava de vinos cuenta con luces LED en
ambos lados del interior, así como también sobre
el cajón del freezer y sobre el cajón adaptable.
La cava de vinos cuenta con una opción de
iluminación de pantalla para las luces del lado
interior: corriente completa o ½ de la corriente.
En el modo de pantalla ya sea con corriente
completa o ½ de la corriente, las luces
permanecerán encendidas luego de haber
cerrado la puerta y se apagarán
automáticamente luego de 1 hora.
Luces con Corriente Completa
Luces con la ½ de la corriente
Para acceder a las opciones de iluminación,
presione el indicador de ZONE (Zona) en la tecla
de control. En el modo de vinos, el botón LIGHTS
(Luces) se encuentra sobre la derecha de la tecla
de control.
Cuando las luces tienen corriente complete, hay
2 barras debajo de LIGHTS (Luces); con la mitad
de la corriente, hay 1 barra; cuando las luces
están apagadas, no hay barras.
Luces Apagadas
12
Page 61

Modo Sabático
Reserva de Vinos
Modo
Sabático
Sabbath Mode (Modo Sabático) fue diseñado
para el Día Sabático y Feriados. Esta función
hace posible para aquellas personas de religión
judía que siguen esta celebración refrigerar y
congelar alimentos durante todo el feriado.
La función Sabbath Mode (Modo Sabático) se
puede configurar para anular reacciones típicas
ocasionadas por su interacción con el
refrigerador. Mientras se encuentre en Sabbath
Mode (Modo Sabático), su refrigerador
continuará funcionando. Sin embargo, el
refrigerador no responderá a sus acciones.
Mientras se encuentre en Sabbath Mode (Modo
Sabático), es posible que observe que el
ventilador está funcionando cuando se abre la
puerta; sin embargo, esto no es el resultado de
sus acciones. El ventilador funcionará en
horarios predeterminados. El calentador de
descongelación continuará descongelando el
refrigerador y el freezer y será activado con un
temporizador. El calentador de descongelación
no descongelará como resultado de abrir la
puerta o cualquier acción del consumidor.
PANTALLAS, ALARMAS y LUCES—Las pantallas
del control principal de temperatura serán
desactivadas; por lo tanto, no serán encendidas,
sonará un tono u operarán cuando se las toque.
Las alarmas y luces de la puerta serán
desactivadas.hed. Door alarms and lights will be
disabled.
ICEMAKER (Máquina de Hacer Hielo) —La
máquina de hacer hielo continuará funcionando.
La máquina de hacer hielo podrá ser
desactivada presionando la tecla OFF (Apagado)
de la máquina de hacer hielo, antes del Día
Sabático (consulte Máquina de Hacer Hielo
Automática).
ON/OFF (Encender/ Apagar) —Para activar
Sabbath Mode (Modo Sabático), presione el
botón ALARM (Alarma) y la tecla (+) en el panel
de control durante 5 segundos. SAB aparecerá
en el control. SAB permanecerá en la pantalla y
la tecla (+) y el botón de la alarma permanecerán
encendidos hasta que Sabbath Mode (Modo
Sabático) sea desactivado. Los controles y luces
no funcionan hasta que el botón ALARM (Alarma)
y la tecla más (+) se mantengan presionados
nuevamente durante 5 segundos.
13
Page 62

Cuidado y Limpieza
Reserva de Vinos
Limpieza
exterior
Limpieza
interior
Manijas y bordes de la puerta—Limpie con una tela
húmeda con agua y jabón. Seque con una tela seca.
Mantenga la parte exterior limpia. Limpie con una
tela limpia que esté ligeramente humedecida con
detergente líquido suave para platos. Seque con
una tela limpia y suave.
No seque el refrigerador con una tela sucia para
platos o una toalla mojada, ya que podrán dejar
residuos que pueden dañar la terminación. No use
estropajos, limpiadores en polvo, blanqueadores o
limpiadores que contengan blanqueadores, ya que
estos productos pueden rayar y dañar la
terminación.
Acero Inoxidable—En forma regular limpie y pula
los paneles y manijas de puertas de acero
inoxidable (en algunos modelos) con un limpiador de
Apague el interruptor desde el disyuntor o caja de
fusible antes de realizar la limpieza. Si esto no
resulta práctico, estruje el exceso de humedad para
eliminarlo de la esponja o tela al limpiar alrededor
de los interruptores, luces o controles.
Use agua caliente y solución de bicarbonato de
sodio — aproximadamente una cuchara sopera (15
ml) de bicarbonato de sodio para un cuarto de
galón (1 litro) de agua. Esto limpia y neutraliza los
olores. Enjuague y seque totalmente.
acero inoxidable comercialmente disponible tal
como Stainless Steel Magic™, a fin de conservar y
proteger la terminación.Stainless Steel Magic está
disponible a través de GE Parts and Accessories
(Piezas y Accesorios de GE), 800.626.2002, o
GEAppliances.com. Ordene el número de pieza
WX10X15.
No use cera para electrodomésticos ni pula sobre el
acero inoxidable.
Paneles de Madera a Medida - comuníquese con
su proveedor de paneles a medida para recibir
instrucciones sobre cuidado y limpieza.
Otras partes del refrigerador—incluyendo juntas
de la puerta, cajón de verduras, estantes para
guardar hielo y todas las piezas de plástico – se
pueden limpiar de la misma forma. Luego de limpiar
las juntas de la puerta, aplique una capa fina de
vaselina a las juntas de la puerta del lado de las
bisagras. Esto ayuda a evitar que las juntas se
peguen o pierdan su forma debido a una inclinación
hacia afuera.
Evite limpiar repisas de vidrio frías con agua
caliente, ya que la diferencia extrema de
temperatura puede ocasionar rompeduras.
Sostenga las repisas de vidrio con cuidado. Un
manejo brusco del vidrio templado podrá hacer
que se rompa en pedazos.
No lave ninguna pieza de plástico en el
lavavajillas.
14
Page 63

Cuidado y Limpieza
Reserva de Vinos
Preparación
para las
vacaciones
Reemplazo
de la luz
interna
Si estará de vacaciones o ausente por tiempo
prolongado, retire la comida del refrigerador.
Ajuste la temperatura hacia arriba (+) hasta que
la unidad se apague. Limpie el interior con una
solución de bicarbonato de sodio de una
cuchara sopera (15 ml) de bicarbonato de sodio
para un cuarto de galón (1 litro) de agua. Deje la
puerta abierta.
No intente reemplazar una luz LED quemada.
Será necesario que un técnico autorizado
reemplace las luces LED.
Si se trata de vacaciones cortas, retire los
alimentos perecederos y deje el control en la
configuración regular. Sin embargo, si se espera
que la temperatura ambiente se sea inferior a
60°F (16°C), siga las mismas instrucciones que
seguiría si se tratara de vacaciones prolongadas.
Apague la máquina de hacer hielo y cierre el
suministro de agua del freezer.
15
Page 64

Preparación
Reserva de Vinos
Ubicación del
refrigerador
Espacios
Libres
No instale el refrigerador donde la
temperatura sea inferior a 60°F (16°C), ya que
no mantendrá la temperatura apropiada, y el
refrigerador podría desarrollar un nivel de
humedad alto.
Permita que haya un espacio libre de un mínimo
de 15" entre la puerta y la pared para un giro de
puerta completo de 115º. Permita que haya un
espacio libre mínimo de 5” hasta una pared para
un giro de puerta de 90º si se trata de modelos
Para una instalación correcta, el refrigerador
se deberá ubicar en una superficie nivelada de
material duro que posea la misma altura en el
resto del piso. Esta superficie deberá ser lo
suficientemente fuerte como para resistir el
peso de un refrigerador totalmente cargado o
aproximadamente 1.200 libras (140 kg.). Para
acceder a instrucciones completas, consulte
las Instrucciones de Instalación.
de Acero Inoxidable Monogram (Europeos).
4” distance to Wall.
16
Page 65

Solución de Problemas
Reserva de Vinos
¿Preguntas?
¡Use este
solucionador
de problemas!
PROBLEMA CAUSA POSIBLE
EL SISTEMA DE •Puede estar en el ciclo de descongelamiento, donde el sistema de
RESERVA DE VINOS NO reserva de vinos no funciona por unos 45 minutos.
FUNCIONA •El control de temperatura se encuentra en la posición OFF (Apagado).
•Si la luz interna no está encendida, es posible que el refrigerador no
esté enchufado al tomacorriente.
•Se quemó el fusible/ el disyuntor está desactivado. Reemplace el fusible
o reinicie el disyuntor.
• Apague la función Sabbath Mode (Modo Sabático).
•Si en el panel de control aparece SHO, entonces se activó el modo de
sala de exposición. Para apagarla, mantenga presionado el botón
ALARM (Alarma) y la tecla (-) simultáneamente durante 5 segundos.
DE FORMA FRECUENTE EL
SISTEMA DE RESERVA DE
VINOS FUNCIONA
DURANTE PERÍODOS O
CICLOS PROLONGADOS
(Los refrigeradores y
freezers modernos con
mayor espacio de
almacenamiento y un
freezer más grande
requieren más tiempo de
funcionamiento. Se activan
y se detienen con
frecuencia para mantener
temperaturas parejas).
•Normal cuando el refrigerador se enchufa por primera vez. Espere 24
horas para que el refrigerador se enfríe totalmente.
•Sucede con frecuencia cuando se colocan grandes cantidades de
comida en el refrigerador. Esto es normal.
•Se dejó la puerta abierta o un paquete hace que la puerta quede
abierta.
•Agua caliente o se abre la puerta con frecuencia. Esto es normal.
•Control de temperatura configurado en la posición más fría. Observe el
Control de Temperatura
VIBRACIÓN NORMAL •Es posible que el refrigerador no esté correctamente instalado.
O RUIDOSA (una – Es posible que el soporte anti-volcaduras esté suelto.
vibración leve es normal). – Es posible que la unidad no esté nivelada.
RUIDO SECO AL • Se trata de un ruido normal en el funcionamiento.
CERRAR LA PUERT A
RUIDOS DE • El compresor de velocidad variable.
FUNCIONAMIENTO
• Cerrar la puerta lentamente minimizará el sonido.
•Flujo de aire normal del ventilador – múltiples ventiladores soplan aire
frío a través de los compartimientos de alimentos frescos y del freezer;
otros ventiladores enfrían el compresor.
• Los ventiladores cambian de velocidad a fin de proveer un enfriamiento
óptimo y ahorros de energía.
• Estos sonidos NORMALES también se escucharán de vez en cuando:
– Es posible que se escuchen zumbidos o gorgoteos al cerrar la puerta.
Esto se debe al equilibrio de la presión dentro del refrigerador.
– Es posible que se escuche un sonido de goteo durante el ciclo de
descongelación, a medida que el hielo se derrite desde el evaporador
y fluye hasta la olla de drenaj.
– Es posible que el flujo de refrigerante a través de los espirales de
enfriamiento del freezer produzca un gorgoteo similar a agua
hirviendo.
– El agua que cae sobre el calentador de descongelamiento puede
producir un chisporroteo, traqueteo o zumbido durante el ciclo de
descongelamiento.
– Es posible que escuche un craqueo o traqueteo cuando el
refrigerador sea enchufado por primera vez en o durante/ luego del
ciclo de descongelamiento. Esto sucede a medida que el refrigerador
se enfría hasta la temperatura correcta.
– El compresor puede ocasionar un chasquido o gorjeo al intentar
reiniciarse (esto puede tomar hasta 5 minutos).
– El tablero de control electrónico puede ocasionar un chasquido
cuando los relés se activan para controlar los componentes del
refrigerador.
– Cubos de hielo que caen en la hielera y agua que corre por las
tuberías mientras la máquina de hacer hielo se vuelve a llenar.
– La válvula de agua de la máquina de hacer hielo zumbará cuando
esta última se llene de agua.
17
Page 66

18
Solución de Problemas
Reserva de Vinos
PROBLEMA CAUSA POSIBLE
LA PUERTA NO •Es posible que un paquete o una botella mantengan la puerta abierta.
CIERRA CORRECTAMENTE • Controle la junta de la puerta; es posible que esté fuera de posición.
• El refrigerador no está nivelado. Consulte las Instrucciones de
Instalación.
• Los resortes de las bisagras están desactivados. Consulte las
Instrucciones de Instalación.
EL REFRIGERADOR ESTÁ •El control de temperatura no se configuró en un nivel lo
DEMASIADO CALIENTE suficientemente frío. Observe el Control de Temperatura.
•Agua caliente o se abre la puerta con frecuencia.
•La puerta se deja abierta durante demasiado tiempo.
•Es posible que un paquete mantenga la puerta abierta.
LA TEMPERATURA ACTUAL • Se acaba de enchufar el refrigerador. Espere 24 horas hasta que el
NO ES EQUIVALENTE A LA sistema se estabilice.
TEMPERATURA CONFIGURADA • La puerta se mantuvo abierta durante demasiado tiempo. Espere 24
horas hasta que el sistema se estabilice.
•Se agregó comida caliente al refrigerador. Espere 24 horas hasta que el
sistema se estabilice.
•El ciclo de descongelamiento está en proceso. Espere 24 horas hasta
que el sistema se estabilice.
CRISTALES DE HIELO O • Se dejó el cajón abierto o un paquete hace que la puerta quede abierta.
ESCARCHA EN ALIMENTOS • Seabre la puertade formamuy frecuente oprperíodos demasiado
largos.
CONGELADOS(La escarcha•Es posible que el cajón se haya dejado abierto.
dentro de paquetes • Es posible que hayan quedado cubos de hielo u algún otro objeto
es normal) atorado detrás del cajón.
CONGELAMIENTO LENTO • Es posible que el cajón se haya dejado abierto.
DE CUBOS DE HIELO • Configure el control de temperatura en una posición más fría.
•Es posible que un paquete mantenga el cajón abierto
LOS CUBOS DE HIELO •Es necesario descartar los cubos de hielo viejos.
POSEEN OLOR/ GUSTO •Los recipientes para almacenamiento de hielo se deberán vaciar y
lavar.
•Es posible que los paquetes que no estén sellados dentro del freezer
transmitan olor/ gusto a los cubos de hielo.
•Es necesario limpiar el interior del freezer. Consulte la sección de
Cuidado y Limpieza.
•El agua que ingresa posee un gusto no agradable. Cambie el filtro de
agua.
LA MÁQUINA DE HACER •La máquina de hacer hielo está apagada.
HIELO AUTOMÁTICA •El suministro de agua está apagado o no está conectado.
NO FUNCIONA • El freezer está demasiado caliente.
•Los cubos apilados en el recipiente pueden hacer que la máquina de
hacer hielo se apague demasiado rápido. Nivele los cubos en forma
manual.
•El recipiente para hielo no se encuentra en su posición.
•Filtro con agua obstruida
SE FORMA HUMEDAD EN •No es atípico durante períodos con altos niveles de humedad. Seque la
LA PARTE EXTERIOR superficie.
DEL REFRIGERADOR •Encienda la función External Moisture Control (Control de Humedad
Exterior).
SE ACUMULA HUMEDAD • Se abre la puerta de forma muy frecuente o por períodos demasiado largos.
EN LA PARTE INTERIOR •En climas húmedos, el aire transporta humedad al refrigerador cuando
las puertas se abren.
•El cajón inferior se cambió desde el freezer para enfriar o para el vino.
EL REFRIGERADOR •Las comidas con olores Fuertes se deberán cubrir de forma hermética.
TIENE OLOR •Controle que la comida no se haya echado a perder.
•Se debe limpiar la parte interior. Consulte la sección de Cuidado y
Limpieza.
LAS LUCES INTERNAS • No hay corriente en el tomacorriente.
NO FUNCIONAN •Es necesario reemplazar las luces LED. Consulte la Sección de Servicio
al Cliente.
•Es posible que Sabbath Mode (Modo Sabático) esté en funcionamiento.
Apague la función Sabbath Mode (Modo Sabático).
ES DIFÍCIL VOLVER A ABRIR •El sellado hermético de la puerta se debe al equilibrio de la presión
LA PUERTA DE FORMA dentro del refrigerador. Luego de cerrar la puerta, espere entre 5 y 30
INMEDIATA LUEGO DE segundos para volver a abrirla.
CERRAR LA MISMA
Page 67

FICHA TECNICA DE FUNCIONAMIENTO
Cartucho GSWF de Sistema de Filtrado SmartWater
Este sistema fue evaluado de acuerdo con NSF/ANSI 42/53 para la reducción de las sustancias que figuran a continuación.
La concentración de las sustancias indicadas en agua que ingresan al sistema fue reducida a una concentración inferior o
igual al límite tolerable de agua que puede dejar el sistema, de acuerdo con lo especificado en NSF/ANSI 42/53*.
(Factores de seguridad 100% incorporados para uso no mesurable).
Estándar Nº 42: Efectos Estéticos
Parámetro USEPA Concentración Concentación del Efluente % Reduction Reducción Mínima
Cloro — 1.845 mg/L 2.0 mg/L+10% < 0.05 mg/L 0.05 mg/L > 97.29% 96.43% > 50%
T & O — — — — — — — —
Partículas** — 143,333 #/mL
Parámetro USEPA Concentración
Turbiedad 1 NTU*** 10.3 NTU*** 1+1 NTU*** 0.106 NTU 0.14 NTU 98.97% 98.61% 0.5 NTU
Quistes
Plomo en pH 6.5 0.015 mg/L 0.15 mg/L 0.15 mg/L+10% < 0.001 mg/L < 0.001 mg/L > 99.33% > 99.33% 0.010 mg/L
Plomo en pH 8.5 0.015 mg/L 0.14 mg/L 0.15 mg/L+10% 0.001 mg/L 0.003 mg/L > 99.29% 97.86% 0.010 mg/L
Lindano
Atrazina
MCL Promedio Peligro de Intrusión Promedio Máximo Promedio Mínimo Requerida
Por lo menos 10,000 partículas/mL
Standard No. 53: Health Effects
MCL Promedio Peligro de Intrusión Promedio Máximo Promedio Mínimo Requerida
99.95% Reduction
0.0002 mg/L
0.003 mg/L
200,000 #/L
0.0216 mg/L 0.002 mg/L+10%
0.008 mg/L 0.009 mg/L+10% < 0.002 mg/L < 0.002 mg/L > 76.12% > 66.67% 0.003 mg/L
Concentación del
Minimum 50,000 L
29.83 #/mL 140 #/mL 99.98% 99.91% > 85%
Efluente % Reduction Reducción Mínima
0 0 > 99.99% > 99.99% > 99.95%
< 0.00002 mg/L < 0.00002 mg/L
99.07% 98.75% 0.0002 mg/L
* Evaluado usando un promedio de flujo de 0.5 gpm; presión de 60 psig; pH of 7.5 ± 0.5; temperatura de 68° ± 5°F (20° ± 3°C)
** Medición en Partículas/ml. Las partículas usadas fueron de 0.5-1 micrones
*** NTU=unidades de turbiedad nefelométrica
Especificaciones de Funcionamiento
■ Capacidad: Certificado para hasta 750 galones (2.838 l); hasta seis meses
■ Requisitos de presión: 40-120 psi (barra 2.8-8,2)
■ Temperatura: 33–100ºF (0.6–38ºC)
■ Promedio de flujo: 0.5 gpm (1.9 lpm)
Instalación General/ Funcionamiento /Requisitos de Mantenimiento
■ Deje correr el nuevo cartucho en el flujo máximo por 3 minutos para purgar el aire atrapado.
■ Reemplace el cartucho cuando el flujo empiece a ser demasiado lento.
Avisos Especiales
■ Las instrucciones de instalación, piezas y disponibilidad de servicio, y la garantía estándar se incluyen en el envío del
producto. Este sistema de agua potable se deberá mantener de acuerdo con las instrucciones del fabricante, incluyendo el
reemplazo de cartuchos de filtro.
■ No se deben usar con agua que no sea segura a nivel microbiológico o que sea de calidad desconocida sin una desinfección
adecuada, antes o después, del sistema. Los sistemas certificados para la reducción de quistes se podrían usar en aguas
desinfectadas que puedan contener quistes filtrables. Los contaminantes u otras sustancias eliminadas o reducidas por este
sistema de tratamiento de agua no se encuentran necesariamente en su agua.Controle que se cumpla con las leyes y
reglamentaciones estatales y locales.
■ Observe que aunque la evaluación se realizó de acuerdo con condiciones estándares de laboratorio, el desempeño puede
variar. Los sistemas se deben instalar y usar de acuerdo con los procedimientos y pautas recomendados por el fabricante.
El sistema es evaluado y certificado por NSF International contra el Estándar 42 para la
reducción de cloro, gusto y olor, Clase de Partícula I y el Estándar 53 para la reducción de
quistes, plomo, Lindano, Atrazina y turbiedad.
Fabricado por: General Electric Company, Louisville, KY 40225
NSF
®
19
Page 68

State of California
Department of Health Services
Water Treatment Device
Certificate Number
155903 -
Date Issued: April 28, 2003
Trademark/Model Designation
GE GSWF GSWF
Manufacturer: General Electric Consumer Products
The water treatment device(s) listed on this certificate have met the testing requirements pursuant to Section
116830 of the Health and Safety Code for the following health related contaminants:
Microbiological Contaminants and Turbidity
Cysts
Turbidity
Organic Contaminants
Atrazine
Lindane
2,4-D
Replacement Elements
Inorganic/Radiological Contaminants
Asbestos
Lead
750 galRated Service Capacity: 0.5 gpm
Conditions of Certification:
Do not use where water is microbiologically unsafe or with water of unknown quality, except that systems certified for
cyst reduction may be used on disinfected waters that may contain filterable cysts.
20
Rated Service Flow:
Page 69

Notas
Reserva de Vinos
21
Page 70

Notas
Reserva de Vinos
22
Page 71

Servicios al Cliente
Reserva de Vinos
Con la adquisición de su nuevo electrodoméstico Monogram, esté
seguro de que si alguna vez necesita información o asistencia de
GE, allí estaremos. ¡Todo lo que tiene que hacer es llamar!
GE Answer
Center
800.626.2000
®
Servicio de
Reparación en
el Hogar
800.444.1845
Para Clientes
con
Necesidades
Especiales…
Cualquiera sea su consulta sobre uno de los electrodomésticos principales de Monogram, el
servicio de información de GE Answer Center® está disponible para brindarle ayuda. Su llamada
– y su consulta – será respondida a la brevedad y del modo más gentil. Llame a GE Answer
Center® de lunes a viernes de 8 a.m. a 10 p.m., Hora del Este, y los sábados de 8 a.m. a 7 p.m.
O
Visite nuestro sitio web en: monogram.com
Un profesional del servicio al cliente de GE le brindará el servicio de reparación profesional
programado en el día y horario que sea de su conveniencia. Para programar una cita del
servicio técnico, comuníquese de lunes a viernes de 7 a.m. a 10 p.m., Hora del Este, o los sábados
y domingos de 8 a.m. a 6 p.m. Muchas ubicaciones de Servicio al Cliente de GE a cargo de la
empresa le ofrecen el servicio hoy o mañana, o a su conveniencia. Nuestros técnicos con
capacitación en fábrica conocen su electrodoméstico por dentro y por fuera, de modo que la
mayoría de las reparaciones se pueden resolver en una sola visita.
GE ofrece controles en Braille para una variedad de electrodomésticos de GE, y un catálogo para
planificar una cocina sin obstáculos para personas con movilidad limitada. Los consumidores
con incapacidad auditiva o de diálogo que poseen acceso a un TDD o a un teletipo convencional
se pueden comunicar al 800.TDD.GEAC (800.833.4322) para solicitar información o el servicio
técnico.
800.626.2000
Contactos del
Servicio Técnico
800.626.2224
Piezas y
Accesorios
800.626.2002
Puede estar seguro de que el Servicio al Cliente de GE aún estará allí una vez que su garantía
caduque. Adquiera un contrato de GE mientras su garantía aún está vigente y recibirá un
importante descuento. Con un contrato a muchos años, se asegura el acceso al servicio técnico
futuro a los costos actuales.
Aquellos individuos calificados para realizar el servicio técnico de sus propios
electrodomésticos pueden solicitar el envío de piezas y accesorios directamente a sus hogares. El
sistema de piezas de GE brinda acceso a más de 47,000 piezas… y todas las Piezas de Renovación
Genuina de GE están totalmente garantizadas. Se aceptan las tarjetas VISA, MasterCard y
Discover. Visite www.GEAppliances.com.
Las instrucciones de mantenimiento por parte del usuario que figuran en este manual
cubren los procedimientos que deberán ser realizados por cualquier usuario. Otros servicios
técnicos generalmente deberían ser derivados a personal calificado del servicio. Se deberá
tener cuidado, ya que una reparación indebida podrá ocasionar que el funcionamiento no
sea seguro.
23
Page 72

GARANTÍA DE SU REFRIGERADOR Y FREEZER MONOGRAM
Abroche el recibo de venta o cheque cobrado aquí. Para acceder al servicio
técnico correspondiente a la garantía, deberá contar con el recibo de la fecha
original de compra.
QUÉ CUBRE LA
GARANTÍA
Desde la Fecha de
la Compra Original
Garantía
Reserva de Vinos
GARANTÍA LIMITADA POR DOS AÑOS
Por dos años desde la fecha original de compra, le brindaremos, sin costo, piezas y trabajos de servicio técnico en
su hogar para la reparación o reemplazo de cualquier parte del refrigerador o freezer que presente fallas debido
a defectos de fabricación.
GARANTÍA LIMITADA POR CINCO AÑOS
Por cinco años desde la fecha original de compra, le brindaremos, sin costo, piezas y trabajos de servicio
técnico en su hogar para la reparación o reemplazo de cualquier parte del sistema de reserva de vinos sellado
(el compresor, condensador, evaporador y todos los tubos de conexión) que presente fallas debido a defectos
de fabricación.
GARANTÍA LIMITADA ADICIONAL DE SEIS A DOCE AÑOS SOBRE EL SISTEMA DE SELLADO
Para la adquisición de seis a doce años desde la fecha original de compra, le brindaremos, sin costo, el
reemplazo de partes para cualquier pieza del sistema de reserva de vinos sellado (el compresor, condensador,
evaporador y todas las conexiones de tuberías) que presenten fallas debido a defectos de fabricación. Usted
paga por el viaje del profesional del servicio técnico a su hogar y por los costos del trabajo del servicio técnico.
GARANTÍA LIMITADA DE TREINTA DÍAS DEL CARTUCHO DEL FILTRO DE AGUA (Filtro de agua, si se
incluye)
Desde la fecha de adquisición original le brindaremos, sin costo, el reemplazo de partes de cualquier pieza del
cartucho del filtro de agua que presente fallas debido a defectos de fabricación. Durante la garantía limitada
por treinta días, también le brindaremos, sin costo, el reemplazo de un cartucho del filtro de agua.
QUÉ NO CUBRE
LA GARANTÍA
Esta garantía se extiende al comprador original y cualquier dueño subsiguiente para productos adquiridos para
uso normal en el hogar en los 48 estados contiguos, Hawái, Washington, D.C. o Canadá. Si el producto se
encuentra en un área donde no se encuentra disponible un Proveedor Autorizado de Servicio Técnico de GE,
usted será responsable por el costo de un viaje o se podrá requerir que traiga el producto a una Ubicación del
Servicio Técnico de GE Autorizado para recibir el servicio. En Alaska, la garantía es la misma, excepto que es
LIMITAD A debido a que usted debe pagar el costo del envío del producto hasta el negocio del servicio técnico o
por los costos de viaje del técnico del servicio a su hogar.
Todo el servicio de la garantía será provisto por nuestros Centros del Servicio de Fabrica o por un proveedor
autorizado del servicio de Customer Care® durante el horario laboral normal.
Si necesita el servicio técnico para su electrodoméstico, durante el período de garantía o en forma posterior,
llame al 800.444.1845. Al llamar al servicio, se solicita que tenga a mano los números de serie y modelo.
• Viajes del técnico del servicio a su hogar para
enseñarle sobre cómo usar el producto.
• Reemplazo de los fusibles de la casa o reinicio
de disyuntores.
• Daños ocasionados sobre el producto por
accidente, incendio, inundaciones o catástrofes
naturales.
• Fallas del producto si su uso es para propósitos
diferentes al original o uso comercial.
• Daño causado después de la entrega.
• Instalación inadecuada, entrega o
mantenimiento. Si tiene algún problema durante
la instalación, comuníquese con su vendedor o
instalador. Usted es responsable de brindar
instalaciones adecuadas de conexión eléctrica,
plomería u otras instalaciones de conexión.
EXCLUSIÓN DE GARANTÍAS IMPLÍCITAS—Su única y exclusiva alternativa es la reparación del producto,
como se indica en la Garantía Limitada. Las garantías implícitas, incluyendo garantías implícitas de
comerciabilidad o conveniencia sobre un propósito particular, se limitan a un año o al período más
corto permitido por la ley.
• Reemplazo de bombillas de luz, si se incluyen, o el
cartucho del filtro de agua, si se incluye, a
diferencia de lo detallado anteriormente.
• Reemplazo del cartucho del filtro de agua, si se
incluye, debido a la presión del agua que está fuera
del rango de funcionamiento específico o debido a
exceso de sedimentos en el suministro de agua.
• Pérdida de alimentos por mal estado.
• Daños consecuentes o incidentales causados por
posibles defectos sobre este producto.
• Producto no accesible para brindar el servicio
requerido.
197D8243P001
49-60616
12-10 GE
Algunos estados no permiten la exclusión o limitación de daños incidentales o consecuentes, de modo que es
posible que dicha exclusión o limitación no se aplique a usted. Esta garantía le da derechos legales específicos y
es posible que tenga otros derechos legales que varían entre un estado y otro. Para conocer cuáles son sus
derechos legales en su estado, consulte en la oficina de asuntos del consumidor local o estatal o al Fiscal de su
estado.
Garante: General Electric Company,
Louisville, KY 40225
 Loading...