

Page 1
Installation Instructions
PLEASE READ BEFORE INSTALLATION:
To be read in conjunction with SUNPIPE installation instructions.
• Before commencing installation ensure the relevant
mains supply has been safely isolated.
• Installation should be carried out in accordance with the
latest relevant wiring regulations for the specific country/
region.
• Wiring should be carried out by a qualified electrician.
• Ensure all electrical connections are tight with no loose
strands, including factory made connections.
WARNINGS
• Use only with the approved driver for this product.
• This luminaire is for indoor use only.
• IMPORTANT: The product must not be covered by
ceiling insulation material; this will reduce the unit’s
operational lifetime, invalidate the guarantee and
cause a risk of fire.
Page 2
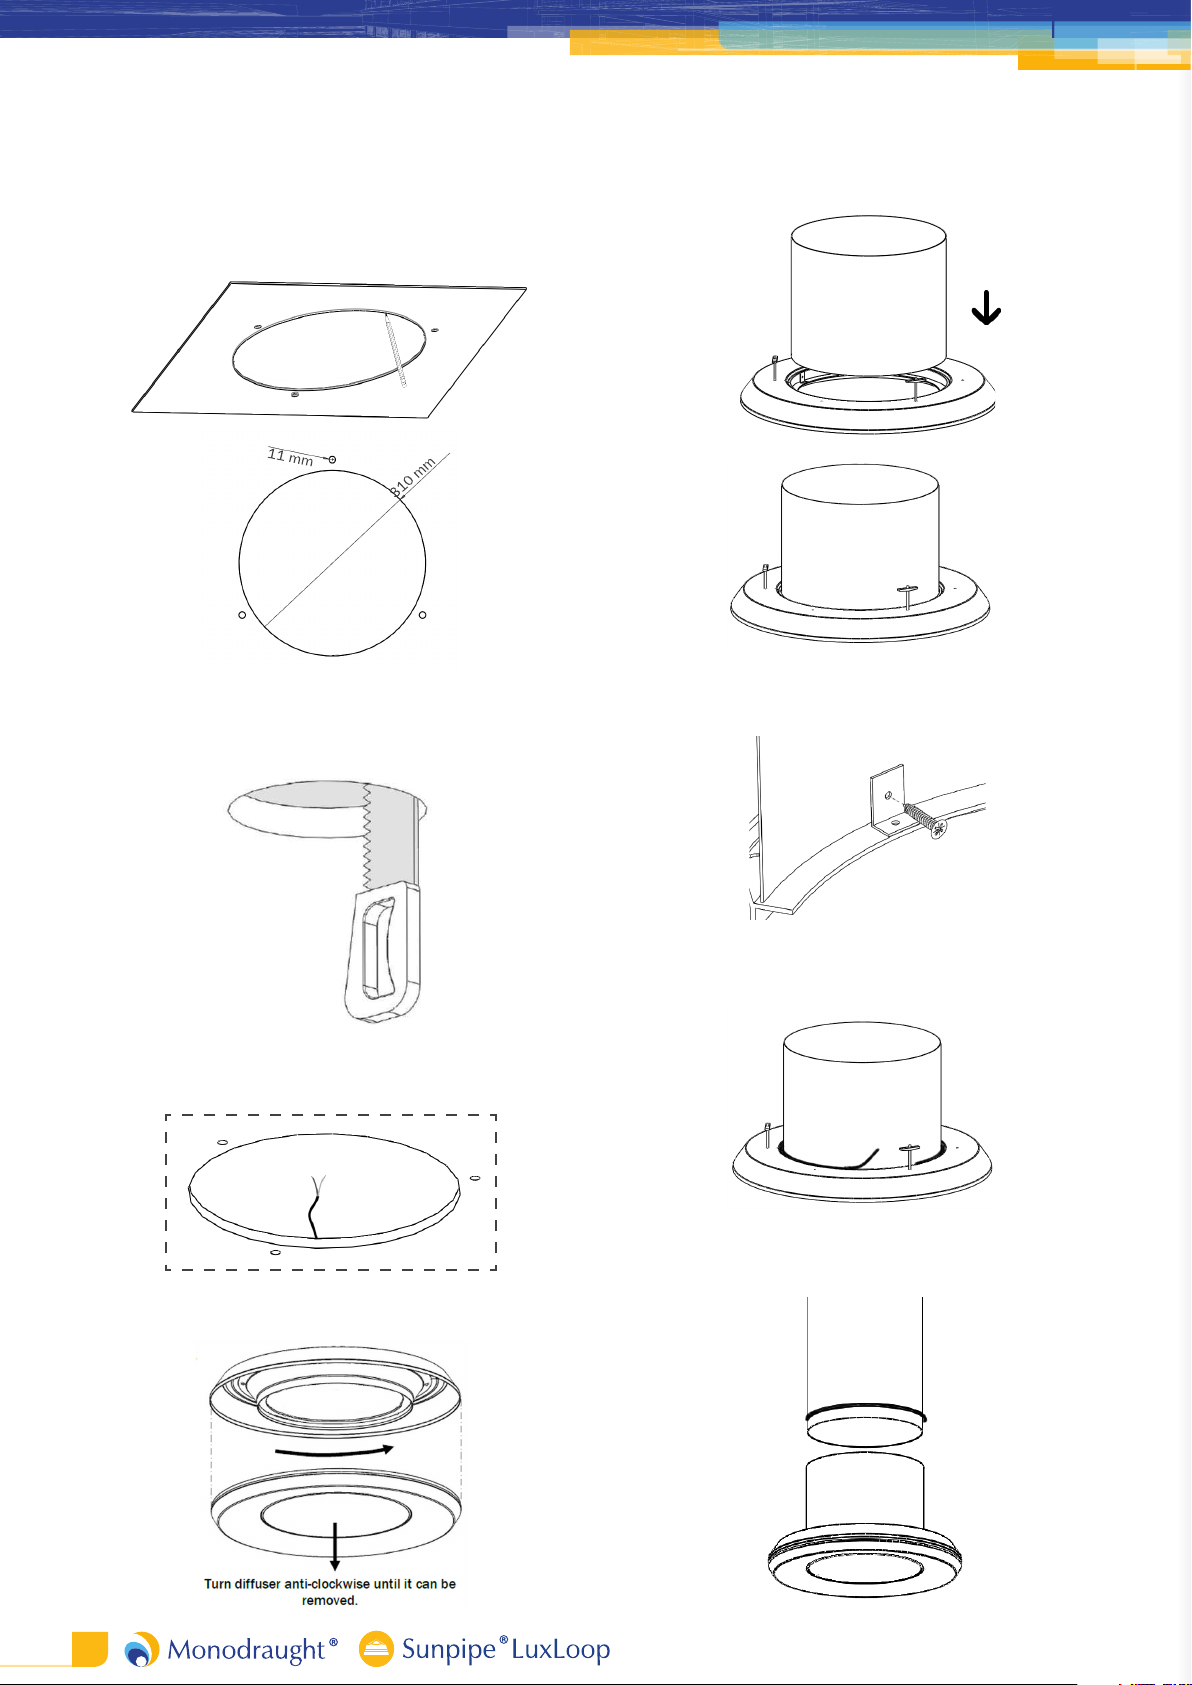
SUNPIPE LuxLoop Surface Model
1. Using the template, mark out 310 mm opening for
SUNPIPE and 11 mm fixing holes. If possible, use the stud
finder to avoid ceiling obstructions.
2. Cut opening, and drill fixing Ø11 mm hole positions for
spring toggle clamps. The fixing template can be used to
mark positions.
5. Insert SUNPIPE Slip Length into LuxLoop luminaire.
6. Fasten SUNPIPE length to angle brackets using pipe
screws provided.
3. Run power cables from existing lighting circuit to opening.
Position fixing template above ceiling if required.
4. Remove diffuser from SUNPIPE LuxLoop.
7. Adhere white seal to outside of pipe around the join
between pipe and luminaire.
8. Place black sponge seal around the outside of the offered
length of SUNPIPE in the roof void.
2
[email protected] / +44 (0)1494 897700
Page 3
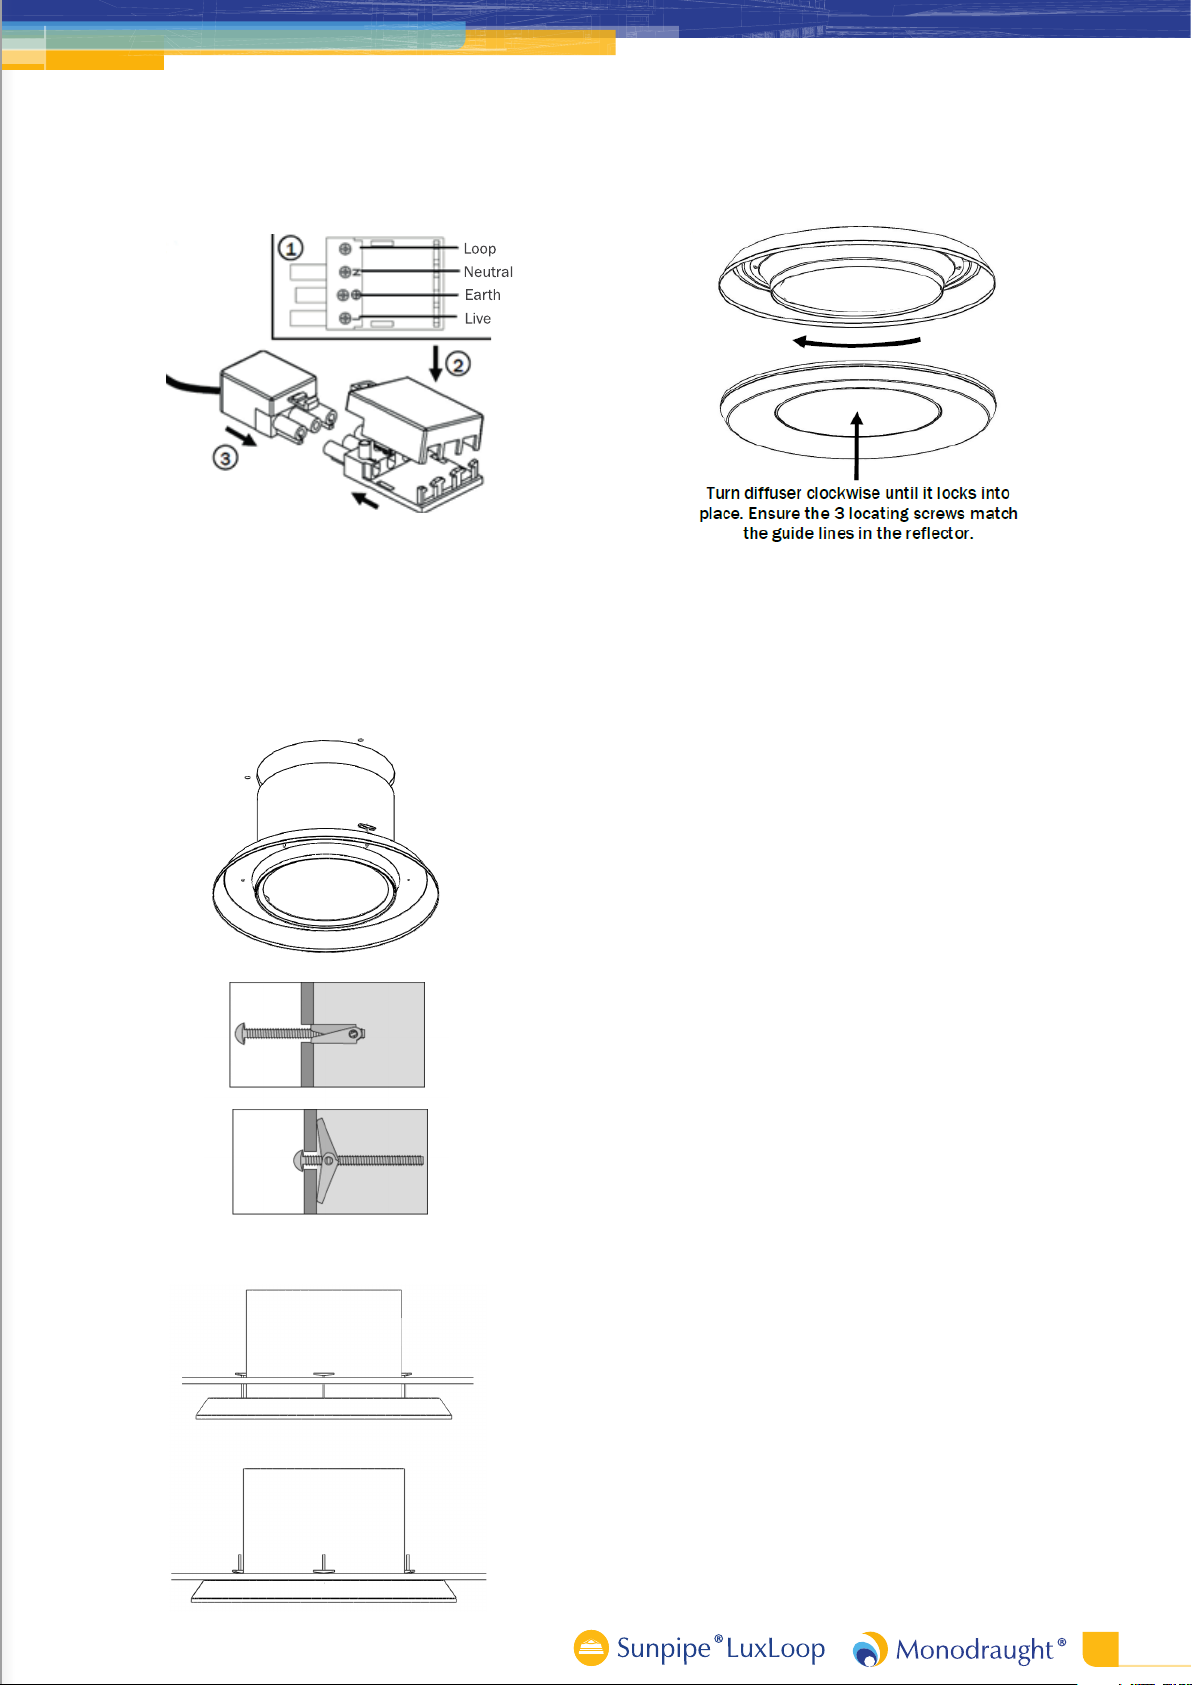
9. Ensure the mains supply is disconnected and wire mains
to the large half of the connector.
10. Note down the MAC address and password of the LED
driver if necessary. These are found on the label on the
driver. (Only for HalcyonTM drivers)
11. Thread SUNPIPE LuxLoop up through ceiling opening
and onto last SUNPIPE length. Feed the spring toggles
through the 11 mm holes until they spring back to hold
the luminaire in position.
13. Put diffuser back in and twist until it locks.
12. Tighten the screw heads until the unit is tight against the
ceiling.
[email protected] / +44 (0)1494 897700
3
Page 4
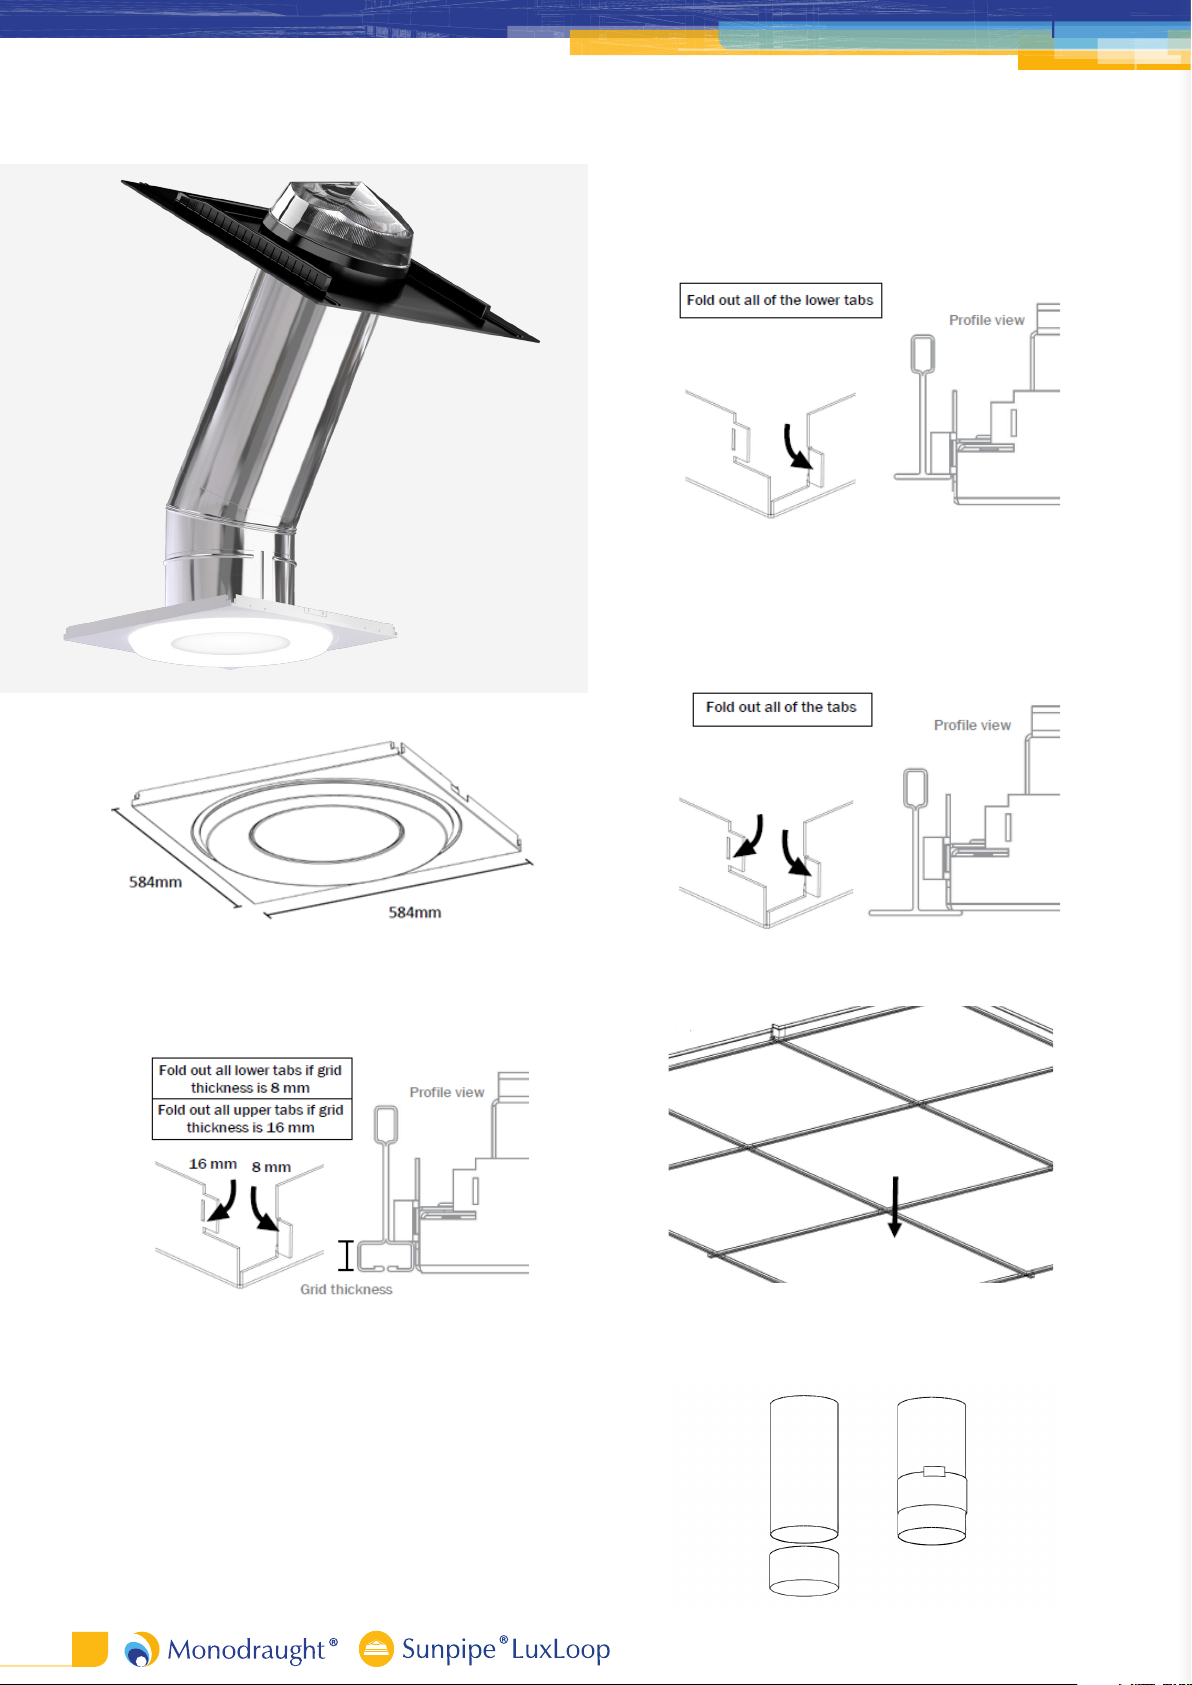
SUNPIPE LuxLoop Panel Model
For 15 mm Exposed T Grids
Lower tabs should be folded out in each corner,
allowing them to rest on the grid.
For 24 mm Exposed T Grids
All tabs need to be folded out to prevent the panel
from shifting but the panel rests on the grid rather
than the tabs.
1. The panel is suitable to 15 mm and 24 mm ceiling grids.
For 15 mm Designer Grids
Relevant tabs should be folded out in each corner,
allowing them to rest on the grid.
2. Remove tile from ceiling grid (if needed).
3. Assemble the Slip Length and slide over the last SUNPIPE
length, temporarily securing it with tape.
4
[email protected] / +44 (0)1494 897700
Page 5
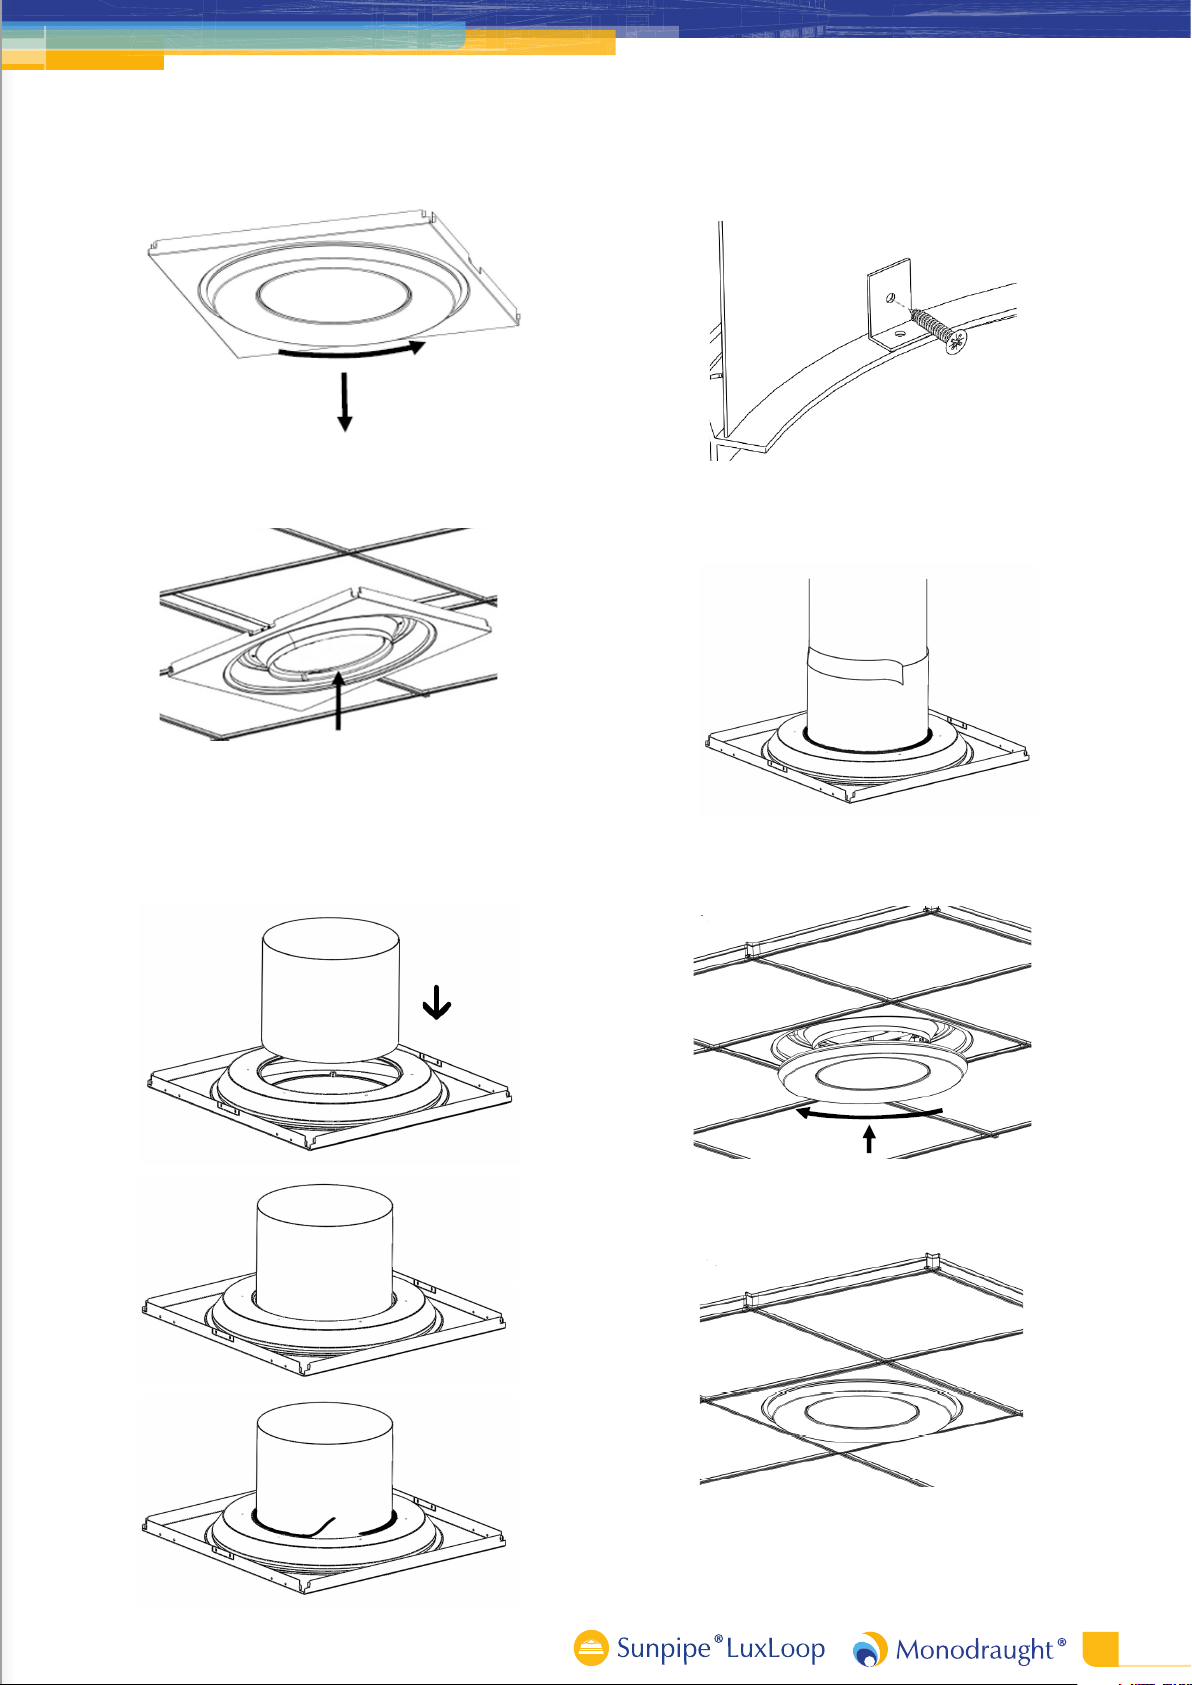
4. Remove the diffuser by rotating it anti-clockwise.
5. Angle the fitting and pass it up through the ceiling void
(ensuring the correct tabs have been folded out).
7. Fasten SUNPIPE length to angle brackets using pipe
screws provided.
8. Seal the Slip Length with the last length of SUNPIPE using
SUNPIPE tape.
6. Insert SUNPIPE Slip Length into LuxLoop Luminaire.
Remove the tape temporarily securing the slip length and
lower through the opening in the back of the luminaire.
Adhere white seal to outside of pipe around the join
between pipe and luminaire.
9. Align the diffuser and rotate it clockwise to secure in
position.
10. Once the fitting is secured in the grid, reconnect the
mains supply.
[email protected] / +44 (0)1494 897700
5
Page 6

Information
Frequently Asked Questions
How much power does SUNPIPE LuxLoop use?
The actual amount of energy used by SUNPIPE LuxLoop depends on the amount of
natural daylight available and the control strategy for each system. The maximum
power usage for the artificial luminaire is 40W, however in practice there may be
days where only the natural daylight function is required.
What is the expected product life of SUNPIPE LuxLoop?
SUNPIPE LuxLoop has a 10 year warranty on all natural daylight components and a
5 year warranty on the artificial luminaire components when registered. The LEDs
powering the artificial light are rated to 50,000 hours usage. Because of the hybrid
nature of SUNPIPE LuxLoop this could be considered to be significantly longer in
terms of years of usage than an equivalent 50,000 hour rated light.
What happens if I require a replacement part?
Please feel free to contact Monodraught should you require any replacement
components.
Does the SUNPIPE LuxLoop require maintenance?
Due to the shape of the dome, the SUNPIPE is self-cleaning. The internal tube also
does not require any maintenance or cleaning, although care should be taken
during install to not leave finger marks on the mirror finish to ensure the very best
performance from the system. The artificial luminaire may need to be replaced after
50,000 hours of usage.
Do Monodraught sell light switches for the Standard configuration SUNPIPE LuxLoop?
Monodraught to not sell light switches – these should be purchased elsewhere and
wired by a professional electrician.
How much light can the system provide?
The SUNPIPE LuxLoop delivers up to 4000 lumens of artificial light and up to 4400
lumens of natural daylight.
What is the IP rating of SUNPIPE LuxLoop?
The SUNPIPE LuxLoop ceiling diffuser has an IP rating of 20.
6
[email protected] / +44 (0)1494 897700
Page 7

Page 8

Halifax House, High Wycombe
Buckinghamshire, HP12 3SE
+44 01494 897700
+44 01494 532465
www.monodraught.com
Monodraught Ltd
@MonodraughtLtd
Monodraught Ltd
 Loading...