

Monobuggy CHES-B2 Assembly And Operation Instructions Manual
06725_DE-GB-FR-NL.indb 1
20.01.11 16:55
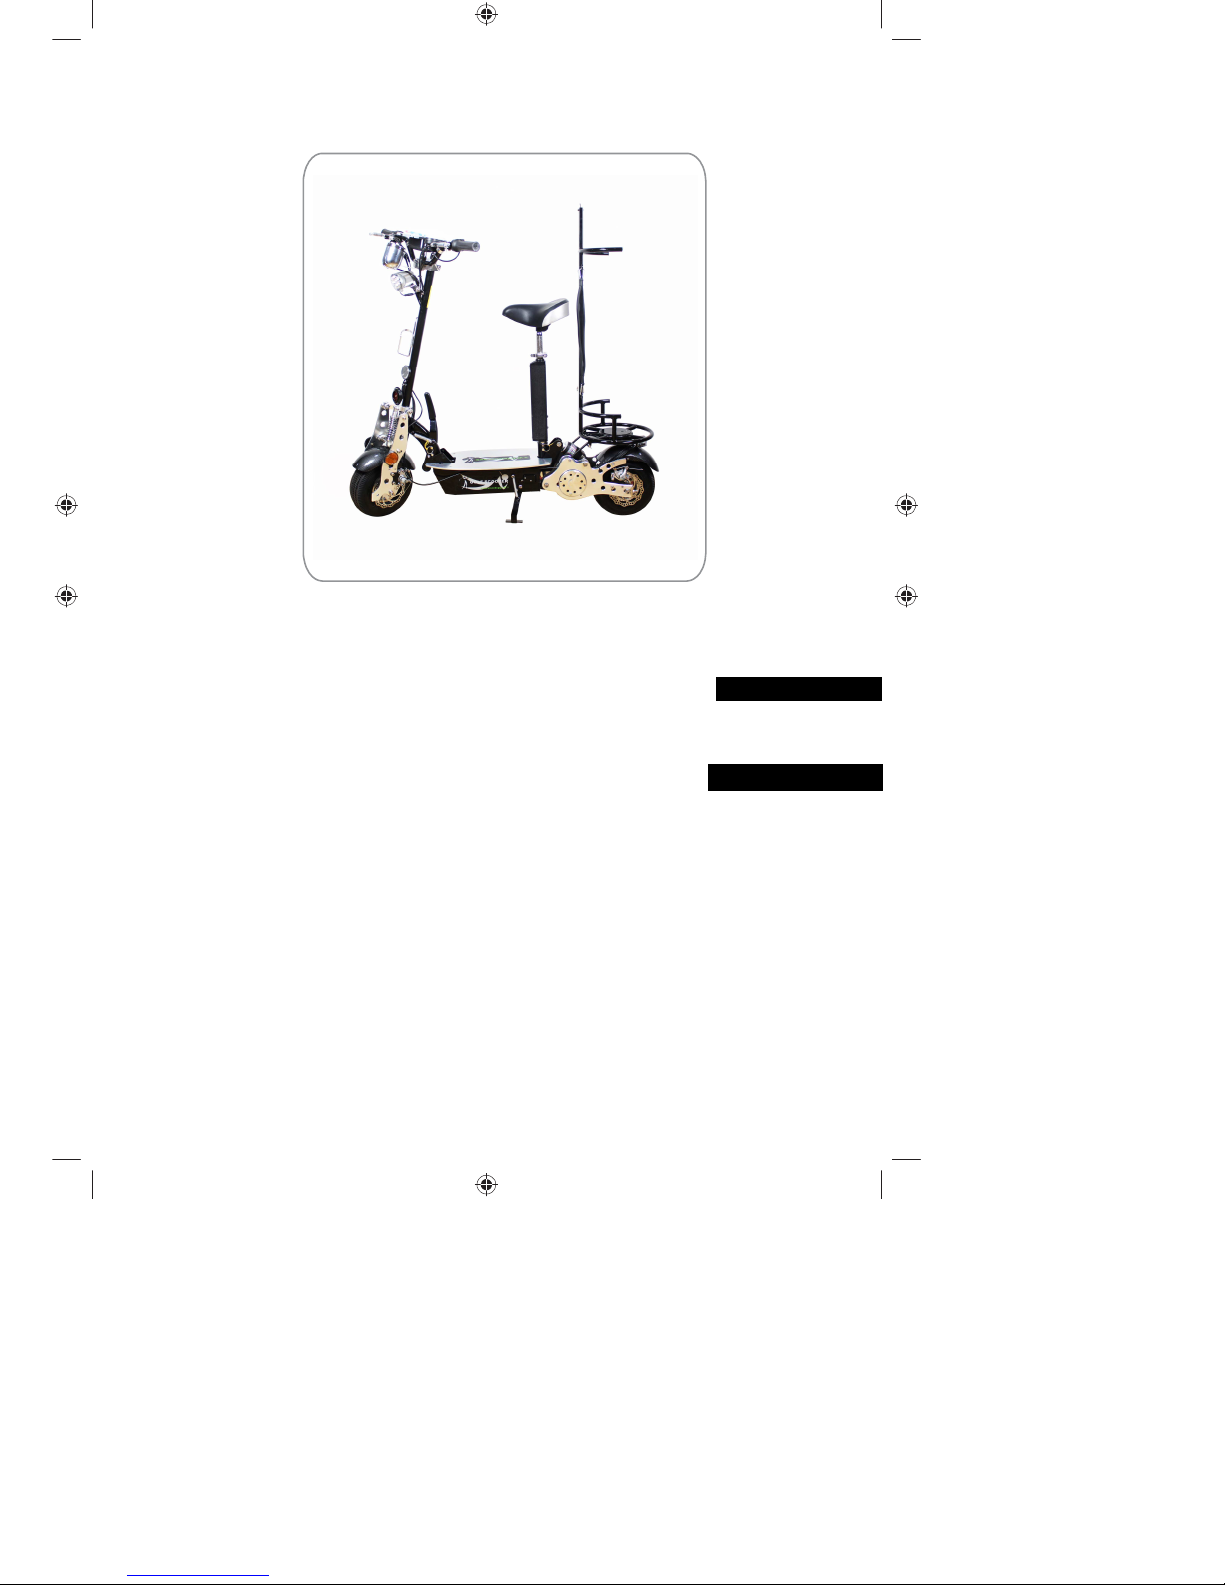
Golf Scooter Mono Buggy
Assembly and operation instructions(page 2)
ENGLISH
Golf Scooter Mono Buggy
Manual og samlevejledning(page 23)
ENGLISH
SCANDINAVIAN

06725_DE-GB-FR-NL.indb 2
20.01.11 16:55
ENGLISH
GB
Contents
Meaning of the Symbols in These Instructions 3
Safety Instructions 3
Warranty Terms 6
What is supplied 6
Overview 7
Before your first ride 8
Unpacking 8
Assembly 9
Raising up the steering rod 9
Finish assembling the handlebar, tacho and headlight 9
Attaching the rear-view mirrors 10
Inserting the battery fuse 10
Attaching the saddle 10
Attaching the score board 11
Attaching the bottle holder 11
Attaching the golf rack 11
Operating the golf rack 12
Charging the battery 13
Operation 14
Before setting off 14
Important notes on braking 14
Starting and stopping 15
After your ride 15
Information about the range 16
Care 16
Battery 16
Cleaning the frame 16
Cleaning the foot board 16
Lubricating the chain 17
Maintenance 17
Tyres 17
Setting the brakes 17
Adjusting the chain 18
Retightening the steering rod 18
Removing and inserting the battery 18
Storage / folding up the scooter 19
Troubleshooting 20
Disposal 21
Technical data 22
Customer service 22
2
06725_DE-GB-FR-NL.indb 23
20.01.11 16:55
Dear Customer,
We are delighted that you have chosen the Golf Scooter Mono Buggy. This modern and
environmentally friendly golf scooter is suitable for all age groups and is ideal for covering short
distances, e. g. when playing golf or camping, in your leisure time or in everyday life. The
comfortable saddle and excellent suspension mean that it provides great comfort for the rider.
We hope you have lots of fun and safe journeys wherever you travel with your new Golf
Scooter Mono Buggy.
Before using the scooter for the first time, please read the instructions through carefully and store them in a safe place. If the scooter is given to someone else, it should
always be accompanied by these instructions. The manufacturer and importer will not
accept liability if the directions in these instructions are not observed!
Meaning of the Symbols in These Instructions
All safety instructions are marked with this symbol. Read these instructions carefully
and follow them to avoid injury to persons or damage to property.
Tips and recommendations are marked with this symbol.
Safety Instructions
Intended use
❒
Due to its design and configuration, this scooter is intended for use on golf ground and
paved paths. This vehicle is not suitable for steep gradients, competitions, artistic trick
cycling or cross-country riding.
❒
The maximum gross weight is 150 kg.
❒
The scooter is not suitable for children and youngsters under the age of 16.
❒
The scooter is designed for private use and not for commercial use.
❒
The scooter must only be used as described in the operating instructions. Any other use is
deemed to be improper.
❒
The scooter can not travel on public roads before getting a class M driving licence and an
insurance plate
.
Use
❒
Keep children away from the packaging material. There is a danger of suffocation, as well as
other hazards!
❒
This scooter is not suitable for use by people (including children) who have restricted
physical, sensory or mental capacity, or who lack experience and/or knowledge.
Children must be supervised in order to ensure that they do not play with the scooter.
3

06725_DE-GB-FR-NL.indb 24
20.01.11 16:55
❒
Do not make any additions or alterations to the scooter.
❒
Always ride with the headlight switched on (even during the day).
❒
Use the scooter on public roads only when you have familiarised yourself with its use.
❒
Always check the scooter for signs of damage before putting it into operation. Do not try
to repair bent safety-critical parts such as the frame, forks, handlebar, saddle, saddle post,
or brake levers; have them replaced immediately. "Risk of breakage!"
❒
Use only original spare parts!
❒
Unqualified repairs create risks and danger for the user and void all warranty claims! If
necessary, contact an approved workshop.
❒
Have repairs, particularly on the brake system, carried out only by an approved workshop.
❒
As with all mechanical components, the scooter is subject to wear and high loads. Different materials and components can react differently with respect to wear and fatigue caused
by these loads. If the design service life of a component is exceeded, the component can
suddenly fail and possibly result in injury to the rider. Any form of cracks, scratches or discolourations in highly stressed areas is an indication that the service life of the component
has been reached and that the part should be replaced.
❒
Do not transport any heavy loads! Do not hang bags on the handlebar!
This will impair the riding safety.
❒
Do not ride in wet weather or in snow and ice or on unpaved paths. Be aware that the
effect of the brakes is impaired in unfavourable weather conditions.
❒
Avoid riding in heavy rain, through puddles or snow. Although the scooter has splash
guards, it cannot be protected from water getting on to it. There may therefore be shortcircuits within the electronics. Damage to the electronics caused by "trips in the rain" is
not covered by the guarantee.
❒
Ride carefully and at an appropriate speed at which you have the scooter under control.
Always look ahead and ride defensively.
❒
When you are riding, look out for any potholes, drain covers, tram and railway lines and
other obstacles which might endanger your safe riding.
❒
Keep all body parts away from the rotating parts of the scooter.
Correct behaviour on public roads
❒
Familiarise yourself with the country-specific road-traffic regulations and comply with these
regulations when you are riding.
❒
Do not ride the scooter if you are under the influence of alcohol or drugs.
❒
Outside of built-up areas, use cycle lanes where they are available. The use of public footpaths and cycle paths is not allowed in built-up areas.
❒
Always ride well to the right and overtake on the left.
❒
Before turning, always give a clearly visible sign with your outstretched arm.
❒
Always ride in the prescribed direction of travel.
❒
Adapt your speed to the weather conditions, a wet road will result in a longer braking
distance!
❒
Do not listen to music via headphones when riding your scooter!
4

06725_DE-GB-FR-NL.indb 25
20.01.11 16:55
❒
Riding without hands and hanging on to other vehicles is extremely dangerous and furthermore forbidden.
❒
Riding two or more abreast hinders the other traffic and should therefore be avoided.
❒
Keep a safe distance from the person in front.
❒
Never allow more than one person to use the scooter at a time.
❒
Riding without a saddle is not permitted in the area covered by the road traffic regulations.
❒
Wear suitable sturdy clothing and ideally a helmet to prevent injuries. Preferably wear
noticeable, bright colours so that you can be seen better and more quickly by other road
users. (Wear reflective clothing if necessary.)
Safety instructions for the battery and charger
❒
Be sure to avoid storing the battery when empty as the cells can be damaged or destroyed
by a deep discharge.
❒
Do not heat the battery, throw it into fire, immerse it in liquids, short-circuit or place it in
a microwave oven!
❒
Never open the battery pack or the charger!
❒
Only ever use the charger supplied to charge the battery!
❒
The charger must only be connected to mains sockets that have been properly installed.
The socket must also be readily accessible after connection. The mains voltage must be the
same as that stated in the technical data of the charger. Only use suitable extension cables
whose technical data is the same as that of the charger.
❒
Ensure that it is not possible for others to trip over the connected mains cable.
❒
Position the cable in such a way that it does not become squashed or bent and does not
come into contact with hot surfaces.
❒
From time to time, check the charging process!
❒
Remove the mains plug from the mains socket,
– if a fault occurs during operation,
– before a thunderstorm,
–
before you clean it.
❒
When you want to remove the mains plug from the socket, always pull the plug and not
the cable.
❒
Never immerse the charger and battery in water or other liquids! Ensure that the charger,
battery, cable or plug do not fall into water or become wet. Should the charger fall into
water, switch off the power supply immediately.
❒
Never touch the charger, cable or plug with wet hands.
❒
Risk of short-circuits! Ensure that there are no metallic objects in the vicinity of the
charger plug and the contacts of the battery!
❒
Risk of short-circuits! After charging, be sure to push the cover over the charger socket of
the battery.
Equipment and device damage
❒
The use of aggressive cleaning additives and excess moisture may damage the scooter.
5

06725_DE-GB-FR-NL.indb 26
20.01.11 16:55
❒
PLEASE NOTE! Never immerse the battery, charger, mains lead or plug in water or other
liquids.
❒
Remove the plug from the mains socket before cleaning the charger. Wipe the outside with
a clean and slightly damp cloth.
❒
Do not drop the charger or allow it to be knocked violently.
❒
Do not expose the scooter and the charger to extreme temperatures, wide temperature
variations, or direct sunlight.
❒
Keep the scooter and the charger in a dry place at temperatures of between 0 and 40°C.
❒
In the event of any damage/malfunctions, switch the scooter off immediately and contact
your nearest customer service centre/specialist dealer or distributor to ensure your own safety.
Warranty Terms
The following are excluded from the warranty: all defects and damage caused by improper
handling or unauthorised attempts to repair. The same applies for normal wear.
What is supplied
•
1 scooter
•
1 saddle
•
1 score board
•
1 waterproof cover
•
1 saddle bar
•
1 saddle post
•
1 safe bolt for saddle post
•
1 safe bolt for lever of fold down
•
1 battery (already inserted)
•
1 charger
•
2 rear-view mirrors (option)
•
2 keys
•
1 tool set, incl. 2 fuses
•
these operating instructions
6
06725_DE-GB-FR-NL.indb 27
20.01.11 16:55
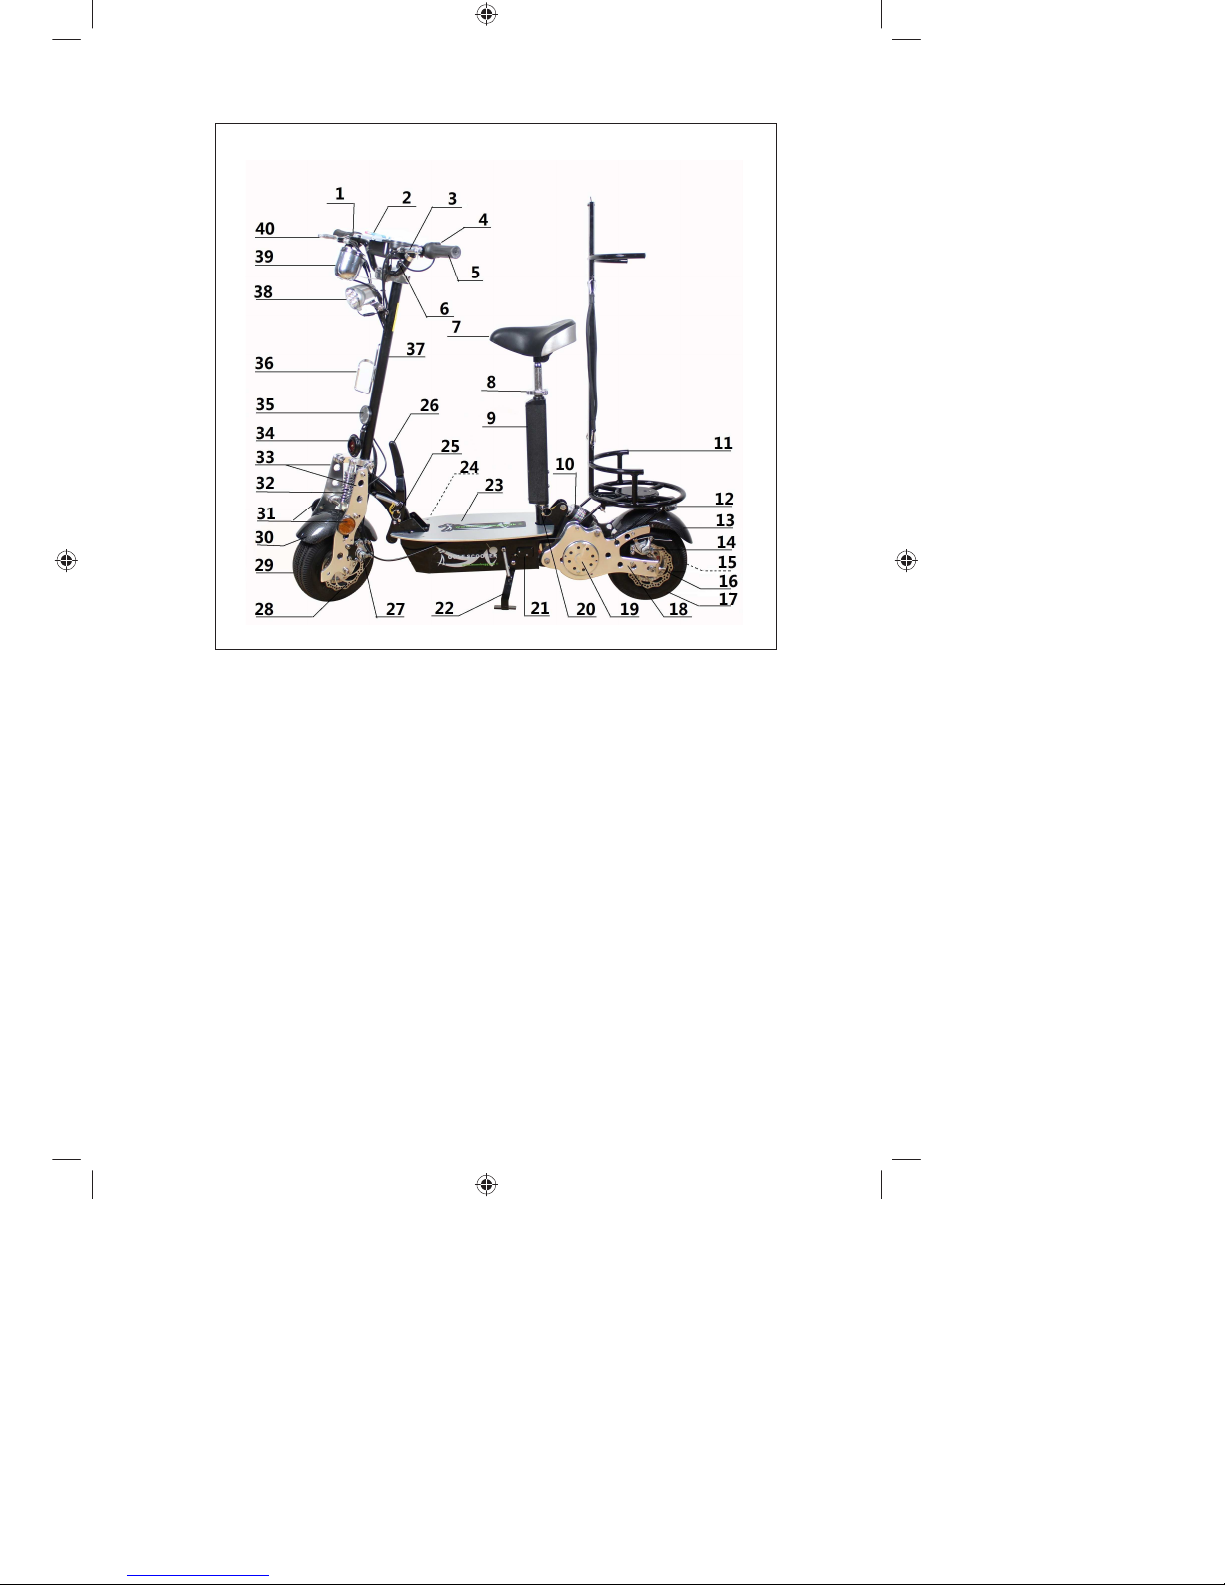
Overview
1
Accelerator throttle
2
Score board
3
Rear brake lever
4
Buttons for headlight and horn
5
Handle grip
6
Ignition key
7
Saddle
8
Quick-release lever
9
Saddle post
10
Rear suspension
11
Golf rack
12
Rear light
13
Rear fender
14
Rear brake caliper
15
Chain
16
Rear brake disc
17
Rear wheel
18
Rear forks
19
Electric motor
20
Safe bolt for saddle post
21
Contact switch for stand
22
Stand
23
Footboard
24
Charger socket
25
Safe bolt for fold down
26
Lever for fold down
27
Front brake caliper
28
Front brake disc
29
Front wheel
30
Front fender
31
Side reflector
32
Front suspension
33
Front forks
34
Horn
35
Front reflector
36
Bolt holder
37
Steering rod
38
Headlight
39
Speedometer
40
Front brake lever
7
06725_DE-GB-FR-NL.indb 28
20.01.11 16:55
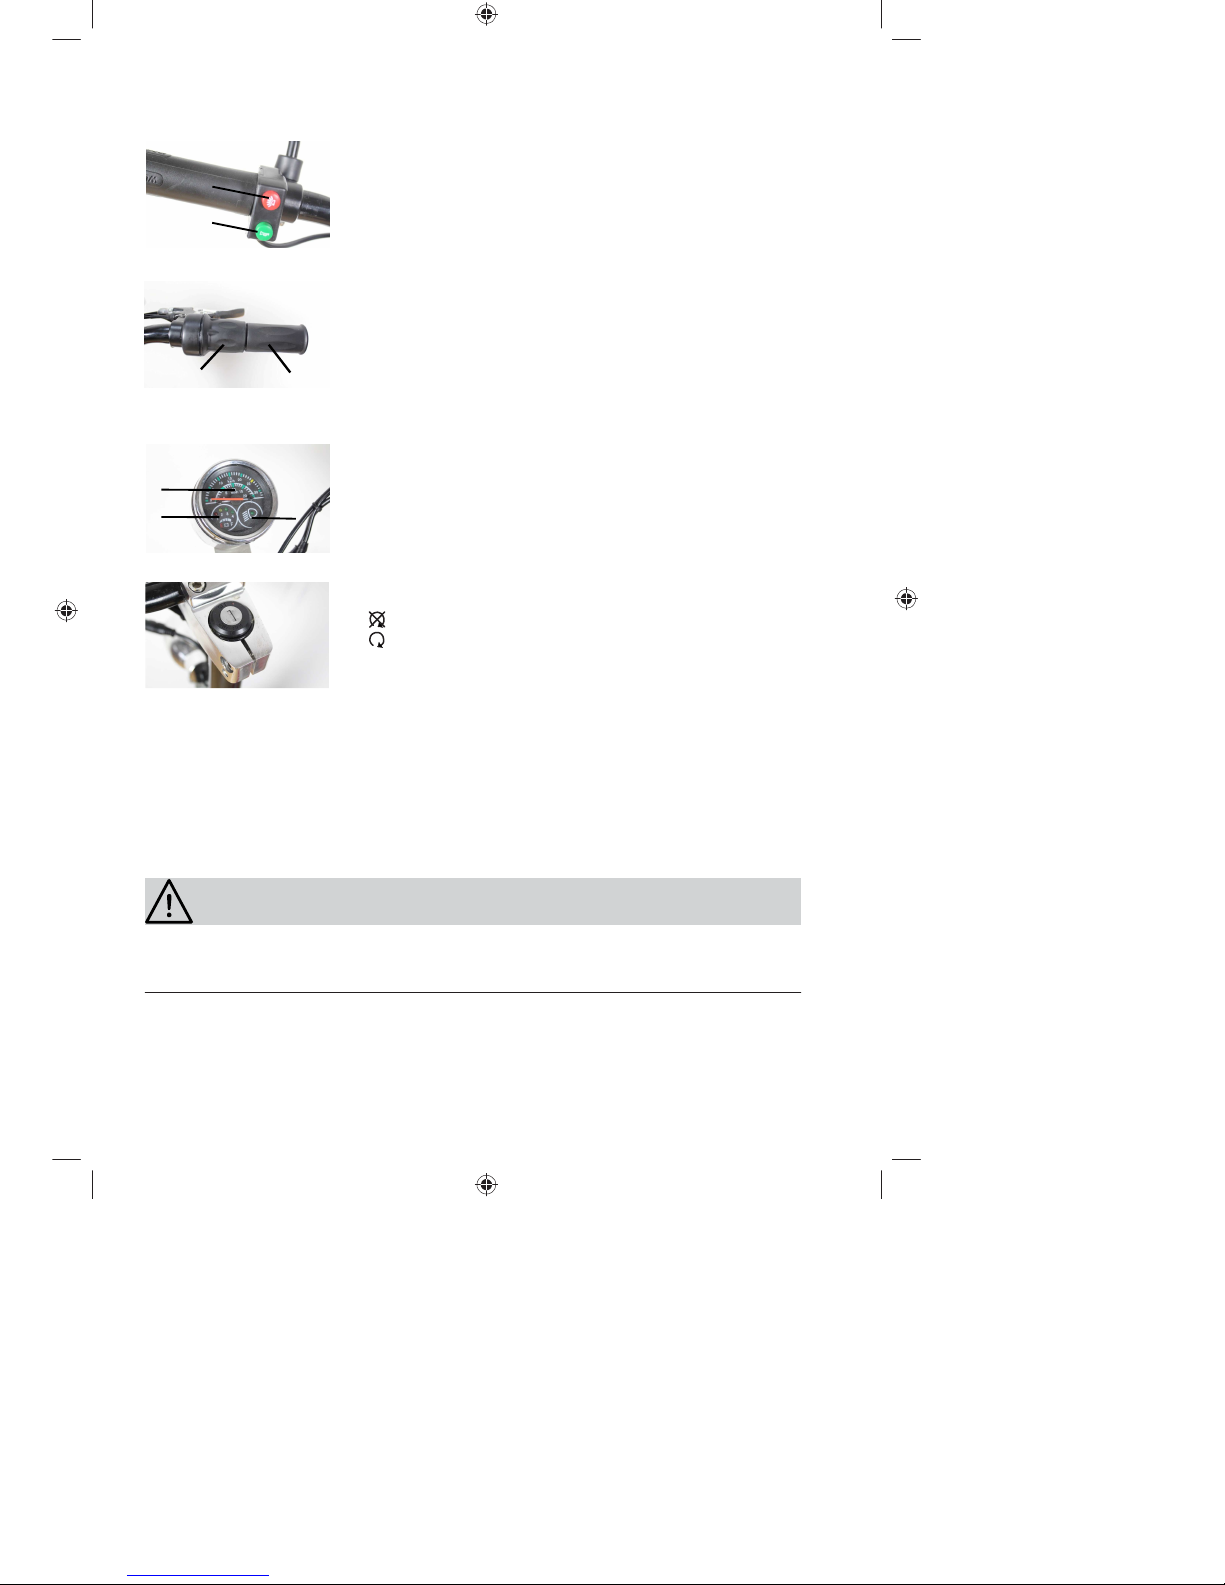
Headlight and horn
1
2
Accelerator throttle
1 2
Speedometer
3
4 5
Ignition lock
•
1
On/Off button for headlight
• 2 Horn button
• 1 Accelerator throttle to control speed.
• 2 Right handle grip.
•
3
Speedometer display in km/h and mph
• 4 Charge status of the battery: 1 (E) Battery must be charged
up; 4 (F) Battery is full.
•
5
Lights up when the headlight is switched on.
•
The key can be turned to the following positions in the ignition lock:
Switch off
Switch on
Before your first ride
Before you can ride the scooter, you must:
•
unpack the items supplied,
•
finish assembly of the scooter and adjust it to your personal requirements,
•
attach the golf rack
•
charge up the battery.
Unpacking
PLEASE NOTE!
❒
Keep children and animals away from the packaging material. There is a danger of suffocation!
•
Unpack all parts and check the scope of supply for completeness (see "Scope of Supply"
section); also check for transport damage. If you find any damage to the components, do
not use them (!), please contact with local dealer or distributor.
8
06725_DE-GB-FR-NL.indb 29
20.01.11 16:55
Assembly
You will need
•
an open-jaw wrench, size 10 and 13
•
an Allen key, size 5 and 6
If you do not have any tools to hand, you can also use the tool set that is supplied.
We recommend that you get help from a second person when assembling the
scooter.
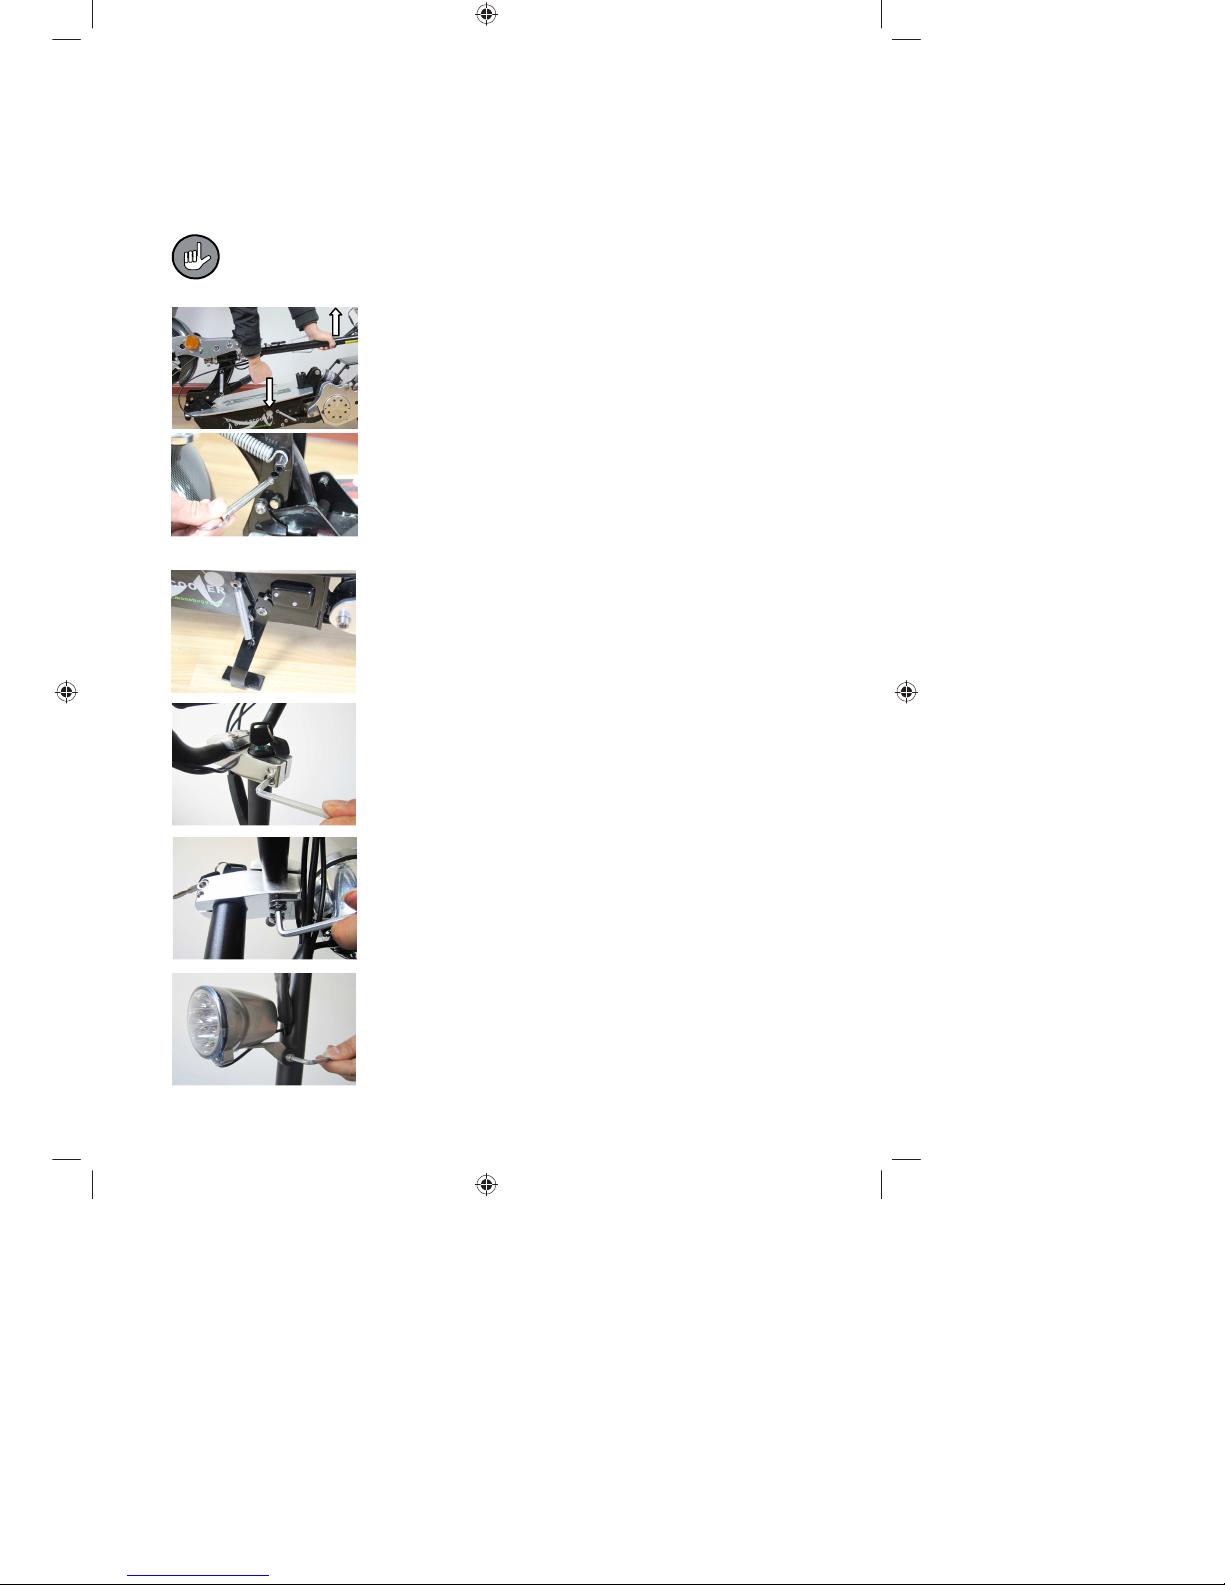
Raising up the steering rod
1.
Raise up the steering rod. To do this, use one hand to press
the lever down towards the foot board and use your other
hand to raise up the steering rod. Set the steering rod upright
until you hear it lock into place.
2.
To make rider safer,place the safe bolt into lever for fold
down.
Finish assembling the handlebar, tacho and headlight
3. To make assembly easier, you can fold down the stand.
4. Push the clamp to which the handlebar is attached onto the
steering rod. Please note here that the accelerator throttle
must be positioned in the rider's right hand. The clamp must
be flush with the steering rod at the top, with only the ignition
lock protruding out.
5. Align the handlebar in the correct position. Tighten the two
screws in the clamp using an Allen key (6 mm).
6. Tighten the screw of speedometer bracket from below onto
the clamp (beneath the handlebar). You will need an Allen key
(5 mm) to do this.
7. Screw the headlight onto the front of the steering rod with
the aid of an Allen key (5 mm). You will require an open-jaw
wrench, size 10 for the nut.
9
06725_DE-GB-FR-NL.indb 30
20.01.11 16:55
Attaching the rear-view mirrors (Option)
8. If you find a right-hand and left-hand rear-view mirror supplied with the scooter. After
assembly, the mirrors must be bent outwards (away from the steering rod).
9. Take one rear-view mirror and undo the lock nut on the end of the mirror bracket so that
the thread is revealed.
10. Select the correct side of the handlebar to which you wish to
attach the mirror and rotate the thread of the mirror bracket
into the thread next to the hand brake. Align the mirror in the
correct position.
11. Pull the rubber cover down over the lock nut and the screw
of the brake.
12. Attach the second rear-view mirror in the same way.
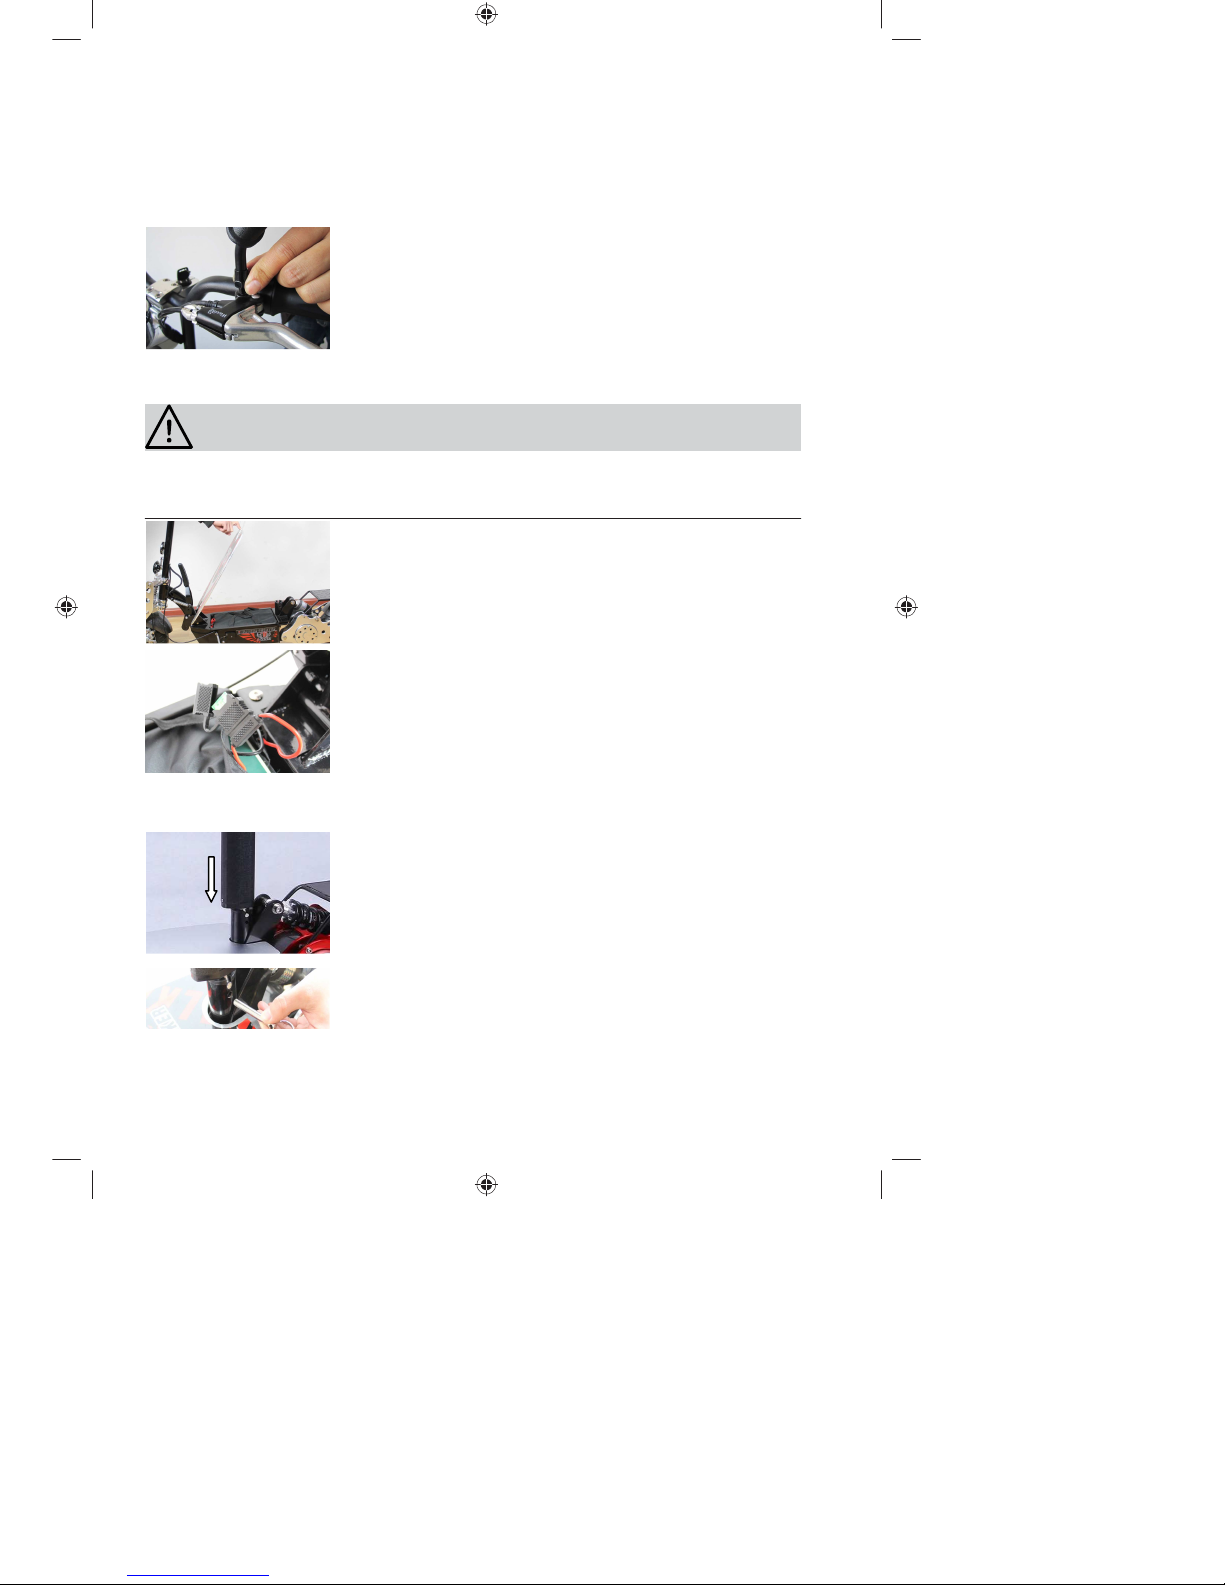
Inserting the battery fuse
PLEASE NOTE!
❒
Never pull on the cables! To release a cable connection, only ever pull on the connector
plug.
13. Upwards to open the footboard and battery pack inside.
14. The small fuse box is located at the side next to the battery.
Attaching the saddle
15. Take one of the fuses which is supplied in the tool set,
open the cap of the fuse box, insert the fuse and then close
the cap again.
16. Stow all of the cables and the small fuse box away at the side
next to the battery.
17. Close the battery compartment and snap the latches shut.
Check whether the latches have closed correctly.
18. Insert the saddle post into the holder socket next to the
footboard. Press the saddle post down to its limit stop!
19. To fix saddle post, insert the safe bolt into the holder socket
10

06725_DE-GB-FR-NL.indb 31
20.01.11 16:55
Attaching the score board
Attaching the bolt holder
Attaching the golf rack
20. If necessary, slide the saddle bar into the saddle post (the
narrow end must point upwards) and adjust it to the height
you want. Tighten up the quick-release lever.
21. Place the saddle on the saddle bar and adjust it to the
optimum angle of inclination. Tighten the two nuts using an
open- jaw wrench (size 13).
22. There are two screws from sponge on handlebar.
Please screw it out from the sponge using a screw driver.
23. Take out score board from package and open white cover.
There are two screw holes below the white cover.
24. Place the score board onto the sponge(Note:golf ball on the
left). Screw holes on the score board must be in line with
the holes on sponge and cross rod among sponge.
25. Tighten the two screws into the sponge and cross rod using
a screw driver.
26. Bottle holder has be fixed on the side of steering rod by
maker, please check and tighten the two screws using a
screw driver.
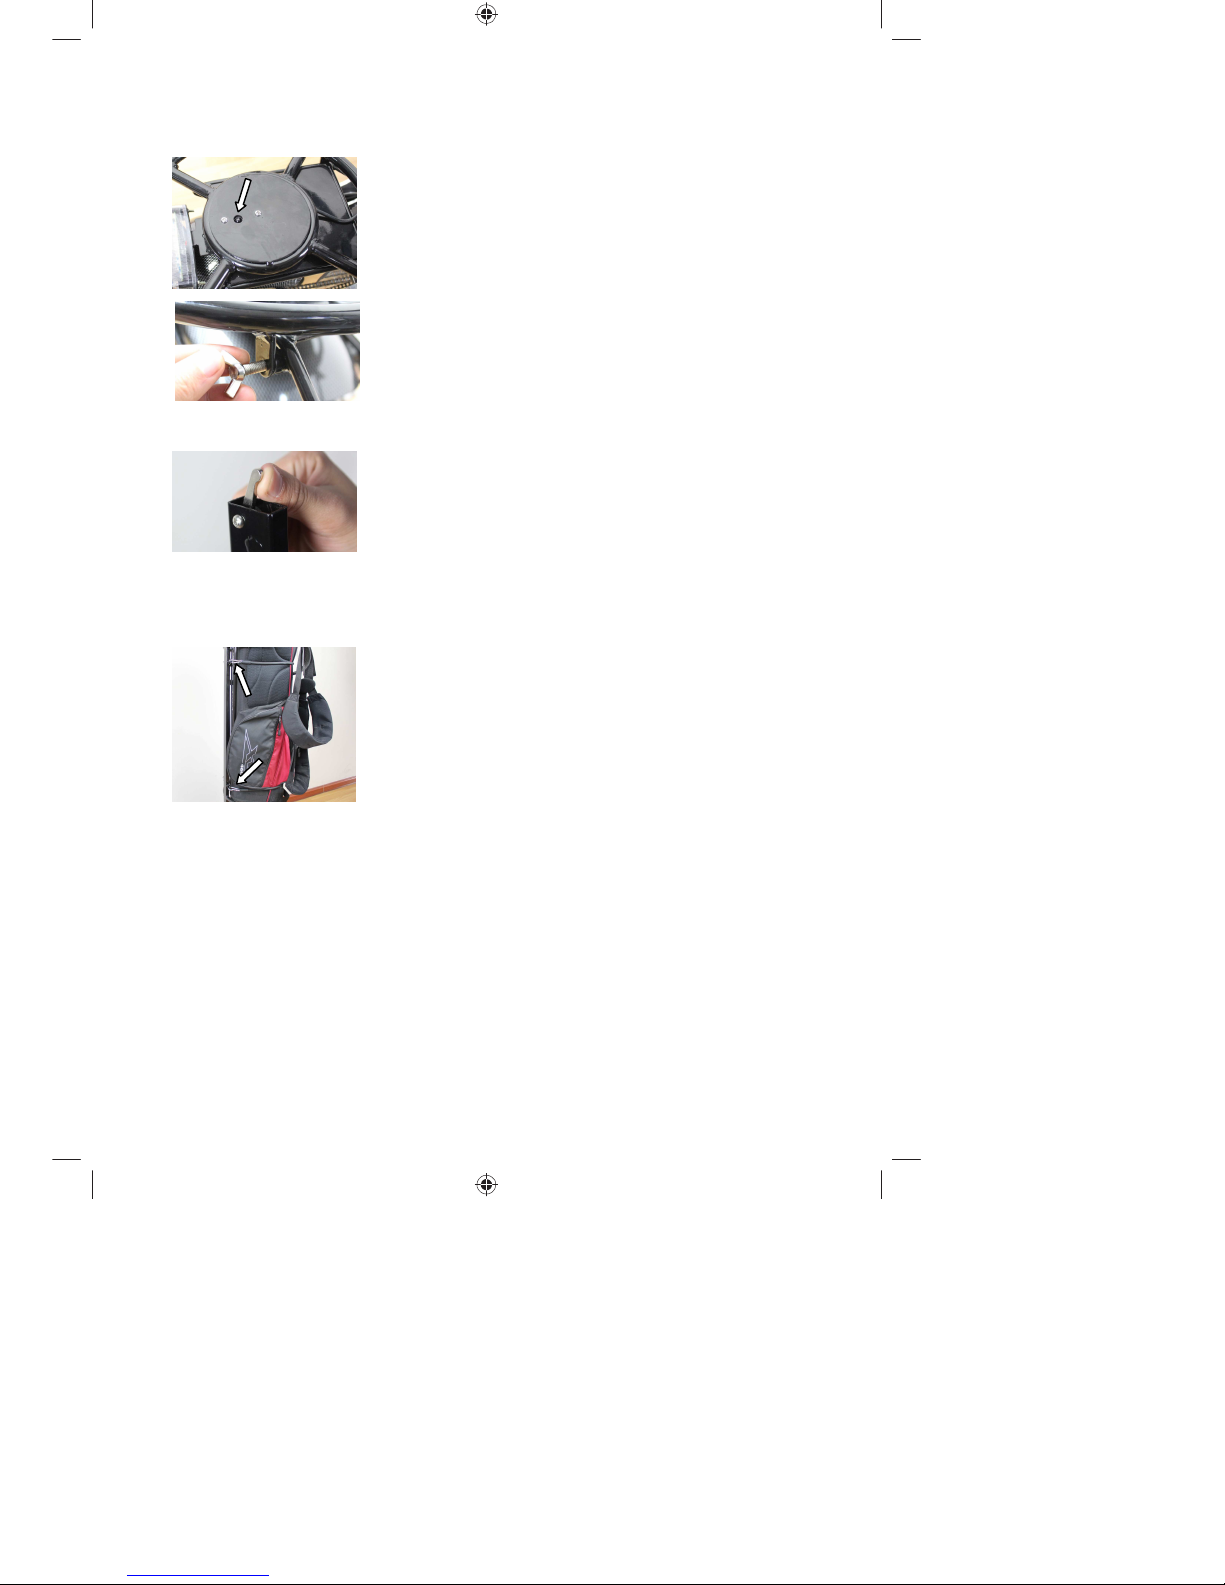
27. There is a convex pin on rear rack board, the pin is a part
of lock device which quickly lock and release golf rack.
28. There are two butterfly nuts on both sides of the rear rack
board, please unscrew the two nuts and keep it.
11
06725_DE-GB-FR-NL.indb 32
20.01.11 16:55
29. Take out the golf rack from package, there is a hole on the
base of the golf rack.
30. Place the golf rack on the rear rack board of the scooter.
Make sure that make the pin from rear rack board into the
hole on the base of the golf rack.
31. To fix the golf rack on the rear rack board, please screw-in
the butterfly nuts and tighten it using your hand.
Operating the golf rack
32. There is an unlocking switch on the top of the golf rack.
The switch is another part of lock device which quickly
lock and release the golf rack.
33. Two black elastic belts with buckle is attached on the golf rack.
You can bind and fix the golf bag with the elastic belts, and lock
it by the buckle.
12
06725_DE-GB-FR-NL.indb 33
20.01.11 16:55
Charging the battery
PLEASE NOTE!
❒
It is essential that you fully charge up the battery before you first use the scooter.
❒
The battery may not be completely discharged because this could damage it.
❒
Only use the charger indoors and in the dry.
❒
The contacts of the charger must remain free of dust and dry at all times.
❒
If the scooter and the battery are not used for a lengthy period of time, the battery should
be fully charged up before it is stored away in order to avoid a deep discharge.
❒
Risk of short-circuits! After charging, be sure to push the cover over the charger socket of
the battery.
Fully charge up the battery before you first use the scooter and after each ride. The maximum
charging time is approx. 6 – 8 hours. If the charging time is significantly longer, please read the
"Troubleshooting" section.
You should charge the battery ideally at room temperature. Do not charge it at temperatures
of below 0°C or above 40°C!
The scooter is equipped with a lead-acid battery which does not have to be fully
charged and discharged (no memory effect). It will last for a particularly long time if it
is kept charged. So whenever possible leave the scooter connected to the mains, even
if the battery is charged up. It is not possible to overcharge it because the charger
automatically switches back.
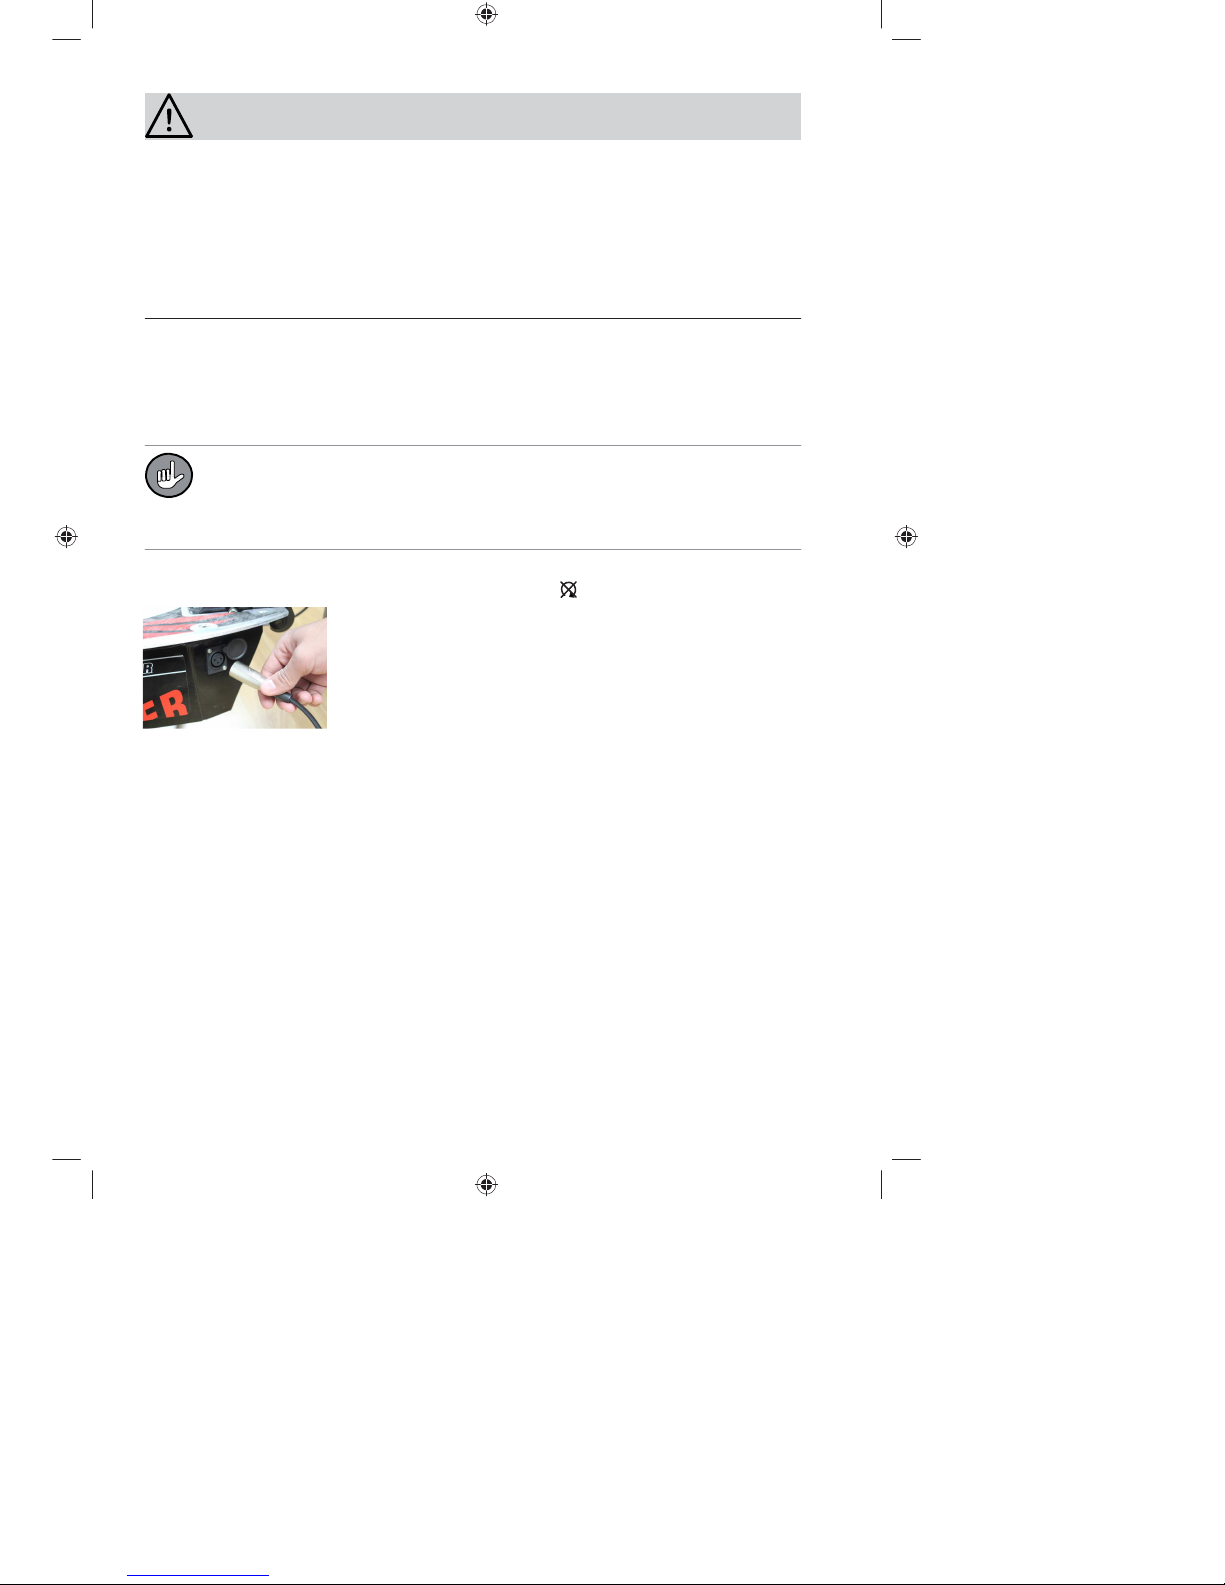
1. Park the scooter on its stand close to a plug socket.
2. Make sure that the scooter is switched off (key position ).
3. Push the cover of the charger socket to the side.
4. Plug the 3-pole charger plug into the charger socket.
5. Connect the mains plug of the charger to a properly installed
and easily accessible mains socket. The mains voltage must be
the same as that stated in the technical data of the charger.
6. As soon as the charger is connected to the power supply and
to the battery, the red charger indicator light comes on.
Charging stops automatically when the battery is fully charged
the indicator light now changes from red to green.
7. Disconnect the charger first from the mains supply and then from the battery. Store it out
of the reach of children.
8. Push the cover over the charger socket of the battery.
13

06725_DE-GB-FR-NL.indb 34
20.01.11 16:55
Operation
PLEASE NOTE!
•
Before each journey you make, check that all the components are securely mounted and
working properly. In particular, you should check the brakes, the accelerator throttle and
the headlight. Make sure that the battery is charged.
•
Select a quiet road or a car park for your first ride. Practise braking with the front and rear
wheel brakes.
•
After you have switched on the scooter, do not unintentionally press the accelerator
throttle. The scooter will respond immediately.
•
Always use the stand to park the scooter.
•
Do not sit on the scooter when the stand is folded down! It could become bent. Always
fold the stand up before using the scooter.
Before setting off
•
Before you turn on the scooter, check that it will roll freely. As you roll it forwards, the
motor should offer slight resistance. When you push the scooter backwards, you will
notice a higher level of resistance. This resistance is intentional.
•
Test the brakes: Push the scooter forward slightly and pull the right-hand brake lever to
apply the front-wheel brake, and pull the left-hand brake lever to apply the rear-wheel
brake. The wheels ought to be stopped when the corresponding brake lever is applied. If
this is not the case, the brakes need to be adjusted (see "Maintenance" section).
•
Check that the accelerator throttle springs back into place. If it cannot be turned or does
not spring back into place, contact a specialist or local dealer or distributor.
•
Insert the key into the ignition lock and turn it to position . Then press the headlight button to check whether the headlight is working properly. You should also try the right-hand
and left-hand brake levers in turn. The brake light should light up when you do so.
•
Check the battery charge indicator on speedometer. If yellow light 2 is lit up, battery
charge is lacking,if only red light 1 is lit up,must charge up the battery (see "Charging
the battery" section).
•
Check the tyres and the chain tension on a regular basis (see "Maintenance" section).
This is not just for your own safety, but is also important for the range and speed of the
scooter.
If the scooter is not working properly, go to the "Troubleshooting" chapter.
Important notes on braking
When you activate a brake lever, the motor is automatically switched off.
•
The scooter is equipped with 2 autonomous disc brakes.
•
If the brakes are used incorrectly, you could lose control of your scooter as they have a
very strong braking effect. Practise braking with your new scooter in a place where you
cannot endanger yourself or others. First ride slowly and actuate the brake levers lightly to
familiarise yourself with the response of the brakes.
14
 Loading...