

Page 1
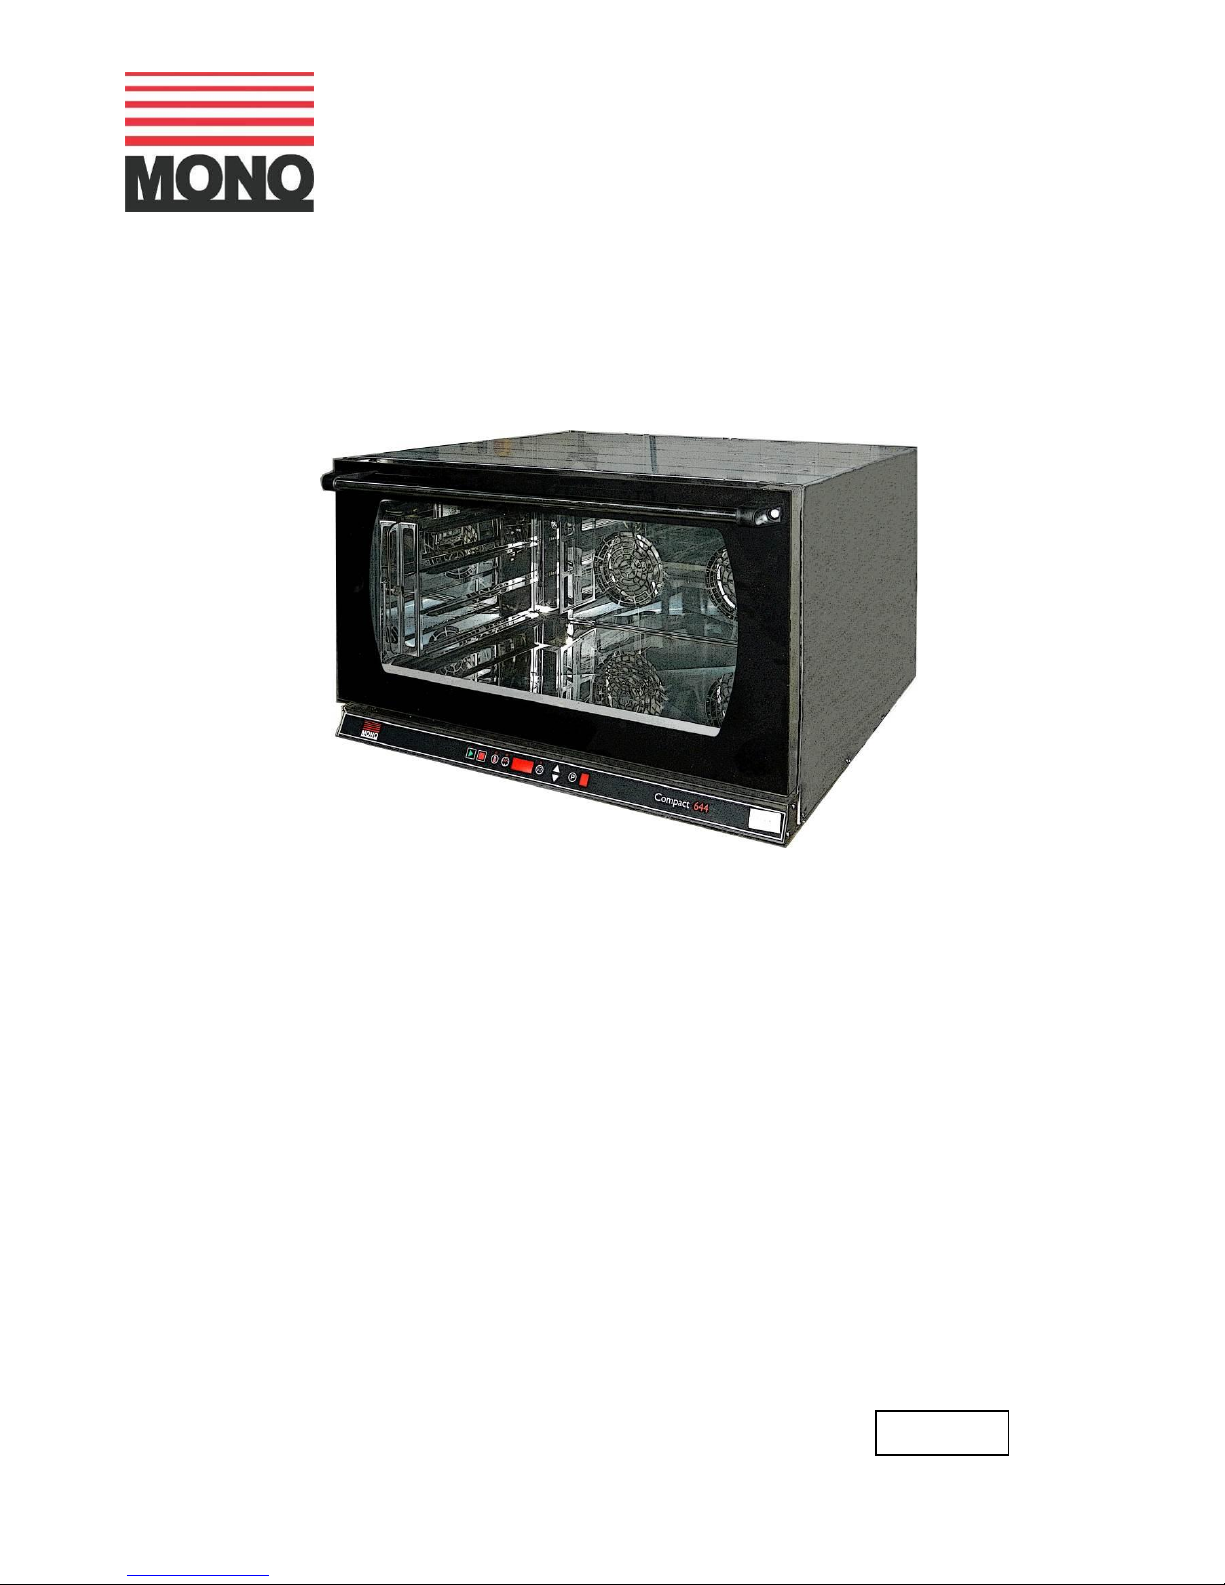
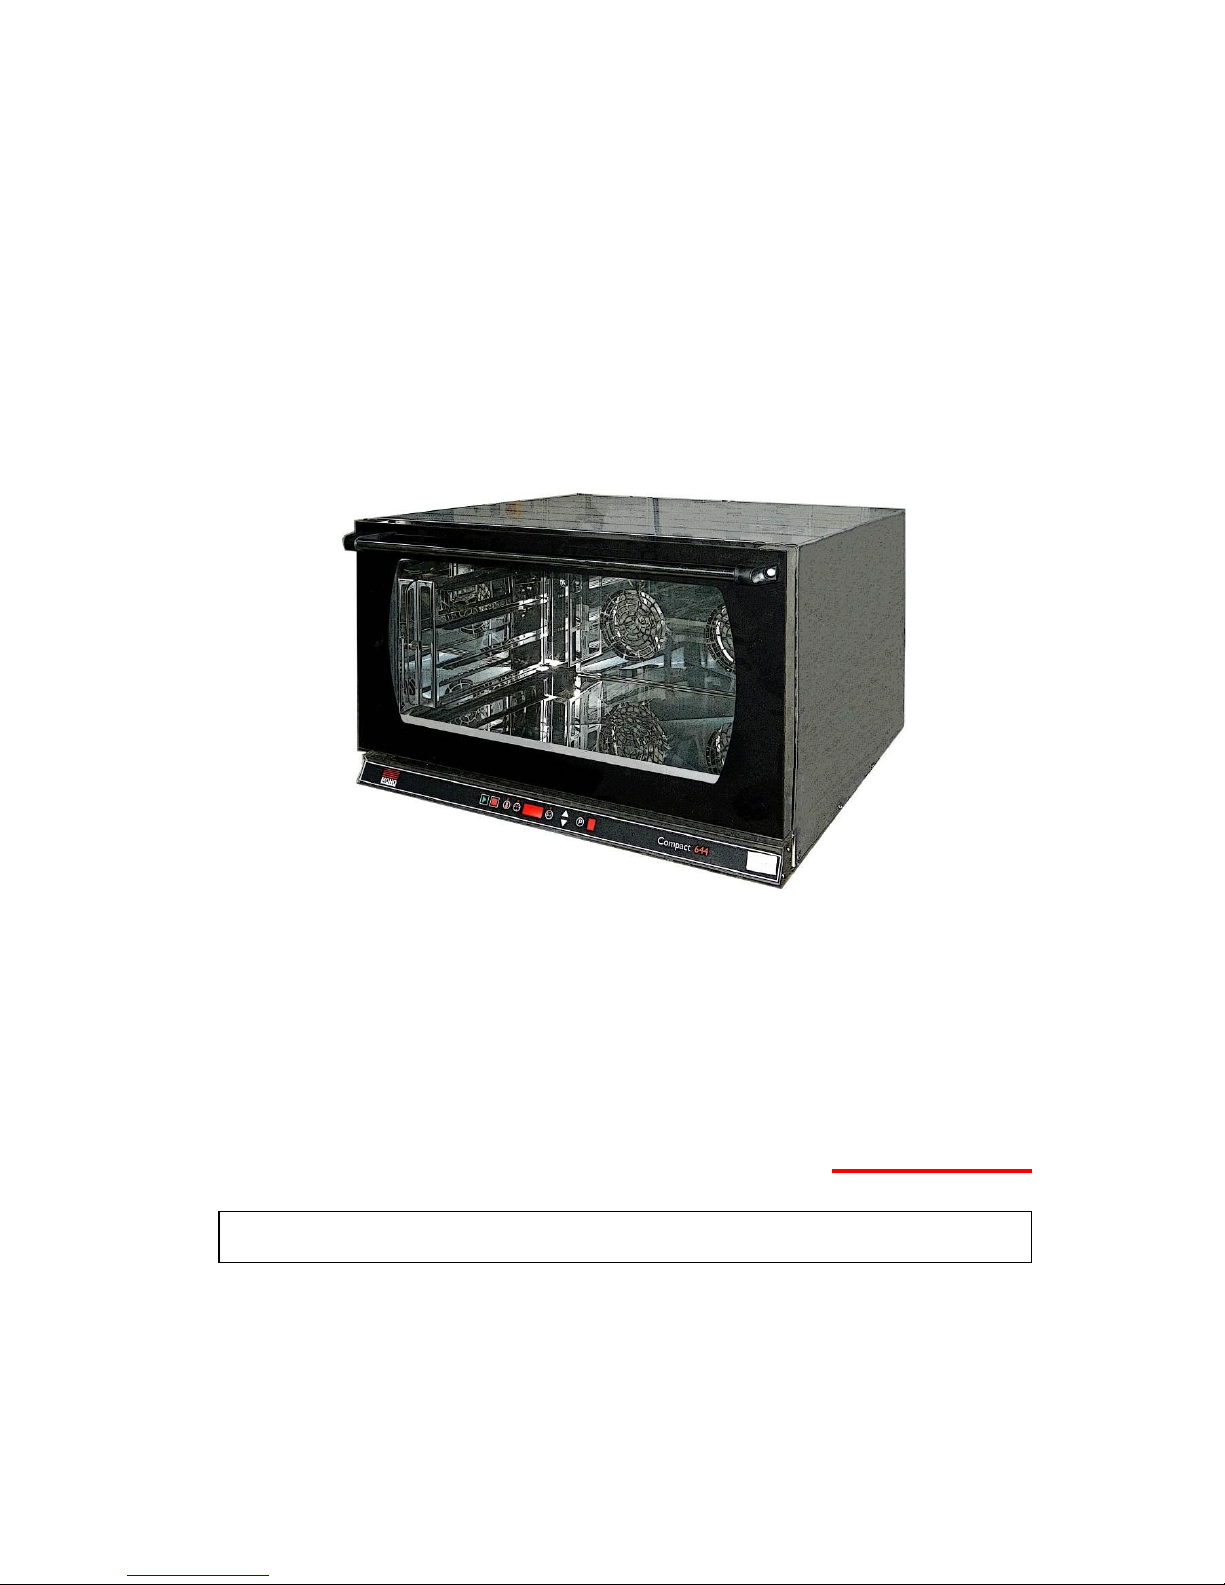
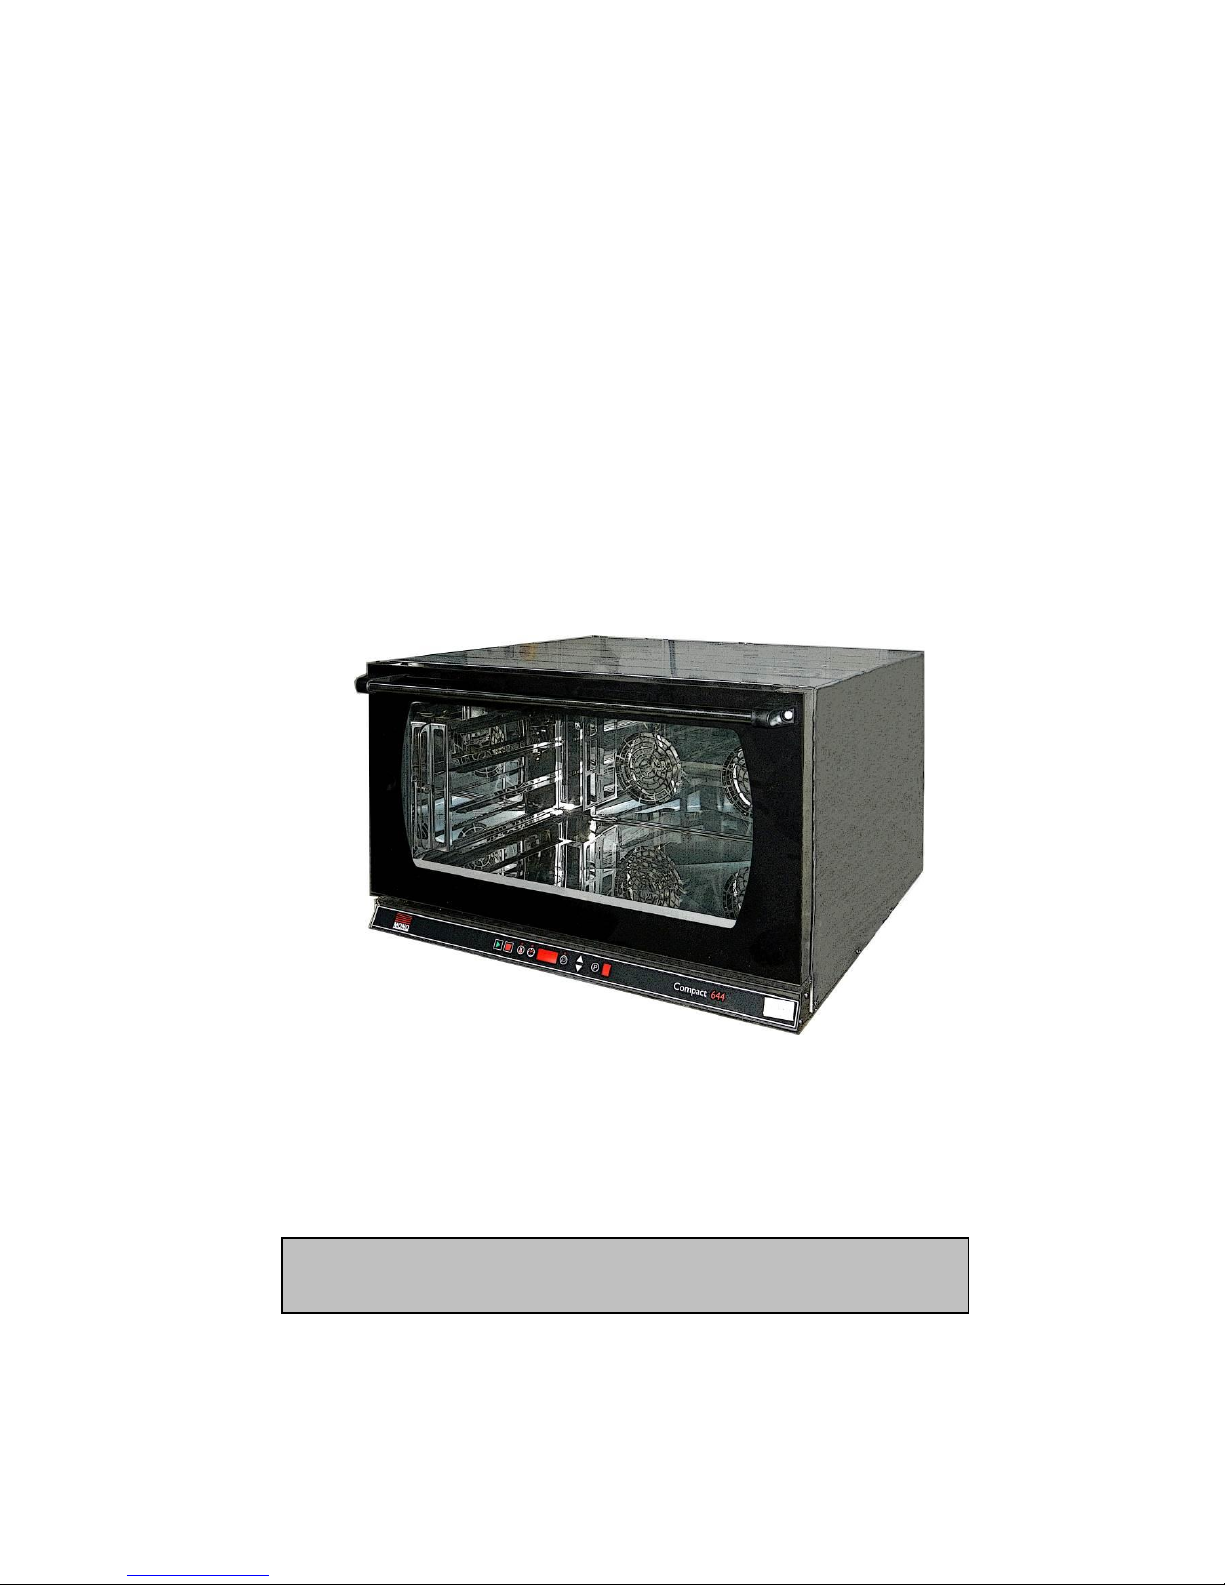
644 compact 4 tray RevA17 10-04-17
1
OPERATING AND MAINTENANCE MANUAL
COMPACT
644 4 TRAY OVEN
SERIES
Enter Serial No. here.____________________________
In the event of an enquiry please quote this serial number.
www.monoequip.com
FILE 98
Page 2
644 compact 4 tray RevA17 10-04-17
2
Failure to adhere to the cleaning and maintenance
instructions detailed in this booklet could affect the
warranty of this machine.
To conserve heat do not keep door open longer than needed.
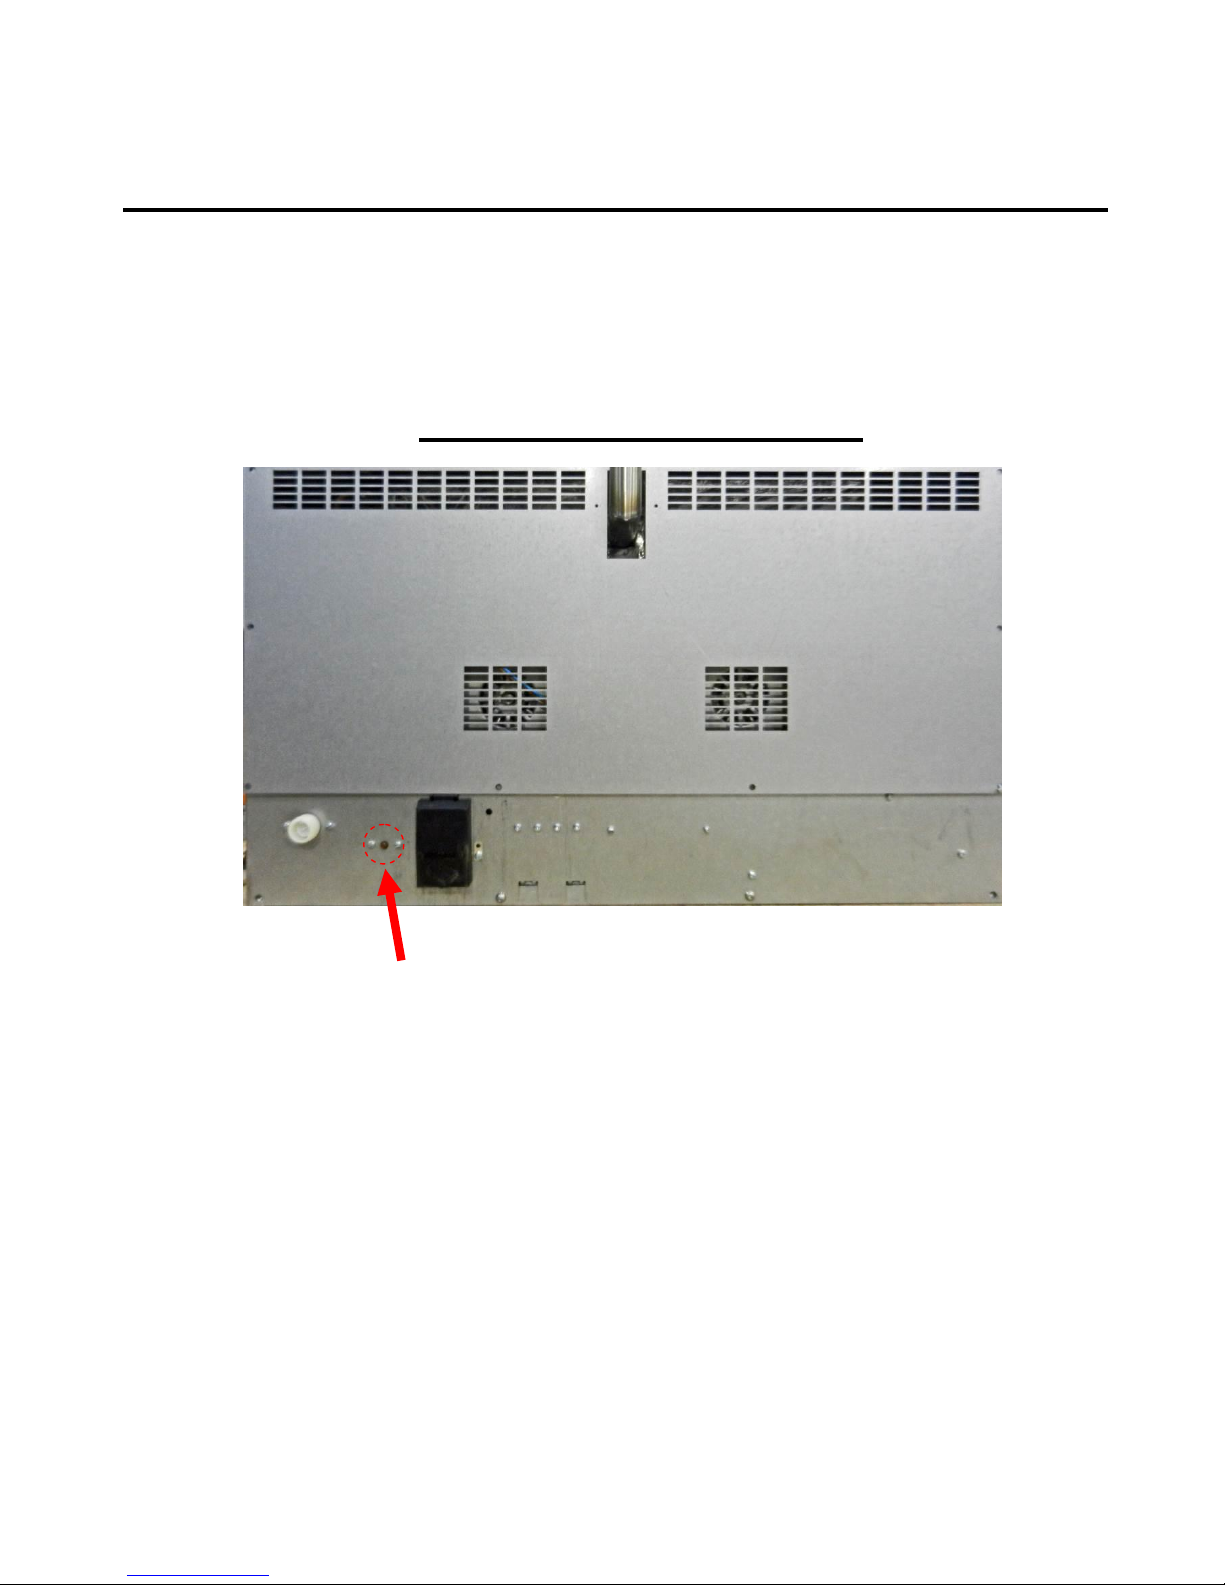
IF OVEN FAILS TO HEAT UP, WHEN FIRST CONNECTED TO A
POWER SUPPLY OR DURING USE AT ANYTIME,
PRESS RESET BUTTON
LOCATED THROUGH THE REAR BACK PANEL.
(DO NOT REMOVE BACK PANEL)
ATTENTION
Page 3
644 compact 4 tray RevA17 10-04-17
3
Page 4

644 compact 4 tray RevA17 10-04-17
4
CONTENTS
PART 1.0 Introduction
PART 2.0 Dimensions
PART 3.0 Specifications
PART 4.0 Safety
PART 5.0 Installation
PART 6.0 Isolation
PART 7.0 Cleaning Instructions
PART 8.0 Operating Conditions
PART 9.0 Operation Instructions
PART 10.0 Maintenance
PART 11.0 Steam System Maintenance
PART 12.0 Bulb Replacement
PART 13.0 Spares Information
NO INFORMATION IS AVAILABLE AT THIS TIME
PART 14.0 Electrical Information
Page 5
644 compact 4 tray RevA17 10-04-17
5
1.0 INTRODUCTION
The MONO COMPACT oven
is a compact, electric oven with a capacity for four 60cm x 40cm baking trays.
The oven is robustly made of stainless steel with a bake chamber shaped to
allow the unit to be easily cleaned.
It has very high levels of insulation for safety and to help save energy.
A great deal of attention has been given to keeping the front areas cool.
It is has an exceptionally easy to operate control panel that will save up to nine
programs.
MONO COMPACT is designed to be stackable, without the requirement for a
separate support and will grow with your business without occupying a large
area of your valuable retailing space.
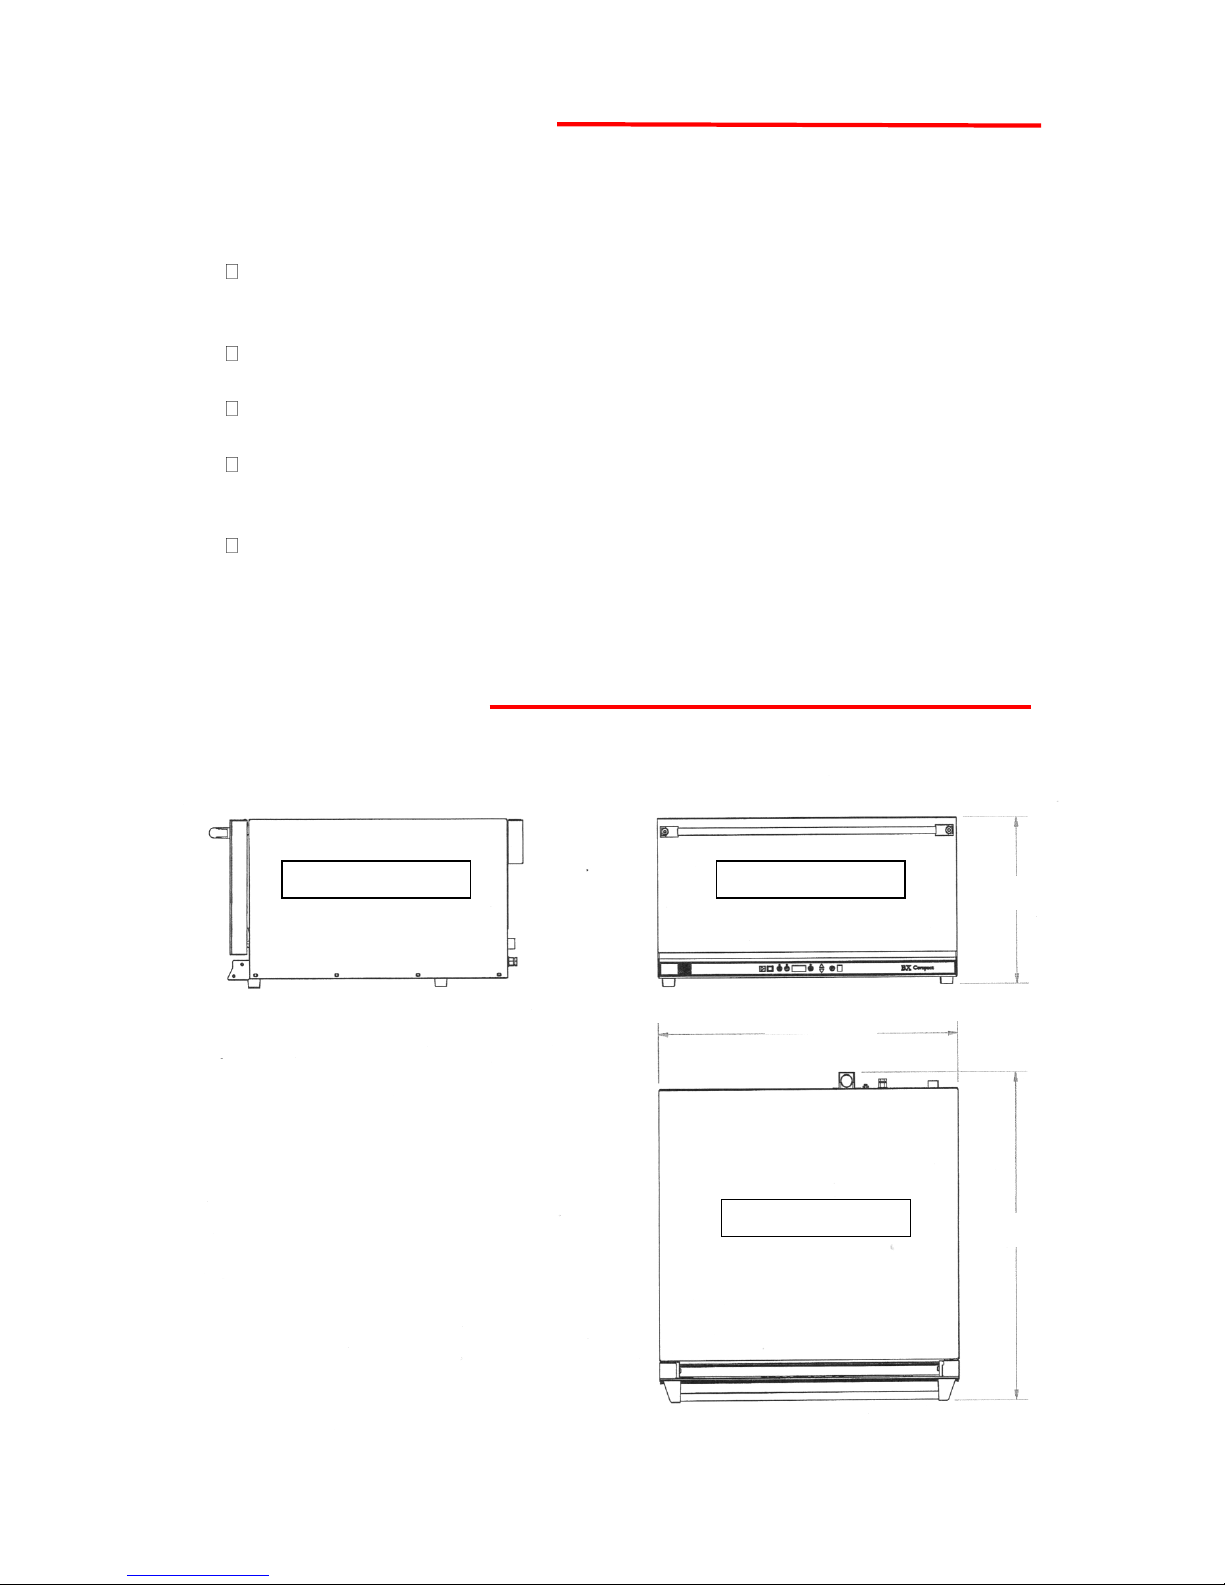
2.0 DIMENSIONS
PLAN VIEW
FRONT VIEW
SIDE VIEW
FRONT
800mm
835mm
500mm
Page 6

644 compact 4 tray RevA17 10-04-17
6
2.1 OUTER DIMENSIONS
Height: 500mm.
Depth, door closed: 835mm.
Depth, door open: 1175.
Width: 800mm.
Operational clearance:
50mm (2") clearance is required at the back and sides of the oven and 250mm (10”) above
to allow adequate circulation of air.
3.0 SPECIFICATIONS
PLEASE CHECK RATING PLATE ON OVEN FOR APPLICABLE VERSION
Total Power: 6.2 kW.
Electric Supply: 230v. Single-phase 50Hz , 27amp
or
400v, 50Hz, 3 phase + E, 12.6 Amps per phase
Supply Cable: 2 metres of cable supplied.
Water connection ¾” B.S.P. and should be at a pressure of 2 bar to 4 bar.
(normal domestic water supply is usually within these limits).
Maximum bake temperature 250 degrees C
Maximum bake time 99 Minutes
Maximum steam time 20 seconds
Maximum number of programs 9
Noise Level: Less than 85dB.
WEIGHT 65KG
Page 7

644 compact 4 tray RevA17 10-04-17
7
4.0 SAFETY
In the interest of safety and efficient operation of this oven, it is essential that this
manual should be made available to the operator before work is commenced.
The following points should be closely observed and rigorously pursued at all
times.
To safely use this convection oven, read this owner manual completely and follow
the warnings below, as well as all other warnings in this manual.
The oven is designed for the baking of bread, confectionery and savory products.
Do not use it for baking other items without first consulting the supplier.
All repairs and maintenance of electrical units must only be carried out by an
authorized service technician.
Electrical access panels must not be opened except by an authorized service
technician and the oven power cord must be unplugged.
While the oven is in operation, and for some time after use, DO NOT TOUCH the
oven window and surrounding area as these surfaces may be hot.
The oven must be operated as described in this manual.
Authorized service technicians should only use original manufacturer spare parts on
the oven.
The construction of the oven must not be changed or altered.
This appliance must be disconnected from the power supply before moving or
cleaning/servicing.
Check for frayed or bare cables.
The machine must not be used if frayed or bare cables are visible.
Oven gloves should be worn when moving products in or out of the oven.
Unless trays/containers for the purpose of holding the oven products are supplied
with the oven by the manufacturer, it is the responsibility of the customer to ensure
that the nature and surface conditions of materials likely to come into contact with
food shall be such that they cannot contaminate or spoil the food.
Page 8
644 compact 4 tray RevA17 10-04-17
8
5.0 INSTALLATION
CAUTION Because of the weight, lifting the oven should not be attempted by one person.
Ensure that the oven base is level or a level working height surface capable of
supporting at least 100kg is used
The COMPACT oven should be connected to a local means of isolation.
Operational clearance of 50mm (2") is required at back and sides of oven
and 250mm (10") top clearance to allow circulation of air.
In the interests of hygiene, before using the oven for the first time, we
strongly recommend that you wipe the inside of your oven and all
accessories thoroughly with a clean cloth soaked in warm soapy water.
Although the utmost care is taken during assembly and pre-delivery
inspection, there is always a possibility of residue contaminating your first
bake if this is not done.
DISPOSAL
Care should be taken when the machine comes to the end of its working life.
all parts should be disposed of in the appropriate place, either by recycling or
other means of disposal that complies with local regulations.
(in UK, “environmental protection act 1990” applies)
6.0 ISOLATION
To stop the oven in an emergency,
switch off at the wall isolator.
Page 9
644 compact 4 tray RevA17 10-04-17
9
7.0 CLEANING INSTRUCTIONS
NOTE:
BEFORE CLEANING, ISOLATE OVEN FROM MAINS SUPPLY AND ALLOW TO COOL.
IMPORTANT
NEVER SPRAY THE OVEN WITH A HOSE OR HIGH PRESSURE WASHING DEVICE.
TO AVOID ELECTROCUTION OR OVEN DAMAGE –NEVER ALLOW WATER, STEAM,
CLEANING SOLUTION, OR OTHER LIQUIDS TO ENTER THE ELECTRICAL PANELS
OR CONNECTIONS.
The equipment is to be cleaned daily using a solution of mild detergent and hot water.
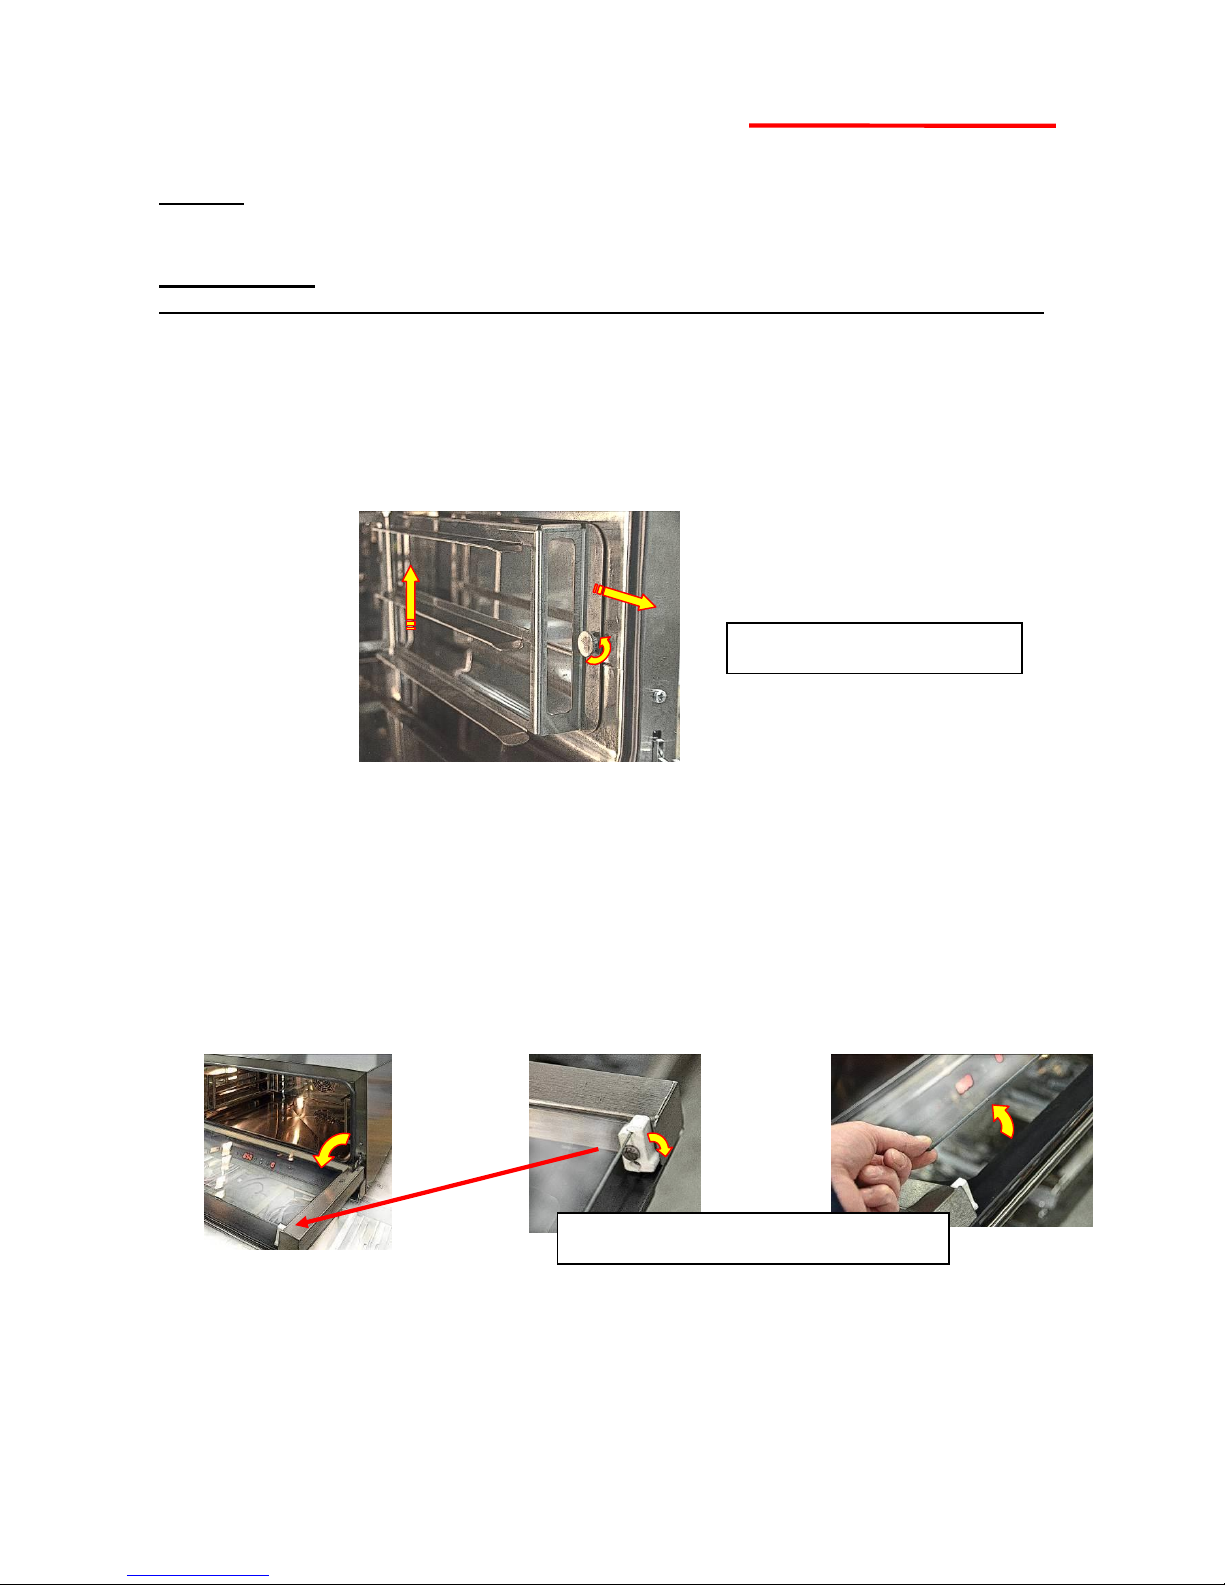
Remove the tray racks by unscrewing the fixing knob at the front and lifting the rack
up slightly to disengage the back locator. Withdraw the racks and wipe over.
Sweep any debris left in the chamber (after it has been allowed to cool) onto trays
and remove. Wipe out the chamber with a damp cloth that has been soaked in a
solution of mild detergent and hot water. Be careful not to damage the probe on the
left hand side at the back.
With the door open, release the glass retaining clips (one each side). Lift the inner
glass and clean both exposed surfaces. Lower the inner glass gently and ensure
the clips are engaged both sides.
Brush down and wipe outer oven front, back and sides.
Wipe clean outer oven front, back and sides with a damp cloth that has been
soaked in a solution of mild detergent and hot water (do not soak the lower control
panel area with water).
TRAY RACK REMOVAL
UNCLIP GLASS AND LIFT
Page 10

644 compact 4 tray RevA17 10-04-17
10
8.0 OPERATING CONDITIONS
CAUTION Because of the weight, lifting the oven should not be attempted by one
person. Ensure that the oven base is level or a level working height surface capable of
supporting at least 90kg is used
For the most efficient operation, the oven should be used in ambient temperatures
not exceeding 40oC (115oF). The life of components will be reduced and your
warranty will be affected if run above 40oC.
The ventilation of steam (extraction) from the oven should be sufficient to ensure
water does not condense on or around the oven. Any water ingress could affect
your warranty.
It is the customers' sole responsibility to arrange for adequate ventilation and
operational clearance at the back and sides of the oven to allow circulation of air.
Refer to Outer dimensions 2.1.
Any component malfunctioning during the guarantee period that is found to have been
subjected to excessive humidity or ambient working temperatures above 40oC
(115oF) will not be covered by the component manufactures guarantee, or MONO’s
product warranty.
.
Page 11
644 compact 4 tray RevA17 10-04-17
11
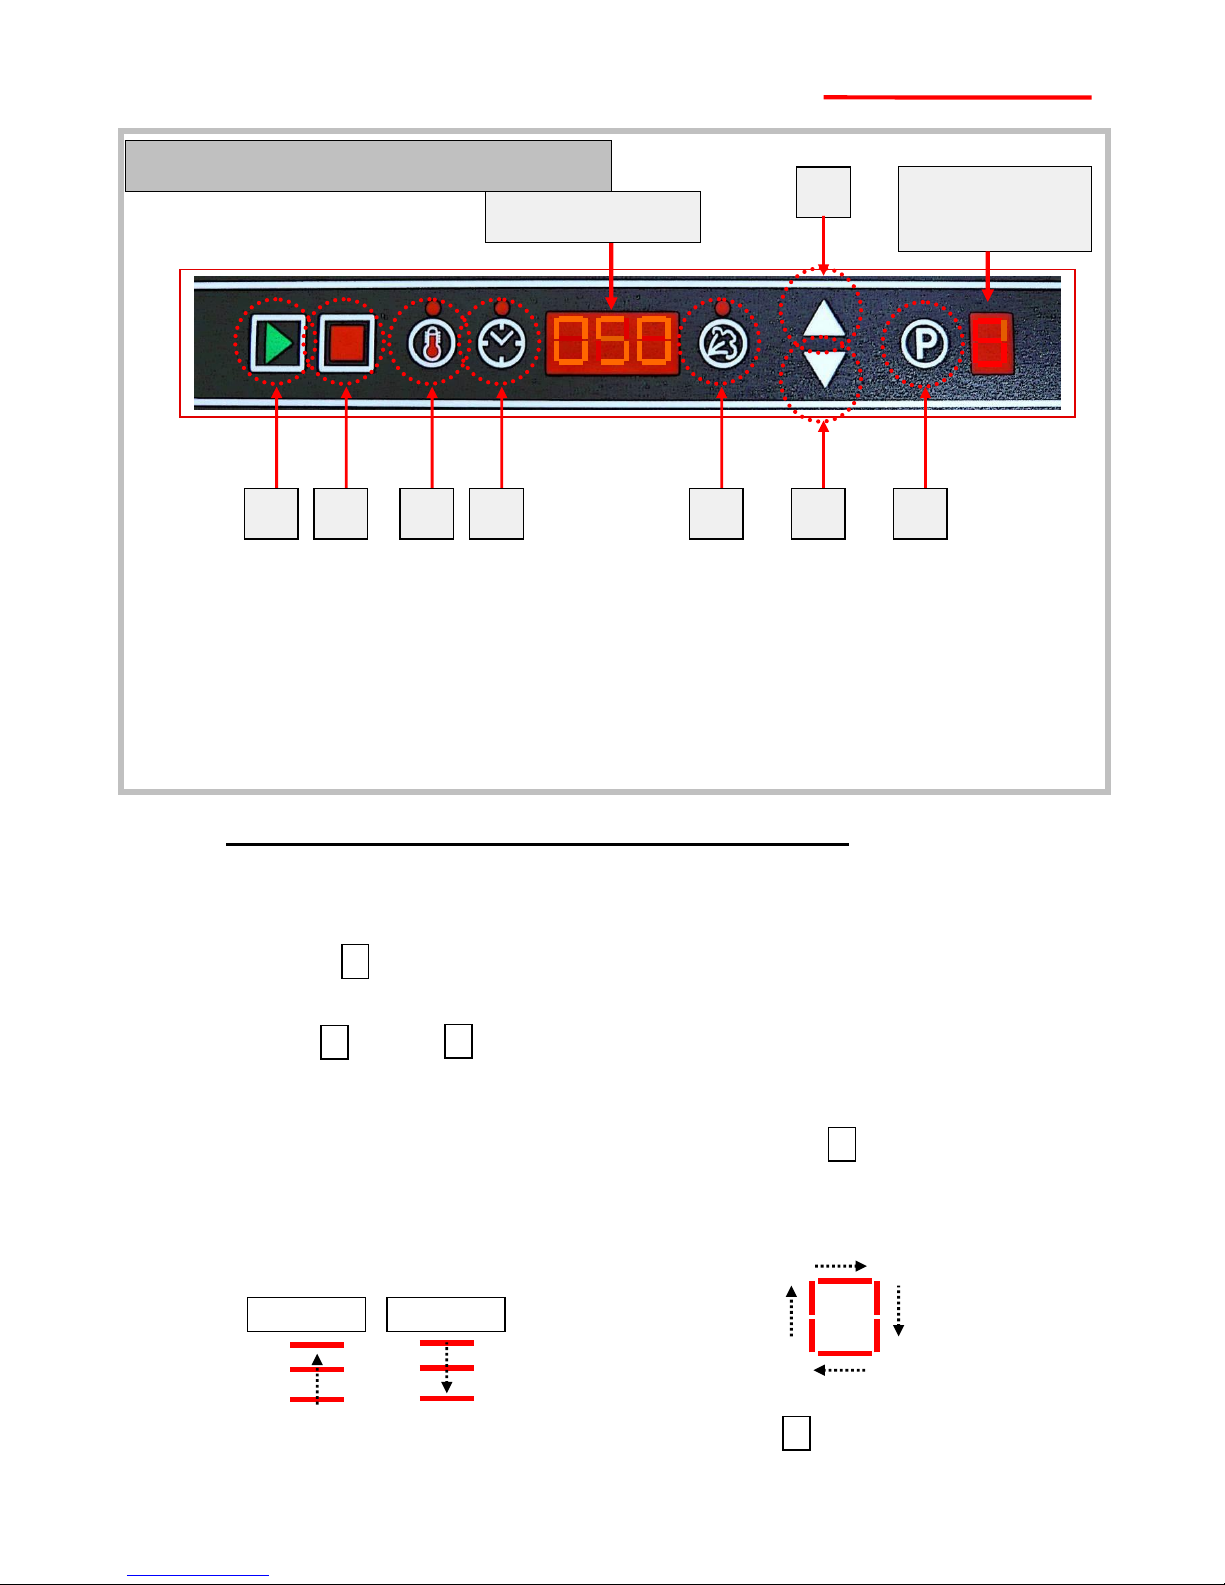
1. Start bake button 5. Set bake steam time button
2. Stop bake button 6. Down button for settings
3. Set bake temperature button 7. Up button for settings
4. Set bake time button 8. Program button
TO BAKE USING PRESET PROGRAMS
1. Connect power to the oven.
Panel will show “OFF” in the main display window.
2. Press start 1 button
Temperature will flash in main display.
3. Press up 6 or down 7 buttons to get the program number required.
Temperature will flash in main display until the temperature required by the program
is reached.
4. When display stops flashing, load the oven and press start. 1
This starts the timer countdown and activates the steam.
7. At the end of the bake a beep will be heard. Press stop 2 to stop.
BARS WILL ROTATE IN THE PROGRAM DISPLAY
WINDOW WHEN A BAKE PROGRAM IS RUNNING
1 2 3 4 5 8 7
6
MAIN DISPLAY
PROGRAM
DISPLAY
WINDOW
IF THE BARS ON THE MAIN
DISPLAY MOVE UPWARDS THE
OVEN IS HEATING, IF THEY
MOVE DOWNWARDS THE
OVEN IS COOLING.
HEATING
COOLING
To turn oven right off, hold down until a beep is heard.
9.0 OPERATING INSTRUCTIONS
DIGITAL CONTROL PANEL
Page 12

644 compact 4 tray RevA17 10-04-17
12
TO SET A BAKE PROGRAM (or MANUAL BAKE)
NOTE
If the new settings are to be saved, select the program number to be saved before
changing the values then proceed as follows.
If the new settings are for one bake only (manual bake), proceed as follows:
1. Press temperature button 3
The set value will show in the main display window and the red dot above the
button will illuminate.
2. Press up 6 or down 7 to change the temperature value.
3. Press temperature button 3 again to set the value. (or wait a few seconds and the
red dot will go out).
4. Do the same procedure to set time 4 and steam 5 .
5. If saving the values to a program number, press Program 8 button for six seconds
until a beep is heard. The values chosen are now set to the program number (this
will remove any values that were saved to the program number before).
NOTE
If new settings are not saved, the old settings of the program number showing on the
screen will be used the next time the program is chosen.
6. Load oven and press start. 1
7. At the end of the bake a beep will be heard. Press stop 2 to stop.
Page 13
644 compact 4 tray RevA17 10-04-17
13
TO SET PARAMETERS
1. With the oven in standby (OFF showing in display), press stop 2 and program 8
together and hold for about six seconds until a beep is heard.
“1” will show in the program display window.
2. This is the fan forward/reverse time.
The time the fan goes in each direction before changing.
Maximum of 180 seconds.
Press up 6 to increase or 7 to decrease the time required.
3. Press start 1 and “2” will show in program display window.
This allows the settings to be in degrees C or F
Press up 6 or 7 to change.
4. Press start 1 and “3” will show in program display window.
This is the “standby delay time setting.
00 = disabled. Setting can be up to 90 minutes (maximum) in 10 minute increments.
5. Press start 1 and “4” will show in program display window.
This shows the latest firmware revision.
6. Press stop 2 to exit setup and save the parameters.
Page 14

644 compact 4 tray RevA17 10-04-17
14
Check for frayed or bare cables.
The machine must not be used if frayed or bare cables are visible.
Follow cleaning instructions meticulously.
There is no special maintenance required.
EM INT
11.0 STEAM SYSTEM MAINTENANCE
If it is noticed that the steaming operation has deteriorated, perhaps due to hard water
scaling, please contact your oven supplier.
10.0 MAINTENANCE
Page 15
644 compact 4 tray RevA17 10-04-17
15
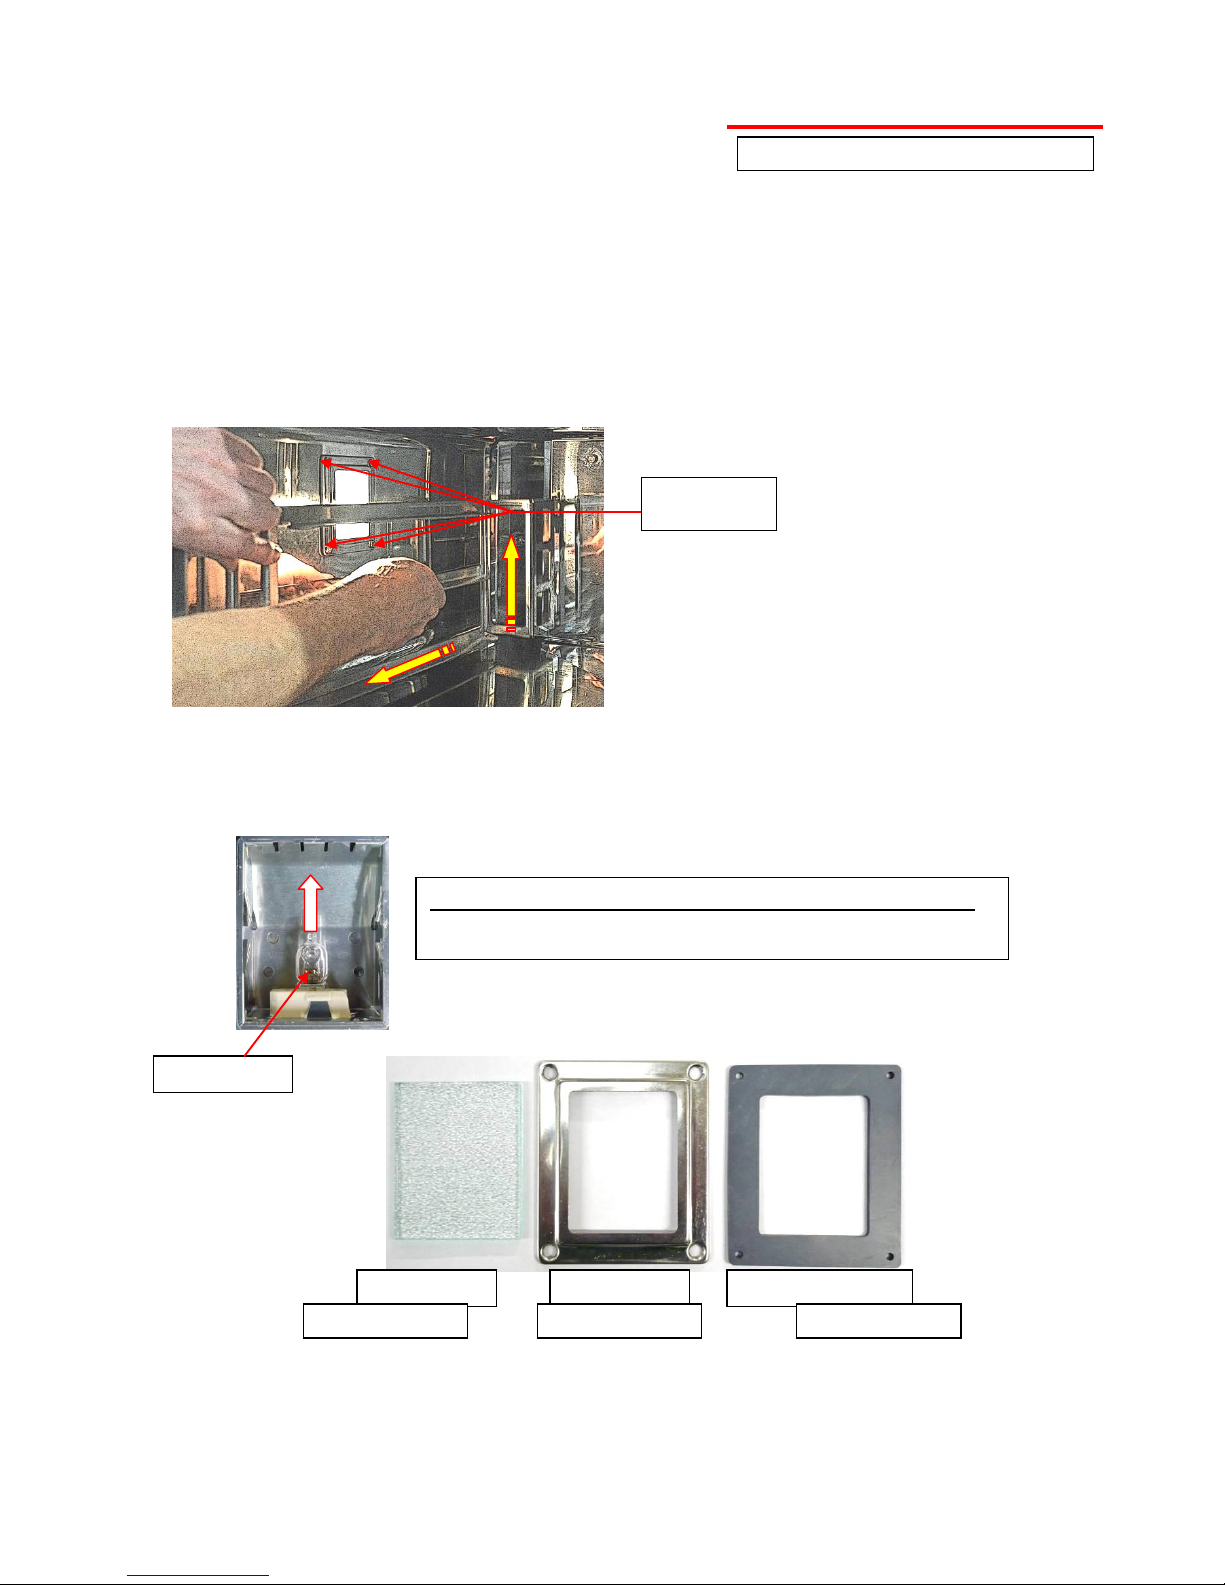
12.0 BULB REPLACEMENT
In the event of a bulb failure, Instructions on how to change a bulb are as follows: -
1. Ensure oven is isolated from mains supply and allow to cool.
2. Remove the left hand tray rack by unscrewing the fixing knob at the front and lifting
the rack up slightly to disengage the back locator. (See illustration, section 7.0).
3. Remove the four fixing screws and take glass, frame and gasket off lamp unit.
4. Remove the bulb by pulling in the direction of the arrow shown below and replace
with a new bulb.
5. Refit glass front, taking care that the gasket is in position around stainless steel frame.
6. Re-connect oven to the power supply and test.
GASKET
GLASS
Pt No.B721-67-008
Pt No.B721-67-010
DO NOT TOUCH NEW BULBS WITH BARE HANDS.
USE A CLOTH OR GLOVES TO STOP ANY MARKS THAT WILL
CAUSE HOT SPOTS AND PREMATURE BULB FAILURE.
REPLACEMENT BULB = B857-94-007
SCREWS
FRAME
Pt No.B721-67-009
BULB
Page 16
644 compact 4 tray RevA17 10-04-17
16
Spares Tel. +44(0)1792 564039
email:[email protected]
13.0 Spares Information
NO INFORMATION IS AVAILABLE AT THIS TIME
Page 17
644 compact 4 tray RevA17 10-04-17
17
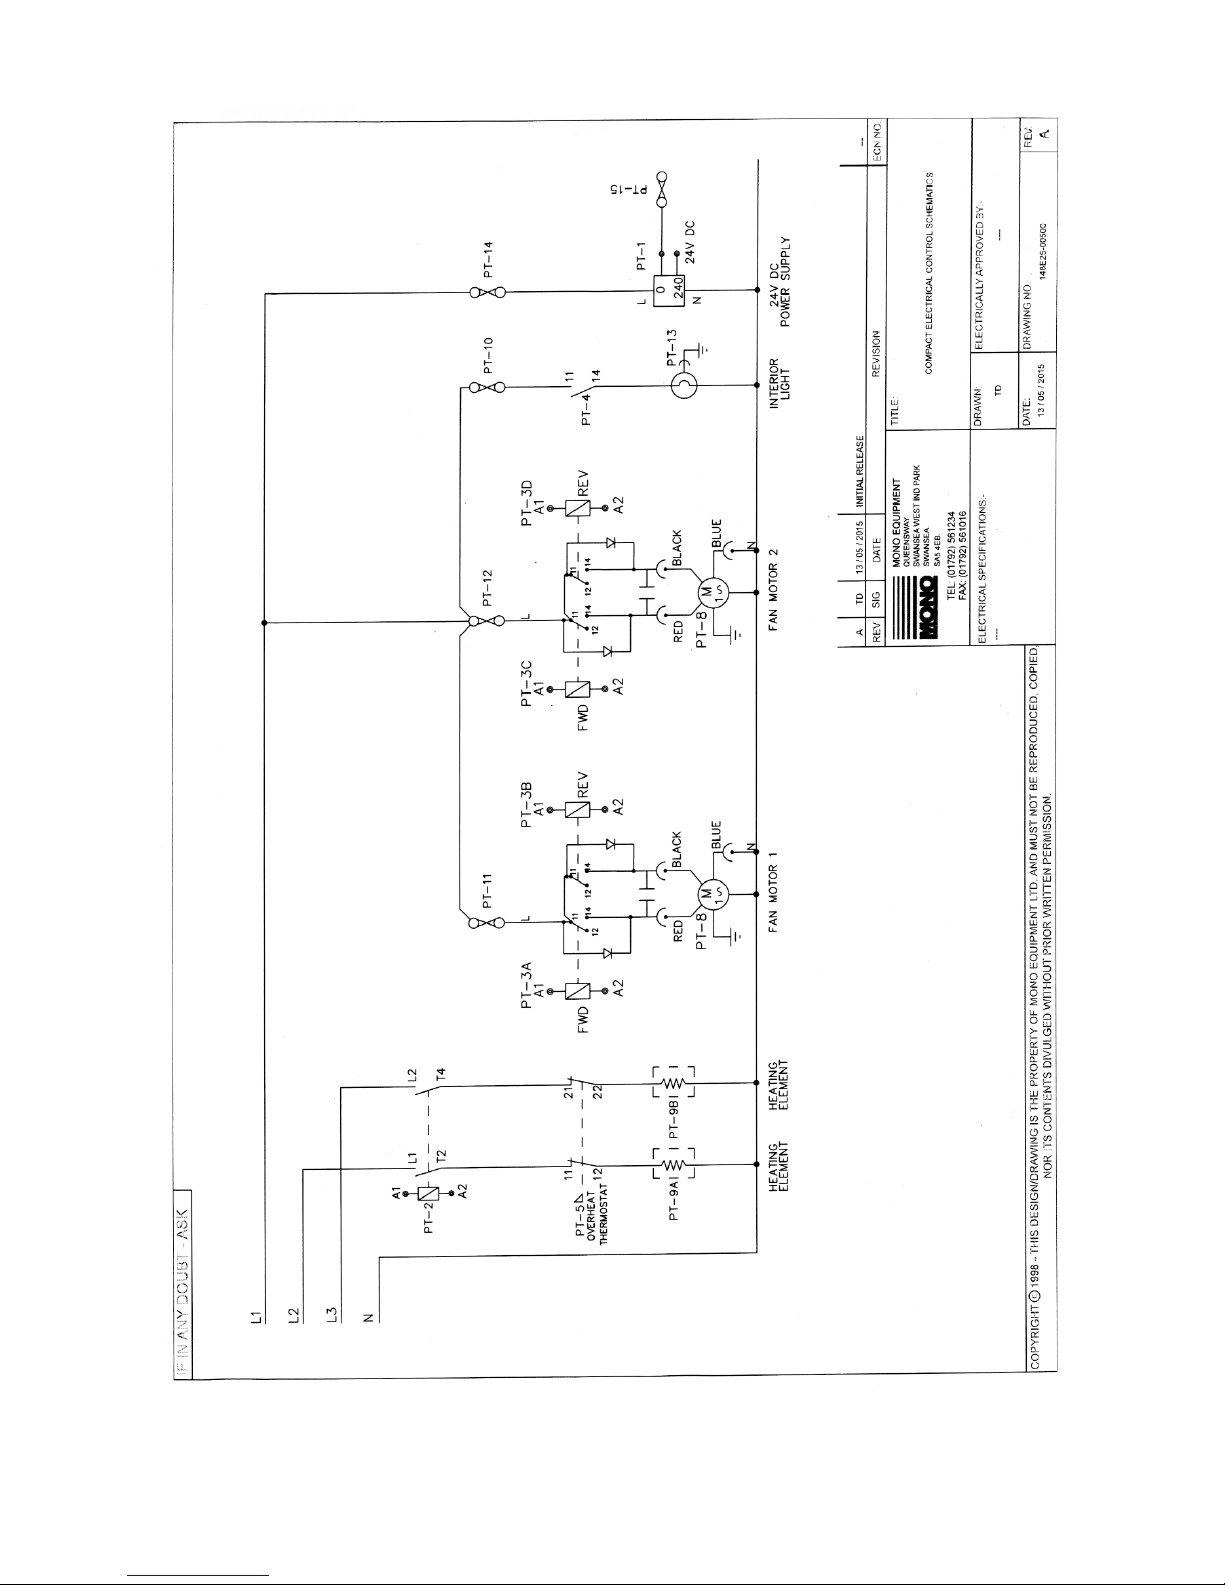
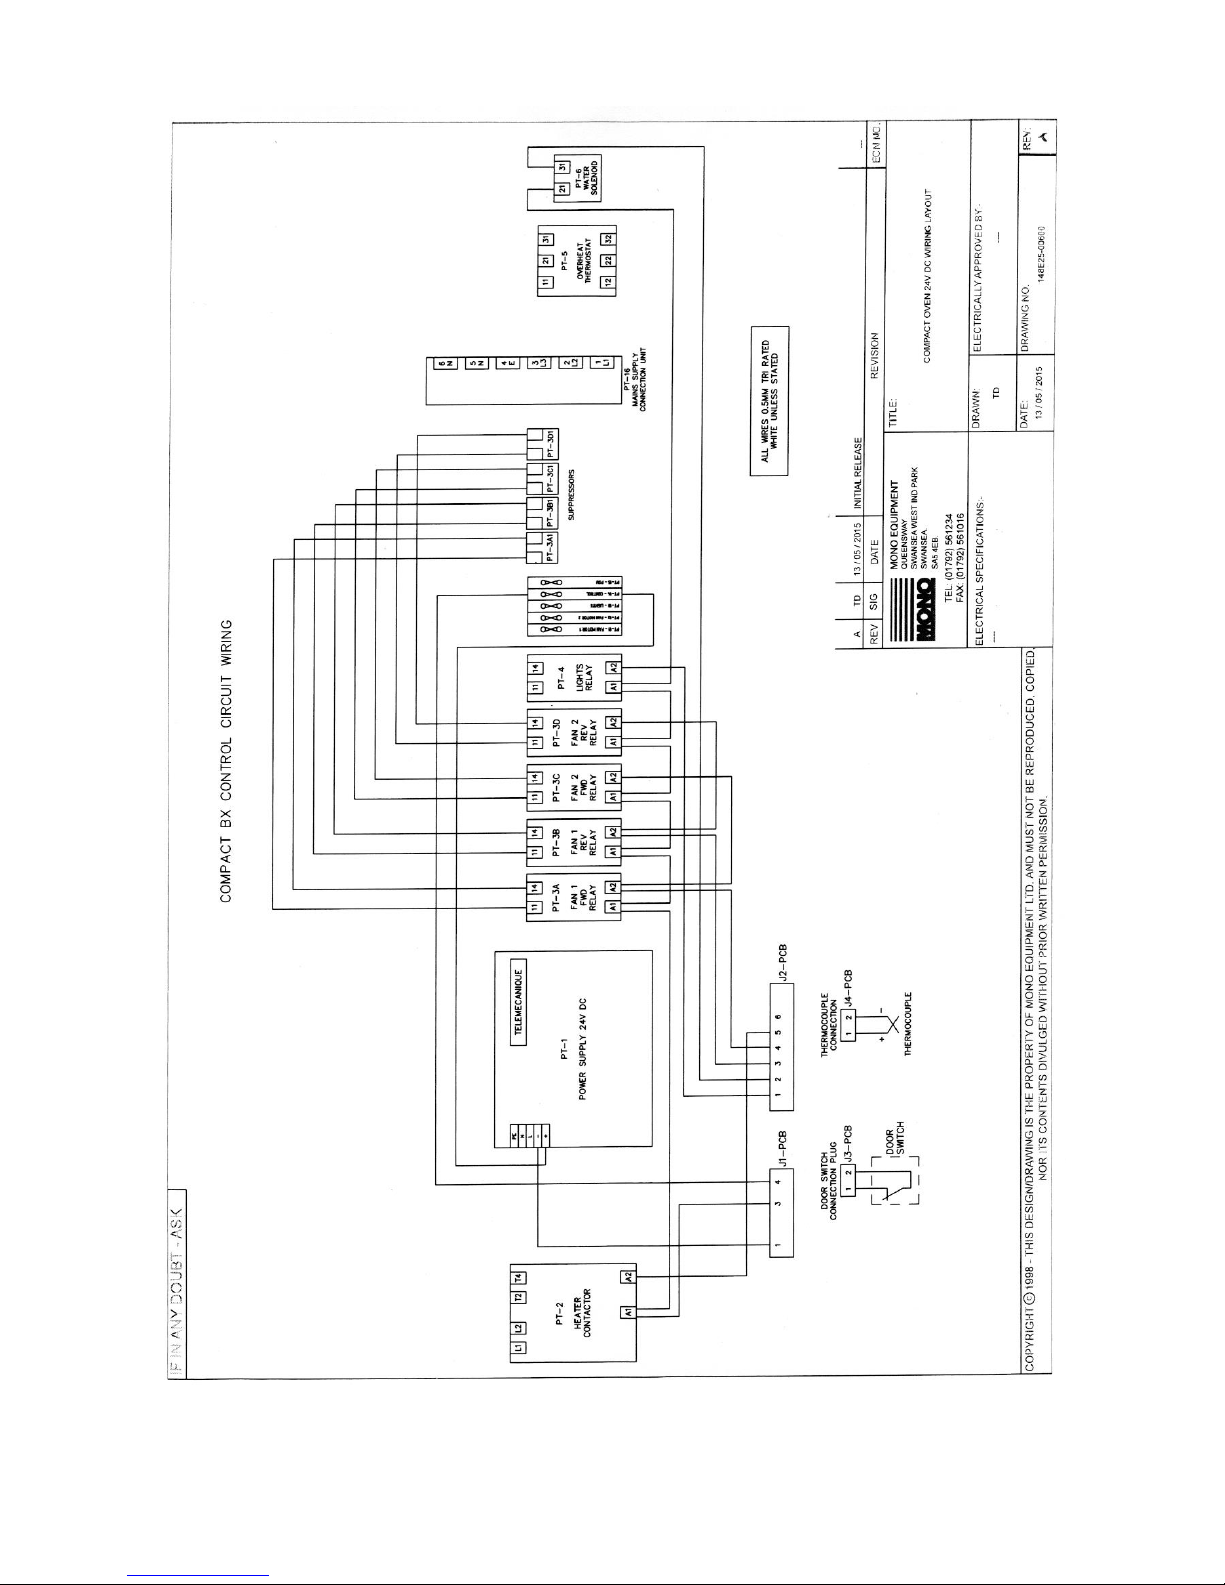
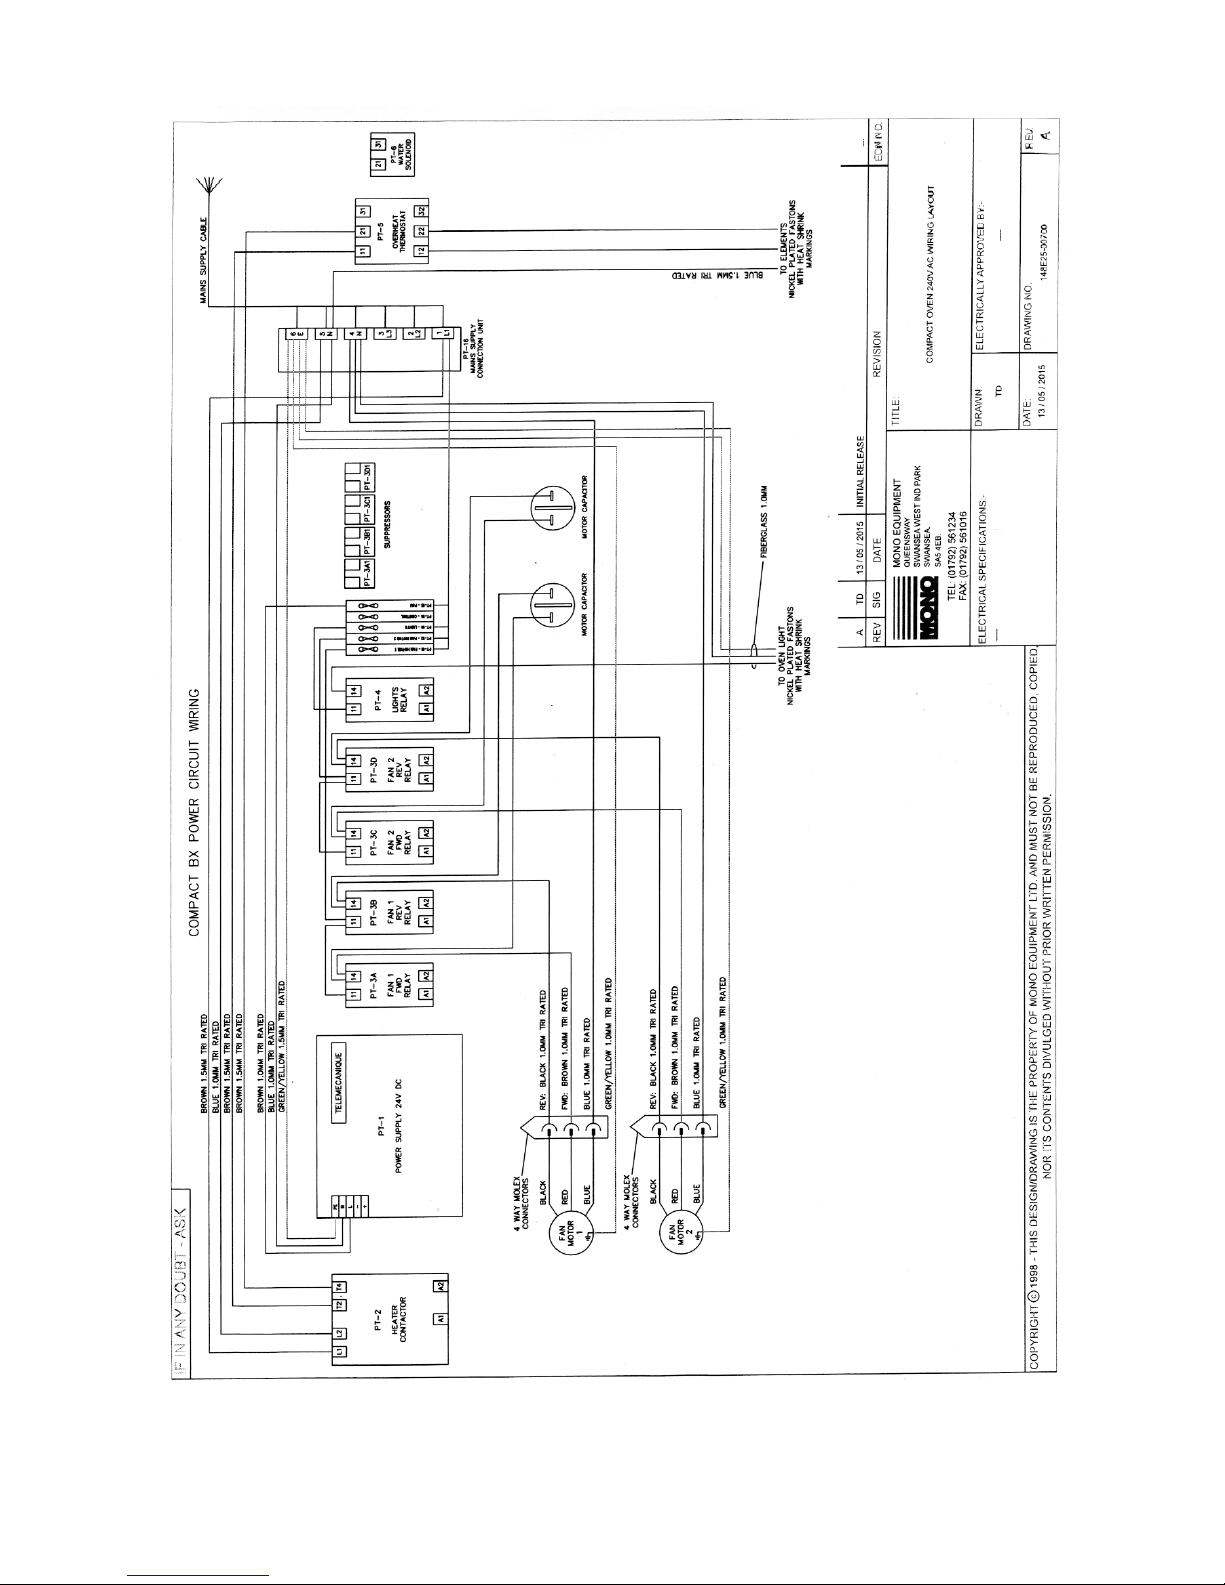
14.0 ELECTRICAL INFORMATION
Page 18
644 compact 4 tray RevA17 10-04-17
18
Page 19
644 compact 4 tray RevA17 10-04-17
19
Page 20
644 compact 4 tray RevA17 10-04-17
20
Page 21

644 compact 4 tray RevA17 10-04-17
21
DISPOSAL
CARE SHOULD BE TAKEN WHEN THE MACHINE COMES TO THE END OF ITS WORKING LIFE. ALL PARTS SHOULD
BE DISPOSED OF IN THE APPROPRIATE PLACE, EITHER BY RECYCLING OR OTHER MEANS OF DISPOSAL THAT
COMPLIES WITH LOCAL REGULATIONS.
(IN UK, ENVIRONMENTAL PROTECTION ACT 1990 APPLIES)
Queensway
Swansea West Industrial Estate
Swansea.
SA5 4EB
UK
Tel. +44(0)1792 561234
Fax. 01792 561016
Web site:www.monoequip.com
Spares Tel. +44(0)1792 564039
email:[email protected]
 Loading...