

Page 1
Monnit Ethernet Gateway 4
User Guide
IMPORTANT!
For best results, please wait to power on your Ethernet Gateway 4 until after you have
registered an account on iMonnit and added your gateway and sensors to the online
system.
Page 2
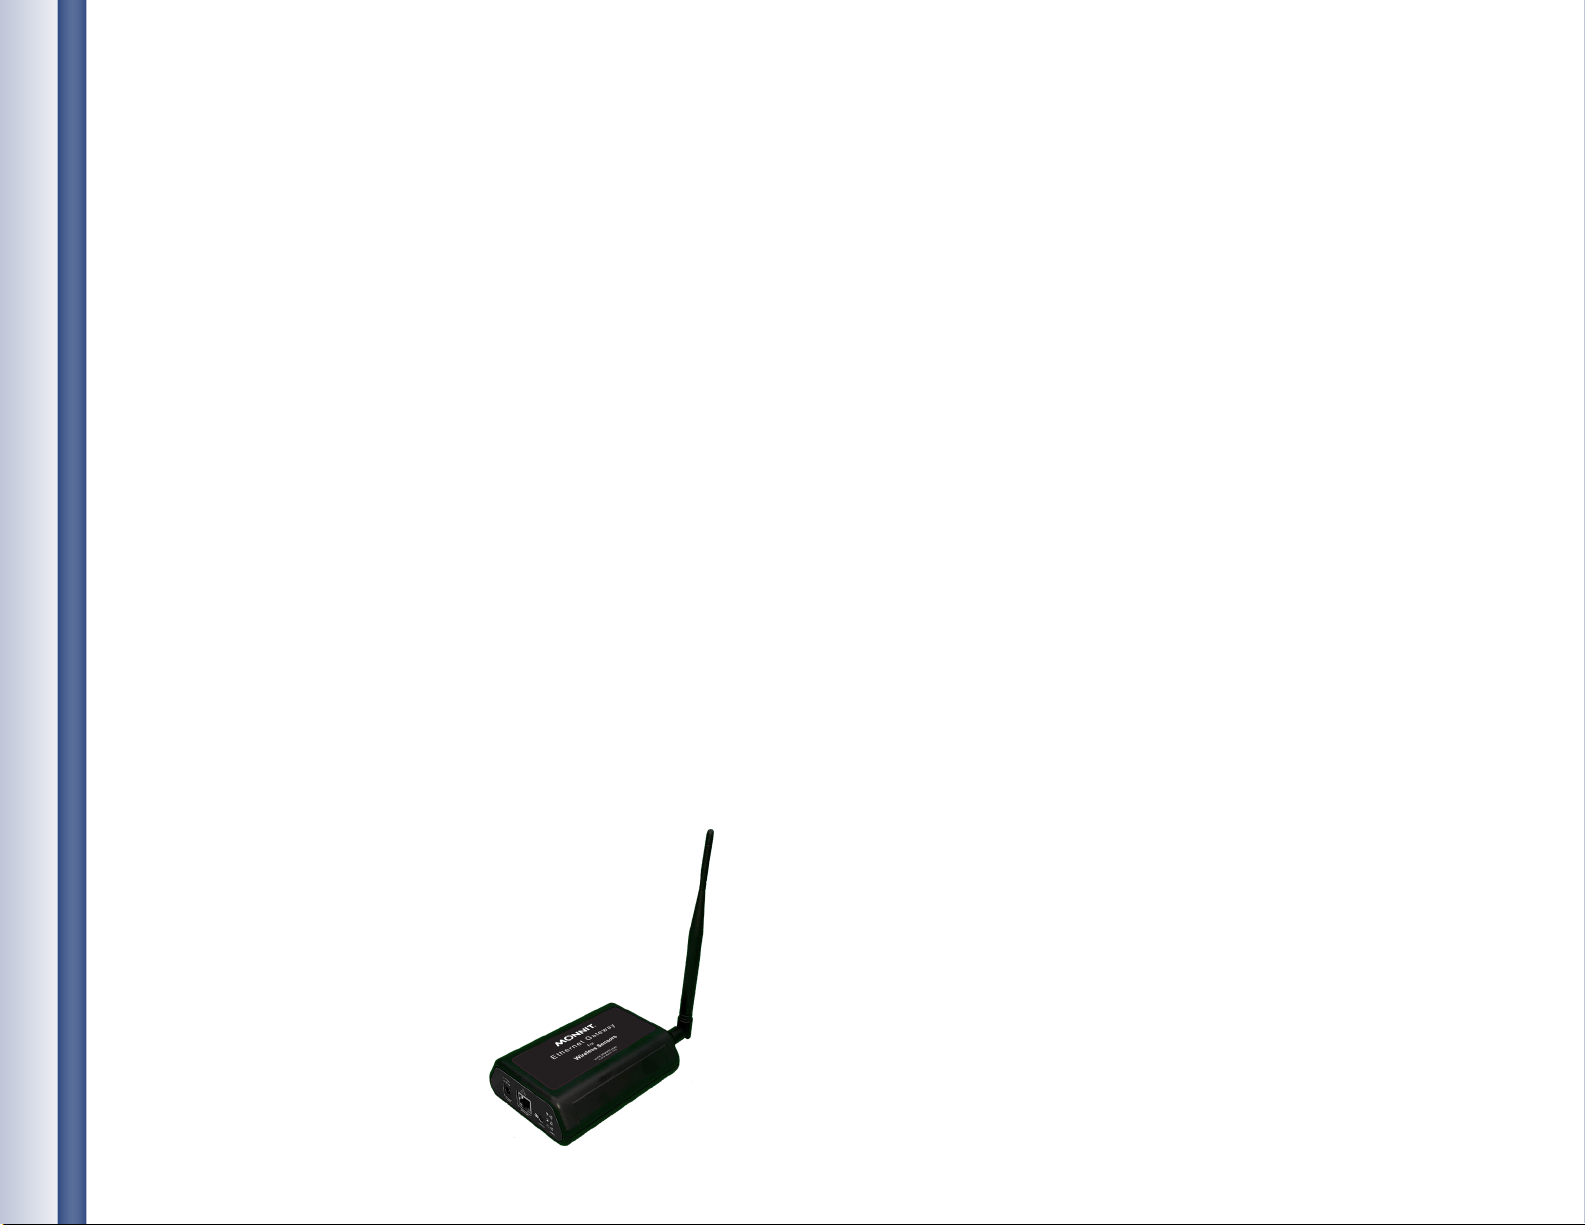
Table of Contents
I. ABOUT THE ETHERNET GATEWAY 4 1
MONNIT ETHERNET GATEWAY 4 FEATURES 1
EXAMPLE APPLICATIONS 1
II. HOW YOUR GATEWAY WORKS 2
III. GATEWAY SECURITY 3
DATA SECURITY ON THE GATEWAY 3
3iMONNIT SECURITY
HTTP INTERFACE SECURITY
SNTP INTERFACE SECURITY 3
SNMP INTERFACE SECURITY 3
IV. GATEWAY REGISTRATION 4
REGISTERING THE GATEWAY 4
V. USING THE ETHERNET GATEWAY 4
USING THE ETHERNET GATEWAY 4
ETHERNET GATEWAY 4 SETTINGS 6
VI. USING THE LOCAL INTERFACE 11
GATEWAY STATUS TAB
GATEWAY OPTIONS TAB
SUPPORT
CERTIFICATIONS
3
5
5
5UNDERSTANDING THE ETHERNET GATEWAY 4 LIGHTS
11
12
14DATA INTERFACES TAB
19
19WARRANTY INFORMATION
21
I. ABOUT THE ETHERNET GATEWAY 4
Monnit’s Ethernet Gateway 4 allows your Monnit Wireless Sensors to communicate with the
iMonnit® Online Wireless Sensor Monitoring and Notication System without the need for a
PC. Simply provide power and plug the gateway into an open Ethernet network port with an
Internet connection. It will then automatically connect with our online servers, providing the
perfect solution for commercial locations where there is an active Internet connection.
The Ethernet Gateway 4 allows your Monnit Wireless Sensors to communicate with the
iMonnit system via Ethernet transmission. Ethernet Gateways are advanced wireless
IoT gateways that enable fast time-to-market solutions. Monnit’s Ethernet Gateway 4 is
specically designed to respond to the increasing market need for global technology that
accommodates a variety of vertical IoT application segments and remote wireless sensor
management solutions.
* Actual time may vary depending on usage.
MONNIT ETHERNET GATEWAY 4 FEATURES
• True plug & play, no hassles for internet
conguration set-up
• No PC required for operation
• Remote software upgrade capability
• Local status LEDs with transmission and online status indicators
• 15,000 sensor message memory
• AC power supply
• Wireless Range: 250 – 300 ft. (non line-of-sight / indoors through walls, ceilings &
oors) *
* Actual range may vary depending on environment.
EXAMPLE APPLICATIONS
• Remote Location Monitoring
• Shipping and Transportation
• Agricultural Monitoring
• Vacant Property Management
• Vacation Home Property Management
• Construction Site Monitoring
• Data Center Monitoring
PAGE II PAGE 1
Page 3
II. HOW YOUR GATEWAY WORKS
Your Ethernet Gateway 4 manages communication between your sensors, iMonnit, and
network peers through the SNMP v1 and Modbus TCP protocols. When running, the
gateway will periodically transmit data on a heartbeat to the iMonnit servers. The gateway
will store information received from sensors until its next heartbeat.
The Ethernet Gateway 4 uses an Ethernet connection to relay data recieved from sensors
to iMonnit. Sensors communicate with the gateway, then the gateway relays information to
the cloud.
For your wireless sensors to work optimally, orient all antennas for your sensor(s) and
gateway(s) the same direction (typically vertical). Keep the gateway and sensors at least
three feet apart in order to function properly.
III. GATEWAY SECURITY
Security is paramount for the Ethernet Gateway 4 when it comes to managing your
environment and equipment. Great care and attention to detail has been taken to keep
the exchange of data secure on the gateway and in gateway communications.
DATA SECURITY ON THE GATEWAY
Even when the data is at rest, the Ethernet Gateway 4 is designed to prevent prying
eyes from accessing the data. The Monnit Ethernet Gateway 4 does not run on an
o the shelf multi-function OS (operating system). Instead it runs a purpose specic
real-time embedded state machine that can’t be hacked to run malicious processes.
When fully secured after initial conguration steps, the gateway provides no active
interface that can be used to gain access. The fortied gateway prevents snooping
of sensor trac, keeping your sensitive data from malicious parties and secures the
gateway from becoming a relay for malicious programs.
iMONNIT SECURITY
iMonnit is the online software and central hub for conguring your device settings. All
data is secured on dedicated servers operating Microsoft SQL Server. Access is granted
through the iMonnit user interface, or an Application Programming Interface (API)
safeguarded by 256-bit AES encryption. TLS is blanket of protection to encrypt all data
exchanged between iMonnit and you. The same encryption is available to you whether
you are a Basic user of Premiere user of iMonnit. You can rest assured that your data is
safe with iMonnit.
HTTP INTERFACE SECURITY
Enabling this interface will allow users with access to the network to congure the settings
of the gateway also information about the sensor network is available, but no actual data
can be obtained through these pages. To enhance security to the shortest value that will
allow the necessary access. Once this period has expired after startup or utility button is
pressed, the interface will be disabled so no one else can access it. If you need to make
additional changes, you can press the utility button to re-enable the interface for the
specied timeout period.
SNTP INTERFACE SECURITY
The gateway can be set up to retrieve time from an SNTP server. An SNTP server can be
set up on the same LAN as the gateway, such as on a router or a Linux computer. The
gateway should be congured to retrieve time from only trusted servers, such as ones
maintained by your ISP. Incorrect time can aect the delivery of sensor trac.
If the Monnit Server is active, it will be utilized for time synchronization in ordinary operation. So SNTP will be used as a backup.
SNMP INTERFACE SECURITY
SNMP stands for Simple Network Management Protocol) is an Internet application protocol
that manages and monitors network device functionality. Monnit uses SNMP version 1.
These settings can both be congured both on iMonnit and the local interface.
PAGE 2 PAGE 3
Page 4
IV. GATEWAY REGISTRATION
If this is your rst time using the iMonnit online portal, you will need to create a new
account. If you have already created an account, start by logging in. For instructions on
how to register for an iMonnit account, please consult the iMonnit User Guide viewable at
monnit.com/support/documentation.
REGISTERING THE ETHERNET GATEWAY 4
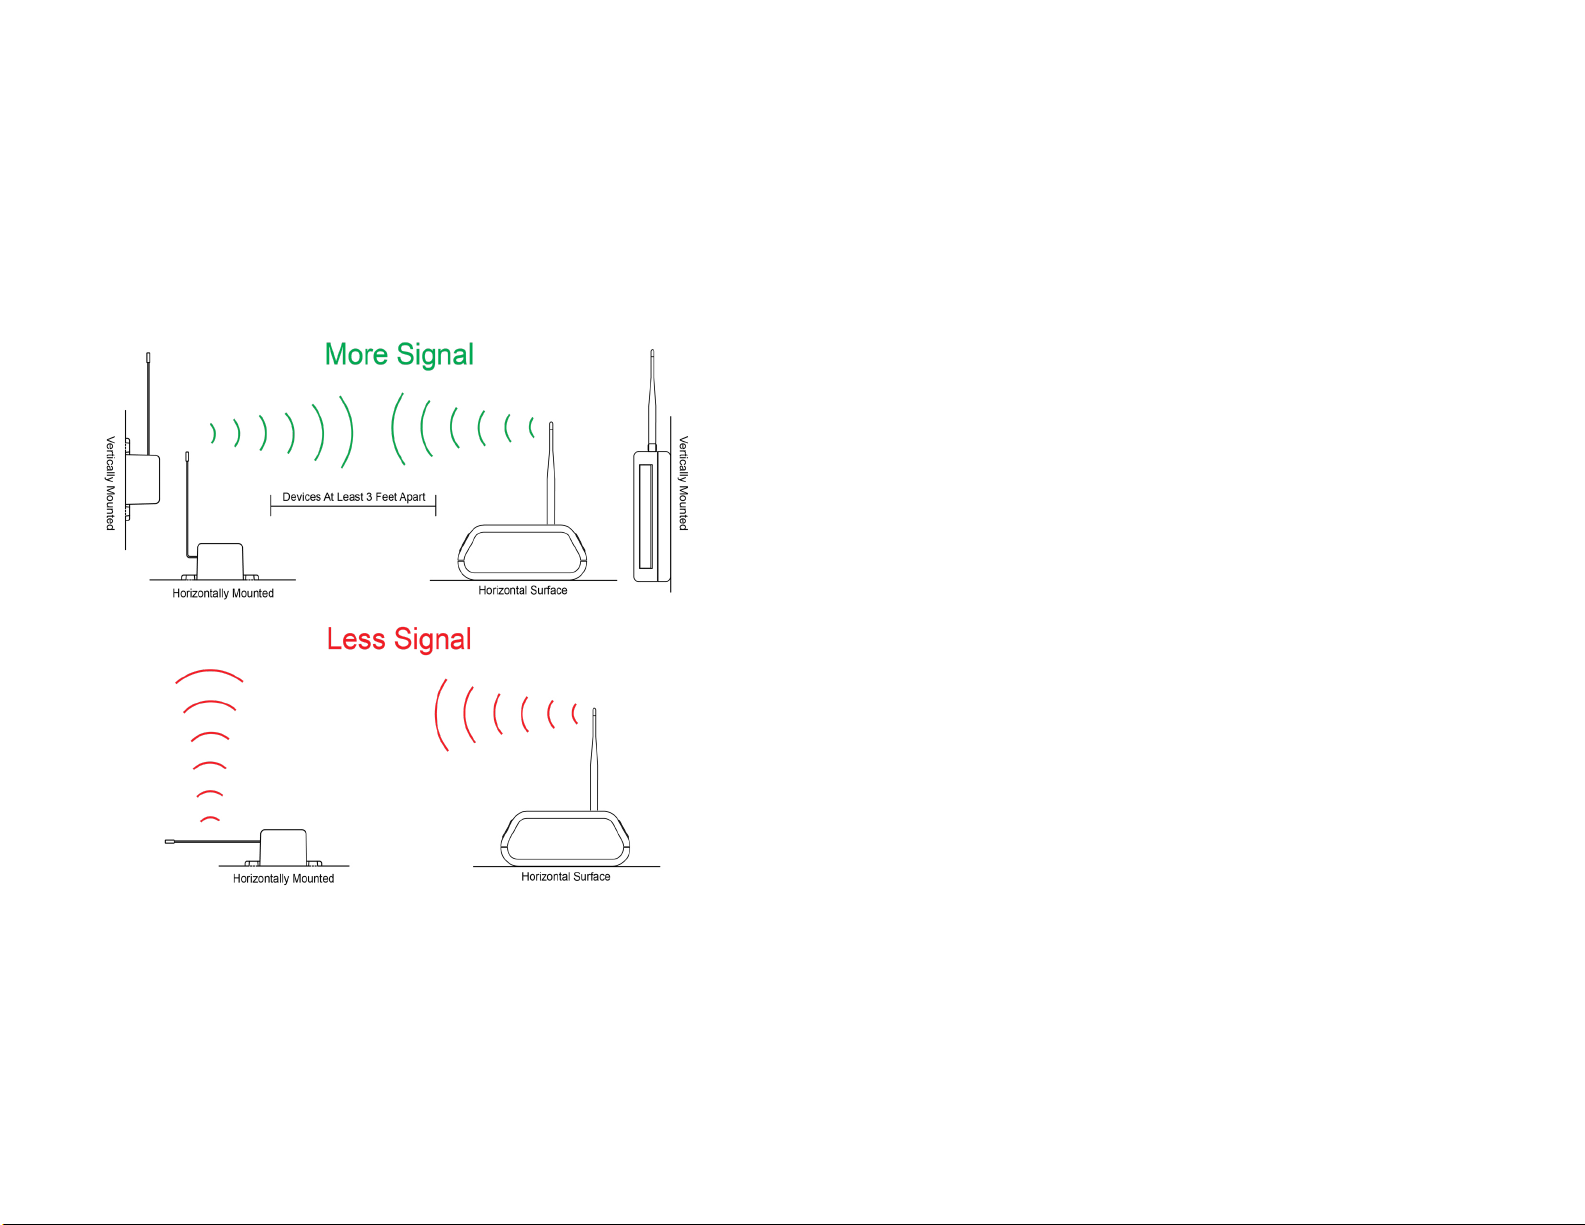
To register your gateway on iMonnit, you will need to enter the Device ID and the Security
Code from your Ethernet Gateway 4 in the corresponding text boxes. Use the camera on
your smartphone to scan the QR code on your Gateway. If you do not have a camera on
your phone, or you are accessing the online portal through a desktop computer, you may
enter the Device ID and Security Code manually.
• The Device ID is a unique number located on each device label.
• Next you’ll be asked to enter the Security Code (SC) on your device. A security
code will be all letters, no numbers. It can also be found on the barcode label of
your gateway.
When completed, select the “Submit” button.
IMPORTANT: Add the gateway and all sensors to the iMonnit portal so that on boot, the
gateway can download and whitelist the sensors from the congured sensor network.
V. USING THE ETHERNET GATEWAY 4
USING THE ETHERNET GATEWAY 4
The back of your gateway will look like the diagram below:
From left to right, we see:
Power: This is where your power cord will be plugged into.
Network: This is the socket where your Ethernet cord will go.
Utility Button: A short, ve second, press of this button will enable the local interface.
Pressing the utility button for fteen seconds will reset the gateway.
1. Connect your antenna to the gateway.
2. Plug the power supply cord into an outlet.
3. After the three LED lights switch to green, your network is ready to use.
UNDERSTANDING THE ETHERNET GATEWAY 4 LIGHTS
The gateway will enter three stages as it powers on:
Power-on stage: The gateway will analyze electronics and programming. The LED
lights will ash red and green, before all becoming green for one second and entering a
“waterfall” pattern. In case of failure, the light sequence will repeat after ten seconds. The
gateway will continue trying to boot until it succeeds. Please contact technical support if
the lights aren’t green after two minutes.
Connection stage: When the LEDs turn solid green for 1.5 seconds, the power-on stage
will be complete. After the Network Uplink Connectivity Indicator displays a solid green
LED, the gateway will attempt to begin making connections to it’s default server and other
congured surfaces. The gateway will attempt to settle all operational connections. As the
gateway rst connects to the network, all other lights will be dark.
Operational stage: All of the lights will remain green while powered externally, unless
there is an issue. A blinking link light is a signal that the gateway has encountered an issue
in the network.
Steady Green: Communication with sensors is normal.
Blinking Green: Active communication with sensors.
Steady Red: Gateway hardware may be faulty
Steady Green: Communication with the default server is ok.
Blinking Green: Active communication with the default server
Steady Red: Last communication with the data interface was
unsuccessful. This could signal an issue with the default server.
Steady Green: Network connection successful.
Steady Red: No Network connection has been made.
PAGE 4 PAGE 5
Page 5
ETHERNET GATEWAY 4 SETTINGS
The Ethernet Gateway 4 will receive data from all sensors assigned to the network and
within range, then return this data to the iMonnit server in a series of heartbeats.
You can access gateway settings by selecting “Gateways” in the main navigation panel.
Choose the Ethernet Gateway 4 from the list of gateways registered to your account.
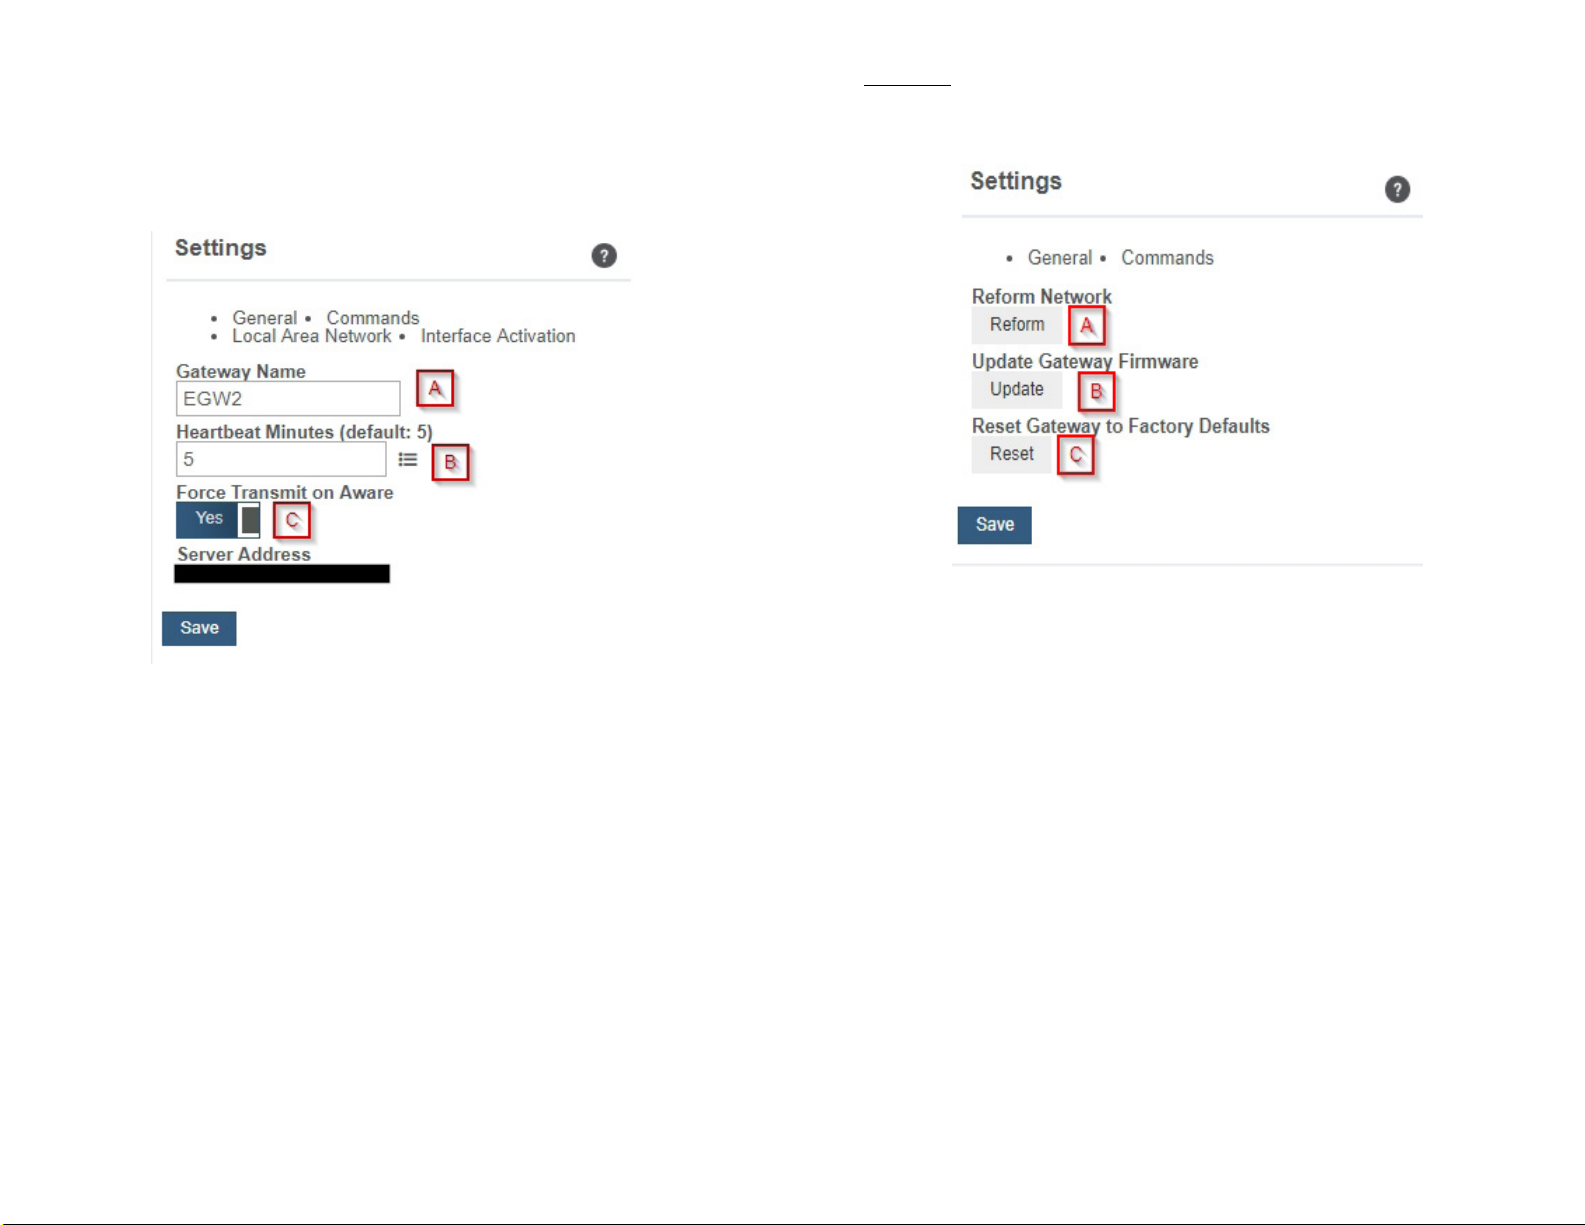
Select the “Settings” tab to edit the gateway:
Commands
Choose the bullet for Commands located just under the Settings title to access the
commands page.
A. Selecting the Reform Network command will trigger the gateway to remove all
sensors from the internal whitelist, and then request a new sensor list from the server.
This command will force all sensors to reinitialize their connection with the gateway.
A. The Gateway Name eld is where you assign your gateway a unique title. By default,
the gateway name will be the type followed by the Device ID.
B. The Heartbeat Minutes congures the interval that the gateway checks in with the
server. The default is ve minutes. So every ve minutes your gateway will report to the
server.
C. Force Transmit on Aware means that if the sensors reach an aware state outside of
the heartbeat interval, the gateway will immediately relay that data to the server instead of
waiting the extra time it would take to reach the next heartbeat minute.
PAGE 6 PAGE 7
Reforming the network cleans up communication when multiple networks are in
range of each other so they are all in sync. This is especially useful if you must move
sensors to a new network, and would like to clear these sensors from the gateway’s
internal list. Reforming the network will place a new list of sensors that will continue to
exchange data.
B. If there are updates available for your gateway rmware, the Update Gateway
Firmware button will appear, giving you the option to select it and install the latest
rmware.
C. Choosing the Reset Gateway to Factory Defaults button will erase all your unique
settings and return the gateway to factory default settings.
Page 6

Local Area Network
Choose the Local Area Network bullet under the Settings title to open up the local area
network conguration page. The Local Area Network includes the ability to switch your
network IP address from DHCP to Static. DHCP will be the default network IP address.
Multiple interfaces can be active, if using any of the polling interfaces we recommend
using a static IP address on the Gateway. An IP address is a unique number typically
formatted as XXX.XXX.XXX.X.
To change your IP address to a Static IP, navigate to the network IP option and switch
it from DHCP to Static. Then input your data for the Static IP, Network Mask, Default
Gateway, and Default DNS Server.
Static IP - A static Internet Protocol (IP) address is a numerical sequence assigned to a
computer by a Network Administrator. This is dierent from a Dynamic IP Address in that a
Static IP doesn’t periodically change and remains constant.
Network Mask - Also known as a “subnet mask” this number hides the network half of an
IP address. The most common Network Mask number is 255.255.255.0.
Default Gateway - This is the forwarding host a computer utilizes to relay data to the
Internet.
Default DNS Server - DNS Servers take alphanumerical data (like a url address) and
return the ip address for the server containing the information you’re looking for.
Interface Activation
There are additional interfaces available for activation on your Gateway Settings page. To
activate them, choose the Interface Activation bullet. Toggle on each of the interfaces to
access their individual settings.
SNMP Interface – SNMP stands for Simple
Network Management Protocol) is an Internet
application protocol that manages and monitors
network device functionality. Monnit uses SNMP
version 1. These settings can both be congured
both on iMonnit and the local interface.
Inbound IP Range Start and End - This
is the IP address for the SNMP client. If
you have one device to communicate with,
the start and end IP addresses will be the
same. Exchanging information with multiple
machines will require a set of dierent start
and end IP addresses.
Inbound Port - This is the number for where
specically in the server data from the gate-
way is received.
SNMP Community String – This is used to
support SNMPv1 protocol by giving access
to a router’s or other device’s statistics. The
default will be set to “public.”
Trap Settings
The switch for Trap Settings will be disabled
by default. Enable to view the trap settings.
Trap IP Address - The IP Address for the
SNMP Server where the trap will be sent.
Trap Port – The server port where the trap
alert state is sent when active.
PAGE 8
PAGE 9
Page 7

Modbus Interface – Modbus TCP (Transmission Control Protocol) is the Modbus RTU
protocol with a TCP interface that runs on Ethernet. Monnit provides the Modbus TCP
interface for you to pull gateway and sensor data. You can use Modbus without the server
interface active. The data will not be sent to a server, but you can continue to poll for new
data as it is received by the gateway.
SNTP Interface – SNTP is a synchornized computer clock on a network. An SNTP server
can be set up on the same LAN as the gateway, such as on a router or a Linux computer.
The gateway should be congured to retrieve
time from only trusted servers, such as
ones maintained by your ISP. Incorrect
time can aect the delivery of sensor
trac.
VI. USING THE LOCAL INTERFACE
If using iMonnit is not an option, you can set up your gateway and sensors oine through
the local interface.
• Connect the gateway to a router or network swtich using an Ethernet cord.
• Plug in the gateway to a power outlet.
• Power on the gateway. While booting, the lights will scroll green.
• Press and hold the utility button. At the end of the boot process, all lights will be green
for two seconds then shift to red. Release the button and the local conguration page
will be temporarily enabled.
• Use a PC on the local network to access your router’s conguration page rst (see
your router documentation). Use your router’s web interface to determine the IP
address it assigns your gateway.
• Use your web browser to connect to your gateway using the assigned IP address.
You should be redirected to the Gateway Status page.
• Once the gateway interface has been reached, head over to the General Options tab
and select the Miscellaneous System Conguration page. Enable the HTTP interface
and set it to be available for one hour (3600 seconds). Select “Save Changes” when
completed.
• Note that each time a page is refreshed or every time the gateway restarts the HTTP
interface time resets. After it times out, the web interface will be disabled until either
the gateway restarts with a non-zero timeout value, or the special restart mode is
enabled using the utility button. After conguration set this to a small integer.
If the Monnit Server is active, it will be
utilized for time synchronization in ordinary
operation. So SNTP will be used as a
backup If you disable the default server
interface, you must congure the SNTP
Interface.
HTTP Interface – The HTTP Interface allows you to set how long you wish the local interface
to be active before being automatically disabled. For increased Security, your choices are
to have the local HTTP interface disabled after 1 minute, 5 minutes, 30 minutes, or always
active. See the next section for more on the local interface.
PAGE 10
GATEWAY STATUS TAB
Ethernet Local Area Network Status
This is a read only section listing the
current conditions for your Local Area
Network.
Gateway MAC Address - This is
the media control address of your
gateway to exclusively identify
the device to a Network Interface
Controller.
Gateway IP Address - This is a
numerical identier for your gateway
when it is connected to the Internet.
Router IP Address - This is a
numerical identier for your router
when it is connected to the Internet.
Network Mask - Also known as a
“Subnet Mask,” this masks the ip
address by dividing it into the network address and the host address.
DNS Address - A Domain Name System is the method employed by a URL of translating
the alphabetic entry in an address bar into a numerical address associated with a server.
PAGE 11
Page 8

Data Interface Statuses
Gateway data cache used - This percentage represents the amount of internal ash mem-
ory storage for holding sensor messages has been used out of the maximum (896 kB).
Messages sent from wireless sensors are stored temporarily in the gateway cache until a
data interface (i.e. Default Server, SNMP, Modbus, etc.) conrms the data has been stored
or transmitted elsewhere.
Status Table - These status elds indicate the current operation status for each data interface. The Default Server eld can contain “O”, “O due to Settings Error”, “On and Server
Error”, or “On”. The SNTP eld can contain “O”, “O due to Settings Error”, “On and
Synced”, or “On”. The Modbus TCP eld can contain “O”, “O due to Settings Error”, or
“On”. The SNMP eld can contain “O”, “O due to Settings Error”, “On and Traps Ready”,
or “On”.
Wireless Sensor Network Status
This section list the number of gateways communicating with the server. A table below this
number shows the exact slot number and device identication number associated with the
gateway. There is a maximum of 256 available slots.
Wireless Sensor Network Conguration
GATEWAY OPTIONS TAB
Ethernet Local Area Network Conguration
From the Local Area Network
Conguration tab, you can modify
settings for your IP address, Network
Mask, Default Gateway, and DNS
Server.
IP Address - A unique number typically
formatted as XXX.XXX.XXX.X. It can
be dynamic, meaning the IP address is
constantly changing, or static, meaning
the IP address stays the same.
Router IP Address - This is a unique
number identifying your router to the
default server.
Subnet Mask - This number hides the
network half of an IP address. The most
common Subnet Mask number is 255.255.255.0.
DNS Server - DNS Servers take alphanumerical data (like a url address) and return the IP
address for the server containing the information you’re looking for.
Slot Index - The slot index is an optional setting for assigning your gateway. If a Slot ID is
entered, the device will be added to the appropriate slot in the Wireless Device List. If a slot
ID is not entered, the device will be added to the rst available slot.
Device ID - This is a unque numerical identier included with your gateway and listed on
the back label.
Security Code - This is an alphabetical six letter code included with your gateway and
listed on the back label.
Selecting the “Reform Wireless Network” button will remove all devices from the current
Wireless Device List.
System Time Conguration
Simple Network Time Protocol (SNTP) synchronizes computer clocks on a network when
the Monnit Interface is unavailable.
PAGE 12 PAGE 13
Page 9

SNTP IP Address: This is the IP Address for the server the time is being pulled from.
SNTP Resample Period: The time in seconds when the gateway will check the server for
the correct time.
Epoch between Default Server and SNTP: This is the dierence in seconds between the
standard NTP Epoch (start date 01/01/1900) and Monnit’s Epoch (start date 01/01/2012).
System Reset Period: The time in hours it takes for the system to reset.
Secondary Time Source Failover Period: The time in seconds that the gateway will
continue to attempt to poll the Primary System Time Source unsuccessfully for an updated
time before switching over and using time from the secondary time source. This time period
should be longer than the SNTP Resample Period if SNTP is being used.
Miscellaneous System Conguration
HTTP Service Timeout: This is a
security setting for allowing this web
interface to be active. The default is
5 minutes. Setting the eld to 0 will
turn it o.
Device Latest Data Retrieval: An
expiration period for data before it is
considered to be “old” meaning data
interfaces will not report this sensor
data.
Clear Sensor Data button: Pressing
this button will purge all old device
messages from the gateway to start
from a clean slate. You will lose all
messages for all data interfaces.
Modbus Transmission Control Protocol Conguration
Modbus TCP interface runs on an Ethernet connection. TCP makes sure all data is
received. Modbus TCP is a non-streaming data interface standard. This means data must
be requested in order for it to be received. The Modbus TCP Interface will store all data
values in 16-bit registers. The registers and their associated data elds are mapped below.
To access the sensor holding registers for a particular device, the assigned slot number for
the device needs to be known. When reviewing added devices through the default server,
the order in which devices are presented may not necessarily correspond to the order
in which the devices are stored in the gateway network list as the default server will sort
the devices based on their ID. To be certain which device is in a particular slot, go to the
gateway local web interface wsn.htm page or status page and note which slot the desired
device is assigned to.
DATA INTERFACES TAB
Default Server Conguration
The default server is the Monnit
server. It is the only option enabled by
default.
Many of the settings here are the
same as they are in iMonnit.
The Network Device List Refresh
Period setting controls the amount of
time before the gateway requests the
network device list from the default
server.
The Disable Network on No Server
setting controls whether the wireless
device network is disabled after the
gateway determines it cannot reach
the default server.
After the slot number(s) for the desired devices to read from are known, the following
formula may be applied to determine the correct starting register to read from to retrieve
the recorded data from the device: starting register=101+16(slot no.-1). Each reading will
report the most recent message received from that device by the gateway, so the polling
frequency should be greater than the device heartbeat frequency to avoid missing device
updates.
PAGE 14 PAGE 15
Page 10

GATEWAY HOLDING REGISTERS
Field Description Register Data
Gateway ID_High The rst 16 bits of a 32-bit serial ID number. 40001 0
Gateway ID_Low The last 16 bits of a 32-bit serial ID number. 40002 1
Gateway Version
Revision + Major
Gateway Version
Minor + Release
Gateway Device
Count
Field Description Register Data
Sensor ID_High The rst 16 bits of a 32-bit serial ID number 40101 100
Sensor ID_Low The last 16 bits of a 32-bit serial ID number 40102 101
Device Type The unique type identier for the sensor prole 40103 102
Data Age The number of seconds that have elapsed since the last data
Is Device Active 0 indicates no data for this slot 40105 104
Is Aware Becomes aware when a sensor threshold has been breached 40106 105
Voltage Battery voltage 40107 106
RSSI Signal Strength Indicator...0-100% 40108 107
Data 1 Sensor Data Field 1 40109 108
Data 2 Sensor Data Field 2 40110 109
Data 3 Sensor Data Field 3 4 0111 110
Data 4 Sensor Data Field 4 40112 111
Data 5 Sensor Data Field 5 40113 11 2
Data 6 Sensor Data Field 6 40114 11 3
Data 7 Sensor Data Field 7 40115 11 4
Data 8 Sensor Data Field 8 40116 11 5
Sensor ID_High The rst 16 bits of a 32-bit serial ID number 40117 116
Sensor ID_Low The last 16 bits of a 32-bit serial ID number 40118 11 7
Device Type The unique type identier for the sensor prole 40119 118
Data Age The number of seconds that have elapsed since the last data
Is Device Active 0 indicates no data for this slot 40121 120
Is Aware Becomes aware when a sensor threshold has been breached 40122 121
Voltage Battery voltage 40123 122
RSSI Signal Strength Indicator...0-100% 40124 123
Data 1 Sensor Data Field 1 40125 124
The gateway rmware Revision and Major version numbers (1
byte each)
The gateway rmware Minor and Release version numbers (1
byte each)
The number of devices in its wireless network. 40005 4
SENSOR HOLDING REGISTERS
was retrieved
was retrieved
Address
40003 2
40004 3
Address
40104 103
40120 119
SNMP Conguration
SNMP (Simple Network Management Protocol) settings for a gateway can be adjusted
on the oine local interface. You can continue to use SNMP without the server interface
active. The data will not be sent to a server, but you can continue to poll for the data as it is
received by the gateway.
PAGE 16
• Inbound IP Range Start and End - This is the IP address for the SNMP client. If
you have one device to communicate with, the start and end IP addresses will be the
same. Exchanging information with multiple machines will require a set of dierent
start and end IP addresses.
PAGE 17
Page 11

• Inbound Port – This is the number for where specically in the server data from the
gateway is received.
• SNMP Community String – This is used to support SNMPv1 protocol by giving
access to a router’s or other device’s statistics. The default will be set to “public.”
Trap Settings
Trap IP Address –The IP Address for the SNMP Server where the trap will be sent.
Trap Port – The server port where the trap alert state is sent when active.
MIB-II System Conguration Strings
Although it is not necessary, it is a good idea to set the contact, name, location and
description strings available at the bottom of the SNMP conguration page on the local
interface.
SUPPORT
For technical support and troubleshooting tips, please visit our support knowledge base
online at monnit.com/support. If you are unable to solve your issue using our online
support, email Monnit support at support@monnit.com with your contact information and a
description of the problem, and a support representative will contact you within about one
business day.
For error reporting, please email a full description of the error to support@monnit.com.
WARRANTY INFORMATION
(a) Monnit warrants that Monnit-branded products (Product) will be free from defects in
materials and workmanship for a period of one (1) year from the date of delivery with
respect to hardware and will materially conform to their published specications for a period
of one (1) year with respect to software. Monnit may resell sensors manufactured by other
entities and are subject to their individual warranties; Monnit will not enhance or extend
those warranties. Monnit does not warrant that the software or any portion thereof is error
free. Monnit will have no warranty obligation with respect to Products subjected to abuse,
misuse, negligence or accident. If any software or rmware incorporated in any Product
fails to conform to the warranty set forth in this section, Monnit shall provide a bug x or
software patch correcting such non-conformance within a reasonable period after Monnit
receives from customer (i) notice of such non-conformance, and (ii) sucient information
regarding such non-conformance so as to permit Monnit to create such bug x or software
patch. If any hardware component of any Product fails to conform to the warranty in this
section, Monnit shall, at its option, refund the purchase price less any discounts, or repair
or replace nonconforming Products with conforming Products, or Products having substan-
tially identical form, t, and function and deliver the repaired or replacement Product to a
carrier for land shipment to customer within a reasonable period after Monnit receives from
customer (i) notice of such non-conformance, and (ii) the non-conforming Product provided;
however, if, in its opinion, Monnit cannot repair or replace on commercially reasonable
terms it may choose to refund the purchase price. Repair parts and replacement Products
may be reconditioned or new. All replacement Products and parts become the property of
Monnit. Repaired or replacement Products shall be subject to the warranty, if any remains,
originally applicable to the Product repaired or replaced. Customer must obtain from Monnit
a Return Material Authorization Number (RMA) prior to returning any Products to Monnit.
Products returned under this warranty must be unmodied.
Customer may return all Products for repair or replacement due to defects in original
materials and workmanship if Monnit is notied within one year of customer’s receipt of the
Product. Monnit reserves the right to repair or replace Products at its own and complete
discretion. Customer must obtain from Monnit a Return Material Authorization Number
(RMA) prior to returning any Products to Monnit. Products returned under this Warranty
must be unmodied and in original packaging. Monnit reserves the right to refuse warran-
ty repairs or replacements for any Products that are damaged or not in original form. For
Products outside the one year warranty period repair services are available at Monnit at
standard labor rates for a period of one year from the customer’s original date of receipt.
(b) As a condition to Monnit’s obligations under the immediately preceding paragraphs,
customer shall return Products to be examined and replaced to Monnit’s facilities, in shipping cartons which clearly display a valid RMA number provided by Monnit. Customer acknowledges that replacement Products may be repaired, refurbished or tested and found to
be complying. Customer shall bear the risk of loss for such return shipment and shall bear
all shipping costs. Monnit shall deliver replacements for Products determined by Monnit to
be properly returned.
PAGE 18
PAGE 19
Page 12

(c) Monnit’s sole obligation under the warranty described or set forth here shall be to repair
or replace non-conforming Products as set forth in the immediately preceding paragraph, or
to refund the documented purchase price for non-conforming Products to customer. Mon-
nit’s warranty obligations shall run solely to customer, and Monnit shall have no obligation
to customers of customer or other users of the products.
Limitation of Warranty and Remedies.
THE WARRANTY SET FORTH HEREIN IS THE ONLY WARRANTY APPLICABLE TO
PRODUCTS PURCHASED BY CUSTOMER. ALL OTHER WARRANTIES, EXPRESS
OR IMPLIED, INCLUDING BUT NOT LIMITED TO THE IMPLIED WARRANTIES OF
MERCHANTABILITY AND FITNESS FOR A PARTICULAR PURPOSE ARE EXPRESSLY
DISCLAIMED. MONNIT’S LIABILITY WHETHER IN CONTRACT, IN TORT, UNDER ANY
WARRANTY, IN NEGLIGENCE OR OTHERWISE SHALL NOT EXCEED THE PURCHASE
PRICE PAID BY CUSTOMER FOR THE PRODUCT. UNDER NO CIRCUMSTANCES
SHALL MONNIT BE LIABLE FOR SPECIAL, INDIRECT OR CONSEQUENTIAL DAMAGES. THE PRICE STATED FOR THE PRODUCTS IS A CONSIDERATION IN LIMITING
MONNIT’S LIABILITY. NO ACTION, REGARDLESS OF FORM, ARISING OUT OF THIS
AGREEMENT MAY BE BROUGHT BY CUSTOMER MORE THAN ONE YEAR AFTER
THE CAUSE OF ACTION HAS ACCRUED.
IN ADDITION TO THE WARRANTIES DISCLAIMED ABOVE, MONNIT SPECIFICALLY
DISCLAIMS ANY AND ALL LIABILITY AND WARRANTIES, IMPLIED OR EXPRESSED,
FOR USES REQUIRING FAIL-SAFE PERFORMANCE IN WHICH FAILURE OF A PROD-
UCT COULD LEAD TO DEATH, SERIOUS PERSONAL INJURY, OR SEVERE PHYSICAL
OR ENVIRONMENTAL DAMAGE SUCH AS, BUT NOT LIMITED TO, LIFE SUPPORT OR
MEDICAL DEVICES OR NUCLEAR APPLICATIONS. PRODUCTS ARE NOT DESIGNED
FOR AND SHOULD NOT BE USED IN ANY OF THESE APPLICATIONS.
CERTIFICATIONS
United States FCC
This equipment has been tested and found to comply with the limits for a Class B digital
devices, pursuant to Part 15 of the FCC Rules. These limits are designed to provide reasonable protection against harmful interference in a residential installation. This equipment
generates, uses, and can radiate radio frequency energy and, if not installed and used in
accordance with the instruction manual, may cause harmful interference to radio communications. However, there is no guarantee that interference will not occur in a particular
installation. If this equipment does cause harmful interference to radio or television recep-
tion, which can be determined by turning the equipment o and on, the user is encouraged
to try to correct the interference by one of more of the following measures:
• Reorient or relocate the recieving antenna.
• Increase the separtation between the equipment and reciever
• Connect the equipment into an outlet on a circuit dierent from that to which the
reciever is connected.
• Consult the dealer or an experienced radio/TV technician for help.
Warning: Changes or modications not expressly approved by Monnit could void
the user’s authority to operate the equipment.
RF Exposure
WARNING: To satisfy FCC RF exposure requirements for mobile
transmitting devices, the antenna used for this transmitter must not be
co-located in conjunction with any antenna or transmitter.
Monnit and ALTA Gateways:
This equipment complies with the radiation exposure limits prescribed for an uncontrolled
environment for xed and mobile use conditions. This equipment should be installed and
operated with a minimum distance of 23 cm between the radiator and the body of the user
or nearby persons.
All Monnit Wireless Sensors and Gateways Contain FCC ID: ZTL-RFSC1
Approved Antennas
The following antennas are approved for use with Monnit devices (required antenna impedance is 50 ohms.)
• Hyperlink HG905RD-RSP (5.1 dBi Rubber Duck)
• Pulse W1063 (3.0 dBi Rubber Duck)
• ChangHong GSM-09 (2.0 dBi Rubber Duck)
• Specialized Manufacturing MC-ANT-2014 0C (4” whip)
PAGE 20 PAGE 21
Page 13

Canada (IC)
English
Under Industry Canada regulations, this radio transmitter may only operate using an anten-
na of a type and maximum (or lesser) gain approved for the transmitter by Industry Canada.
To reduce potential radio interference to other users, the antenna type and its gain should
be so chosen that the Equivalent Isotropically Radiated Power (E.I.R.P.) is not more than
that necessary for successful communication.
The radio transmitters (IC: 9794A-RFSC1, IC: 9794A-G2SC1, IC: 4160a-CNN0301, IC:
5131A-CE910DUAL, IC: 5131A-HE910NA, IC: 5131A-GE910 and IC: 8595A2AGQN4NNN)
have been approved by Industry Canada to operate with the antenna types listed on previous page with the maximum permissible gain and required antenna impedance for each
antenna type indicated. Antenna types not included in this list, having a gain greater than
the maximum gain indicated for that type, are strictly prohibited for use with this device.
This device complies with Industry Canada licence-exempt RSS standard(s). Operation is
subject to the following two conditions: (1) this device may not cause interference, and (2)
this device must accept any interference, including interference that may cause undesired
operation of the device.
French
Conformément à la réglementation d’Industrie Canada, le présent émetteur radio peut
fonctionner avec une antenne d’un type et d’un gain maximal (ou inférieur) approuvé pour
l’émetteur par Industrie Canada. Dans le but de réduire les risques de brouillage radioélectrique à l’intention des autres utilisateurs, il faut choisir le type d’antenne et son gain de
sorte que la Puissance Isotrope Rayonnée Èquivalente (P.I.R.È) ne dépasse pas l’intensité
nécessaire à l’établissement d’une communication satisfaisante.
Le présent émetteurs radio (IC: 9794A-RFSC1, IC: 9794A-G2SC1, IC: 4160a-CNN0301,
IC: 5131A-CE910DUAL, IC: 5131A-HE910NA, IC: 5131A-GE910 et IC: 8595A2AGQN4NNN) a été approuvé par Industrie Canada pour fonctionner avec les types d’antenne
gurant sur la page précédente et ayant un gain admissible maximal et l’impédance requise
pour chaque type d’antenne. Les types d’antenne non inclus dans cette liste, ou dont le
gain est supérieur au gain maximal indiqué, sont strictement interdits pour l’exploitation de
l’émetteur.
Le présent appareil est conforme aux CNR d’Industrie Canada applicables aux appareils
radio exempts de licence. L’exploitation est autorisée aux deux conditions suivantes : (1)
l’appareil ne doit pas produire de brouillage, et (2) l’utilisateur de l’appareil doit accepter
tout brouillage radioélectrique subi, méme si le brouillage est susceptible d’en compromettre le fonctionnement.
European Union - Directive 1999/5/EC
Monnit Wireless Ethernet Gateway model MNG2-9-EGW-CCE has been evaluated against
the essential requirements of the 1999/5/EC Directive.
Hereby, Monnit Corp., declares that Monnit ethernet gateway model MNG2-9-EGW-CCE
is in compliance with the essential requirements and other relevant provisions of Directive
1999/5/EC.
In order to satisfy the essential requirements of 1999/5/EC Directive, the Monnit ethernet
gateway is compliant with the following standards: standards:
Article 3.1(a): Electrical safety EN 60950-1:2006 + A11:2009 + A1:2010 +
Article 3.1(a): Exposure to electromagnetic
elds
Article 3.1(b): EMC EN 301 489-1 V1.9.2
Article 3.2: Radio spectrum use EN 301 511 V9.0.2
The conformity assessment procedure referred to in Article 10 and detailed in Annex IV of
Directive 1999/5/EC has been followed with the involvement of the following Testing Body.
Testing Body:
N E M K O C A N A D A I N C
303 River Road
Ottawa, ON, Canada
There is no restriction for the commercialisation of Monnit and ALTA 868MHz and 433MHz
wireless products in all the countries of the European Union.
A12:2011 + AC:2011
EN 62311:2008
EN 301 489-7 V1.3.1
Manufacturer:
Monnit Corp.
3400 South West Temple
Salt Lake City, UT 84115
PAGE 22 PAGE 23
Page 14

SAFETY RECOMMENDATIONS
READ CAREFULLY
Be sure the use of this product is allowed in the country and in the environment required.
The use of this product may be dangerous and has to be avoided in the following areas:
• Where it can interfere with other electronic devices in environments such as hospitals
airports, aircrafts, etc.
• Where there is risk of explosion such as gasoline stations, oil reneries, etc.
It is responsibility of the user to enforce the country regulation and the specic environment
regulation.
Do not disassemble the product; any mark of tampering will compromise the warranty
validity. We recommend following the instructions of this user guide for correct setup and
use of the product.
Please handle the product with care, avoiding any dropping and contact with the internal
circuit board as electrostatic discharges may damage the product itself. The same precau-
tions should be taken if manually inserting a SIM card, checking carefully the instruction for
its use. Do not insert or remove the SIM when the product is in power saving mode.
Every device has to be equipped with a proper antenna with specic characteristics. The
antenna has to be installed with care in order to avoid any interference with other electronic
devices and has to guarantee a minimum distance from the body (23 cm). In case this requirement cannot be satised, the system integrator has to assess the nal product against
the SAR regulation.
The European Community provides some Directives for the electronic equipments intro-
duced on the market. All the relevant information’s is available on the European Community
website: http://ec.europa.eu/enterprise/sectors/rtte/documents/
Additional Information and Support
For additional information or more detailed instructions on how to use your Monnit Wireless
Sensors or the iMonnit Online System, please visit us on the web at monnit.com/support.
Monnit Corporation
3400 South West Temple
Salt Lake City, UT 84115
801-561-5555
www.monnit.com
Monnit, Monnit Logo and all other trademarks are property of Monnit, Corp.
© 2020 Monnit Corp. All Rights Reserved.
 Loading...